She Followed Me Home, Honest


 06-06-14, 10:26 AM
#1180
Thanks, got it covered.
Apparently that VW box suffers frequent failures at the alternator connection and indeed, half the units I found had melted the alt terminal right out of the housing.
Accordingly, I've decided to use it as the distro block in the cabin, where it won't see such high current draw.
The objection to the GM block was that it is unfused and I've found a way around that using fuse blocks found on Mitsubishis. I shall install them tomorrow.
Although Aaron's (and others) assertion that wiring, not components, is protected by fuses is correct, I think it's also somewhat deceptive.
In the practical world it seems that manufacturers use fuses to minimize wire size...use the smallest cable you think you can get away with and then protect it with a fuse.
Our power structure is so much more robust than anything I've seen on another car, I'd be surprised if any individual leg is carrying even half its rated load capacity.
I guess we'll see how it turns out.
I've been to the yard every day this week, gathering parts and ideas and it's been a fairly mundane experience till yesterday when I made what could be my most unexpected find.
It was a whim purchase and I didn't really know what I'd bought till I got home.
Pics will follow after tomorrow's session.
06-06-14, 06:30 PM
#1181
Rotary Enthusiast
iTrader: (1)

Join Date: Nov 2012
Location: bloomington, mn
Posts: 1,100
Likes: 0
Received 0 Likes
on
0 Posts
Seriously though. My mkIV jetta I drive everyday gets its grounds checked around every 1500 miles. Amazing how many faults are in the system if left unchecked. Also, 2001-2004 jetta/golf, if you can figure out a way to check the door latches, and they work. Take them all and peddle them on the VW forum. You will make millions.
06-08-14, 08:31 AM
#1183
Another milestone day yesterday, totally unexpected...the best kind.
I had prepared by scouring the yard for more electrical components and was planning to move forward on the wiring but that was not to be.
You'll get to see that stuff later.
What I'd thought would be the star of yesterday's show was relegated to bystander status, so I'll show it first to make it feel better:
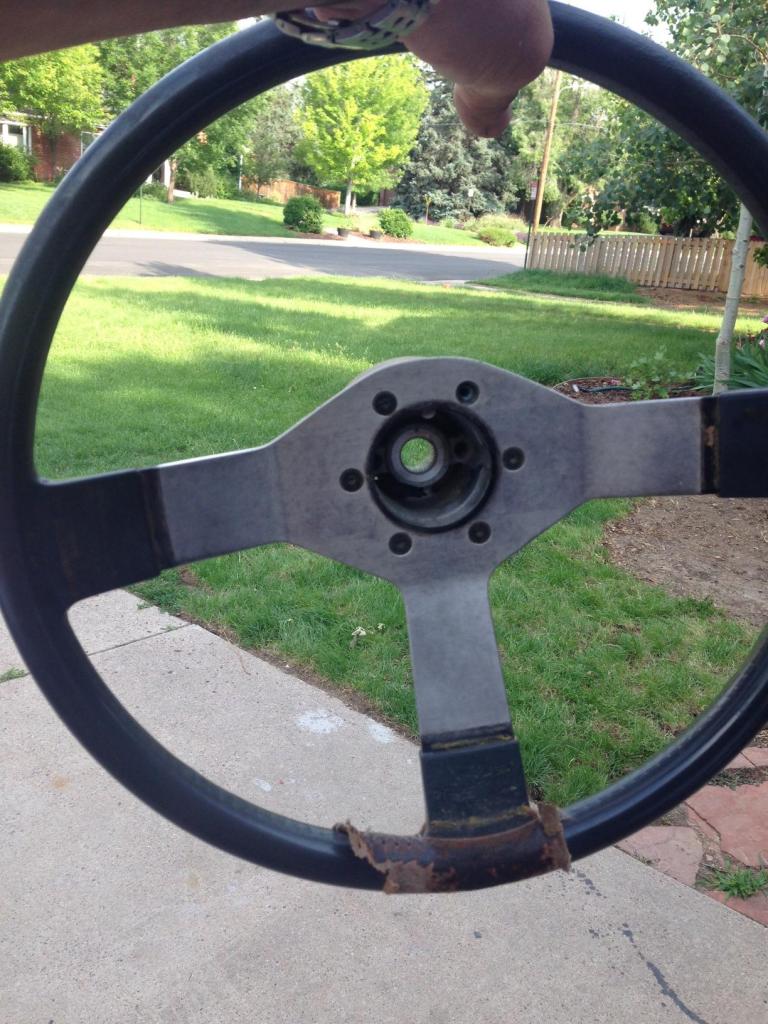
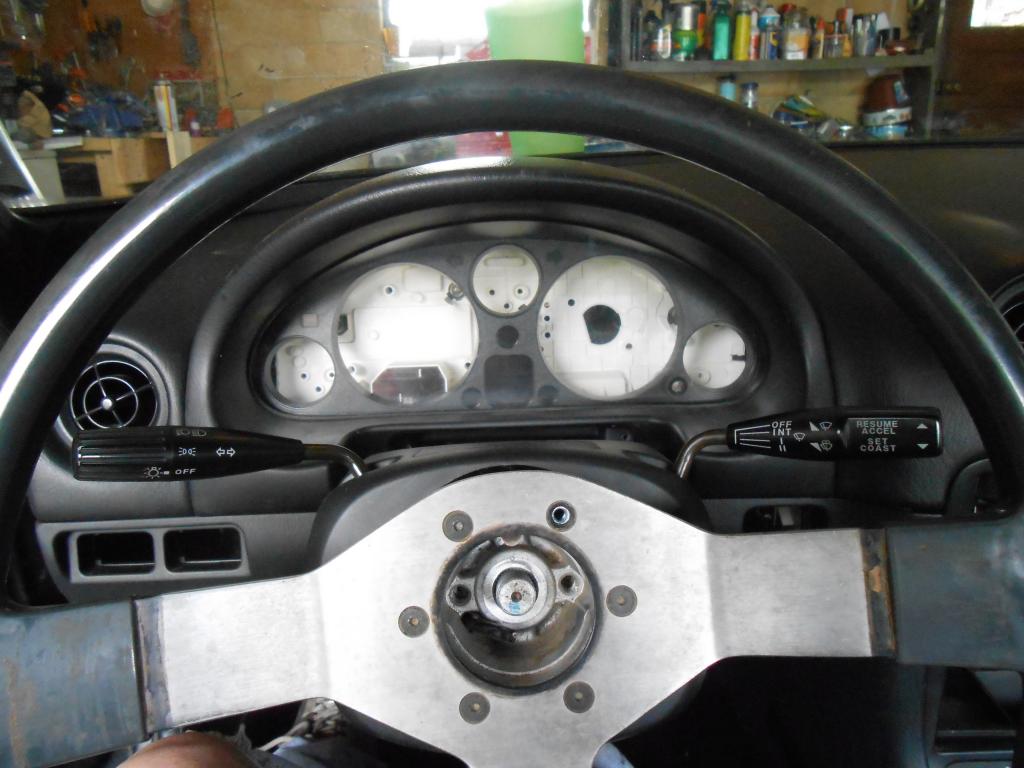
I found this sitting loose in a '73 Datsun pickup truck, just laying on the front seat.
It was covered in a ratty leather wrap (a bit still evident on the lower spoke) and I was really only interested in the hub but couldn't separate the two, so bought the whole package.
Wasn't till I got home that I turned it over and saw this:
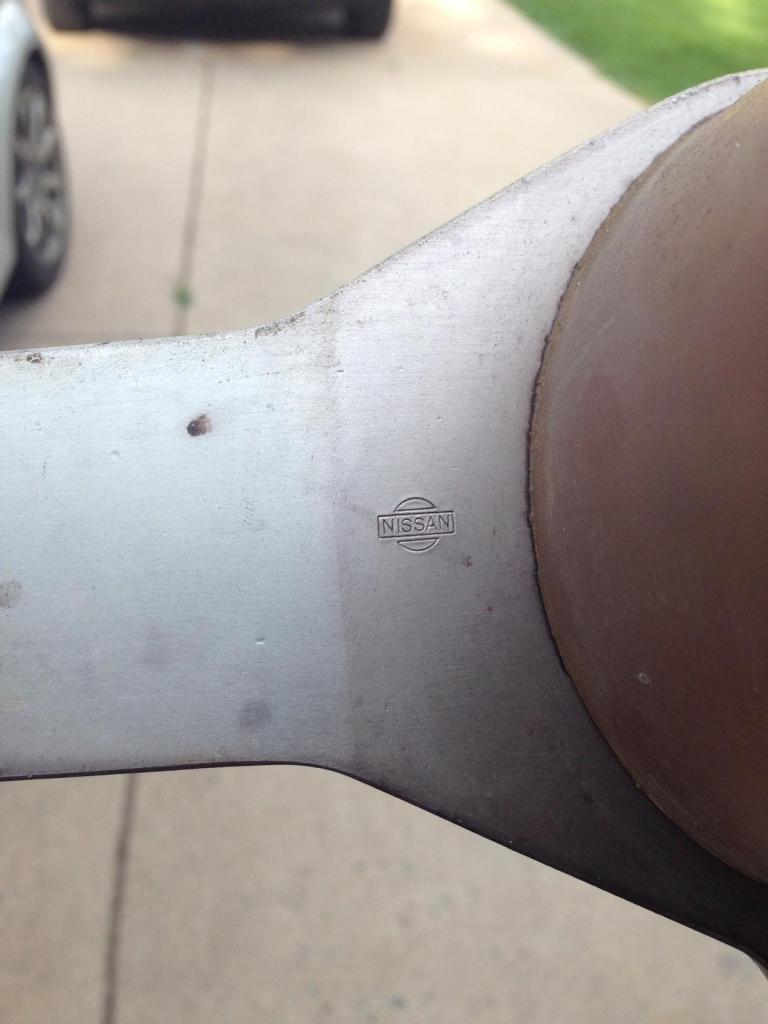
A Nissan logo?
A Momo knockoff wheel/hub (the bolt spacing is the same as Momo), made by Nissan and installed in a pickup truck?
Seems very weird.
It fits the Z column and we're going to try and renovate it and use it.
It's very period correct, after all.
As we marvelled over the wheel and the other junkyard goodies, Sigfrid got a phone call from an elusive Craigslist seller we'd been chasing for weeks.
(Why do people put stuff up for sale and then fail to respond to inquiries? This seems to happen to us a lot...)
We dropped everything and hightailed across town to a Twilight Zone junkyard I've never visited.
Run by Iranians and staffed by Hispanics, no one seemed to speak English. Fortunately, Sigfrid speaks fluent French (to the Iranians) and Spanish as well and within minutes they were all best buds.
We were lead out back to inspect a crashed 2003 Miata they were parting out.
We wanted the dash mainly and it was in near mint condition, so we (well, Sigfrid) haggled on price and a deal was struck.
Then they said it would take at least eight hours to remove and we'd have to return Monday.
More haggling in foreign languages, the price goes down and we pull it ourselves.
With borrowed tools, in 35 minutes.
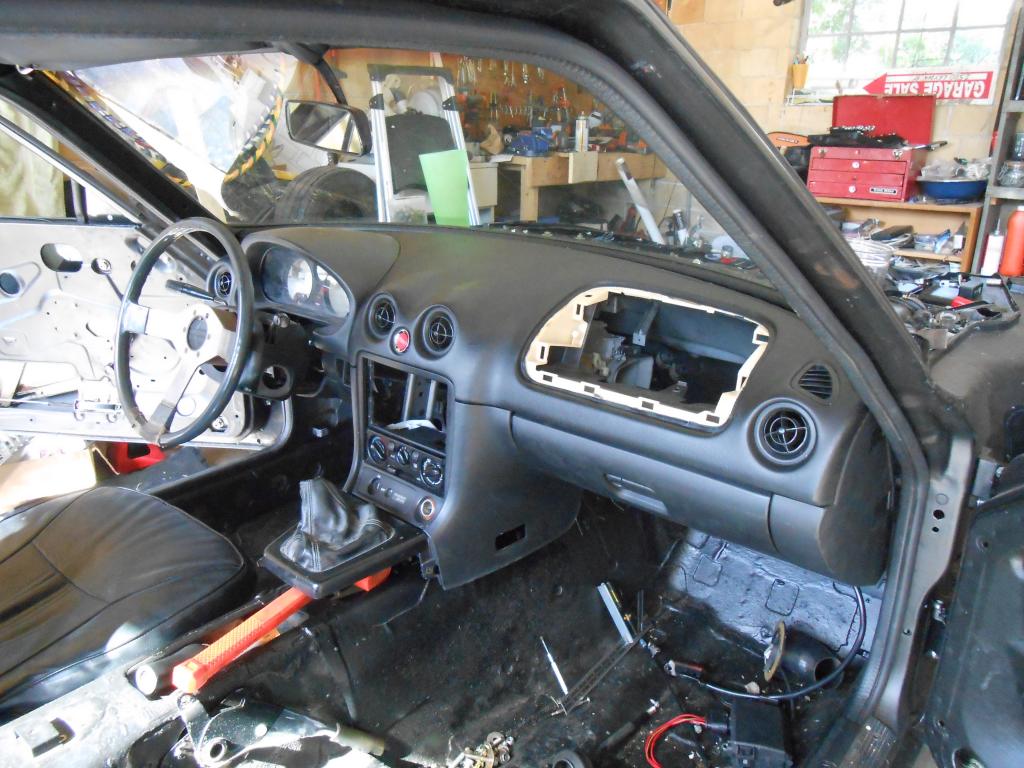
Suddenly, completely out of the blue, I've got the dash I've dreamed of and we spent the rest of the day playing with it.
And by playing, I mean hacking the **** out of it.
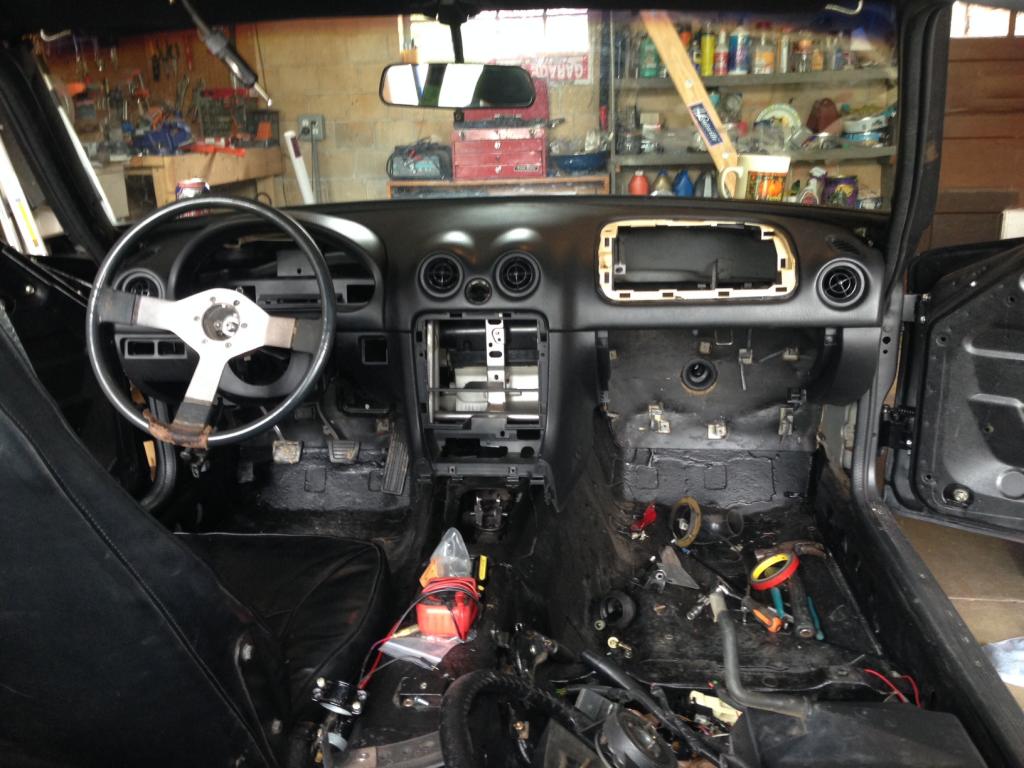
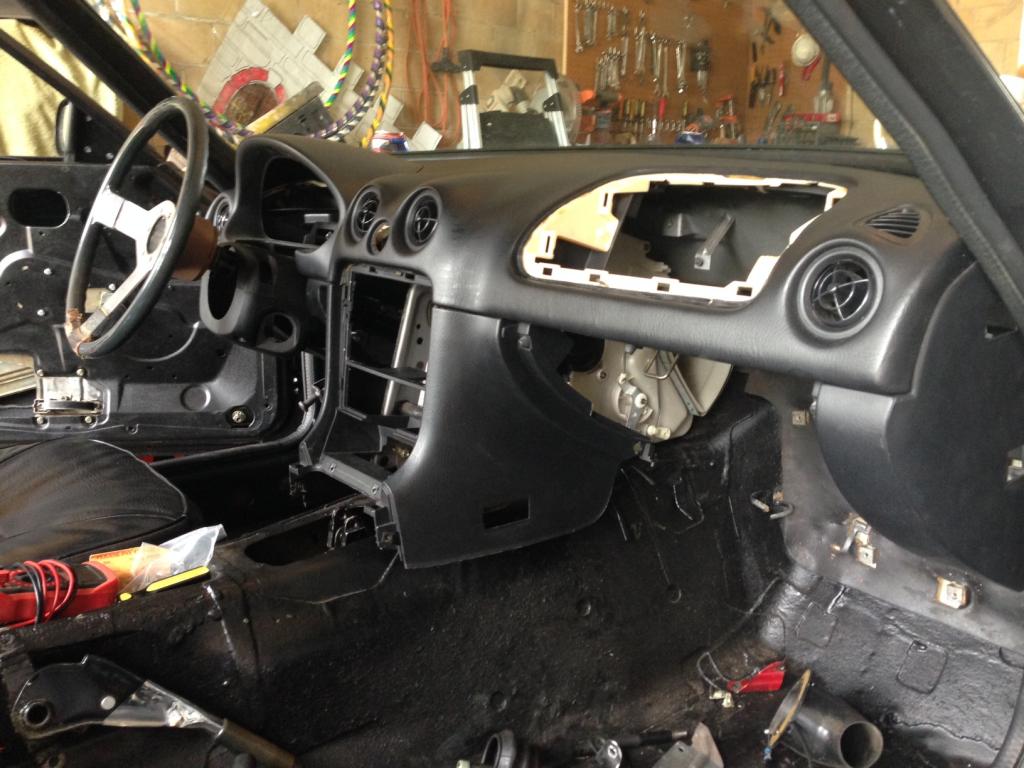
It's just sitting in place here, a testament to how well it fits- bracketry to firmly attach it is the next project.
I'll not minimize the scope of this step, there are several obstacles to overcome yet but so far, nothing that looks like a dealbreaker.
The technical difficulties, extensive as they are, are just work...boring and tedious but not complicated and are far outweighed by the benefits.
We now have the keystone design element of the interior and it's possible to begin imagining how to carry that over to the rest of the cabin.
It's already obvious that the original doorpanels are going to look like *** next to the Miata dash and will have to be redone and we've never even had a center console, so that too is up in the air.
My immediate jobs are to adapt the Miata column switchgear to the Z steering column (something I have some experience with...) and fab up a bracket for the trans tunnel.
Once the dash is tied to the trans tunnel, we'll just go around and make up the remaining bracketry as necessary.
With the dash permanently affixed, the Miata HVAC system will have to be grafted in to mate up to the dash ductwork.
That should be fun.
Our supercool headlight/running/TS assemblies arrived but yesterday was so full of cool stuff and unexpected sidetrips that they didn't even rate a picture.
They'll get their day in the sun soon enough.
Jeez, a lot seems to be happening all of a sudden.
Good.
I had prepared by scouring the yard for more electrical components and was planning to move forward on the wiring but that was not to be.
You'll get to see that stuff later.
What I'd thought would be the star of yesterday's show was relegated to bystander status, so I'll show it first to make it feel better:
I found this sitting loose in a '73 Datsun pickup truck, just laying on the front seat.
It was covered in a ratty leather wrap (a bit still evident on the lower spoke) and I was really only interested in the hub but couldn't separate the two, so bought the whole package.
Wasn't till I got home that I turned it over and saw this:
A Nissan logo?
A Momo knockoff wheel/hub (the bolt spacing is the same as Momo), made by Nissan and installed in a pickup truck?
Seems very weird.
It fits the Z column and we're going to try and renovate it and use it.
It's very period correct, after all.
As we marvelled over the wheel and the other junkyard goodies, Sigfrid got a phone call from an elusive Craigslist seller we'd been chasing for weeks.
(Why do people put stuff up for sale and then fail to respond to inquiries? This seems to happen to us a lot...)
We dropped everything and hightailed across town to a Twilight Zone junkyard I've never visited.
Run by Iranians and staffed by Hispanics, no one seemed to speak English. Fortunately, Sigfrid speaks fluent French (to the Iranians) and Spanish as well and within minutes they were all best buds.
We were lead out back to inspect a crashed 2003 Miata they were parting out.
We wanted the dash mainly and it was in near mint condition, so we (well, Sigfrid) haggled on price and a deal was struck.
Then they said it would take at least eight hours to remove and we'd have to return Monday.
More haggling in foreign languages, the price goes down and we pull it ourselves.
With borrowed tools, in 35 minutes.
Suddenly, completely out of the blue, I've got the dash I've dreamed of and we spent the rest of the day playing with it.
And by playing, I mean hacking the **** out of it.
It's just sitting in place here, a testament to how well it fits- bracketry to firmly attach it is the next project.
I'll not minimize the scope of this step, there are several obstacles to overcome yet but so far, nothing that looks like a dealbreaker.
The technical difficulties, extensive as they are, are just work...boring and tedious but not complicated and are far outweighed by the benefits.
We now have the keystone design element of the interior and it's possible to begin imagining how to carry that over to the rest of the cabin.
It's already obvious that the original doorpanels are going to look like *** next to the Miata dash and will have to be redone and we've never even had a center console, so that too is up in the air.
My immediate jobs are to adapt the Miata column switchgear to the Z steering column (something I have some experience with...) and fab up a bracket for the trans tunnel.
Once the dash is tied to the trans tunnel, we'll just go around and make up the remaining bracketry as necessary.
With the dash permanently affixed, the Miata HVAC system will have to be grafted in to mate up to the dash ductwork.
That should be fun.
Our supercool headlight/running/TS assemblies arrived but yesterday was so full of cool stuff and unexpected sidetrips that they didn't even rate a picture.
They'll get their day in the sun soon enough.
Jeez, a lot seems to be happening all of a sudden.
Good.
06-08-14, 11:55 AM
#1185
There's no way the Miata door panels could be used, even if the general shape was close.
The door handle, window crank and armrest aren't remotely close location-wise.
The "style" of the Z panels will have to be upgraded from the baroque overly ornamented original to something more modern but at this point, that's way down the list.
We did not get the Miata cluster with the dash, we need to get one (easy).
The question is, which one?
The NA cluster has a mechanical speedo that might be adaptable to the Z cable.
The NB cluster has the white faces and electronic speedo Sigfrid favors.
The tach in either model will probably read wrong when driven by the Z electronics.
The secondary gauges (fuel, volts, oil pressure, water temp) are no big deal as we are going to use VDO parts instead (grafted into the Miata cluster).
I've only begun to ponder the gauge issue and have a variety of options already in mind.
Let 'em percolate for a while, see what boils up to the top.
06-08-14, 12:00 PM
#1186
Red Pill Dealer
iTrader: (10)

Is the alignment of the steering column and hole in the Miata dash as bad as it looks or just because it's not properly fastened yet? Otherwise, I'm seriously impressed.
06-08-14, 01:18 PM
#1187
The trim is just laying on the column as the switchgear (to which it mounts) is not yet in place.
In fact however, the column does not align perfectly with the dash, it needs to move to the right about 1". This doesn't seem too big a deal and will be addressed presently.
I may as well disclose the other two main issues we'll need to cope with, neither of which strike me as too difficult.
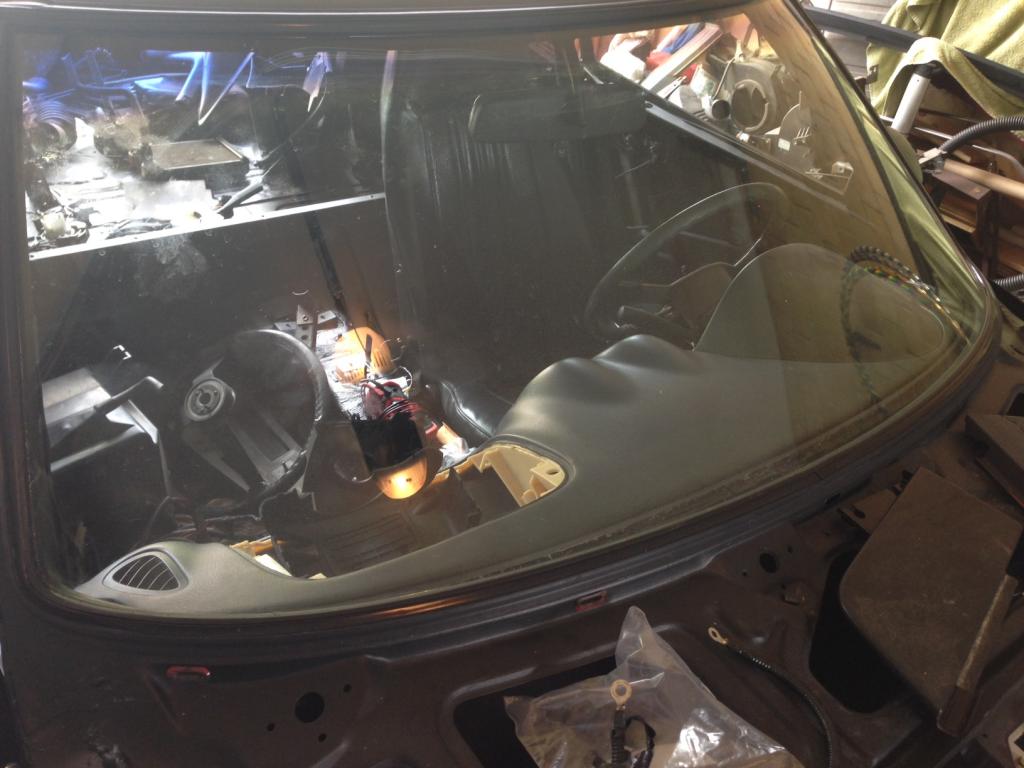
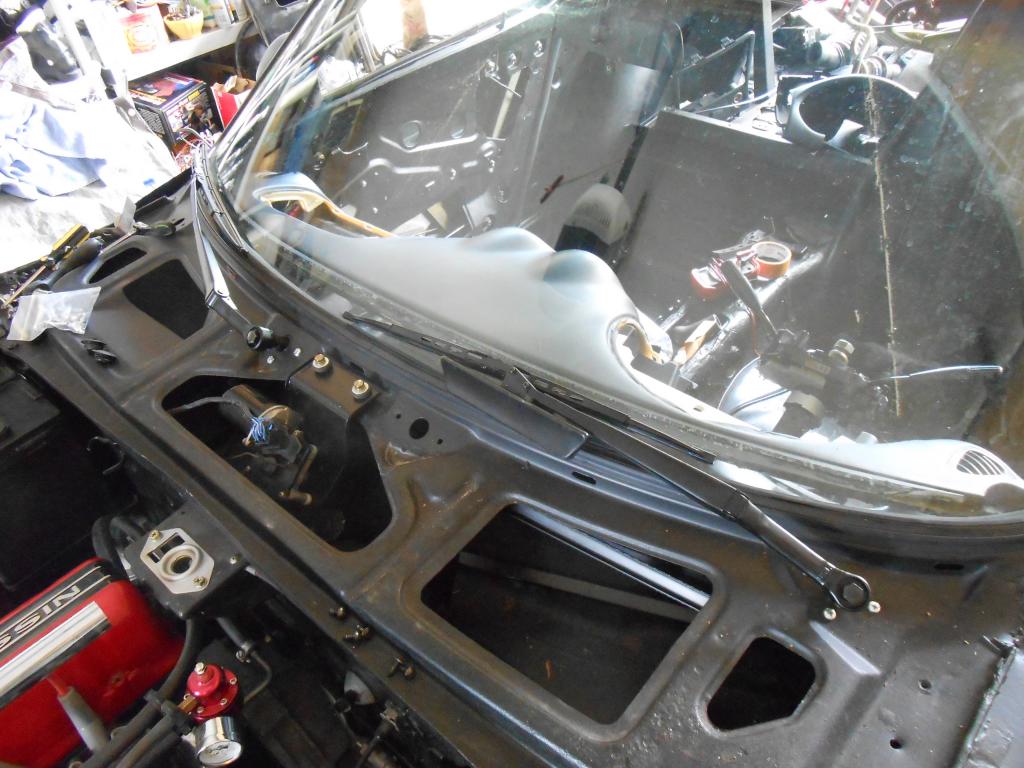
Looking at the pic shot through the windshield, the attentive might notice that we have no defrost vents.
We had to shave that entire defrost garnish area off in order to set the dash back far enough to uncover the shifter, which was buried in the center stack.
The shifter still needs to be relocated about 4" rearward but we'd planned on doing that anyway and already know how to do it.
As for the now missing vents, we need to get the dash and HVAC fixed in place and see what kind of room we have to work with. I'm hoping we can just use another set of eyeball vents (like the ones we have) but other, potentially neater, options may arise.
We will have functional defrost but I'm not sure what it'll look like yet.
06-08-14, 05:22 PM
#1188
Moderator
iTrader: (3)
Join Date: Mar 2001
Location: https://www2.mazda.com/en/100th/
Posts: 30,832
Received 2,603 Likes
on
1,847 Posts
Although Aaron's (and others) assertion that wiring, not components, is protected by fuses is correct, I think it's also somewhat deceptive.
In the practical world it seems that manufacturers use fuses to minimize wire size...use the smallest cable you think you can get away with and then protect it with a fuse.
In the practical world it seems that manufacturers use fuses to minimize wire size...use the smallest cable you think you can get away with and then protect it with a fuse.
06-08-14, 08:46 PM
#1189
Red Pill Dealer
iTrader: (10)
That "hole" is actually the steering column surround trim, not part of the dash.
The trim is just laying on the column as the switchgear (to which it mounts) is not yet in place.
In fact however, the column does not align perfectly with the dash, it needs to move to the right about 1". This doesn't seem too big a deal and will be addressed presently.
I may as well disclose the other two main issues we'll need to cope with, neither of which strike me as too difficult.
Looking at the pic shot through the windshield, the attentive might notice that we have no defrost vents.
We had to shave that entire defrost garnish area off in order to set the dash back far enough to uncover the shifter, which was buried in the center stack.
The shifter still needs to be relocated about 4" rearward but we'd planned on doing that anyway and already know how to do it.
As for the now missing vents, we need to get the dash and HVAC fixed in place and see what kind of room we have to work with. I'm hoping we can just use another set of eyeball vents (like the ones we have) but other, potentially neater, options may arise.
We will have functional defrost but I'm not sure what it'll look like yet.
You are the man.
06-10-14, 05:44 AM
#1190
I've been prepping for dash install, which begins tomorrow.
The Miata column switches have been modified to fit the Datsun steering shaft- that required 2" of 1 1/2" black ABS plumbing tube and five minutes on the lathe.
I rambled the yard yesterday but was constrained by the mud and lakes remaining from a downpour the night before...about half the cars were unreachable without waders (or galoshes, at least).
Still acquiring body plugs to seal the firewall/cabin, a tedious process that we're slowly finishing up.
Mainly though I was looking for brackets that might be useful to mount the dash.
The original Z dash is made of metal (and thus, weighs a ton) but doesn't really have a crash bar/structure like our cars (and all other newish cars too, I suppose).
When we were first fitting the Miata dash (which does have the crash stuff) it was soon apparent that the Z didn't have a convenient place to mount the end brackets, so we pulled the support structure and looked at how to mount just the dash skin.
We then realized that we needed the center stack part of the metal frame as it holds the climate controls and radio, so we cut it out and it screws to the dash skin in six places. It's visible in the pics.
It's the two lower arms of this metal frame that need mounting to the trans tunnel, just like on the FC. I found some Honda Civic pieces that might just work with a bit of tweaking, we'll see tomorrow.
The tunnel mounts are the main fixing point of the dash, once that's permanently set, all remaining brackets can be fabbed to suit. We're trying minimize the contact points between our wet noodle flexi-chassis and the plastic dash in an attempt to eliminate creaks and rattles.
We may have to revisit the dash mounts after the car is on the road but this will at least be a start.
Our plan is to install the dash and HVAC and then pull it all for the electrical work.
Post electrical, it all goes back in and we drive the car around a bit (notice how I'm still blithely assuming this engine will run...) to check for leaks or any other issues.
Then it all comes out again for Dynamat and carpet install, so we'll have at least two opportunities to alter the dash mounts if necessary.
I found out that the weird steering wheel was factory installed on Datsun 720 Sport Trucks (the "ST" package)...very strange that a truck gets the Momo knockoff and the sports cars got cheesy sedan steering wheels but you'll have that from time to time, I suppose.
06-10-14, 10:27 AM
#1191
Moderator
iTrader: (3)
Join Date: Mar 2001
Location: https://www2.mazda.com/en/100th/
Posts: 30,832
Received 2,603 Likes
on
1,847 Posts
its amazing how well that dash fits...
06-11-14, 08:28 AM
#1193
Rotary Enthusiast
iTrader: (1)
Join Date: Nov 2012
Location: bloomington, mn
Posts: 1,100
Likes: 0
Received 0 Likes
on
0 Posts
I will admit I just now realized that is not the factory dash. I typically lurk the club in the morning hours groggy eyed with coffee in hand, but still! Hip hip good sir.
06-12-14, 08:40 AM
#1195
Jeebus, this is a lot of work.
I must say though that after all this time preparing to wire the chassis, it was nice to actually begin.
I started by dumping out all my electrical stuff and sorting through to find the exact components I'll be using. As decisions were made, the components were placed in their approximate locations and trial fitting commenced.
I'm starting at the ends of the car and working towards the center, yesterday I spent mostly on the front because that is the most constrained by space and is also totally visible, so I want it to look good.
No attempt is being made to stealth the wiring, in fact it is not only intended to be fully exposed for service but will also serve as a design element in the bay. The "power skeleton" is now complete and nicely routed (the only unfused cable is now the battery>starter wire). The resulting "design" is the foundation that all to follow will be based on.
I must say it looks cool as hell.
I have about half of the front components mounted or at least, ready to mount after I make some brackets. It'll be pic-worthy when that's done.
Of course, there are a million other things that need doing (like mounting the dash, for instance) and I contemplate them as I rest my back (lots of bending over in the engine bay...ouch!).
They don't need doing right away but I'm trying to formulate plans of attack so we have an idea what to do when the time comes.
Sigfrid's family is away on a three week vacation, he leaves today to join them for five days.
When he returns, we'll have about ten days with no kids or wife to work around and I think that would be a perfect time to finish painting the body panels and assemble the car. There is no reason not to any longer- we'd originally thought wiring would be run under the fenders but that's no longer the case and anyway, I'm dying to see what she looks like.
There is still a considerable amount of construction to do in the nose area- ducting, grill, etc.- and the panels must be in place to continue, so there's a logic to this schedule change.
The psychological lift would be nice, too.
I hope to convince him.
06-13-14, 10:39 PM
#1196
I had a pleasantly productive day, albeit quite long.
The goal was to place/mount all the engine bay chassis electrical components and despite a few sidetracks, I got it done.
Miata wiper motor and arms, original Z linkage:
*one of the diversions I fell into...*
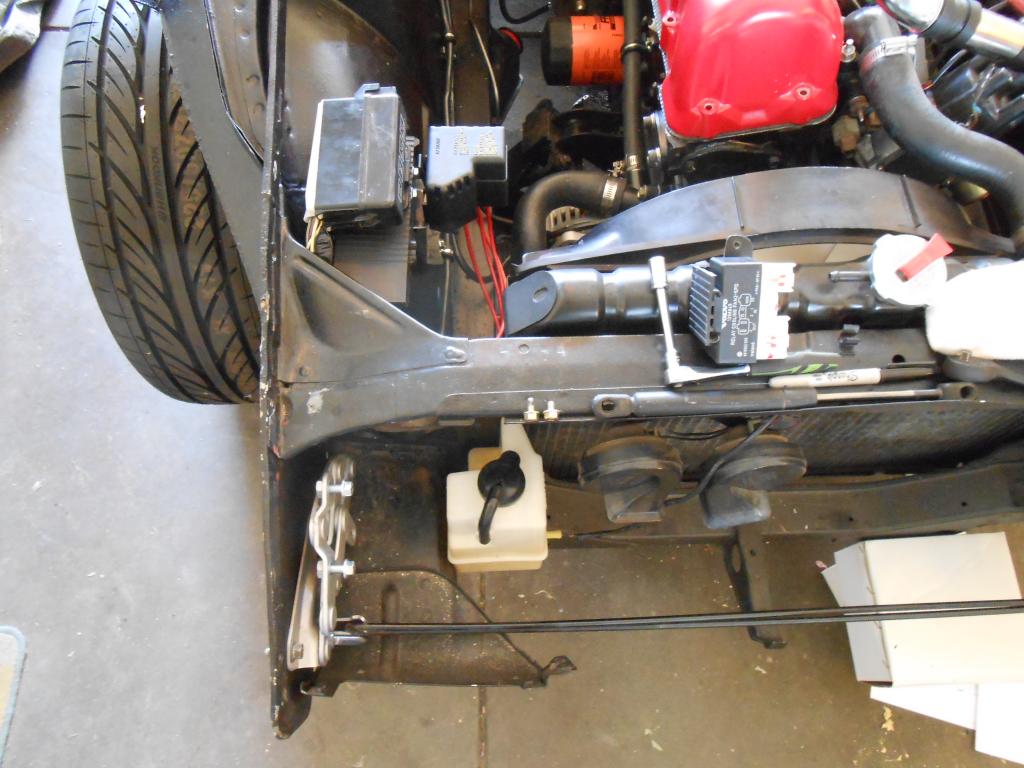
The coolant recovery tank installed:
The day's most time/labor intensive project was the front relay/fuse cluster.
What you're seeing is the fourth (and final, I think) version.
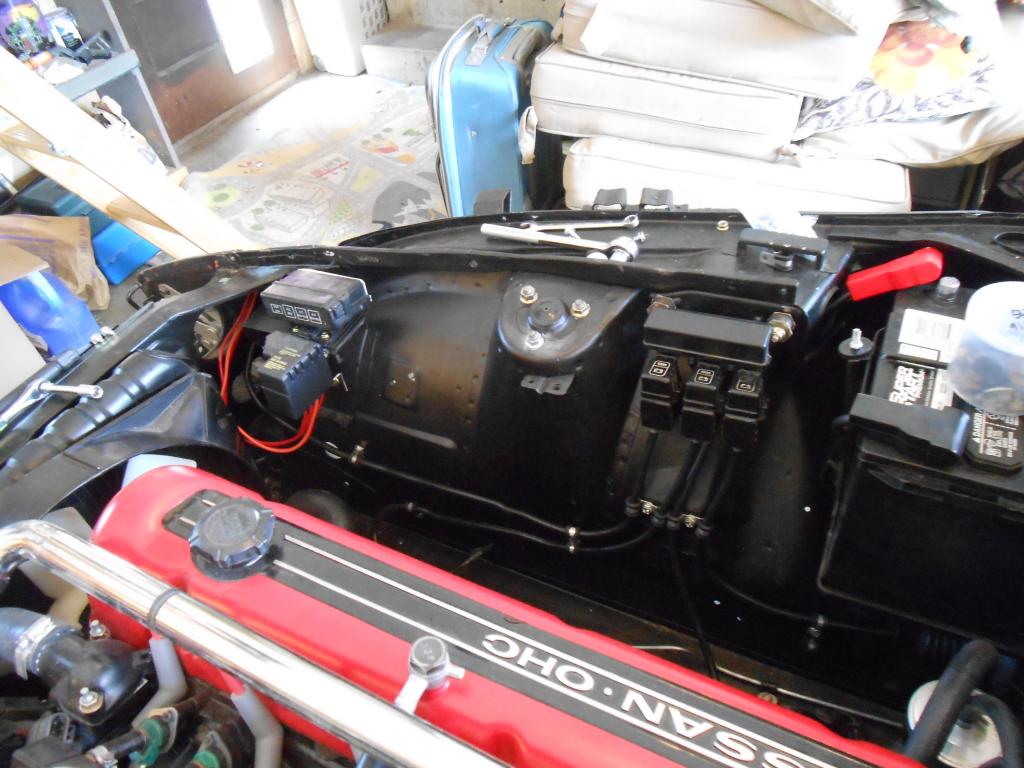
I'm now ready to hook up wire in the engine bay but first I have to do the same thing in the rear of the car. I haven't decided exactly where I'm going to locate that cluster, so that will need finalizing. There are only seven wires that go from the front cluster into the the cabin.
The original Z ignition assembly does not work with the Miata column surround trim, so I'd contemplated adapting the Miata ignition but then decided **** it, we're going keyless ignition.

Oh yeah, like you didn't see that one coming.
The goal was to place/mount all the engine bay chassis electrical components and despite a few sidetracks, I got it done.
Miata wiper motor and arms, original Z linkage:
*one of the diversions I fell into...*
The coolant recovery tank installed:
The day's most time/labor intensive project was the front relay/fuse cluster.
What you're seeing is the fourth (and final, I think) version.
I'm now ready to hook up wire in the engine bay but first I have to do the same thing in the rear of the car. I haven't decided exactly where I'm going to locate that cluster, so that will need finalizing. There are only seven wires that go from the front cluster into the the cabin.
The original Z ignition assembly does not work with the Miata column surround trim, so I'd contemplated adapting the Miata ignition but then decided **** it, we're going keyless ignition.
Oh yeah, like you didn't see that one coming.
06-13-14, 11:17 PM
#1197
Rotary Enthusiast
iTrader: (1)
Join Date: Nov 2012
Location: bloomington, mn
Posts: 1,100
Likes: 0
Received 0 Likes
on
0 Posts
I will admit, I am jealous of your mechanical ability. I am good at cleaning things and taking things apart and putting them back together. But you two take it to another level with the cleanliness and keeping it stock looking,
I took apart my alternator tonight in a drunken stupor and...... now am looking how to put it back together. sigh....
I took apart my alternator tonight in a drunken stupor and...... now am looking how to put it back together. sigh....
06-13-14, 11:25 PM
#1198
Rotary Enthusiast

Impressive.
Question: when you say keyless ignition, is there still going to be some kind of kill switch or ignition lock? If you're looking to play with electronics, there's this: RFID Car immobiliser with PIC12629
Note, if you do build the circuit, the BD677 transistor (used to control the relay coil) pin 2 gets grounded from pin 1, not positive when going high on pin 3 from the microcontroller. The tiny glass 125KHz RFID tags (https://www.sparkfun.com/products/9416) can be concealed in just about anything (like inside a remote transmitter) and there are other choices. The ID-12 or ID-20 (with internal antenna) RFID readers are small and can be mounted behind a panel almost anywhere you can think of.
I've already programmed a microcontroller (PICKIT 3 with 5V being supplied from the programmer)., built the circuit on a breadboard and it works consistently on the bench. It's going in my FC (somewhere) next year during the winter months when I finally assemble it.
06-15-14, 07:18 AM
#1199
Another long day, but not nearly as much to show for it.
Failure takes as much time as success and I was in fail mode for most of the day.
The Honda seats I wanted to try simply will not fit.
With our current engine/rad, there is no room for a proper efan.
That was about four hours right there.
Throughout the day I was also attending to a bunch of little stuff, the kind of detail that will pay off down the road but is not apparent yet.
I did make actual progress on two fronts but again, nothing final to show yet.
I hope to rectify that today as I concentrate on mounting the dash.
I know I said I would be continuing the rear electrics but I need another junkyard run to complete that and the dash is a PITA to work around as it's just propped in place and keeps moving. It needs to be fixed in position so the HVAC can be fitted to it.
The other work in progress is the wiper system.
This job exemplifies the problems I'll be encountering more often now as we near completion.
At some point, all this new stuff I've been adding (in this case, the Miata wiper motor) will have to mate with the old stuff (the Z wiper linkage) and sometimes that can be troublesome.
The Miata motor connects to the linkage with a ball & socket arrangement (just like the FC), the Z had a threaded stud.
This is actually a pretty minor inconvenience but it brought back a long festering desire to try something a bit odd.
We'll see if it works out.
Monday, I hope.
Today though is the dash.
The first and primary mount point is the center stack>trans tunnel and I've already made the brackets but it'd be way easier to install them with two people, so I've been holding off.
Just going to have to bite the bullet and do it alone cause I don't want to wait for Sigfrid's return.
That should be fun.
There's a new episode of Project Binky out, if you're following that...
Which you should be.
06-16-14, 06:39 PM
#1200
My goodness but there are so many little things to do.
One consequence of slathering bedliner all over the car is that all threaded holes need to be chased.
This takes about three times longer than you'd expect, and ten times longer than you'd hope, but has to be done.
I've also started allocating hardware to specific locations and in future pics you might notice bolts just randomly sticking out of nothing...that's final hardware and the hole has been chased.
I also began cleaning out the car and installing the junk we've tossed in over the months.
Some of it is maddeningly difficult to do, the vapor collection tank in particular. It's only three bolts but the tank is quite constrained by the tubing, which must be attached first.
Once in place (which took about fifteen minutes) it looks like the easiest thing ever.
Cruel.
Dashwork has progressed nicely, it's basically mounted.
I plan on three more supplementary braces but need the HVAC in place so the ducting can be put in. Right now the whole dash is empty and there are a million places we could tie in but all that glorious space (and the options it promises) gets filled with ducts and will narrow down the choices a lot.
We need to acquire an airbag cover (but don't need the airbag) and a stereo, but the dash is mostly complete:
From previous Miata cluster projects I scavenged the housing/face and lens cover. Right now it's just a placeholder that allowed me to "adjust" the steering column to fit the dash:
And here we have the result of trimming the dash to move it towards the firewall:
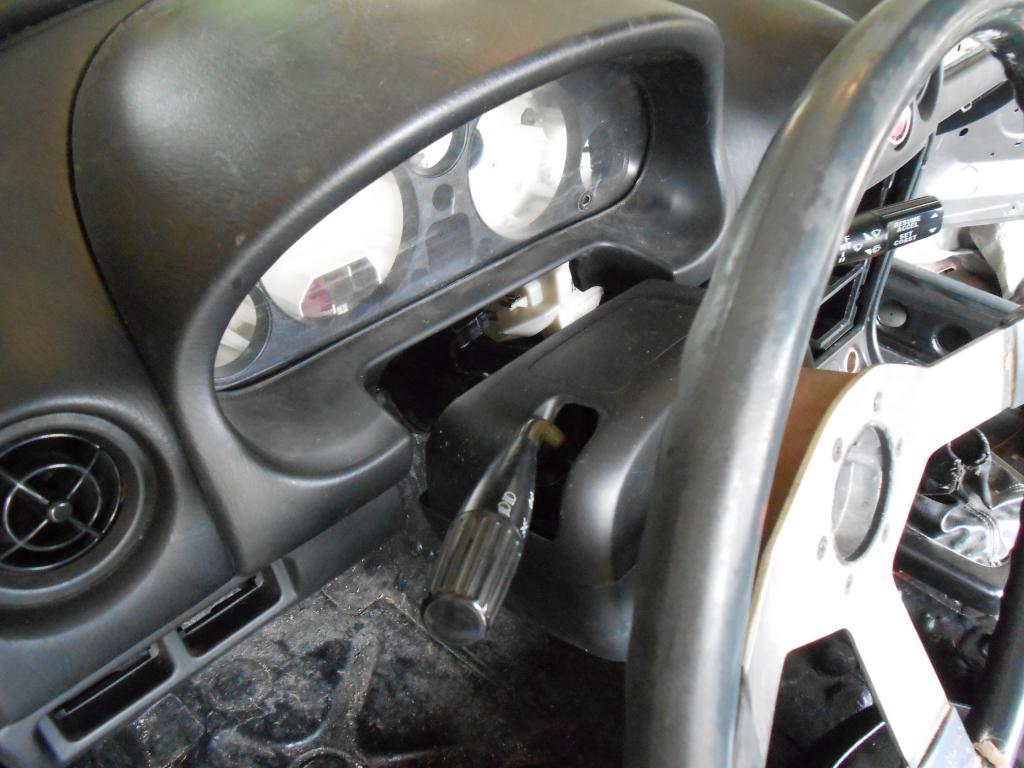
The column surround trim is about 2" away from the dash.
It's an optical illusion...when viewed from the side our column looks freakishly long when in fact, the dash is freakishly short.
The fix will be to find a combo switch with a larger (longer) surround trim that better fits the space we have.
If this is our biggest issue with the dash swap, we're bloody golden.
One consequence of slathering bedliner all over the car is that all threaded holes need to be chased.
This takes about three times longer than you'd expect, and ten times longer than you'd hope, but has to be done.
I've also started allocating hardware to specific locations and in future pics you might notice bolts just randomly sticking out of nothing...that's final hardware and the hole has been chased.
I also began cleaning out the car and installing the junk we've tossed in over the months.
Some of it is maddeningly difficult to do, the vapor collection tank in particular. It's only three bolts but the tank is quite constrained by the tubing, which must be attached first.
Once in place (which took about fifteen minutes) it looks like the easiest thing ever.
Cruel.
Dashwork has progressed nicely, it's basically mounted.
I plan on three more supplementary braces but need the HVAC in place so the ducting can be put in. Right now the whole dash is empty and there are a million places we could tie in but all that glorious space (and the options it promises) gets filled with ducts and will narrow down the choices a lot.
We need to acquire an airbag cover (but don't need the airbag) and a stereo, but the dash is mostly complete:
From previous Miata cluster projects I scavenged the housing/face and lens cover. Right now it's just a placeholder that allowed me to "adjust" the steering column to fit the dash:
And here we have the result of trimming the dash to move it towards the firewall:
The column surround trim is about 2" away from the dash.
It's an optical illusion...when viewed from the side our column looks freakishly long when in fact, the dash is freakishly short.
The fix will be to find a combo switch with a larger (longer) surround trim that better fits the space we have.
If this is our biggest issue with the dash swap, we're bloody golden.