She Followed Me Home, Honest
 01-27-14, 07:54 AM
#976
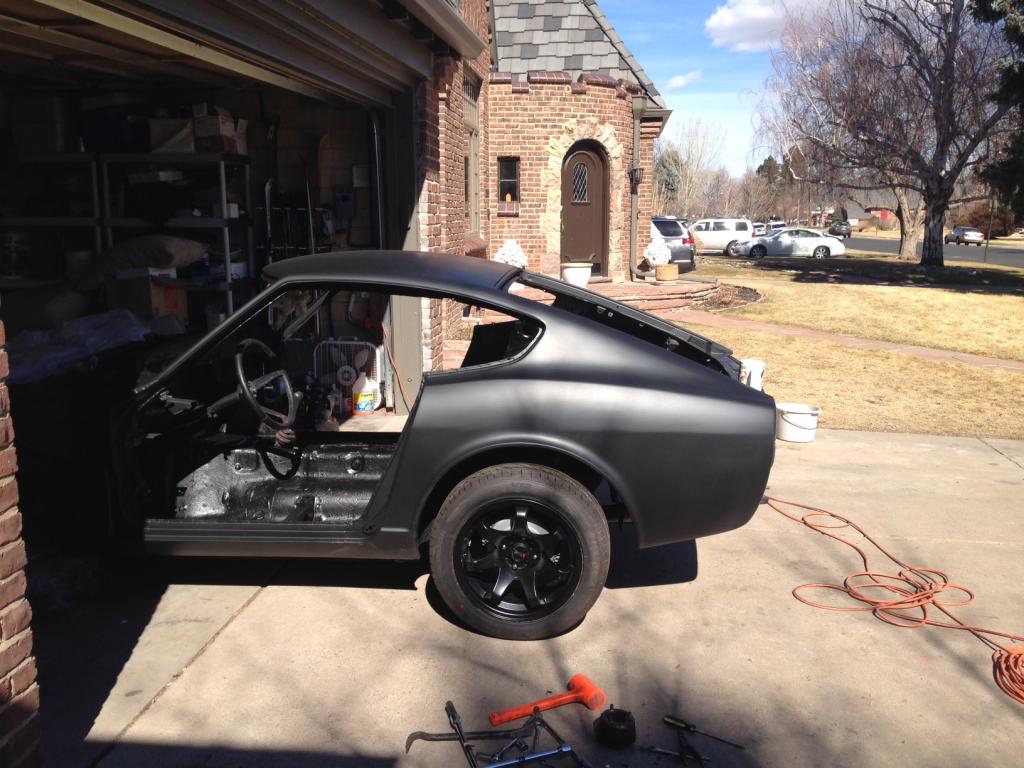
We are ready for paint.
Err...I mean "dip".
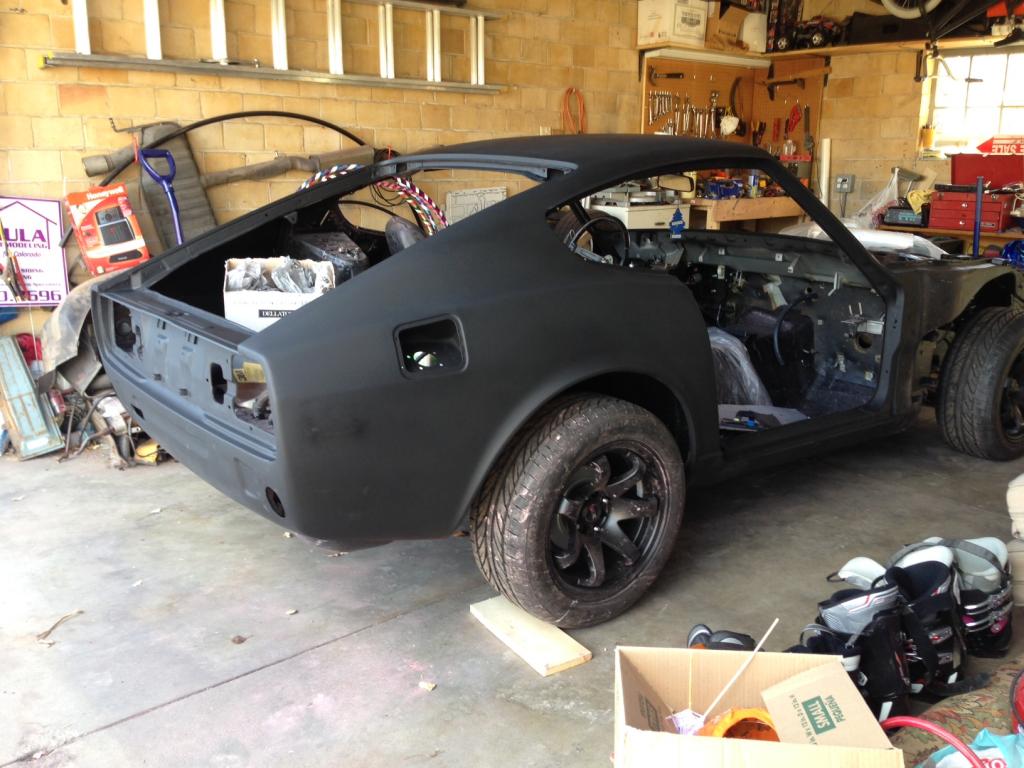
After 7 months, we have finally seen the chassis in a solid color, albeit black primer.
I can hardly express how gratifying this is.
Now, were we proceeding to paint, this would be only the beginning of the prep process but the coating thickness and (slightly) textured finish of Plastidip renders further surface refinement useless. You'd just never be able to tell. It's like primer/filler on steroids.
Don't get me wrong, this is not a halfassed job,,,she actually looks pretty good and a "real" bodyshop would have a reasonable base to start with.
The body is smooth but not very straight.
If nothing else, this project has taught me some stuff about bodywork.
First...I still don't like it.
Second...we made what I'm sure pros consider a classic mistake- we started sanding BEFORE we blocked the body. You can sand the metal till it's smooth as can be but if it's not straight, you've still failed. Right now our car could probably pull off an OK white or silver paint job but anything darker would not end well.
We should have left the body intact and block sanded it as a whole piece, then pulled it apart to concentrate on individual areas/problems.
We didn't do this because our initial priority (which I still consider valid) was to strip the car completely searching for rot...no point throwing effort/cash into a rusty bucket and early Z's are notorious for body rot.
We tried to slipstream the various stages into one and bypassed a lot of panel test fitting, removal, sanding, refitting...etc.
You just can't do it that way.
Oh well, we are perfectly fine for the dip finish and I think she'll look great.
Last week before leaving I took one of the dip test panels and drizzled some brake fluid on it, then left it outside all week long.
Not a mark on it when washed with soapy water.
I should probably try that with gasoline but didn't have any handy...I'd like to know if we need extra protection around the gas fill area.
Our dip order arrives sometime this next week and then all we need is for decent weather and Sigfrid's schedule to coincide and we can git 'r dun.
This stage has been such a choke point as progress on every other front has totally stopped, it will be freeing to be able to turn attention to multiple phases again instead of concentrating on just paint.
We have also reached the point where there's nothing left to remove, from now on stuff goes back on for good.
YAY!
After the shell is dipped the interior will get a final beauty coat of bedliner (it's brushed on, so no overspray concerns) before work commences on chassis wiring.
Then we have to decide about sound deadening (which is a definite) and a cage (possible/probable).
We have new carpet but will leave it out till the car is actually running, so the interior will be stripped for a while longer. Much easier to deal with all the plastic/carpet when it's not frozen anyway.
We (well, primarily me) are hoping to acquire a Megasquirt before I get to the engine harness. Save me the trouble of doing it twice and the squirt would work for any engine we may decide to swap, so it'd be a good investment.
Even the guys who keep the stock six love the Megasquirt...I don't see a downside.
Well, except for money.
The Super Bowl will kill us next weekend and so we plan to dip the weekend following.
So close now...
Err...I mean "dip".
After 7 months, we have finally seen the chassis in a solid color, albeit black primer.
I can hardly express how gratifying this is.
Now, were we proceeding to paint, this would be only the beginning of the prep process but the coating thickness and (slightly) textured finish of Plastidip renders further surface refinement useless. You'd just never be able to tell. It's like primer/filler on steroids.
Don't get me wrong, this is not a halfassed job,,,she actually looks pretty good and a "real" bodyshop would have a reasonable base to start with.
The body is smooth but not very straight.
If nothing else, this project has taught me some stuff about bodywork.
First...I still don't like it.
Second...we made what I'm sure pros consider a classic mistake- we started sanding BEFORE we blocked the body. You can sand the metal till it's smooth as can be but if it's not straight, you've still failed. Right now our car could probably pull off an OK white or silver paint job but anything darker would not end well.
We should have left the body intact and block sanded it as a whole piece, then pulled it apart to concentrate on individual areas/problems.
We didn't do this because our initial priority (which I still consider valid) was to strip the car completely searching for rot...no point throwing effort/cash into a rusty bucket and early Z's are notorious for body rot.
We tried to slipstream the various stages into one and bypassed a lot of panel test fitting, removal, sanding, refitting...etc.
You just can't do it that way.
Oh well, we are perfectly fine for the dip finish and I think she'll look great.
Last week before leaving I took one of the dip test panels and drizzled some brake fluid on it, then left it outside all week long.
Not a mark on it when washed with soapy water.
I should probably try that with gasoline but didn't have any handy...I'd like to know if we need extra protection around the gas fill area.
Our dip order arrives sometime this next week and then all we need is for decent weather and Sigfrid's schedule to coincide and we can git 'r dun.
This stage has been such a choke point as progress on every other front has totally stopped, it will be freeing to be able to turn attention to multiple phases again instead of concentrating on just paint.
We have also reached the point where there's nothing left to remove, from now on stuff goes back on for good.
YAY!
After the shell is dipped the interior will get a final beauty coat of bedliner (it's brushed on, so no overspray concerns) before work commences on chassis wiring.
Then we have to decide about sound deadening (which is a definite) and a cage (possible/probable).
We have new carpet but will leave it out till the car is actually running, so the interior will be stripped for a while longer. Much easier to deal with all the plastic/carpet when it's not frozen anyway.
We (well, primarily me) are hoping to acquire a Megasquirt before I get to the engine harness. Save me the trouble of doing it twice and the squirt would work for any engine we may decide to swap, so it'd be a good investment.
Even the guys who keep the stock six love the Megasquirt...I don't see a downside.
Well, except for money.
The Super Bowl will kill us next weekend and so we plan to dip the weekend following.
So close now...
 02-04-14, 09:40 AM
#977
I can't recall a worse performance by a "professional" team, it was painful to watch.
And, after that horrible waste of time, the weather has decided to really crap on us and get even colder and snowier than before. It's highly unlikely we'll get to touch the Z this weekend.
Instead, I suspect we'll end up putting a new radiator into Sigfrid's Audi TT.
He's been having cooling issues and somehow decided it was the rads fault...not sure why but then again, I don't really care.
To the extent that I do care, it's only because the TT has always been a royal pain to do anything to, it's not nearly as user friendly as I like.
So, either Saturday or Sunday I expect to be figuring out how to wrestle with an Audi in 15� snowy weather.
Oh joy.
The Z project has stopped limping forward and now stands frozen and huddling.
Every one of those balmy fall days we wasted now comes back to haunt me.
02-08-14, 07:46 AM
#978
And the weather...I don't know what to say (neither do local weather people).
Thursday morning it was -20�, Friday it was 40�...a 60� swing in 24 hours.
It felt like ****** July.
My junkyard puts barcode tags on the cars, every night guys walk the lot with scanners and the info is uploaded to their website.
On Wednesday another Z showed up in inventory but there was no bloody way I was going to the yard in such brutally cold weather. Friday morning though was so nice I couldn't resist.
By the time I got there the Z had been in yard for a day and a half, during which the temp never rose above 0� but some hearty soul had spent all day Thursday (a day so cold I blew off checking the mail!!) stripping that car naked. According to the counter guys, there were two folks there for most of the day and they pulled the engine/tranny/diff...all in negative degree temps.
Whoever you are, I salute you; that was an epic display of determination.
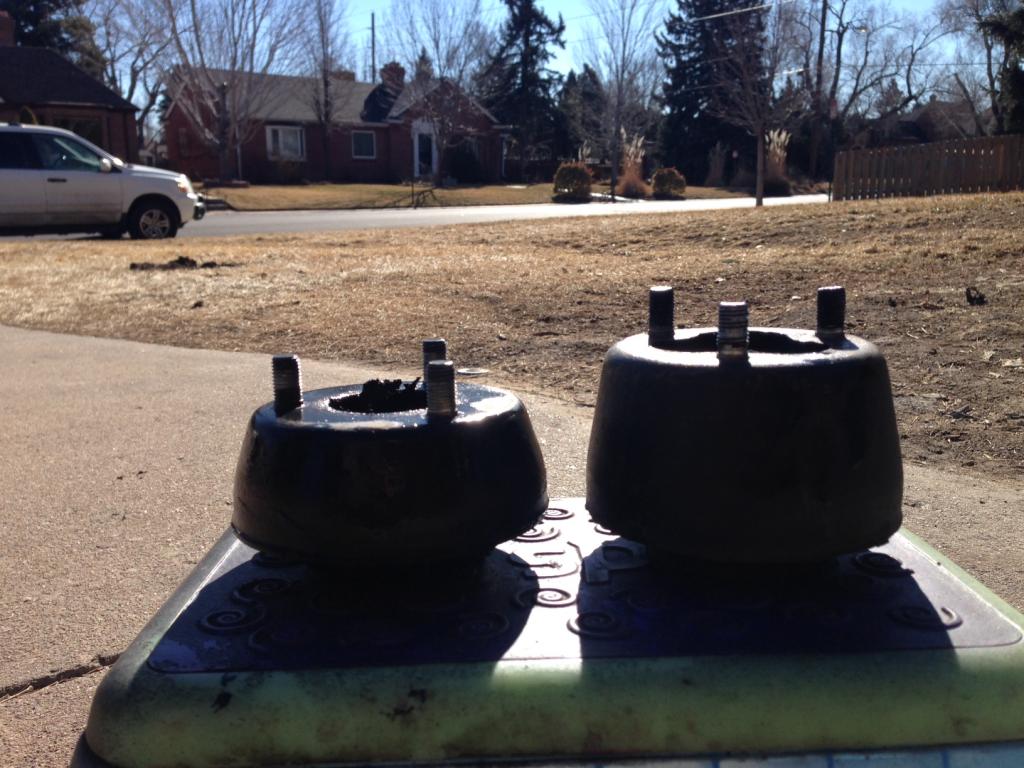
Fortunately, they left the only thing I was really looking for...the front strut isolator/tophats.
The Z has a truly wretched suspension, it is awful in so many ways that it's a miracle that they handle as well as they do (did). One of the worst features is the struts, which are part of the hubs (does that make them MacPherson or Chapman or what?).
All you can really do is change the inserts and use slightly shorter springs, more extensive changes to stance get very involved.
In this initial phase of the project we did not want to commit to expensive experiments, so we just put in new strut inserts (Monroe...yeah, go ahead and chuckle) and new Eibach "lowering" springs.
She sits like a Conestoga wagon, the wheel gap is ridiculous.
The Z always did sit very high, especially viewed with our modern sensibilities, but our car seemed especially lofty.
Fortunately, there is an easy fix for the rear and that's why I was at the junkyard.
The tophats (mounts) for the struts are identical front and rear EXCEPT the fronts are about half the height...you see where this is going.
Swapping the junkyard "front" hats onto our rear struts should drop us to a more reasonable stance...at least in the rear.
No idea what we'll do for the front.
It's looking like the weather will allow us to dip the car next weekend, we'll just have to see.
Meanwhile though, I've gotten motivated again and am going to renovate the taillights/trim panel, a project I've been ignoring for months.
I'll also adapt the Miata wiper motor to the Z bracket and get that painted.
Getting the chassis painted will unleash a flood of progress (one hopes), I'm really tired of fiddling around.
02-08-14, 11:24 AM
#979
Moderator
iTrader: (3)
Join Date: Mar 2001
Location: https://www2.mazda.com/en/100th/
Posts: 30,891
Received 2,638 Likes
on
1,868 Posts
....there were two folks there for most of the day and they pulled the engine/tranny/diff...all in negative degree temps.
Whoever you are, I salute you; that was an epic display of determination.
...One of the worst features is the struts, which are part of the hubs (does that make them MacPherson or Chapman or what?).
All you can really do is change the inserts and use slightly shorter springs, more extensive changes to stance get very involved.
the 1st gen has struts like this too, along with most other JDM cars of the era, and BMW used the same setup into the 90's, as do 911's.
the good part is that most of the JDM stuff uses the same diameter strut, just different lengths, so its really common to pick a shorter insert, and cut the tube shorter. or use something like this https://technotoytuning.com/toyota/a...s-ae86-corolla
the really ambitious people pull the tube out, and redrill the spindle at an angle of their choosing, and run a larger tube.
and Porsche actually runs a full length shock and moves the spindle up, like the pic.
02-08-14, 12:27 PM
#980
The normal progression seems to be:
-Install new "stock" inserts with "lowering" springs.
-Stand back and wonder why your definition of "lower" differs so radically from theirs.
-Swap in short top hat in the rear...this is where we're at now.
-Car now looks like a dog squatting to ****.
-Cut the front springs.
Opinion splits at this point.
Some say it's fine as is, others, not so much.
The "others" then:
- Cut and section the front strut tube just as you suggest j9, use an insert from a Toyota MR2, remove the lower spring perch and use a Ground Control sleeve/spring setup.
This reportedly works well too, but you can't drop the car too far down without running into camber issues.
The problem with that is the Z strut tower does not lend itself easily to using an adjustable plate, normally the whole top is cut off and a new panel welded in.
This getting complicated fast.
Assuming you make it that far, you've made it to the base of a very steep cliff.
The only available course from this point is a major suspension swap, something like the kit from Arizona Z car:
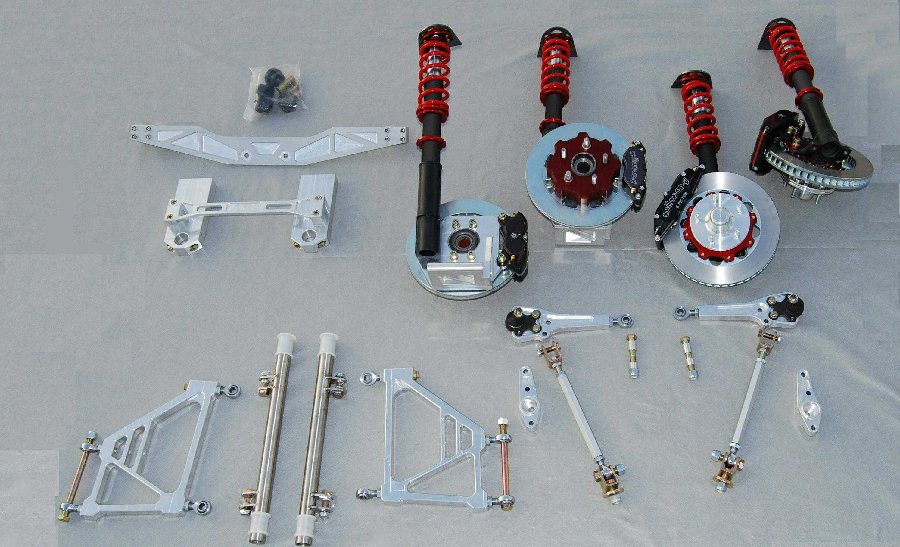
Around $10k, IIRC (not including the new 5 lug wheels you'll need).
Other than that, it's total custom, baby.
At which point you realize you're talking crazy.
Bless those who don't get the message and carry on though, they are what make the internet interesting.
-Install new "stock" inserts with "lowering" springs.
-Stand back and wonder why your definition of "lower" differs so radically from theirs.
-Swap in short top hat in the rear...this is where we're at now.
-Car now looks like a dog squatting to ****.
-Cut the front springs.
Opinion splits at this point.
Some say it's fine as is, others, not so much.
The "others" then:
- Cut and section the front strut tube just as you suggest j9, use an insert from a Toyota MR2, remove the lower spring perch and use a Ground Control sleeve/spring setup.
This reportedly works well too, but you can't drop the car too far down without running into camber issues.
The problem with that is the Z strut tower does not lend itself easily to using an adjustable plate, normally the whole top is cut off and a new panel welded in.
This getting complicated fast.
Assuming you make it that far, you've made it to the base of a very steep cliff.
The only available course from this point is a major suspension swap, something like the kit from Arizona Z car:
Around $10k, IIRC (not including the new 5 lug wheels you'll need).
Other than that, it's total custom, baby.
At which point you realize you're talking crazy.
Bless those who don't get the message and carry on though, they are what make the internet interesting.
02-08-14, 01:02 PM
#981
Moderator
iTrader: (3)
Join Date: Mar 2001
Location: https://www2.mazda.com/en/100th/
Posts: 30,891
Received 2,638 Likes
on
1,868 Posts
maybe you need adjustable lower control arms like these Adjustable Front Lower Control Arms for 79-85 RX-7 - Racing Beat
but yeah you're right, its a slippery slope!
but yeah you're right, its a slippery slope!
02-08-14, 02:25 PM
#982
troubleshooting sucks
were definately on the same page there clokker. even the "cheaper" coilovers seem expensive. as always i am mipressed with your ingenuity when solving things like this without breaking the bank. in your case, knowledge is discount! 
the z is really starting to take shape! looks mean as hell. concerning the ride height, wont you be able to cheat a bit with the overfenders?
the z is really starting to take shape! looks mean as hell. concerning the ride height, wont you be able to cheat a bit with the overfenders?
Last edited by meerkat8701; 02-08-14 at 02:27 PM.
02-09-14, 11:18 AM
#983
The flares are molded to the body shape and can only be adjusted up/down and front/back a little bit before they don't sit nicely on the sheetmetal.
I don't know what we're going to do.
Yet.
Meanwhile, I've decided to quit whining about the weather and get moving again.
I've had the taillights at my house for months as I worked out the new electrical system but they are now more important to me for decorative reasons.
I'm still trying to work out the overall "look" of the car and I think it's important that it not be totally monochrome, we're going to need some different finishes/highlights so it doesn't look like we just sprayed the whole car flat black.
Viewed from the side, doorhandles and window trim (both originally polished stainless steel...nice touch, Datsun!) are obvious highlights and I'm thinking they will be gloss black.
From the front, I still have no idea...we've never had it assembled completely and I'm not even sure what it looks like. We have no grill, so that whole thing will have to be fabricated but until it's together and we mount the new airdam/lower valence, I don't even know what the opening looks like.
So that is on hold.
The rear though can be finalized and it will be a perfect area to try out my paint ideas.
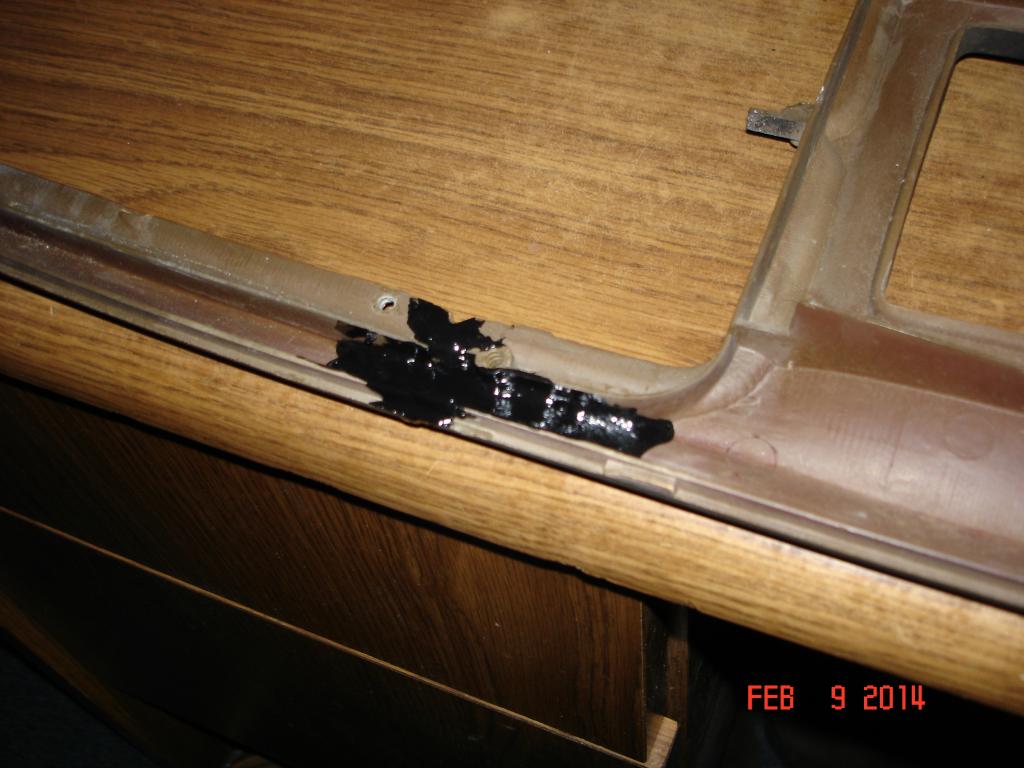
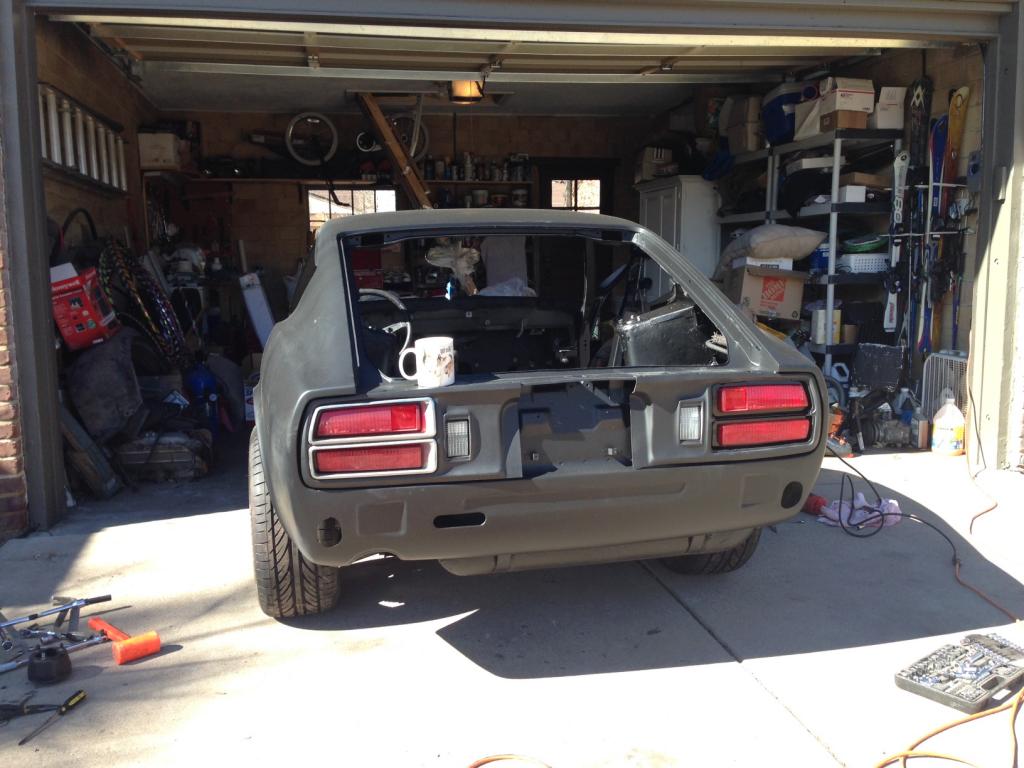
Here's a bad pic of a tail assembly:
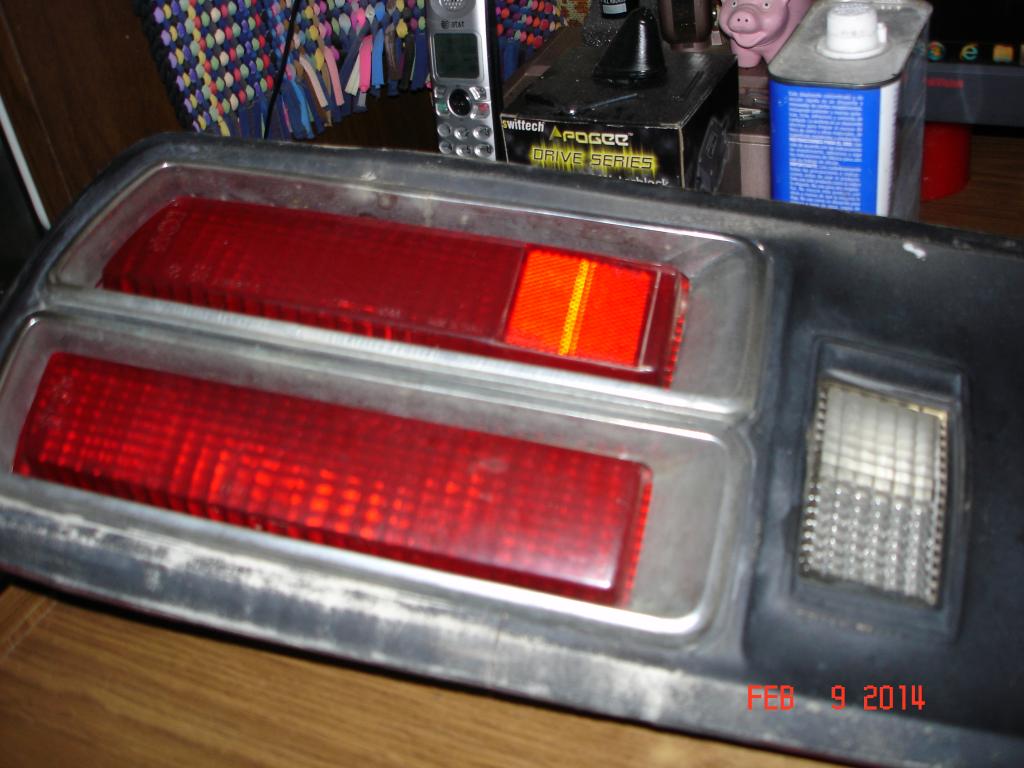
This is made up of three pieces, the lamp/lens assembly, the gray(ish) plastic trim panel and the chrome bezel around the lenses.
Our lamp housings are fine, as are the lenses, so they just need a bit of clean and polish.
Both of the plastic panels are broken...in exactly the same place, there is obviously a stress problem that will need addressing.
Finally, there are the bezels, which are structurally sound but cosmetically awful.
I'm unsure if the "chrome" was electro-deposited or if it's a thin, adhesive backed film stretched/shrunk over the plastic...either way, it needs to come off.
The obviously bubbled/delaminated areas are relatively easy to pick off with a razor blade but the rest is quite obstinate and I'm not sure how best to proceed. The main problem is that the substrate is so much softer than the coating and also more chemically sensitive.
This will require some thought.
Meanwhile though, I can fix the trim panels.
Oh boy! Something I enjoy doing for a change.
I had two goals with these repairs, first, rejoin the two broken ends and second, reinforce the area so it didn't crack again (this turns out to be a two phase solution as well...).

I chose not to water wash the panels until after the repair. They'll get washed as I wetsand the front and I didn't want any water to possibly contaminate the glue up.
Instead I used q-tips and acetone to scrub out the channels and thoroughly soak the surrounding areas. This is important, it's like primer for paint. The wash of acetone will soften and begin to dissolve the plastic and help the new material meld to it.
Then butter up the joint with the ABS "bondo" and clamp the piece together.
That gets the joint finished but does nothing for reinforcement.
I cut two thin strips of 1/8" ABS sheet (@ 3/16" x 3") to fit in the main channel on the back. Soaked them in acetone for about 15 minutes to soften them up a bit, then pressed them into the channel, spanning the cracked area. Then buttered them in with the ABS goop to create a solid plug behind the break.
Let dry overnight.
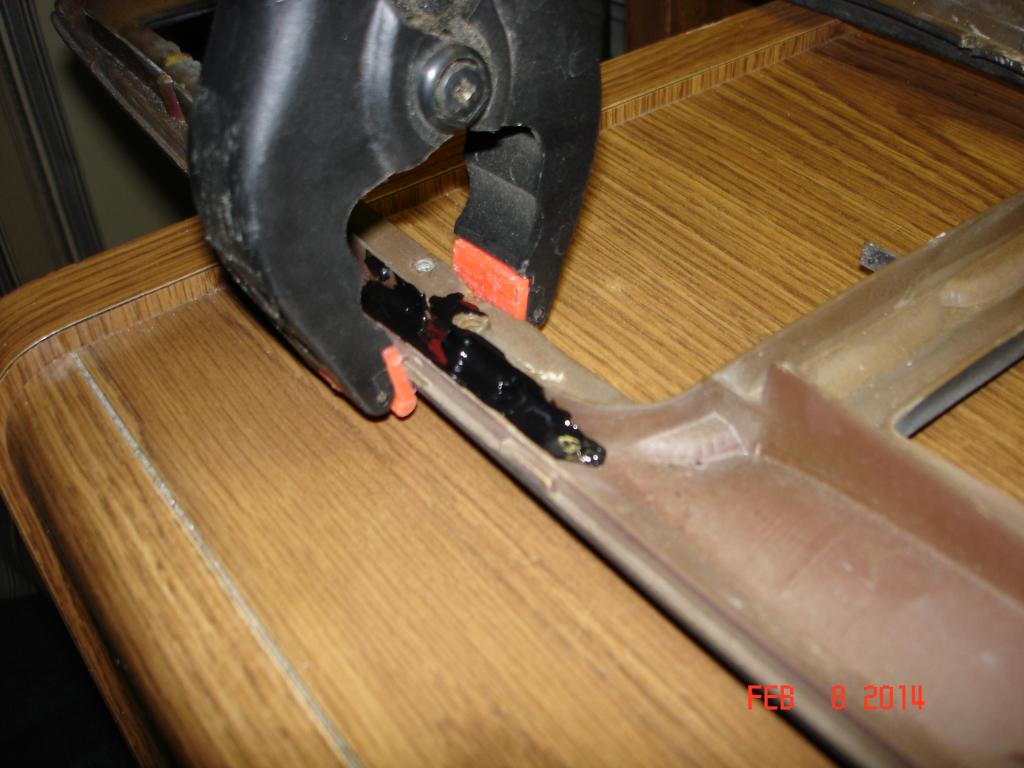
I test fit the bezel to a panel and discovered what I believe is the root cause of these identical cracks. The bezels is held with six screws but in order to get them all installed you have to slightly flex the plastic panel. I think this installation stress ultimately causes the plastic to break in the thinnest, weakest spot.
When I install the bezels (assuming I can solve this chrome removal problem) I'll only use the screws that fit without bending and a dab of GOOP where the others went.
It's not structural and as long as it doesn't fall off it'll be fine.
I'm giving the panels another 24 hours of cure time before sanding and paint...tomorrow, I hope.
They will be satin black.
If I figure out the bezels, they will be gloss black.
I'll be very interested to see how it turns out.
02-16-14, 06:09 PM
#984
**** those tail trim panels, they're boring and awful.
Let's see the dipped car instead!
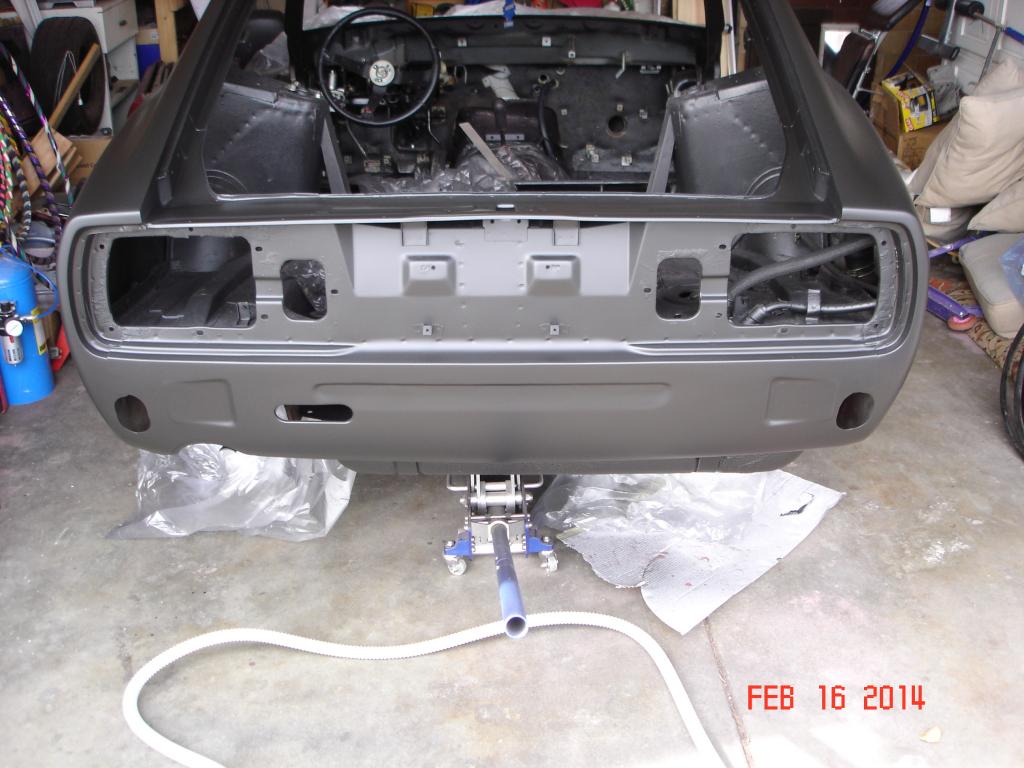
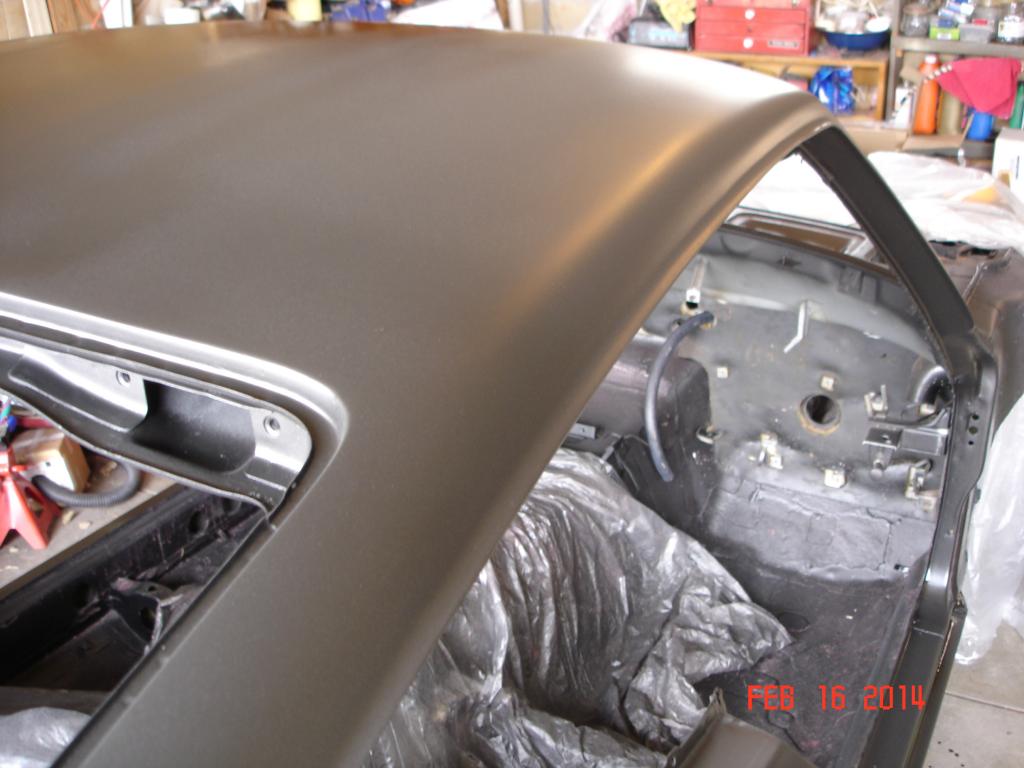
It's actually black, trust me; the lighting and camera conspired to make it so gray.
These shots were taken after the fourth coat.
Started with two fairly light dust coats. Coats 3 and 4 were medium wet with heavy emphasis on jambs, wheelwells, rockers and the final two coats were full wet on the whole thing.
It will have surface cured by tomorrow and I'll get to see what it really looks like.
Assuming all is well, I'll brush on the interiors final beauty coat of bedliner and the chassis will be finished. We can start building onto instead of removing and cleaning...endlessly, endlessy.
Sigfrid and family are skiing this weekend so I did this alone, he missed all the fun.
Wasn't bad at all took maybe 6 1/2 hours all told and the weather was beautiful, maybe 65�.
The whole process went just like all the youtube videos I'd watched, no nasty surprises.
This major roadblock removed, we are back in business.
Let's see the dipped car instead!
It's actually black, trust me; the lighting and camera conspired to make it so gray.
These shots were taken after the fourth coat.
Started with two fairly light dust coats. Coats 3 and 4 were medium wet with heavy emphasis on jambs, wheelwells, rockers and the final two coats were full wet on the whole thing.
It will have surface cured by tomorrow and I'll get to see what it really looks like.
Assuming all is well, I'll brush on the interiors final beauty coat of bedliner and the chassis will be finished. We can start building onto instead of removing and cleaning...endlessly, endlessy.
Sigfrid and family are skiing this weekend so I did this alone, he missed all the fun.
Wasn't bad at all took maybe 6 1/2 hours all told and the weather was beautiful, maybe 65�.
The whole process went just like all the youtube videos I'd watched, no nasty surprises.
This major roadblock removed, we are back in business.
02-17-14, 10:37 AM
#986
Moderator
iTrader: (3)
Join Date: Mar 2001
Location: https://www2.mazda.com/en/100th/
Posts: 30,891
Received 2,638 Likes
on
1,868 Posts
i would be really happy with that, it turned out really well (good? smashing?)
02-17-14, 02:11 PM
#988
Thanks folks, I am (mostly) pleased my ownself.
I returned today and applied a beauty coat of bedliner to the interior...everything is now nice clean black, inside and out.
I'm pretty sure there's a "dry" spot on the roof where I missed on the last wet coat.
We'll roll her outside this weekend and see in some real light, but it's not a big deal, a simple wet coat will fix it right up.
It'd take under an hour and would be so much easier with two people.
Now the excitement is over I guess it's back to those damn tail panels.
02-17-14, 03:53 PM
#989
Bravo! An extremely long thread, but your attention for detail is baffling...kudos for being a guru at your craft. When the thread opened in the last pages, I thought the Z was a heavily modified RX, but that's what I get for assuming. Hope the new project goes well, and I hope to be able to apply some of your know-how & ingenuity to my build. Cheers!
02-17-14, 03:55 PM
#990
I used a FD VSS which bolted right into the FC trans speedo cable drive (Thanks to Ben/Rotary Evolution for the heads up on that). Had to swap the driven gear for the FC one, but otherwise it's a bolt in proposition. Speedo is dead accurate up to @60mph, at an indicated 80, she's actually doing 76mph (checked on a State Patrol radar gun...). Tach is right on the money, fuel gauge is close enough to be semi-useful.
02-19-14, 07:32 AM
#991
Just because I write this thread doesn't mean I get credit for all the work.
In fact, because I am the presenter, the very definition of "all the work" is skewed from my perspective and seriously shortchanges Sigfrid's contribution.
Whether one works in a team or solo the drab & dull parts of a project must be addressed, yet it is rarely mentioned in most build threads. Researching, ordering and PAYING for parts/material is a massive but largely unmentioned aspect of any project.
I was only able to rebuild the undercarriage in two weeks because S. had spent the weeks prior arranging for all the parts to be on hand. I don't even know where most of this **** comes from or what it costs.
And he does get hands on as well, it's not like he's just an office drone or something.
It's a sweet deal for me, I get to be Jeckyll to his Hyde and the collaboration seems to work quite well.
Plus, it keeps me off the streets.
The specific project occupying me this week is those bloody tail panels.
Still.
*******.
If we're to use the stock tail lights, these trim panels must be made to work.
I always wanted to go full custom but S. did not and I burned that bridge when I painted the car...it's a little late for cutting and fabbing now.
So, off to work.
02-19-14, 10:38 AM
#992
Moderator
iTrader: (3)
Join Date: Mar 2001
Location: https://www2.mazda.com/en/100th/
Posts: 30,891
Received 2,638 Likes
on
1,868 Posts
if at any point Sigfrid, made a reference to Kaos, 86, 99, control, not doing zis here, or craws, then he deserves his half credit 
02-19-14, 11:09 AM
#994
troubleshooting sucks
maybe a dumb suggestion here but would it give the trim panels a little extra rigidity and reduce the pressure on that weak point if you were to apply a thin layer of bondo over the whole inside of the trim panel or would that mess up the fit/not help?
02-19-14, 12:05 PM
#995
The panels screw to the lamp housings and then just float in front of the body, they are really under no "structural stress".
I think it's just what happens to 40 year old plastic, they're old and withered.
Presumably we could buy new/repro panels, I haven't looked into that.
I'm hoping that temporarily putting the assemblies on the car will give me a better idea of what we are dealing with because remember, we've never seen her assembled and a consistent color.
The approach I'm taking might well look good enough to roll with for a while...unlikely but possible.
Although we face the same issue at both ends of the car, deleting the bumpers has a bigger effect at the rear where it covered up a lot of space.
The bezels and multiplaned panels add a lot of depth and visual interest to the tail light area and that detailing is important to offset the bland/unformed space below.
Most of the "custom" approaches I've seen are merely flat panels cut to fit the stock body recess, sometimes using OEM lights, other times not. Thing is though, no matter how nicely you trim and fit the panel it's always obvious that you've just trimmed and fit a flat panel... it's too easy.
It needs the 3D contrast that the original provided, maybe not as much or done differently but it can't just be flat.
It's a big unknown till this weekend.
02-23-14, 09:22 AM
#996
And Oh!, what fun we had.
Well, kind of...we spent most of the day on Sigfrid's Audi TT but that was an aberration that we shall never speak of again.
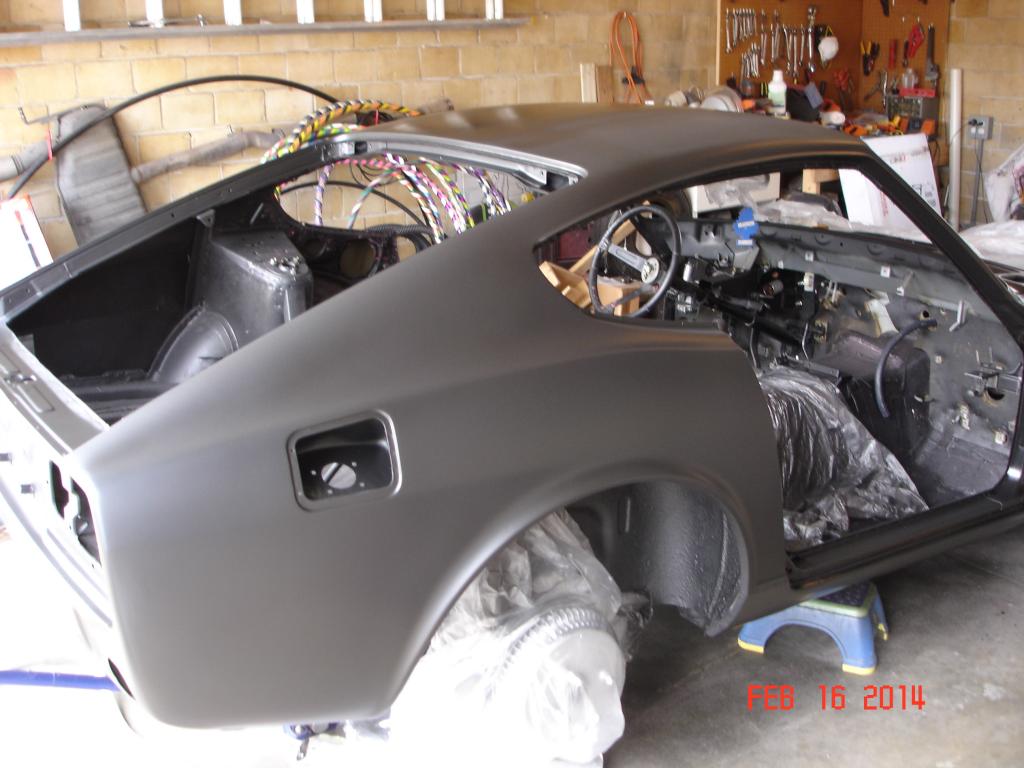
We rolled the Z out into the sunlight and I got my first real look at the paint job.
As I suspected, there is a dry spot on the roof but otherwise it's pretty damn good.
I slotted the tail lights/finish panels in place:
Note how dusty the finish appears...that's because it is, the next door neighbor was doing lawn work and it was fairly breezy, so we got covered. The plastidip seems to show dirt quite readily, I suspect the greys would be less sensitive than the black. I was able to hose off a section behind the wheel and it cleans up just fine, a rinse was all it took. I'll update as we get more experience with this finish...
I won't (can't?) detail our discussion about the minutia of the tail lights, suffice to say that after several bowls we decided on a plan.
There are many compelling reasons to use the stock lights- at least to start with- and if we do, that more or less dictates we use the stock trim panels. Again, at least to begin.
I'll be working on the lights/panels again this week and should have them ready for final install by the weekend.
We also installed the short isolators on the rear struts:
We had run across a random comment that said assembling and tightening the suspension with the car in the air and the arms drooping could sometimes lead to a high ride height. I was skeptical but really had nothing to lose, so we set her on ramps and loosened/retorqued everything while under body weight.
She still sits high, I'm not sure it dropped at all but there's not much we can do right now. The weight of fuel and interior will help and suspensions typically "pack down" a bit when driven, we'll just have to see where she finally lands.
It's now obvious that our wheel offsets sucks, so the extra ride height is actually saving us from tire rub...a silver lining, I guess.
The primary focus of our shared worktime will now turn to getting the cabin weathertight. Initially this means prepping the doors and hatch and painting them.
I'd like to able to pressure wash the car and check for leaks before work (primarily electrical to begin with) continues on the interior.
All of our glass is rubber gasketed and the original weatherstripping is horrible, so Z's are notoriously prone to leakage and I'd like to address that tendency while it's easy to see/get to.
Meanwhile I'll be independently beginning on the wiring, which starts with component siting. Sigfrid must decide on the stereo configuration he wants because speaker location will dictate the space I have available for relays/fuses, etc.
After the tail lamps are finished my next "home" project will be the quarter windows, which will be the testbed for two more critical decisions we must make.
First is the window tint- how dark, can we do ourselves, etc.?
Second is the window frame, originally polished stainless (most think it's chrome but it's not), we want gloss black. The door has a similar window frame, so the way we treat them is a big part of the side-view visual.
I'm going to try for a good result with spray paint but powdercoating is the fallback option.
We've gone from twiddling our thumbs, unable to do anything, to an embarrassment of riches...there are a million things we can do now.
The trick- as usual- is to figure the most logical/productive path.
Well, kind of...we spent most of the day on Sigfrid's Audi TT but that was an aberration that we shall never speak of again.
We rolled the Z out into the sunlight and I got my first real look at the paint job.
As I suspected, there is a dry spot on the roof but otherwise it's pretty damn good.
I slotted the tail lights/finish panels in place:
Note how dusty the finish appears...that's because it is, the next door neighbor was doing lawn work and it was fairly breezy, so we got covered. The plastidip seems to show dirt quite readily, I suspect the greys would be less sensitive than the black. I was able to hose off a section behind the wheel and it cleans up just fine, a rinse was all it took. I'll update as we get more experience with this finish...
I won't (can't?) detail our discussion about the minutia of the tail lights, suffice to say that after several bowls we decided on a plan.
There are many compelling reasons to use the stock lights- at least to start with- and if we do, that more or less dictates we use the stock trim panels. Again, at least to begin.
I'll be working on the lights/panels again this week and should have them ready for final install by the weekend.
We also installed the short isolators on the rear struts:
We had run across a random comment that said assembling and tightening the suspension with the car in the air and the arms drooping could sometimes lead to a high ride height. I was skeptical but really had nothing to lose, so we set her on ramps and loosened/retorqued everything while under body weight.
She still sits high, I'm not sure it dropped at all but there's not much we can do right now. The weight of fuel and interior will help and suspensions typically "pack down" a bit when driven, we'll just have to see where she finally lands.
It's now obvious that our wheel offsets sucks, so the extra ride height is actually saving us from tire rub...a silver lining, I guess.
The primary focus of our shared worktime will now turn to getting the cabin weathertight. Initially this means prepping the doors and hatch and painting them.
I'd like to able to pressure wash the car and check for leaks before work (primarily electrical to begin with) continues on the interior.
All of our glass is rubber gasketed and the original weatherstripping is horrible, so Z's are notoriously prone to leakage and I'd like to address that tendency while it's easy to see/get to.
Meanwhile I'll be independently beginning on the wiring, which starts with component siting. Sigfrid must decide on the stereo configuration he wants because speaker location will dictate the space I have available for relays/fuses, etc.
After the tail lamps are finished my next "home" project will be the quarter windows, which will be the testbed for two more critical decisions we must make.
First is the window tint- how dark, can we do ourselves, etc.?
Second is the window frame, originally polished stainless (most think it's chrome but it's not), we want gloss black. The door has a similar window frame, so the way we treat them is a big part of the side-view visual.
I'm going to try for a good result with spray paint but powdercoating is the fallback option.
We've gone from twiddling our thumbs, unable to do anything, to an embarrassment of riches...there are a million things we can do now.
The trick- as usual- is to figure the most logical/productive path.
02-23-14, 10:28 AM
#998
During a recent major service, a new water pump was installed, so we are assuming that it is good.
I am not at all familiar with the car, so my descriptions will be noobish.
Sigfrid had decided we needed to replace the coolant fill/overflow tank (a round plastic ball thing) because an integrated sensor had apparently failed (low coolant warning? I don't know...) and we were also going to replace the radiator with an upgraded model and put in a new thermostat.
The plastic tank had a broken bung right out of the box, so that put a kink in the plans just as we began.
Ultimately, we decided to do just the thermostat as we waited for the replacement tank and jeebus keeerist, what a pain that is.
Do German engineers intentionally make common replacement parts absurdly difficult to access?
This was diabolical for what should be a simple project.
Made even more interesting (if you define "interesting" as "rage inducing") when Sigfrid dropped the lower housing bolt and it disappeared between the block and a big bracket (AC mount?).
This is when I discovered that VW/Audi is fond of 7mm bolts because none of my Japanese metric stuff would fit, so we HAD to find the original.
Removed the passenger side wheel and the access panels in the well and by hook and by crook (but mostly with a coat hanger) the bolt was teased out of hiding.
It appears that the whole front of the car must be removed to get the radiator out, so we're really hoping the thermostat fixes us up, at least till the weather gets nicer.
It sat idling in the driveway for over 45 minutes and never got over 95-96�C (S. has a display that shows what the ECU is reading, we're not using the stock water temp gauge), the fans (which apparently trigger at 100�...can you confirm?) never came on.
We'll know when he commutes this week.
02-23-14, 11:10 AM
#1000
Senior Member

The fans have two speeds, low speed turns on around 95*c high speed turns on somewhere around 105. You are correct for the radiator, the front bumper must come off and the core support moved into service position or removed pending what you find to be easier. Most cooling issues we see are from stuck open tsats, bad engine coolant temp sensors or a bad fan module. Midway down on the drivers side is a sensor on the radiator for coolant temp. Its either 3 or 4 wire. You jump that in various combinations. (Cant remember off the top of my head) but the fans will come on at various speeds (low and high) this confirms fan module is good and fans are good.