She Followed Me Home, Honest
 02-23-14, 01:23 PM
#1001
Moderator
iTrader: (3)
Join Date: Mar 2001
Location: https://www2.mazda.com/en/100th/
Posts: 30,832
Received 2,603 Likes
on
1,847 Posts
that is a good description of an Audi, it LOOKS like a car, but it is actually a cleverly concealed torture device.
case in point is the "service position" where you remove the front of the car for 2 hours to get it into a position where you can service it
BTW if you're going to go into service position, you should change the timing belt, they shed teeth at 60,000.5 miles, and its an interference engine, so when that happens you need a new head/valves.
 02-23-14, 05:01 PM
#1003
Moderator
iTrader: (3)
Join Date: Mar 2001
Location: https://www2.mazda.com/en/100th/
Posts: 30,832
Received 2,603 Likes
on
1,847 Posts
ah i see, would you believe 2 hours, and a guy with a 7mm wrench?
02-24-14, 05:51 PM
#1005
troubleshooting sucks
im not even gonna start with the french... seems like mazda borrowed quite alot of tech from them though. n'est-ce pas?
02-24-14, 08:23 PM
#1006
I'm sure it's mostly due to VW/Audi cramming the same engine package into a variety of different cars, it's gonna get awkward sooner or later.
It's a totally unfair, apples/oranges comparison but I couldn't help but contrast the TT with the Z or the FC, where the thermostat and housing are right on top of the engine and accessible without obstruction. My Mom could install a Z thermostat.
I have often heard the (possibly apocryphal) story that when Honda began morphing into car production, the designers and engineers were required to work on the prototype cars, make sure any required service/maintenance was actually possible in situ.
True or not, I can't help but think that if the guy who signed off on this design ever had to swap out a thermostat in his driveway, he would have thought up some alternatives tout suite.
This experience has lead me to postulate a new theory:
CLOCKER'S FIRST LAW OF OBFUSCATION
The number of beauty panels removed before actually viewing the engine is directly proportional to how miserable the work experience will be. The more covers, the more hideous and combative the creature beneath.
There would of course be corollaries, like:
Every time someone expends the time/energy to achieve "Service Position", a German engineer gets an erection.
They write themselves...
02-25-14, 10:52 AM
#1007
Moderator
iTrader: (3)
Join Date: Mar 2001
Location: https://www2.mazda.com/en/100th/
Posts: 30,832
Received 2,603 Likes
on
1,847 Posts
my brother has an 85 VW, and he bought new shifter bushings, and you know, on a mazda you can do it in 15 minutes with the engine running an AC on, its easy.
it took him a whole day under the car and he came out looking like a coal miner, i think at the factory the must place the shifter bushing on the jig, and then build the car around it....
the other really odd part, was that he needed to get a mechanic to work on it (it turned out the EGR solenoid was missing...), and my friend who works at VW refused to work on it, my other friend who works at a VW shop, literally ran away.
it was really hard to find someone even willing to work on an 85 VW, which is weird, as they will usually look at an FD..
02-25-14, 12:01 PM
#1008
my brother has an 85 VW, and he bought new shifter bushings, and you know, on a mazda you can do it in 15 minutes with the engine running an AC on, its easy.
it took him a whole day under the car and he came out looking like a coal miner, i think at the factory the must place the shifter bushing on the jig, and then build the car around it....
the other really odd part, was that he needed to get a mechanic to work on it (it turned out the EGR solenoid was missing...), and my friend who works at VW refused to work on it, my other friend who works at a VW shop, literally ran away.
it was really hard to find someone even willing to work on an 85 VW, which is weird, as they will usually look at an FD..
it took him a whole day under the car and he came out looking like a coal miner, i think at the factory the must place the shifter bushing on the jig, and then build the car around it....
the other really odd part, was that he needed to get a mechanic to work on it (it turned out the EGR solenoid was missing...), and my friend who works at VW refused to work on it, my other friend who works at a VW shop, literally ran away.
it was really hard to find someone even willing to work on an 85 VW, which is weird, as they will usually look at an FD..

thanks for my second HUGE laugh for the day. I needed it.
02-25-14, 10:41 PM
#1009
*My POS camera has gone to a farm upstate where it will live out its days with other free-range Sonys and ergo, the following work was not scintillatingly documented in pics.
This is not a great loss as the job was pedestrian and not especially photogenic.
Sigfrid can get some shots when we install the lights this weekend.
Despite not yet figuring out what to do about the chrome bezels, we committed to using the stock lights and trim panels. After playing around with some different colors, we decided to mimic the original Datsun scheme and make the tail panel a dark/charcoal grey...gunmetal Plastidip, to be specific.
I had masked and sprayed the lens side of the housings last week, yesterday I finished it up pretty and did the backs as well. I just wanted them to look nice(r), they are not visible with the interior in place.
Each trim panel has five mount points and of the ten, five were broken and two were missing altogether. Originally, there were short, fat self tapping screws going through the housing flange and into bosses on the back of the panels. Two of these bosses had broken off flush with the panel and five others were cracked or missing sections.
Went to my fallback inspiration center- Ace Hardware- and found some studs. One inch long, the bottom half was self tapping/woodscrew thread, the top was 8-32 machine thread. Double nutted the machine thread end, dipped the screw thread in my ABS goop and then screwed them in as far as I dared. Then gooped around them to really hold em in.
The two bosses that had broken clean off were still threaded on the screws, so they were salvaged and reused, much like the others.
I think the studs will work much better than the screws, the twisting stress is now on the housing flange instead of the panel bosses.
Time will tell.
Tomorrow the panels get dipped, then hang and cure till Friday when I'll assemble the lights.
02-26-14, 07:38 AM
#1010
Ban Peak
iTrader: (49)

I just wanted to share my appreciation of the disdain you share for Audi's. My wife has a '99 A6 and I have had the desire for someone to hit it and total it ever since I taught myself how to replace a timing belt on it. I got to do the T-belt twice because the first time I took a shortcut and decided not to replace the cam plugs, seals, and tensioner gaskets. It runs like a freakin' champ but it has been the biggest pain in my ***. Once you fix all the oil leaks, one springs from another location. I finally think I have them all stopped, I replaced both valvecover gaskets for a third time over the weekend......
02-26-14, 09:09 AM
#1011
I see you reside in Dale City...I lived right up the road in Springfield, about 40 years ago...
I pick on the Audi because it's the only "new" car I've worked on in a while. I'm guessing that all new cars are as cranky to service, especially when compared to the dinosaurs I prefer.
Basically, if you look down at an engine bay and can't see the ground below...close hood and walk away.
And let's not even get started on all the crap German hardware.
It's the "wrong" size and they love stupid Torx-type heads- the toolbox I used to completely assemble the FC was useless on the TT.
We are a dying breed.
I cut my teeth on British cars, constant maintenance (charmingly called "fettling") was required and expected. All the work was very simple mechanical stuff though...a hammer and screwdriver handled most of it.
All of our mechanical expertise will never save a modern car because it's electronic failure that will kill it, not rust, badly adjusted points or worn suspension bushings.
Sigfrid's TT is on it's third gauge cluster and the tach just failed again.
The display in my Mom's Lexus is (mostly) dead...you can adjust the stereo or the climate control but you can't see what you're doing.
You take a car like the Z (or, at the very edge of my sample, the FC) and it is relatively simple to replace or even bypass the electronics.
Not so with modern cars, the computers run everything and there are no analogue/mechanical options.
On both the Z and the FC you can unbolt the FI manifolds and bolt on carbs.
You can replace the ignition by dropping in the old style points distributor.
They may not run great, but they will run...because that's how they started out.
New engines like the VW/Audi were designed with all the new tech baked into the design, not added on later, so there are no simple/older replacement options. Those engines simply couldn't run without the precise and pervasive control afforded by computers.
Yikes!, I'm rambling again...
02-26-14, 09:26 AM
#1012
Ban Peak
iTrader: (49)
I went to West Springfield HS and lived in West Springfield for about 8 years.
I pick on the Audi because it's the only "new" car I've worked on in a while. I'm guessing that all new cars are as cranky to service, especially when compared to the dinosaurs I prefer.
Basically, if you look down at an engine bay and can't see the ground below...close hood and walk away.
We are a dying breed.
I cut my teeth on British cars, constant maintenance (charmingly called "fettling") was required and expected. All the work was very simple mechanical stuff though...a hammer and screwdriver handled most of it.
All of our mechanical expertise will never save a modern car because it's electronic failure that will kill it, not rust, badly adjusted points or worn suspension bushings.
I'm kind of in between with my abilities, however, the old cars are easier to figure out with an understanding of electricity and basic electronics.
I am surprised that new cars still have gauges besides just a speedometer and a gas gauge. there really is no point in the other because the car could be programmed to just go into limp mode and throw a warning light on if something is out of spec. Back when you were in your prime you NEEDED the gauges to see if everything was operating correctly.
I'll end my rant and get back on topic.
The Z is looking great and I lurk ITT often, terribly upset that your camera is broken. I enjoy that you have the time to give step by step updates!
02-26-14, 10:49 AM
#1014
Moderator
iTrader: (3)
Join Date: Mar 2001
Location: https://www2.mazda.com/en/100th/
Posts: 30,832
Received 2,603 Likes
on
1,847 Posts
the newer Mazdas are incredibly easy to work on and service. for instance the Rx8 interior will come out in about 20minutes. the electronics are there on the Mazda's, but they have it implemented so it works like the FC, for the most part.
02-26-14, 10:03 PM
#1015
Senior Member

On the v6s you replace cam plugs seals, tensioner gaskets and valve cover gaskets while doing the belt. There is a trick to doing just the gaskets without doing the belt, but not easy on your first try.
02-27-14, 08:01 AM
#1016
Just a few thoughts on Plastidip as I continue working with it...
The heavier/wetter the coats, the better it flows out and the smoother it ends up.
I sprayed these panels laying flat and was putting on frighteningly thick coats...they surely would have run if hanging, but they turned out really well.
Mostly.
A side effect of the application thickness is that fine detail will be smeared/obscured.
In my case this was fine, the smaller details of these panels were pretty rough and the dip smoothed them out but if you were starting with a good piece, with details you wanted to preserve, dip may not be the best choice of finish.
The Gunmetal Grey dries darker than it appears right after application.
I haven't shown the final two pieces of the assembly yet...there's a center panel for the license plate and the plate illumination lamp. The panel has been dipped to match and I'll just clean up the lamp, it looked pretty good under casual inspection.
Datsun used plastic push pins to retain these panels...the kind that pop in once then break when removed. We hate that ****.
Nutserts would be a viable solution but I'm going to do something lower tech and completely reversible instead.
It's easier to show than describe, so I'll get pics this weekend.
Whichever day we work this weekend (weather will be marginal), the doors will be the primary focus. Should have them ready for dip by the end of the day (I think). Might even get the hatch frame ready, it's been more extensively prepped (and there's less of it).
Assuming we're happy with the tail panel (or at least, don't hate it), my next "home project" will be the quarter windows.
They are small and we already have all new seals on hand, so they're an easy test bed for some decisions we must make.
First is the window tint, how dark, what color, etc.
Second is how to refinish the polished stainless trim to gloss black.
Whatever process we develop will be duplicated on the larger door frame and be the defining visual accent from the side view.
So it's kinda important.
We also need to paint the door/hatch hinges (they've already been soda blasted) and get them installed. Once the doors get dipped they go right on the car, it's the safest place for 'em.
The sequence I envision is:
-Sand and finish bondo the outer skins
-Bedliner the interior of the doorshell (as much as possible) and the inner doorskin (but not the jambs, they will be dip)
-Renovate and install as much of the window regulator and door latch hardware as possible
-Dip the outer skins and jambs
-Hang doors and finish the hardware/glass install.
That's the plan, we'll see how it goes.
02-27-14, 05:57 PM
#1017
troubleshooting sucks
CLOCKER'S FIRST LAW OF OBFUSCATION
The number of beauty panels removed before actually viewing the engine is directly proportional to how miserable the work experience will be. The more covers, the more hideous and combative the creature beneath.
There would of course be corollaries, like:
Every time someone expends the time/energy to achieve "Service Position", a German engineer gets an erection.
They write themselves...
 i helped do a service on a buddys "newer" bmw last autumn and the whole panels and torx thing is soo true. its just annoying and time consuming. it seems like cars nowadays are built more and more for people who know as little about them as possible..
 for a novice like me, the simplicity of an older cars engine bay is the perfect platform for a lesson in the basics of the combustion engine and management systems. a newer cars nowadays seems to require a masters degree in computer engineering.
looking forward to pics on the tails it definately sounded good!
02-27-14, 06:27 PM
#1018
Well, I'm touched and bemused.
Not because you've immortalized me in your sig, just in general, touched and bemused.
I wish I could have gotten some sequence pics but everything turned out pretty well and I'll get some shots this weekend.
The tail section will be complete (save the chrome lens bezels) for the first time ever, I hope the color is OK.
I've never liked any of this and have almost actively resented the time spent renovating the tails but it is what it is and will have to do for the foreseeable future.
Some netsearch revealed that EasyOff oven cleaner might remove the "chrome" from the lens bezels (without attacking the plastic) and Sigfrid hopes to try that out before we meet up again.
Fingers crossed because that would be the easiest solution by far.
Easier=gooder.
03-02-14, 08:33 AM
#1019
As a young sprout I subscribed to the theory (even had the bumpersticker!), "A bad day racing is better than a good day at work". Nothing could be worse than mindlessly cranking out TPS reports, the crappiest job on a race team was much to be preferred.
Mostly, that's still how I feel about project cars but yesterday was the rare exception...it just sucked and I hated it.
It was WORK.
All I really wanted was to see how the taillights looked but if Sigfrid was going to carve car time from his family obligations and I drove all the way over there (he's 17 miles away on the other side of the city), we were kinda committed to actually doing something.
The taillights looked like this:
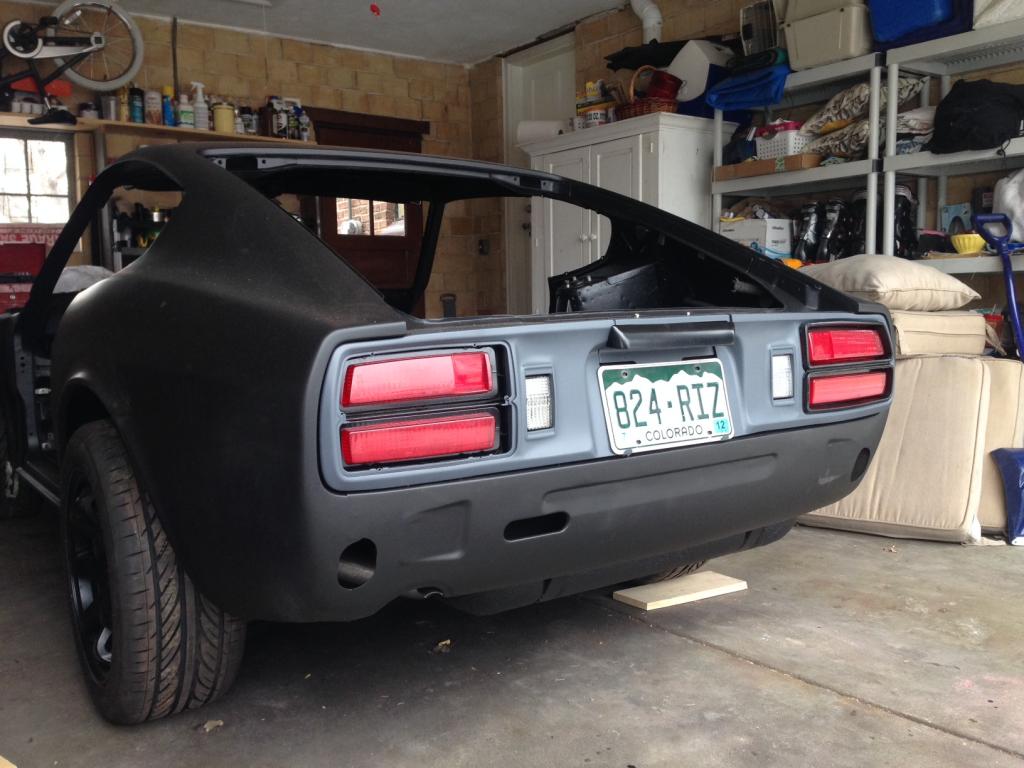
Nothing is bolted down, it's all just sitting in position...
Completely wrong color.
Way too light, way too blue.
*No, no, no, nooooo...*
Yeah, well, nothing like starting the day with a major disappointment, is there?
Now would be a good time to mention the weather...it was awful.
About 10�, gusting winds and snow that was like frozen grit.
More like winter in Buffalo than Colorado's typical storybook winter wonderland.
About 10am it looked like the sun might break through, the streets started steaming and we could actually see but that was shortlived, the clouds came back, temp went even lower and all the melted snow refroze.
There was a 100 car pileup in the central Denver corridor ( on a Saturday morning!) due to the flash refreeze.
Predictions call for a dramatic change for the warmer starting Monday (70� on Thursday!...maybe) and, anticipating better conditions next week, I decided we needed to keep to our schedule and keep prepping the doors.
Can't sand in the garage anymore (Get the car all dirty again? **** that!), so we set up in the driveway, completely at the mercy of the elements.
And suffered for the rest of the day.
I felt terrible...it was my idea to work but I spent the rest of the day trying to figure a graceful way to get the **** home.
We could spend about 15 minutes outside before running like schoolgirls for the warmth of the kitchen. It just got harder every time to force ourselves back out.
Remarkably, we got a shitton done and I'll credit Sigfrid for doing it.
We bedlinered the inside of both doorshells (which turned into a bloodbath as we squeezed our frozen hands through the razor edged access holes in the inner skin...we only discovered the cuts as our hands thawed in the kitchen) and the outer skins are prepped and ready for primer.
One more day of prep should see both doors and the hatch frame ready for dip.
During our kitchen breaks (coffee, weed and hands glued to the radiator) I, having taken real measurements of our glass, figured out what window tint from eBay would cost us. Triple ply 3M 35% film would be @$120 and I think we could have it done for that (if not less). Gonna check with some shops this week and see.
As my frozen fingers clumped over the keyboard, Sigfrid was toying with the "chrome" light bezels, which I had basically given up on. He could immediately see why I was discouraged but kept picking away and refining his technique. By end of day he'd gotten about 90% of the metal film peeled off.
(The internets say that EasyOff oven cleaner will safely remove this "chrome" but it didn't do a thing on ours. Boo.)
That means we can use the bezels and once we figure out the proper color, the tail area will be done. I may not like it but it will be complete and solidly mounted and will do for now. We will revisit it as the car comes together and the gestalt begins to manifest, I'm sure.
Last night, ruminating over the experience, I realized that I've been trying to make up what I consider three "lost" months this fall as the project meandered through the last of the warm weather.
Yeah, we made some poor scheduling decisions and took some diversionary paths and now here we are.
But so what?
It's not worth suffering to maintain an illusory blue sky schedule...this is supposed to be hobby, not an obsession.
* I am aware that "suffering" in this context is totally a first world problem and does not compare to the real thing. I mean, I could be in Siberia or *shudder*, Sweden!
I look back fondly on the past nine months- even the crappy dirty parts at the beginning (remember the hornets?)- but yesterday is one I'll erase from the memory banks.
Bluurgh.
Mostly, that's still how I feel about project cars but yesterday was the rare exception...it just sucked and I hated it.
It was WORK.
All I really wanted was to see how the taillights looked but if Sigfrid was going to carve car time from his family obligations and I drove all the way over there (he's 17 miles away on the other side of the city), we were kinda committed to actually doing something.
The taillights looked like this:
Nothing is bolted down, it's all just sitting in position...
Completely wrong color.
Way too light, way too blue.
*No, no, no, nooooo...*
Yeah, well, nothing like starting the day with a major disappointment, is there?
Now would be a good time to mention the weather...it was awful.
About 10�, gusting winds and snow that was like frozen grit.
More like winter in Buffalo than Colorado's typical storybook winter wonderland.
About 10am it looked like the sun might break through, the streets started steaming and we could actually see but that was shortlived, the clouds came back, temp went even lower and all the melted snow refroze.
There was a 100 car pileup in the central Denver corridor ( on a Saturday morning!) due to the flash refreeze.
Predictions call for a dramatic change for the warmer starting Monday (70� on Thursday!...maybe) and, anticipating better conditions next week, I decided we needed to keep to our schedule and keep prepping the doors.
Can't sand in the garage anymore (Get the car all dirty again? **** that!), so we set up in the driveway, completely at the mercy of the elements.
And suffered for the rest of the day.
I felt terrible...it was my idea to work but I spent the rest of the day trying to figure a graceful way to get the **** home.
We could spend about 15 minutes outside before running like schoolgirls for the warmth of the kitchen. It just got harder every time to force ourselves back out.
Remarkably, we got a shitton done and I'll credit Sigfrid for doing it.
We bedlinered the inside of both doorshells (which turned into a bloodbath as we squeezed our frozen hands through the razor edged access holes in the inner skin...we only discovered the cuts as our hands thawed in the kitchen) and the outer skins are prepped and ready for primer.
One more day of prep should see both doors and the hatch frame ready for dip.
During our kitchen breaks (coffee, weed and hands glued to the radiator) I, having taken real measurements of our glass, figured out what window tint from eBay would cost us. Triple ply 3M 35% film would be @$120 and I think we could have it done for that (if not less). Gonna check with some shops this week and see.
As my frozen fingers clumped over the keyboard, Sigfrid was toying with the "chrome" light bezels, which I had basically given up on. He could immediately see why I was discouraged but kept picking away and refining his technique. By end of day he'd gotten about 90% of the metal film peeled off.
(The internets say that EasyOff oven cleaner will safely remove this "chrome" but it didn't do a thing on ours. Boo.)
That means we can use the bezels and once we figure out the proper color, the tail area will be done. I may not like it but it will be complete and solidly mounted and will do for now. We will revisit it as the car comes together and the gestalt begins to manifest, I'm sure.
Last night, ruminating over the experience, I realized that I've been trying to make up what I consider three "lost" months this fall as the project meandered through the last of the warm weather.
Yeah, we made some poor scheduling decisions and took some diversionary paths and now here we are.
But so what?
It's not worth suffering to maintain an illusory blue sky schedule...this is supposed to be hobby, not an obsession.
* I am aware that "suffering" in this context is totally a first world problem and does not compare to the real thing. I mean, I could be in Siberia or *shudder*, Sweden!
I look back fondly on the past nine months- even the crappy dirty parts at the beginning (remember the hornets?)- but yesterday is one I'll erase from the memory banks.
Bluurgh.
03-03-14, 10:46 AM
#1021
March/April are historically our snowiest months, I expect several more weather delays before springs arrives and I start bitching about the heat.
Meanwhile, I've begun attacking the quarter windows.
And by "attacking", I mean "utterly failing to remove any of the tiny philips head screws" that hold the frame together.
This is going to be trying, I can see it already.
03-04-14, 07:48 AM
#1022
IIRC, I only ran into two bolts that gave me trouble when taking the whole car apart- every single fastener in the quarter windows is a fight.
Since I am still without a camera, I'll entertain you with the only illustration from the service manual:
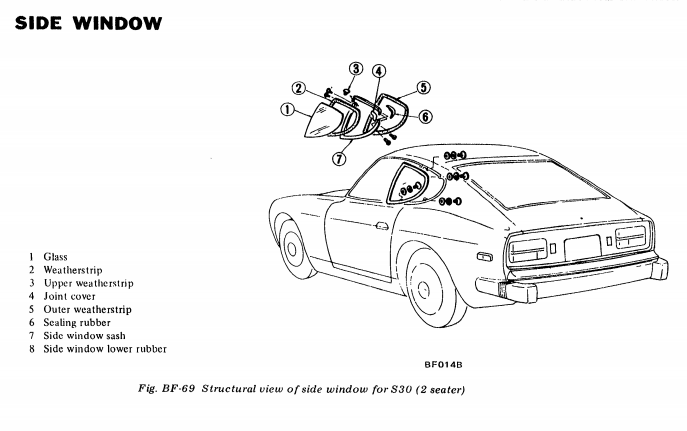
That's helpful, isn't it?
Basically, the glass is surrounded by a rubber gasket that is enclosed by a three piece metal frame that "slot>tabs" together. The outside of the frame gets a glued on rubber gasket and the whole thing is squished into place and screwed down.
Having scraped off the outer gasket and then removed the 40 year old dried contact cement, the 3mm countersunk philips head screws are revealed.
Uh-huh...like they're going to come out.
I'm immediately skeptical because it's obvious that removal has been tried before...all but one of the heads has thoughtfully been "pre-fucked" by a previous owner.
I assume he gave up before destroying the last one.
One side is now completely apart and two more screws left on the other.
The driver side (with the remaining screws) also has one broken "tab" and I'm unsure of how this will get fixed.
As a backup we've already started searching for a replacement window but there's no guarantee that another used frame would be any better unless the seller is willing to disassemble it first...which I wouldn't be willing to do and can't see happening.
I'll see what I can figure out.
Assuming I can get them all apart, I'll take the glass in for a quote on tinting.
I made a few calls about tint yesterday and ran into an odd problem.
Neither of the first two shops I called could grasp the idea that I was bringing in just glass, not an assembled car.
They were both telling me the glass couldn't be tinted unless it was already installed because the adhesive would be an issue.
I don't think they were old enough to remember when glass was just popped in with a rubber gasket...there is no adhesive involved with our install.
I finally got a recommendation and called a third shop who knew exactly what I wanted and saw no problem doing it.
His only concern was that I understood his warranty would only cover the film>glass integrity- bubbles, etc. would be his problem, any damage from install would be ours.
Seems fair to me.
So, the quarter windows are limping towards completion.
This weekend we'll be concentrating on finish prepping the doors.
As Sigfrid does his sanding thing, I'll clean and prep the interior door mechanisms, specifically the window bits, which were tricky to remove. I think it'd be best to get those in before paint, minimize the chance of scratches later.
The working schedule now calls for dipping the doors and hatch two weekends from now but as usual, weather will be the arbitor of that.
A week of cure time, then install.
It's possible we could be weathertight by end of month.
I know I've kept talking about beginning the electrical work but I keep finding more important things to do first.
The latest diversion is the HVAC system, which may or may not turn into a major issue.
I have no problem with the basic unit but the controls are an insane mix of cables, electrical and vacuum actuators.
Casually inspected, it appears that the basic structure is 240Z with more elaborate controls grafted on, so it may be possible to just put all 240Z lever/cable actuators on and be done.
But...
The all mechanical 240Z controls and the partial mech. 280Z controls both require a lot of structure to mount the control panel as it has to resist much more force than say, the Logicon, where you're pushing buttons or sliding a potentiometer.
In typical early Datsun fashion, the 280 had a veritable jungle gym of braces, brackets and mounts holding in the control panel. Most of the structure is mounted to the top of the trans tunnel but they couldn't resist also tying it to the plastic trim on the dash...gee, I wonder if that might crack?
As I was pulling this apart, lo these many months ago, I instantly forgot what it all looked like because I'd had already decided it was too absurd to reuse and I'd figure out an alternative.
Whelp, now's the time to start figuring.
03-08-14, 08:56 AM
#1023
The quarter windows are not finished but at least now I know how they are supposed to go together.
(The picture in my previous post is the ONLY mention of the side glass in the whole FSM...there is no text or more detailed info provided by Datsun. Apparently, no one was EVER going to need replacements...)
Without pics I cannot cogently describe the assembly, so suffice to say the frames are very deceptively assembled. A combination of removable and spot welded joints...that look absolutely the same.
The passenger side is fine, the driver side needs repair.
I'm finally at the point where the fix can be attempted, then the frames will be soda blasted and painted gloss black.
I also researched window tint, went to three different shops.
It looks like we'll be applying the film ourselves, their prices were significantly higher than our projected material cost (estimates ranged from $165-185, depending on how dark we went and there was no discount on labor for working on uninstalled panes).
Pretty sure the first two shops had no idea what I was doing because they kept insisting that tint couldn't be applied til the glass was glued in. Our install is rubber gasket, no adhesive, so this made no sense to me.
Or them either, apparently.
The last place got it right away and she was very helpful, unfortunately, she was also the priciest.
I did get the shop tour and watched part of an install, which only reinforced my belief we could do this ourselves. With our basically flat glass, the process just doesn't look that hard or tricky.
It was useful though to see the various grades of tint installed.
We're going with 10% on the quarters and hatch, 25-30% on the door glass.
Although this combo is wildly illegal in CO, all three installers said cops don't really care and not to worry.
OK then.
I had begun the search assuming that 3M was the best material choice but two of the shops much preferred Suntek instead and only use 3M if you insist.
I'll now have to look into this as I've never heard of Suntek.
Yesterday we got a couple inches of wet, spring snow but it'll be 50� today and 65� tomorrow, so our work day should be much less brutal this time around.
Doors and hatch in primer by tomorrow night is the plan.
03-08-14, 02:52 PM
#1024
Red Pill Dealer
iTrader: (10)

I did the sliding rear window for my pick-up the way you are going. Had the frame apart and the glass out of the rubber. No matter how careful, I still ended up with some dust specs under the film. Keeping those out seemed to be the hardest thing for me.
03-10-14, 10:12 AM
#1025
Sigfrid will be ordering the tint and windshield/hatch gaskets this week, if our new schedule holds up, we hope to have the cabin (mostly) enclosed within the next three weeks.
S. and I worked yesterday (Sun.) and unlike last week's arctic waterboarding, the weather was perfect.
Sunny and 75�...could have done with a bit less wind but it's callow to bitch.
I handed over the repaired quarter window frames and along with the hatch hinges, Sigfrid will soda blast them this week.
The door hinges/striker plates were blasted weeks ago and finally got painted (satin black) and are ready to install.
The primary goal was to get the doors and hatch prepped for dip:
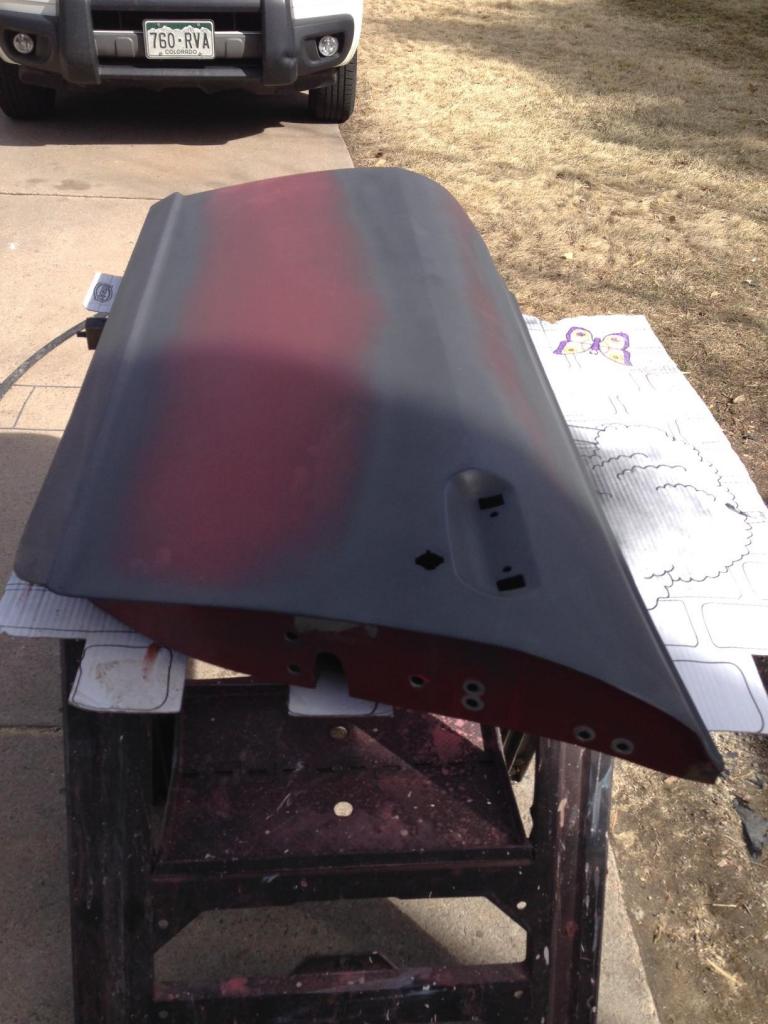
I don't even know what stage this pic shows...each door went through three stages of sanding/filler/primer/putty as Sigfrid refined his technique.
Basically, we did the body prep all wrong.
We had our reasons for the sequence we followed but nevertheless, we should have block sanded the body before disassembly. There are some distinct body lines that flow from front to back and sanding them as a whole is obviously the better way to maintain them.
She's gonna look fine and we're in great shape should we ever decide to peel the dip and go for real paint but it's worth noting the mistake.
Anyway, they're ready.
Next nice day, we can dip.
Interspersed with the ballet of the doors (sanding/washing/drying/filling/priming, sanding...lather, rinse, repeat), experimentation on the tail light area continued.
In a remarkable feat of reclamation, Sigfrid got the lens bezels into usable condition.
Previously covered with peeling "chrome" (and broken/cracked in multiple places), they are now a quite presentable gloss black.
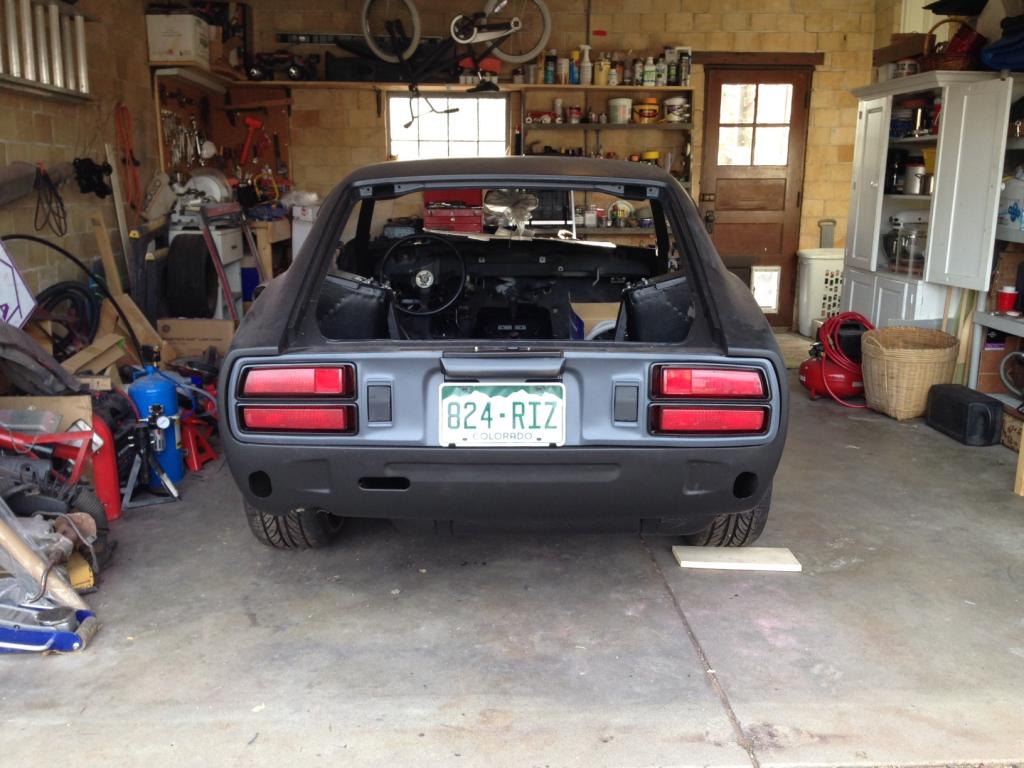
Sigfrid came up with the idea of tinting the reverse lights (temporarily imitated by black tape in the pic) and we'll probably do that next week as the whole thing comes apart for the panel color change and final install.
Now that we've reached the point where "final install" is part of our vocabulary, I'm going to be hard pressed to provide suitable hardware...I can't stand crappy nuts and bolts.
Not sure yet how I'll deal with this, probably a combination of the junkyard and McMaster Carr, but it has now become a fairly pressing matter.
If it's not one thing, it's another.