
She Followed Me Home, Honest


Damnit I wish we had pick and pull yards near me. The closest ones are an hour away. There are a bunch of closer small yards but they dont let you wander around, you have to come in and know what you want and they get it. 
Very cool little details, and that generation 626 steering wheel definitely had a nice shape. not stellar to look at but was comfortable to hold.
Very cool little details, and that generation 626 steering wheel definitely had a nice shape. not stellar to look at but was comfortable to hold.

Seems like most people start in the center and work their way to the wheelwells, I did just the opposite. The Volvo valence is close but does not quite fit the curvature or distance of the FC nose...I ended up with a bulge in the middle.
Which, after some enhanced ponderation, I decided I kind of liked. The arc closely mimics the curve of the nose at the trim line and adds some visual interest.
Unfortunately, bad lighting made all my pics useless, I'll try again later.
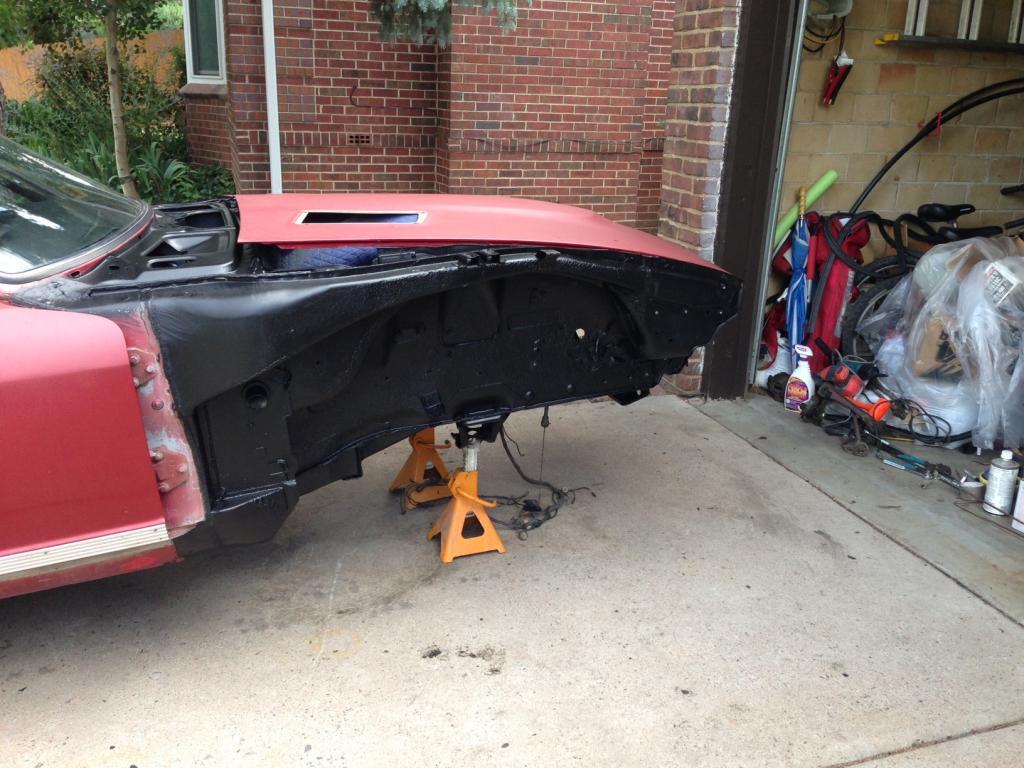
I successfully created the Mark VII version of the radiator cover panel, went back to an earlier, simpler design. I finally got all my hole alignment correct and it fits well, basically falls into place.


Yes on a S5 you should start in the center of more correctly just off center on each side. I had to trim off the alignment /attachment tabs from the top edge and had to re-contour the corners by cutting out thin pie shaped sections and cutting slits in the top edge. I drilling the upper edge and reused the 12 factory screws. I used a hole punch to cut out rounds holes to fit over the hex heads for the lower fender attachment bolts. I made three brackets out of aluminum stock for attaching the center section and then paint them black. I wiped the valance panel down with acetone and a rag to clean it and remove oxidation so it looks fairly good/new as well.
All in all it came out fairly nice - is it prefect, no. The issue as noted at the front of the wheel well for instance - not sure if you can graft on the stock trim piece there as gap filler. But hey even the wife (who is a non car person) said it looks better than the factory trim pieces. With my near stock ride height, I have 4-1/2" clearance and no issues going over the curb and onto the driveway apron nor pulling out of the driveway either. You just need to be careful in parking lots with the stop curbs.
From the photos I have seen, the Volvo lower valance may fit the bottom of S4 bumper better than the S5.
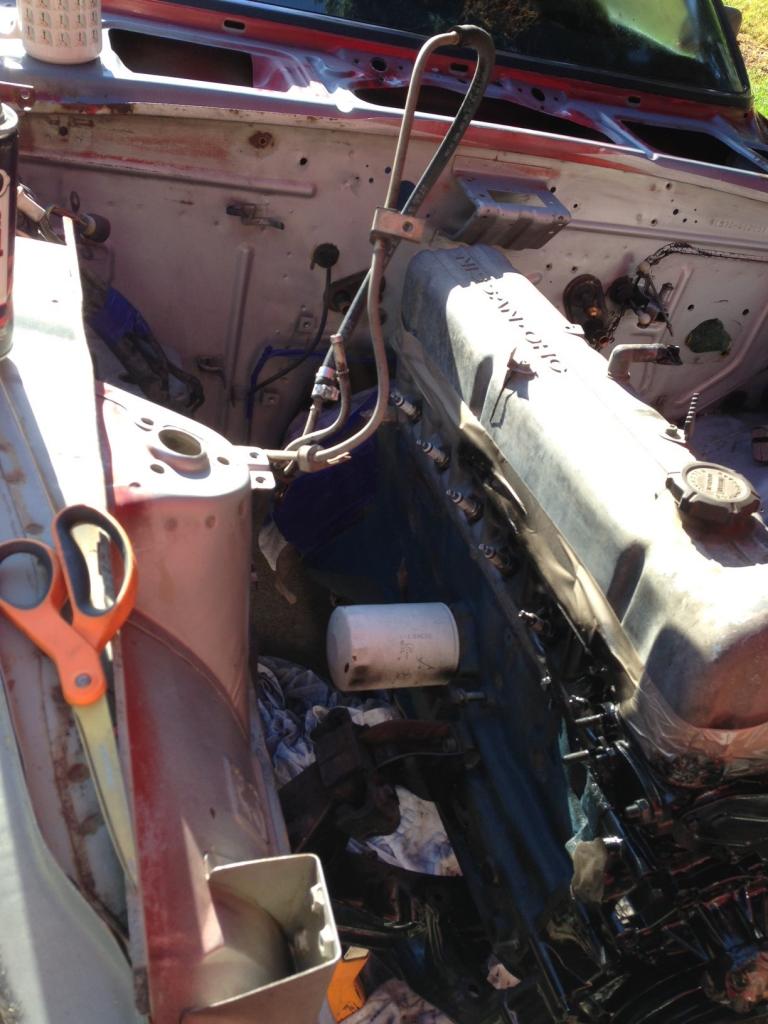
A longtime bee in my bonnet has been the poor condition of the rear hatch seal, which has several tears for some reason.
It seemed likely that I could find a suitable replacement in the junkyard and I began searching in the minivan section, the theory being that the rear doors would have a seal much bigger than I needed and could be trimmed to fit.
I did finally find something that looked about right but it turns out to be a shade too tall, so the hunt continues.
I did however decide to indulge a idea I've had and snagged some door seals as well.
I've long thought that one of the missing elements of the engine bay panels was an edge finish treatment and your basic doorseal looked like a likely (and cheap!) place to start.
I decided to extend the trim all the way up the sides of the bay on the fender flanges to maybe make it look more integrated.
Like so:

I like it.
Still haven't done much more to the front lip, I plan on remounting it starting in the middle as Deacon suggested but that probably won't happen till Tues/Wed.
I also found some potentially interesting pieces that will require more investigation before purchase, again, later this week.
It seemed likely that I could find a suitable replacement in the junkyard and I began searching in the minivan section, the theory being that the rear doors would have a seal much bigger than I needed and could be trimmed to fit.
I did finally find something that looked about right but it turns out to be a shade too tall, so the hunt continues.
I did however decide to indulge a idea I've had and snagged some door seals as well.
I've long thought that one of the missing elements of the engine bay panels was an edge finish treatment and your basic doorseal looked like a likely (and cheap!) place to start.
I decided to extend the trim all the way up the sides of the bay on the fender flanges to maybe make it look more integrated.
Like so:


I like it.
Still haven't done much more to the front lip, I plan on remounting it starting in the middle as Deacon suggested but that probably won't happen till Tues/Wed.
I also found some potentially interesting pieces that will require more investigation before purchase, again, later this week.

Thanks, glad you like it.
Also, thanks for all the page views. Who'da thunk that a thread that's about nothing would garner such attention? Like Seinfeld, kinda.
Although it's still early days, I've noticed a definite drop in running temps since the lip and panel install. We've had temps in the mid nineties lately yet the fan hardly comes on and when it does, only briefly.
This is somewhat unexpected and I see no reason for it, so I'll be keeping an eye on the situation, see if it persists.
Sometimes it's just as worrisome when things go better than normal...
This morning I get to see my friend Sigfrids new project car, one I'll be heavily involved in no doubt.
No idea what it is yet.
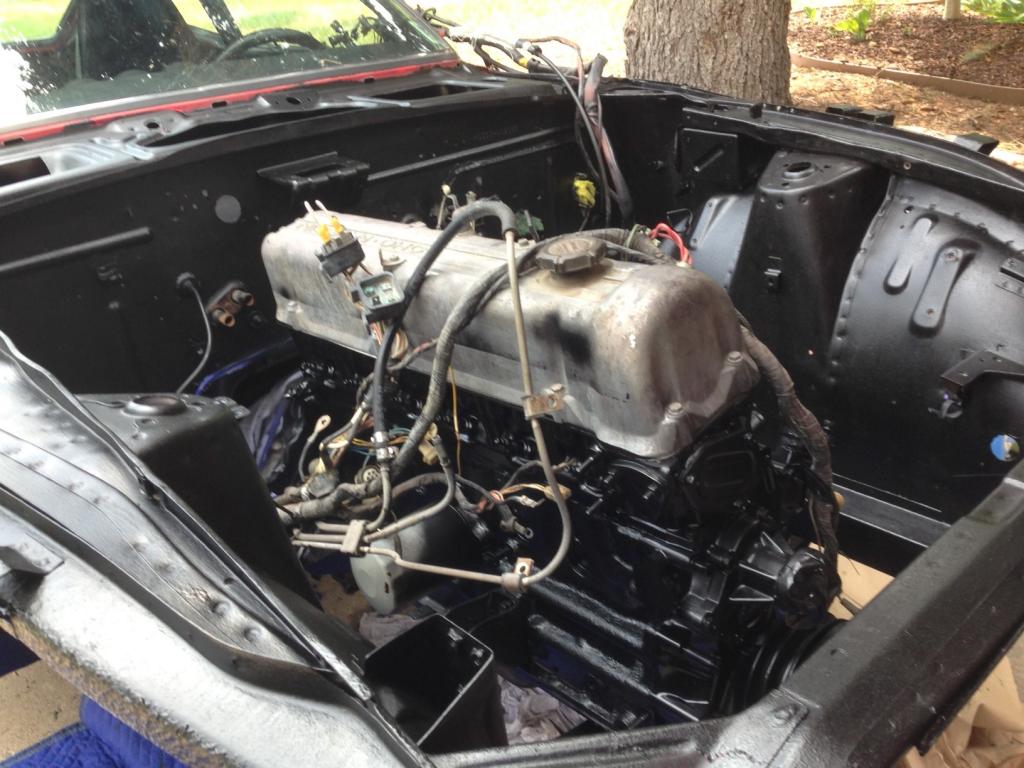
New project, 1978 280Z:
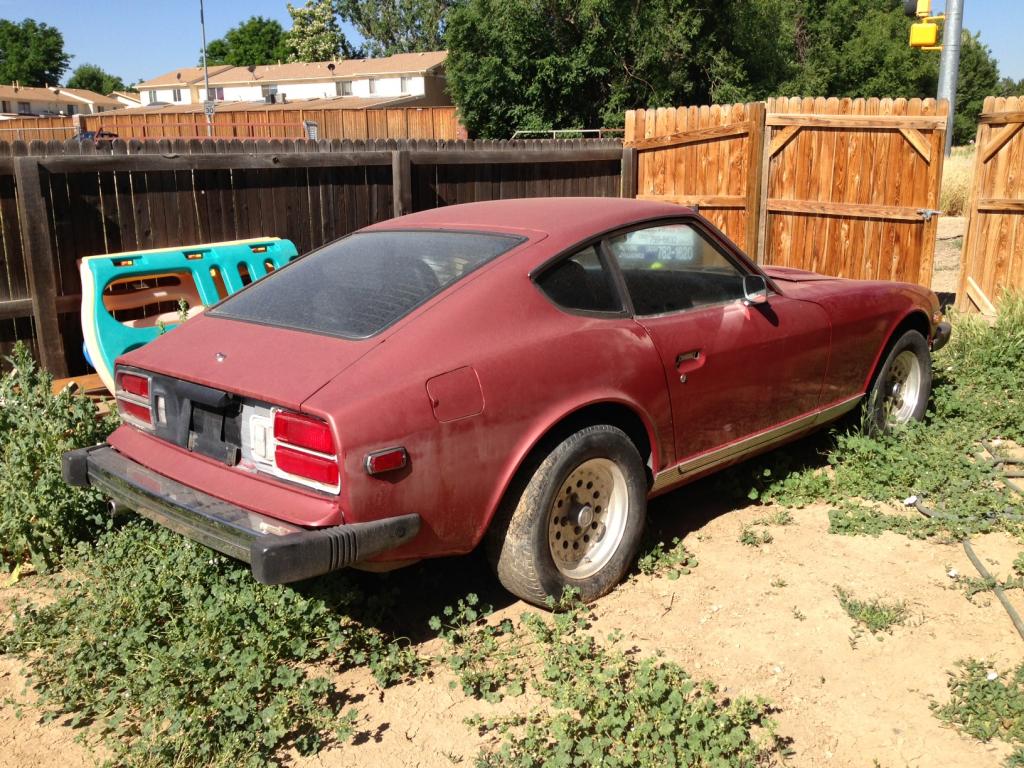
Paint is shot and there is some surface rust on the front fenders/cowl but the sheetmetal is very straight and the usual disaster areas are intact. Engine/trans (5-speed) are original and largely unmolested. She runs, but poorly.
Interior is too dirty to evaluate but a few panels are missing and the driver seat is ripped up (naturally). Dash is uncracked and all gauges work.
The wheels don't match and the tires are useless.
We need to spend some time evaluating exactly what we have and I expect we'll do so just as I did at the beginning of this thread- start tearing things apart and cleaning/renovating.
A lot will depend on how onerous it is going to be getting road legal.
If that's easy, a new set of wheels and tires and she's driveable.
But enough about that POS.
My car is running so well that I'm feeling better about investing a bit in her.
I may have a hookup for a windshield, something it desperately needs.
Then I want the door/hatch glass tinted.
If I could find a pair of S5 NA injectors I'd have a full set and could send them out to Witch Hunter and swap them all out at once.
These expenditures (investments?) are justified by a long trip I've planned for the end of summer.
About 3k miles in ten or so days.
It would be nice to see at night and not get parboiled in my black, non-AC interior.
Fresh injectors can't hurt mileage.
Speaking of mileage, I just did the second fillup where I averaged 20mpg.
For the past five years she's averaged a very consistent 16-17mpg under identical conditions.
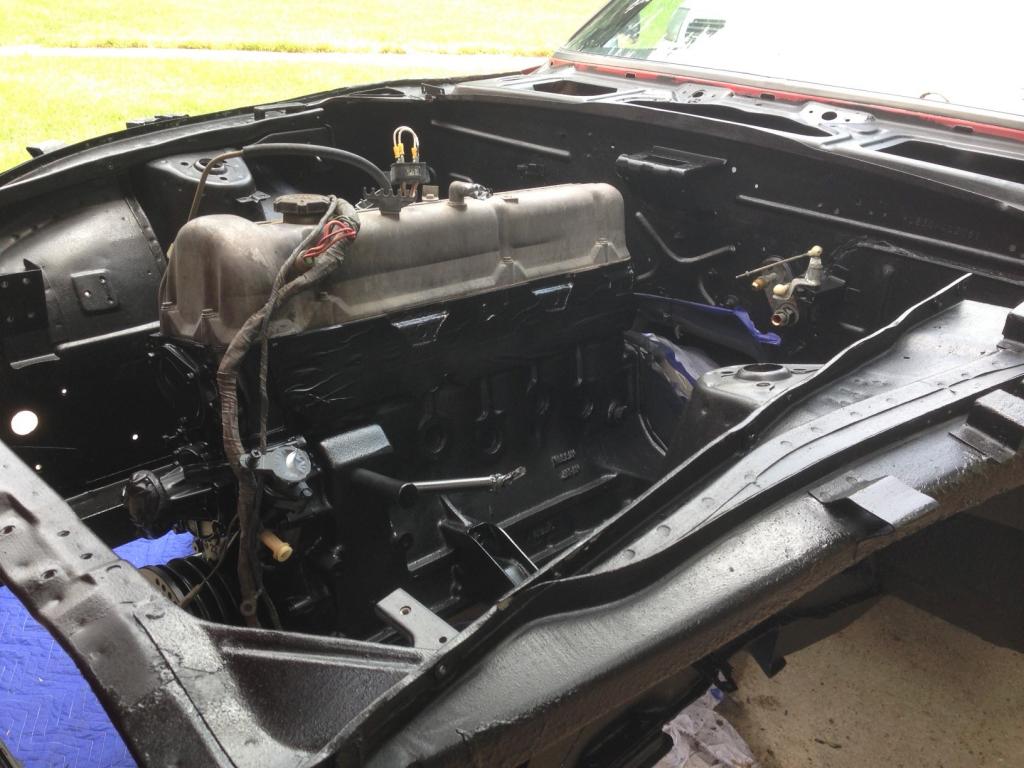
And she's running cooler than ever before.
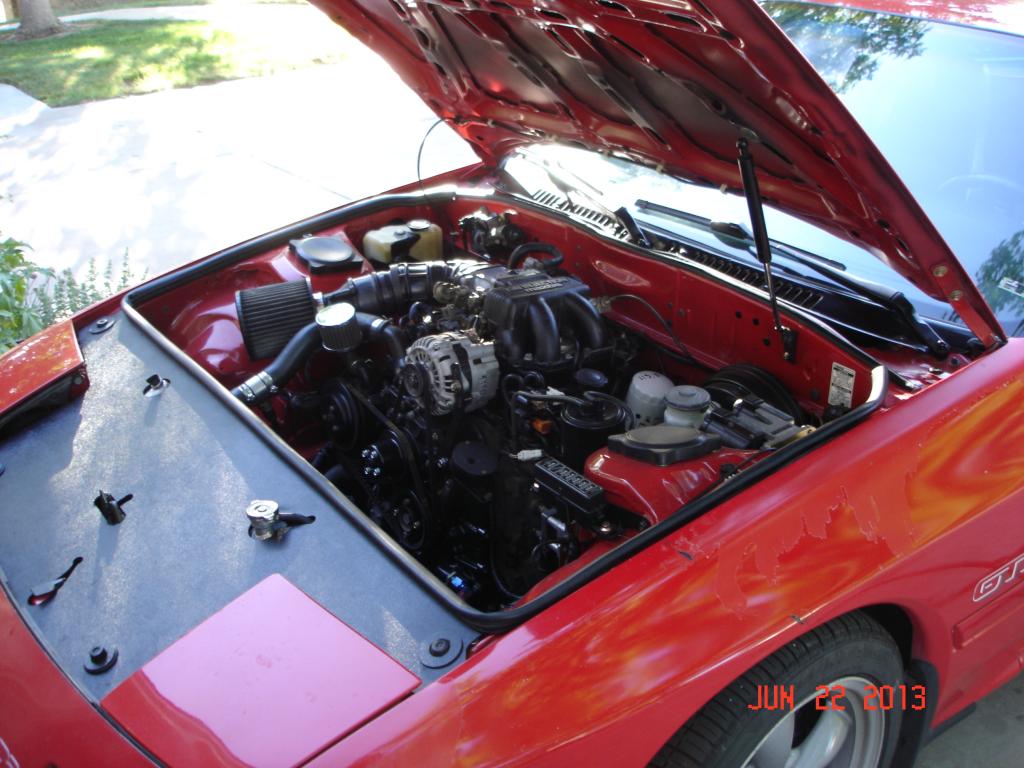
I am also aware that the intake, as pictured above, is probably the worst case scenario in terms of thermal efficiency. An open filter sitting above the exhaust manifold and pulling air mostly from behind the radiator is the bad ricer cliche and I admit that's precisely what I have. It was done for a reason and I have the complete stock setup (from throttle body to airbox) that could go in any time.
Thing is, the car seems to run great like this, even in heat soaking traffic.
Just another weird thing that's happening.

Paint is shot and there is some surface rust on the front fenders/cowl but the sheetmetal is very straight and the usual disaster areas are intact. Engine/trans (5-speed) are original and largely unmolested. She runs, but poorly.
Interior is too dirty to evaluate but a few panels are missing and the driver seat is ripped up (naturally). Dash is uncracked and all gauges work.
The wheels don't match and the tires are useless.
We need to spend some time evaluating exactly what we have and I expect we'll do so just as I did at the beginning of this thread- start tearing things apart and cleaning/renovating.
A lot will depend on how onerous it is going to be getting road legal.
If that's easy, a new set of wheels and tires and she's driveable.
But enough about that POS.
My car is running so well that I'm feeling better about investing a bit in her.
I may have a hookup for a windshield, something it desperately needs.
Then I want the door/hatch glass tinted.
If I could find a pair of S5 NA injectors I'd have a full set and could send them out to Witch Hunter and swap them all out at once.
These expenditures (investments?) are justified by a long trip I've planned for the end of summer.
About 3k miles in ten or so days.
It would be nice to see at night and not get parboiled in my black, non-AC interior.
Fresh injectors can't hurt mileage.
Speaking of mileage, I just did the second fillup where I averaged 20mpg.
For the past five years she's averaged a very consistent 16-17mpg under identical conditions.
And she's running cooler than ever before.
I am also aware that the intake, as pictured above, is probably the worst case scenario in terms of thermal efficiency. An open filter sitting above the exhaust manifold and pulling air mostly from behind the radiator is the bad ricer cliche and I admit that's precisely what I have. It was done for a reason and I have the complete stock setup (from throttle body to airbox) that could go in any time.
Thing is, the car seems to run great like this, even in heat soaking traffic.
Just another weird thing that's happening.
The most important thing to check on with an S30 are the so-called "frame rails" - make sure they are intact and not crushed/bent or "wrought-ed out" or you will have to cut them out and replace them, which is NOT cheap. Rust of course is a close second - rocker panels, floors, base of A-pillar, front and rear strut towers and around the hatch glass. S30 are light because they uses thin gauge steel and rust eats though it fast.
The suspension on an S30 is not the greatest (compression rod front and '60's IRS) and you can spend a **** load of $$$ to get it right and make it "better" than factory. That is a later S30 so at least you have the better dash, wider tunnel and the better S200 differential. You can also update the sub axles to new CV style units from a 300XZ. Plus if you hate the later bumpers, you can back date to the early thin ones if you like - not 100% bolt-on, but it can/has been be done.
The suspension on an S30 is not the greatest (compression rod front and '60's IRS) and you can spend a **** load of $$$ to get it right and make it "better" than factory. That is a later S30 so at least you have the better dash, wider tunnel and the better S200 differential. You can also update the sub axles to new CV style units from a 300XZ. Plus if you hate the later bumpers, you can back date to the early thin ones if you like - not 100% bolt-on, but it can/has been be done.
Last edited by DeaconBlue; Jun 23, 2013 at 10:54 PM.
My previous car was a much loved '71 240Z, so I'm pretty familiar with the common pitfalls of the platform.
I'm hoping to get it road legal/driveable ASAP so she can be driven and enjoyed during the summer/fall.
Until Sigfrid straightens out his garage situation (too many vehicles) there's no place to tear the car apart and leave it, so all the initial projects must be "dun in a day" to keep the situation manageable. The brakes will be the most extensive job immediately undertaken and that will give us the best opportunity for a really thorough inspection of the undercarriage/wheelwells.
Unlike the rest of the systems, which we plan on keeping stock (mostly), the brakes are going to get an immediate upgrade to the booster/MC and front calipers. The rear brakes (assuming they're in good shape) will remain drums until we decide they need help.
We both have semi-busy schedules through September, so we're hoping to get her running well enough to evaluate until time frees up and space becomes available.
I want to focus on Sweetheart anyway, getting her prepped for the big trip will take the rest of the summer. I already have a list of piddly **** to address, it's a neverending job keeping up with an older car and I'd like everything to come together by mid-August so I can spend the remaining time detailing her so she looks as good as possible.
Boring seal work continues.
I'm on the second attempt replacing the hatch rubber gasket, the first candidate was just too tall, making the hatch difficult to close.
Now trying the seal from the side door of a Ford Windstar, the profile is different but the height is correct, the hatch closes properly and the rubber seems to make full contact.
Unfortunately, it's about 2-2.5" short, so I'll need another to provide a splice patch.
The other mod project I've been working on is sideskirts.
I'm quite enamored of the new Volvo front lip and would like to continue the look down the sides of the chassis...nothing extreme, more a finish detail than a real aero aid.
I had noticed that several Hondas are equipped with plastic (presumably ABS) rocker trim/finish panels and finally was able to remove a set from a '96 Accord. This was more difficult than you'd imagine as the yard removes the wheels and sets cars down on supports (welded bare rims), usually right on the rocker panels.
I prevailed though and for $10 had a pair of likely candidates.
A few bowls, much contemplation and lots of turning-this-way-and-that finally showed a reasonable path but I quickly ran into a problem.
The damn front mudflaps.
For my initial attempt I simply cut the overlong Honda skirt to butt up to the rear edge of the flap but the abrupt profile change looked awful and unfinished. That would not do at all.
To make this work the skirt is going to need trimming so it overlaps the flap and continues all the way forward.
It's hard to explain and I have no pics, so bear with me here for a while.
The trick will be figuring out the correct profile cut for the overlap.
It's going to be obvious there are two parts- no way around that- but the joint should look intentional, not like the obvious grafting of two dissimilar pieces (which of course, they are!).
I'll practice/refine using the now useless first victim and hope I can find another replacement at the yard. (Although many Hondas share this design detail, the profile seems to change from year to year, so I'll have to be careful to find the correct part and then hope I can remove it).
Work continues on the Z also.
New wheels, tires and exhaust are ordered and on the way.
General tune-up/maintenance parts (fluids, filters, etc.) are being gathered.
The intake will need lots of work, most of the rubber bits are perished and vacuum leaks abound.
Here's something weird/inexplicable...
The car is arranged much like the 7 with a radiator bulkhead and then a space in the nose. In the 7, this space carries the rad overflow tank and relays, in the Z, we have the airbox.
How handy! Airbox right where you'd want it and right where FC owners struggle to pull intake air.
Then, for some weird reason, Nissan runs the intake to the airbox which, keep in mind, is mere inches from the nose opening, all the way across the front and back into the engine bay on the passenger side.
They are intentionally doing just what we all attempt mightily to avoid.
Go figure.
Clokker, you can bond the fore and aft sections of the resized skirt with a product like 3M 35887 EZ Sand Flexible Parts Repair. We used the similar Dynaweld (which 3M bought and killed) to attach the Corksport bumper caps to the vert's rear bumper and they aren't going anywhere. You can sand it so no one will ever know.
The nice thing about the Dynaweld was that it was in normal caulk gun tubes where 3M requires you to buy the special gun and mixing nozzles. I guess someone there was a fan of Gillette's "cheap handles and expensive blades" and HP's "cheap printers and super expensive ink" go-to-market strategies.
The nice thing about the Dynaweld was that it was in normal caulk gun tubes where 3M requires you to buy the special gun and mixing nozzles. I guess someone there was a fan of Gillette's "cheap handles and expensive blades" and HP's "cheap printers and super expensive ink" go-to-market strategies.
I'm not bonding a spliced skirt back together, vr.
I'm cutting the end from an overlong donor part and shaping it to overlap/contour to the already present factory mudflap.
I spent some time this morning using the already wrong first attempt as a model...slowly refining the end cut till it was looking pretty good.
Now I have to transfer the profile to the untouched part and see how well I did.
Then I can figure out how to attach it.
It's featherweight, I'm hoping 3M tape might do the trick.
troubleshooting sucks
Joined: Sep 2011
Posts: 575
Likes: 0
From: sweden
just sat up all night and read your thread from beginning to its current state. what can i say... awe inspiring. you have done a splendid job of the engine bay not to mention the rest of the car. superclean! i especially enjoyed your obsession with the intake. i sir..am humbled by your dalai-laama like patience and aspire to one day reach your level of mazda enlightenment 
I'm back!
Even though it's just to say that not much has happened.
I house sat a friend's place for ten days, which ended all work on my car as I begin to plan for the 280Z (which, fortuitously, is AT my friend's house).
However, this break from work allowed for some pure observation of how the 7 does in a regular day to day, heavy traffic situations and I'm pleased to say, she does quite well.
I'm hesitant to say so, but my sneaking suspicion is that the Volvo airdam/front valence is mostly responsible for how well the cooling system is working.
I now have four years experience with the same engine/cooling package and it has never run so cold and recovered so quickly as she has since the Volvo valence install. I suppose I could remove it and see if things get worse, but really...**** that.
It ain't broke, don't fix it.
Along with the improved cooling came a real and consistent spike in fuel efficiency. I've been averaging @16-17 mpg in city driving, over the last 750 miles that's jumped to over 20mpg.
Be interesting to see if that continues now that I'm back home and my driving becomes more "normal".
Although work on the 7 slowed down during this hiatus, conceptualizing did not.
In fact, an idea that came to me for the Z might be applicable to the RX and solve a long standing issue I've ignored for too long.
Off to the junkyard now to see if I can make it happen.
Well, the junkyard was somewhat of a bust, it's just too goddamn hot to spend the time necessary ferreting through subtle details. I did find a good replacement for my hatch seal, which was much harder than I thought. I now know more about seal profiles than is healthy or normal.
The Z is almost fully stripped, everything forward of the doors is off and the bay should be naked (except for the engine block) by tomorrow. The massive rear bumper is off but removing the bumper shocks requires dropping the fuel tank and exhaust (the exhaust was going anyway).
We want all four wheelwells empty and all understructure exposed so we can find/repair any rust and then coat it all. Leaning towards Rustoleum roll on truck bed liner.
So far, there's no indication of any cancerous rust, just some surface corrosion and underneath the grime it's all straight.
The Z's paint is trash (car was originally silver then repainted a drab burgundy) and we are strongly considering PlastiDip instead of paint.
Now we loop back to the 7 again...
Through a tenuous family connection I discovered that an authorized Dip Garage exists in Denver and we know the owner (a very little bit), so I went to check it out yesterday.
I'm sold.
Not only would the Z look great in satin black (the new wheels are all satin black also) with some gloss black highlights, but this has rekindled my desire to panda my RX.
I've long thought that from a side profile the S5 looks kinda fat, mitigated on the S4 by the black body trim, so I considered just painting mine.
But this is what I really like:
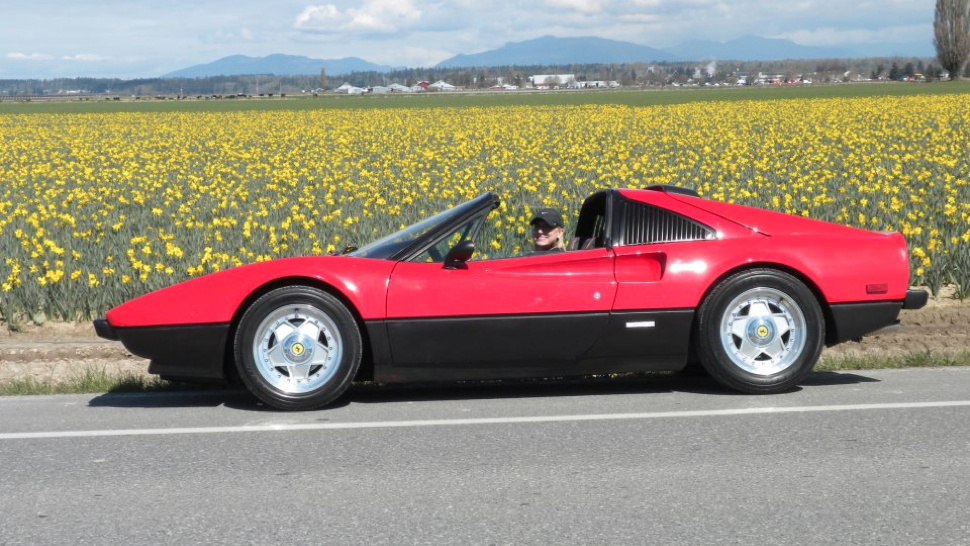
...and think PlastDip is the perfect way to get that look.
I am really very tempted.
Very.
The real sell point is that it's completely and easily reversible besides being easily touched up.
I want to go to there.
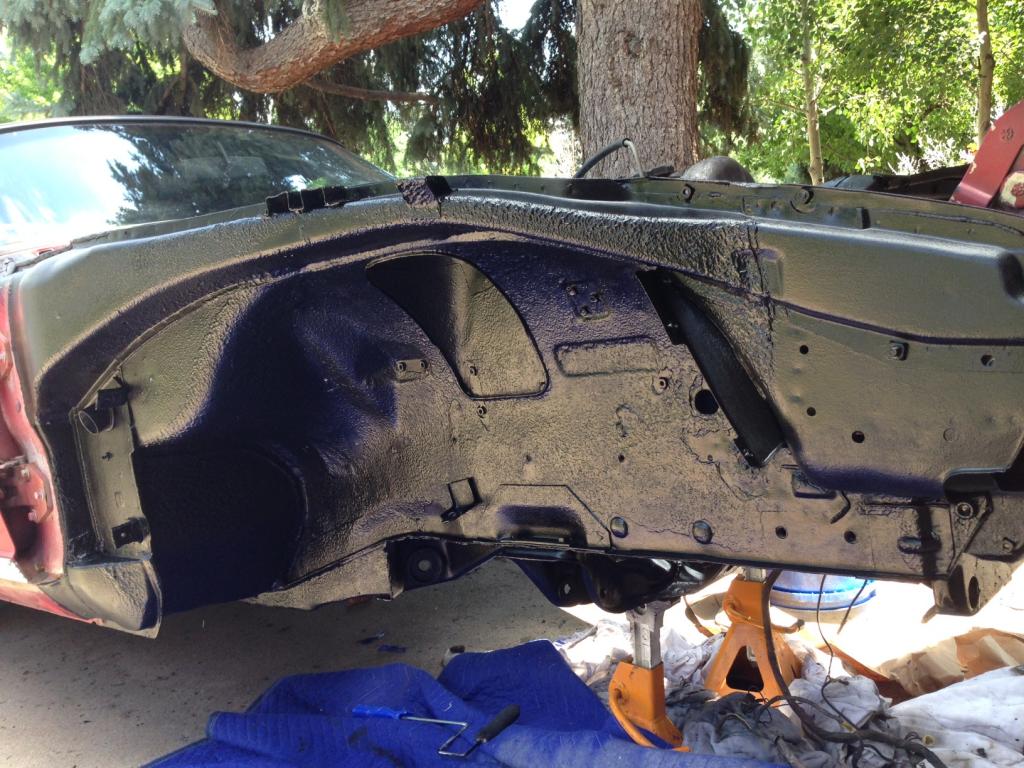
I spent 9 straight hours yesterday stripping the Z, preparing for "paint".
Not the exterior, we're concentrating on the understructure for now, the PlastDip exterior will come later.
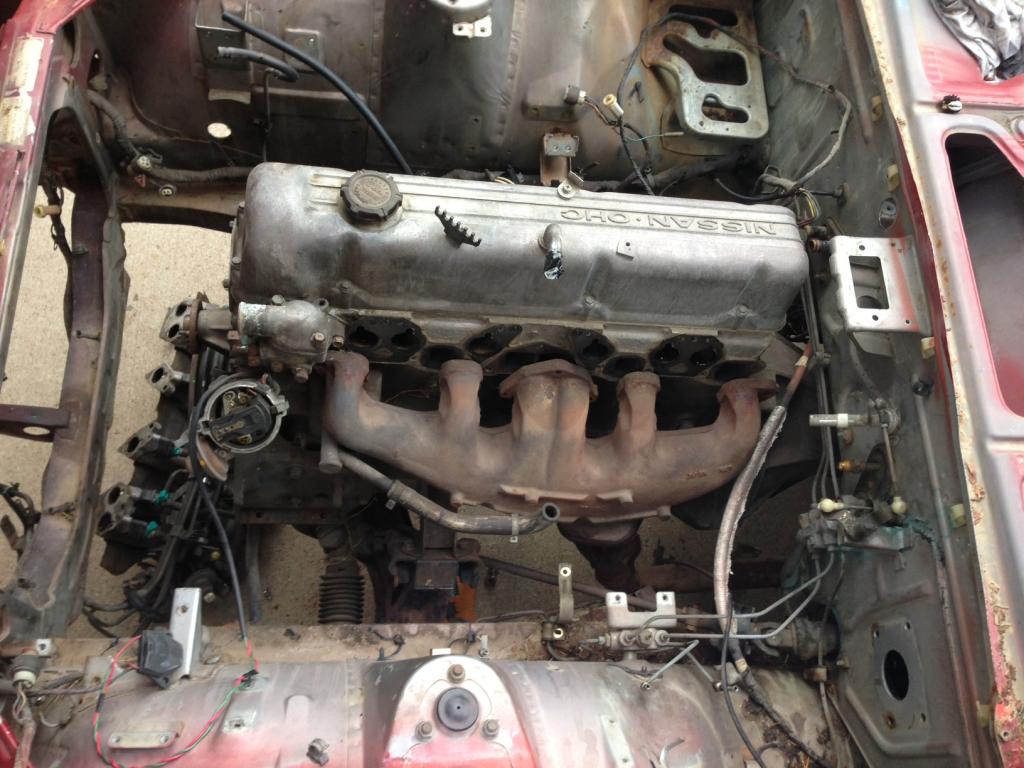
It's been quite illuminating to strip the car, comparing construction methods to my RX.
There's very little plastic in the Z, everything is metal and held with screws. The fenderliner for instance...we screw into plastic inserts and the liner itself is plastic. On the Z, part of the liner is metal and it all screws into intricate metal flanges with 6mm bolts.
The belly pan is a very cute all metal stamping.
Complain all you want about the RX's wiring but it's worlds better than the Z's...the car was basically unchanged for eight years but all sorts of new components were added (primarily in the swap from carbs to EFI) and they just kept tacking on to the original 240Z harness. It's ridiculous.
So far we've spent $3200 (including purchase price and registration) and have new wheels/tires, all new exhaust (headers to tailpipe), a complete bushing kit for the suspension and a box full of seals, gaskets and rubber bits.
We've chosen Rustoleum Bedliner for the wheel wells and, depending on how it looks, probably the engine bay as well. Probably use two gallons at @$100/per.
We begin the process tomorrow and hope to have the whole front (doors forward) covered by Sunday night.
Then we move to the back, pull the suspension (new bushings!) and treat the rear wells.
The gas tank has to come out- it's filled with ancient varnished fuel, all the rubber hoses are probably mush (everything in the bay was...) and it's in the way of removing the ugly, soon to be binned, rear bumper support dampers. Once that's out, we'll have a completely unobstructed view of the entire undercarriage so we can check for rust.
Haven't really found anything significant yet and my hopes are high.
Once the basic structural cosmetics are finished, assembly can begin and that should go rather quickly. There are only two areas that concern us...the brakes and the intake.
As delivered, the 280Z comes with 2-piston front calipers and rear drums. There are a variety of "upgrade" options that will require study before a decision is made but initially we'll probably just stay stock and see how it feels.
The intake is slightly more difficult.
Given the toxic nature of the gas in the tank, we're pretty sure the injectors are very likely all gummed up and their electrics (the connectors, basically) are falling apart. Also, the car is burdened by the ultra complex- and basically ineffectual- early emissions package, which is horribly ugly.
We could clean/replace the injectors and renovate the emissions (essentially doing just what you'd do on the RX) OR just shitcan the whole thing and go aftermarket intake/injectors/ECU.
Or we could revert to carbs.
This is the most perplexing/far reaching decision of this initial stage of the build.
Fortunately, that is Sigfrid's decision, I'm in charge of the wiring which is a big enough job to keep me busy for a while.
Neither of us has spent any time in the interior, no telling how much work that's going to entail.
This is all reminiscent of where I was six months ago with my GTU and I must admit, I really enjoy the process.
Especially since Sigfrid has a much bigger budget than I did.
Not the exterior, we're concentrating on the understructure for now, the PlastDip exterior will come later.
It's been quite illuminating to strip the car, comparing construction methods to my RX.
There's very little plastic in the Z, everything is metal and held with screws. The fenderliner for instance...we screw into plastic inserts and the liner itself is plastic. On the Z, part of the liner is metal and it all screws into intricate metal flanges with 6mm bolts.
The belly pan is a very cute all metal stamping.
Complain all you want about the RX's wiring but it's worlds better than the Z's...the car was basically unchanged for eight years but all sorts of new components were added (primarily in the swap from carbs to EFI) and they just kept tacking on to the original 240Z harness. It's ridiculous.
So far we've spent $3200 (including purchase price and registration) and have new wheels/tires, all new exhaust (headers to tailpipe), a complete bushing kit for the suspension and a box full of seals, gaskets and rubber bits.
We've chosen Rustoleum Bedliner for the wheel wells and, depending on how it looks, probably the engine bay as well. Probably use two gallons at @$100/per.
We begin the process tomorrow and hope to have the whole front (doors forward) covered by Sunday night.
Then we move to the back, pull the suspension (new bushings!) and treat the rear wells.
The gas tank has to come out- it's filled with ancient varnished fuel, all the rubber hoses are probably mush (everything in the bay was...) and it's in the way of removing the ugly, soon to be binned, rear bumper support dampers. Once that's out, we'll have a completely unobstructed view of the entire undercarriage so we can check for rust.
Haven't really found anything significant yet and my hopes are high.
Once the basic structural cosmetics are finished, assembly can begin and that should go rather quickly. There are only two areas that concern us...the brakes and the intake.
As delivered, the 280Z comes with 2-piston front calipers and rear drums. There are a variety of "upgrade" options that will require study before a decision is made but initially we'll probably just stay stock and see how it feels.
The intake is slightly more difficult.
Given the toxic nature of the gas in the tank, we're pretty sure the injectors are very likely all gummed up and their electrics (the connectors, basically) are falling apart. Also, the car is burdened by the ultra complex- and basically ineffectual- early emissions package, which is horribly ugly.
We could clean/replace the injectors and renovate the emissions (essentially doing just what you'd do on the RX) OR just shitcan the whole thing and go aftermarket intake/injectors/ECU.
Or we could revert to carbs.
This is the most perplexing/far reaching decision of this initial stage of the build.
Fortunately, that is Sigfrid's decision, I'm in charge of the wiring which is a big enough job to keep me busy for a while.
Neither of us has spent any time in the interior, no telling how much work that's going to entail.
This is all reminiscent of where I was six months ago with my GTU and I must admit, I really enjoy the process.
Especially since Sigfrid has a much bigger budget than I did.
If we keep the stock intake we'll just get new injectors and be done with it.
Much to my surprise though, "running engine" is pretty far down the to-do list..."rolling chassis" is the primary focus right now.
The first series Z cars (1970-1978) have several well known rust areas and we were intent on making sure we were building on a solid chassis, so extensive stripping of the body was necessary. Fortunately, we've found no trace of cancer, the metal is in superb condition.
We spent about 30 hours stripping down the bay and wheelwells, pressure washing/cleaning, scuffing and sanding.
After some research, Sigfrid chose Rustoleum Bedliner to coat the chassis and I must say I'm impressed so far. We brushed it on and after two coats (their recommendation) I think it looks great. We'll see after it fully cures (24 hours) how tough it is, but the aesthetic improvement alone was worth it.
We left as much of the factory undercoating intact as possible, so the wheelwells look kind of leprous but at least they're clean, a consistent color and well protected.
The engine bay was simply transformed.
Here are some before/after shots...
The exterior will be matte black PlastiDip which should be a good compliment to this textured, semi-matte bedliner finish.
We also gave the engine block a "*****'s bath" makeover. It too was scrubbed and cleaned then shot with satin black engine enamel. It actually turned out looking pretty good given the half assed prep and lots of it gets covered up anyway, so I'm happy.
At least now everything is clean and one color, the psychological uplift is gratifying.
(Haven't decided on how to treat the valve cover yet...it's a big visual component of the finished bay and we're waiting to see how things evolve)
As the coatings finish their cure time, I'll take the day and hit the junkyard again...there's a lot of stuff I want to look at/for.
By midweek all the suspension bits will be in hand and reassembly can commence.
Once the front end is back on wheels, we do the same thing to the rear end...gas tank comes out, suspension is removed and it all gets coated.
Remarkably, we're right on schedule so far.
I assume this won't last but it's nice that nothing horrible has happened yet.
Much to my surprise though, "running engine" is pretty far down the to-do list..."rolling chassis" is the primary focus right now.
The first series Z cars (1970-1978) have several well known rust areas and we were intent on making sure we were building on a solid chassis, so extensive stripping of the body was necessary. Fortunately, we've found no trace of cancer, the metal is in superb condition.
We spent about 30 hours stripping down the bay and wheelwells, pressure washing/cleaning, scuffing and sanding.
After some research, Sigfrid chose Rustoleum Bedliner to coat the chassis and I must say I'm impressed so far. We brushed it on and after two coats (their recommendation) I think it looks great. We'll see after it fully cures (24 hours) how tough it is, but the aesthetic improvement alone was worth it.
We left as much of the factory undercoating intact as possible, so the wheelwells look kind of leprous but at least they're clean, a consistent color and well protected.
The engine bay was simply transformed.
Here are some before/after shots...


The exterior will be matte black PlastiDip which should be a good compliment to this textured, semi-matte bedliner finish.
We also gave the engine block a "*****'s bath" makeover. It too was scrubbed and cleaned then shot with satin black engine enamel. It actually turned out looking pretty good given the half assed prep and lots of it gets covered up anyway, so I'm happy.
At least now everything is clean and one color, the psychological uplift is gratifying.
(Haven't decided on how to treat the valve cover yet...it's a big visual component of the finished bay and we're waiting to see how things evolve)
As the coatings finish their cure time, I'll take the day and hit the junkyard again...there's a lot of stuff I want to look at/for.
By midweek all the suspension bits will be in hand and reassembly can commence.
Once the front end is back on wheels, we do the same thing to the rear end...gas tank comes out, suspension is removed and it all gets coated.
Remarkably, we're right on schedule so far.
I assume this won't last but it's nice that nothing horrible has happened yet.
After working with my rotary it is disconcerting to see how bloody long the straight six is. The 13B would look tiny in that bay.
After the exhilaration of the bay/wheelwell project (it really was a great psychological bump to see what the car could look like absent the horrible paint), I'm back to being nipple deep in cruddy parts. All the steering and suspension parts must be stripped/cleaned/painted before being rebuilt or rebushed. Every replaceable suspension component is being renewed, we have a pile of ball joints, u-joints (no CV joints for us!), and bushes to install.
The "install" part is fun, prepping to get there is not.

Joined: Mar 2001
Posts: 31,863
Likes: 3,245
From: https://www2.mazda.com/en/100th/
Complain all you want about the RX's wiring but it's worlds better than the Z's...the car was basically unchanged for eight years but all sorts of new components were added (primarily in the swap from carbs to EFI) and they just kept tacking on to the original 240Z harness. It's ridiculous..
plus i kind of like to keep the essence of a car stock, and with the Z that means keeping the engine.
its like a V8 Rx8, sure its better, but it sounds wrong, looks wrong, and its dumb and clunky

