She Followed Me Home, Honest

 10-16-12, 02:16 PM
#230
The partially lit Logicon drove me crazy all night, I awoke determined to fix it.
I was pleasantly surprised to discover that I had enough slack that I didn't have to undo the diabolical Logicon pigtail in order to unscrew the faceplate and access the defective bulb.
I thought I was golden.
Until...
Both of the bulbs pirated from my spare Logicon were bad.
Bummer.
But nothing compared to the discovery that the correct replacement bulb is unique to the Logicon and apparently an expensive, dealer-only item.
Long story short, I ended up using the bulb from a spare warning cluster and adapting it into the original Logicon socket.
T'was pretty simple.
So I now have full night time illumination:
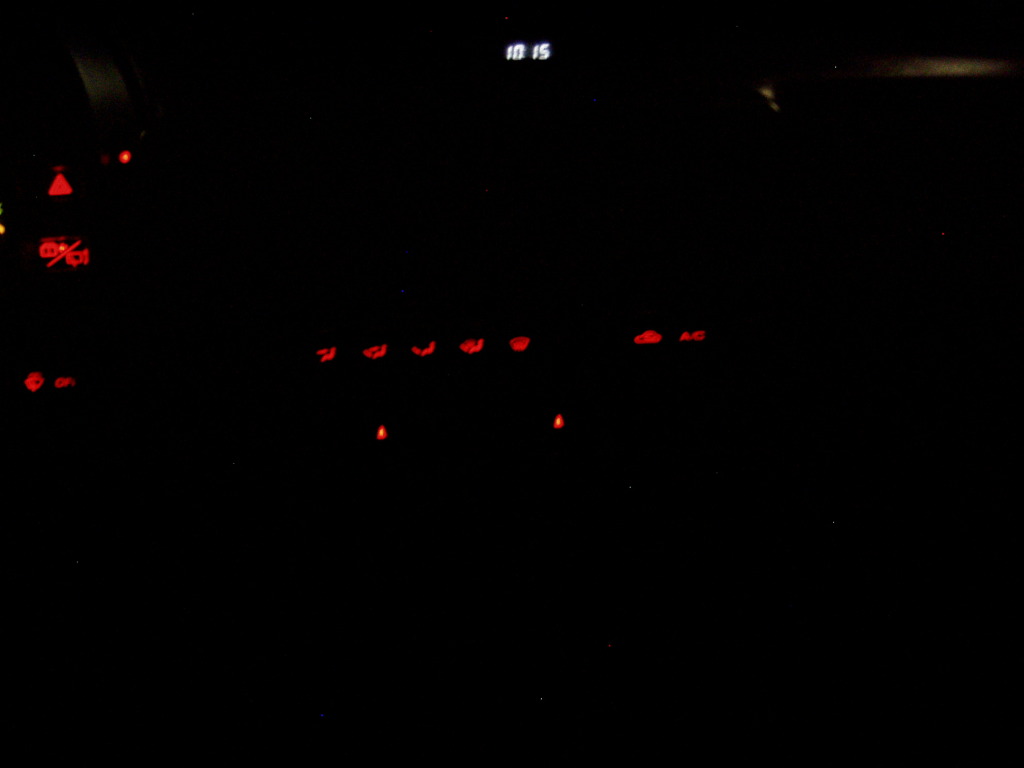
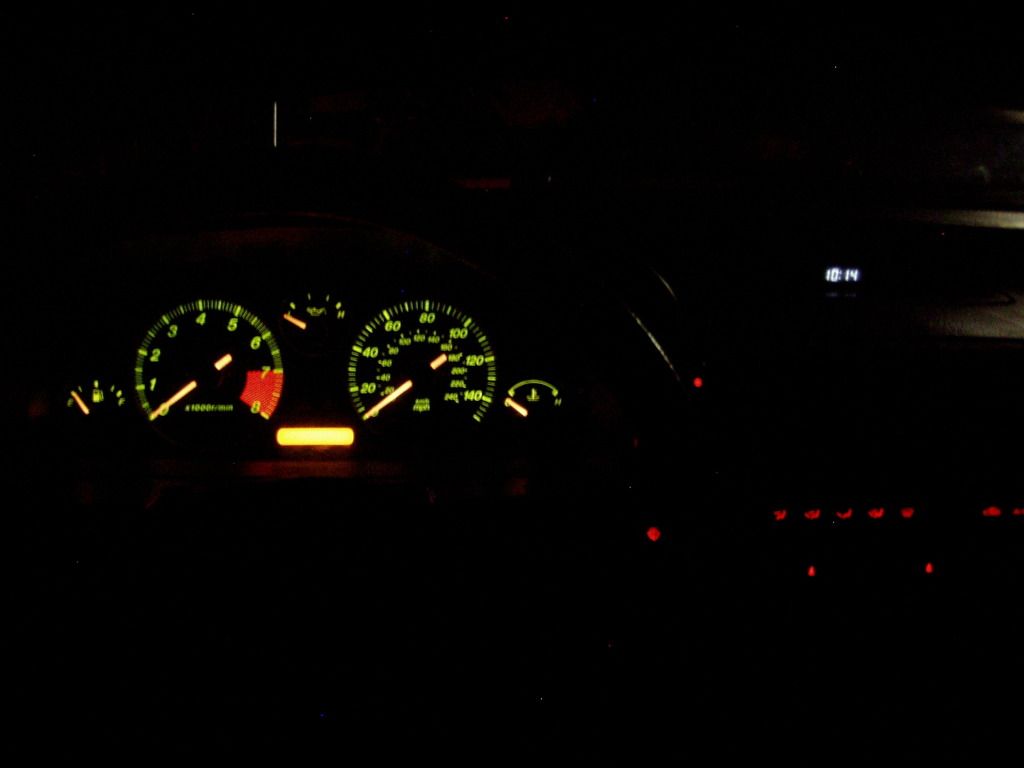
Note that even the clock seems to work (we'll see when she hits a bump).
Oh, I felt so much better, I can tell you.
Looking at the punchlist I discover another loose end...the cigarette lighter doesn't work.
A bit of wiring repair (the radio installers tapped the lighter's ground and did a crap job) and the lighter now lights.
I had also decided that it was silly- and potentially dangerous- to leave the non-functional radio in place (why tempt thieves with a dead radio?), so out it came.
I whipped up a filler plate that incorporated the Subaru cupholder and a little cubby for sunglasses.
Doesn't look bad but I hope it's only temporary (I want music in this car).
I was on a roll and moved on to the transmission again, this time to get the extremely nasty inner bellhousing clean.
The amount of oil in there has forced me to conclude I need to replace the front transmission seal and while I'm at it, the rear as well.
I already have the seals for the VSS.
I'd like a drip free transmission.
I had to start by scraping the thick layer of gunk away with some plastic strips, then followed up with mineral spirits (very effective) on a paint brush and finished with the smaller brushes and Purple Power.
It's not perfect, but certainly good enough:
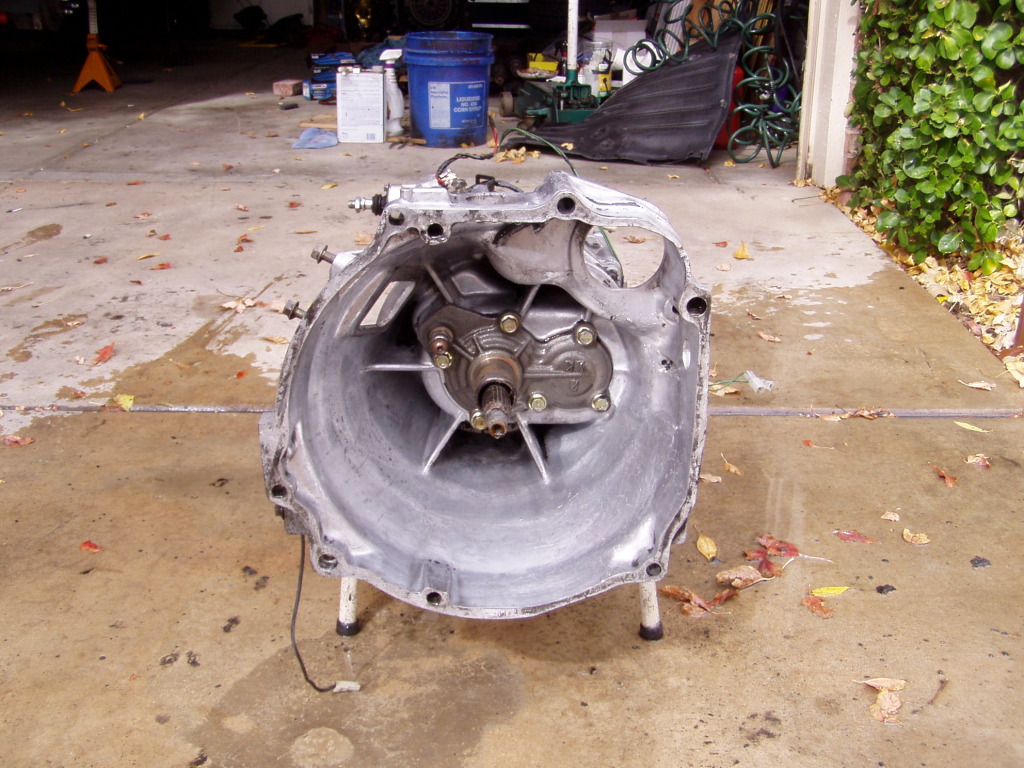
At least I can see the cover I need to unbolt to replace the seal...
I was pleasantly surprised to discover that I had enough slack that I didn't have to undo the diabolical Logicon pigtail in order to unscrew the faceplate and access the defective bulb.
I thought I was golden.
Until...
Both of the bulbs pirated from my spare Logicon were bad.
Bummer.
But nothing compared to the discovery that the correct replacement bulb is unique to the Logicon and apparently an expensive, dealer-only item.
Long story short, I ended up using the bulb from a spare warning cluster and adapting it into the original Logicon socket.
T'was pretty simple.
So I now have full night time illumination:
Note that even the clock seems to work (we'll see when she hits a bump).
Oh, I felt so much better, I can tell you.
Looking at the punchlist I discover another loose end...the cigarette lighter doesn't work.
A bit of wiring repair (the radio installers tapped the lighter's ground and did a crap job) and the lighter now lights.
I had also decided that it was silly- and potentially dangerous- to leave the non-functional radio in place (why tempt thieves with a dead radio?), so out it came.
I whipped up a filler plate that incorporated the Subaru cupholder and a little cubby for sunglasses.
Doesn't look bad but I hope it's only temporary (I want music in this car).
I was on a roll and moved on to the transmission again, this time to get the extremely nasty inner bellhousing clean.
The amount of oil in there has forced me to conclude I need to replace the front transmission seal and while I'm at it, the rear as well.
I already have the seals for the VSS.
I'd like a drip free transmission.
I had to start by scraping the thick layer of gunk away with some plastic strips, then followed up with mineral spirits (very effective) on a paint brush and finished with the smaller brushes and Purple Power.
It's not perfect, but certainly good enough:
At least I can see the cover I need to unbolt to replace the seal...
10-16-12, 10:04 PM
#232
Passion for Racing
Join Date: Aug 2010
Location: Crown Point, Indiana
Posts: 1,066
Likes: 0
Received 2 Likes
on
2 Posts
Question about your trans: would you be able to rig up a dial indicator and measure how much play you've got on the input shaft? I assume your trans is a-okay and mine is on its way out (my rpm based vibrations are coming back stronger again) so I want to pull mine and compare. I can't seem to find any literature on what play amount determines what's good or bad. Our FSM isn't the most informative out there...
10-17-12, 07:08 AM
#233
Check back tonight.
I said in the previous post that I'd made a filler plate for the center stack...I meant to post pics but totally spaced it.
So, here:
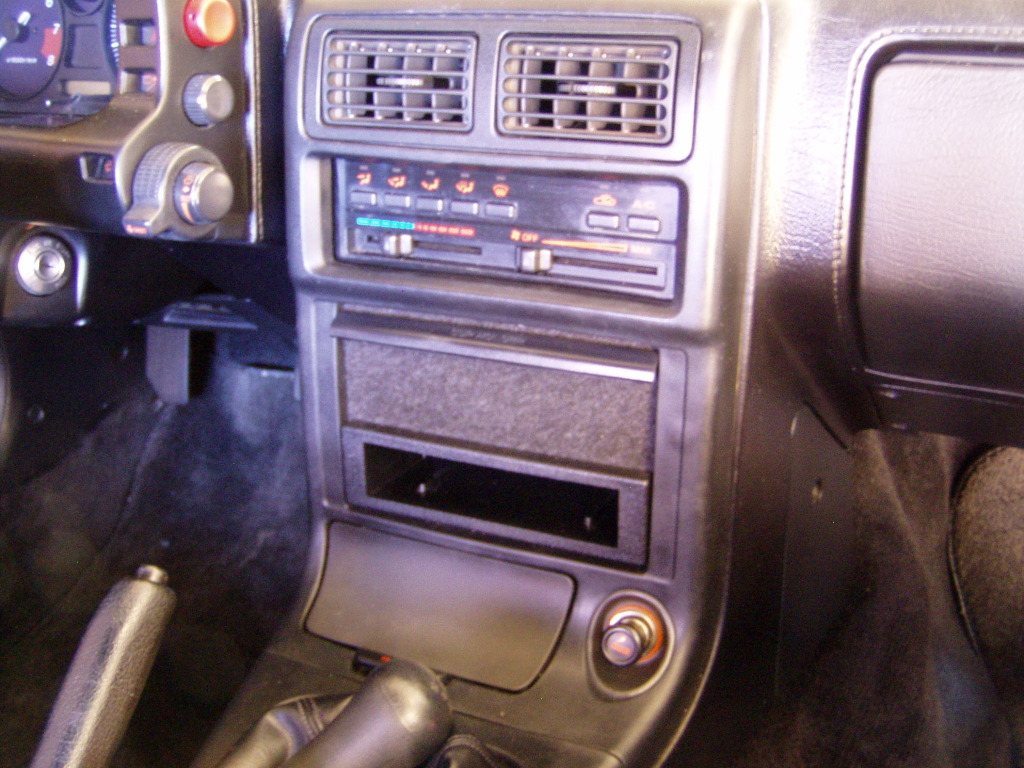
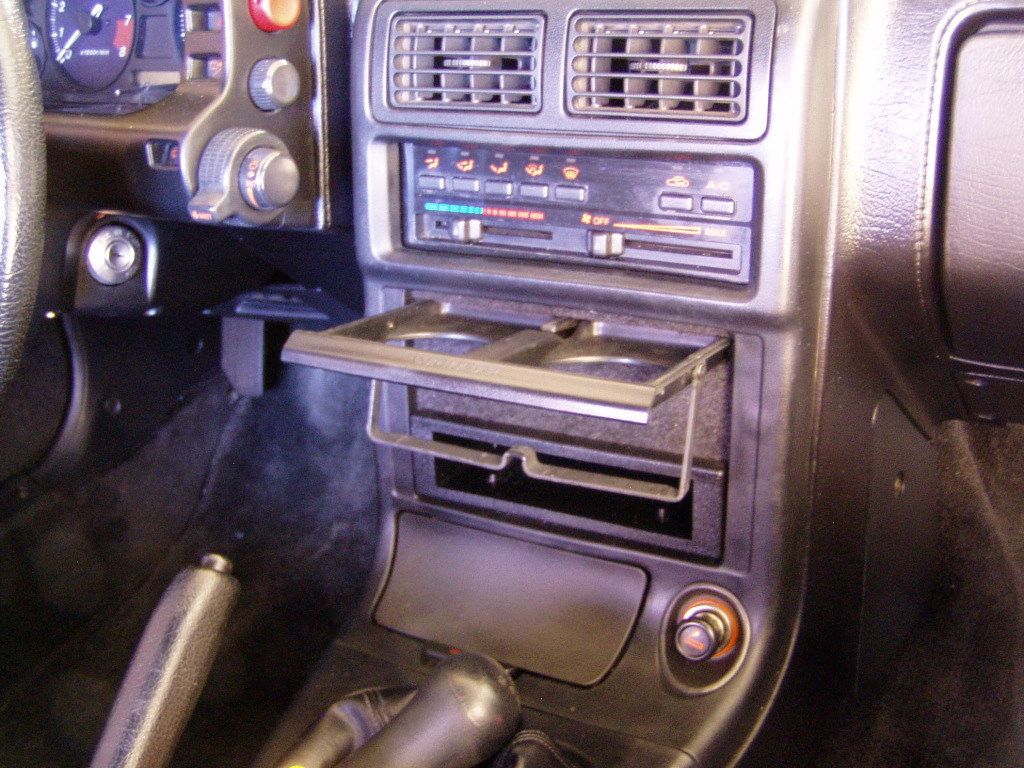
And no, even populated with two cans (it won't hold much larger than a 12oz can...), this doesn't interfere with the shifter.
In the few years since install (in the old car) I used the cupholder exactly once and that was mostly out of a sense of duty rather than need...this little addition is more of a nicety than anything else.
I spent quite a bit of time on the ergonomics of my previous 7 and was planning on the same for the GTU but it doesn't seem to need much.
The center console is a transplant from the old "91, so I know that's good (with my forearm on the armrest, the shift **** falls right to hand and only requires a flick of the wrist).
The armrest on the door seems to be located higher than on the power windowed S5, which is perfect.
I'm not sure if the rest is actually higher or if the GTU stock seats are sitting lower than the Honda seats I had previously, but it doesn't matter really, the net effect is the same and the armrest is sitting nicely for my normal driving posture.
It's still harder than I'd like and I may do something about that.
The seats are a concern.
I just don't feel like the Mazda seats fit me as well as others I've had (my favorites coming from Honda) but these are so cosmetically perfect (I'd almost consider them "mint") and the interior so original, it would break my heart to mess it up.
I went through something like six pairs of chairs in the '91, so I know what's involved in swapping them out and that's what is holding me up.
I know exactly what a PITA putting anything but stock on the passenger side can be and I refuse to have mismatched seats (I have an irrational dislike of the look*), so I guess I'll just wait and see if I can live with the originals.
And a final tidbit...
I was excited when I took this dash apart to see it had the light diffuser for the cigarette lighter and ashtray.
My old car didn't have one (and for some reason, they differ from S4 to S5) and I kind of made this part a benchmark for completeness.
Now that I've repaired the wiring and everything works, I'm quite disappointed...the light distribution is uneven and dim.
What a let down.
*You know what I always picture when I see a car with a cool driver seat (and usually harness, too) and a stock passenger side?
You've seen those pics of sportbike riders (usually from Cali. or Florida, for some reason) where the rider (the guy, of course) is wearing $3K in color coordinated, high impact graphics protective gear (helmet, leathers, boots, gloves) and his girlfriend is perched on the back in booty shorts and a tank top?
Guess who walks away from the inevitable accident.
I get the same message from odd seat combos, "I will be swaddled, coddled, cinched in and protected, you on the other hand, are on your own."
Yes, this is completely arbitrary and silly.
In fact, it would make sense to pull the stock driver seat and just store it's perfect little ***, since it's one of the highest wear items inside the car, thus maintaining the integrity of the interior.
I could then fart and dribble cigarette ash on the replacement seat with impunity, secure in the knowledge I was doing no permanent harm.
Hmm, I'll have to think about that.
10-17-12, 07:59 PM
#234
Grabbed the input shaft to see what kind of distance we were talking about measuring and...I got nuttin.
No real "in-n-out" at all, a few thou, max.
There is some axial play (side>side, up>down) but no back>forth.
10-17-12, 08:38 PM
#235
It was a royal PITA, but I was able to completely remove the Logicon so that I could disassemble it on the bench and re-solder all the LED's contacts. I love the fact that all the position indicators now light up when the respective buttons are pushed. I did the same to the upper warning lamp / clock cluster. Very nice to have the clock working correctly now too.
 10-18-12, 08:55 AM
#239
Yesterday was "domestic duty" day, laundry, cleaning and baking (yes, baking...it's relaxing, smells good and even your fuckups are generally edible, so sue me) and I didn't get much done on the car.
I did clean up the starter (as disgusting as the transmission) and the trans mount (even worse).
I mixed/matched the trans rubber mounts from my two spare brackets (I don't even know how/why I ended up with two of these...) and should be fine.
I retired the original punchlist and began a new (much shorter) one.
The number one item, and by far the most vexing, is what to do about the holes left by wing removal.
They should be welded closed- but I can't get that far into paintwork right now.
Whatever I do must be watertight, those holes are perfectly placed to leak like crazy.
I'd like the solution to be as visually unobtrusive as possible, the hole areas are already bad enough without calling attention to them.
So, you see the problem...I can't/won't fix it properly but I don't want it to look half-assed either.
To compound the issue, I'm looking for a sport/duckbill wing (have a few lines out but no bites, yet) and have no idea exactly how that might impinge on the exposed holes (specifically, the two on the very corners and the two along the back).
I don't want the hole "fix" to interfere with the wing sitting nicely.
I have a hazy concept of a nice solution assuming the sport wing is in place but of course, it's not and it may be a while till it is, so I need to figure something out now.
The remaining punchlist items are trivial in comparison and will be handled when convenient (it's all just nit-picky ****, nothing that affects integrity/function).
Surely I'm not the only person to have faced this problem?

 10-19-12, 09:53 AM
#241
I divided yesterday's planned work into "clean" and "dirty"- I have to be very careful now of rolling around on the garage floor and then sitting in the immaculate interior.
The only real "clean" job was to finish off the a-pillar trim.
Converting from auto to manual seatbelts left the a-pillar plastic with nothing to mount to, which is only a problem at the back end where it meets the b-pillar plastic.
I'd solved this problem on the old chassis by drilling a small hole in the roof/door structure and using a screw to hold the plastic(s) in place and I planned the same for the GTU.
Passenger side went perfectly, driver side plastic broke as I gingerly removed it.
I freshened up the ABS glue/bondo mix and repaired the break, adding extra reinforcement (a scab plate) around the mounting hole.
The plastic damage was disappointing but not really a big deal but does point up a trend I've noticed as the project winds down.
As the remaining projects grow smaller and more nit-picky, the more time they require to complete.
It took me longer to fix the lighting in the Logicon than to install the whole dash.
Fixing this plastic piece took longer than putting the subframe back in place.
Anyway, the pillar plastic is fixed and ready to reinstall, that should be the end of interior work for a while.
I got really ripped and spent a few hours rooting around in my hardware stock (which is four Folger coffee cans and a few random bags and boxes) for "nice" hardware to dress the engine/trans.
I have all the original pieces but have been systematically replacing them throughout the entire build with nicer stuff...when I'm done, only about 10% of the nuts/bolts/screws will be original.
This takes a long time because I really like all the bits to match...if, for instance, the trans mount requires four 8mm bolts (which it does), I want them all to be identical, and that search can require going through a lot of hardware.
When I source hardware at the junkyard I try to get it in multiples of two, so if I find one perfect bolt in my supply, I'm pretty sure there's at least one more somewhere.
In the case of the trans mount, I found three beautiful candidates (so I knew there was a fourth) right away and it took another half hour to dig out the last one.
Anyway, I think I have everything sorted now.
Today it's down to the engine block itself.
I need to seal it up well (the rags stuffed in the ports don't count) so I can scrub it down with impunity.
The big stuff (intake/exhaust ports) is not the problem, it's the little stuff like the OMP inlets and injector ports that will be tough.
We'll see how that goes.
10-19-12, 08:18 PM
#242
As is the norm lately, I got up, made all sorts of plans then went up to the garage and did something completely different.
It's become increasingly apparent that the supply of nice days is getting thin...it's been in the thirties here in the mornings and nice, hot days are rare, so if there's going to be any painting done, it'd better be soon.
I've been contemplating the intake lately (I walk by it on my way upstairs) and was considering a change, so I decided to clean all the parts and make a decision.
(I have two (nearly) complete intakes- two throttle bodies, two dynamic chambers and two middle sections (whatever they're called).
My old throttle body has had the secondary throttle plates removed- to no apparent gain or loss- and I'd already decided to use the GTU throttle body because it is bone stock, unmolested.
So it just needed cleaning.
I had painted the old dynamic chamber a wrinkle finish red and the intermediate runner was Hammertone black.
That was a few years ago but the paint has held up quite well (in both cases) and really needs no touch up.
In fact, my biggest objection was that the red wrinkle finish isn't a great match to the chassis Blaze Red, it looks "tomato-ish" when placed next to the body (or the firewall, in this case).
I went ahead and cleaned all the parts and then decided that the Hammertoned intermediate chamber was too good to mess with...problem solved there.
Now it's down to just the dynamic chamber and I really can't decide...I like 'em both:
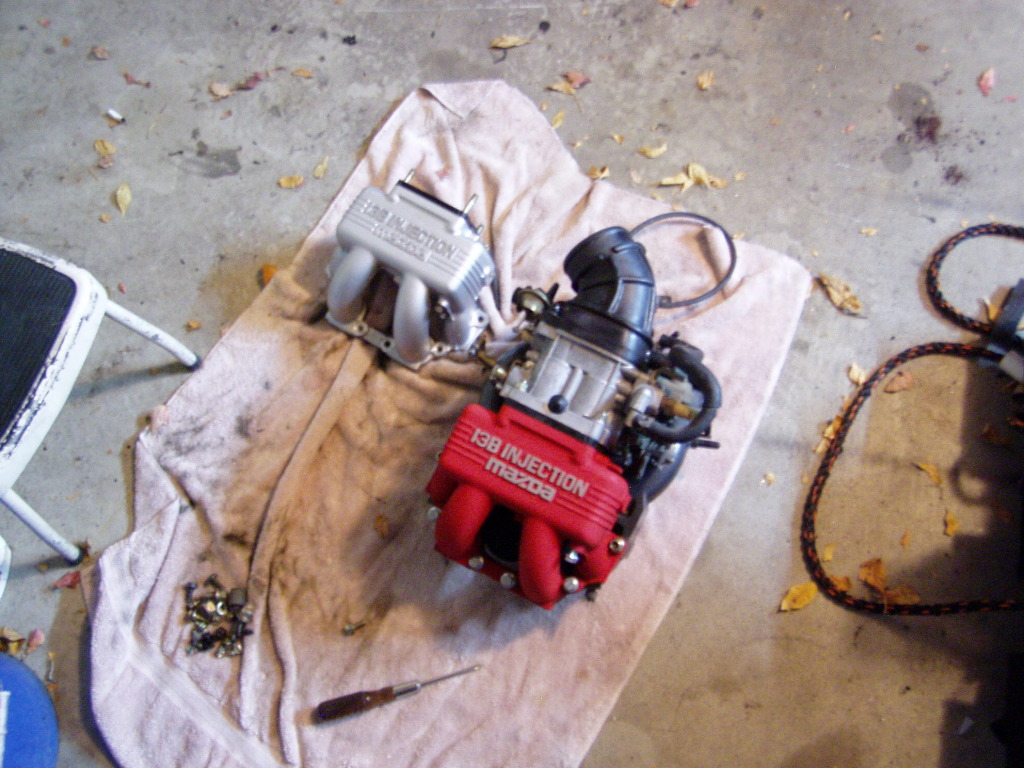
ATM I'm leaning towards the unfinished/silver look but that could change.
I also experimented with a few solutions for the wing holes in the body.One method seems especially promising for a couple of reasons, so I'm concentrating on it.
I have one hole filled and created a dam around it, filled with water.
We'll see how watertight it is tomorrow.
So far, after about 3 hours, it seems good.
That would be excellent if it works because this method is fully compatible with my concept for beautifying the area (to be detailed if/when I follow through).
Tomorrow I really need to quit dithering around and get to the motor.
The weather is supposed to be much nicer (which is why I wanted to be ready to paint if I decided to) and should be pleasant to work in...so no excuses.
Oh, about the a-pillar plastic from yesterday...the repair worked and the part installed, no prob.
The interior is done.
It's become increasingly apparent that the supply of nice days is getting thin...it's been in the thirties here in the mornings and nice, hot days are rare, so if there's going to be any painting done, it'd better be soon.
I've been contemplating the intake lately (I walk by it on my way upstairs) and was considering a change, so I decided to clean all the parts and make a decision.
(I have two (nearly) complete intakes- two throttle bodies, two dynamic chambers and two middle sections (whatever they're called).
My old throttle body has had the secondary throttle plates removed- to no apparent gain or loss- and I'd already decided to use the GTU throttle body because it is bone stock, unmolested.
So it just needed cleaning.
I had painted the old dynamic chamber a wrinkle finish red and the intermediate runner was Hammertone black.
That was a few years ago but the paint has held up quite well (in both cases) and really needs no touch up.
In fact, my biggest objection was that the red wrinkle finish isn't a great match to the chassis Blaze Red, it looks "tomato-ish" when placed next to the body (or the firewall, in this case).
I went ahead and cleaned all the parts and then decided that the Hammertoned intermediate chamber was too good to mess with...problem solved there.
Now it's down to just the dynamic chamber and I really can't decide...I like 'em both:
ATM I'm leaning towards the unfinished/silver look but that could change.
I also experimented with a few solutions for the wing holes in the body.One method seems especially promising for a couple of reasons, so I'm concentrating on it.
I have one hole filled and created a dam around it, filled with water.
We'll see how watertight it is tomorrow.
So far, after about 3 hours, it seems good.
That would be excellent if it works because this method is fully compatible with my concept for beautifying the area (to be detailed if/when I follow through).
Tomorrow I really need to quit dithering around and get to the motor.
The weather is supposed to be much nicer (which is why I wanted to be ready to paint if I decided to) and should be pleasant to work in...so no excuses.
Oh, about the a-pillar plastic from yesterday...the repair worked and the part installed, no prob.
The interior is done.
 10-19-12, 10:54 PM
#244
You only need the belts, the plastic trim won't even fit, so don't bother.
You really need to keep your S5 plastic, there is only a very minimal amount of trimming to fit the manual belt...one hole drilled in the upper b-pillar to hang the shoulder pivot (your chassis already has the threaded boss to accept this) and a very little slot in the upper edge of the lower b-pillar piece to allow the belt to transition to the outside.
The S4 a-pillar trim is not as tall as the mousetracked S5 and that's a problem because the S5 headliner is cut higher to clear the mousetrack and the S4 trim won't cover the gap.
Keep the S5 a-pillar plastic and make it work.
Seems like you could dye the belts if they aren't black but mine were, so I can't say for sure.
10-20-12, 07:35 AM
#245
So, late last night I was looking at pics of my old engine bay (which really went through some ch-ch-ch-changes over the years) and decided that the wrinkle finish was great, the color was not.
Impulsively, I decided to paint it satin black.
I've never tried painting over a wrinkle finish before, have no idea how it might work.
At 11:30 I was back in the garage, spraying.
I brought the freshly painted chamber inside to dry (it's too cold at night now in the garage) but have avoided looking at it yet this morning.
It could be glorious, it could be crap, it could be so-so...the anticipation is building.
Although I haven't checked the paint yet, while making coffee I went into the garage to check on my water test of the hole plugging technique.
The water level in the dam had dropped but it wasn't all gone...there is evidence that the dam leaked a bit (it's just a clay ring pressed around the hole and it looks like water might have seeped under it) but the rag under the hole was slightly damp as well, so some water did get in.
This is actually pretty encouraging because for the real install I'd use some Goop sealant and I think it would do the trick.
I don't consider the problem solved, but I'm hopeful.
Now I need some vinyl.
10-20-12, 09:08 AM
#246
You only need the belts, the plastic trim won't even fit, so don't bother.
You really need to keep your S5 plastic, there is only a very minimal amount of trimming to fit the manual belt...one hole drilled in the upper b-pillar to hang the shoulder pivot (your chassis already has the threaded boss to accept this) and a very little slot in the upper edge of the lower b-pillar piece to allow the belt to transition to the outside.
The S4 a-pillar trim is not as tall as the mousetracked S5 and that's a problem because the S5 headliner is cut higher to clear the mousetrack and the S4 trim won't cover the gap.
Keep the S5 a-pillar plastic and make it work.
Seems like you could dye the belts if they aren't black but mine were, so I can't say for sure.
You really need to keep your S5 plastic, there is only a very minimal amount of trimming to fit the manual belt...one hole drilled in the upper b-pillar to hang the shoulder pivot (your chassis already has the threaded boss to accept this) and a very little slot in the upper edge of the lower b-pillar piece to allow the belt to transition to the outside.
The S4 a-pillar trim is not as tall as the mousetracked S5 and that's a problem because the S5 headliner is cut higher to clear the mousetrack and the S4 trim won't cover the gap.
Keep the S5 a-pillar plastic and make it work.
Seems like you could dye the belts if they aren't black but mine were, so I can't say for sure.
10-20-12, 01:56 PM
#247
Sure.
The satin black over wrinkle red turned out pretty damn well:
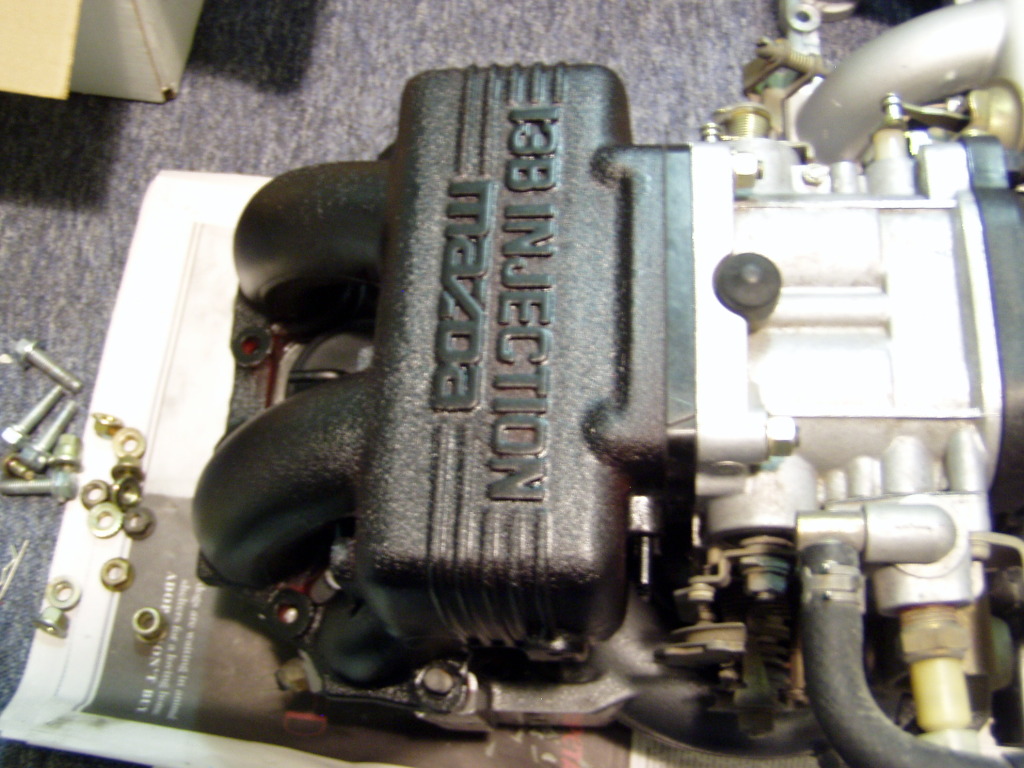
After the paint cures for a few days I'll sand off the script and it should be done.
I finally got busy on the shortblock.
Using the gaskets as templates, I used some scrap ABS to make block off plates for the intake and exhaust...not ideal but the best I could come up with.
Stuffed the ports with rags, bolted up the plates and the motor was ready for it's first bath.
I don't expect it'll get super clean but it'd be nice if I don't get greasy just handling it and I think that's doable.
There are actually only a couple of really nasty areas, the rest is not too bad.
First wash is done, I'm letting it dry off some before going further.
Pics when it's done (probably tomorrow).
The satin black over wrinkle red turned out pretty damn well:
After the paint cures for a few days I'll sand off the script and it should be done.
I finally got busy on the shortblock.
Using the gaskets as templates, I used some scrap ABS to make block off plates for the intake and exhaust...not ideal but the best I could come up with.
Stuffed the ports with rags, bolted up the plates and the motor was ready for it's first bath.
I don't expect it'll get super clean but it'd be nice if I don't get greasy just handling it and I think that's doable.
There are actually only a couple of really nasty areas, the rest is not too bad.
First wash is done, I'm letting it dry off some before going further.
Pics when it's done (probably tomorrow).
10-20-12, 04:46 PM
#248
To "fix" the holes where the wing goes in the back, you can do like I did to the hole in the rear glass when I removed my wiper. Go to your local auto parts store, and get the generic plastic plugs that typically hold on plastic interior panels and what not. Get a can of spray paint that matches your car and blast them. Next, use some RTV and put a light coat on the plugs (underneath) and plop them into the holes. Done! My rear glass has been plugged this way for 5 years, no leaks and no problems! The RTV will hold it in place well, but can easily be removed later when you get a new wing.
10-20-12, 08:56 PM
#249
That is exactly the way I did my first "de-wing" a few years ago (with the exception of painting the plugs) and yes, it works fine.
However, there are problems this doesn't address, like the spots where the wing rubbed through the finish coat into the white primer (mostly at the two corner mounts) and the dents the two back riser feet left on the rear deck.
The two front mount points, with the one large hole and the second small hole, require a very large headed plug to cover both holes and that's ugly.
As I said previously, I know I'm half-assing this, I just don't want to be glaringly obvious about it.
The shortblock seems to have survived it's first round of cleaning just fine, tomorrow it gets a final bath.
10-23-12, 08:20 AM
#250
Things have slowed down as I await funds to continue.
I went back over the keg and did a bit more cleaning but am super paranoid about water getting in, especially on the manifold side, so couldn't be as aggressive as I might have been.
Turns out I didn't need to worry, the preventative measures worked fine.
Mostly out of boredom and a sense of duty, I "destudded" the keg- double nutted and removed the four exhaust manifold studs, the two for the lower intake and four for the waterpump. Cleaned them up on the lathe, chased the threads and reinstalled with anti-seize.
The large studs on the driver side that mount the AC/PS bracket were just removed, not to return.
It's been a while (quite a while, actually) since I finished the chassis engine bay wiring and you may recall that I'd left the part that goes to the engine unloomed, to be finished when the motor was in place.
Turns out, most of that wiring is for the transmission and I think I can clean it up.
There are six wires in total, two in a plug and four individual connectors.
I'm thinking that I can cut the mating connectors from the chassis harness and graft on a six pin connector.
Reuse the stock connectors on the trans side of the new plug so each sensor on the tranny could be separately undone if necessary, but the transmission could be removed simply by unclipping the one six pin connector.
Does that make sense?
Need to find a six pin connector set and see.
If I do that, the chassis harness will be complete and only the EM harness will need finishing.
Hmmm...
I went through the garage and cleaned it up, lots of the supplies were no longer needed and the extra space is welcome.
As I carried stuff to the basement I stumbled over the lower intake manifold, which has sat untouched (and obscured by other crap).
Need to clean that up and prep it for install too.
Still no luck finding the sport/duckbill wing I want.
Of course, I can't actually buy it yet, which is somewhat of a problem, but my solution for the old wing holes kind of depends on whether there will be a duckbill in place or not.
I have body plugs I can use temporarily if needed but the real solution will be slightly more elaborate, involving either vinyl or Plasti-Dip (not sure yet).
No need to be hasty since the car isn't moving, so I can ponder the problem for a while yet.
That is all.