
What type of finish on window moldings for SA & FB


Thread Starter
Original Leather
Joined: Apr 2010
Posts: 110
Likes: 40
From: PA
Discussing with a friend, he believes the trim moldings around the windshield, roof drip rails and front edge of the triangular quarter windows were painted satin black. My opinion is they were either anodized aluminum or black zinc plated metal. Anyone know for sure?

Joined: Mar 2001
Posts: 31,857
Likes: 3,243
From: https://www2.mazda.com/en/100th/
its definitely a paint, its too thick to be anything else. from 79 up to around the 1980 model year (vin 569399-) the moldings are a dark grey, after the vin they are black. when the grey fades a little it looks metallic, not sure it actually is though.
Pictures have been posted somewhere in previous threads. 79 trim was metallic grey, kind of gunmetal in color. 80's were more black, both were satin. This includes the windshield trim, drip rails, door frame, door handles and mirrors. The triangular piece and leading edge of quarter window trim were black too on both 79 and 80. Same with the hinges and latch plate on the rear hatch.
I repainted the ones on my car without removing them. Its fairly easy to do. Get some tape,
sandpaper (from 500 to 1000 grit), some etching primer, and whatever color you want. Its true
the original was satin black (or grey for early SAs) but I used gloss engine paint and figured it
was tough enough to handle road grit better, would fade a bit with age and loose some of its
gloss. All those things have turned out to be true. Although its still a bit glossy, it seems to
match the handles and other trim I didn't paint well enough.
Thread Starter
Original Leather
Joined: Apr 2010
Posts: 110
Likes: 40
From: PA
Thanks to all who replied. I don�t know about the very early RX�s but my 80 LS, which I bought new in 1980, has a satin finish on the black trim. I�m planning this summer�s �activities� for the Rx and thought it would be a good time to fix the finish on the trim that has worn away over the years. Anyone want to make suggestions for a brand /type of paint to use and method of application like straight from the can, decant and spray with an airbrush, etc? I know the old finish needs to be �sanded� smooth and feathered at the edges to get the desired results. I see T G Farrell paint his on the car, any comments on how difficult it is to remove and replace the windshield trim? Any other suggestions would be appreciated.
Trending Topics
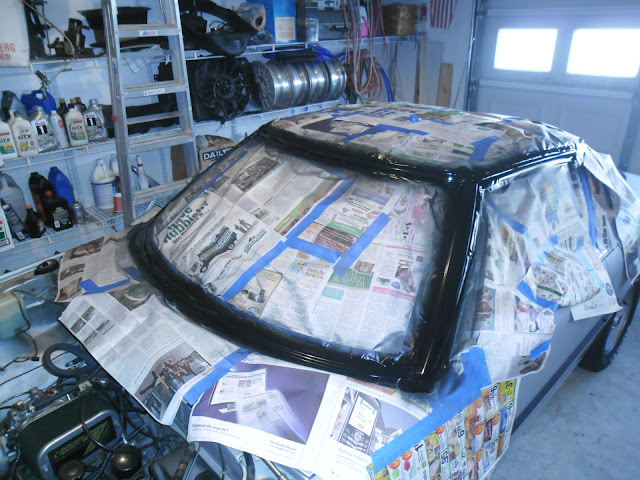
The trim is very fragile along the rain gutters and is easily messed up. Its a pain to remove it.
The windshield requires special clips to get the trim back on because the old ones break on
removal. Much easier to mask and paint. If you have the tools, clips, and the expertise then
removal is the way to go.
The windshield requires special clips to get the trim back on because the old ones break on
removal. Much easier to mask and paint. If you have the tools, clips, and the expertise then
removal is the way to go.
Agreed powder coating is a great way to go, if the service is available. Pricey put very durable finish.
The trim is actually pretty easy to remove and install if:
-you spend $5-25 for a set of (you only need one actually) plastic trim removal tools. And by this, I mean the _tools_ are plastic (maybe nylon). Looks like a plastic mini crow bar that slips under the trim and, using the glass as leverage, "pops" the trim off the clip
-The upper (then, in order, the sides then...) and lower strips clip onto sacrificial clips, meaning they almost always break when you pop the trim. No worries. Ebay (always listed) or thru your local glass shop can order you a "windshield clip kit" for either SA or FB (apparently different). $12 on ebay. I have used these very successfully. Its the whole set for the entire fr windshield.
-beware there are several rubber gaskets and rubber pads aka"dums" (mazda term) that sit under various bits of trim. Don't lose! NLA!
-Install (in reverse order) is straightforward: set the clips on the windshield frame (obvious mount points) and a firm press and they snap back in place.
OR:
-pay a good glass shop $25 and get them to pop these on and off for you.
Stu Aull
80GS
Alaska

If possible, your best route would be masking them off and painting in place. Based on my experience ( I have restored many many cars, although never a RX7,) the factory painted directly over the raw aluminum. I will take a look tomorrow at the paint that I have been using. I believe it is a SEM product. I have used it for years, and it never fails to amaze. It works so well, that I use it as a spray can product. Yes, I have all the spray equipment that is necessary for using a gun and mixing, but in this circumstance, I don't see the benefit. I will post up the exact part number of the spray paint. It is a satin black and would be "correct" for most of the black ( not early grey) moldings.
To paint in place, I would
1) Mask the area to avoid overspray on the rest of the car
2) Clean the moldings with Prep sol or equivalent
3) scuff the moldings using either a very fine paper or fine Scotch Brite type product
4) Use air to blow off any dust created by step 3 (dust will hide in the masked area)
5) Again wipe down with Prep Sol and dry ( allow some time for any left over prep sol to flash off
6) double check that masking was not damaged in sanding/cleaning process
7) paint the moldings!!!
Please remember, that painting needs to be done at a specific temperature and humidity range. I am not sure where you live, but here in NJ there were many days that I had to postpone a paint project due to humidity so high that even in a booth, blushing could occur. Temps between 68-85 work. 70-75 seems best to me.
Good luck and enjoy the project!!
Rich
www.AusRotary.com


Joined: Apr 2003
Posts: 905
Likes: 273
From: Melbourne, Australia
Very important. I lost some of these bits to find out the hard way that they are NLA. Now I basically have to get a whole trim set off a good second hand car.
Plastidip will hold up well for a few years and then you just recoat it and you're good to go
another 3 years. I just did this with the bra I painted on my car. Holding up nicely.
another 3 years. I just did this with the bra I painted on my car. Holding up nicely.

Thread
Thread Starter
Forum
Replies
Last Post