
Trying to delete/simplify rats nest (GSL-SE)

Thread Starter
Environmentally-Hostile
Joined: Sep 2005
Posts: 1,662
Likes: 3
From: Ennis/Arlington Texas
Trying to delete/simplify rats nest (GSL-SE)
I've removed the upper intake manifold and I am replacing it with a Dellorto DHLA 48. At this point, I'm trying to simplify the rats nest of vacuum lines. I've obviously deleted all of emissions control, but I'm trying to determine what is important to keep.
Essentially, I'm trying to eliminate any vacuum system/line that has to do with emissions control or the original EFI operation, and retain any vacuum system that runs auxiliary systems like A/C and power steering. It's so confusing
Essentially, I'm trying to eliminate any vacuum system/line that has to do with emissions control or the original EFI operation, and retain any vacuum system that runs auxiliary systems like A/C and power steering. It's so confusing


Joined: Mar 2001
Posts: 31,851
Likes: 3,240
From: https://www2.mazda.com/en/100th/
ok well i think you can just pull everything as an assembly (or two assemblies).
the relief, switching solenoid and vacuum switch are for the ACV, so they can go.
the vacuum control solenoid controls when the distributor vacuum advances see vacuum.
the pressure control solenoid does the same for the fuel pressure regulator, and the
vent/vac solenoid runs the BAC valve, so all three can be removed as one unit.
this leaves you with the purge valve, which is part of the PCV system. it should go to the air cleaner, or catch can or something.
then the metering oil nozzles, that hose should be hooked up like the RB instructions say to, and you're done.
Thread Starter
Environmentally-Hostile
Joined: Sep 2005
Posts: 1,662
Likes: 3
From: Ennis/Arlington Texas
Ok I've got it mostly worked out. This step in the RB instructions is confusing me still:
Someone care to clarify that?
14. Connect the vent hose which comes from the rear of the car to the short steel tube extending rearward from the intermediate housing below the oil filler neck. Connect the vent hose supplied from the small tube on the filler neck to the vent fitting on the air filter canister
Thread Starter
Environmentally-Hostile
Joined: Sep 2005
Posts: 1,662
Likes: 3
From: Ennis/Arlington Texas
I cannot tell if the instructions are instructing me to keep the purge valve and just connect it to the air cleaner assembly (lol don't have one yet) on the carb or remove the purge valve all together and just connect the filler neck to the air cleaner. If I just run velocity stacks with socks over them, where can I vent this purge valve/pcv thing?
Can I simply install a breather on the oil filler neck? Would that accomplish the same goal?
Can I simply install a breather on the oil filler neck? Would that accomplish the same goal?
Thread Starter
Environmentally-Hostile
Joined: Sep 2005
Posts: 1,662
Likes: 3
From: Ennis/Arlington Texas
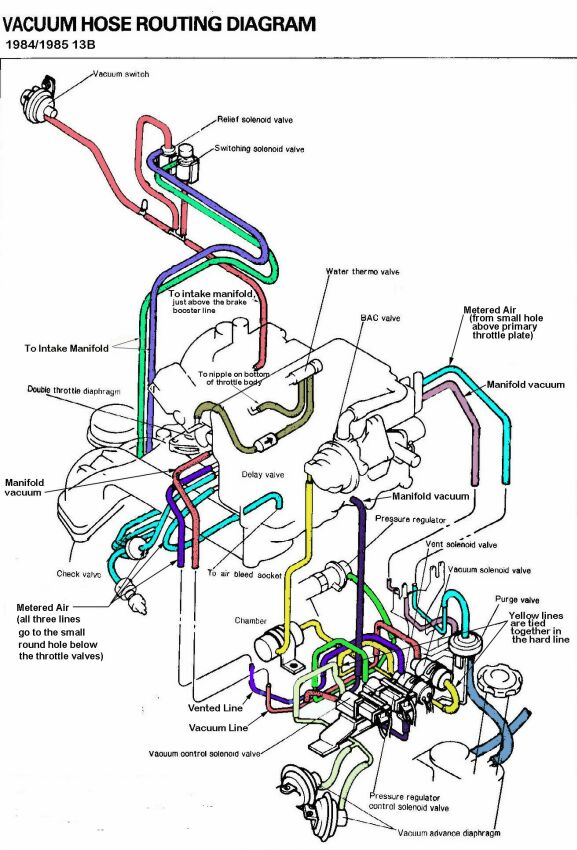
Ok I thought I'd make some little diagrams to clarify the issues/questions I'm having:
First diagram is in reference to this instruction from RB
The line from the 'rear of the car' is what I've highlighted in red. The 'vent hose' is what I've highlighted in green. Do I keep the purge valve in place and route the blue line to the carb? If so, what do I do with the yellow line that extended down into the rats nest originally?
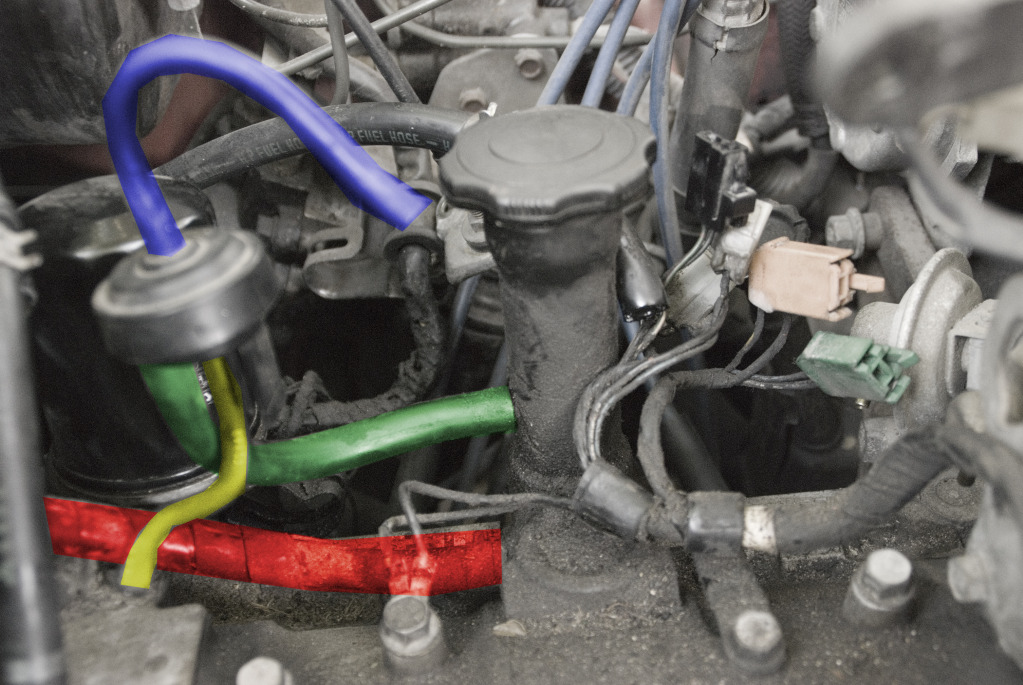
Second question, in reference to this instruction:
Do I totally remove the hose highlighted in red and just attach the one highlighted in blue to it's tube? I think that's what the instructions are telling me, and it makes sense as there is no upper intake manifold for coolant to pass through, but I'm not 100%.
And lastly:
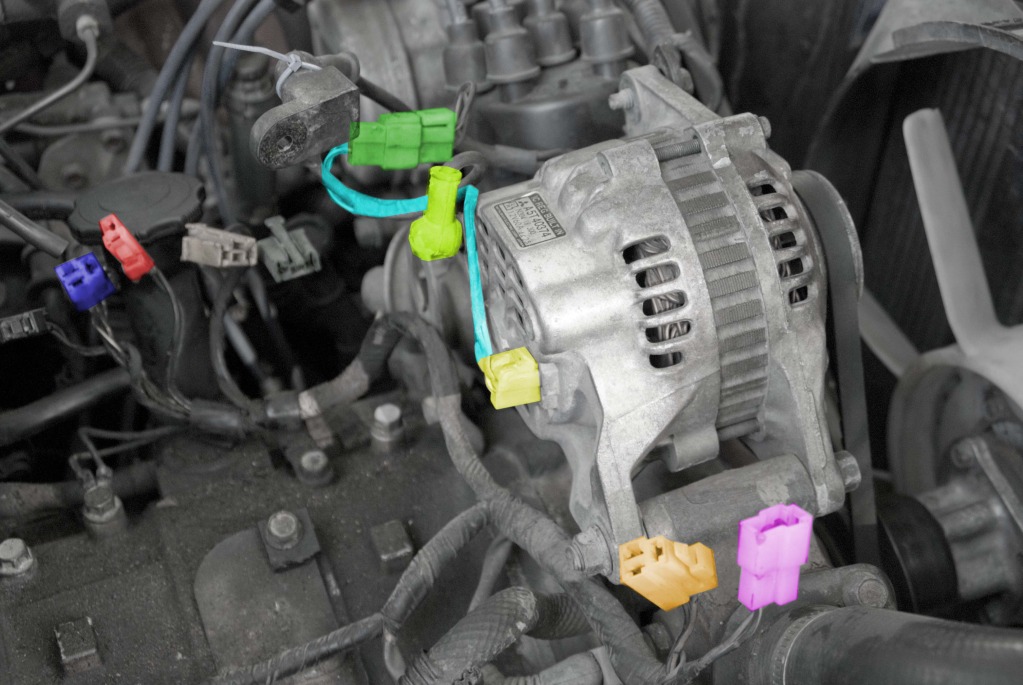
Which connector is the +12v lead? Which quick disconnect do I connect to where? This one has me pretty lost lol. Do I disconnect green and attach it directly to to the alternator? I don't think Orange, Magenta, Blue and Red are related, but I don't want to rule them out.
Is the +12v lead the screw fitting highlighted in puke green just below the neon green?
edit: Figured the last one out. In my situation, the quick disconnect was still not long enough without the extension, however the lead was. So #3 is solved. Also solved the coolant one. Only one remaining is the PCV/Surge valve.
First diagram is in reference to this instruction from RB
14. Connect the vent hose which comes from the rear of the car to the short steel tube extending rearward from the intermediate housing below the oil filler neck. Connect the vent hose supplied from the small tube on the filler neck to the vent fitting on the air filter canister
The line from the 'rear of the car' is what I've highlighted in red. The 'vent hose' is what I've highlighted in green. Do I keep the purge valve in place and route the blue line to the carb? If so, what do I do with the yellow line that extended down into the rats nest originally?
Second question, in reference to this instruction:
8. Connect the long 3/8" diameter hose which is connected to the back of the water pump housing to the 3/8" tube extending up form the rear housing. The routing of this hose is very important, since it must clear the throttle linkage. Check for clearance at full throttle as you perform the next step.
Do I totally remove the hose highlighted in red and just attach the one highlighted in blue to it's tube? I think that's what the instructions are telling me, and it makes sense as there is no upper intake manifold for coolant to pass through, but I'm not 100%.
And lastly:
5. Reconnect the alternator +12V lead and the quick disconnect directly to the alternator (the short extensions used on each of them are no longer necessary).
Which connector is the +12v lead? Which quick disconnect do I connect to where? This one has me pretty lost lol. Do I disconnect green and attach it directly to to the alternator? I don't think Orange, Magenta, Blue and Red are related, but I don't want to rule them out.
Is the +12v lead the screw fitting highlighted in puke green just below the neon green?
edit: Figured the last one out. In my situation, the quick disconnect was still not long enough without the extension, however the lead was. So #3 is solved. Also solved the coolant one. Only one remaining is the PCV/Surge valve.
Joined: Mar 2001
Posts: 31,851
Likes: 3,240
From: https://www2.mazda.com/en/100th/
ok in the first pic. the red hose stays where it is, and the green hose goes to the air cleaner.
second pic, i think you're right. just run the blue hose to the nipple in the rear iron, making sure it can't get stuck in the throttle linkage
third pic, unplug the green connector, plug it into the rear of the alternator. then there is a 10mm attached to the black plastic thing that's now floating, attach this to where the bright green connector is
Thread Starter
Environmentally-Hostile
Joined: Sep 2005
Posts: 1,662
Likes: 3
From: Ennis/Arlington Texas
Ok, need some help identifying a part on the LIM. I've searched and searched and can't figure it out:
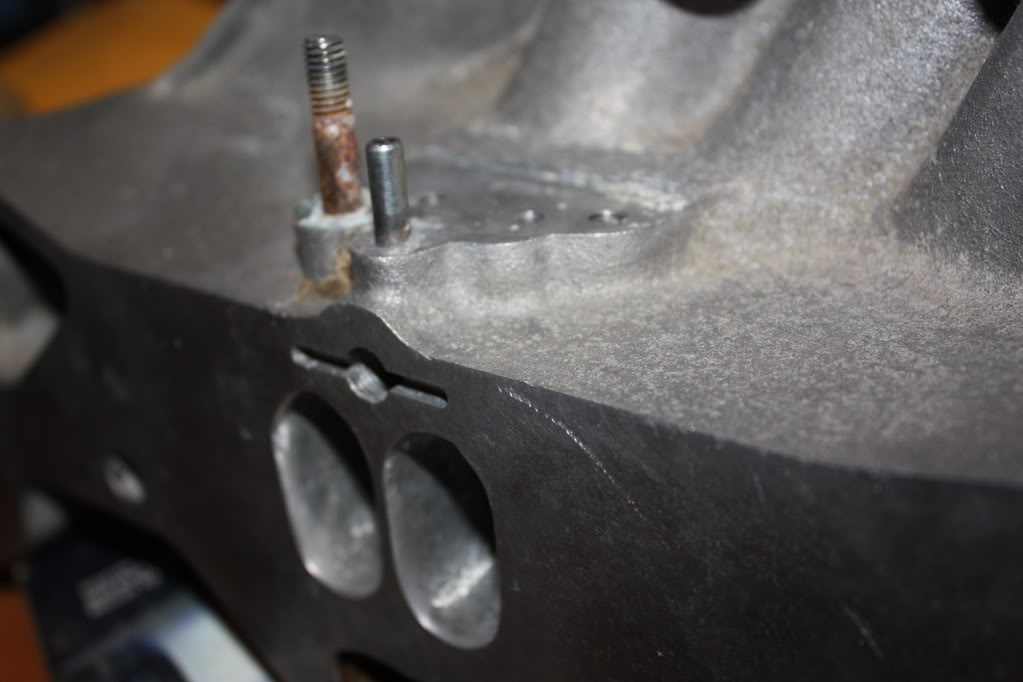
The stud and vacuum nipple are part of some sort of gizmo that attaches to the LIM. What is it, and what does it do? I can't find the part on mazdatrix' extensive engine parts listing and I can't find a labled picture of the LIM (I know there is one out there!). I'm guessing I'm not supposed to block it off because I can't find any block off plates for it. :p
The stud and vacuum nipple are part of some sort of gizmo that attaches to the LIM. What is it, and what does it do? I can't find the part on mazdatrix' extensive engine parts listing and I can't find a labled picture of the LIM (I know there is one out there!). I'm guessing I'm not supposed to block it off because I can't find any block off plates for it. :p
Trending Topics
Thread Starter
Environmentally-Hostile
Joined: Sep 2005
Posts: 1,662
Likes: 3
From: Ennis/Arlington Texas
Because the stock EFI is compromised, very early technology, and sucks ***. I've spent around $600 total for everything I need for a carb swap. It would cost that much alone for decent injectors for a custom EFI setup...
Junior Member
Joined: Dec 2015
Posts: 24
Likes: 0
From: Alabama
Thanks for the explanation! I was wondering why myself and have a 84 SE with injection issues. I'm trying to keep it though. Love the crisp response and feel of efi.

Thread
Thread Starter
Forum
Replies
Last Post
ls1swap
3rd Generation Specific (1993-2002)
17
Jun 3, 2024 03:25 PM