Just finished doing the rats nest removal. Questions...
 01-14-06, 07:54 PM
#1
Just finished doing the rats nest removal. Questions...
Ah, a hard days work... 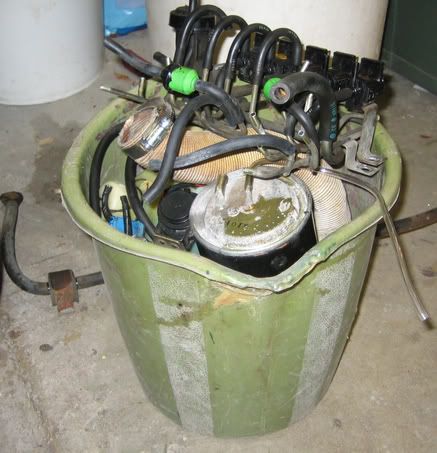
After adding the smog pump all the hoses and bolts and the rear sway bar. Weight totalled 28lbs (including the bucket.)
Now I've got some questions. I'm trying to hook up the crankcase vent/suction line. To the shutter valve? Is this correct? I noticed on the "Rats nest removal" guide It has you cap off the shutter valve completly? But wouldn't you want engine vac on the 2 hoses coming off the dip stick tube to remove moisture? Like so...
I hooked it up like this and it makes the car idle odd so I unplugged it for now.
I just need an ID on some parts.
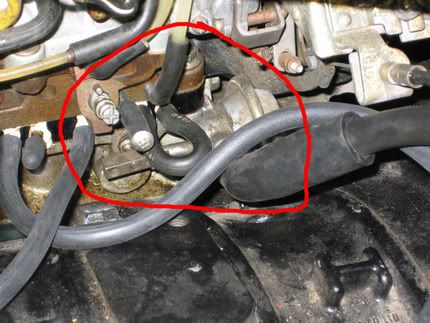
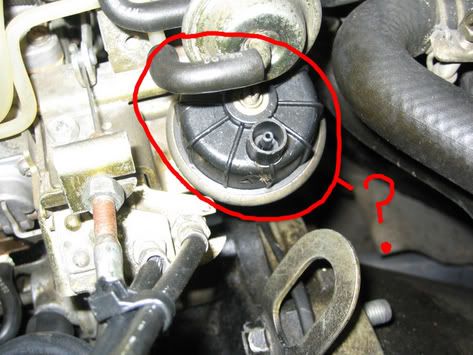
First off is this part on the carb. What is it and can I remove it? It has 2 vac lines at the top of it that I have caped they go to a solenoid (orange) that is capped off on the bottom. ( from the factory?) What is the point of it?
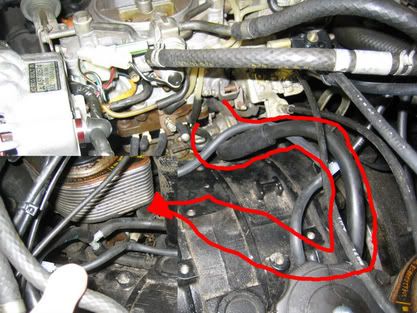
Should I hook this diaphram up to vac? Looks like it does something to idle? But the car idles fine without it? Do I need it or can it be removed?
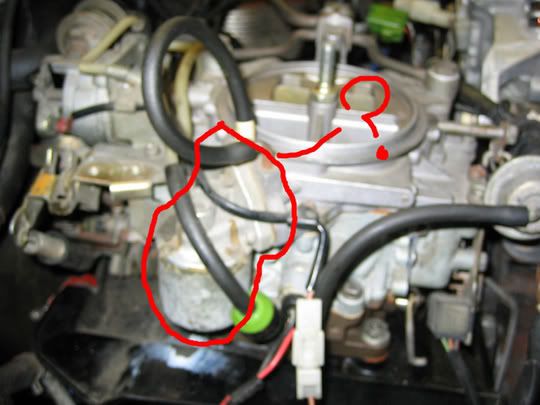
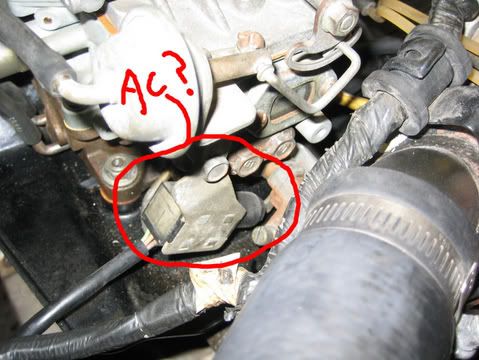
Is this an AC part? maybe to bump up the throttle when the AC is kicked on or something? What controls it, and can I remove it?
Thanks everyone!
After adding the smog pump all the hoses and bolts and the rear sway bar. Weight totalled 28lbs (including the bucket.)
Now I've got some questions. I'm trying to hook up the crankcase vent/suction line. To the shutter valve? Is this correct? I noticed on the "Rats nest removal" guide It has you cap off the shutter valve completly? But wouldn't you want engine vac on the 2 hoses coming off the dip stick tube to remove moisture? Like so...
I hooked it up like this and it makes the car idle odd so I unplugged it for now.
I just need an ID on some parts.
First off is this part on the carb. What is it and can I remove it? It has 2 vac lines at the top of it that I have caped they go to a solenoid (orange) that is capped off on the bottom. ( from the factory?) What is the point of it?
Should I hook this diaphram up to vac? Looks like it does something to idle? But the car idles fine without it? Do I need it or can it be removed?
Is this an AC part? maybe to bump up the throttle when the AC is kicked on or something? What controls it, and can I remove it?
Thanks everyone!
Last edited by vxturboxv; 01-14-06 at 07:57 PM.
 01-14-06, 08:44 PM
#2
Duct-tape fixes all

Join Date: Oct 2005
Location: Toronto, Canada
Posts: 1,000
Likes: 0
Received 0 Likes
on
0 Posts
that weird greyish thing on teh carb with the screw on it, and ahose usualy connects in teh middle... well that is for the ac. If you have a hains manual you can check it up, its in teh back of the book.
01-14-06, 11:21 PM
#3
Interstate Chop Shop CEO

Join Date: Mar 2002
Location: Running an Interstate Chop Shop
Posts: 1,110
Likes: 0
Received 1 Like
on
1 Post
Not sure about the last picture, but second to last with the black diaphram, that piece can be removed if you removed the A/C stuff. It was just the compensator. Which guide did you follow for rats nest removal? If you followed Pratch's it was listed in there what do to do with the crankcase vent. Cap off that shutter valve! Don't hook anything up to it at all. One of the vacuum ports on the piece between the carb and manifold is used and a port up on the carb (iirc) is used for the venting using the pcv type valve that is on the end of that vacuum solenoid rack you removed. If you look in your first picture at the junk in the trashcan it is the black thing with three ports at the end of the rack at the top left of the picture. Be careful, I've broken two of these because the hoses were so stuck on they snapped the ports off.
01-15-06, 01:17 AM
#4
Originally Posted by alien_rx7
Not sure about the last picture, but second to last with the black diaphram, that piece can be removed if you removed the A/C stuff. It was just the compensator. Which guide did you follow for rats nest removal? If you followed Pratch's it was listed in there what do to do with the crankcase vent. Cap off that shutter valve! Don't hook anything up to it at all. One of the vacuum ports on the piece between the carb and manifold is used and a port up on the carb (iirc) is used for the venting using the pcv type valve that is on the end of that vacuum solenoid rack you removed. If you look in your first picture at the junk in the trashcan it is the black thing with three ports at the end of the rack at the top left of the picture. Be careful, I've broken two of these because the hoses were so stuck on they snapped the ports off.
Alright, so can I Tee the two lines (dipsstick and crank case) and run them to the PVC. Then theres 2 1/4 ports on the PVC. One on top and one on bottom. Which ones gets vac? Or do both? Does one get capped off?
Thanks!
01-15-06, 02:43 AM
#5
Interstate Chop Shop CEO
Join Date: Mar 2002
Location: Running an Interstate Chop Shop
Posts: 1,110
Likes: 0
Received 1 Like
on
1 Post
Originally Posted by vxturboxv
Alright, so can I Tee the two lines (dipsstick and crank case) and run them to the PVC. Then theres 2 1/4 ports on the PVC. One on top and one on bottom. Which ones gets vac? Or do both? Does one get capped off?
Thanks!
Thanks!
01-15-06, 06:59 PM
#6
Interstate Chop Shop CEO
Join Date: Mar 2002
Location: Running an Interstate Chop Shop
Posts: 1,110
Likes: 0
Received 1 Like
on
1 Post
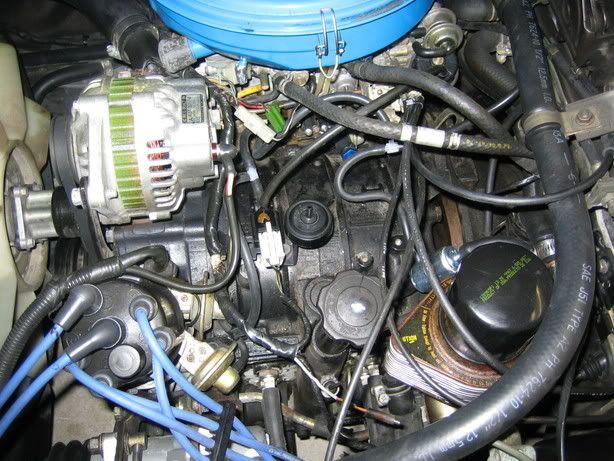
Ok, got the picture and looked at some of the other things you listed.

As you can see, the purge valve is hooked to the outlet on the fill tube, then T'd with one outlet going to the purge valve and the other on to the carb. Next is the top port on the purge valve goes to a vacuum outlet by the mixture screw and the bottom port goes to a vacuum outlet on the plate between the carb and manifold.
The other outlet on the housing goes to a metal line on the fire wall that leads over to the EGR tank on the passenger side.
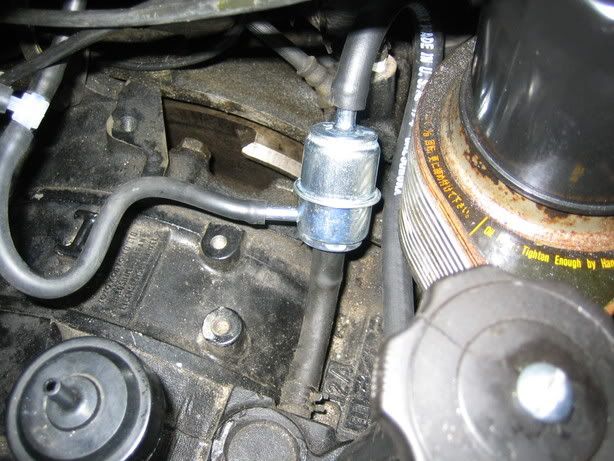
The third to last picture with the big pot. I still have that on the carb. No change here.
The last picture with what looks like a switch. That is also still connected on the carb and into the engine harness. No change here.
Hope this all helps! Oh and ignore the dirty engine and missing spark plug wires. It runs great! I have the FC ignition mod done and the wires on the dizzy are the trailing wires on the leading position.
As you can see, the purge valve is hooked to the outlet on the fill tube, then T'd with one outlet going to the purge valve and the other on to the carb. Next is the top port on the purge valve goes to a vacuum outlet by the mixture screw and the bottom port goes to a vacuum outlet on the plate between the carb and manifold.
The other outlet on the housing goes to a metal line on the fire wall that leads over to the EGR tank on the passenger side.
The third to last picture with the big pot. I still have that on the carb. No change here.
The last picture with what looks like a switch. That is also still connected on the carb and into the engine harness. No change here.
Hope this all helps! Oh and ignore the dirty engine and missing spark plug wires. It runs great! I have the FC ignition mod done and the wires on the dizzy are the trailing wires on the leading position.
01-15-06, 07:01 PM
#7
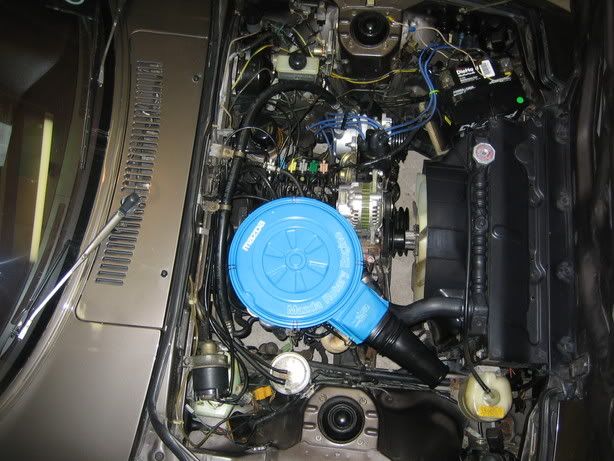
Heres my solution. I don't know what car this valve is for but it worked great. I get a good solid 19lbs of vac at idle and I can unscrew the oil cap and feel a really good amount of suction under the cap.
I cut the original rat nest bundle and kept one section that holds the orig PCV (which I will remove and don't need anymore) and the AC relay. Heres the final product. I'll degrease and pressure clean everything later as well as paint.
VS
Thanks everyone!
I cut the original rat nest bundle and kept one section that holds the orig PCV (which I will remove and don't need anymore) and the AC relay. Heres the final product. I'll degrease and pressure clean everything later as well as paint.
VS
Thanks everyone!
Last edited by vxturboxv; 01-15-06 at 07:04 PM.
Trending Topics
07-10-06, 06:07 PM
#8
Senior Member
Join Date: Mar 2006
Location: Canada
Posts: 634
Likes: 0
Received 0 Likes
on
0 Posts
haha im sorry to say this but i would rather have my car still idle at 350 rpms as smooth as glass, than have it cleaner under the hood. Gotta get on that idle problem. Soon...Thanks for the link (you know who you are)

Thread
Thread Starter
Forum
Replies
Last Post
Turblown
Vendor Classifieds
12
10-17-20 03:25 PM
LongDuck
1st Generation Specific (1979-1985)
12
10-07-15 08:12 PM
ls1swap
3rd Generation Specific (1993-2002)
12
10-01-15 07:58 PM