
How to tear down a 12A without a shop


How to tear down a 12A without a shop
OK, we've all been there. Could use a shop but can't afford one. Here's what I do.
Get a small square piece of plywood to work on, then put the engine on it
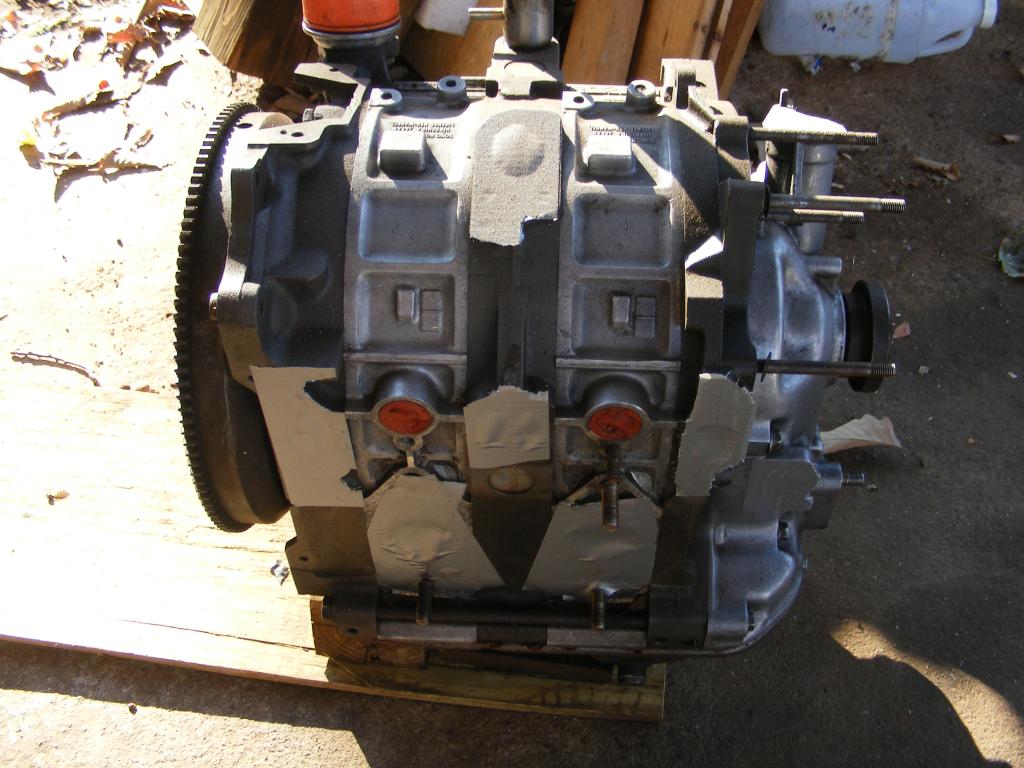
Next put the engine on its end, resting on the flywheel
Now remove the oil pan and oil strainer
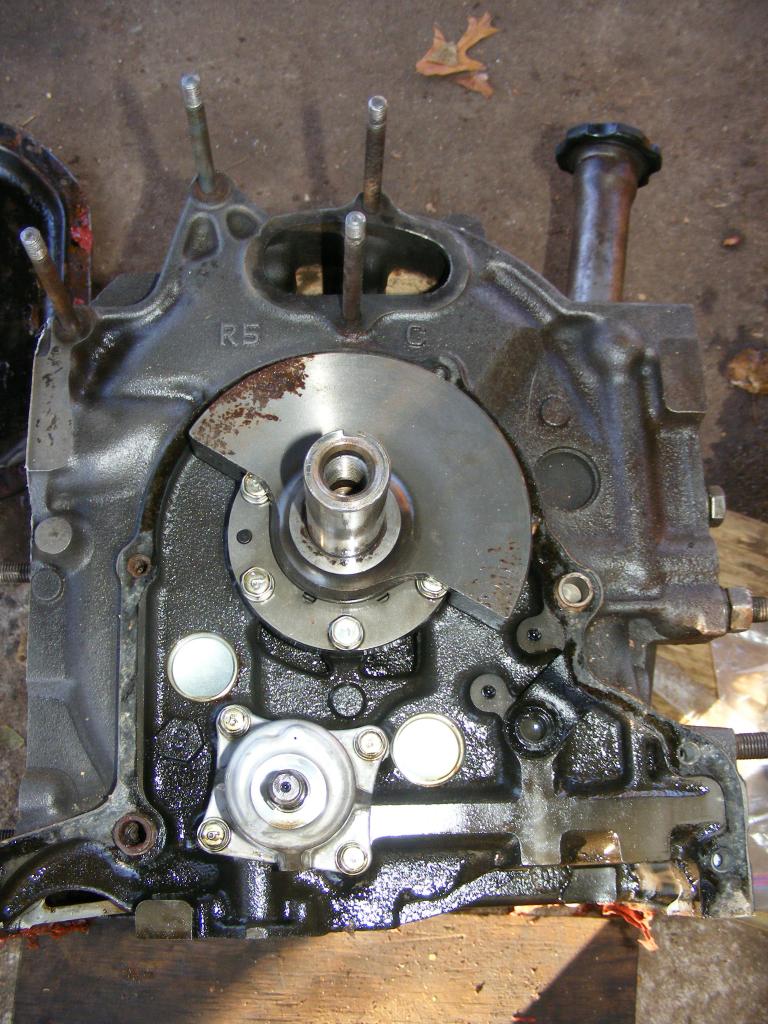
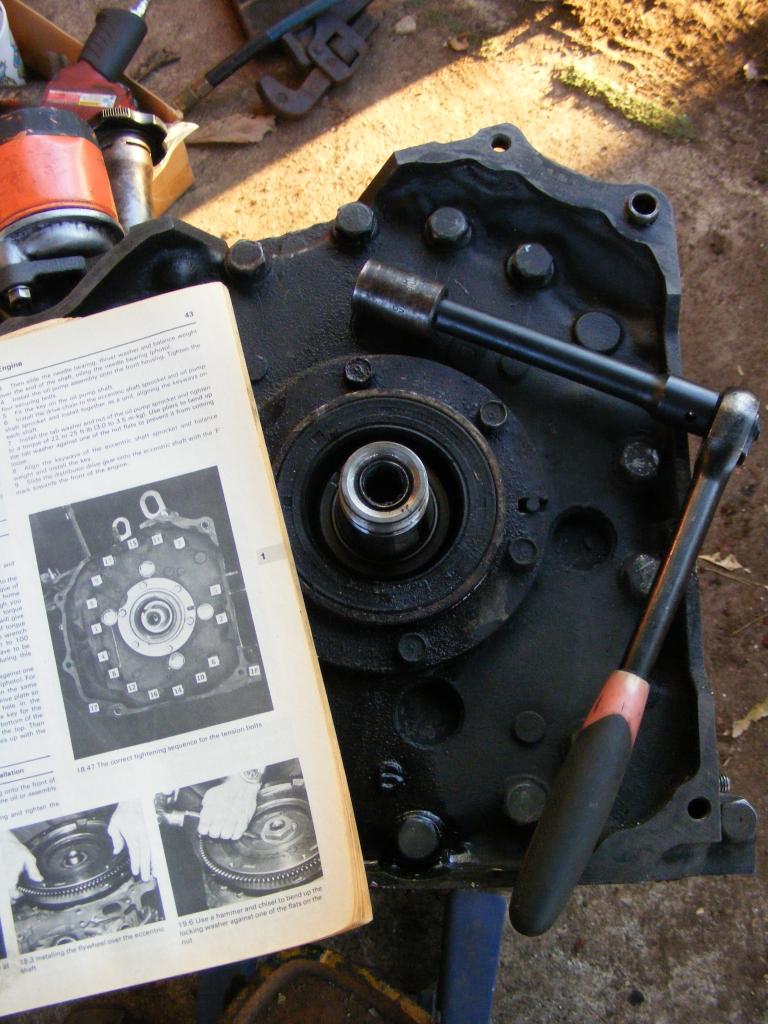
Then do the eccentric shaft pulley and front cover (that 19 mm eccentric shaft bolt can be nasty; I used a 24" breaker bar, having the fly wheel firmly mounted on the plywood helps)
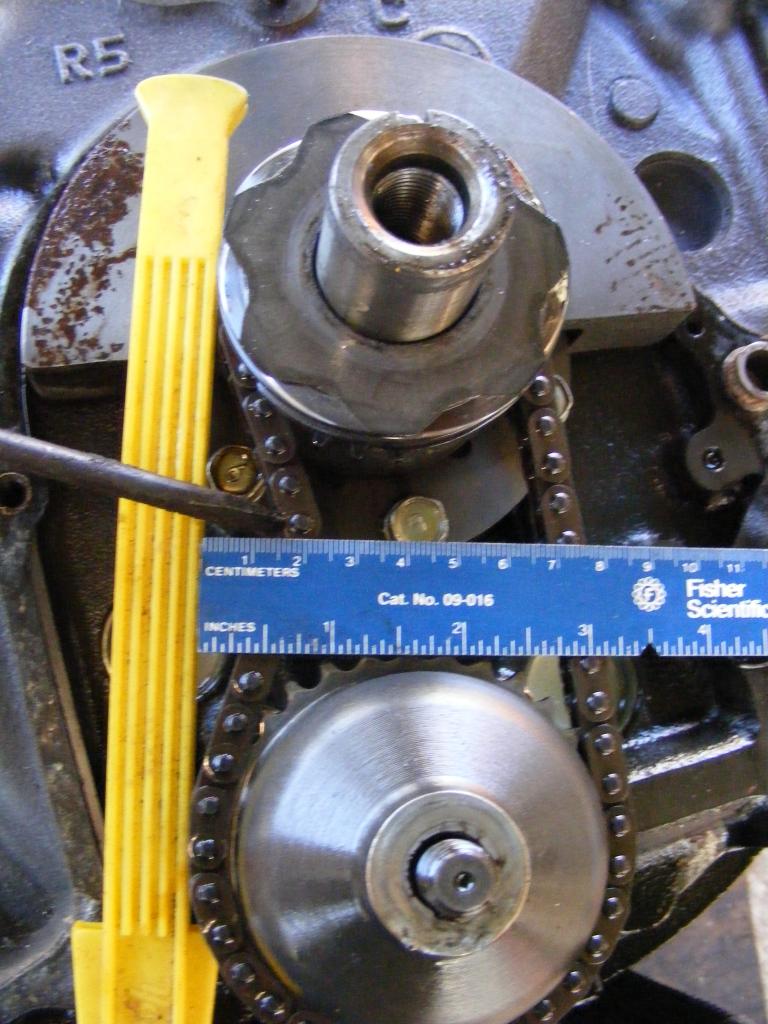
Now check the oil pump chain for play. Write it down, then remove the oil pump drive
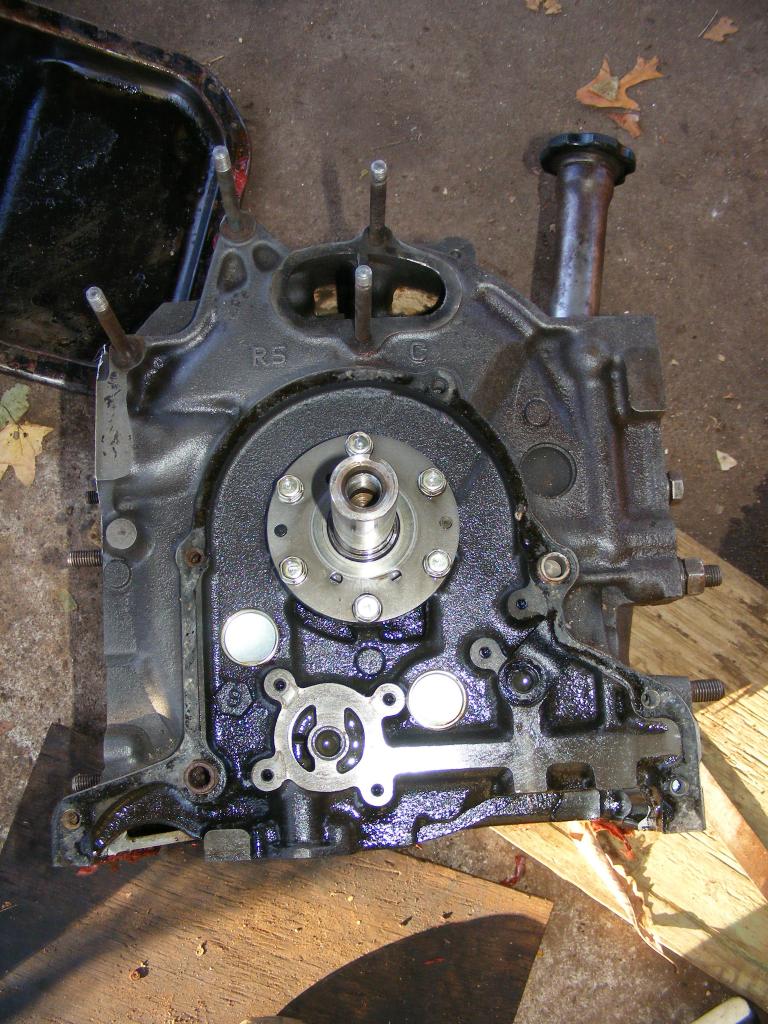
Now remove the oil pump and balance weight
Next you need to get that big old 54 mm nut off the flywheel. First, put the 12A back down horizontally on the plywood.
Then you need to get creative, like borrow the neighbors home made 54 mm nut socket. You drive it with the monkey wrench and the 2 lb. sledge
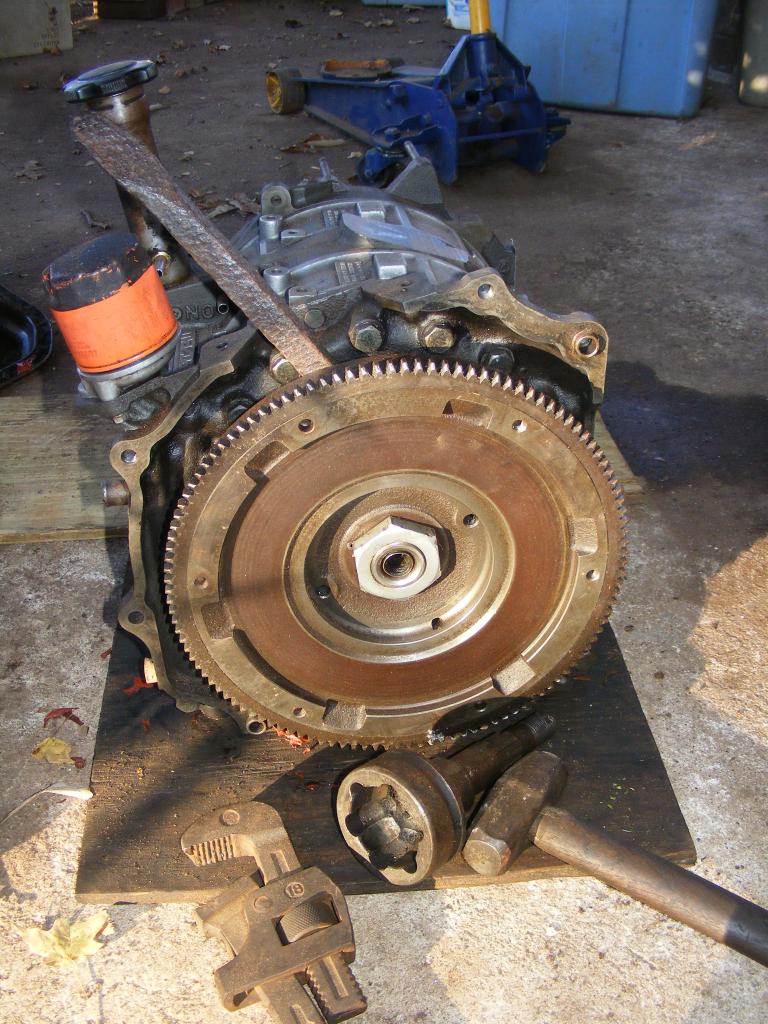
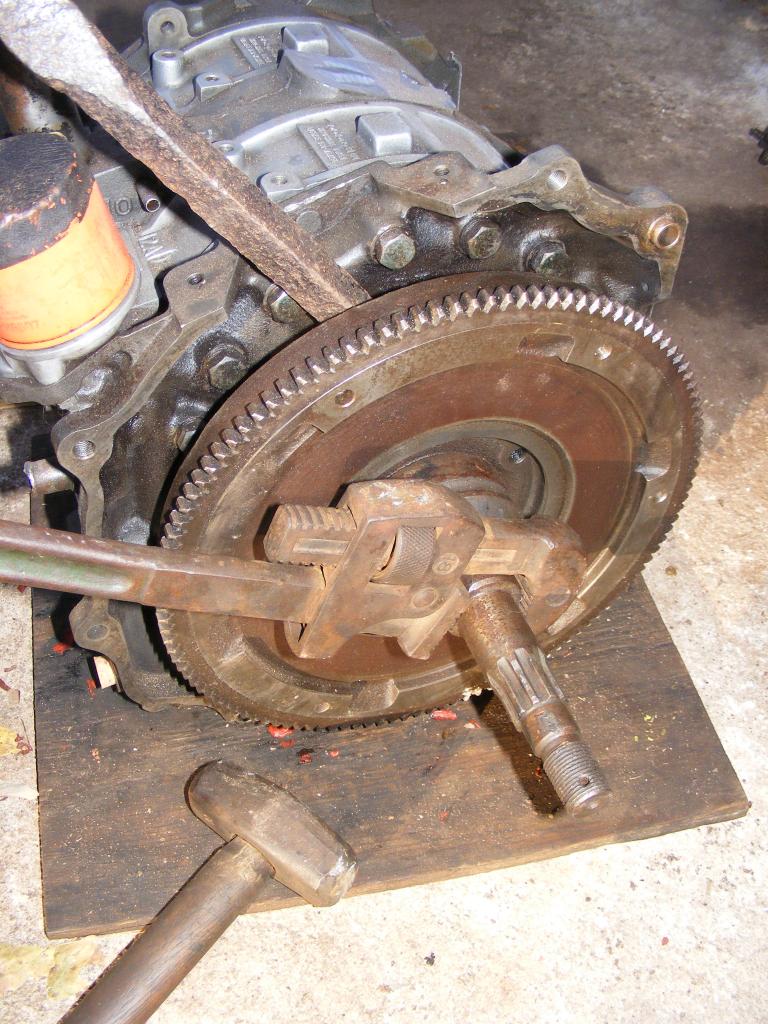
Now comes the hard part, removing the flywheel. Unless you know The Trick. Here it is
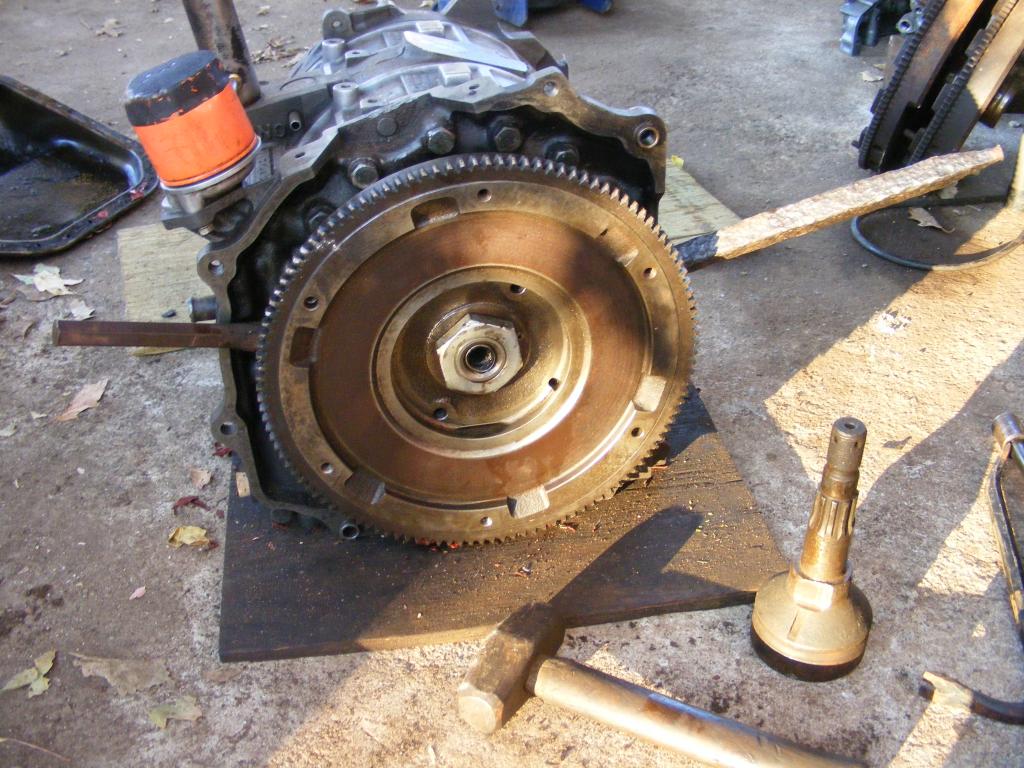
Flywheel done

Get a small square piece of plywood to work on, then put the engine on it
Next put the engine on its end, resting on the flywheel
Now remove the oil pan and oil strainer
Then do the eccentric shaft pulley and front cover (that 19 mm eccentric shaft bolt can be nasty; I used a 24" breaker bar, having the fly wheel firmly mounted on the plywood helps)
Now check the oil pump chain for play. Write it down, then remove the oil pump drive
Now remove the oil pump and balance weight
Next you need to get that big old 54 mm nut off the flywheel. First, put the 12A back down horizontally on the plywood.
Then you need to get creative, like borrow the neighbors home made 54 mm nut socket. You drive it with the monkey wrench and the 2 lb. sledge
Now comes the hard part, removing the flywheel. Unless you know The Trick. Here it is
Flywheel done
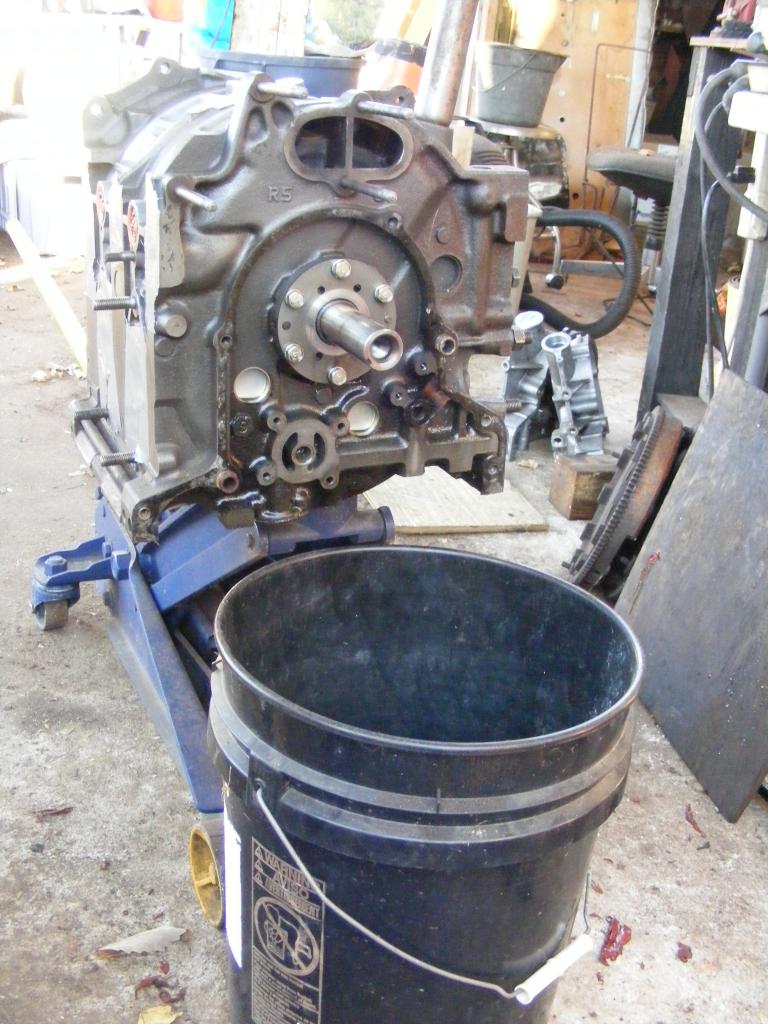
Now you need to load the engine onto the engine mount prior to disassembly of the housings. I use a floor jack and a 5 gallon bucket
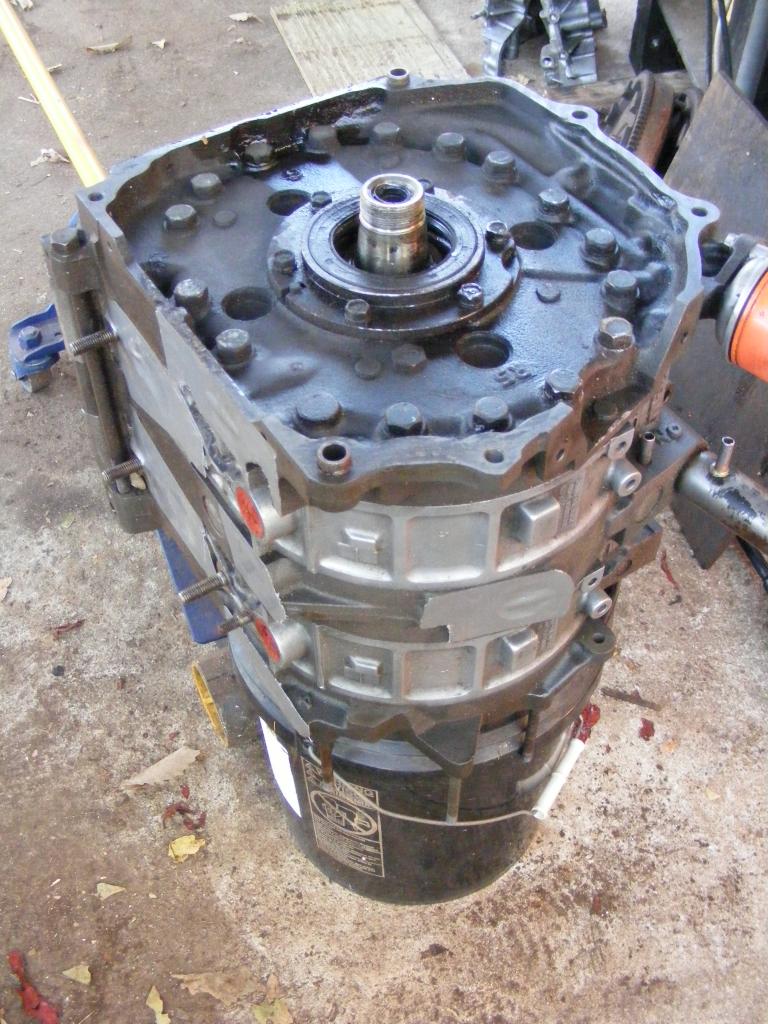
Next remove the tension bolts, just a little at a time, according to the sequence designated in the manual

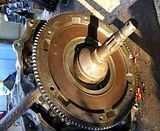
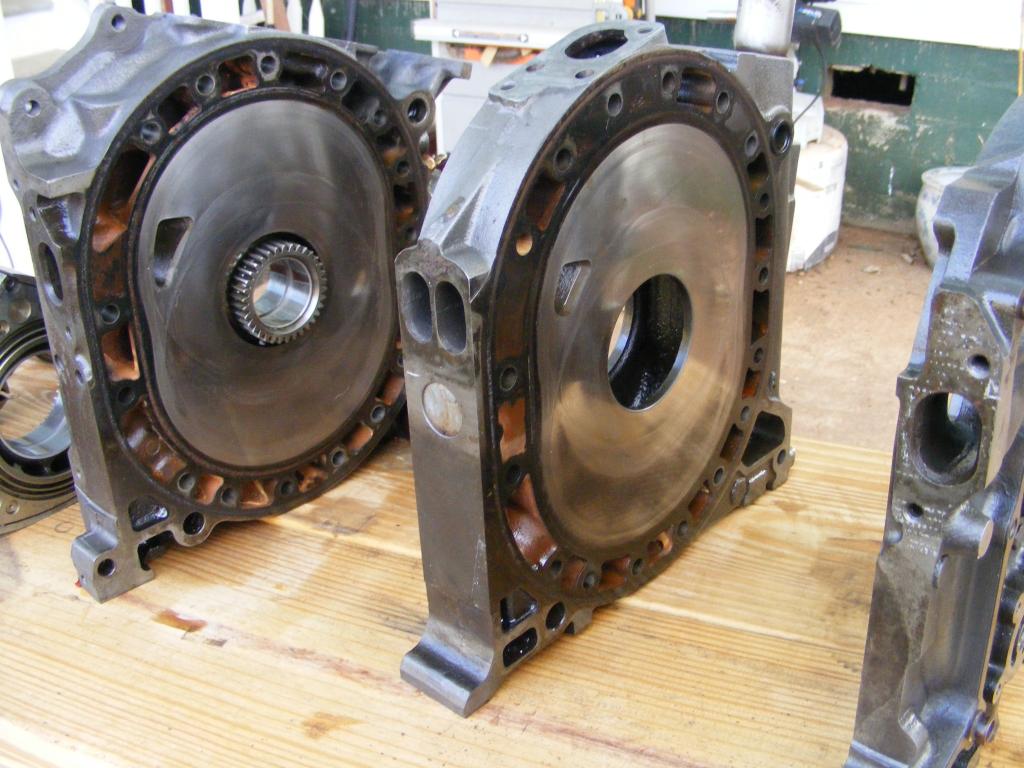
Off comes the rear end plate and there you go, a rotor
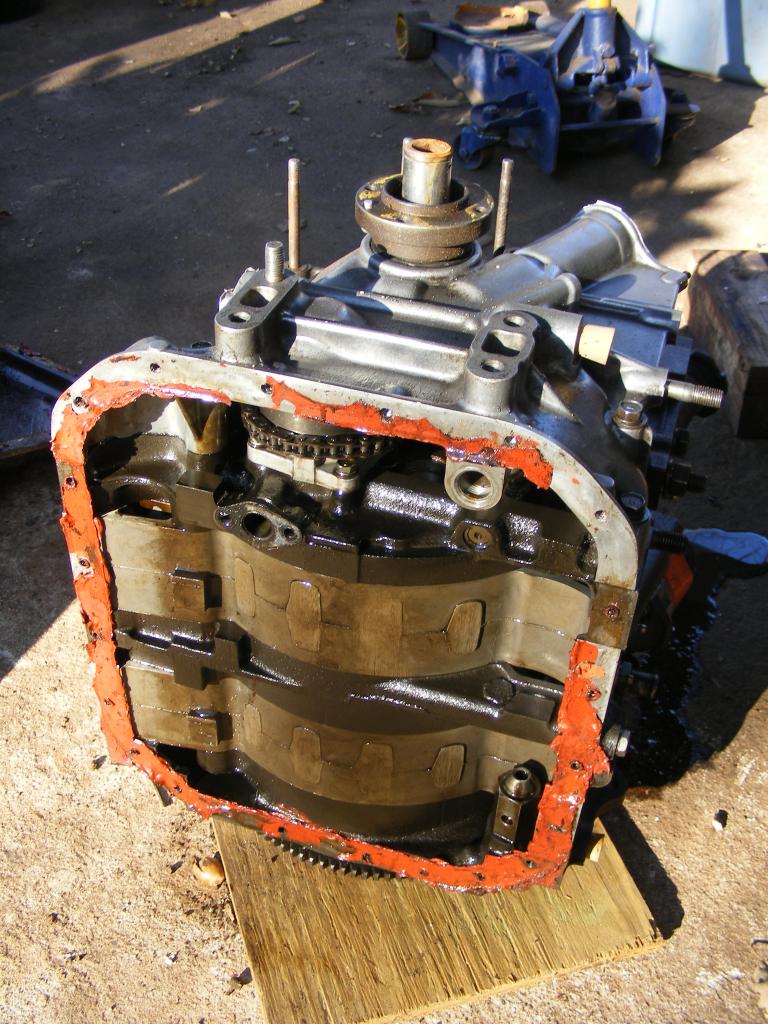
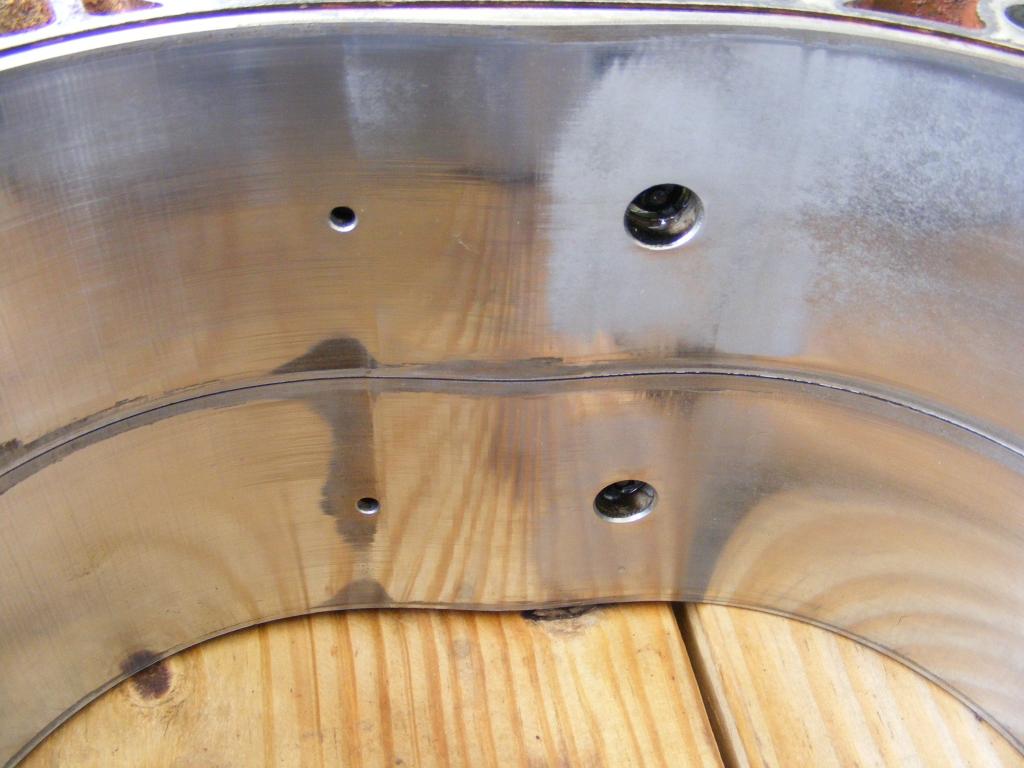
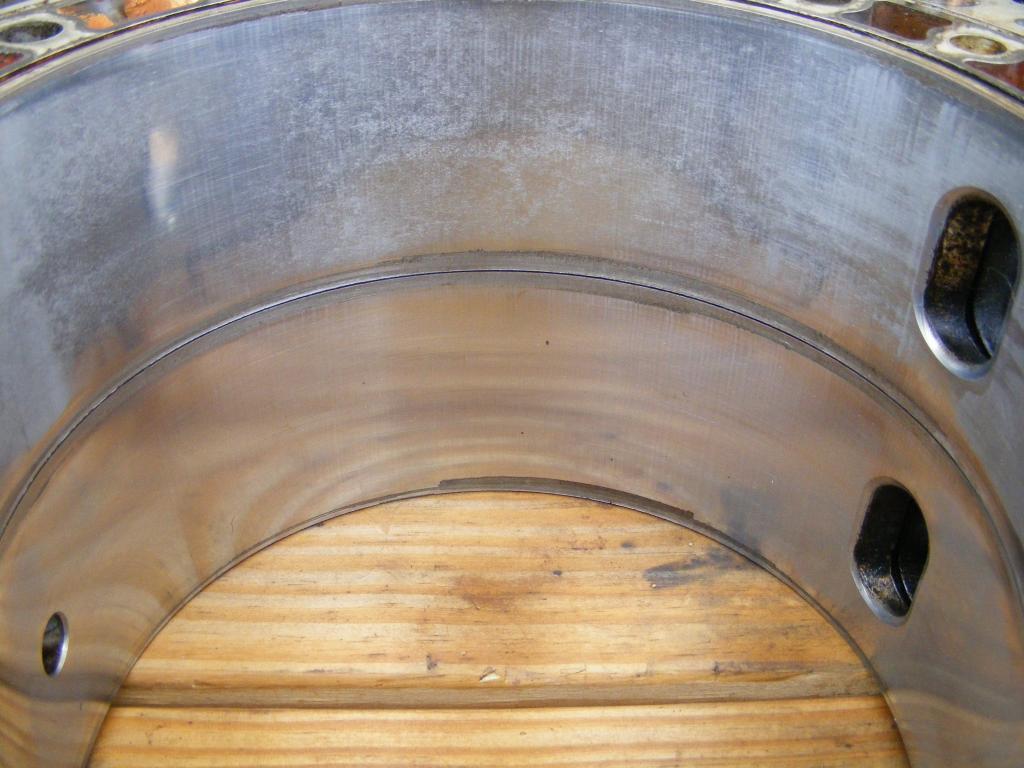
Lift out the rear rotor and find out the news: Is the rotor housing any good?

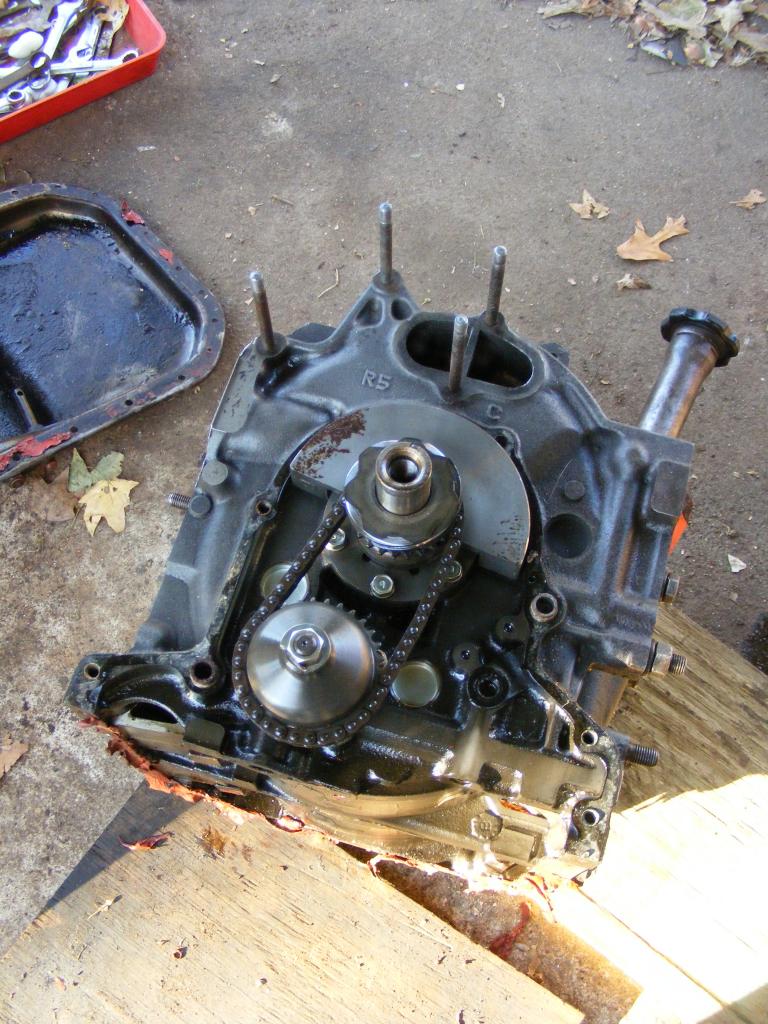
Lift off the rear rotor housing, then comes the midplate and eccentric shaft

Finally take apart the front rotor, rotor housing and front plate.
You're done!
Next remove the tension bolts, just a little at a time, according to the sequence designated in the manual
Off comes the rear end plate and there you go, a rotor
Lift out the rear rotor and find out the news: Is the rotor housing any good?
Lift off the rear rotor housing, then comes the midplate and eccentric shaft
Finally take apart the front rotor, rotor housing and front plate.
You're done!
Congrats on tearing it down! I use different techniques, but good job!
Thanks for posting so many pics! I see 18 tension bolts and a thick rib. Good for 300HP at least.
Notice how the NO plate has no coolant flow through some sections? Yeah, not a very good design. How is the step wear? Is it Christmas time for Divindriver?
You never posted a pic of your oil pump. Is it the 17mm type? It should be because...
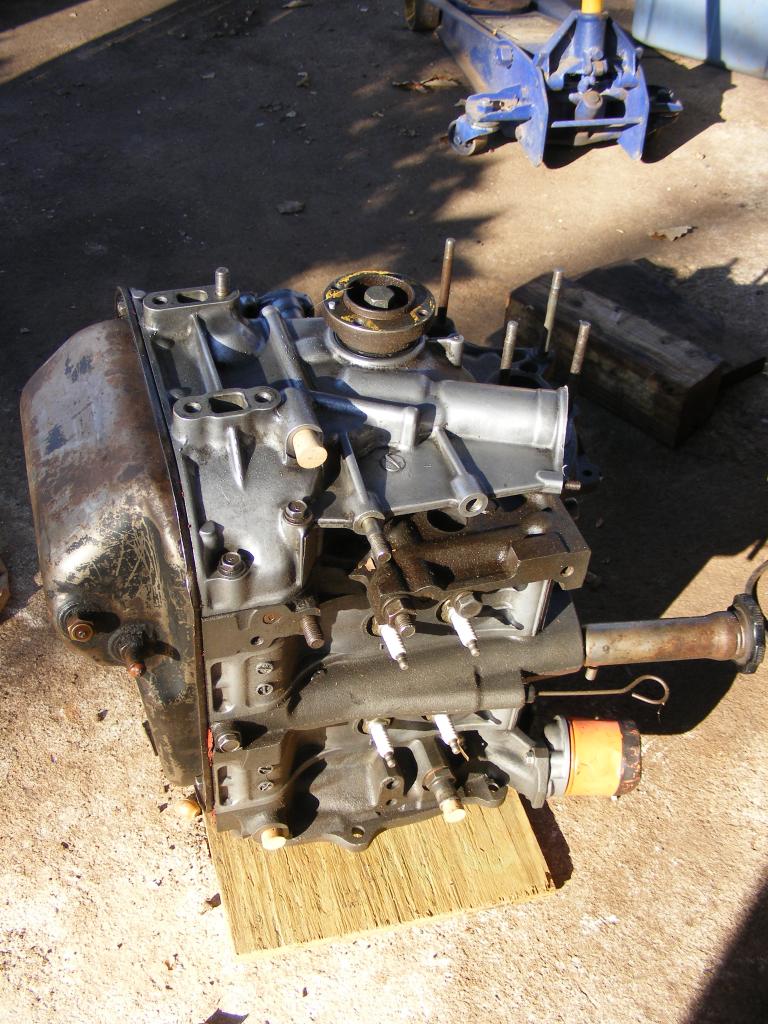
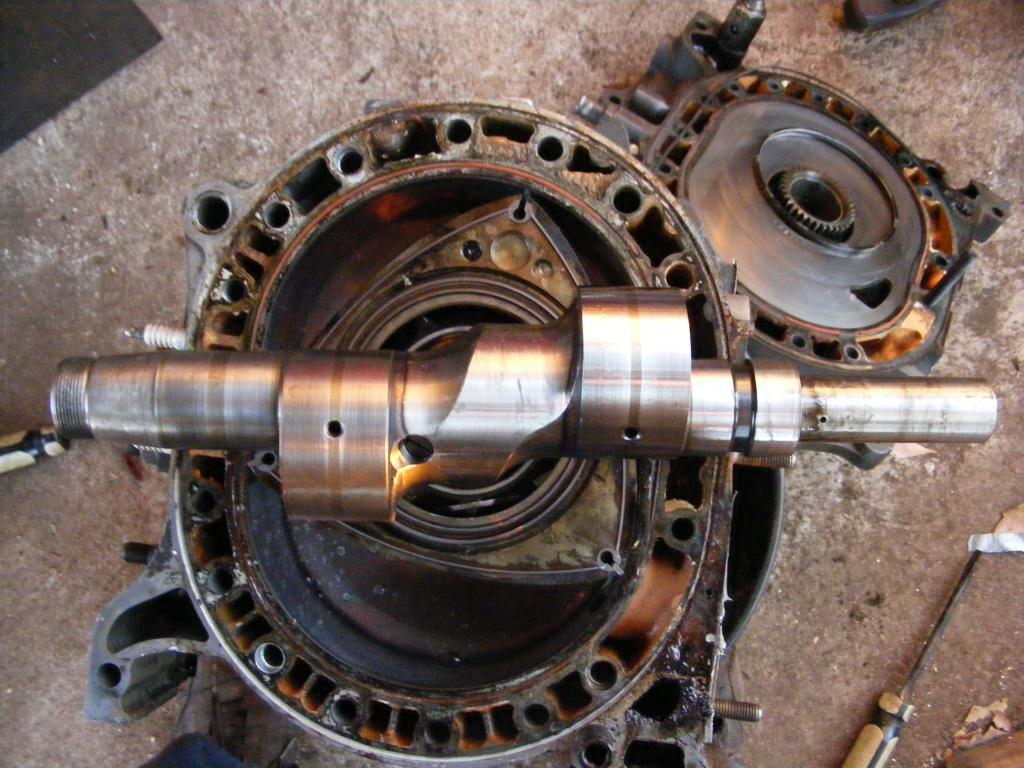
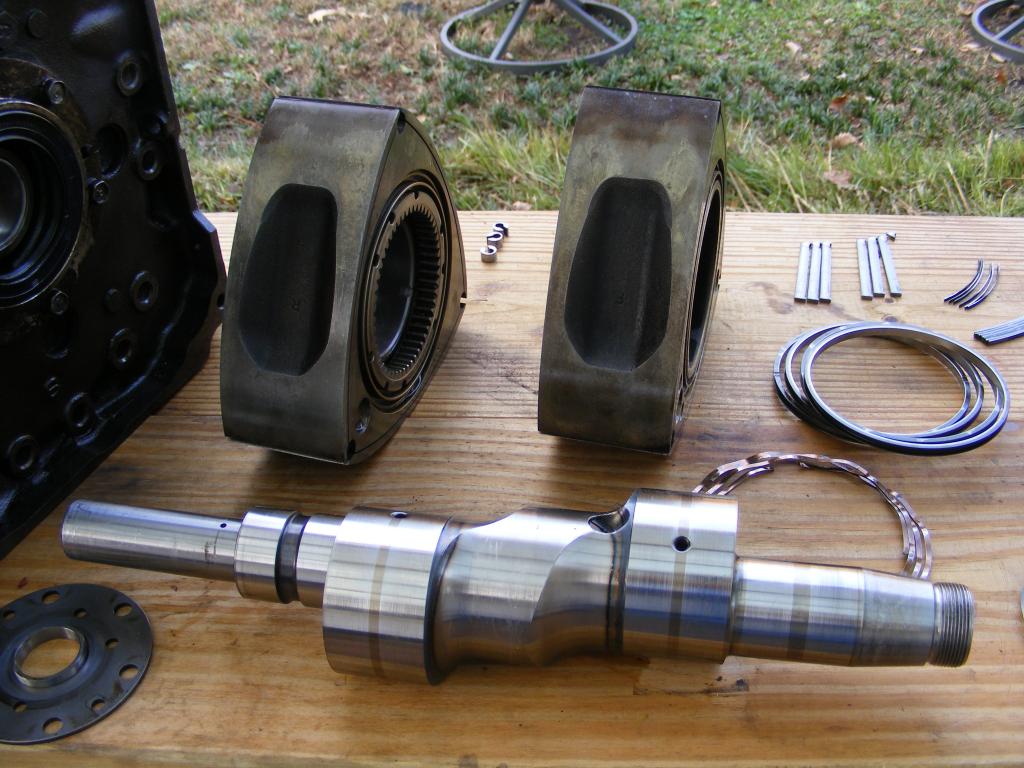
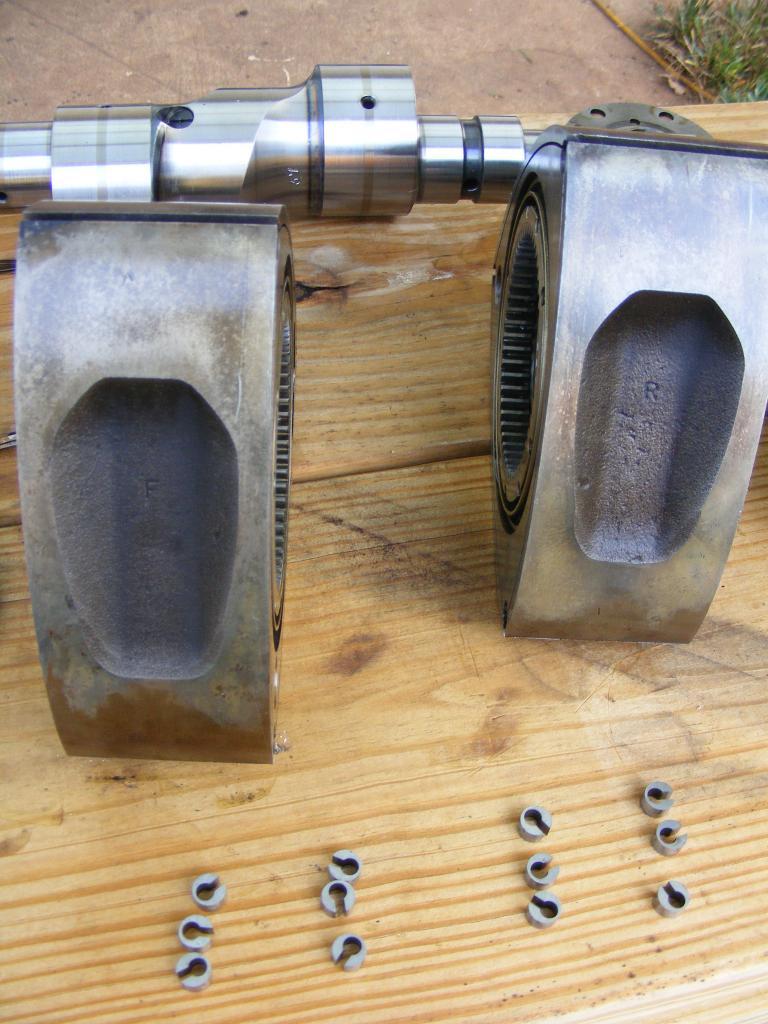
I see a dark colored oil squirter in the shaft. This means it's a full flow. You can test the depth of the hole if you have a narrow probe. If it goes way deep into the shaft, you know there is no check ball in there. I like to use an impact screwdriver and something soft under the shaft to protect it. Swap in some checkball squirters from any 83 or later shaft, but the smaller 82 and older type will work fine. Blue locktite is fine to use, but red if you have it. Make sure the threads are clean (don't use duck tape here lol). Interestingly some of these squirters haven't been exactly tight in the shafts so it's not like they back out on their own, but better to be sure they're in there.
Notice your front counterweight? That is the 74 to 80 half circle type meant to be used with a 30 pound flywheel. If you have an 81-82 front CW lying around, use it and an 81-82 flywheel, but if you don't the stock half circle type can strill be used as it still offsets the same amount of weighght - it just weighs more static so doesn't help the heavy stock rotors any... if that makes sense.
Please be sure to post more pics and info on this build!
Thanks for posting so many pics! I see 18 tension bolts and a thick rib. Good for 300HP at least.
Notice how the NO plate has no coolant flow through some sections? Yeah, not a very good design. How is the step wear? Is it Christmas time for Divindriver?
You never posted a pic of your oil pump. Is it the 17mm type? It should be because...
I see a dark colored oil squirter in the shaft. This means it's a full flow.
You can test the depth of the hole if you have a narrow probe. If it goes way deep into the shaft, you know there is no check ball in there. I like to use an impact screwdriver and something soft under the shaft to protect it. Swap in some checkball squirters from any 83 or later shaft, but the smaller 82 and older type will work fine. Blue locktite is fine to use, but red if you have it. Make sure the threads are clean (don't use duck tape here lol). Interestingly some of these squirters haven't been exactly tight in the shafts so it's not like they back out on their own, but better to be sure they're in there.Notice your front counterweight? That is the 74 to 80 half circle type meant to be used with a 30 pound flywheel. If you have an 81-82 front CW lying around, use it and an 81-82 flywheel, but if you don't the stock half circle type can strill be used as it still offsets the same amount of weighght - it just weighs more static so doesn't help the heavy stock rotors any... if that makes sense.
Please be sure to post more pics and info on this build!
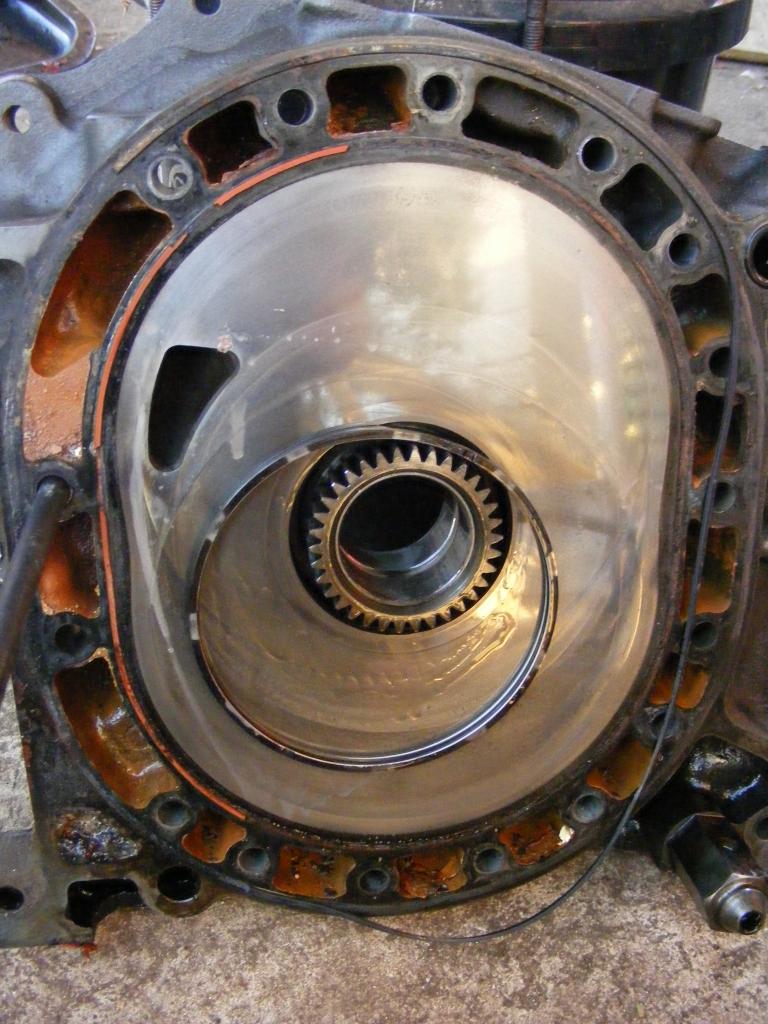
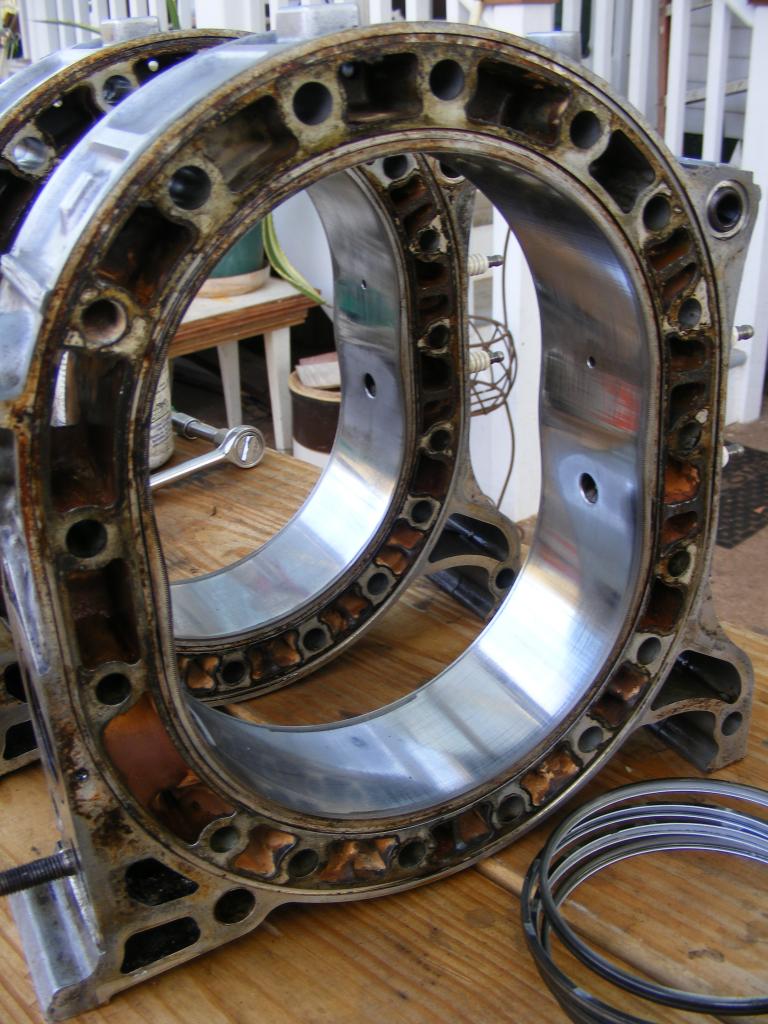
You asked about rotor housing condition with this picture.
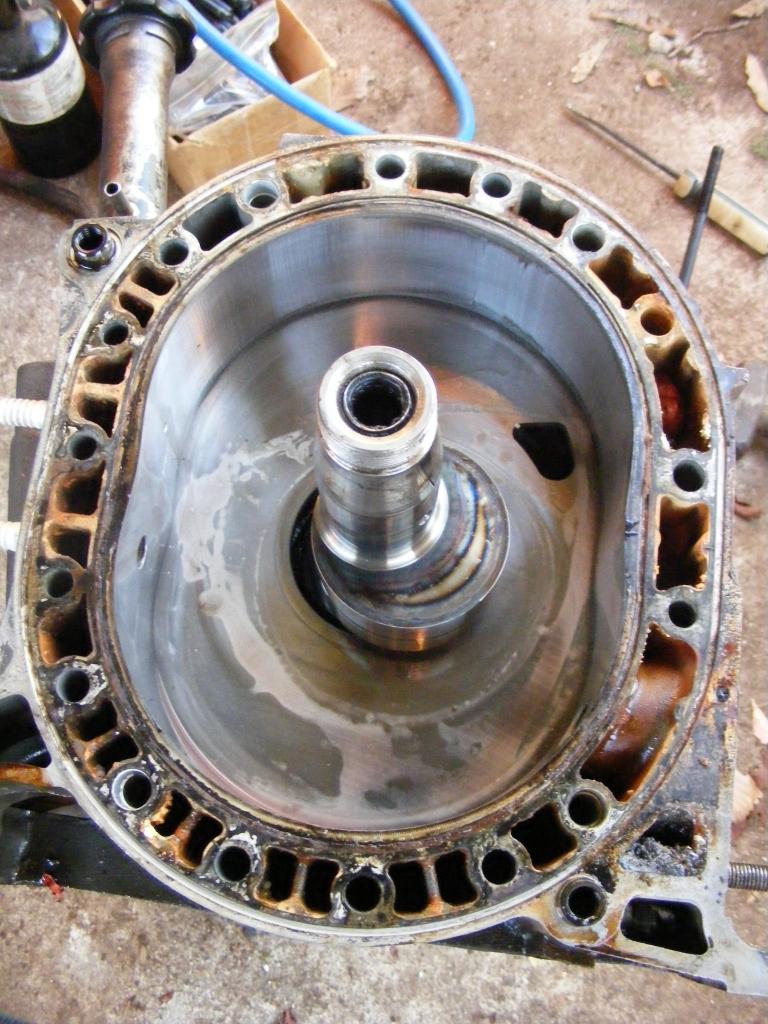
I'd say that's fine. In this day there are so few housings left, I'd be perfectly fine using those again. I recommend Atkins apex seals because they can break in and run excellently on missing chrome like that. We're talking 100psi as long as the side seals are within spec etc.
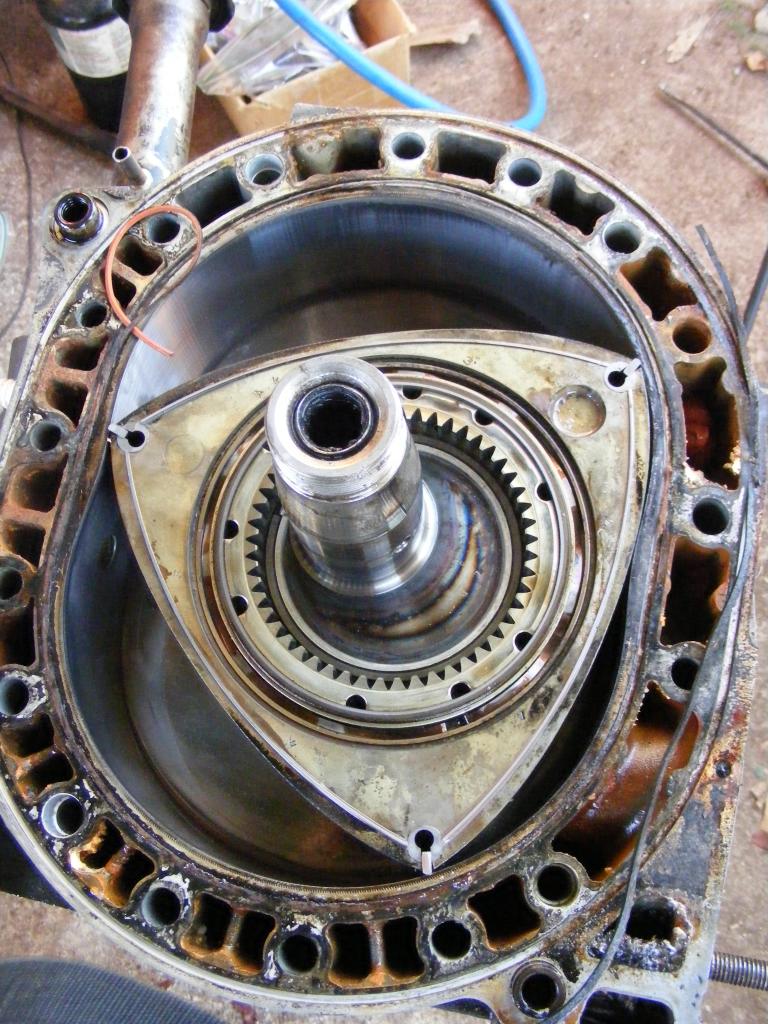
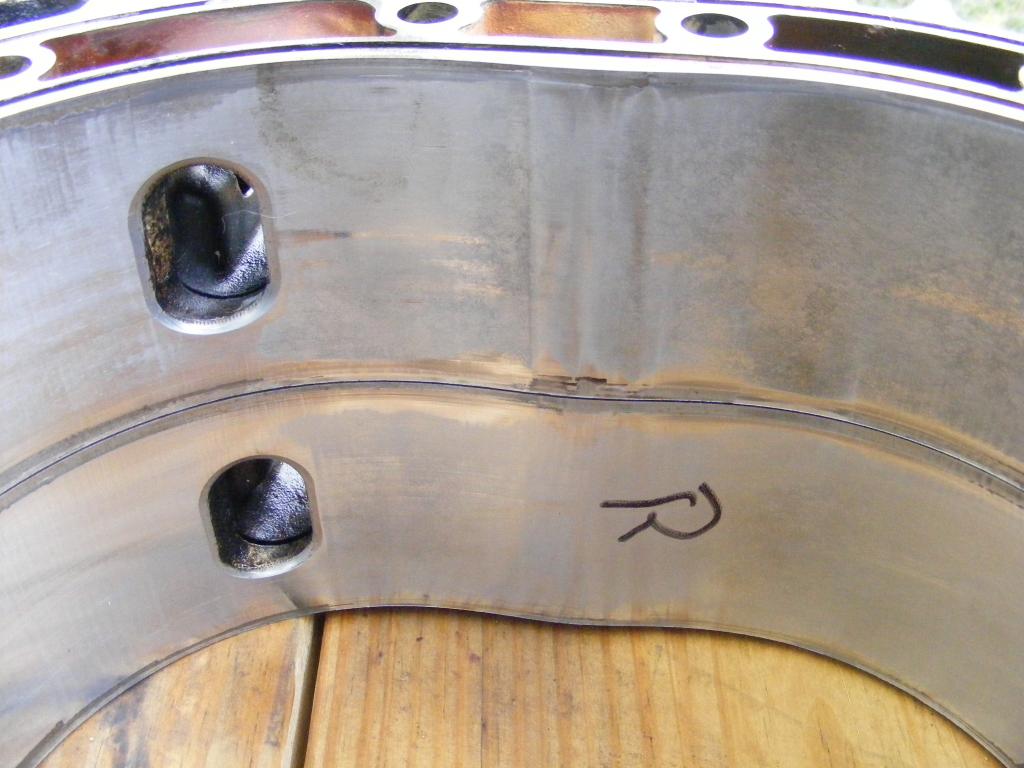
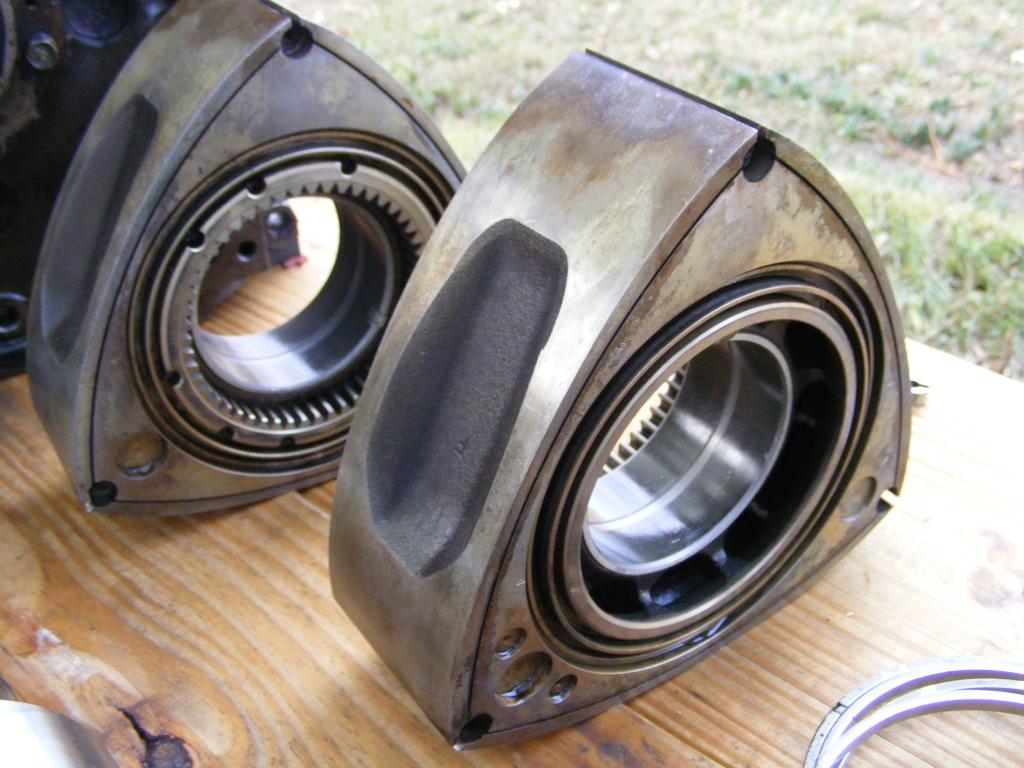
One thing you didn't notice is the pilot seal has been hammered by the trans input shaft. This happens when the PO didn't install a new pilot bearing in deep enough. It leaves not enough room for the seal, which then gets destroyed against the input shaft shoulder. What I do when I find this is I obviously take out the dead seal, then tap the pilot bearing in until it hits the stopper inside the shaft (it's a narrow section that most folks are affraid to find for some reason). It's there for a reason - might as well use it. Then tap in a new pilot seal. You'll see it goes in a good bit deeper. Also remember to grease it up. But that's after the engine is back together.
What's your next move?
I'd say that's fine. In this day there are so few housings left, I'd be perfectly fine using those again. I recommend Atkins apex seals because they can break in and run excellently on missing chrome like that. We're talking 100psi as long as the side seals are within spec etc.
One thing you didn't notice is the pilot seal has been hammered by the trans input shaft. This happens when the PO didn't install a new pilot bearing in deep enough. It leaves not enough room for the seal, which then gets destroyed against the input shaft shoulder. What I do when I find this is I obviously take out the dead seal, then tap the pilot bearing in until it hits the stopper inside the shaft (it's a narrow section that most folks are affraid to find for some reason). It's there for a reason - might as well use it. Then tap in a new pilot seal. You'll see it goes in a good bit deeper. Also remember to grease it up. But that's after the engine is back together.
What's your next move?
Thanks for the perspective on the rotor housings Jeff, I've rejected 2 or 3 FB 12A rotor housings because of similar minor edge flaking like that. Maybe I need to reconsider, they are probably reusable (I thought so all along, but the local builders advised against it. Of course, they were selling 12A rotor housings)
In any case, the SA 12A rotor housings won't be useful to me, since I have two really good ones and two pretty good ones from 84/85 12As, should be enough to last me for the next 20 years or so (I also have one really good SA housing and another pretty good one, with the edge damage, in addition to the two from this engine).
The flat housings look pretty good, real shiny and just light but noticeable step wear, primarily on the midhousing (figures). They could easily be lapped, but I know you don't exactly like that idea. I'll clean them all up and post some pics. Who knows, maybe somebody can use them? (DD, nudge, nudge)
On the oil pumps, I need to figure all that stuff out yet. Looks pretty much like the oil pump that came out of the FB 12As, but I didn't look closely.
I did notice that bashed pilot bearing seal in the eccentric shaft, what a mess. Since I have a couple other good eshafts, its probably not an issue for me, at least.
Good to know the Atkins apex seals are the way to go, I wanted to do that, mostly because they are much more cost effective than the stock Mazda parts. But its good to hear some positive feedback on them (again, the local builders are selling Mazda apex seals, so hard to get good info).
Here's a little video on the 54 mm flywheel nut removal tool (clic the pic). Pretty cool, huh?
Loving your Can-Do spirit Ray!. Bucket is back-yard genius. I sprung for the actual rotary-engine-stand plate, but this is pretty smart. As for front and rear Main nuts, I supplied the rear nut socket ($32 at Sears) and my mechanic buzzed them off with his Pneumatics. No drama other than grunting the 12a to his shop...in my subaru wagon!
You using any How-2 DVDs?
Mazdatrix one is great and has a lot of "secrets" tips that make it $30 well spent.
Also some GREAT freebie videos on the Pineappleracing.com site
Will watch with interest! 'Luck and THANKS!
Stu Aull
80GS
Alaska
You using any How-2 DVDs?
Mazdatrix one is great and has a lot of "secrets" tips that make it $30 well spent.
Also some GREAT freebie videos on the Pineappleracing.com site
Will watch with interest! 'Luck and THANKS!
Stu Aull
80GS
Alaska
Thanks Stu.
No, I avoid those videos, they take all the adventure out of it.
Besides, they slow you down. It took me less than 3 hours start to finish on that project, most of it spent on the main bolt, flywheel nut, flywheel and a couple beer breaks.
Might use the videos to put it back together though.
No, I avoid those videos, they take all the adventure out of it.
Besides, they slow you down. It took me less than 3 hours start to finish on that project, most of it spent on the main bolt, flywheel nut, flywheel and a couple beer breaks.
Might use the videos to put it back together though.
Trending Topics


Blind Hole Bearing Puller - Needle Bearing Puller
I use one of these to pull flywheels.... Takes about 2 seconds give or take.
I just stole this tool from the old man at the shop last week and I am in love!!
EDIT: Oh and that engine looks GOOD!
I use one of these to pull flywheels.... Takes about 2 seconds give or take.
I just stole this tool from the old man at the shop last week and I am in love!!
EDIT: Oh and that engine looks GOOD!

a method that i use is after the flywheel nut is off, tap the clutch mounting surface with a hammer..a 3lb sledge works well. do not tap the area where the disc's friction surface touches the flywheel, just the outer edge. the flywheel is a tapered fit and needs to be nudged in order to be remoived.

Joined: Aug 2011
Posts: 3,078
Likes: 42
From: Cambridge, Minnesota
Awesome pics and cool to see, will use some of these tricks when I need to pull my extra one apart!
I did watch one of Aaron's videos a few months ago, about putting together a 13B, as I recall. Very nicely done, clearly and informatively presented.
If I get a chance I'll clean up those rotor and end housings today and post up pics. I'd be interested in opinions on whether I should have torn it down or used it like it was!
If I get a chance I'll clean up those rotor and end housings today and post up pics. I'd be interested in opinions on whether I should have torn it down or used it like it was!
You want my opinion? It had an NO plate. It's practically telling you "NO, don't use me! Give me to Divindriver!"
I drove an engine around with an NO plate before. It's not fun.
By the way Aaron Cake uses too much lube! So don't follow his videos verbatim. Just ask anyone else who has built a lot of engines. That much lube can cause first start problems. Plus vaseline isn't a very good lubricant anyway. I learned that the hard way. It swelled my coolant seals and allowed one to get crushed. I use a little bit of wheel bearing grease to hold them and the metal seals in now. And some engine oil as lube. Works perfect every time.
The only issue I'd have with Hylomar Robert is that it probably costs three times as much as bearing grease, just because it starts with a capital letter.
Jeff, I agree, Aaron does like to glob on that Vasoline:
But hey, we all have our idiosyncrasies.
I personally wouldn't go with the Vasoline because it also starts with a capital letter. But you know, it probably doesn't smell as bad as bearing grease, if you're married.
I like your idea of using bearing grease for the sticky parts and engine oil for the slippery parts, sounds like a good compromise.
I had a little time to clean up the R5 parts and learn a bit more about these weird SA engines.
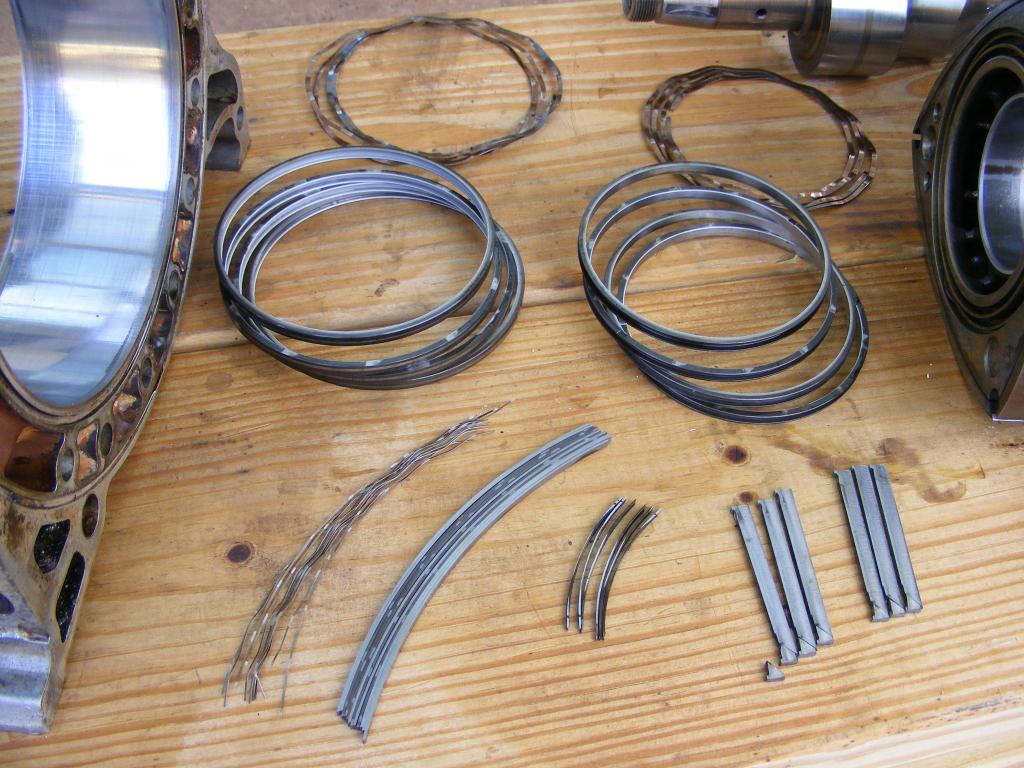
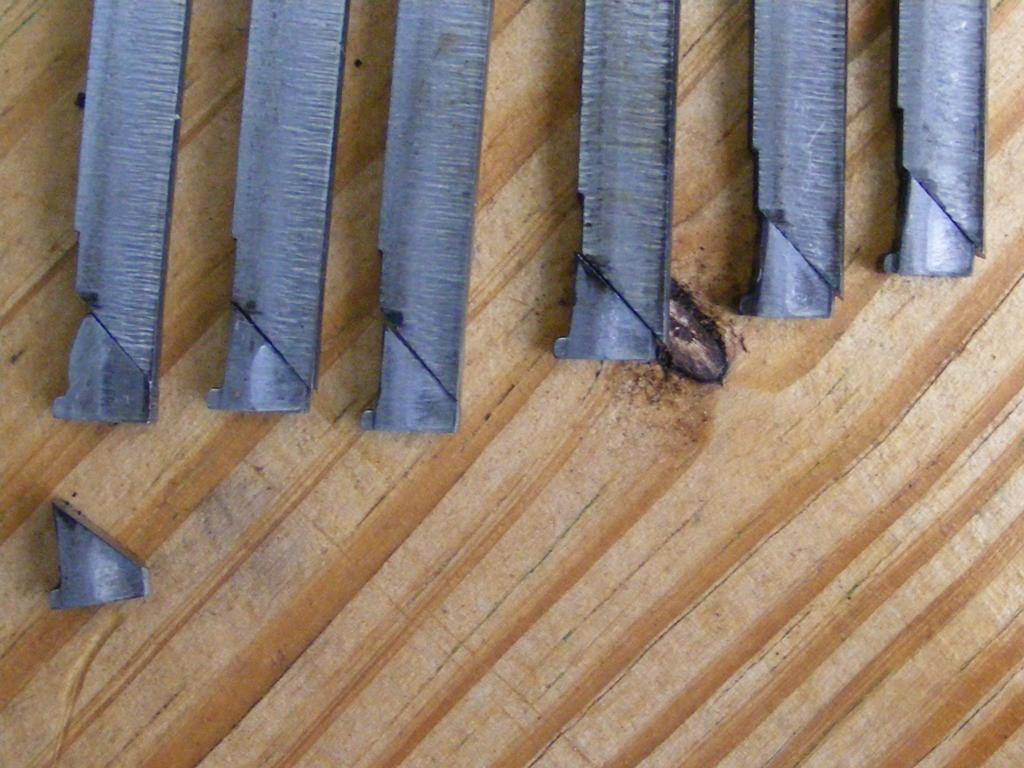
Here's what I think caused the low compression in the front rotor. See the end piece of that apex seal to the left? Looks like it got out of wack.
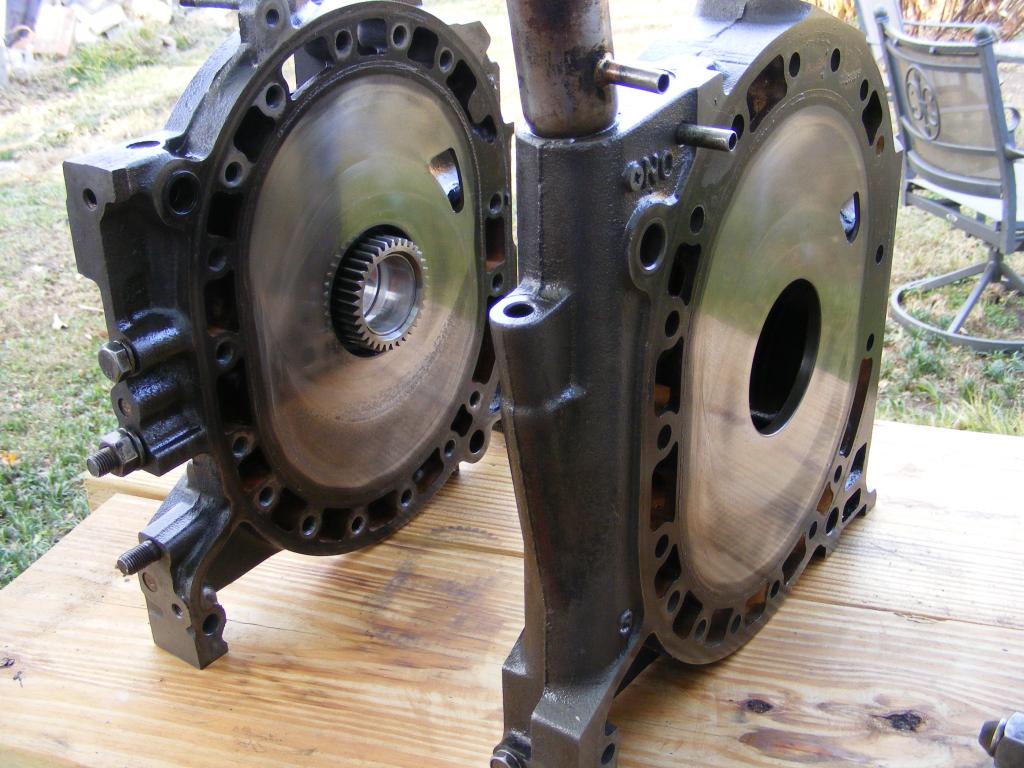
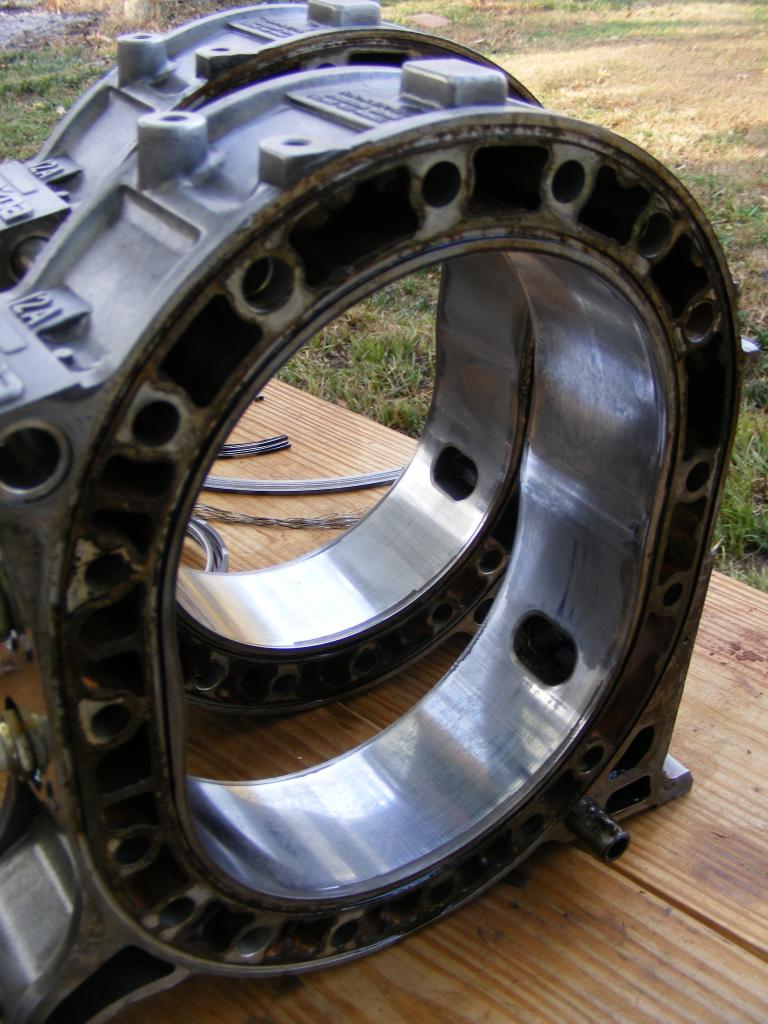
And Jeff, I see what you mean about those R5 midplates being a bit archaic. Here it is compared with the FB midplate, much better design!
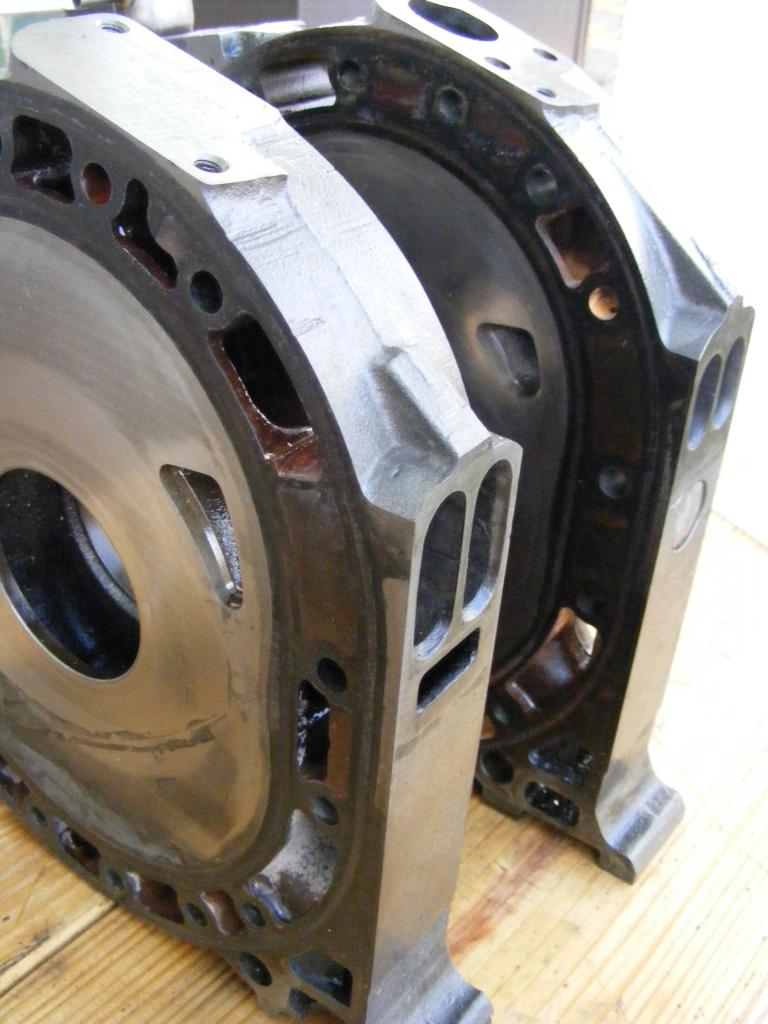

I wouldn't call that NO plate an R5 plate even though it comes stock in some R5 models. I say this because other R5 models had an actual R5 intermediate plate with exact same port timing as your Y. These are the diamonds to look out for.
Look for an R5 or R on the intermediate plate. If you see R5 or R, it has tall runners and Y size primary ports. They make a perfect candidate for your engine. Of course your Y plate will do just fine.
I may have to use a Y plate in my 18 tension bolt R5 build if my R plate isn't available.
Did you check your shaft squirters yet? Very curious. And please post a pic of your oil pump (gear thickness and amount of scoring).
Those rotor housings have Atkins apex seals written all over them. Nice big stock porting in those too. My guess is it's GSL-SE spec (late opening and T2 closing edges - very good for low end torque but can be ported to T2 spec to drive a turbo). I don't think these have 12AT spec, which open early (at T2 spec) but close earlier than T2. Still better than tiny US-spec exhaust ports. Do you have any US-spec housings to compare port timing differences?
Originally Posted by project7s
is the fb mid plate in that pic ported or are the fb ports just that much bigger than sa ones?
Or if you're unlucky enough like me to buy an old school REPU 13B where the builder substituted in an NO plate instead of the much better period correct 74 spec 3B plate, thinking you got a sweet deal only to get burned, you do your best to warn others. But then again if I hadn't experienced this, I'd not know nearly as much about rotaries as I do now. I guess it payed off in the end?
Joined: Jun 2008
Posts: 8,376
Likes: 28
From: Chino Hills, CA
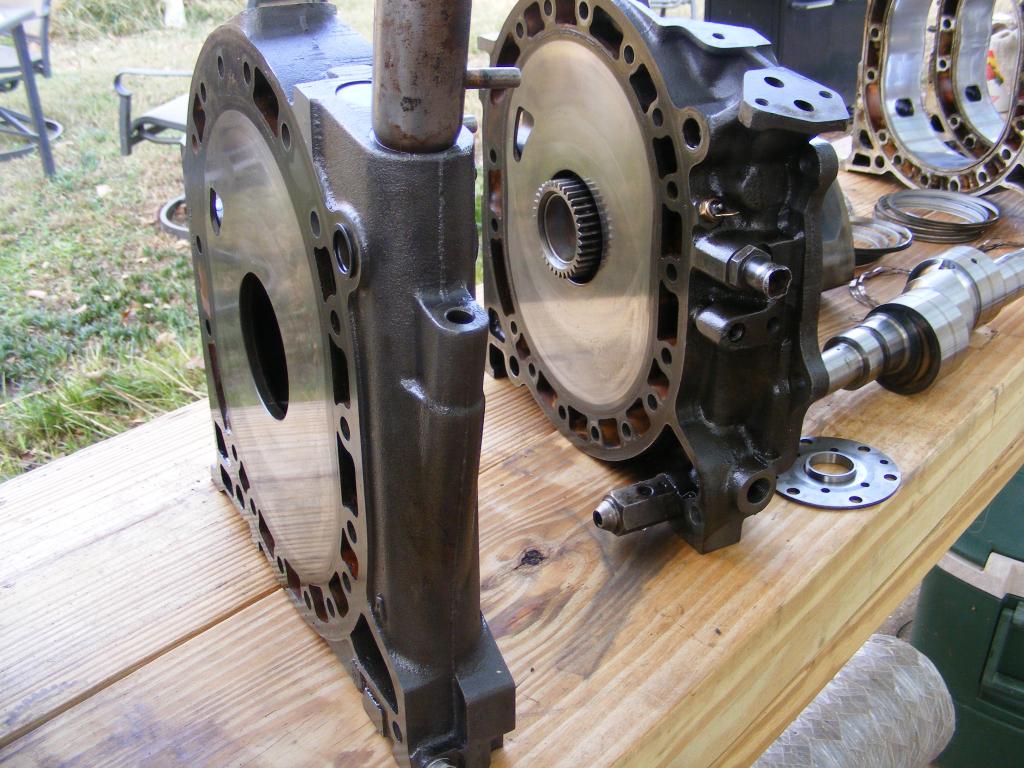
My 80 EGR midplate, and the older EGR midplate I'm running now, both have the tall ports.
The ones Ray's got here look significantly smaller to me. Pics forthcoming shortly.
The ones Ray's got here look significantly smaller to me. Pics forthcoming shortly.
I'm looking forward to it Divin. I always thought you had an NO plate with the small ports/short runners pictured above. I guess we'll find out shortly!
Oh and Ray, judging from this pic:

It appears you have a 17mm oil pump. The aluminum housing looks big. That's the same high volume version found on all 83 to 85 US engines whether 12A or 84-85 13B. And since this engine has an R5 rear plate with an undrilled oil pressure boss, I'm 99% sure you have full flow oil squirters. You know what to do about that.
Oh and Ray, judging from this pic:
It appears you have a 17mm oil pump. The aluminum housing looks big. That's the same high volume version found on all 83 to 85 US engines whether 12A or 84-85 13B. And since this engine has an R5 rear plate with an undrilled oil pressure boss, I'm 99% sure you have full flow oil squirters. You know what to do about that.
Junior Member
Joined: Oct 2012
Posts: 15
Likes: 0
From: Spokane,WA.
Nice post.
Still learning all this so the discussion is good
What is that front axle off of? looks like the back side of a CV joint.
great idea
Still learning all this so the discussion is good
What is that front axle off of? looks like the back side of a CV joint.
great idea
Last edited by lti_57; Nov 24, 2012 at 05:33 PM.