
How to tear down a 12A without a shop


Thanks for the flywheel link Tim, I'll check it out and diagnose my flywheels later this evening or tomorrow.
New Atkins apex seals it is Jeff, sounds like $220 well spent and this way when I take the video of the very first start up, which I promise to do and post, I won't be embarrassed.
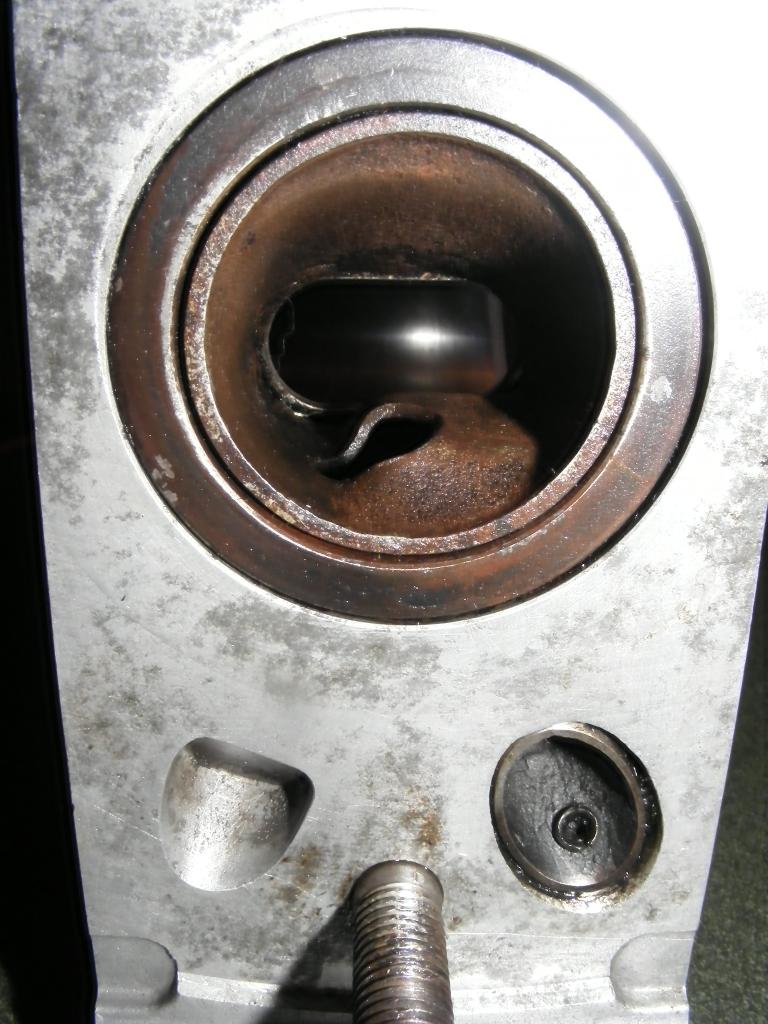
I think Mike is talking about this set of apex seals being the "Atkins seals", which are the ones that came out of the R5 engine on tear down. Here's a pic, they are silvery shiny, not that much carbon, and very different than any of the other apex seals from the FB tear downs. Makes me think the engine had been through a fairly recent rebuild and the atkins seals were installed then:
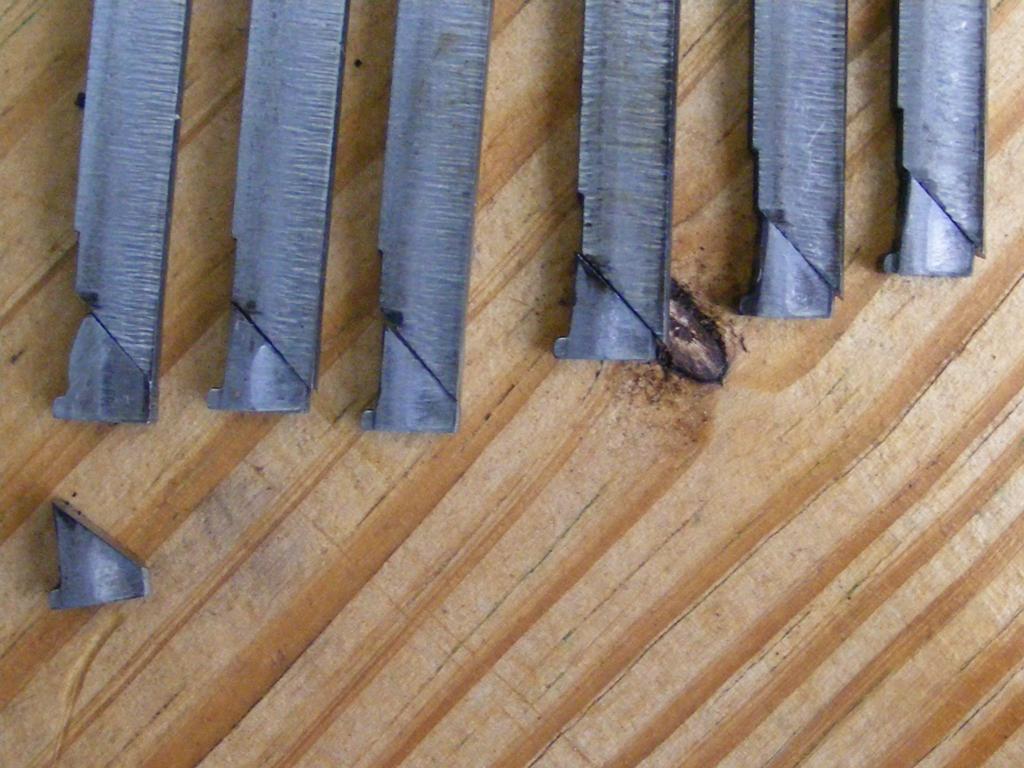
They look good but the only problem is that I measured them with my trusty Fisher lab ruler and found that they only have 6 mm of meat on them, not the 7 mm specified by the FSM. That's why thought I'd use this other set, with you guy's approval, of course. They are similar to all the others I pulled from the tear downs and I assume are OEM. They spec'd out at 7 mm, a full 1 mm wider than any of the others, so I thought they might be useful, but given your warnings Jeff I'll just go ahead and put new Atkins apex seals in. (Incidentally, I do have access to a micrometer and a digital caliper, which I will put to work for final checks on all necessary specs, but I need to borrow them from my neighbor Bobbie, whose an engineer type who is also the fellow that made that flywheel nut removal tool 30 years ago).
I'll inventory my flywheels and counter weights ASAP and post up the pics to get more expert feedback on which to use for what. Might not be this evening though, being the First Tuesday of the Month we have our monthly OGTA meeting tonight. The Rotary Gods are smiling, we are in the 70s here in Georgia this afternoon, should be a perfect evening to hang out in the parking lot and talk rotaries. Then retreat to the Shrinking Kilt for the business meeting and try to keep our eyes off the waitresses.
New Atkins apex seals it is Jeff, sounds like $220 well spent and this way when I take the video of the very first start up, which I promise to do and post, I won't be embarrassed.
I think Mike is talking about this set of apex seals being the "Atkins seals", which are the ones that came out of the R5 engine on tear down. Here's a pic, they are silvery shiny, not that much carbon, and very different than any of the other apex seals from the FB tear downs. Makes me think the engine had been through a fairly recent rebuild and the atkins seals were installed then:
They look good but the only problem is that I measured them with my trusty Fisher lab ruler and found that they only have 6 mm of meat on them, not the 7 mm specified by the FSM. That's why thought I'd use this other set, with you guy's approval, of course. They are similar to all the others I pulled from the tear downs and I assume are OEM. They spec'd out at 7 mm, a full 1 mm wider than any of the others, so I thought they might be useful, but given your warnings Jeff I'll just go ahead and put new Atkins apex seals in. (Incidentally, I do have access to a micrometer and a digital caliper, which I will put to work for final checks on all necessary specs, but I need to borrow them from my neighbor Bobbie, whose an engineer type who is also the fellow that made that flywheel nut removal tool 30 years ago).
I'll inventory my flywheels and counter weights ASAP and post up the pics to get more expert feedback on which to use for what. Might not be this evening though, being the First Tuesday of the Month we have our monthly OGTA meeting tonight. The Rotary Gods are smiling, we are in the 70s here in Georgia this afternoon, should be a perfect evening to hang out in the parking lot and talk rotaries. Then retreat to the Shrinking Kilt for the business meeting and try to keep our eyes off the waitresses.
Those seals are OEMs, I'm telling yah! Probably the earlier design from 76 to 82. They look like the ones from my 76 Cosmo. They don't have the curved boot shape.
I see you measured the height. Yep, OEMs.
Hey Ray, new Atkins seals are 8.4mm tall. The rule is the taller the better when it comes to apex seals. Just because the FSM specs them at 7mm or shorter as being bad, doesn't mean it's a good idea to reuse used seals that may be slightly taller than 7.00mm. What I mean is let's say your other seals are 7.2 to 7.4mm. That's a whole mm shorter than new. And you know how long these things last. So whey would you choose to reuse a nearly worn out seals and put up with potential hot start issue throughout the life of your engine when a one time payment of 220 can solve everything? Just doesn't add up you know?
I guess I'm just kinda disturbed by your attitude at even considering used apex seals for an engien like this one you're gonna build. I know it's cool to save money but believe me they pay for themselves the first time it starts.
New vs used, new wins every time unless conditions are perfect for the used seals to actually work, and what I've seen in this thread, the conditions are way off.
I do have a set of used atkins seals with really low mileage in an engine with 98% perfect chrome. It's the MG's engine. S4 NA rotating assembly with 74-75 3B housings and some porting. No sleeves. The intake porting is mild streetported (just a bit taller than 74 spec). It's a fresh rebuild not test fired yet. I'll test run this in my REPU before I get around to the R5 engine I spoke about earlier. In this case, used seals can work. I predict this engine will fire up without too much trouble.
Another example is used OEM seals in an S4 NA that was test fired in the REPU last year. It took some effort and cranking time to get it to cough to life.
Another example are used 3mm OEM seals in a milled S4 T2/FD hybrid in PercentSevenC's car. This one had trouble starting but I suspect it was due to the brand new MegaSquirt which was completely untuned. Yet it still started relatively easily (I suspect because with EFI you can make it do whatever you want). Not my cup of tea though.
Here is a great example of used OEM seals not wanting to run right. The MG's 98% perfect housings were previously in the GLC's engine build as were some used OEM apex seals. These had a lump at each end due to the missing chrome of the previous housings. By the way these OEMs are the 13B version of yours above (the early ones with the straight triangle piece). This engine didn't want to start. You'd have to dump oil down the carb every time. Then when it would start, it would smoke a lot and not want to run below 1500 RPM. Try driving around like that. When the idle would drop to 1400, it would just stall. No amount of cranking would restart it. You'd have to pull the plugs every time, clean them, reinstall, then dump more oil down the carb and hope it starts. If not, repeate the process until it does. I got sick of it and yanked the whole thing. Then gladly spent 220 on some new atkins seals. Also swapped in a set of 99.5% perfect chrome housings to try them out. This time it fired up at half a crank first try. Idled perfectly at 850rpm cold using my 74 Hitachi. My jaw hit the steering wheel and I had to pinch myself back to reality.
So as you can see, new Atkins seals wins every time. Or conditions have to be perfect for used seals to work, which for you they aren't, so get some new seals. Please.
Edit: Should I post some pics of my 13B J-spec R5 housings for you guys? Maybe in a new thread or something?
Ok, here you go. https://www.rx7club.com/1st-generati...dness-1019622/
You've sold me completely on the new apex seals Jeff, it makes total sense. That's what I'm going to do, along with new springs, the only thing I'll recycle is the side seals. Thanks for sharing your experiences with this and the helpful advice.
Those 13B housings of yours are a perfect clone for the ones I'm working with, even have the weird little fluted inserts in the exhaust port and the same wear and flaking patterns.
So what do you think about the idea that the flutes are just in there to quiet the exhaust note? If so, they certainly can go, if we can get them to budge. They're stuck in their pretty tight though, could take a bit of strategic pounding. Who's going to try it first, you or me?
The problem with mine is one is loose!! Not the inner sleeve, but the whole thing is loose in the aluminum housing itself. Not a good thing. Not sure what to do about it yet.
But I do know if I get in a tiff with the Goose I can always hop on my CB and blow off some steam

I think I'm just anti-car. I need an RE5 SOOOOOO bad.

Ray I just sprung for the Atkins 3mm seals myself...Jeff is very convincing. Thats how much I want to save my mint housings...lol I just spent another 220...(267 shipped) for another set of seals and I'm sitting on a fresh set of oem's. I believe it WILL be worth the extra expense. It was either these or goopy's...which I will be using for the BP motor. OEM's will go in the stock port motor I am doing for the 85 auto. damn...47 bucks shipping is alot for 6 apex seals
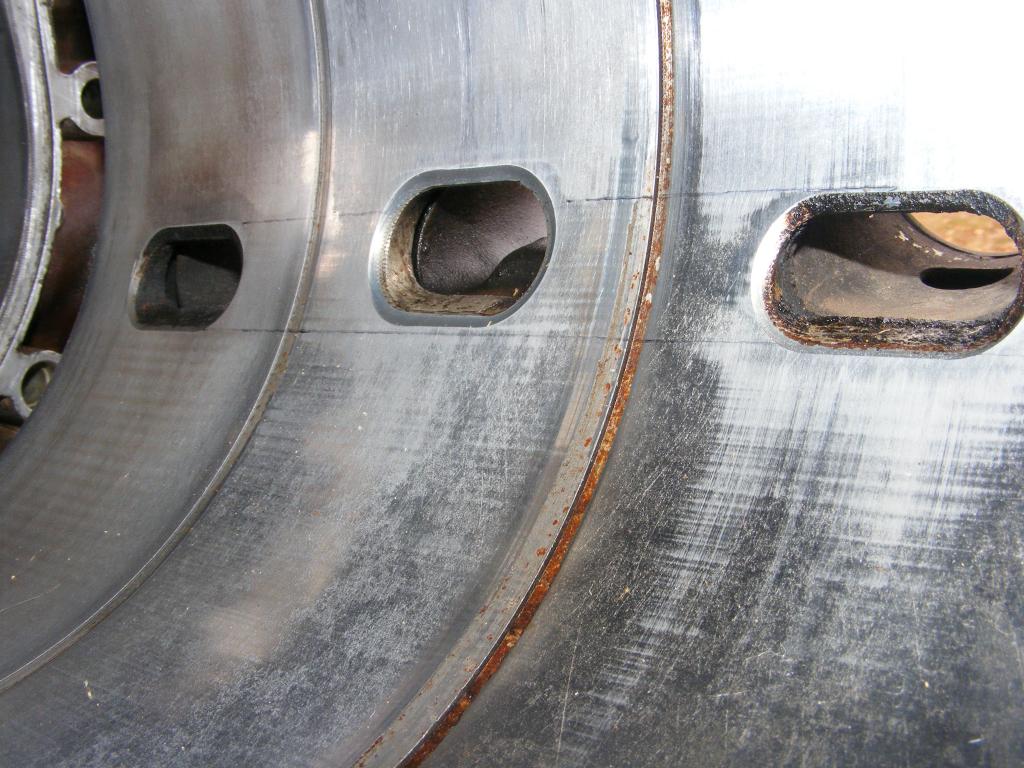
Ray, I think I have an answer for you about the weird sleeves. I looked at mine a little today and it appears the thermal reactor air injection tube extends up into the port through the outer sleeve and will prevent sleeve removal unless you pull the roll pin and then extract the thermal reactor tubes themselves.
I've never done this particular job before but I have swapped sleeves in the 20B. That was tough but not impossible. The roll pins are hard to take out but can be done.
So after all that, I'm considering leaving them in, but I still have the loose sleeve problem. I'll either look into it more and figure out how to get the inner sleeves out, or just tap the two side roll pins in deeper to hopefully tighten up the sleeve and leave them in.
I need you to look into your sleeves and see what Mazda did. Maybe there is an easy solution that I'm just not seeing?
Will do Jeff, I'm hoping just by chance I have another one of those weird Lucy housings among the damaged ones in the pile out there that I can experiment with.
It just seems to me getting those flutes out would make a significant increase in exhaust flow, at least 5%, maybe more, given the way they stick their snoots into the port. And with the header blocking off the reactor tube outlets, there's no place for the exhaust to go, just making the blockage worse.
Colin, that shipping charge for the apex seals is ridiculous, are you sure there isn't some kind of mistake? When I order mine I'll certainly be asking for an explanation.
In any event, the good news is that people who know better than me don't hesitate to give some less than perfect housings another chance to wankel. That, together with Jeff's advice that Atkins seals are the best way to make it work is all I needed to hear, couldn't be happier with the plan.
Then I'll use the Lucy motor to get the White One II project running and use what I learn on this rebuild to commit that sweet housing you gave me, along with another equally decent housing that Rotospeed generously traded for a distributor, to a perfect ten year, 100,000 mile 12A for the long term. It's amazing how this project has been driven by the generosity of others in the rotary community!
I'm finally seeing some daylight from work tomorrow, so I should get around to pounding on those Lucy housings and getting the flywheels and counterweights in order. Stay tuned, more pics coming.

acdelco d1906 Nkg 49034


Joined: Aug 2012
Posts: 1,158
Likes: 97
From: huntsville
stupid question: WTF are apex seals? are they the 2 inch things at the tip of the rotor and are in contact with the housing? or are they the smothed triagle things at the side of the rotor?
just tell me if it is the 1st or 2nd possibility that I set forth, spare me the internet editorial diatribes. I already said it is a stupid question.
just tell me if it is the 1st or 2nd possibility that I set forth, spare me the internet editorial diatribes. I already said it is a stupid question.
I had to reread your question several times. In the pictures posted, the "Apex" seals in this case are the two piece ~2 inch ones at the tip of the rotor (hense Apex or Corner) They can come in one piece or two piece like the pictures posted.
Update on the tear down.
Jeff I banged away on those exhaust inserts but they wouldn't budge. I gave it them a few good wacks so I'm thinking they must be tacked in there somehow. Anyway, I give up, let me know if you figure out a way. This was my attempt:
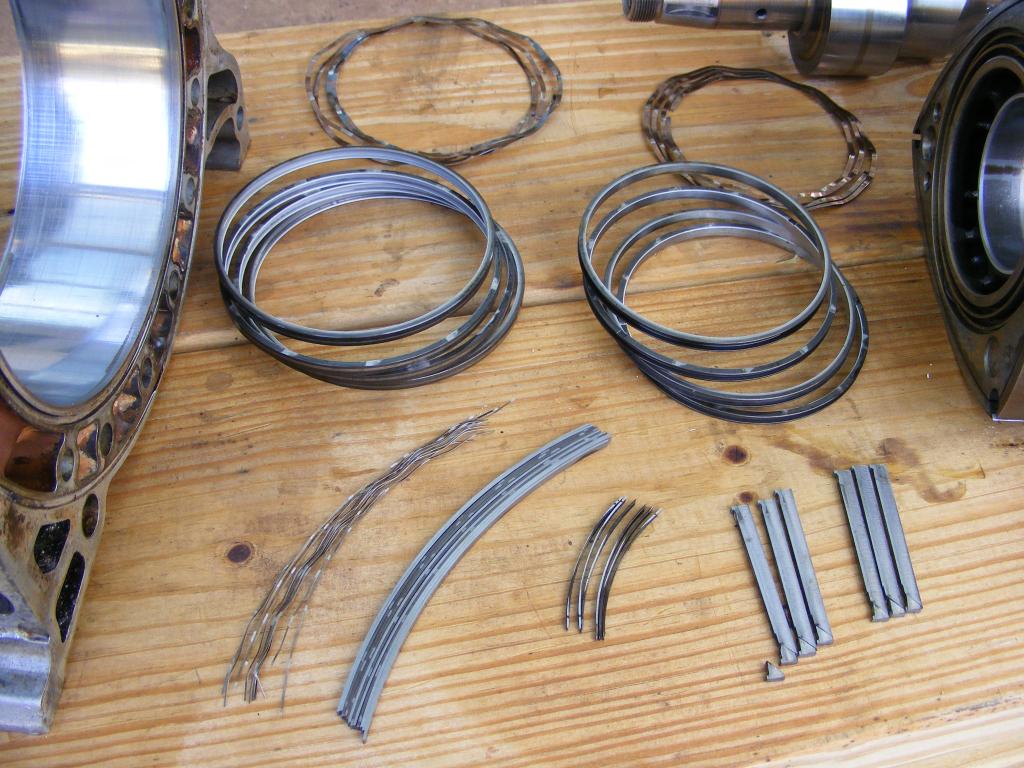
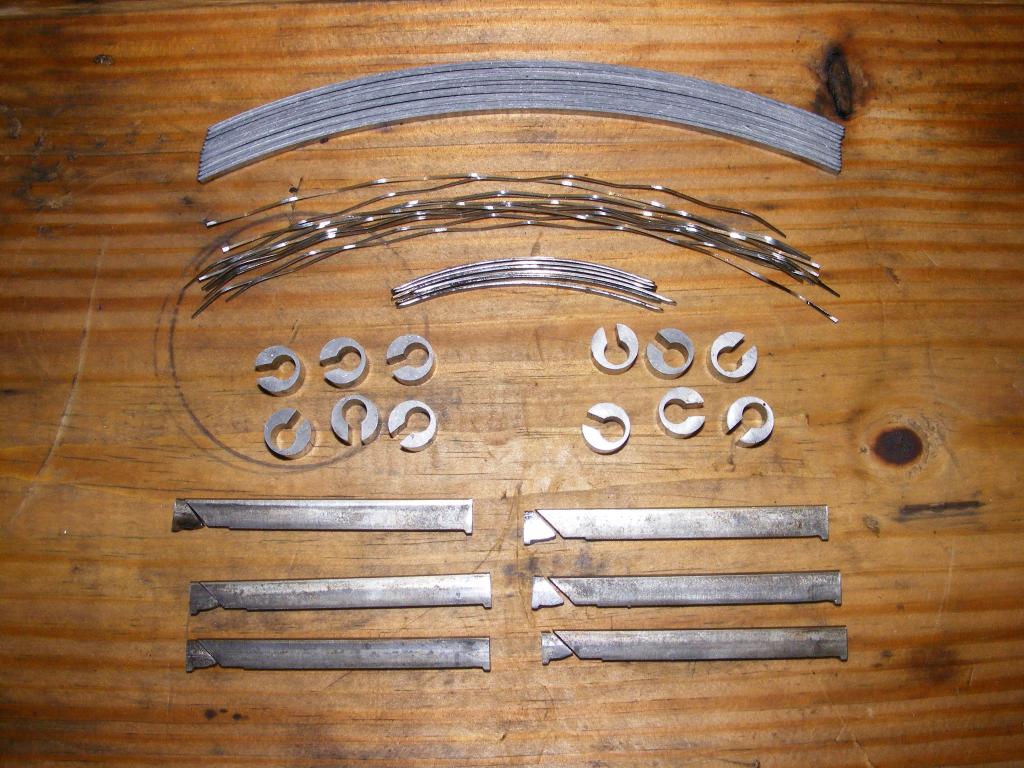
As bad luck would have it, all four of my flywheels are the same, so I'm assuming they're from 83-85 12As. Each of these flywheels weighed in around 26 lbs. on my bathroom scale and the counterweights about 2 lbs.
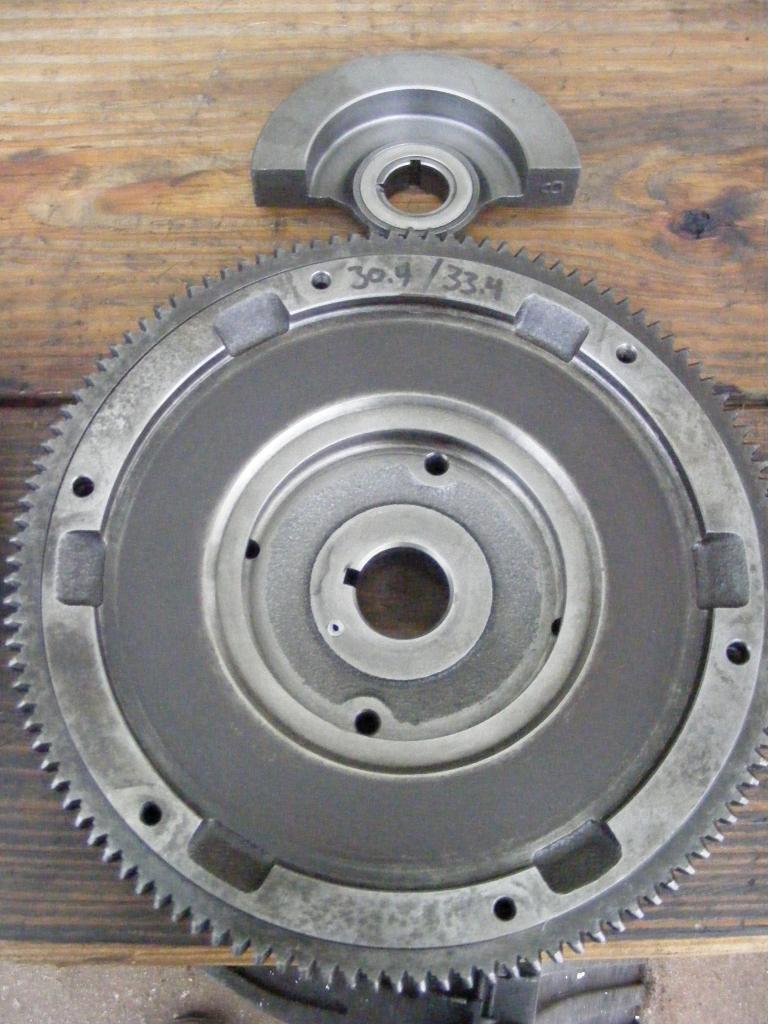
One of the FB counterweights (on the left) was shaped a little different than the other three (one of them shown on the right) so I'm guessing the funny one came from an 83 and the other three came from 84/85 12As. The flywheel from the R5 jspec engine is in the middle, it weighed in just over 30 lbs, with a 3 lb. counterweight, so overall a 5 lb. increase in weight for the R5 units over the later FB equivalents.
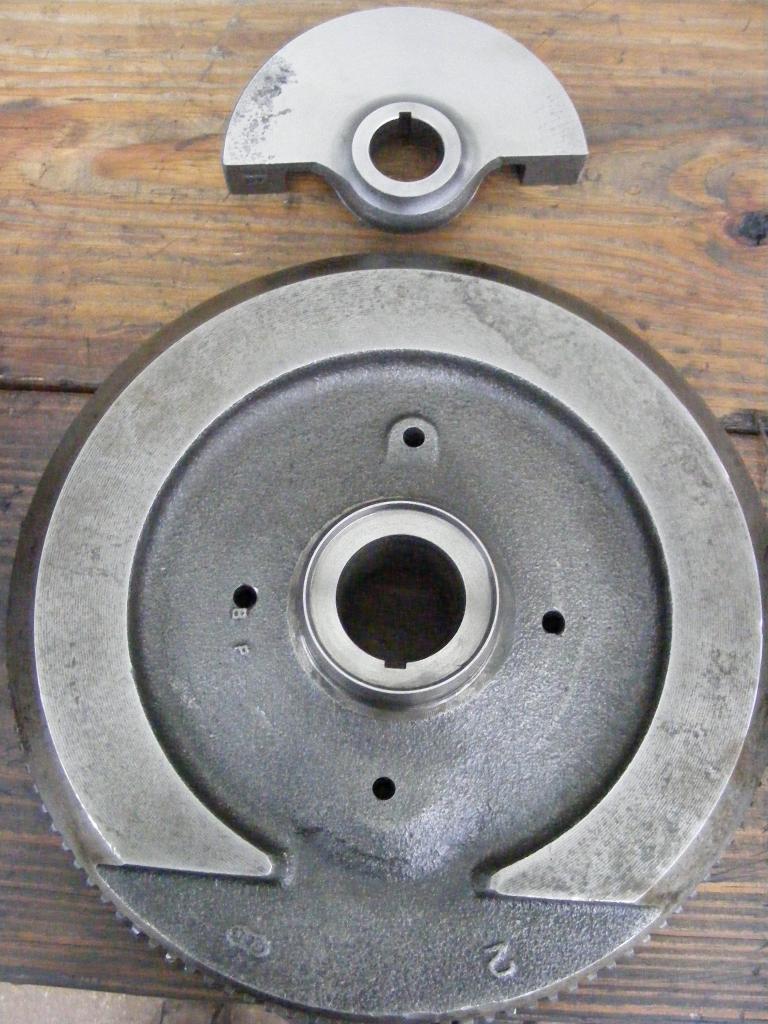
Here's a close up of what I'm guessing is the 84/85 flywheel and counterweight
And the R5 parts
So unfortunately I don't have the light 81-82 option flywheel and it looks like I'll be going with the R5 rotors, eshaft, flywheel, counterbalance and rotor housings on this rebuild, essentially bringing that old R5 back to life except for the newer flat housings from an 84 12A (from the White One). I'm going to name her Lucy, since it appears she came from a Luce.
I got curious about this port timing stuff, so I lined up some of the FB rotor housings and put the R5 housing in the middle, then drew some lines for comparison. The FB housings are about a quarter inch smaller and open further down on the housing compared to the R5 housing in the middle. Still not sure what this all means, can somebody explain it to me?

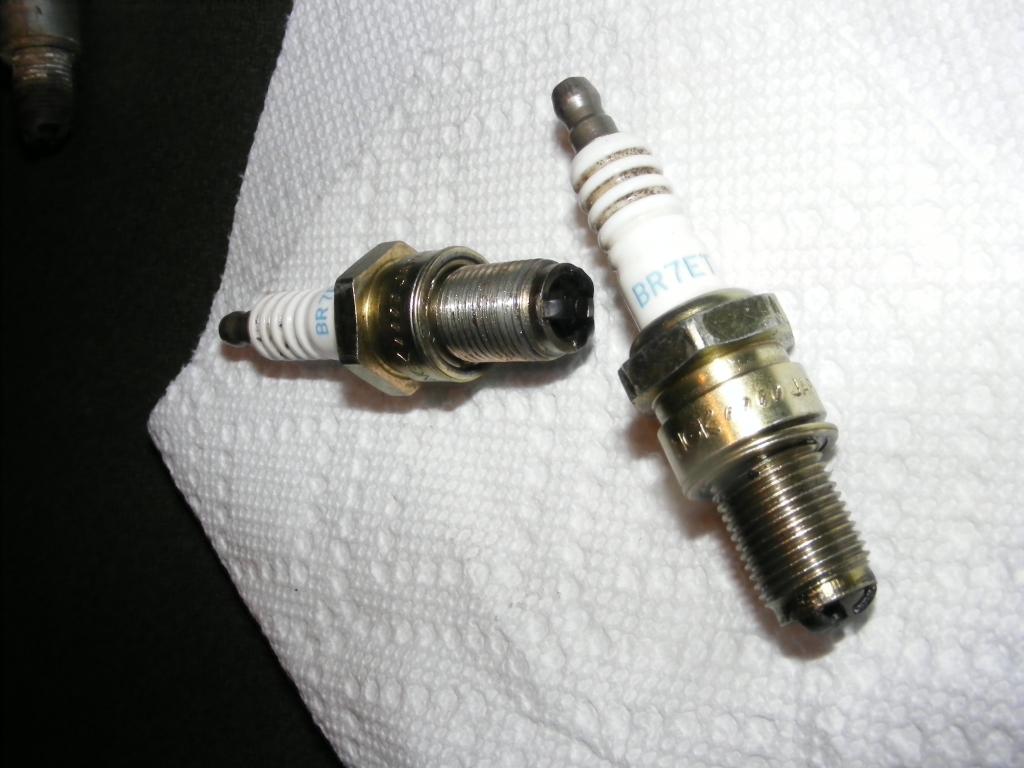
One last question, the spark plugs that were in the R5 engine are NGK BR7ET and still in pretty good shape, three prong instead of the four prong BR8EQ14. The NGK BR7ET reaches into the housing exactly the same distance as the NGK BR7ET and have the same porcelain stem, but the metal body is about a quarter inch shorter. I'm assuming I need to switch to the 80/81 NGK BR7ET plugs if I'm going to use the R5 rotor housings, right? Or can I go with the BR8EQ14?
Jeff I banged away on those exhaust inserts but they wouldn't budge. I gave it them a few good wacks so I'm thinking they must be tacked in there somehow. Anyway, I give up, let me know if you figure out a way. This was my attempt:
As bad luck would have it, all four of my flywheels are the same, so I'm assuming they're from 83-85 12As. Each of these flywheels weighed in around 26 lbs. on my bathroom scale and the counterweights about 2 lbs.
One of the FB counterweights (on the left) was shaped a little different than the other three (one of them shown on the right) so I'm guessing the funny one came from an 83 and the other three came from 84/85 12As. The flywheel from the R5 jspec engine is in the middle, it weighed in just over 30 lbs, with a 3 lb. counterweight, so overall a 5 lb. increase in weight for the R5 units over the later FB equivalents.
Here's a close up of what I'm guessing is the 84/85 flywheel and counterweight
And the R5 parts
So unfortunately I don't have the light 81-82 option flywheel and it looks like I'll be going with the R5 rotors, eshaft, flywheel, counterbalance and rotor housings on this rebuild, essentially bringing that old R5 back to life except for the newer flat housings from an 84 12A (from the White One). I'm going to name her Lucy, since it appears she came from a Luce.
I got curious about this port timing stuff, so I lined up some of the FB rotor housings and put the R5 housing in the middle, then drew some lines for comparison. The FB housings are about a quarter inch smaller and open further down on the housing compared to the R5 housing in the middle. Still not sure what this all means, can somebody explain it to me?
One last question, the spark plugs that were in the R5 engine are NGK BR7ET and still in pretty good shape, three prong instead of the four prong BR8EQ14. The NGK BR7ET reaches into the housing exactly the same distance as the NGK BR7ET and have the same porcelain stem, but the metal body is about a quarter inch shorter. I'm assuming I need to switch to the 80/81 NGK BR7ET plugs if I'm going to use the R5 rotor housings, right? Or can I go with the BR8EQ14?

Full Member
Joined: Jul 2012
Posts: 74
Likes: 0
From: Laurel Fork, Va. 24352
I can't tell you guys how much I'm enjoying this thread.
Two questions that I hope are appropriate for this thread:
#1 What is port timing? Does that have to do with the angle of the port entry to the housing and or the positioning on the housings in relation to the sparkplug?
#2 What is bridgeport, or bridge porting? I think I understand that it has to do with modifying/ opening up the ports for higher CFM. I understand that greater volumn intake and exhaust will have a profound affect on an internal combustion motor, but I don't really understand what it does to an otherwise OEM engine. Advantages disadvantages, etc. Would it be something to tackle on a backyard build?
Ray: I've heard you can use a mig to melt that little roll pin out.
I would use a dremel or drill and drill it out. If I didn't have a MIG and love using my mig for everything... including soldering
BUT I also heard that those diffusers (At least on the NA 13B) mostly quiet the engine down.... I am not too happy with the noisyness of the engine so I leave them alone.
Brown:
1. Yes, Its all about when the ports open as the rotor passes it.
2. A Bridge port is just as it states. You dremel out all of the steel around the intaking port and only leave a little "bridge" for the corner button to ride on. Yeah, you could do it in your back yard, but there are a lot of coolent veins running around in that plate....
No luck removing the inner sleeves while leaving the outer sleeves installed, eh? Ok I'll see what I can do.
Useful advice about counterweights: Use your 81-82 front counterweight in this build. This gives you the lightest one you can use with your R5 rotors and still maintain proper imbalance. Ditch the large semi circle R5 front counterweight. Oh and if you do happen to receive a good used 81-82 flywheel from Santa, you'll already have the front counterweight nestled comfortably under the front cover. 
Exhaust port timing: The R5 opens later and closes later than US-spec 12A FB. See? Neat huh? But what effect does it have on power? It increases low end torque because it gives more time for exhaust gasses to push the rotor and eccentric shaft around thus increasing low end torque, up to a point. That point is 4k. So you gain some low end torque, but there is no gain above 4k. Still not a bad trade off.
If you want technicals, here you go:
•R5 closes at T2 spec but opens later.
•US-spec FB 12A opens at T2 spec but closes too early.
•US-spec GSL-SE has same exact port timing as J-spec R5 12A and 13B
•porting any 12A out to T2 spec is easy if you know where to start (which you do now Ray)
My 76 Cosmo, with points, came stock with those plugs. Change them to BR8EQ-14 for stock FB ignition.
Did you deal with the eccentric shaft oil squirters yet?
Oh hey check the blind plug in the end of the shaft just past the pilot bearing. Some R5 engines didn't have one as they used engine oil as tranny fluid inside an autostick style transmission torque convertor. Weird. I had to install a blind plug once. The bottom of the R5 rear plate has a through hole with a steel sleeve that looks like an alignment dowel for a bellhousing bolt. There should be two, not three on your rear iron. Count them! This hole lets the engine oil drain from the tranny back into the oil pan. I've had to drill out the steel sleeve and tap NPT threads into two R5 rear irons so far.
Useful advice about counterweights: Use your 81-82 front counterweight in this build. This gives you the lightest one you can use with your R5 rotors and still maintain proper imbalance. Ditch the large semi circle R5 front counterweight.
Oh and if you do happen to receive a good used 81-82 flywheel from Santa, you'll already have the front counterweight nestled comfortably under the front cover. Exhaust port timing: The R5 opens later and closes later than US-spec 12A FB. See? Neat huh? But what effect does it have on power? It increases low end torque because it gives more time for exhaust gasses to push the rotor and eccentric shaft around thus increasing low end torque, up to a point. That point is 4k. So you gain some low end torque, but there is no gain above 4k. Still not a bad trade off.
If you want technicals, here you go:
•R5 closes at T2 spec but opens later.
•US-spec FB 12A opens at T2 spec but closes too early.
•US-spec GSL-SE has same exact port timing as J-spec R5 12A and 13B
•porting any 12A out to T2 spec is easy if you know where to start (which you do now Ray)
My 76 Cosmo, with points, came stock with those plugs. Change them to BR8EQ-14 for stock FB ignition.
Did you deal with the eccentric shaft oil squirters yet?
Oh hey check the blind plug in the end of the shaft just past the pilot bearing. Some R5 engines didn't have one as they used engine oil as tranny fluid inside an autostick style transmission torque convertor. Weird. I had to install a blind plug once. The bottom of the R5 rear plate has a through hole with a steel sleeve that looks like an alignment dowel for a bellhousing bolt. There should be two, not three on your rear iron. Count them! This hole lets the engine oil drain from the tranny back into the oil pan. I've had to drill out the steel sleeve and tap NPT threads into two R5 rear irons so far.
Thanks for the tips Jeff! Which one is my 81-82 counterweight? I thought they were all from 83-85 engines because they seem to all weigh in right around 2 lbs. based on my bathroom scale estimates. I'm going to bring them into the lab today to weigh on my lab scale. I'll also start looking around the local rotor head community to see if I can find an 81-82 flywheel. (Figures, I've got 5 good flywheels but now I'm looking for another one).
So those oil squirters are in the eshaft. I see. Haven't even looked at the eshaft yet but now I'm getting curious.
Thanks for the clarification on the exhaust port timing, I definitely will prefer the better torque to power over 4000 rpm. I don't drive with a very heavy foot and do a lot of highway driving right around 80 mph, which tachs out right at 4000 rpm.
So if I were to port the R5 housings I'd dremmel them out down to that line, right? And if you port the exhaust, should you also mess with the intakes? I'm assuming that would mean changing the carb set up, which I'm not inclined to do, because I really like the overall performance of the Nikki, good power range combined with good fuel economy.
I haven't given up on getting those mufflers out of the exhaust ports yet, just sitting back and waiting for wiser minds to tell me how to do it. I wouldn't want to do some irreversible damage to those housings at this point.
James, as best I could tell, that roll pin only holds the smaller sleeves into the thermoreactor ports and those sleeves do not intrude far enough into the exhaust ports to be what is holding them in place, although it's hard to be positive about that and they could cause a problem even if it is possible to get the exhaust mufflers to start moving because they look like they'd interfere with the final removal.

Joined: Mar 2001
Posts: 31,851
Likes: 3,239
From: https://www2.mazda.com/en/100th/
I got curious about this port timing stuff, so I lined up some of the FB rotor housings and put the R5 housing in the middle, then drew some lines for comparison. The FB housings are about a quarter inch smaller and open further down on the housing compared to the R5 housing in the middle. Still not sure what this all means, can somebody explain it to me?
the opening point. just like a piston engine there is a compromise between using all the gasses in the power stroke, and getting them out the tailpipe. with the rotary the later you open the port the better. the power stroke becomes longer.
if you would like examples, the US spec 12A opens @75 degrees, the Peripheral port engines open @73, which is later (higher), and the T2/FD engines open @71, which is even later. the extreme example is the Rx8 which opens @50.
on a street engine the closing point of the port is chosen by the amount of port overlap it creates. since the exhaust port closes After TDC, there is an amount of time that the intake and exhaust ports are both open, called overlap. every stock street engine has as little as possible. the US spec 12A is the earliest closing @38 degrees but earliest opening, so they keep, the size of the port reasonable. the later 13B's all close @48. the Racing engines, run 55, they only care about peak power, low RPM driveability and emissions aren't a concern
the RX8, which is the most eco friendly, closes @-3. closing the exhaust early, let them open the intake early, so the Rx8 basically has a big street port from the factory. since the exhaust ports are on the side housings, there are 4 of them, so port area is actually bigger even though the port timing is smaller.
so for power in your engine, you want to run the T2/FD/R5 port, 71/48, as its the closest thing to the race port that you want 73/55.
Mike it sounds like you're saying the T2/FD exhaust ports are the same as R5. They're not. T2/FD opens earlier than R5 but they both close the same. As for width, T2/FD is wider than an R5 13B port by 2mm on each side. I assume you could widen a 12A R5 port by 1mm on each side and achieve a similar effect.
Ray, this is your 81-82 front cw.

You will love the R5 exhaust ports. I did in the blue car. I'm probably going to leave them alone in the REPU too. If I stay NA. Gotta love that low end!
Yes, down to the line, but redraw it first. Looks like you're off a bit there. Recreate the factory bevel so it looks/opens like the others in your picture. Don't try to be a hero because the bigger you go here, the lesser it will run for your intended purpose.
You don't really need to enlarge the intakes if you open up the exhaust ports. You could but it's not necessary. If anything I would clean up the casting flash and the sharp 90 degree edges but leave intake port timing stock. The engine will start up quicker for you and idle easier when cold. Of course it will also make more power because the efficiency of the port goes up when you smooth out the nasty factory edges. There's no need to go 74 spec here because it's too big for a stock Nikki that still has its factory 20mm venturis.
Um those weird inner sleeves are not mufflers. They are emissions devices. They better control the air the enters to/from the thermal reactor. Only NA FC engines had diffusers which kinda act like mufflers where they break up the strong supersonic exhaust pulse into something a little more friendly for the rest of the exhaust system. Your R5 sleeves do not do this. So mufflers they are not. And yes keep looking for a way to get them out of there! I will too. Maybe later today?
T2/FD opens earlier than R5 but they both close the same. As for width, T2/FD is wider than an R5 13B port by 2mm on each side. I assume you could widen a 12A R5 port by 1mm on each side and achieve a similar effect.Ray, this is your 81-82 front cw.
You will love the R5 exhaust ports. I did in the blue car. I'm probably going to leave them alone in the REPU too.
If I stay NA. Gotta love that low end!Yes, down to the line, but redraw it first. Looks like you're off a bit there. Recreate the factory bevel so it looks/opens like the others in your picture. Don't try to be a hero because the bigger you go here, the lesser it will run for your intended purpose.
You don't really need to enlarge the intakes if you open up the exhaust ports. You could but it's not necessary. If anything I would clean up the casting flash and the sharp 90 degree edges but leave intake port timing stock. The engine will start up quicker for you and idle easier when cold. Of course it will also make more power because the efficiency of the port goes up when you smooth out the nasty factory edges. There's no need to go 74 spec here because it's too big for a stock Nikki that still has its factory 20mm venturis.
Um those weird inner sleeves are not mufflers. They are emissions devices. They better control the air the enters to/from the thermal reactor. Only NA FC engines had diffusers which kinda act like mufflers where they break up the strong supersonic exhaust pulse into something a little more friendly for the rest of the exhaust system. Your R5 sleeves do not do this. So mufflers they are not. And yes keep looking for a way to get them out of there! I will too. Maybe later today?
Thanks you guys for the info on the exhaust timing, it's starting to make sense but about half way through reading Mike's description, all those light bulbs that had come on in my brain caused a short circuit and everything went blank. So I'm going to have to return to that subject once the neural circuits get repaired over the weekend.
For now, I'm happy with Jeff's assessment that "I will love the R5 exhaust ports", good enough to go with that plan for this rebuild and figure out the nuances of porting for the next one. I'm going to use those R5 rotor housings just the way they are, sans those thermal reactor air control inserts if we can figure out how to get them out. I'll keep trying.
Jeff, correct me if I'm wrong, but if I have an 81-82 counterweight, I must have an 81-82 flywheel, n'est-ce pas?
Maybe I need to separately weigh those four FB flywheels that look identical and all have "31" stamped in them, one might be a lightweight 81-82 flywheel after all!
Gene, about the spark plugs, if those BR7 units are for points ignition, it sounds like I should go with the BR8EQ14 plugs for my electronic ignition.
Damn, you learn a thing or two every day around here.
Again, thanks for the help dudes.
So I checked out the flywheels and they all come in at 26.4 lbs, they are the 83-85 versions, matching the mazdatrix chart:
Flywheels
So I don't know how that 81-82 counterweight got in there. But it's kind of academic since without the lightweight flywheel I'll be using the heavier 79-80 flywheel for the rebuild, along with the heavy rotors, eshaft and counter weight that came with the RB engine, about a 5 lb. weight gain over the 83-85 rotating assembly, I figure.
This should add even more torque to the R5 port, not a bad thing in a 12A really. I'll just have to keep that rotating assembly spinning at the stop lights.
Jeff, I've been looking at those thermal reactor air control inserts in the R5 housings and I'm beginning to think they need to be in there. First of all, they won't budge.
But also, they look like they're designed to push air into the exhaust flow, not the other way around, so they're actually pretty streamlined with the exhaust flow. Removing the inserts might actually create more turbulence because the post port channel would be hollowed out.
At least with the exhaust ports cut the way they came from the factory, the inserts don't at any point reduce the cross-sectional area of the exhaust flow, so maybe they aren't such a bad idea after all.
Ray, I was a little confused by Mike's exhaust explanation too. I think he might have been mistaken about when R5 ports open compared with T2/FD, as I pointed out above. I've compared these myself and know for a fact what I said above is true and correct. But go grab somebody's T2 or FD rotor housing (with thier permission of course) and directly compare open/close times against your R5 ports. You will see exactly what I'm talking about. And by the way FC NA housings (with diffusers) are exactly the same casting/port timing as T2/FD as well, just the diffusers tend to block/delay the opening some, kinda doing what the R5 port does naturally from the factory. Mazda knew, back then, but wanted to save money by going to just ONE port timing and letting the sleeve dictate whether turbo or NA.
I looked into my R5 ports again. There is indeed a tube that sticks up through the outer sleeve blocking its removal and is covered/shrouded by the inner sleeve. I must find a way to separate the inner sleeve from the outer and trim down or simply remove the thermal reactor tube first. So I'll start by pulling the roll pins from the thermal reactor tubes. Then see what I can do to separate the sleeves from each other without full sleeve removal from the housings. But if they have to come out, so be it.
But you're right that they don't really block much flow if the port timing is kept stock, as I did in the blue car. Works fine in there!
Concerning the 81-82 front CW, use it! In the build! *You must! Why? Because Mazda redesigned it to lighten it up a bit while still correctly balancing the rotors. Plus did you notice the rear CW is listed the same from 76 to 82? That tells me Mazda doesn't care which front CW it is paired with. So go with the stock disgusting 30 pounder for now if you must, but keep an eye out for a nice 81-82 and swap it in at your next clutch job or something.
*Rarity voice
By the way you can do a 225mm disc and pressure plate upgrade to an 81-82 flywheel!!!!! I've done it. It's just a bolt on. The long bolt kit is found at Mazdatrix. And any stock 83-91 NA pressure plate can be used! Bet you didn't know that? Just watch for the three rivits and their clearance.
I hate heavy flywheels. You'll quickly grow fatigued with the crappy slow revs from a 30 pound flywheel and stock heavy half circle front CW. I'm telling you! Remember what I used in my R5 setup? I went to a light steel flywheel because I'd rather give myself an enema daily than to daily drive a 30 pound flywheel in a chassis as light as a 1st gen. Even the REPU with tall 77 gears was inappropriate for a 30 pounder. I got rid of all my 30 pounders and haven't ever regretted it. The REPU drove like a boss with an S4 NA at 26 pounds with light FC rotors, for example.
Heaviest I'll ever do again in anything is a GSL-SE at 26 pounds (same as your 83-85 12A flywheel) but prefer S4 NA 24 pound or lighter on down to the RB light steel flywheel at 13 pounds and rear CW at 4 pounds (total 17 pounds). I don't really like the light weights like RB's aluminum at 7.5 pounds or the Greddy at 8 pounds, but they can be ok in some applications. But for daily driving, the window between the RB light steel and 81-82 23 pounds is ideal. Of course S5 NA at 21 pounds is technically perfect, but that's only if you've got the right rotors for it.
If I had to build another R5/SA or 82 and older 12A, and had a 30 pound R5/SA flywheel plus front CW or an 81-82 set sitting side by side, I'd pick the 81-82 set every time. Why wouldn't you?
Ray you have the perfect chance to improve your enjoyment for years to come by just swapping the 81-82 CW in for the build now, and looking for an 81-82 at your leisure. Doesn't have to be today but get the word out you're looking for an 81-82 flywheel. Can you do that for me? I've spent a lot of time typing for you. Least you could do is humor me.
Um, have you ever set end play before? There might a thousandth difference between these front CWs that you need to find out about. Stack it and measure the Judge Ito way. Look for .002" to .003". And you're all like there's no need to worry about end play if I keep the stock R5 CW... right? Wrong! Most if not all R5s I've ever built have had too loose end play from the factory. Like .0045" and more! Not good! I've had to play musical thrust spacers every time to get it down to the magic Ito numbers, and it has been worth it every time as I've torn down several engines built by a local shop that have had damaged and dying thrust assemblies because the guy didn't know you needed to check these things.
Mazda knew, back then, but wanted to save money by going to just ONE port timing and letting the sleeve dictate whether turbo or NA.I looked into my R5 ports again. There is indeed a tube that sticks up through the outer sleeve blocking its removal and is covered/shrouded by the inner sleeve. I must find a way to separate the inner sleeve from the outer and trim down or simply remove the thermal reactor tube first. So I'll start by pulling the roll pins from the thermal reactor tubes. Then see what I can do to separate the sleeves from each other without full sleeve removal from the housings. But if they have to come out, so be it.
But you're right that they don't really block much flow if the port timing is kept stock, as I did in the blue car. Works fine in there!
Concerning the 81-82 front CW, use it! In the build! *You must! Why? Because Mazda redesigned it to lighten it up a bit while still correctly balancing the rotors. Plus did you notice the rear CW is listed the same from 76 to 82? That tells me Mazda doesn't care which front CW it is paired with. So go with the stock disgusting 30 pounder for now if you must, but keep an eye out for a nice 81-82 and swap it in at your next clutch job or something.
*Rarity voice
By the way you can do a 225mm disc and pressure plate upgrade to an 81-82 flywheel!!!!! I've done it. It's just a bolt on. The long bolt kit is found at Mazdatrix. And any stock 83-91 NA pressure plate can be used! Bet you didn't know that? Just watch for the three rivits and their clearance.
I hate heavy flywheels. You'll quickly grow fatigued with the crappy slow revs from a 30 pound flywheel and stock heavy half circle front CW. I'm telling you! Remember what I used in my R5 setup? I went to a light steel flywheel because I'd rather give myself an enema daily than to daily drive a 30 pound flywheel in a chassis as light as a 1st gen. Even the REPU with tall 77 gears was inappropriate for a 30 pounder. I got rid of all my 30 pounders and haven't ever regretted it. The REPU drove like a boss with an S4 NA at 26 pounds with light FC rotors, for example.
Heaviest I'll ever do again in anything is a GSL-SE at 26 pounds (same as your 83-85 12A flywheel) but prefer S4 NA 24 pound or lighter on down to the RB light steel flywheel at 13 pounds and rear CW at 4 pounds (total 17 pounds). I don't really like the light weights like RB's aluminum at 7.5 pounds or the Greddy at 8 pounds, but they can be ok in some applications. But for daily driving, the window between the RB light steel and 81-82 23 pounds is ideal. Of course S5 NA at 21 pounds is technically perfect, but that's only if you've got the right rotors for it.
If I had to build another R5/SA or 82 and older 12A, and had a 30 pound R5/SA flywheel plus front CW or an 81-82 set sitting side by side, I'd pick the 81-82 set every time. Why wouldn't you?
Ray you have the perfect chance to improve your enjoyment for years to come by just swapping the 81-82 CW in for the build now, and looking for an 81-82 at your leisure. Doesn't have to be today but get the word out you're looking for an 81-82 flywheel. Can you do that for me? I've spent a lot of time typing for you.
Least you could do is humor me.Um, have you ever set end play before? There might a thousandth difference between these front CWs that you need to find out about. Stack it and measure the Judge Ito way. Look for .002" to .003". And you're all like there's no need to worry about end play if I keep the stock R5 CW... right? Wrong! Most if not all R5s I've ever built have had too loose end play from the factory. Like .0045" and more! Not good! I've had to play musical thrust spacers every time to get it down to the magic Ito numbers, and it has been worth it every time as I've torn down several engines built by a local shop that have had damaged and dying thrust assemblies because the guy didn't know you needed to check these things.
talking head
Joined: Apr 2008
Posts: 2,775
Likes: 15
From: Perth, WA, OZ
bit late into this thread -- these may help some
http://www.ausrotary.com/viewtopic.p...=197881&start=
( may have to sign up )
counter weight numbers - RX7Club.com
changing intake opening and closing on a turbo engine for NA use - RX7Club.com
ok .. a few quick things just to catch up -
the "bent bottom" apex seal wedge shown on the apex seal picture is entirely normal..
there is a few years there that these where supplied
, my observation is somewhere in the late 70s..
AFAIK progression-- mazda used a longer main piece and very short pointy wedge piece for 74/5 ..;any of these parts is NOT reverse compatible with any later apex seal..
wedge piece grew a few mm longer at the top edge for all 76 onwards engines ( and main piece shorter )
.. somewhere in the late 70s mazda tries that bent bottom wedge piece
.. its interchangeble,, but methinks is used originally with a main apex seal piece that has a large section of the underside removed between the apex spring ends
later,, mazda go back to a conventional shaped wedge end and then develop the 2mm 3 piece seal for the 86-92 13b engine,, and the 2mm 2 piece seal for the 92 onwards 13b till rx8
as wedge pieces wear shorter,, they get longer along the top.. naturally .. only 74/75 engines have the sharp piece
also
speaking primary plates --
i have more than a half dozen NO plates in my shed..
all are the small runner/ small port from japanese JDM engine origin.. japanese engines are common in aus
i have never seen tall runner tall port NO primary plates till now.. !! wow..
IIRC--
generally ,,our supplied aus market engines have equiv tall runner mid-plates R, R5 and Y,, variously in 42 and 48 mm tall ports ..similar to the secondaries ..
when same endplate coded engines in japan all cop the NO plate with small runner / port in black and grey forms
japanese rx7 12a's ( pre 1983 ) all get the NO small runner/ port
and the s1/s2 rx7 oz engine gets small runner / 42 mm tall port N mid plate
83 on aus rx7 12a gets the Y plate ( tall runner / tall port )