What did you do to your FB today?

 06-11-13, 09:00 PM
#3128
Ready or not...
Join Date: Dec 2009
Location: Taos, NM
Posts: 261
Likes: 0
Received 0 Likes
on
0 Posts
The exhaust sounds mellow and sweet. The motor won't come up to speed. I have had it running smooth before exhaust change, but never any real power. Tomorrow I'll print out the tutorial to remove the rats nest and start the shopping list to prepare... I currently have the timing all the way extremely retarded or advanced (I have to research, I read a post that was quite confusing). When I get the distributor parts I'll eliminate some more variable. When she's going good I'll be bragging and using all kinds of cute animated emoticons! I still can't get the idle up.
I will be interested!
Meanwhile, what are some impressions of this wear of the distirbutor and rotor cap? Is this just older than the hills? or bespeaking a real problem?


I still can't get the idle up.I will be interested!
Meanwhile, what are some impressions of this wear of the distirbutor and rotor cap? Is this just older than the hills? or bespeaking a real problem?
06-12-13, 12:35 AM
#3129
That is caused by a cap that isn't seated correctly. Double check how it sits on the dizzy housing. Just because the clips can be popped on doesn't necessarily mean the cap is actually seated properly.
However even a properly seated dizzy cap won't fix whatever running problem you have (you see, a spark will jump a small gap in a dizzy cap because it's kinda designed for that to happen anyway).
However even a properly seated dizzy cap won't fix whatever running problem you have (you see, a spark will jump a small gap in a dizzy cap because it's kinda designed for that to happen anyway).
06-12-13, 12:46 AM
#3130
What did I do today? I got the window relays wired up and installed. Also installed a center console and window switches. First time for me so it took a while. I also had to fab a bracket for the rear of the console but it turned out great. Alignment of the holes is like a factory bracket I borrowed.
The roll up/roll down speed improved from 5 seconds to 3.5! Actually the 5 seconds was after a full greasing of course. These windows haven't moved since 1997! They only moved a tiny bit when I first tried them. Scary.
The battery was at 12.3 volts but the voltage through the stock wires was only 12.02 to 11.9 at rest (imagine it will drop down a lot when a window is in motion). I could see the gauge dip and the dash lights would dim a bit.
So I rewired it!
A fused 12 gauge wire to feed the relays. Now I don't see the gauge dip and the lights don't dim anymore. Plus a whole 1.5 seconds faster is nice. I'm sure once it's running and the alt is charging at like 14 volts or whatever, that they'll move even quicker. I can't wait to throw a 12A or something in it now. It won't be sweltering in there anymore.
06-12-13, 12:51 AM
#3131
That is caused by a cap that isn't seated correctly. Double check how it sits on the dizzy housing. Just because the clips can be popped on doesn't necessarily mean the cap is actually seated properly.
However even a properly seated dizzy cap won't fix whatever running problem you have (you see, a spark will jump a small gap in a dizzy cap because it's kinda designed for that to happen anyway).
However even a properly seated dizzy cap won't fix whatever running problem you have (you see, a spark will jump a small gap in a dizzy cap because it's kinda designed for that to happen anyway).
They no longer sell the direct OEM replacement belt, the new ones are far longer and require us to stretch out much further along the tensioner. This pushes it closer to the dizzy to the point that it touches and causes the cap to be just ever so slightly out of align.
I pulled my tensioner and ground away several mm of clearance for the dizzy cap and have since eliminated the gouges in the cap

-Geoff
06-12-13, 02:21 AM
#3132
This evening I pulled the seats out and removed the rear carpet in order to get better access to the e-brake handle in a misguided attempt to remove the parking brake cables. Turns out the cables don't remove from the handle, but rather from inner rear subframe, held in with cotter pins. I know all of you know this, but the FSM makes no mention of how these are removed. :p I did manage to get one off. The driver's side cable is still tucked away under the fuel pump shield, so I'll deal with it tomorrow.
The upside is I'm prepared to do a thorough cleaning of the carpets and I found $3.31 in change plus two 1-cent stamps.

fm
The upside is I'm prepared to do a thorough cleaning of the carpets and I found $3.31 in change plus two 1-cent stamps.
fm
06-12-13, 02:29 AM
#3133
What I got done today is on my build thread but I'll throw this up here and get some sleep:
Super stoked for the future now
 06-12-13, 09:05 AM
#3134
Ready or not...
Join Date: Dec 2009
Location: Taos, NM
Posts: 261
Likes: 0
Received 0 Likes
on
0 Posts
I truly suspect my coils are puny. THAT could be a power problem. It ju$t keeps adding up! Wanna send me your old coils that only performed up to 7k? you get my attention when you use the word SMOOTH. I really only aspire to reach stock performance.
06-12-13, 11:02 AM
#3135
Moderator
iTrader: (3)
Join Date: Mar 2001
Location: https://www2.mazda.com/en/100th/
Posts: 30,826
Received 2,594 Likes
on
1,842 Posts
This evening I pulled the seats out and removed the rear carpet in order to get better access to the e-brake handle in a misguided attempt to remove the parking brake cables. Turns out the cables don't remove from the handle, but rather from inner rear subframe, held in with cotter pins. I know all of you know this, but the FSM makes no mention of how these are removed. :p I did manage to get one off. The driver's side cable is still tucked away under the fuel pump shield, so I'll deal with it tomorrow.
The upside is I'm prepared to do a thorough cleaning of the carpets and I found $3.31 in change plus two 1-cent stamps.
fm
The upside is I'm prepared to do a thorough cleaning of the carpets and I found $3.31 in change plus two 1-cent stamps.
fm
06-12-13, 08:56 PM
#3136
Ready or not...
Join Date: Dec 2009
Location: Taos, NM
Posts: 261
Likes: 0
Received 0 Likes
on
0 Posts
06-12-13, 09:17 PM
#3137
I've actually read that it's a more responsive rear end without the sway bar back there (to a certain power limit). I'm actually tempted to take mine out since the bushings are all shot anyways.
Still trying to find my AFM and intake setup for the turbo engine...grrrrr
Still trying to find my AFM and intake setup for the turbo engine...grrrrr
06-12-13, 09:22 PM
#3138
Ready or not...
Join Date: Dec 2009
Location: Taos, NM
Posts: 261
Likes: 0
Received 0 Likes
on
0 Posts
I don't even know where to look. I decided to see if one of my coils is lame... easy, right? remove a coil wire, see if she'll start, then the other. Started fine with either single coil...??? Nada with both disconnected... reinstated a fraction of my sanity.
On a single coil the low end was all she had, but I was really quite impressed that she started at all? Someone educate me, or point me to a reference. PLEASE? If each coil was capable of taking me to 3k.. together I get 6? (I'm being silly) but really... WEIRD! These are NOT cylinders (I knew that, but I'm on a threshold of new perception).
On a single coil the low end was all she had, but I was really quite impressed that she started at all? Someone educate me, or point me to a reference. PLEASE? If each coil was capable of taking me to 3k.. together I get 6? (I'm being silly) but really... WEIRD! These are NOT cylinders (I knew that, but I'm on a threshold of new perception).
06-12-13, 09:31 PM
#3139
DIY, the coil to the front fires the trailing plugs. The car will run, drive even, on trailing only, but power is limited.
The coil to the rear fires the leading plugs. These are where the juice is made. On leading only you should note appreciably more power than trailing only.
How new are your plugs? Wires?
The coil to the rear fires the leading plugs. These are where the juice is made. On leading only you should note appreciably more power than trailing only.
How new are your plugs? Wires?
06-12-13, 10:52 PM
#3140
I fixed a chip in the top of the rear hatch defogger and rear wiper switch. Forgot to take a photo. This was on the top above the switch hinge pin. It was chipped when I bought the car in 1999 and I found the missing piece of plastic a while back and decided I would glue it back in place one day. You can see the repair but only if you know to look. I don't know if the epoxy will adhere well to that kind of plastic. No photos of that one.
The photos are of the before and after of my rust repair attempt phase one in the rear drivers side wheel well. The fiberglass is a 2x2 twill weave 8.8 ounce glass. The tear strength is about 400 lbs per inch. The patch is 5 inches wide and not quite 3 inches high. I used a wire wheel to remove all the undercoat on the first photo and before I applied the bandaid I also removed all the primer. That is some tough primer. The bright white appearance is not from the fiberglass. That is from the shiny metal underneath. Fiberglass when whetted out with epoxy is pretty transparent. This rust appears to have come from the inside of the car. It looks like the interior primer must have gotten scratched at some point and the foam rubber pad trapped moisture against it. Over the long years the rust spread. The damage on the inside is far greater. I am going to finish up the wheel well side of things and I will show the inside at a later date. There are a couple of other spots needing repair and this was a test to see how well this idea will work. The plan is to clean back a little more of the undercoating around the patch and then apply rust inhibiting primer. Finally either just hit it with flat black or apply fresh undercoating or maybe bed liner. This isn't ever going to be a show car, I just want to do a reasonable fix that will handle the junk that happens in a wheel well. I think this is going to work out well.
The photos are of the before and after of my rust repair attempt phase one in the rear drivers side wheel well. The fiberglass is a 2x2 twill weave 8.8 ounce glass. The tear strength is about 400 lbs per inch. The patch is 5 inches wide and not quite 3 inches high. I used a wire wheel to remove all the undercoat on the first photo and before I applied the bandaid I also removed all the primer. That is some tough primer. The bright white appearance is not from the fiberglass. That is from the shiny metal underneath. Fiberglass when whetted out with epoxy is pretty transparent. This rust appears to have come from the inside of the car. It looks like the interior primer must have gotten scratched at some point and the foam rubber pad trapped moisture against it. Over the long years the rust spread. The damage on the inside is far greater. I am going to finish up the wheel well side of things and I will show the inside at a later date. There are a couple of other spots needing repair and this was a test to see how well this idea will work. The plan is to clean back a little more of the undercoating around the patch and then apply rust inhibiting primer. Finally either just hit it with flat black or apply fresh undercoating or maybe bed liner. This isn't ever going to be a show car, I just want to do a reasonable fix that will handle the junk that happens in a wheel well. I think this is going to work out well.
06-12-13, 11:12 PM
#3141
Ready or not...
Join Date: Dec 2009
Location: Taos, NM
Posts: 261
Likes: 0
Received 0 Likes
on
0 Posts
how it is
The PO said he went out of his way to purchase and install plugs appropriate to the position... I think it was hotter plugs for Leading, cooler for trail. I installed new wires.
06-13-13, 01:48 AM
#3142
lindahlish, congrats on getting a running TII in your FB. Just a matter of time that you get the drivetrain sorted out.
This evening, I got the driver's side parking brake cable out and installed the GSL-SE parking brake cables in the rear subframe. I'll hook them up whenever I get my SE rear end in.
I also drilled 8 holes in each end of my upper links. The bushings were OK, but I was planning on replacing the links anyway. I figured I'd try softening up the bushings a bit using the technique described on PB&J Racing's site. I'll get lock nuts and such to attach the upper link as well. I attached them to the car and even now there is a lot more flex in those bushings. Hopefully not too much. We'll see.
Also took this time to remove the end link brackets for my rear sway bar as I"ll be running without one.
I'm waiting on my rear Bilsteins and some goodies from Lefthanderchassis.com before I button up the rear end swap. Probably sometime next week.
fm
06-13-13, 06:56 AM
#3143
Original Blackfuries Plyr
Cool find! And yeah, those e-brake things are a royal pain. I tried pulling them when I was getting a junkyard (what I thought was big-bearing GSL LSD rear end, turned out to be a small-bearing GSL LSD) rear axle setup... I just ended cutting them which wasn't easy either.
What I got done today is on my build thread but I'll throw this up here and get some sleep:
1st Gen FB RX-7 S4 Turbo II TII Swap First Startup
Super stoked for the future now
What I got done today is on my build thread but I'll throw this up here and get some sleep:
1st Gen FB RX-7 S4 Turbo II TII Swap First Startup
Super stoked for the future now
06-14-13, 12:55 AM
#3144
Rather than struggle with pulling the entire rear swaybar out, I simply removed one of the endlink brackets and endlink from one side on my '79. No trouble while I was driving it daily. I did this after a buddy removed his on his autocrossing GSL-SE after research, and reported good results.

Today:
Went home with a good friend and started it up for him. He loves the rotaries and especially the high redlines and loping idles. Then went to his house for a few hours and helped with his 92 Audi S4...think I know what I want my next DD to be
Than came home and......cleaned!......if you see the video you can see why I didn't want to. But it was necessary.
Then made this, just a temporary for now:
 06-14-13, 01:03 AM
#3145
rotorican85
iTrader: (9)
Join Date: Sep 2005
Location: en el culo de texas...
Posts: 900
Likes: 0
Received 0 Likes
on
0 Posts
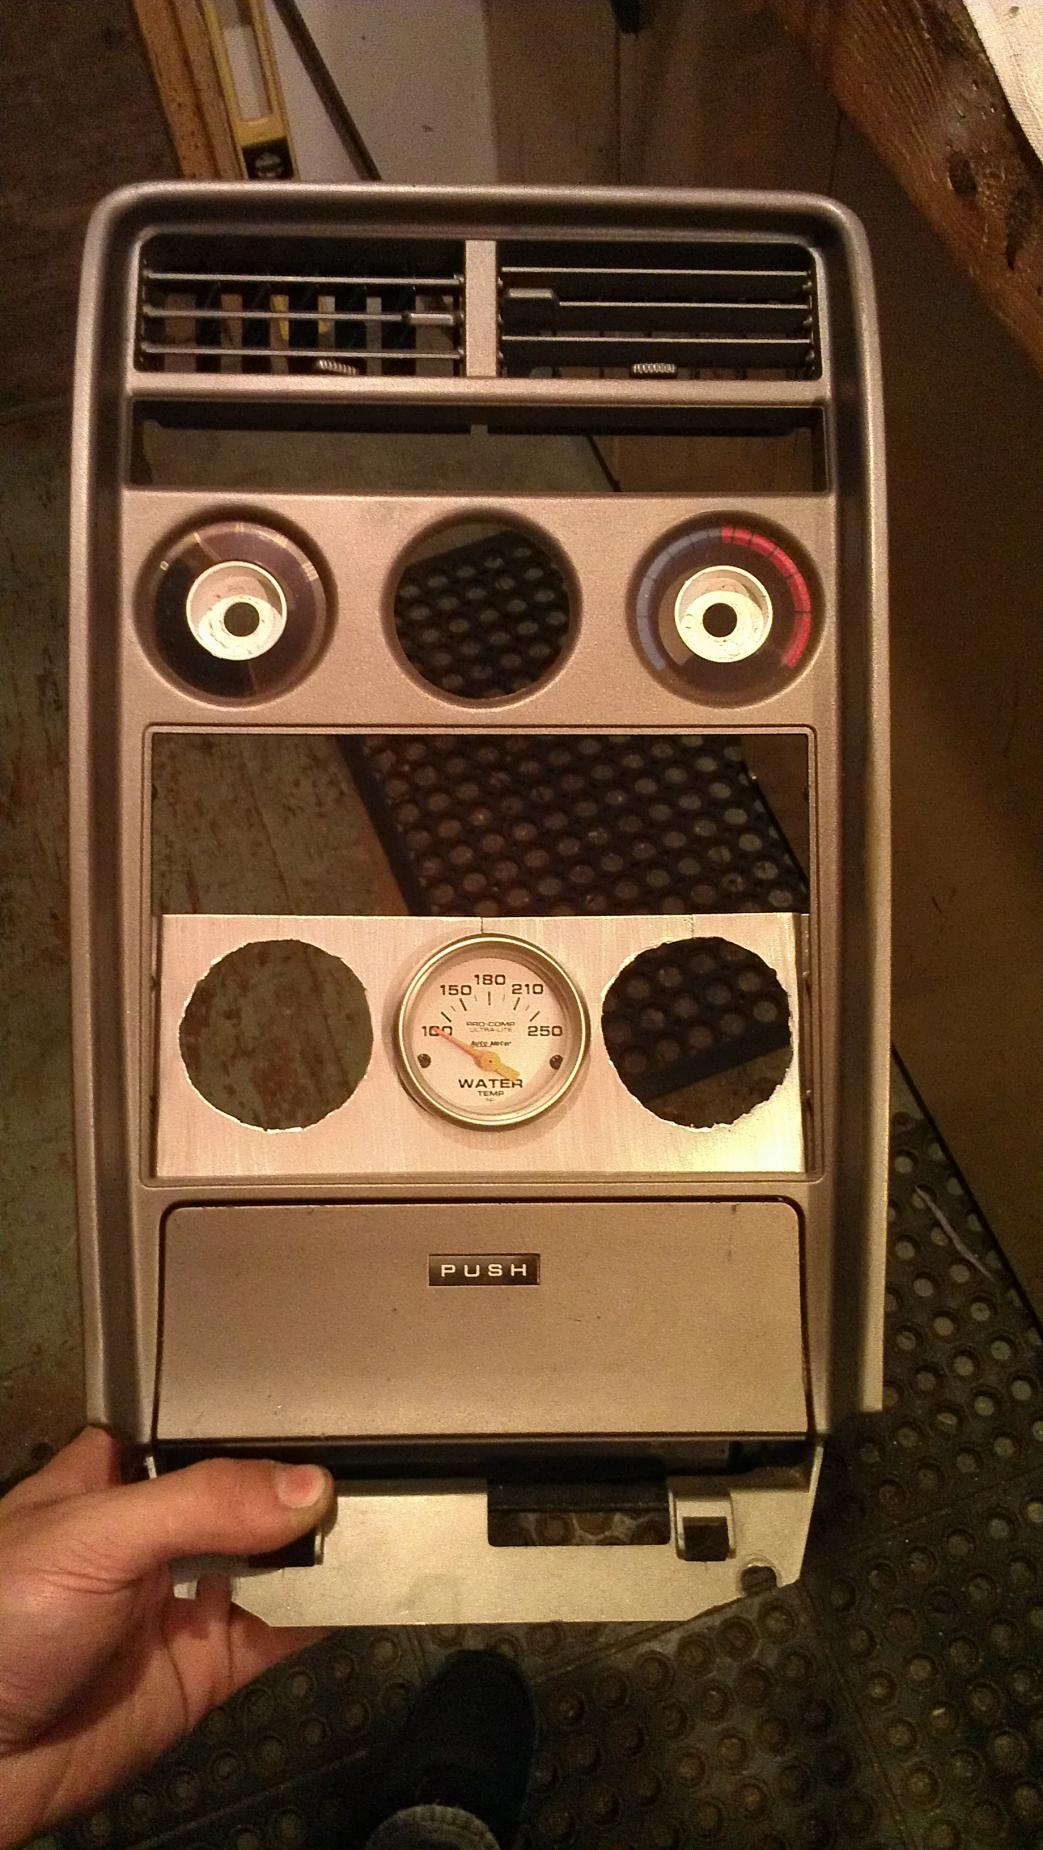
^^ i had my gages like that but got tired of them so i built a panel and moved them to the glove box. I also put the turbo timer there and when i park, i close the lid and car looks bone stock inside...down to the working gslse radio with eq!! Now all i need is a good shifter surround...
06-14-13, 01:57 AM
#3146
This evening I vacuumed the carpets and the inside of the hatch thoroughly. Started to clean some of the stuck-on sound deadening off the floor of the hatch. Got called away, so I got about 1/4 of the way done with cleaning up the hatch area.
Later this evening, I decided I should check the driveshaft to be sure the U-joints are OK. I really should have checked the FSM before I did this. I checked the rear u-joint while the shaft was on the car and it was good. I was hoping to be able to see the other u-joint under the car, but it was covered up with exhaust and heat shielding. I picked up the driveshaft and wiggled it and the next thing I know it was off the tranny and in my hands.
I honestly had no idea how easy it was to remove one of these. Now that it was in my hands, I could tell it was an OEM replacement driveshaft. The front u-joint was in great shape too. Of course, now I have to drop the exhaust and heat shields to put this thing back on.
I'm really lucky I had my car jacked up in the rear as I could have had tranny fluid all over the floor.
fm
Later this evening, I decided I should check the driveshaft to be sure the U-joints are OK. I really should have checked the FSM before I did this. I checked the rear u-joint while the shaft was on the car and it was good. I was hoping to be able to see the other u-joint under the car, but it was covered up with exhaust and heat shielding. I picked up the driveshaft and wiggled it and the next thing I know it was off the tranny and in my hands.
I honestly had no idea how easy it was to remove one of these. Now that it was in my hands, I could tell it was an OEM replacement driveshaft. The front u-joint was in great shape too.
Of course, now I have to drop the exhaust and heat shields to put this thing back on. I'm really lucky I had my car jacked up in the rear as I could have had tranny fluid all over the floor.
fm
06-14-13, 04:47 PM
#3148
This post is me taking a break from doing little things I have been putting off for months.
On the GSL-SE: Last fall the clutch master started leaking and I bought a replacement and a stainless flex line. It looked like the weather was going to suck for several days and since I wanted to drive the car I replaced the Clutch MC in light drizzle threatening to turn to sleet. I didn't do the flex line thinking that could wait until a nice day. Today was that nice day. Also replaced the right front long headlight rod. I am 3 for 4 on those. I think adjusting the stop after replacement is key to making it last. If the headlamp isnt resting on the stop then when you hit a bump it bounces both ways. Tried to clean out the coolant reservoir but it still looks filthy. I guess on this car it is in a place you can't really see.
On the GSL-EV I primed my fiberglass bandaid from a couple of days ago and picture is included. Also I had purchased a LED bulb for the dome light. It looked like it should fit when I ordered it but I wasn't 100% certain. It didn't. So today I sanded the circuit board edges to allow clearance between the clips. While doing so I knocked off one of the contacts and soldered it back on. You can see a little solder on the outside. I should clean it up but I am afraid I will break it again so I am calling this good enough. It is so bright you can't look at it. Illuminated the interior nicely. Because of the futzing around I can't recommend this as a general replacement but if you want to mess here is a link:
30mm LED Festoon bulb
06-14-13, 04:54 PM
#3149
Doug - the headlight rods are on my list as well. I might have to pick your brain on the bump stop adjustment.
My radiator overflow is gnar gnar as well. I tried pouring boiling water in it and shaking it around - but it only took off a fraction of the goobs. Really would need to have rocks or something in there - and I've heard you do NOT want to put any sort of cleaner or solvent in where there will be coolant, no matter how much you rinse it out afterwards. If i Could, I'd go for a brand spanker, but they are NLA so far as i can tell for the GSL-SE version (lower base to clear the air intake box)
I've thought about those dome LED lights, but decided against them for brightness purposes. Would some clear PVC sanded down act as a diffuser to help do you think? Or is there even enough room to fit it?
06-14-13, 06:35 PM
#3150
Roller into Roadster
iTrader: (1)

Join Date: Apr 2012
Location: Ft. Campbell, KY
Posts: 77
Likes: 0
Received 0 Likes
on
0 Posts
First step on a long journey of small parts, drained oil system and rest of coolant from keg today, and put back on the lift points. Tomorrow should be the day to unbolt the transmission and engine mounts and lift out the short block.
One question: I work at a place with gigantic solvent cleaning tanks for cleaning weapons, can I use the same chemical solution to start cleaning up all my small bits as I dissassemble my small block for overhaul?
One question: I work at a place with gigantic solvent cleaning tanks for cleaning weapons, can I use the same chemical solution to start cleaning up all my small bits as I dissassemble my small block for overhaul?