
GB: FC Bi-xenon HID Projector Headlights

Balls deep...
Joined: Mar 2006
Posts: 668
Likes: 0
From: Bay Point, CA
ran in to same problems as Madscience_7 did...dremeled that metal piece off...hella fucked up my front kit in the process... =(


I thought this was gonna be plug n' play?...lol... now my headlights won't open all the way...i have to force it open, spent hours trying to figure things out, dremeling more in the process... then i just gave up... now my headlights are permanently up for the time being... 'til i figure something out.
I thought this was gonna be plug n' play?...lol... now my headlights won't open all the way...i have to force it open, spent hours trying to figure things out, dremeling more in the process... then i just gave up... now my headlights are permanently up for the time being... 'til i figure something out.
Thread Starter
Joined: May 2003
Posts: 4,150
Likes: 0
From: CA (Bay Area)
ran in to same problems as Madscience_7 did...dremeled that metal piece off...hella fucked up my front kit in the process... =(
I thought this was gonna be plug n' play?...lol... now my headlights won't open all the way...i have to force it open, spent hours trying to figure things out, dremeling more in the process... then i just gave up... now my headlights are permanently up for the time being... 'til i figure something out.
I thought this was gonna be plug n' play?...lol... now my headlights won't open all the way...i have to force it open, spent hours trying to figure things out, dremeling more in the process... then i just gave up... now my headlights are permanently up for the time being... 'til i figure something out.
I can visibly see they are sitting out too far... we used a 3/4 spacer, with a 1/8" nut... that = 7/8" which is the thickness of those large spacers. I think we adjusted those inner headlight bucket aiming screws first though which would bring the entire assembly IN
If you're on AIM shoot me a message -> sakebombgarag
... also your rear socket seems to be attached wrong and can bind at the back of the headlight bucket when the lights are raising up. It should be connected/rotated so that when engaged the wire points towards the fender.

RoToPIMP
Joined: Jun 2005
Posts: 138
Likes: 1
From: California


Thread Starter
Joined: May 2003
Posts: 4,150
Likes: 0
From: CA (Bay Area)
also try removing the nut and lock washer from behind the cylindrical spacers.... i swear 7/8" worked for us ...... it's a damn tight fit but there is still 1mm clearance (we did trim those rubber flaps a tiny bit). I think the aiming screws need to come in.....
Thread Starter
Joined: May 2003
Posts: 4,150
Likes: 0
From: CA (Bay Area)
UH OH!! I think I just realized the mistake. When we made the original spacer design we did it solely with the cylindrical spacers... it came out to 7/8" . I somehow missed the fact that the landing (on the black bucket) for those screws is actually indented, so when I ordered the side spacers I ordered 7/8" .
Can someone put a straight edge across the face of the bucket (and then put a ruler on the indented section of the bucket and tell me the difference?). I can special order/overnight some spacers to compensate for that discrepency quickly and send them out as soon as I get them. I'll need someone to measure that difference though. Sorry guys... I dropped the ball here pretty bad . I was in a rush to get them out and have an FC headlight bucket assembly here, but didn't get a chance to go back and re-test them on a car. We'll get it sorted, and quickly. Sorry again guys........
-Heath
Can someone put a straight edge across the face of the bucket (and then put a ruler on the indented section of the bucket and tell me the difference?). I can special order/overnight some spacers to compensate for that discrepency quickly and send them out as soon as I get them. I'll need someone to measure that difference though. Sorry guys... I dropped the ball here pretty bad
. I was in a rush to get them out and have an FC headlight bucket assembly here, but didn't get a chance to go back and re-test them on a car. We'll get it sorted, and quickly. Sorry again guys........ -Heath
Balls deep...
Joined: Mar 2006
Posts: 668
Likes: 0
From: Bay Point, CA
UH OH!! I think I just realized the mistake. When we made the original spacer design we did it solely with the cylindrical spacers... it came out to 7/8" . I somehow missed the fact that the landing (on the black bucket) for those screws is actually indented, so when I ordered the side spacers I ordered 7/8" .
Can someone put a straight edge across the face of the bucket (and then put a ruler on the indented section of the bucket and tell me the difference?). I can special order/overnight some spacers to compensate for that discrepency quickly and send them out as soon as I get them. I'll need someone to measure that difference though. Sorry guys... I dropped the ball here pretty bad . I was in a rush to get them out and have an FC headlight bucket assembly here, but didn't get a chance to go back and re-test them on a car. We'll get it sorted, and quickly. Sorry again guys........
-Heath
Can someone put a straight edge across the face of the bucket (and then put a ruler on the indented section of the bucket and tell me the difference?). I can special order/overnight some spacers to compensate for that discrepency quickly and send them out as soon as I get them. I'll need someone to measure that difference though. Sorry guys... I dropped the ball here pretty bad
. I was in a rush to get them out and have an FC headlight bucket assembly here, but didn't get a chance to go back and re-test them on a car. We'll get it sorted, and quickly. Sorry again guys........ -Heath

 well i won't be able to touch my FC 'til this sunday...long work week starts tomorrow...this past weekend was the only weekend for me this month to actually put in work in the FC...so let me get this straight...once you get the right measurements, you'll get new spacers made and send them to us correct?...man..just wished i caught this sooner...so i didn't have to hack up my front kit
Thread Starter
Joined: May 2003
Posts: 4,150
Likes: 0
From: CA (Bay Area)
oohhh i see...and after all this time, i thought i was doing it wrong well i won't be able to touch my FC 'til this sunday...long work week starts tomorrow...this past weekend was the only weekend for me this month to actually put in work in the FC...so let me get this straight...once you get the right measurements, you'll get new spacers made and send them to us correct?...man..just wished i caught this sooner...so i didn't have to hack up my front kit oh well i guess...it's all trial and error...just gotta move on and hopefully you get us the correct spacers.
well i won't be able to touch my FC 'til this sunday...long work week starts tomorrow...this past weekend was the only weekend for me this month to actually put in work in the FC...so let me get this straight...once you get the right measurements, you'll get new spacers made and send them to us correct?...man..just wished i caught this sooner...so i didn't have to hack up my front kit . Again, sorry for this issue, I thought we were squared away but in the rush to get the spacer kit made I missed the indent on the original mounts
Balls deep...
Joined: Mar 2006
Posts: 668
Likes: 0
From: Bay Point, CA
it's cool, not mad at you guys, i'm just mad about the fact why this installation process was taking so long lol...but things are clarified, hopefully you can get those needed measurements ASAP! i've been wanting to learn how to do small body work anyways..some bondo, a little sanding...spray can...my front kit will be fine
Full Member
Joined: Sep 2010
Posts: 59
Likes: 0
From: Lakewood, Wa
Just got your email Heath. Haha I was wondering why nothing seemed to be right this afternoon when I tried installing mine (unsuccessfully). I ended up ditching the spacers entirely and dremeled the crap out of the headlight bucket so it fit all the way in, only to realize the spacers were there to keep the back of the headlights from getting caught when moving up and down. My other problem is I cant get the painted cover off the top of the headlights. The screws are stripped. Any suggestions? Also, no worries Heath, we all make mistakes. As long as in the end everything works out as it should is what's important.
Thread Starter
Joined: May 2003
Posts: 4,150
Likes: 0
From: CA (Bay Area)
Just got your email Heath. Haha I was wondering why nothing seemed to be right this afternoon when I tried installing mine (unsuccessfully). I ended up ditching the spacers entirely and dremeled the crap out of the headlight bucket so it fit all the way in, only to realize the spacers were there to keep the back of the headlights from getting caught when moving up and down. My other problem is I cant get the painted cover off the top of the headlights. The screws are stripped. Any suggestions? Also, no worries Heath, we all make mistakes. As long as in the end everything works out as it should is what's important.
If you guys want to do a temporary fix while waiting for the extruded aluminum spacers to show up, you can put a 5/8" anything in back of the lights on the sides so you can at least use them for now. Hopefully we'll be able to get this stuff shipped out late this week/early next.
Stripped screws... PB blaster and let them soak for a day... if that doesnt cut it... you'll need to get a screw remover tool. It's possible to do it without removing the cover, just not easy.
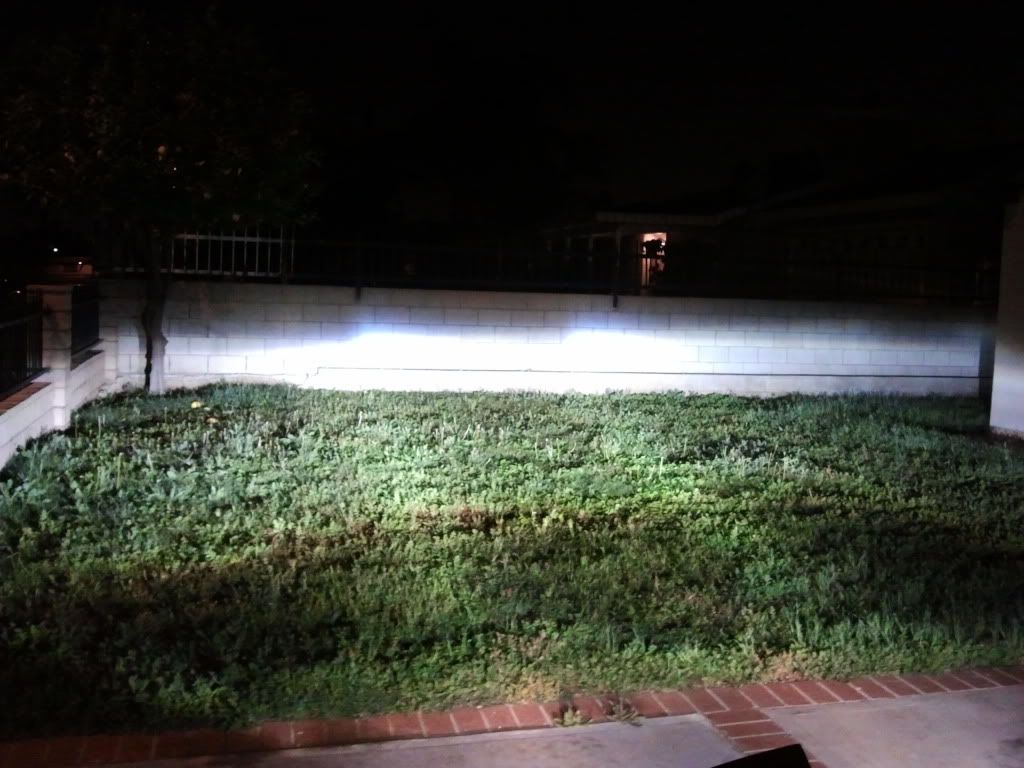
I got mine to work, goes up and down no problem. Did a rough trim on my shrouds, they fit as well, albeit a little roomier to compensate for the increased travel arc.
I will try the smaller spacer when you guys send it, will come back with results!
After aiming them, the lights are out of this world.
I will try the smaller spacer when you guys send it, will come back with results!
After aiming them, the lights are out of this world.
Too old for this
Joined: Oct 2009
Posts: 488
Likes: 0
From: Denver, CO
Just got your email Heath. Haha I was wondering why nothing seemed to be right this afternoon when I tried installing mine (unsuccessfully). I ended up ditching the spacers entirely and dremeled the crap out of the headlight bucket so it fit all the way in, only to realize the spacers were there to keep the back of the headlights from getting caught when moving up and down. My other problem is I cant get the painted cover off the top of the headlights. The screws are stripped. Any suggestions? Also, no worries Heath, we all make mistakes. As long as in the end everything works out as it should is what's important.


Early this next week (hoping monday). The replacement spacers are ordered and on the way to us, and I'll get them in the mail the day they get here.
-Heath
-Heath
__________________
SAKEBOMB GARAGE LLC
www.SAKEBOMBGARAGE.com
Specialty aftermarket parts & service // Fremont, California
Contact: info@sakebombgarage.com
SAKEBOMB GARAGE LLC
www.SAKEBOMBGARAGE.com
Specialty aftermarket parts & service // Fremont, California
Contact: info@sakebombgarage.com

Thread Starter
Joined: May 2003
Posts: 4,150
Likes: 0
From: CA (Bay Area)

you guys should have your "real" spacers shortly 
__________________
SAKEBOMB GARAGE LLC
www.SAKEBOMBGARAGE.com
Specialty aftermarket parts & service // Fremont, California
Contact: info@sakebombgarage.com
SAKEBOMB GARAGE LLC
www.SAKEBOMBGARAGE.com
Specialty aftermarket parts & service // Fremont, California
Contact: info@sakebombgarage.com