GT35R Here I come! :D

 07-25-06, 01:28 PM
#127
Love the setup, very nice craftsmenship. The only thing I'm not too fond of is the FMIC as a V-mount, but to each his own. Either way, lots of blood, sweat and of course Money went into this car.
Quick question, what are you going to use for the air pump?
Quick question, what are you going to use for the air pump?
07-25-06, 02:32 PM
#128
Rotary Enthusiast
Thread Starter

Originally Posted by Scrub
The only thing I'm not too fond of is the FMIC as a V-mount,...
Quick question, what are you going to use for the air pump?
Quick question, what are you going to use for the air pump?

As for the airpump, well I scrubbed that idea when I started with all the extra modifications. I may end up relocating it to the drivers side where my AC and PS used to be, but I don't think I have room there either!
 Electric?....
Due to the 200 degree heat in the garage, I haven't gotten much further.

Last edited by atihun; 07-25-06 at 02:45 PM.
07-26-06, 12:36 AM
#129
With all the money you've put into that car I'm surpised you don't have Central air in your garage, or at least a window unit
I really can't discuss any positives or negatives you may have using that core in detail. If you have a flow rating for the blitz core then I could probably give you positives and negatives towards it. Do you know how thick the Blitz core is? Is it a bar and plate design or tube and fin design? I really couldn't tell from the pics, but since Blitz is a quality company I'd assume it's a tube and fin design.
I figured you were gonna use an electric pump since it would be much easier then trying to fit a mechancial one on the engine. The nice thing about an electric pump is, you can mount it anywhere! I was asking what you were gonna use because I'm in the same situation as you, where I have a cat, but no pump.
-Dan
I really can't discuss any positives or negatives you may have using that core in detail. If you have a flow rating for the blitz core then I could probably give you positives and negatives towards it. Do you know how thick the Blitz core is? Is it a bar and plate design or tube and fin design? I really couldn't tell from the pics, but since Blitz is a quality company I'd assume it's a tube and fin design.
I figured you were gonna use an electric pump since it would be much easier then trying to fit a mechancial one on the engine. The nice thing about an electric pump is, you can mount it anywhere!
I was asking what you were gonna use because I'm in the same situation as you, where I have a cat, but no pump. -Dan
07-26-06, 04:14 PM
#130
Darkside FD
Join Date: Jan 2004
Location: AZ
Posts: 1,175
Likes: 0
Received 0 Likes
on
0 Posts
Originally Posted by atihun
Due to the 200 degree heat in the garage, I haven't gotten much further.
! Friday the high was 118...I guess I just tough it out in the name of progress. I need to get this thing finished!!! It will be cool to see yours done though! I know I am anxious to see.I got the stock airpump to work with my Aspec t4 35r...I dont have nearly as cool of an intercooler setup though!
07-26-06, 09:23 PM
#131
Rotary Enthusiast
Thread Starter
Don't think I haven't thought about the AC in the garage! But instead I'm working inside re-doing a bathroom upstairs; tearing out the walls as they used flat paint around the shower... ugh.
Normally it's only hot like this for about a month or so... usually anyway. This year it seems like a El Nino year.
Anyhow, the Blitz FMIC looks like a tube and fin design, but what do I know.
Yea the IC / tubing looks great, but I shot myself in the foot as the tubing slightly in the way where the stock air pump should be... Oh well!!!
Looks like I'll have to go with an electric air pump?
But instead I'm working inside re-doing a bathroom upstairs; tearing out the walls as they used flat paint around the shower... ugh.Normally it's only hot like this for about a month or so... usually anyway. This year it seems like a El Nino year.
Anyhow, the Blitz FMIC looks like a tube and fin design, but what do I know.
Yea the IC / tubing looks great, but I shot myself in the foot as the tubing slightly in the way where the stock air pump should be... Oh well!!!
Looks like I'll have to go with an electric air pump?
09-15-06, 10:17 PM
#135
Senior Member

Join Date: Feb 2006
Location: NH
Posts: 309
Likes: 0
Received 0 Likes
on
0 Posts
Originally Posted by atihun
Thanks guys!
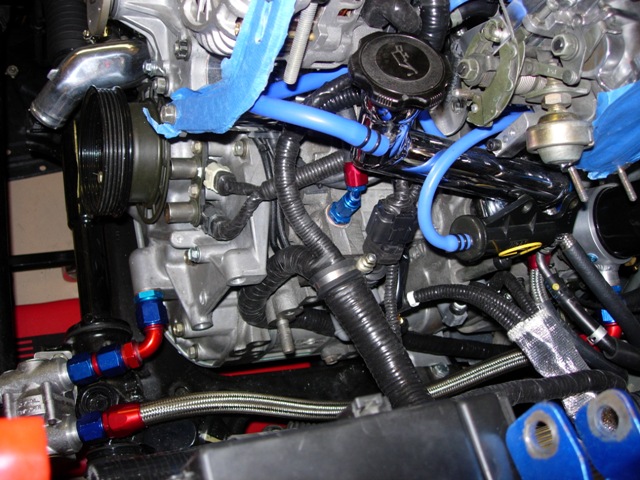
Now I have to make a custom oil inlet pipe (the add oil tube) as the stock one is 1/4 too short.
Now I have to make a custom oil inlet pipe (the add oil tube) as the stock one is 1/4 too short
.
09-15-06, 10:43 PM
#136
Rotary Enthusiast
Thread Starter
Originally Posted by davedge
You can use a stock T2 Oil Filler tube. You may need to clock/rotate it slightly, but it is metal, so you can cut/shorten/rotate as necessary. TIG or braze it.......
And I had it chromed for $15 bucks!We just got back from Kauai, so I am starting to work on it again! I am almost done with the new wiring harness from the battery to the engine. I'll take some pics in a few days.
Attila
09-20-06, 11:57 PM
#138
Rotary Enthusiast
Thread Starter
Finally tamed the battery/engine wiring harness... I don't want to do wiring for a long time

Here's the harness in place:
Here's the FC oil tube:
Here's the relocation of the fuseboxes:
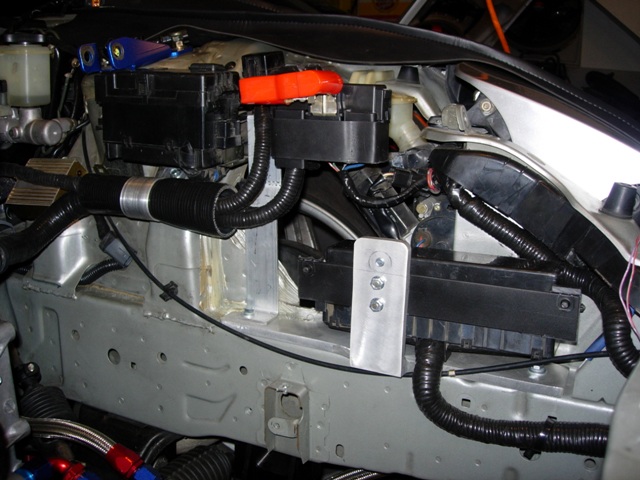
Little by little...
BTW, silicone self fusing tape is the best thing ever!
Here's the harness in place:
Here's the FC oil tube:
Here's the relocation of the fuseboxes:
Little by little...
BTW, silicone self fusing tape is the best thing ever!
Last edited by atihun; 09-21-06 at 12:00 AM.
09-21-06, 12:33 AM
#139
Can't believe how many times in one thread I get a "chubby" over something you've done or that is in your garage. Great motivation for my my projects. Thanks for sharing!
09-21-06, 08:12 AM
#142
Rotary Enthusiast
Thread Starter
Thanks! Almost as good as pr0n?!? 
Both harnesses were new, just removed the unused wires and replaced some with new wires that needed different connectors, then rewrapped them. PITA...
Both harnesses were new, just removed the unused wires and replaced some with new wires that needed different connectors, then rewrapped them. PITA...
09-21-06, 10:15 AM
#145
Rotary Enthusiast
Thread Starter
Originally Posted by dubulup
very clean...you are getting close to start up!
what is left? AND LOOK at that blingin' oil filler!!
(psst, remove that used stud on the front iron)
what is left? AND LOOK at that blingin' oil filler!!
(psst, remove that used stud on the front iron)
Yea, that stud looks out of place. I'll probably need that hole for the electric air pump. Oh crap, add that to the list too... It's the never ending list!
09-24-06, 10:46 PM
#146
Rotary Enthusiast
Thread Starter
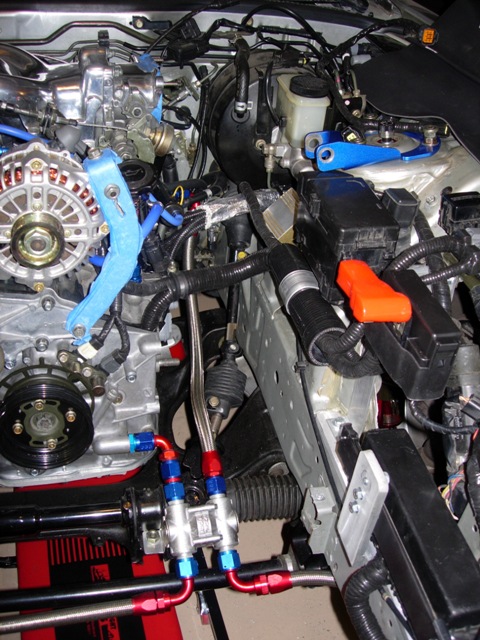
McMaster Carr is the shiznit! I found some welded stainless mesh that works great for the front bumper. They delivered it in a day...
I figured since I spent some time on the V-mount, I would provide it some protection...
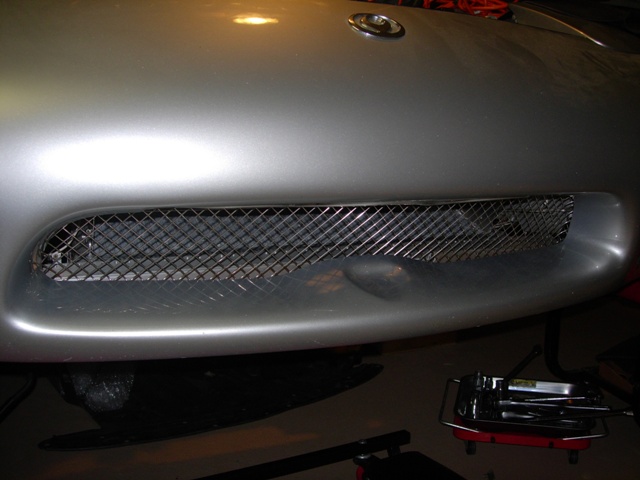
As soon as I'm done with the mesh for the oil ducts, the car should be back on the ground after being in the air for over a year! YAY!
I figured since I spent some time on the V-mount, I would provide it some protection...
As soon as I'm done with the mesh for the oil ducts, the car should be back on the ground after being in the air for over a year!
YAY!
Last edited by atihun; 09-24-06 at 11:09 PM.
09-25-06, 01:32 AM
#148
Ghost Ride the Whip
is that a crooked willow oil cooler kit i see in there?
you have to watch out, the fitting that connects the thermostat to the block will eventually give from the friction from the motor and will crack
happened to me two times before I redid all the lines....
you have to watch out, the fitting that connects the thermostat to the block will eventually give from the friction from the motor and will crack
happened to me two times before I redid all the lines....
09-25-06, 08:28 AM
#149
Rotary Enthusiast
Thread Starter
Originally Posted by 1FooknTiteFD
is that a crooked willow oil cooler kit i see in there?
you have to watch out, the fitting that connects the thermostat to the block will eventually give from the friction from the motor and will crack
happened to me two times before I redid all the lines....
you have to watch out, the fitting that connects the thermostat to the block will eventually give from the friction from the motor and will crack
happened to me two times before I redid all the lines....
Is it the fitting between the thermostat and front cover, or the actual fitting on the thermostat?
I know that the fitment wasn't the best designed as the tstat is floating, so when I installed it, I made a bracket that is flexible and bolted it to the tstat bracket and the steering rack bolt. Since I have solid motor mounts, I think the bracket will help, maybe...
Can you post a pic of how you re-mounted yours?