GT35R Here I come! :D


 02-12-06, 11:31 AM
#78
Rotary Enthusiast
Thread Starter

Originally Posted by signofinfinity
Atihun,
Very very nice set up... awsome. What did you do for that heat sheald? Is it custom or the e bay one?
Congrats!!!
George
Very very nice set up... awsome. What did you do for that heat sheald? Is it custom or the e bay one?
Congrats!!!
George
The one above is from ATP Turbo.
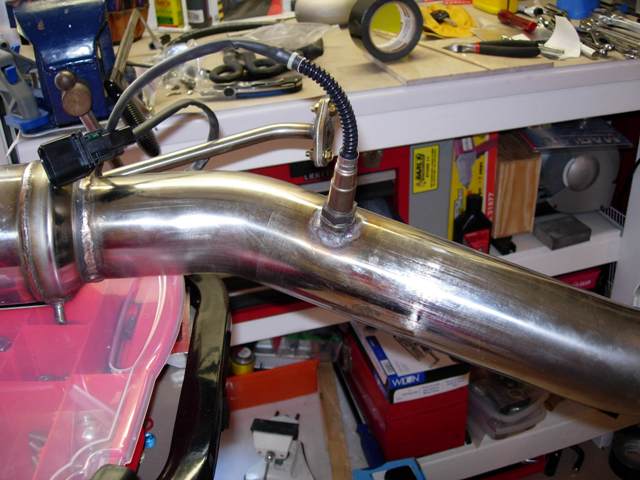
I have the wideband SS O2 bung welded into the high flow cat, so I will be wrapping it, maybe the downpipe too, and then bolt everything up and tighten the manifolds down so I can finish the fuel lines.
02-12-06, 05:00 PM
#79
development
Originally Posted by Asleep
"The other guy" says heat cycles and if you ever drive the car in the rain. Don't worry, it is not permanent and you'll get a chance to replace it. And we're talking a GT40r sitting low and tight, baking all that shiny goodness with up to 23psi. Your results may vary.
"The other guy"
"The other guy"
and there you have it, I don't drive in the rain and I don't have issues...
02-13-06, 01:00 PM
#80
Rotary Enthusiast
Thread Starter
When I did the "stick on" heat barrier, one trick I used was to run superglue alond the seams (where the fiberglass material was exposed). This will help it from starting to seperate and come unglued faster. Hopefully it will last a while; I guess $60 every year or two to replace the barrier and protect the body isn't too bad! 
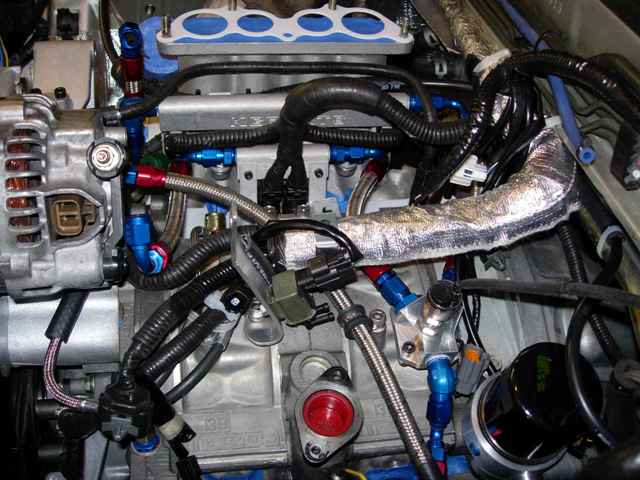
Here's some more updates:
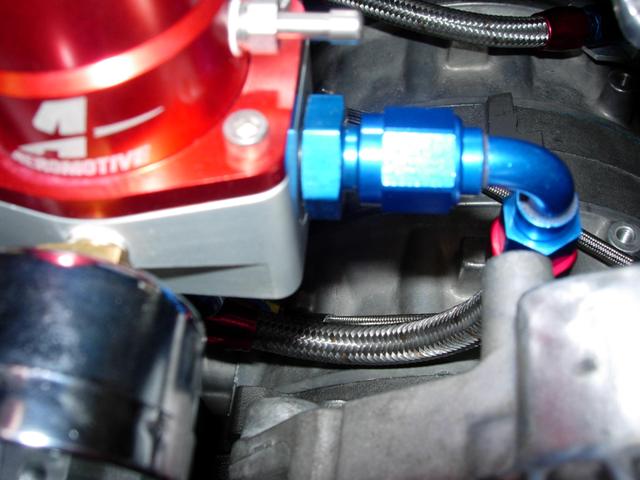
My bung welded in for the wideband O2 sensor:
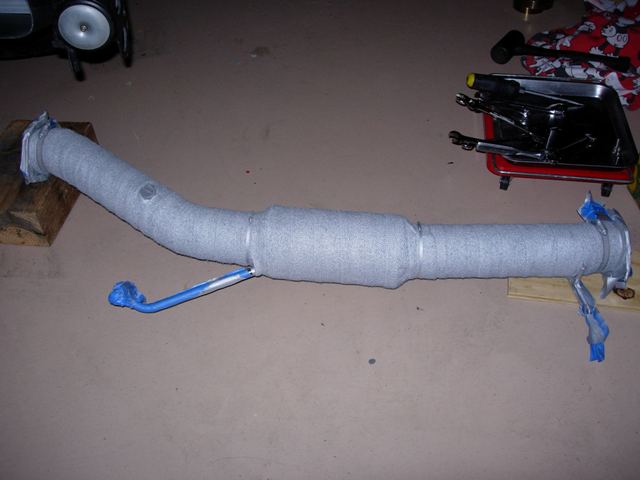
BOO!!! Here's the nice and shiny stainless cat, all wrapped and painted, (it's good that I'm more worried about function than looks! ) :
) :
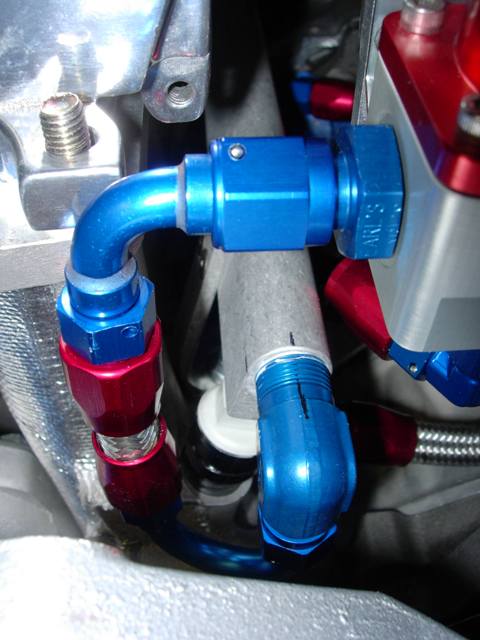
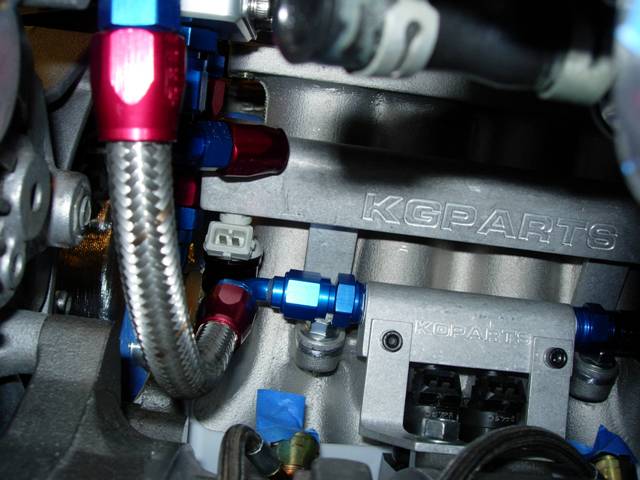
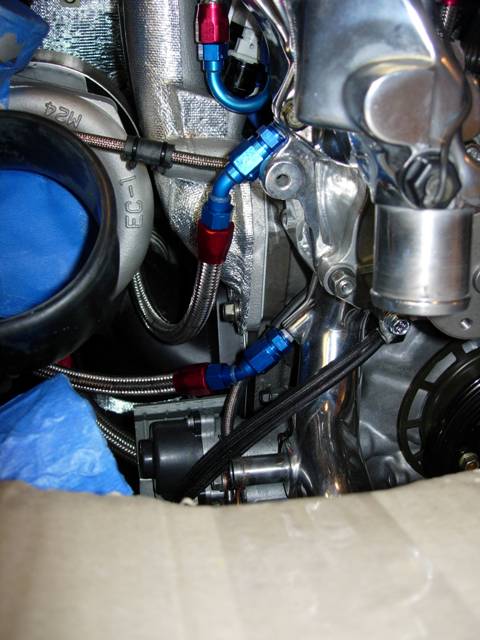
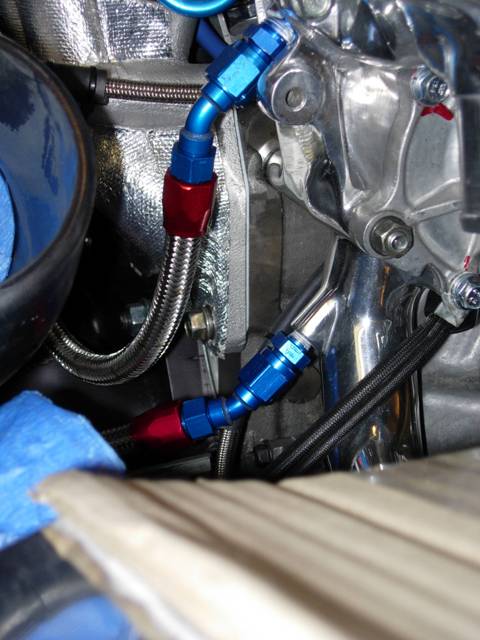
Here's the pictures for the fuel lines; everything is solid, I just hope I don't have any leaks:
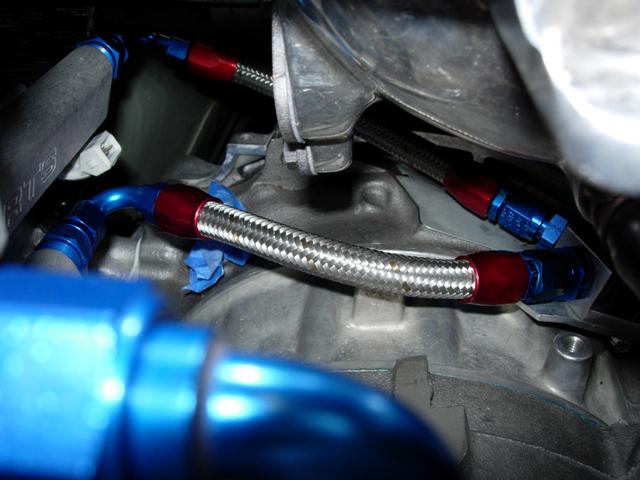
From the Secondary rail to the FPR:
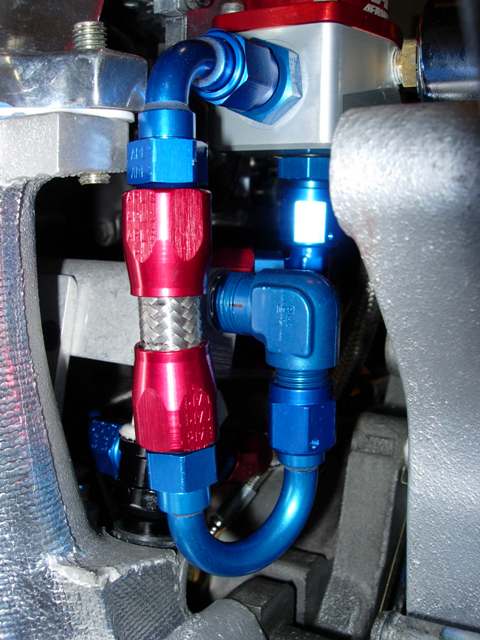
From the Primary rail to the FPR:
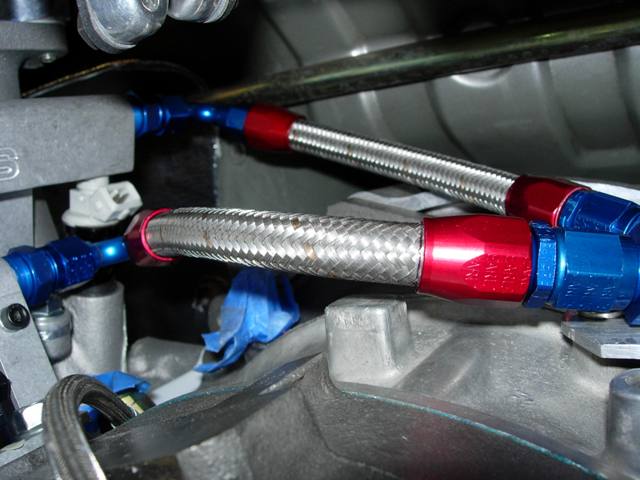
Feed lines from the Y to both rails:
I hope these pictures will help others with their projects! I know that I use the forum for ideas all the time.
Here's some more updates:
My bung welded in for the wideband O2 sensor:
BOO!!! Here's the nice and shiny stainless cat, all wrapped and painted, (it's good that I'm more worried about function than looks!
) :Here's the pictures for the fuel lines; everything is solid, I just hope I don't have any leaks:
From the Secondary rail to the FPR:
From the Primary rail to the FPR:
Feed lines from the Y to both rails:
I hope these pictures will help others with their projects! I know that I use the forum for ideas all the time.
02-13-06, 02:53 PM
#82
Rotary Enthusiast
Thread Starter
Originally Posted by dubulup
Nice!! but why the WB so far down stream?
Plus, it's a heated O2 sensor so I'm not too worried.
02-13-06, 03:08 PM
#84
Perpetual Rebuilder
Originally Posted by atihun
I've already built the line ... the pictures are a little out of order; look at the 3rd pic up from this post and you'll see that the line is already there. It fits great and I can actually screw it on. I just need to make sure that everything is leak proof!
I will probably go to a bosch 044 or something larger external later. But at 16 psi I think that the FPR and the Cosmo fuel pump will be adequate to feed the 750's and 1600's.
... the pictures are a little out of order; look at the 3rd pic up from this post and you'll see that the line is already there. It fits great and I can actually screw it on. I just need to make sure that everything is leak proof!I will probably go to a bosch 044 or something larger external later. But at 16 psi I think that the FPR and the Cosmo fuel pump will be adequate to feed the 750's and 1600's.
I found 16psi to be the absolute max a cosmo would support in my 750/1680 setup with a base fuel pressure of 32psi at idle. 16psi was 100% injector duty with no room for error. I lost my wastegate hose and then lost my engine. I will be using dual pumps, a 3bar map, and a threaded wastegate hose after this...
Good luck with the project it looks great!
02-13-06, 03:20 PM
#85
Rotary Enthusiast
Thread Starter
Originally Posted by shawnk
I found 16psi to be the absolute max a cosmo would support in my 750/1680 setup with a base fuel pressure of 32psi at idle. 16psi was 100% injector duty with no room for error. I lost my wastegate hose and then lost my engine. I will be using dual pumps, a 3bar map, and a threaded wastegate hose after this...
Good luck with the project it looks great!
Good luck with the project it looks great!
Do you know if you were running really rich? I'm wondering if I should also re-wire the pump?Thanks for the info though... I will definitely go slowly in tuning as this would be quite an expensive pile of crap if I blow it up.... AND my wife already told me that if it doesn't start when I'm done or I blow it up, I will be parting it out!
As for the wastegate, what kind of threaded hose are you talking about? A direct screw in to the Tial ports?
02-13-06, 03:30 PM
#86
Perpetual Rebuilder
I had rewired the pump to run 100% all of the time with its own run from the battery. My AFR was 11.2-3 at WOT.
As far as the wastegate hose I have a hks and it has a 1/8 NPT threaded hole for the hose with a barb fitting in it. I found a 1/8 NPT to 4an fittng and will run a 4an stainless hose to the IC piping to make sure that there is no chance to blow that hose off again.
As far as the dual pump goes I will probably wire the cosmo back into the 2 stage stock wiring and have the second pump (stock FD pump) running at 100% all of the time. I'll give you some real world data in the next 2 weeks hopefully on this setup versus the last.
02-13-06, 09:09 PM
#87
Originally Posted by dubulup
yo man, it wasn't a personal attack...i didn't feel like searching back thru the thread to find out who said what.
and there you have it, I don't drive in the rain and I don't have issues...
and there you have it, I don't drive in the rain and I don't have issues...
Whats that? He says heat, the very element which it reflects, is the enemy of the glue.
03-06-06, 08:41 PM
#88
 03-28-06, 08:55 AM
#90
Full Member
Join Date: May 2005
Location: Auburn, PA
Posts: 144
Likes: 0
Received 0 Likes
on
0 Posts
What are you using on the fittings where they go into the fuel rails? Is there any special thread sealant required on any of the fittings or joints to prevent leaks?
I have a similar setup going in, and have searched with no avail on how to seal up the fuel lines!
BTW.....Very clean install with lots of attention to detail.
I have a similar setup going in, and have searched with no avail on how to seal up the fuel lines!
BTW.....Very clean install with lots of attention to detail.
03-28-06, 09:53 AM
#91
Tequila? ..it's like beer
iTrader: (1)
Join Date: Mar 2001
Location: Woodbine, MD
Posts: 1,124
Likes: 0
Received 0 Likes
on
0 Posts
Originally Posted by IEatVipers4Brkfast
What are you using on the fittings where they go into the fuel rails? Is there any special thread sealant required on any of the fittings or joints to prevent leaks?
I have a similar setup going in, and have searched with no avail on how to seal up the fuel lines!
BTW.....Very clean install with lots of attention to detail.
I have a similar setup going in, and have searched with no avail on how to seal up the fuel lines!
BTW.....Very clean install with lots of attention to detail.
03-28-06, 10:55 AM
#92
Rotary Enthusiast
Thread Starter
The fuel rails are 3/8 NPT. I have a straight 3/8 NPT to -6 AN fitting. You do not need to lock NPT fittings as they are tapered and will tighten as it's turned in.
Loctite makes a better product specifically for thread sealing; it's fuel safe.
This is what I used:
Loctite� anaerobic thread sealants cure in the absence if air when confined within the threads of metal pipe connections. The cured sealant will not shrink, crack, or shred, and will maintain its sealing properties even after heat aging. Loctite� thread sealants form a strong seal that resists the effects of vibration, temperature, pressure, and industrial solvents. Sealed pipe joints can be disassembled using standard hand tools.

All of the other AN fittings do not need any sealant.
Loctite makes a better product specifically for thread sealing; it's fuel safe.
This is what I used:
Loctite� anaerobic thread sealants cure in the absence if air when confined within the threads of metal pipe connections. The cured sealant will not shrink, crack, or shred, and will maintain its sealing properties even after heat aging. Loctite� thread sealants form a strong seal that resists the effects of vibration, temperature, pressure, and industrial solvents. Sealed pipe joints can be disassembled using standard hand tools.
All of the other AN fittings do not need any sealant.
03-28-06, 11:41 AM
#94
Rotary Enthusiast
Thread Starter
I've been working 12 hour days so I've gotten only a little further on the project. I know 'waah waaah waaaaa'!
Here's some of the updates:
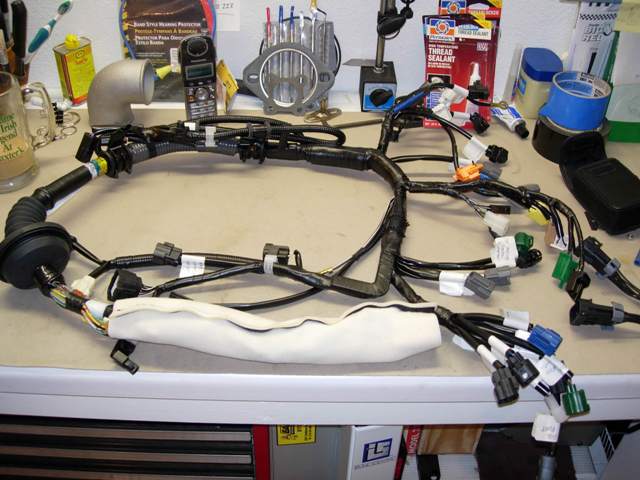
Brand new wiring harness waiting for the slaughter!
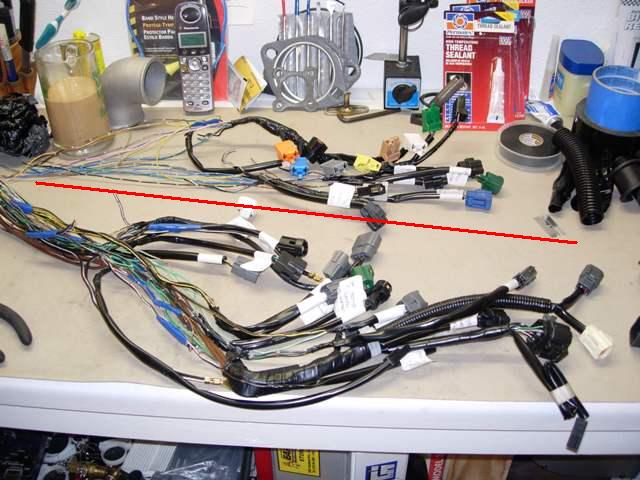
About 1/2 of the connectors that were removed (above the red line).
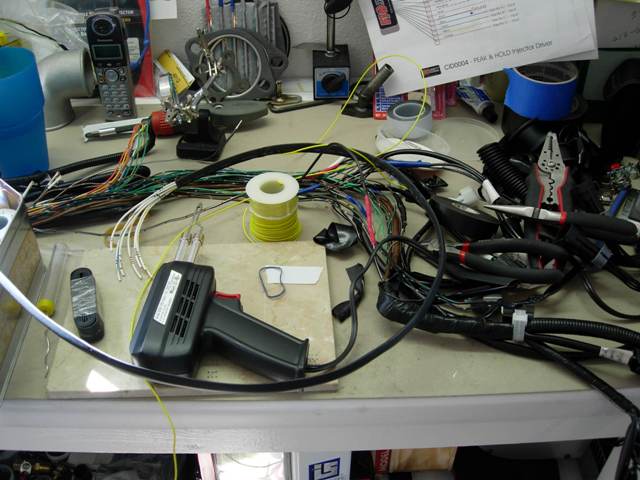
Just putting in new lines for the fuel injectors and the injector driver.
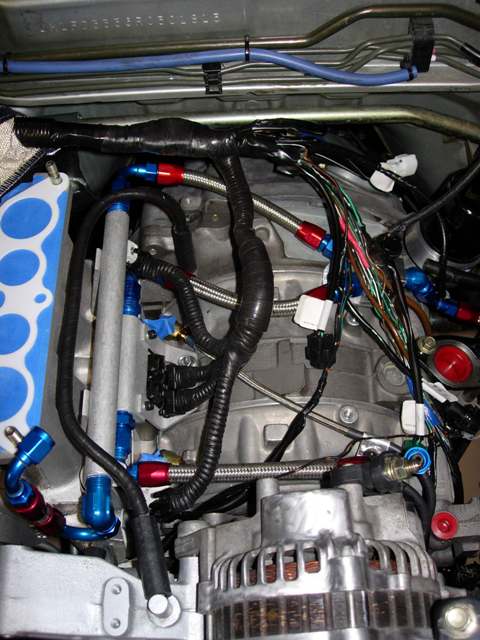
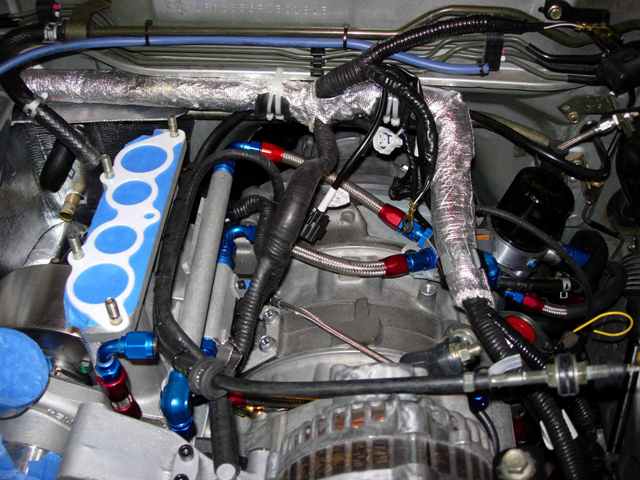
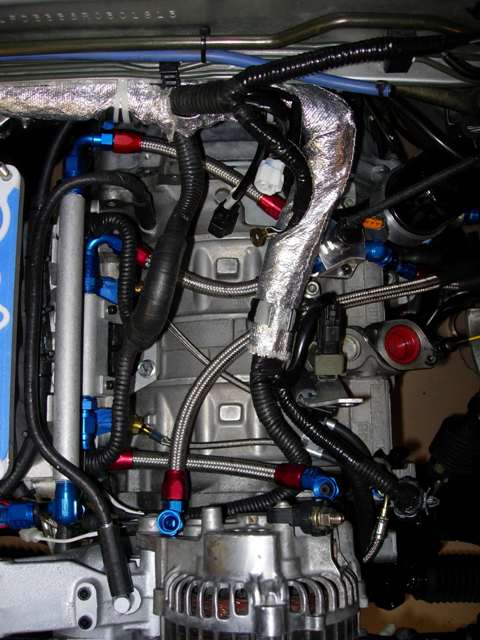
Here's what it looks like installed; still have to do some more work:
Rob (GoRacer): Here's the piping for the coolant lines; I'm waiting on a 45 degree AN fitting, so as soon as I have that done I'll post a pic.

Attila
Here's some of the updates:
Brand new wiring harness waiting for the slaughter!
About 1/2 of the connectors that were removed (above the red line).
Just putting in new lines for the fuel injectors and the injector driver.
Here's what it looks like installed; still have to do some more work:
Rob (GoRacer): Here's the piping for the coolant lines; I'm waiting on a 45 degree AN fitting, so as soon as I have that done I'll post a pic.
Attila
Last edited by atihun; 03-28-06 at 11:46 AM.
03-28-06, 06:24 PM
#98
Speed Mach Go Go Go
iTrader: (2)
Join Date: Oct 2001
Location: My 350Z Roadster kicks my RX7's butt
Posts: 4,772
Likes: 0
Received 2 Likes
on
2 Posts
Cool jelly beans, that is the only angle my snail will fit to but mine actually hits. You have alot more patience then I do (and a neater garage). I never stripped my harness. I will leave that for another project. I just want to actually drive the damn car more then two months a year. ...actually, i'd like to drive it period. Sitting in the garage making vroom vroom noises is getting old. 
Will have to dig up your old year book and see if you were voted "most likely to have the cleanest engine and garage on the forum".
Oh, he didn't really hack the harness. It was planned as he removed unused connectors for a cleaner instillation. You could also rewrap with better insilation or heat resistant tape. I'll get to mine eventually.
Last edited by GoRacer; 03-28-06 at 06:33 PM.
06-03-06, 10:46 AM
#100
Rotary Enthusiast
Thread Starter
Man I am soooo close! I can almost smell the fuel! Oh wait, that was me spilling it all over my face when I was replacing the fuel filter.... duh.
Well here's some updates:
I redid the coolant lines to the turbo. After 3 weeks and ruining 2 waterpump housings, I was able to make what I wanted:
Here's the wiring harness all finished up, what a pain in the ***!
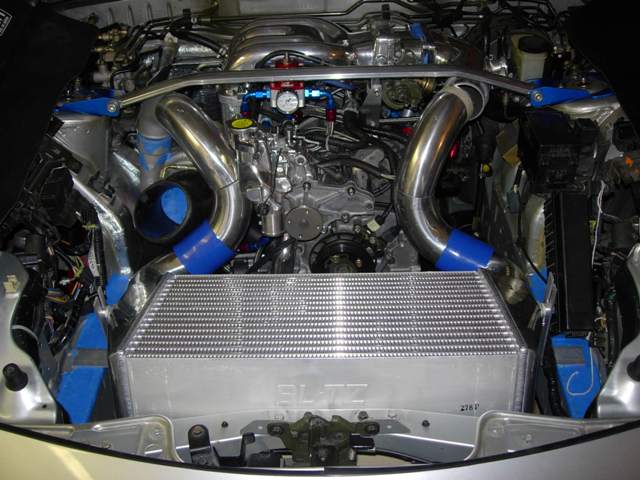
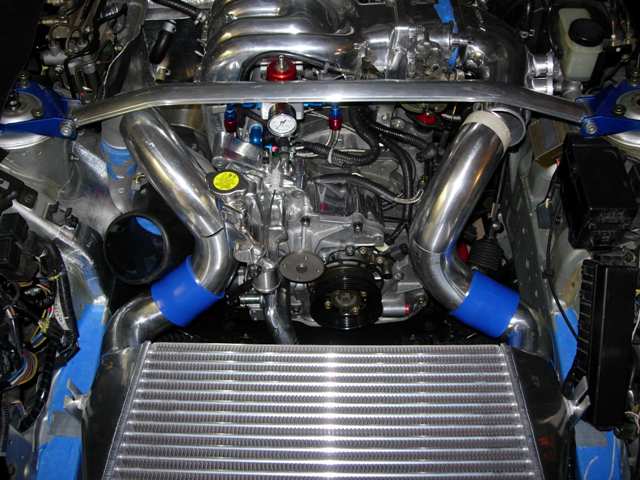
And here's the mockup of the Blitz FMIC in my v-mount setup:
Almost! I just hope I'm not building a big pile-o-crap.
Well here's some updates:
I redid the coolant lines to the turbo. After 3 weeks and ruining 2 waterpump housings, I was able to make what I wanted:
Here's the wiring harness all finished up, what a pain in the ***!
And here's the mockup of the Blitz FMIC in my v-mount setup:
Almost! I just hope I'm not building a big pile-o-crap.
Last edited by atihun; 06-03-06 at 10:50 AM.