GT35R Here I come! :D

 08-08-05, 11:45 PM
#42
Rotary Freak
Join Date: Mar 2003
Location: GLENDALE, CA
Posts: 2,274
Likes: 0
Received 0 Likes
on
0 Posts
Originally Posted by atihun
Well I've finally got the hard parts done! 
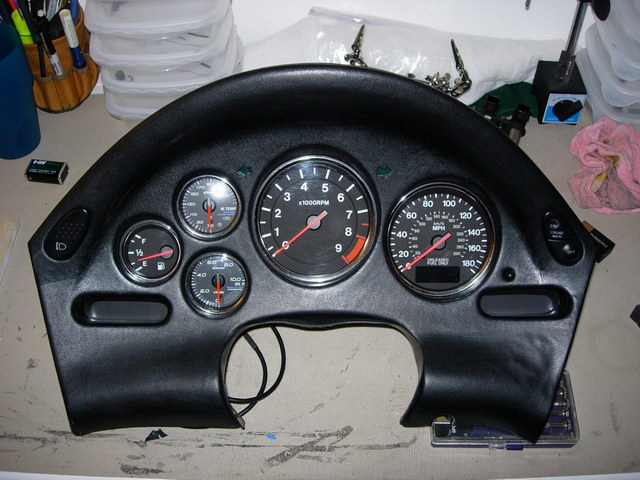
Here's the guage pod, reconfigured, rewired, and all the illumination will be green (I hope):
As for the air splitter, that is exactly what I was thinking; that the flow will be different through each, especially with the fans on. That's why I thought it was a good idea.
I started with the prepping of the engine parts, but I'm stuck. I have a set of new (from a Reman) stock 2 piece Mazda apex seals and a set of new Rotary Aviation apex seals. I've been bouncing back and forth on which to use. Aaargh!
I hope to get the car running this month, as I will be gone all next month out of town. And if I don't, then it probably won't be ready for SS8.
you better make it for SS8!!!

 01-31-06, 03:33 PM
#45
Rotary Enthusiast
Thread Starter

Well I'm working on the car again! 
Maybe it will be done before its one year anniversary of being down. (June)
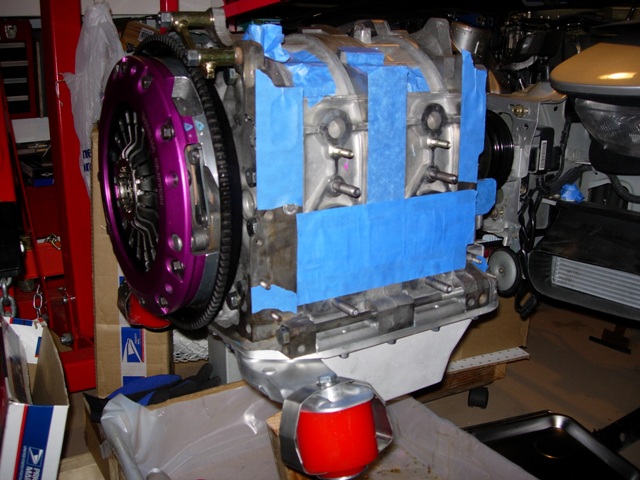
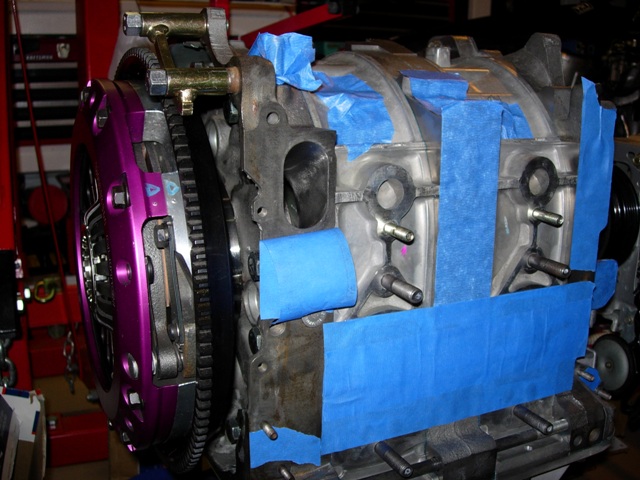
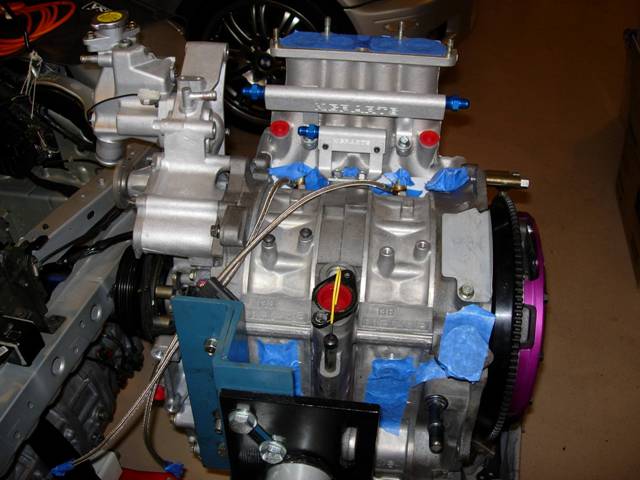
Here's some pics:
Random engine pics:
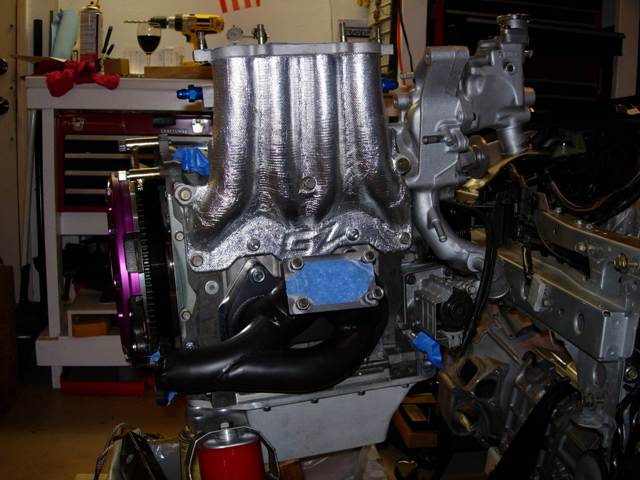

...
Maybe it will be done before its one year anniversary of being down.
(June)Here's some pics:
Random engine pics:
...
01-31-06, 03:38 PM
#46
Rotary Enthusiast
Thread Starter
...
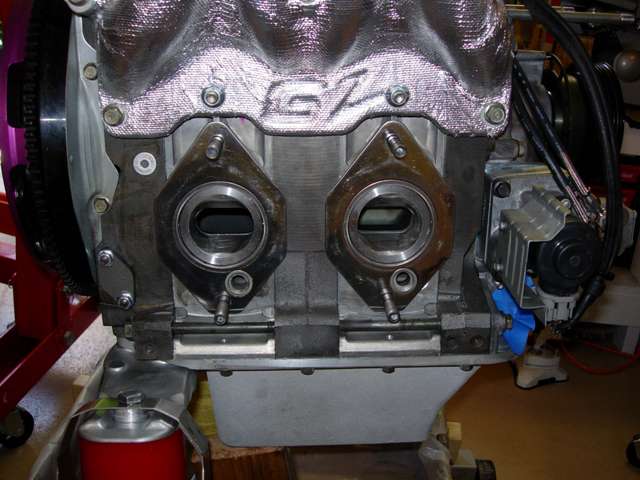
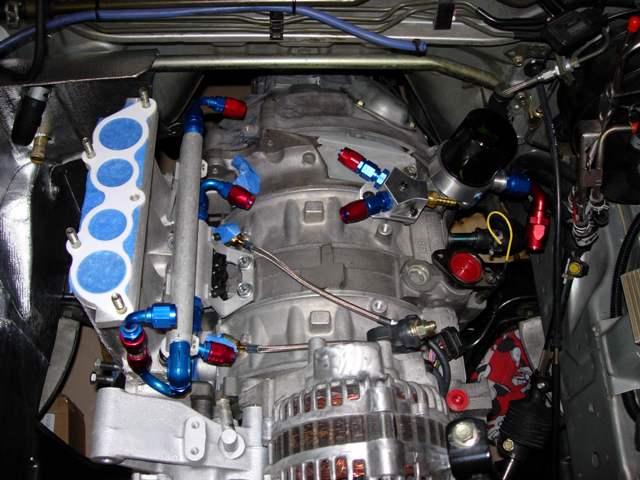
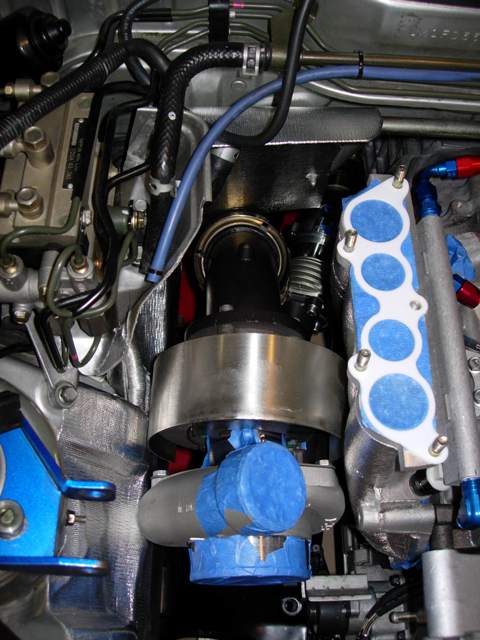
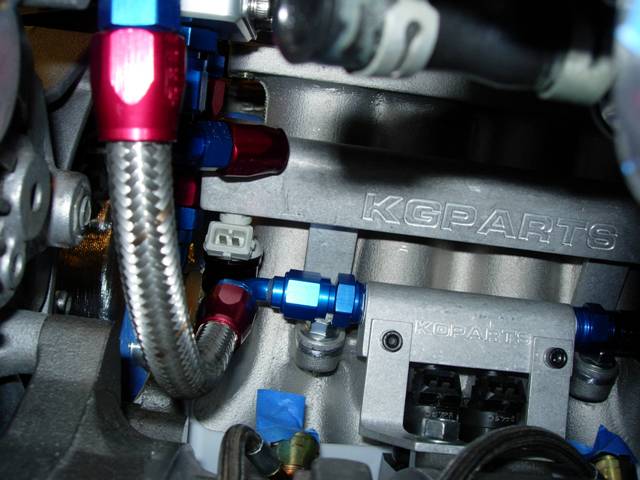
New fuel lines and configuration:
Heat shielding:
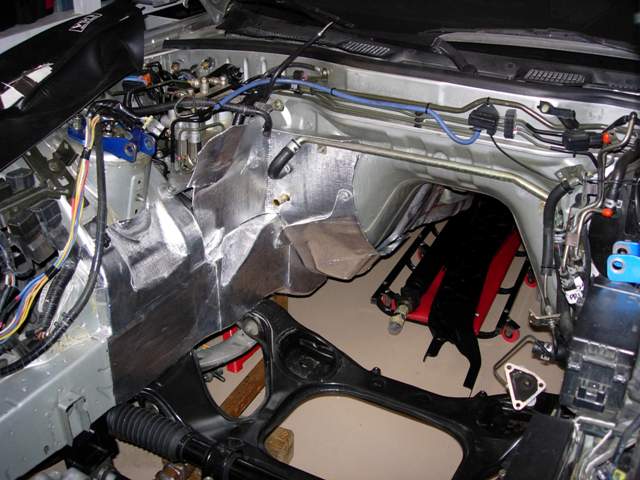
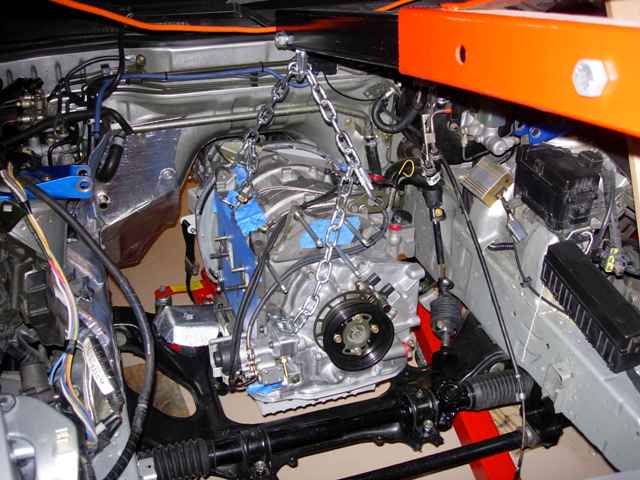
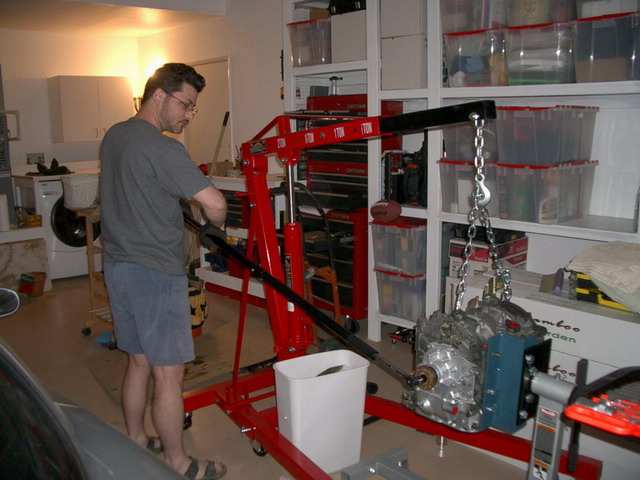
Engine finally going in:
More fule lines:
More fuel lines with injectors installed:
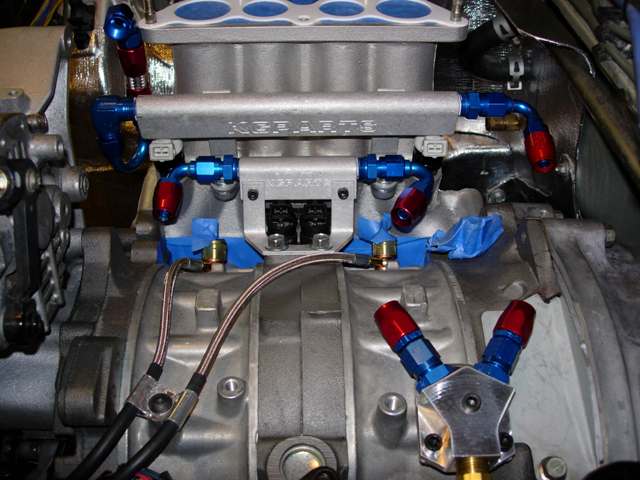
Custom bracket for FPR to allow the split of the fuel rails (note the 180 from the secondary...turned out awesome)!
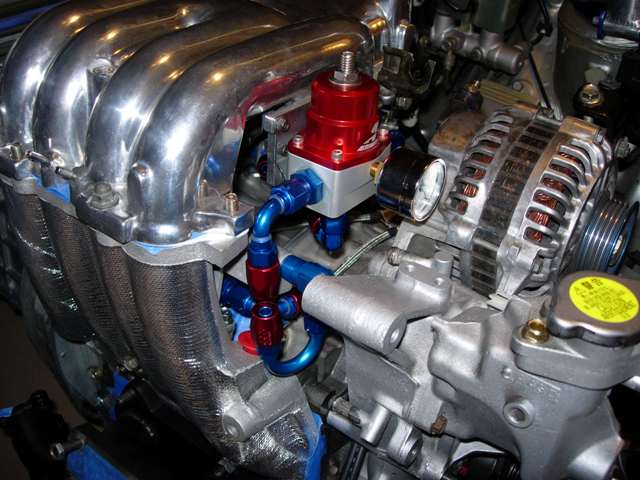
And I have 1/8 inch from the UIM to the line and 1/8 inch space from the FPR to the strut bar:
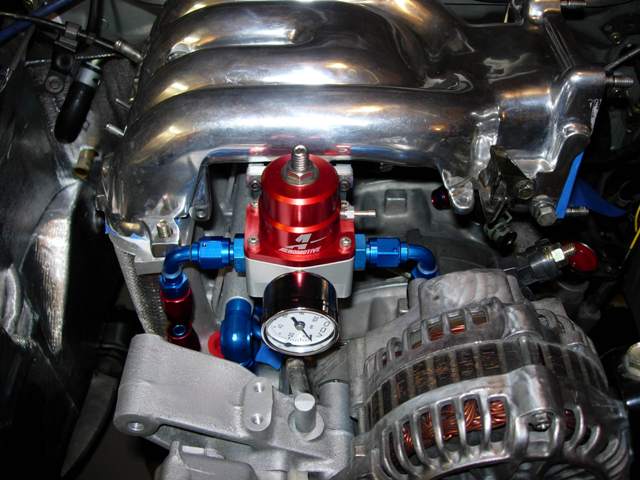
New fuel lines and configuration:
Heat shielding:
Engine finally going in:
More fule lines:
More fuel lines with injectors installed:
Custom bracket for FPR to allow the split of the fuel rails (note the 180 from the secondary...turned out awesome)!
And I have 1/8 inch from the UIM to the line and 1/8 inch space from the FPR to the strut bar:
Last edited by atihun; 01-31-06 at 04:01 PM.
01-31-06, 04:38 PM
#49
development
nice work...looks like you aren't sparing any detail! how the **** are you going to build a line from your 2nd rail to the FPR??? that's nutz!!!!
I really like your Y from the pump, but...should have put dual pumps
I really like your Y from the pump, but...should have put dual pumps
01-31-06, 05:58 PM
#51
Speed Mach Go Go Go
iTrader: (2)
Join Date: Oct 2001
Location: My 350Z Roadster kicks my RX7's butt
Posts: 4,772
Likes: 0
Received 2 Likes
on
2 Posts
The fuel looks tight but not very stock, expecially with the FPR mounted. Is the intake manifold covered with heat shield (looks weird)? Did you wear sandals when you dropped the engine on yer foot, I mean in the bay lol 
 01-31-06, 06:04 PM
#53
Rotary Enthusiast
Thread Starter
Originally Posted by dubulup
nice work...looks like you aren't sparing any detail! how the **** are you going to build a line from your 2nd rail to the FPR??? that's nutz!!!!
I really like your Y from the pump, but...should have put dual pumps
I really like your Y from the pump, but...should have put dual pumps
 ... the pictures are a little out of order; look at the 3rd pic up from this post and you'll see that the line is already there. It fits great and I can actually screw it on. I just need to make sure that everything is leak proof!
I will probably go to a bosch 044 or something larger external later. But at 16 psi I think that the FPR and the Cosmo fuel pump will be adequate to feed the 750's and 1600's.
01-31-06, 06:20 PM
#54
Speed Mach Go Go Go
iTrader: (2)
Join Date: Oct 2001
Location: My 350Z Roadster kicks my RX7's butt
Posts: 4,772
Likes: 0
Received 2 Likes
on
2 Posts
I can't find any specs on the Cosmo/Nippendenso pump. The Walbro is 210/LH and my Nismo Skyline pump is 276/LH. The Apexi looks the same as my Nismo but no spexs on that either.
Lookin good. I gotta play catch up now so we can do a dyno day or it's a road trip to Texas for me.
Lookin good. I gotta play catch up now so we can do a dyno day or it's a road trip to Texas for me.
01-31-06, 06:44 PM
#55
Rotary Enthusiast
Thread Starter
Originally Posted by GoRacer
The fuel looks tight but not very stock, expecially with the FPR mounted. Is the intake manifold covered with heat shield (looks weird)? Did you wear sandals when you dropped the engine on yer foot, I mean in the bay lol
The heat barrier is made by ThermoTec; it has an adhesive backing. I ordered it from Summit Racing (THE-13590)http://store.summitracing.com/defaul...=egnsearch.asp
I was wearing socks at least!
The Cosmo FP is rated at 255 lph.
02-01-06, 05:59 PM
#56
Originally Posted by atihun
Yes the lower intake manifold is covered with a heat shield... it may look weird but you won't be saying that when you see where your exhaust side of the GT35R sits.
The heat barrier is made by ThermoTec; it has an adhesive backing. I ordered it from Summit Racing (THE-13590)http://store.summitracing.com/defaul...=egnsearch.asp
I was wearing socks at least!
The Cosmo FP is rated at 255 lph.
The heat barrier is made by ThermoTec; it has an adhesive backing. I ordered it from Summit Racing (THE-13590)http://store.summitracing.com/defaul...=egnsearch.asp
I was wearing socks at least!
The Cosmo FP is rated at 255 lph.
BTW, the adhesive on the ThermoTec will last about a years worth of heat cycles. At least mine did around the same areas of the body, I didn't do the LIM.
Tony
 02-01-06, 07:37 PM
#58
Okay, Z, be by tomorrow afternoon.
On topic, using the flexible and vented stainless sheeting that Jegs/Summit carries as a heat barrier works really well between the LIM and turbo. Also, good wrapping on the DP with generous overlap (on SS) has been great for heat reduction in the 'bay area.'
On topic, using the flexible and vented stainless sheeting that Jegs/Summit carries as a heat barrier works really well between the LIM and turbo. Also, good wrapping on the DP with generous overlap (on SS) has been great for heat reduction in the 'bay area.'
02-01-06, 08:51 PM
#60
Rotary Enthusiast
Thread Starter
Originally Posted by Asleep
On topic, using the flexible and vented stainless sheeting that Jegs/Summit carries as a heat barrier works really well between the LIM and turbo. Also, good wrapping on the DP with generous overlap (on SS) has been great for heat reduction in the 'bay area.'
As for the main cat (Metallit SS high flow), I will be wrapping that with exhaust wrap. The wrap I bought says only to overlap 1/4?... So are you saying that generous overlap on stainless steel is okay, won't heat stress the metal?
02-01-06, 08:57 PM
#61
Rotary Enthusiast
Thread Starter
Originally Posted by Fd3BOOST
This line here between the secondary rail and the FPR has almost no room for movement. If anything that is what I would re-arrange, but if it works out for you what can I say. Other than that it looks like it's coming along pretty well.
With the bracket, the FPR, rail, and the fittings don't move at all.
02-01-06, 10:13 PM
#62
Originally Posted by atihun
I'm hoping that the ceramic coating on the downpipe to the cat will help with the heat. I bought a stainless steel heat shield for the turbo exhaust housing.
As for the main cat (Metallit SS high flow), I will be wrapping that with exhaust wrap. The wrap I bought says only to overlap 1/4?... So are you saying that generous overlap on stainless steel is okay, won't heat stress the metal?
As for the main cat (Metallit SS high flow), I will be wrapping that with exhaust wrap. The wrap I bought says only to overlap 1/4?... So are you saying that generous overlap on stainless steel is okay, won't heat stress the metal?
Did you coat the inside of the pipe or the outside?
Attila, I am a pervert for garage setups. Do you have any pics of your garage shelves and containers? I noted some color coordination in there and nice shelf around the tool chest.
Tony
02-01-06, 10:34 PM
#63
Rotary Enthusiast
Thread Starter
Originally Posted by Asleep
My ignorance is bliss. I am no metals expert so heed them. Last SS pipe that just came off had no ill effects after 2 years. Discoloring, is all. This DP is bigger diameter for a new setup. My overlap is 1/2 the width, or on average <1". If it halves the life, I am okay with having another one made in a few years.
Did you coat the inside of the pipe or the outside?
Attila, I am a pervert for garage setups. Do you have any pics of your garage shelves and containers? I noted some color coordination in there and nice shelf around the tool chest.
Tony
Did you coat the inside of the pipe or the outside?
Attila, I am a pervert for garage setups. Do you have any pics of your garage shelves and containers? I noted some color coordination in there and nice shelf around the tool chest.
Tony
I have this old one from a while back. I built those shelves myself as our atic is on the second floor, and I like to be organized!
(I actually built the shelving around the dimensions of the bins and the tool chest)... so I guess I'm a pervert too!
 02-01-06, 11:05 PM
#64
Speed Mach Go Go Go
iTrader: (2)
Join Date: Oct 2001
Location: My 350Z Roadster kicks my RX7's butt
Posts: 4,772
Likes: 0
Received 2 Likes
on
2 Posts
^ Osha approved work shoes.  I still can't beleive that you still don't have any stains on the floor, uhg.
I still can't beleive that you still don't have any stains on the floor, uhg.
Last edited by GoRacer; 02-01-06 at 11:08 PM.
02-02-06, 11:41 AM
#65
Originally Posted by atihun
I've put the braided hose in already, and I can fit everything without problem. If something will move around then I have some bigger problems. With the bracket, the FPR, rail, and the fittings don't move at all.
With the bracket, the FPR, rail, and the fittings don't move at all.Make sure that you leave some room from the fuel hard lines (unless you replaced them all the way back to the fuel tank) to the splitter you have mounted on the iron for the engine to move some. The only way I could see it not needing any slack is if your using solid motor mounts. Other wise when you go WOT the engine shifts slightly to the pass side. Obviously the better your motore mounts are the less movement you will have. With no slack for that movement you can imagine the problems that could create.
I learned that lesson with zip-tying my engine loom to tightly to the firwall and over to the engine. I ended up breaking some of the connections on the injector resistors.
Anyhow food for thought.
Best of luck.
02-03-06, 12:47 PM
#66
Originally Posted by atihun
They're coated inside and out. The inside coating is not the black color but greyish.
I have this old one from a while back. I built those shelves myself as our atic is on the second floor, and I like to be organized!
(I actually built the shelving around the dimensions of the bins and the tool chest)... so I guess I'm a pervert too!
I have this old one from a while back. I built those shelves myself as our atic is on the second floor, and I like to be organized!
(I actually built the shelving around the dimensions of the bins and the tool chest)... so I guess I'm a pervert too!
(1) why can't you have a garage that neat (2) my what a big tool he is using there!
Next house will have a detached 2.5 car garage and ideas I've gathered from looking at pictures like yours.
Good idea coating the inside of the pipe. Did you ceramic coat the front cover of the engine? I had the "ceramakrome" done to mine, not that it can be seen.
You have never leaked oil in you engine bay, have you?!
02-10-06, 05:50 PM
#67
Rotary Enthusiast
Thread Starter
Some Updates:
What a shame that the Tial WG has to be under the car; it's soo purdy!
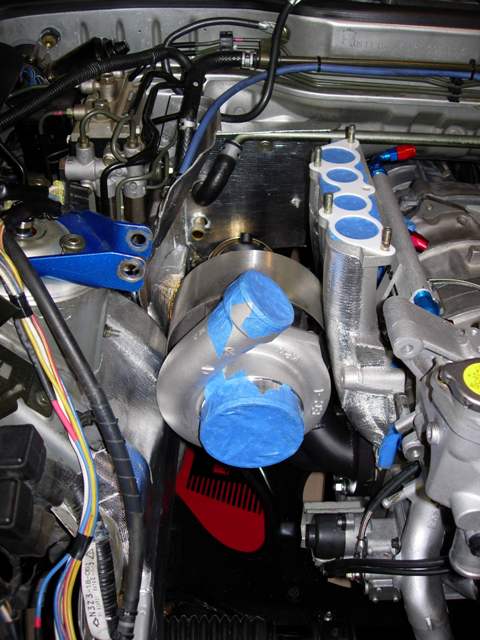
Quite a tight fit... I hope those solid motor mounts don't allow any movement.
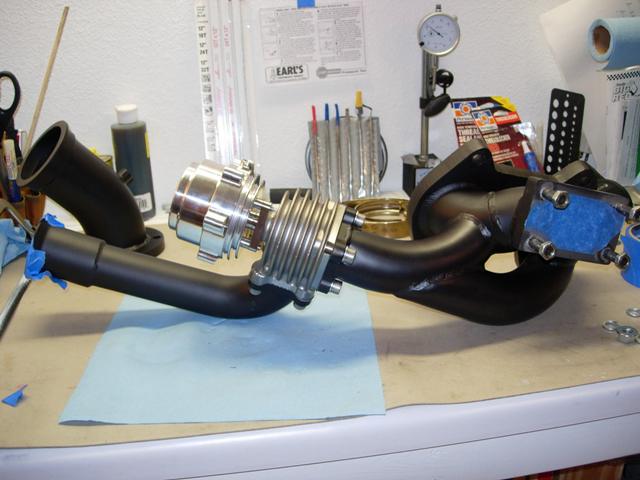
Stainless heat shield:
Undercar views:
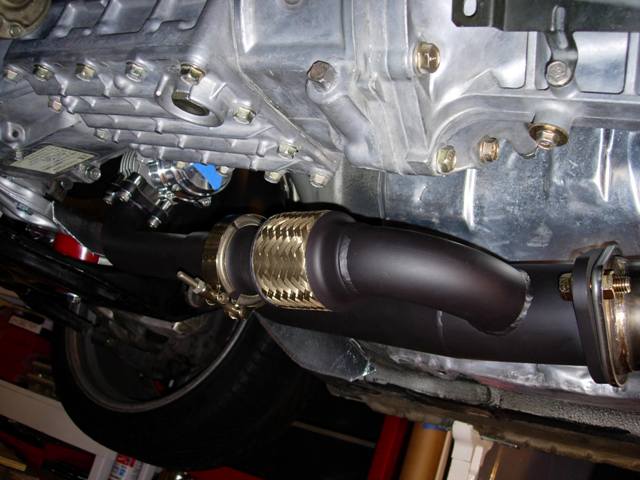
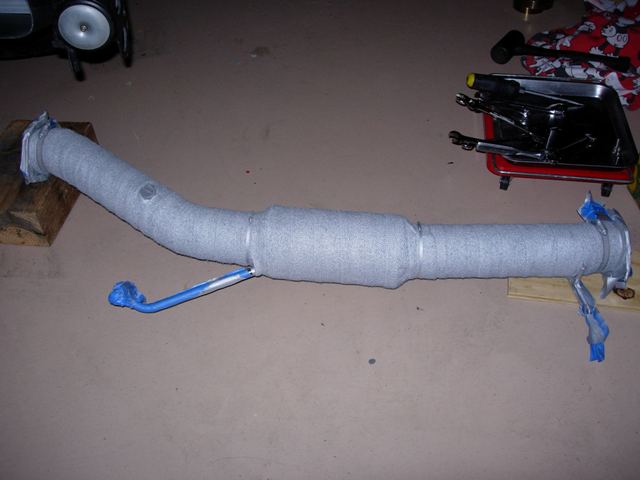
Knightsports Metallit High Flow Stainless Cat:
Yea, I don't like a dirty bottom!
What a shame that the Tial WG has to be under the car; it's soo purdy!
Quite a tight fit... I hope those solid motor mounts don't allow any movement.
Stainless heat shield:
Undercar views:
Knightsports Metallit High Flow Stainless Cat:
Yea, I don't like a dirty bottom!
02-10-06, 06:14 PM
#69
NorCal 7's Co-founder
Wow!! That is a great looking setup! I can't wait to see what it does for you when it's all finished, broken in, and put on the dyno. Plus I'm sure the "smile factor" will be really high on such a nice car. Congrats!
Zach
Zach
02-10-06, 10:00 PM
#71
Speed Mach Go Go Go
iTrader: (2)
Join Date: Oct 2001
Location: My 350Z Roadster kicks my RX7's butt
Posts: 4,772
Likes: 0
Received 2 Likes
on
2 Posts
Look's pretty tight. I think you'll be ready for the Kan tuning session in March. Is your heat shield rubbing the intake manifold and the sidewall? Will the air pump tubes to the cat clear that turbo heat shield? Do you have the V-Mount all worked out yet? Did your clutch come with the push/pull conversion kit and where did you get it? I'm deciding if i'm going to swtich mine and which brand.
02-10-06, 11:04 PM
#72
Rotary Enthusiast
Thread Starter
Originally Posted by GoRacer
Look's pretty tight. I think you'll be ready for the Kan tuning session in March. Is your heat shield rubbing the intake manifold and the sidewall? Will the air pump tubes to the cat clear that turbo heat shield? Do you have the V-Mount all worked out yet? Did your clutch come with the push/pull conversion kit and where did you get it? I'm deciding if i'm going to swtich mine and which brand.
Is Steve coming to town in March? I will be doing my own tuning but it sure wouldn't hurt to have Steve look it over...
I will re-route the airpump tubes a bit. The V-Mount is almost ready, I just received about 20 feet of aluminum tubing
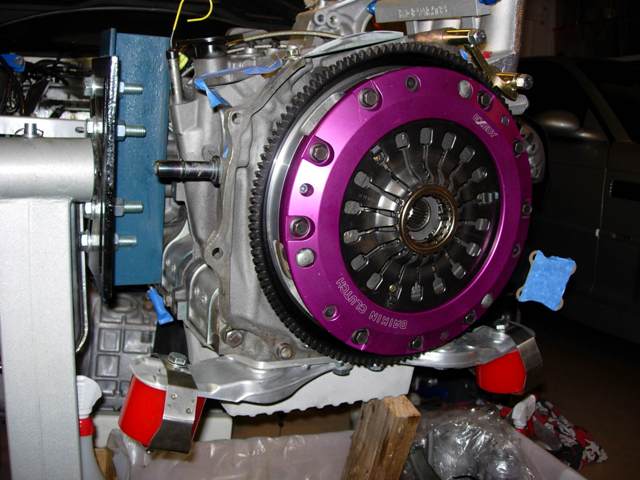
.The clutch is a twin plate pull type, so no conversion was necessary. It's an Exedy.
Last edited by atihun; 02-10-06 at 11:16 PM.
02-10-06, 11:07 PM
#73
Rotary Enthusiast
Thread Starter
Originally Posted by dubulup
still looking good! I wish I had wrapped my manifold...as I just ceramic coated it. Cuts down on a little noise as well; something to think about
You think I should wrap the downpipe as well? Won't that rub through the ceramic coating after awhile?
02-11-06, 03:45 PM
#74
development
you can, I think the black exhaust wrap is sharp looking, Gotham sells a black fiberglass turbine blanket too...little extras like that might give the adhesive (thermotec) a longer life (I don't have as much as you, and mine is still stuck after 12k miles, up to 18psi worth of heat...not sure what that other guys issue was).
Ceramic is a soft finish, but I think if you wrap tight enough and properly secure the straps, you shouldn't have any movement.
Ceramic is a soft finish, but I think if you wrap tight enough and properly secure the straps, you shouldn't have any movement.
02-11-06, 06:00 PM
#75
Originally Posted by dubulup
not sure what that other guys issue was).
"The other guy"
 02-12-06, 11:31 AM
#78
Rotary Enthusiast
Thread Starter
Originally Posted by signofinfinity
Atihun,
Very very nice set up... awsome. What did you do for that heat sheald? Is it custom or the e bay one?
Congrats!!!
George
Very very nice set up... awsome. What did you do for that heat sheald? Is it custom or the e bay one?
Congrats!!!
George
The one above is from ATP Turbo.
I have the wideband SS O2 bung welded into the high flow cat, so I will be wrapping it, maybe the downpipe too, and then bolt everything up and tighten the manifolds down so I can finish the fuel lines.
02-12-06, 05:00 PM
#79
development
Originally Posted by Asleep
"The other guy" says heat cycles and if you ever drive the car in the rain. Don't worry, it is not permanent and you'll get a chance to replace it. And we're talking a GT40r sitting low and tight, baking all that shiny goodness with up to 23psi. Your results may vary.
"The other guy"
"The other guy"
and there you have it, I don't drive in the rain and I don't have issues...
02-13-06, 01:00 PM
#80
Rotary Enthusiast
Thread Starter
When I did the "stick on" heat barrier, one trick I used was to run superglue alond the seams (where the fiberglass material was exposed). This will help it from starting to seperate and come unglued faster. Hopefully it will last a while; I guess $60 every year or two to replace the barrier and protect the body isn't too bad!
Here's some more updates:
My bung welded in for the wideband O2 sensor:
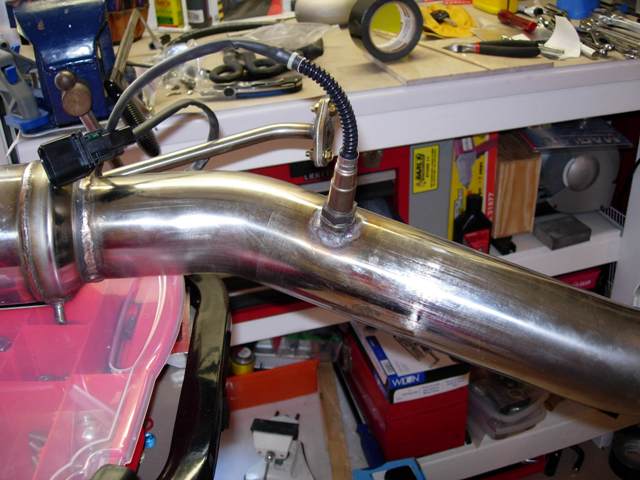
BOO!!! Here's the nice and shiny stainless cat, all wrapped and painted, (it's good that I'm more worried about function than looks! ) :
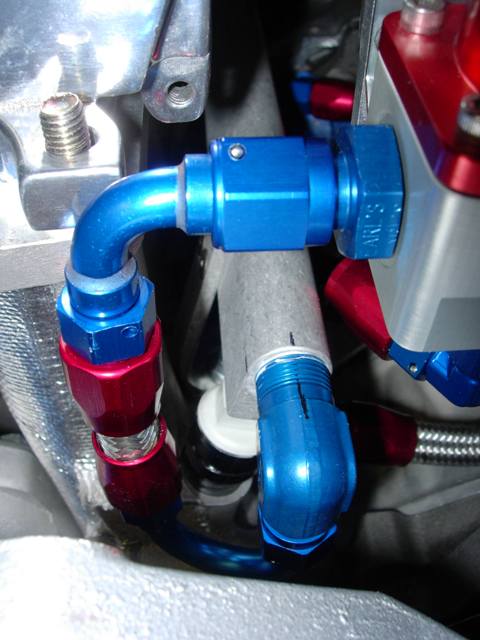
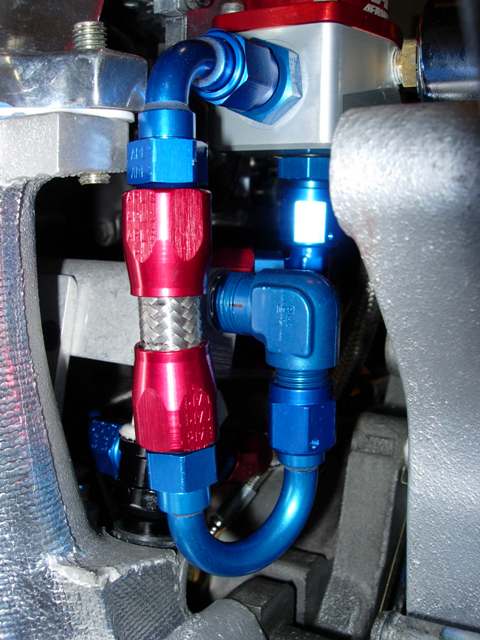
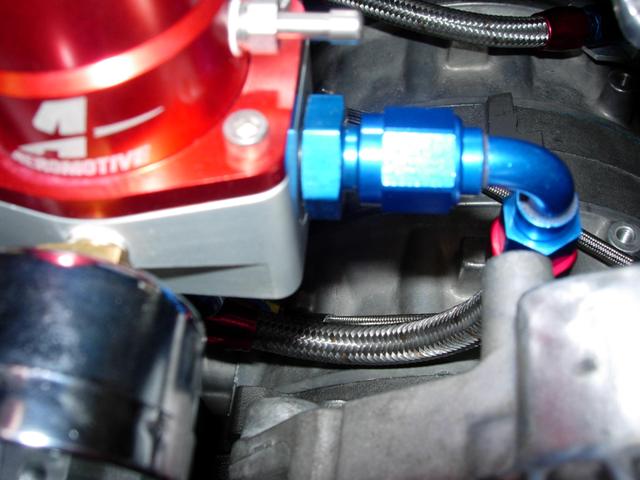
Here's the pictures for the fuel lines; everything is solid, I just hope I don't have any leaks:
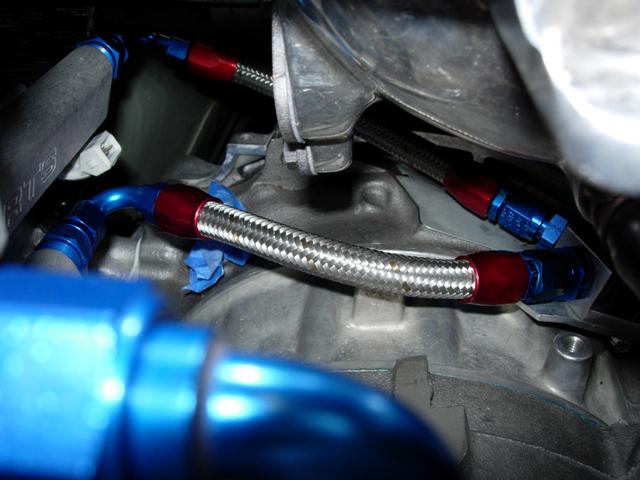
From the Secondary rail to the FPR:
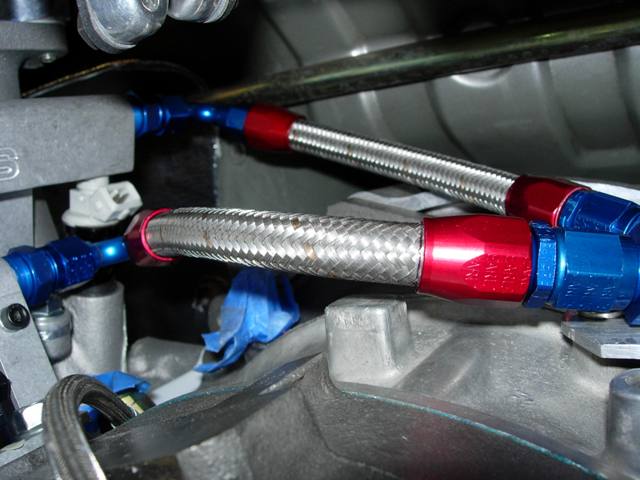
From the Primary rail to the FPR:
Feed lines from the Y to both rails:
I hope these pictures will help others with their projects! I know that I use the forum for ideas all the time.
Here's some more updates:
My bung welded in for the wideband O2 sensor:
BOO!!! Here's the nice and shiny stainless cat, all wrapped and painted, (it's good that I'm more worried about function than looks!
) :Here's the pictures for the fuel lines; everything is solid, I just hope I don't have any leaks:
From the Secondary rail to the FPR:
From the Primary rail to the FPR:
Feed lines from the Y to both rails:
I hope these pictures will help others with their projects! I know that I use the forum for ideas all the time.