
new sleek kit

Thread Starter
Joined: Dec 2007
Posts: 1,284
Likes: 0
From: morton, il
got the new brackets today. everything fits great. on my first design i had to trim/grind down the nylon spacers a bit to fit, not a big deal but kind of a pain in the ***. now the high modules sit about 5.5mm higher. no new trimming as far as i know, will let you know asap.
will get some pics as soon as a get my buddies camera.
will get some pics as soon as a get my buddies camera.


Thread Starter
Joined: Dec 2007
Posts: 1,284
Likes: 0
From: morton, il
the shrouds are coming along well. i just ran into the speed bump of the bracket needed adjusted to work (or fit) better with the shroud. im going get as much done on the shrouds to help things move along smoothly once james arrives.
hopefully we will be able to finish all the stuff that i need the car for, leaving only smoothing and some tedious final detail fun.
just another though:
i have 3 brackets i designed for the project, assuming this redesigned bracket works perfectly, things should move great. most of the hiccups have been related to one bracket or another. the problem with a bracket not working are greater than it may seem. first the obvious, the time it takes me to redesign it. second, the time it takes to get the brackets (a good turn around is still), 1-2 weeks. and finally, the fact that i cant really do any work on the shroud, as i would have to turn around and redo it with the new brackets.
so all in all, it should be a good few weeks.
Thread Starter
Joined: Dec 2007
Posts: 1,284
Likes: 0
From: morton, il
sorry for the delay guys, its slowly moving along. i should be able to make some good progress this weekend when james comes over. the driver side shroud is just about done. then the passenger side should be quicker.


Thread Starter
Joined: Dec 2007
Posts: 1,284
Likes: 0
From: morton, il
dont worry joe, i wont be doing anything that will interfere with progress on the sleek kit. the sleepy kit is something i can do on my own since im merely duplicating it. the sleek kit only gets progress while james is here and i really cant do anything without him being here.
Thread Starter
Joined: Dec 2007
Posts: 1,284
Likes: 0
From: morton, il
https://www.rx7club.com/interior-exterior-audio-26/carbonfiber-fiberglass-pieces-vendor-help-968167/
check this out to help me find a vendor to make my shrouds
check this out to help me find a vendor to make my shrouds


Thread Starter
Joined: Dec 2007
Posts: 1,284
Likes: 0
From: morton, il
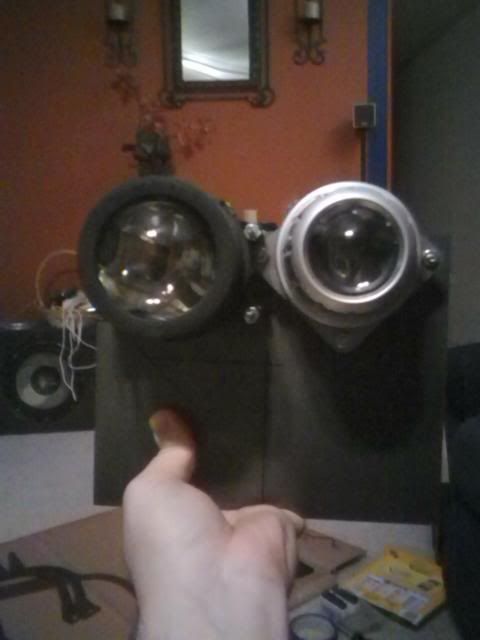
there is actually more work done after those pics but it will be a bit before i get a chance to get em on.
i have the mounting flange on the shroud, now too
i have the mounting flange on the shroud, now too


Thread Starter
Joined: Dec 2007
Posts: 1,284
Likes: 0
From: morton, il
also there have been a few more changes made to the shroud, not shown in these pictures...
the mounting flange has been cleaned up to match the mounting bracket, and holes drilled in the flange to match the bracket.
you will see a height difference in the leading, inside edge of the shroud (the resin color vs black), this has been fixed.
i am currently working on the height discrepancy between the inside, leading corner of the shroud and the hood/bumper. also i am shaping the dividing wall between the high and low projector holes. then obviously cleaning up the curves and smoothing out the rest.

Full Member
Joined: Dec 2010
Posts: 58
Likes: 0
From: London
brilliant work - nearing the end of what is an amazing effort. I'm glad that you have maintained your enthusiasm throughout in terms of attention to detail - the end product will more than meet everyone's expectations I suspect!