From Zero to Hero: Heavy JDM Influenced Restoration
 06-08-20, 09:37 PM
#301
wow... cosmetically this thing looks amazing! Superb build man! 
However I must pick two things on it, that's actually bugged me :P and I have learnt on my own build
#1 is the electrical tape on the loom everywhere, it looks messy and when heat and water get to it over time it starts to unravel (been there done that) - Replace that with heat shrink!
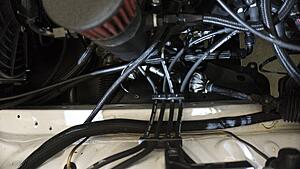
#2 is the ignition wires.. although you may not see any issues atm, but if you ever want to turn it up you will get ignition break up... Having the ignition wires cross and close to together you will get spark jumping from one lead to another... you shouldn't cross them, and have a few mm apart
but overall man, holllllly!
However I must pick two things on it, that's actually bugged me :P and I have learnt on my own build
#1 is the electrical tape on the loom everywhere, it looks messy and when heat and water get to it over time it starts to unravel (been there done that) - Replace that with heat shrink!
#2 is the ignition wires.. although you may not see any issues atm, but if you ever want to turn it up you will get ignition break up... Having the ignition wires cross and close to together you will get spark jumping from one lead to another... you shouldn't cross them, and have a few mm apart
but overall man, holllllly!
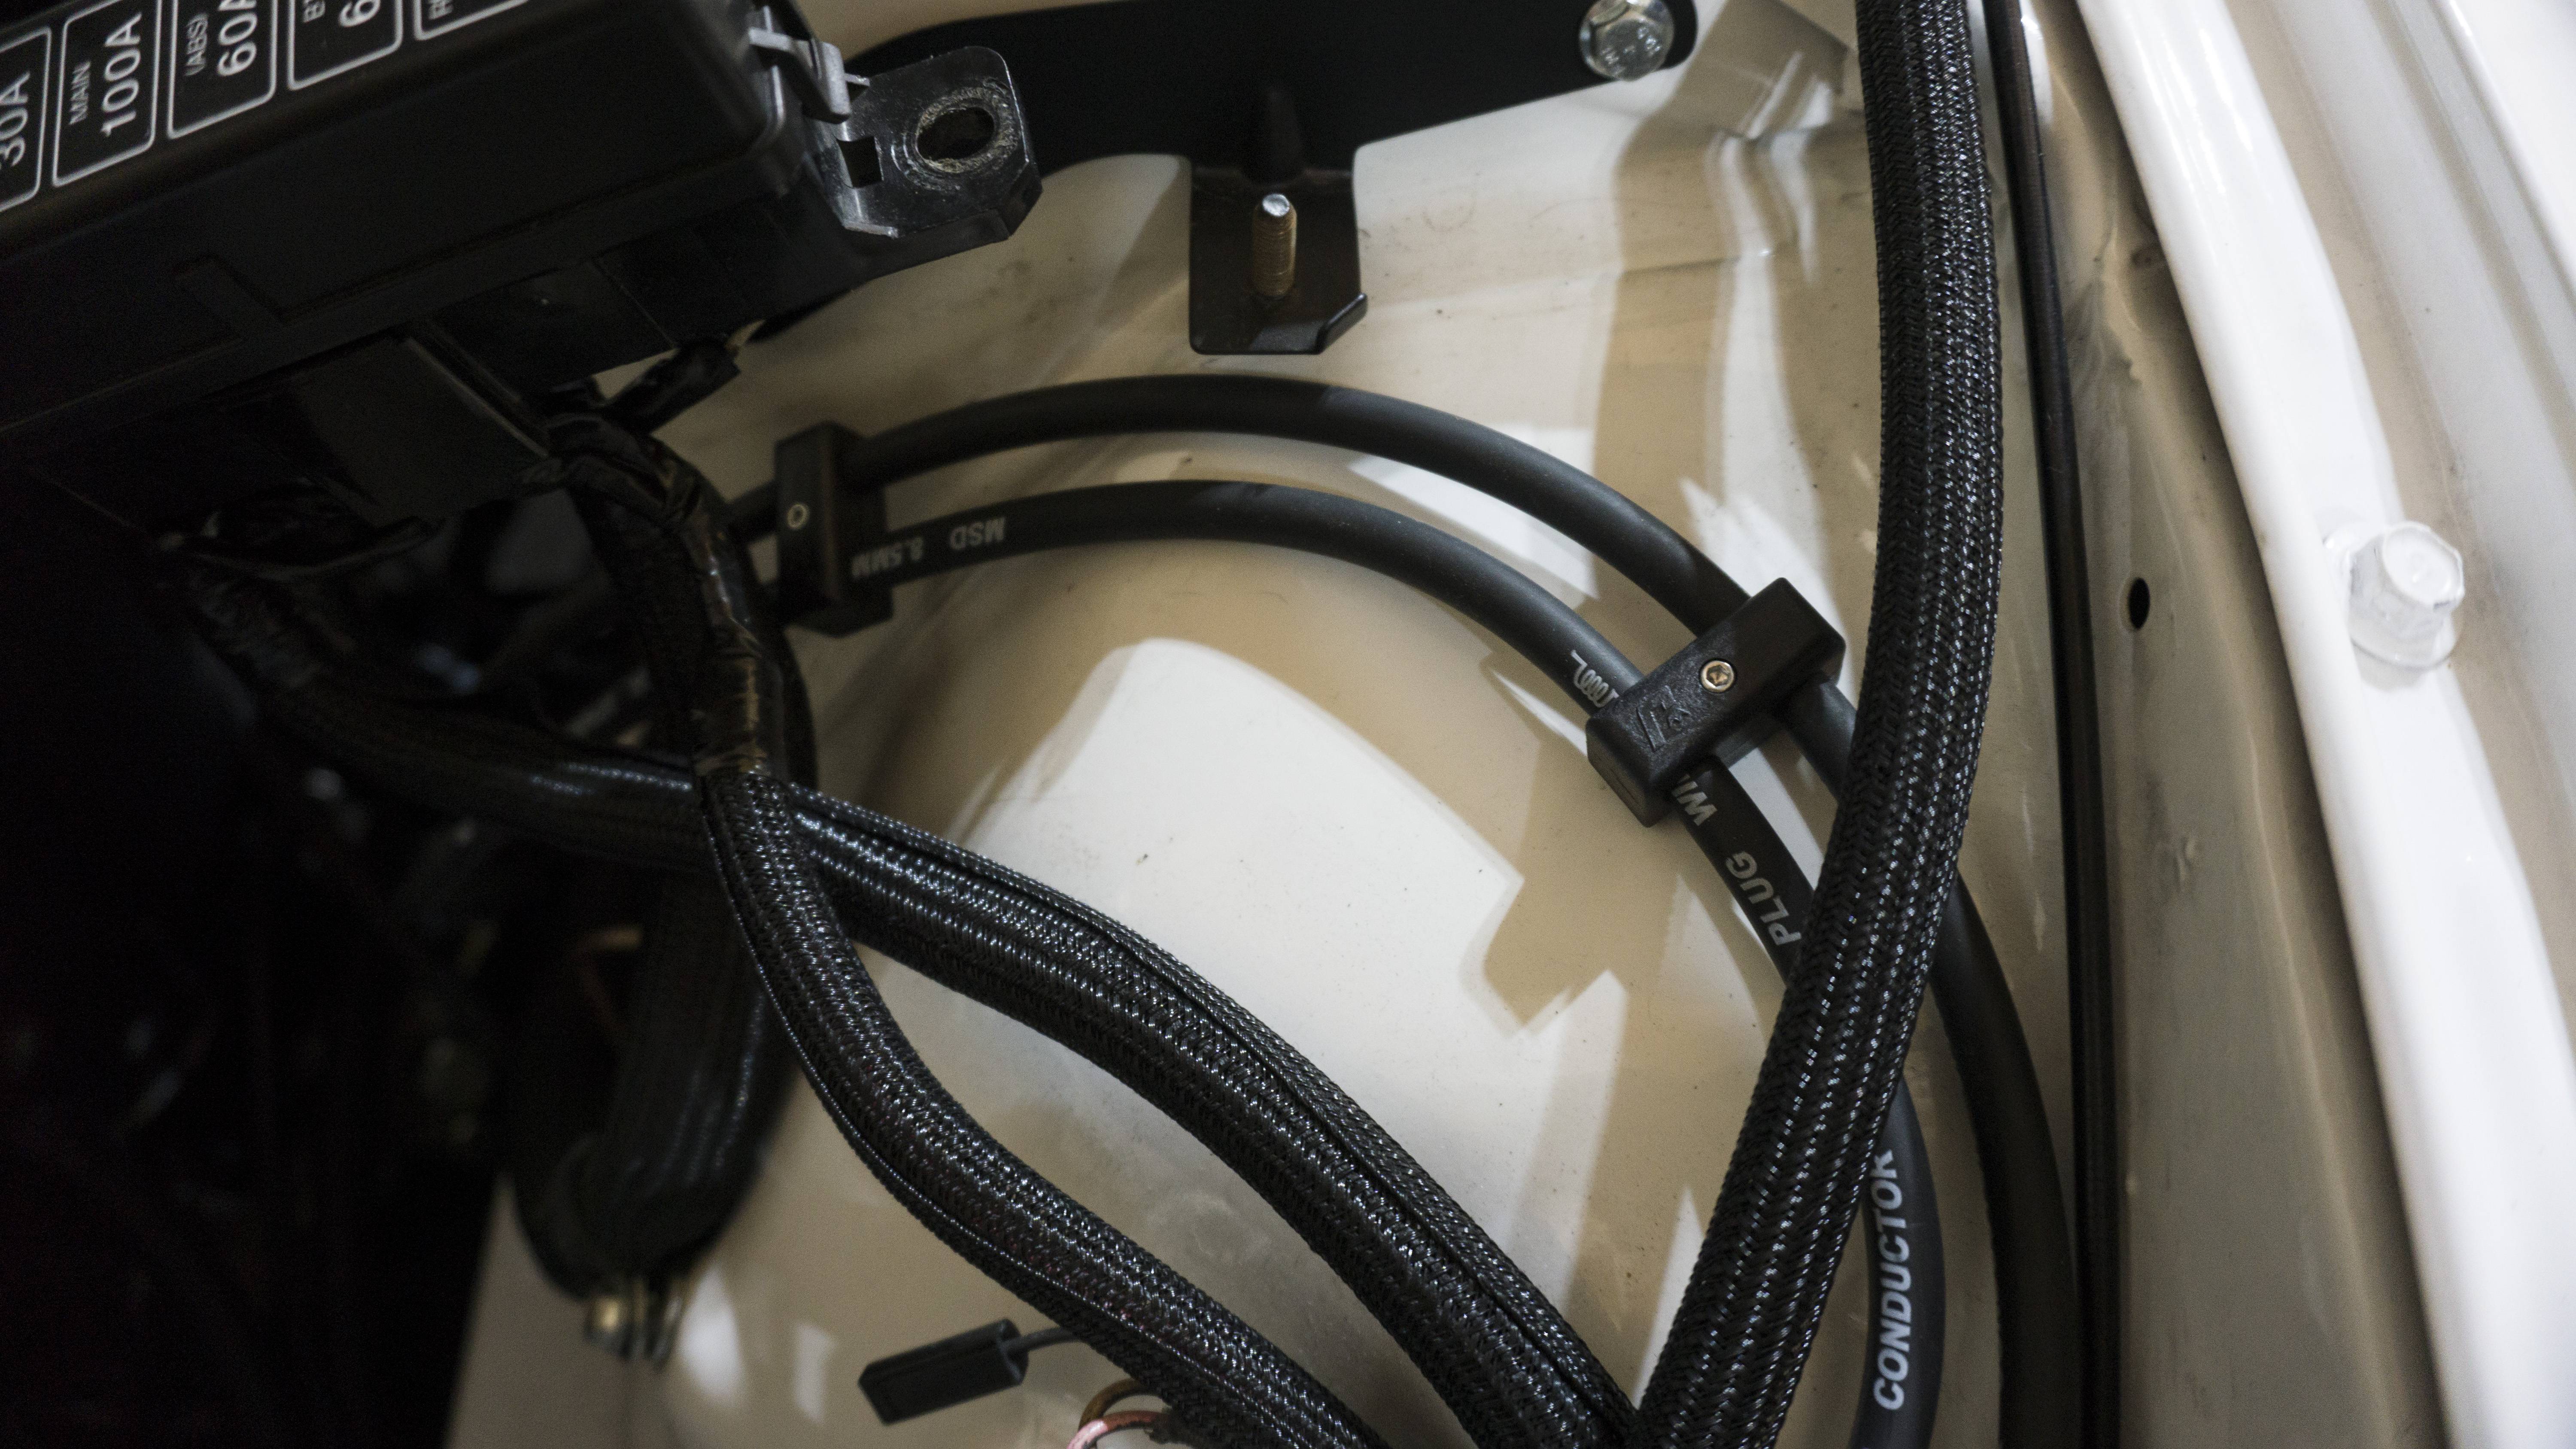
I'll keep #2 in mind. Instead of using a wire holder to hold them all on the strut tower I may find a method that bolts and allows me to keep them separate. I've seen them before, but don't know their actual name. However, from my understanding you should really only experience cross fire if there are two holes/bad wires allowing the jump to happen.
Thanks for taking the time to read the thread!
Last edited by Akomix; 06-09-20 at 09:02 AM.


 07-04-20, 01:11 PM
#303
Update 7/4/2020
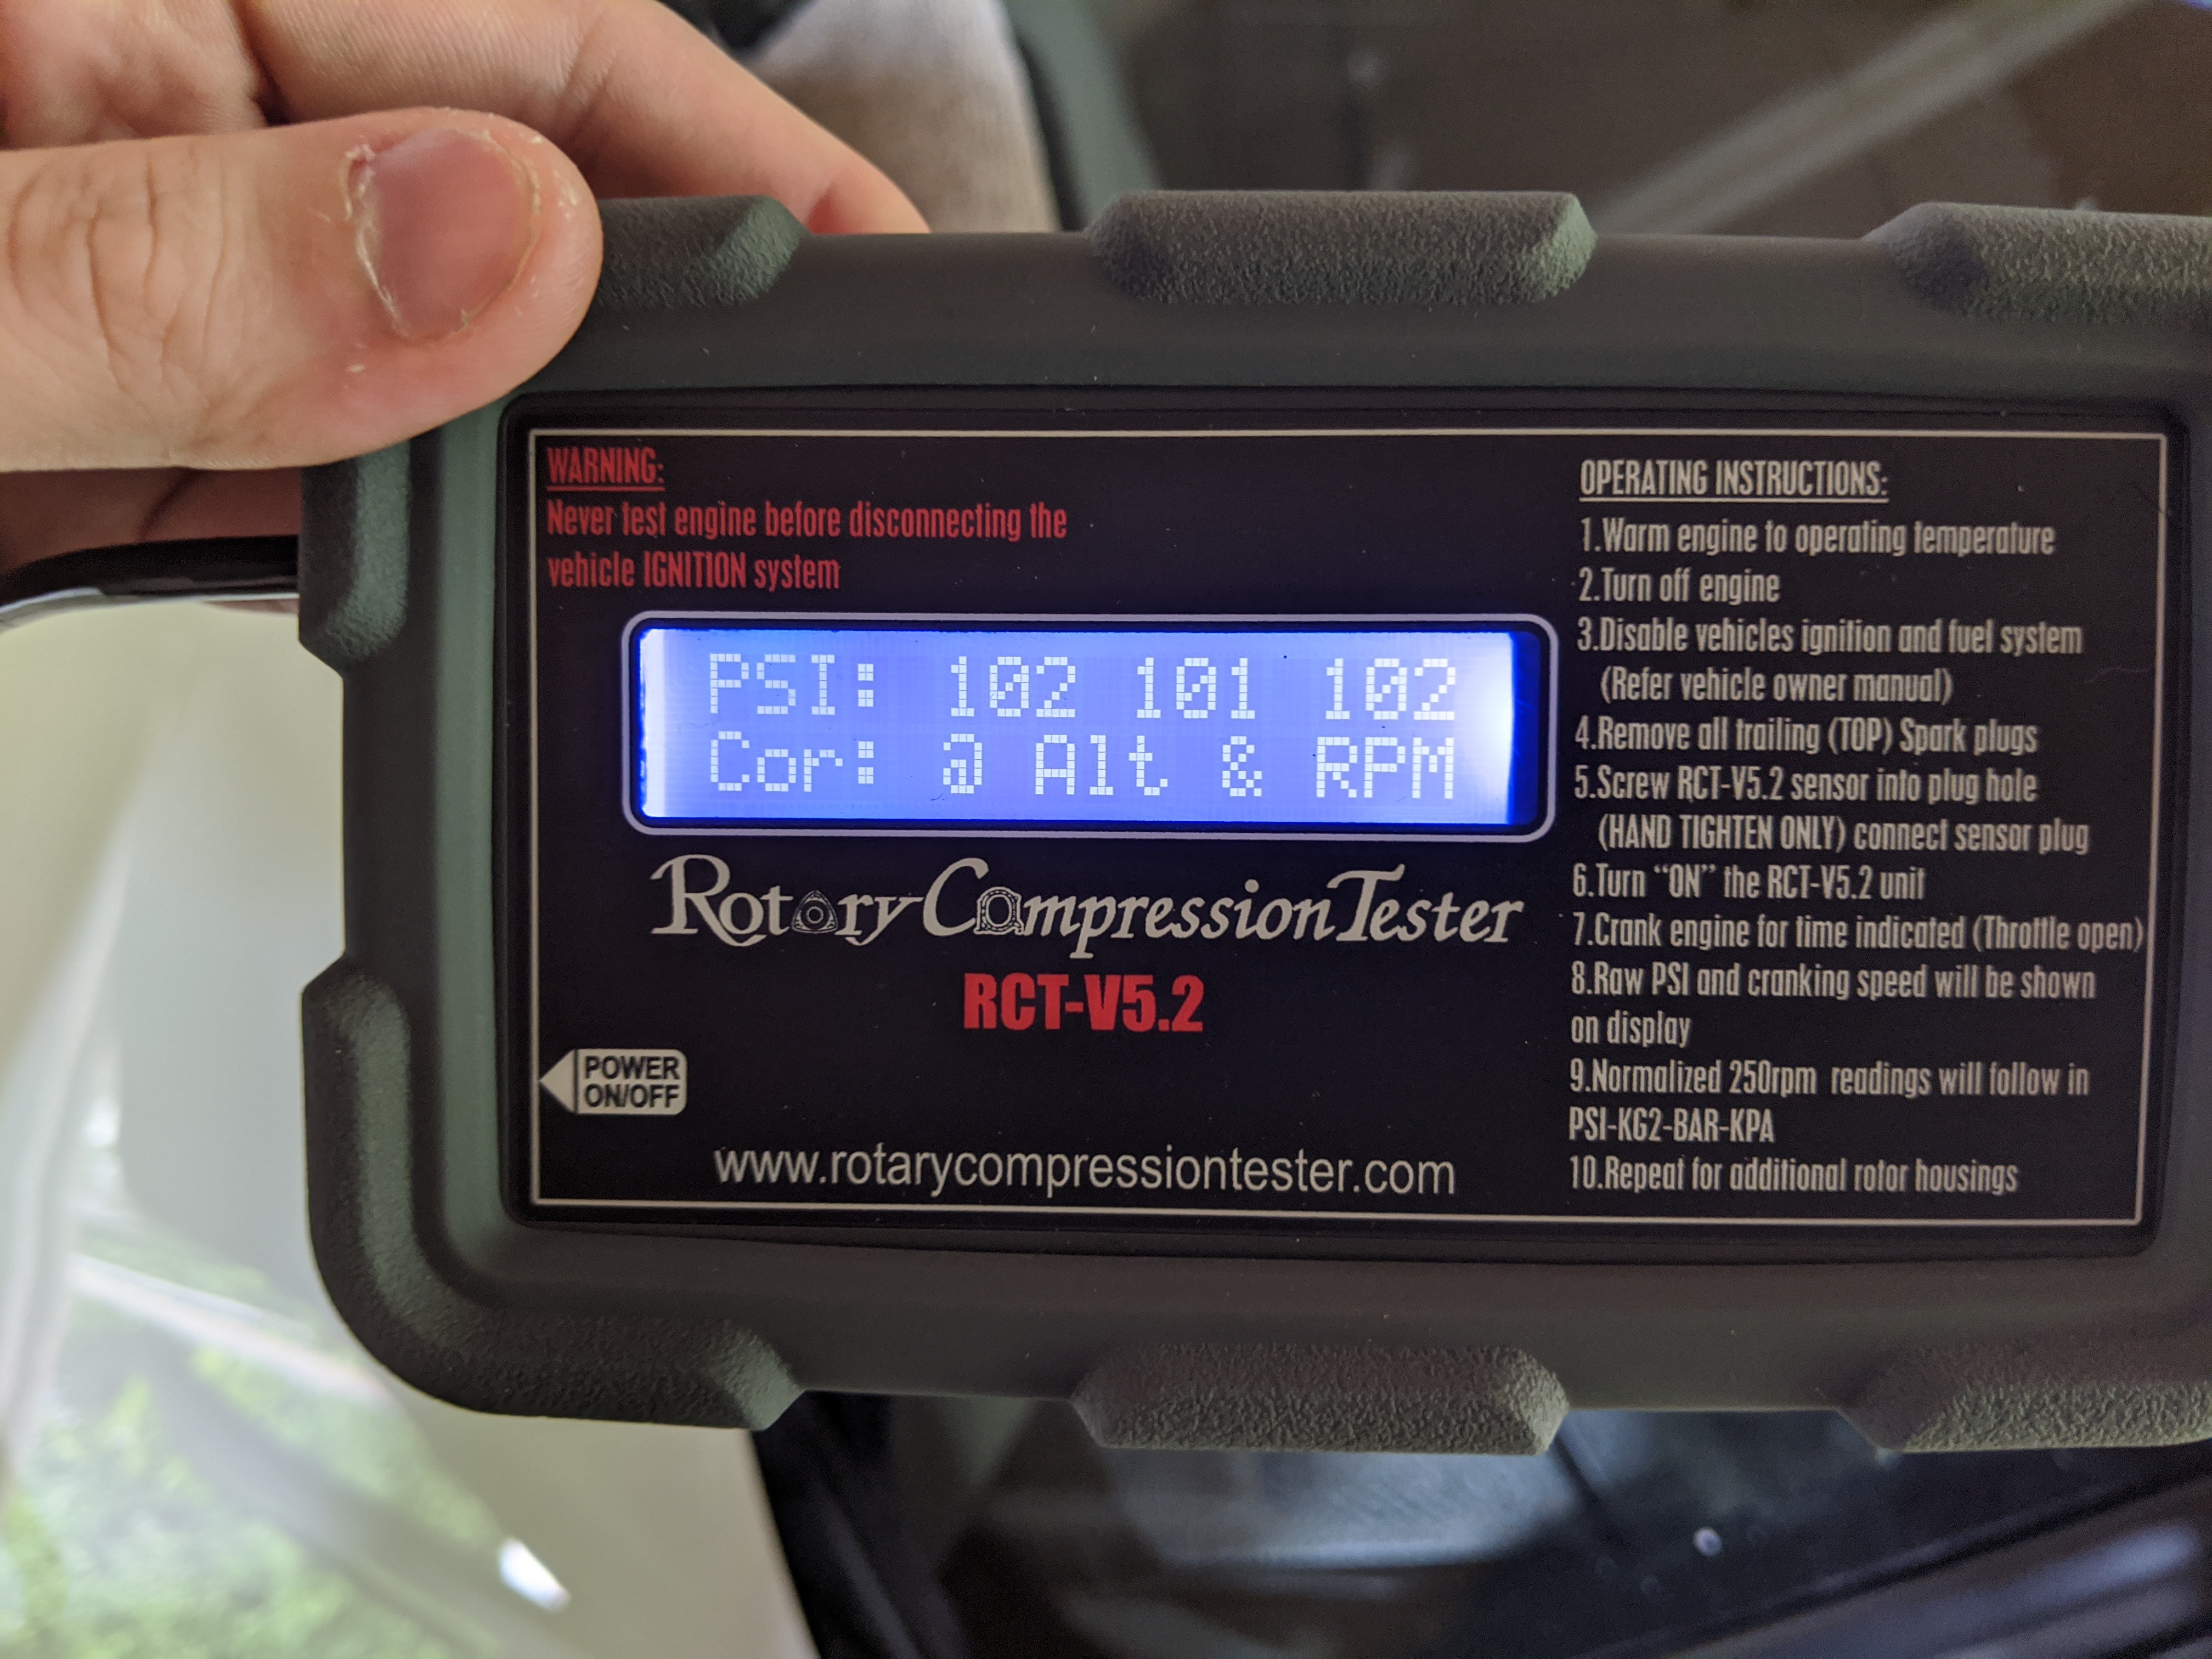
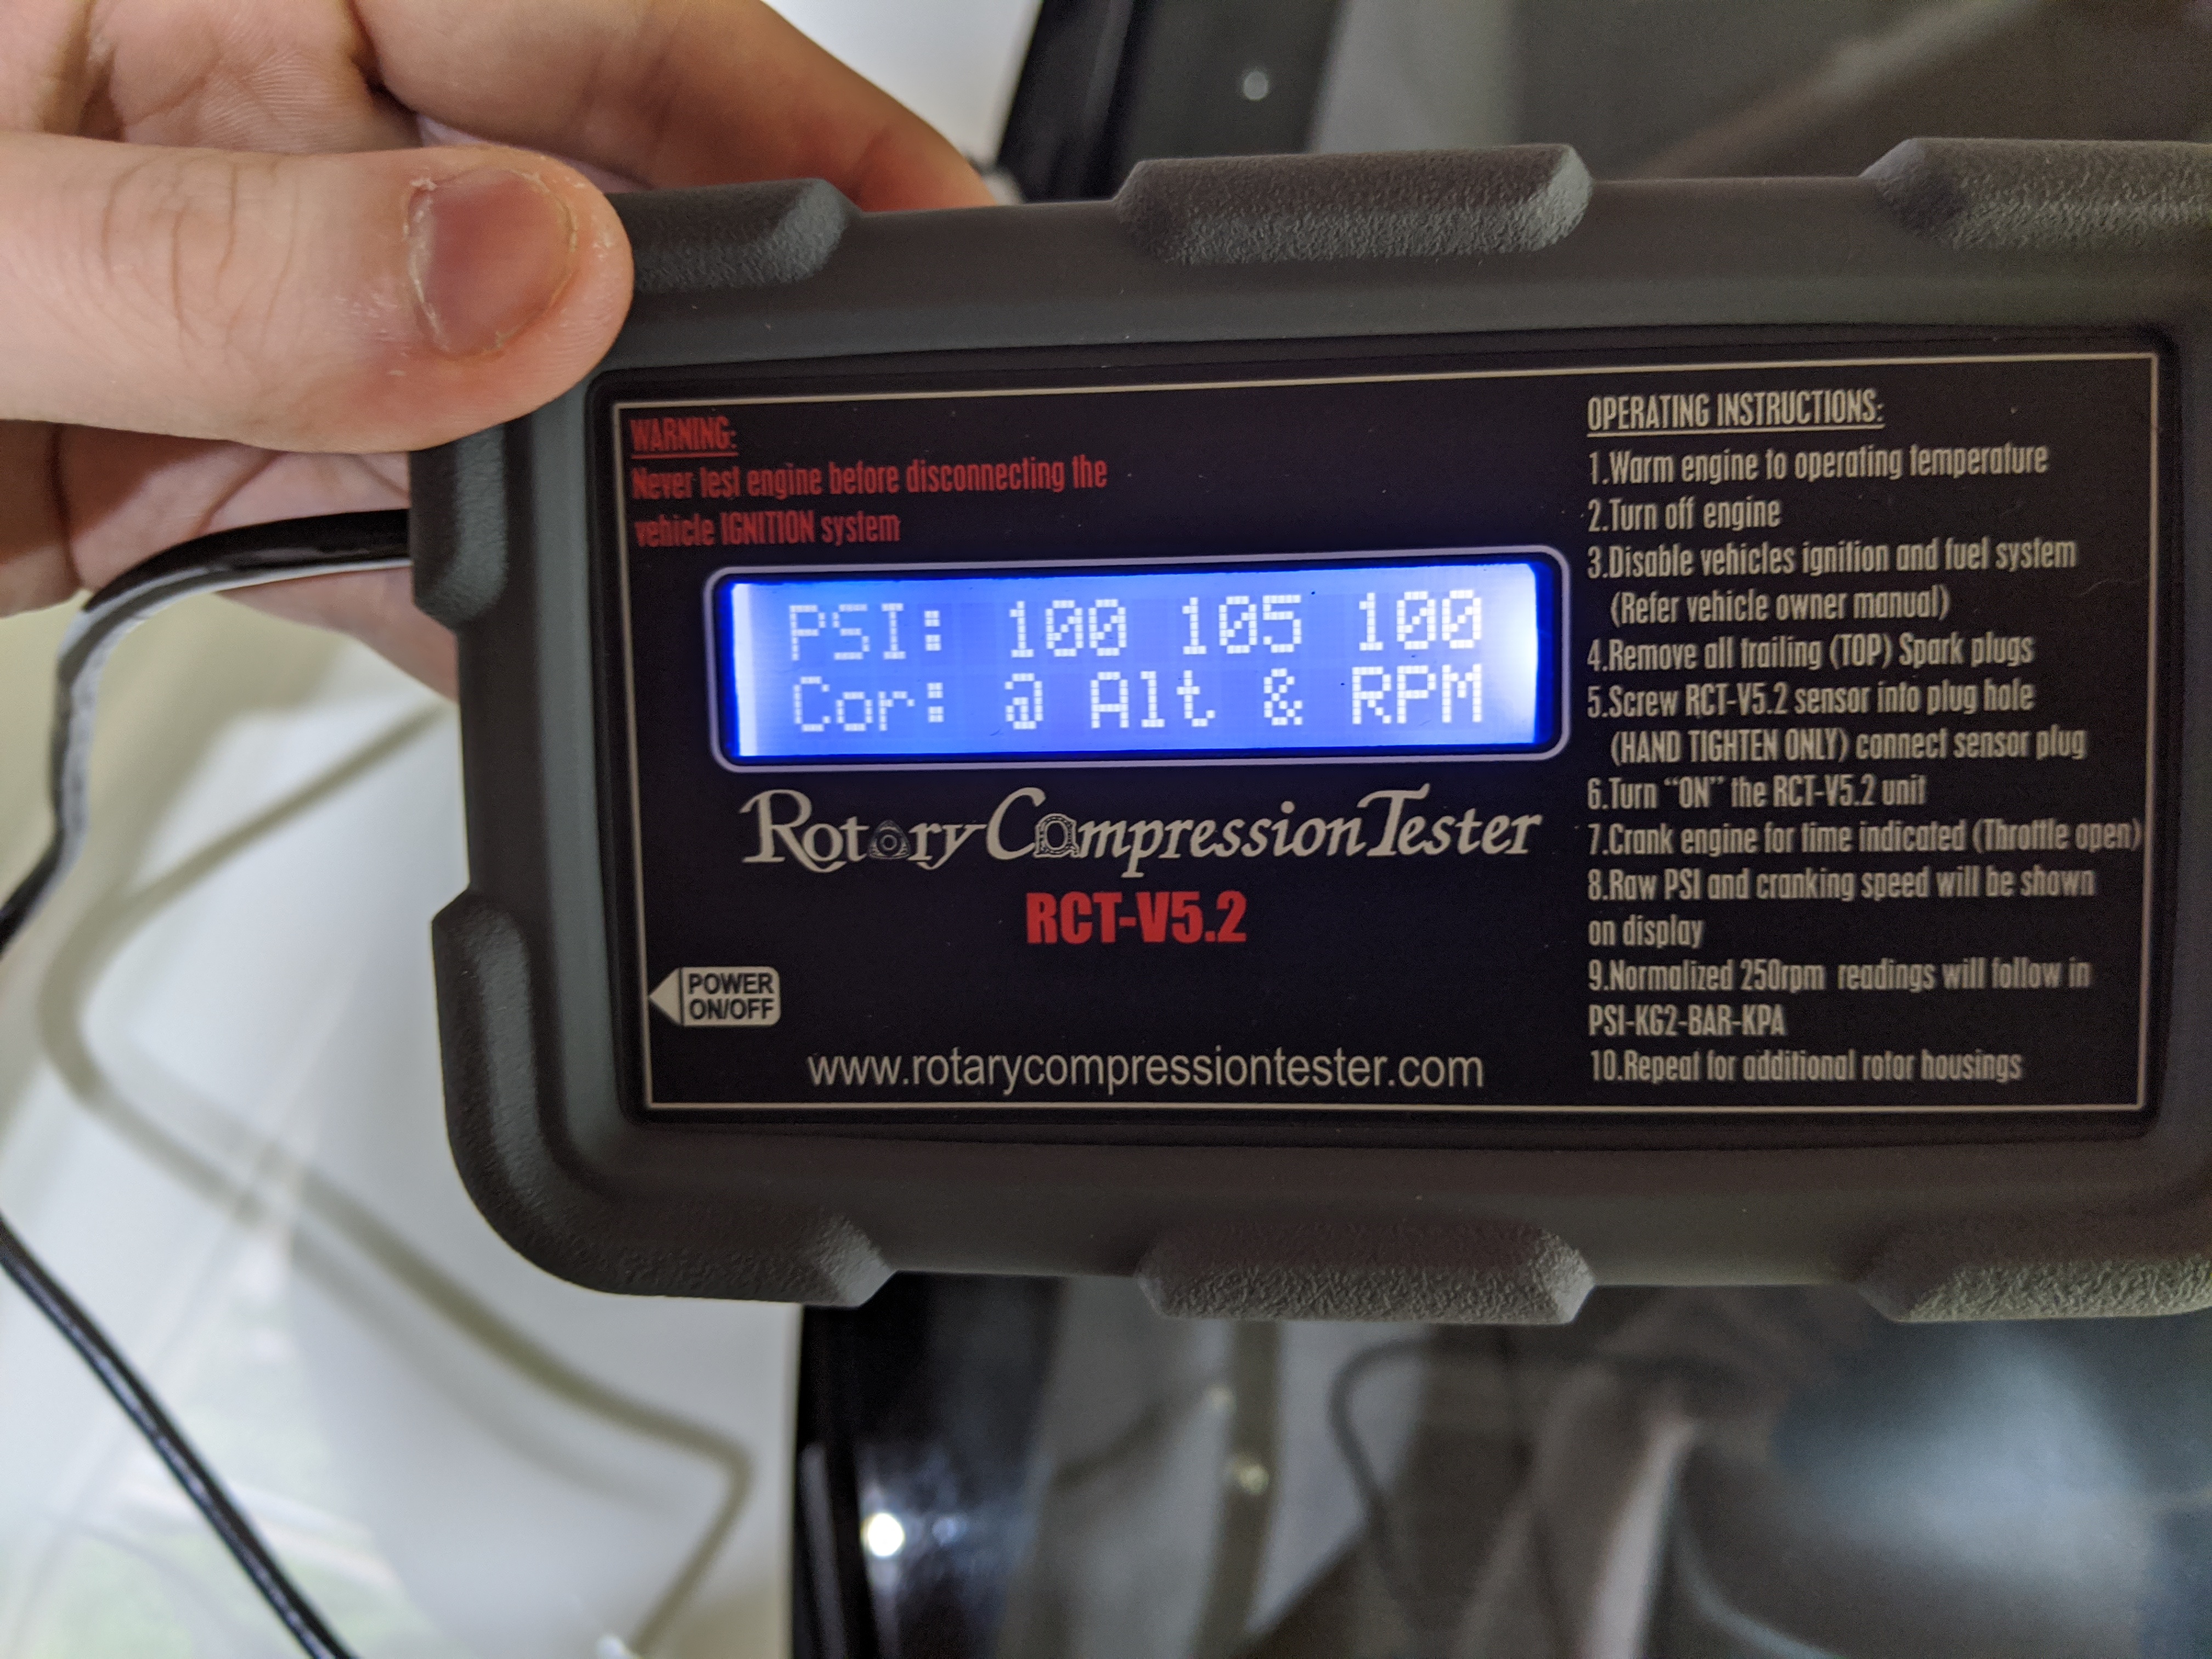
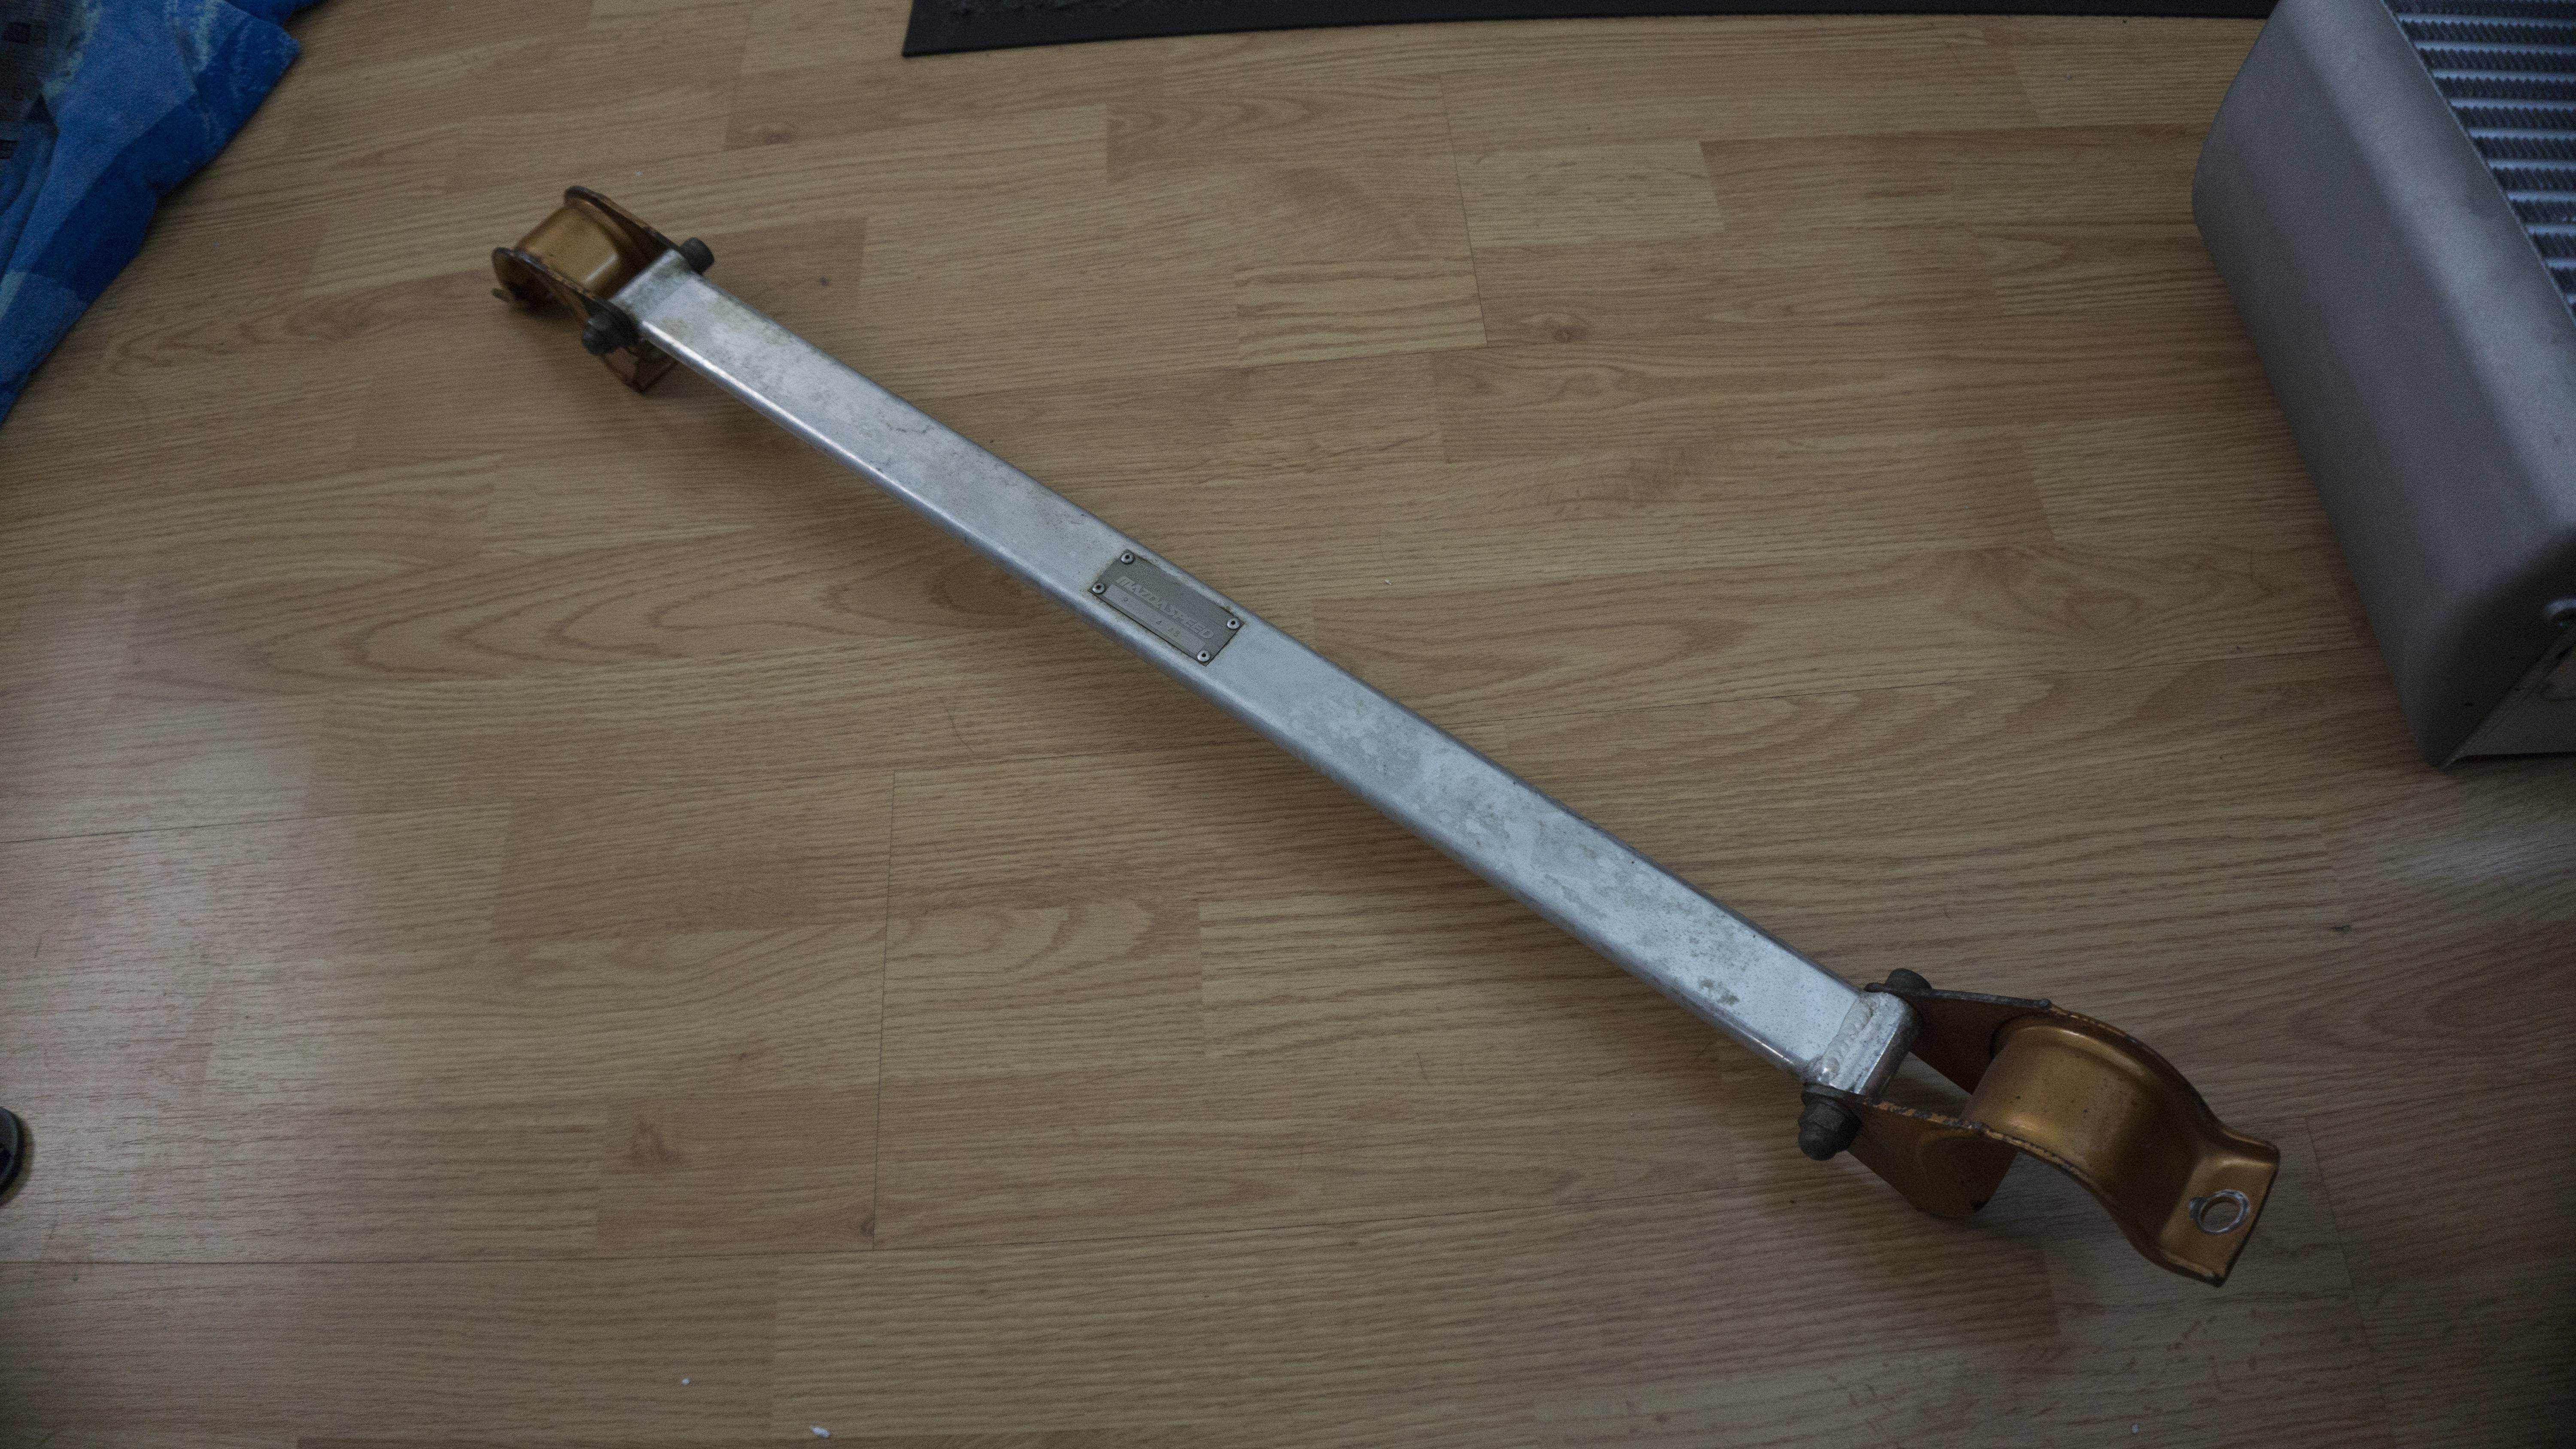
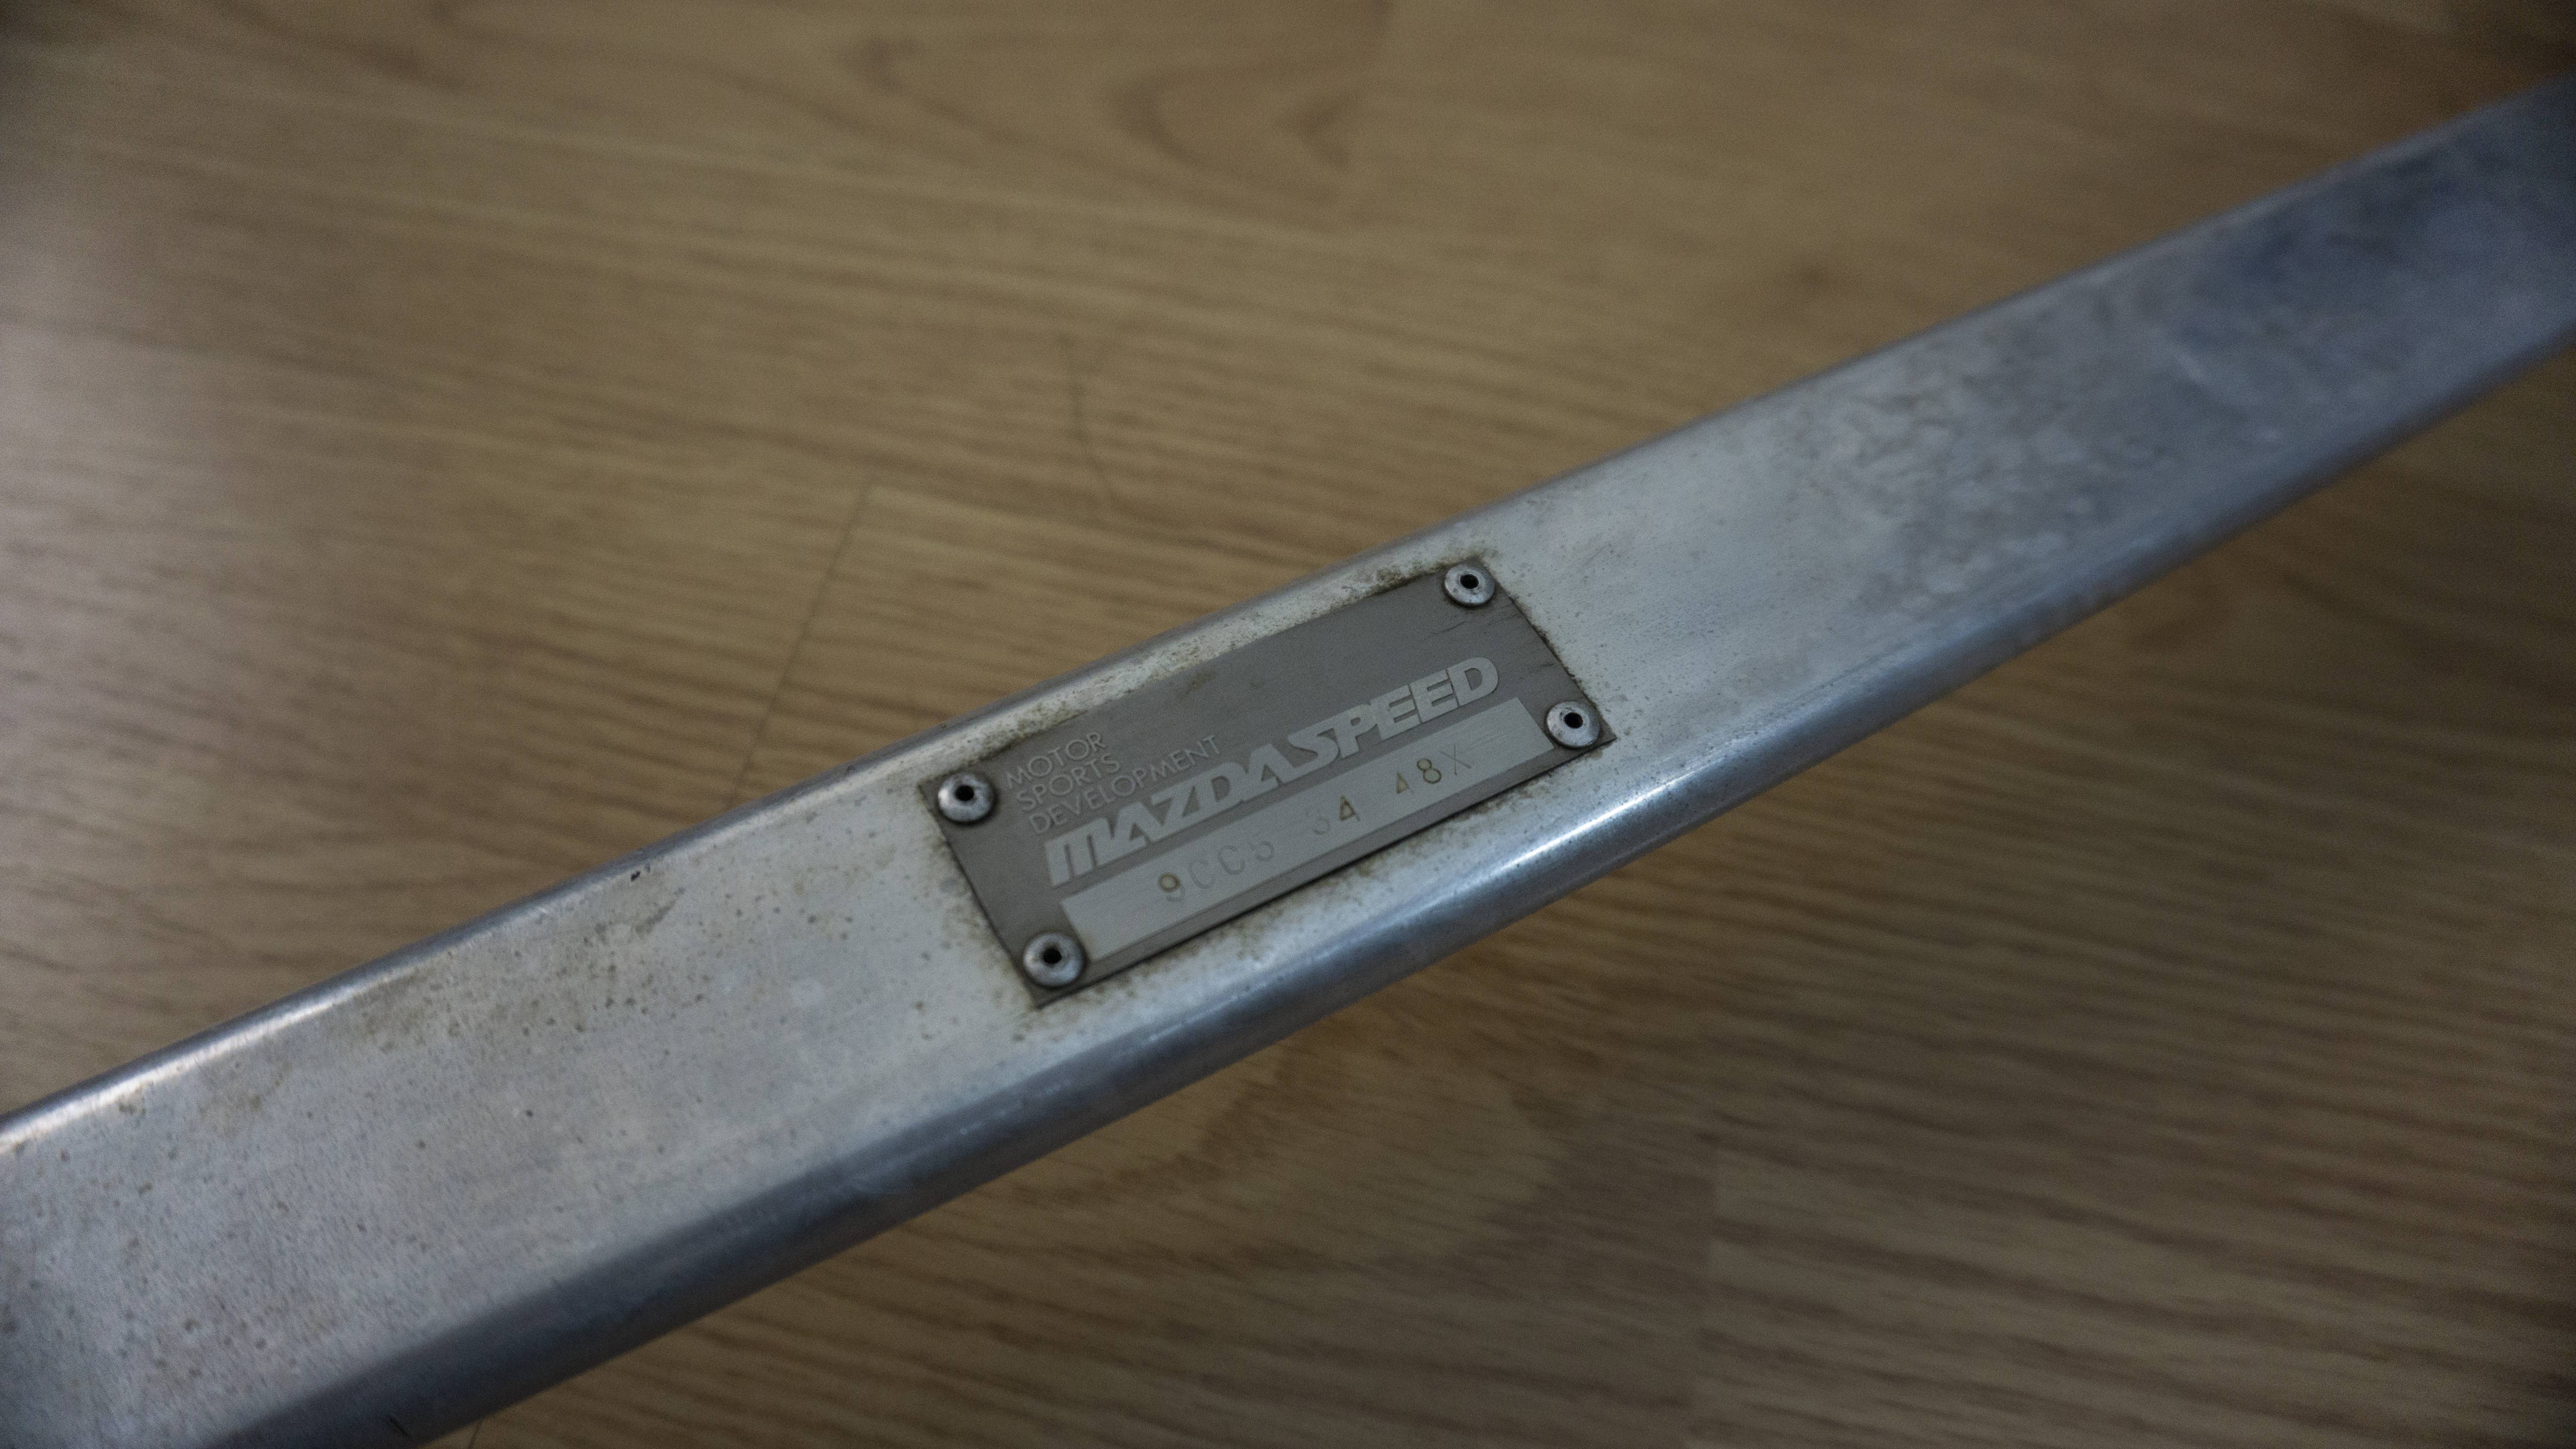
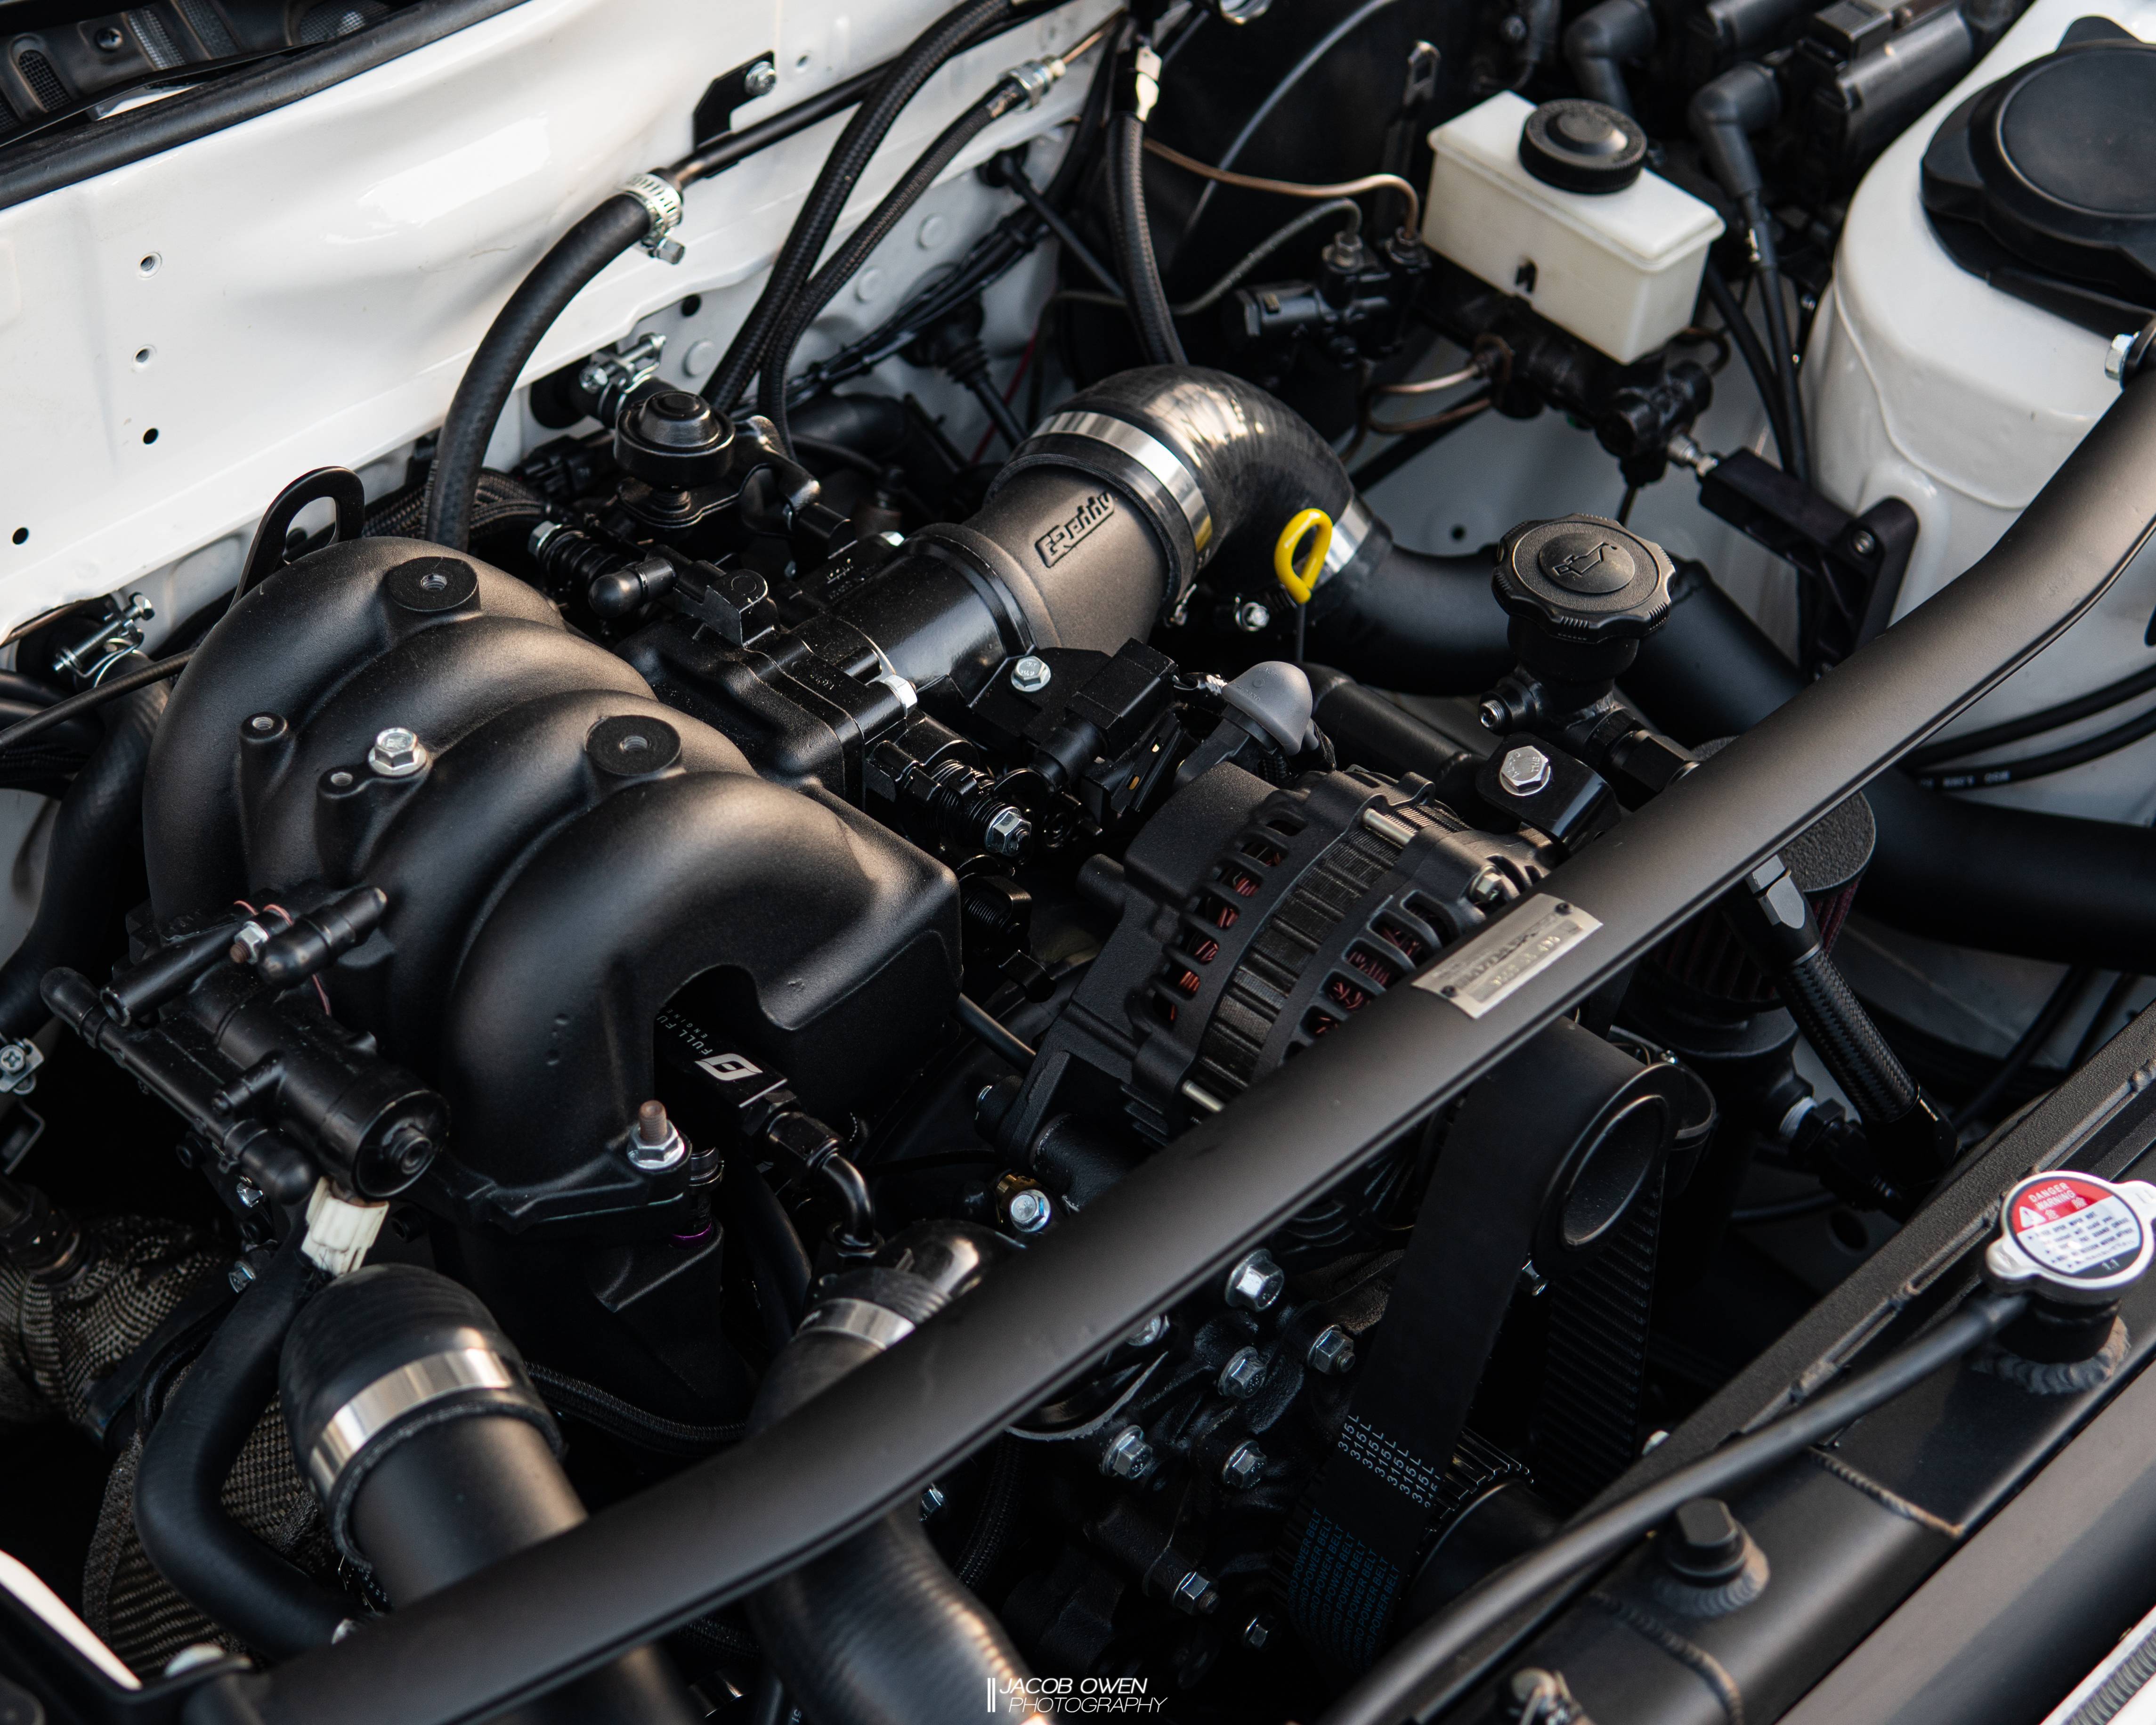
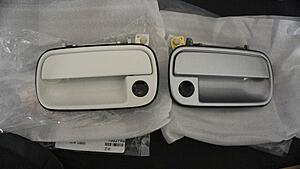
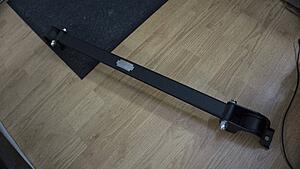
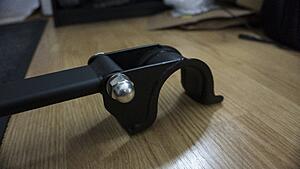
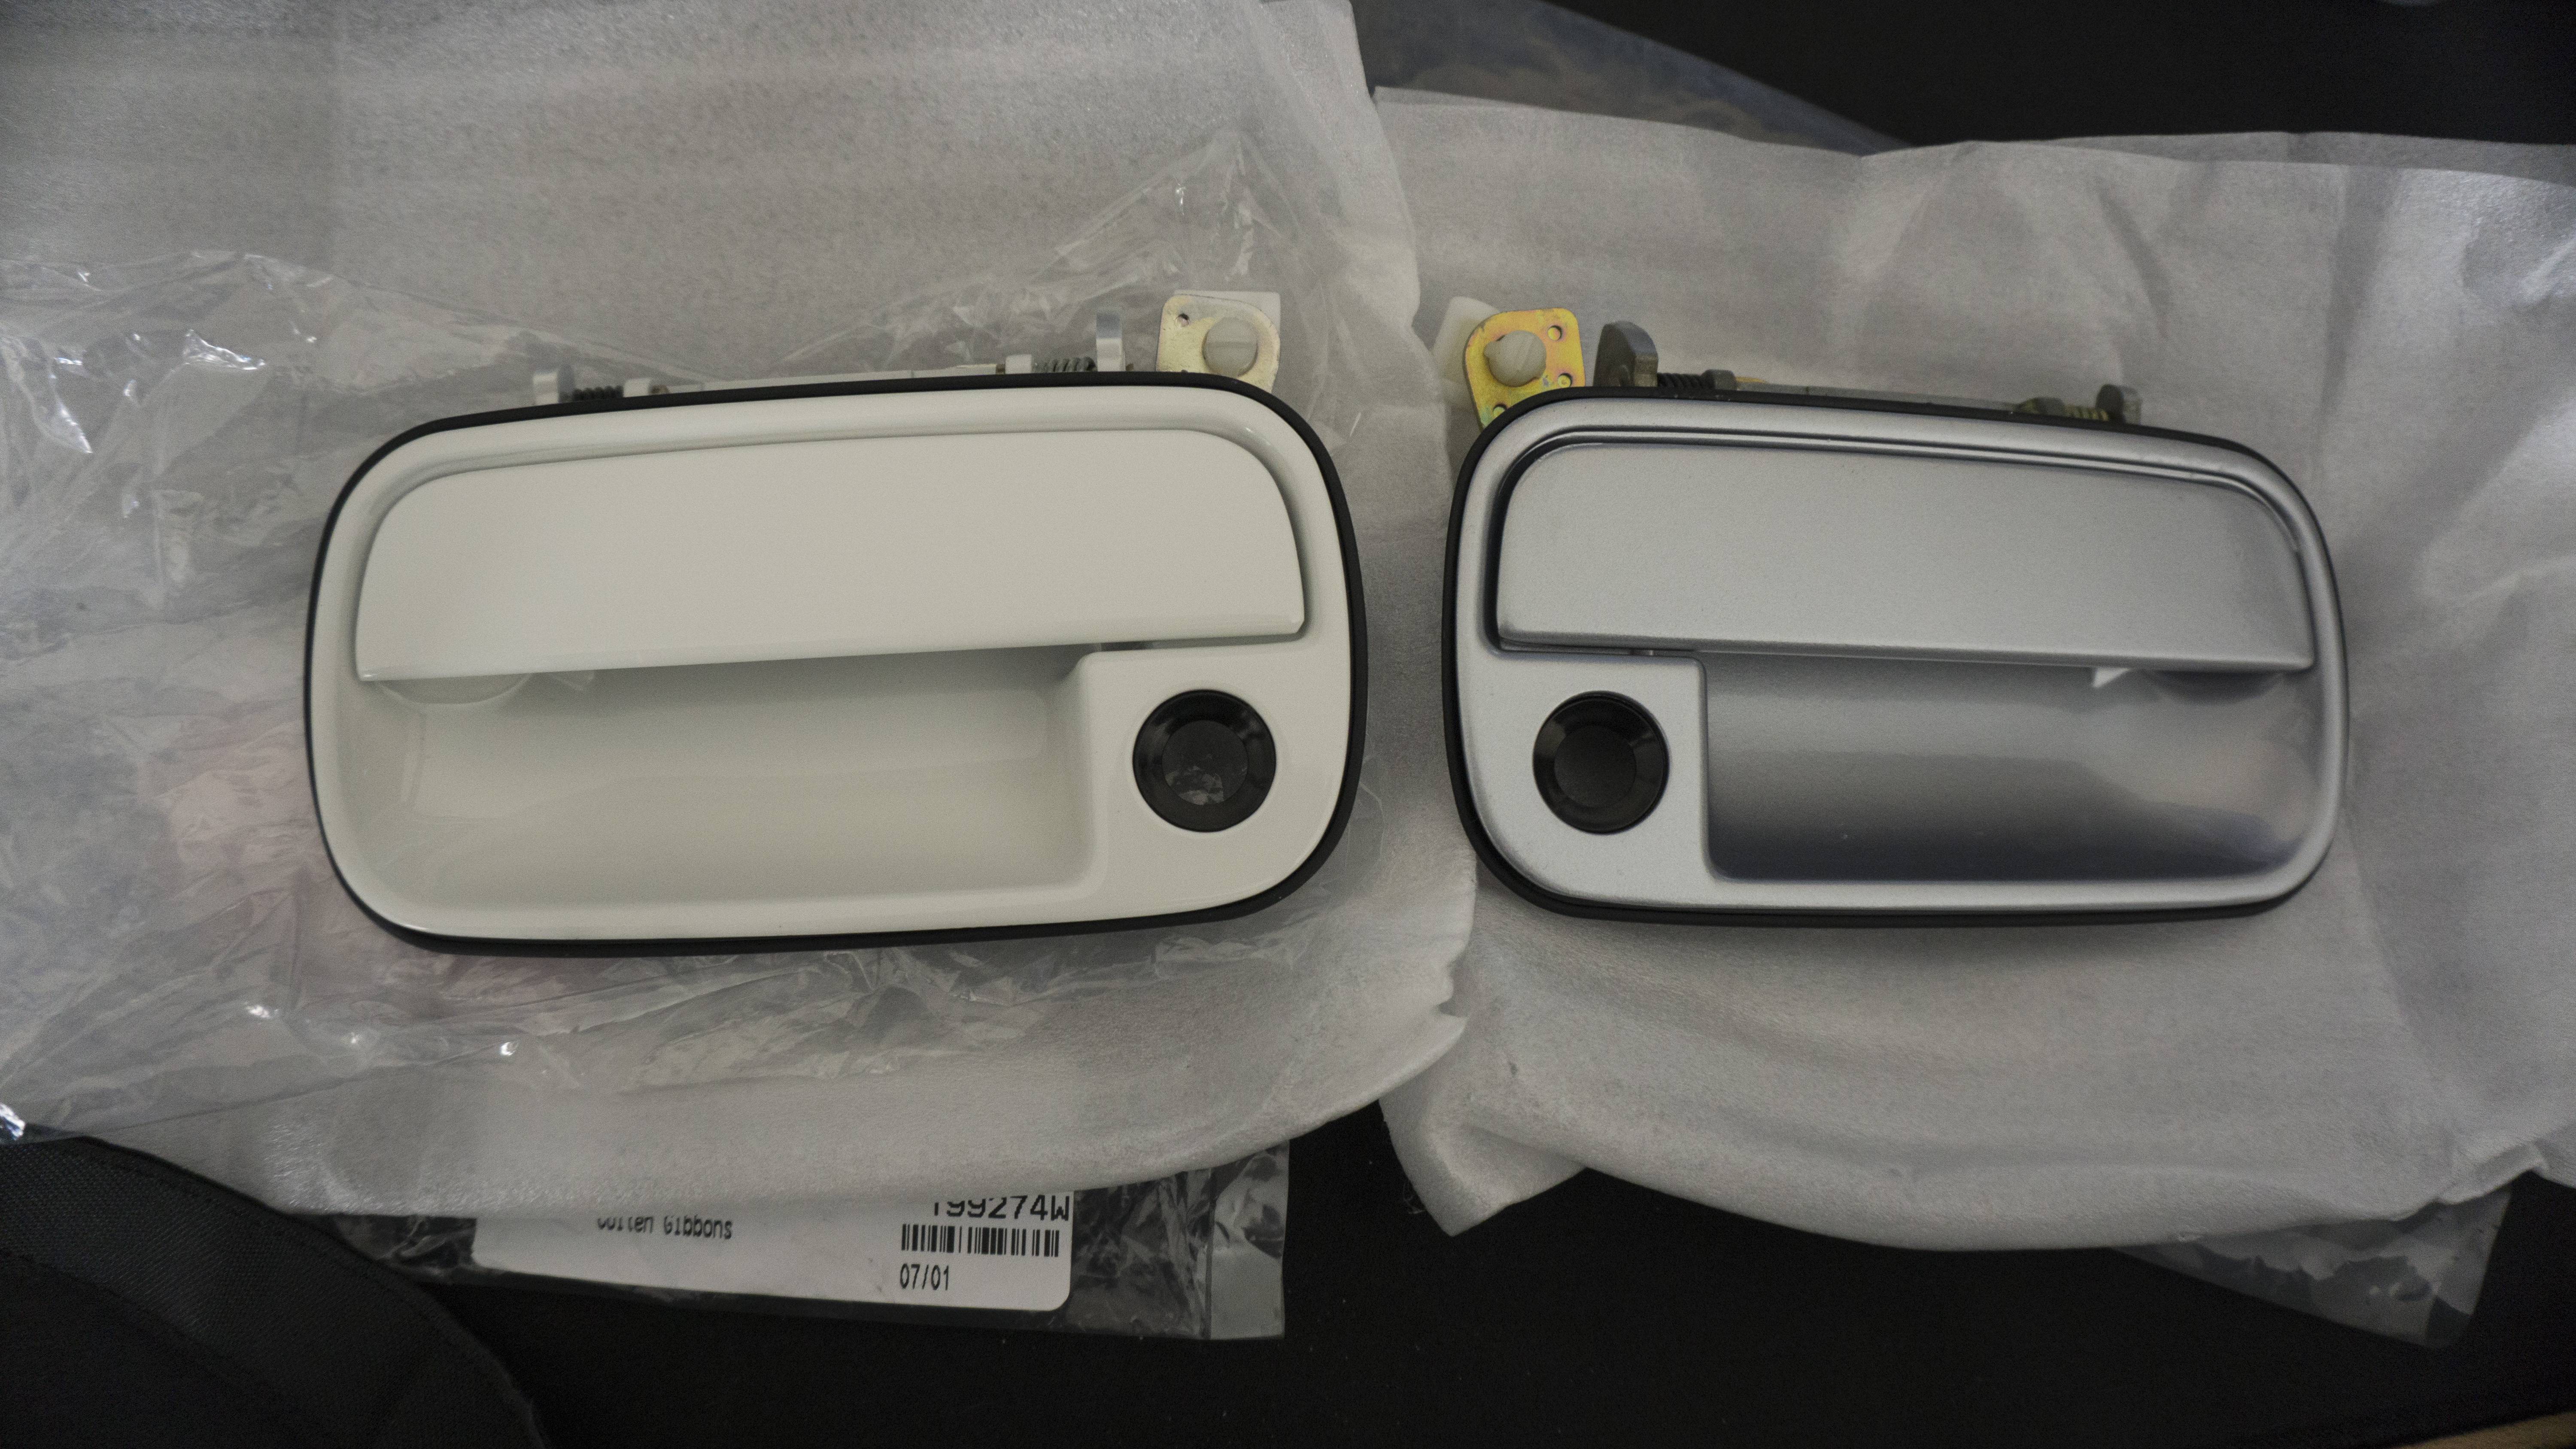
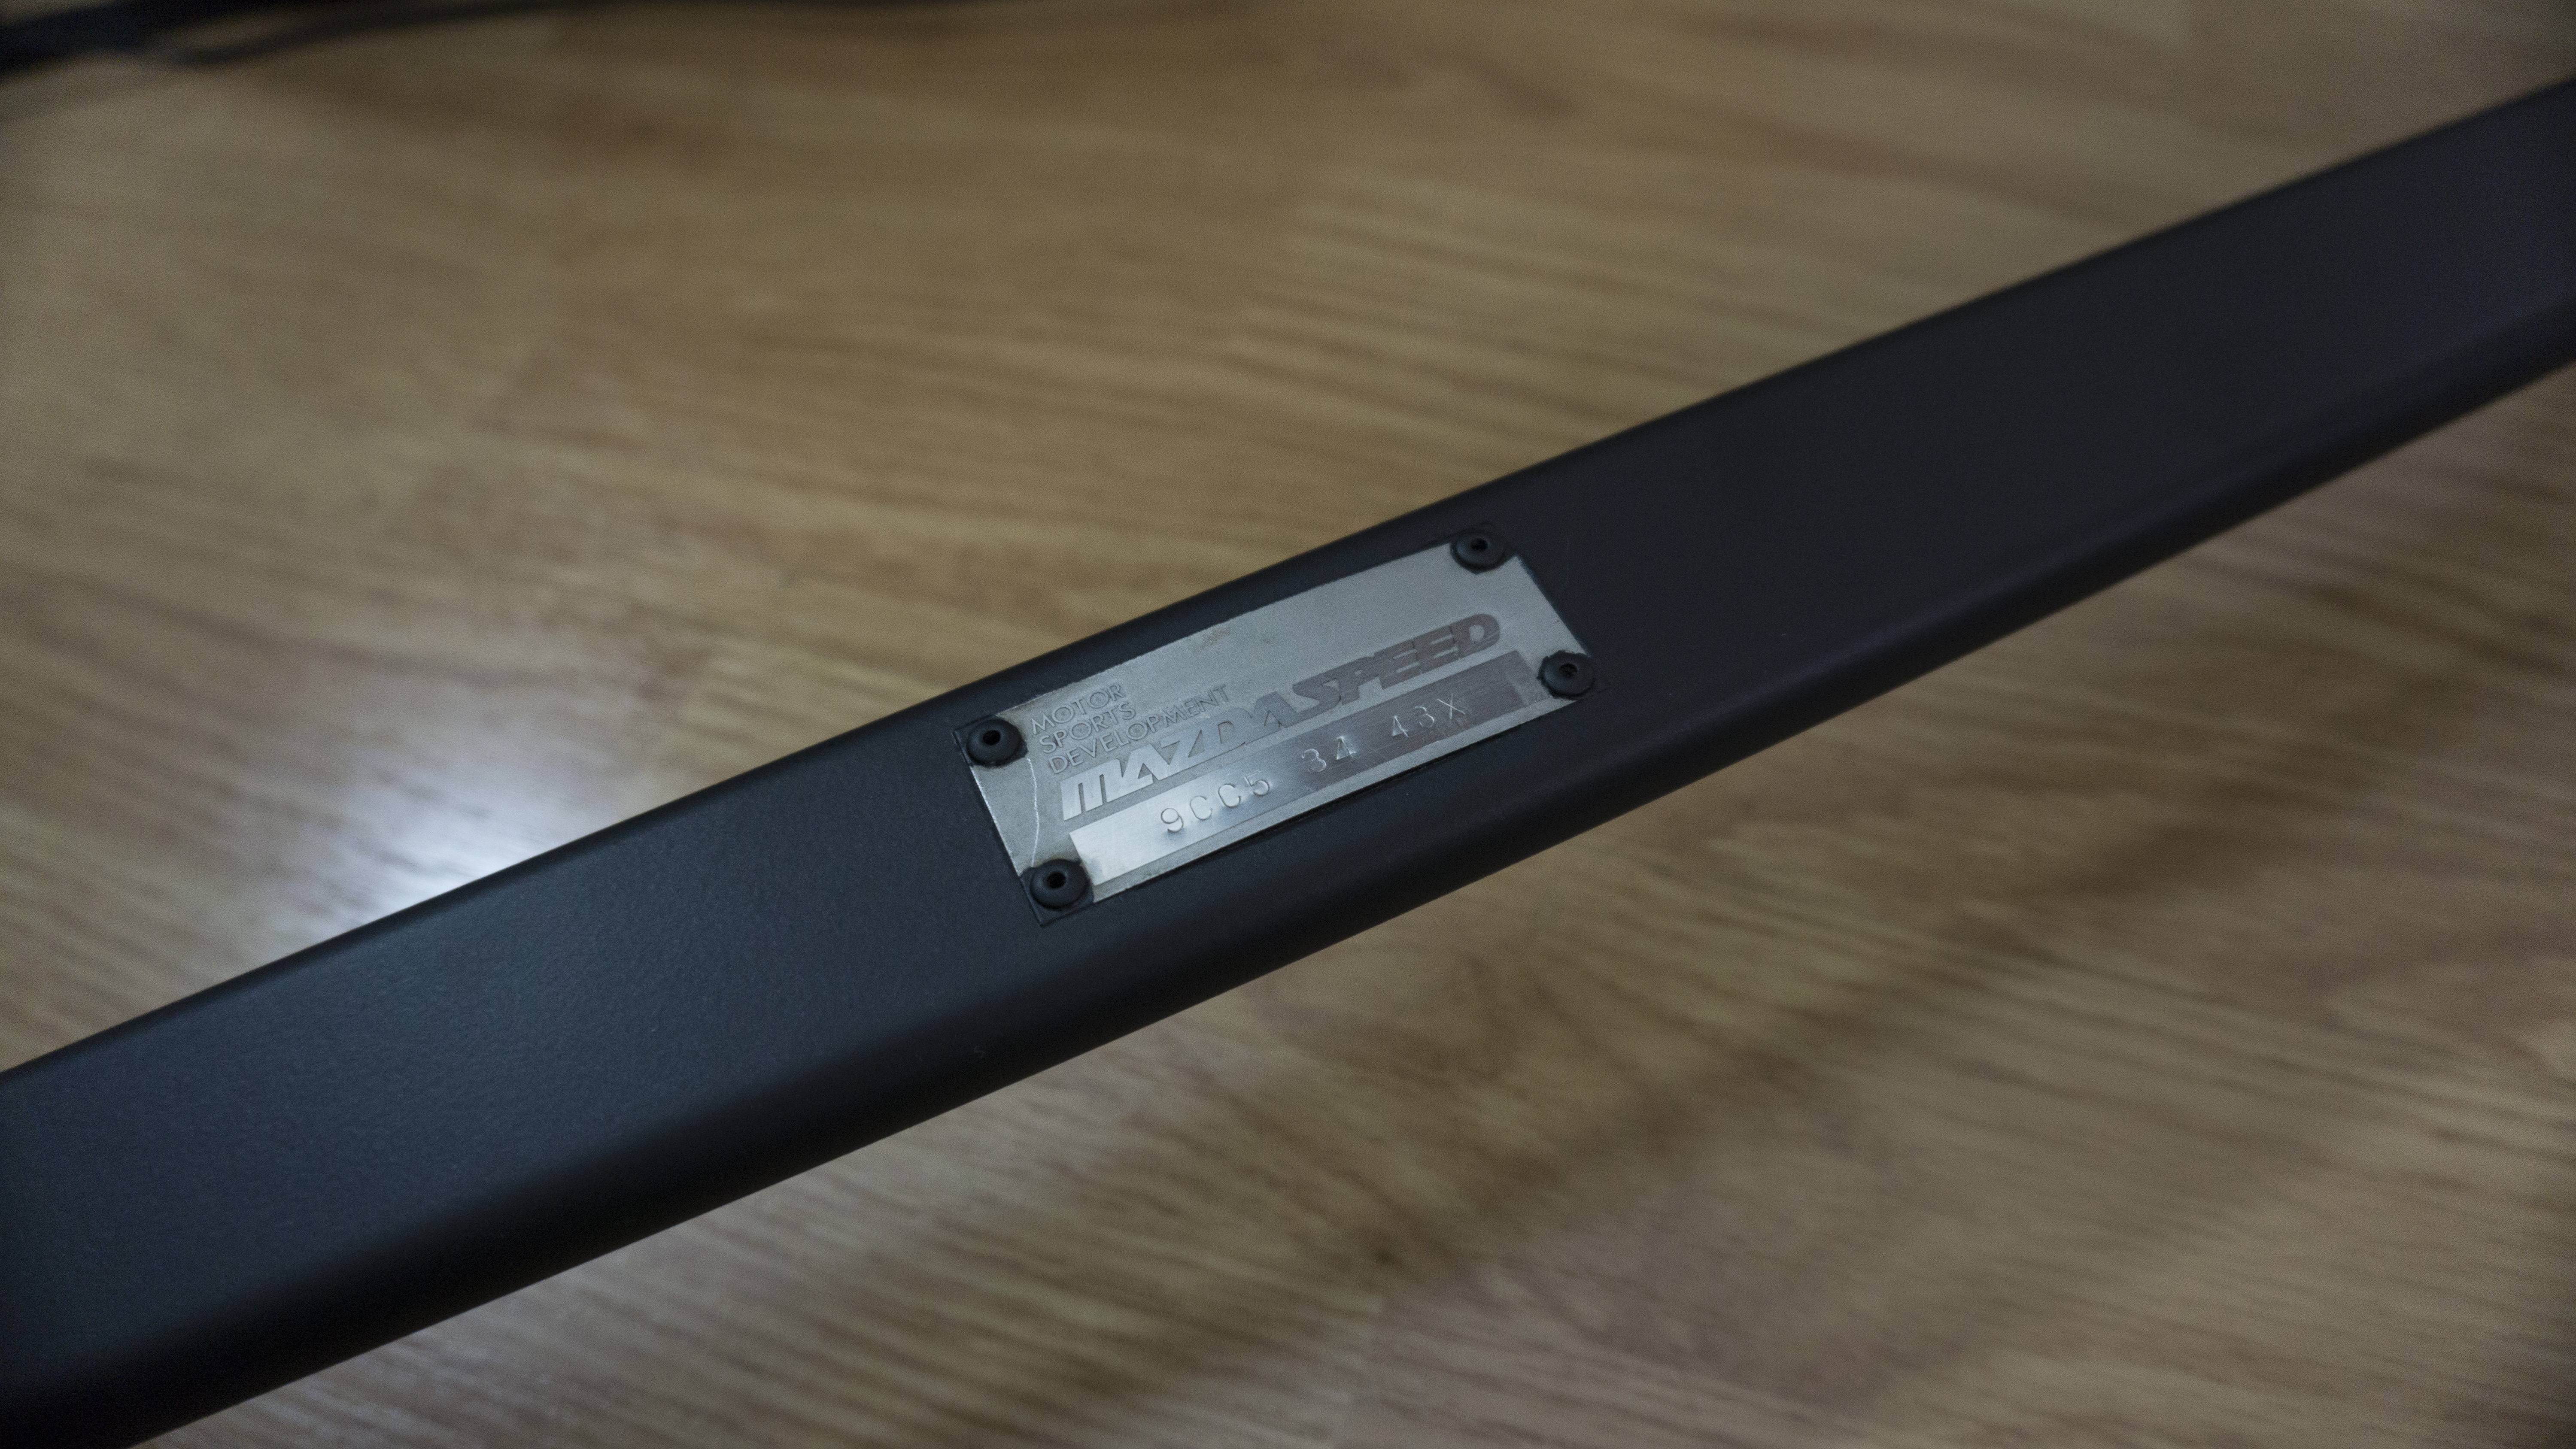
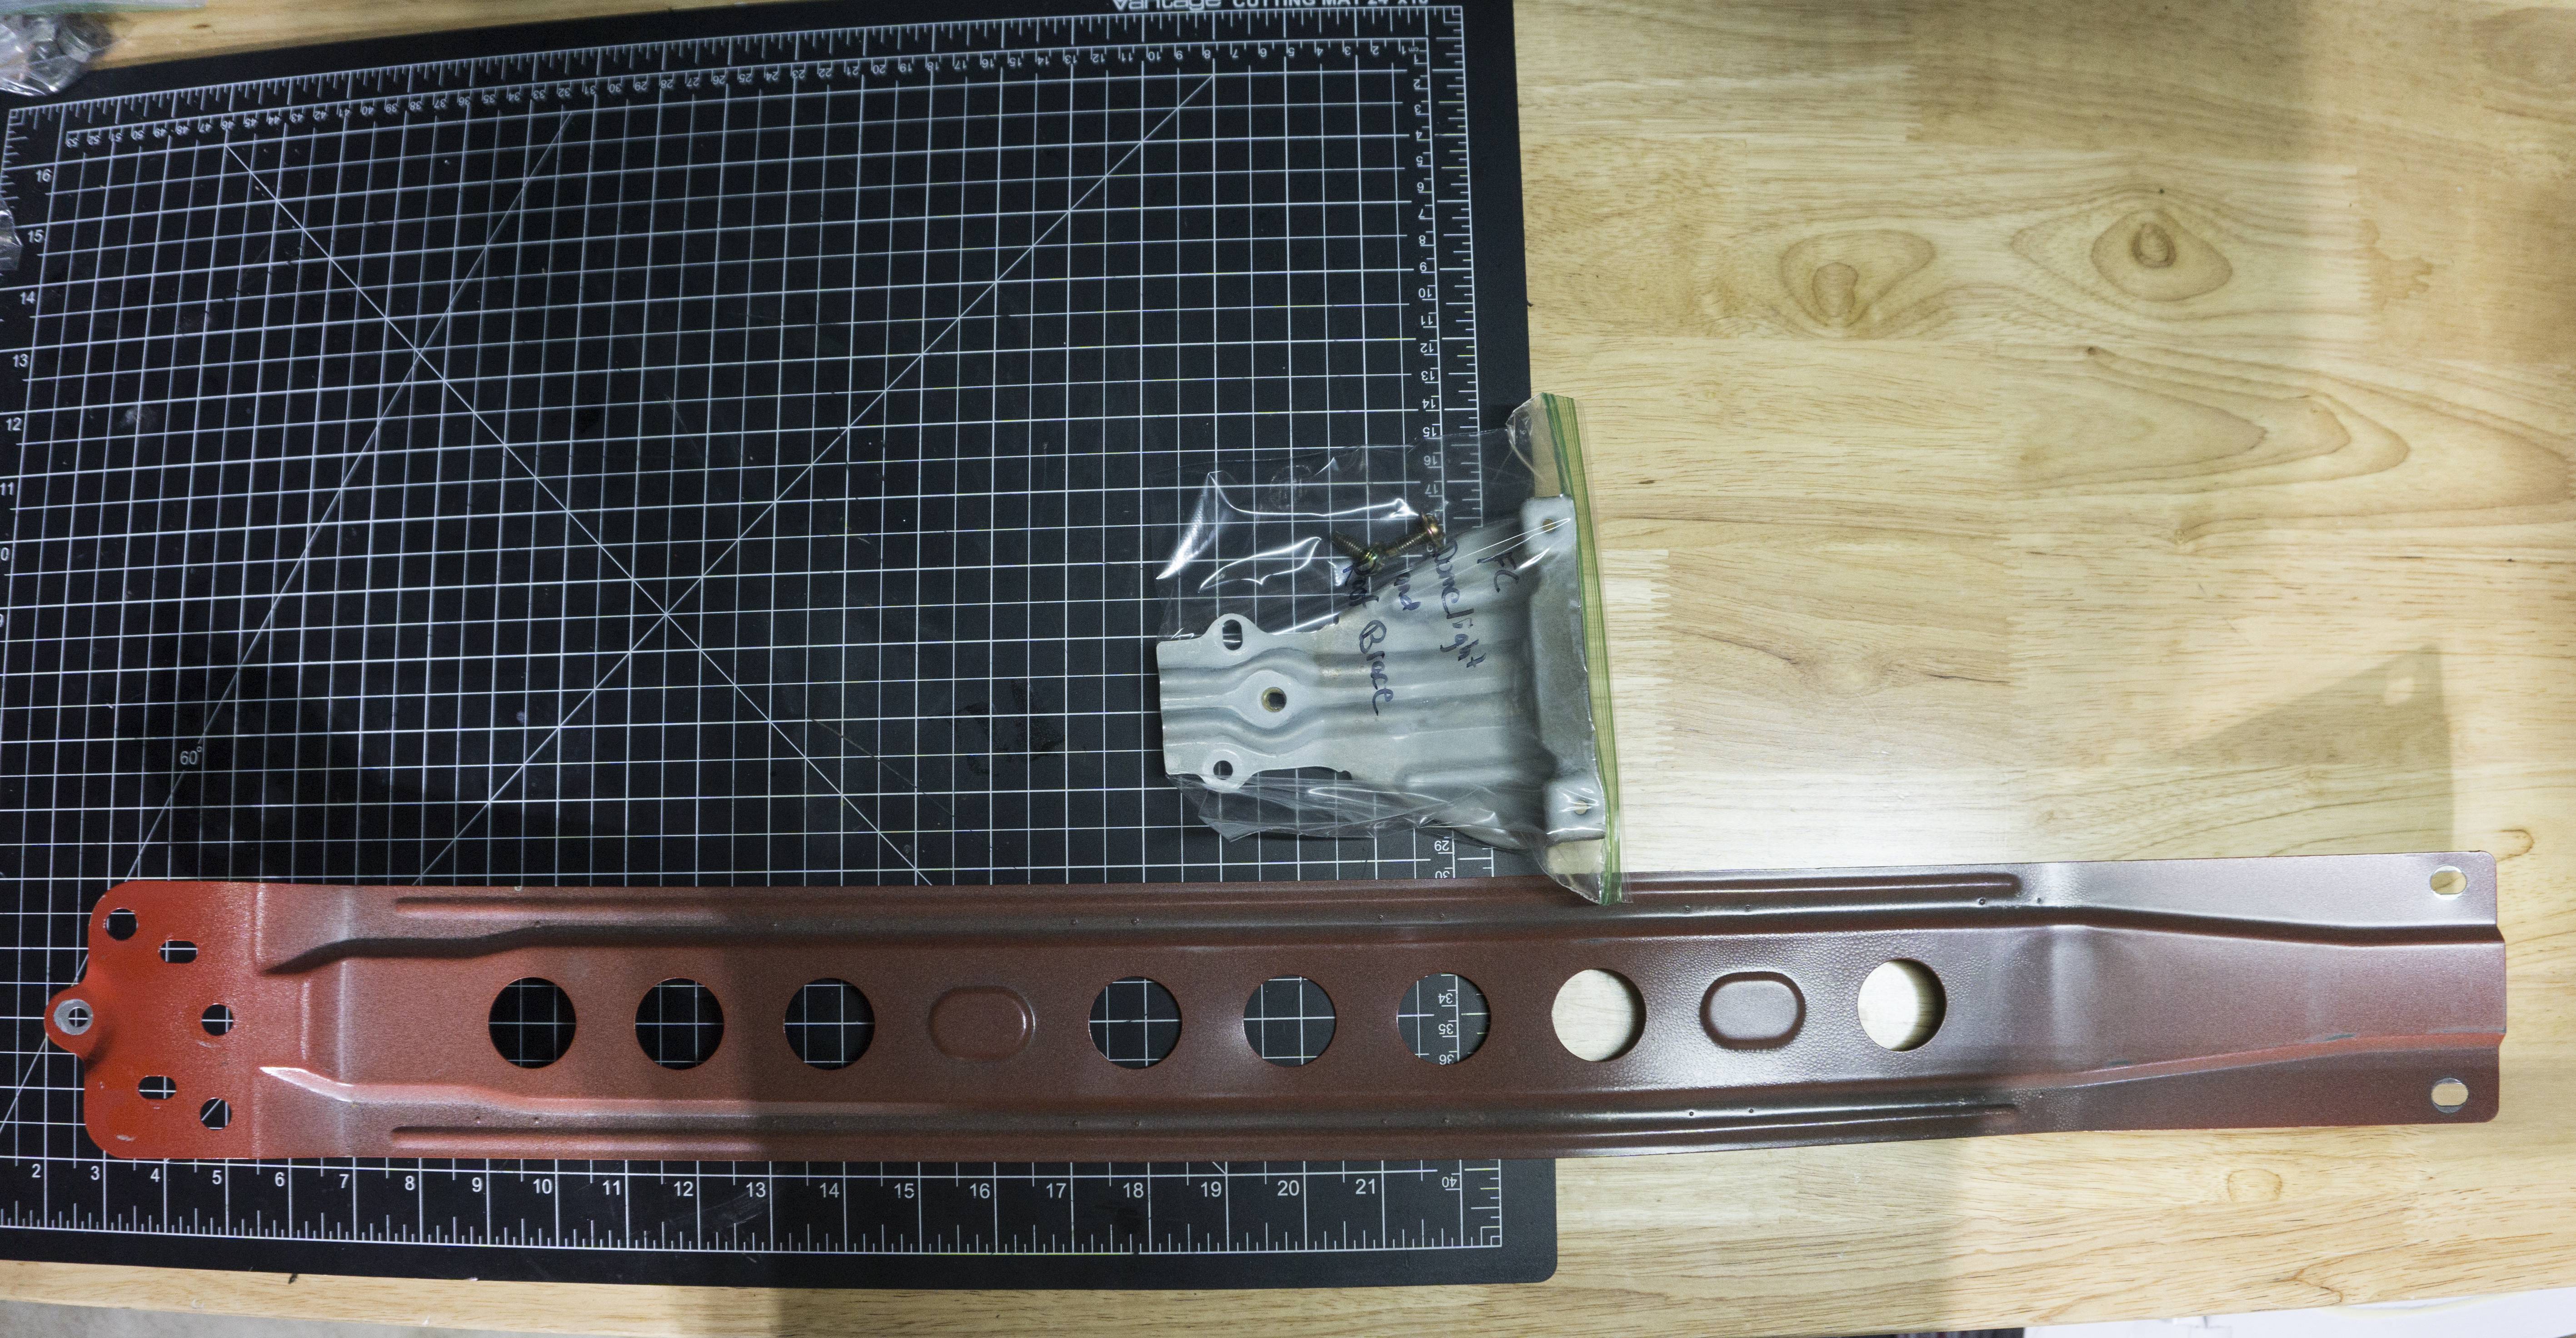
Happy 4th of July! The car has just re-rolled over 500 miles and I did a compression check on it. I�ve been doing compression checks every 250 miles and plan to until 1000 miles. So far so good! I�ll post some pictures of the results below, but a pretty even spread slightly above 100 is good to me! These are S4 Turbo rotors so I�m thinking that�s pretty good. In slightly sad news, my driver side door handle broke. I ordered some billet aluminum door handle inserts from JDL Manufacturing as well as two brand new door handles from Mazda. I plan to retrofit the aluminum handles onto my old door handles and keep the new units. New units are the only way to get the black �gasket� that surrounds the handle assembly. In more slightly bad news, I�m slowly losing coolant from the reservoir. I�m not sure where it�s going, maybe it�s filling in some air bubbles? I�m not seeing coolant anywhere so either it�s filling in air bubbles or it�s immediately burning off (which may point me to the turbo rear water banjo). I plan to keep an eye on the reservoir and act accordingly if it continues to go down. I took one of the above posters' advice and separated the spark plug cables. I understand the risk is reasonably low to experience cross-firing, but I�d rather completely eliminate the risk than have a low risk. I ordered some spark plug separators from Jegs; I was a little shocked at how expensive these things are, but they turned out really nice. One more purchase I made was a super rare Mazdaspeed Lower Control Stiffener. It�s currently at powder getting the same treatment as the rest of my MazdaSpeed bars, so I�m excited to get that back in and on the car. That completes the collection of MazdaSpeed braces that they offered (I think). Hope to have another update shortly!
Until next time!
Here are the results of the 500 miles compression test


Here are the spark plug separators

Here is the new MazdaSpeed Lower Stiffener


Here are some shots my friend grabbed from a recent event
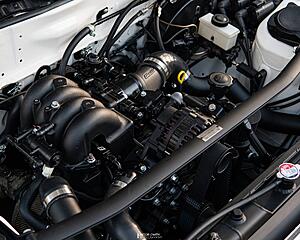
Happy 4th of July! The car has just re-rolled over 500 miles and I did a compression check on it. I�ve been doing compression checks every 250 miles and plan to until 1000 miles. So far so good! I�ll post some pictures of the results below, but a pretty even spread slightly above 100 is good to me! These are S4 Turbo rotors so I�m thinking that�s pretty good. In slightly sad news, my driver side door handle broke. I ordered some billet aluminum door handle inserts from JDL Manufacturing as well as two brand new door handles from Mazda. I plan to retrofit the aluminum handles onto my old door handles and keep the new units. New units are the only way to get the black �gasket� that surrounds the handle assembly. In more slightly bad news, I�m slowly losing coolant from the reservoir. I�m not sure where it�s going, maybe it�s filling in some air bubbles? I�m not seeing coolant anywhere so either it�s filling in air bubbles or it�s immediately burning off (which may point me to the turbo rear water banjo). I plan to keep an eye on the reservoir and act accordingly if it continues to go down. I took one of the above posters' advice and separated the spark plug cables. I understand the risk is reasonably low to experience cross-firing, but I�d rather completely eliminate the risk than have a low risk. I ordered some spark plug separators from Jegs; I was a little shocked at how expensive these things are, but they turned out really nice. One more purchase I made was a super rare Mazdaspeed Lower Control Stiffener. It�s currently at powder getting the same treatment as the rest of my MazdaSpeed bars, so I�m excited to get that back in and on the car. That completes the collection of MazdaSpeed braces that they offered (I think). Hope to have another update shortly!
Until next time!
Here are the results of the 500 miles compression test
Here are the spark plug separators

Here is the new MazdaSpeed Lower Stiffener

Here are some shots my friend grabbed from a recent event


The following users liked this post:
driftxsequence (07-09-20)
07-05-20, 06:37 PM
#304
Dang, that's a sweet pickup to find one of those Mazdaspeed lower arm bars. I just got around to installing an Infini front bar on my FC. Didn't bother refinishing it yet, because I don't know what color I want to go with.
As always, everything is looking great. It's always reassuring to see good compression numbers, too.
As always, everything is looking great. It's always reassuring to see good compression numbers, too.

 07-08-20, 09:35 AM
#307
Moderator
iTrader: (3)
Join Date: Mar 2001
Location: https://www2.mazda.com/en/100th/
Posts: 30,829
Received 2,597 Likes
on
1,845 Posts
for the wires there are 3 things to be aware of, i'm early in the research, so they are more like google search terms... the Japanese tuners are really really crazy about this kind of stuff
1. inductive crossfire, its when the induction on one wire can fire another, which will break stuff. Ford has a few bulletins about it.
2. RFI, i think Radio Frequency Interference, the spark frequency can cause problems with ECU's and radios an such, its a bigger problem on Corvettes and airplanes that aren't metal
3. Spark Leakage. this is the one that i have had a hard time finding, i think with a piston engine you need to be making a TON of hp before this is a problem. basic outline is that the higher the combustion chamber pressure is, the more energy it takes to fire the spark plug. electricity is lazy, and it will just go to the easiest place. so there is a point where the electricity will skip the spark plug, and just leak out of the wire/boot/coil etc.
check out this wire set, every car they work on gets one https://www.rhdjapan.com/revolution-...d3s-kouki.html
07-14-20, 07:21 PM
#308
Update 7/14/2020
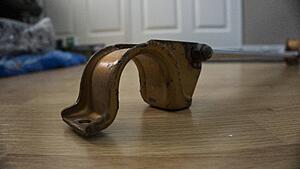
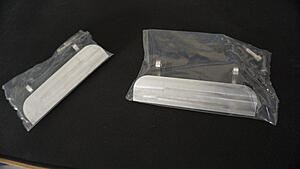
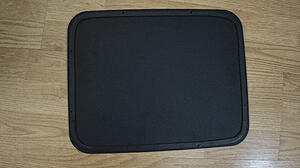
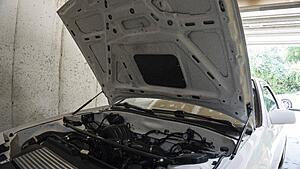
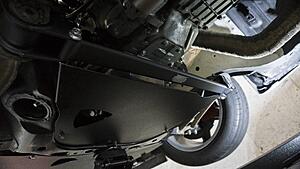
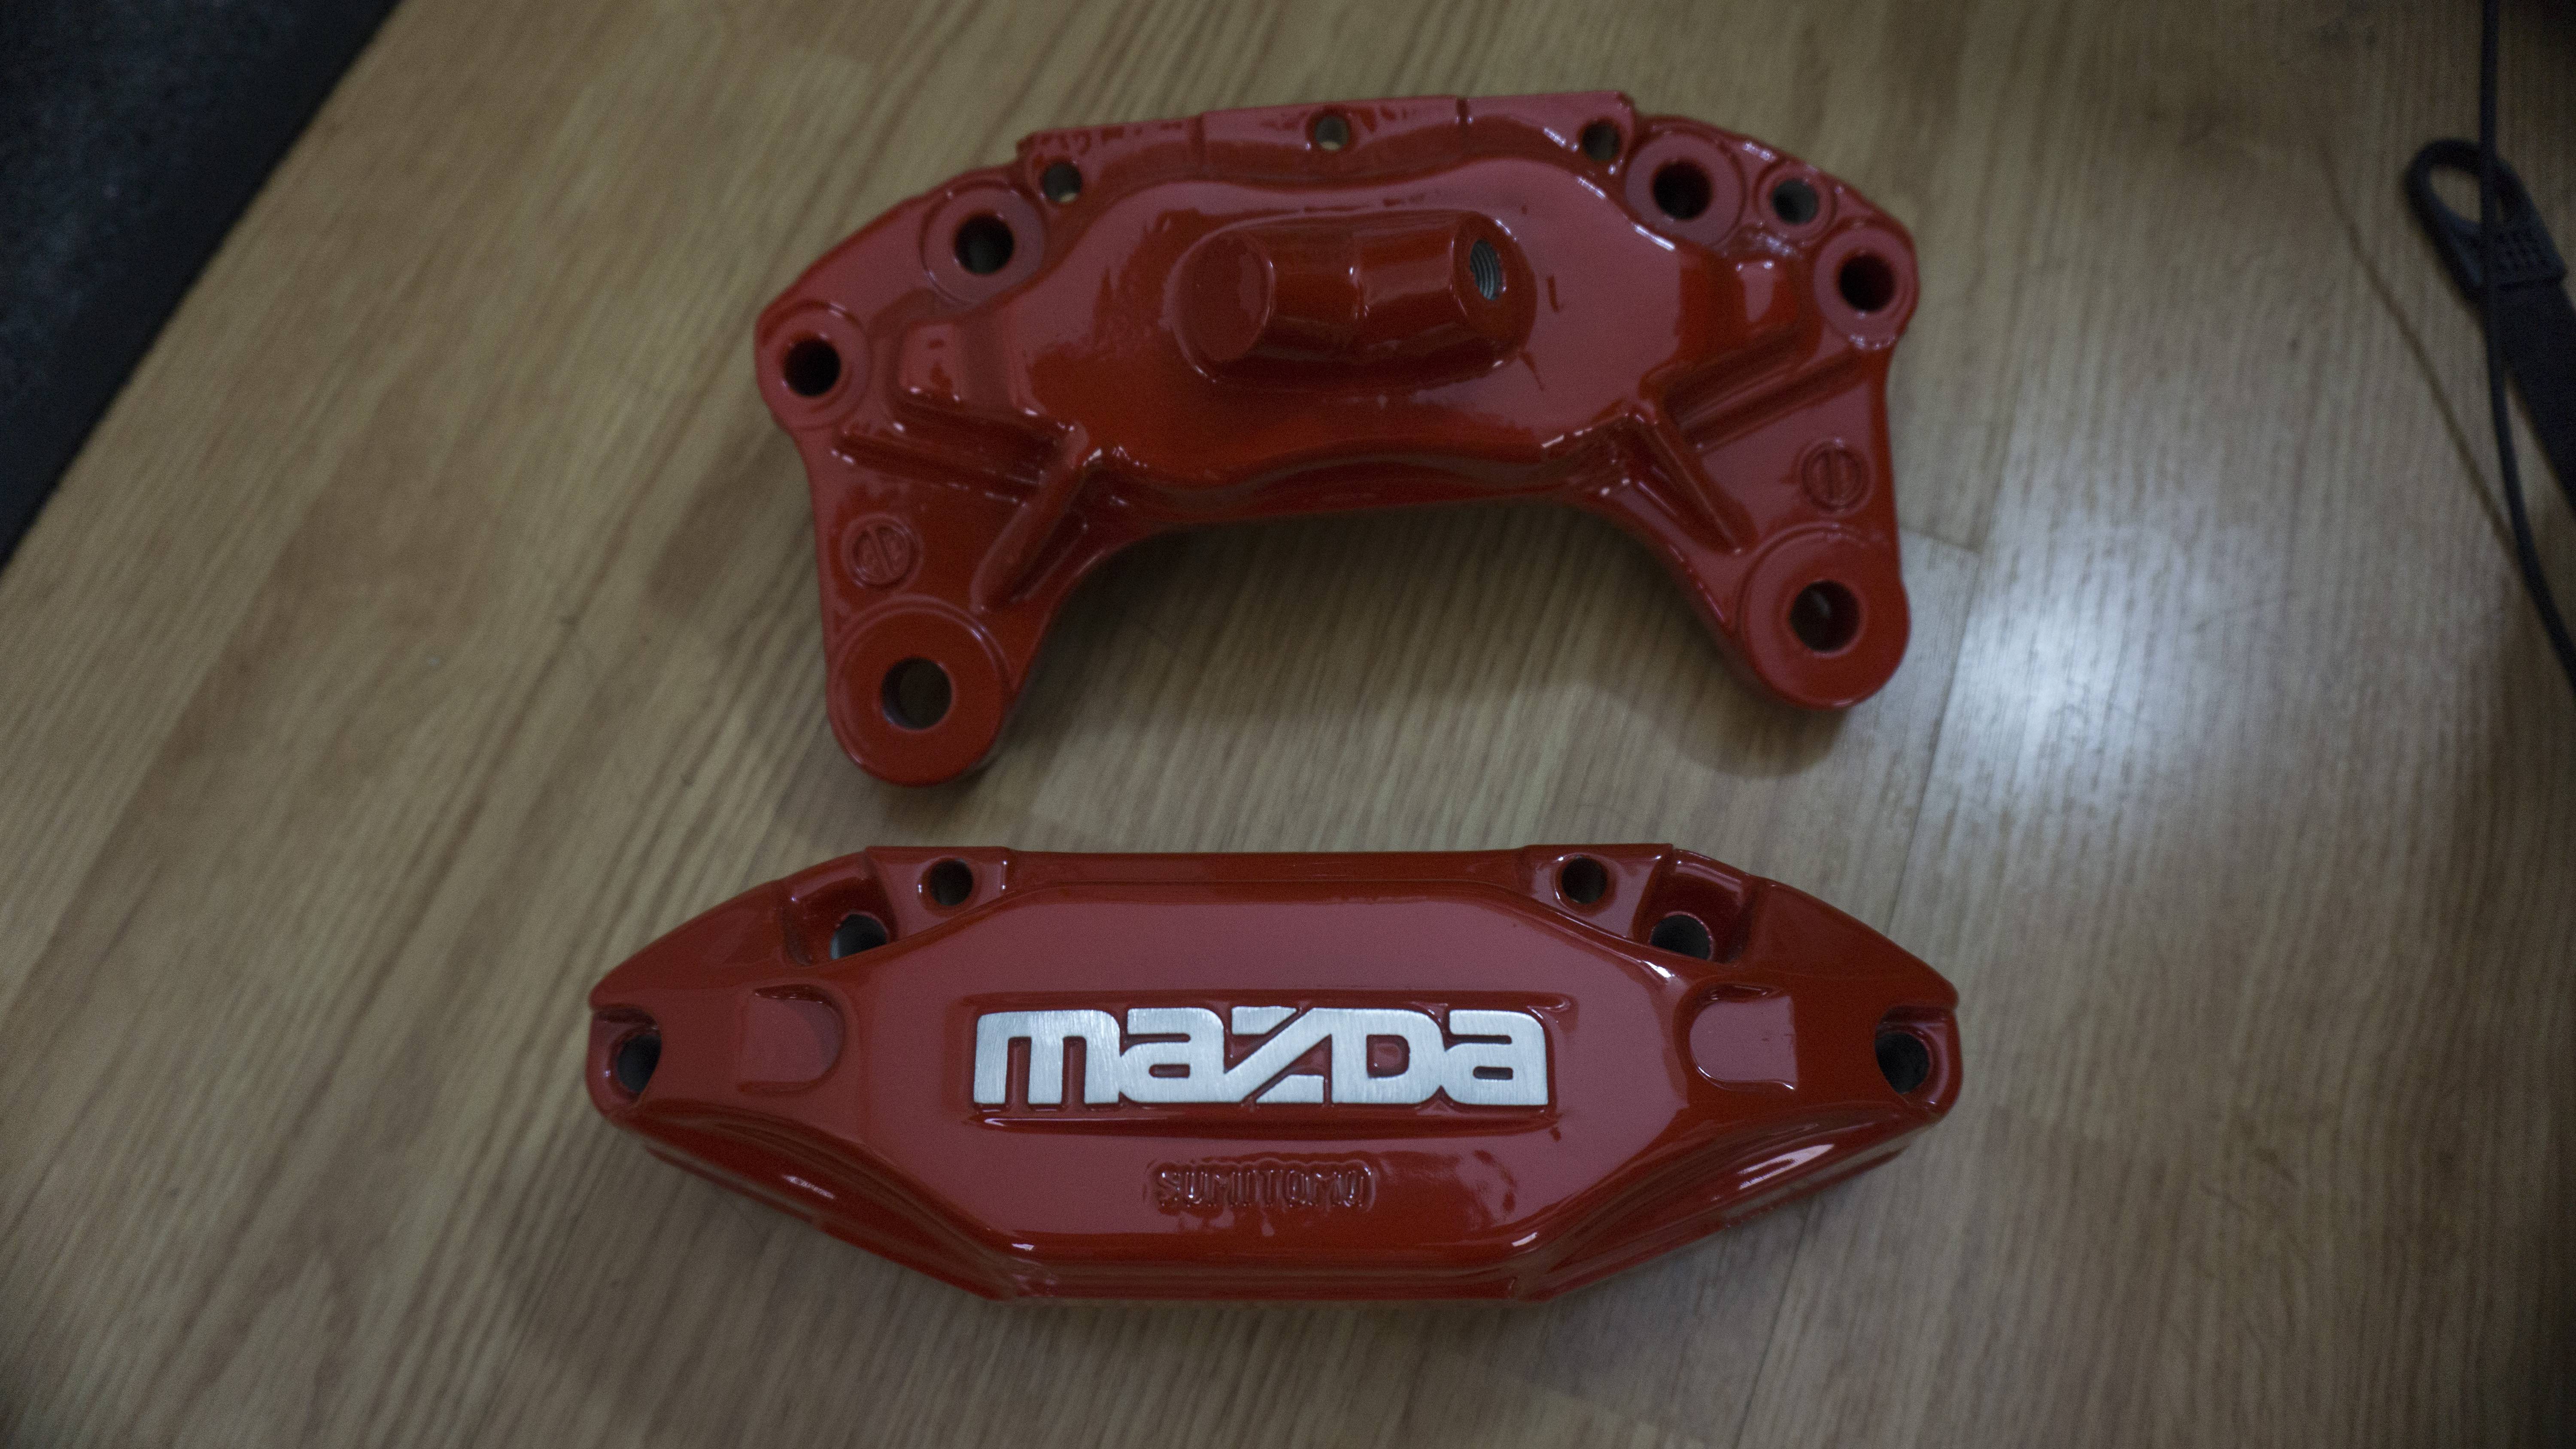
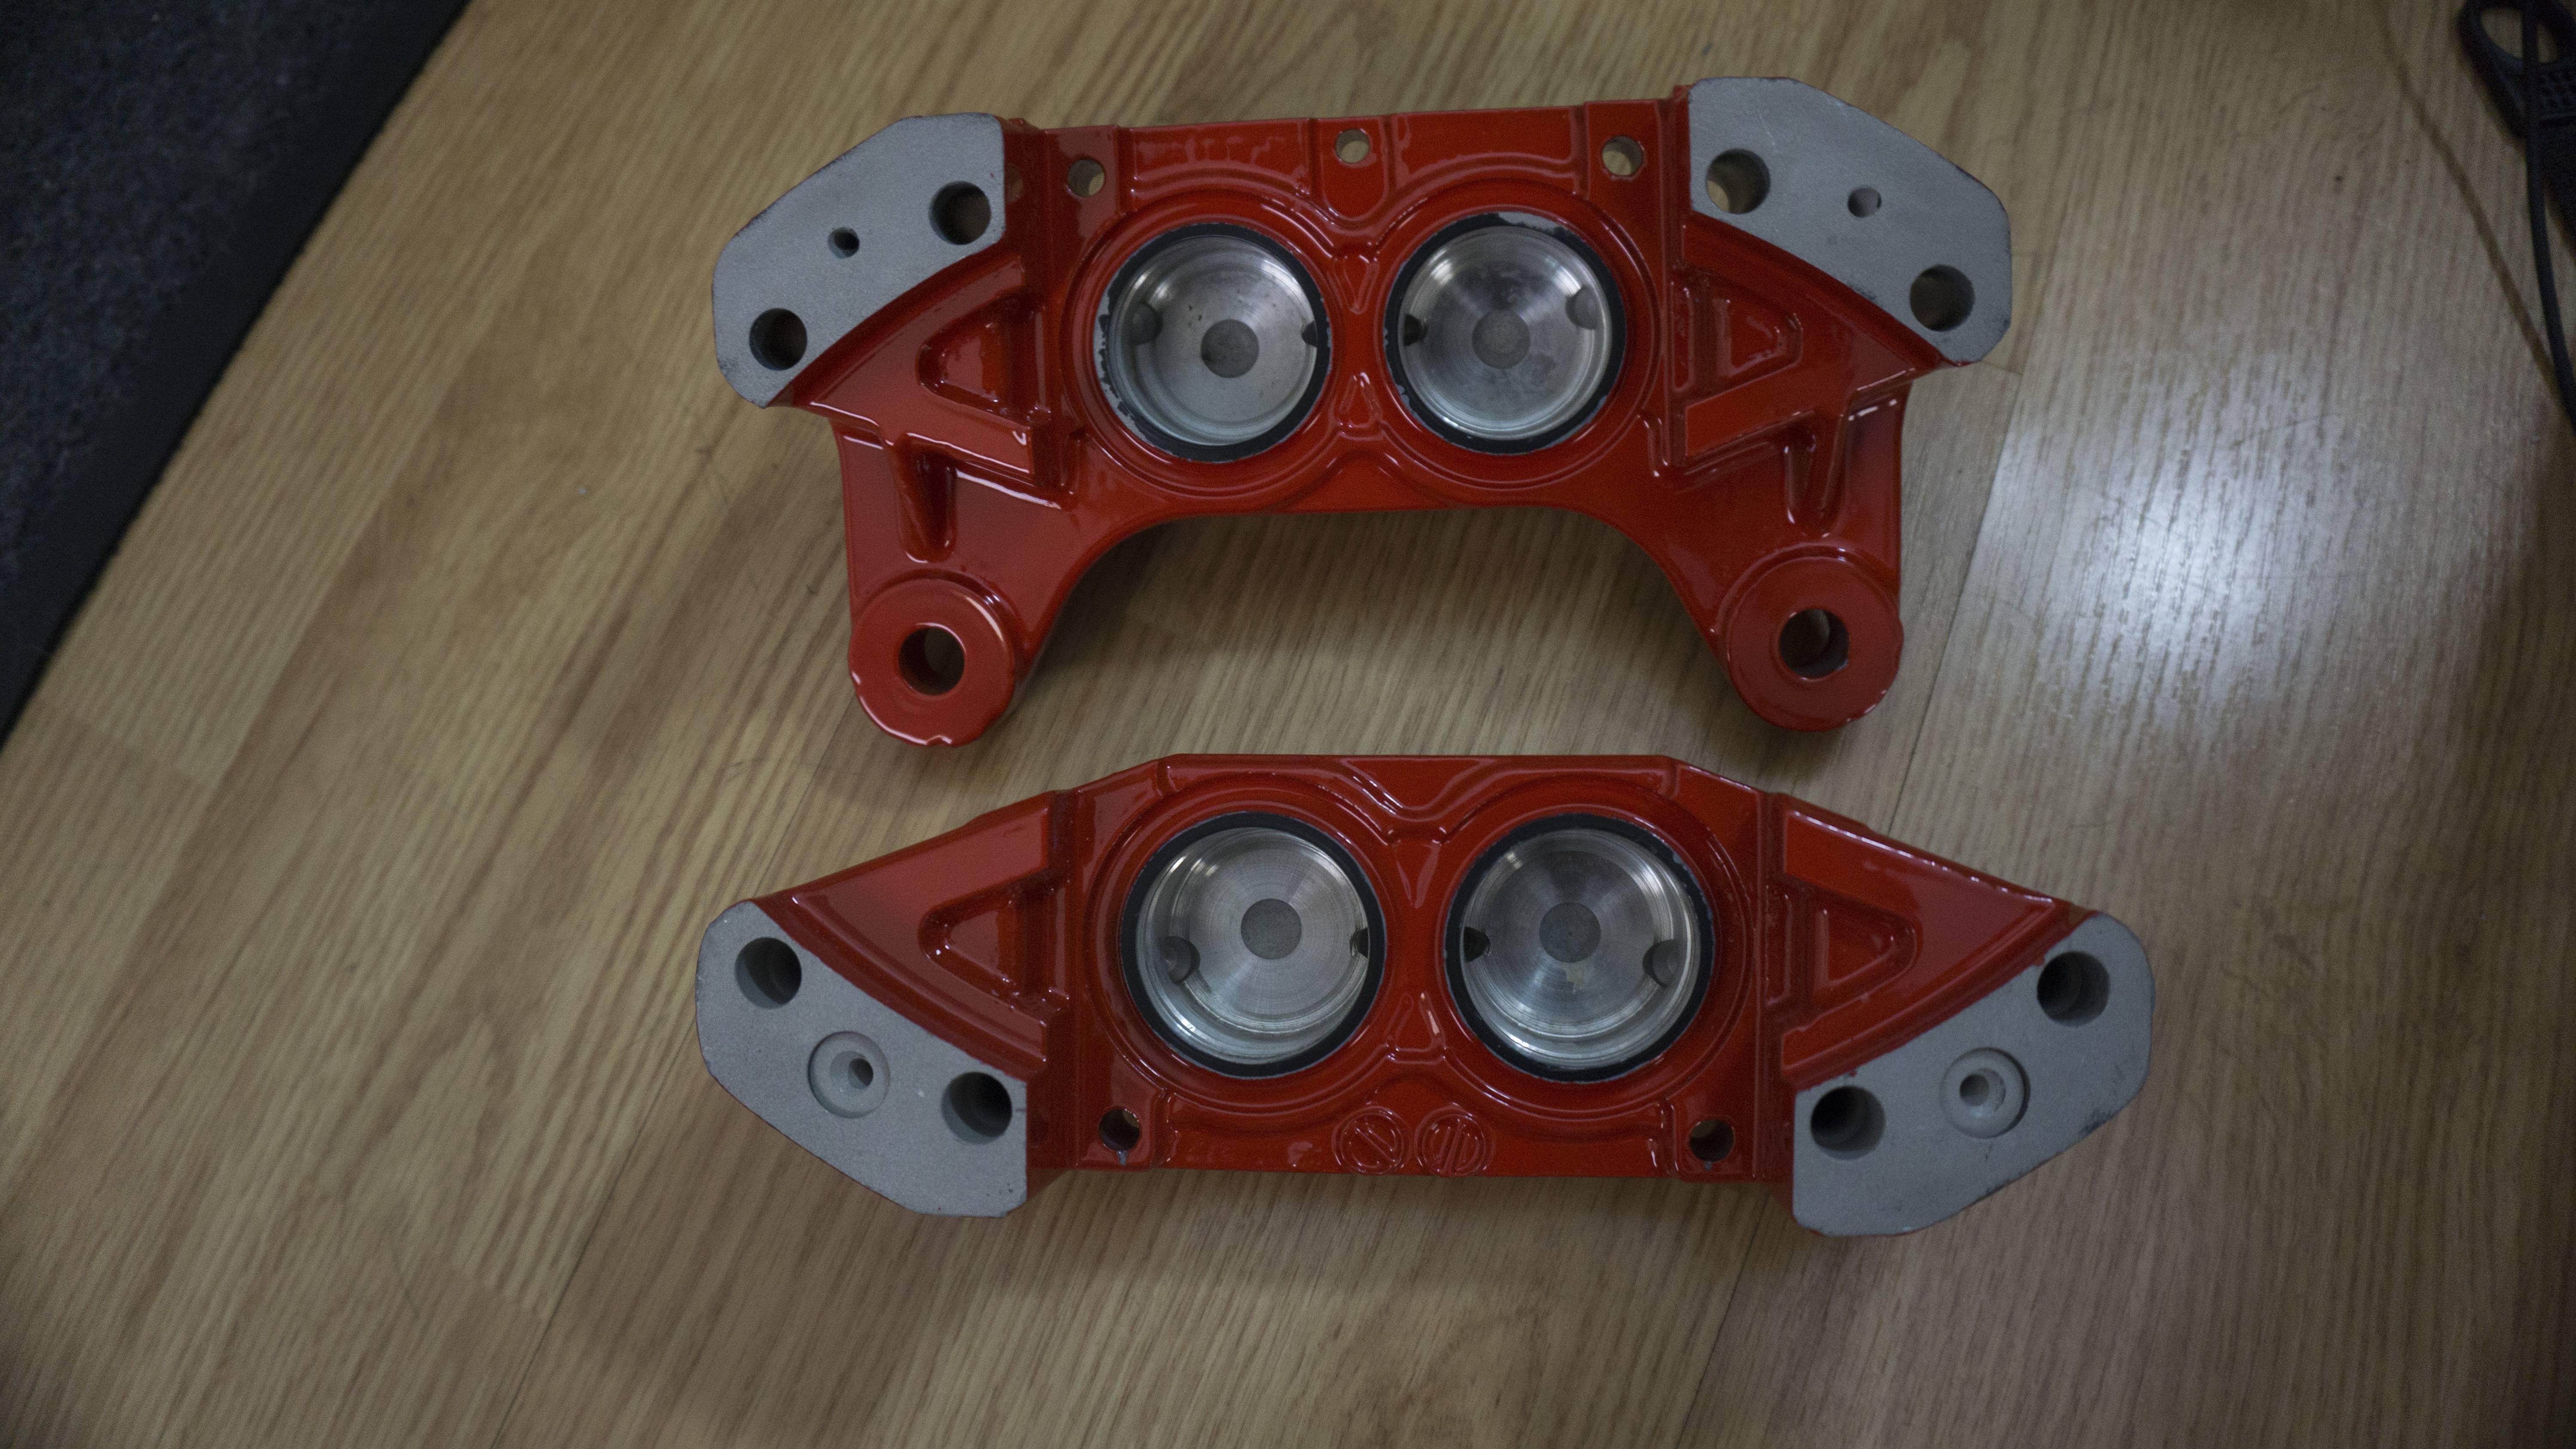
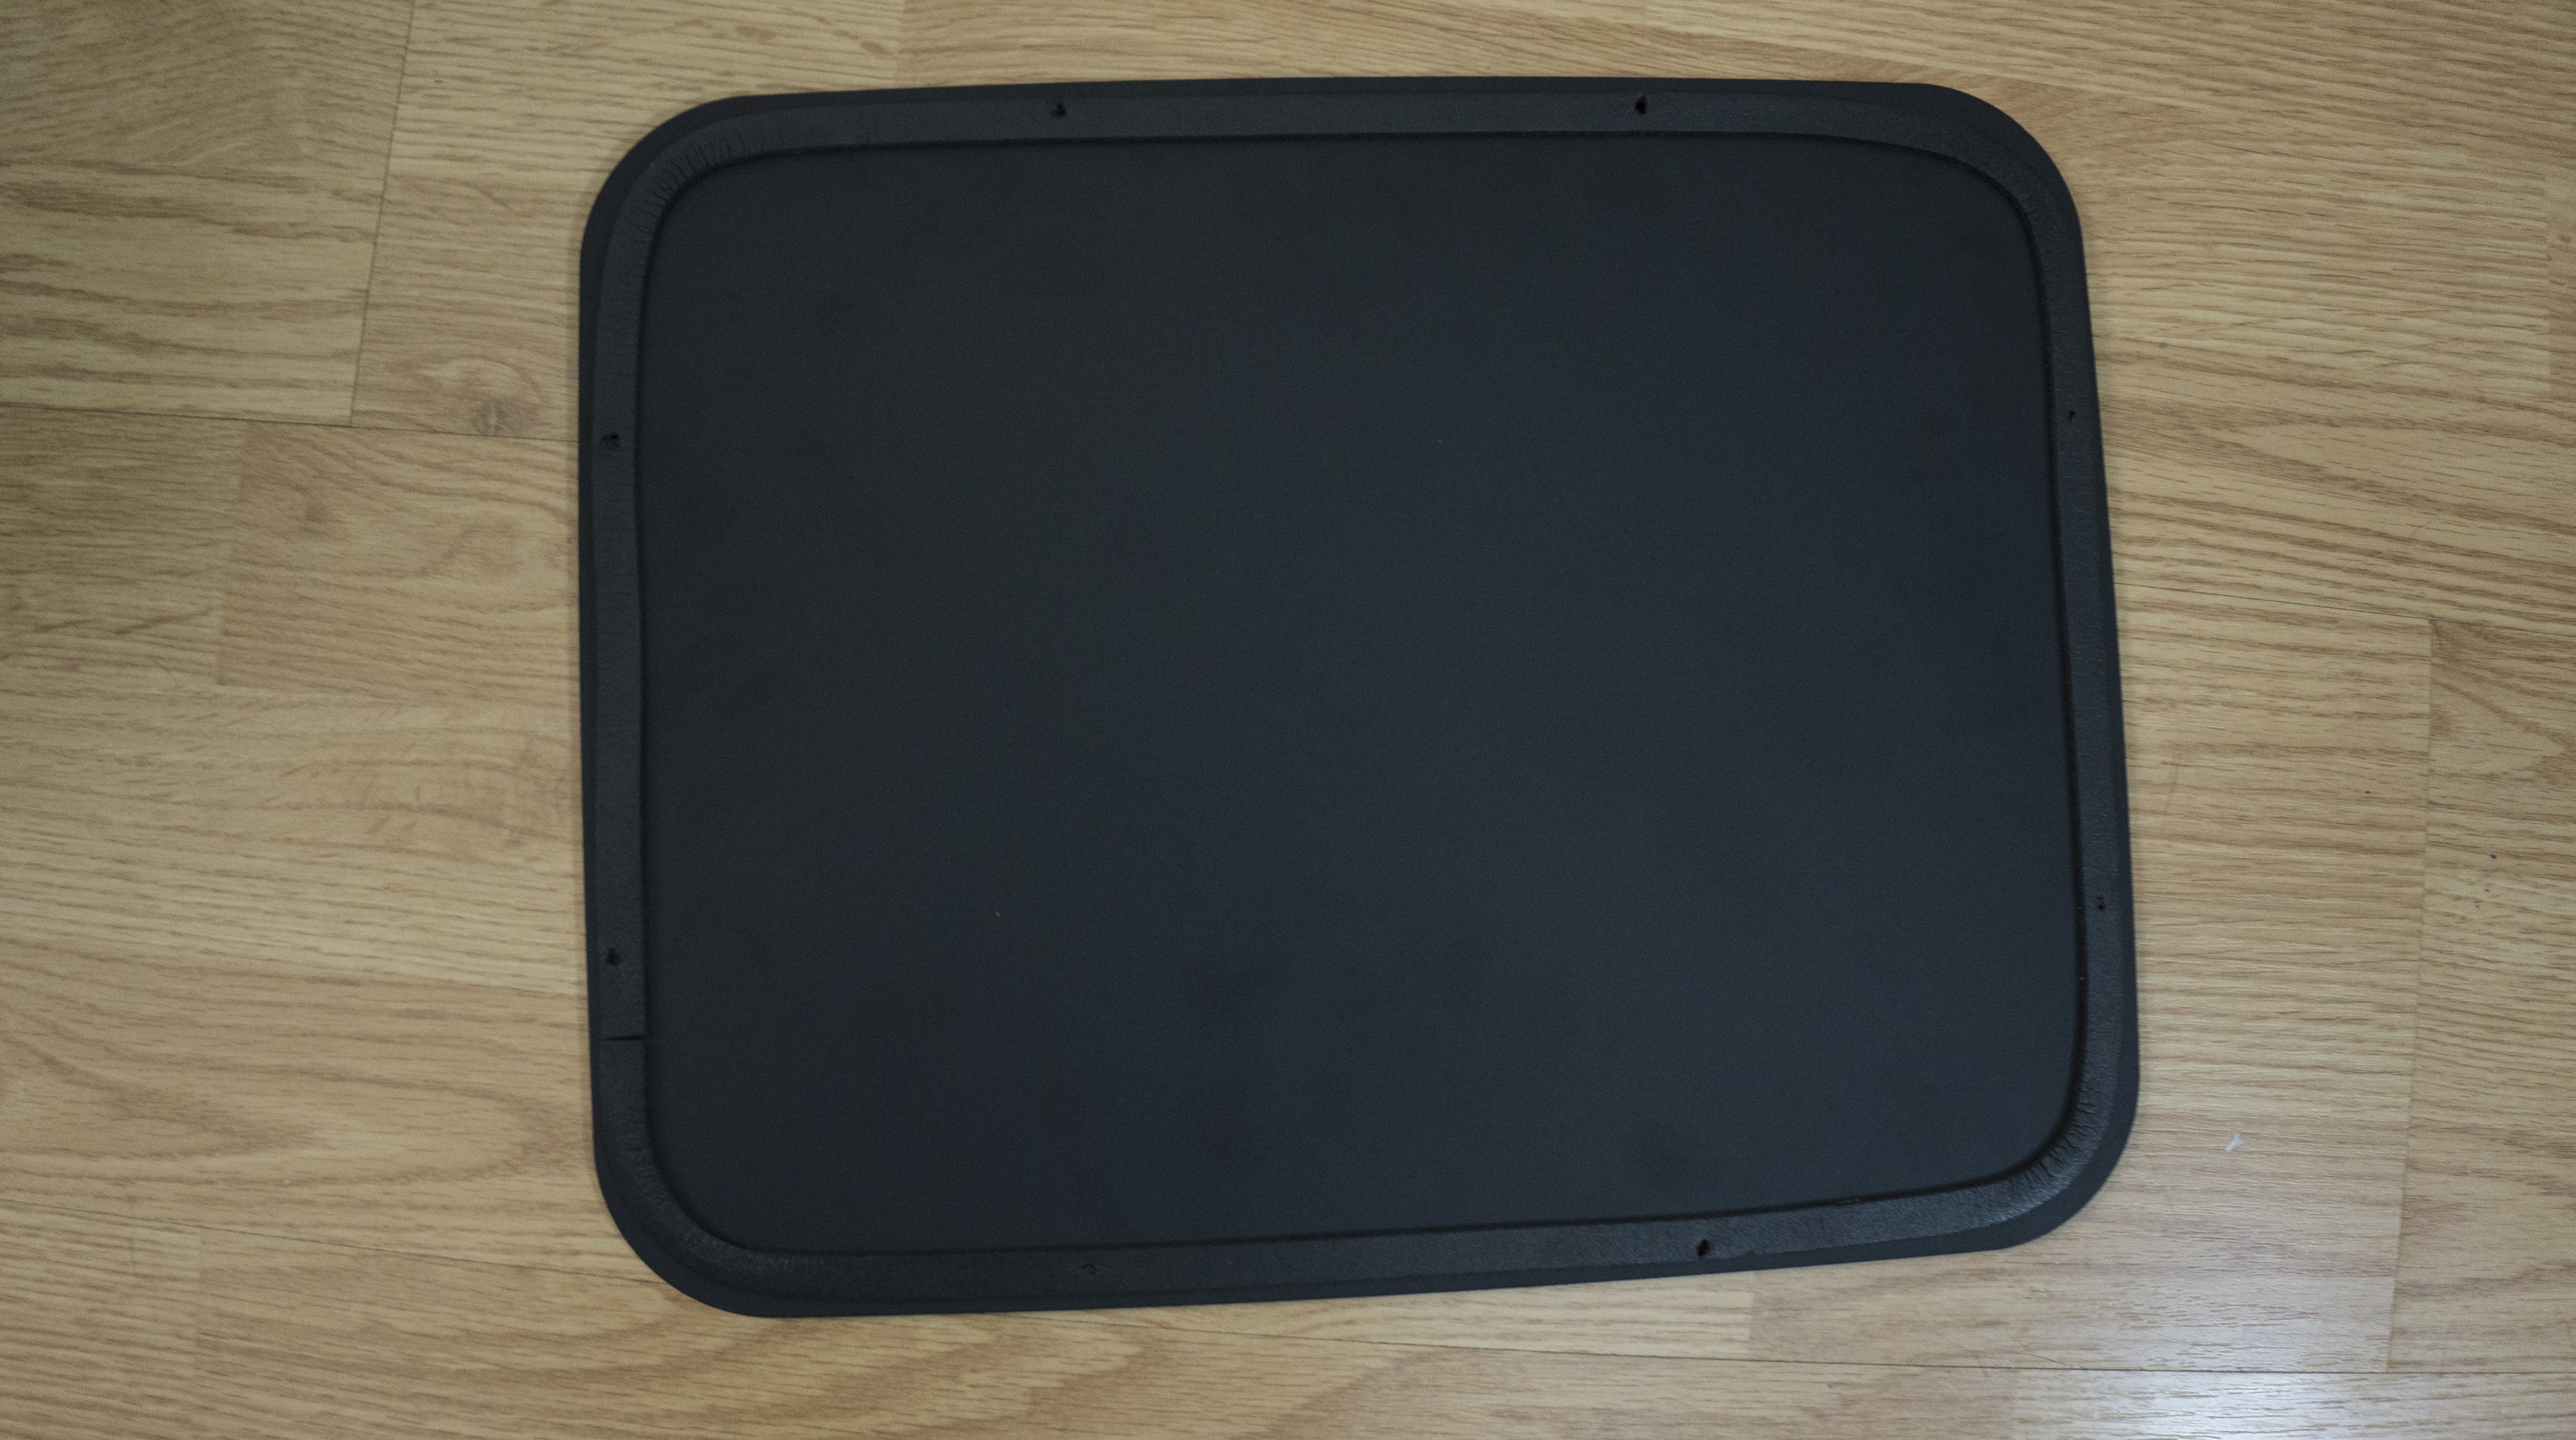
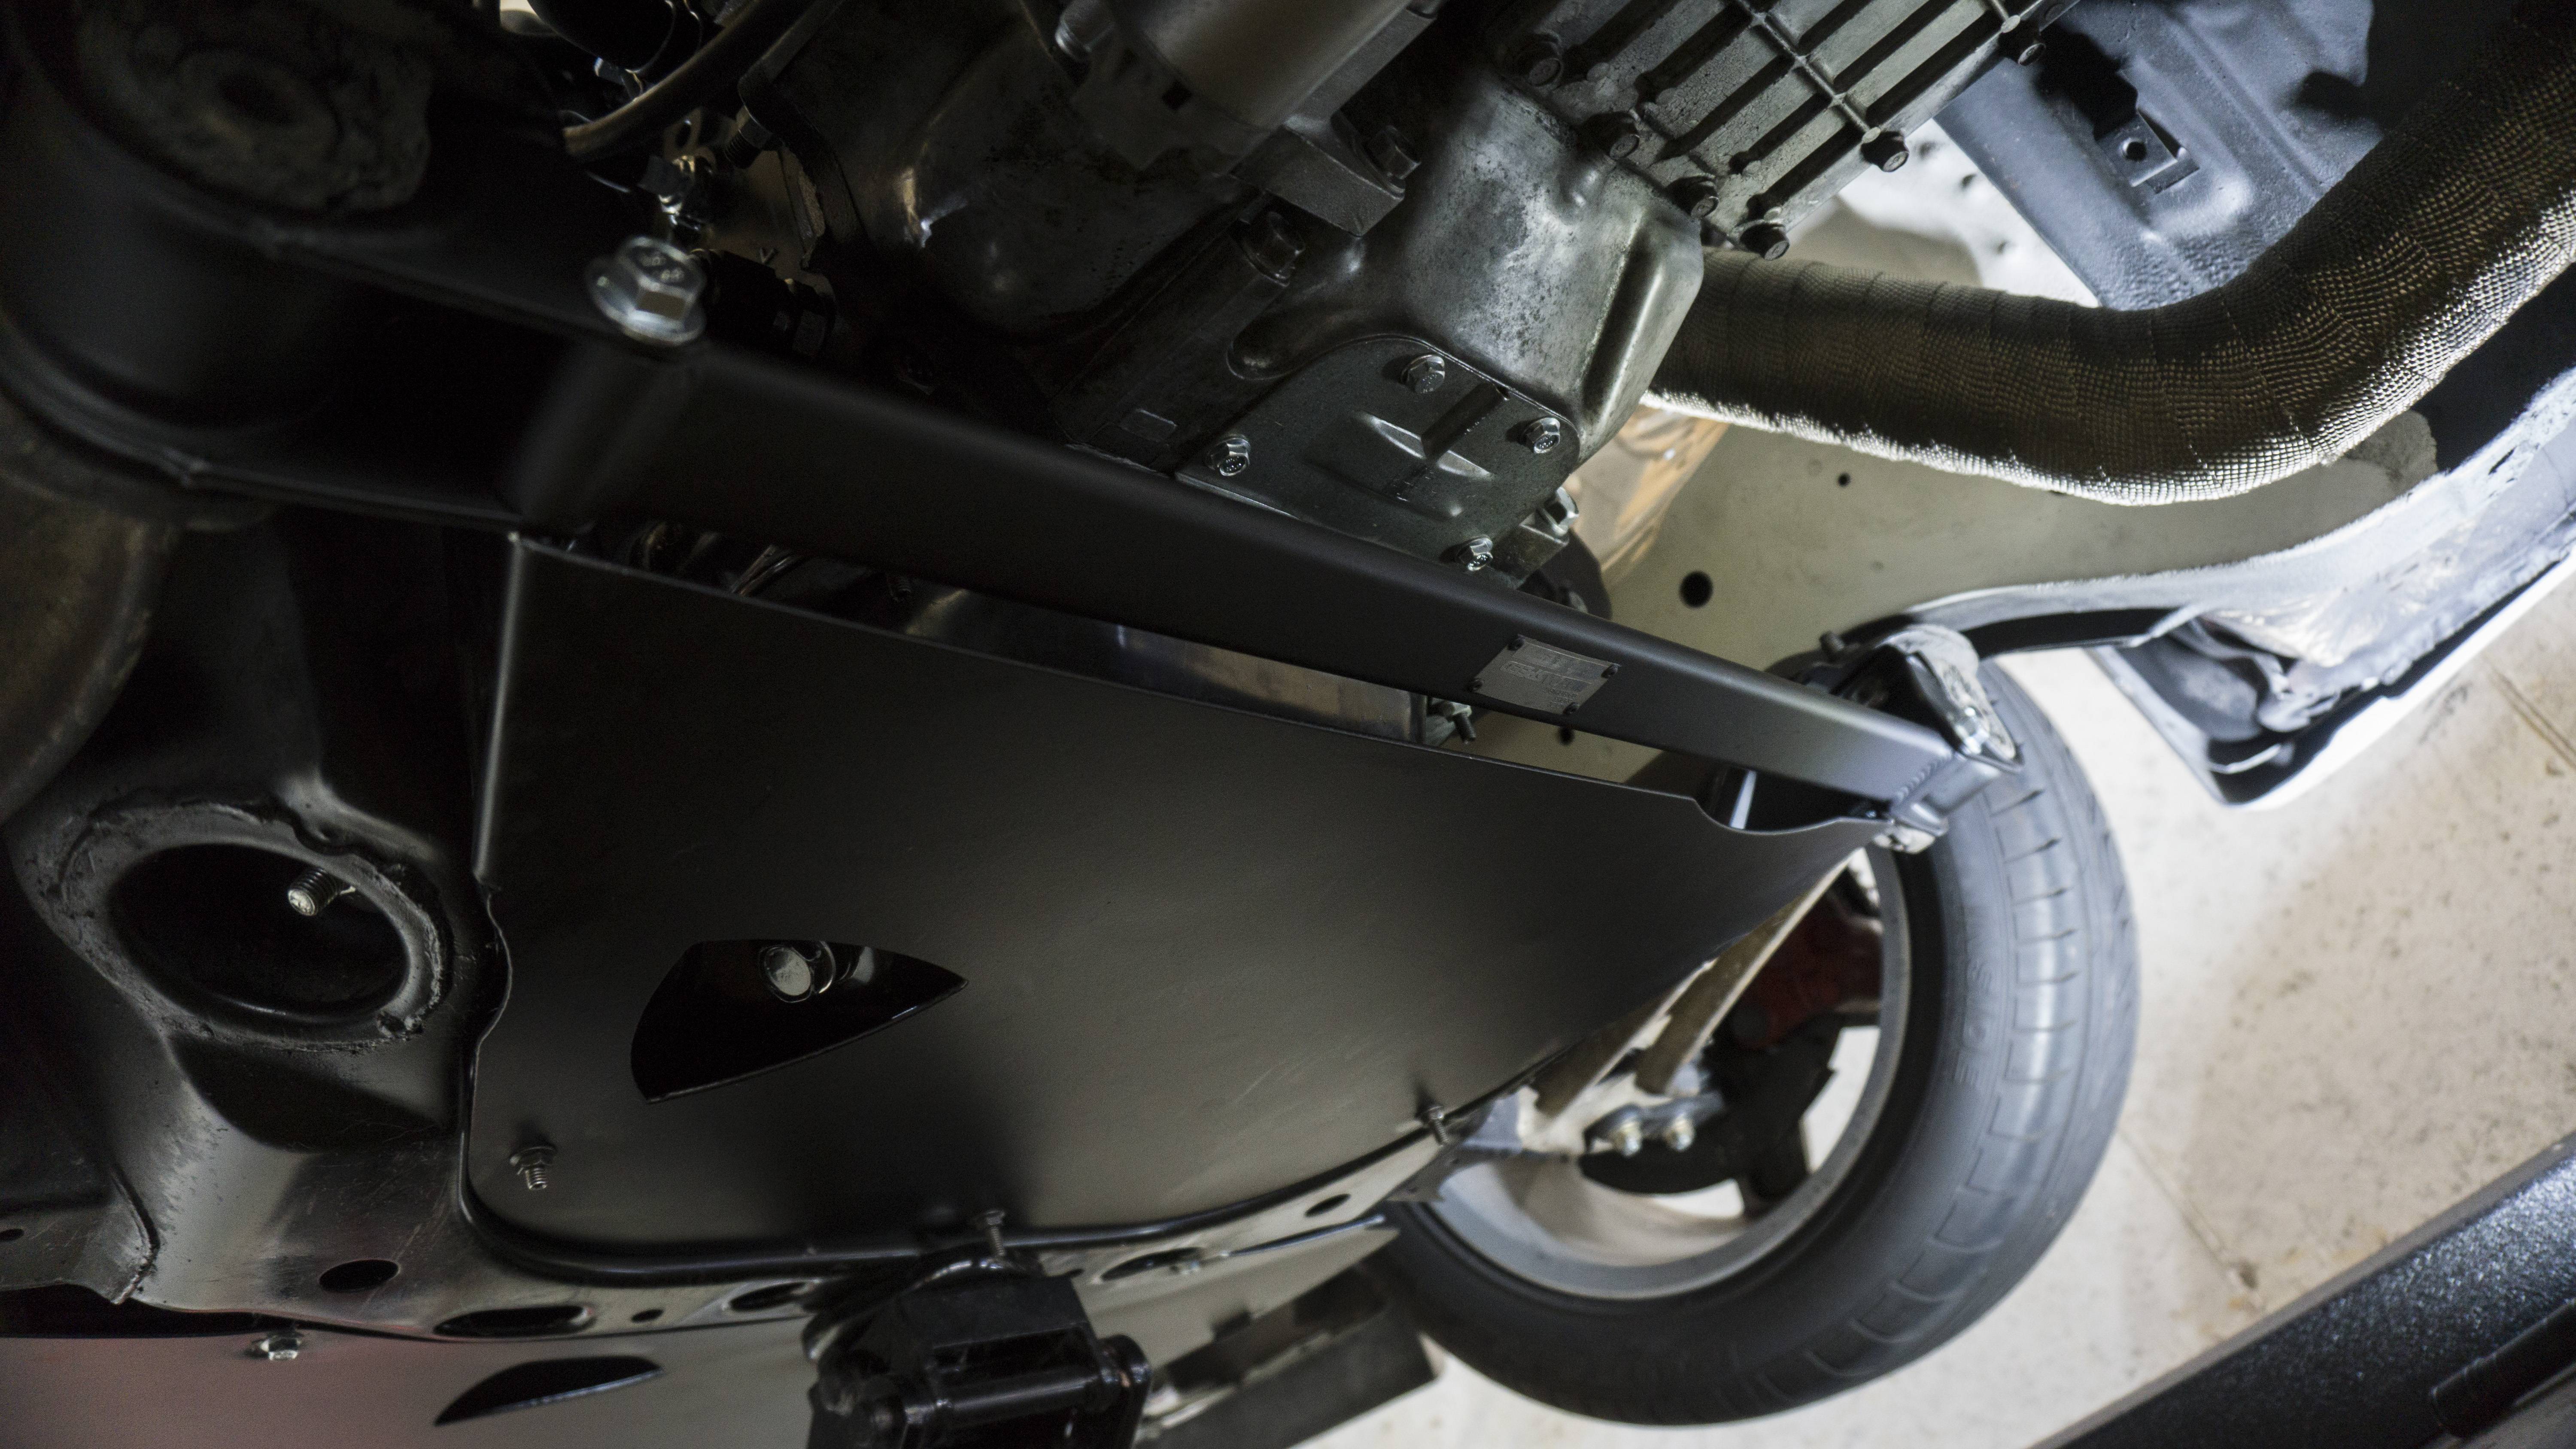
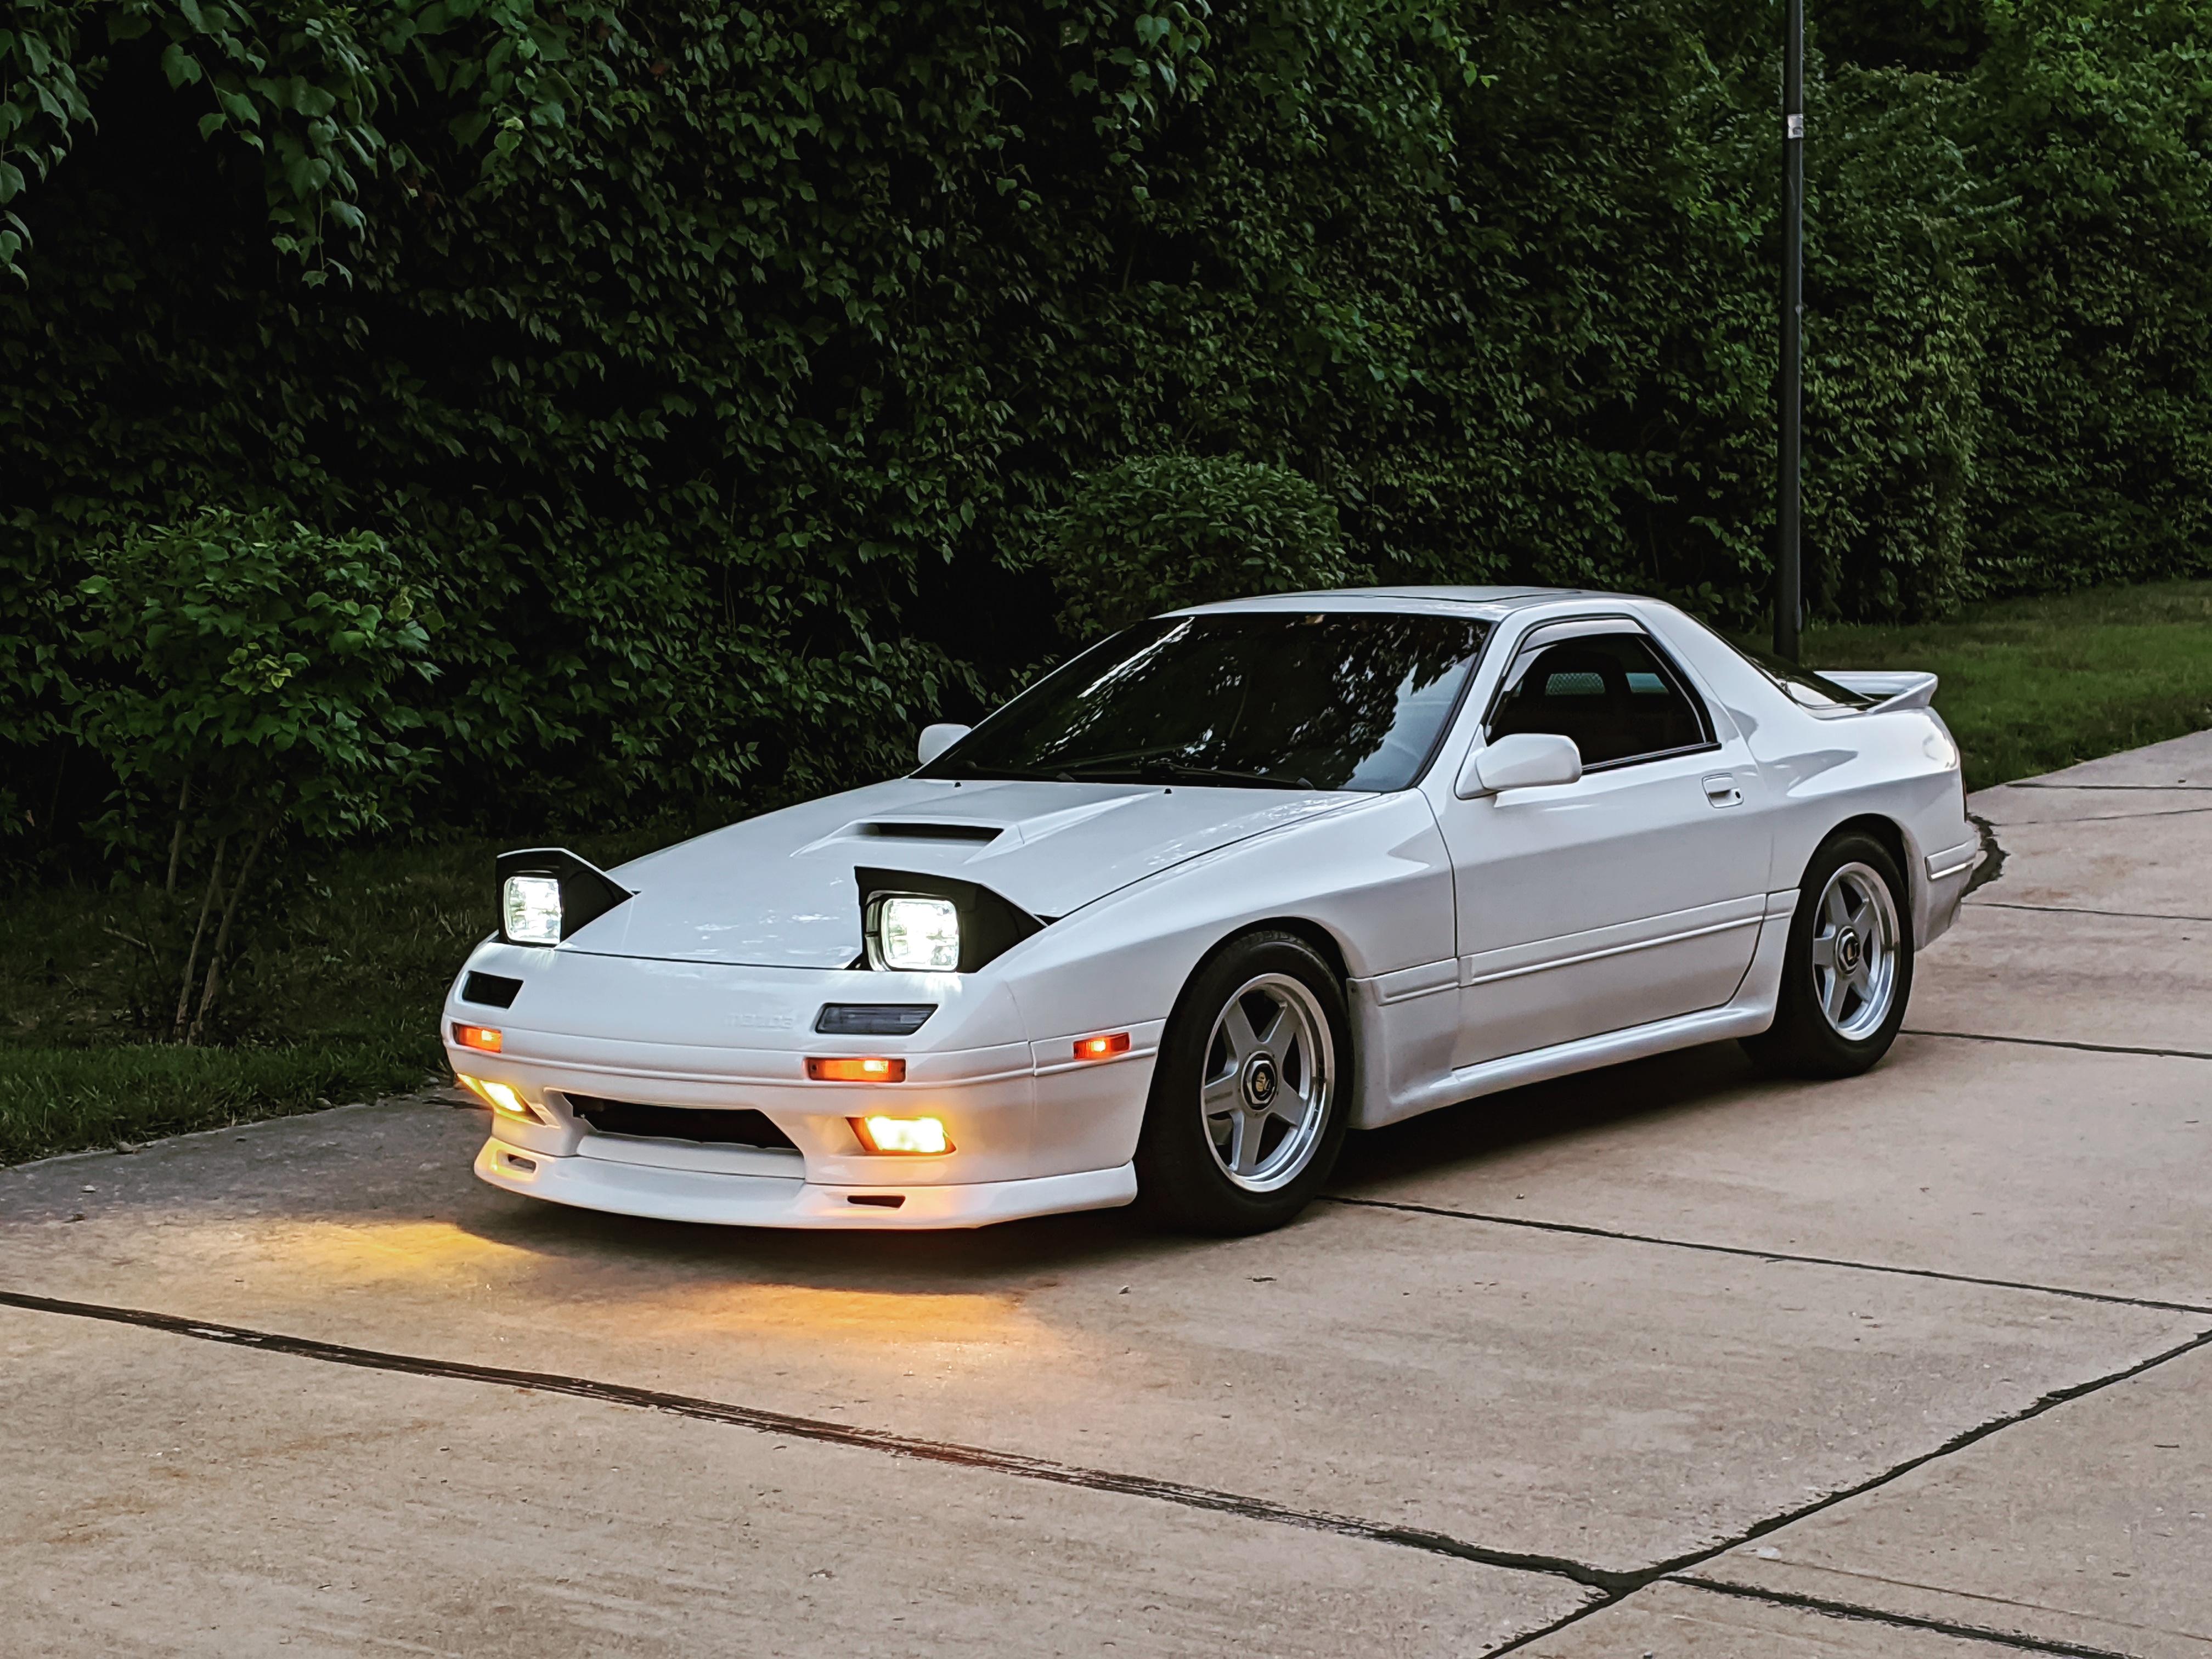
I think this will be the last update for a while. Let�s start with some good news. I�m pretty sure I fixed the coolant leak. I pressure tested and found the gremlin (hopefully the last one). While I was doing all that I replaced the 1.1 pressure cap with an OEM .9. I really wish companies would make anodized black .9 caps, but I guess there isn�t a big market. My new OEM Door handles and the JDL door handle inserts came in. The plan is to use the brand new OEM door handles for now, and retrofit my old ones with the JDL door handle inserts. All of my stuff ended up coming back from powder too. The calipers look amazing and I�m excited to get those fully back together. I tried to order brand new bridge bolts, but they are even NLA in Japan. So I will try and restore these bridge bolts as best as possible. I still plan on new pistons, guides, hardware, and sealing kits. I don�t consider the calipers high priority, so I may just get the stuff when I have excess funds. I finished up my hood scoop blocker and got it on the car. I ran a stream of Mishimoto rubber along the outside to seal it up. It worked out rather well. Now all the bugs can die by the hands of the hood scoop and no longer my firewall�. Lol. The last thing I did was partially install my MazdaSpeed Lower Stiffener. I�m going to have to modify the LRB Speed aero panel slightly, but I saved that for tomorrow; It�s 95~ degrees here! The car currently has 850 miles on it. I�m planning to start revving to 8k for another 125 miles then transition to half throttle/low boost for 250 miles before going further into boost. Taking all the precautions this time! (Even though we clearly saw the issue the last engine failed - it wasn�t my break-in procedure lol).
Until next time!
Here are the door handles and inserts
Here are the calipers


Here is the hood scoop blocker
Here is the MazdaSpeed Lower Stiffener

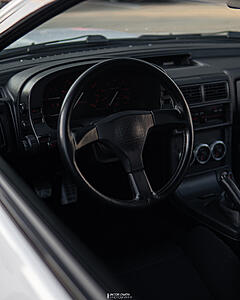
Here is a shot of the car
I think this will be the last update for a while. Let�s start with some good news. I�m pretty sure I fixed the coolant leak. I pressure tested and found the gremlin (hopefully the last one). While I was doing all that I replaced the 1.1 pressure cap with an OEM .9. I really wish companies would make anodized black .9 caps, but I guess there isn�t a big market. My new OEM Door handles and the JDL door handle inserts came in. The plan is to use the brand new OEM door handles for now, and retrofit my old ones with the JDL door handle inserts. All of my stuff ended up coming back from powder too. The calipers look amazing and I�m excited to get those fully back together. I tried to order brand new bridge bolts, but they are even NLA in Japan. So I will try and restore these bridge bolts as best as possible. I still plan on new pistons, guides, hardware, and sealing kits. I don�t consider the calipers high priority, so I may just get the stuff when I have excess funds. I finished up my hood scoop blocker and got it on the car. I ran a stream of Mishimoto rubber along the outside to seal it up. It worked out rather well. Now all the bugs can die by the hands of the hood scoop and no longer my firewall�. Lol. The last thing I did was partially install my MazdaSpeed Lower Stiffener. I�m going to have to modify the LRB Speed aero panel slightly, but I saved that for tomorrow; It�s 95~ degrees here! The car currently has 850 miles on it. I�m planning to start revving to 8k for another 125 miles then transition to half throttle/low boost for 250 miles before going further into boost. Taking all the precautions this time! (Even though we clearly saw the issue the last engine failed - it wasn�t my break-in procedure lol).
Until next time!
Here are the door handles and inserts

Here are the calipers
Here is the hood scoop blocker

Here is the MazdaSpeed Lower Stiffener


Here is a shot of the car
 08-14-20, 08:11 PM
#309
Update 8/14/2020
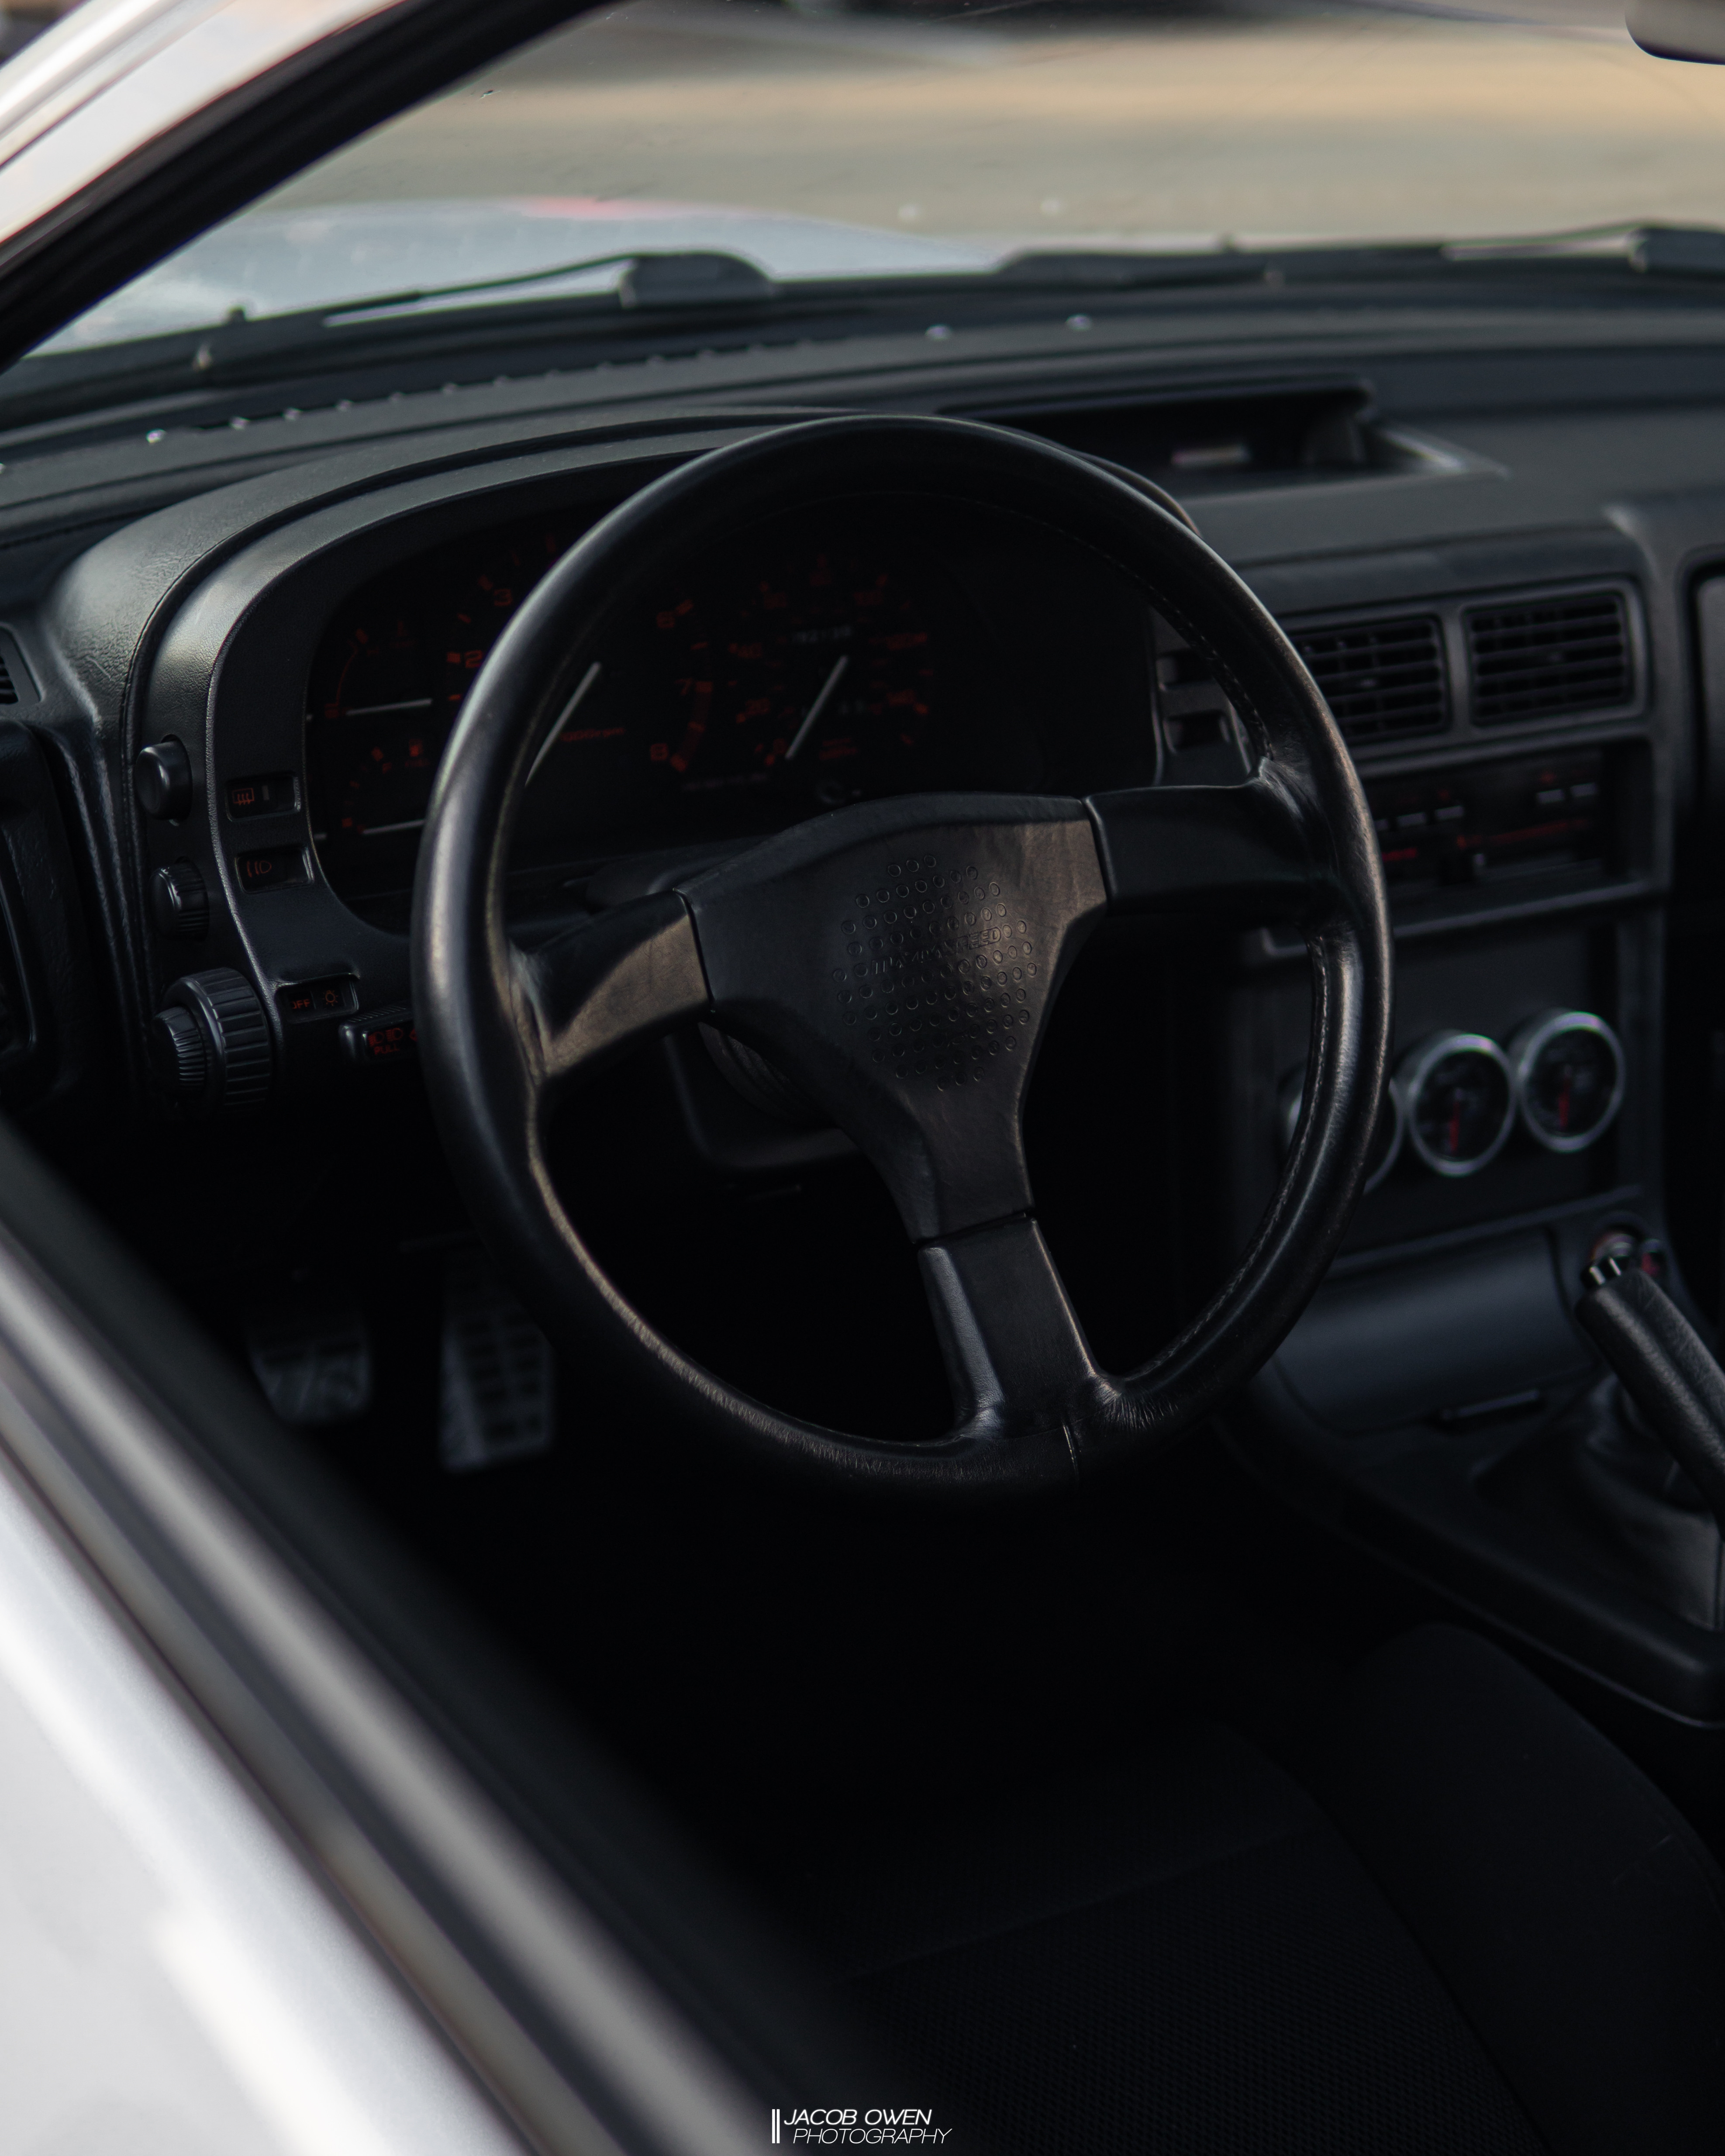
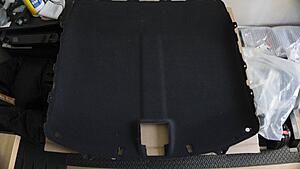
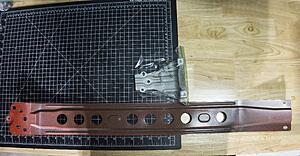
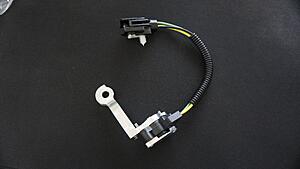
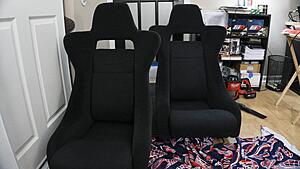
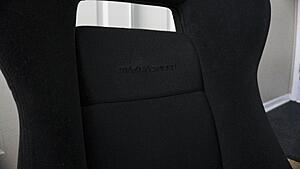
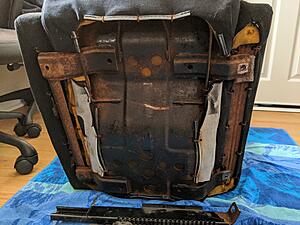
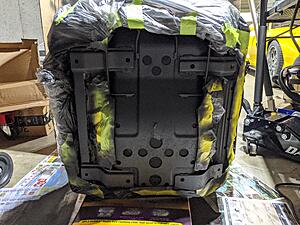
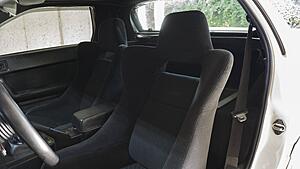
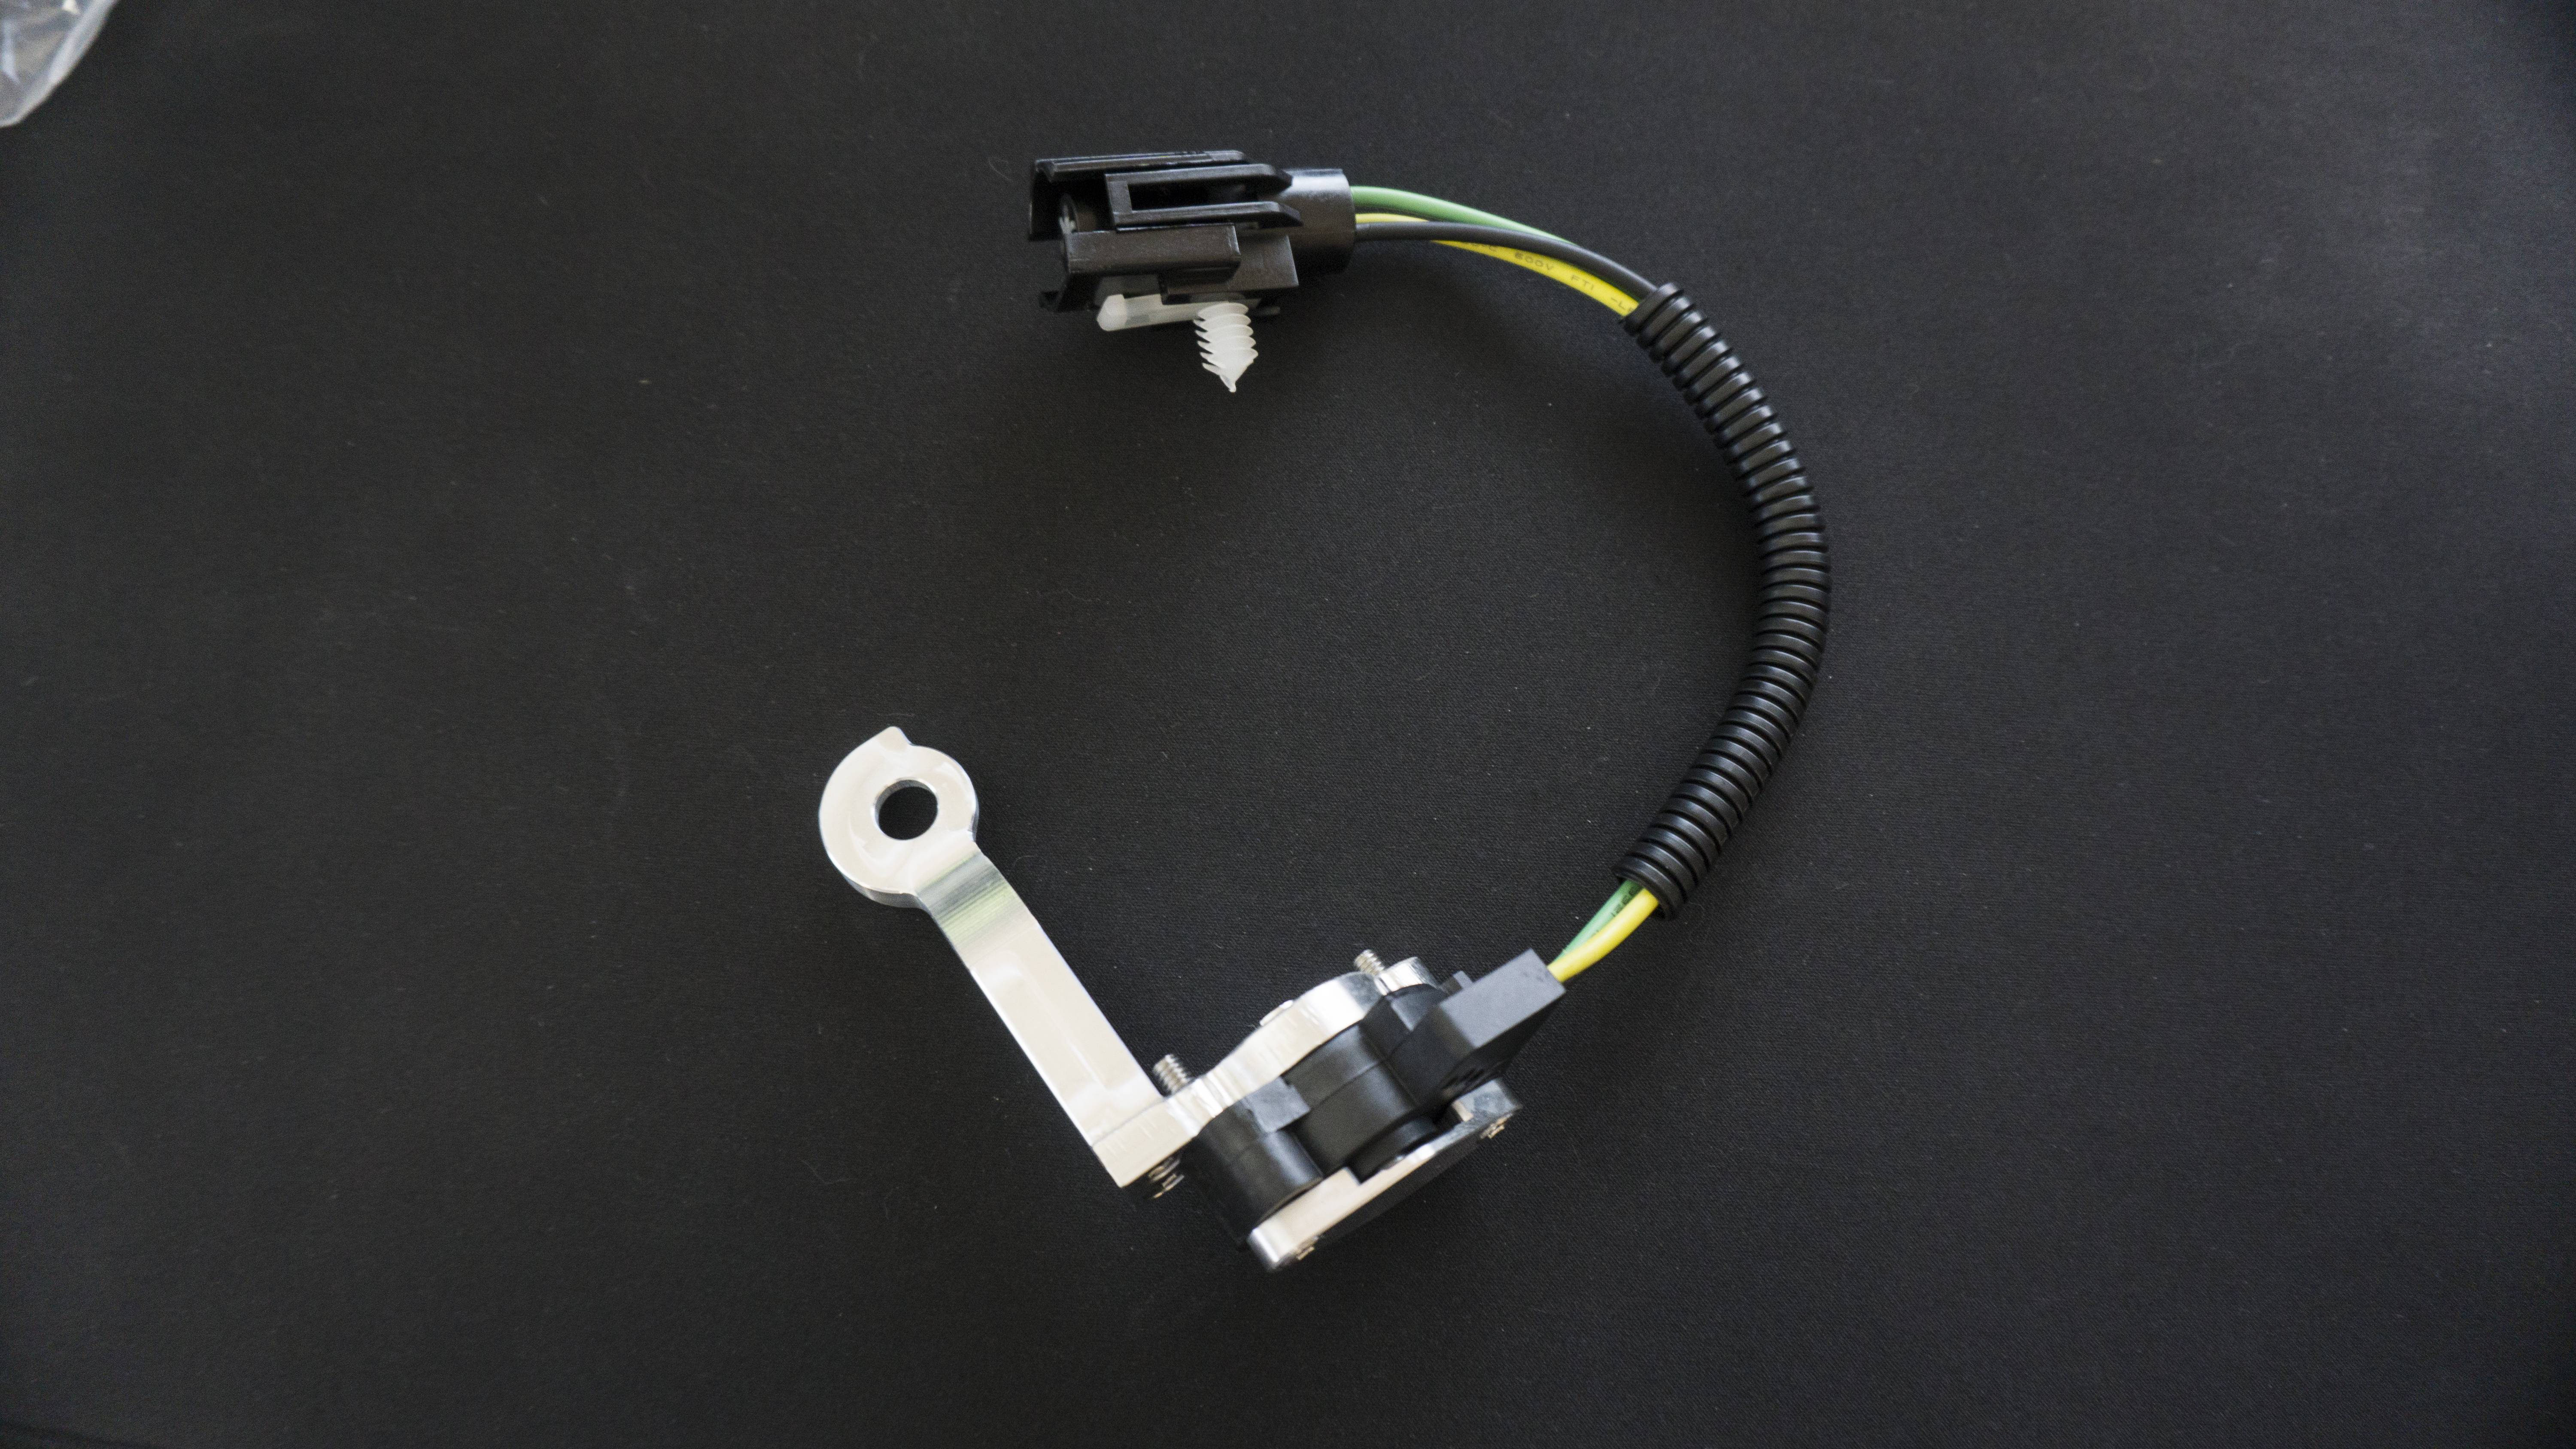
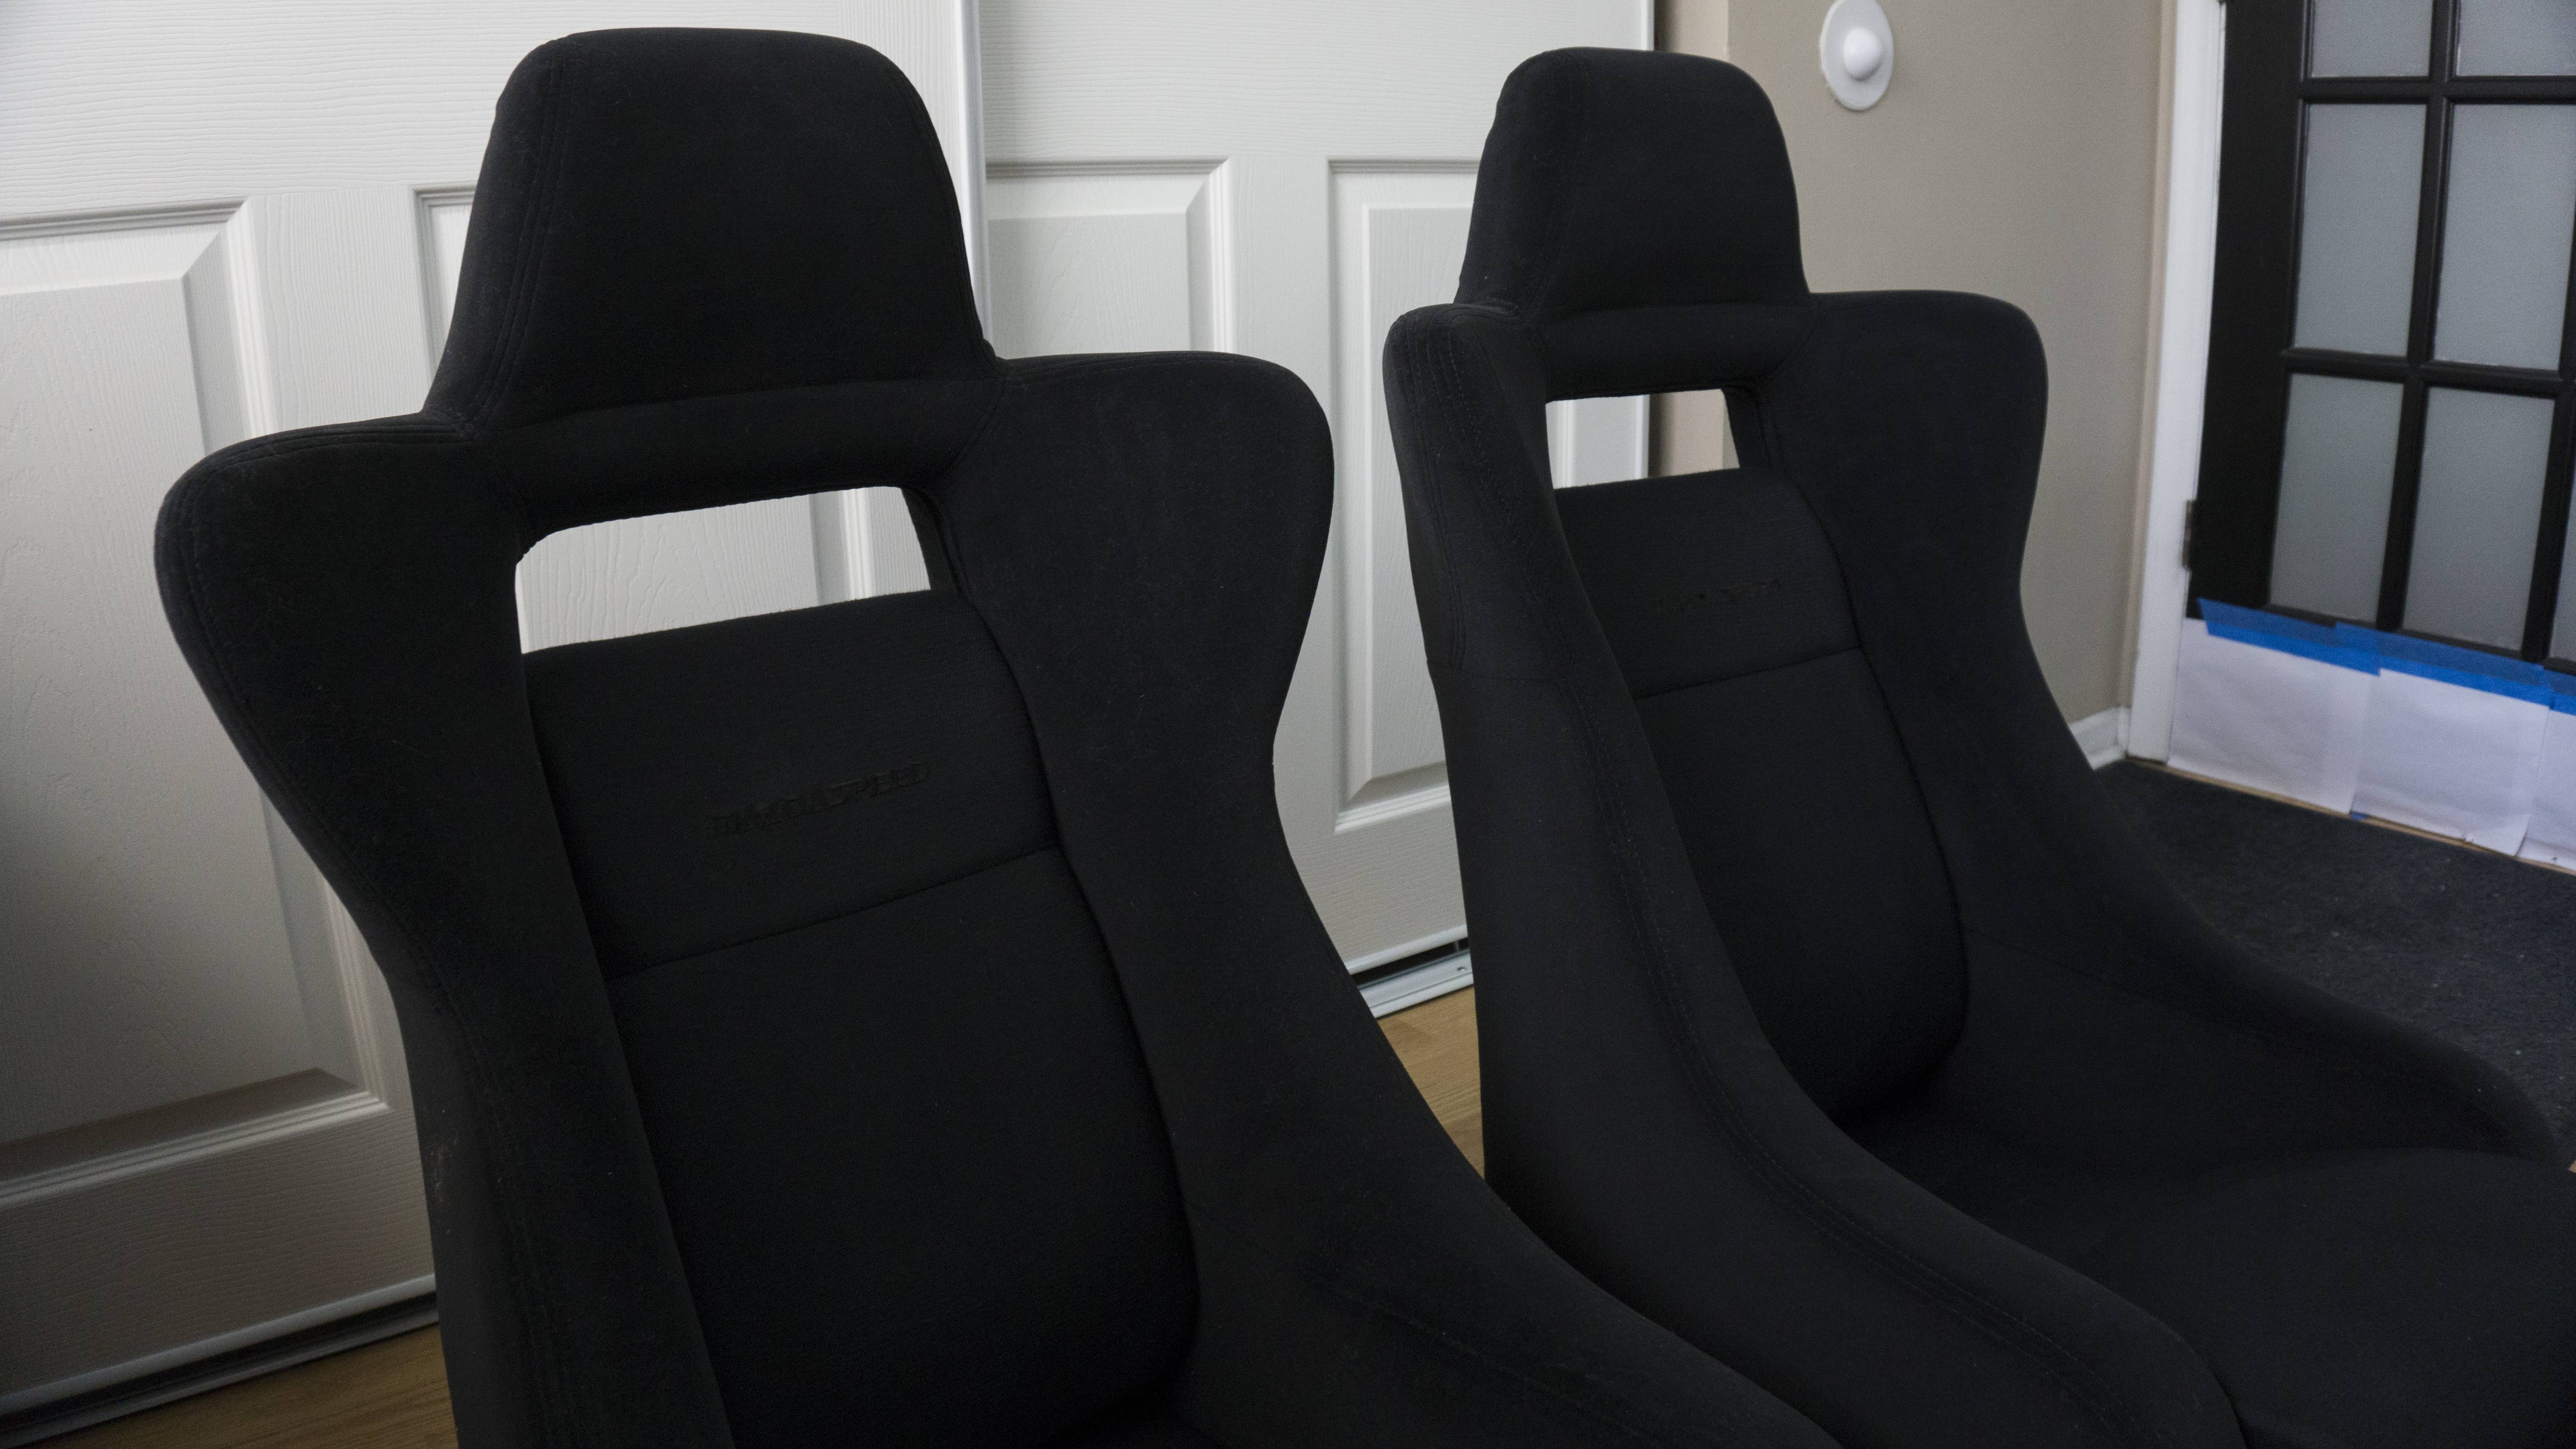
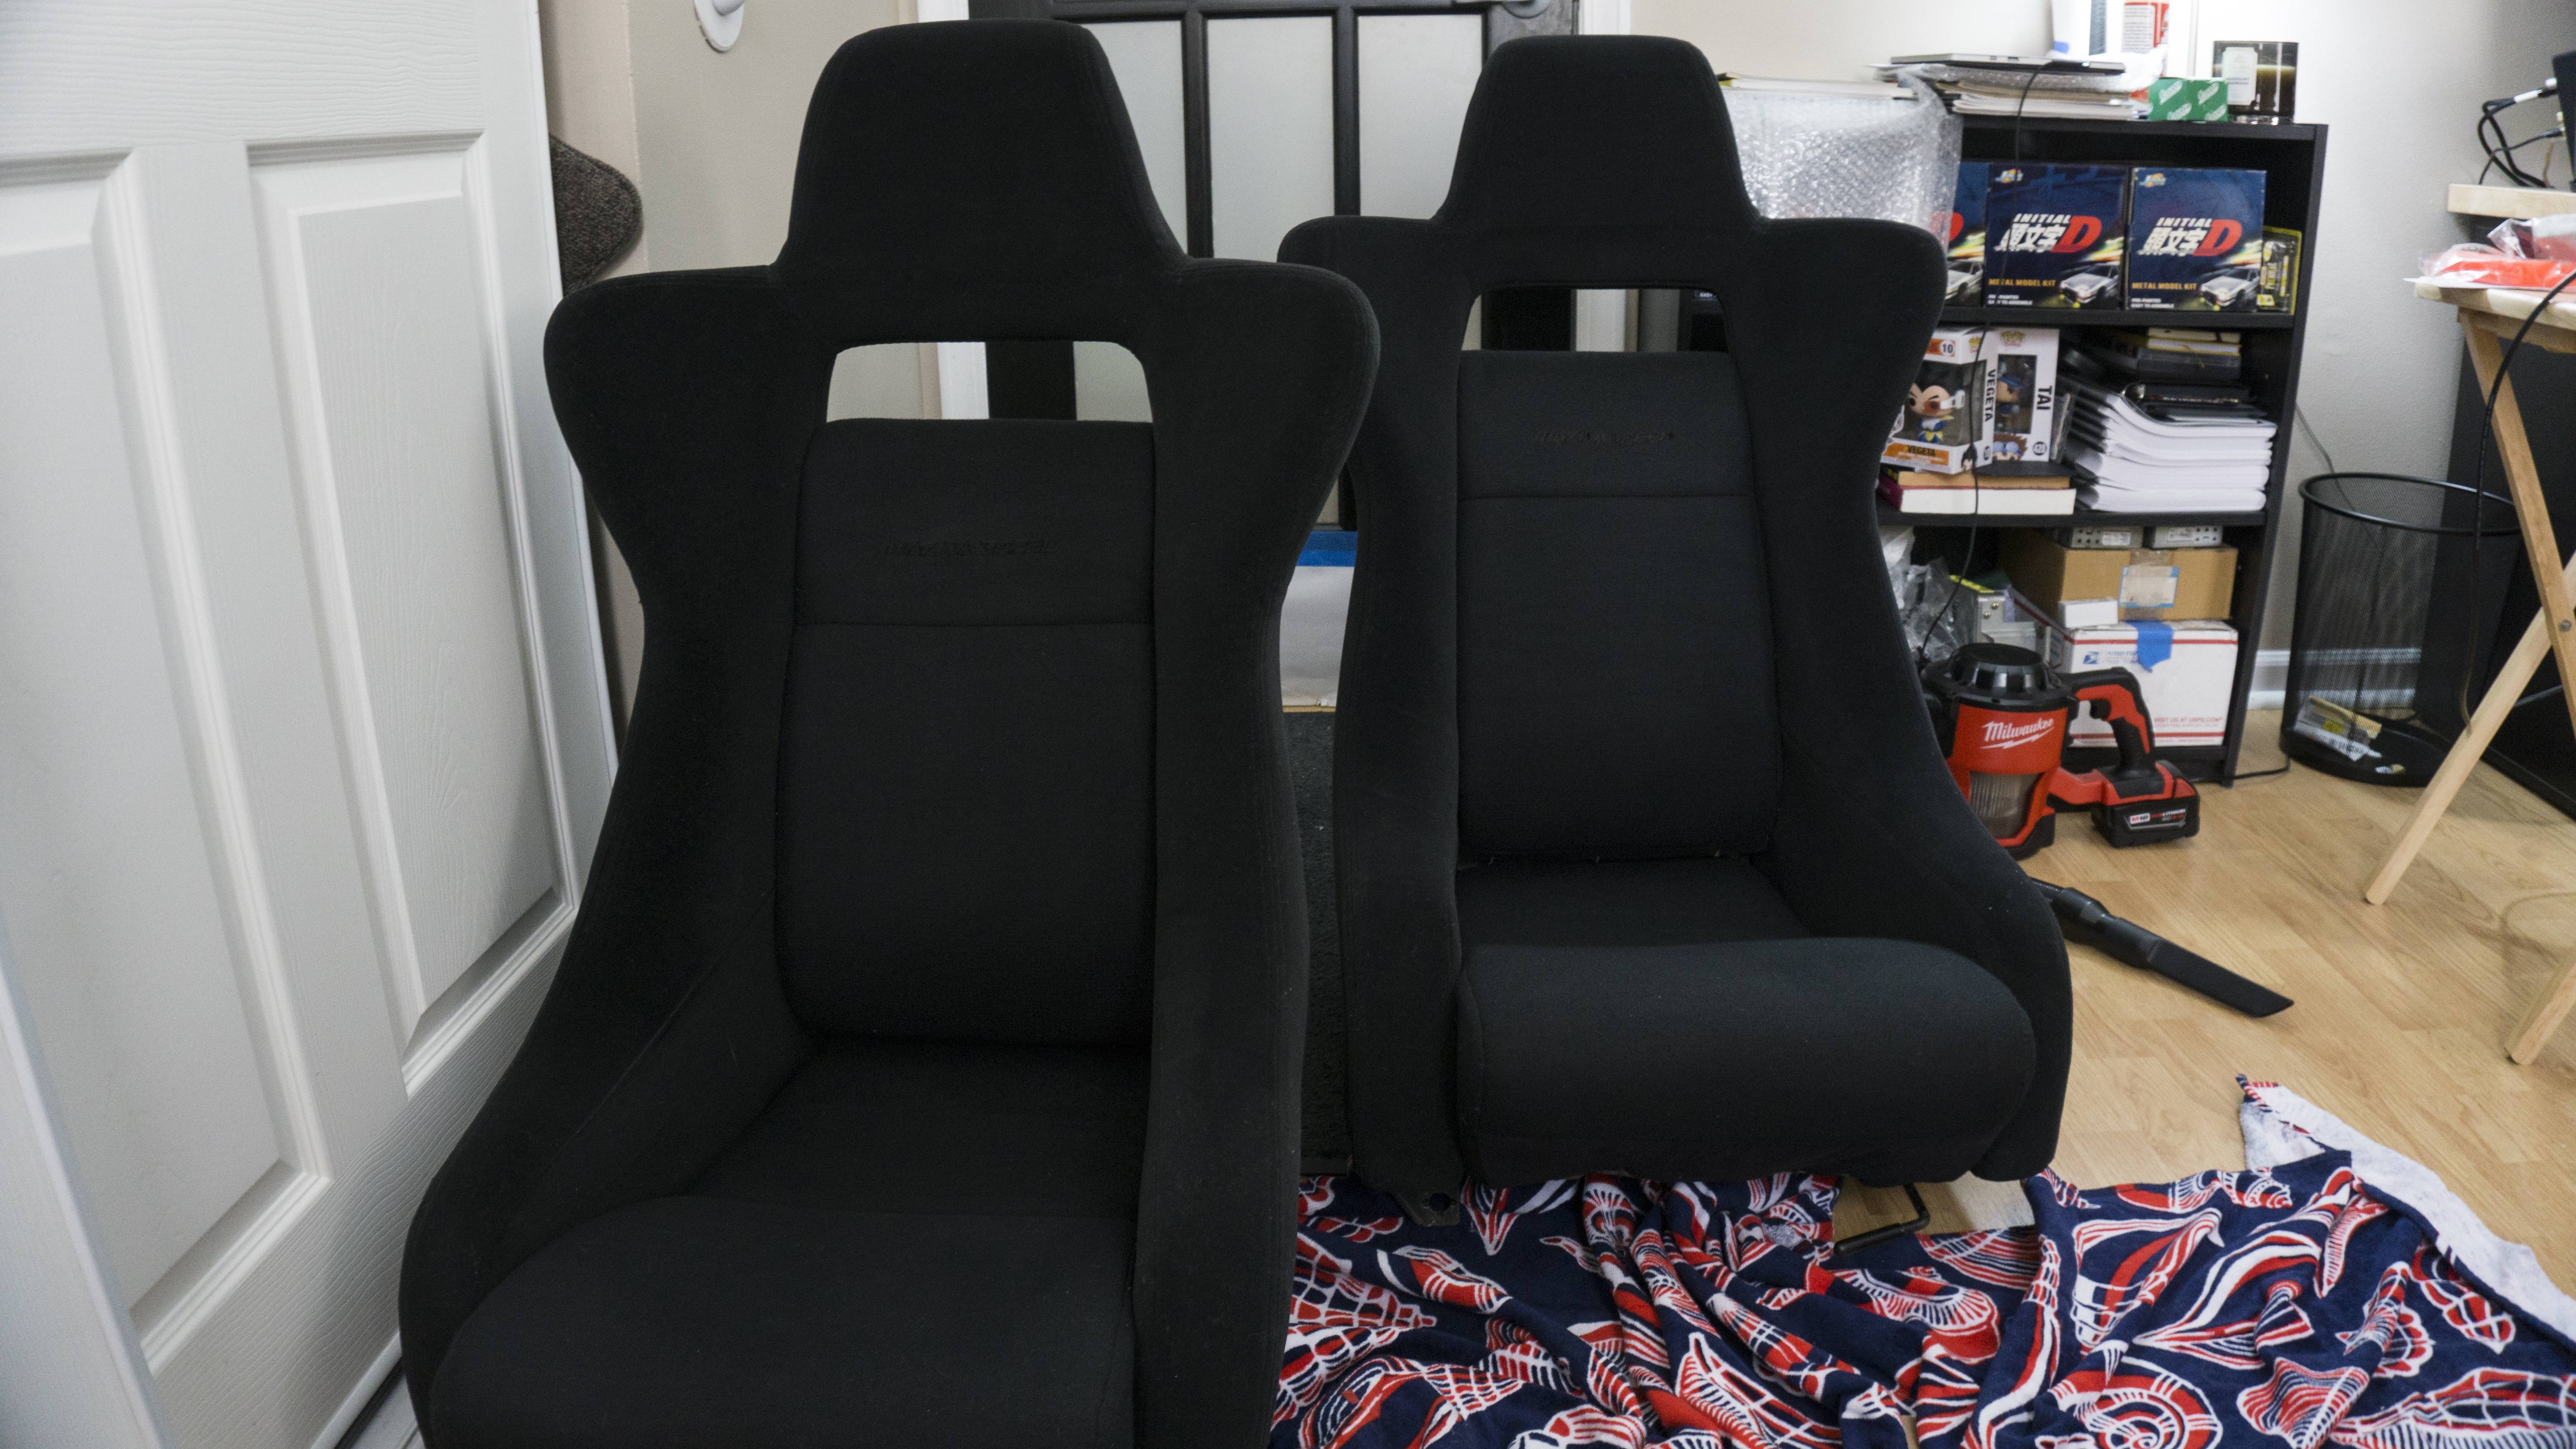
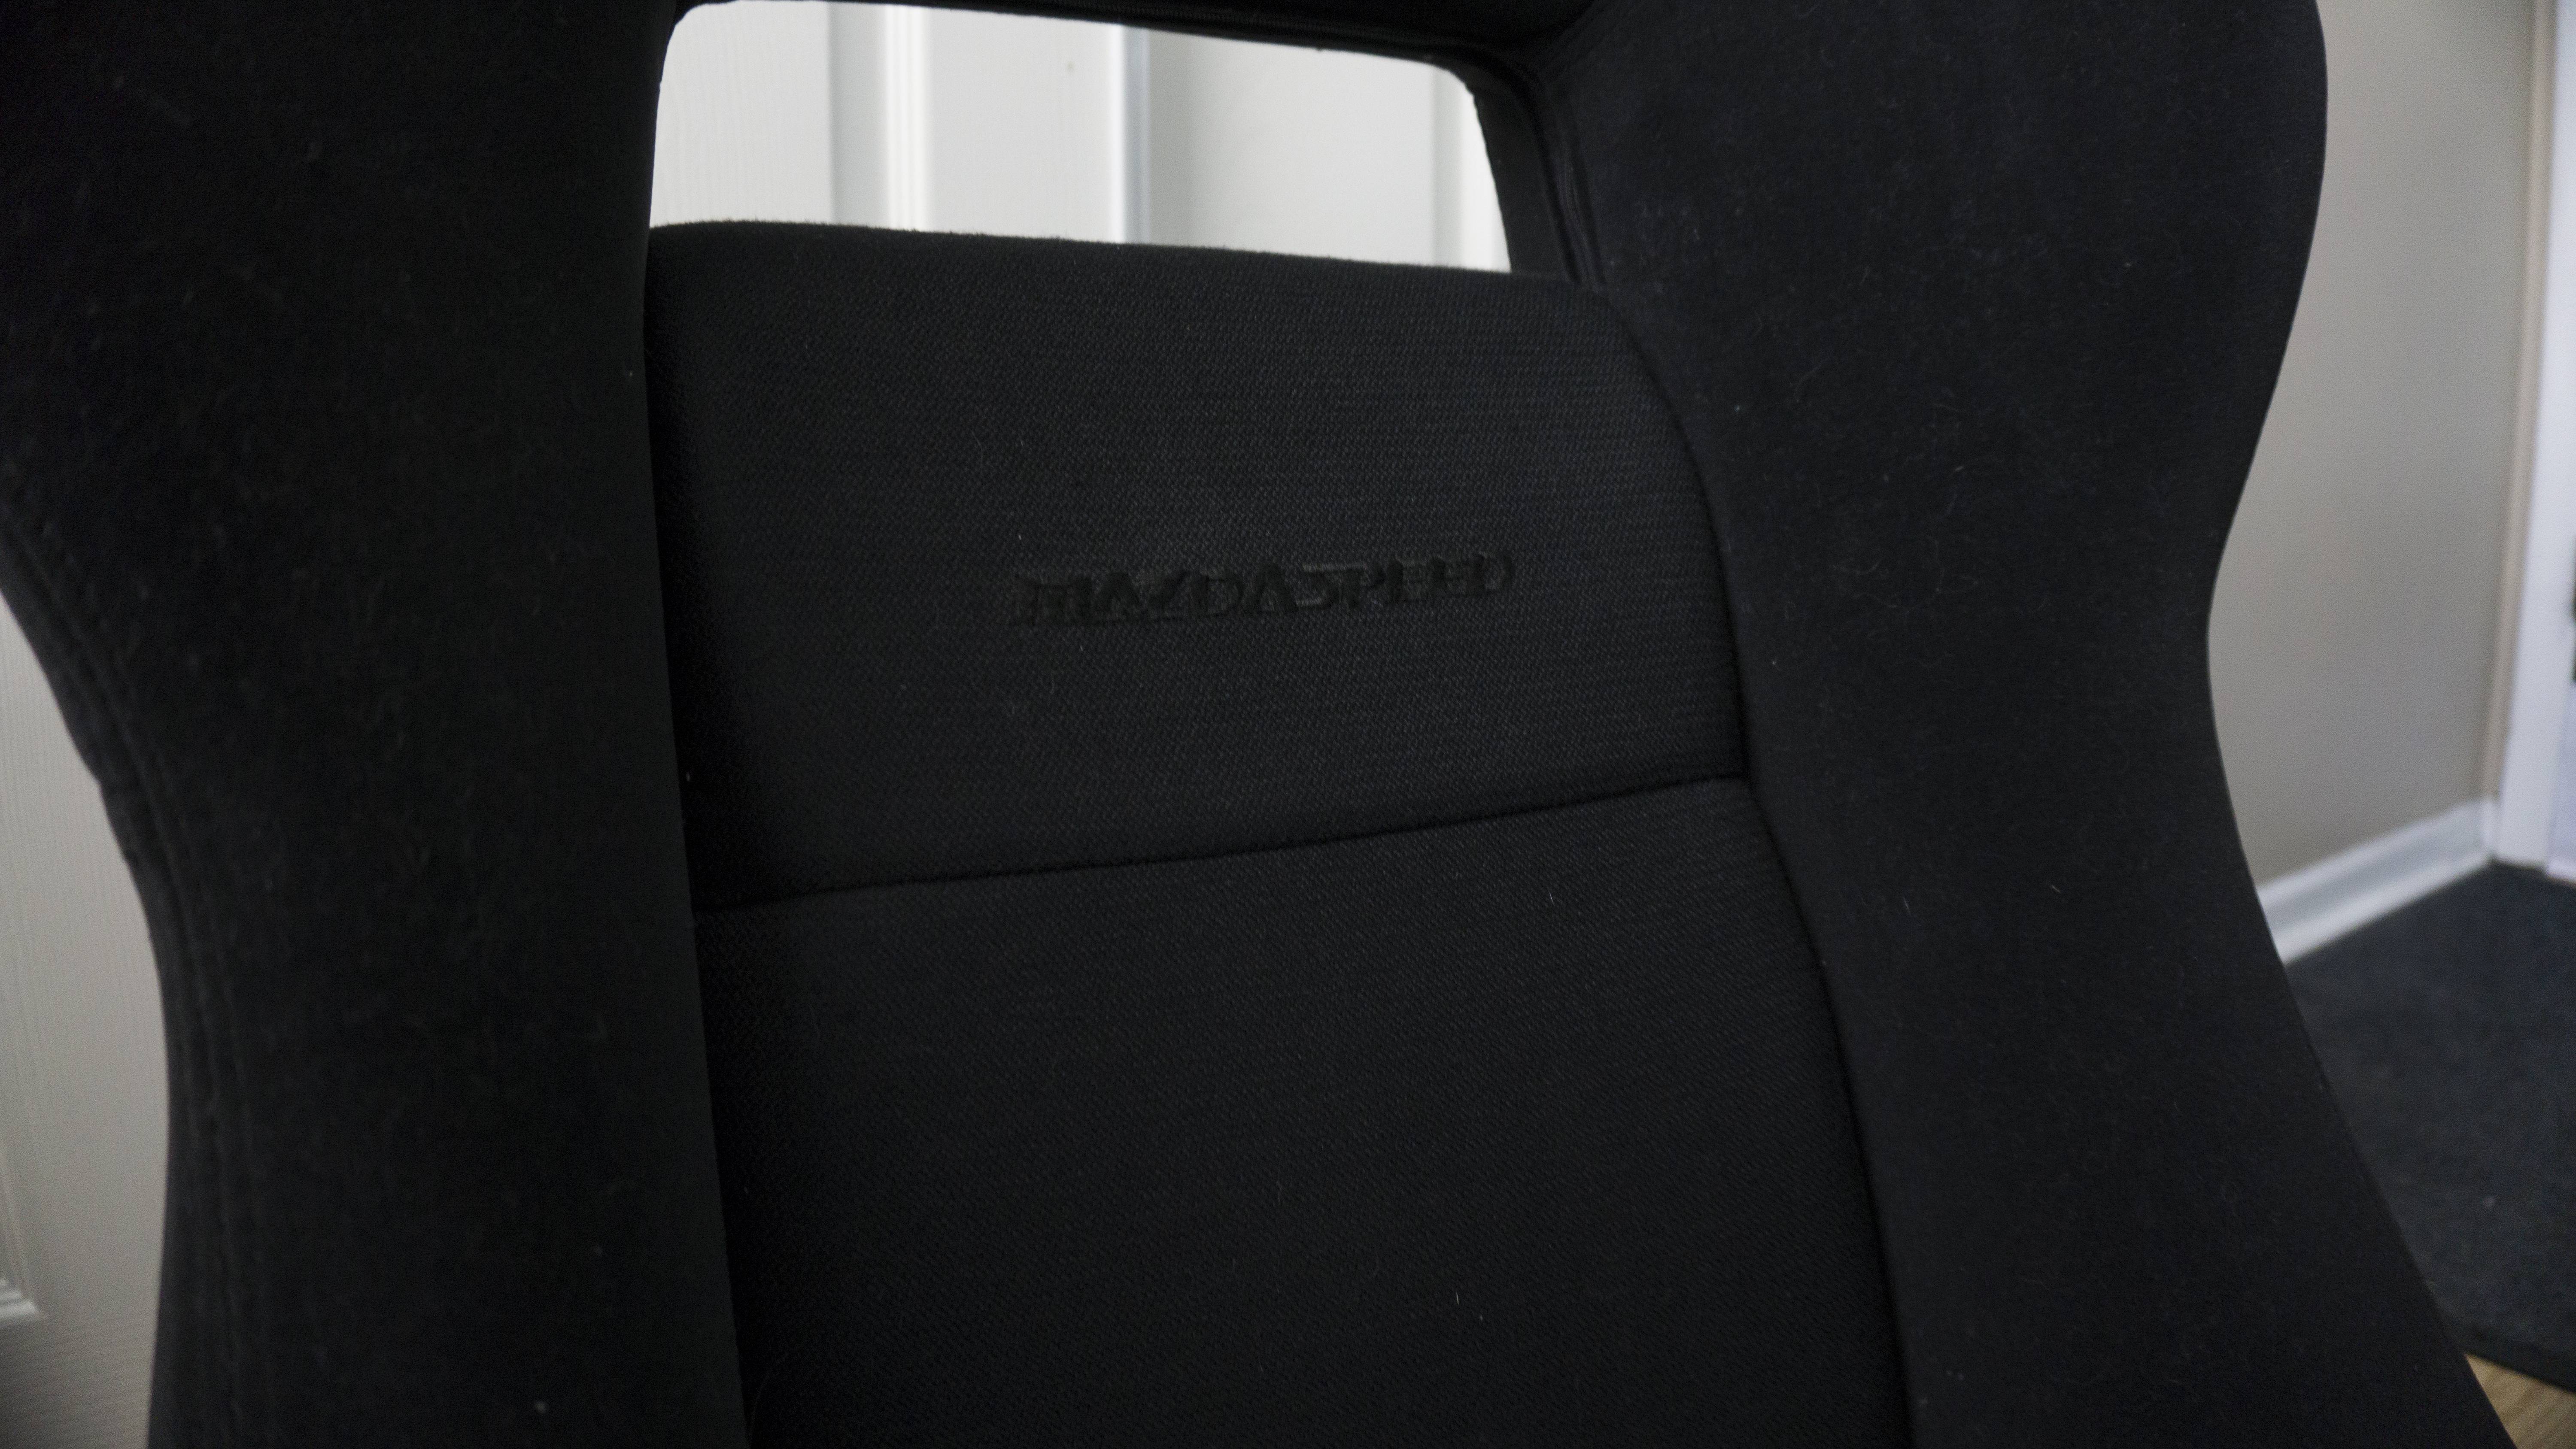
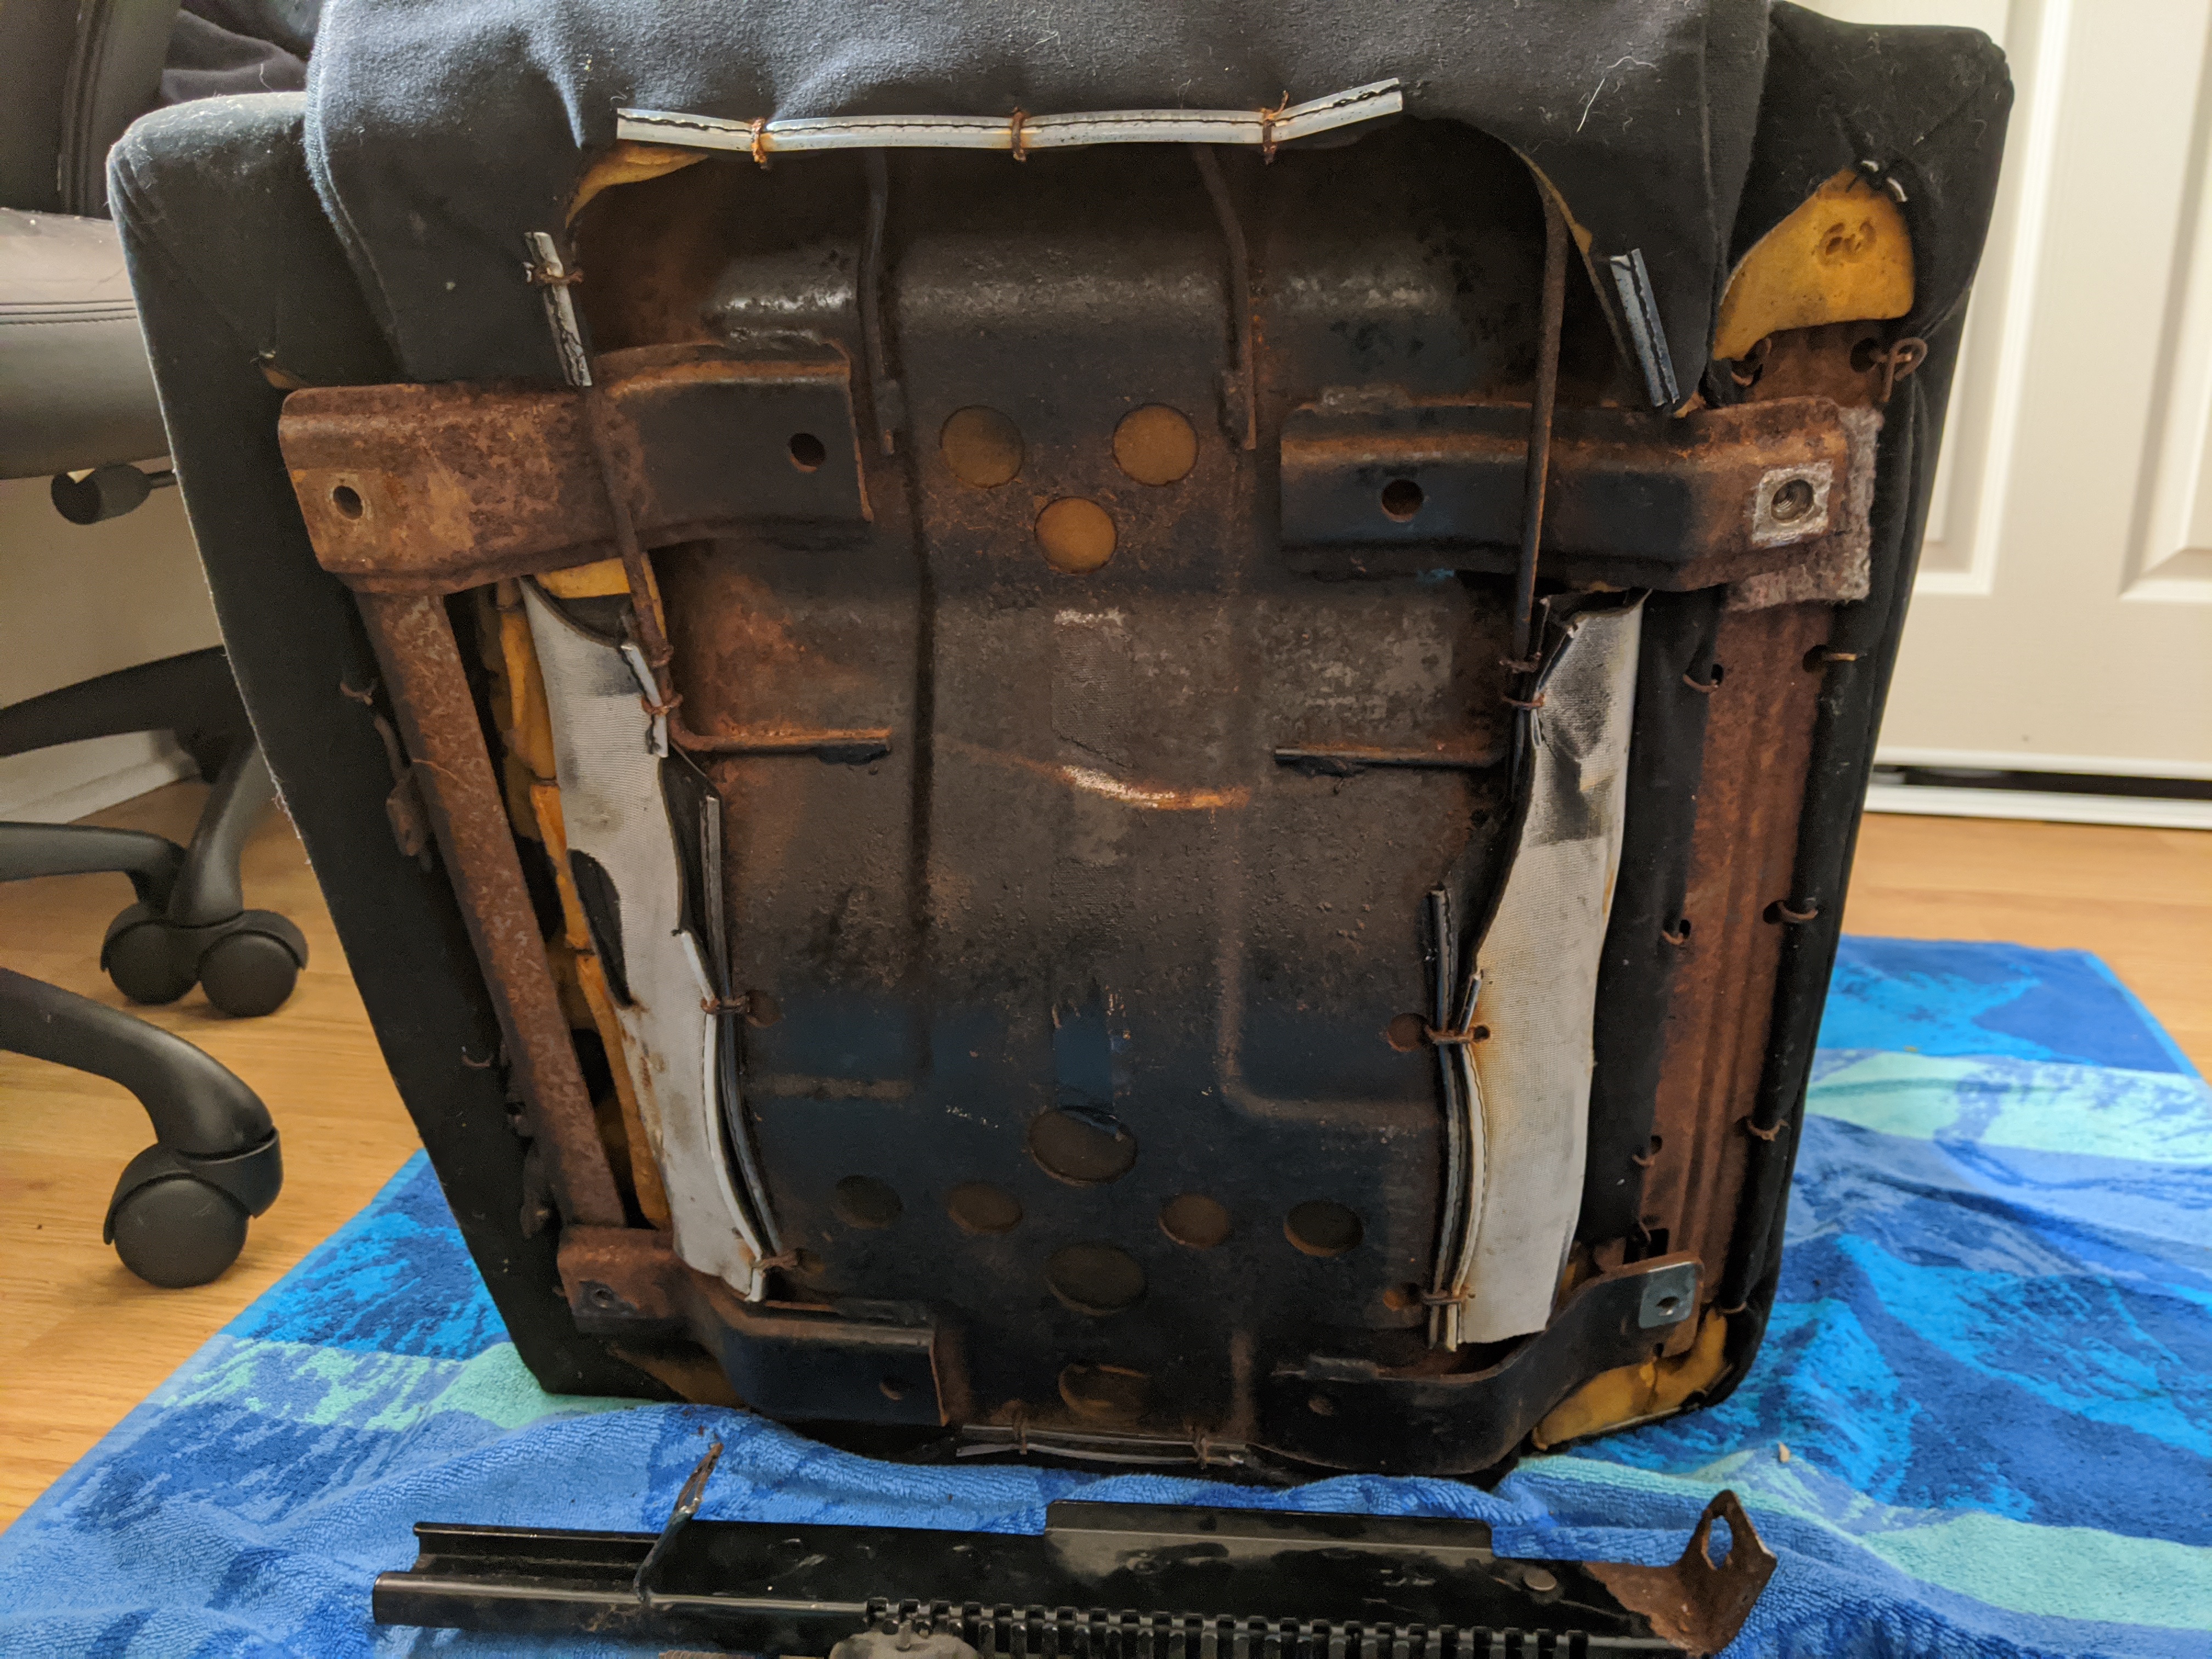
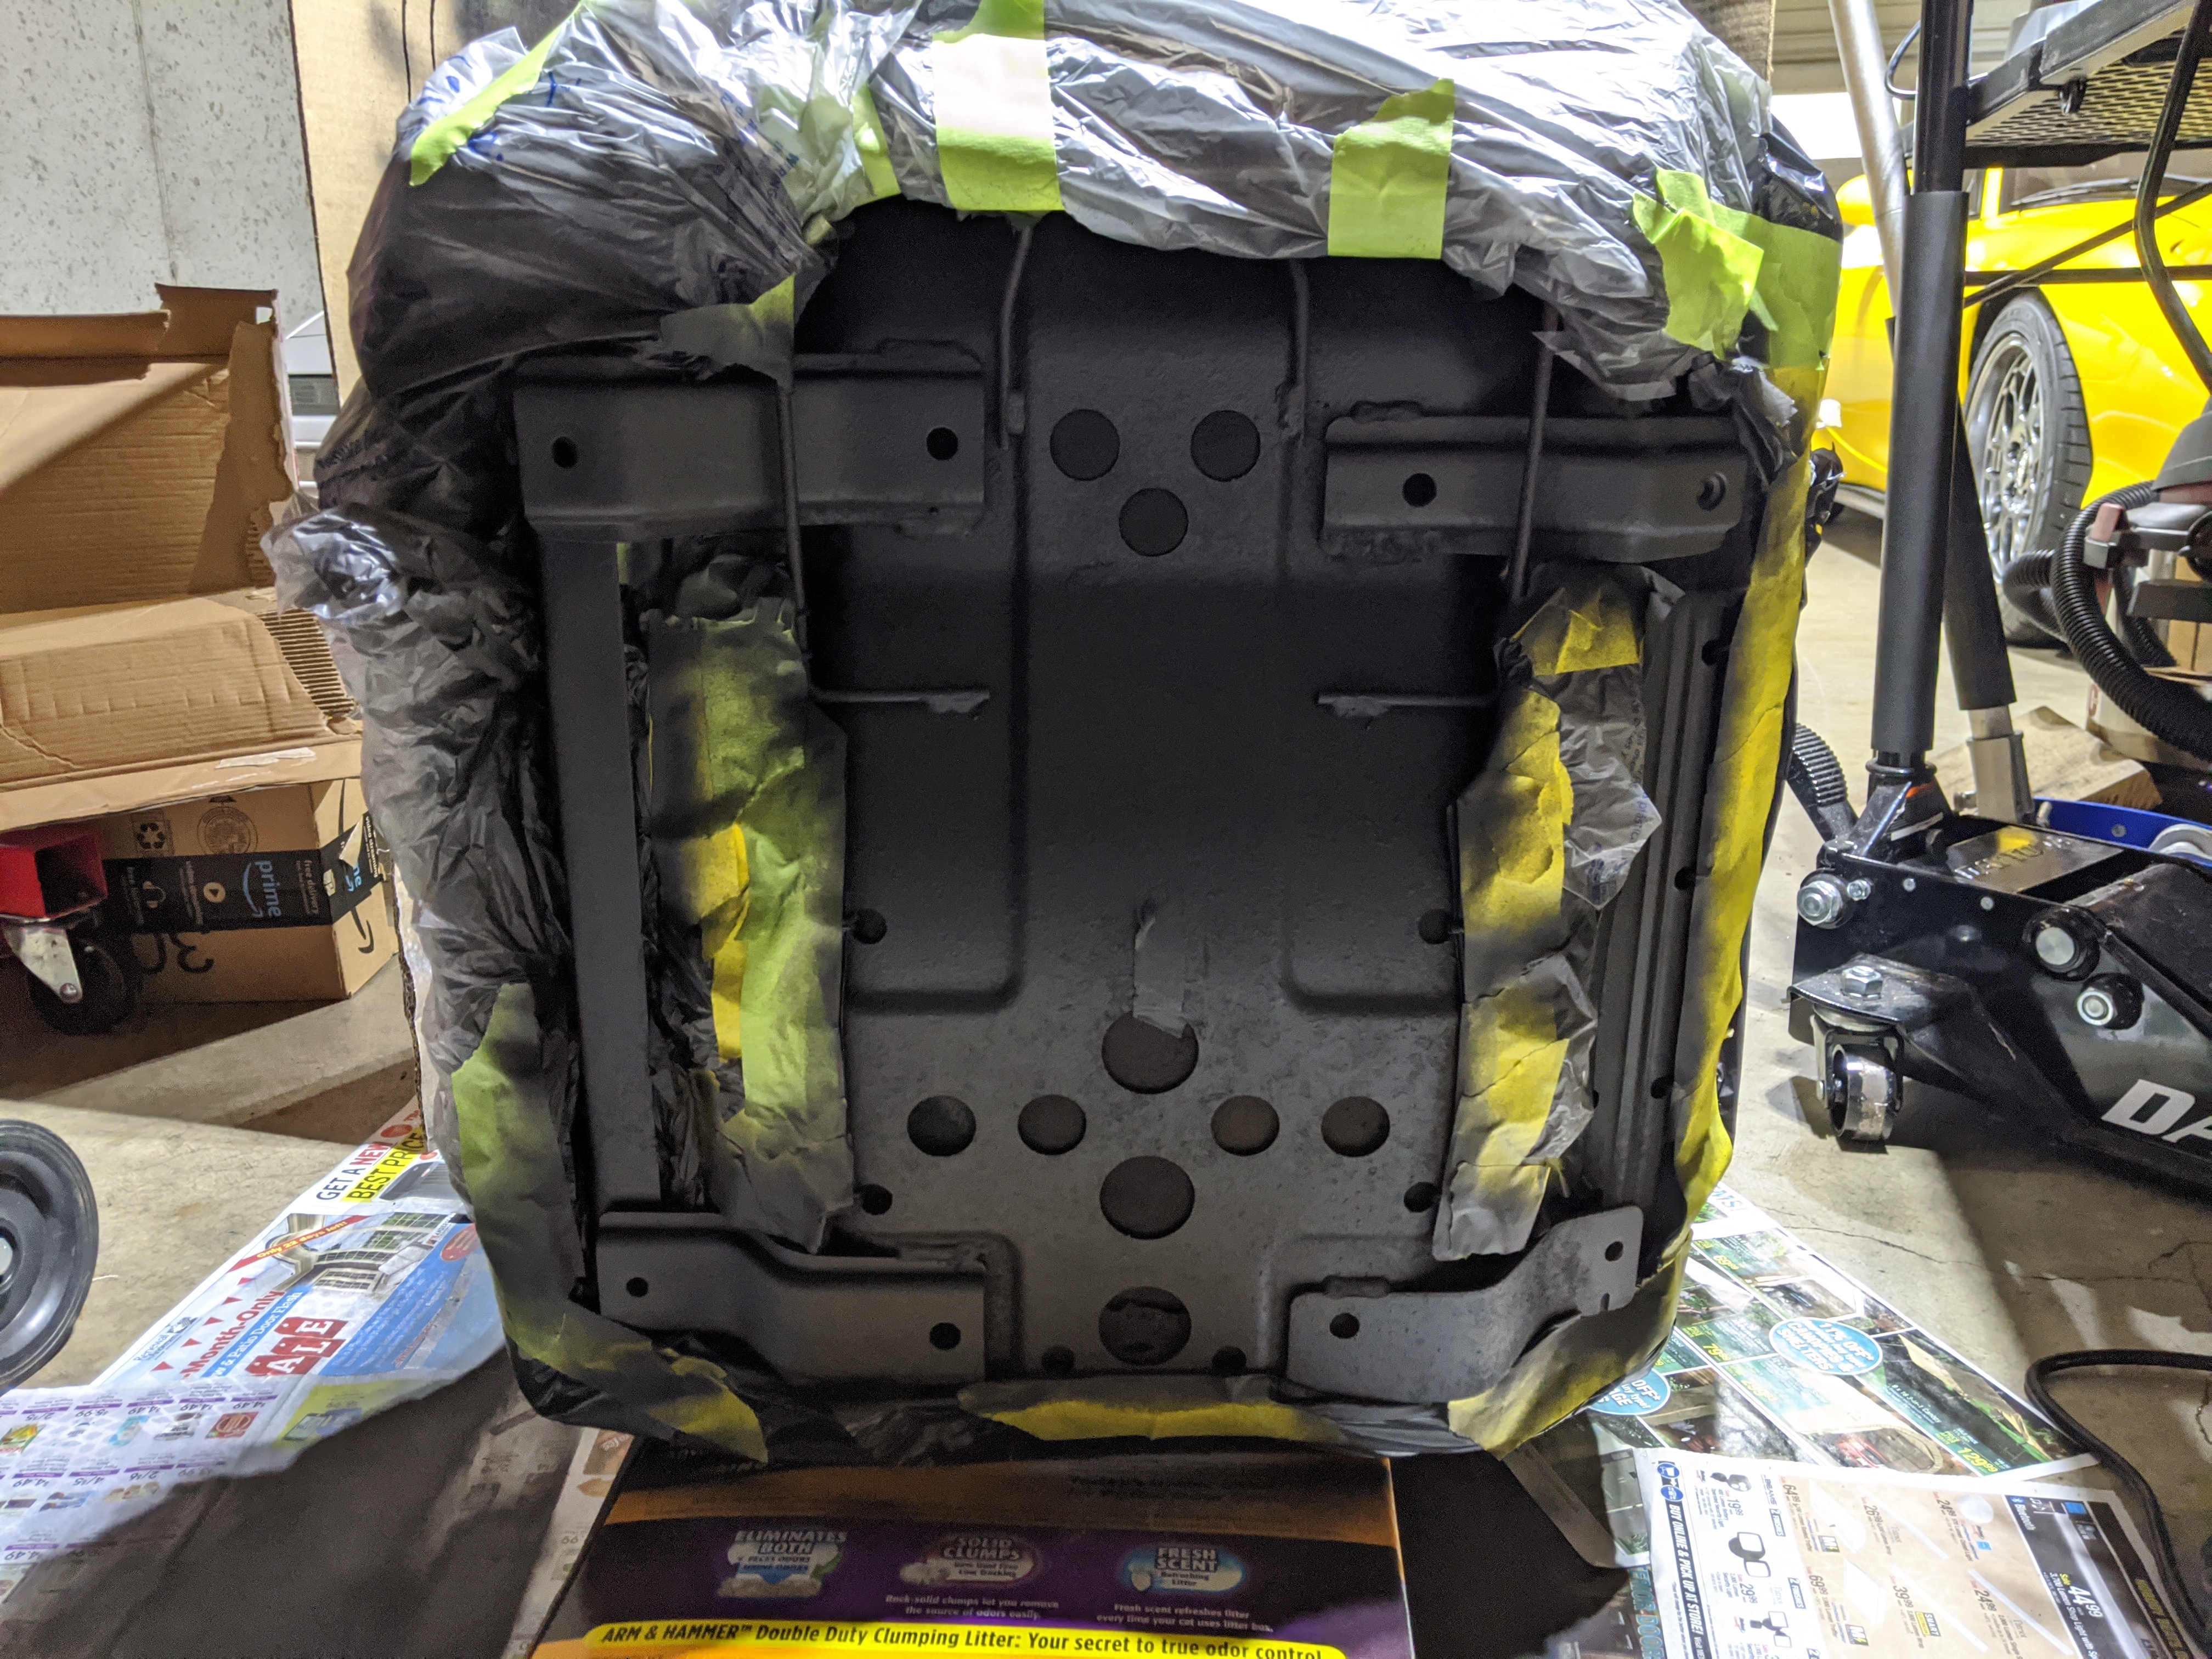
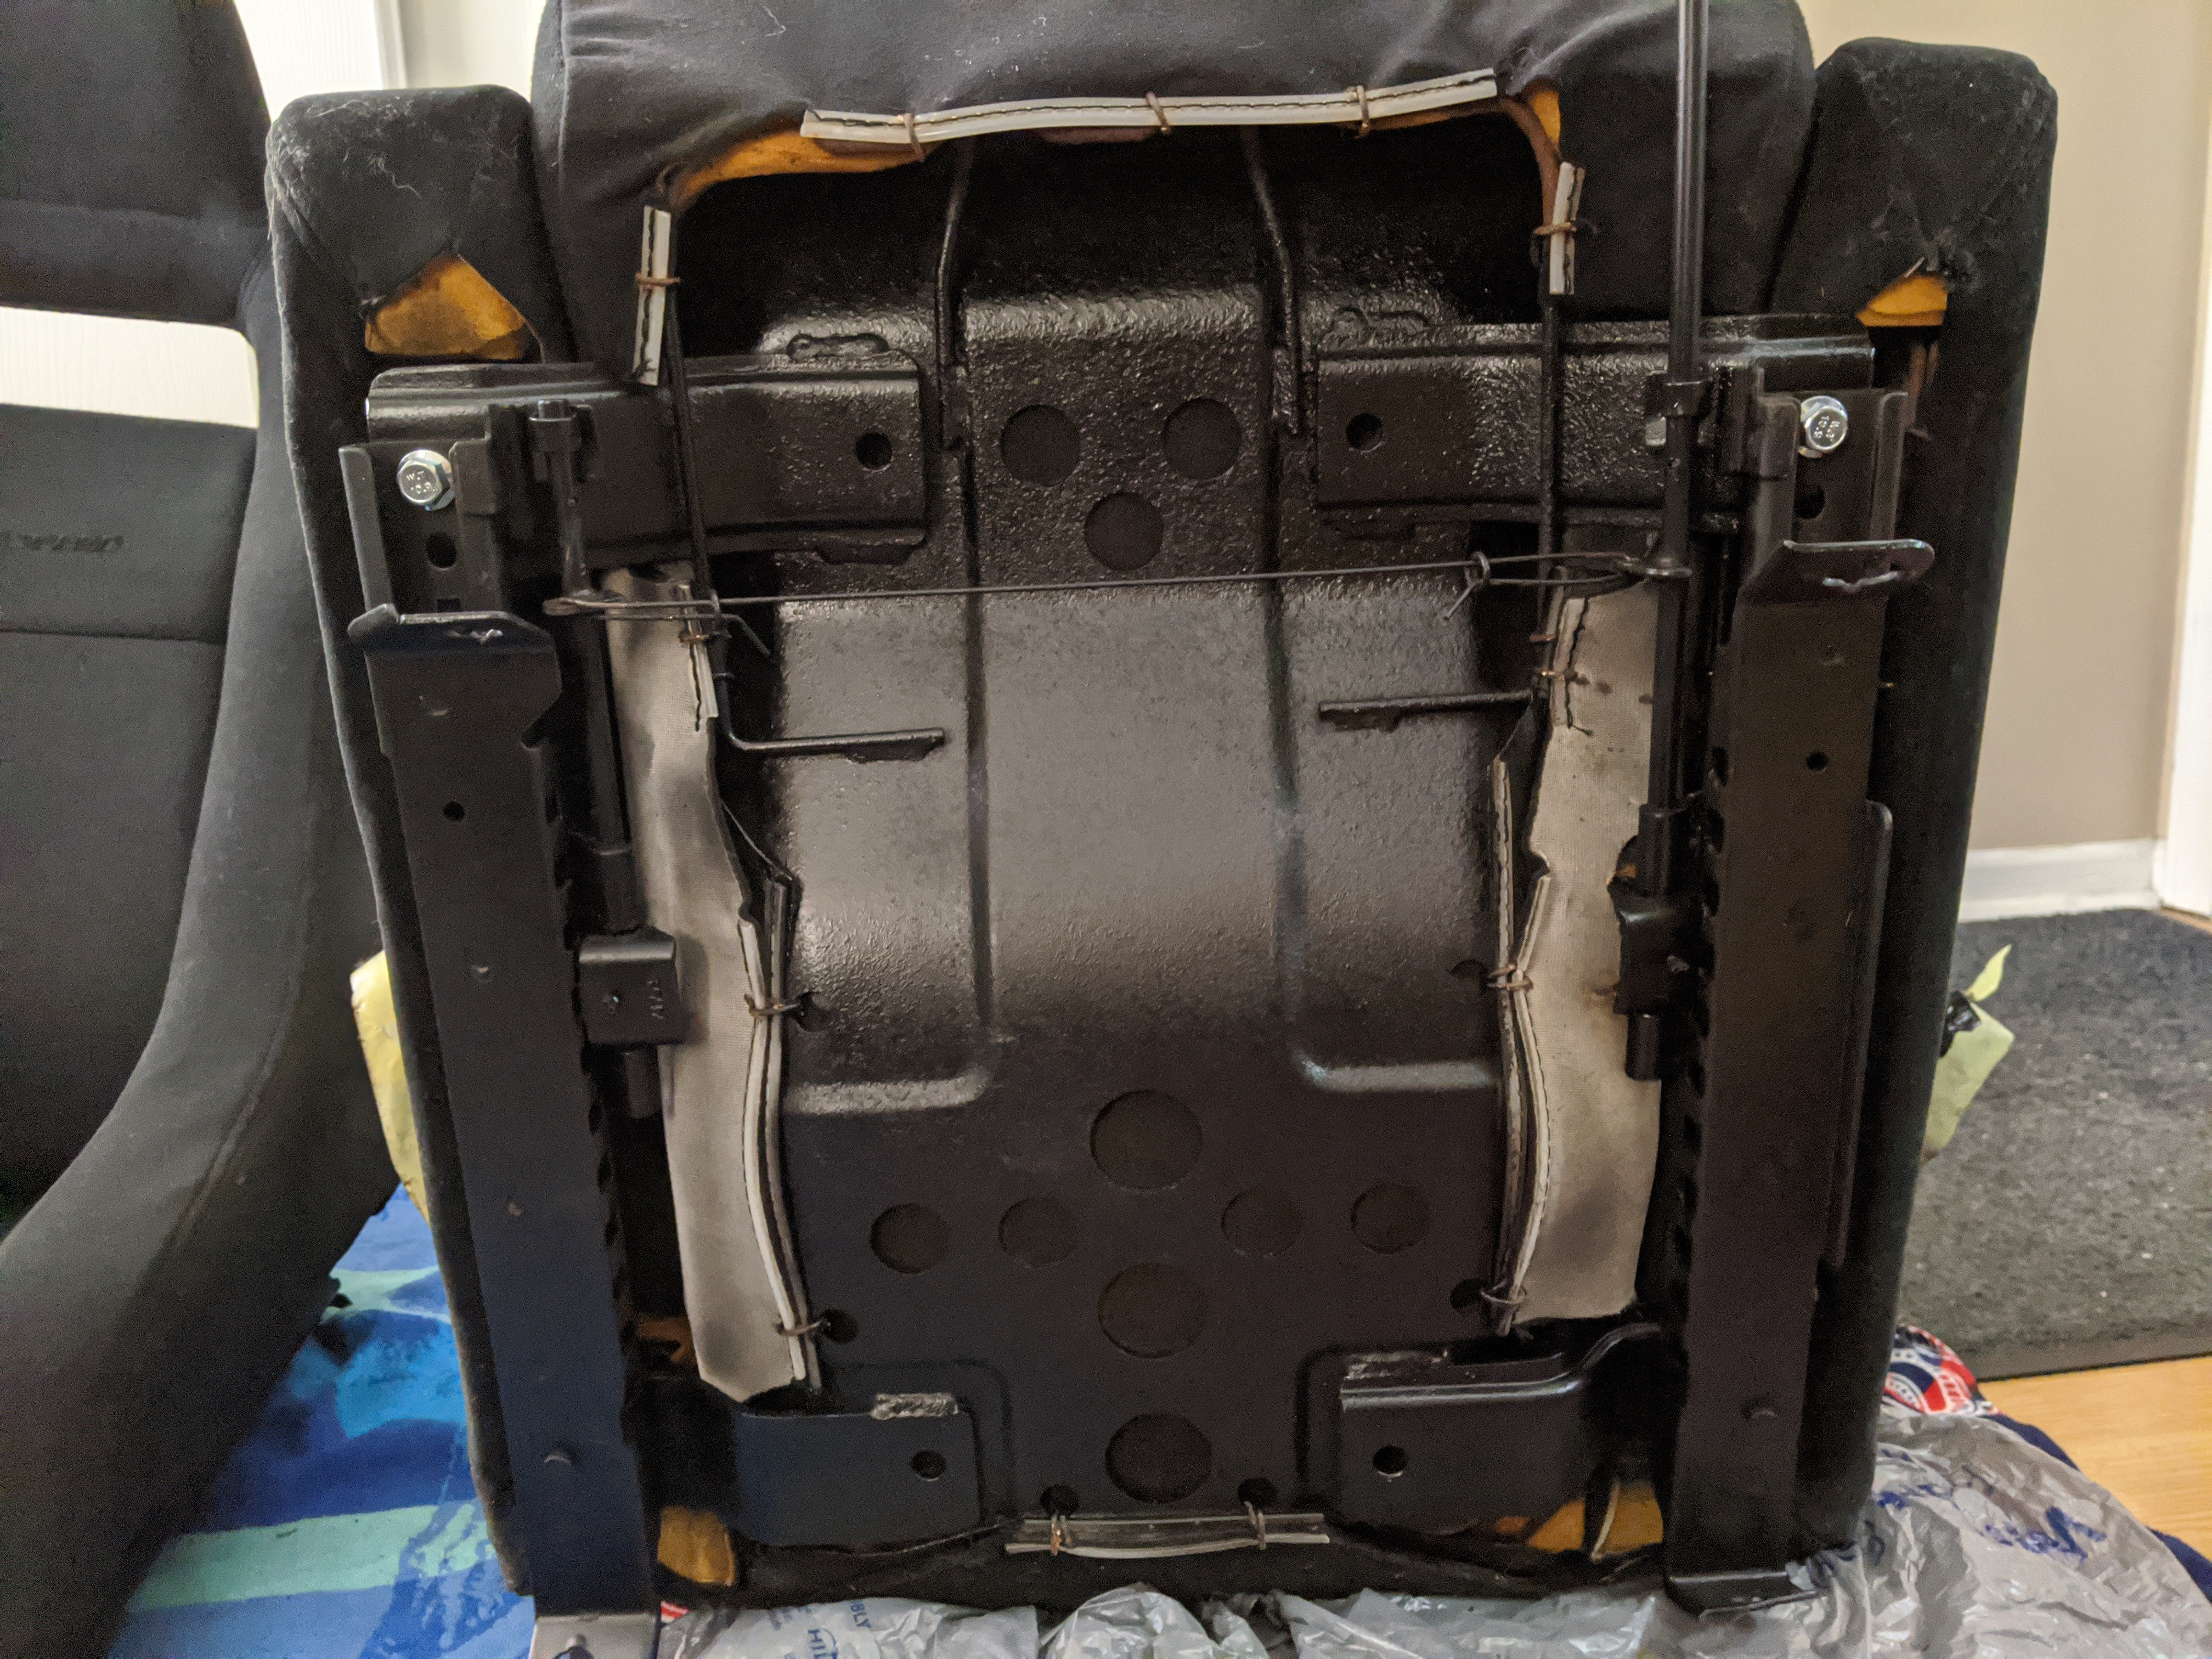
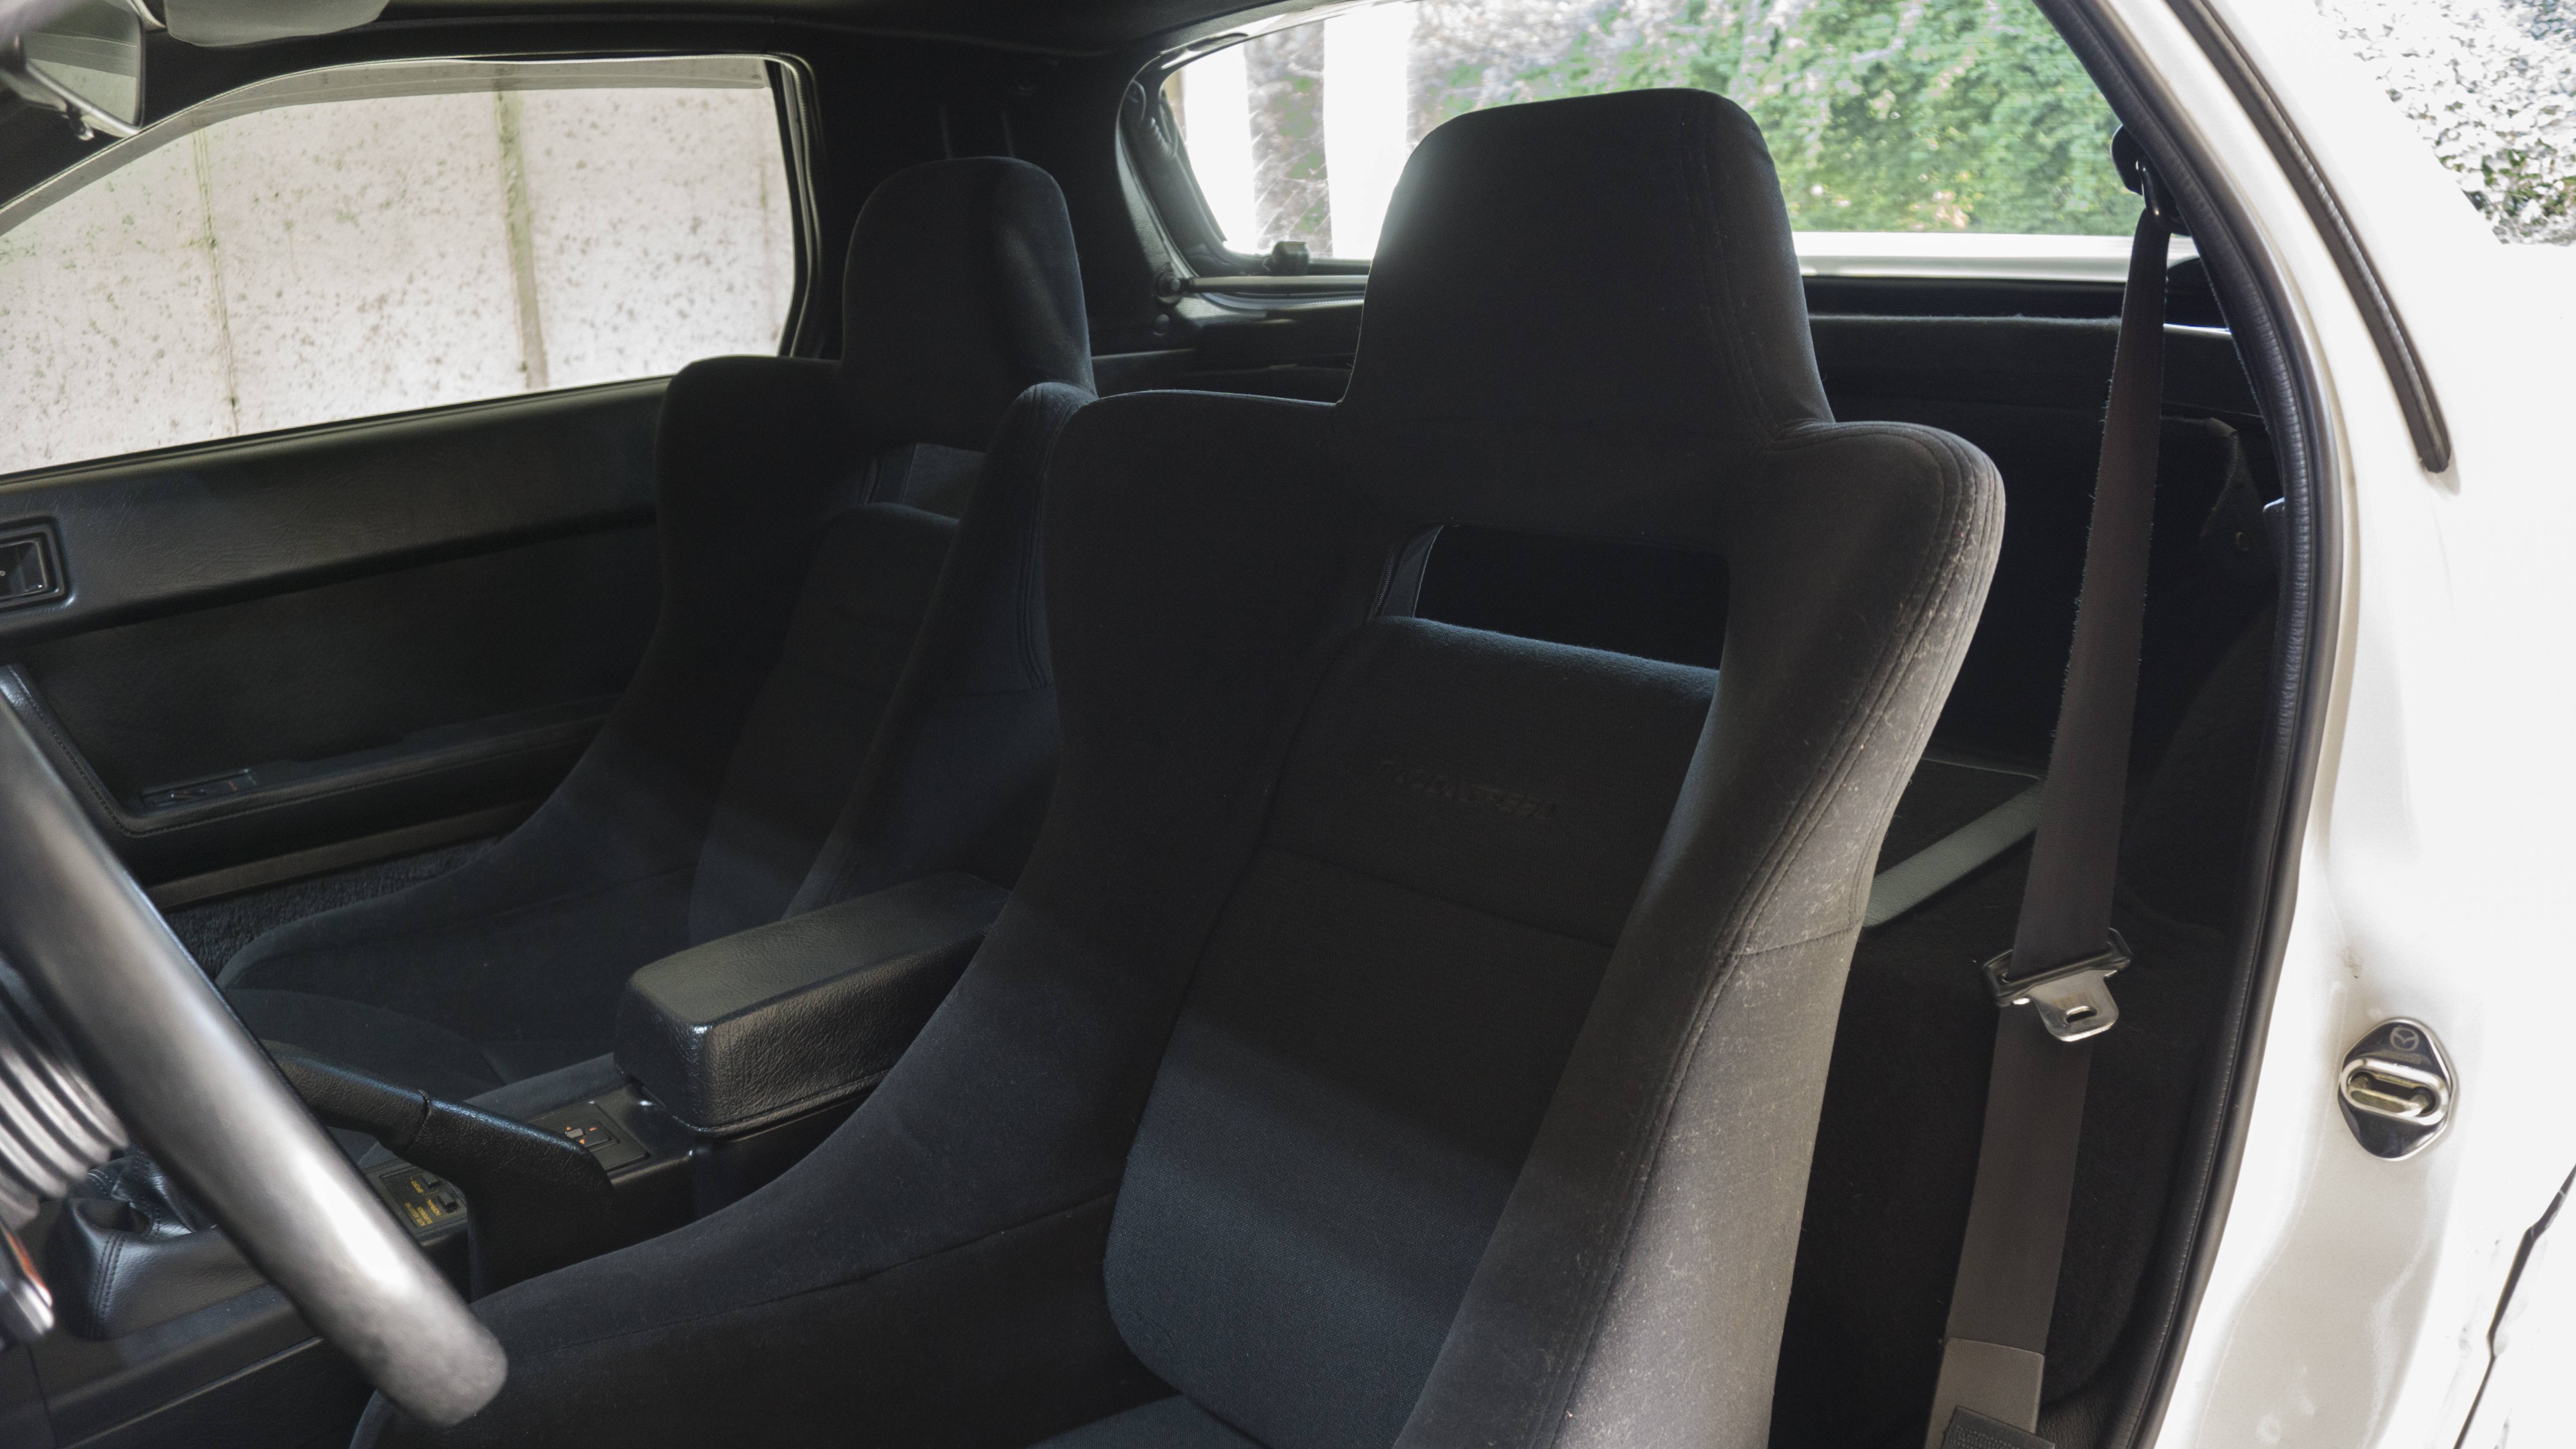
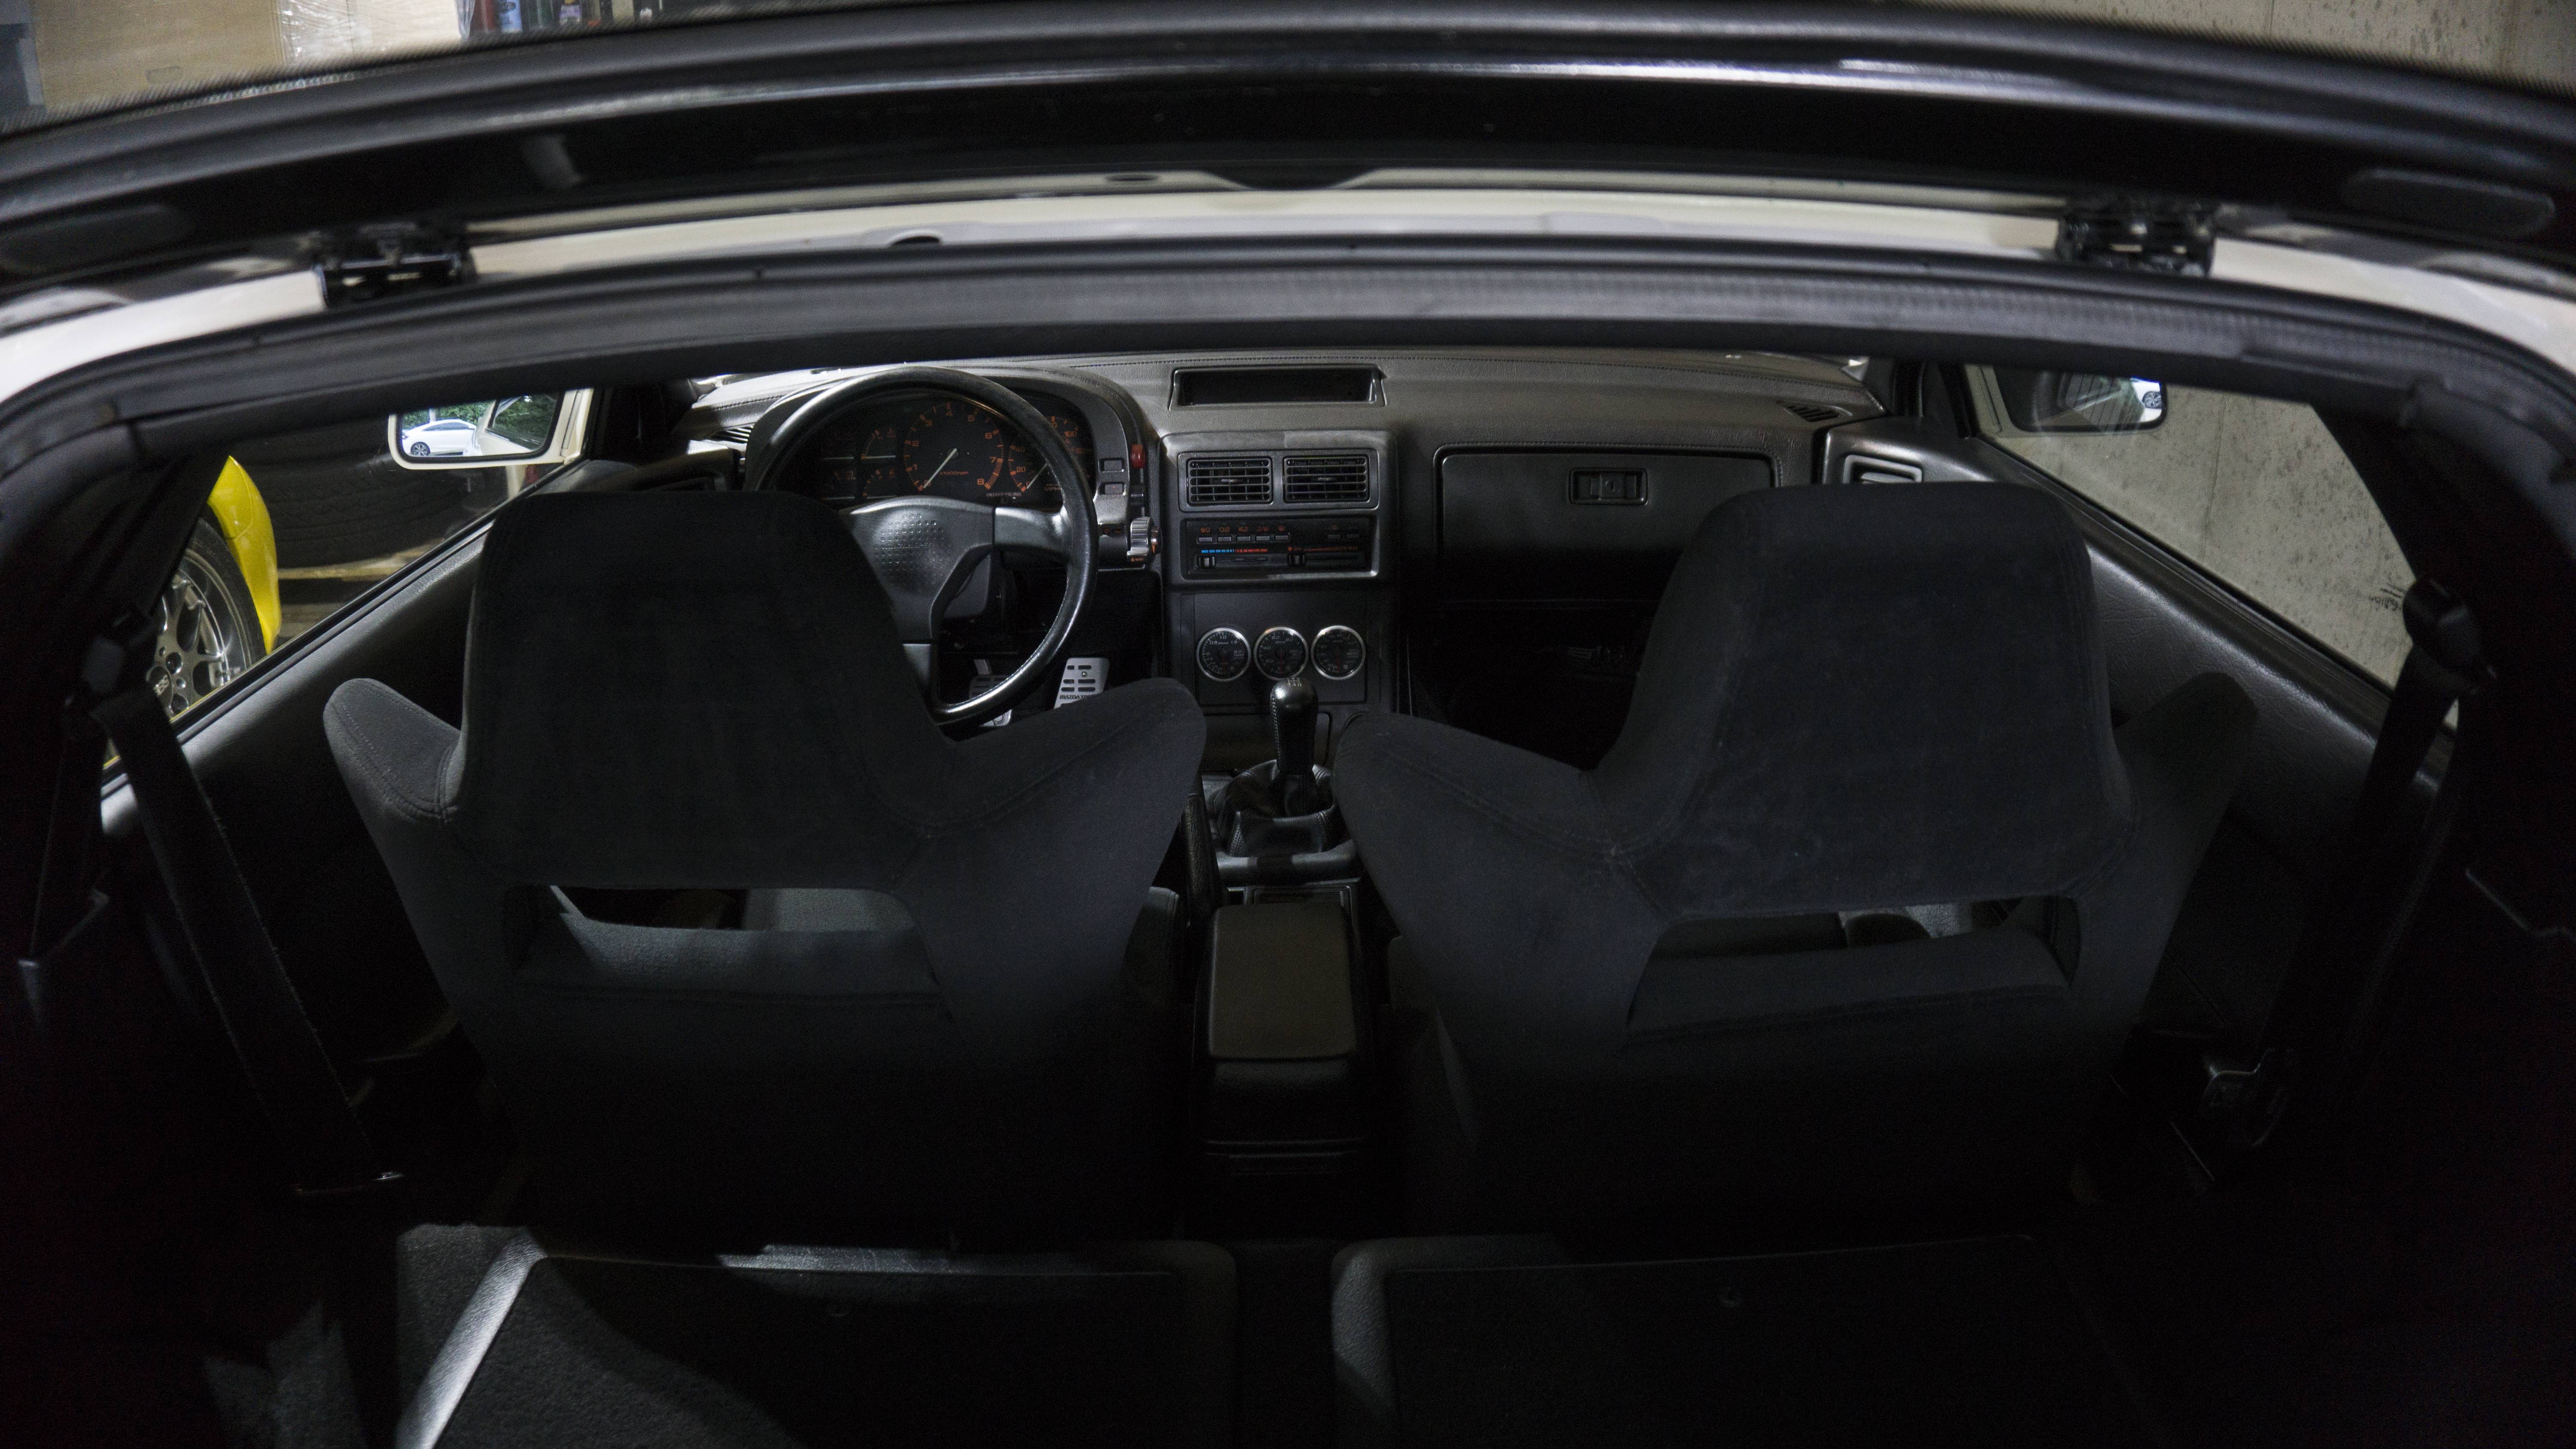
I always start off with saying this will be the last update for a while. This time I think I mean it lol. I would say half-way through this project I created this vision of the perfect FC chassis in my mind. It was a S4 Slicktop. I didn�t want auto-belts and I didn�t want a sunroof. I had one of those things, but not the other. I don�t want to re-shell because I�ve put a lot of work into this chassis already so in order to reach my vision I�ve begun sourcing the things required to delete my sunroof. I purchased a JDM Black Non-Sunroof Headliner, the roof brace, and the dome light bracket. This should be everything I need to go slicktop. I haven�t decided if I�ll do a cut from another chassis or just delete it the old fashion way. I�m confident my body guy can do it properly and make it look as it would have originally so I may just delete it without chopping another shell up. I also purchased a TPS Bracket from JDL Manufacturing to run a Ford TPS. My TPS has been acting up lately, as they all eventually do, so I went ahead and sourced this for an eventual swap. The last thing I did...was make a 100% impulse buy. I found a set of MazdaSpeed Infini IV seats for sale on Facebook. I was able to purchase them and have them shipped from the UK. I noticed they had some surface rust under the seat. I took the rails off and cleaned up the under metals and the rails. I ground all the rust off, then used Rust Reformer, and finally encapsulated with some VHT Epoxy Paint. I think they turned out pretty nice and should hopefully last another 30 years.
Some quick history on the seats. There were 600 of the last run of the Infini IV. 300 in the first batch and 300 in the second batch. A mere 20 of the 300 in the second batch were sent to MazdaSpeed to be outfitted with these special MazdaSpeed Infini IV seats among other MazdaSpeed interior pieces (Steering wheel and shift ****). Only 20 of these seats ever existed and I feel extremely fortunate to have them in my car.
I don�t foresee an update for awhile. I�d wager the next update will be the sun-roof delete (if I�m able to do it over the winter) and the FD Caliper rebuild/installation. So, until next time!
Here�s the parts for the sun-roof delete
Here�s the bracket and TPS Sensor
Here�s the seats as they came in

Here�s the restoration of the underneath (original, rust reformer, finished)

Here�s the seats in the car

I always start off with saying this will be the last update for a while. This time I think I mean it lol. I would say half-way through this project I created this vision of the perfect FC chassis in my mind. It was a S4 Slicktop. I didn�t want auto-belts and I didn�t want a sunroof. I had one of those things, but not the other. I don�t want to re-shell because I�ve put a lot of work into this chassis already so in order to reach my vision I�ve begun sourcing the things required to delete my sunroof. I purchased a JDM Black Non-Sunroof Headliner, the roof brace, and the dome light bracket. This should be everything I need to go slicktop. I haven�t decided if I�ll do a cut from another chassis or just delete it the old fashion way. I�m confident my body guy can do it properly and make it look as it would have originally so I may just delete it without chopping another shell up. I also purchased a TPS Bracket from JDL Manufacturing to run a Ford TPS. My TPS has been acting up lately, as they all eventually do, so I went ahead and sourced this for an eventual swap. The last thing I did...was make a 100% impulse buy. I found a set of MazdaSpeed Infini IV seats for sale on Facebook. I was able to purchase them and have them shipped from the UK. I noticed they had some surface rust under the seat. I took the rails off and cleaned up the under metals and the rails. I ground all the rust off, then used Rust Reformer, and finally encapsulated with some VHT Epoxy Paint. I think they turned out pretty nice and should hopefully last another 30 years.
Some quick history on the seats. There were 600 of the last run of the Infini IV. 300 in the first batch and 300 in the second batch. A mere 20 of the 300 in the second batch were sent to MazdaSpeed to be outfitted with these special MazdaSpeed Infini IV seats among other MazdaSpeed interior pieces (Steering wheel and shift ****). Only 20 of these seats ever existed and I feel extremely fortunate to have them in my car.
I don�t foresee an update for awhile. I�d wager the next update will be the sun-roof delete (if I�m able to do it over the winter) and the FD Caliper rebuild/installation. So, until next time!
Here�s the parts for the sun-roof delete

Here�s the bracket and TPS Sensor
Here�s the seats as they came in
Here�s the restoration of the underneath (original, rust reformer, finished)
Here�s the seats in the car
Last edited by Akomix; 08-14-20 at 10:12 PM.
08-22-20, 10:16 PM
#314
I think given the age they are in really good shape. There was one minor little hole on the driver seat. Everything else looks great. I think my Recaro LX-Bs were in better condition, but those threw me around everywhere during spirited driving.
The following users liked this post:
Jager (09-04-20)
09-04-20, 01:56 PM
#318
Thank you!
09-29-20, 05:44 PM
#319
Update 9/29/2020
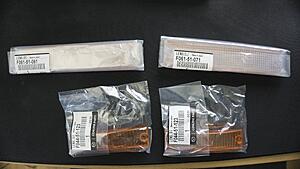
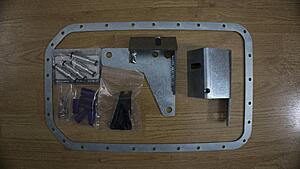
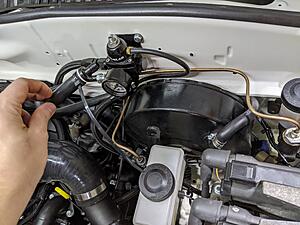
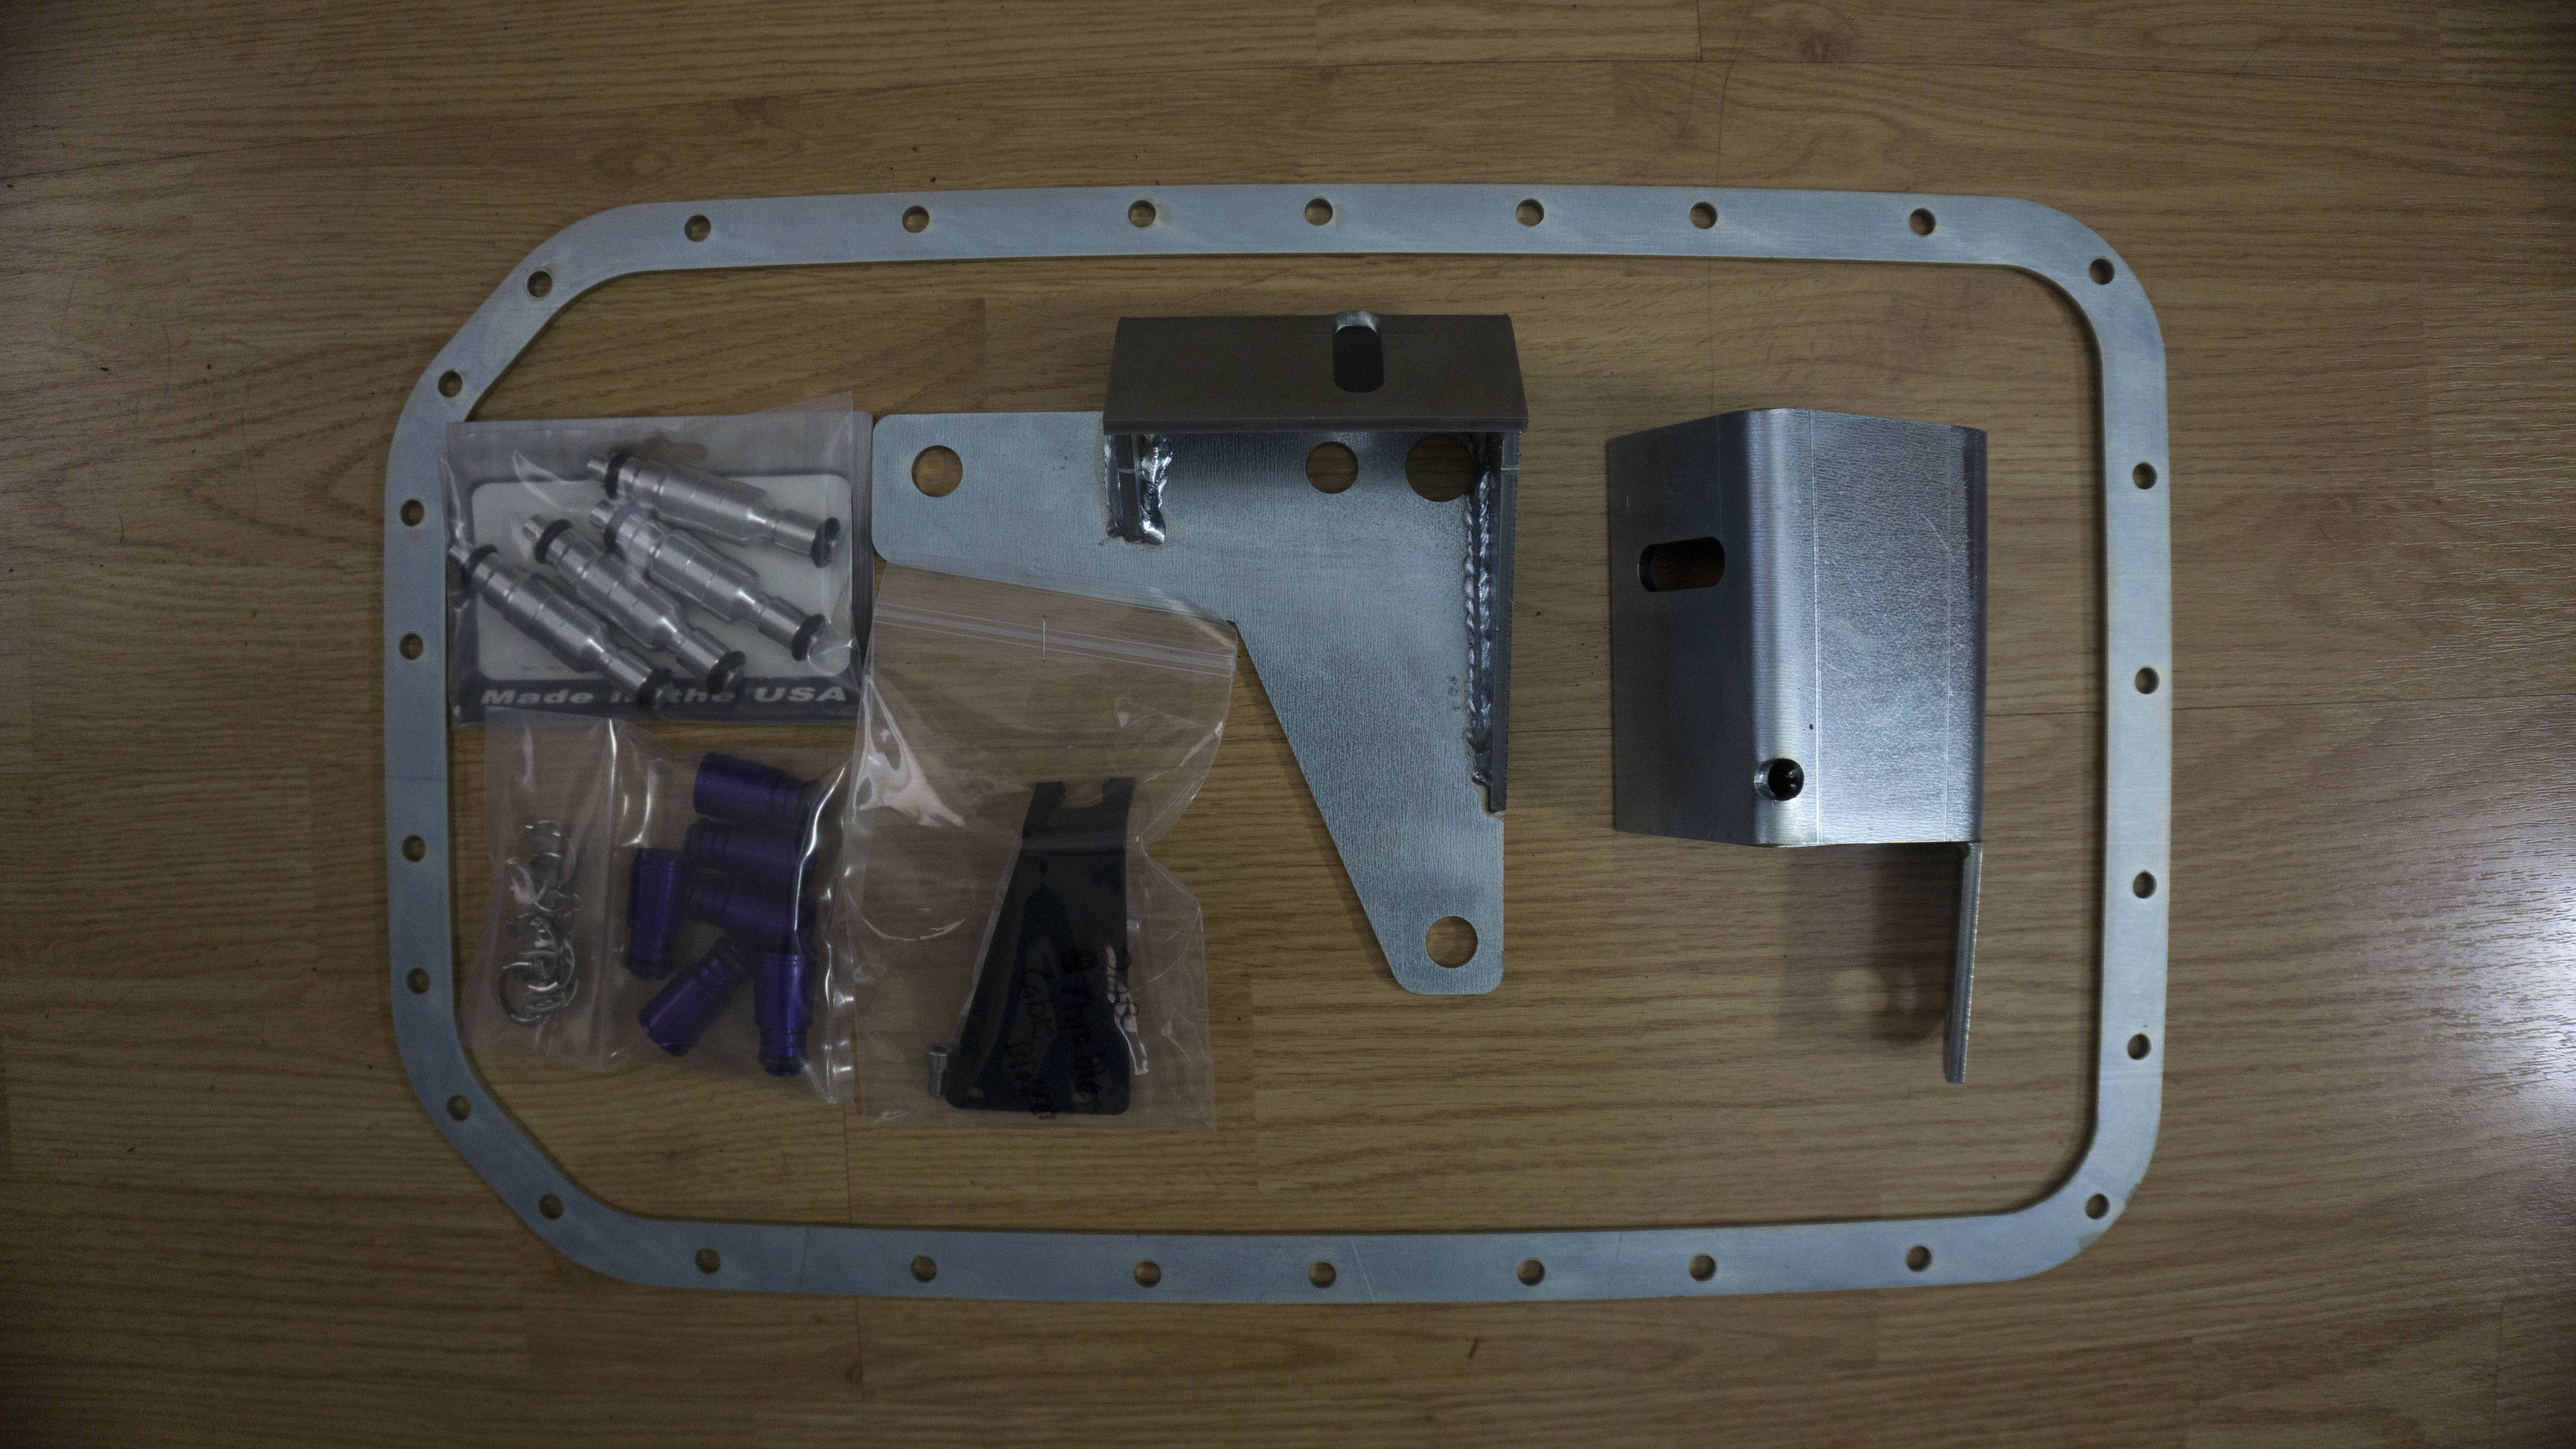
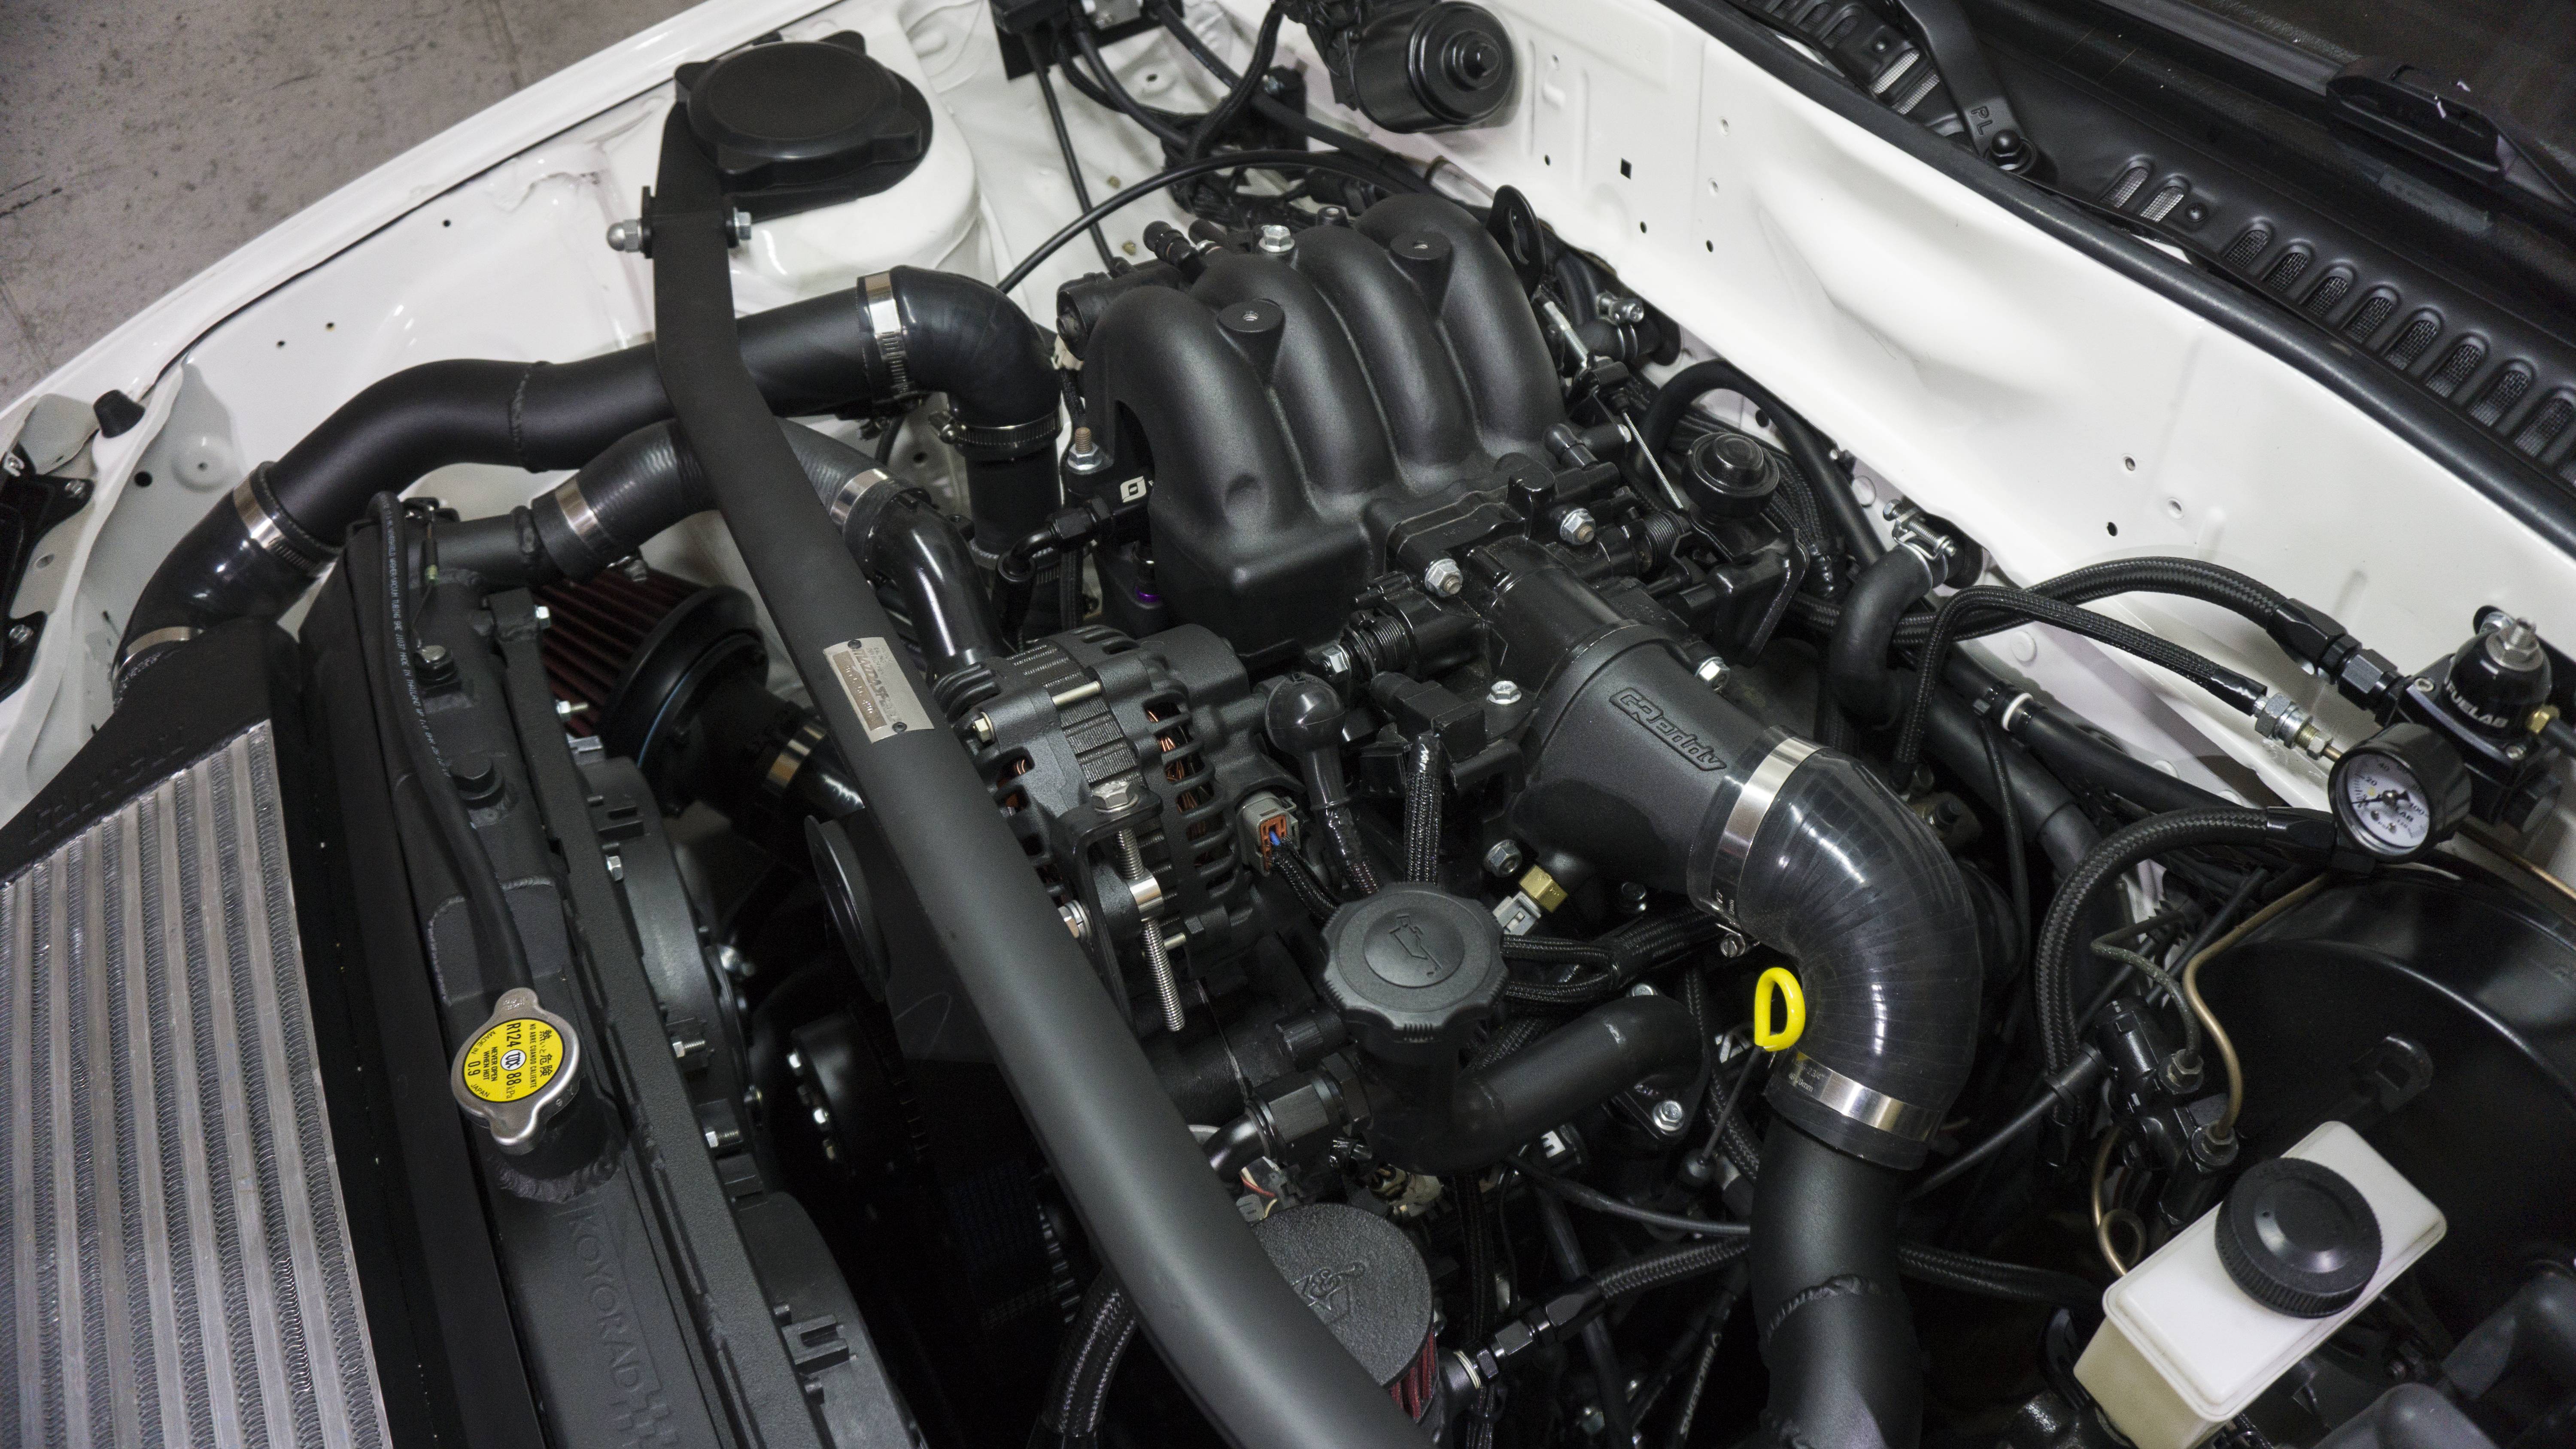
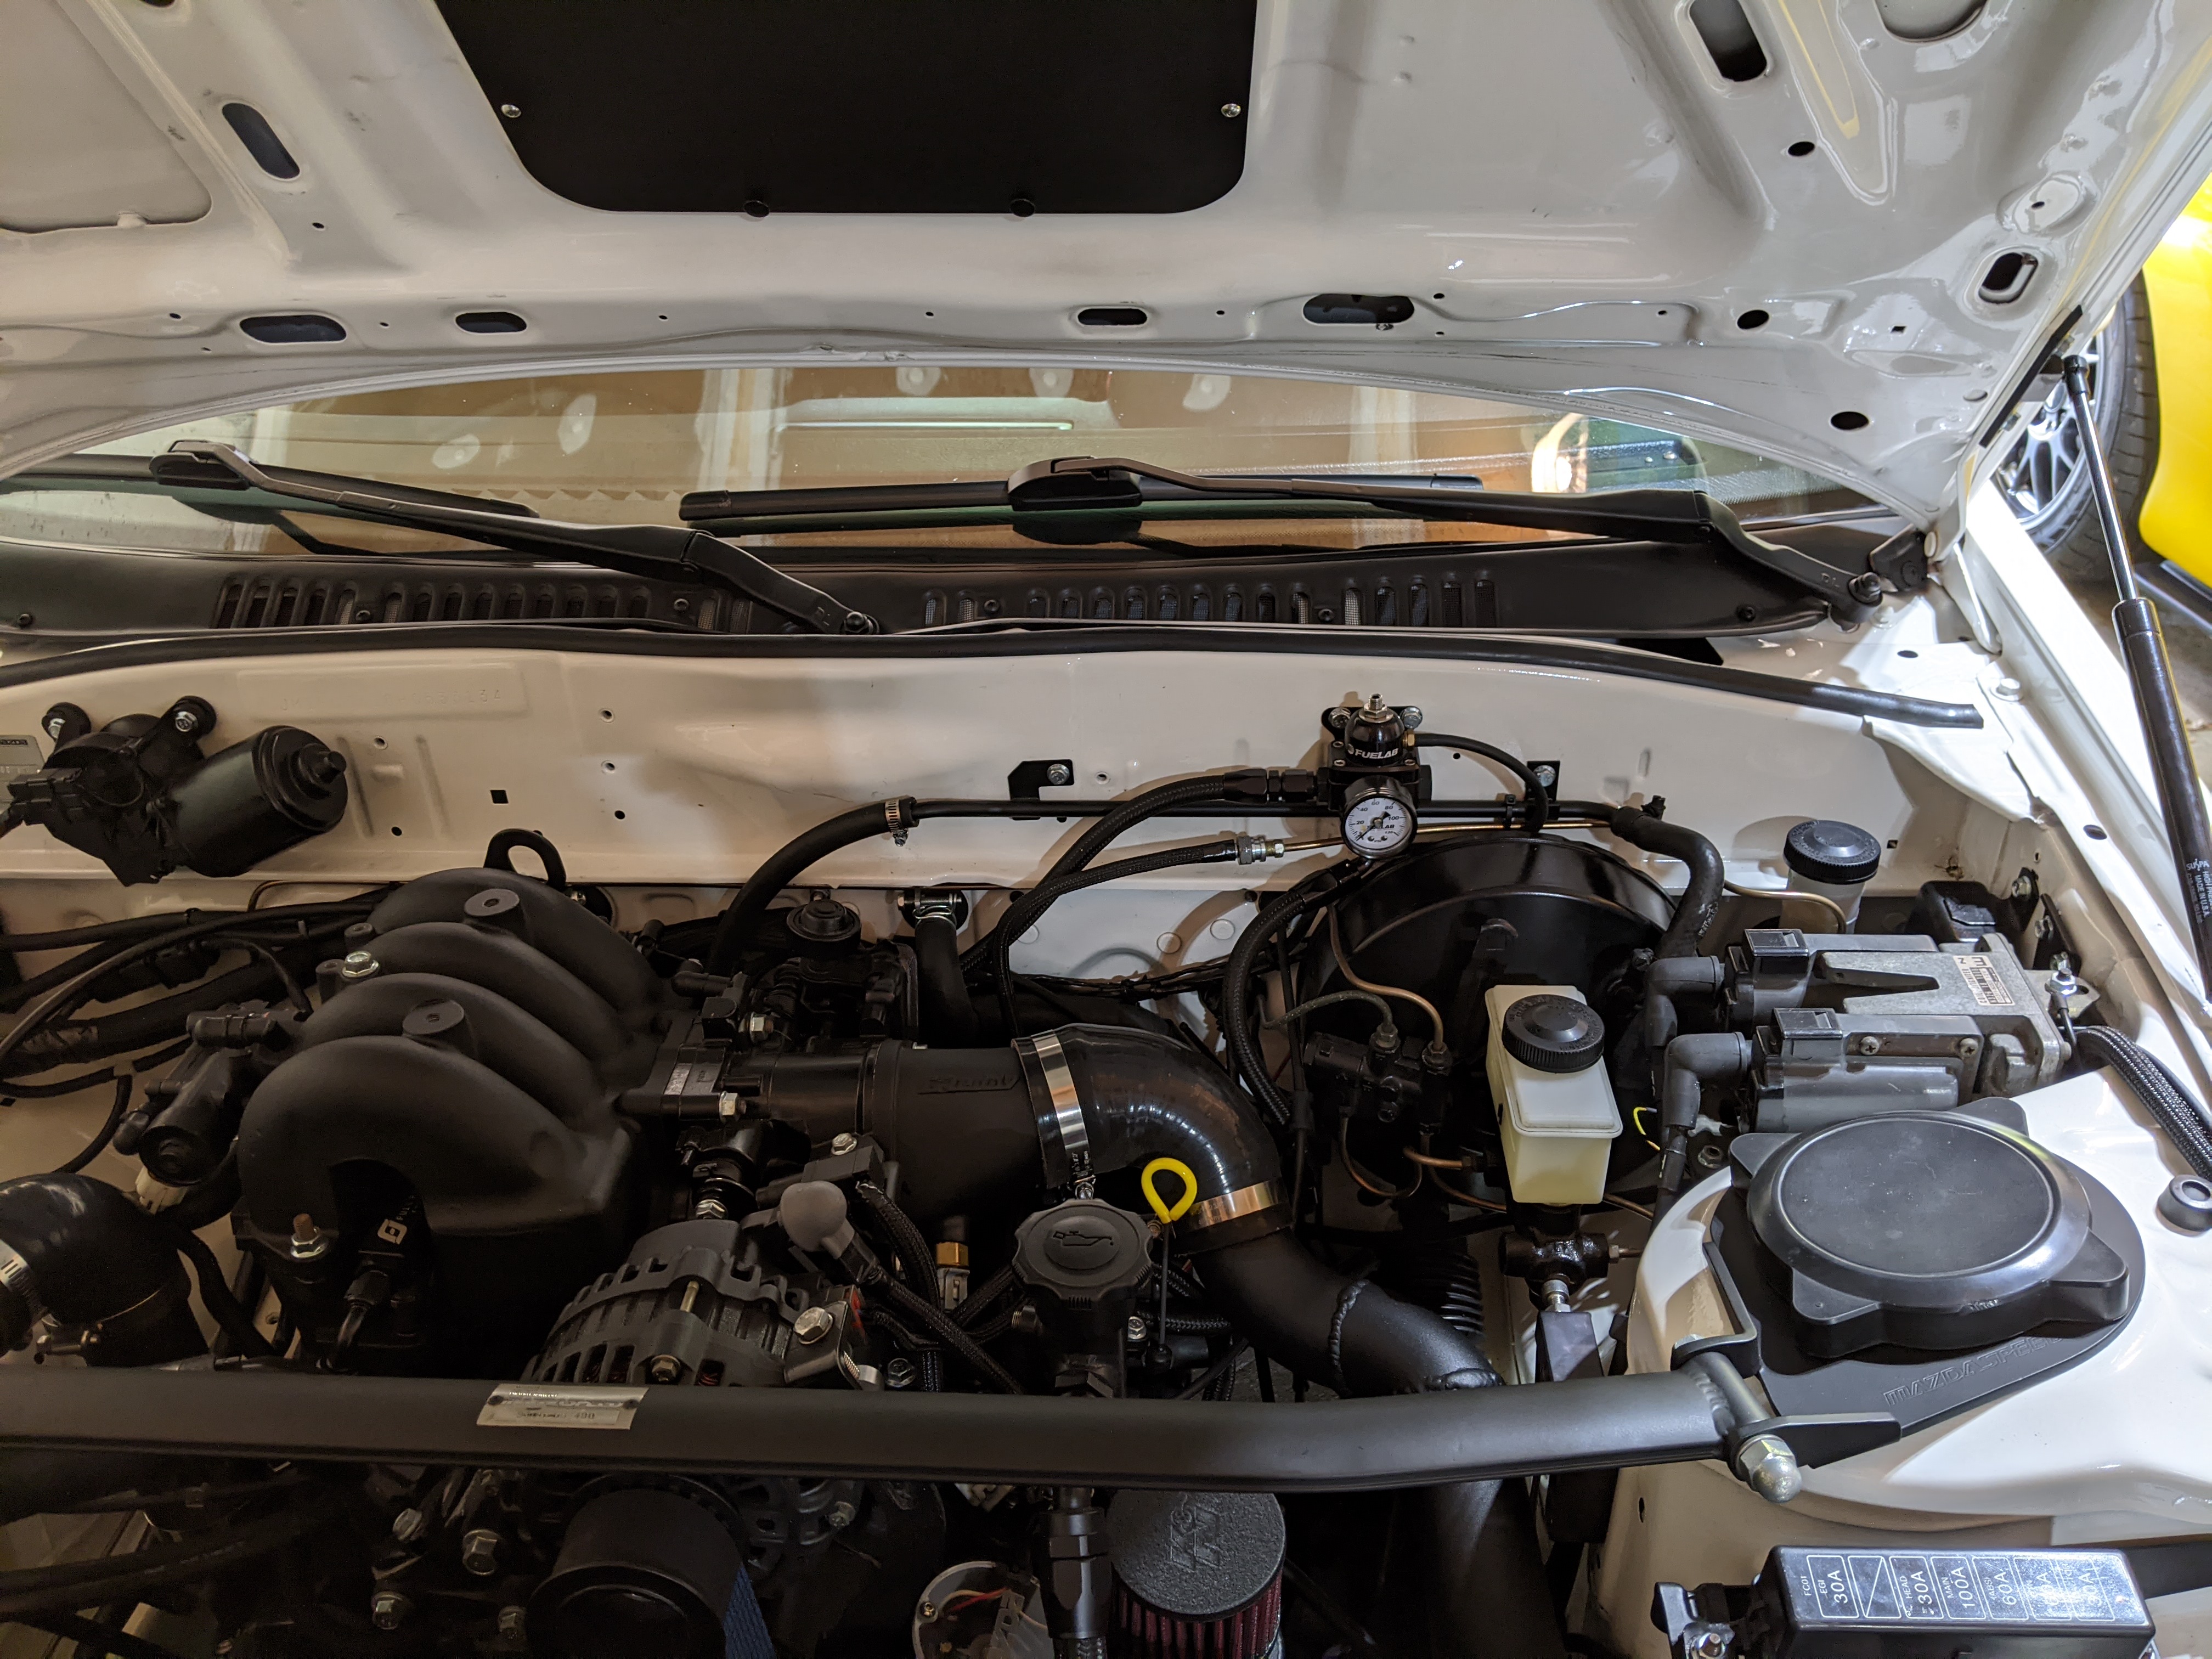
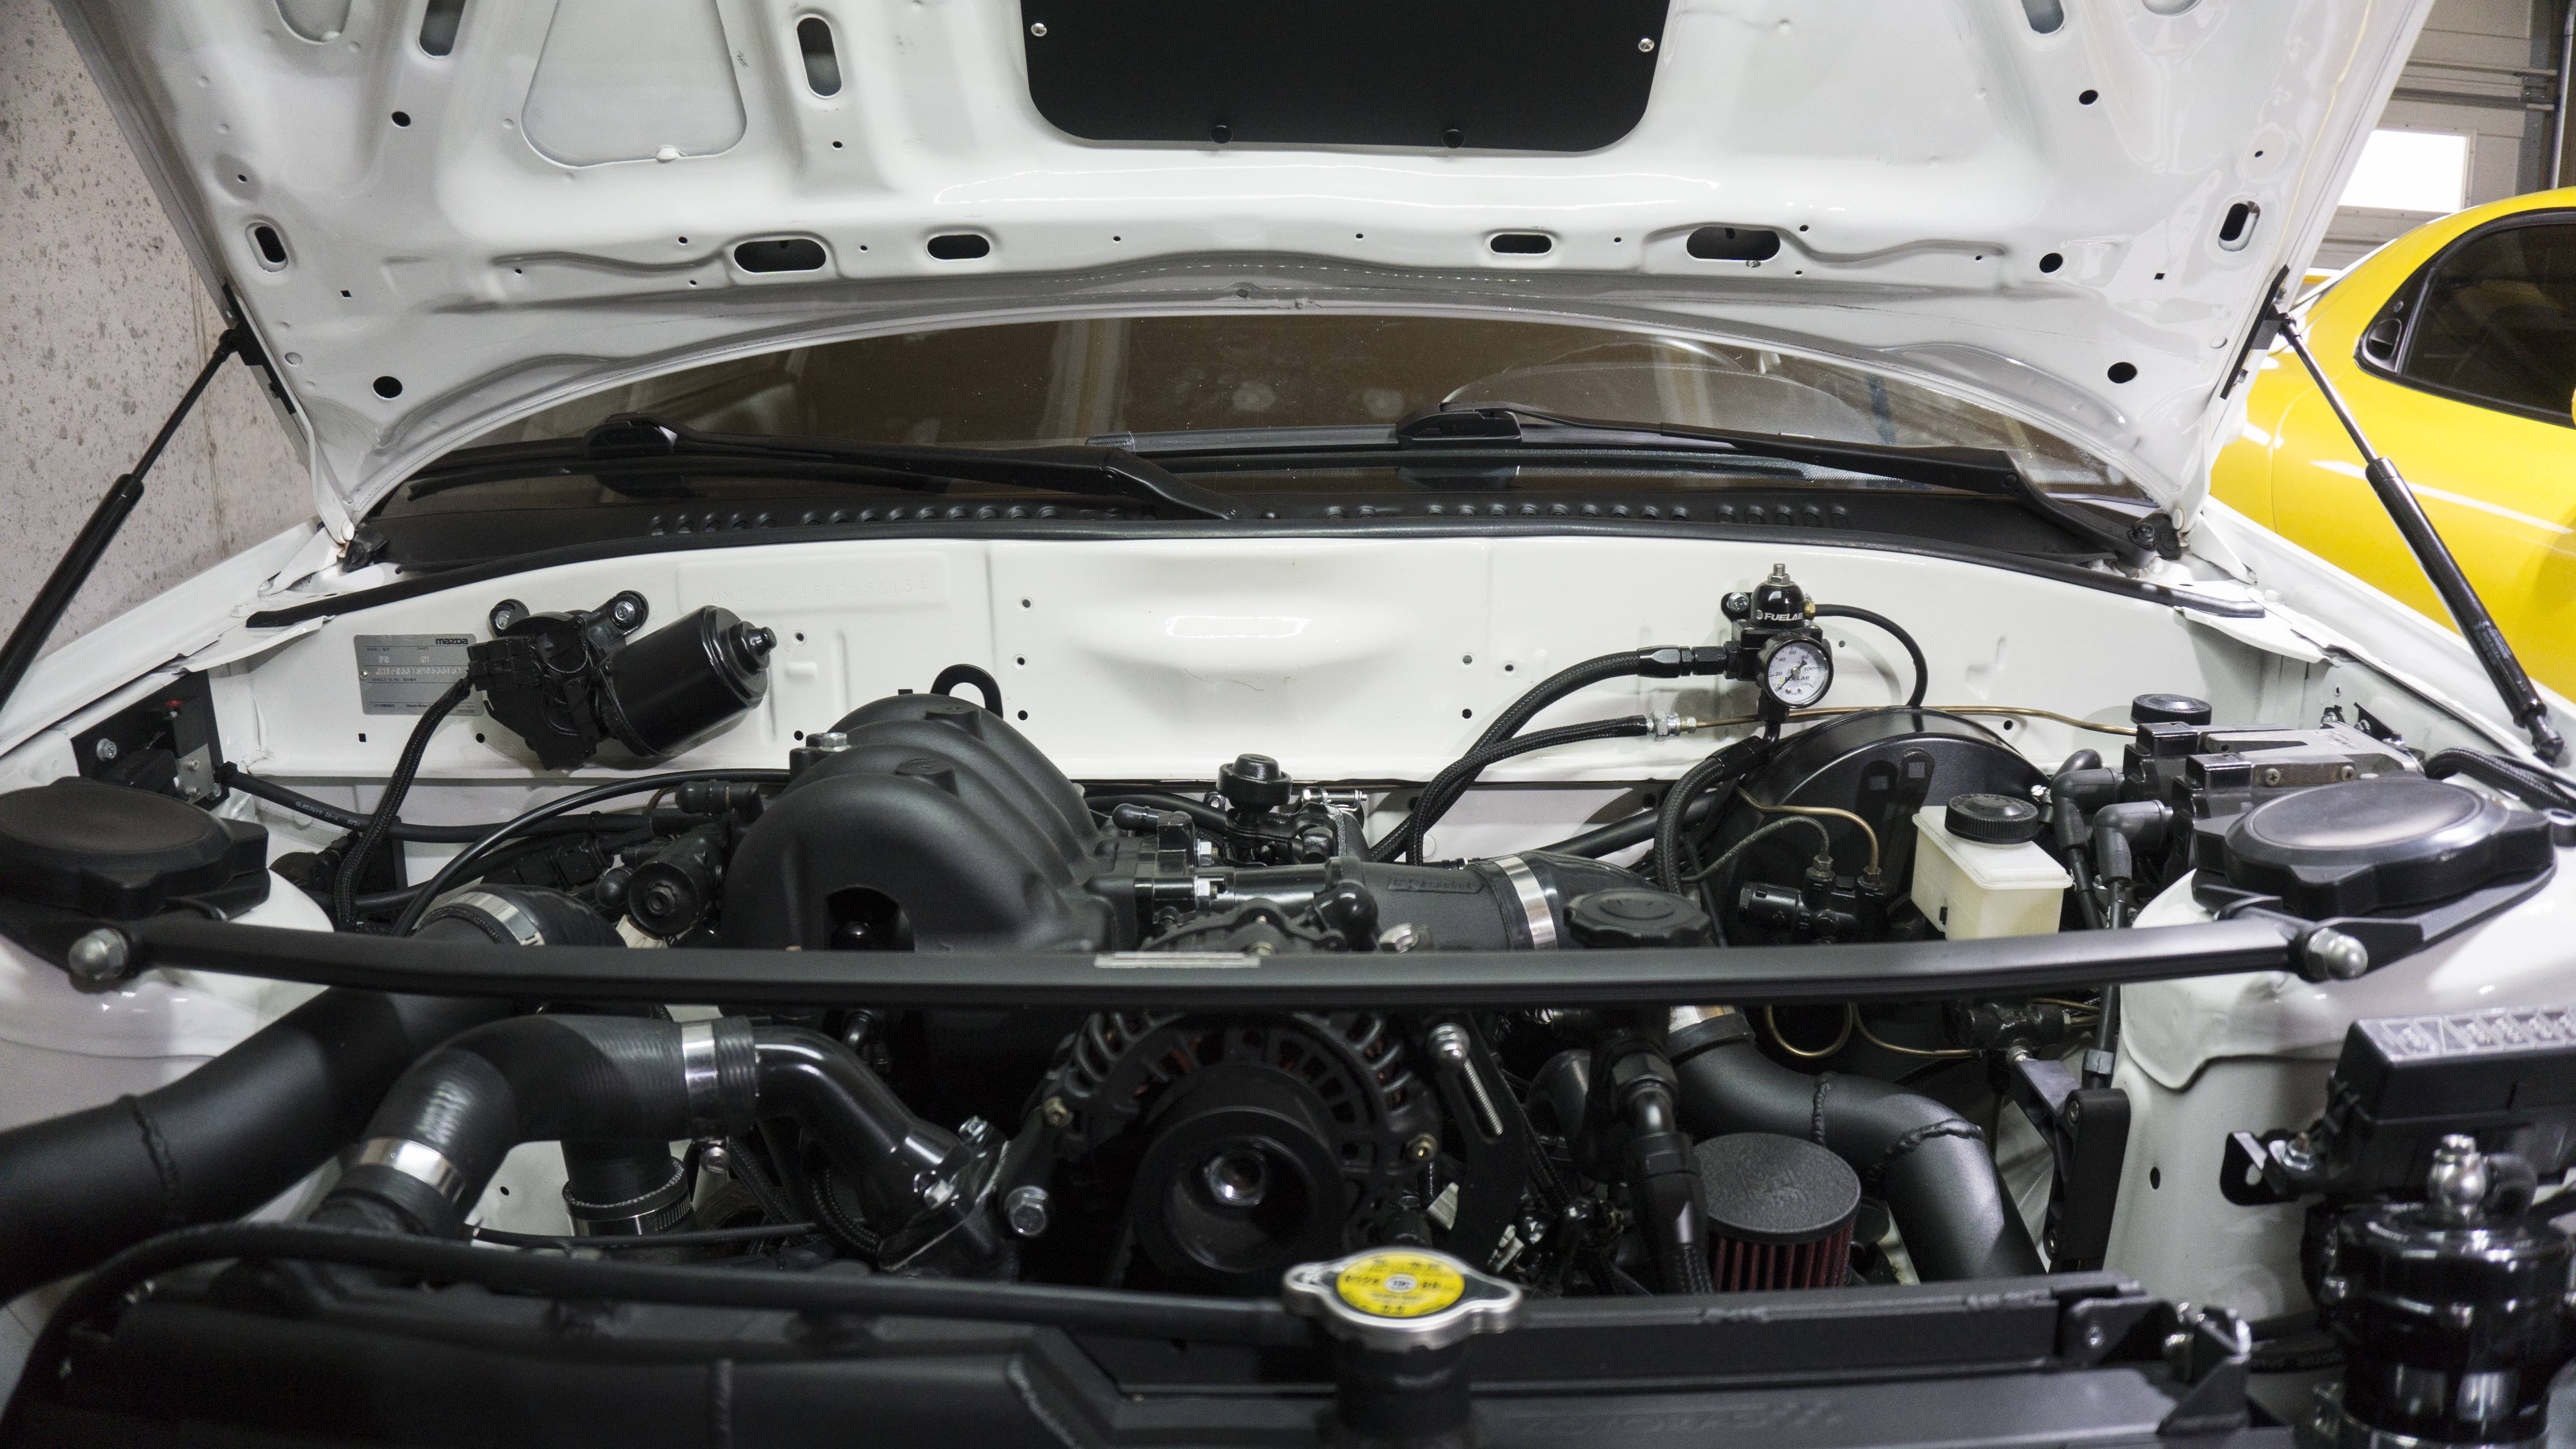
It�s been a little bit since the last update! I�ve done a couple of things to the car and made a couple of decisions on the car. First things first, I finally got the car on a dyno (I�ll have a fancy video below that my friend made). The load of the dyno compared to the street was way different� I was pig rich (10.4-10.6) through the entire range while on the dyno, but as soon as I hit the street AFR was exactly where it was when I tuned it. The car is also extremely safe on my ignition timing map. With all that being said, the car made 286 rwhp. I think with my fuel not pegged rich and my ignition timing actually tuned I should be around 310-325. Now, on to the decision I made. Given that the car is only going to make 325~ rwhp on it�s best day with the BNR I�ve decided to change things up - I�ve decided to go 20b NA in the FC. The focus for me currently is on acquiring a house, so I�m very slowly collecting parts. Thus far I�ve purchased the mounts, oil pan brace, and a couple of other odds and ends. Around Black Friday timeframe I plan on purchasing some more goods from Full Function Engineering. I�m doing it this way to cut the big cost at the end; once I acquire a house the rest is immediately being purchased. I�ve done some math and I�ll recoup a bit from selling my stuff and as I looked towards the final, final vision for the car it needed something extra out of the ordinary. I also purchased some brand new side markers and front turn signal lenses from Japan. No telling when those will become NLA and I didn�t want to be without a set if the car was ever in an accident. JP3 Motorsports was nice enough to make me some FC metal nut blockers. I know tape and everything else works too, but these are super convenient to grab and throw over the top. I�d definitely recommend picking some up before they are no longer made again.
In regards to actually working on the car I installed the JP3 Motorsports black alternator boot cover instead of the grey one I had. I also finally deleted the vacuum hardline on the firewall. I think it really helped clean up that area. Although the next step in the FC�s journey is semi-on the back burner, I�m incredibly excited to see it through.
Here�s all the normal stuff that came in
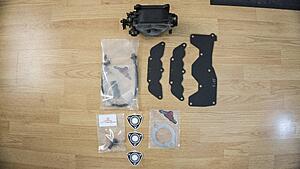
Here�s stuff for the 20b
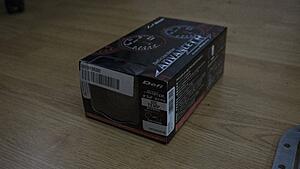
Here�s the new alternator terminal boot
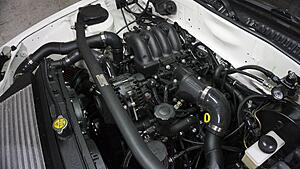
Here's the hard line delete
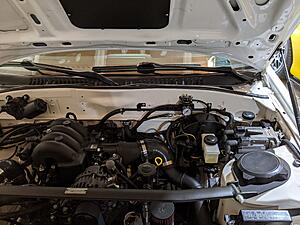
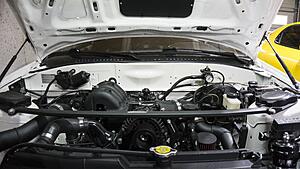
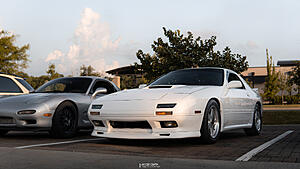
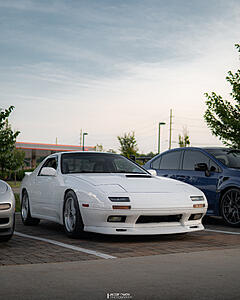
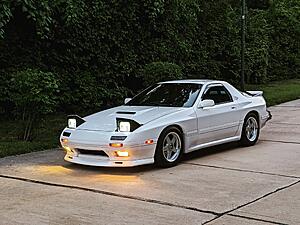
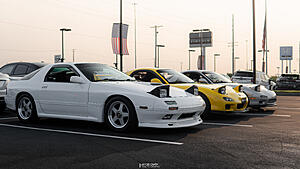
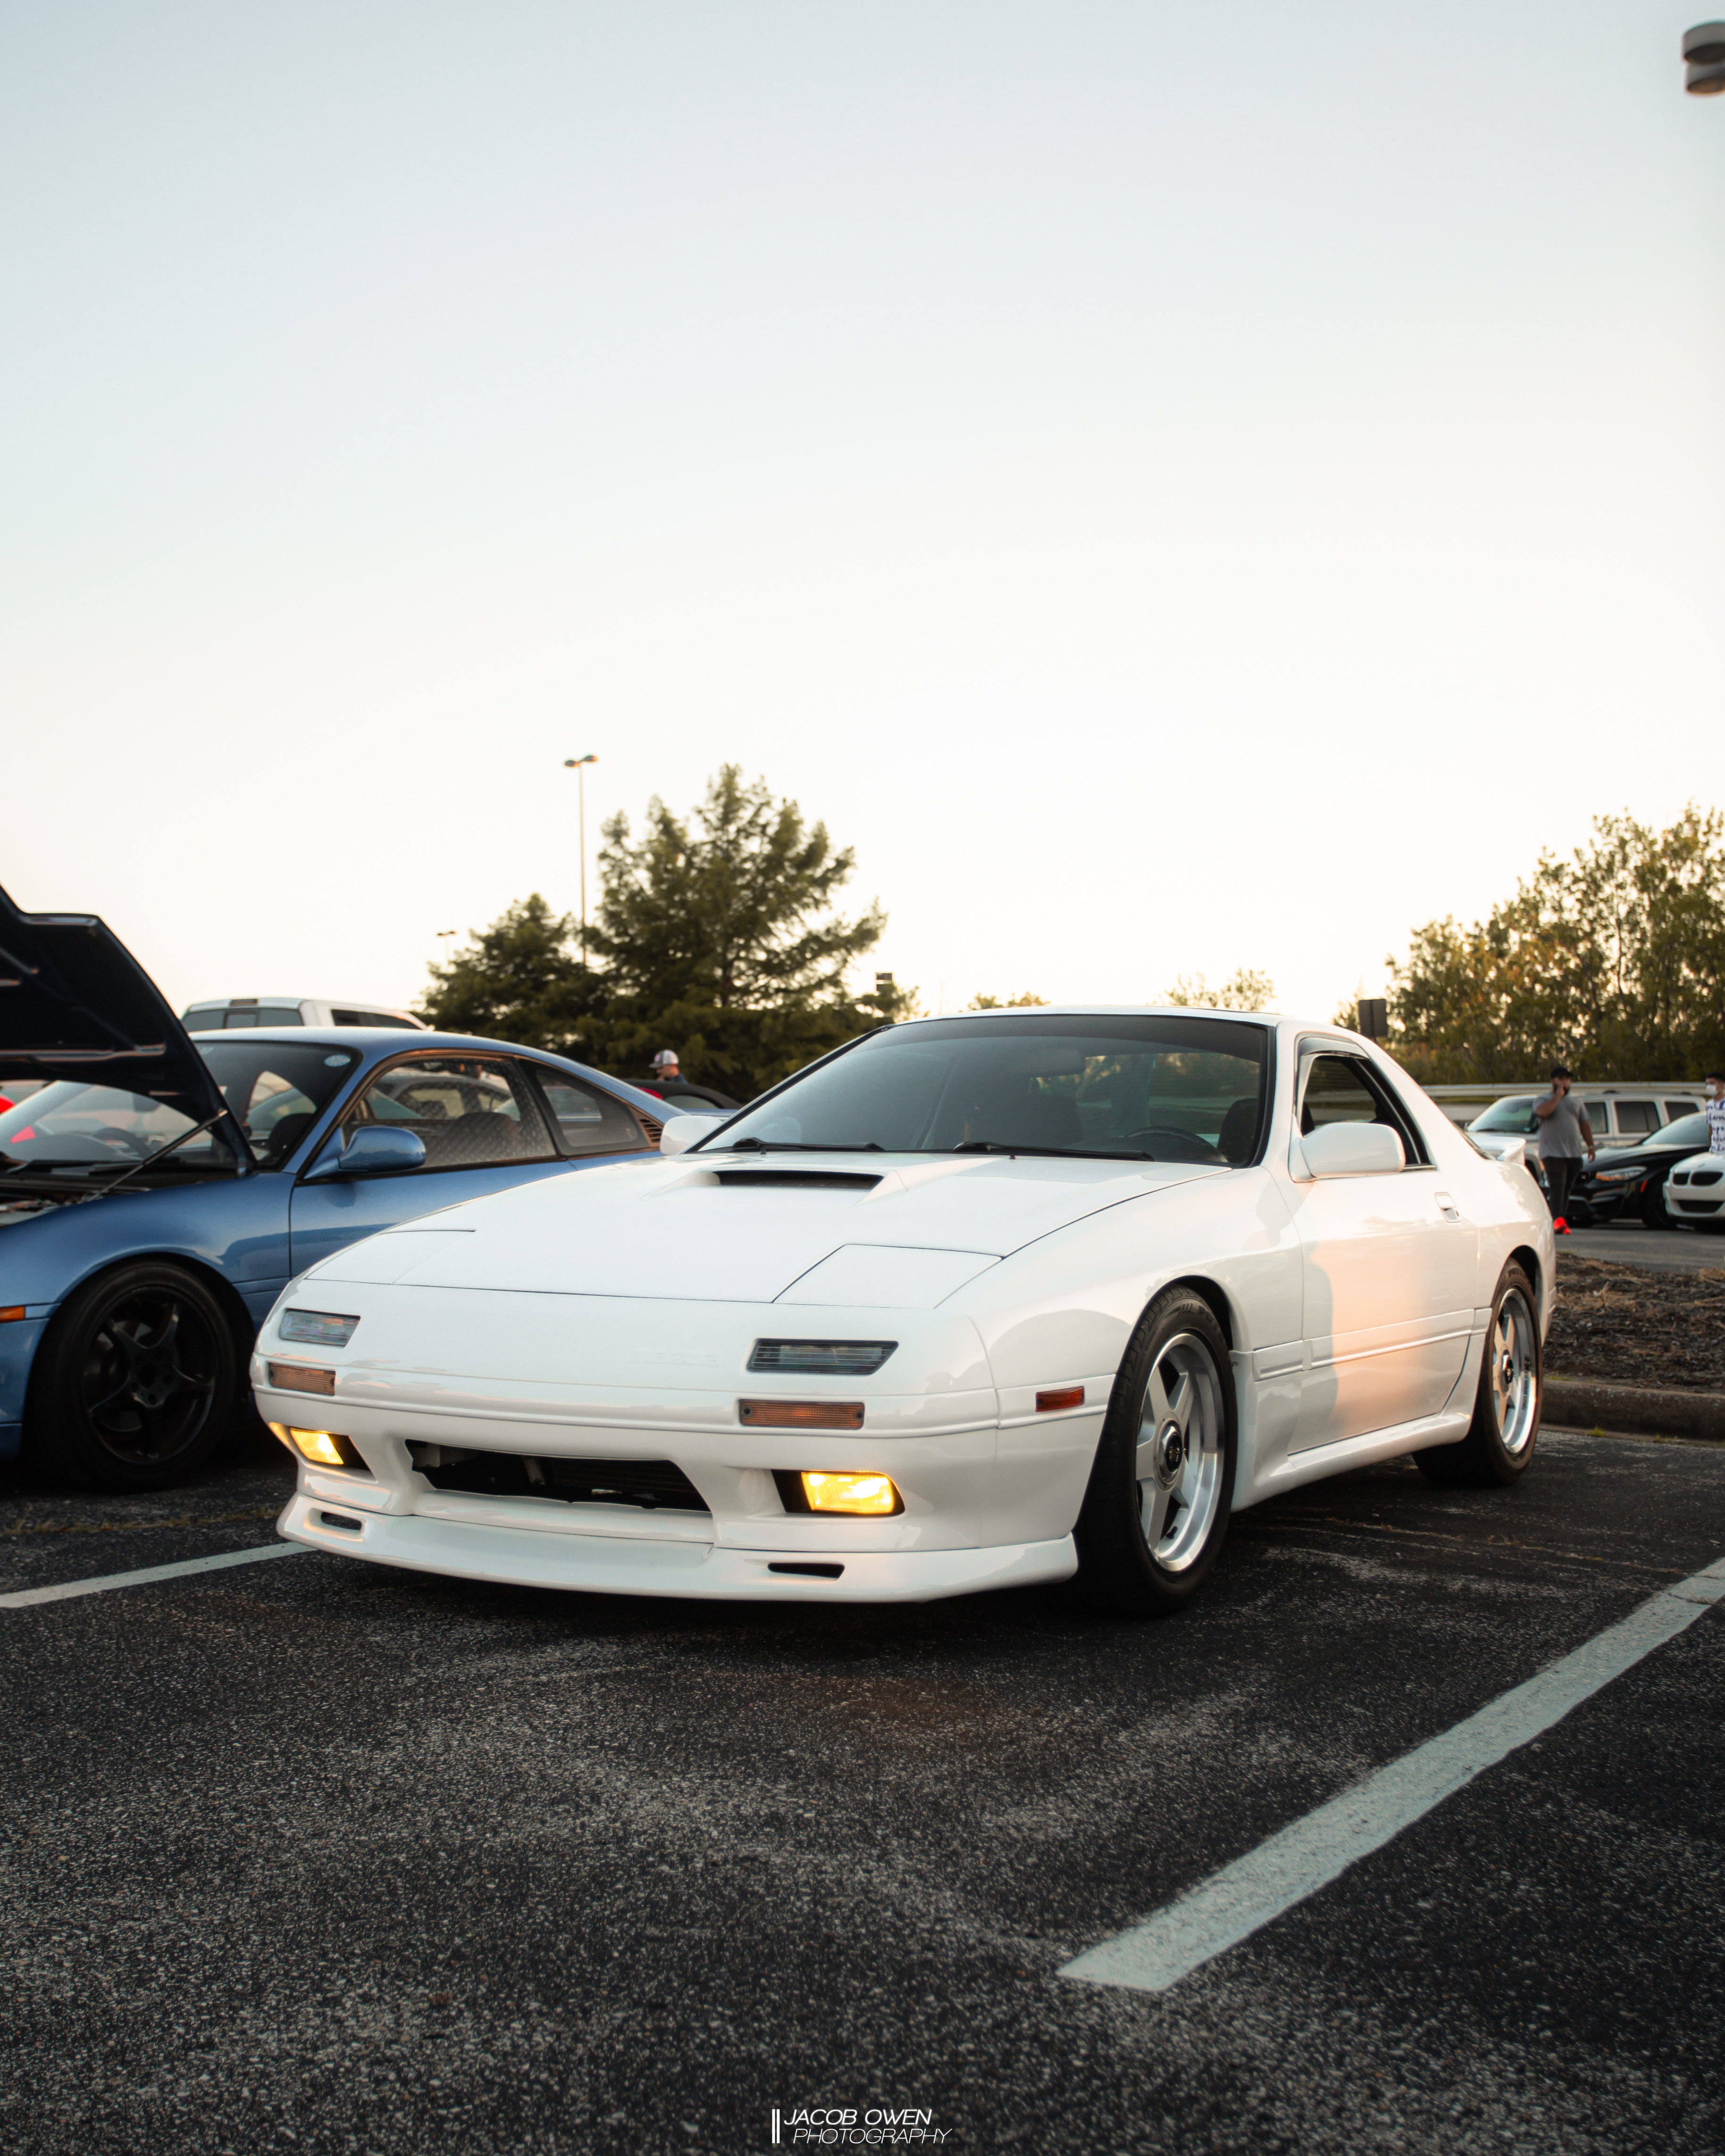
Here's some latest pictures of the car

Here's the Youtube video my friend made of the Dyno
Bonus Youtube of my friend riding with me in the car
It�s been a little bit since the last update! I�ve done a couple of things to the car and made a couple of decisions on the car. First things first, I finally got the car on a dyno (I�ll have a fancy video below that my friend made). The load of the dyno compared to the street was way different� I was pig rich (10.4-10.6) through the entire range while on the dyno, but as soon as I hit the street AFR was exactly where it was when I tuned it. The car is also extremely safe on my ignition timing map. With all that being said, the car made 286 rwhp. I think with my fuel not pegged rich and my ignition timing actually tuned I should be around 310-325. Now, on to the decision I made. Given that the car is only going to make 325~ rwhp on it�s best day with the BNR I�ve decided to change things up - I�ve decided to go 20b NA in the FC. The focus for me currently is on acquiring a house, so I�m very slowly collecting parts. Thus far I�ve purchased the mounts, oil pan brace, and a couple of other odds and ends. Around Black Friday timeframe I plan on purchasing some more goods from Full Function Engineering. I�m doing it this way to cut the big cost at the end; once I acquire a house the rest is immediately being purchased. I�ve done some math and I�ll recoup a bit from selling my stuff and as I looked towards the final, final vision for the car it needed something extra out of the ordinary. I also purchased some brand new side markers and front turn signal lenses from Japan. No telling when those will become NLA and I didn�t want to be without a set if the car was ever in an accident. JP3 Motorsports was nice enough to make me some FC metal nut blockers. I know tape and everything else works too, but these are super convenient to grab and throw over the top. I�d definitely recommend picking some up before they are no longer made again.
In regards to actually working on the car I installed the JP3 Motorsports black alternator boot cover instead of the grey one I had. I also finally deleted the vacuum hardline on the firewall. I think it really helped clean up that area. Although the next step in the FC�s journey is semi-on the back burner, I�m incredibly excited to see it through.
Here�s all the normal stuff that came in


Here�s stuff for the 20b
Here�s the new alternator terminal boot
Here's the hard line delete

Here's some latest pictures of the car

Here's the Youtube video my friend made of the Dyno
Bonus Youtube of my friend riding with me in the car
10-01-20, 01:31 PM
#323
I wish I was driving!
10-02-20, 08:42 AM
#325
It'll be awhile before the engine is put up for sale; concentrating on a house first. I won't be having a shop do the work. Initial plan is just to drop whatever engine I acquire in the car and run it until it starts to get tired. Then I'd overhaul and go ITB.