From Zero to Hero: Heavy JDM Influenced Restoration


 01-18-20, 05:16 PM
#280
Update 1/18/2020:
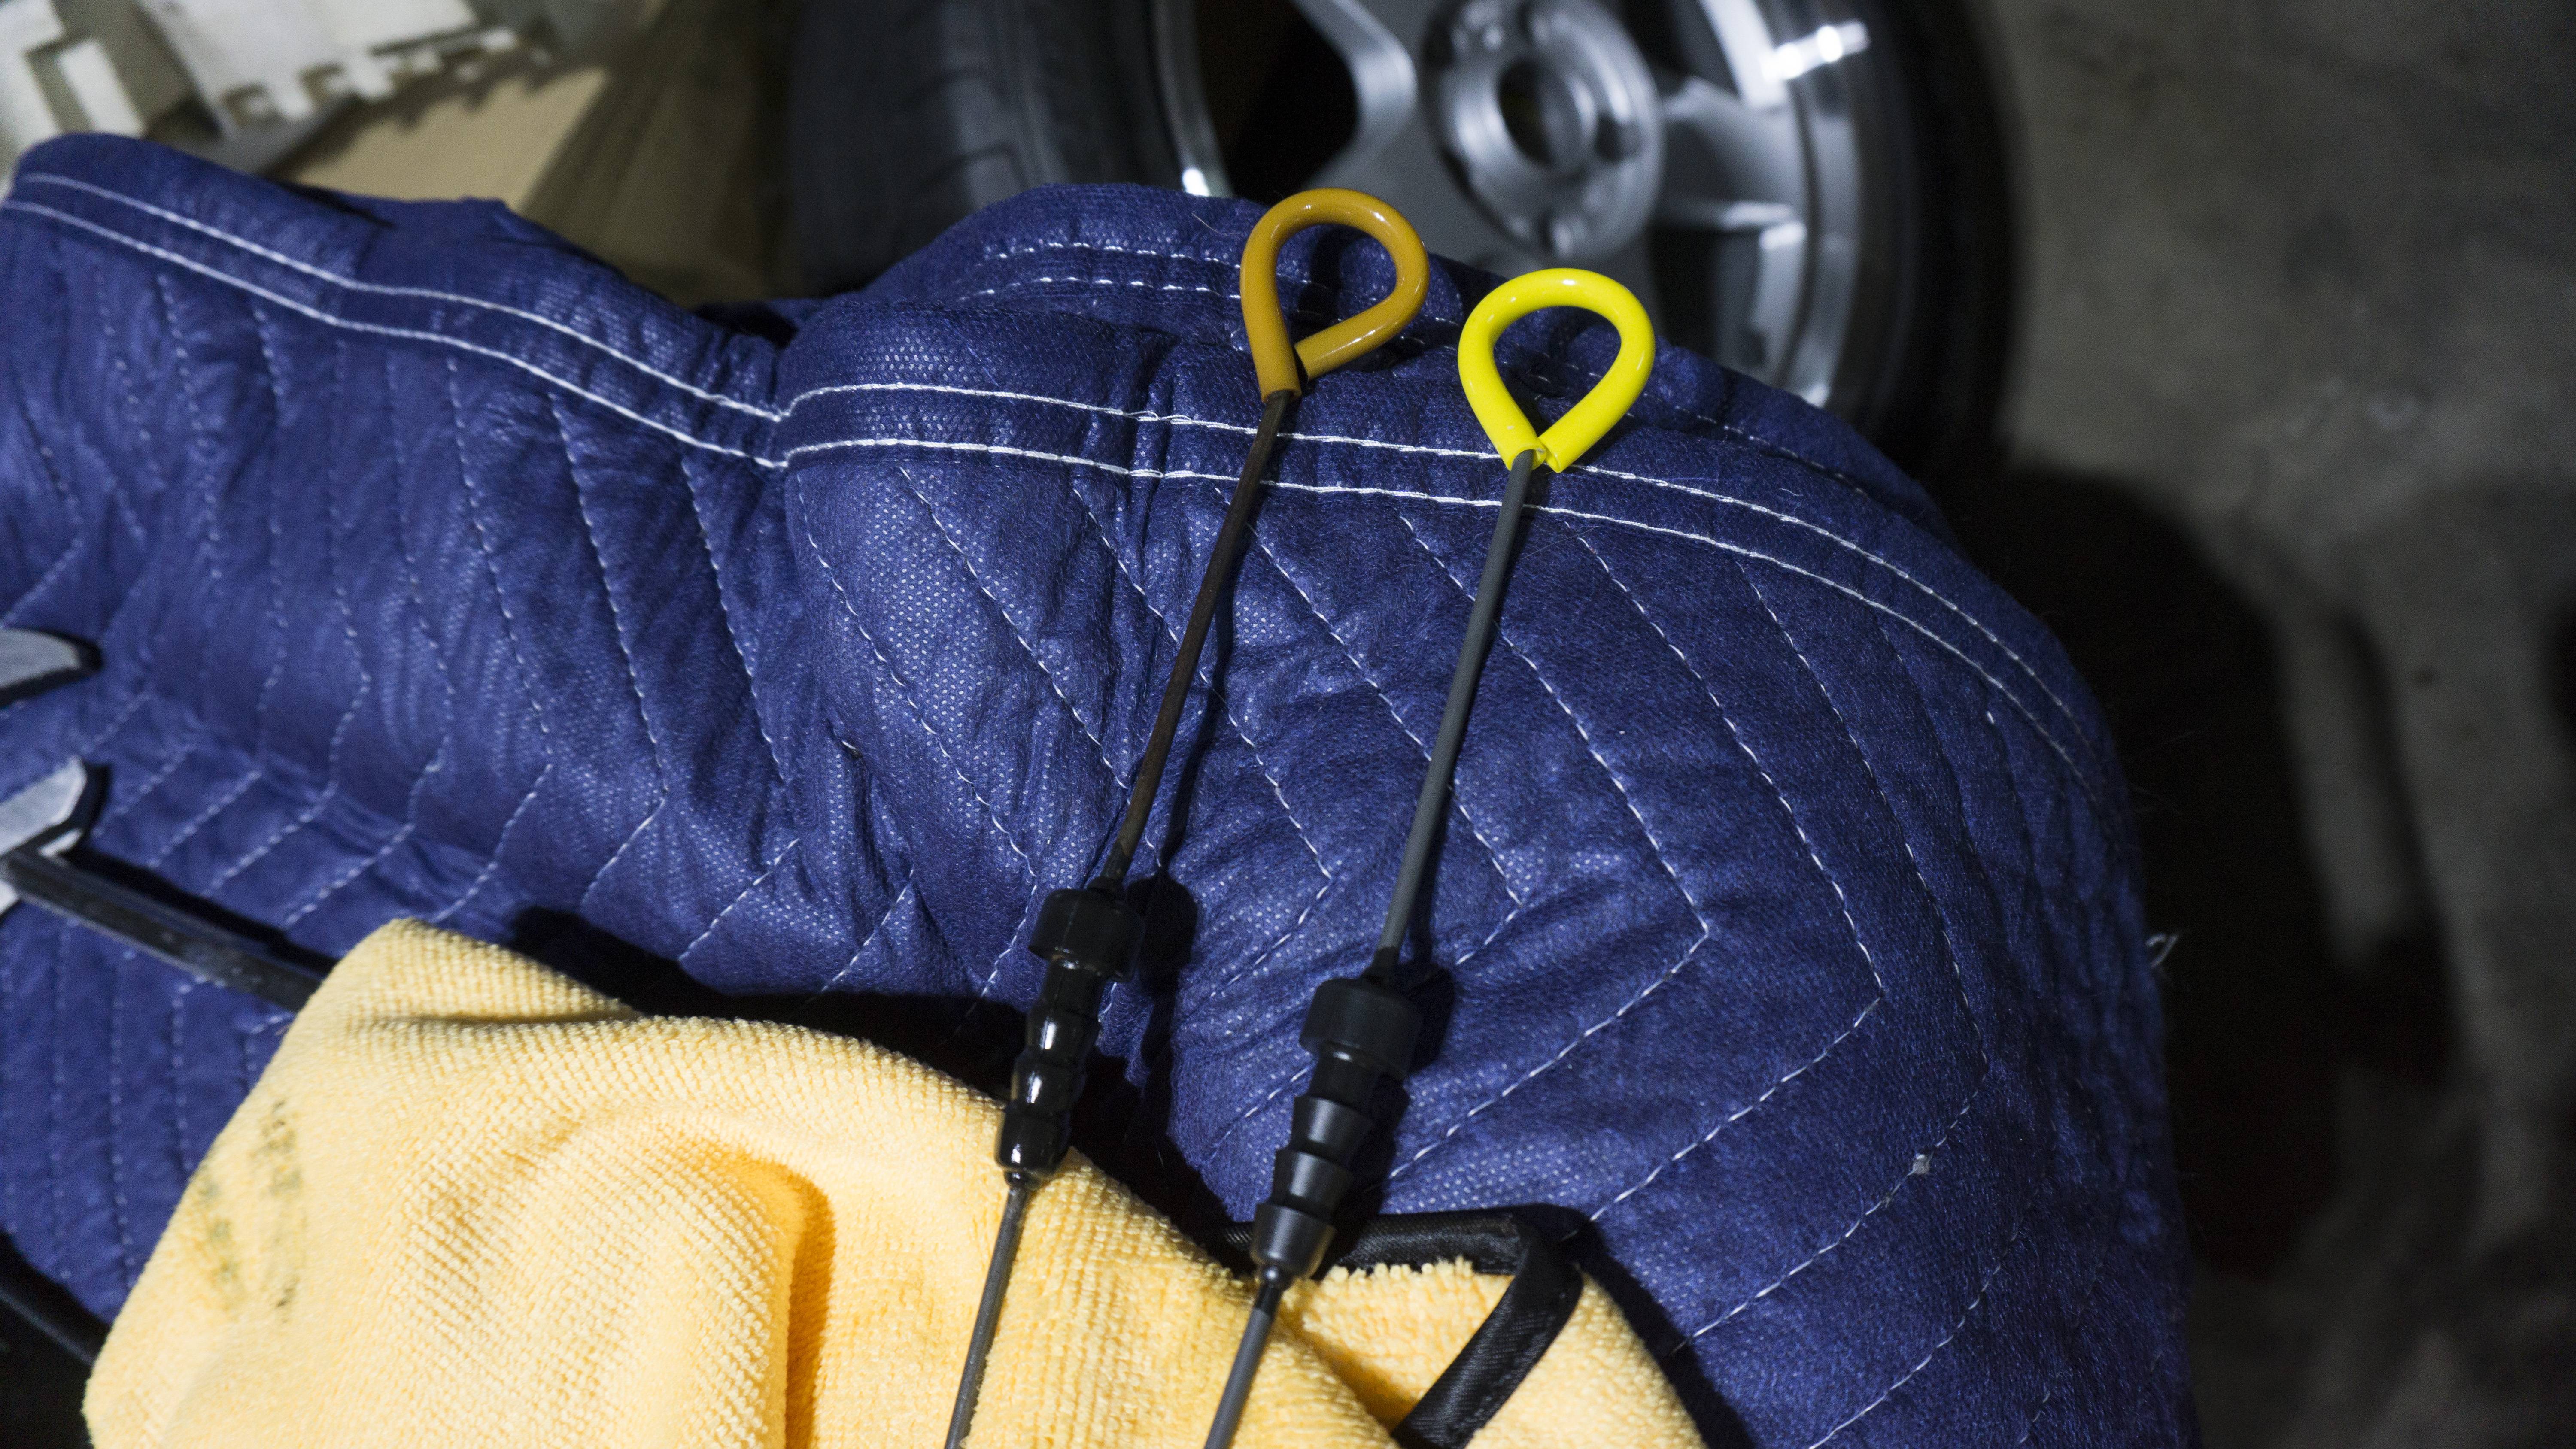
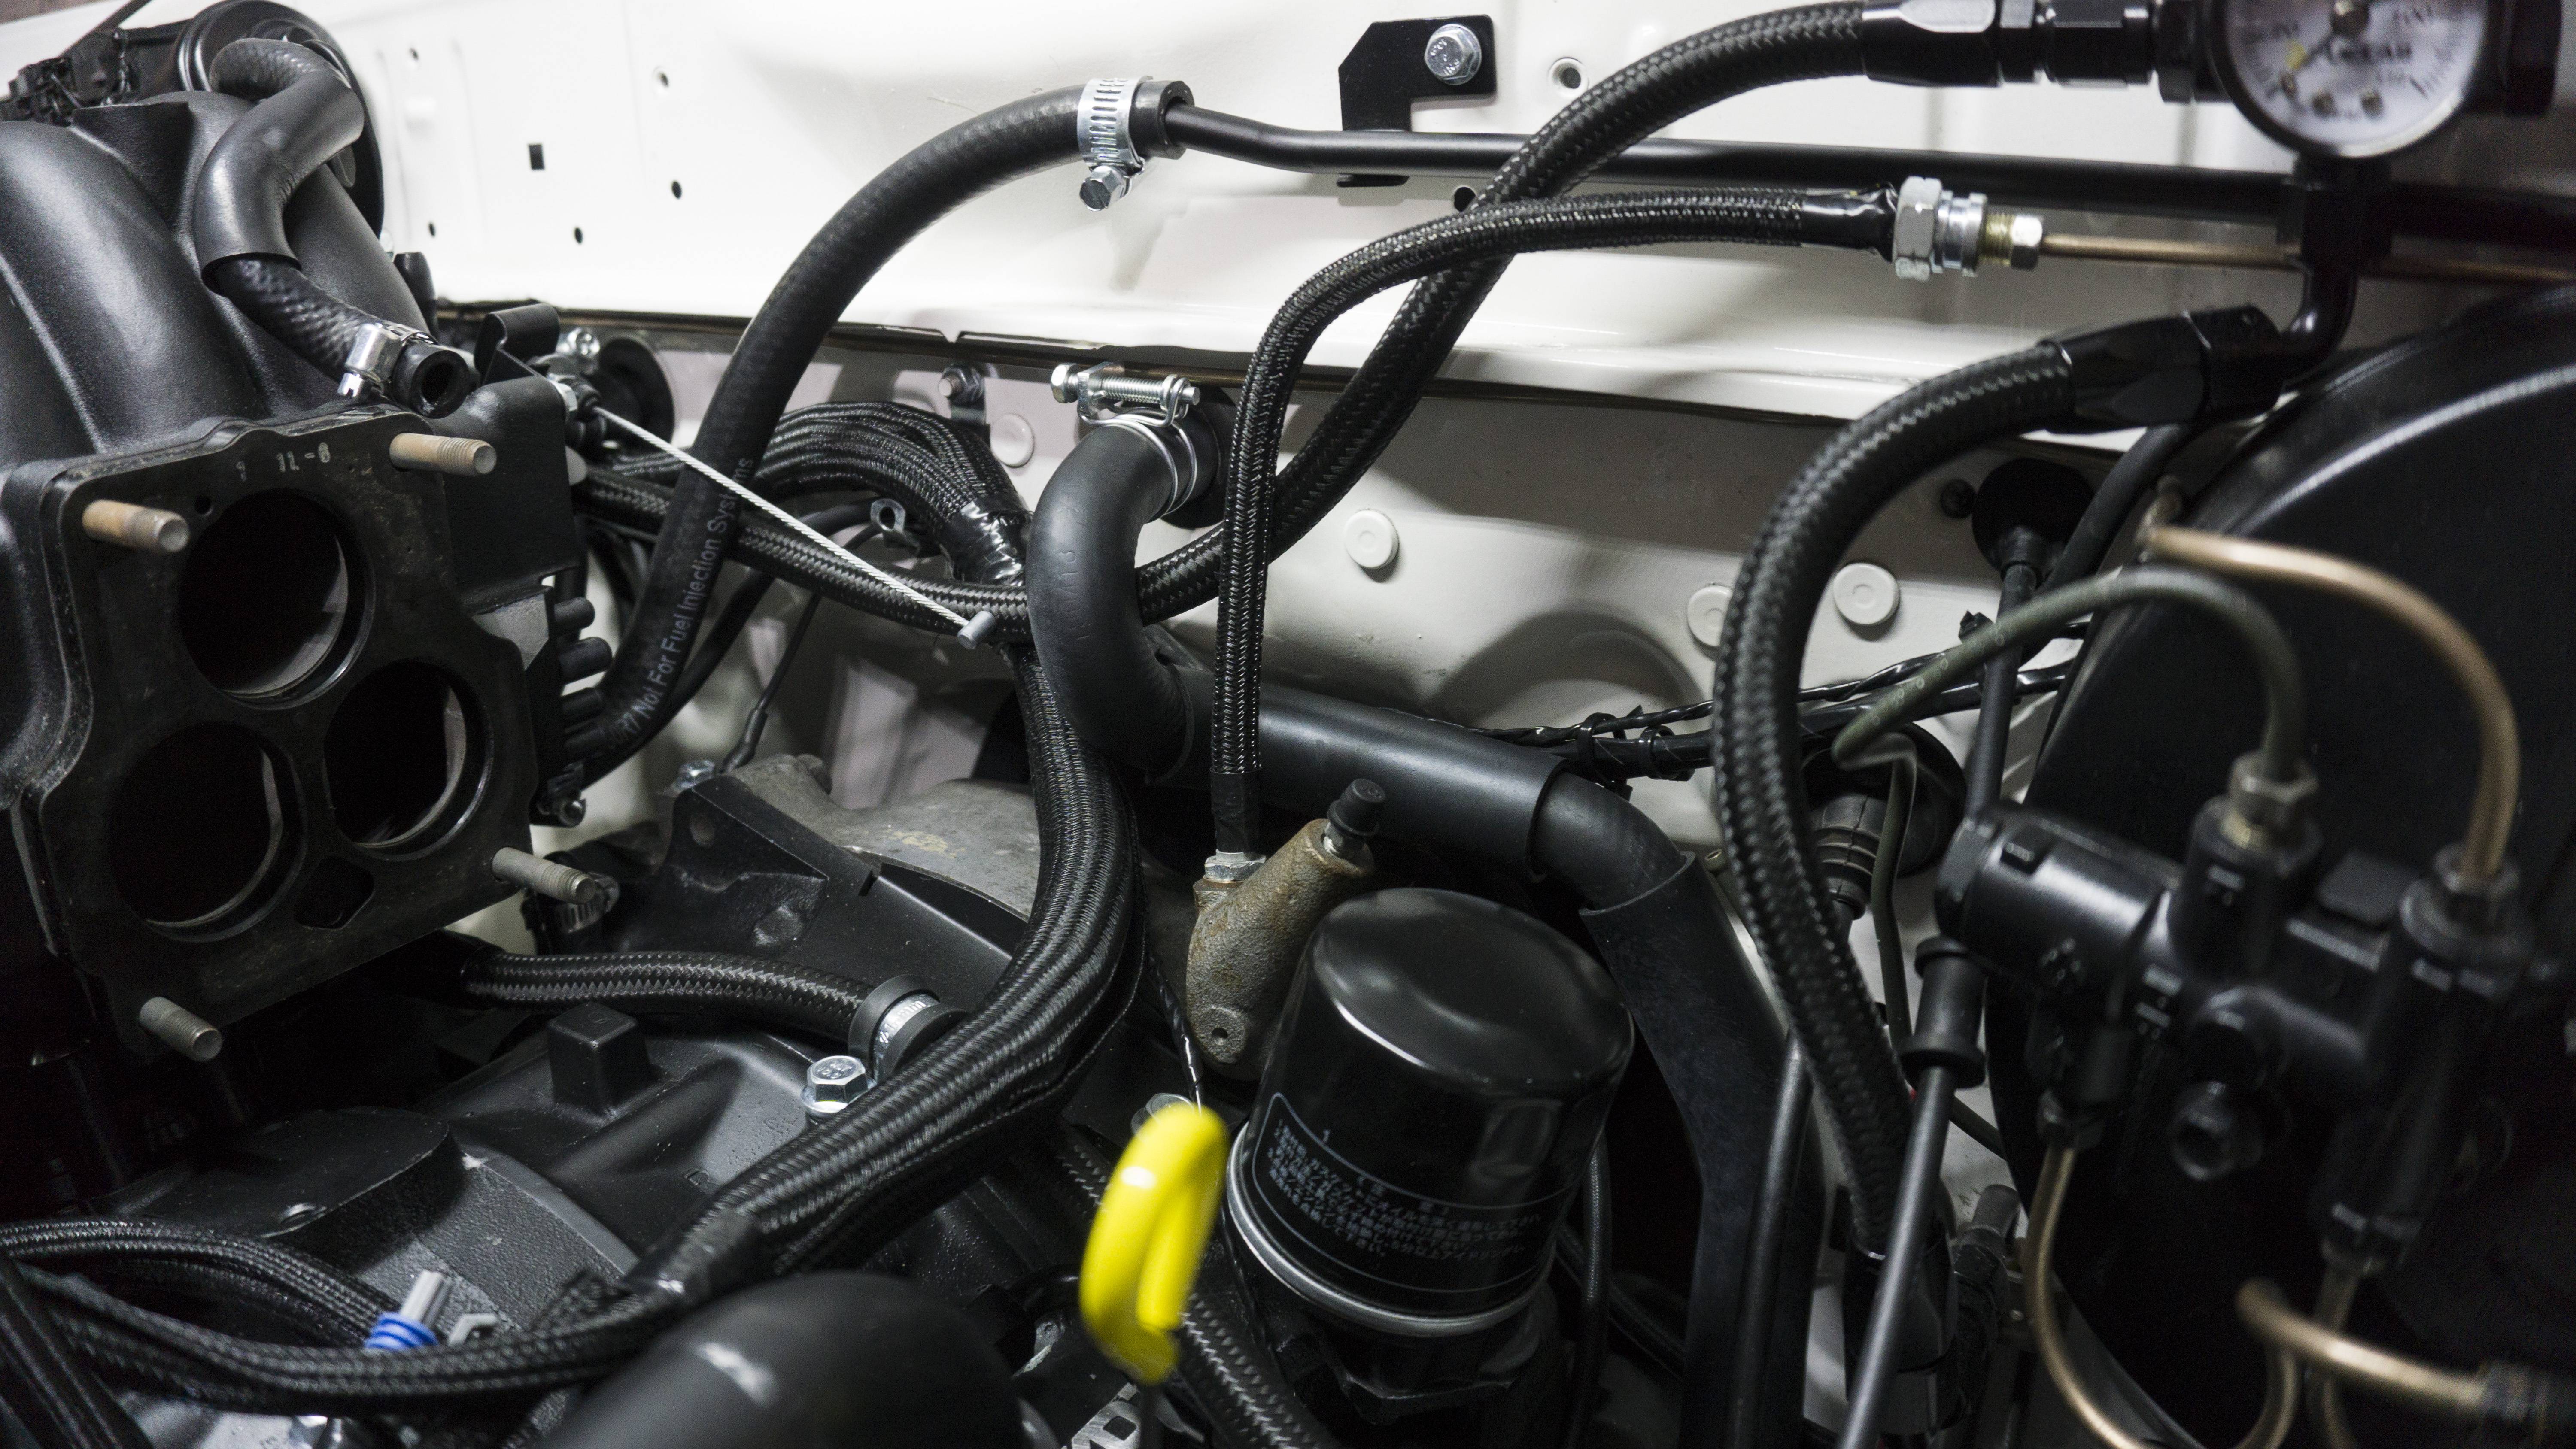
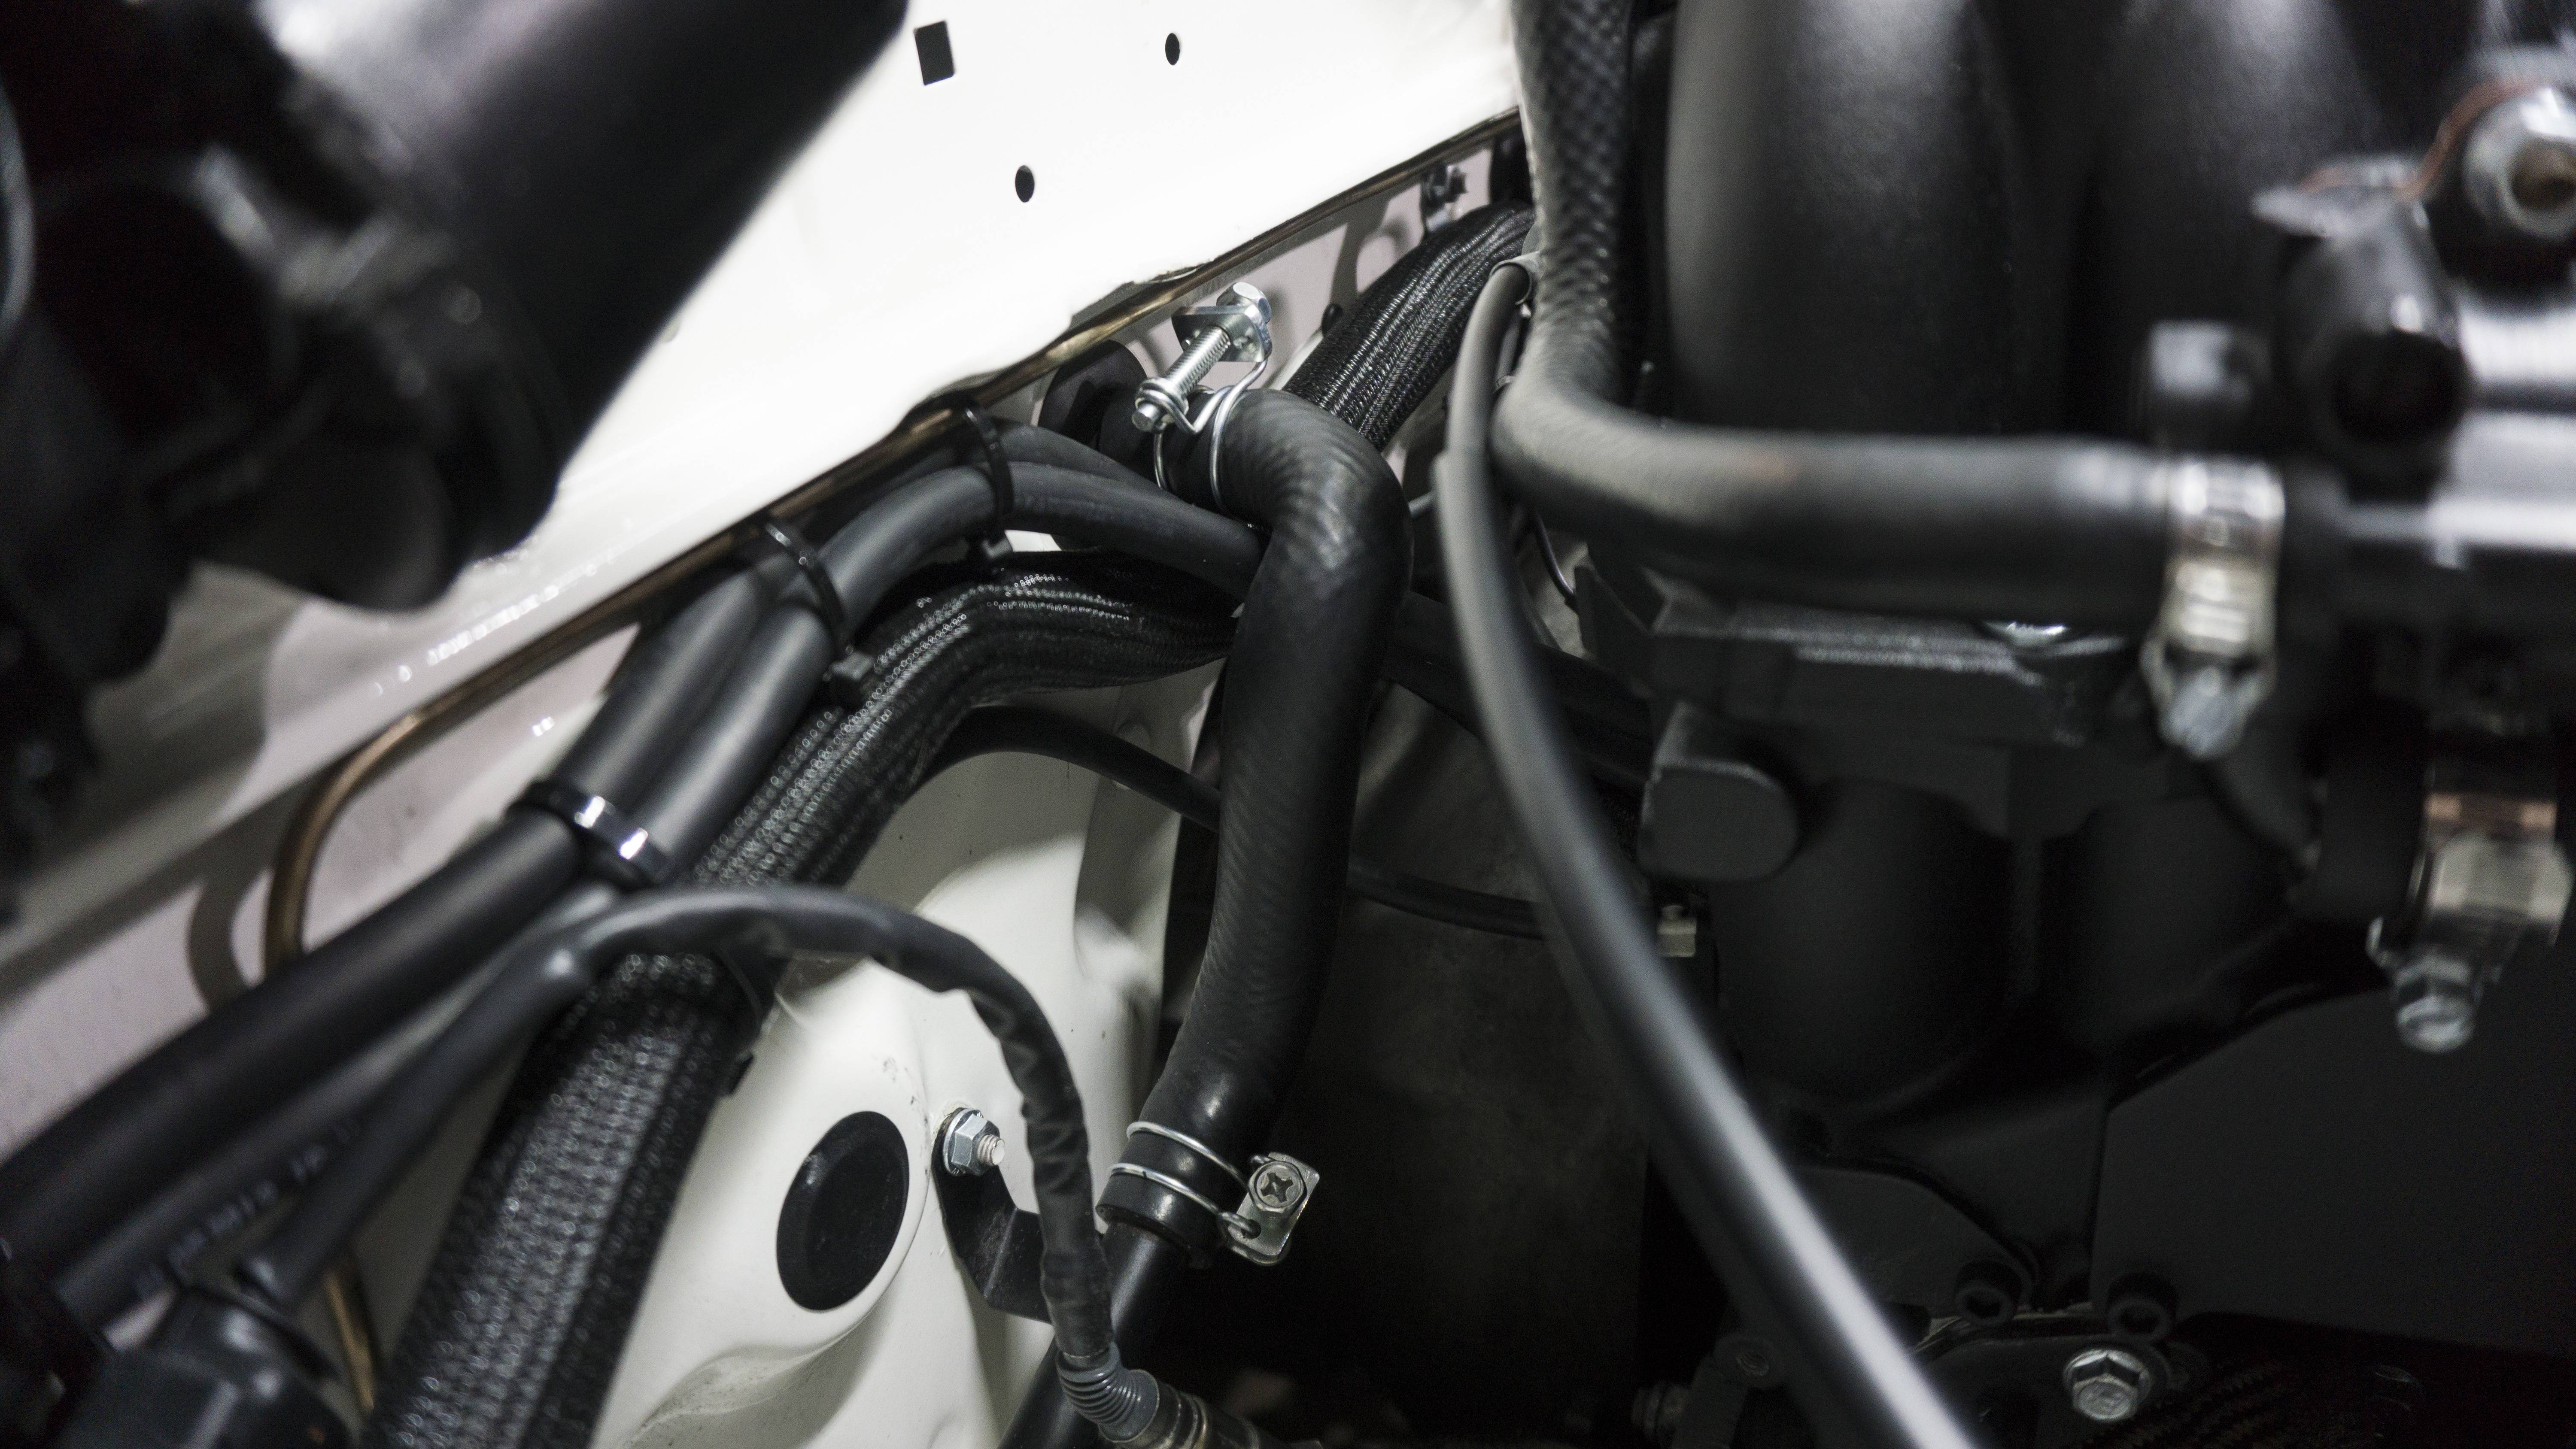
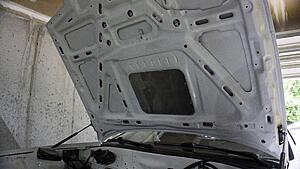
Well, I got idle dialed in.. only for the front oil line to pop out. I�m not sure what caused that, but I lost a quart and a half of oil until I noticed. I spent most of the day cleaning that up. However! I�m not going to let that keep me down, I�ll just rebuild the line and be good to go. I am still working on other things while doing this. I got all of my intake piping clamped on. I had to order a 65 degree coupler for the APEXi intake as the older one didn�t want to work. I also finally decided to put on my new oil dipstick. It�s incredible the difference in shades between the original and a brand new one. I also dropped my hood and side skirts off at paint. I�m holding off throwing the side skirts on until I�m able to give the car a good bath. I want the paint under the skirts to be clean before they go on. Next steps are to get that oil line replaced and then get back to tuning. I�m really close to the finish line!
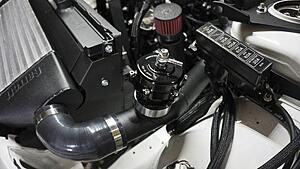
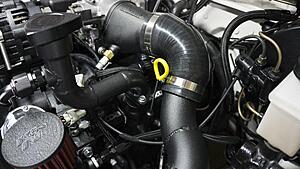
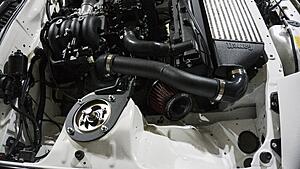
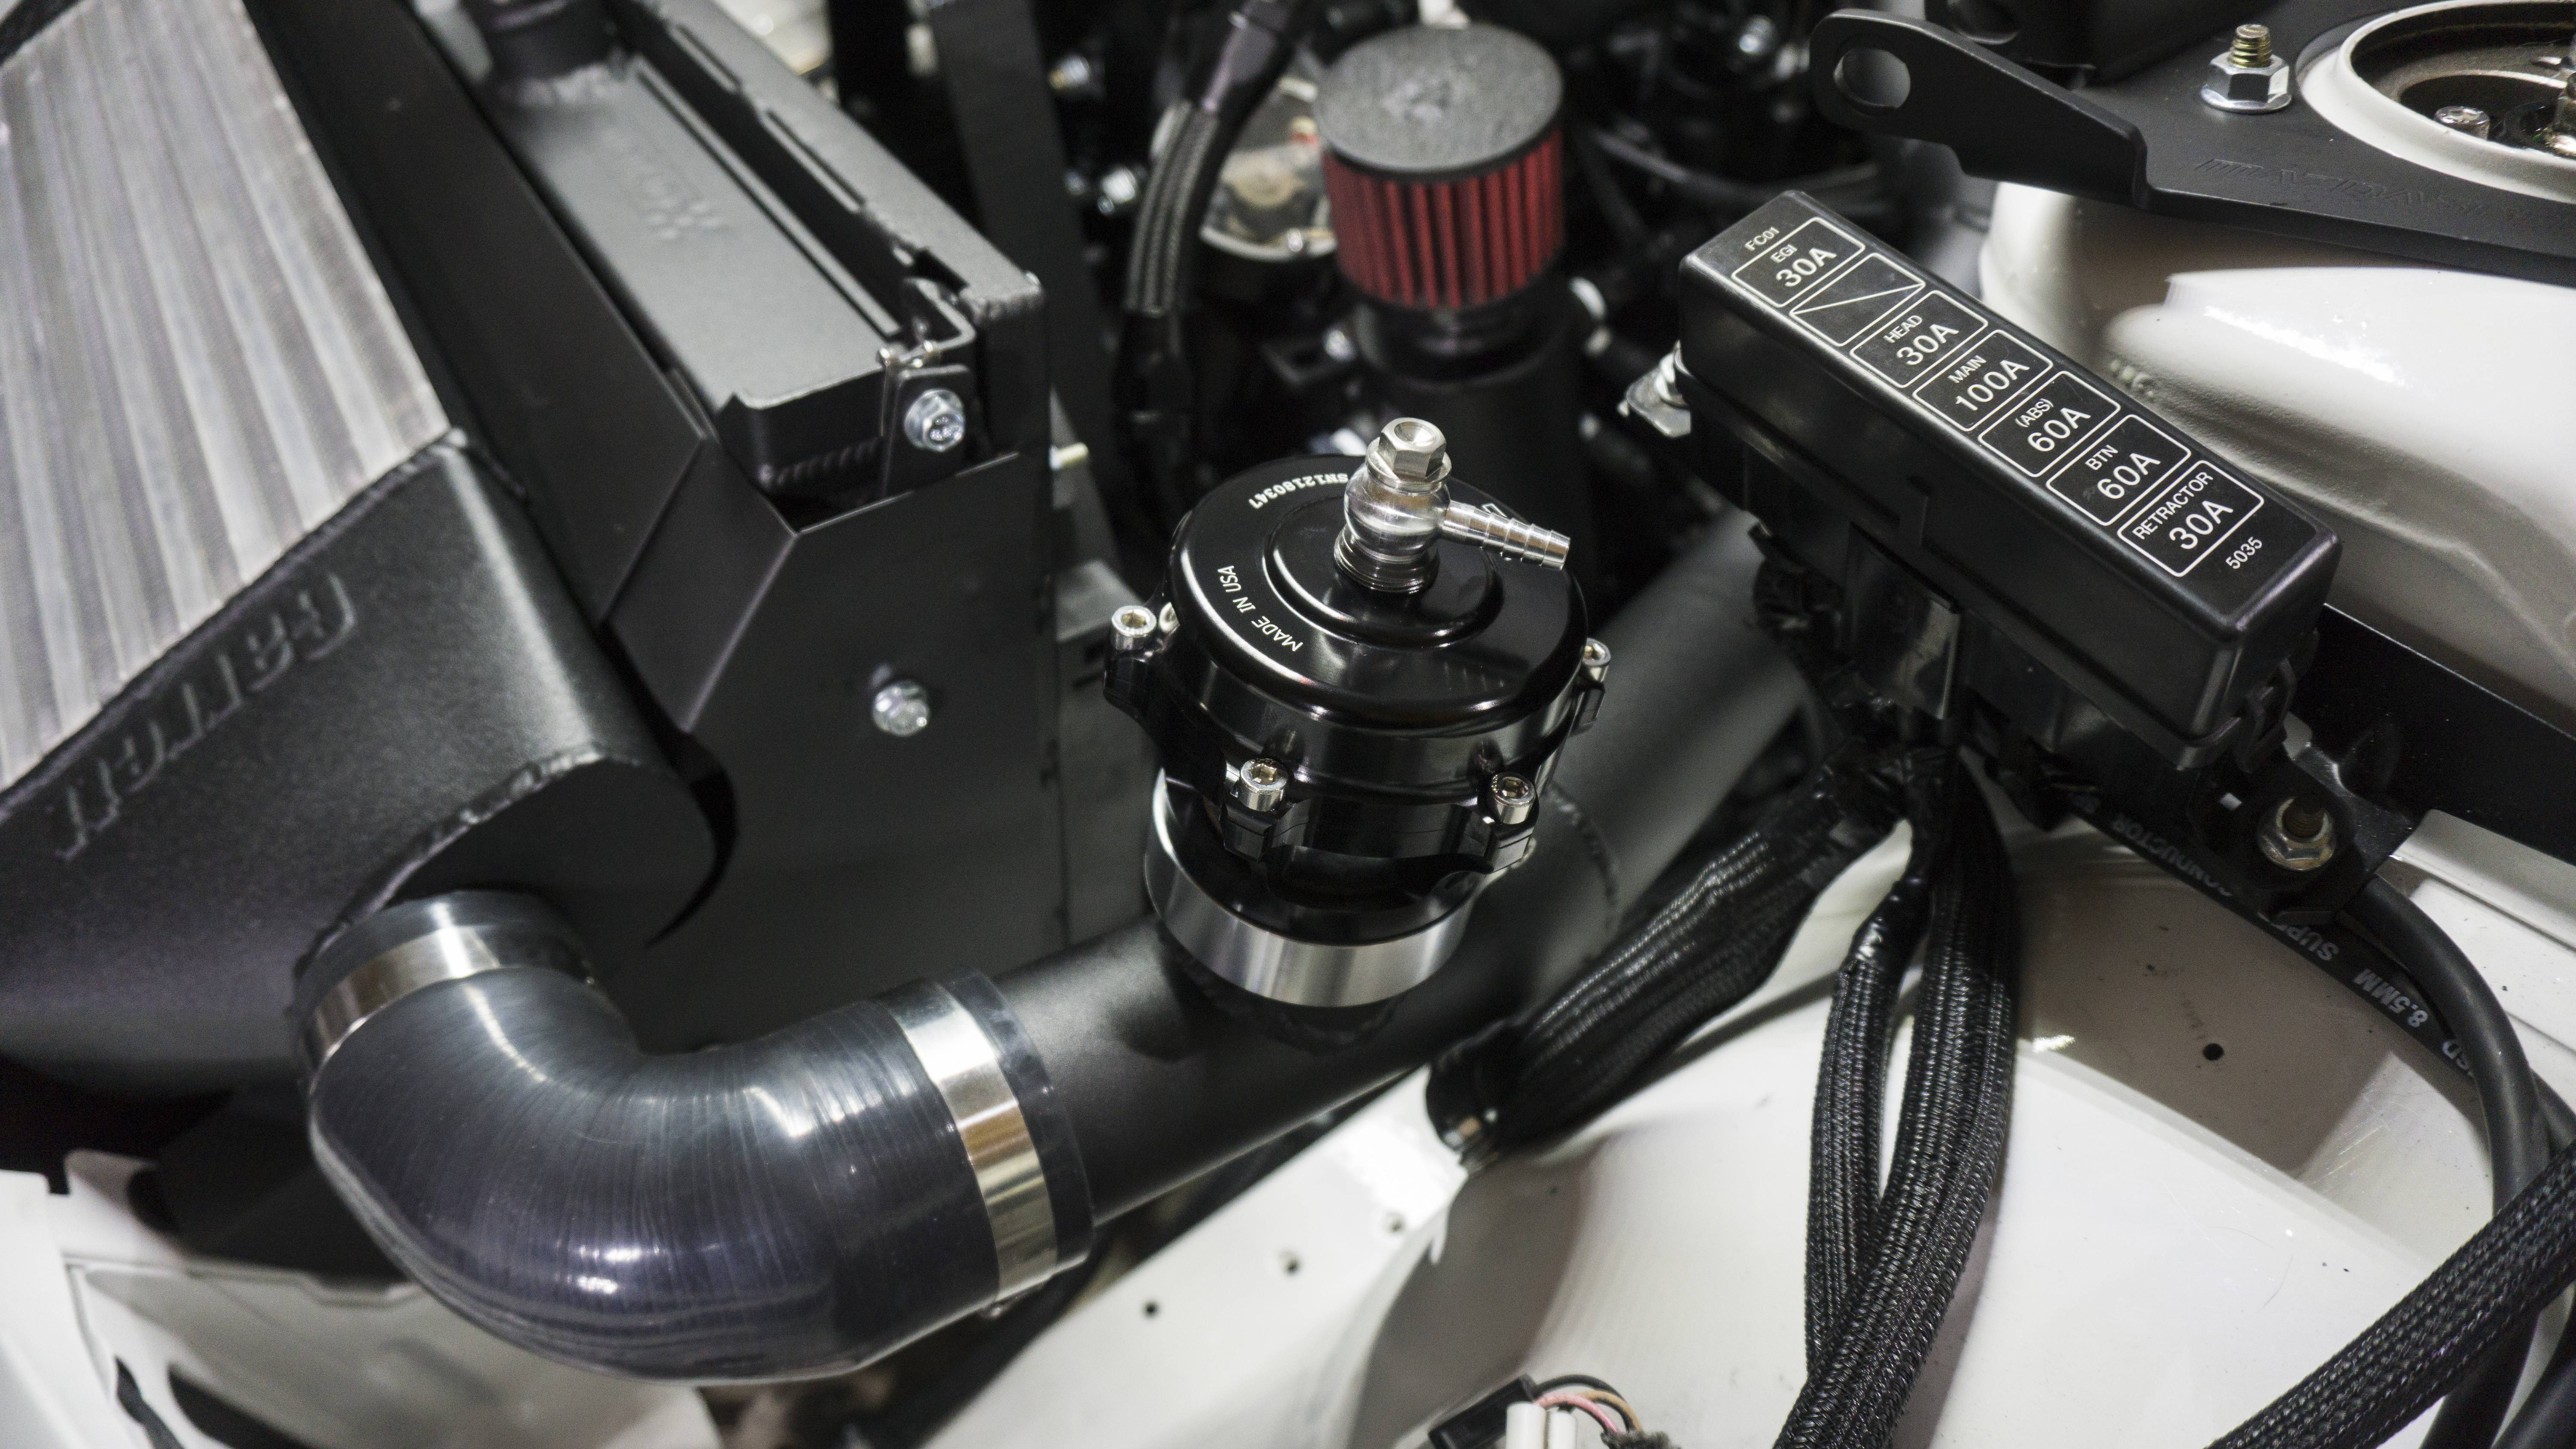
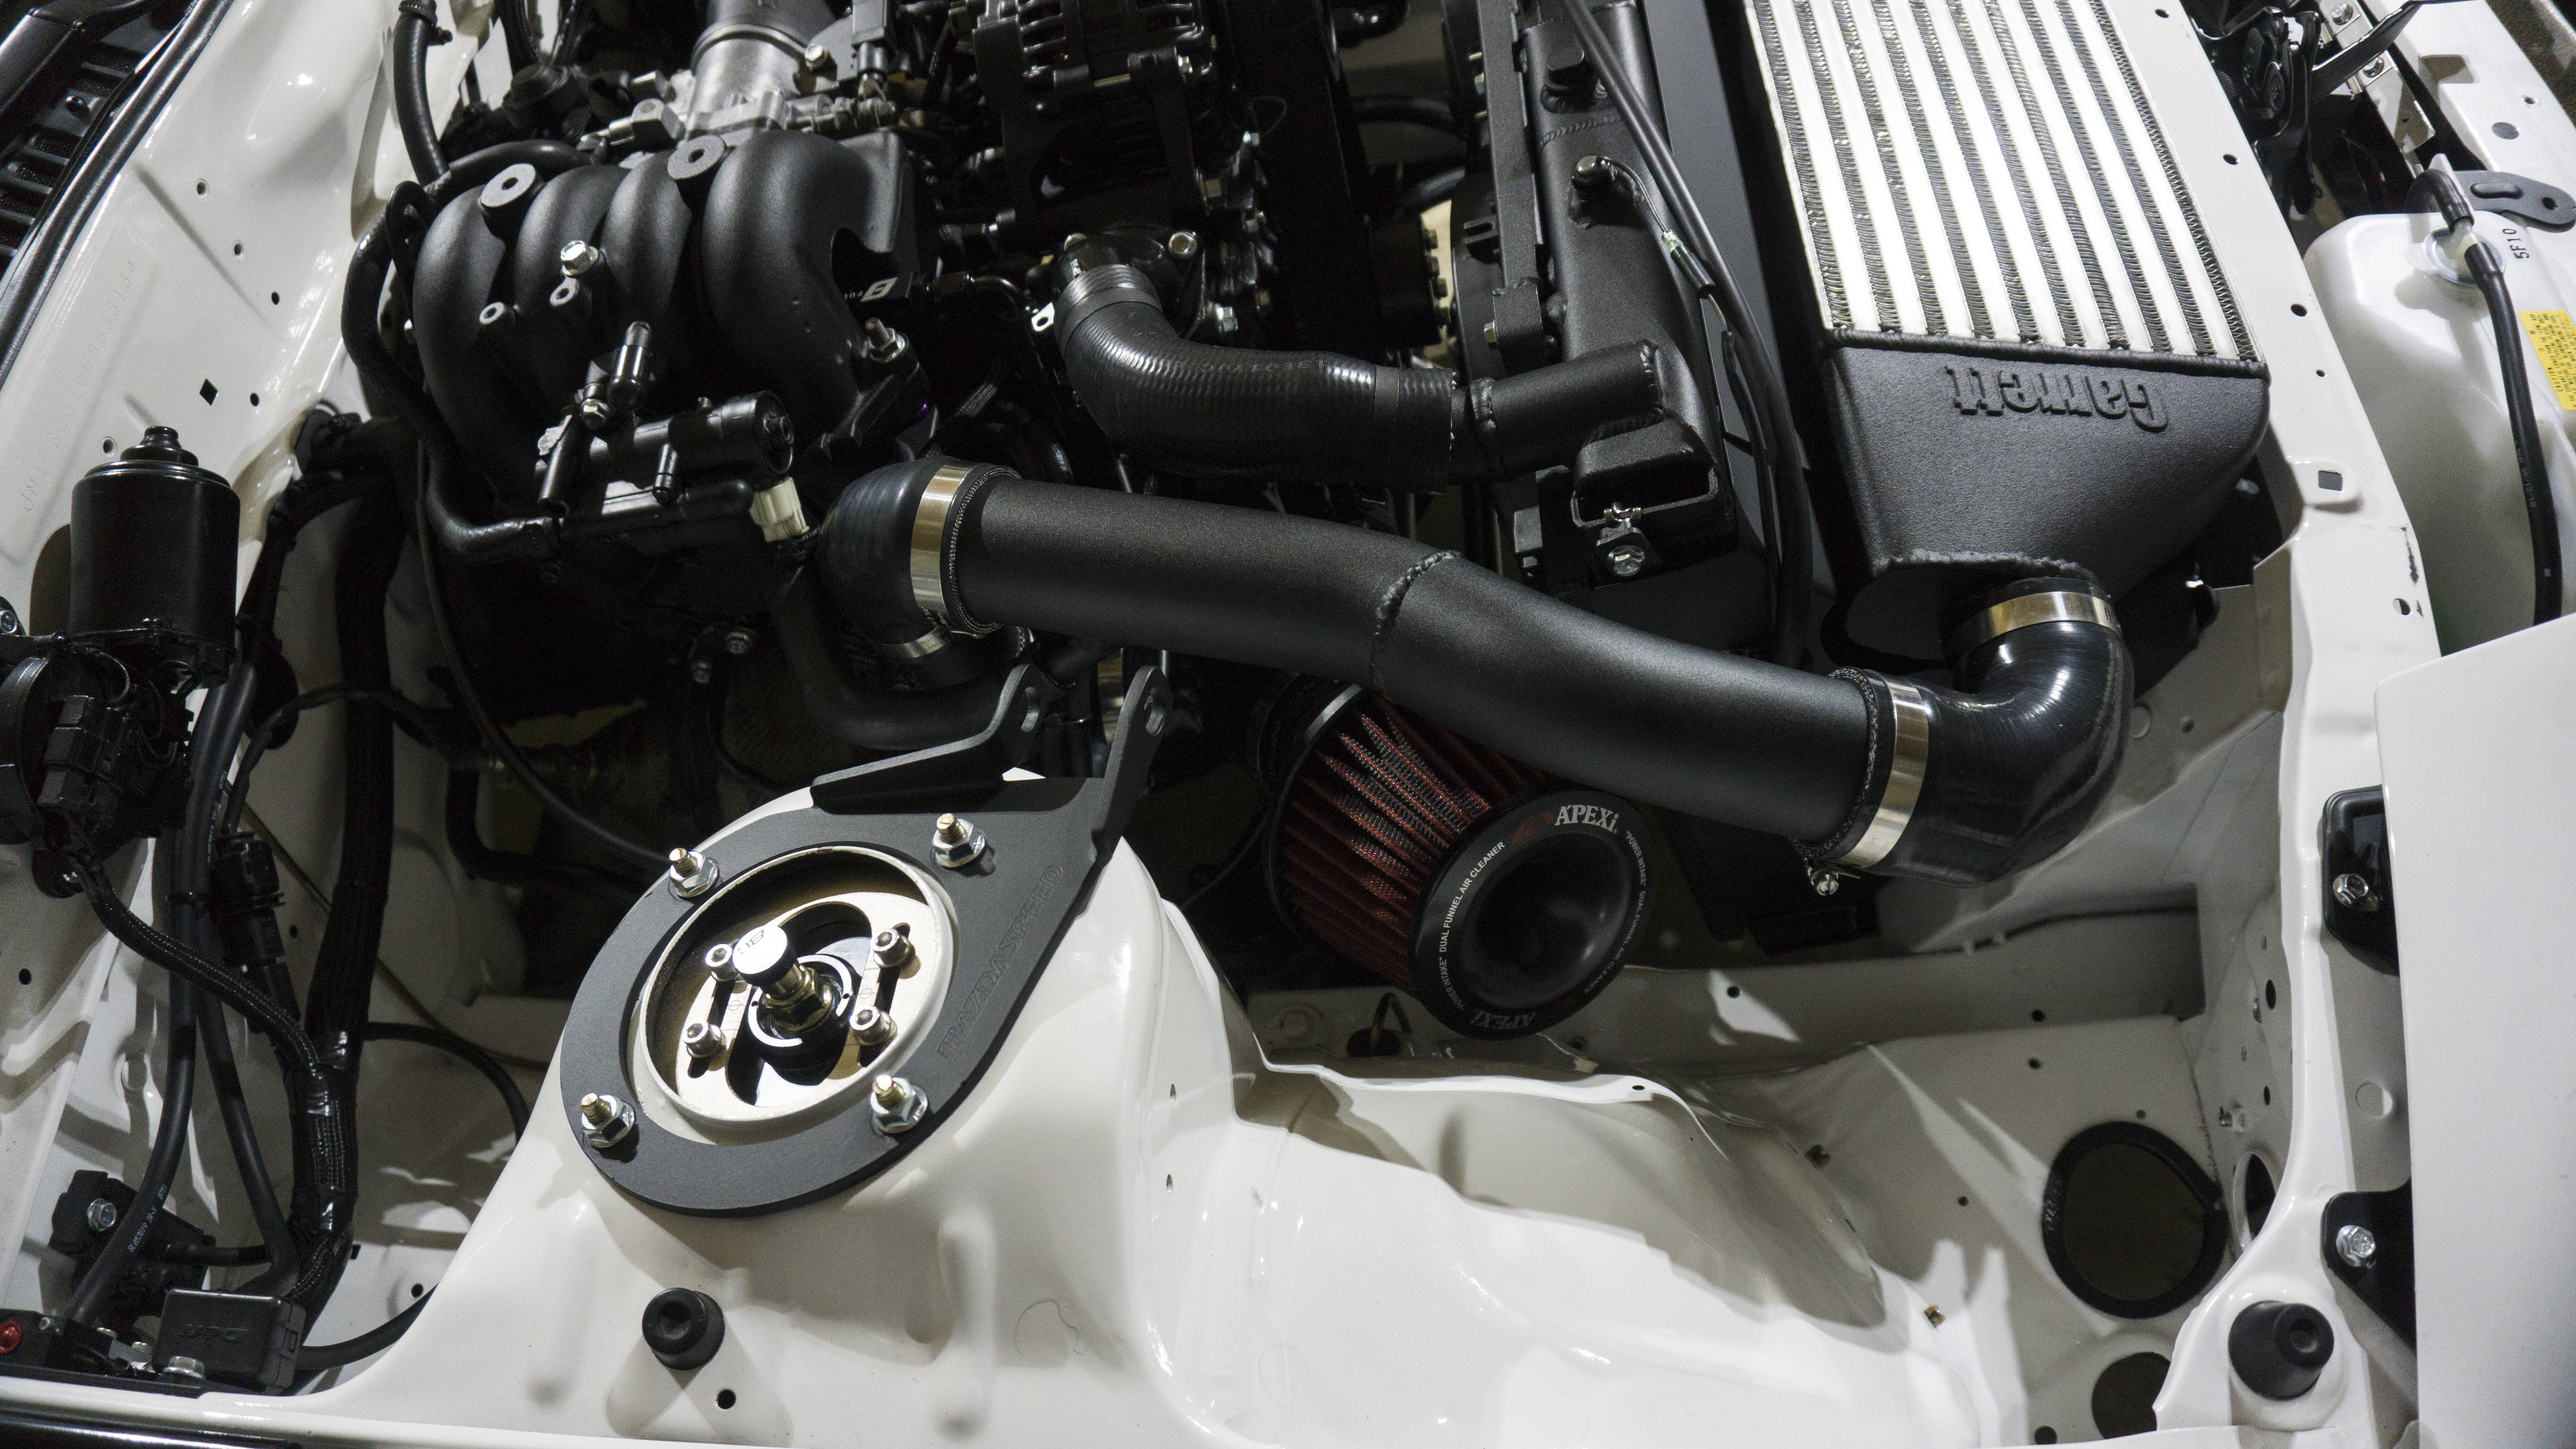
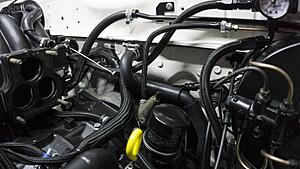
Here are some pictures of the Tial officially installed and driver side piping:

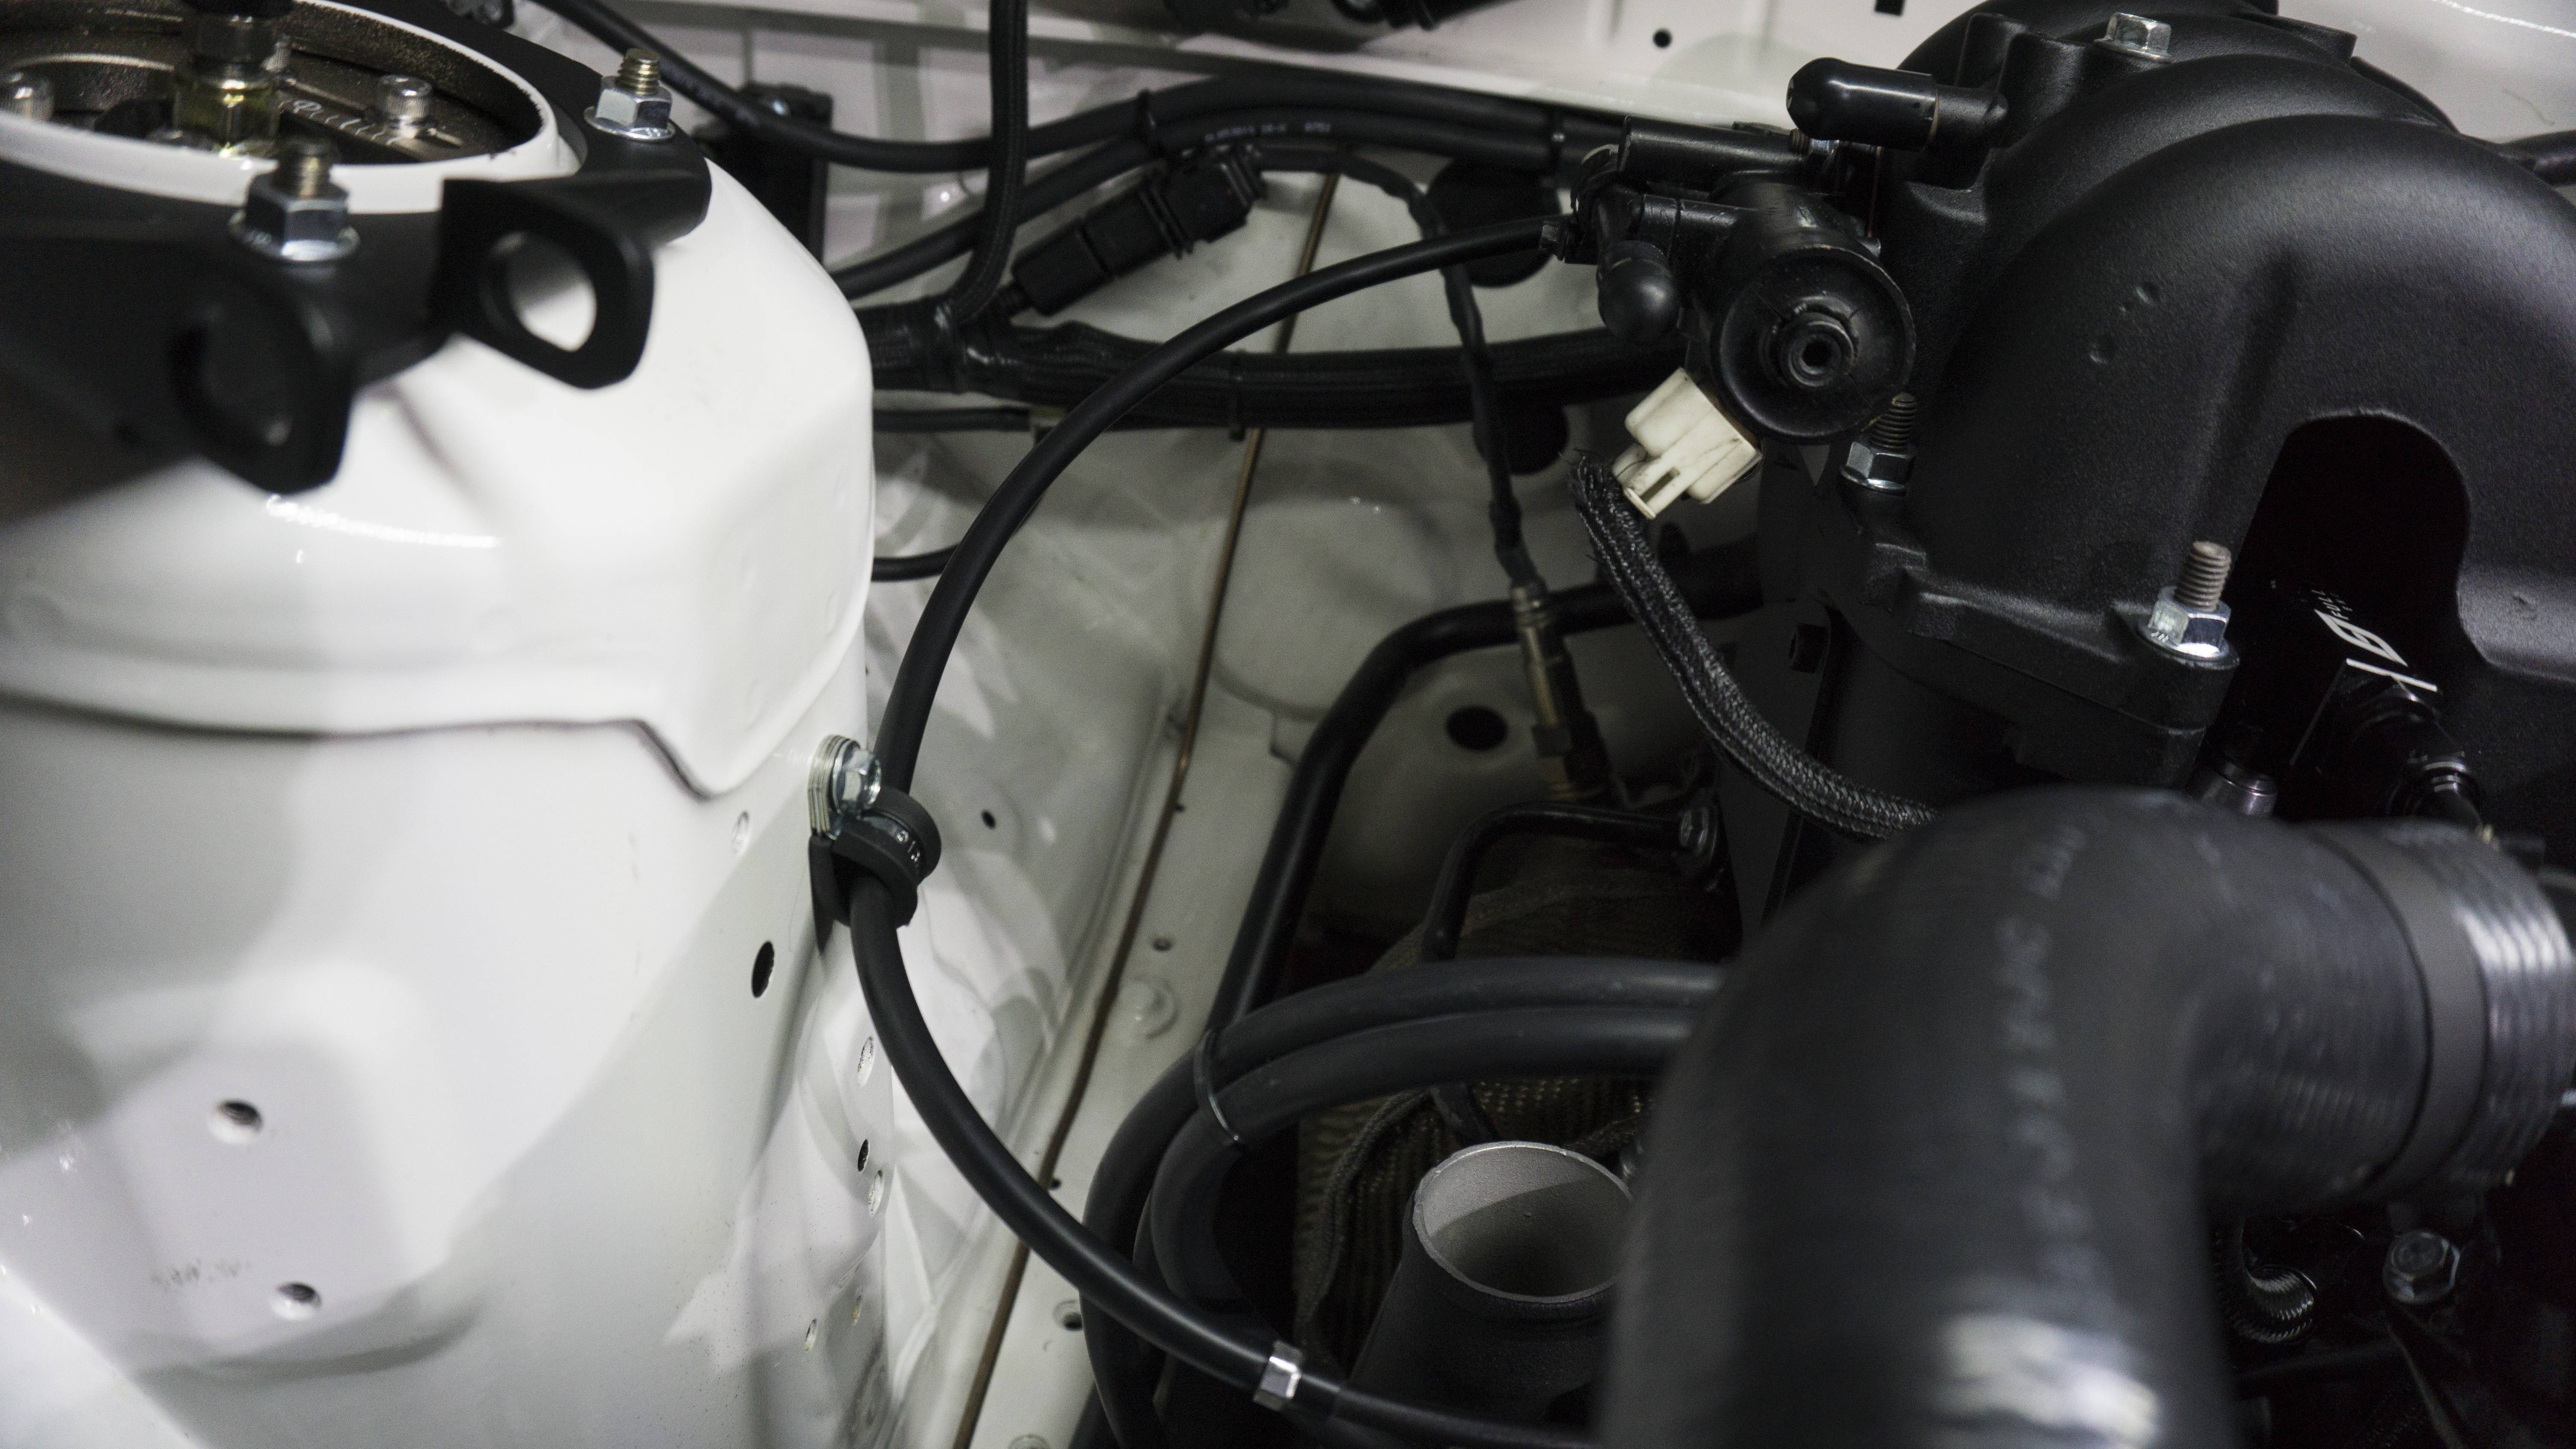
Here is how I routed the throttle cable:
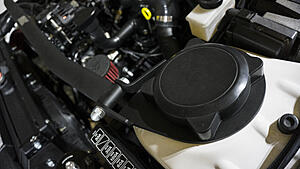
Here is the new oil dipstick:

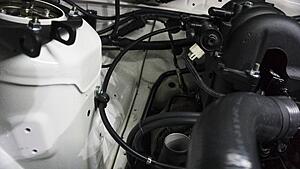
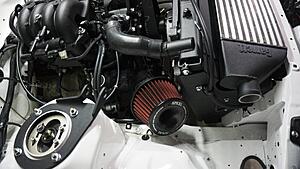
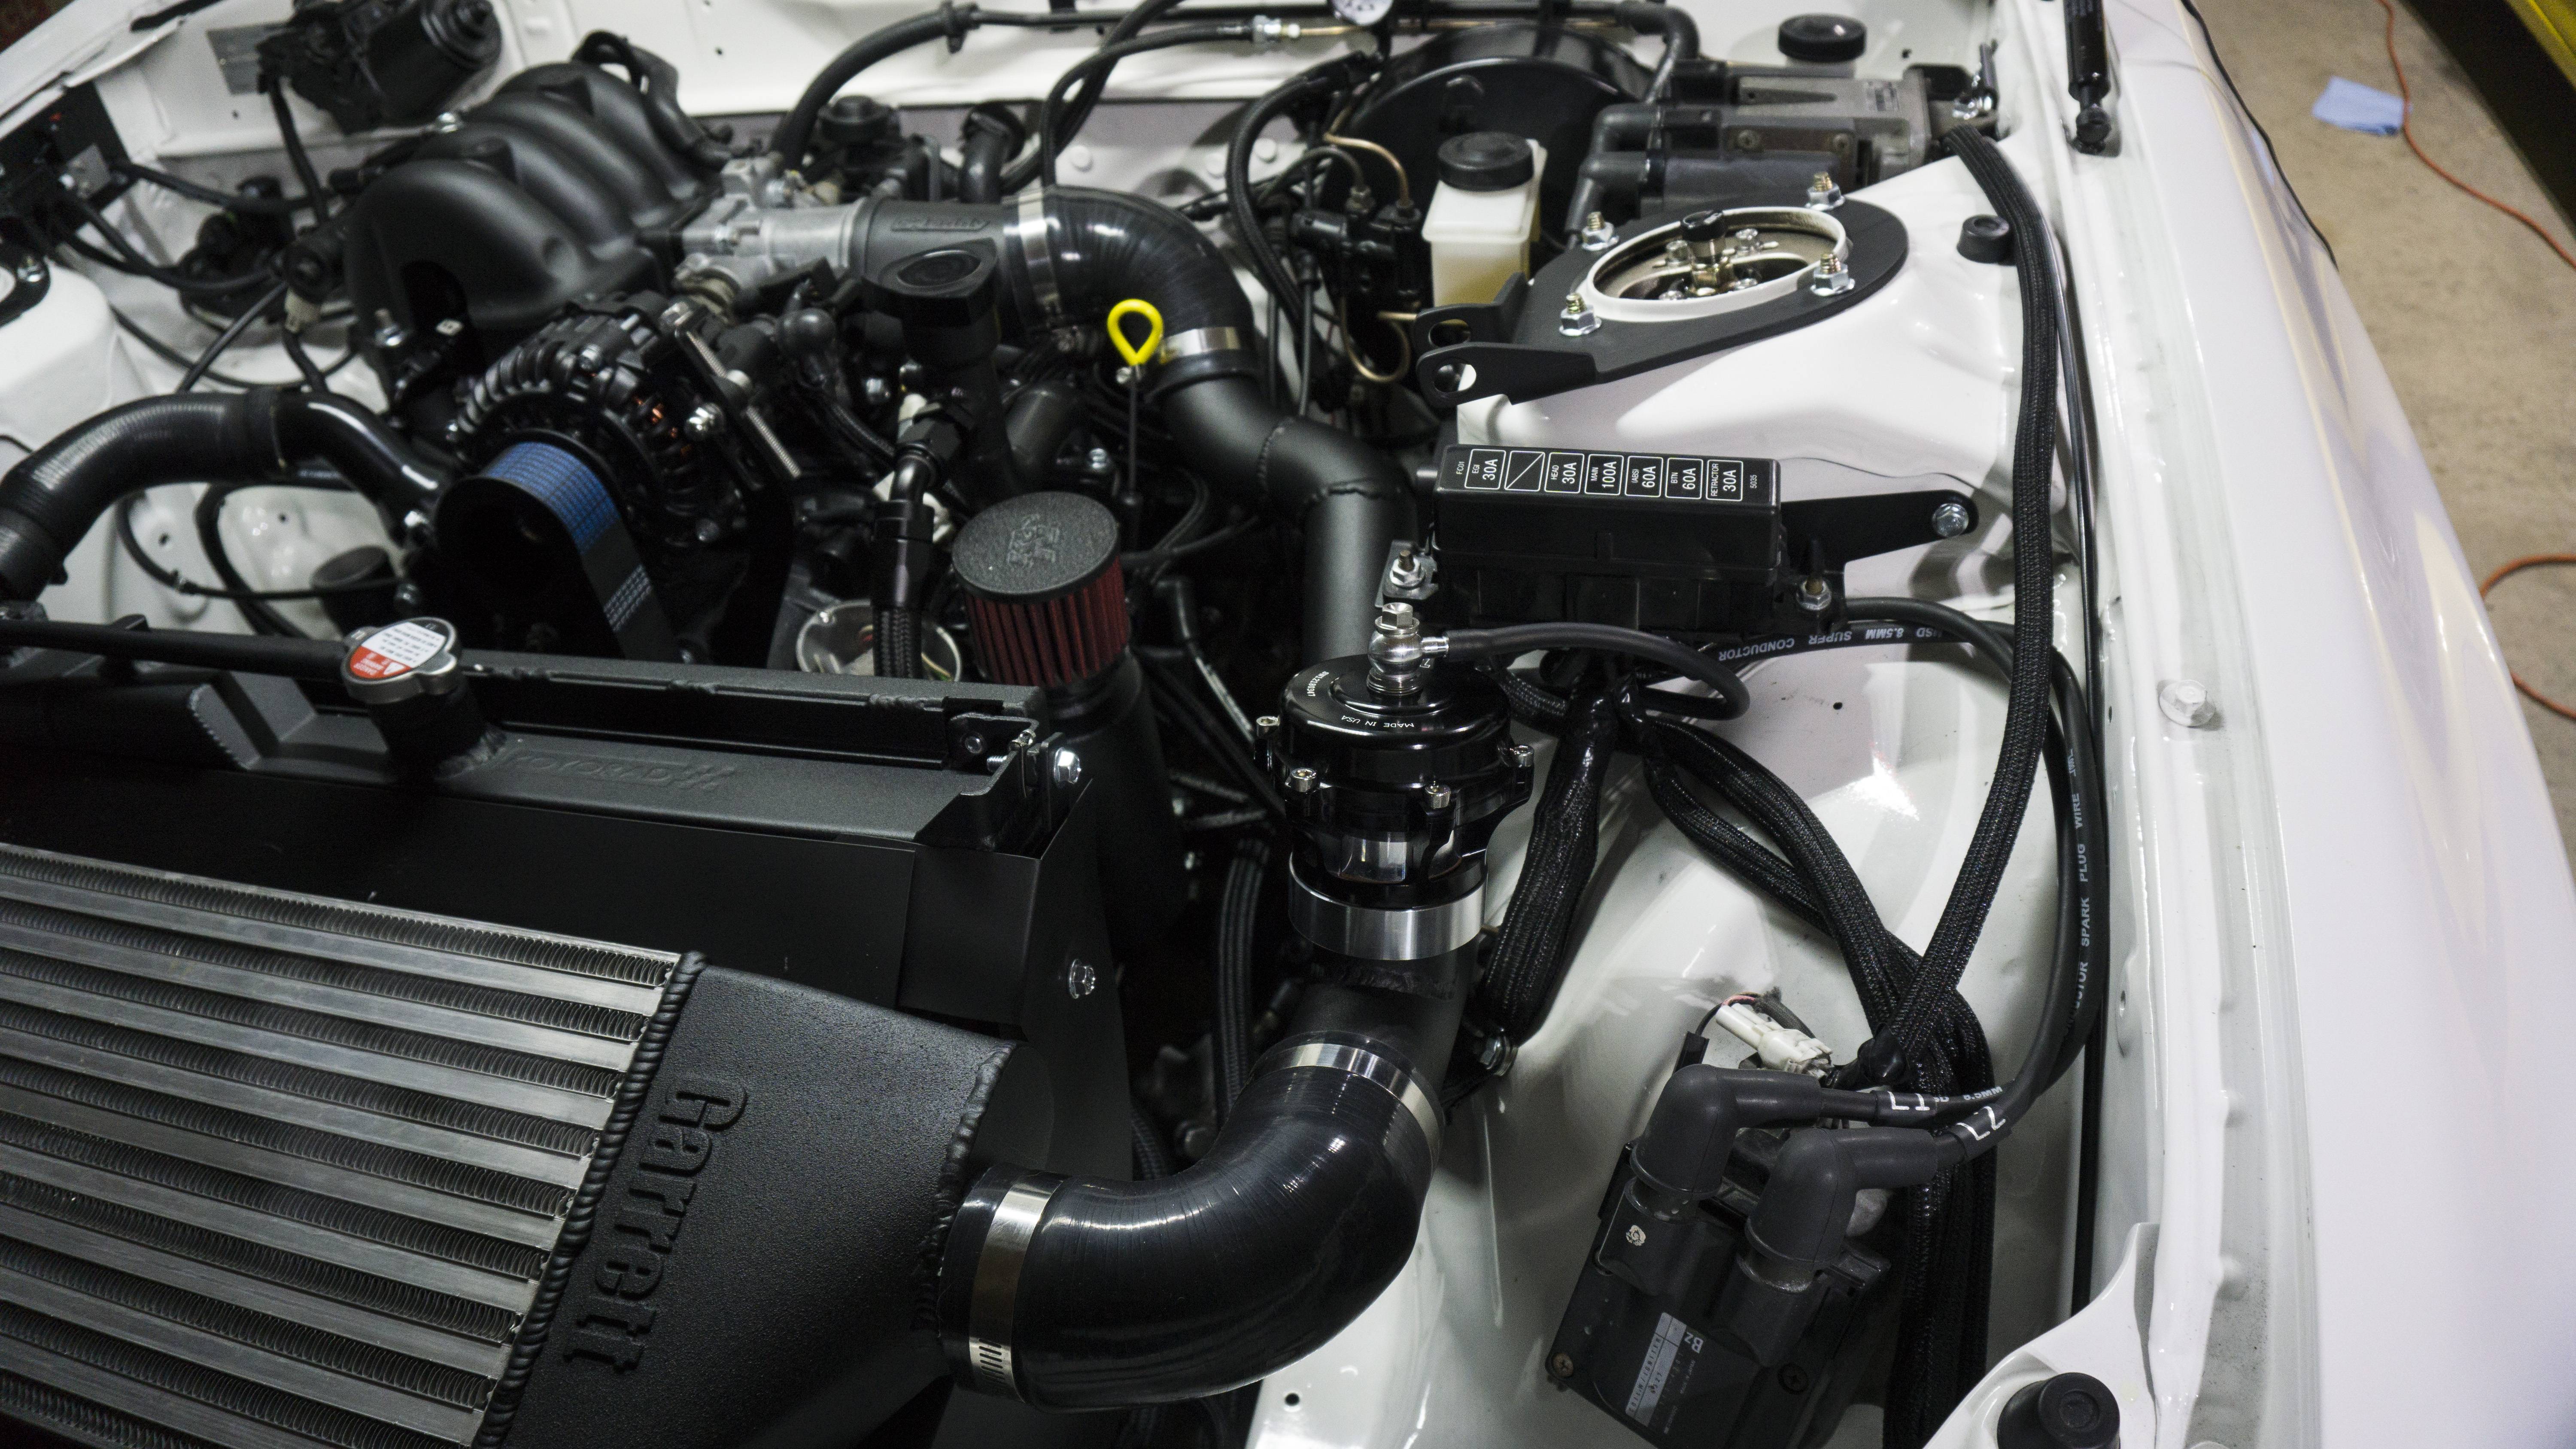
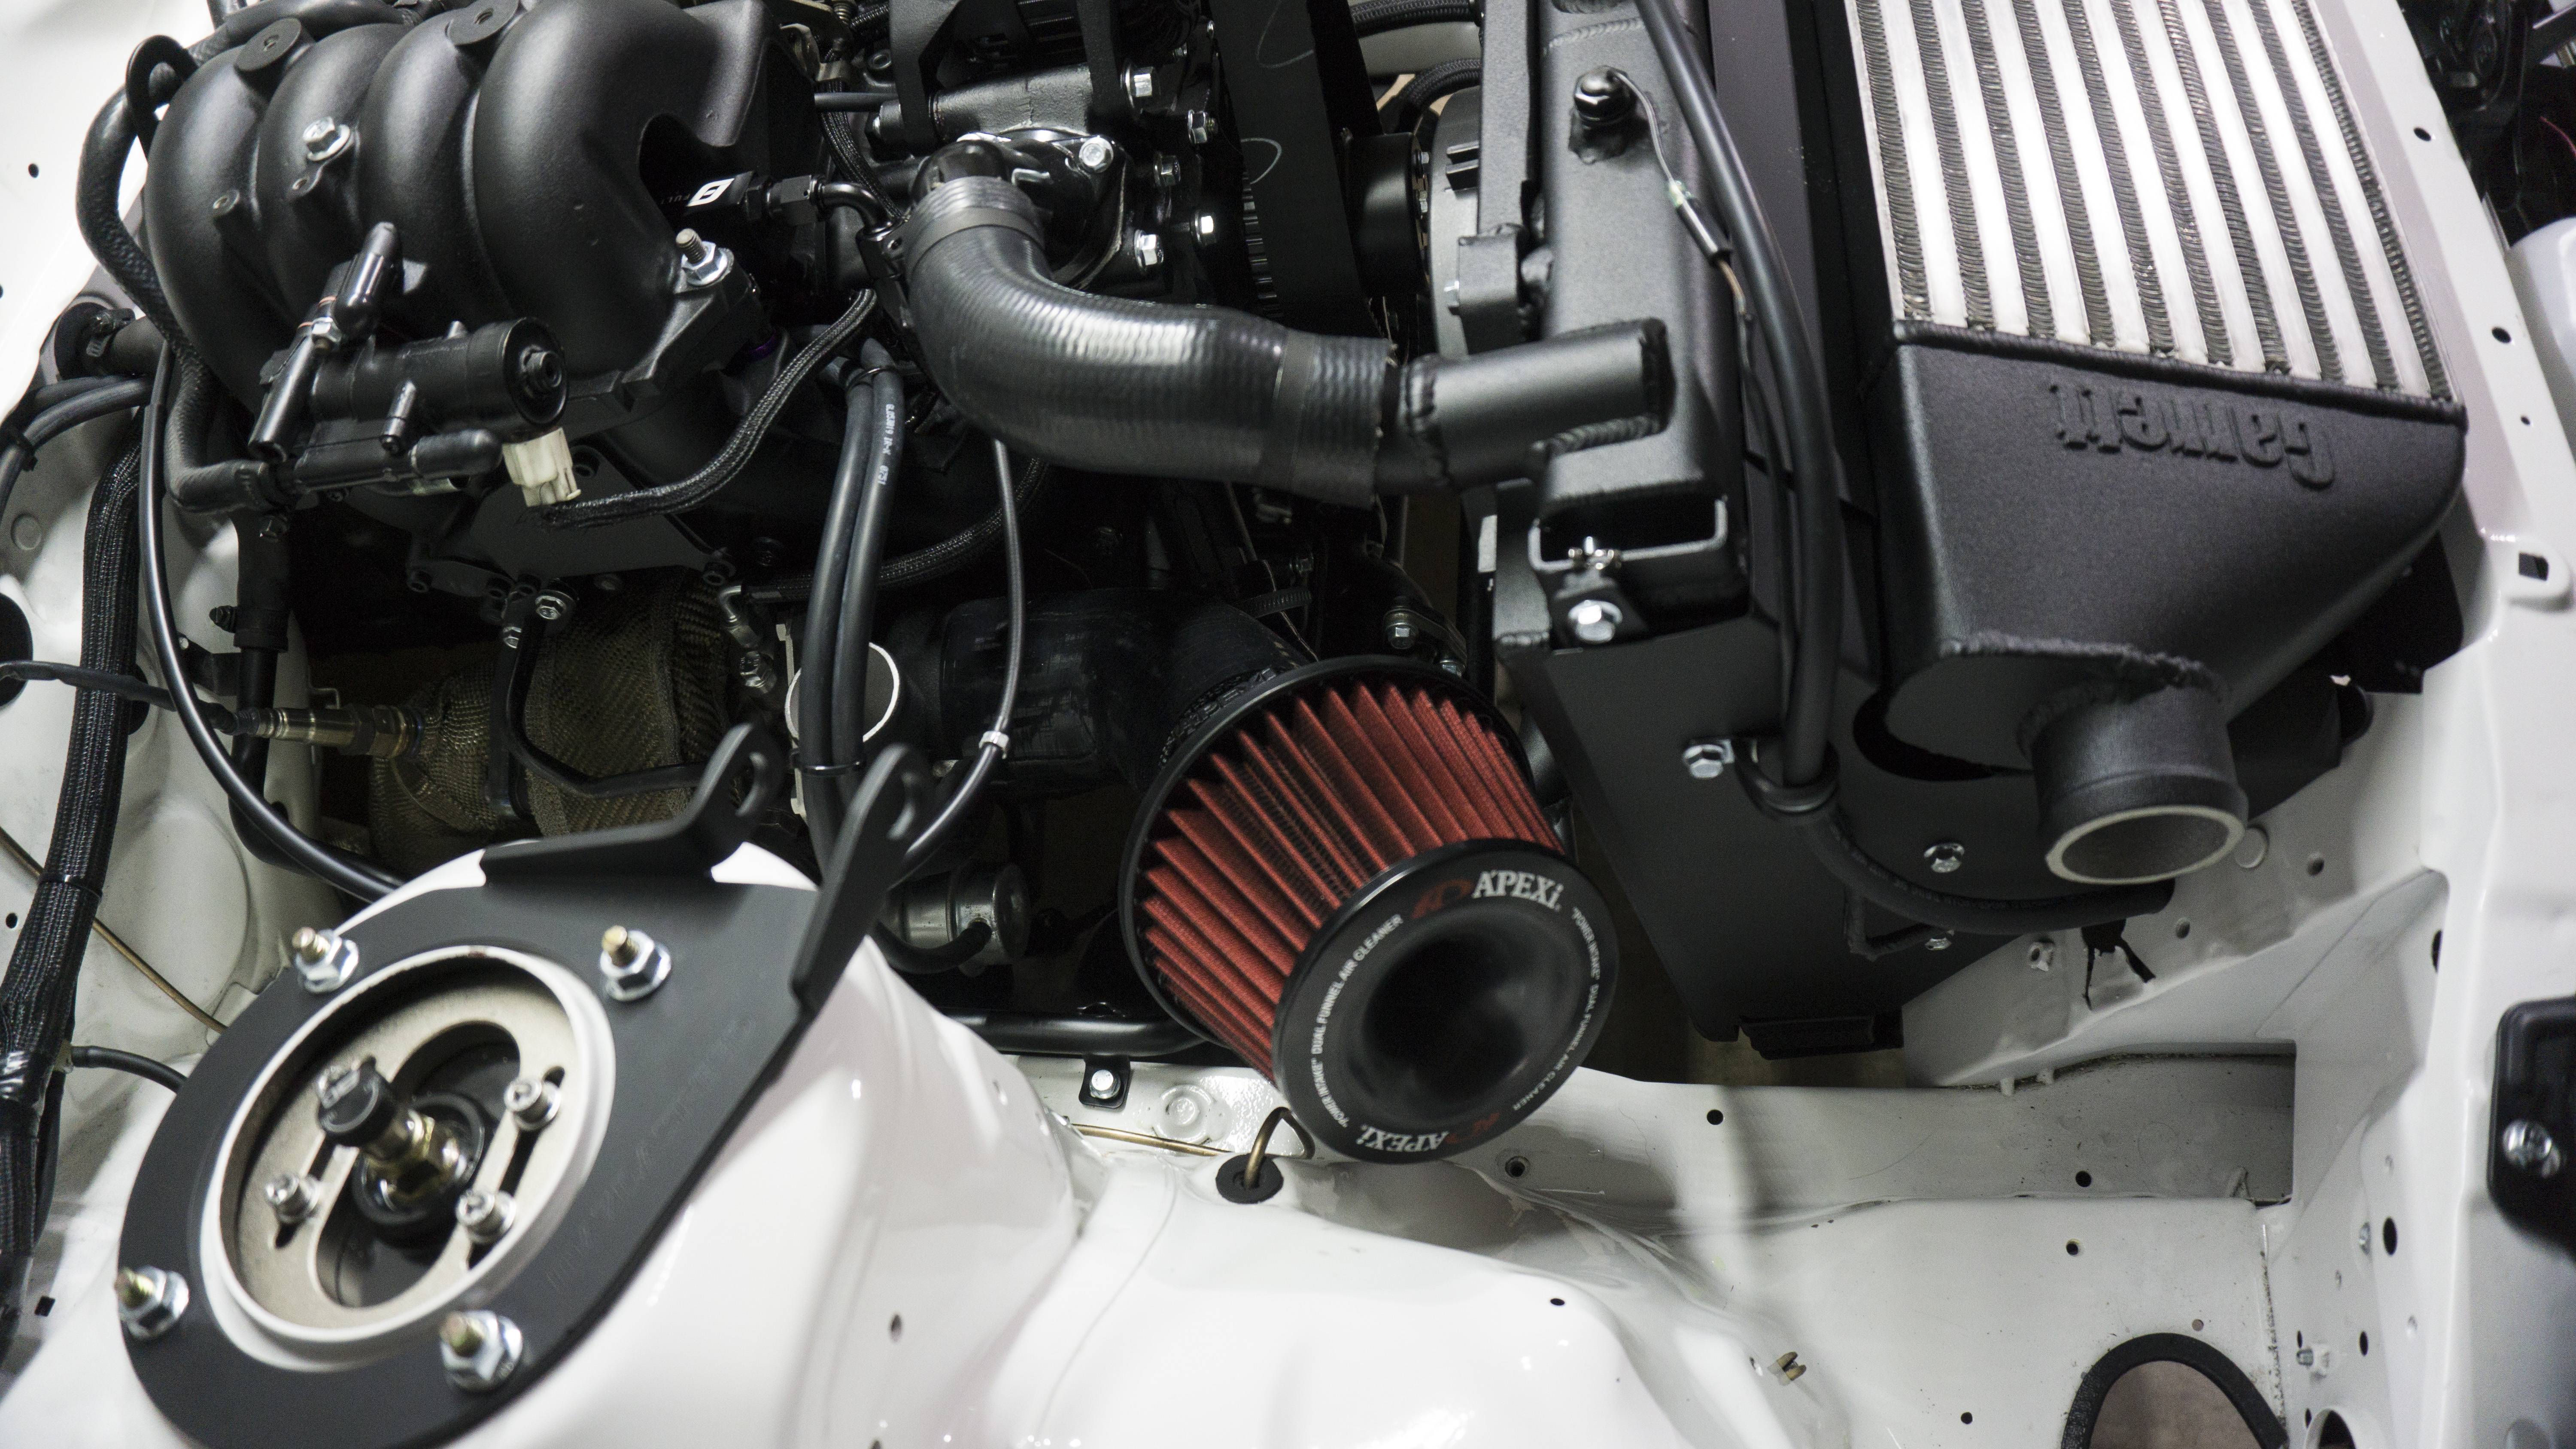
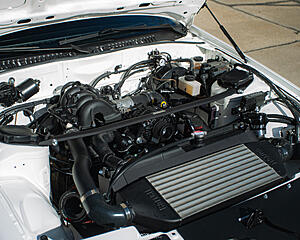
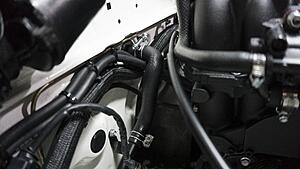
Here is the intake and passenger side piping:
Here is a disaster:
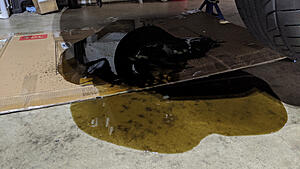
Well, I got idle dialed in.. only for the front oil line to pop out. I�m not sure what caused that, but I lost a quart and a half of oil until I noticed. I spent most of the day cleaning that up. However! I�m not going to let that keep me down, I�ll just rebuild the line and be good to go. I am still working on other things while doing this. I got all of my intake piping clamped on. I had to order a 65 degree coupler for the APEXi intake as the older one didn�t want to work. I also finally decided to put on my new oil dipstick. It�s incredible the difference in shades between the original and a brand new one. I also dropped my hood and side skirts off at paint. I�m holding off throwing the side skirts on until I�m able to give the car a good bath. I want the paint under the skirts to be clean before they go on. Next steps are to get that oil line replaced and then get back to tuning. I�m really close to the finish line!
Here are some pictures of the Tial officially installed and driver side piping:
Here is how I routed the throttle cable:
Here is the new oil dipstick:
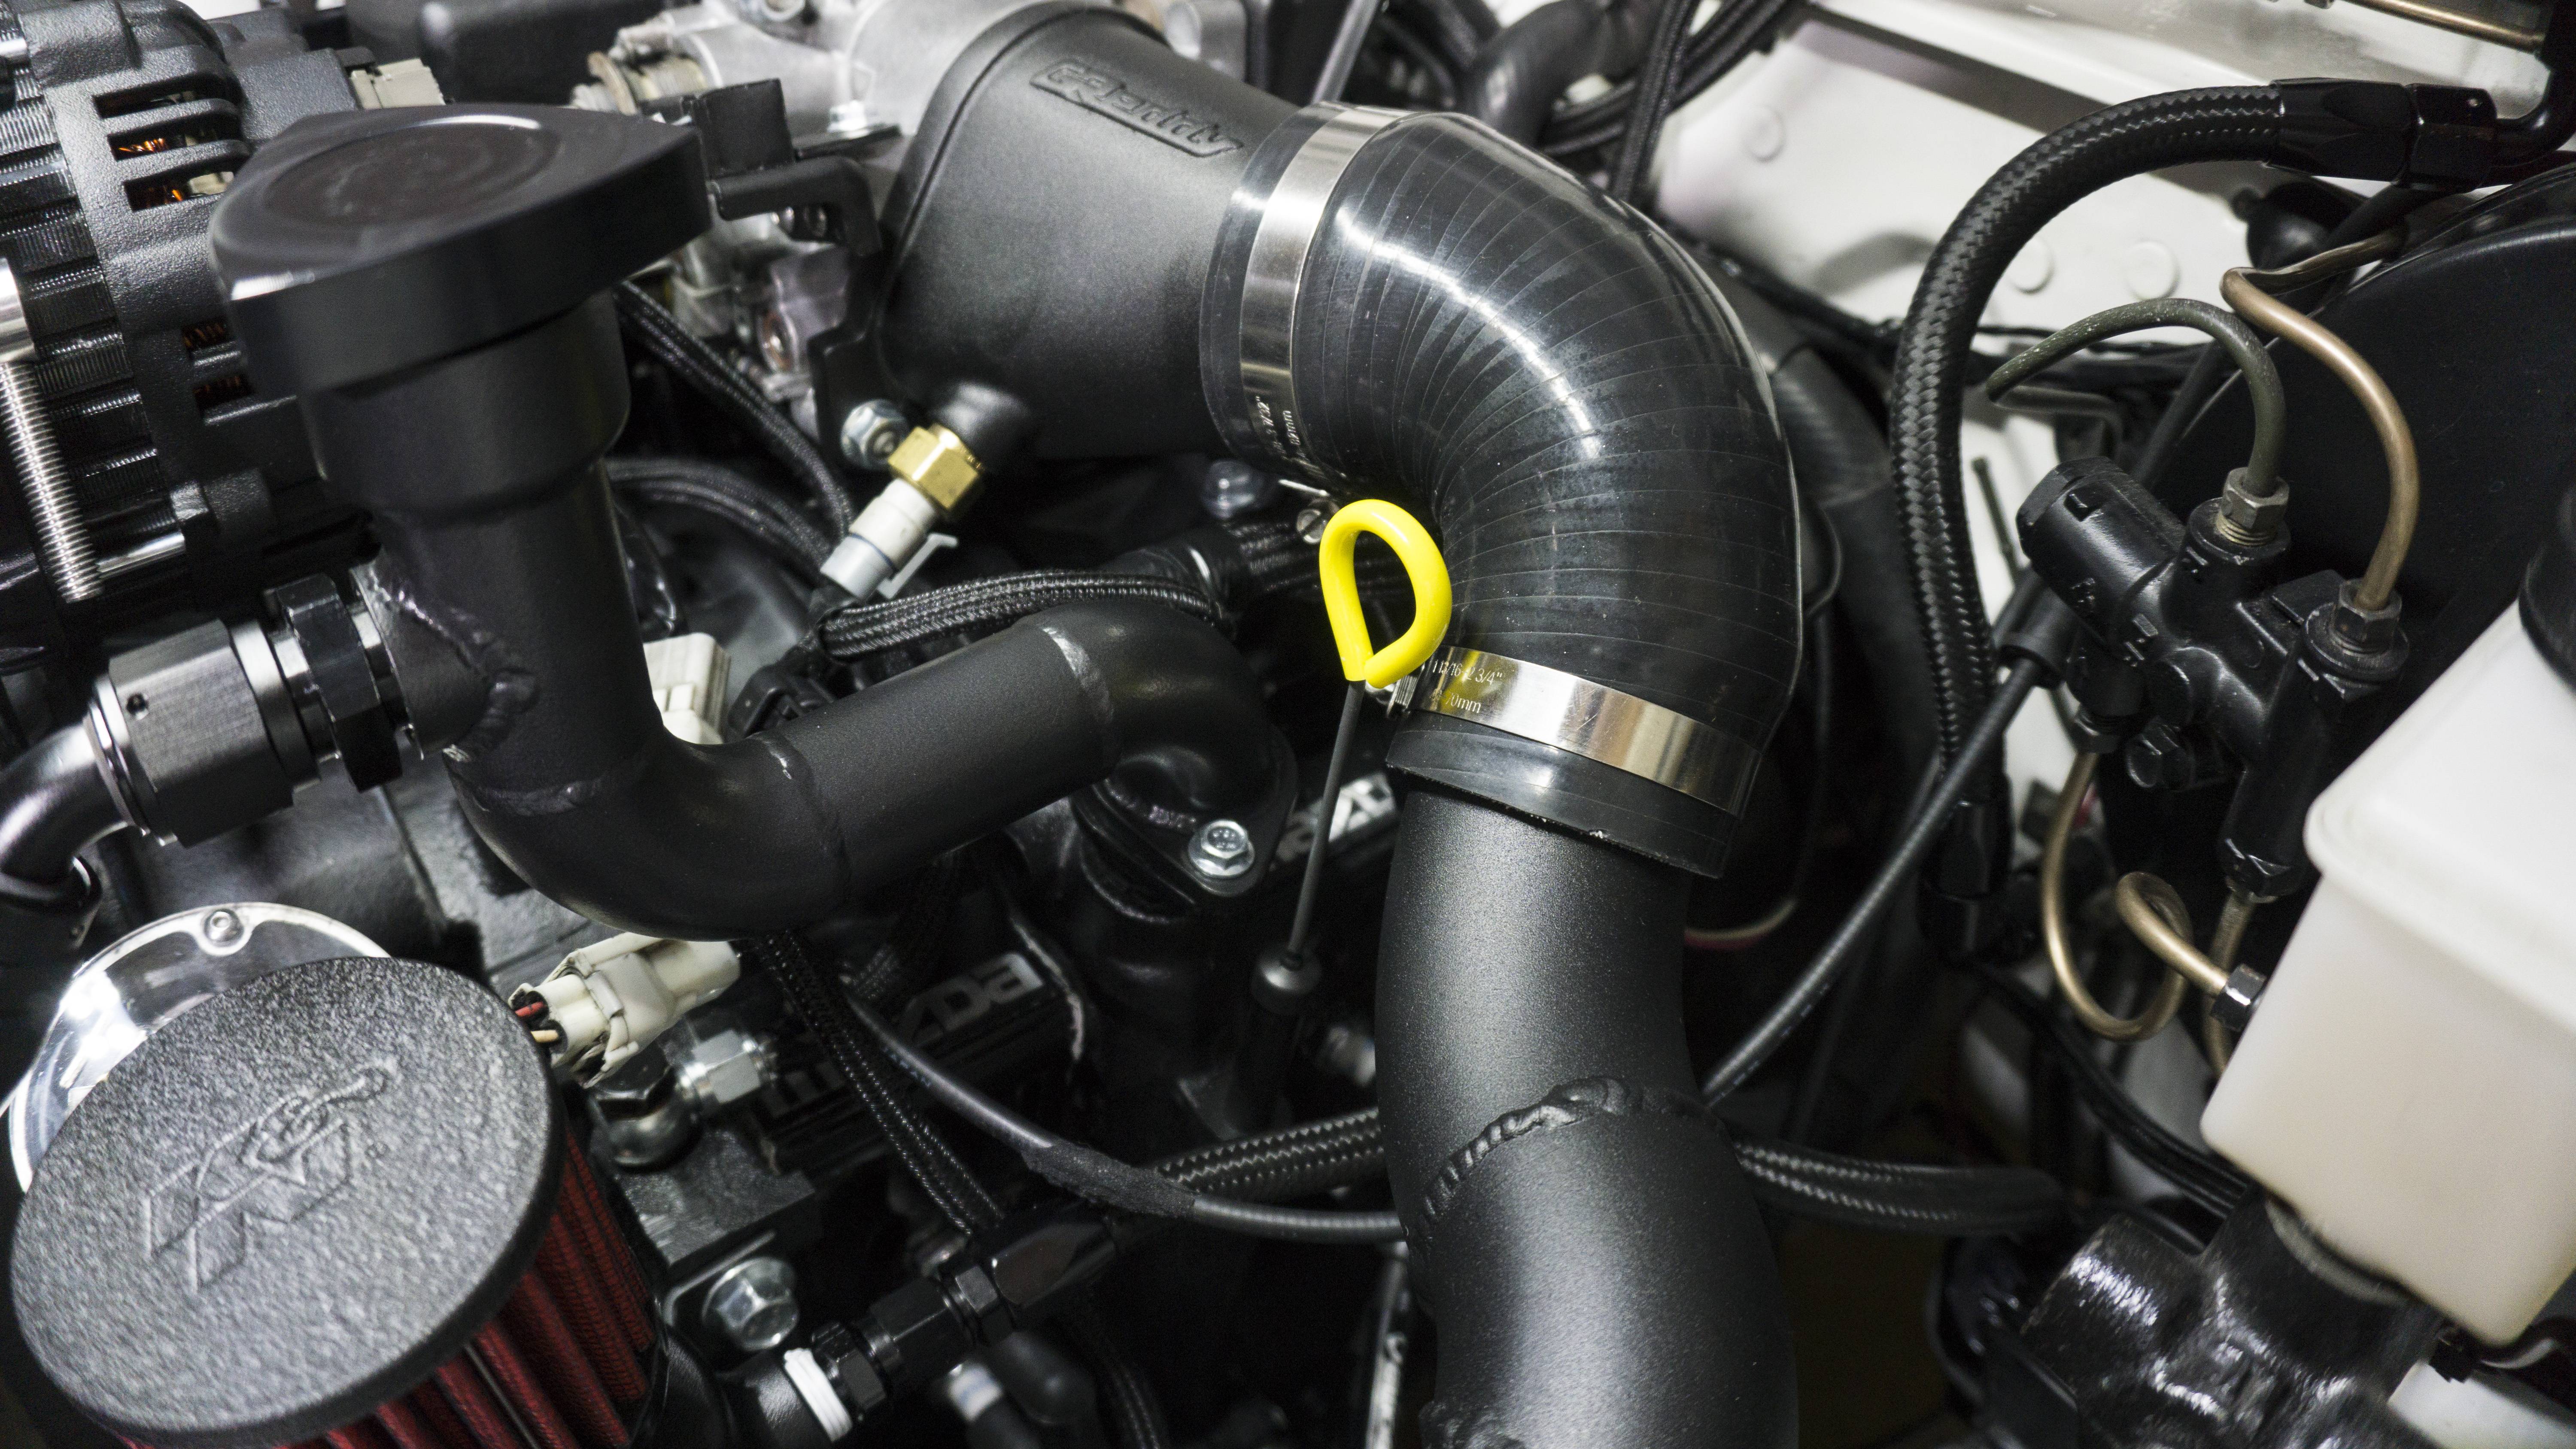
Here is the intake and passenger side piping:
Here is a disaster:
 01-31-20, 10:54 AM
#283
1/31/2020:
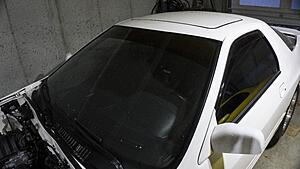
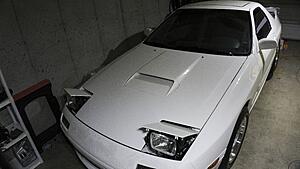
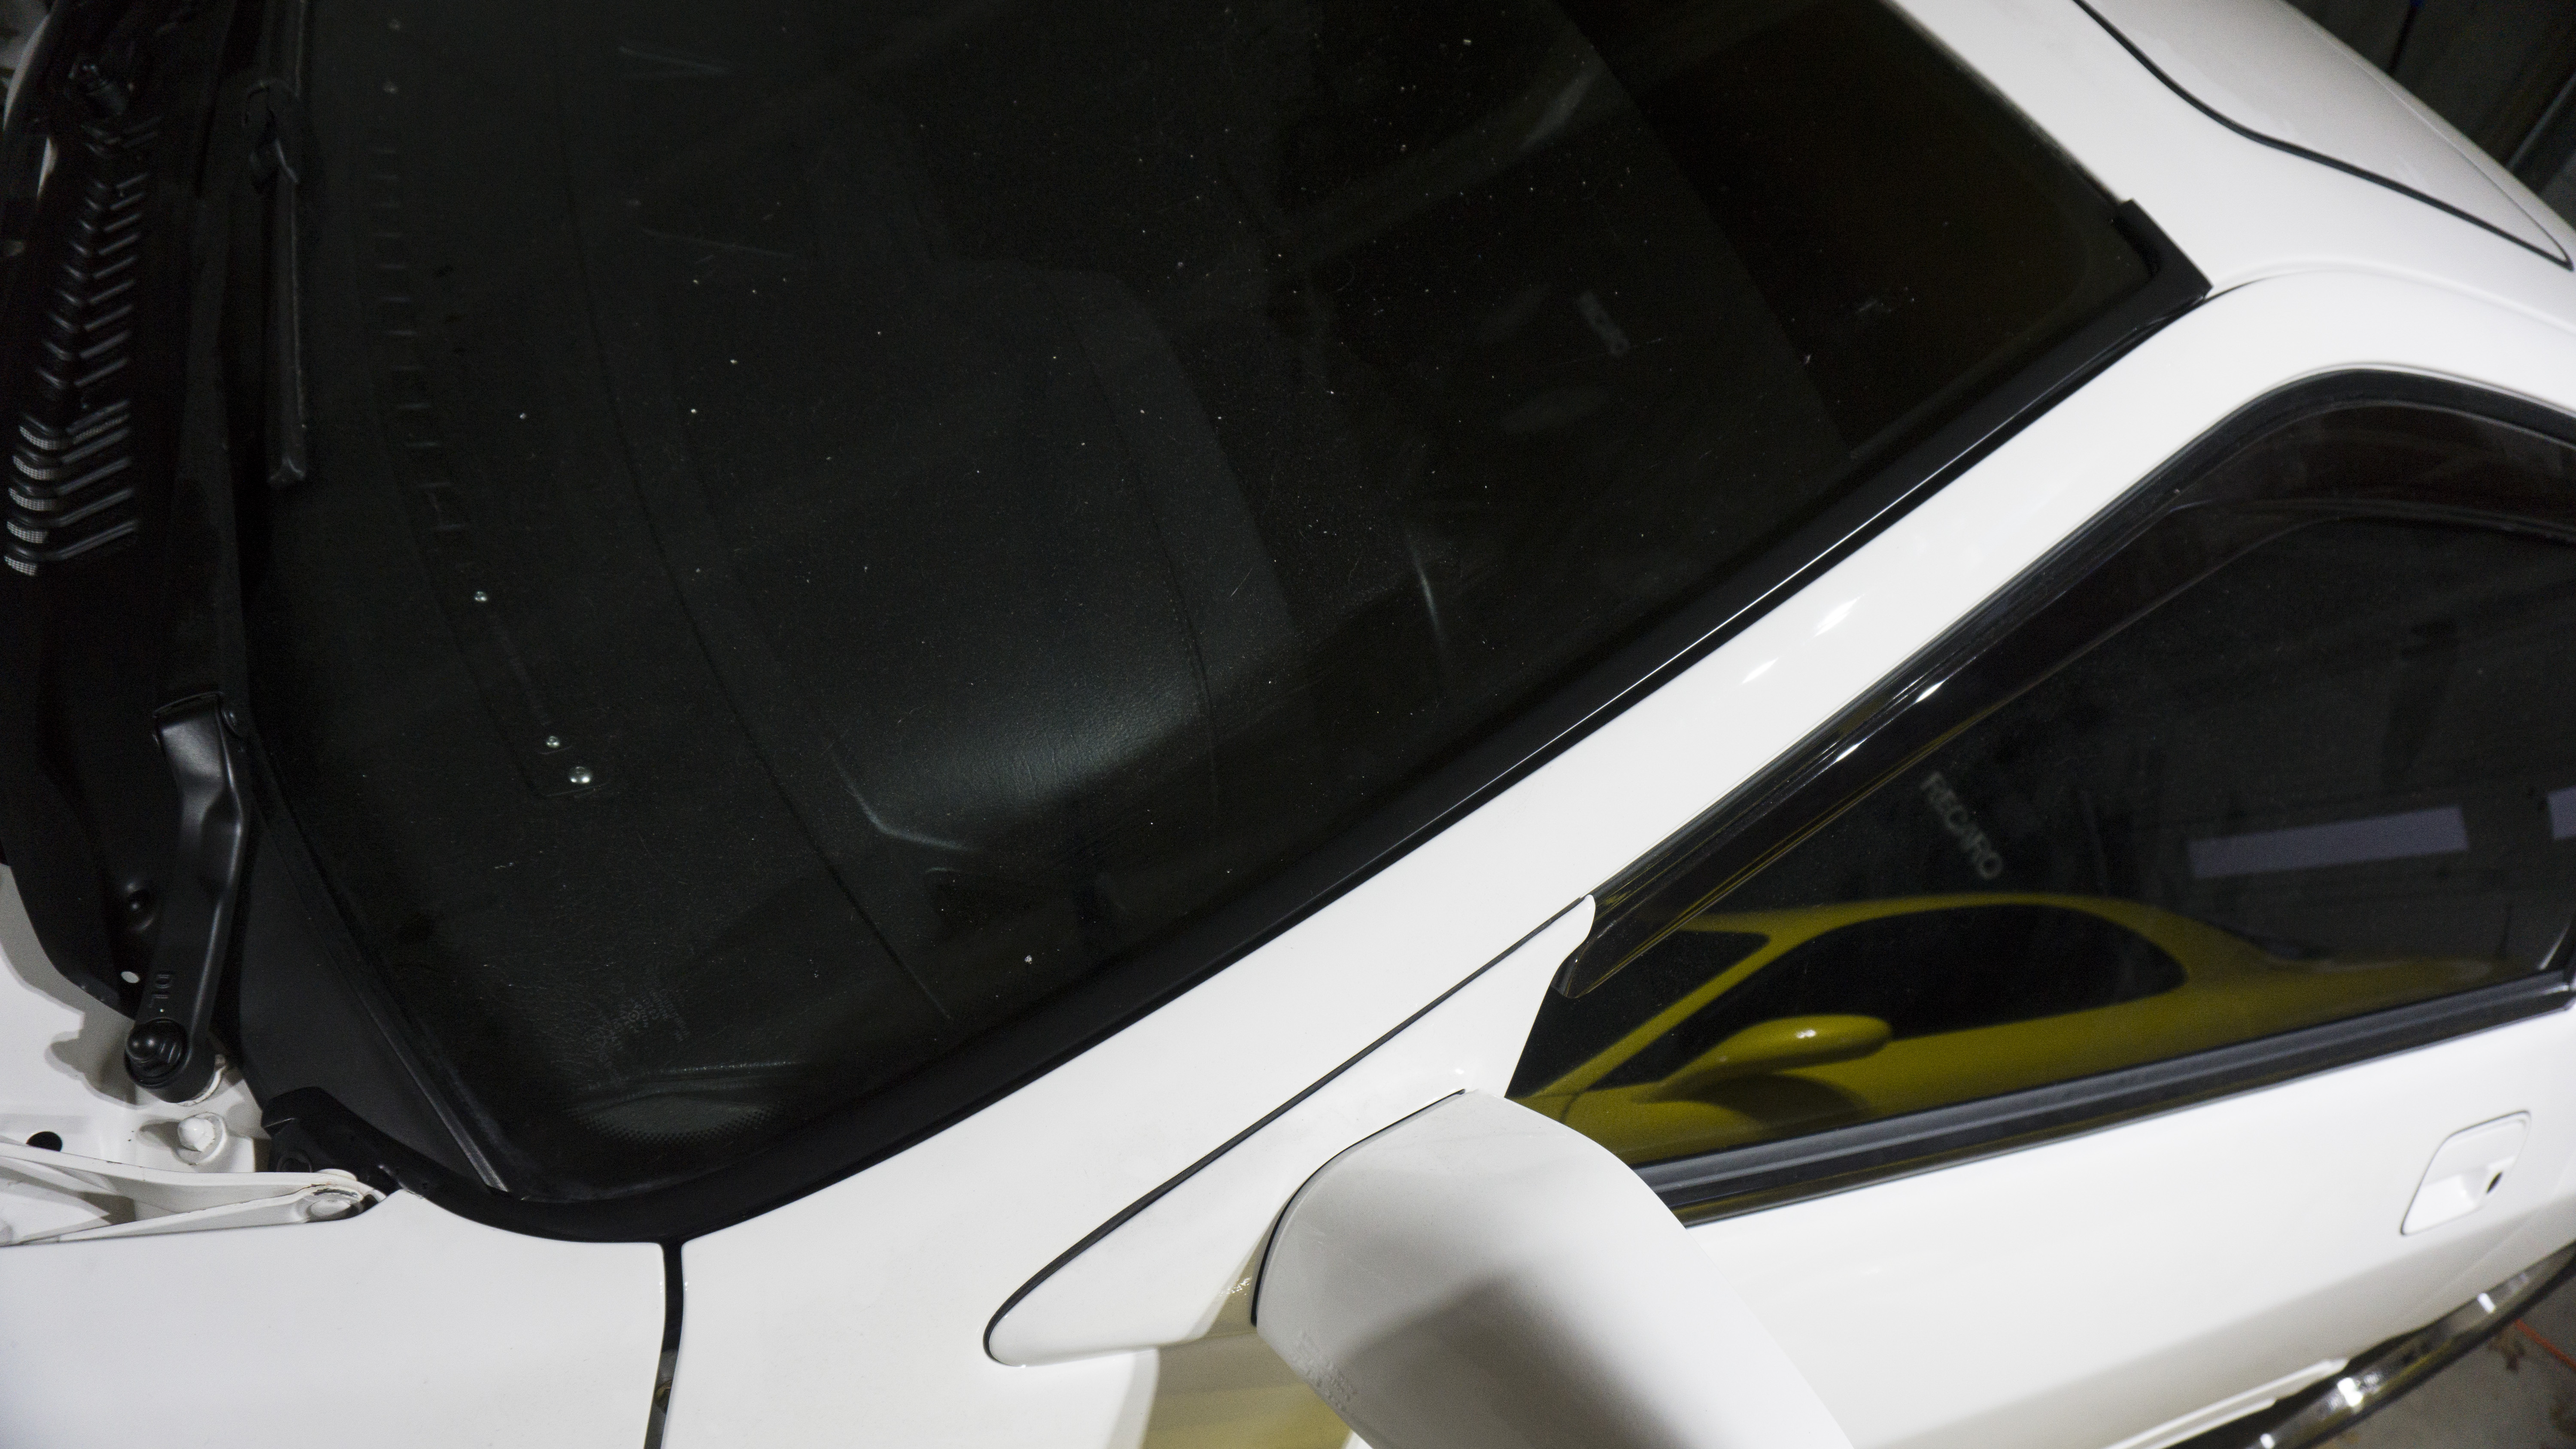
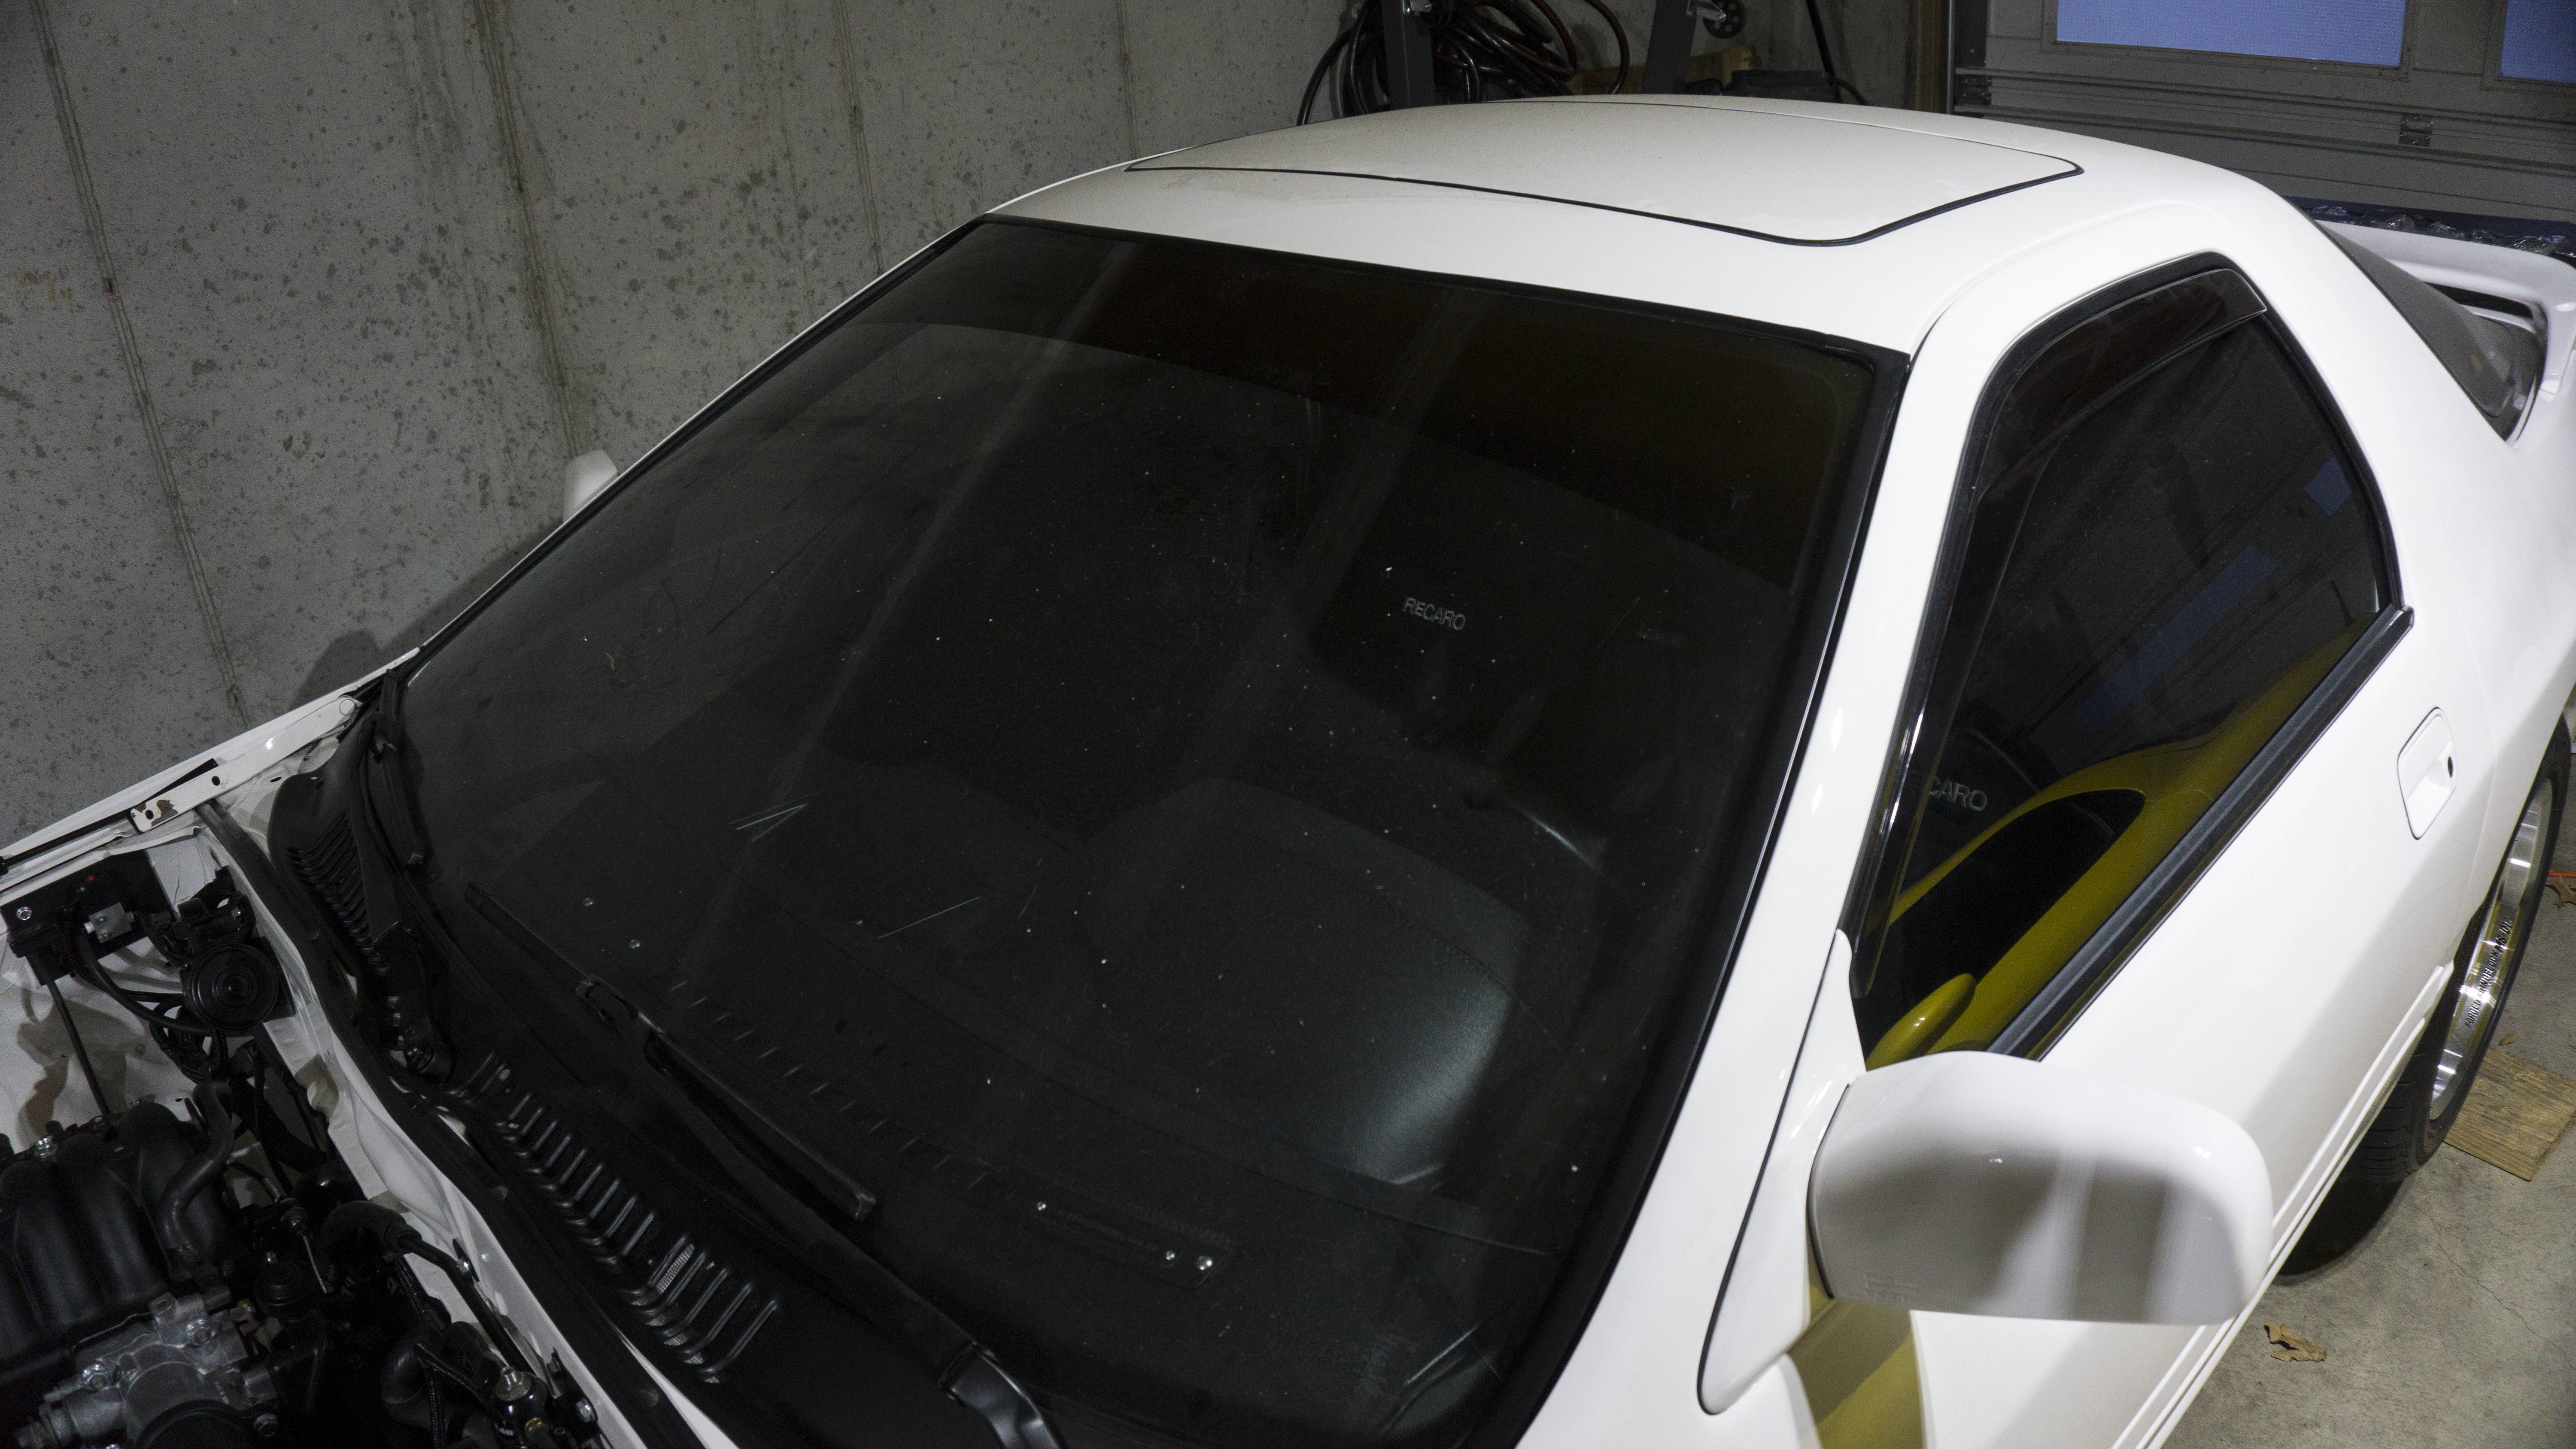
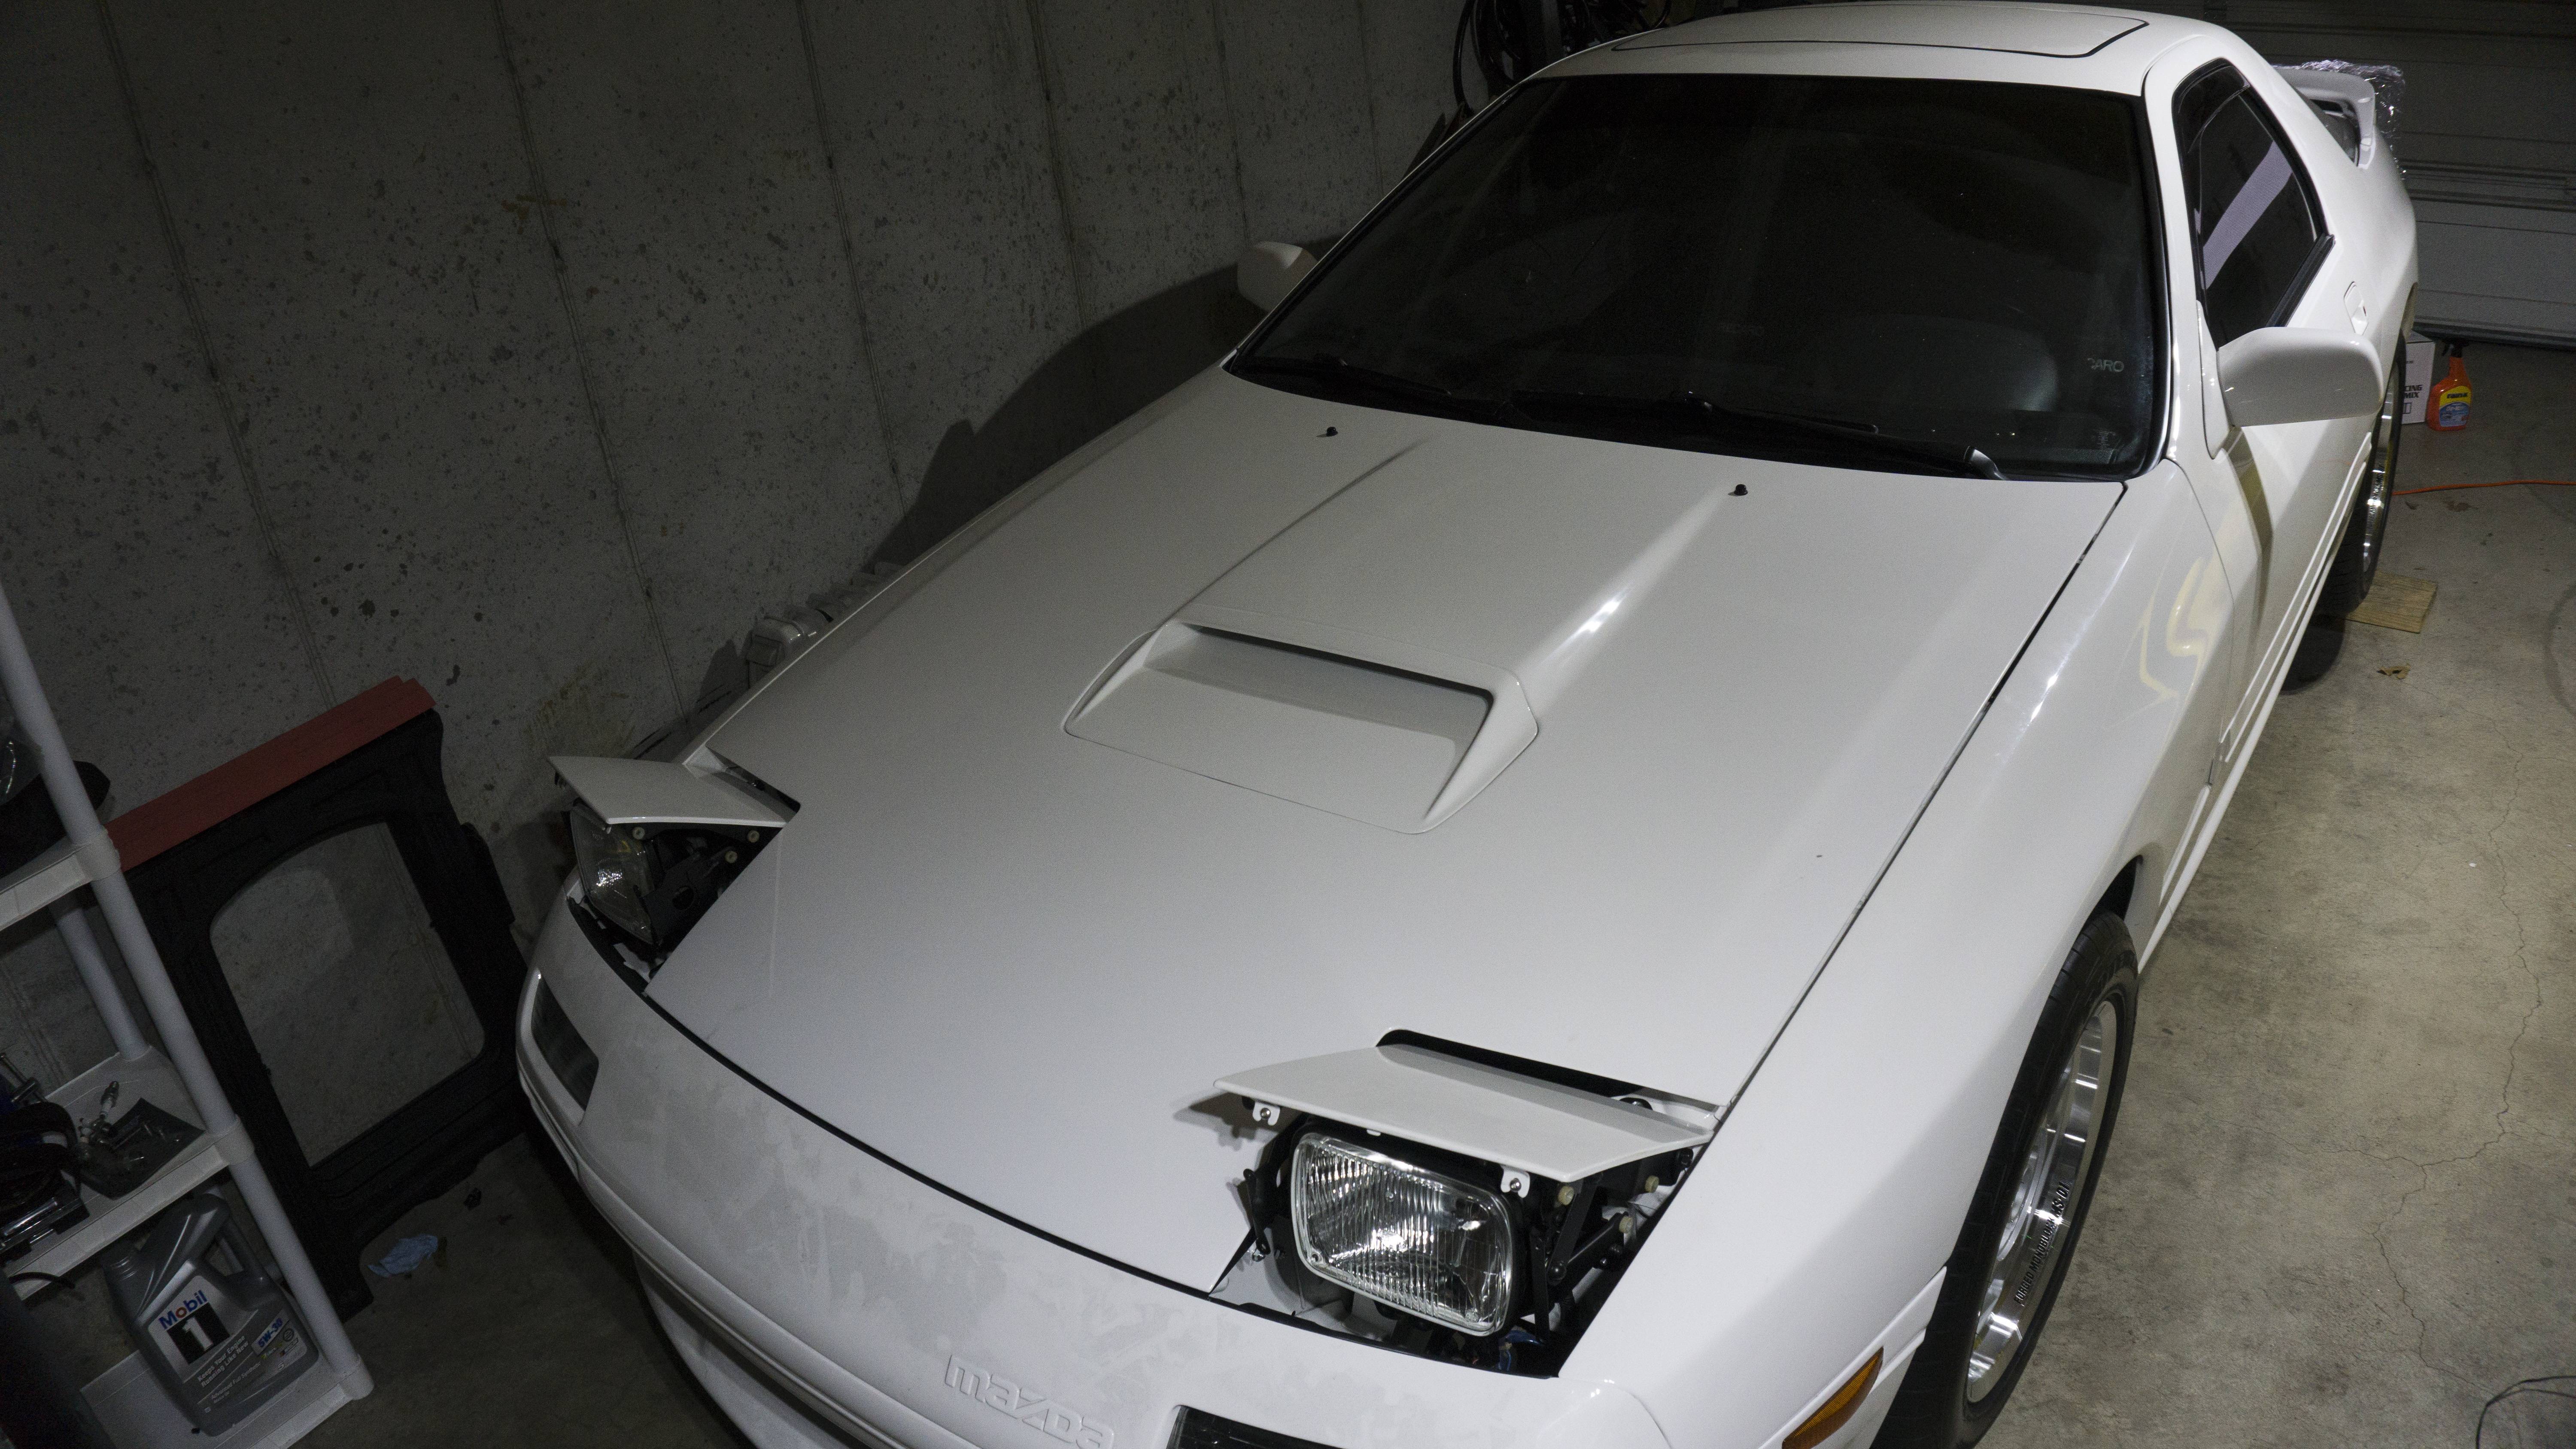
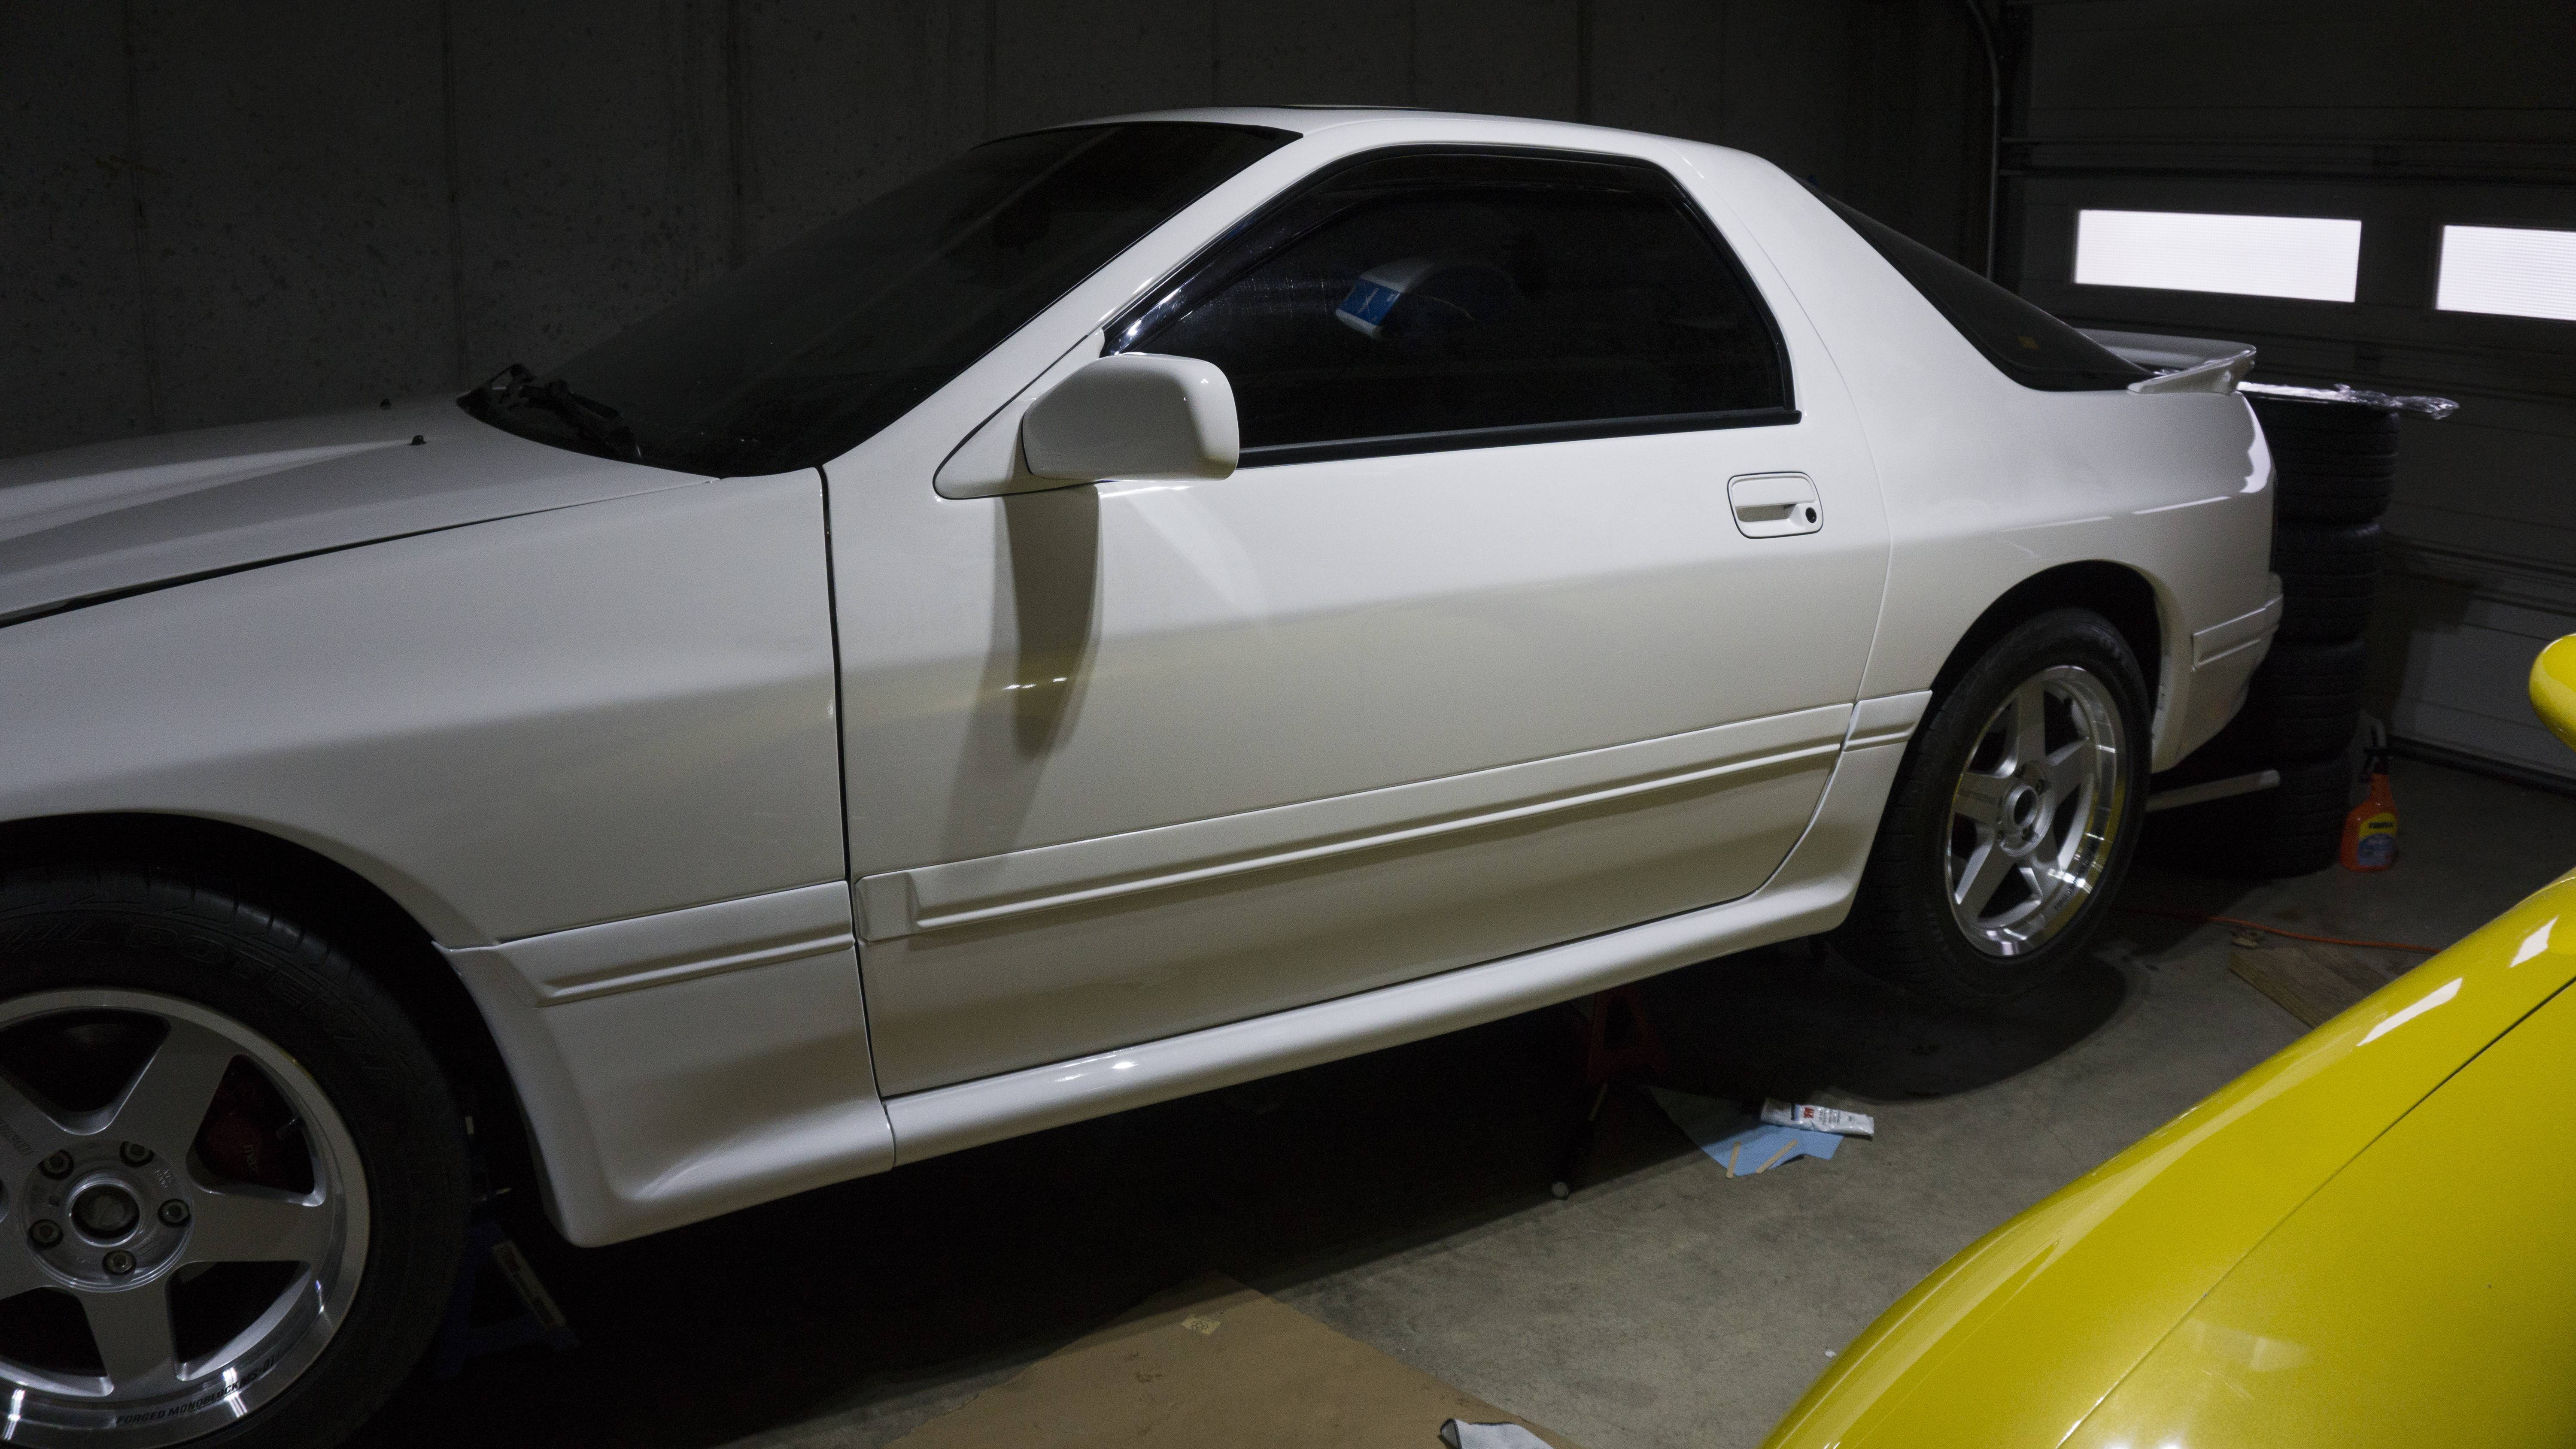
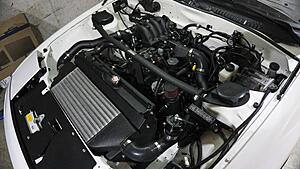
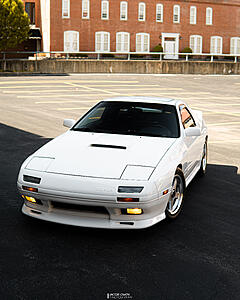
I think for the first update in awhile I don�t have to start off with a �but� or �unfortunately�. Everything has been going well. I re-made both oil cooler lines and can gladly say I am 100% leak free. I had an issue with my rear coil pack that I fixed by giving it a dedicated ground. I�m 98% sure having powdercoated the coil pack mounting brackets wasn't allowing it to ground. I finally, officially now, have the idle dialed in. There were a lot of settings that were wrong in MegaSquirt from my previous setup that I needed to discover and fix. I finally was able to put the strut bar on permanently (for now) and install the rest of the underbelly panels. I also went ahead and installed brand new front windshield side and upper moldings. I�m always amazed how much brand new moldings and plastics are able to transform a car. My stuff from paint came back which allowed me to get the hood fully on and the front bumper. This also allowed me to install my brand new windshield washer nozzles - which are purely cosmetic since I won�t be running a reservoir or pump for it. I also was able to install the Turbo II side skirts. They are kind of a pain, since none of hte clips exist on any car but the S5 Turbo II, or JDM models. This means fitment is not 100% perfect, I�m not sure it will ever be 100% perfect - but I�m able to live with it for now. In the future I may pull it off and scientifically (trial & error), fix it. Tonight I�ll be finishing up the passenger side skirt install which will allow me to get the car fully on the ground. I still have a couple of goodies that will be going on, but I�m expecting my next update to be the last one for awhile. So, close - but not there yet!
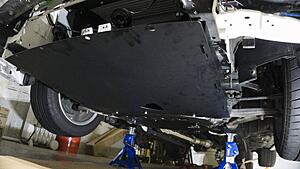
Here are the pictures of the strut bar and underbelly panels:
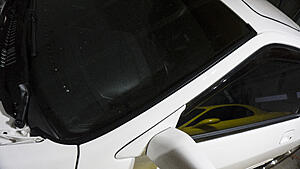
Here are the pictures of the front windshield moldings:
Here are the pictures of the hood:
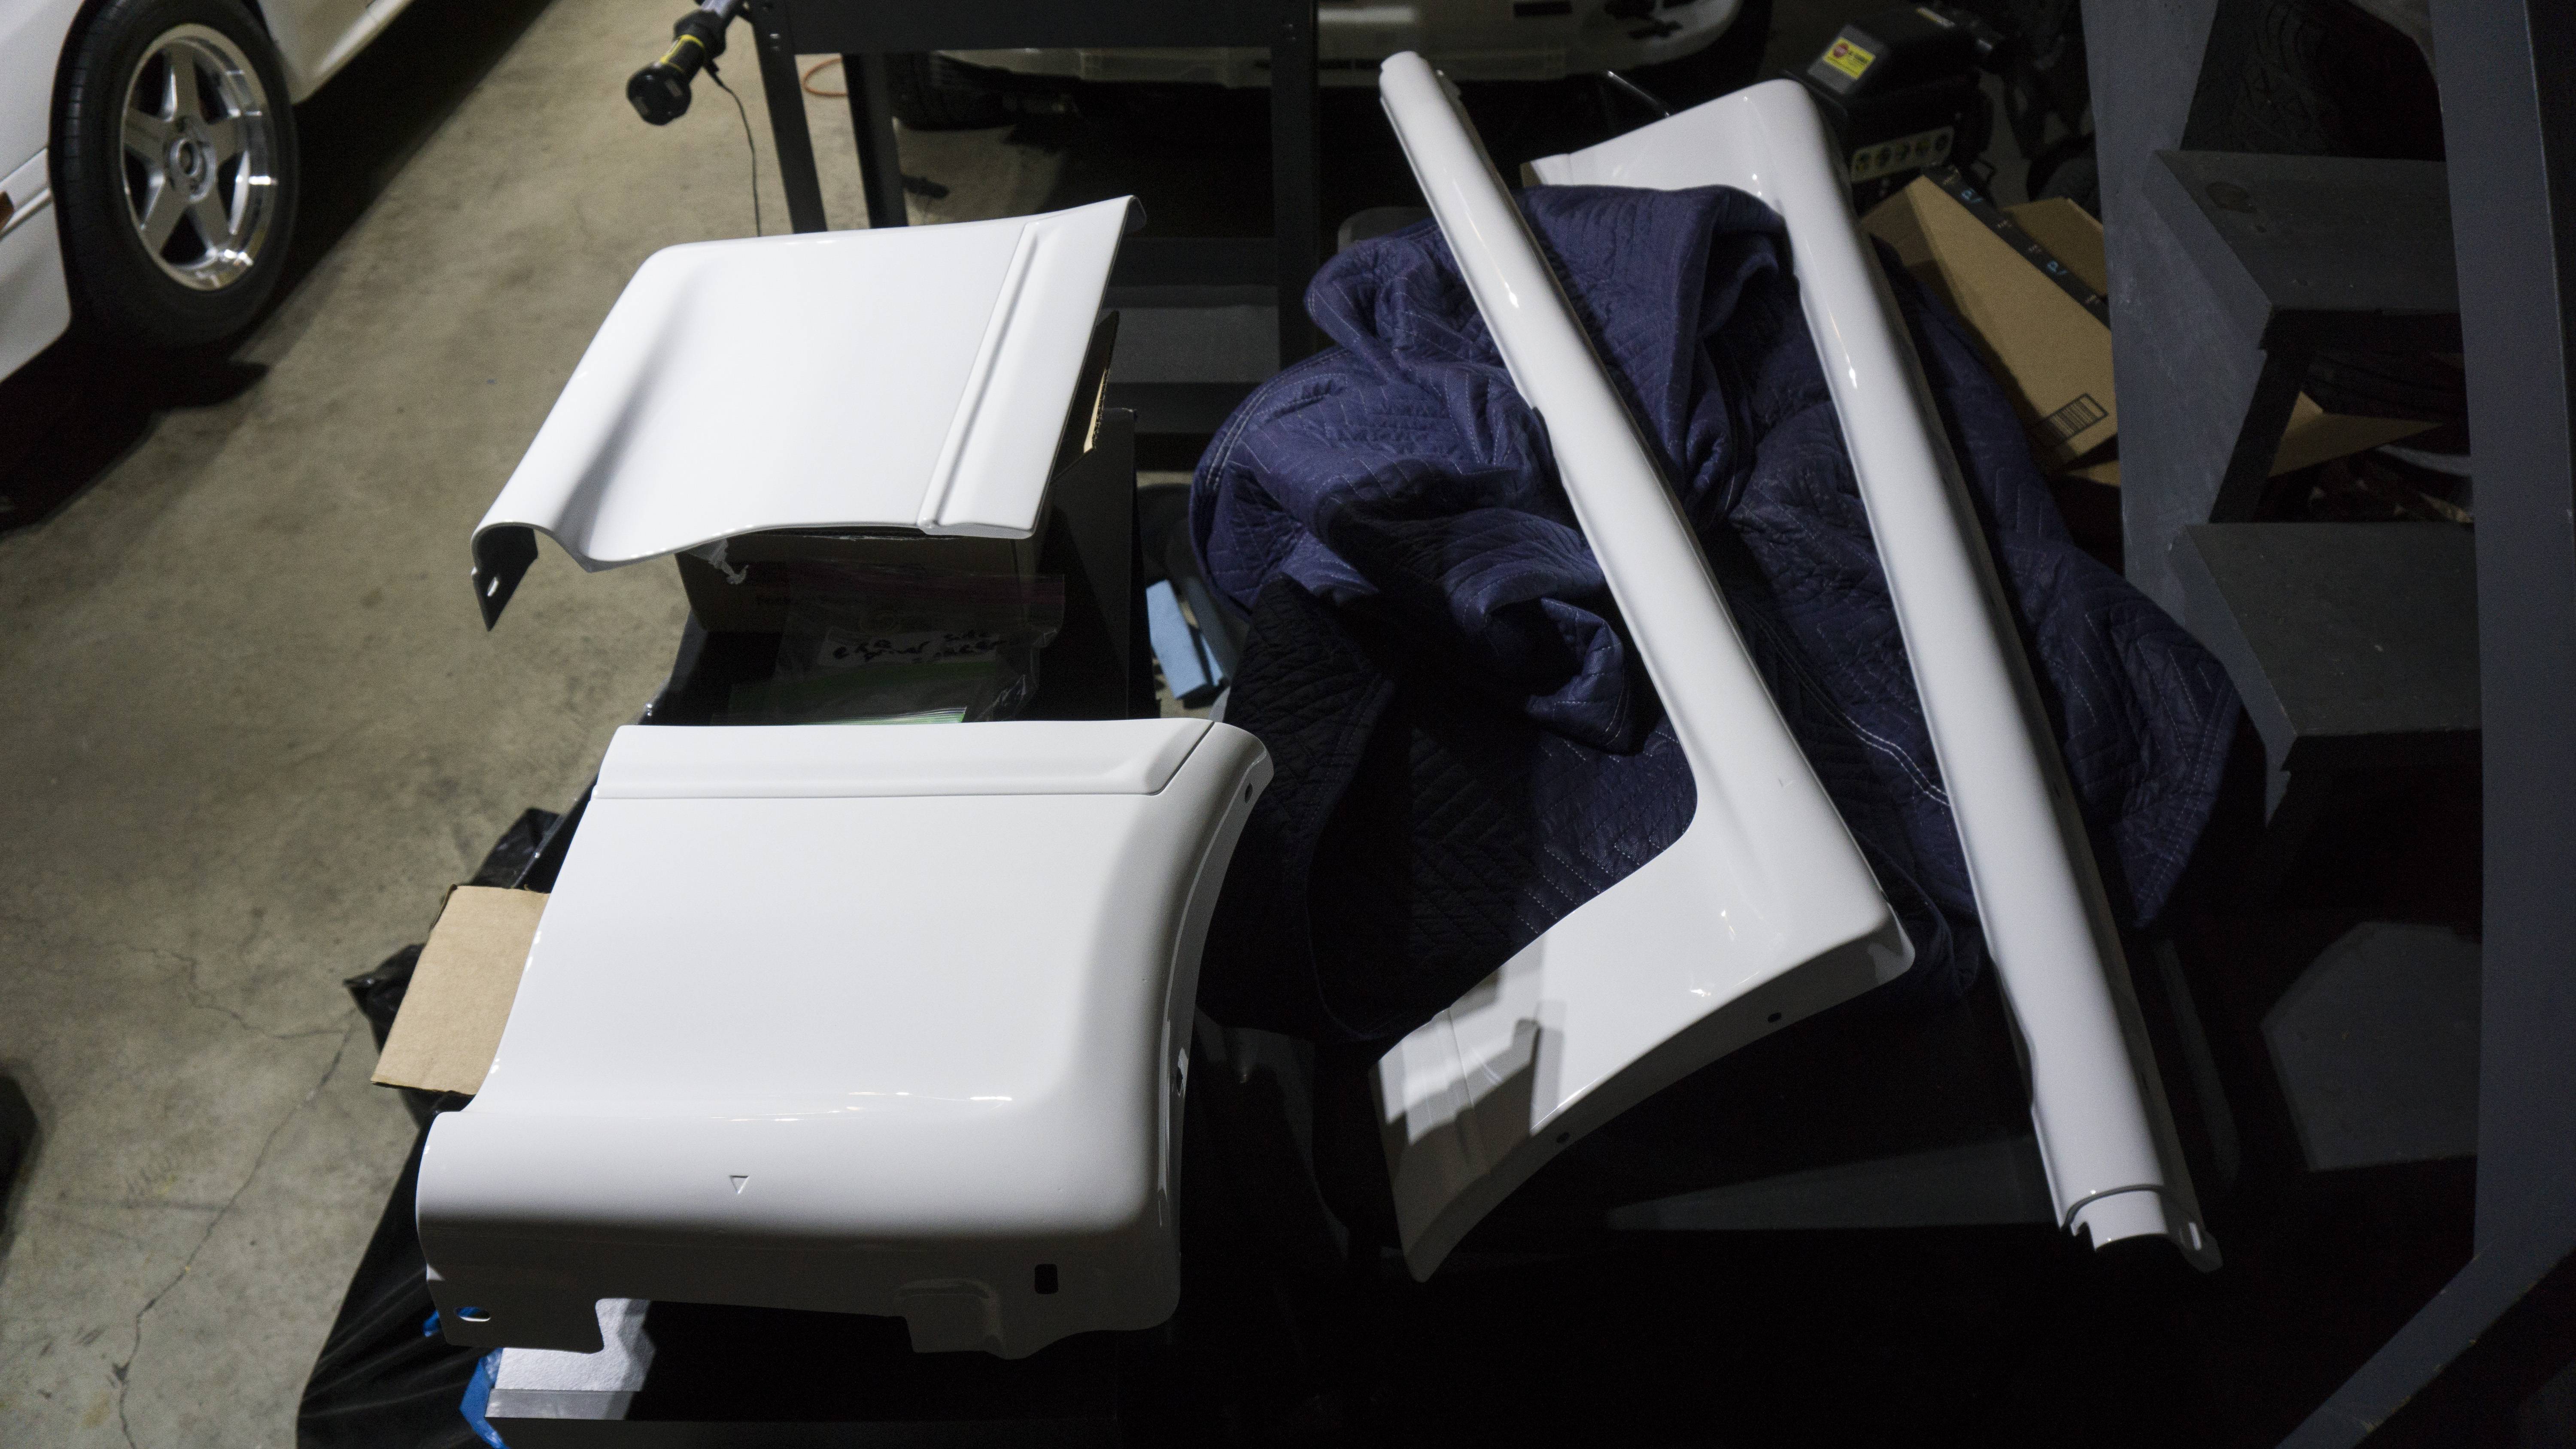
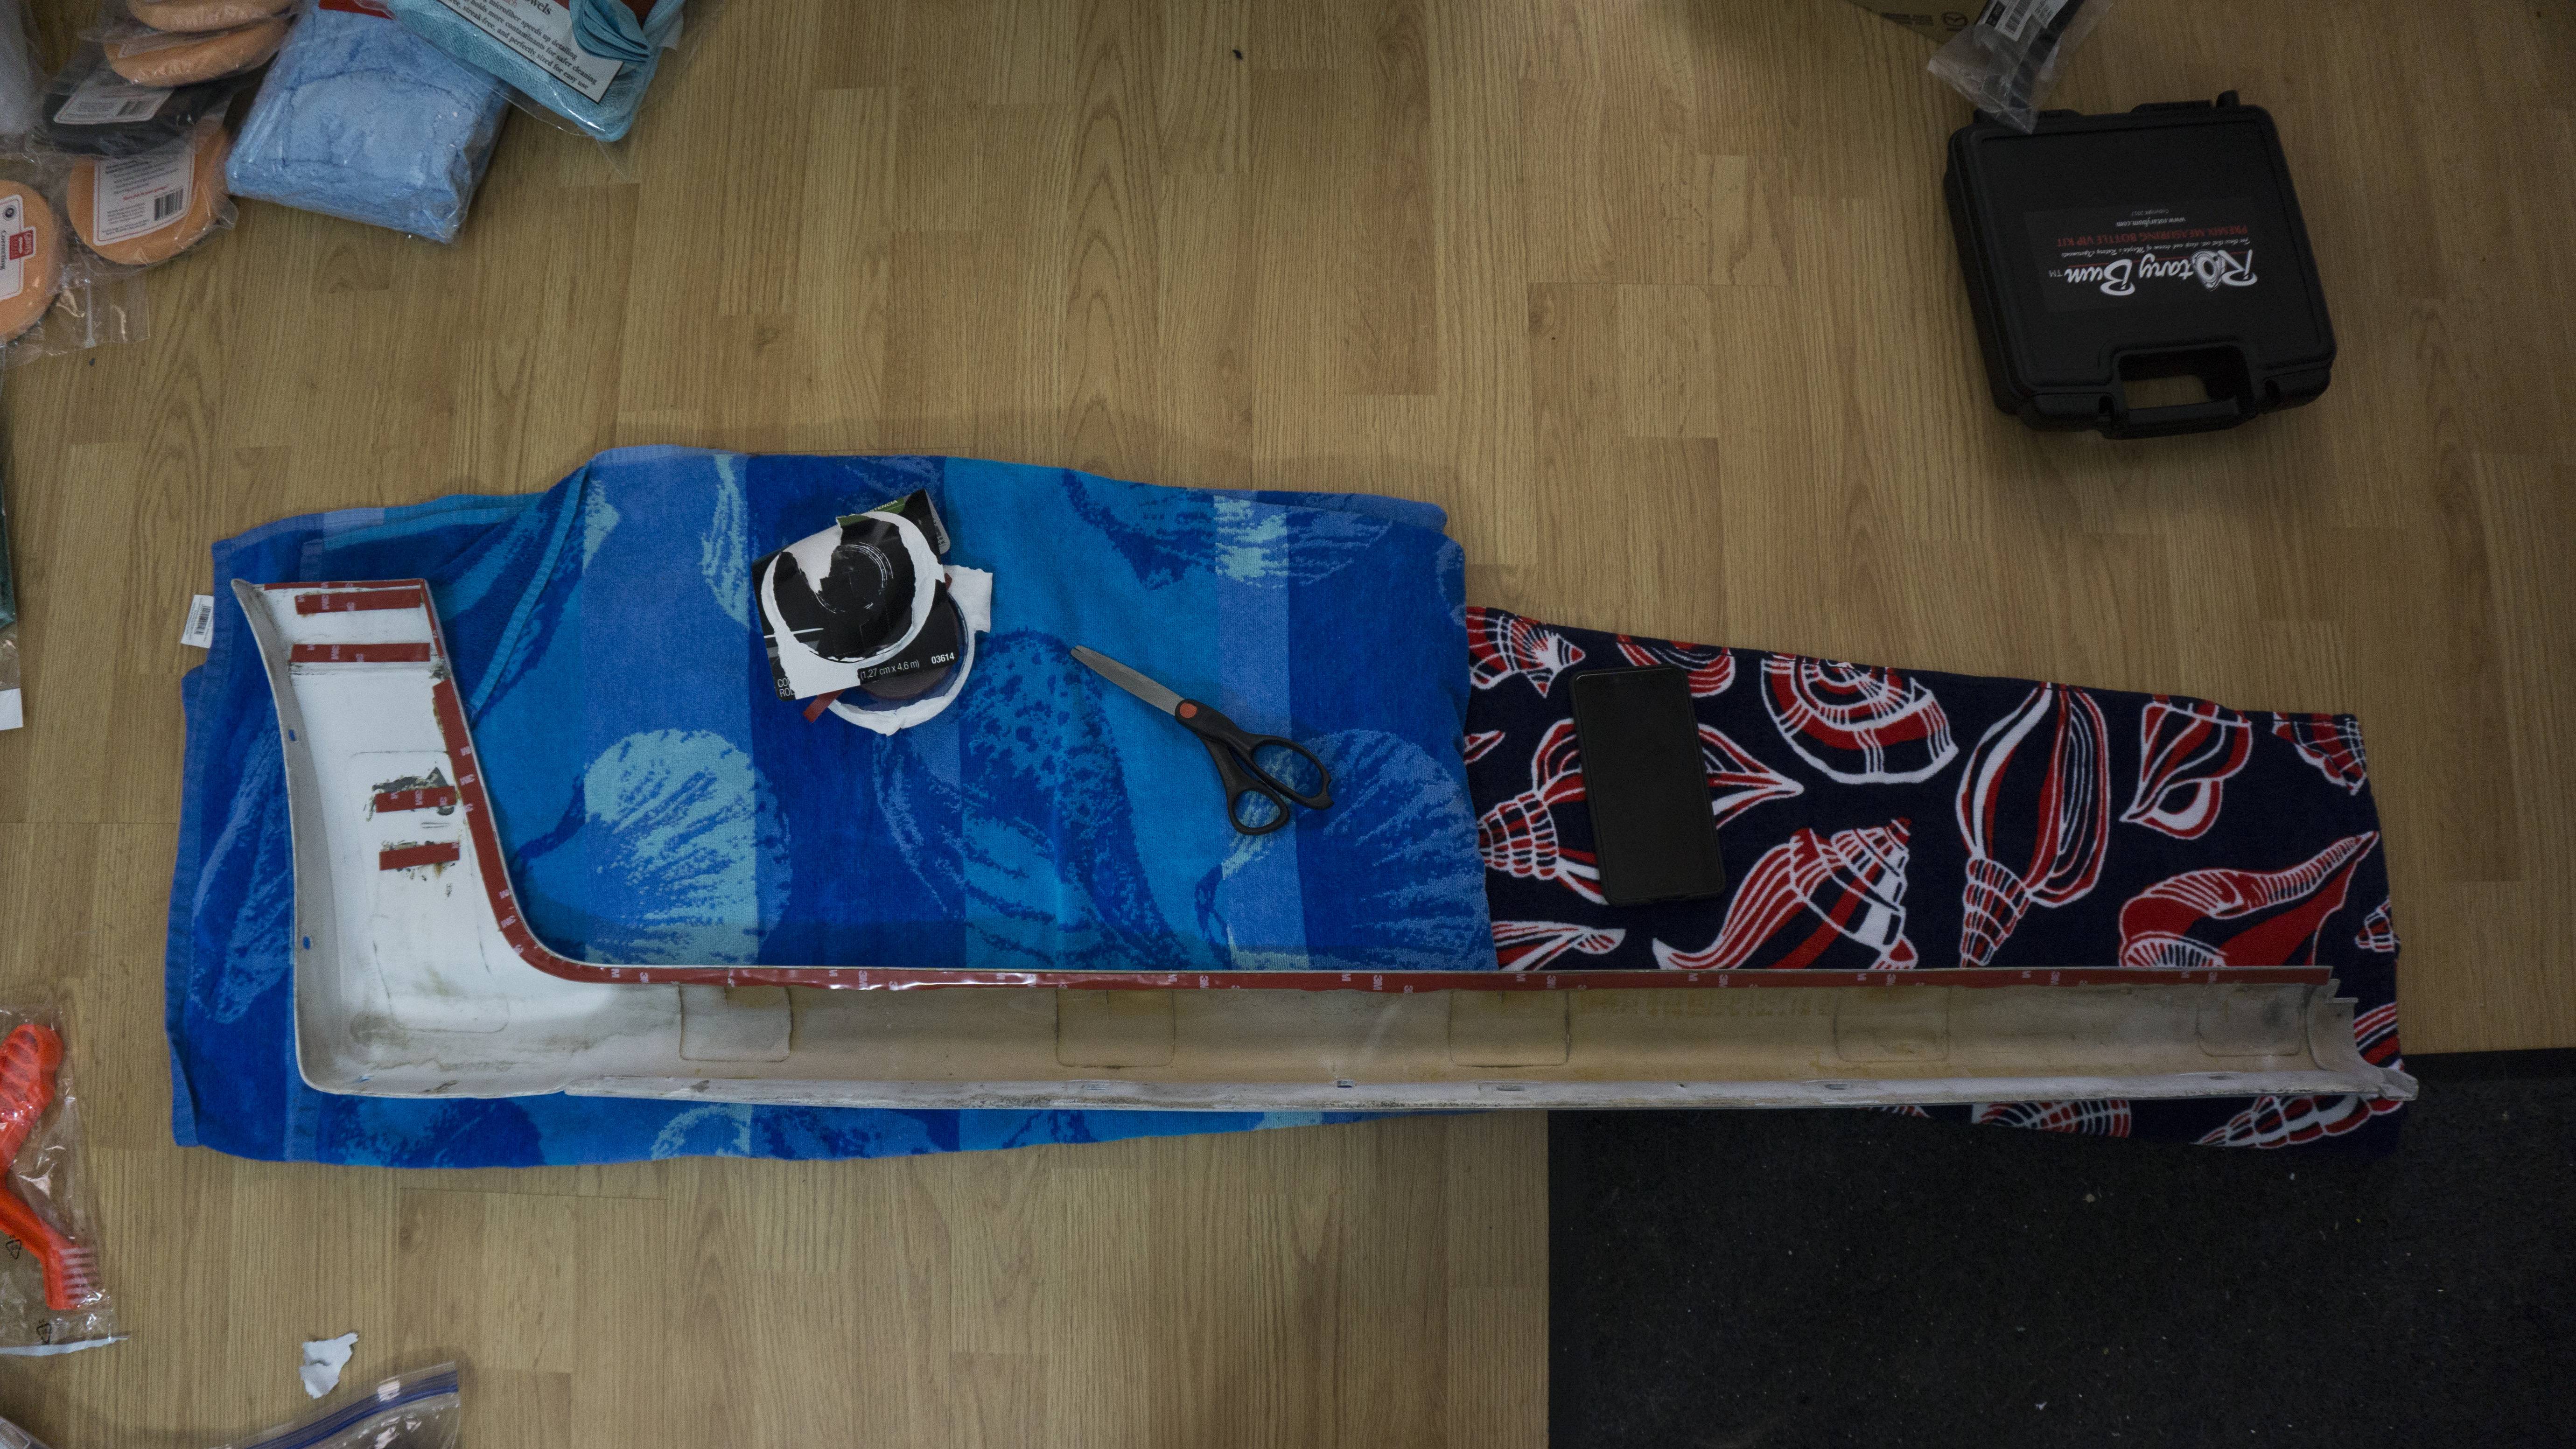
Here are the pictures of the side skirts:
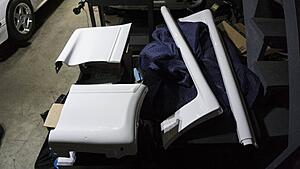
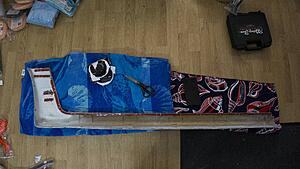
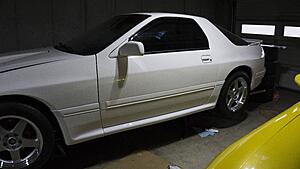
I think for the first update in awhile I don�t have to start off with a �but� or �unfortunately�. Everything has been going well. I re-made both oil cooler lines and can gladly say I am 100% leak free. I had an issue with my rear coil pack that I fixed by giving it a dedicated ground. I�m 98% sure having powdercoated the coil pack mounting brackets wasn't allowing it to ground. I finally, officially now, have the idle dialed in. There were a lot of settings that were wrong in MegaSquirt from my previous setup that I needed to discover and fix. I finally was able to put the strut bar on permanently (for now) and install the rest of the underbelly panels. I also went ahead and installed brand new front windshield side and upper moldings. I�m always amazed how much brand new moldings and plastics are able to transform a car. My stuff from paint came back which allowed me to get the hood fully on and the front bumper. This also allowed me to install my brand new windshield washer nozzles - which are purely cosmetic since I won�t be running a reservoir or pump for it. I also was able to install the Turbo II side skirts. They are kind of a pain, since none of hte clips exist on any car but the S5 Turbo II, or JDM models. This means fitment is not 100% perfect, I�m not sure it will ever be 100% perfect - but I�m able to live with it for now. In the future I may pull it off and scientifically (trial & error), fix it. Tonight I�ll be finishing up the passenger side skirt install which will allow me to get the car fully on the ground. I still have a couple of goodies that will be going on, but I�m expecting my next update to be the last one for awhile. So, close - but not there yet!
Here are the pictures of the strut bar and underbelly panels:


Here are the pictures of the front windshield moldings:
Here are the pictures of the hood:
Here are the pictures of the side skirts:
 02-03-20, 08:35 AM
#284
Update 2/3/2020:
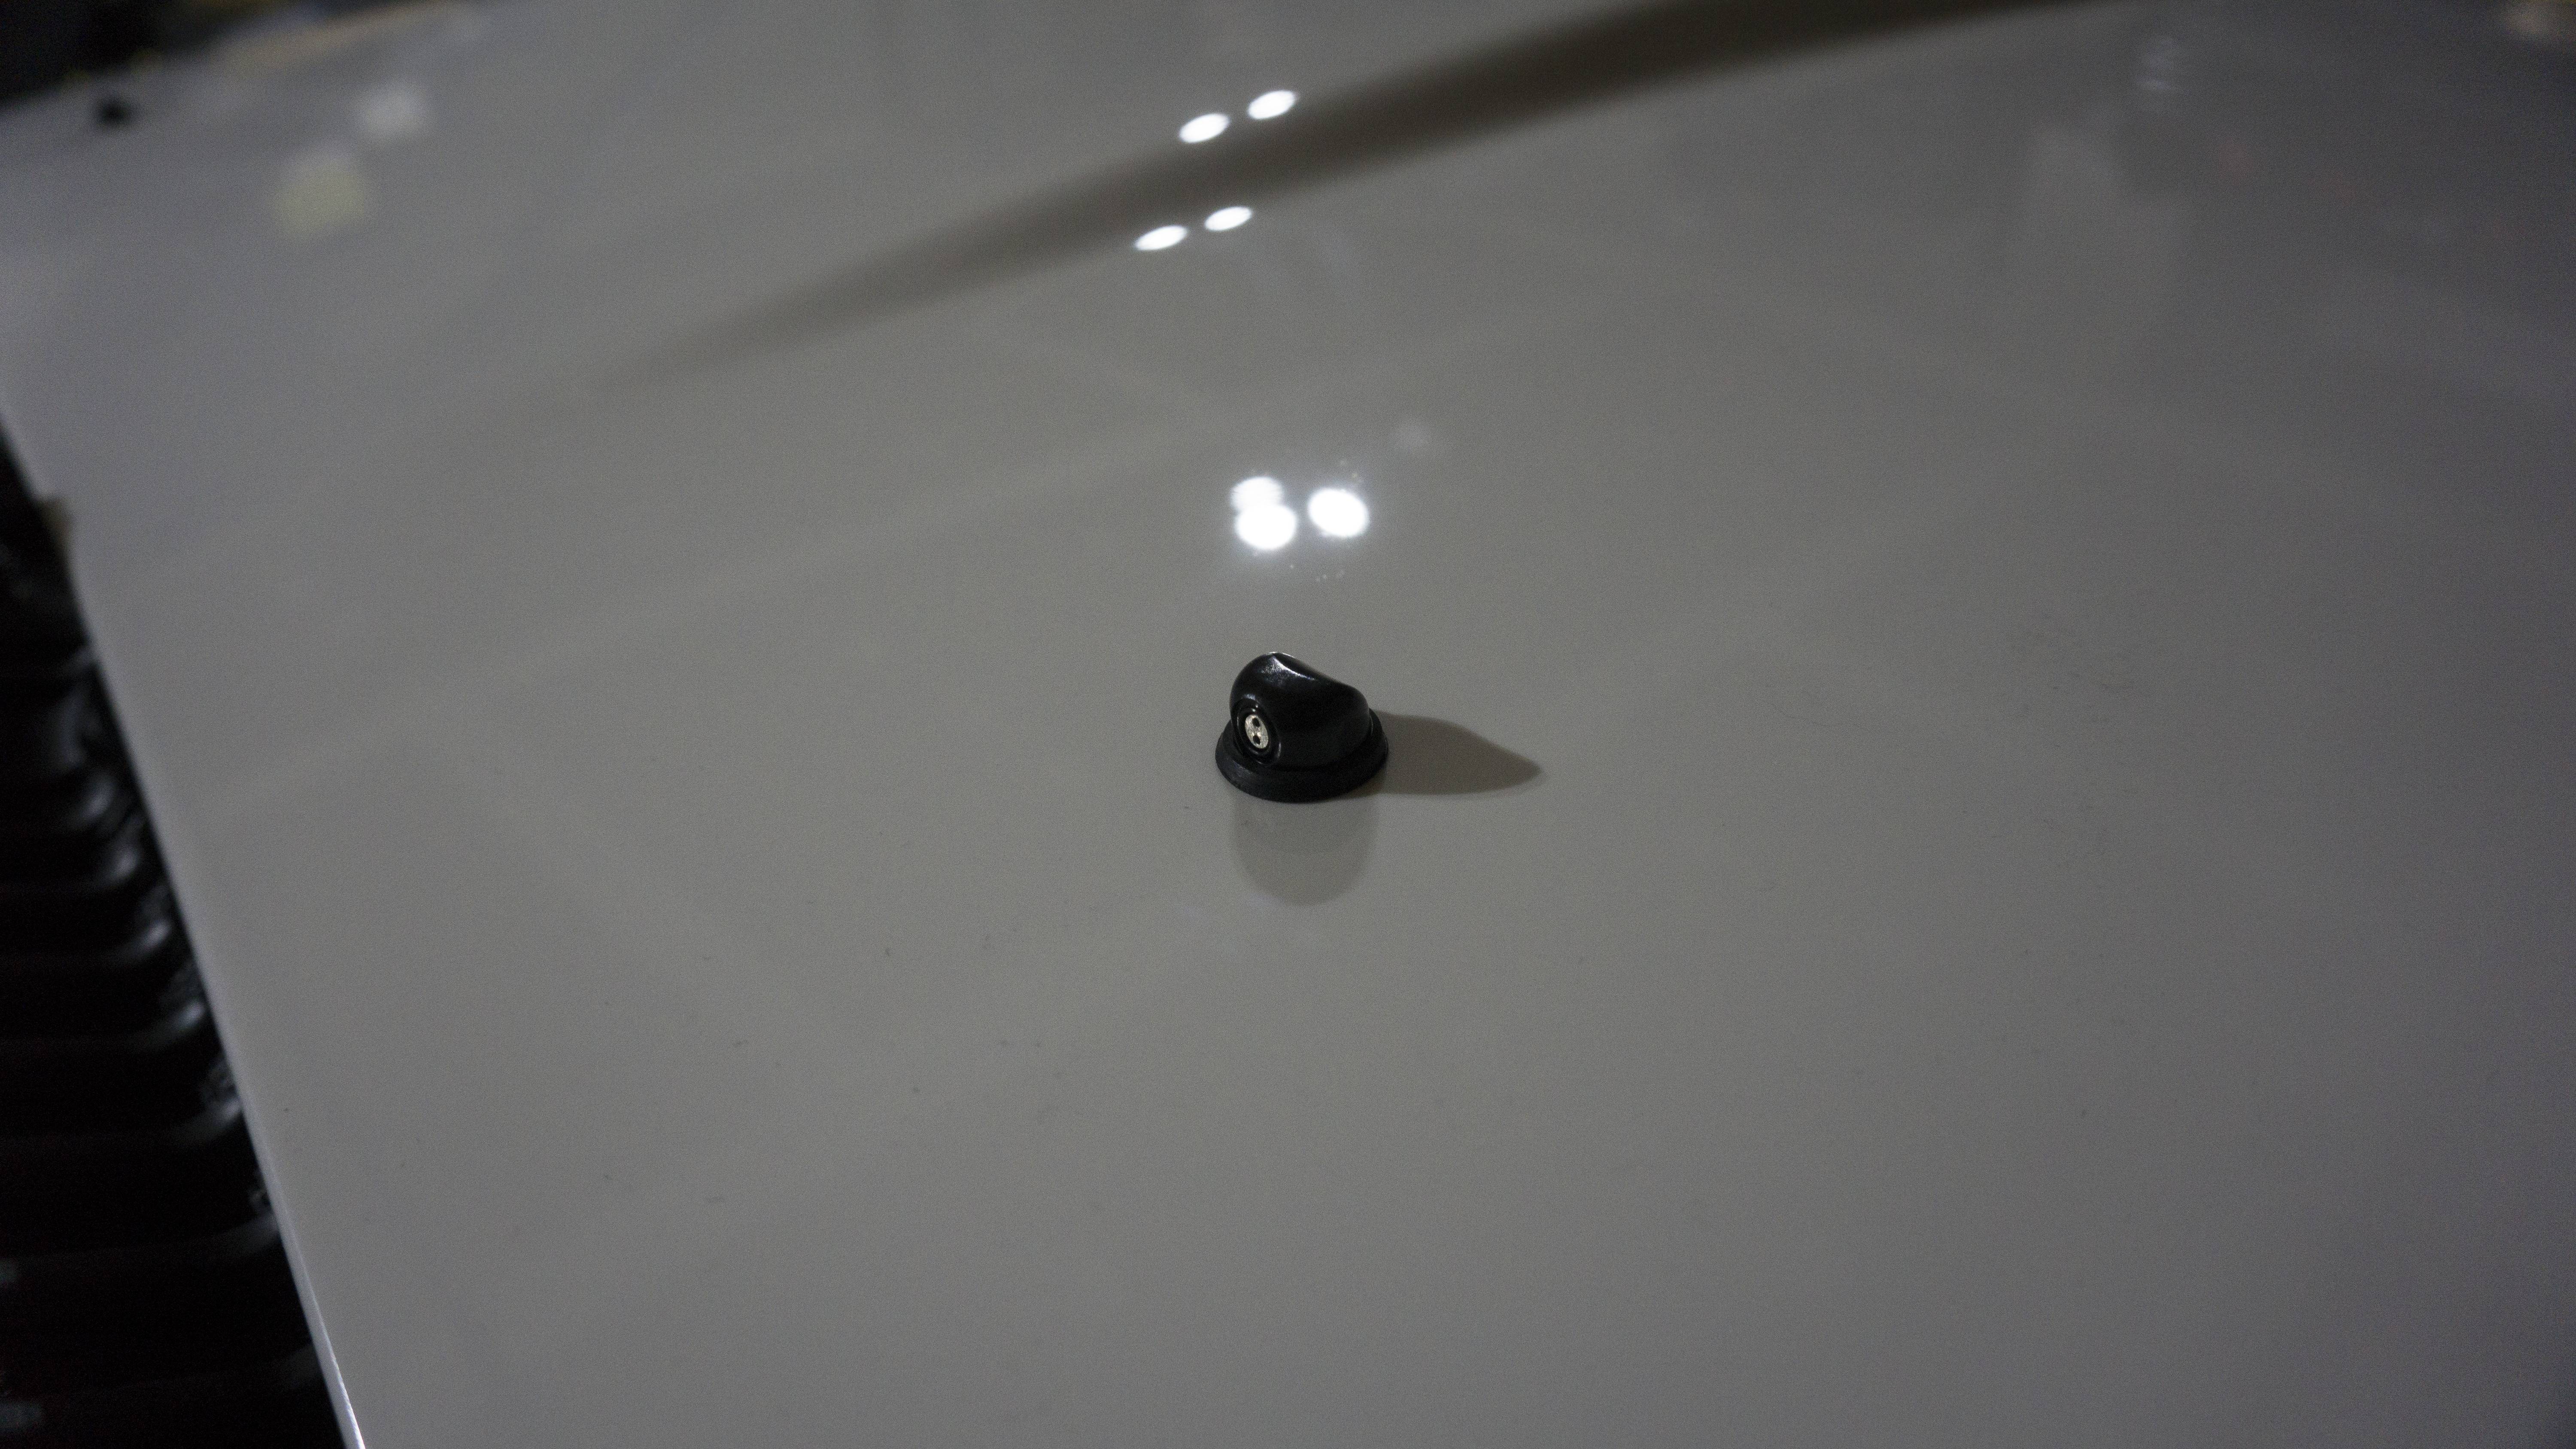
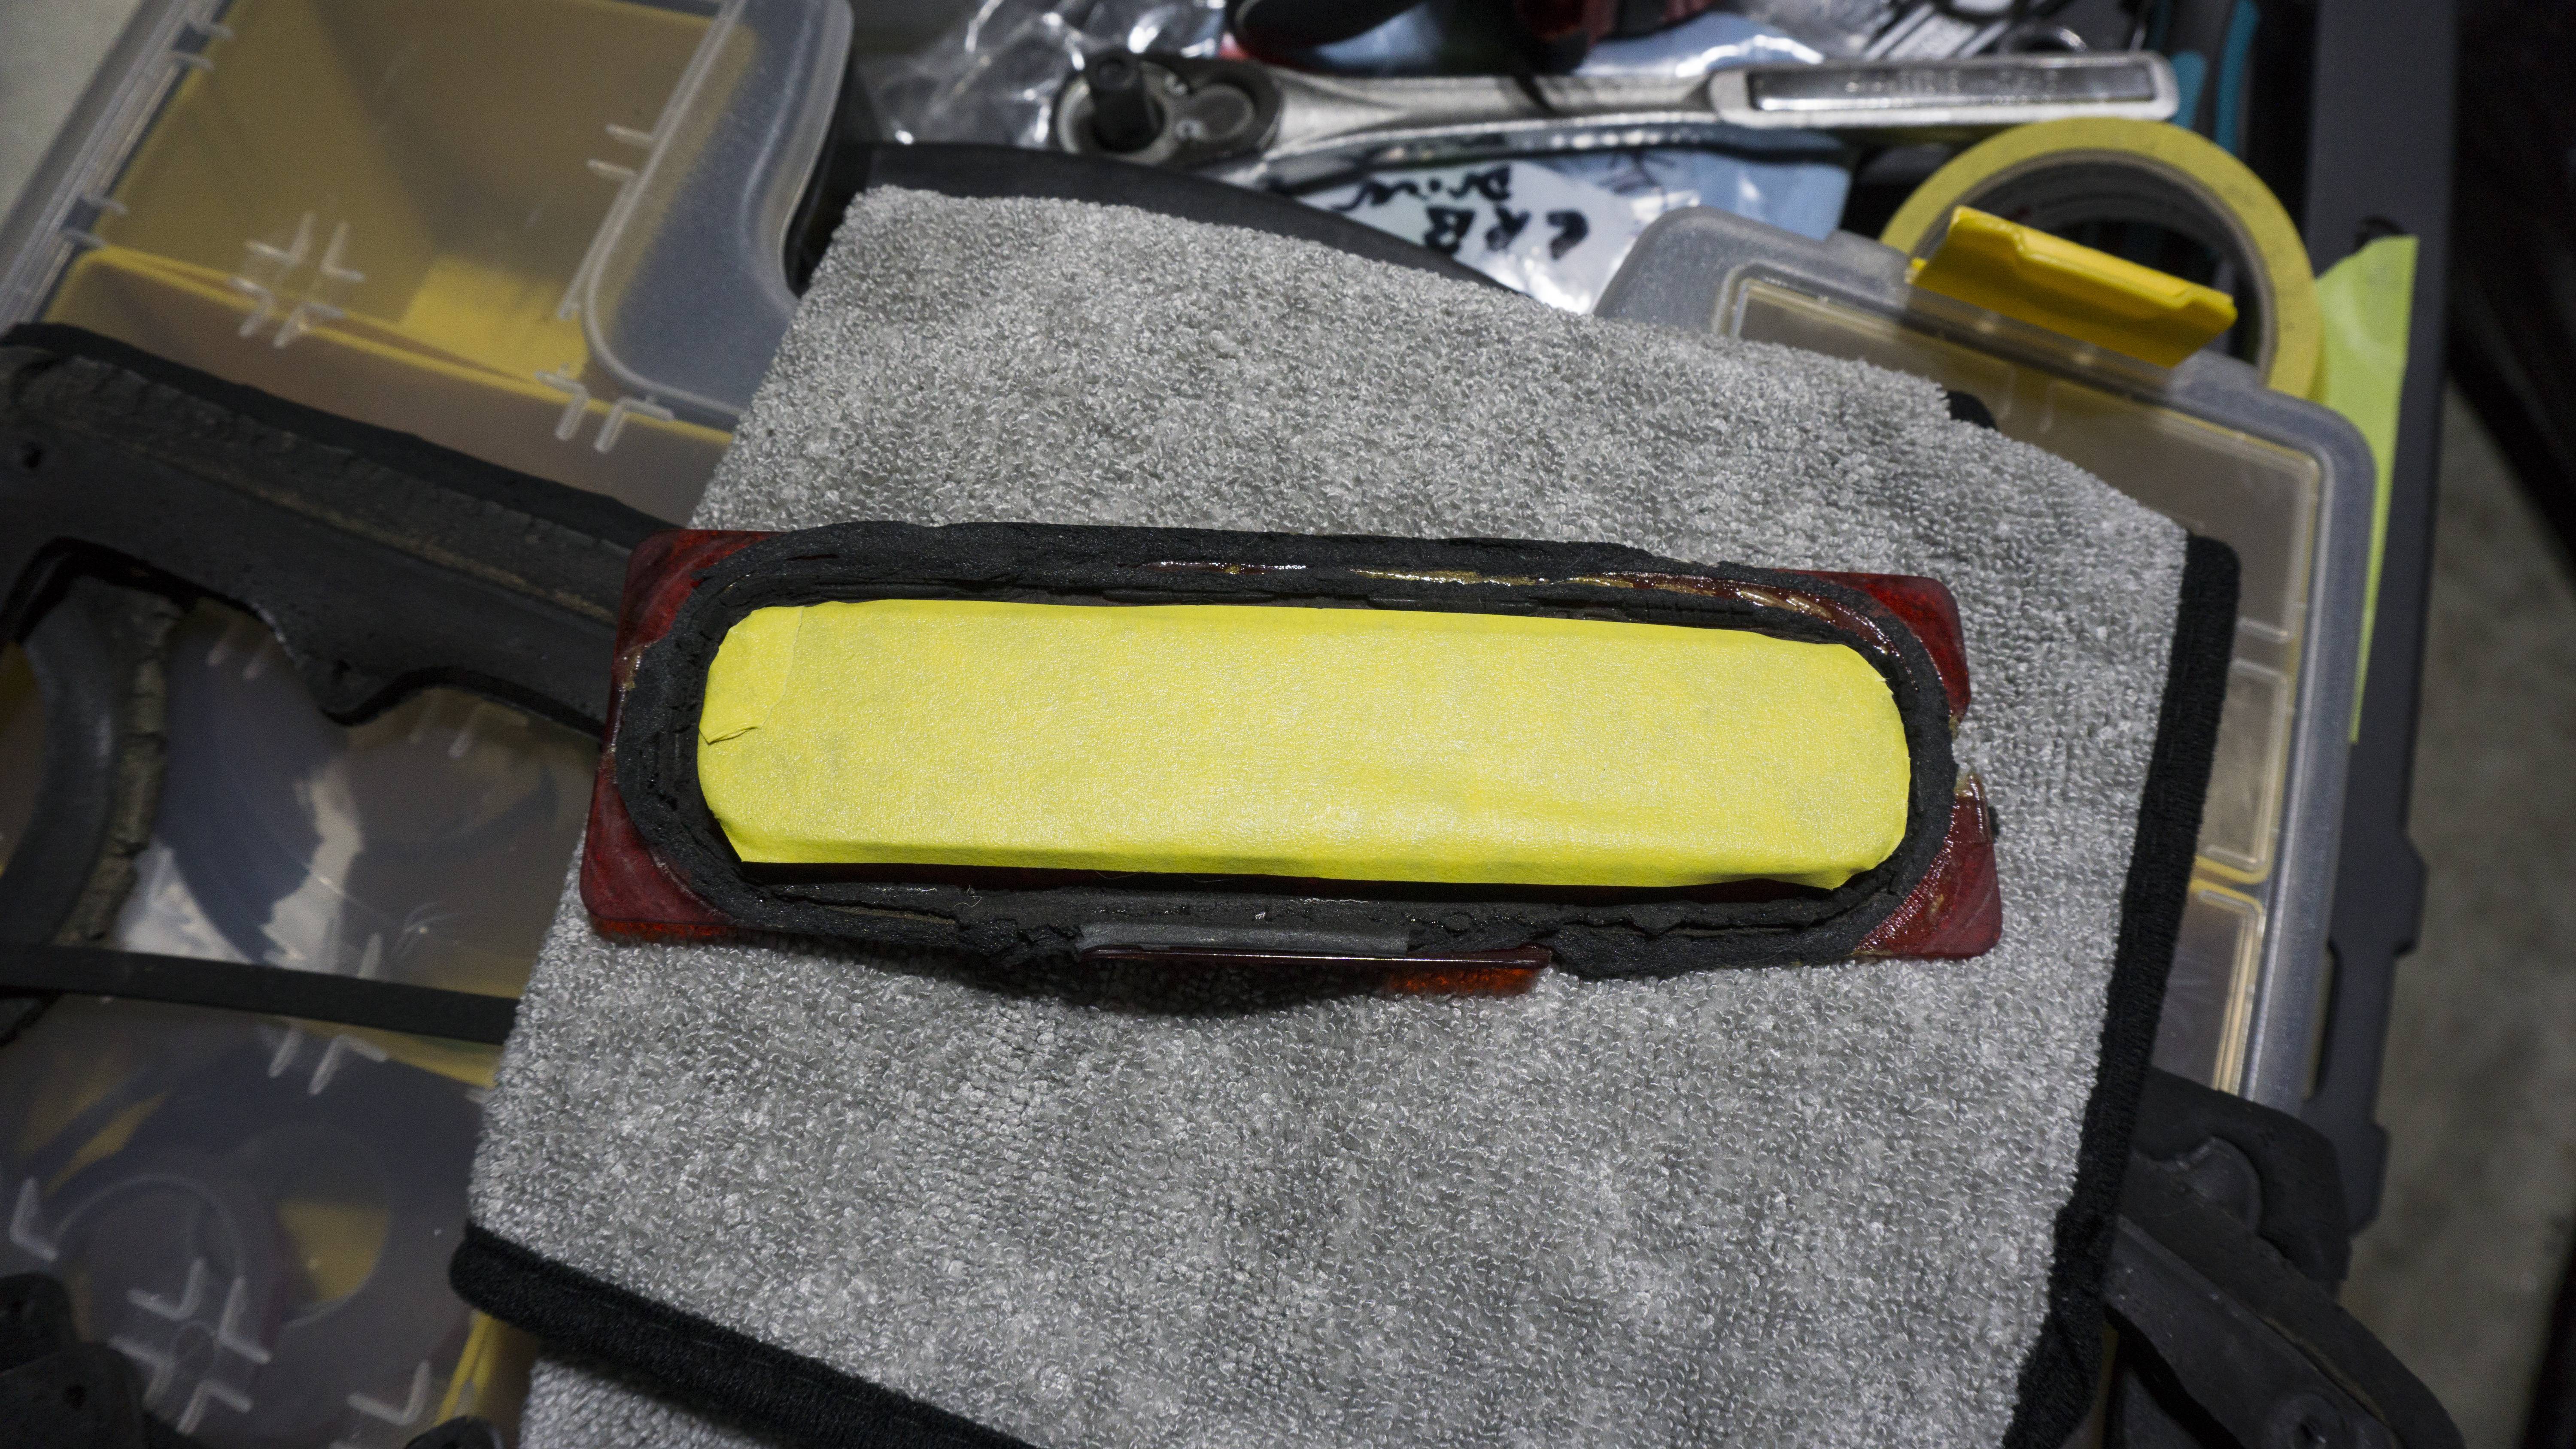
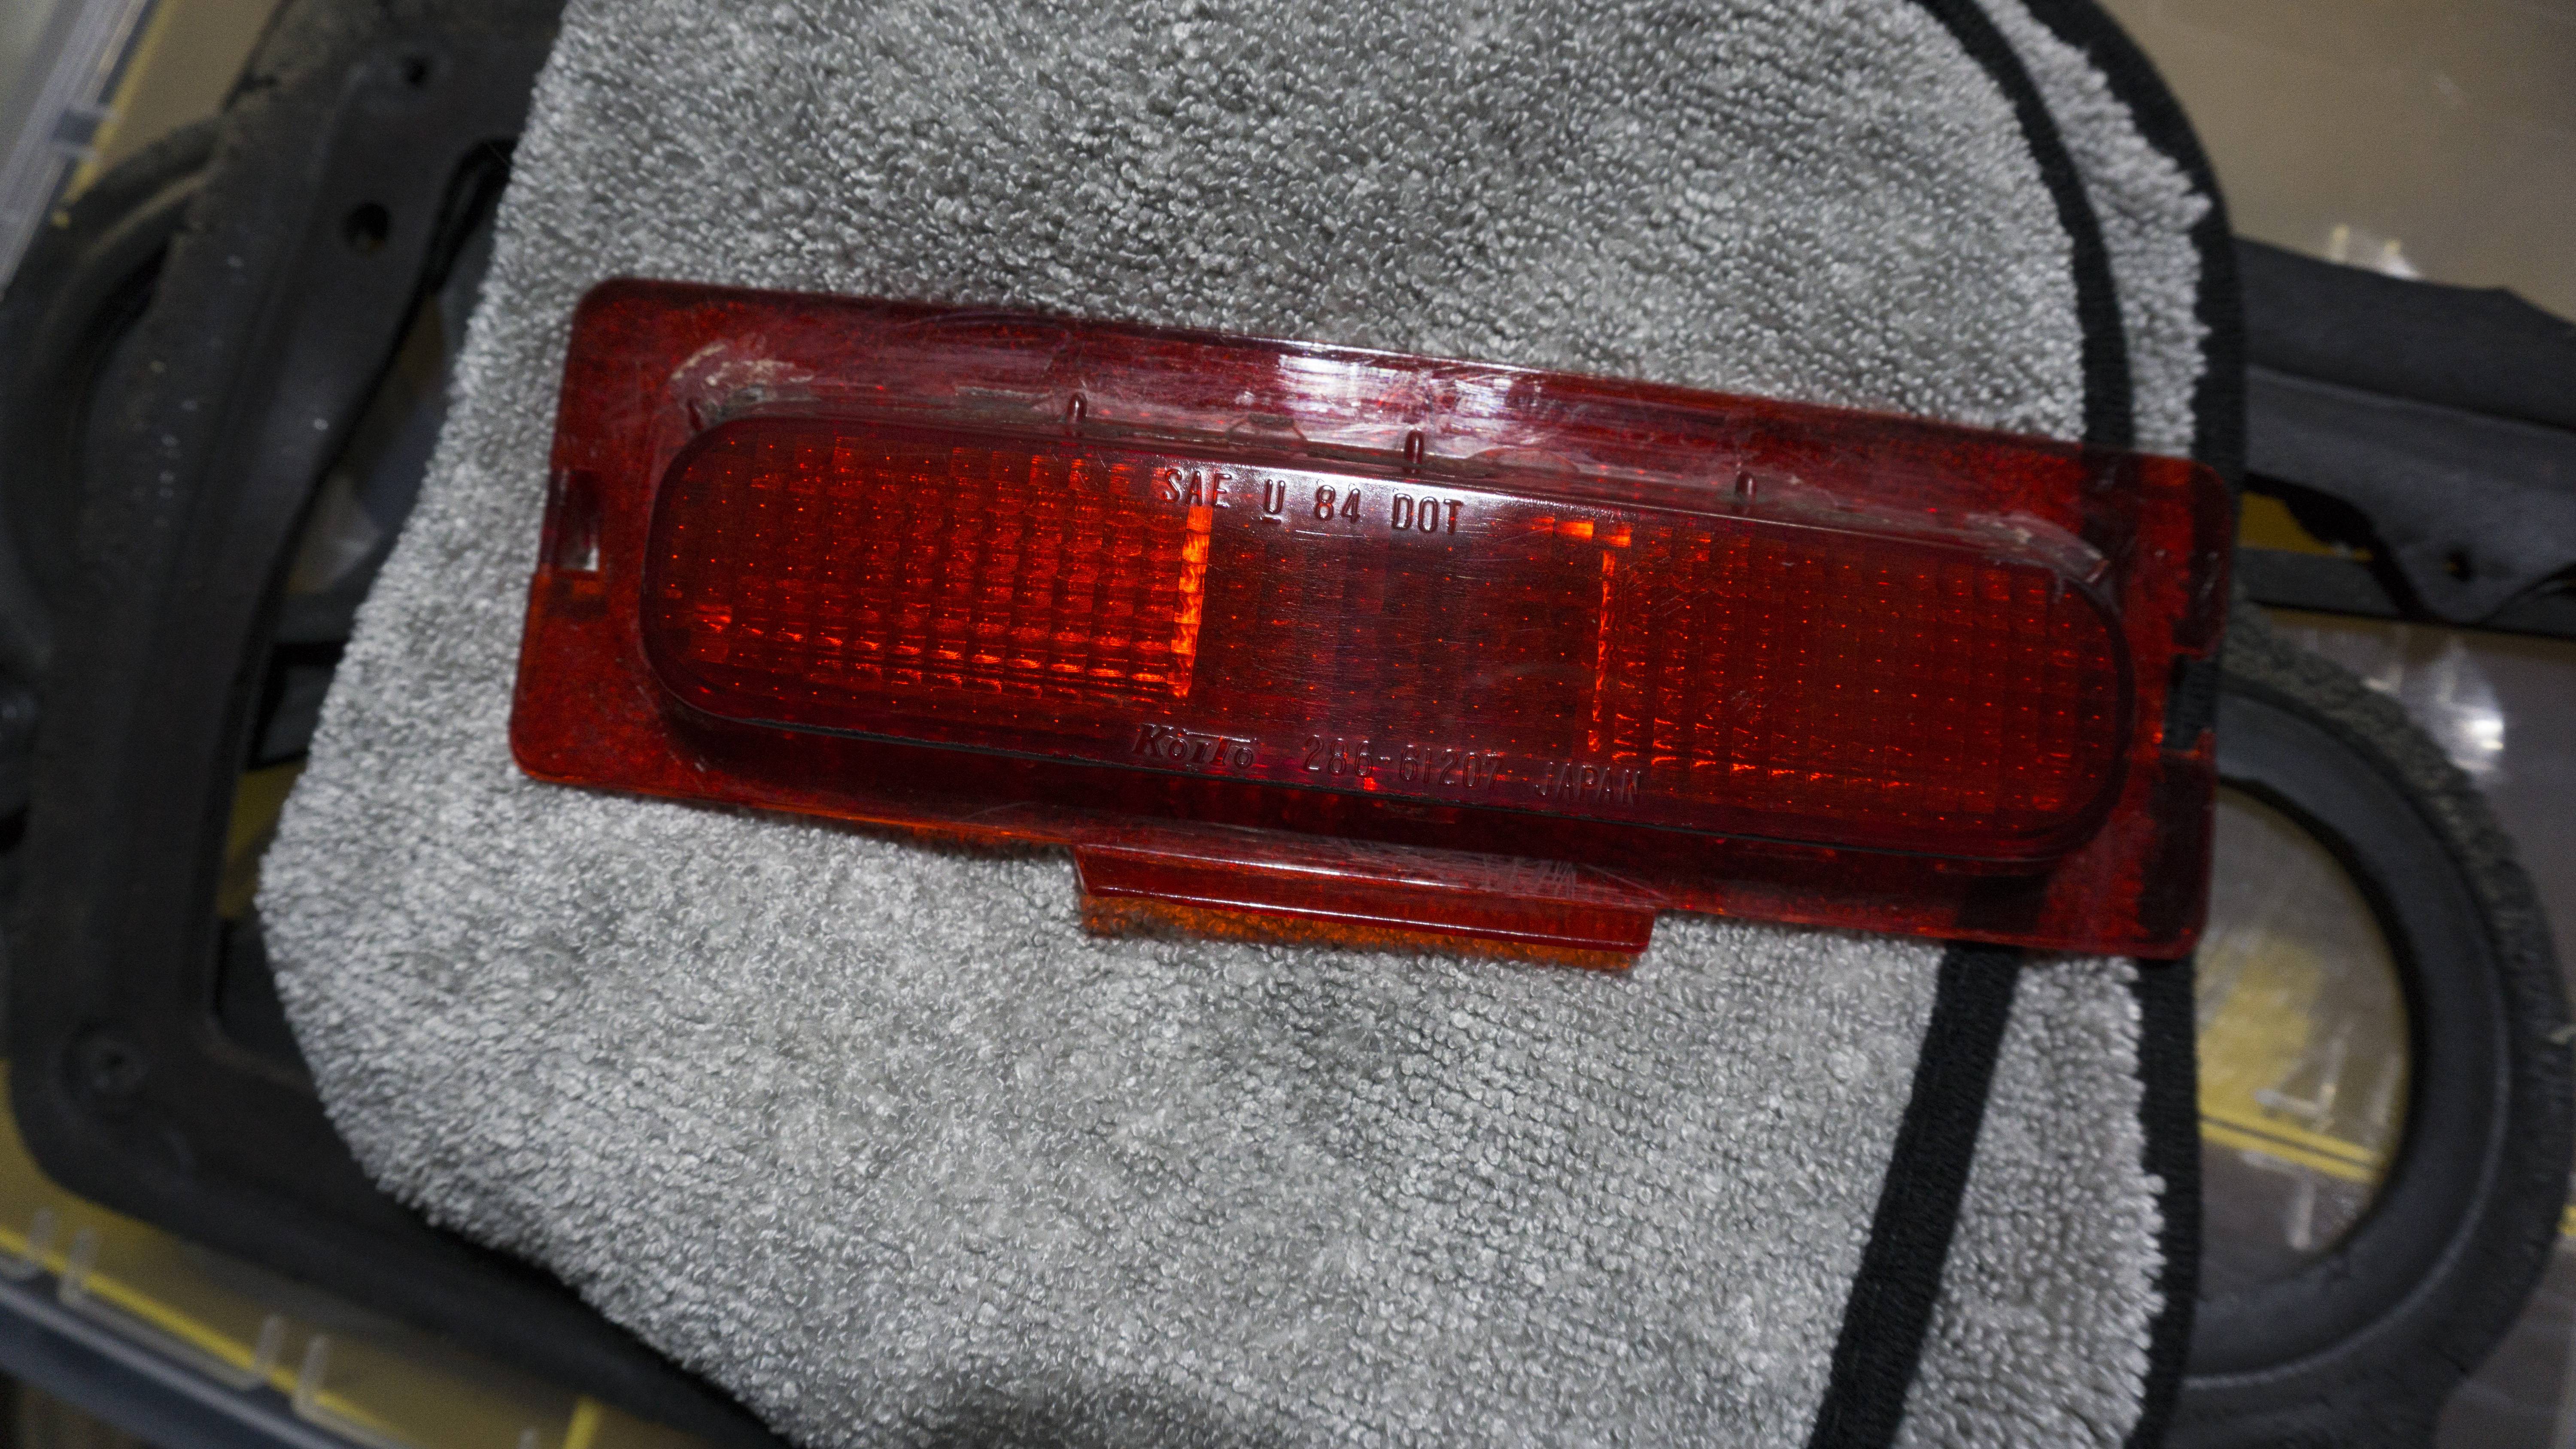
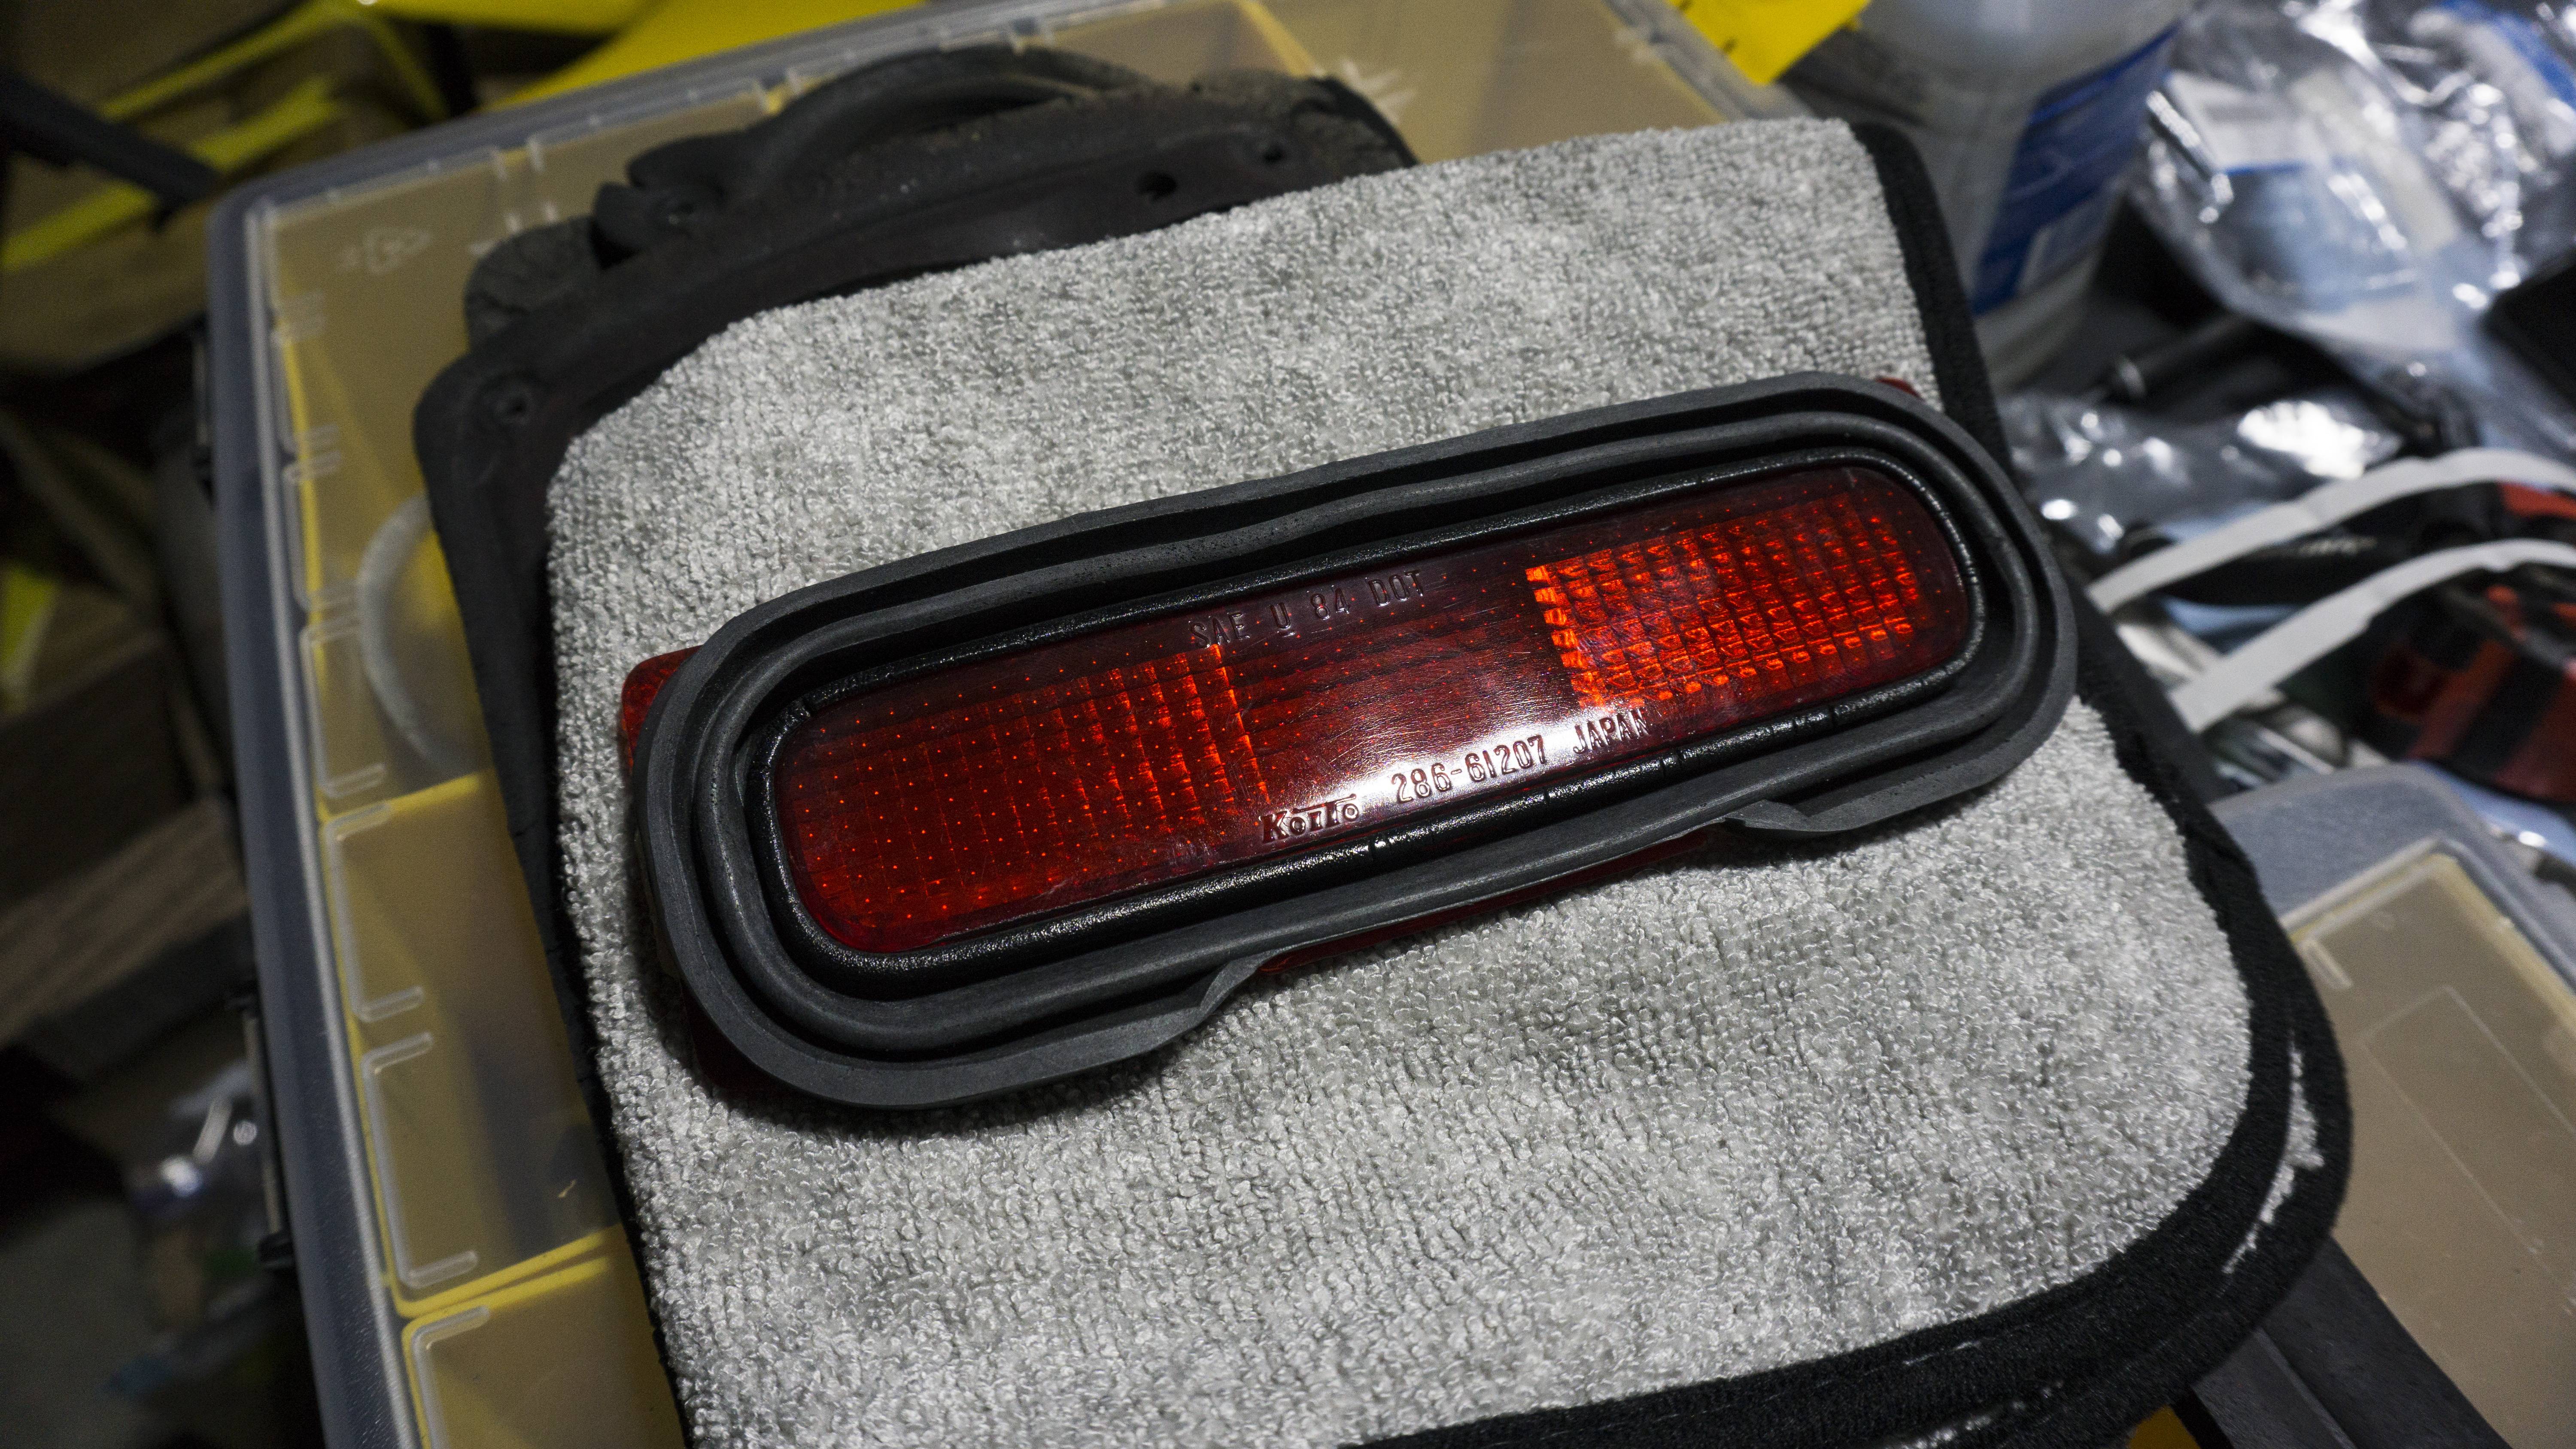
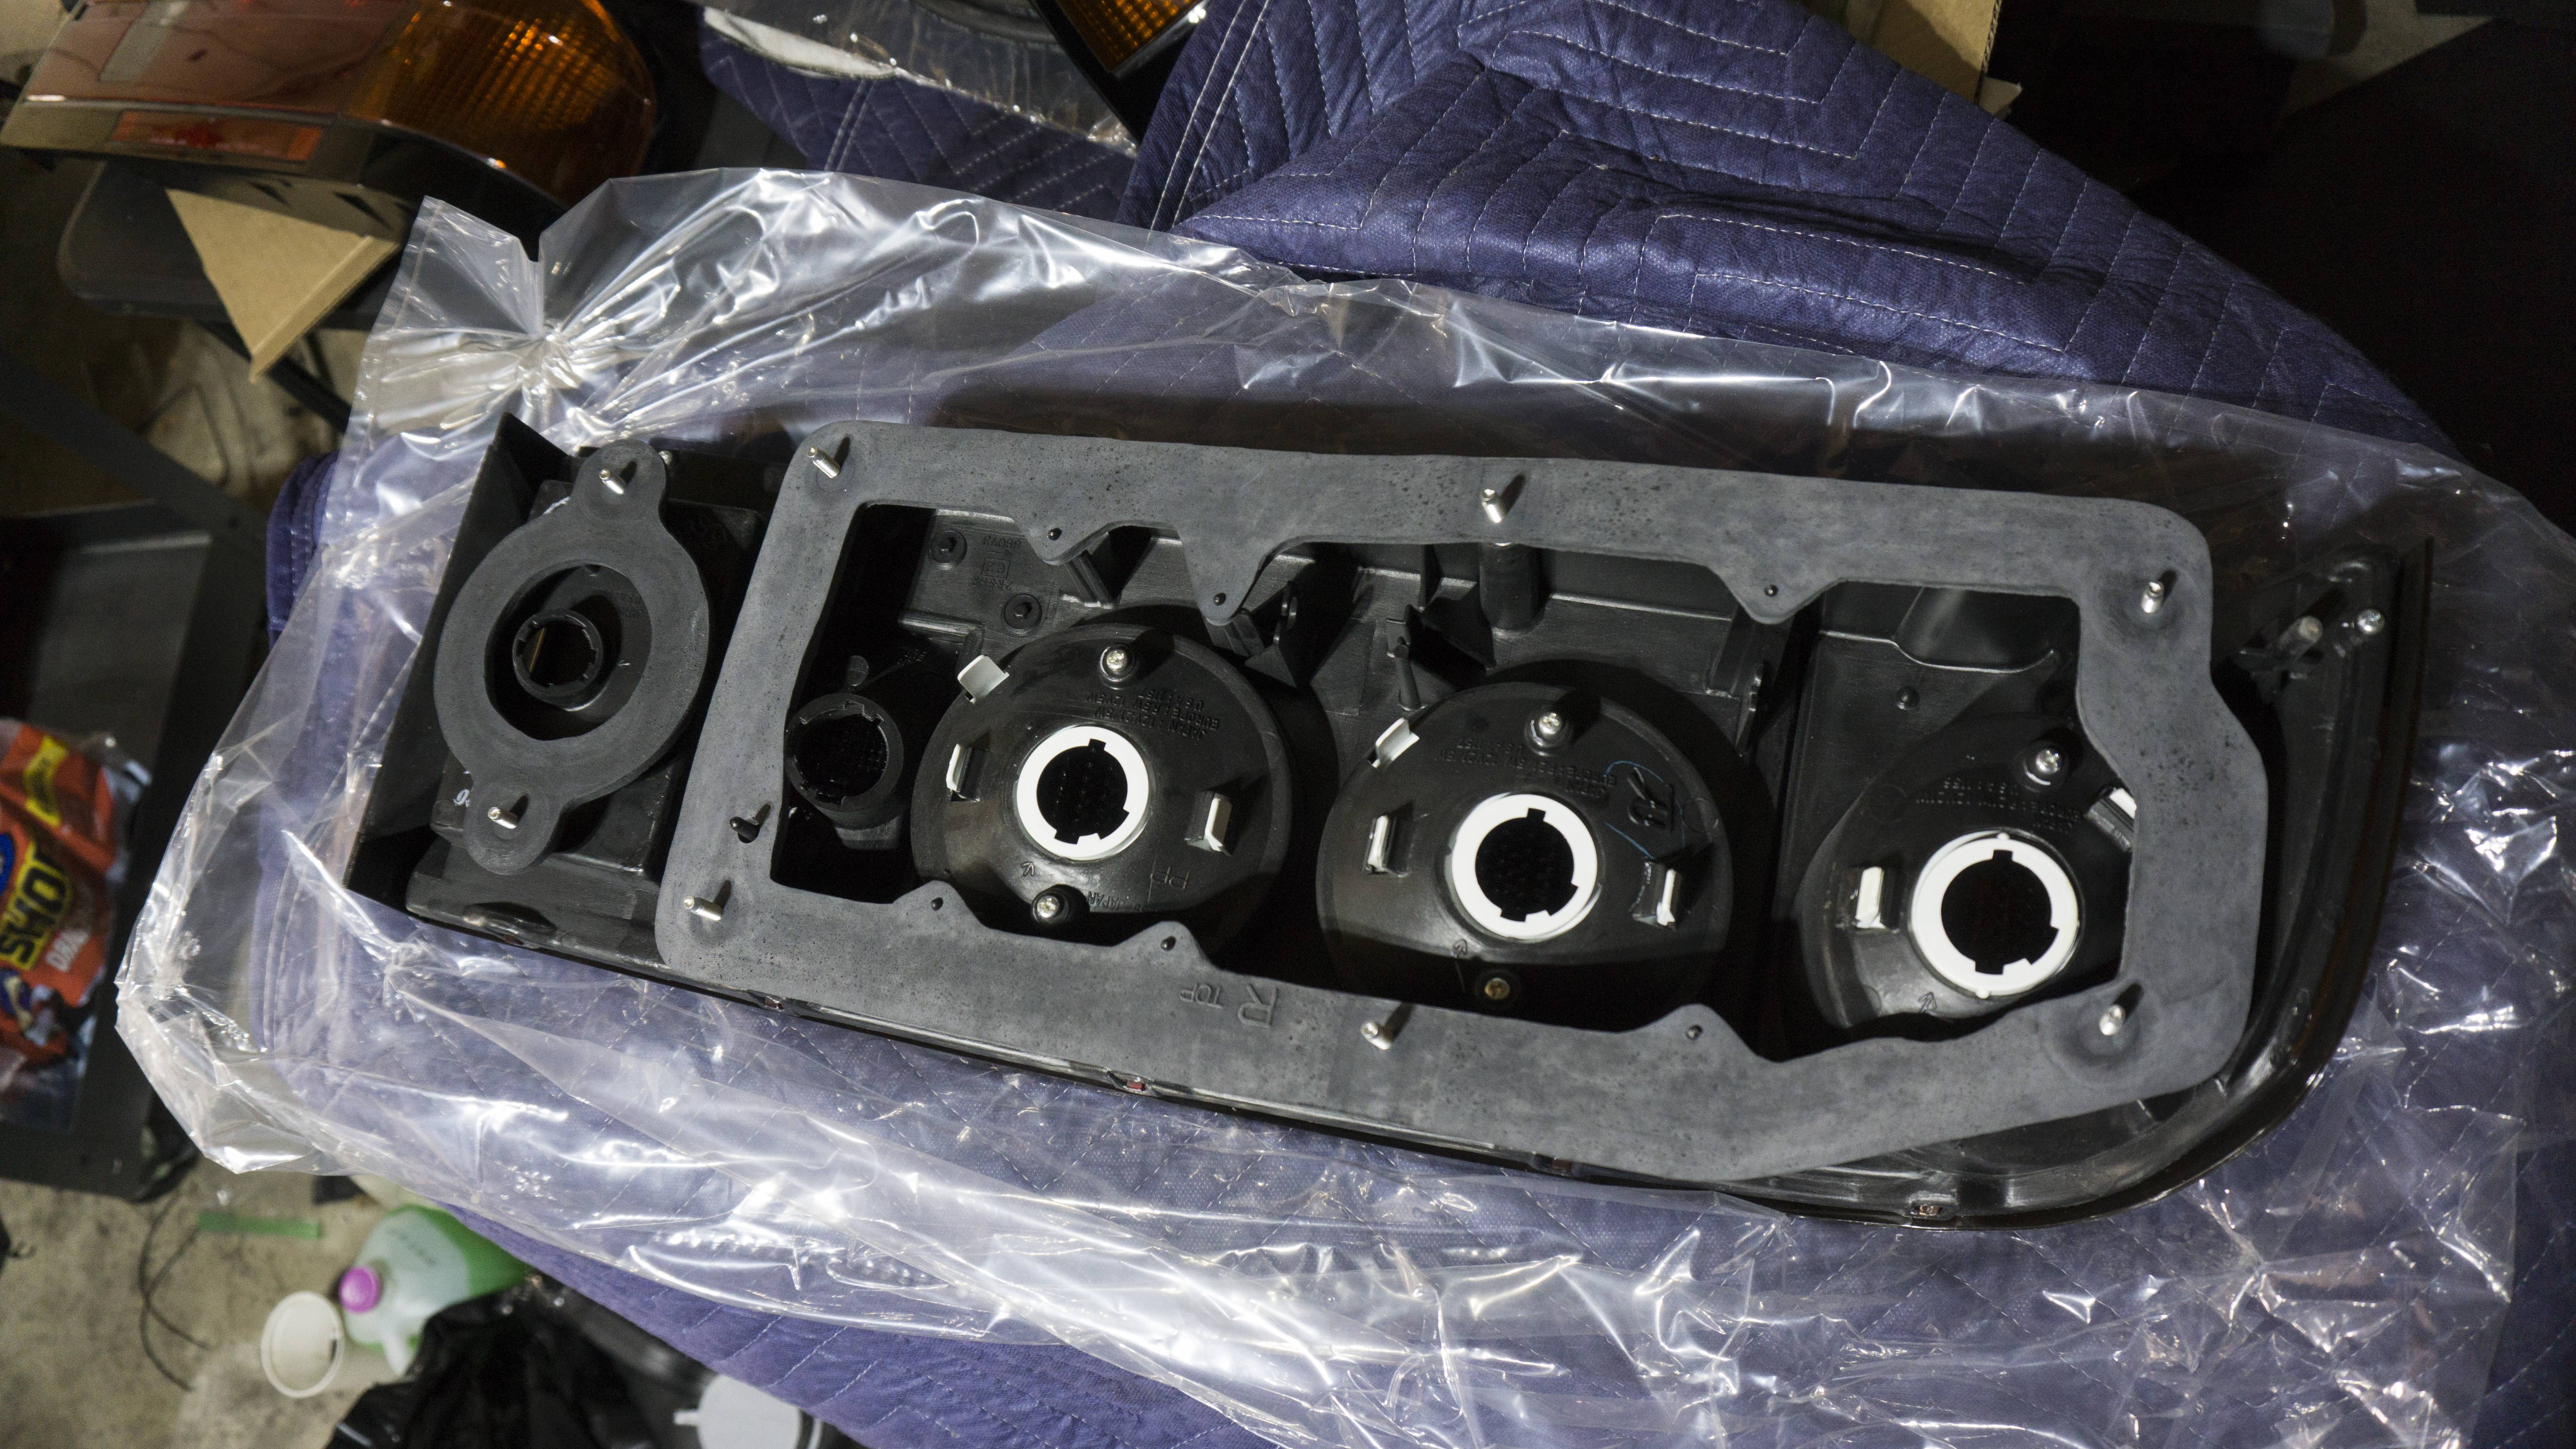
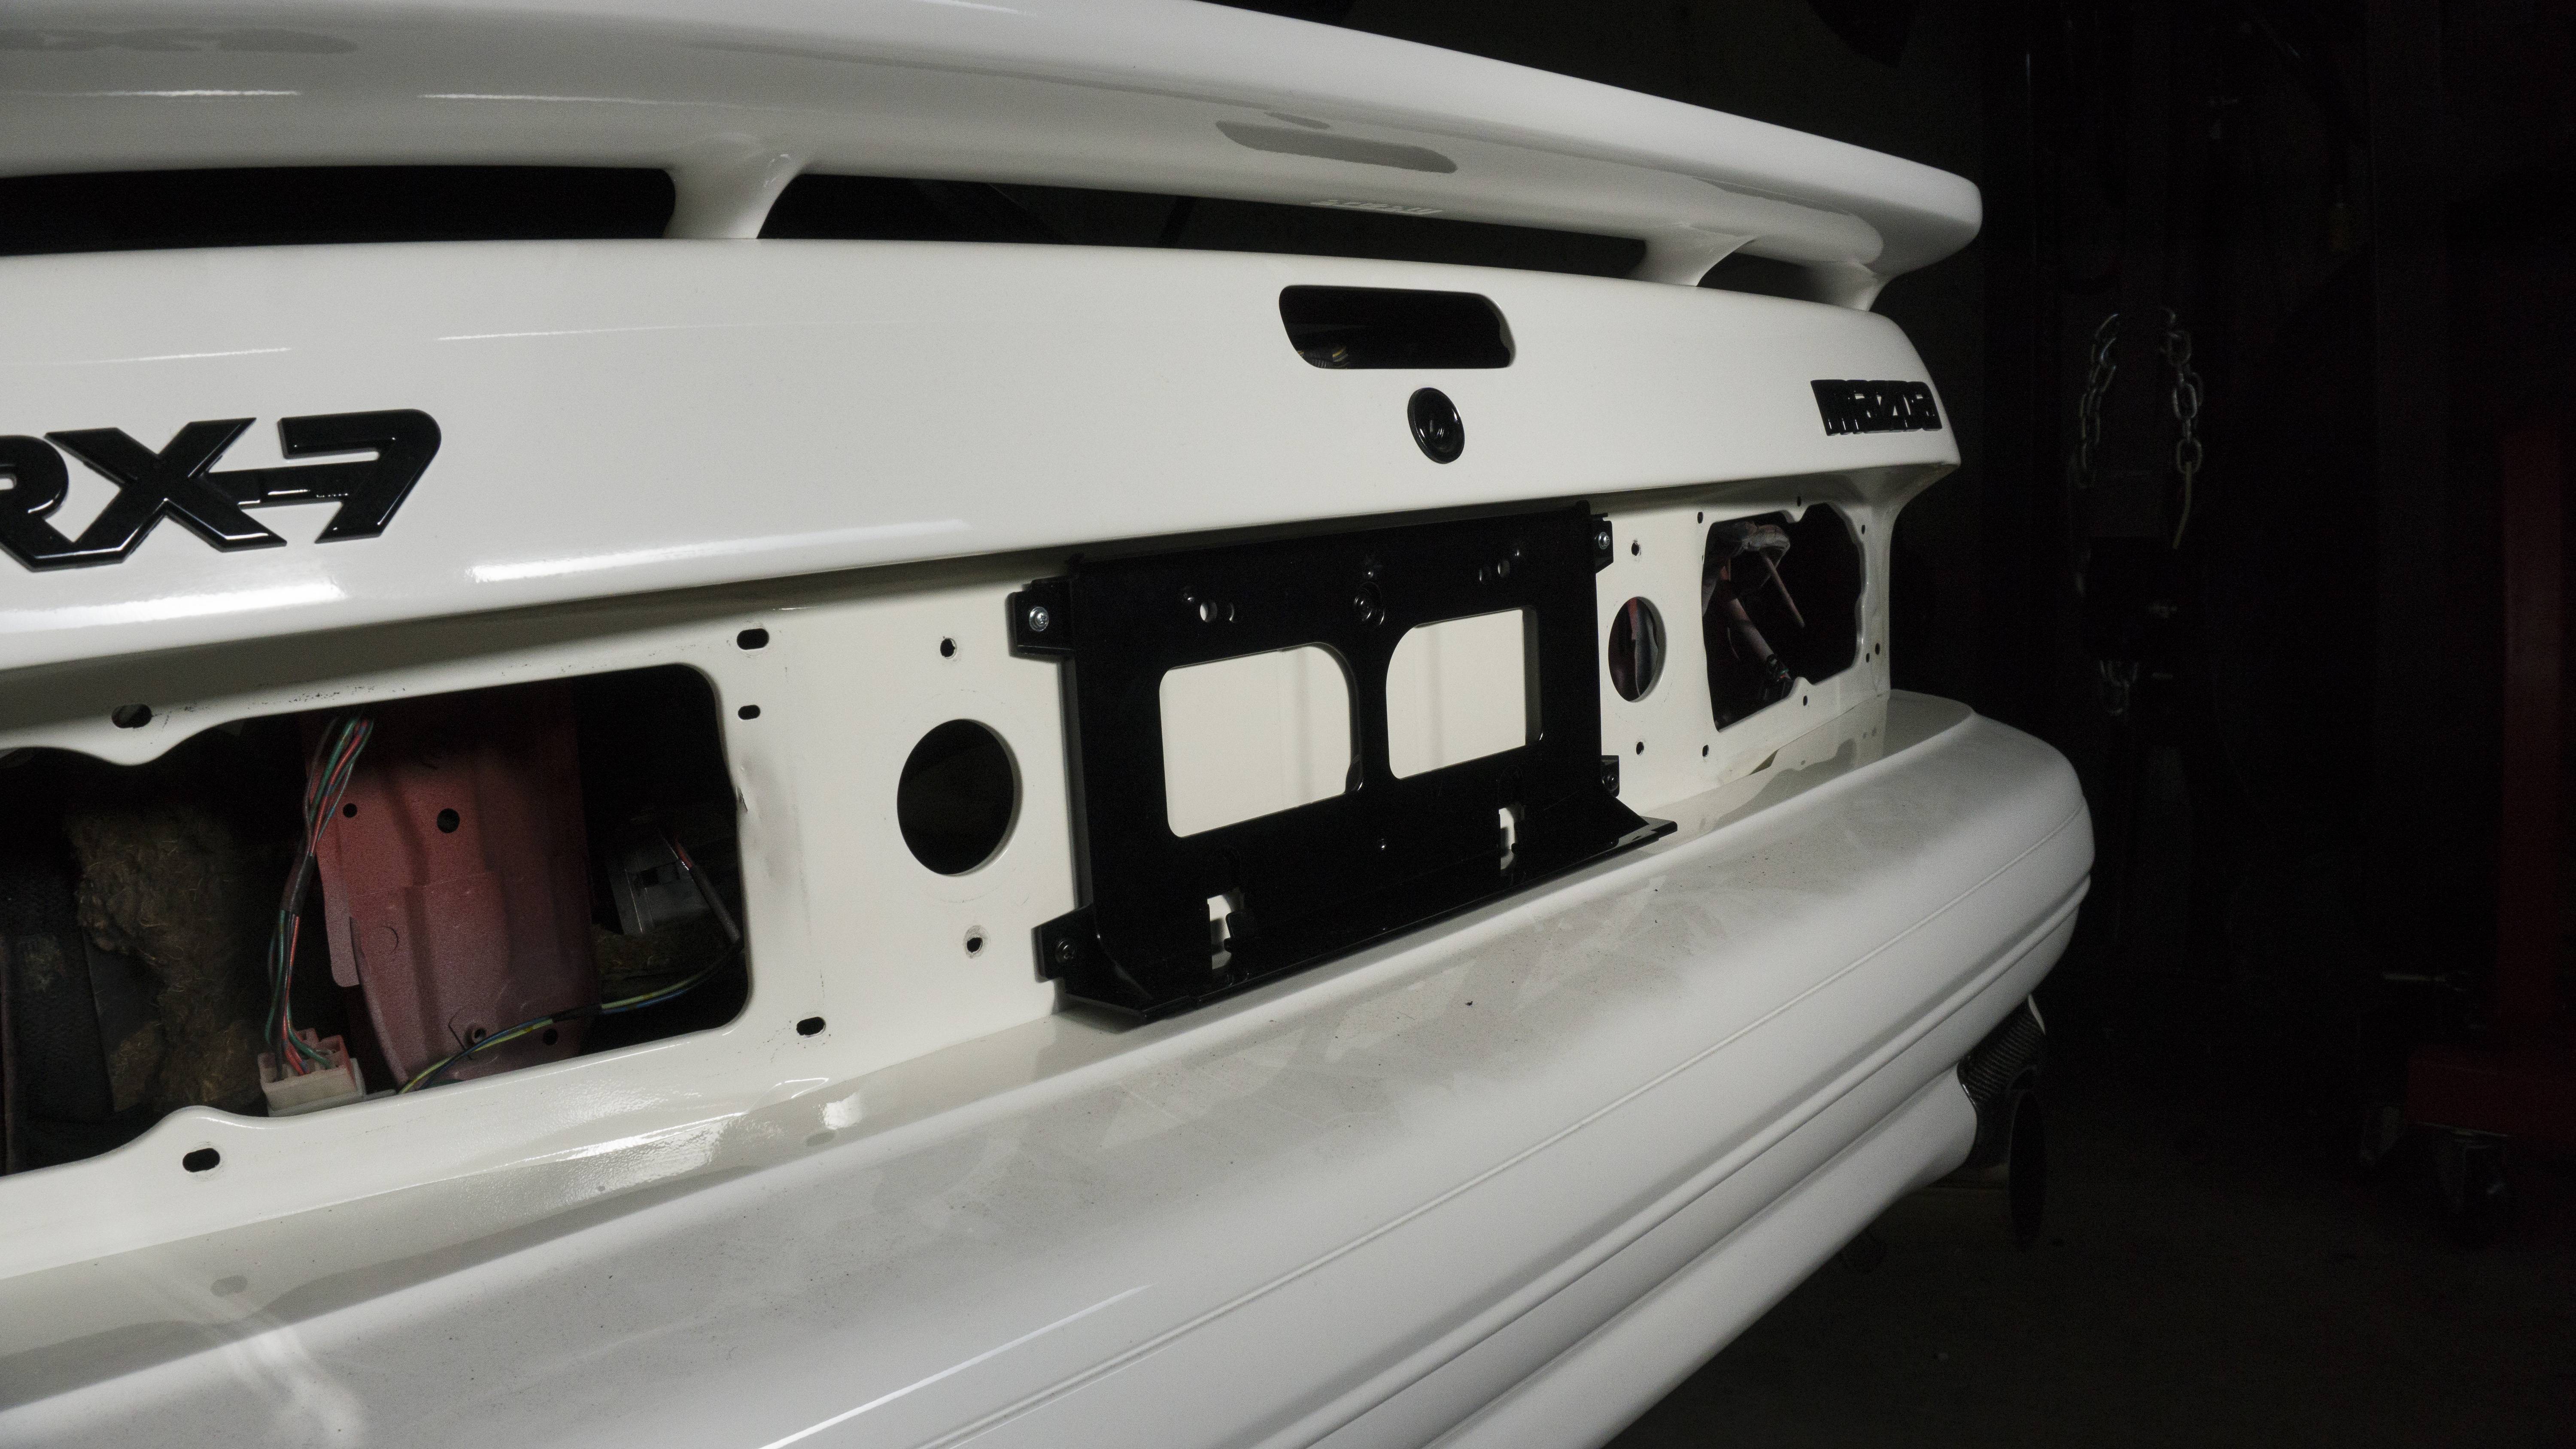
Wanted to post this update before the big-one at the end of this week. I went ahead and got my brand new set of tail lights and new license plate holder on. I thought my refinished tail lights looked good, but these brand new ones look incredible. I also put on brand new gaskets as the old ones were definitely past their prime. I went ahead and replaced the gasket on the third brake light as well - which is an absolute chore. The glue/tape they used back then is awful and difficult to get off. I had to use 3M Adhesive Remover to eat away at the gasket and the underlying glue so it would come off. I then did a quick one-step polish on the plastic. I think it turned out really nice.
Here is the third brake light:


Here are the brand new tail lights and license plate holder:
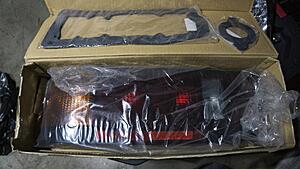
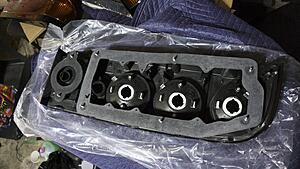
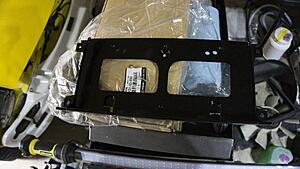
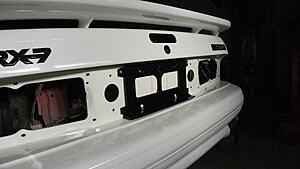
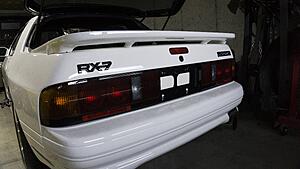
Wanted to post this update before the big-one at the end of this week. I went ahead and got my brand new set of tail lights and new license plate holder on. I thought my refinished tail lights looked good, but these brand new ones look incredible. I also put on brand new gaskets as the old ones were definitely past their prime. I went ahead and replaced the gasket on the third brake light as well - which is an absolute chore. The glue/tape they used back then is awful and difficult to get off. I had to use 3M Adhesive Remover to eat away at the gasket and the underlying glue so it would come off. I then did a quick one-step polish on the plastic. I think it turned out really nice.
Here is the third brake light:
Here are the brand new tail lights and license plate holder:


The following users liked this post:
Relisys190 (02-03-20)
The following users liked this post:
Relisys190 (02-03-20)
02-06-20, 01:03 PM
#286
Update 2/6/2020:
Well here we are again - at the end of another long journey. While this one wasn�t as long as the original, it certainly felt like it. The car is pretty much done. I�ve driven it 6 miles now and only 494 to go for the rest of break-in! I have an alignment this weekend and then I should be good to drive it as much as I want. Once I got idle and warm-up enrichment dialed in MegaSquirt�s Auto Tuning has done a phenomenal job of getting me a driving tune. I plan on having my friend come down after break-in is done so we can complete a boost tune. Water temps were a little higher than what I liked (195f), but I�m not sure the short stop-and-go drive is really indicative for normal driving. I really don�t want to swap to a vented hood in the future, but that may be my only option. I think in the interim I will just end up blocking the Turbo II hood scoop. I also ordered some adhesion promoter to better apply the 3M with the Side Skirts. I was having issues with it not fully sticking, so I plan to fix that.
Is This The End?
Like last time - I still think there is never an end. I still have my original vision and, although it�s changed slightly from the original, currently the car is 99.7% of the way there. There are still a couple of pieces I�m unhappy with. There are always things you can make better. I still want to, eventually, migrate over to IGN1A coils. I�m also planning on getting the rear privacy cover reupholstered. I doubt I�d be able to find a mint condition one, so this may be the only option for that piece. I�m always after the pursuit of perfection and will always continue to replace pieces with better looking ones - probably forever. However, I�m not sure those things, except maybe the coil upgrades, will warrant a thread update. So - end of these types of updates? Maybe - but probably not knowing me.
Complete Mod List
Exterior:
Aluminum Door Striker Covers
GRZ Rear Wiper Delete
HELLA Twin Tone Disc Horns
HELLA Vision Plus Housings
OEM JDM Fog Lights
OEM JDM Folding Mirrors
OEM JDM Rear Side Moldings
ORM JDM Side Markers
OEM JDM Turn Signals
OEM JDM Window Visors
OEM Turbo II Side Skirts
LRB Speed Aero Belly Pan
LRB Speed Underbelly Pan
LRB Speed Rear Hatch Washer Nozzle Delete
Mazda 626 Fuel Cap
Miata Antenna Delete
Modulus Motorsport Exhaust Guard
Rize Japan Ballast-Less LED Headlight Bulbs
Rotary Extreme Hood Dampers
Shine Auto Fujita Engineering Style Front Lip
Suspension/Drivetrain:
ACT Xtreme Clutch Kit
Level Zero Motorsports Aluminum Brake Master Brace
MazdaSpeed Front Strut Bar
MazdaSpeed Rear Strut Bar
Racing Beat DTSS Eliminators
Rotary Shack Short Throw Shifter
RP Stainless Steel D.O.T. Lines
S4 TII Clutch Type Differential
Solid Aluminum Transmission Mounts
V8 Roadster Frame Rail Reinforcements
Engine:
140 AMP Alternator
2.0KW Starter
Allstar Performance Catch Can w/ K&N Breather
APEXi GT Spec Downpipe (Lava Wrapped)
APEXi N1 EVO Cat-Back Exhaust
APEXi Power Intake
Atkins Oil Level Sensor Block-off Plate
Atkins Rotary Oil Cap
Banzai Racing Alternator Bracket Kit
Banzai Racing Oil Pan Brace
Banzai Racing Stainless Steel Clutch Line
Banzai Racing Starter Relay
BNR Stage 3 Hybrid Turbo
Bonez Race Pipe with Welded in Flex-Pipe
DIYAutoTune Electronic Boost Control Solenoid
FD Oil Filler Flange
Fuelab Fuel Filter
Fuelab Mini Fuel Pressure Regulator
Full Function Primary & Secondary Rails
Gilmer Drive Pulley Kit
GReddy Compression Tube
Himni Racing Stainless Steel Oil Feed Line
ICT Billet Aluminum Optima Battery Tray
Injector Dynamics 1050x (x4)
Innovate LC-2 Wideband
IRP SS Oil Filler Neck
ACT Prolite Flywheel
LRB Speed Block-off Plates
LRB Speed CAS Cover
LRB Speed Radiator Cooling Panel
Megasquirt 3 Pro
Optima RedTop 34R Battery
PTP Lava Turbo Blanket
Rotary13b1 Aluminum Coolant Elbow
Rotary Aviation 2MM Classic Seals
Rotary Extreme V2 V-Mount Kit (Garrett Core, FD Koyo N-Flow, Mishimoto 10� fans)
S4 Turbo II Balanced Rotors by Chips Motorsports
S4 Counterweights
Sakebomb Garage Spark Plug Wires
Solid Aluminum Motor Mounts
Tial Q 50mm BOV w/ 8 PSI Spring
Walbro 450 Fuel Pump
Interior:
Banzai Racing Billet E-Brake Button
Bracketeer Fire Extinguisher Mount
Bride Type RO Seat Rails
Custom RX-7 Floor Mats
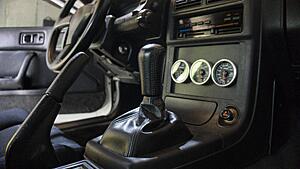
Defi Advance CR Gauges (Boost, Oil Press, Water Temp)
DynoTuneNitrous Square LCD Wideband
H3R Performance Haloguard Fire Extinguisher
H3R Fire Extinguisher Quick Release Bracket
LRB Speed Aluminum Defroster Vents
LRB Speed Aluminum Side Vents
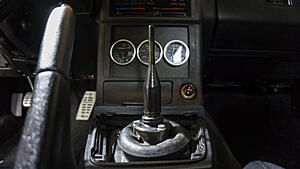
LRB Speed Double Din Gauge Pod
MazdaSpeed '03.5 Pedals
MazdaSpeed B-Spec Steering Wheel
MazdaSpeed Leather Shift ****
MOMO Hub Adapter
Recaro LX-B Seats
Redline Shift Boot
Window and Sunroof Relays
Wheels/Tires:
RAYS MazdaSpeed MS-01f 16x8 +40
Bridgestone Potenza RE760 Sport 225/50/16
Thank You
I started this build thread nearly five years ago now and I�ve gained so much from this car. Back when I first started I had just learned how to change my own oil and to now be able to do all the work mostly on my own - it�s eye opening. I�ve not only seen the car grow over this thread, but also myself. I�ve made countless friends through the build; both on the forum and locally. I�ve had some pretty high offers on selling the car, but I don�t think that I ever could. I think what really defines a car is the memories it holds and not all the cool stuff on it.
I wanted to thank everyone for joining me on this journey and everyone that has had a hand in helping along the way. This thread has been looked at nearly 80,000 times since I started it and is currently within the top 10 most viewed build threads in the 2nd Generation section. While one door �closes� another always opens. I�ll be rotating building attention over to the CYM FD again - if you haven�t checked it out yet you can get over there HERE.
Thanks again
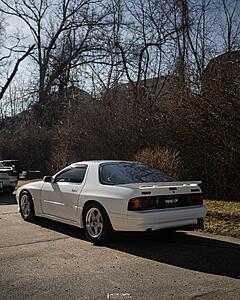
Here are some pictures of the cars first time out:
Well here we are again - at the end of another long journey. While this one wasn�t as long as the original, it certainly felt like it. The car is pretty much done. I�ve driven it 6 miles now and only 494 to go for the rest of break-in! I have an alignment this weekend and then I should be good to drive it as much as I want. Once I got idle and warm-up enrichment dialed in MegaSquirt�s Auto Tuning has done a phenomenal job of getting me a driving tune. I plan on having my friend come down after break-in is done so we can complete a boost tune. Water temps were a little higher than what I liked (195f), but I�m not sure the short stop-and-go drive is really indicative for normal driving. I really don�t want to swap to a vented hood in the future, but that may be my only option. I think in the interim I will just end up blocking the Turbo II hood scoop. I also ordered some adhesion promoter to better apply the 3M with the Side Skirts. I was having issues with it not fully sticking, so I plan to fix that.
Is This The End?
Like last time - I still think there is never an end. I still have my original vision and, although it�s changed slightly from the original, currently the car is 99.7% of the way there. There are still a couple of pieces I�m unhappy with. There are always things you can make better. I still want to, eventually, migrate over to IGN1A coils. I�m also planning on getting the rear privacy cover reupholstered. I doubt I�d be able to find a mint condition one, so this may be the only option for that piece. I�m always after the pursuit of perfection and will always continue to replace pieces with better looking ones - probably forever. However, I�m not sure those things, except maybe the coil upgrades, will warrant a thread update. So - end of these types of updates? Maybe - but probably not knowing me.
Complete Mod List
Exterior:
Aluminum Door Striker Covers
GRZ Rear Wiper Delete
HELLA Twin Tone Disc Horns
HELLA Vision Plus Housings
OEM JDM Fog Lights
OEM JDM Folding Mirrors
OEM JDM Rear Side Moldings
ORM JDM Side Markers
OEM JDM Turn Signals
OEM JDM Window Visors
OEM Turbo II Side Skirts
LRB Speed Aero Belly Pan
LRB Speed Underbelly Pan
LRB Speed Rear Hatch Washer Nozzle Delete
Mazda 626 Fuel Cap
Miata Antenna Delete
Modulus Motorsport Exhaust Guard
Rize Japan Ballast-Less LED Headlight Bulbs
Rotary Extreme Hood Dampers
Shine Auto Fujita Engineering Style Front Lip
Suspension/Drivetrain:
ACT Xtreme Clutch Kit
Level Zero Motorsports Aluminum Brake Master Brace
MazdaSpeed Front Strut Bar
MazdaSpeed Rear Strut Bar
Racing Beat DTSS Eliminators
Rotary Shack Short Throw Shifter
RP Stainless Steel D.O.T. Lines
S4 TII Clutch Type Differential
Solid Aluminum Transmission Mounts
V8 Roadster Frame Rail Reinforcements
Engine:
140 AMP Alternator
2.0KW Starter
Allstar Performance Catch Can w/ K&N Breather
APEXi GT Spec Downpipe (Lava Wrapped)
APEXi N1 EVO Cat-Back Exhaust
APEXi Power Intake
Atkins Oil Level Sensor Block-off Plate
Atkins Rotary Oil Cap
Banzai Racing Alternator Bracket Kit
Banzai Racing Oil Pan Brace
Banzai Racing Stainless Steel Clutch Line
Banzai Racing Starter Relay
BNR Stage 3 Hybrid Turbo
Bonez Race Pipe with Welded in Flex-Pipe
DIYAutoTune Electronic Boost Control Solenoid
FD Oil Filler Flange
Fuelab Fuel Filter
Fuelab Mini Fuel Pressure Regulator
Full Function Primary & Secondary Rails
Gilmer Drive Pulley Kit
GReddy Compression Tube
Himni Racing Stainless Steel Oil Feed Line
ICT Billet Aluminum Optima Battery Tray
Injector Dynamics 1050x (x4)
Innovate LC-2 Wideband
IRP SS Oil Filler Neck
ACT Prolite Flywheel
LRB Speed Block-off Plates
LRB Speed CAS Cover
LRB Speed Radiator Cooling Panel
Megasquirt 3 Pro
Optima RedTop 34R Battery
PTP Lava Turbo Blanket
Rotary13b1 Aluminum Coolant Elbow
Rotary Aviation 2MM Classic Seals
Rotary Extreme V2 V-Mount Kit (Garrett Core, FD Koyo N-Flow, Mishimoto 10� fans)
S4 Turbo II Balanced Rotors by Chips Motorsports
S4 Counterweights
Sakebomb Garage Spark Plug Wires
Solid Aluminum Motor Mounts
Tial Q 50mm BOV w/ 8 PSI Spring
Walbro 450 Fuel Pump
Interior:
Banzai Racing Billet E-Brake Button
Bracketeer Fire Extinguisher Mount
Bride Type RO Seat Rails
Custom RX-7 Floor Mats
Defi Advance CR Gauges (Boost, Oil Press, Water Temp)
DynoTuneNitrous Square LCD Wideband
H3R Performance Haloguard Fire Extinguisher
H3R Fire Extinguisher Quick Release Bracket
LRB Speed Aluminum Defroster Vents
LRB Speed Aluminum Side Vents
LRB Speed Double Din Gauge Pod
MazdaSpeed '03.5 Pedals
MazdaSpeed B-Spec Steering Wheel
MazdaSpeed Leather Shift ****
MOMO Hub Adapter
Recaro LX-B Seats
Redline Shift Boot
Window and Sunroof Relays
Wheels/Tires:
RAYS MazdaSpeed MS-01f 16x8 +40
Bridgestone Potenza RE760 Sport 225/50/16
Thank You
I started this build thread nearly five years ago now and I�ve gained so much from this car. Back when I first started I had just learned how to change my own oil and to now be able to do all the work mostly on my own - it�s eye opening. I�ve not only seen the car grow over this thread, but also myself. I�ve made countless friends through the build; both on the forum and locally. I�ve had some pretty high offers on selling the car, but I don�t think that I ever could. I think what really defines a car is the memories it holds and not all the cool stuff on it.
I wanted to thank everyone for joining me on this journey and everyone that has had a hand in helping along the way. This thread has been looked at nearly 80,000 times since I started it and is currently within the top 10 most viewed build threads in the 2nd Generation section. While one door �closes� another always opens. I�ll be rotating building attention over to the CYM FD again - if you haven�t checked it out yet you can get over there HERE.
Thanks again
Here are some pictures of the cars first time out:


The following 2 users liked this post by Akomix:
JerryLH3 (02-07-20),
Relisys190 (02-06-20)
02-07-20, 06:53 AM
#287
It's never really the end! Maybe the end of a chapter, but there will always be something that needs to be swapped out or tweaked or even "improved". In my situation, my car spent 10 years off the road and I never even really touched the engine bay! I've got a few things I want to do in there, but they may come as things need to be replaced or just later in the year when I get the itch again.
I've said it plenty, but what an amazing build. Everything is absolutely tidy and was done with complete care. I can't wait to see either the FD or the FC at DGRR.
I've said it plenty, but what an amazing build. Everything is absolutely tidy and was done with complete care. I can't wait to see either the FD or the FC at DGRR.
The following users liked this post:
pontiackid (02-16-20)
02-07-20, 03:11 PM
#288
It's never really the end! Maybe the end of a chapter, but there will always be something that needs to be swapped out or tweaked or even "improved". In my situation, my car spent 10 years off the road and I never even really touched the engine bay! I've got a few things I want to do in there, but they may come as things need to be replaced or just later in the year when I get the itch again.
I've said it plenty, but what an amazing build. Everything is absolutely tidy and was done with complete care. I can't wait to see either the FD or the FC at DGRR.
I've said it plenty, but what an amazing build. Everything is absolutely tidy and was done with complete care. I can't wait to see either the FD or the FC at DGRR.
Definitely looking forward to getting to meet up at DGRR! It seems there is an even split of 25 FDs and 25 FCs that have signed up already. Who knows what I'll show up in!

The following users liked this post:
Relisys190 (02-08-20)

 04-06-20, 08:08 PM
#293
Update 4/6/2020:
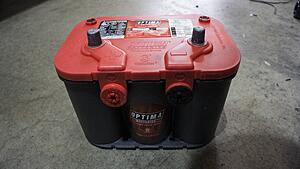
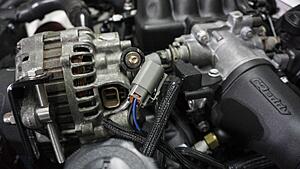
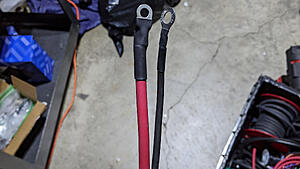
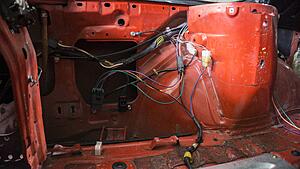
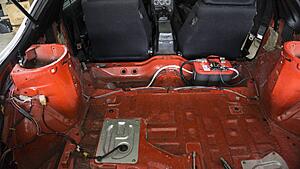
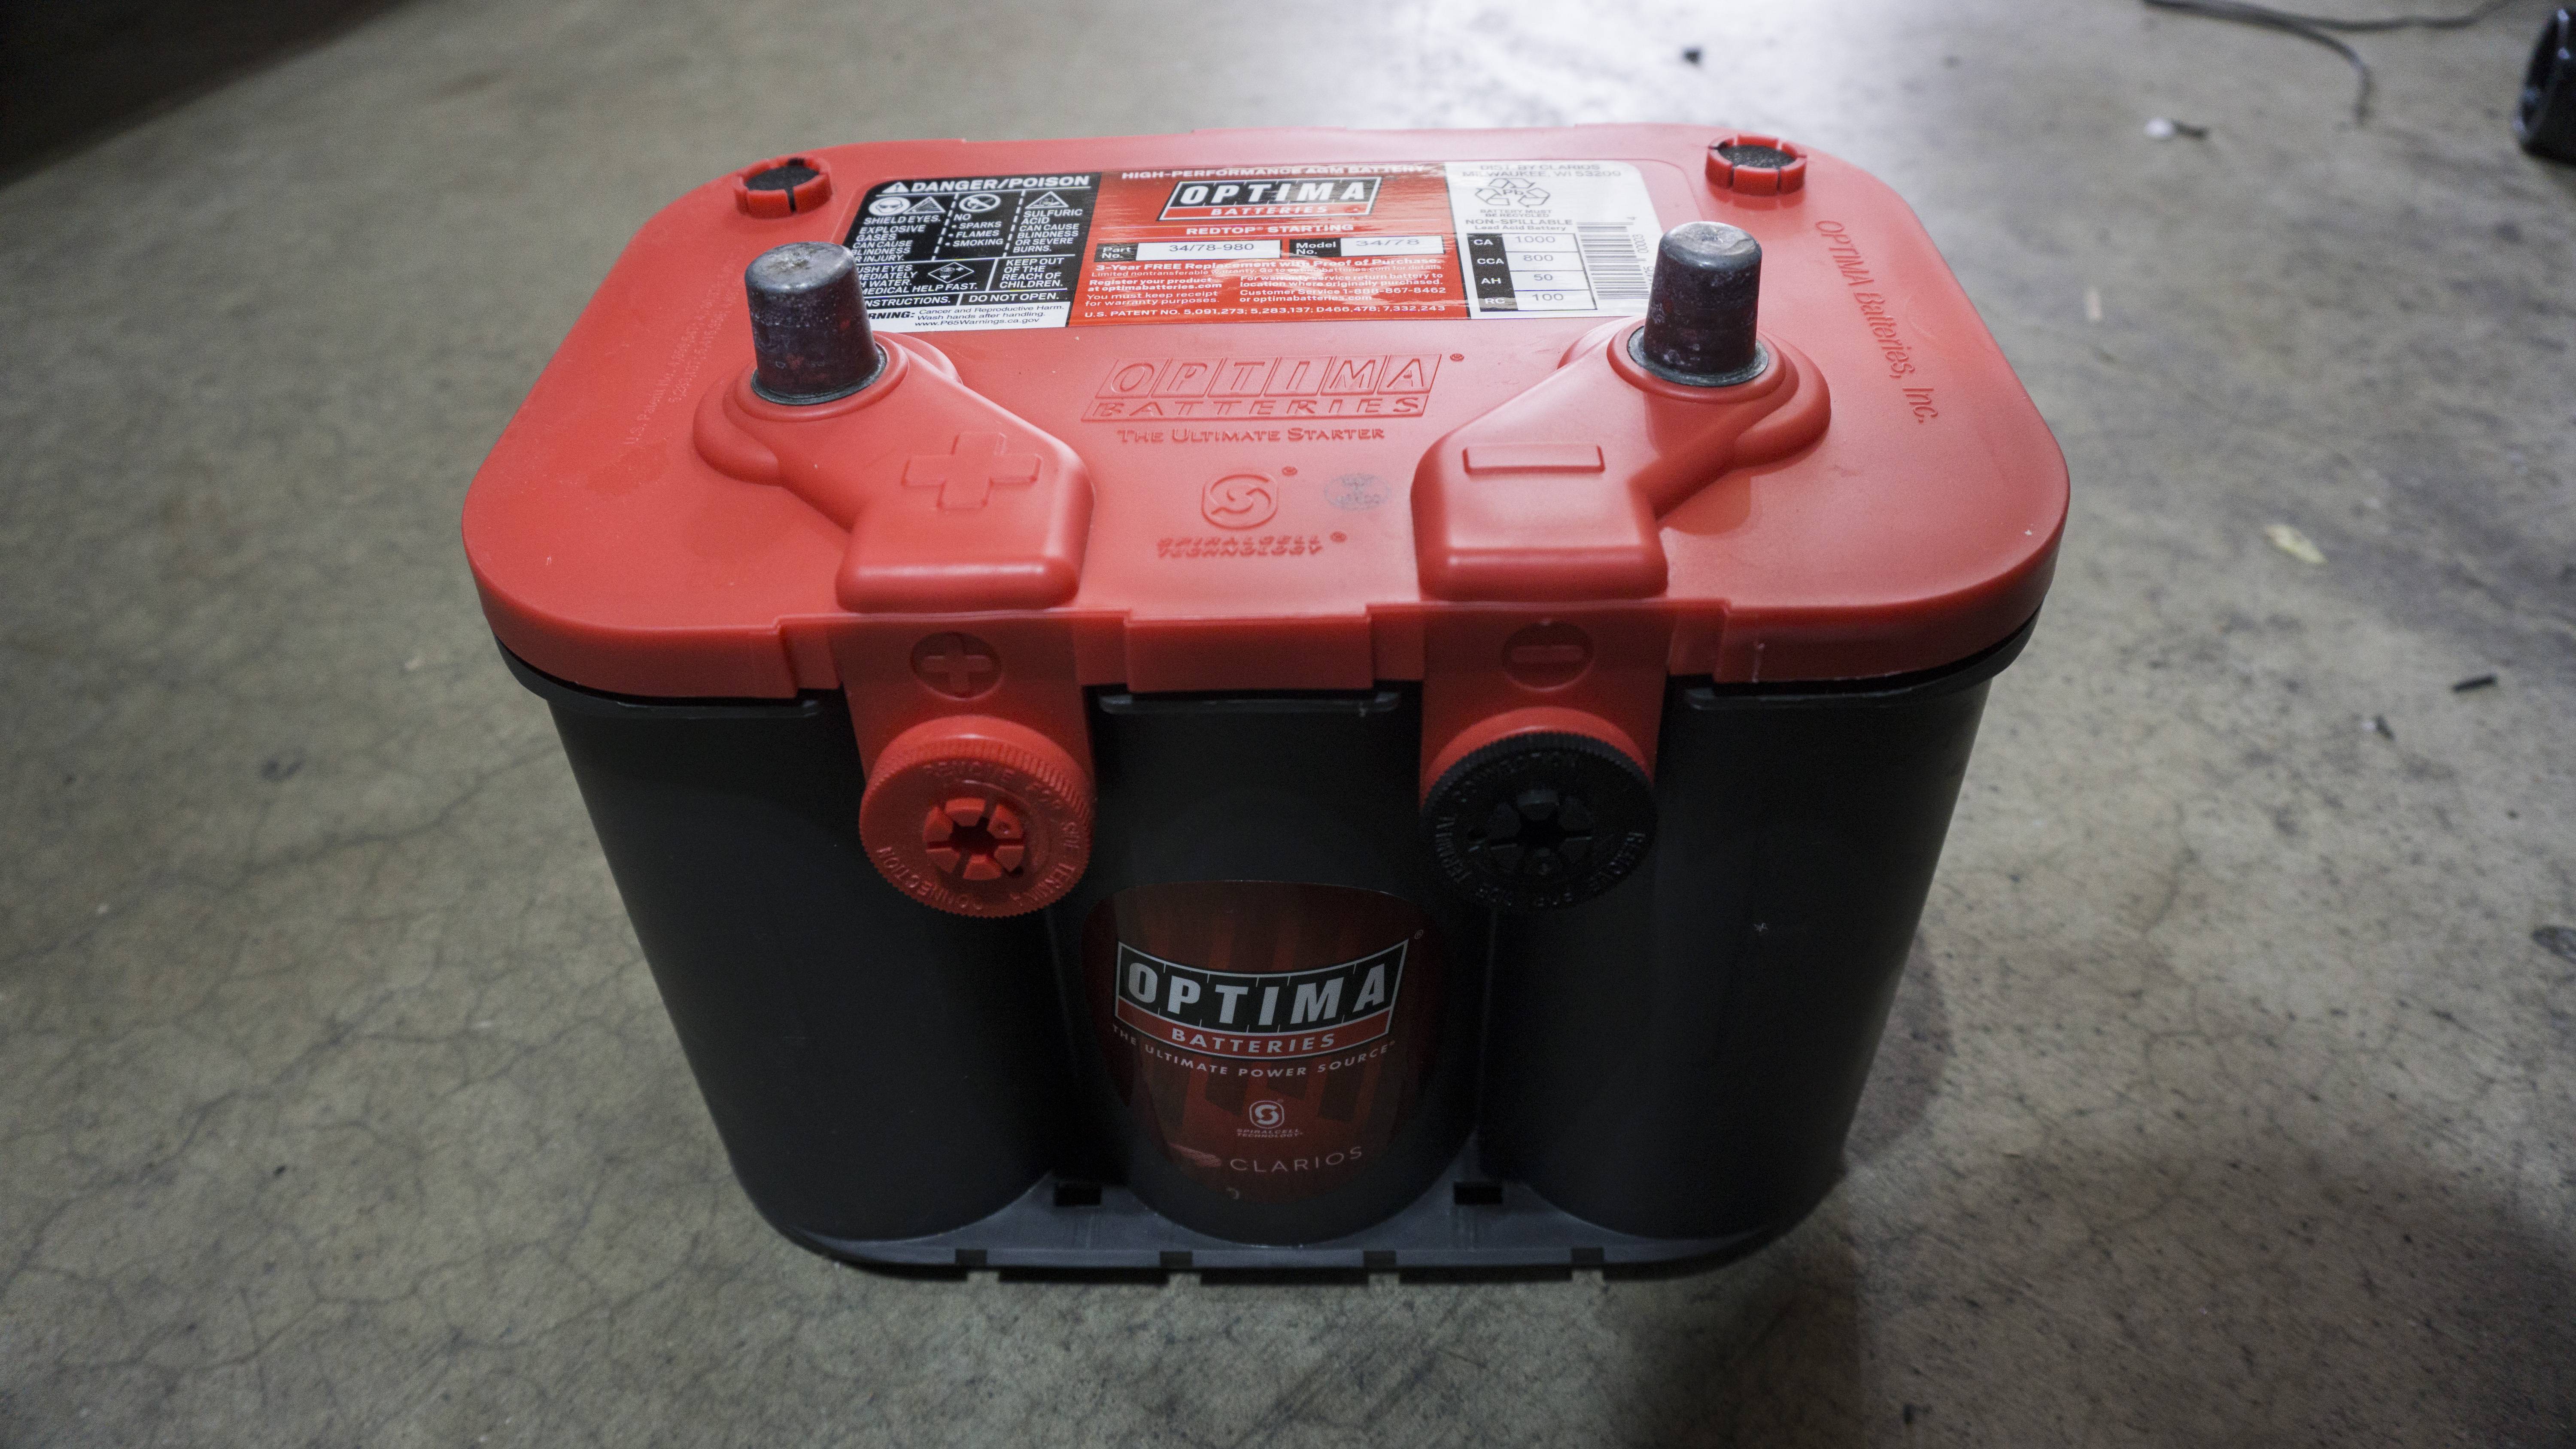
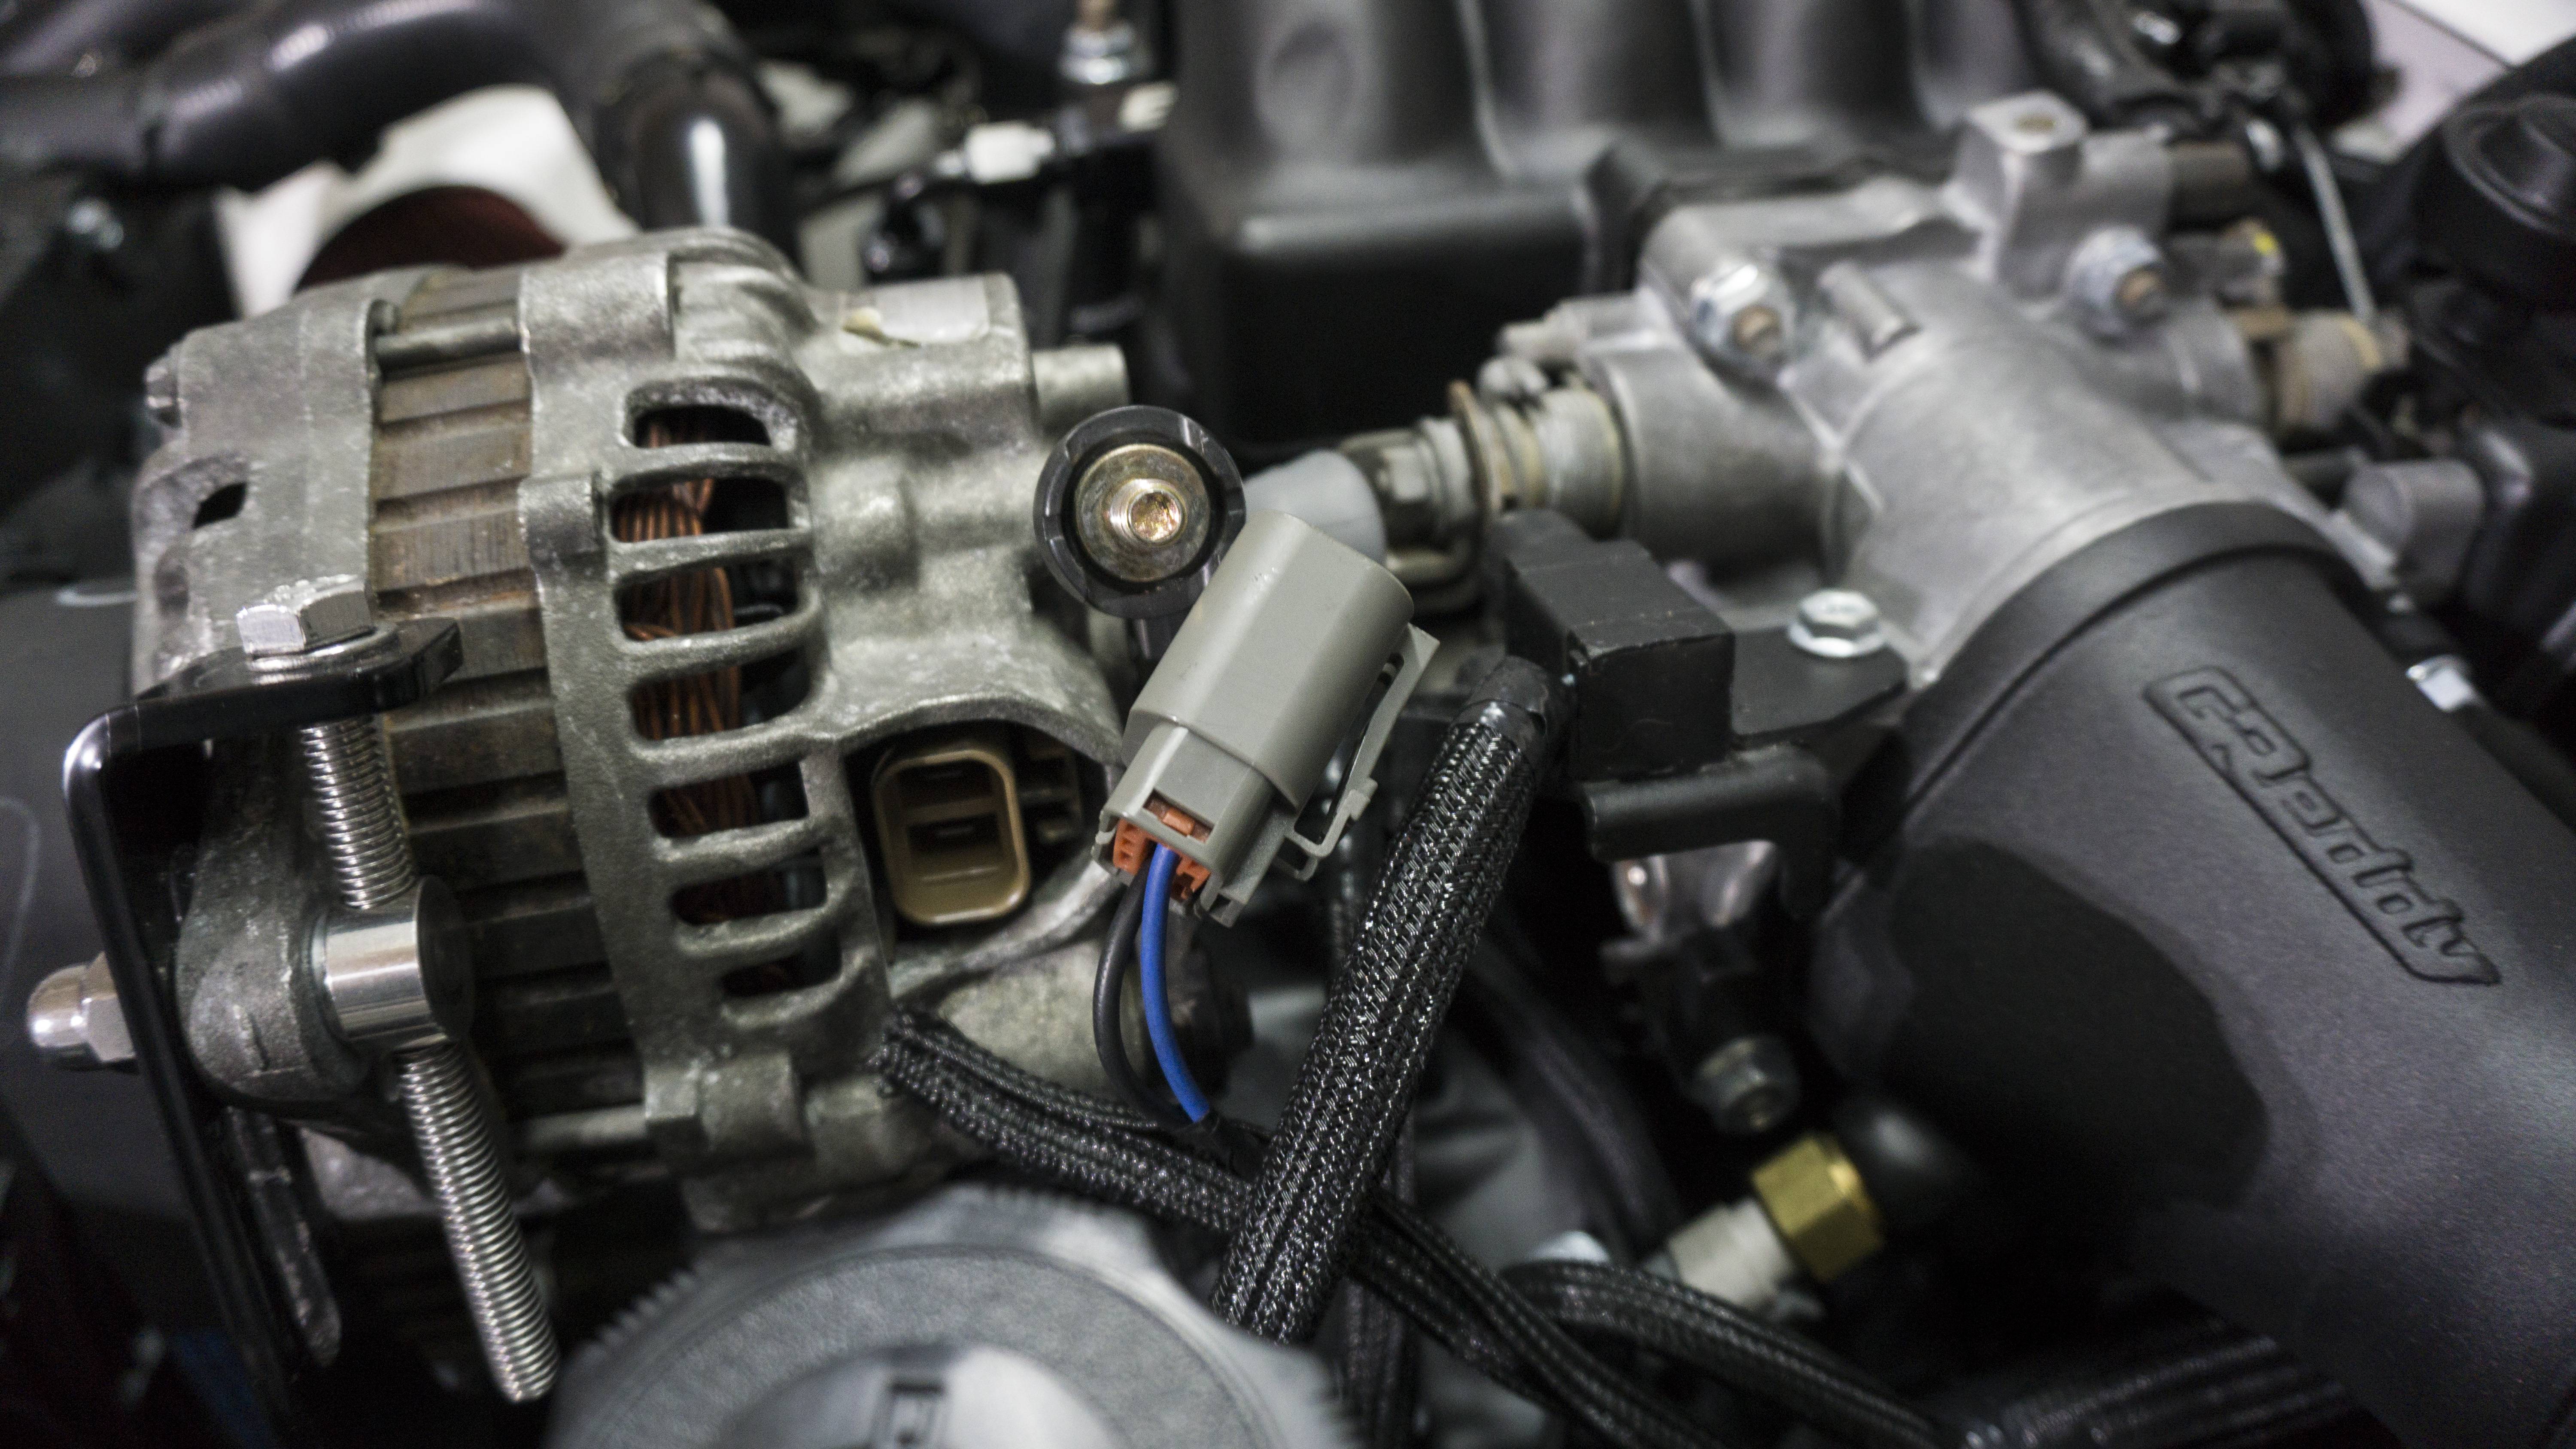
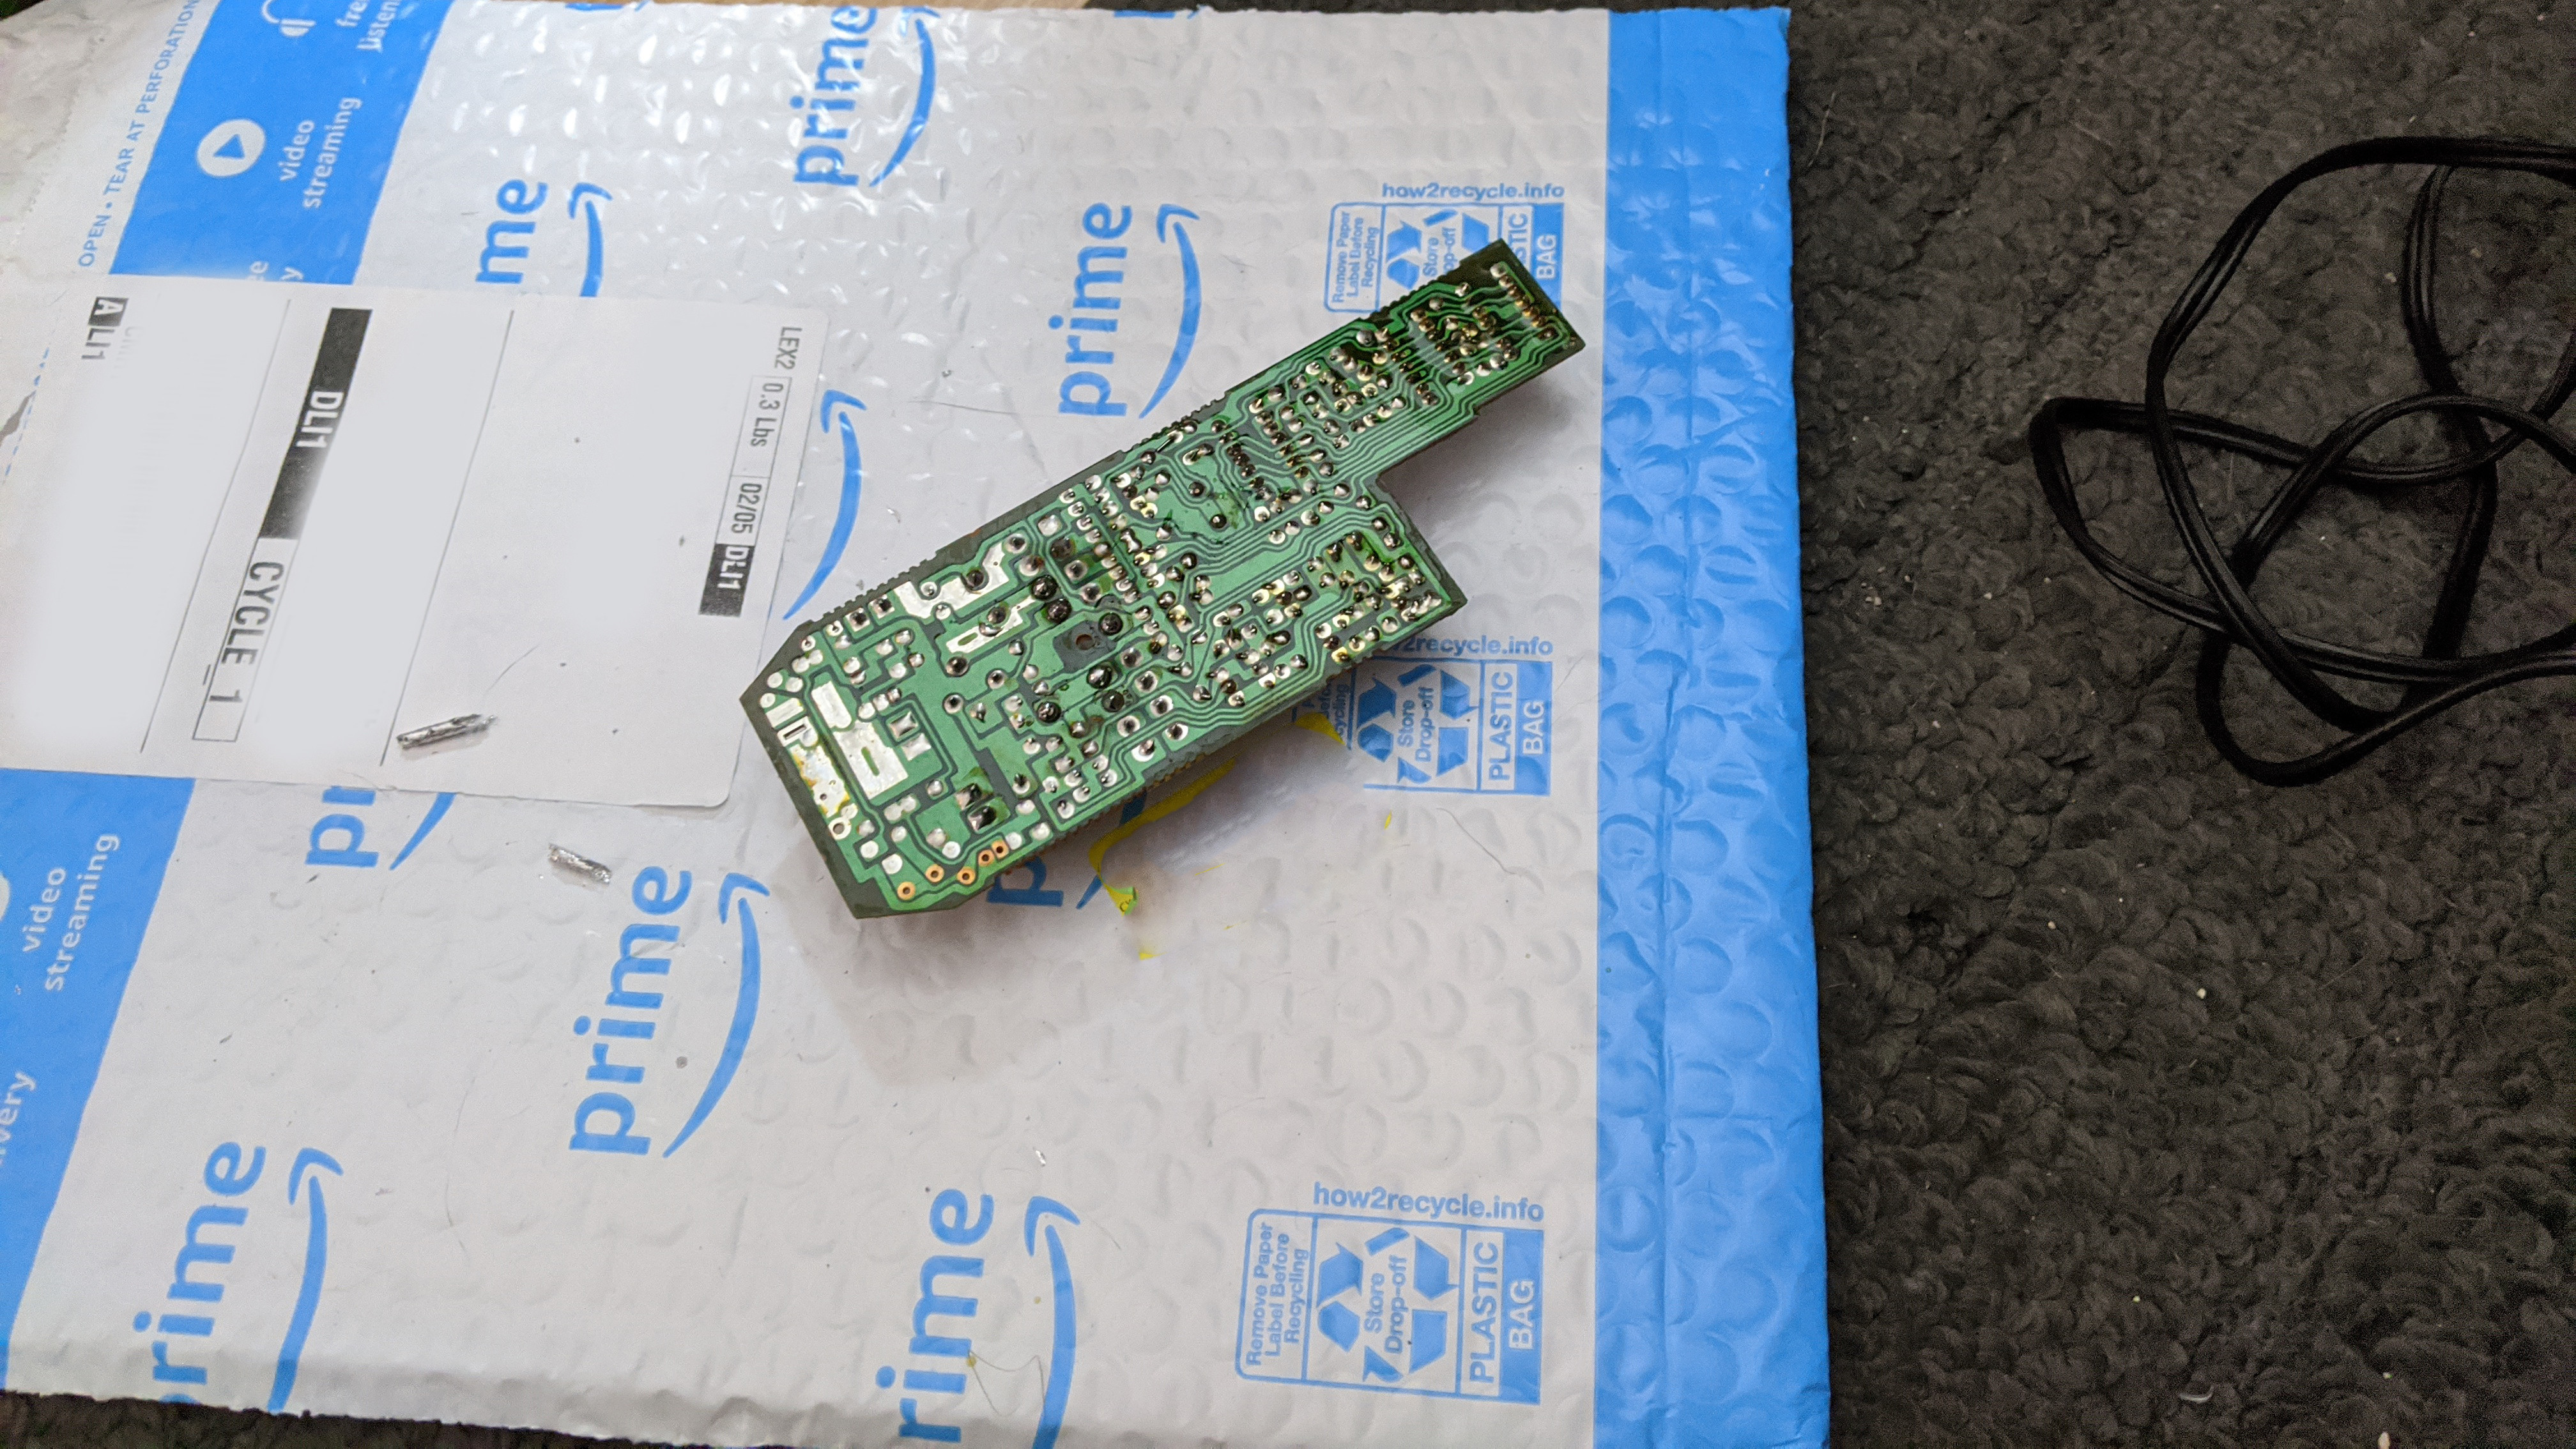
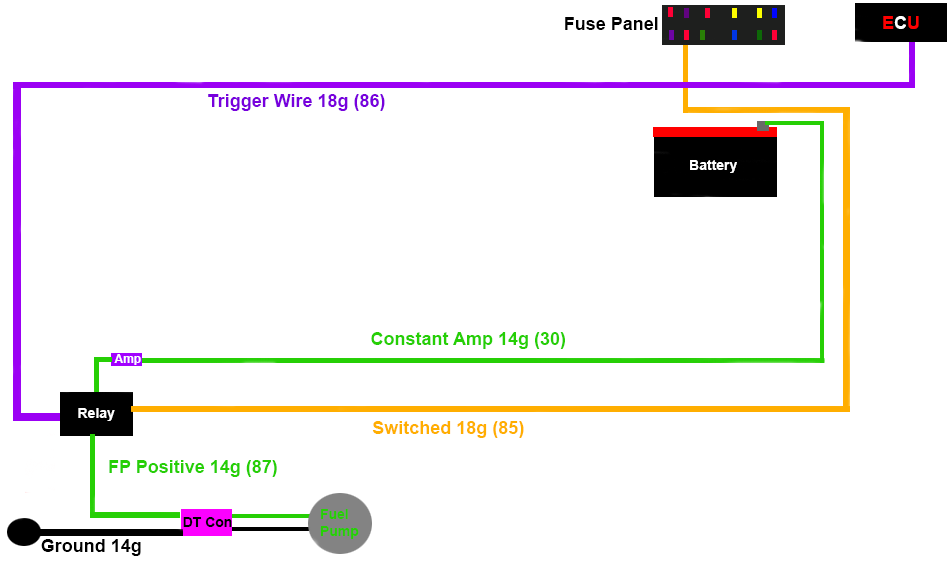
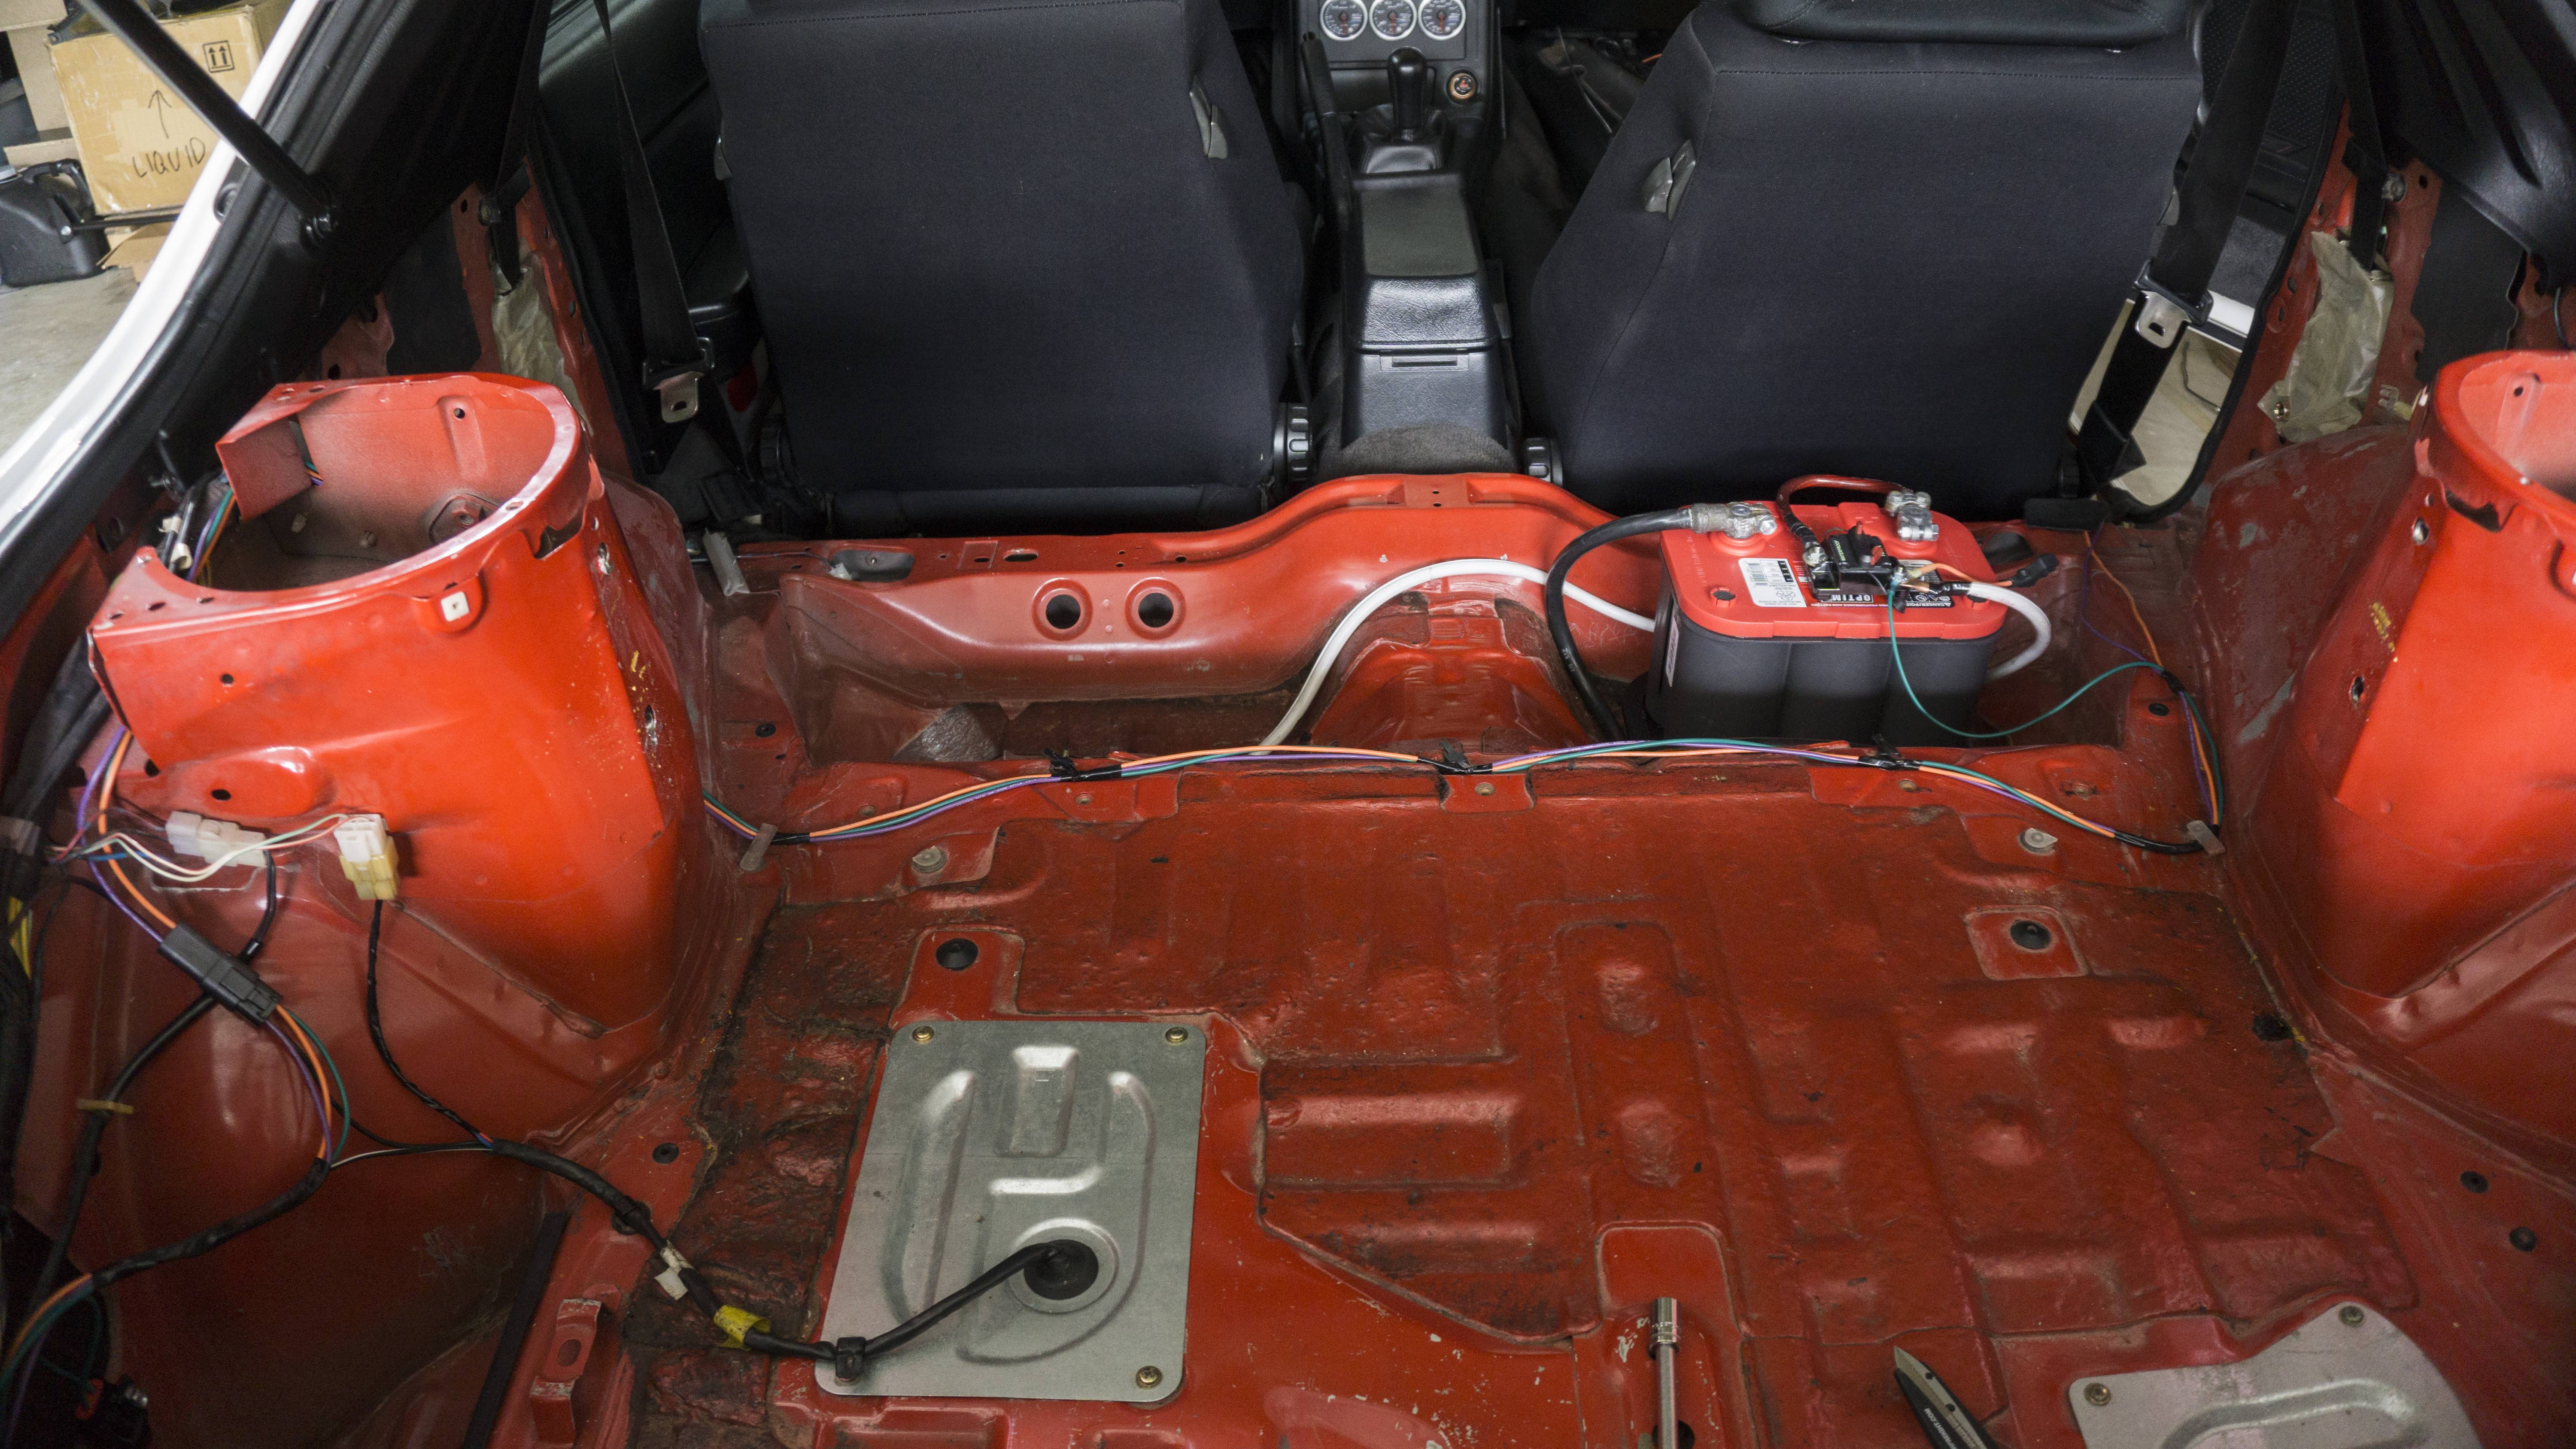
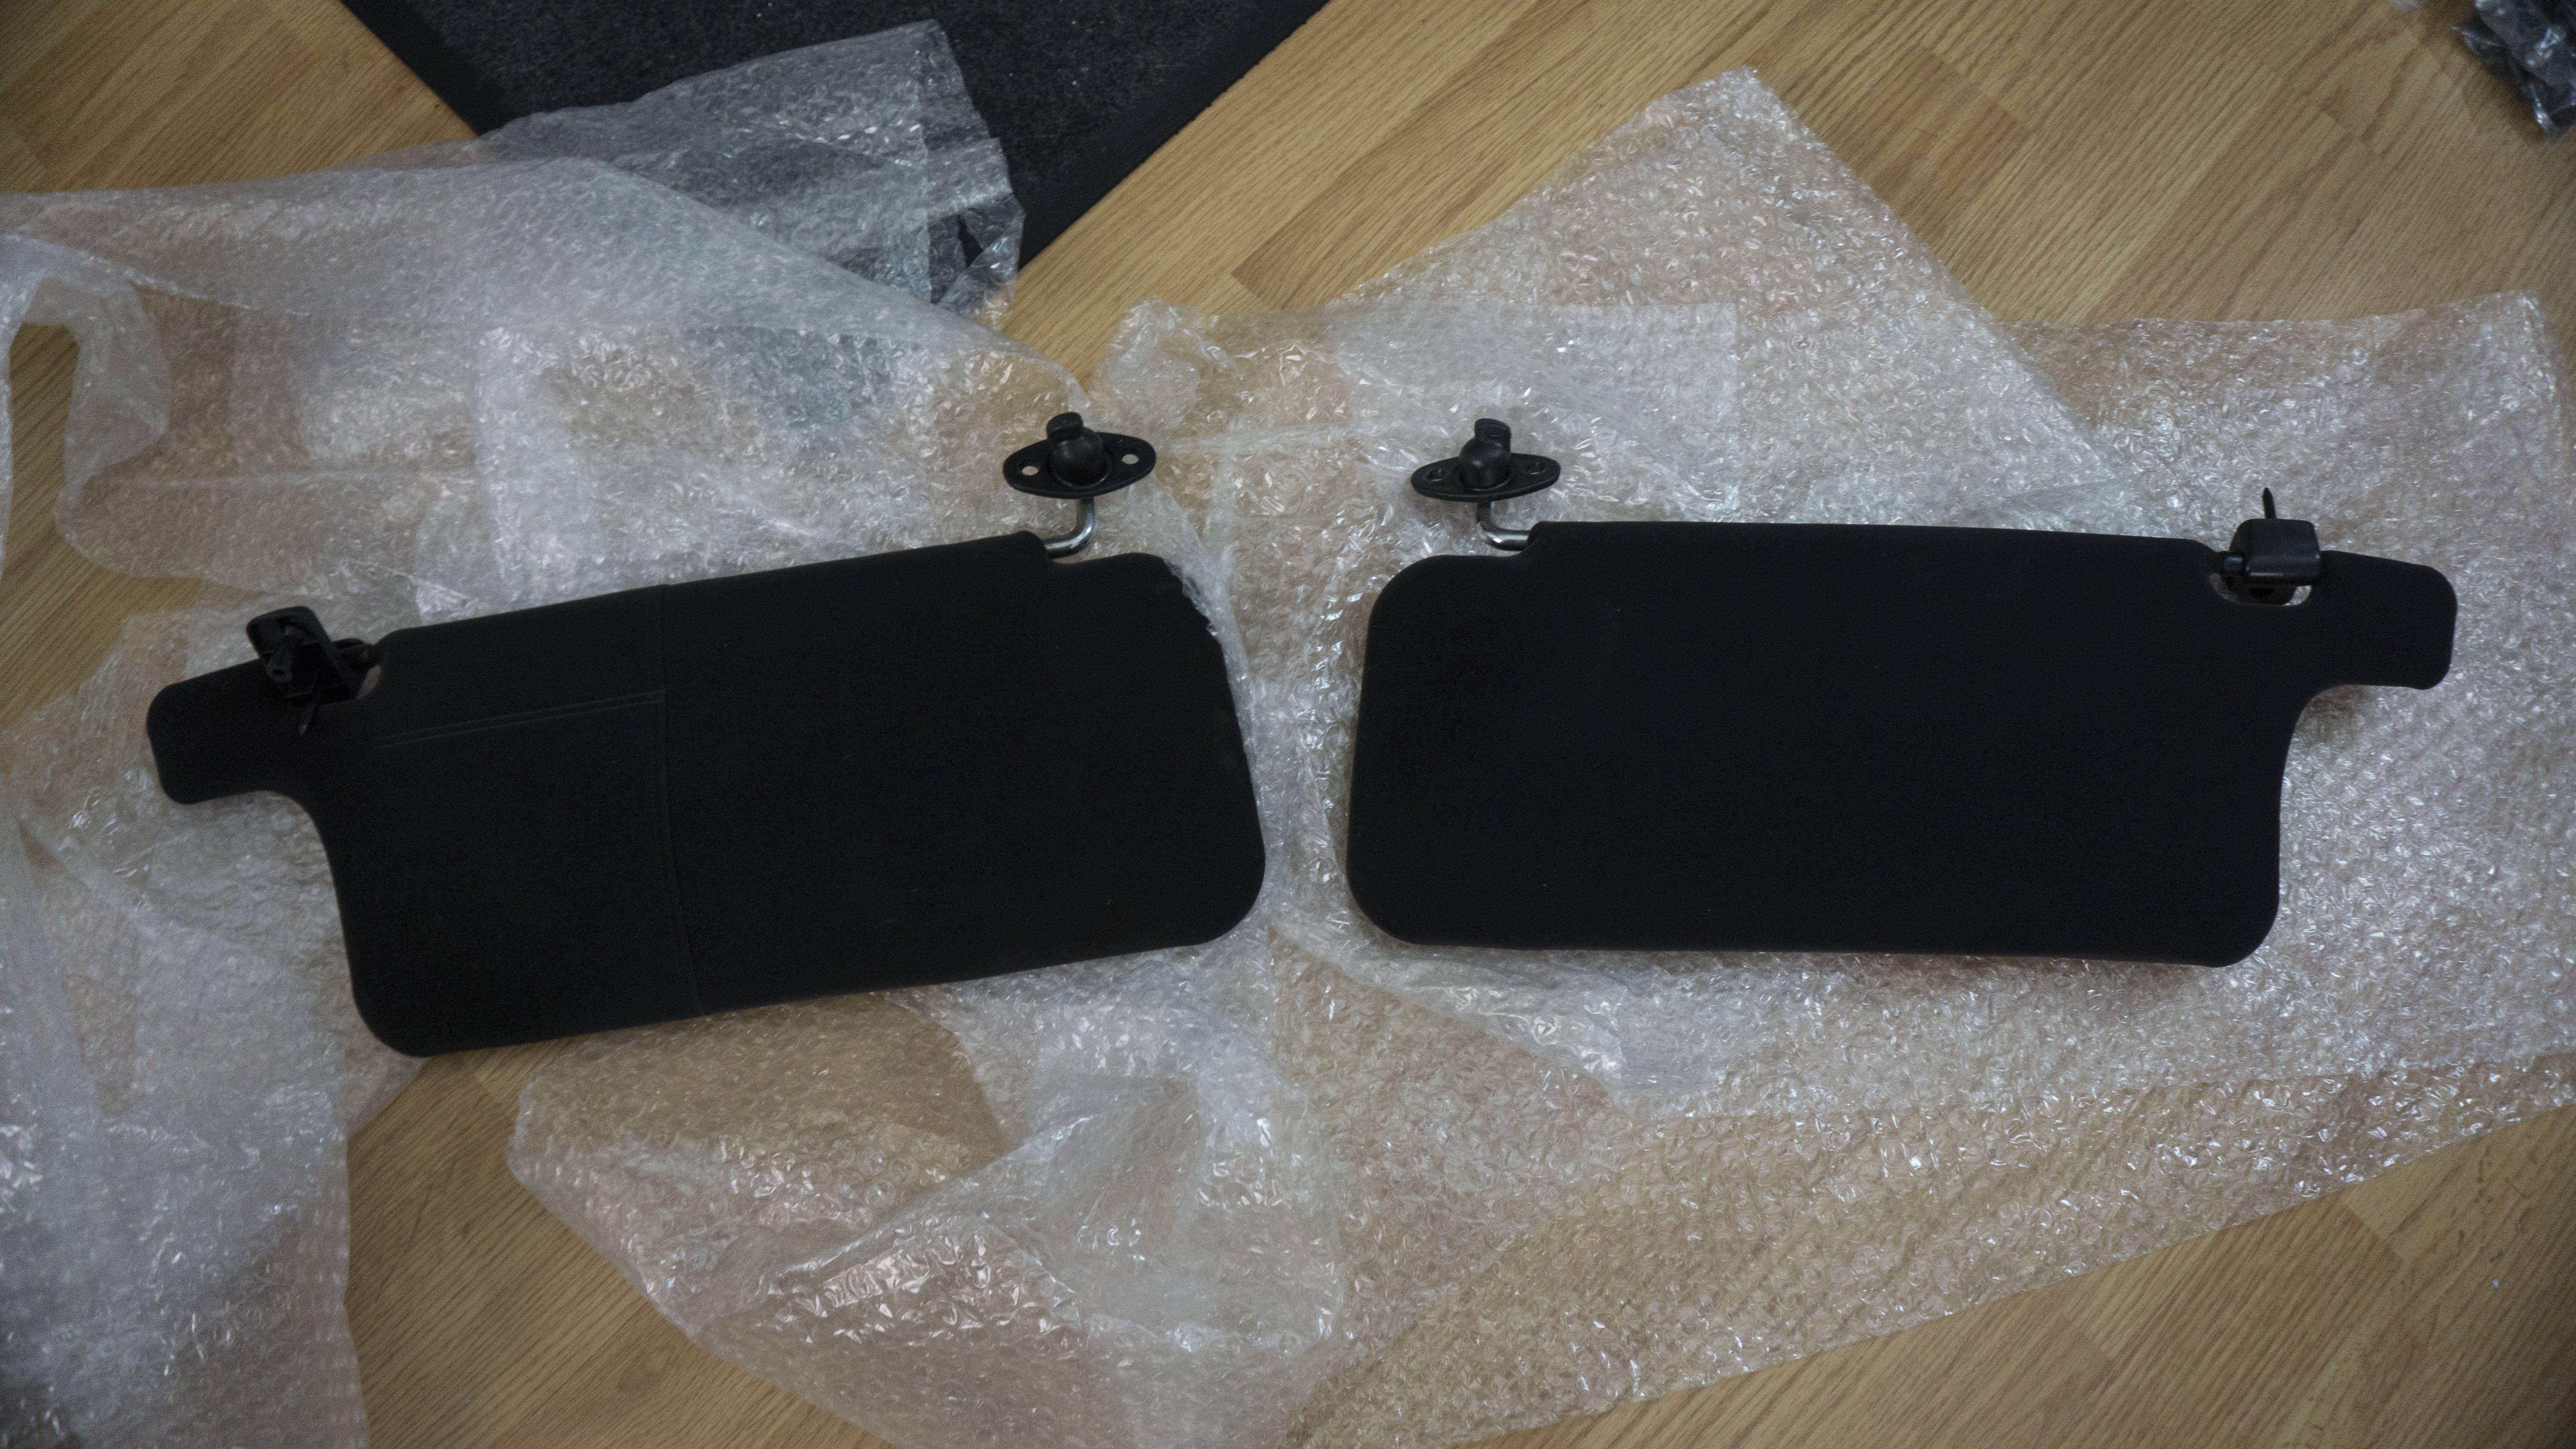
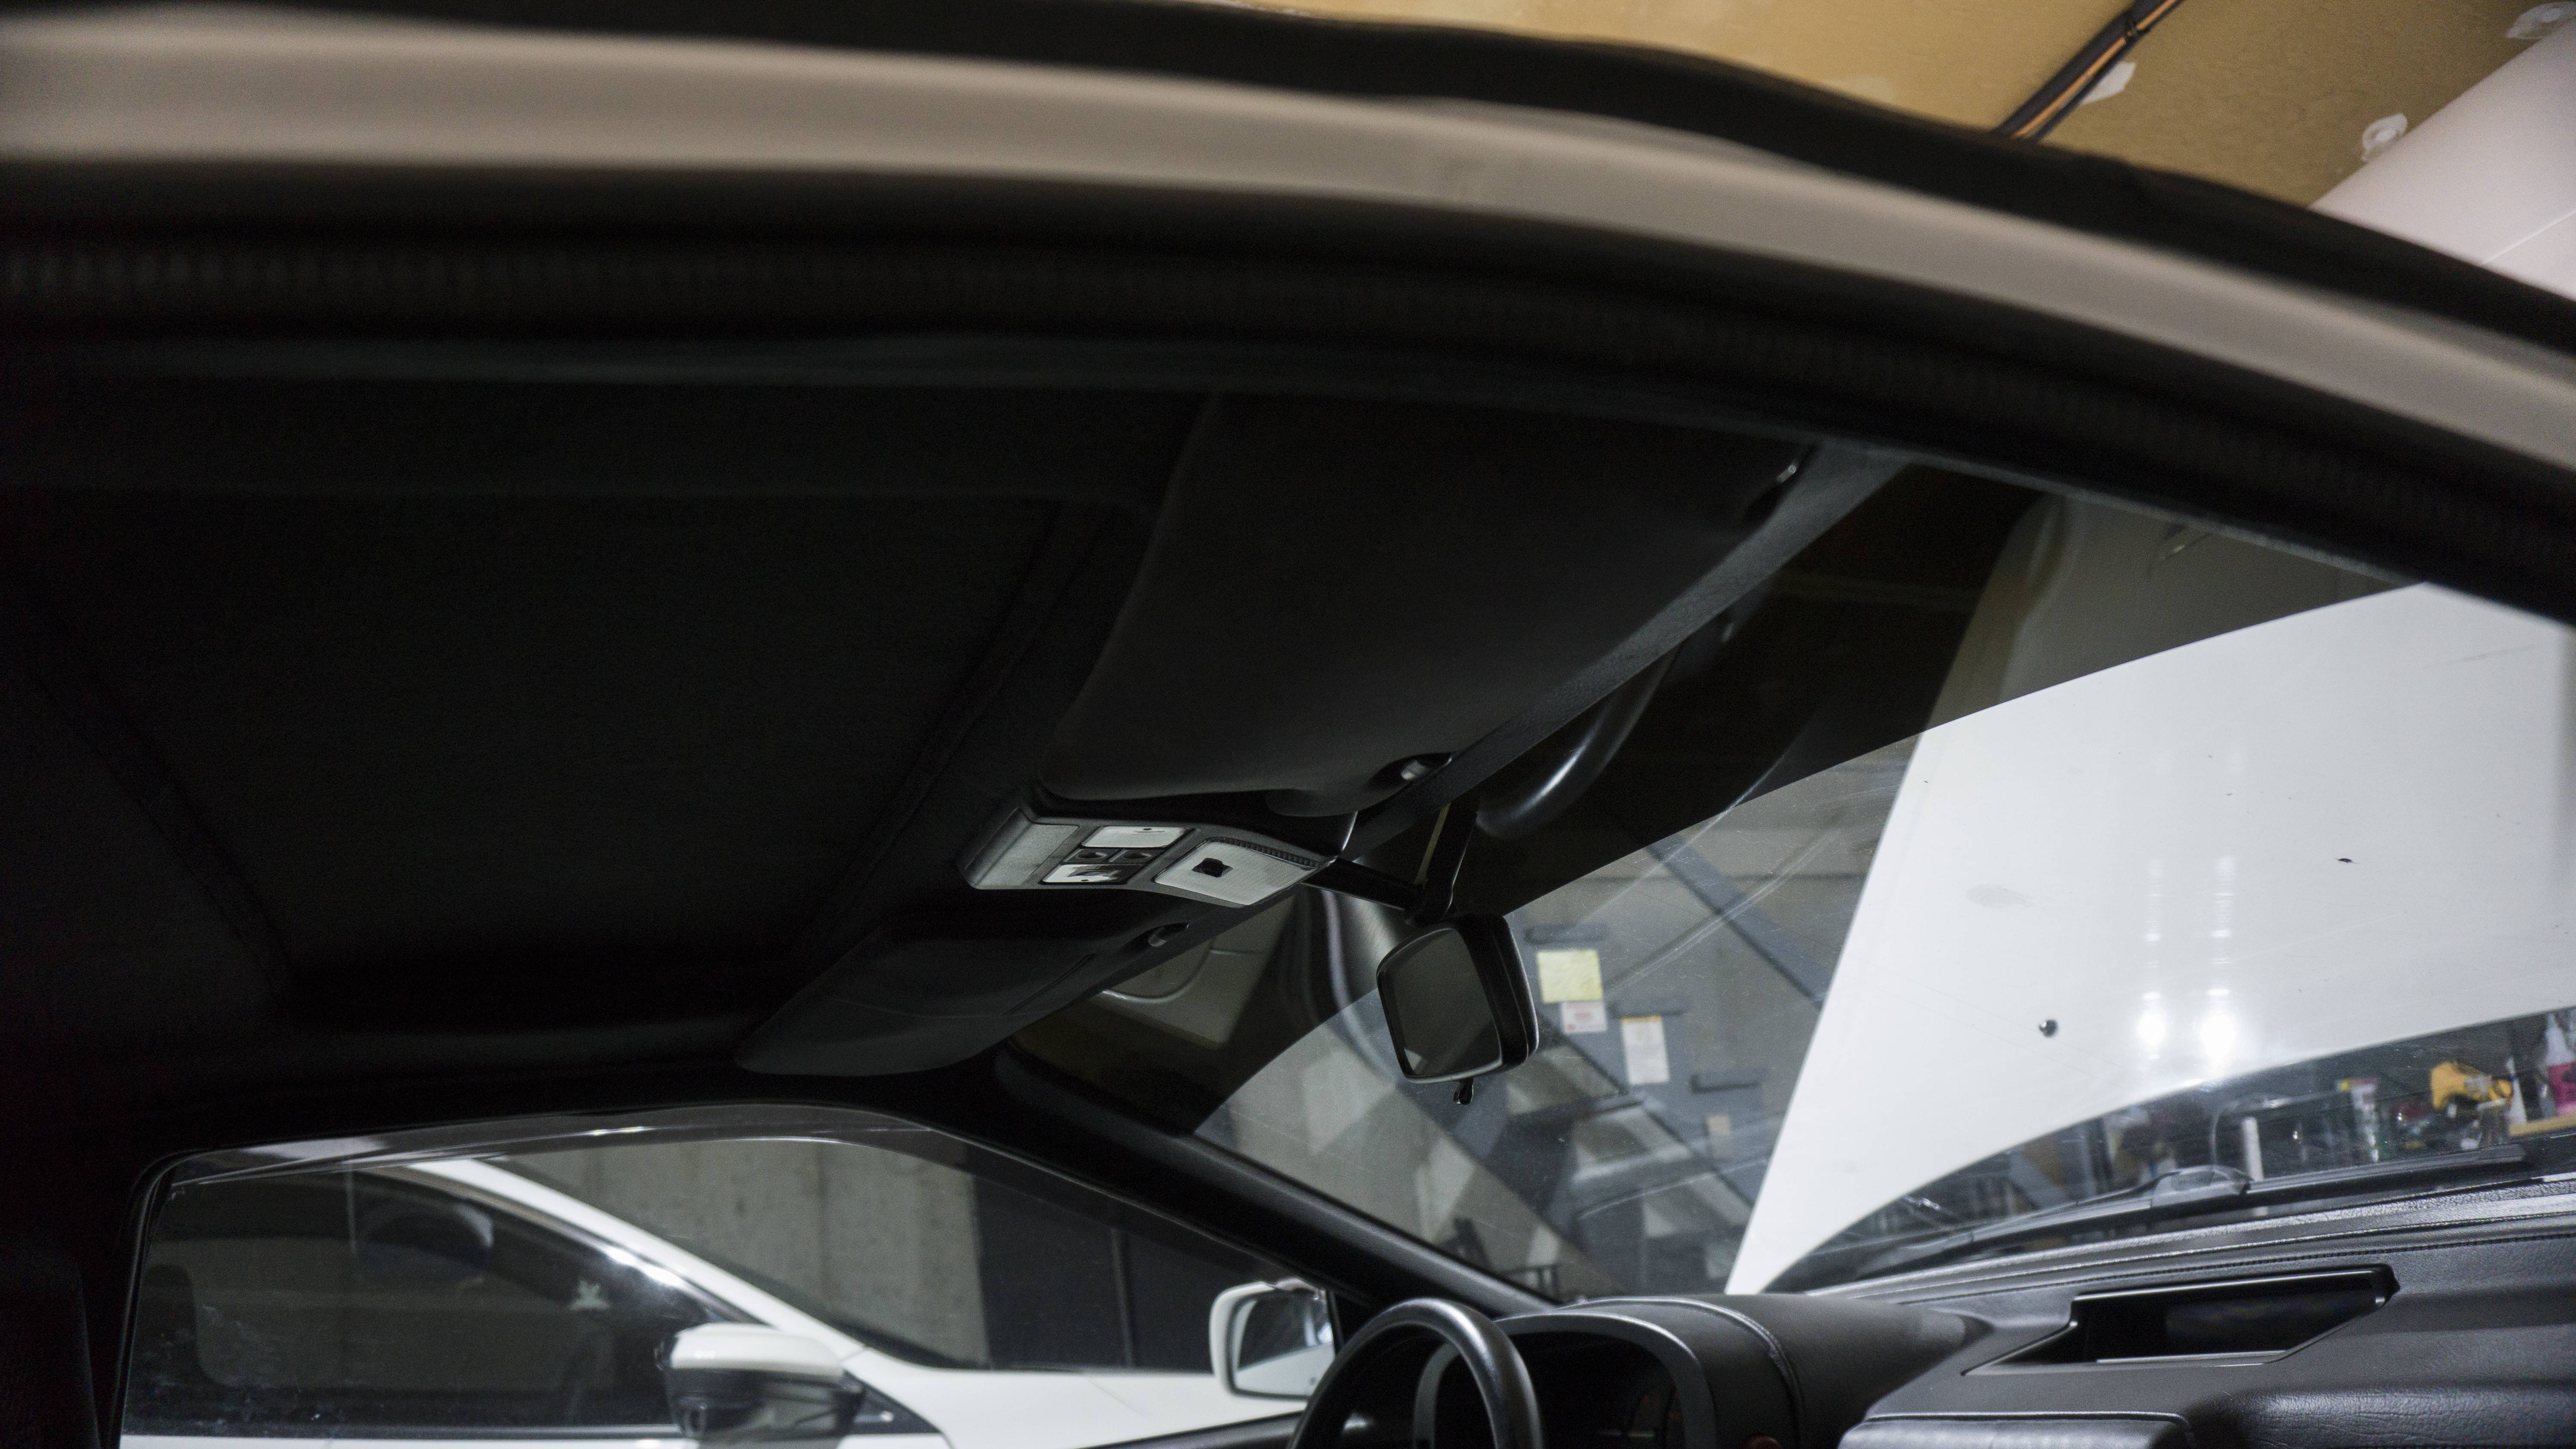
Well, it�s been a process getting this car back on the road fully. I accidentally wired the alternator in backwards and it took me two alternators blowing up to figure out what was going on. (Three if you count the one I bought to continue testing while mine were getting repaired). I also replaced the battery with a brand new one, partially because the one I had previously wasn�t made for the battery mount I was using - it worked, but not as intended. I re-wired the alternator completely utilizing the factory method for the L wire. I didn�t do the wiring previously, so I wanted to just re-do it all so I knew what was done. I ran a new S wire and upgraded the B wire from the OEM stapled wire to 6 gauge. I also bought a new alternator plug to go with the new wiring. Bringing load back through the idiot cluster required me to repair the CPU. I�ve never de-soldered and re-soldered a circuit board before, but I think I did okay for my first time; and more importantly, the relay is now working sending power illuminating the idiot cluster lights when alternator is grounded. However, that didn�t completely fix my issues. My B-post was still putting out 15.6-15.8v while my battery was still only seeing 14.6-14.8v. Weirdly, it only occurred while the car was running. After a lot of different tests it finally dawned on me what had happened. When I upgraded my fuel pump from a Walboro 255 to a Walboro 450 back in the day I never upgraded the wiring along with it. It was still getting its power from the ECU fuse panel we made. This was drawing a lot more voltage and throwing off both the S wire for the alternator and the MegaSquirt voltage read/calculations. I re-wired the fuel pump directly from the battery. I also made it all modular utilizing two Deutsch connectors (one at the kick-panel and one right before the inline-fuse/relay). We are all good now! Battery showing 14.5v, ECU showing 14.5v, and Sense wire showing 14.5v. I also finally sourced some mint sun visors to replace my faded JDM ones. These are from a Canadian 10th AE and do not have the common warning labels that the USDM has (just like the JDM ones).
I�m looking forward to getting back into tuning the car and getting miles on it. MegaSquirt auto-tuning feature is pretty slick and makes things incredibly easy on my part until we get into boost tuning.
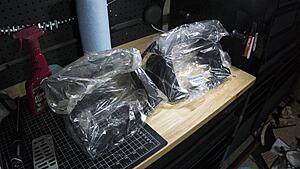
Here is the new battery:
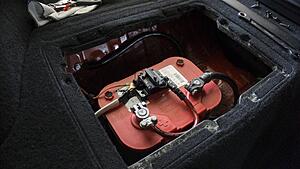
Here is all the new alternator shenanigans:

Here is the fuel pump rewire:

Here is the sun visors:


Well, it�s been a process getting this car back on the road fully. I accidentally wired the alternator in backwards and it took me two alternators blowing up to figure out what was going on. (Three if you count the one I bought to continue testing while mine were getting repaired). I also replaced the battery with a brand new one, partially because the one I had previously wasn�t made for the battery mount I was using - it worked, but not as intended. I re-wired the alternator completely utilizing the factory method for the L wire. I didn�t do the wiring previously, so I wanted to just re-do it all so I knew what was done. I ran a new S wire and upgraded the B wire from the OEM stapled wire to 6 gauge. I also bought a new alternator plug to go with the new wiring. Bringing load back through the idiot cluster required me to repair the CPU. I�ve never de-soldered and re-soldered a circuit board before, but I think I did okay for my first time; and more importantly, the relay is now working sending power illuminating the idiot cluster lights when alternator is grounded. However, that didn�t completely fix my issues. My B-post was still putting out 15.6-15.8v while my battery was still only seeing 14.6-14.8v. Weirdly, it only occurred while the car was running. After a lot of different tests it finally dawned on me what had happened. When I upgraded my fuel pump from a Walboro 255 to a Walboro 450 back in the day I never upgraded the wiring along with it. It was still getting its power from the ECU fuse panel we made. This was drawing a lot more voltage and throwing off both the S wire for the alternator and the MegaSquirt voltage read/calculations. I re-wired the fuel pump directly from the battery. I also made it all modular utilizing two Deutsch connectors (one at the kick-panel and one right before the inline-fuse/relay). We are all good now! Battery showing 14.5v, ECU showing 14.5v, and Sense wire showing 14.5v. I also finally sourced some mint sun visors to replace my faded JDM ones. These are from a Canadian 10th AE and do not have the common warning labels that the USDM has (just like the JDM ones).
I�m looking forward to getting back into tuning the car and getting miles on it. MegaSquirt auto-tuning feature is pretty slick and makes things incredibly easy on my part until we get into boost tuning.
Here is the new battery:

Here is all the new alternator shenanigans:

Here is the fuel pump rewire:

Here is the sun visors:
Last edited by Akomix; 04-06-20 at 08:45 PM.
04-18-20, 08:02 PM
#294
Update 4/18/2020:
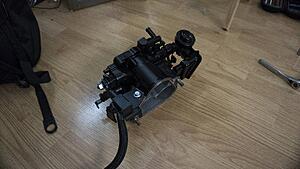
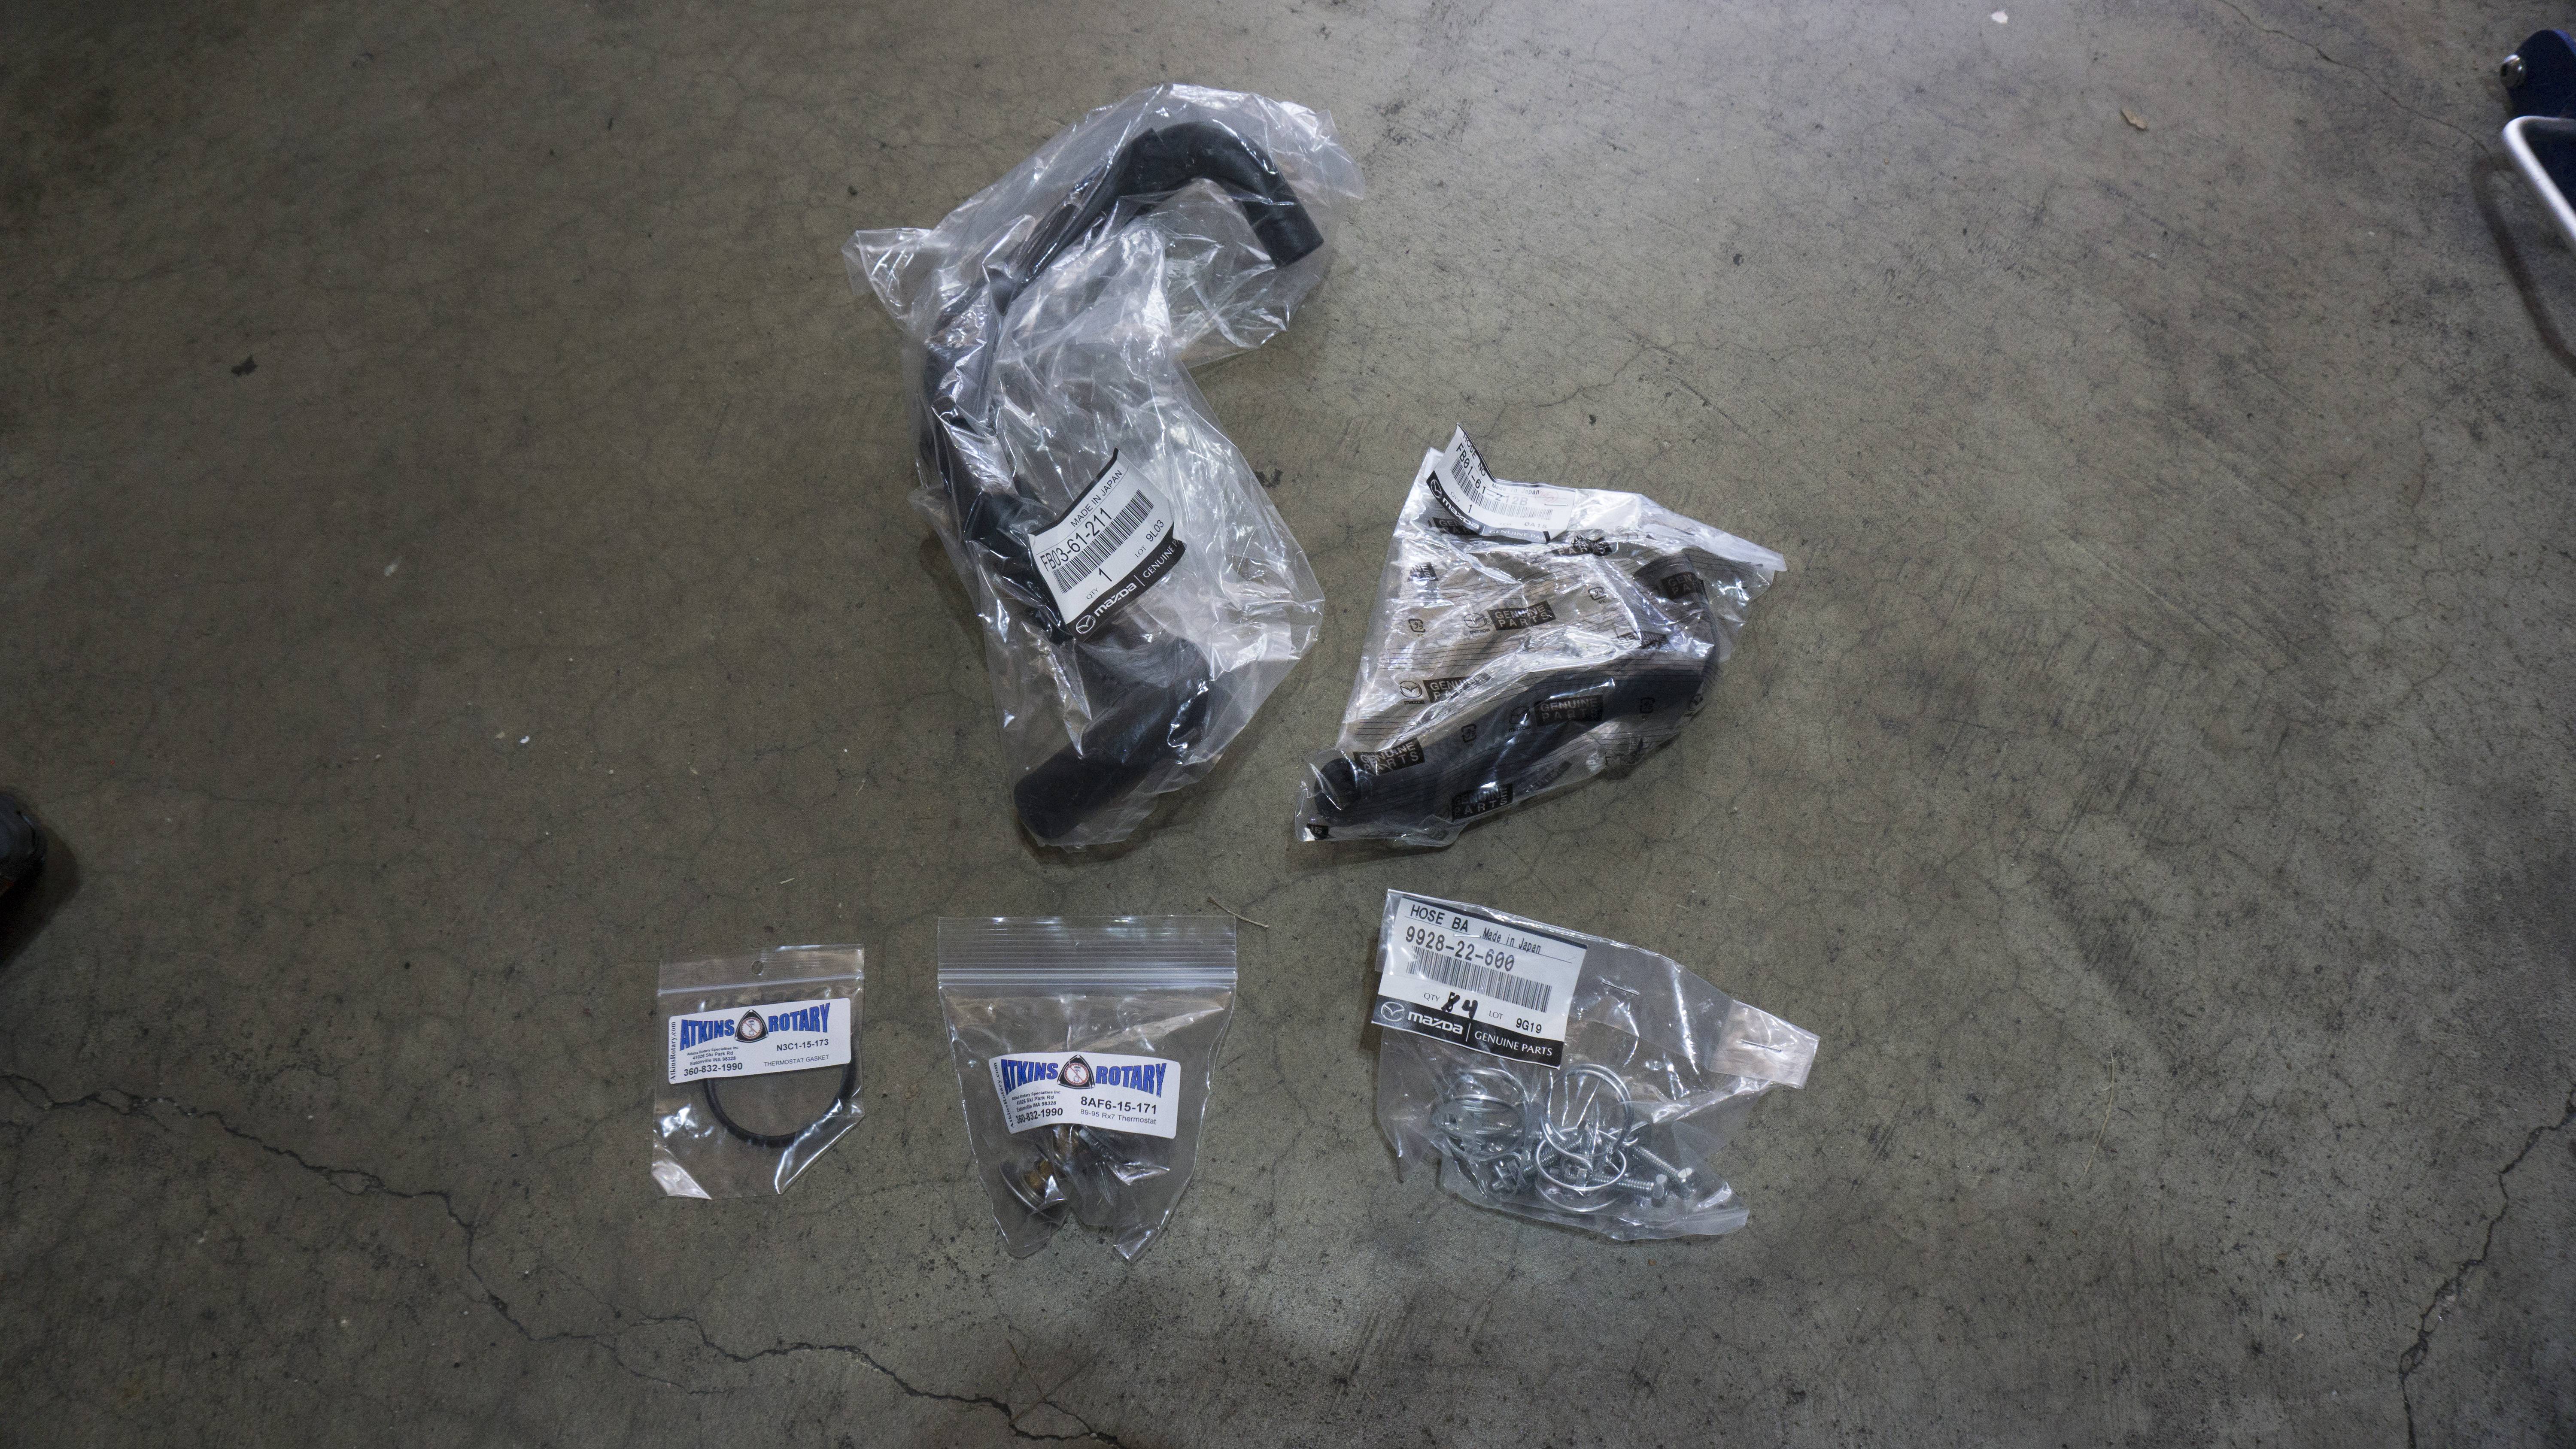
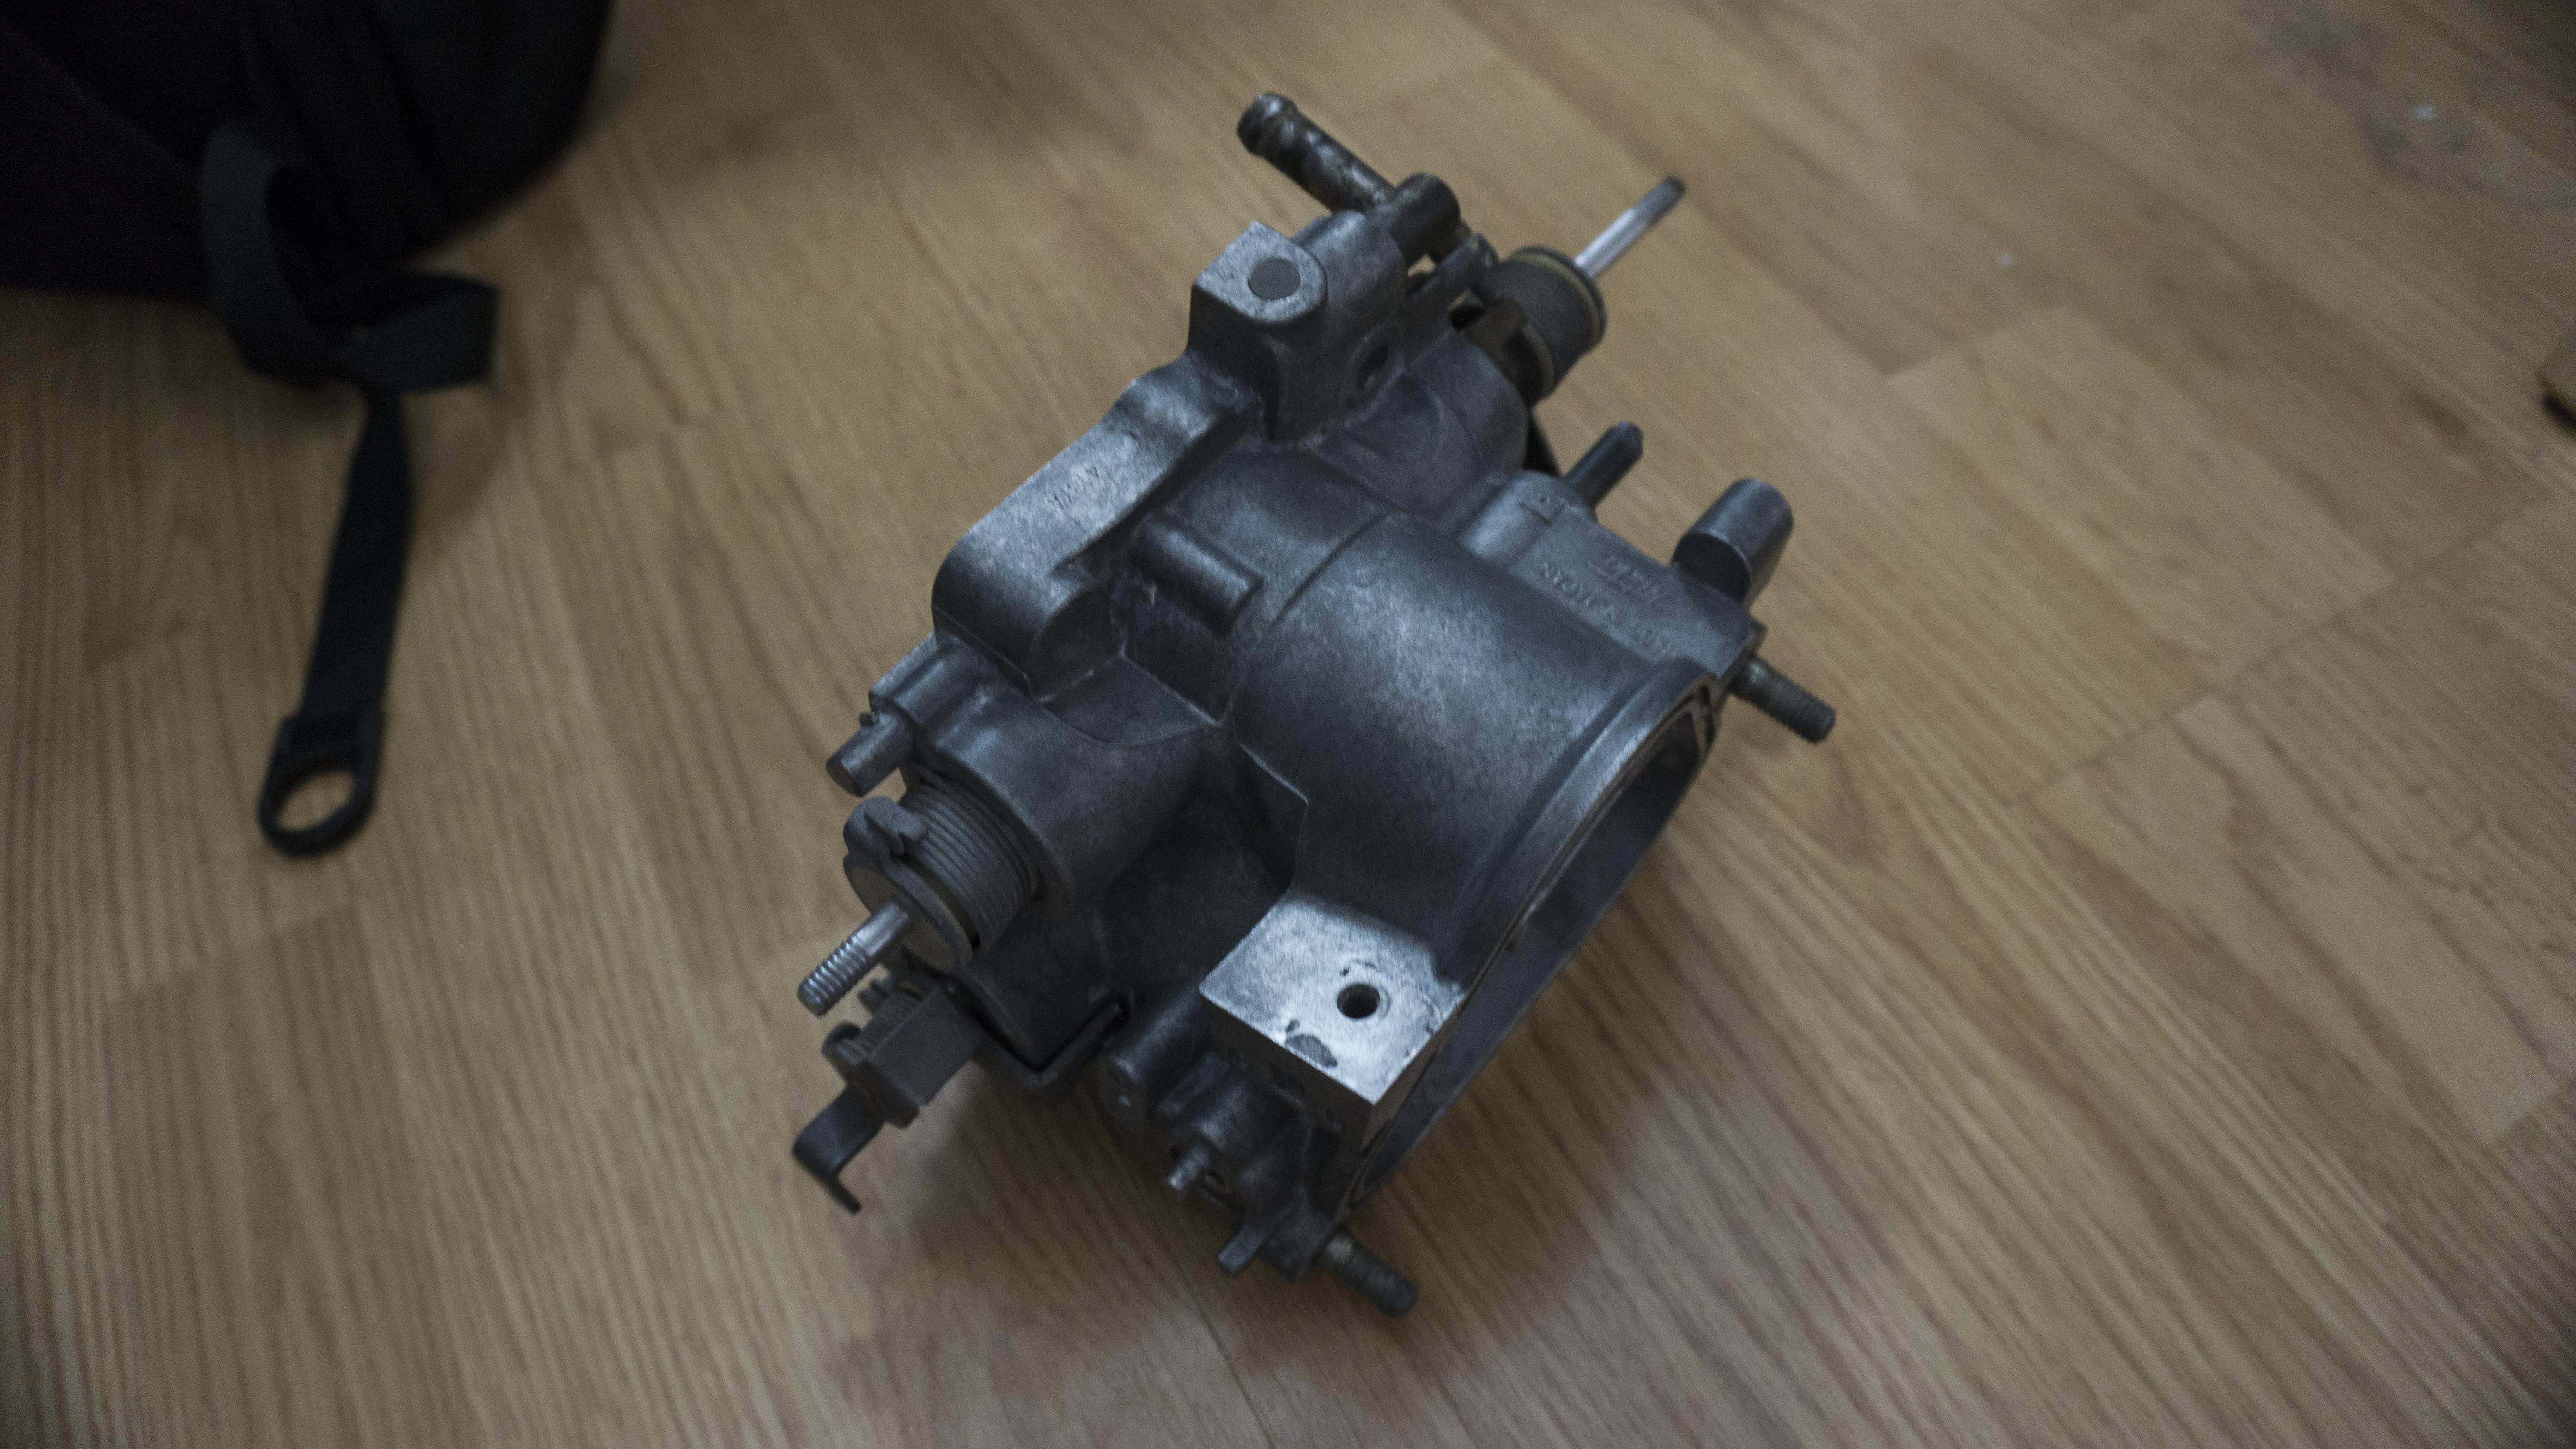
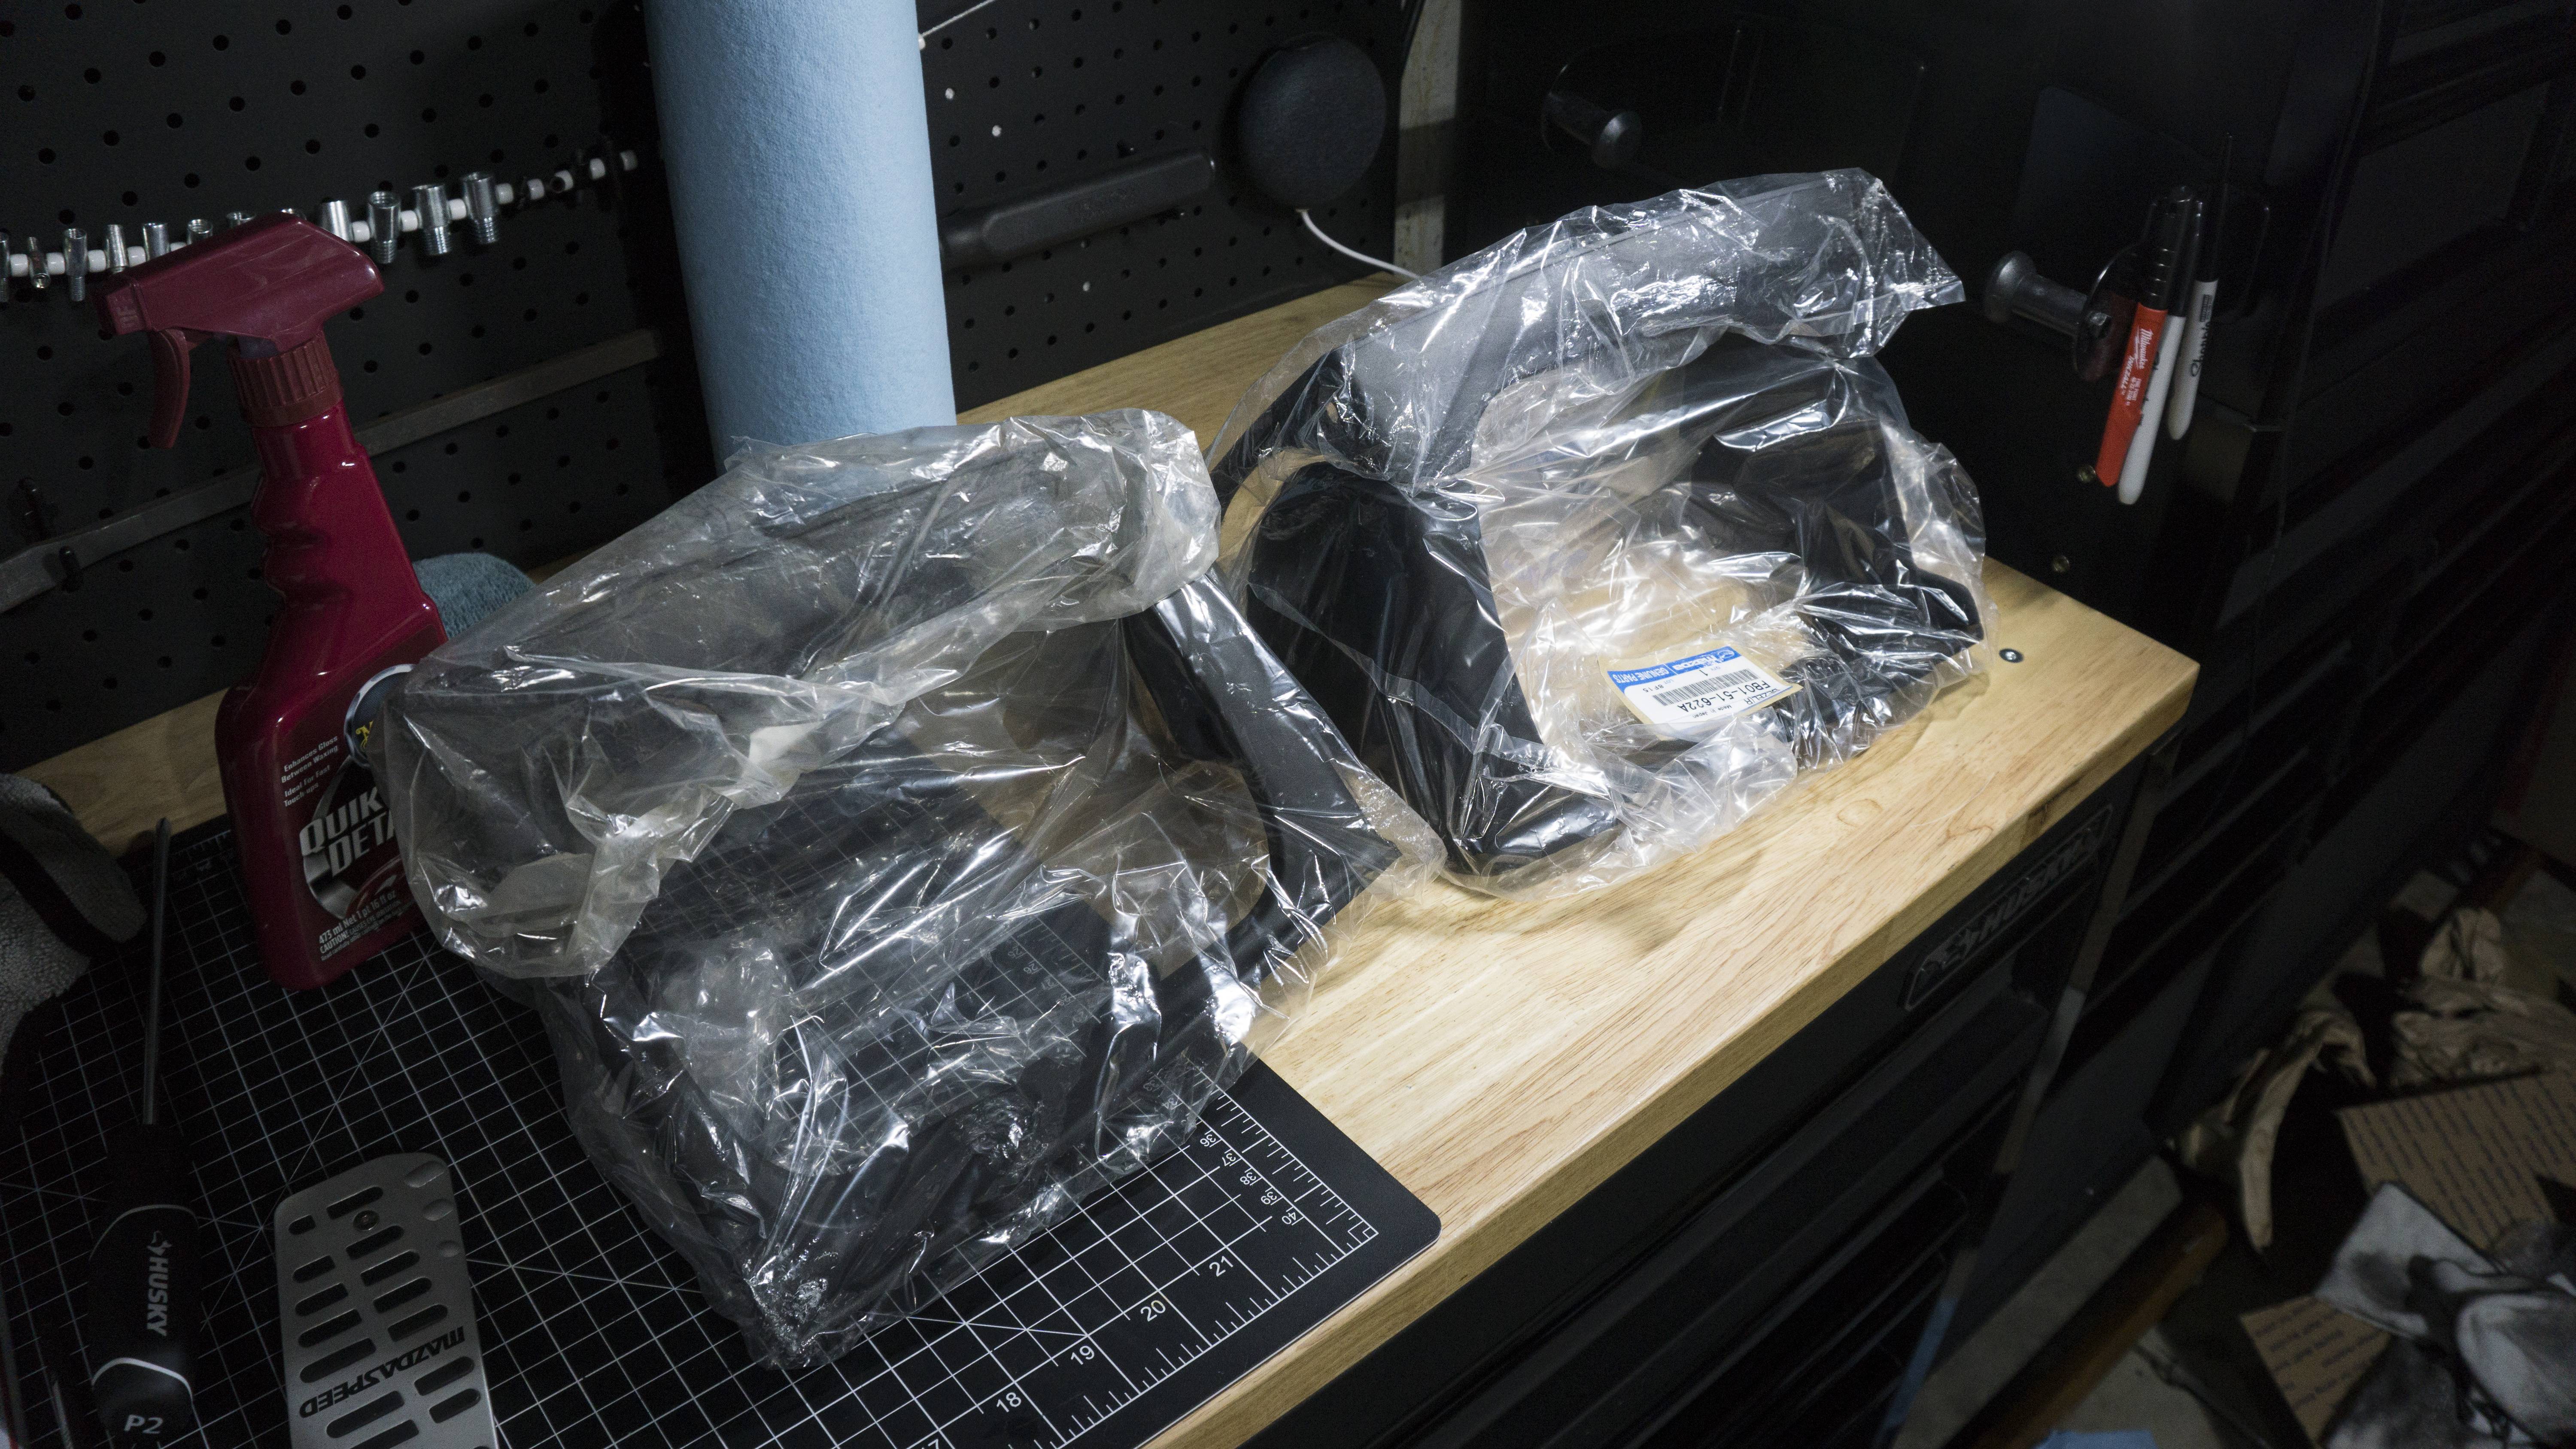
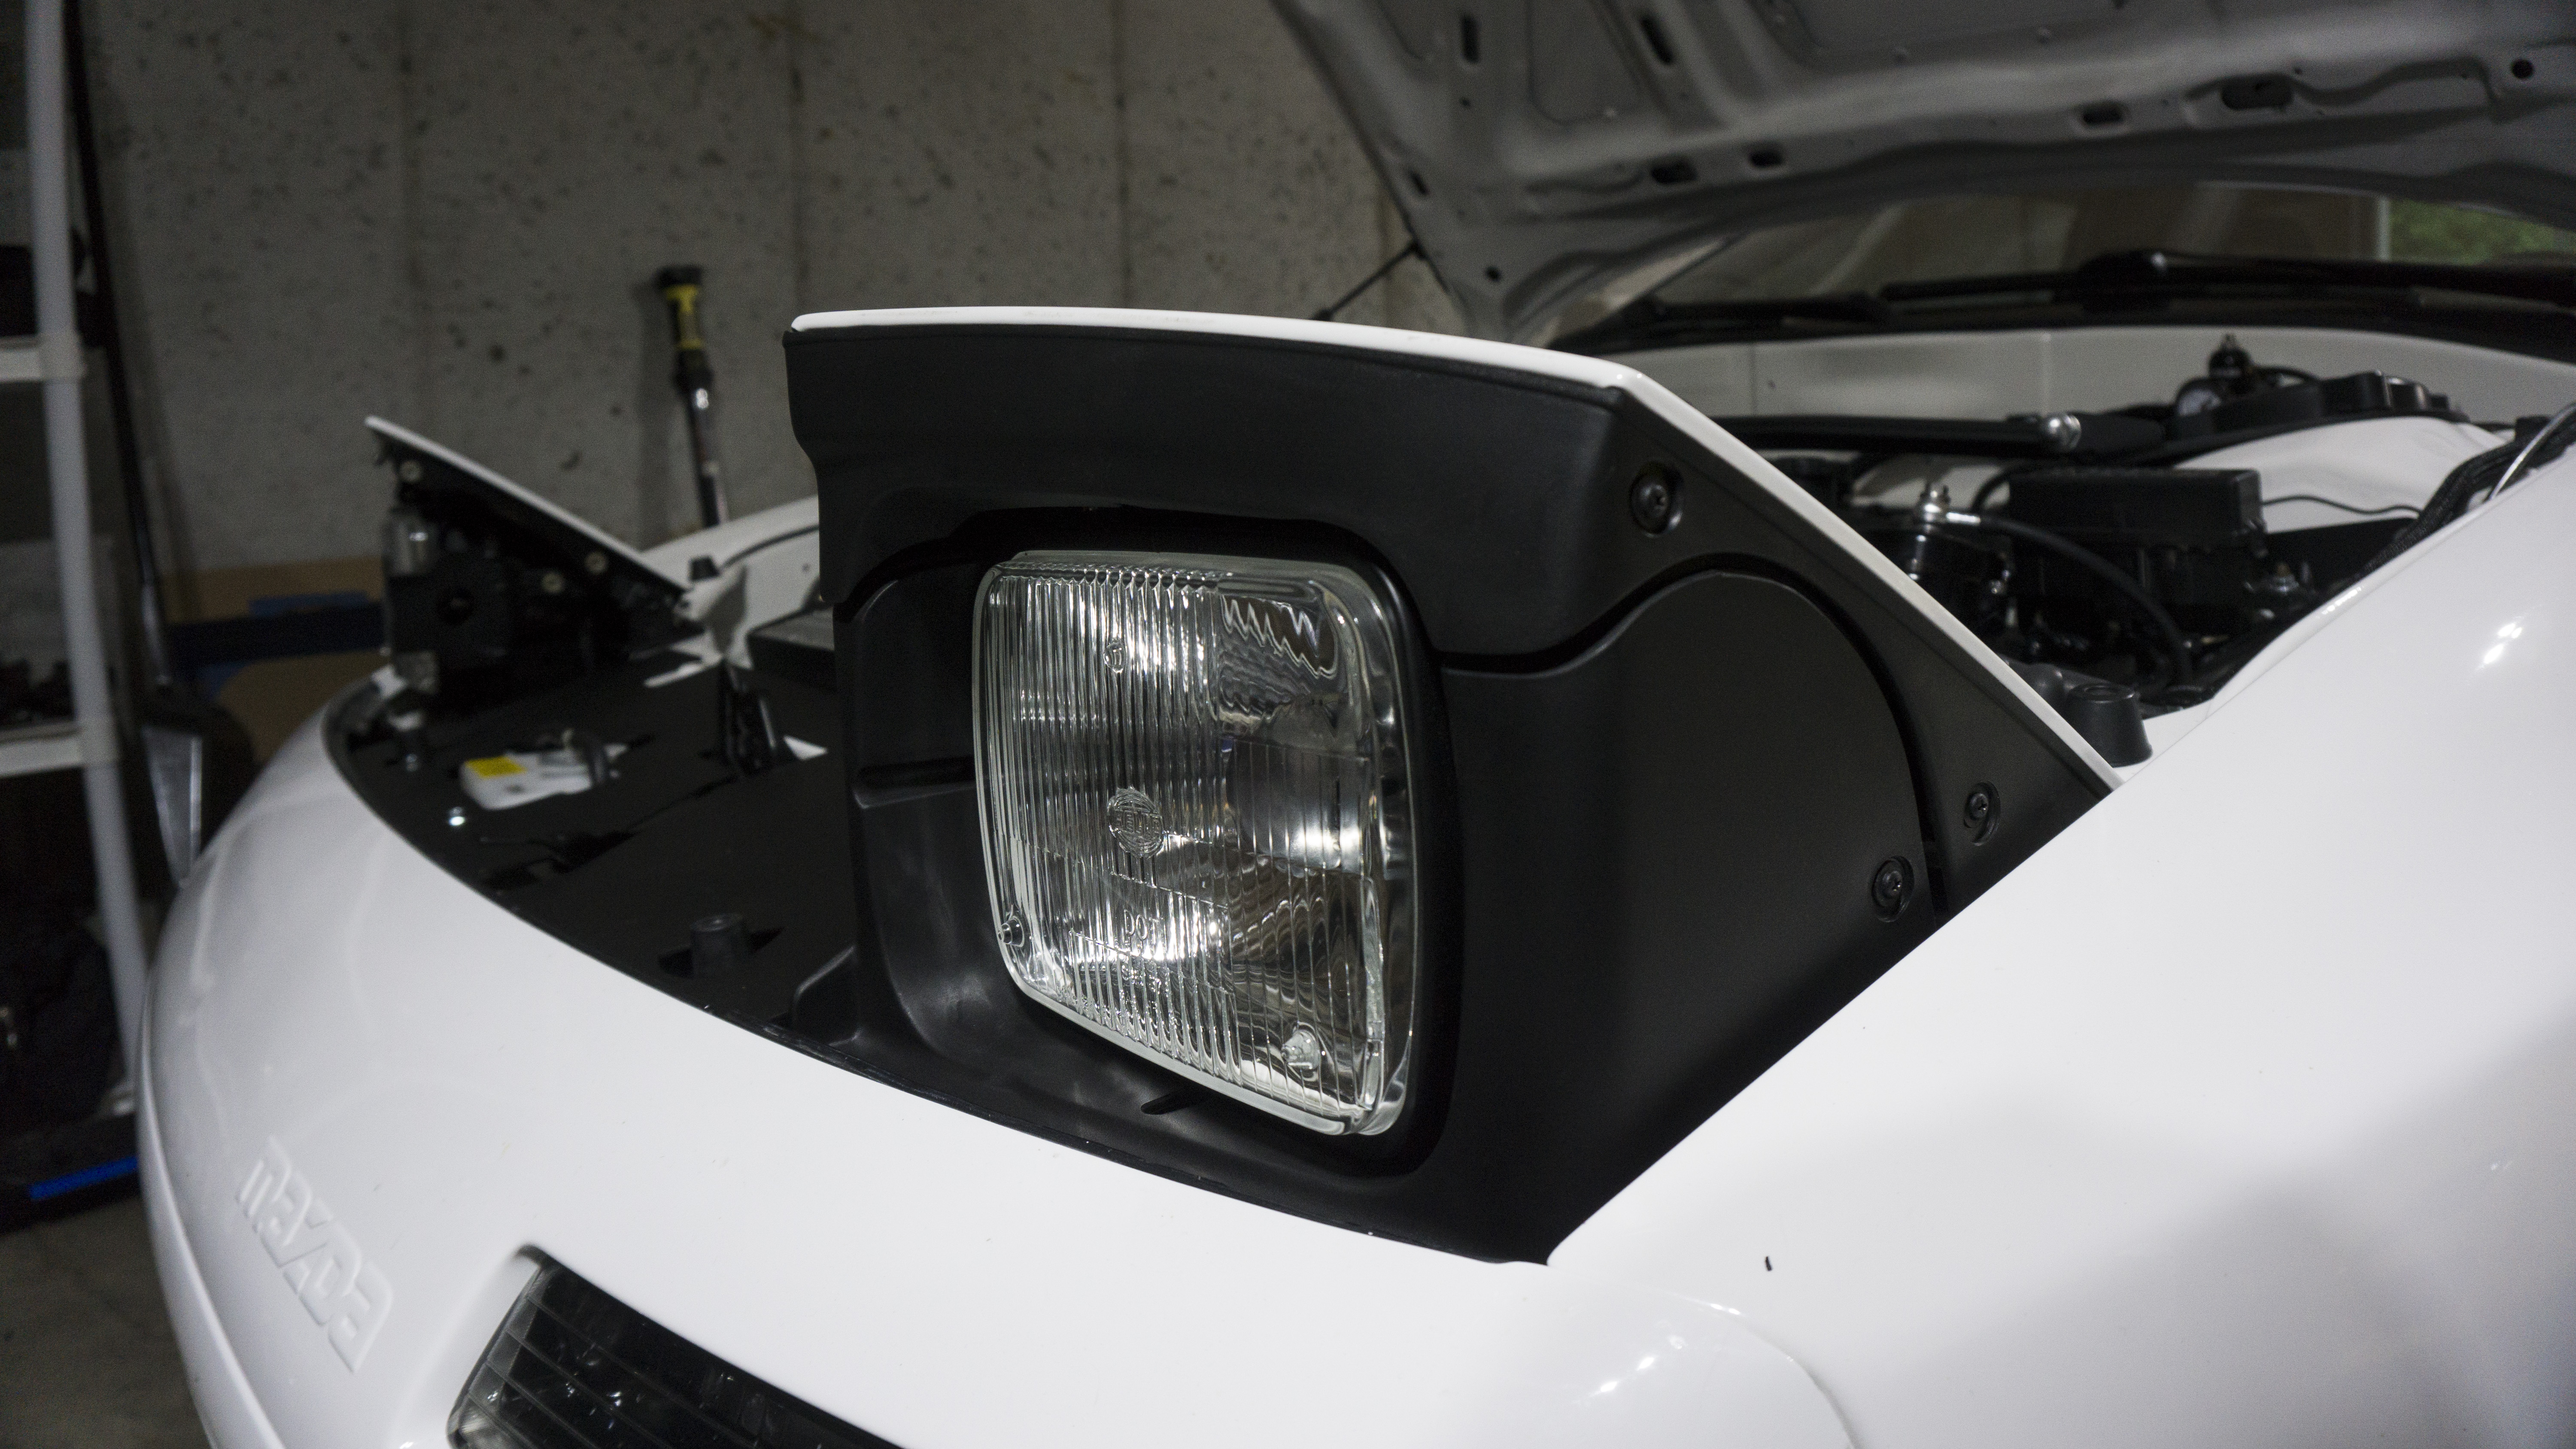
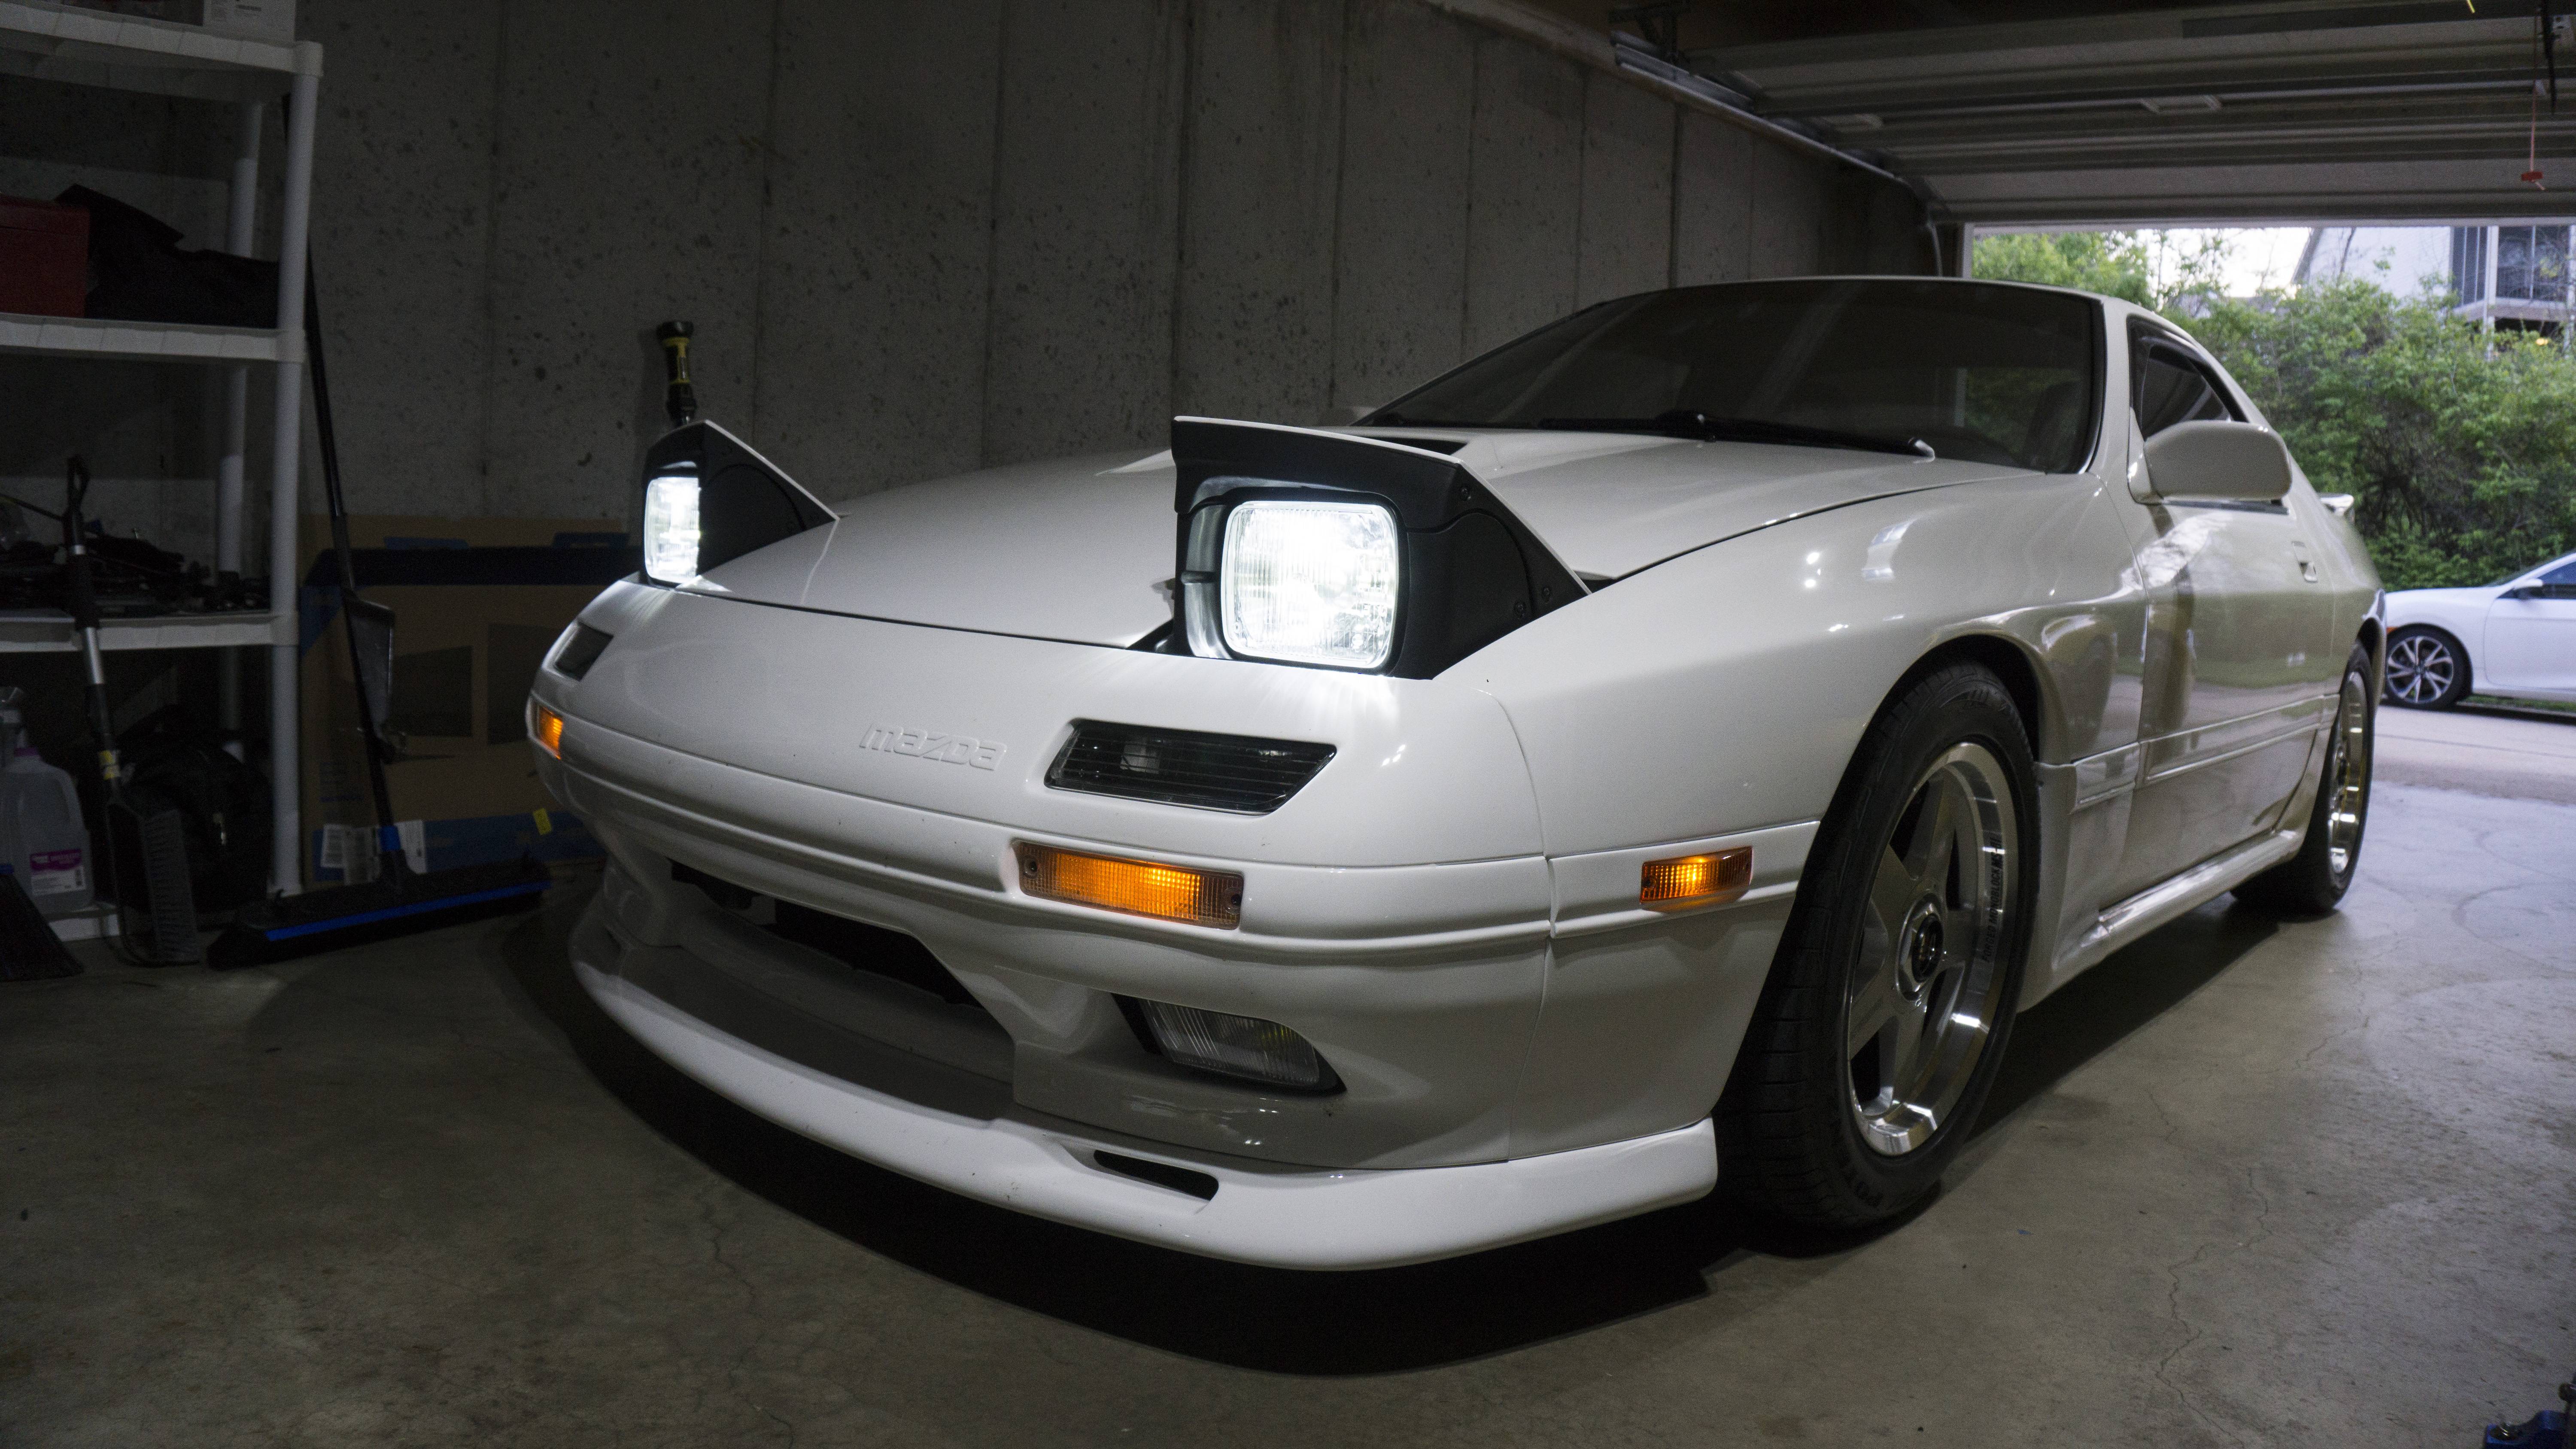
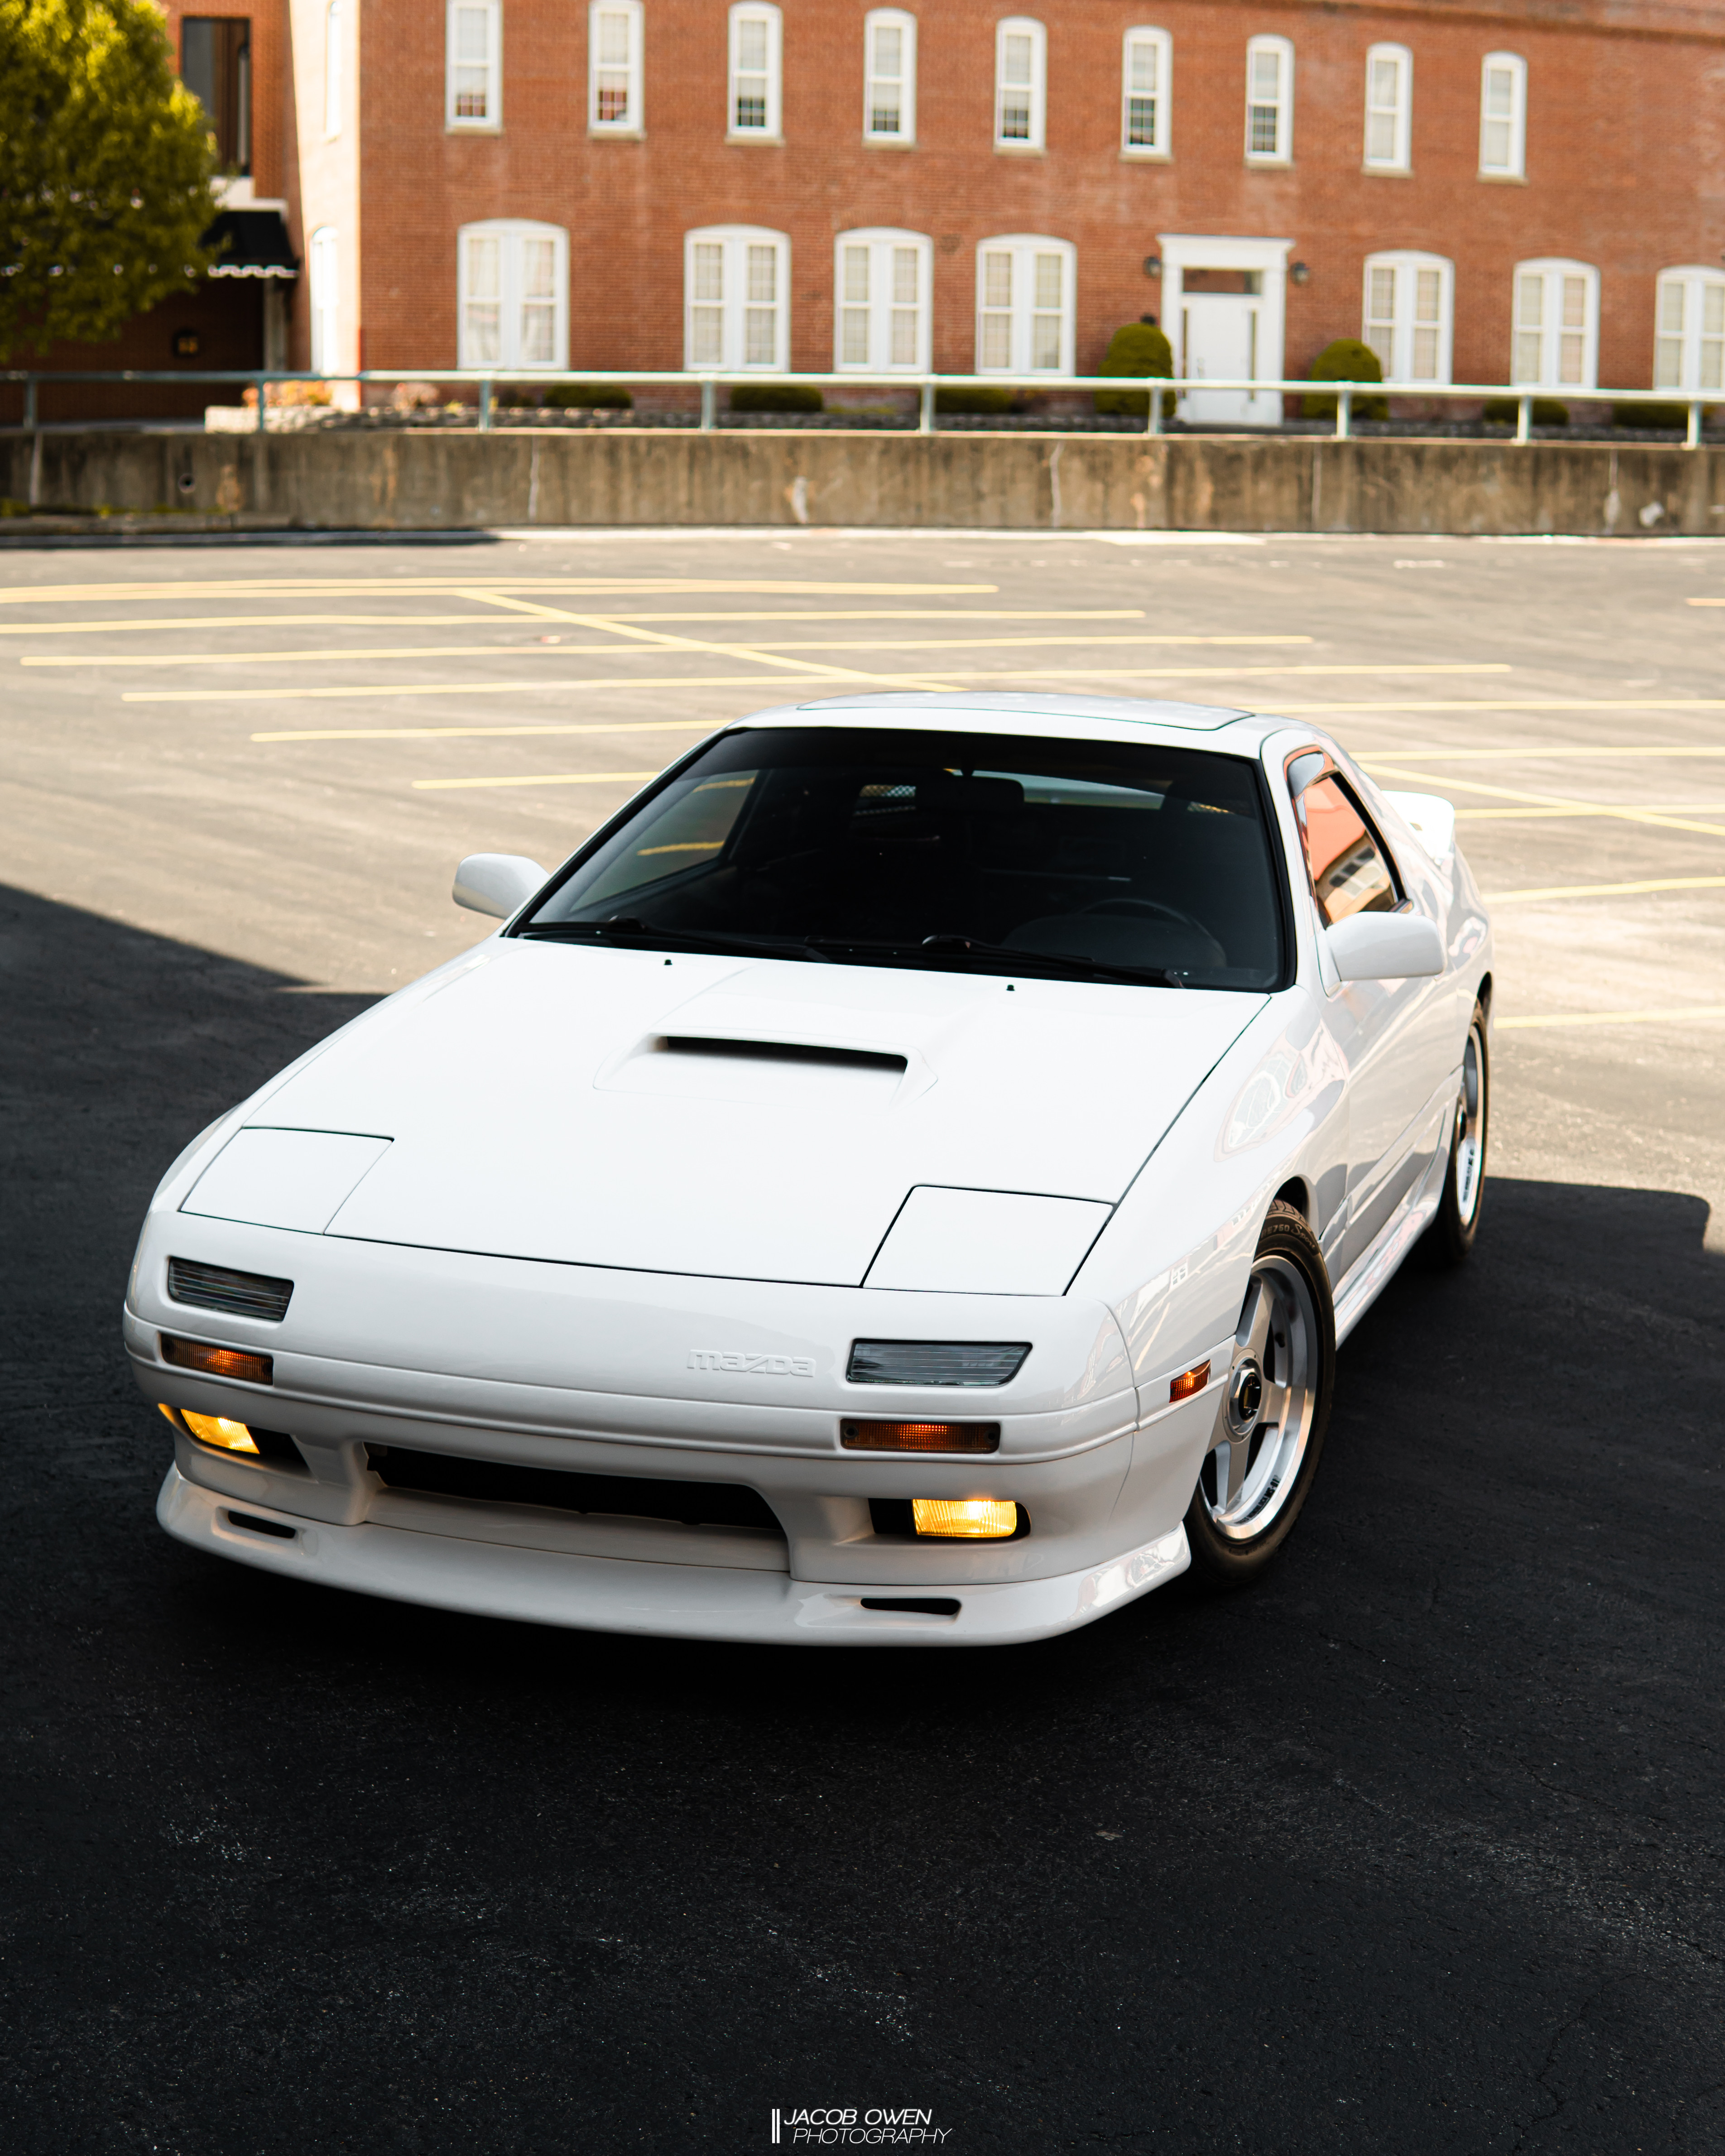
Let�s get right down to business. I�ve put 250 miles on the car so far! I finally have everything dialed in, all the leaks fixed (I think�), and it�s running great - well, as much as it can up to 4k. Once I hit 500 miles it�s time for an oil change and I can begin revving higher. During one of my drives my low coolant buzzer came on during idle. Found out my heater core hoses had deteriorated. Replaced them both with brand new ones and OEM clamps. The clamps I had used previously had contributed to the deterioration. While I was on that mission I also replaced the lower temp thermostat with an OEM. I wasn�t breaking 150F on the the highway and my fans were kicking on quite a bit. After I swapped to the OEM thermostat I�m consistently 175-185 on the highway and my fans are only having to kick on when I�m idling for an extended period. I got bored one day and, after being tired of seeing the random raw throttle body, pulled the TB for paint. I broke it down most of the way and sprayed it with epoxy paint. I think I will end up sourcing another one and tearing it completely down for powder. The linkages don�t look too difficult and it�s only one step further than I went this time. I think it really helps pull the engine bay together - it certainly looks better than the raw one. The last thing I did was align my headlights. This led to me finally being able to throw on the brand new headlight bezels I purchased many moons ago. This was the last new part I had setting aside and I�m glad I was able to put them on. Next goal is to enjoy the car!
Here is the heater hose replacements
Here is the throttle body color change

Here is the headlight alignment and bezels
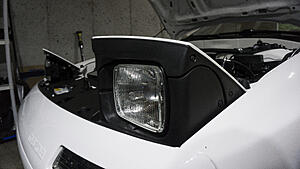
Let�s get right down to business. I�ve put 250 miles on the car so far! I finally have everything dialed in, all the leaks fixed (I think�), and it�s running great - well, as much as it can up to 4k. Once I hit 500 miles it�s time for an oil change and I can begin revving higher. During one of my drives my low coolant buzzer came on during idle. Found out my heater core hoses had deteriorated. Replaced them both with brand new ones and OEM clamps. The clamps I had used previously had contributed to the deterioration. While I was on that mission I also replaced the lower temp thermostat with an OEM. I wasn�t breaking 150F on the the highway and my fans were kicking on quite a bit. After I swapped to the OEM thermostat I�m consistently 175-185 on the highway and my fans are only having to kick on when I�m idling for an extended period. I got bored one day and, after being tired of seeing the random raw throttle body, pulled the TB for paint. I broke it down most of the way and sprayed it with epoxy paint. I think I will end up sourcing another one and tearing it completely down for powder. The linkages don�t look too difficult and it�s only one step further than I went this time. I think it really helps pull the engine bay together - it certainly looks better than the raw one. The last thing I did was align my headlights. This led to me finally being able to throw on the brand new headlight bezels I purchased many moons ago. This was the last new part I had setting aside and I�m glad I was able to put them on. Next goal is to enjoy the car!
Here is the heater hose replacements
Here is the throttle body color change


Here is the headlight alignment and bezels

 05-14-20, 06:22 PM
#295
Update 5/15/2020:
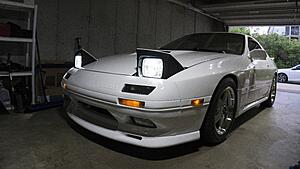
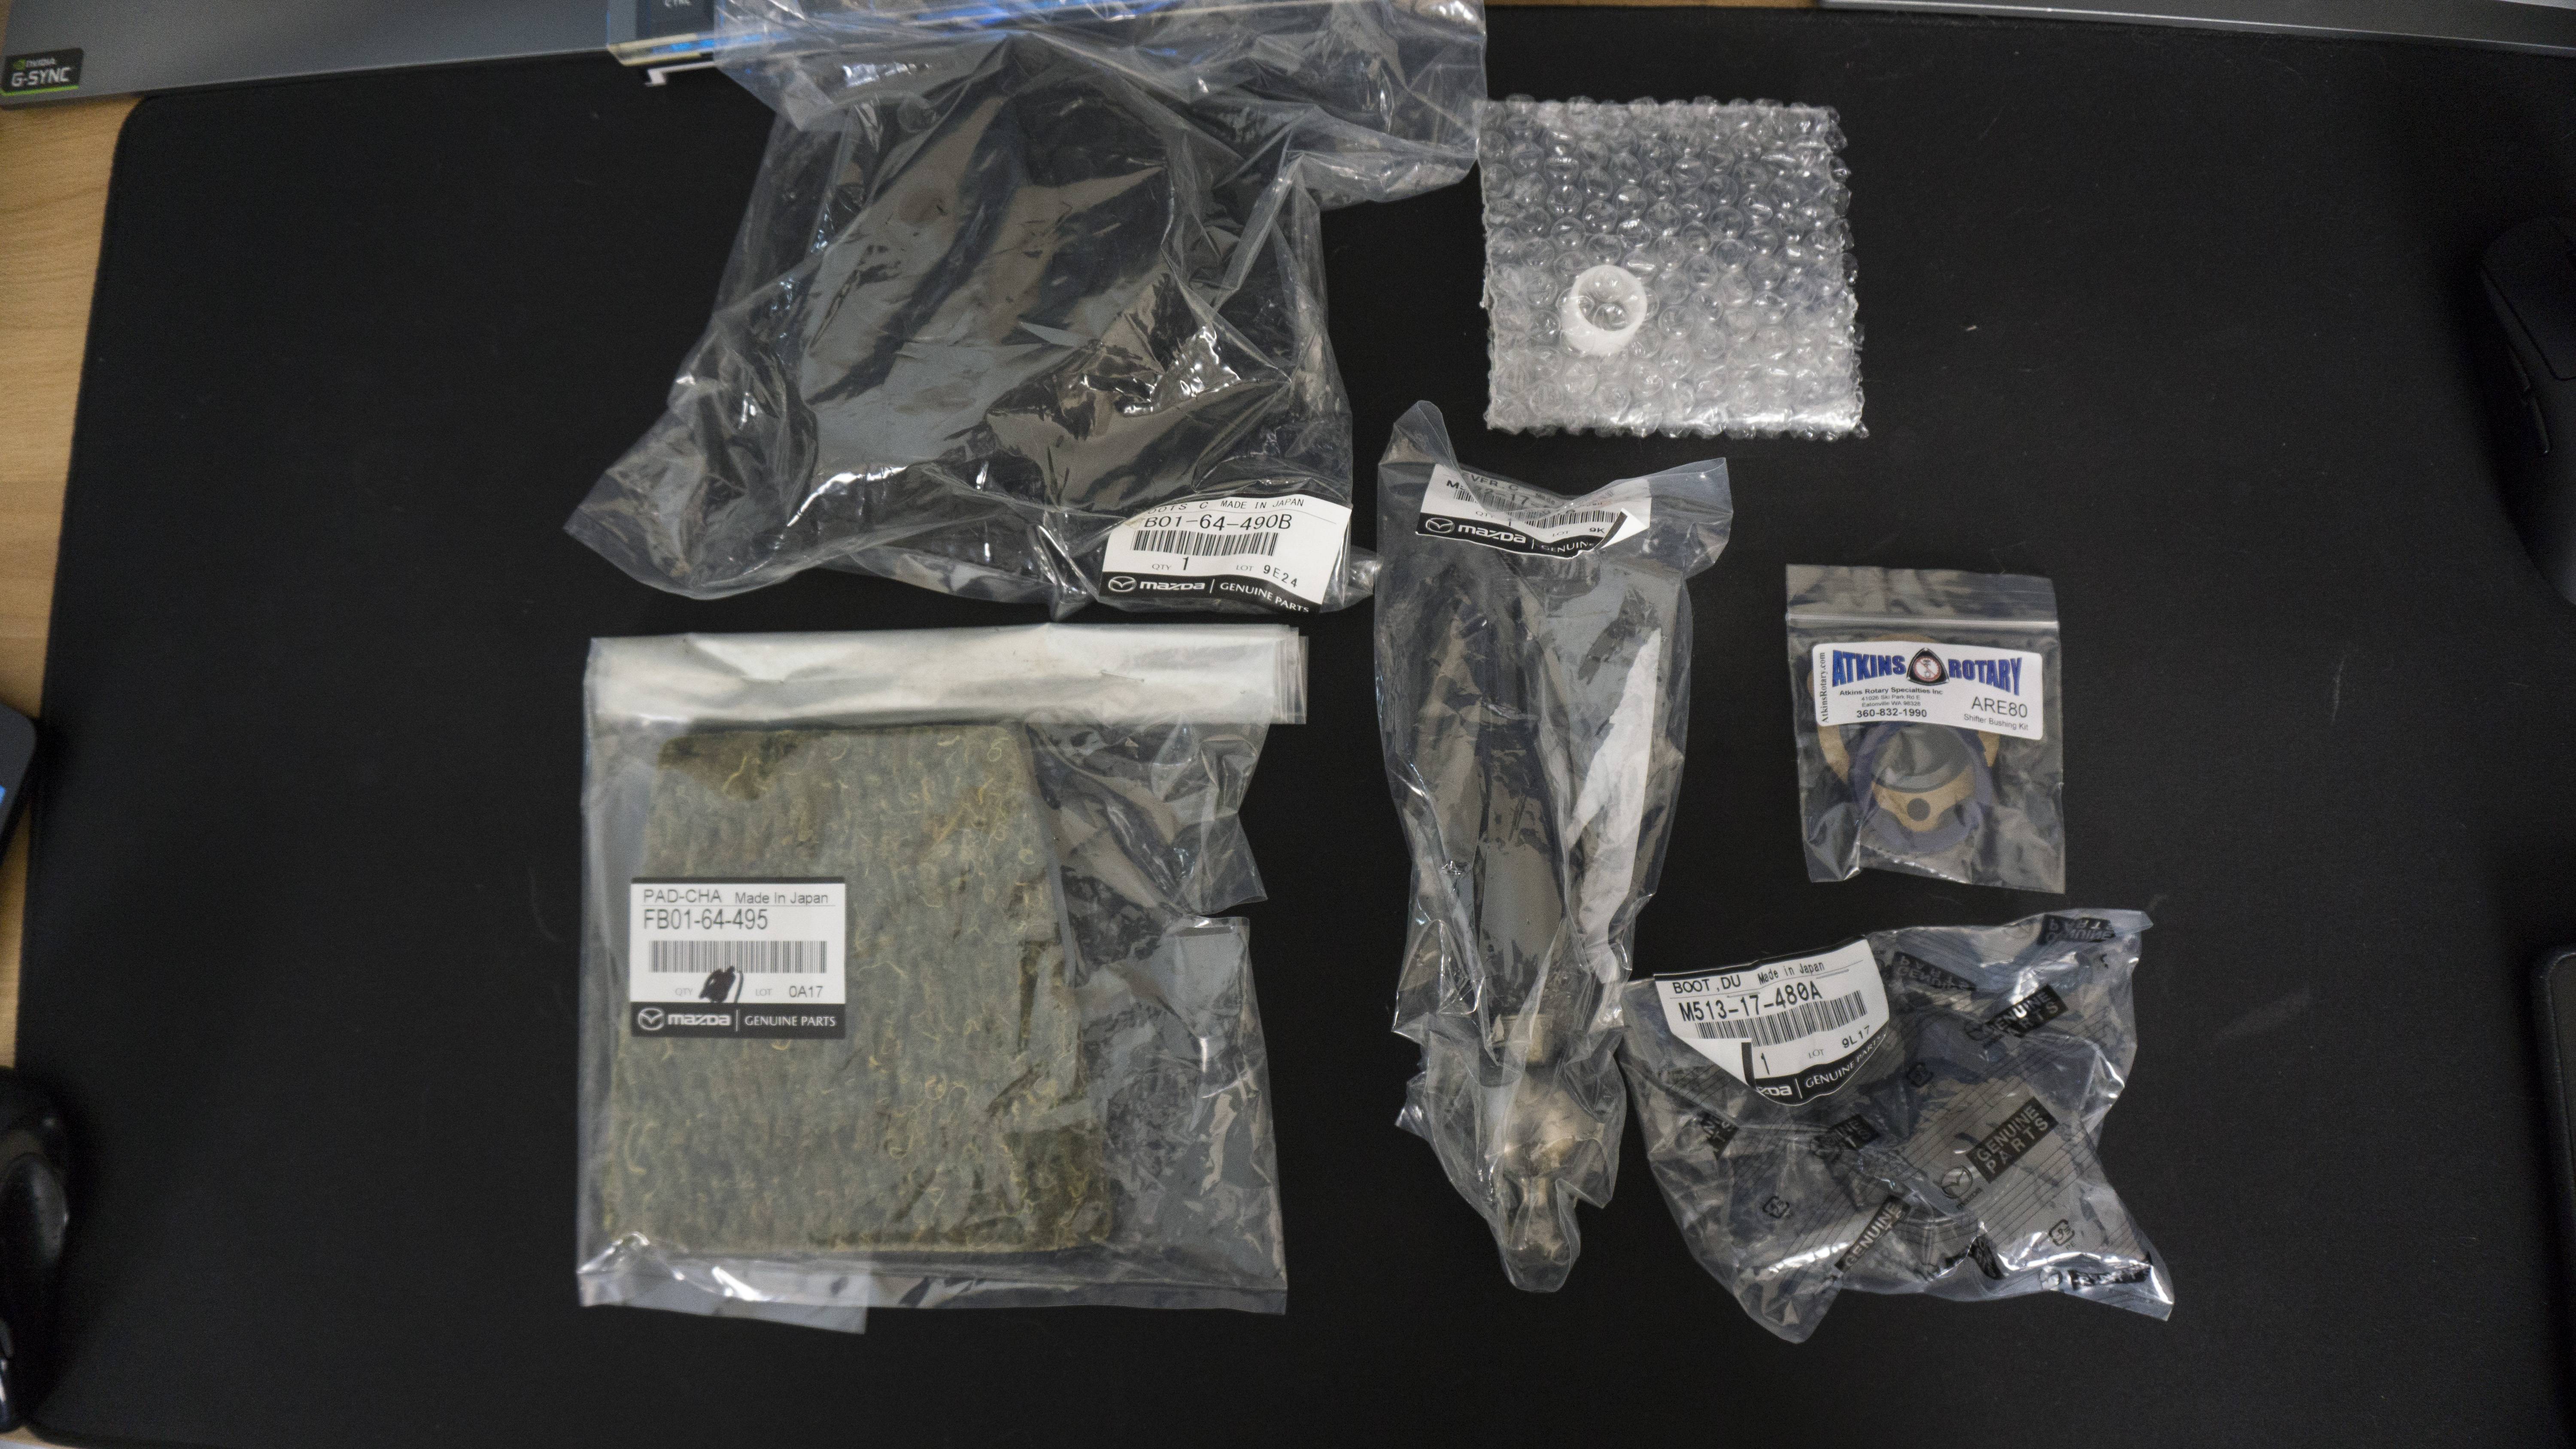
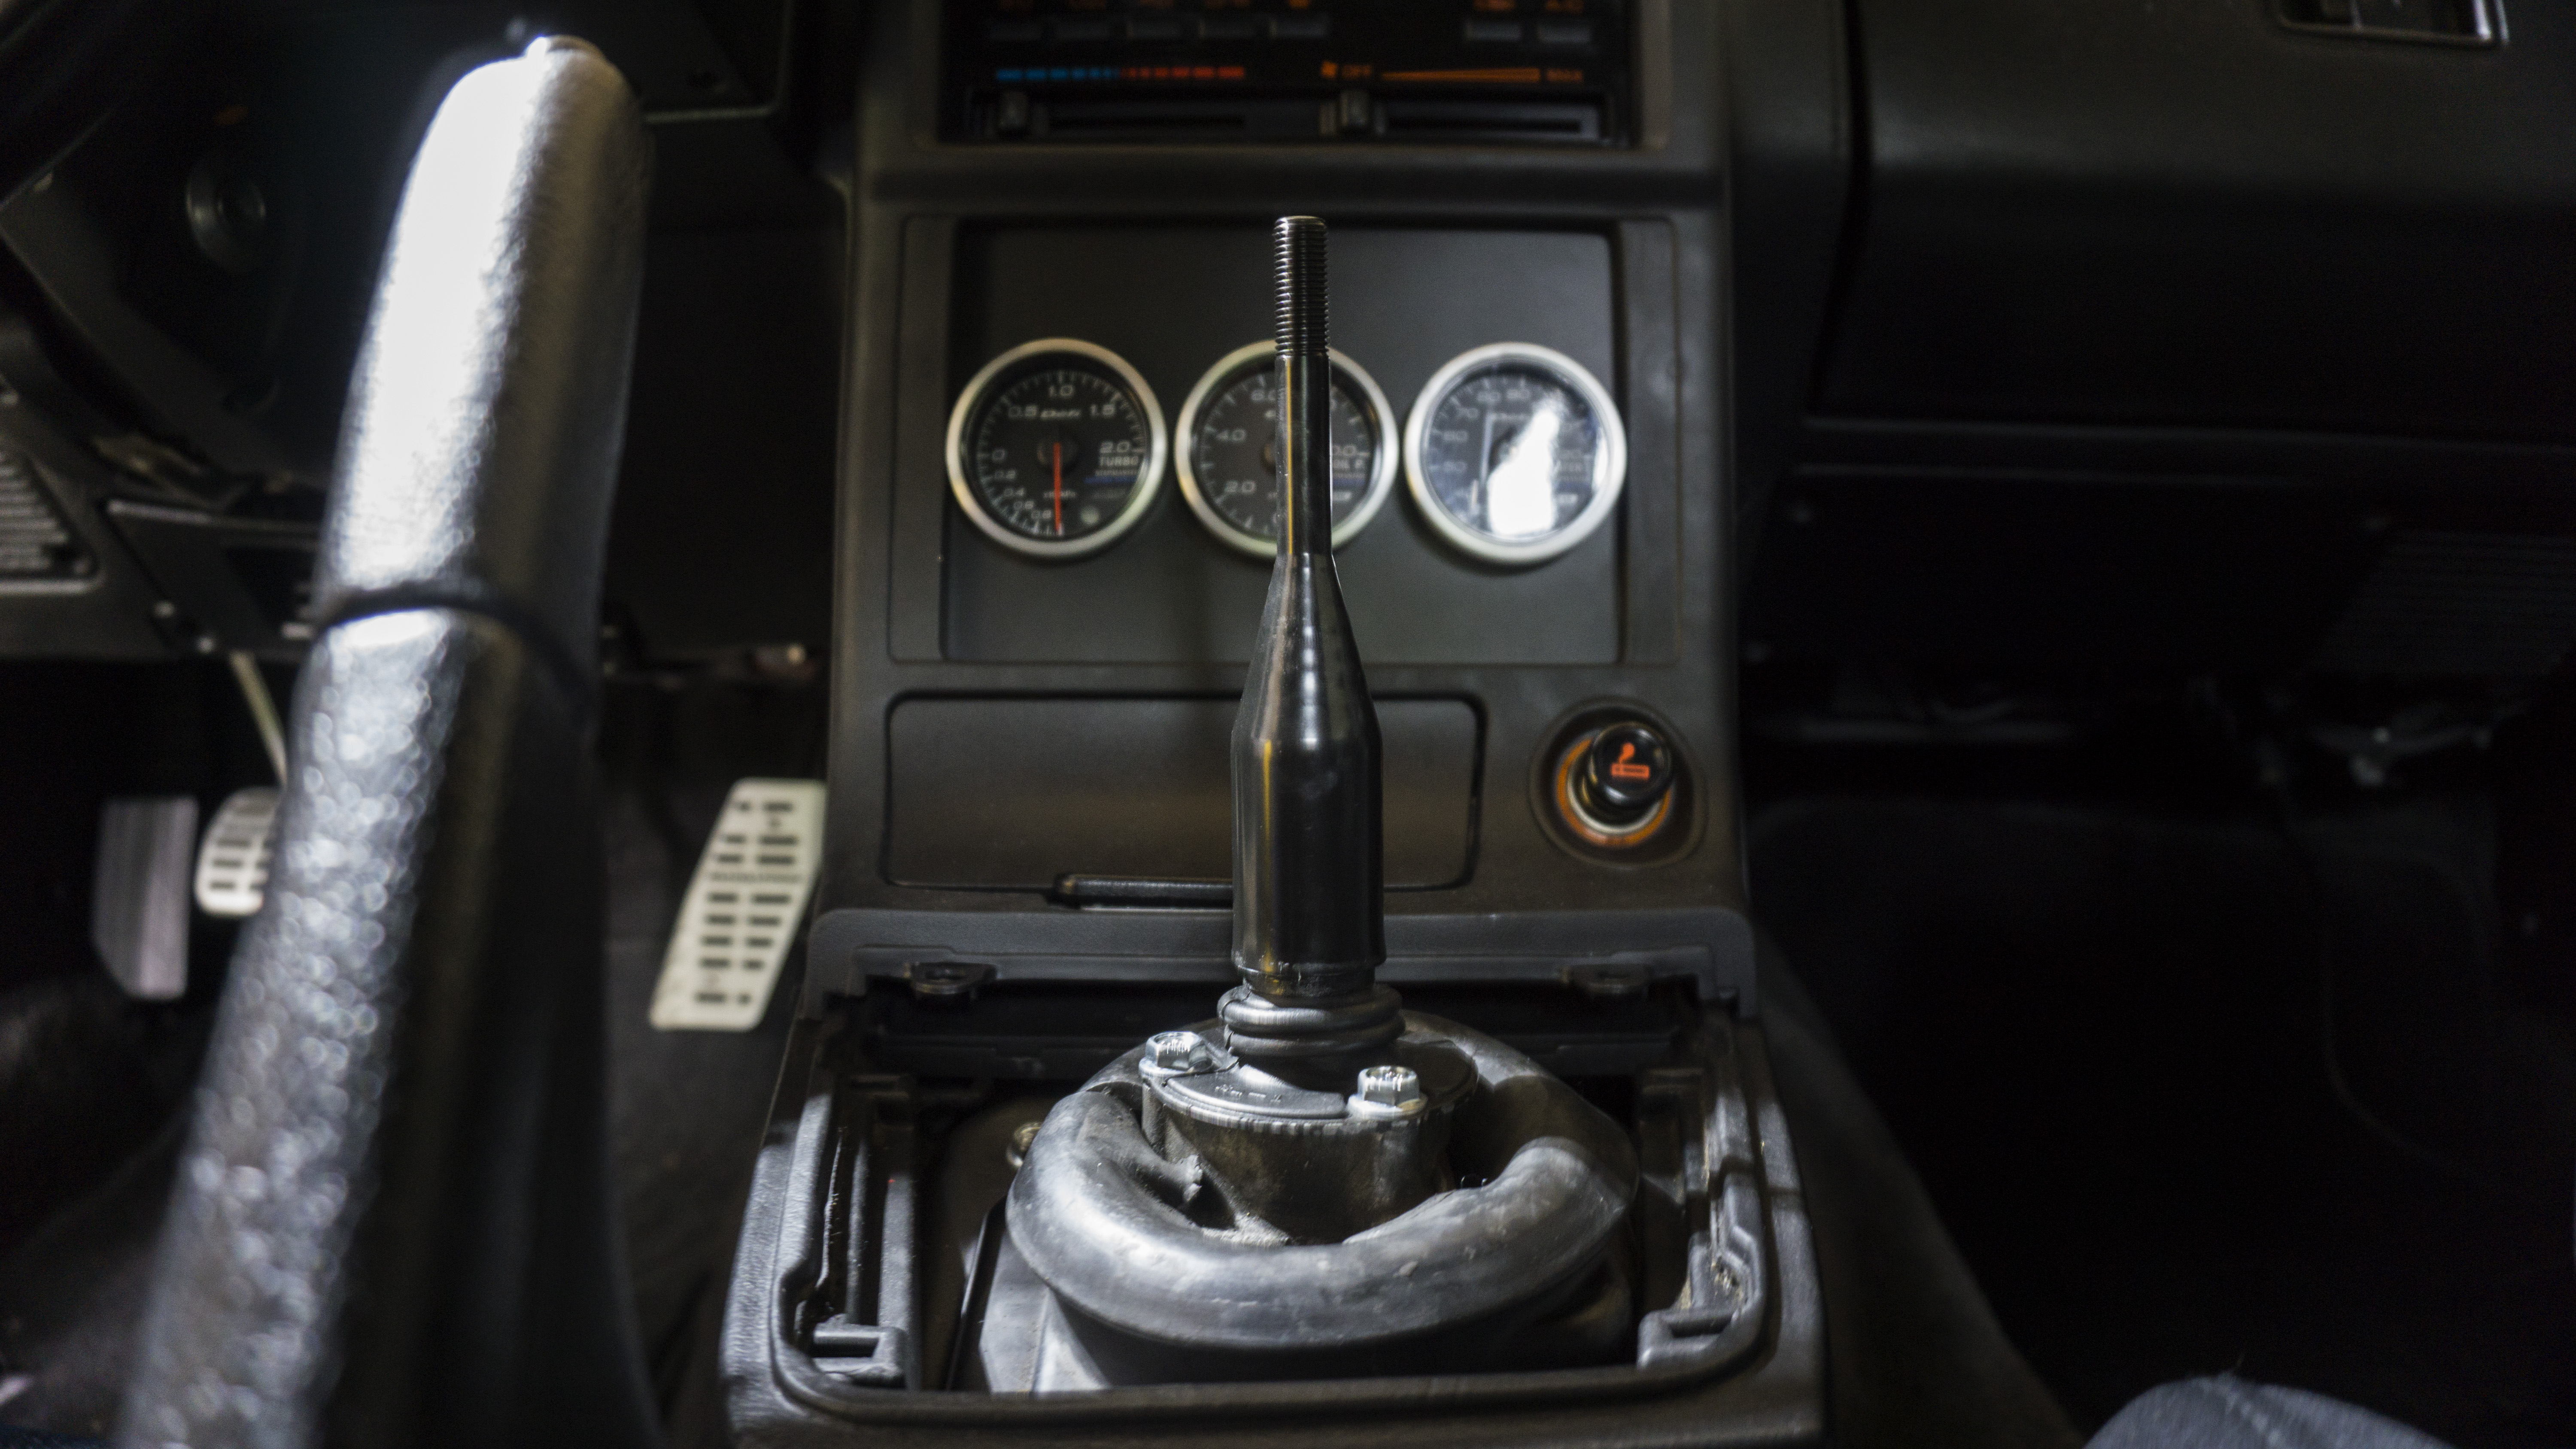
Dang! It’s been a whole month almost since my last update - time sure is flying. First the bad news, I lost compression on the front rotor. Long story short - I had a mutual “friend” do the exhaust ports (since that’s all the time he had) and let’s just say he didn’t do a good job. Good news - nothing was damaged. I went ahead and decided to swap to OEM corner seals and Apex seals. After I bought the Apex seals I wish I would have gotten some harder seals. I believe the RA seals were the only reason my engine is still in really good condition because the seals didn’t shatter, but I think the OEM seals will still be okay. I have my friend coming in tomorrow to help me fix the exhaust ports and he’s going to do a large street port on the irons for me. We will re-stack it and throw it back in! Glad we caught it early enough. However, this really brings to light I need to become self-sufficient with these cars more. My next engine rebuild and porting will be done by myself. If I mess up two or three times well...it’s still cheaper than my college degree lol. Since I have some down time I ordered the stuff to get rid of my Rotary Shack short throw shifter. It felt incredibly notchy to me and was hard to shift. I ordered a brand new shift lever and all brand new bushings. I had to order the nylon cup that shifts in the gear selector from LRB Speed since they are NLA. The shifter feels incredible - I was surprised how smooth it felt. I don’t think I will ever be using a short shifter in the FC again. I also ordered a new turbo water return hose. The old one I had was old and I feared it would do the same thing as the heater hoses (might as well since the engine is out…). I also was FINALLY able to source a clutch inspection plate. These are NLA and no one seems to have one. I was very fortunate that in my search someone reached out to me and sent me one for free! Didn’t even have to pay shipping. Moments like that really make me proud to be in the RX community.
Well that’s all for this update! I look forward to having the car back shortly and sounding supper aggressive with the large street port. I hope this is the last time the engine has to come out.
Here's the new shifter install
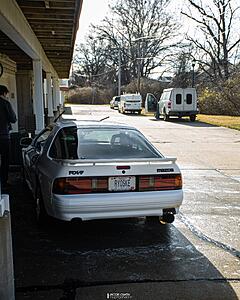
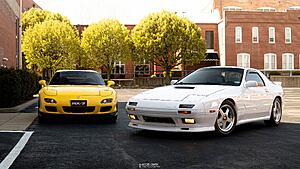
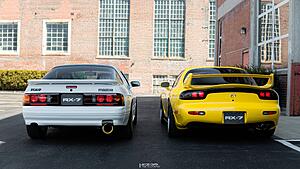
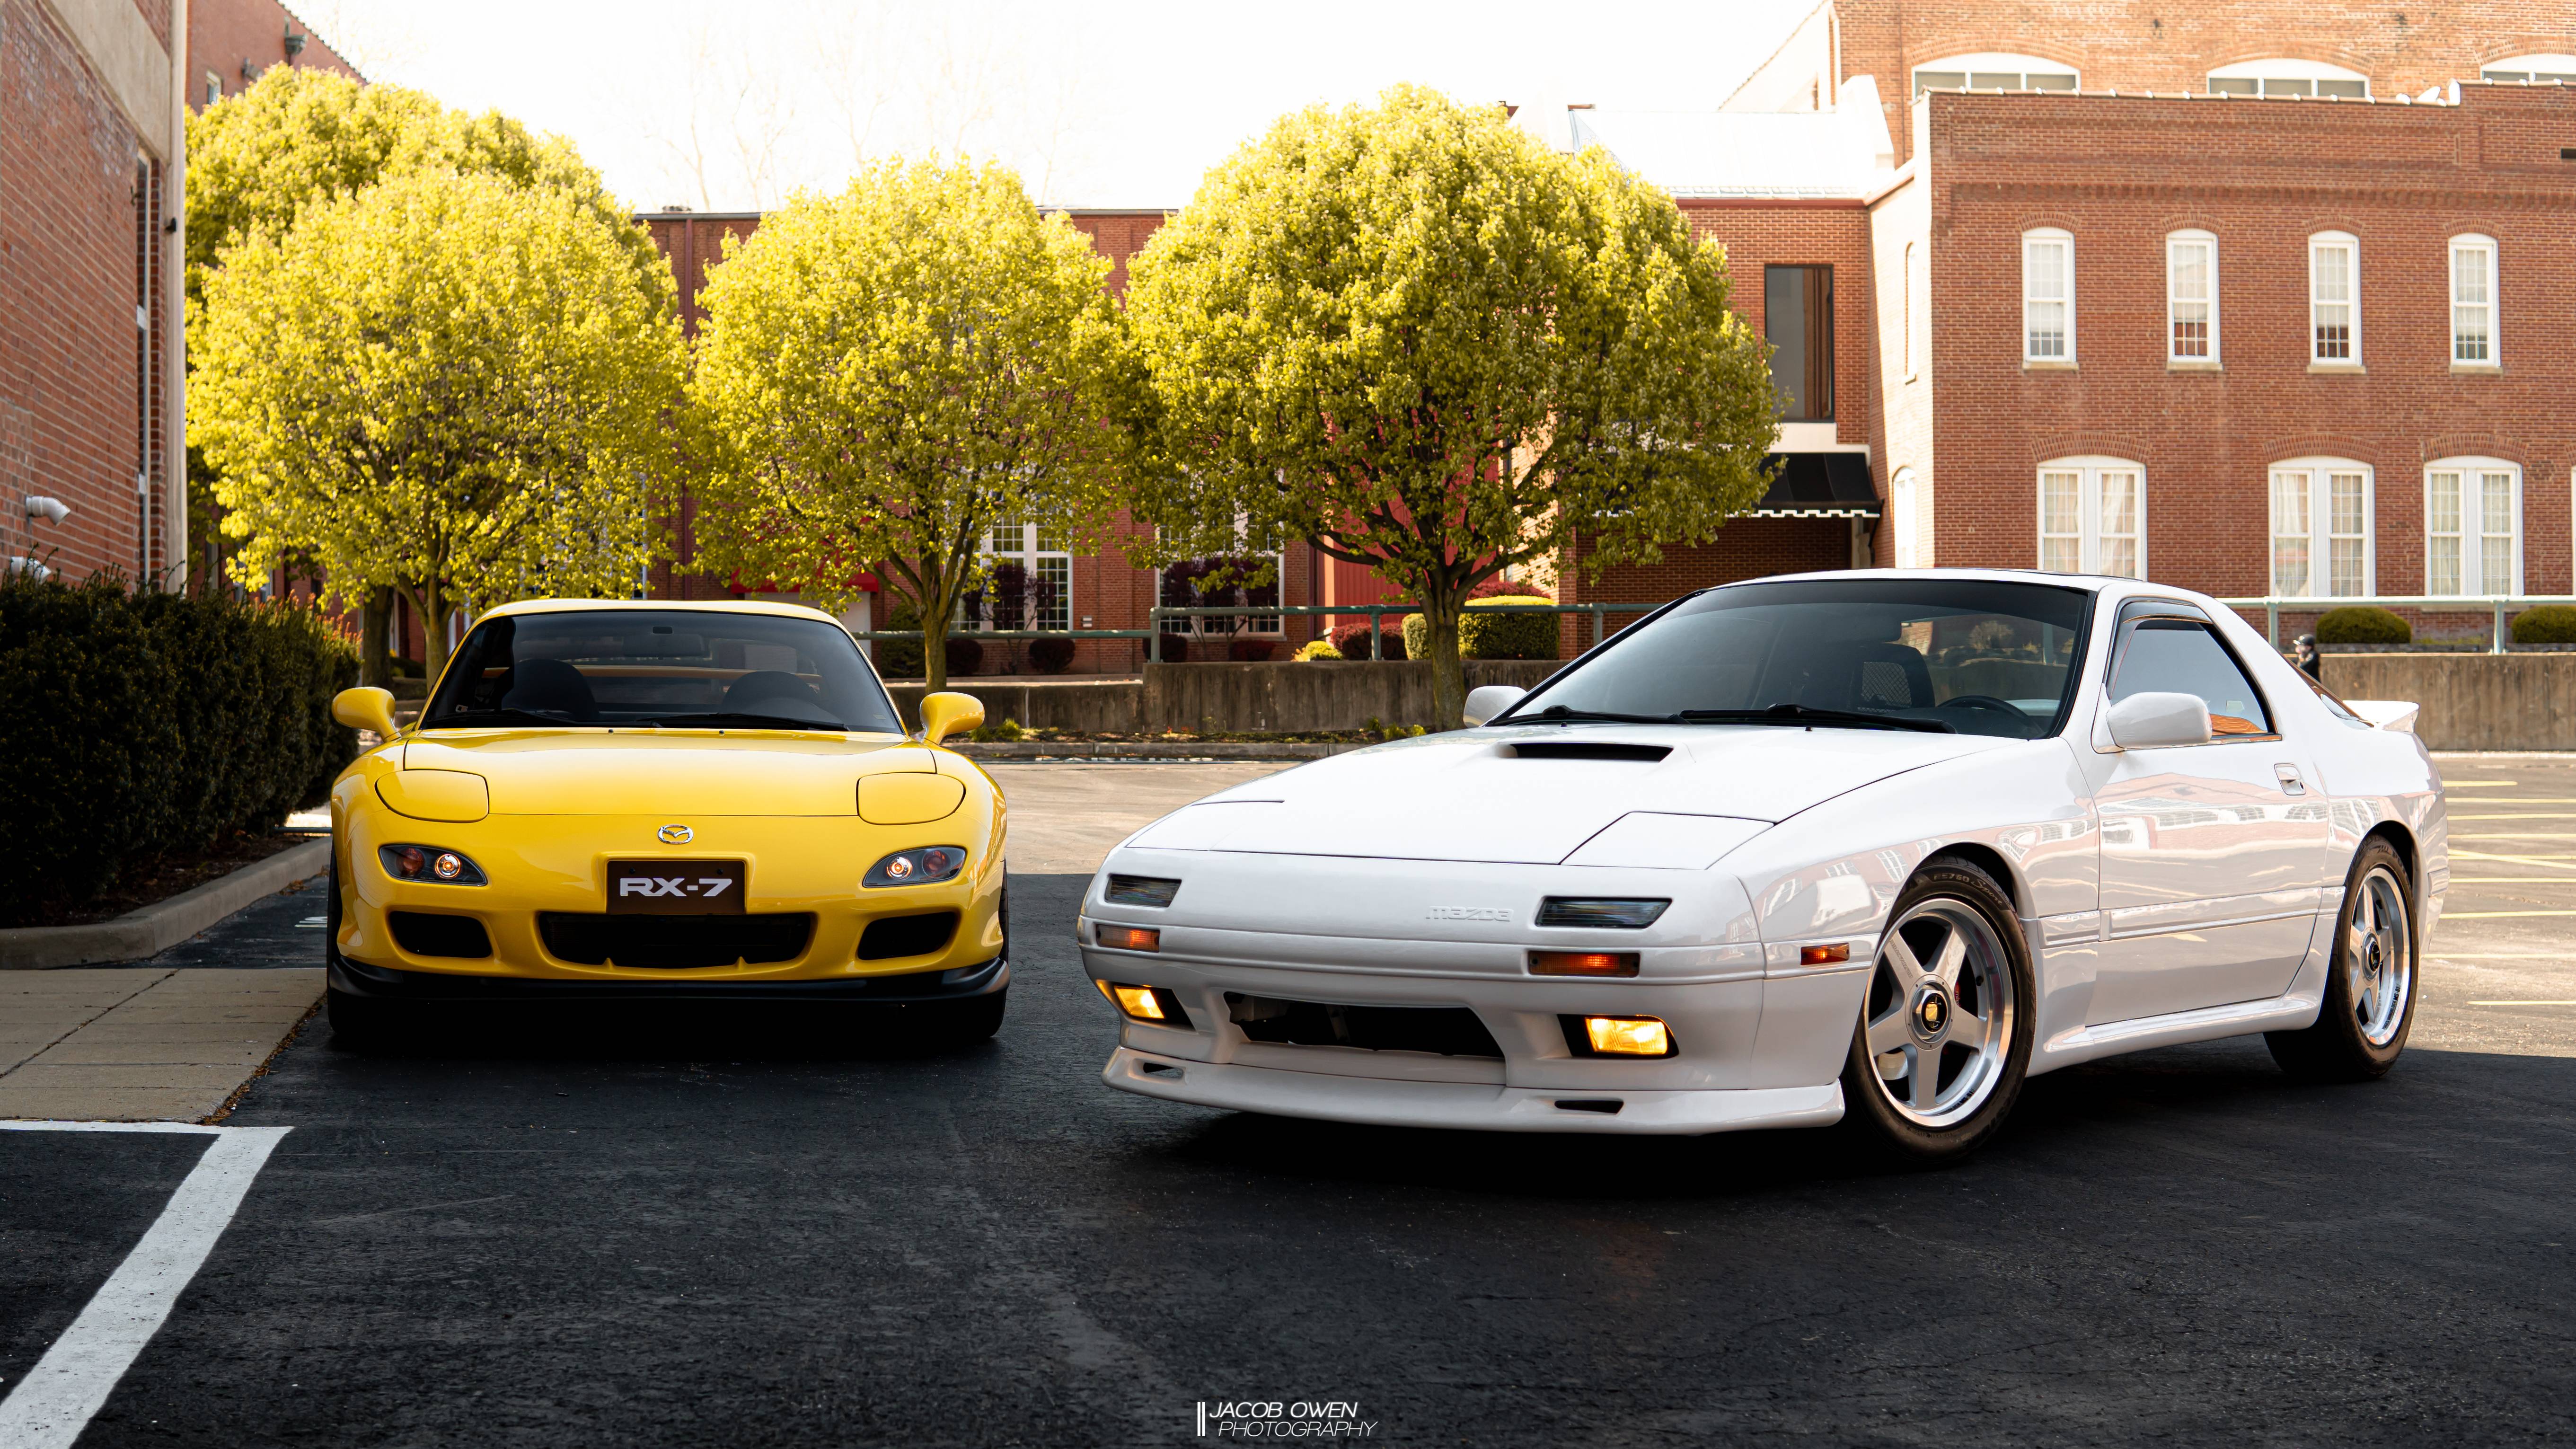
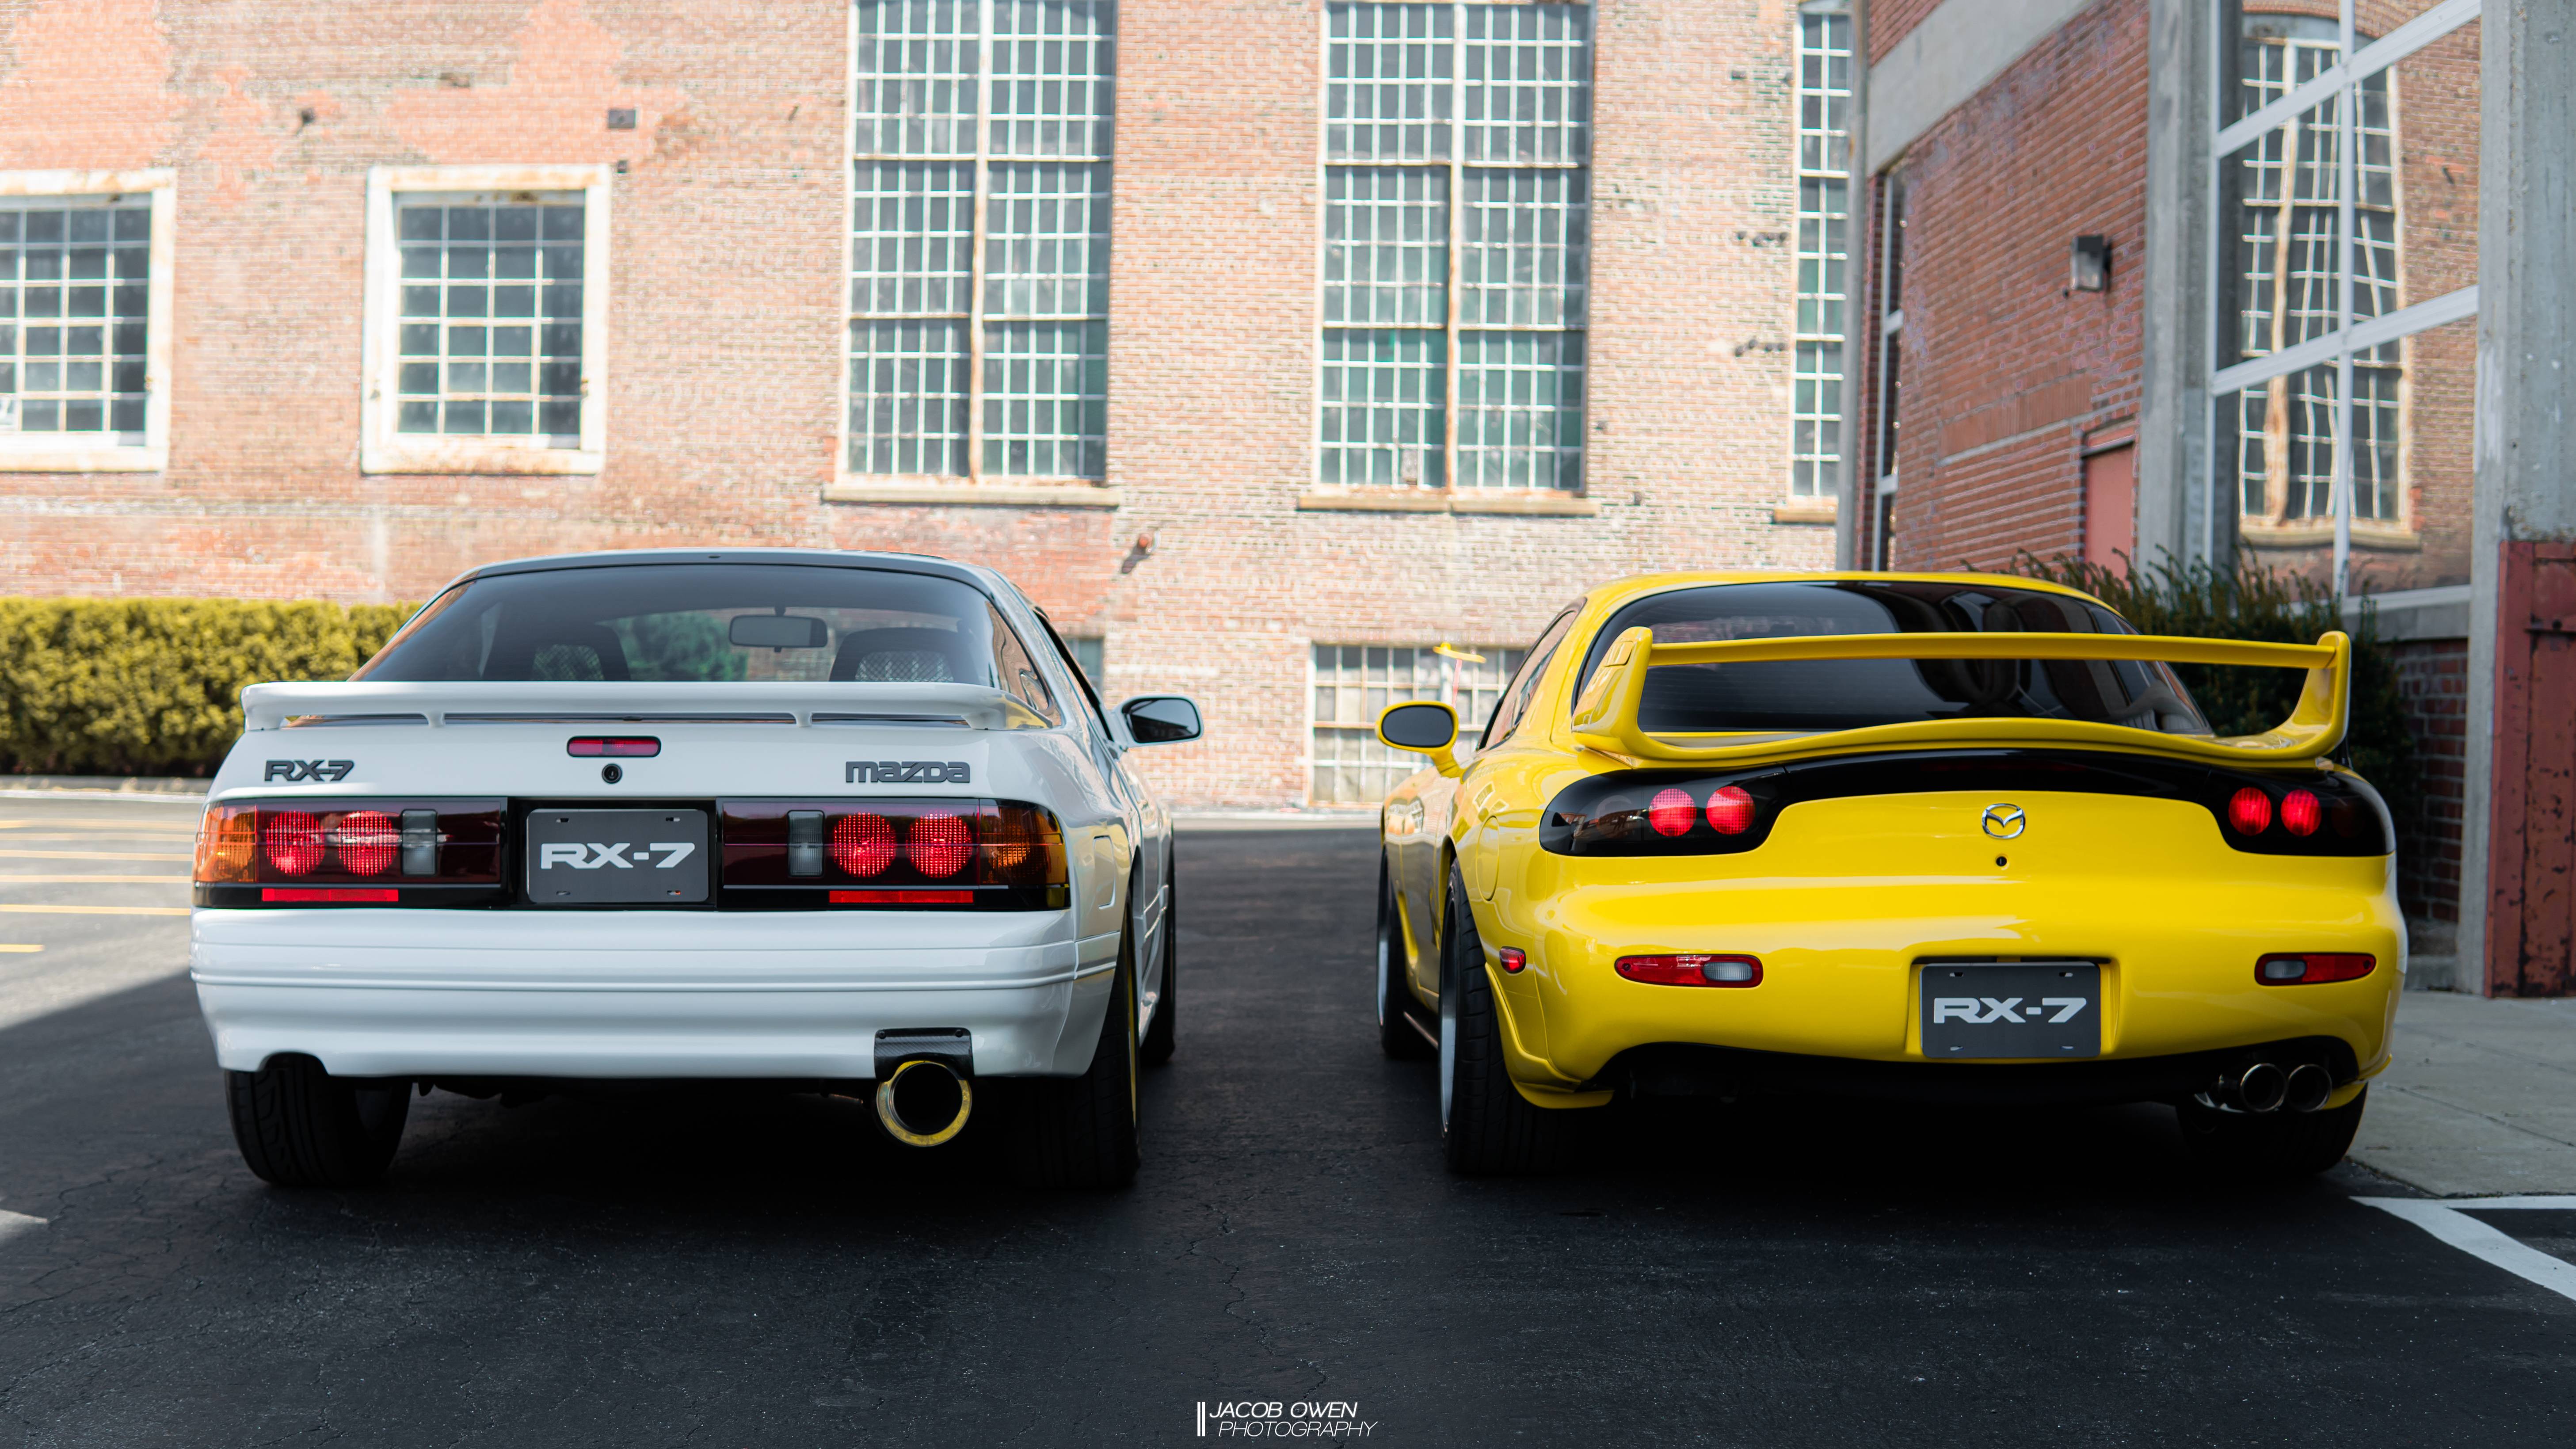
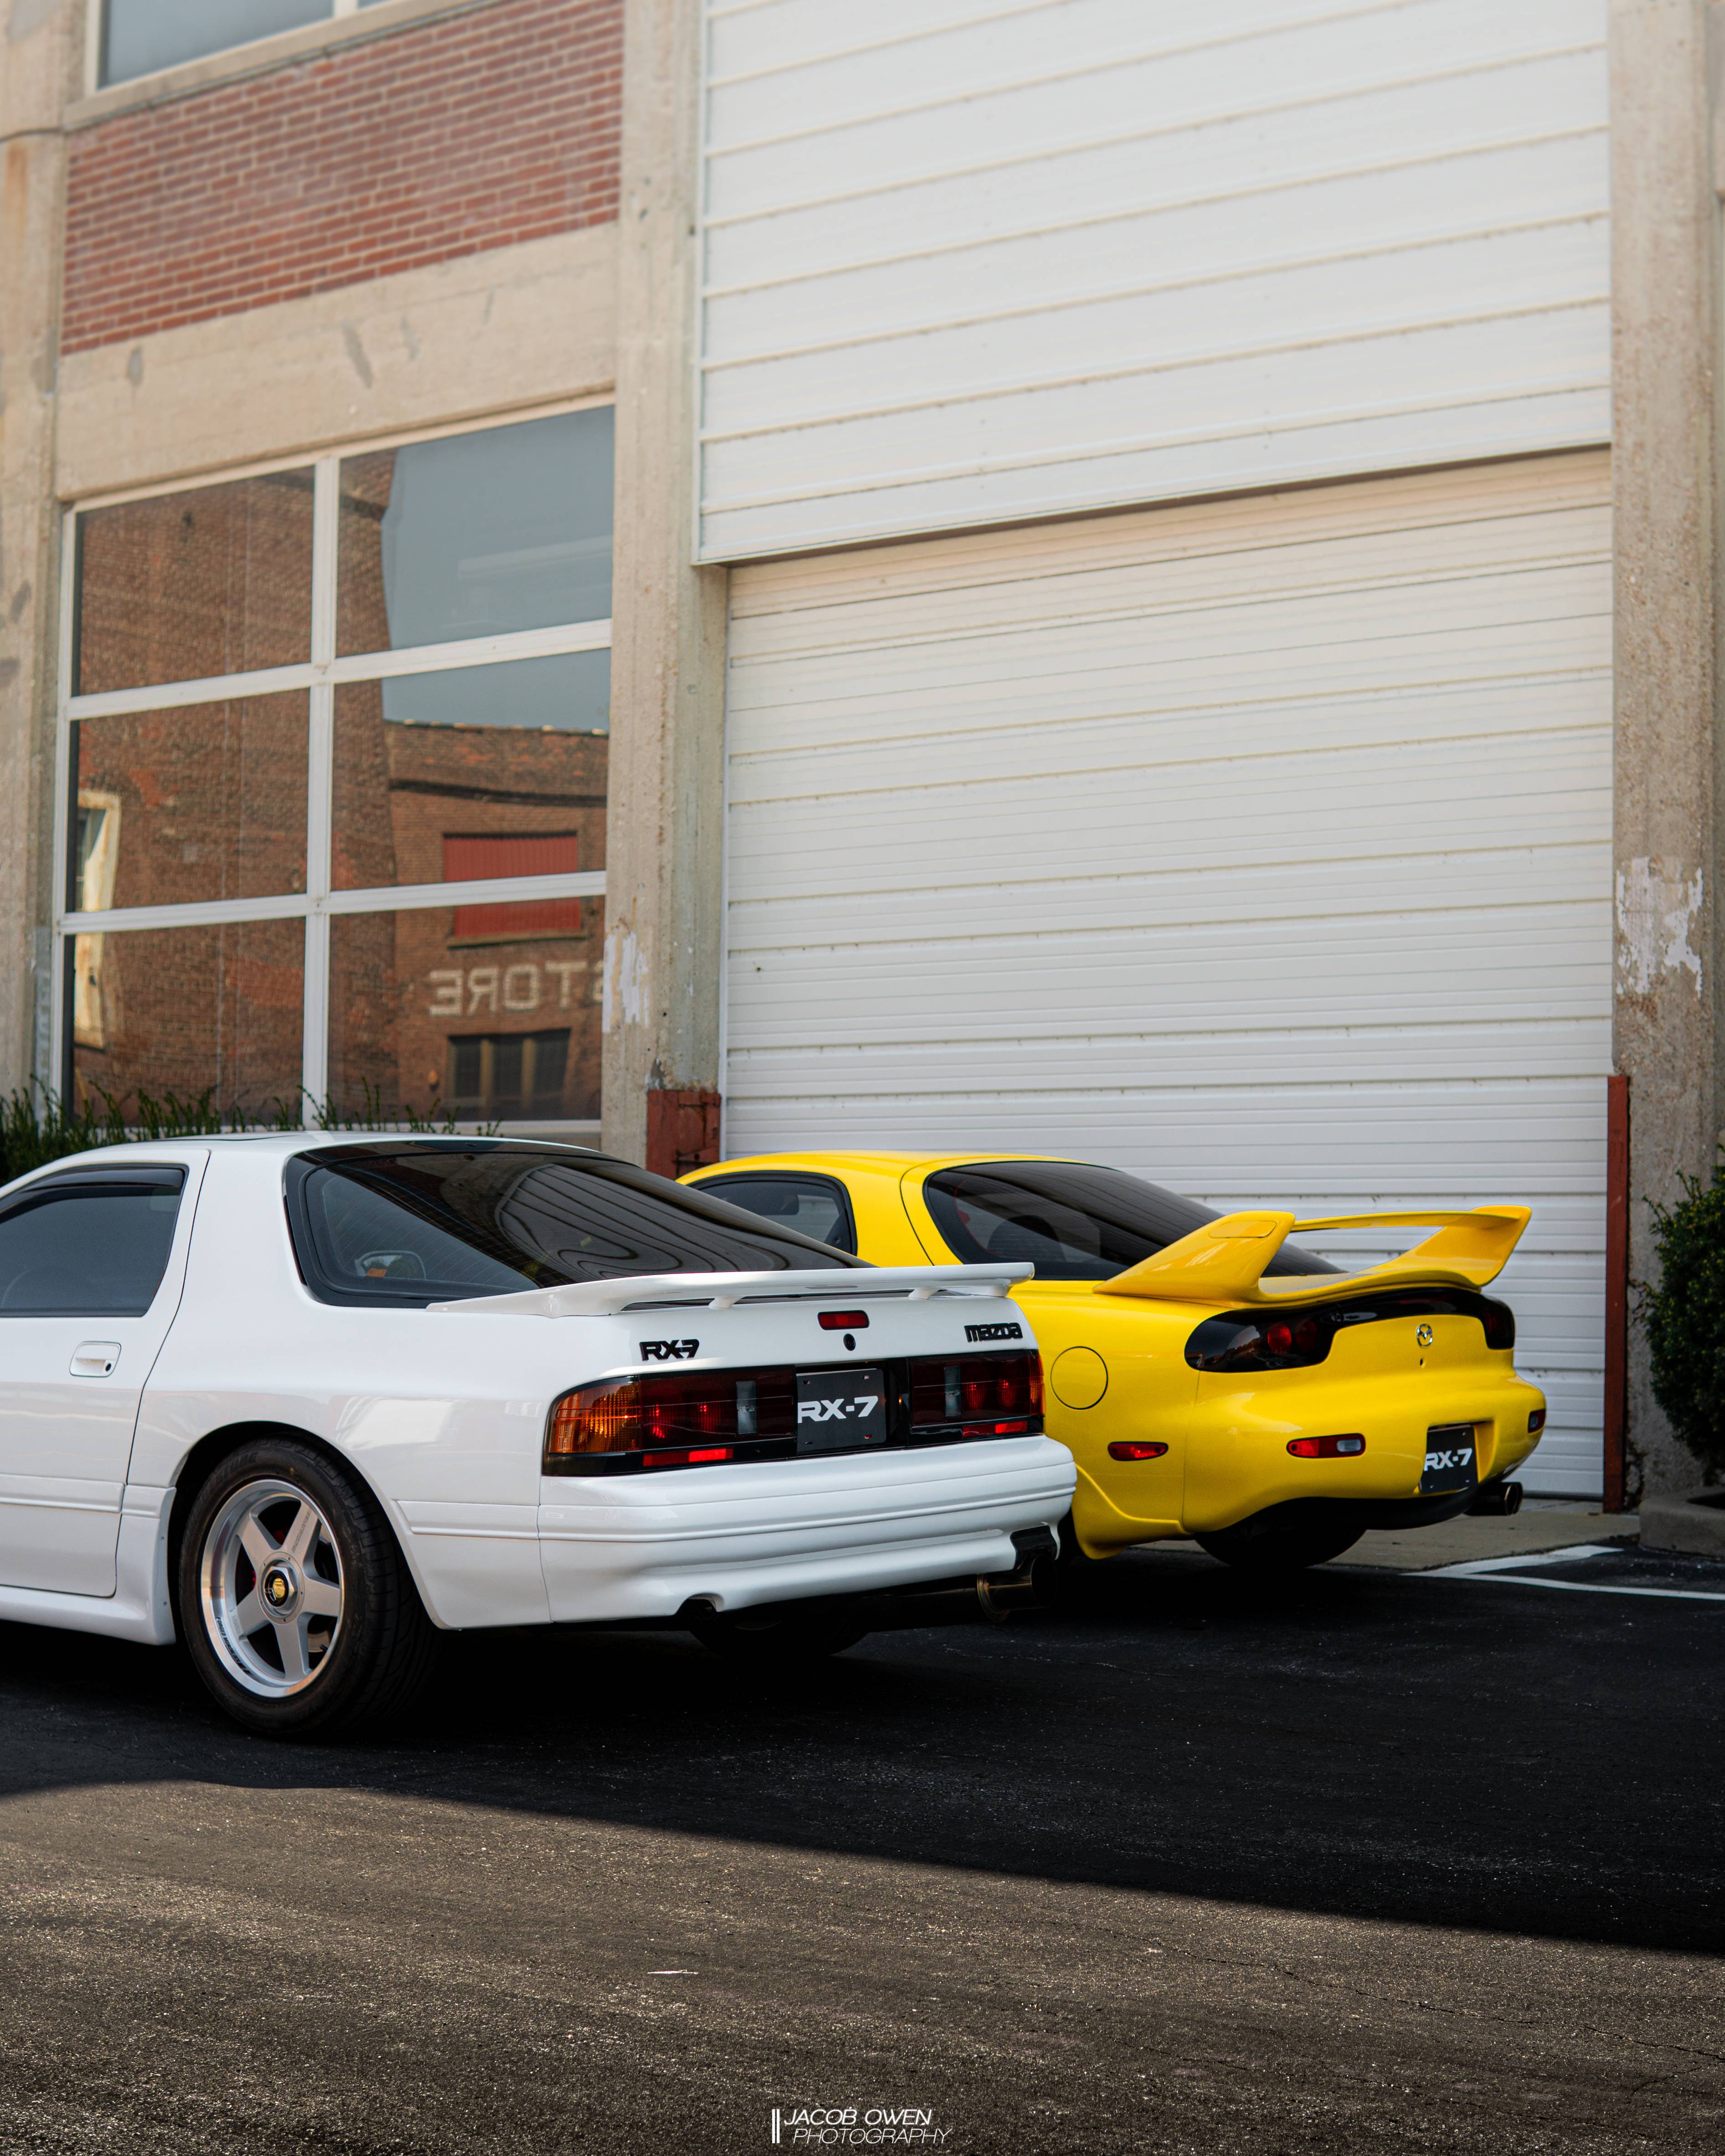
Here's some shots my friend grabbed of my two cars

Dang! It’s been a whole month almost since my last update - time sure is flying. First the bad news, I lost compression on the front rotor. Long story short - I had a mutual “friend” do the exhaust ports (since that’s all the time he had) and let’s just say he didn’t do a good job. Good news - nothing was damaged. I went ahead and decided to swap to OEM corner seals and Apex seals. After I bought the Apex seals I wish I would have gotten some harder seals. I believe the RA seals were the only reason my engine is still in really good condition because the seals didn’t shatter, but I think the OEM seals will still be okay. I have my friend coming in tomorrow to help me fix the exhaust ports and he’s going to do a large street port on the irons for me. We will re-stack it and throw it back in! Glad we caught it early enough. However, this really brings to light I need to become self-sufficient with these cars more. My next engine rebuild and porting will be done by myself. If I mess up two or three times well...it’s still cheaper than my college degree lol. Since I have some down time I ordered the stuff to get rid of my Rotary Shack short throw shifter. It felt incredibly notchy to me and was hard to shift. I ordered a brand new shift lever and all brand new bushings. I had to order the nylon cup that shifts in the gear selector from LRB Speed since they are NLA. The shifter feels incredible - I was surprised how smooth it felt. I don’t think I will ever be using a short shifter in the FC again. I also ordered a new turbo water return hose. The old one I had was old and I feared it would do the same thing as the heater hoses (might as well since the engine is out…). I also was FINALLY able to source a clutch inspection plate. These are NLA and no one seems to have one. I was very fortunate that in my search someone reached out to me and sent me one for free! Didn’t even have to pay shipping. Moments like that really make me proud to be in the RX community.
Well that’s all for this update! I look forward to having the car back shortly and sounding supper aggressive with the large street port. I hope this is the last time the engine has to come out.
Here's the new shifter install

Here's some shots my friend grabbed of my two cars
Last edited by Akomix; 05-14-20 at 06:32 PM.
 05-16-20, 08:00 AM
#297
Well, losing the front rotor certainly stinks, but sounds like it will be up and running again soon looking just as hot as ever. I have an old CorkSport short shifter, and it's not nearly as tight as I thought it would be. The shifts feel fine, but I replaced all bushings and still have some slop. However, I can't remember if I really inspected the bottom cup. Funny story - Landon is local to me and when I thought of selling my RX-7 many, many years ago, he was one person who looked at it.
I've got nearly 1,000 miles on mine post-resto and things are going fairly smoothly. Hope they are for you too!
I've got nearly 1,000 miles on mine post-resto and things are going fairly smoothly. Hope they are for you too!
06-07-20, 07:12 PM
#298
Update 6/7/2020
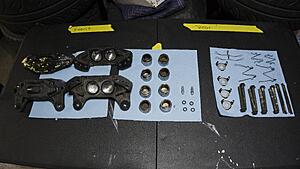
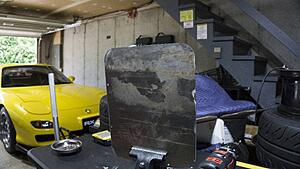
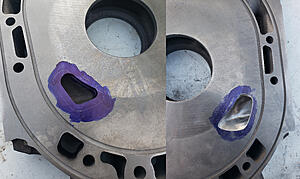
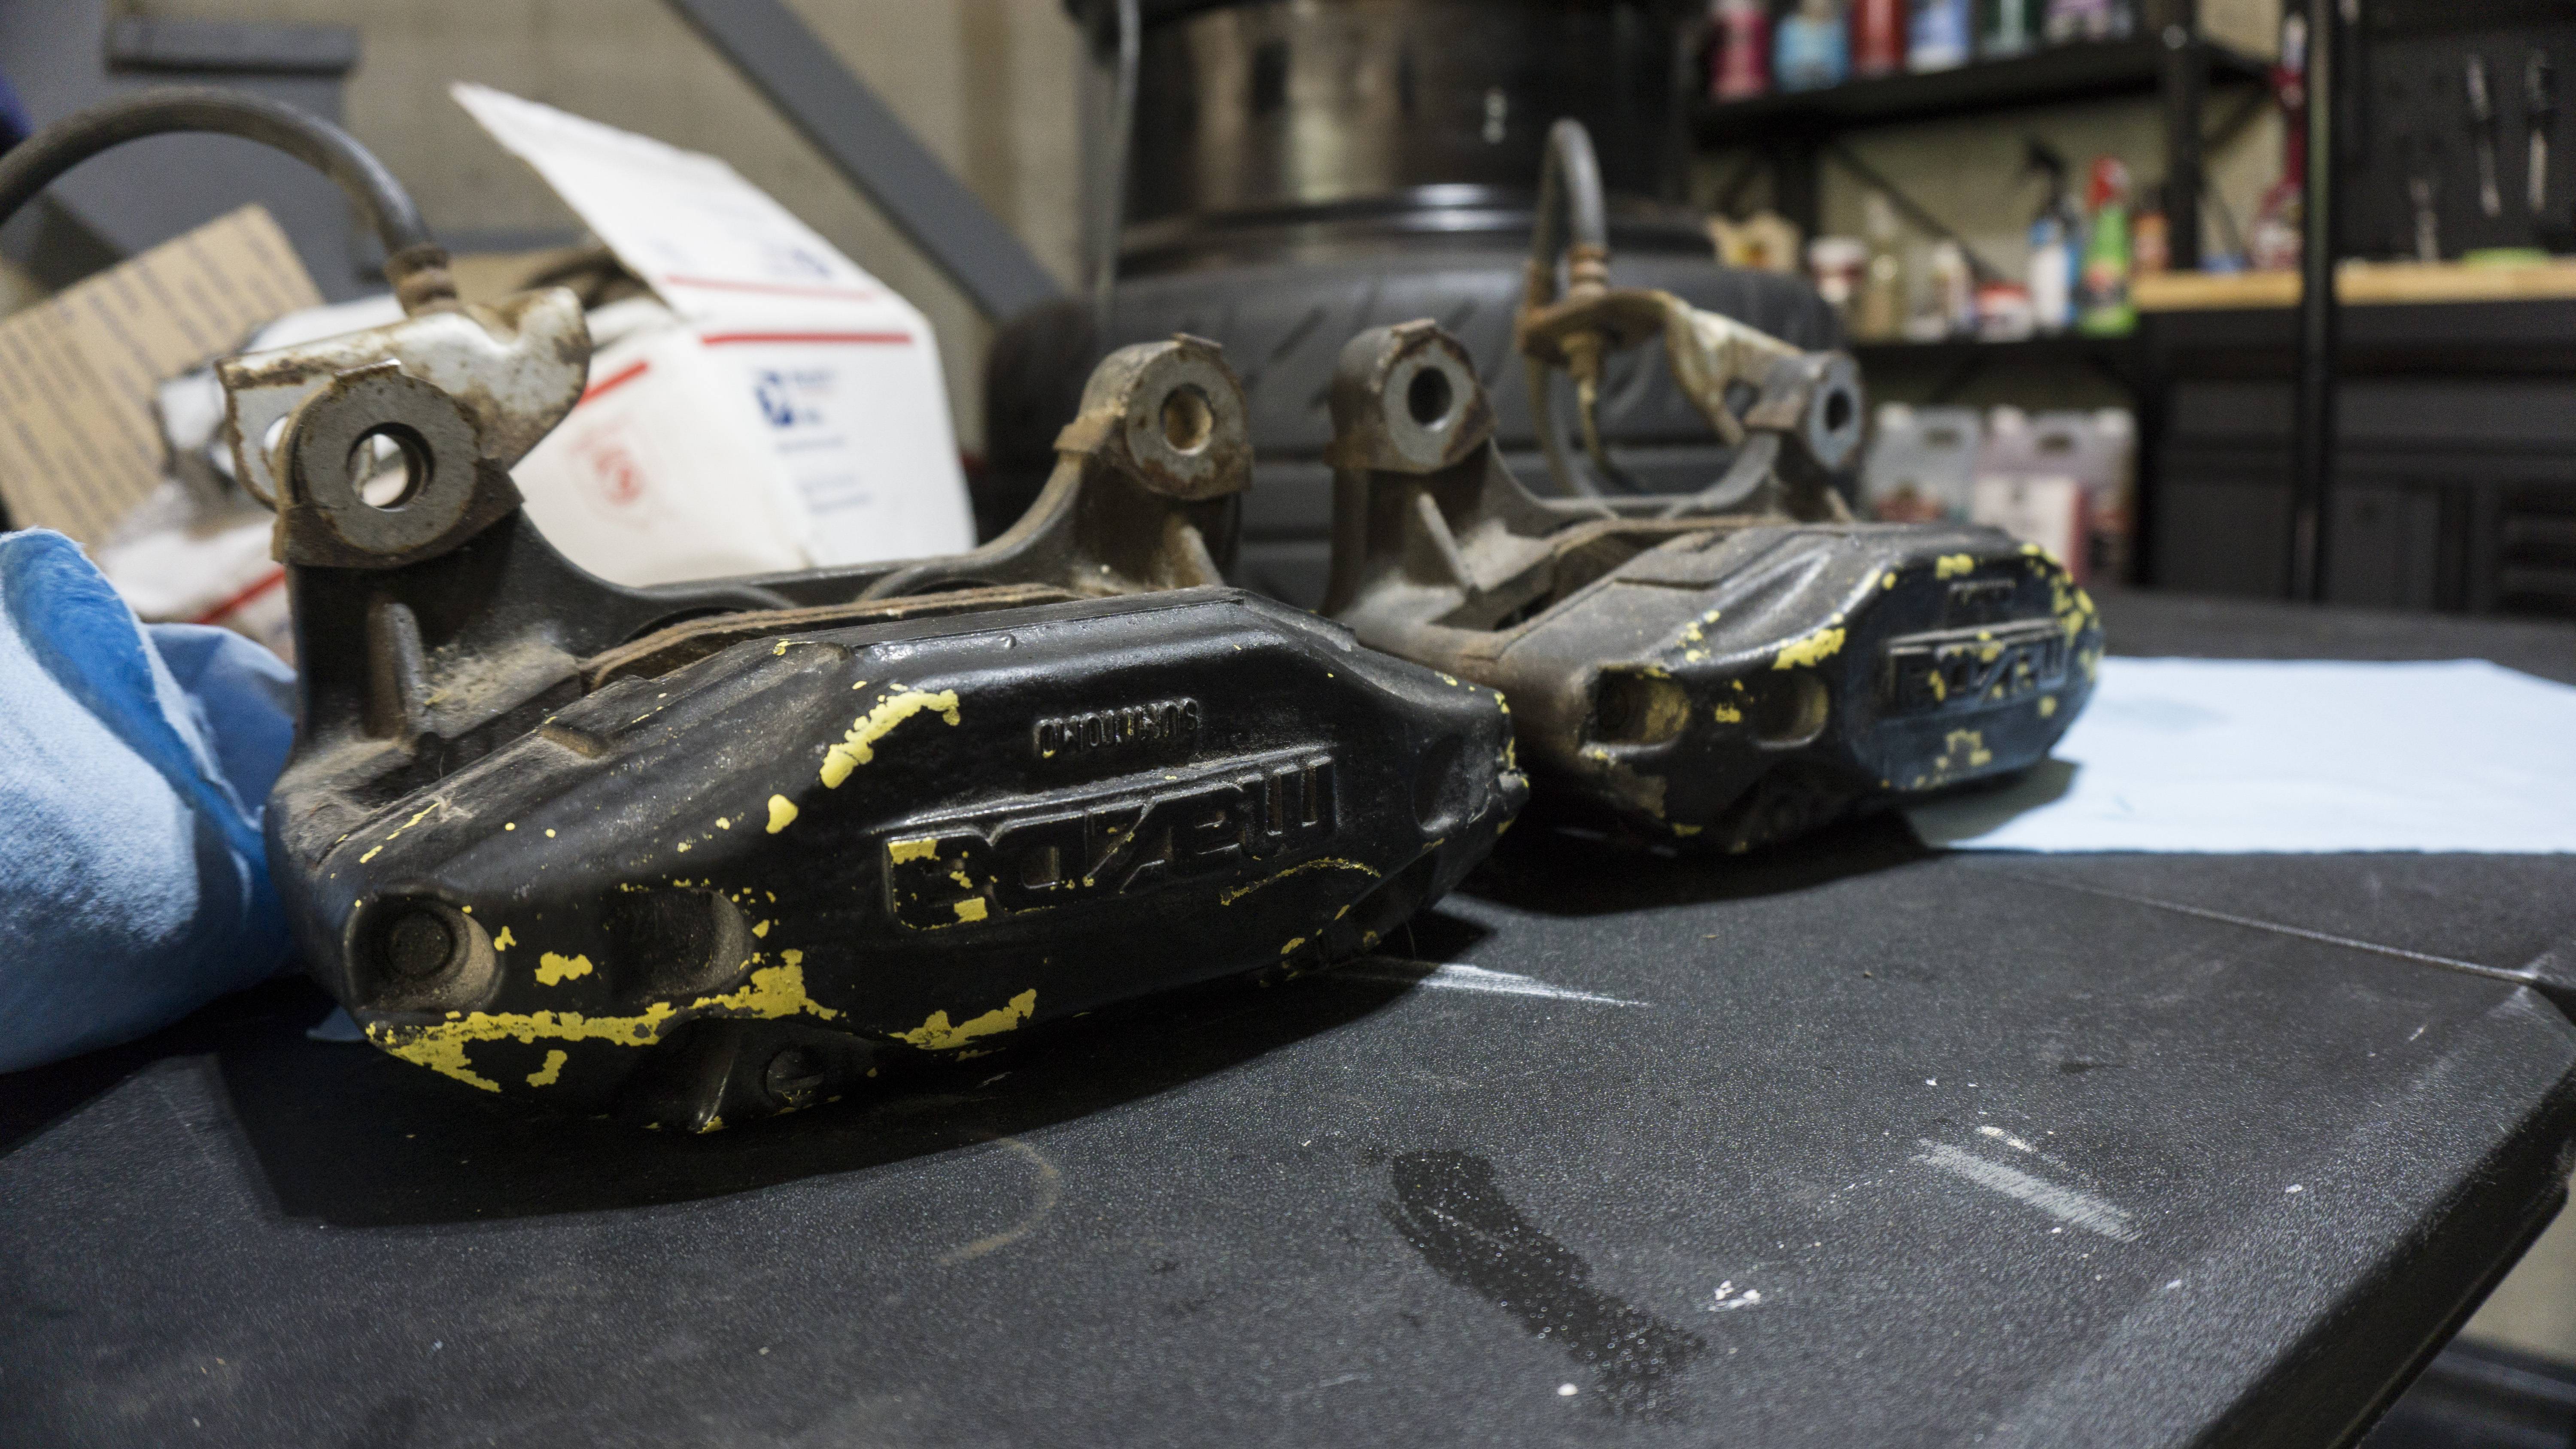
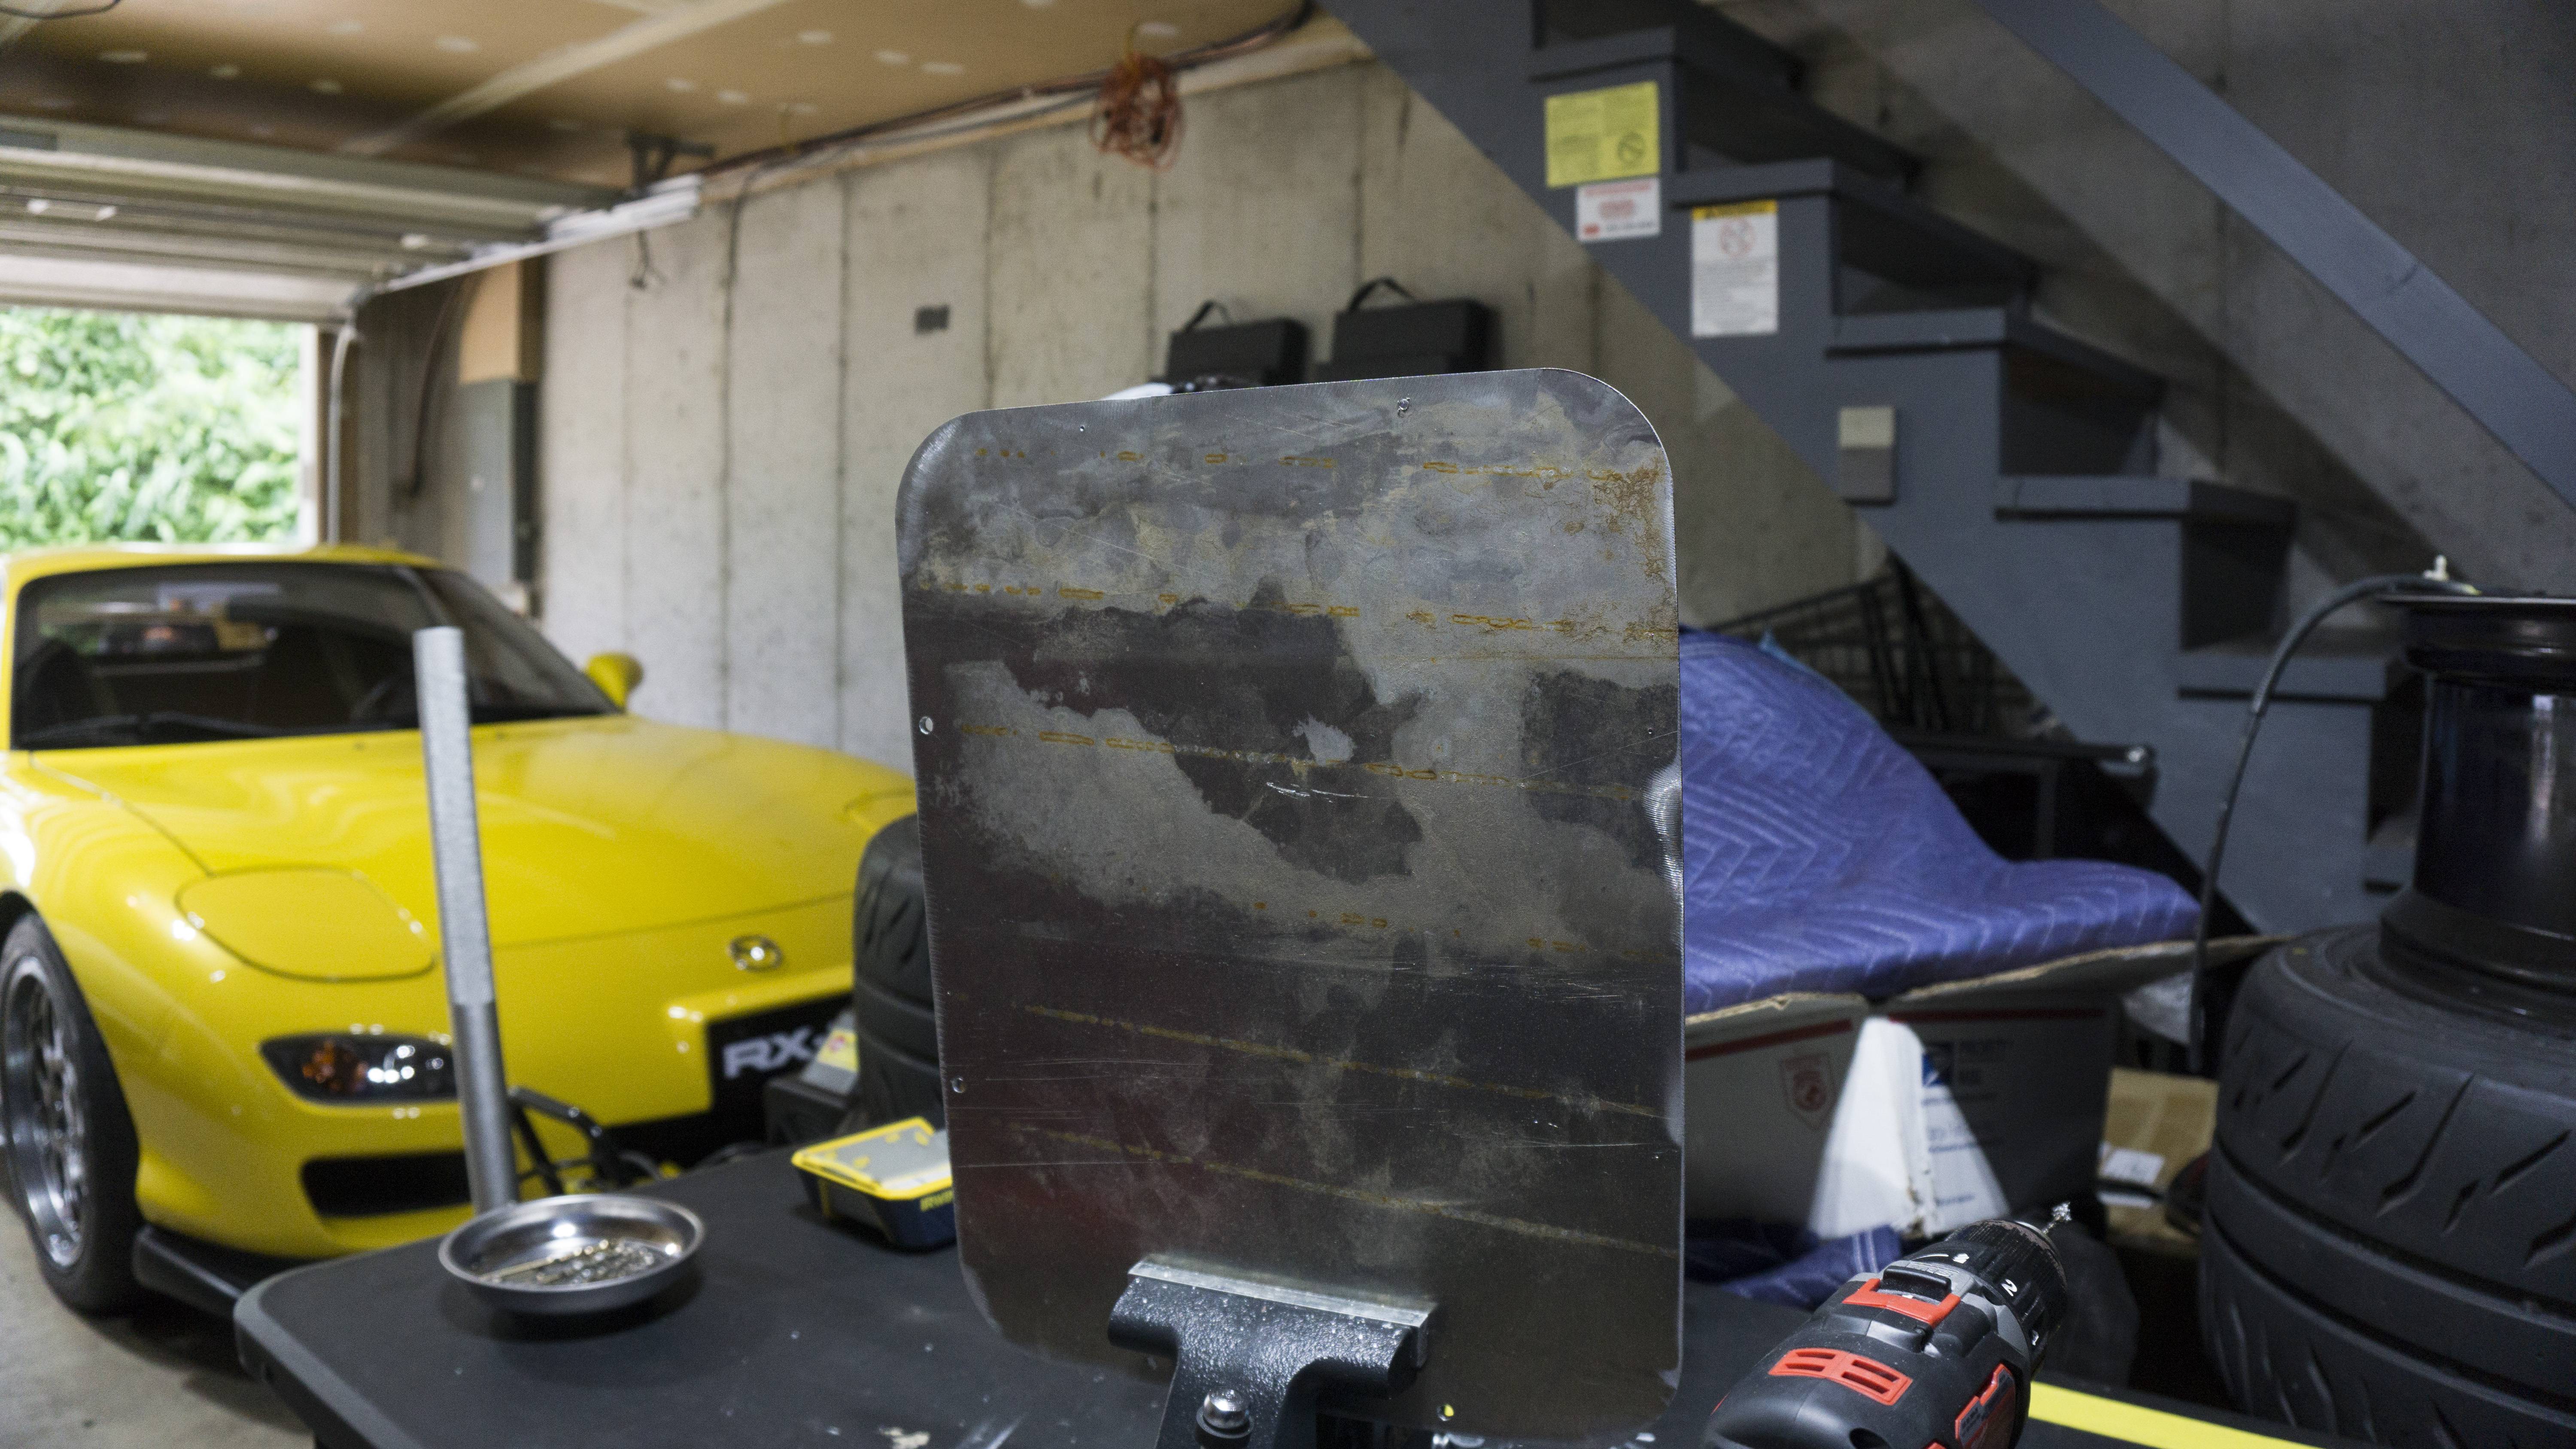
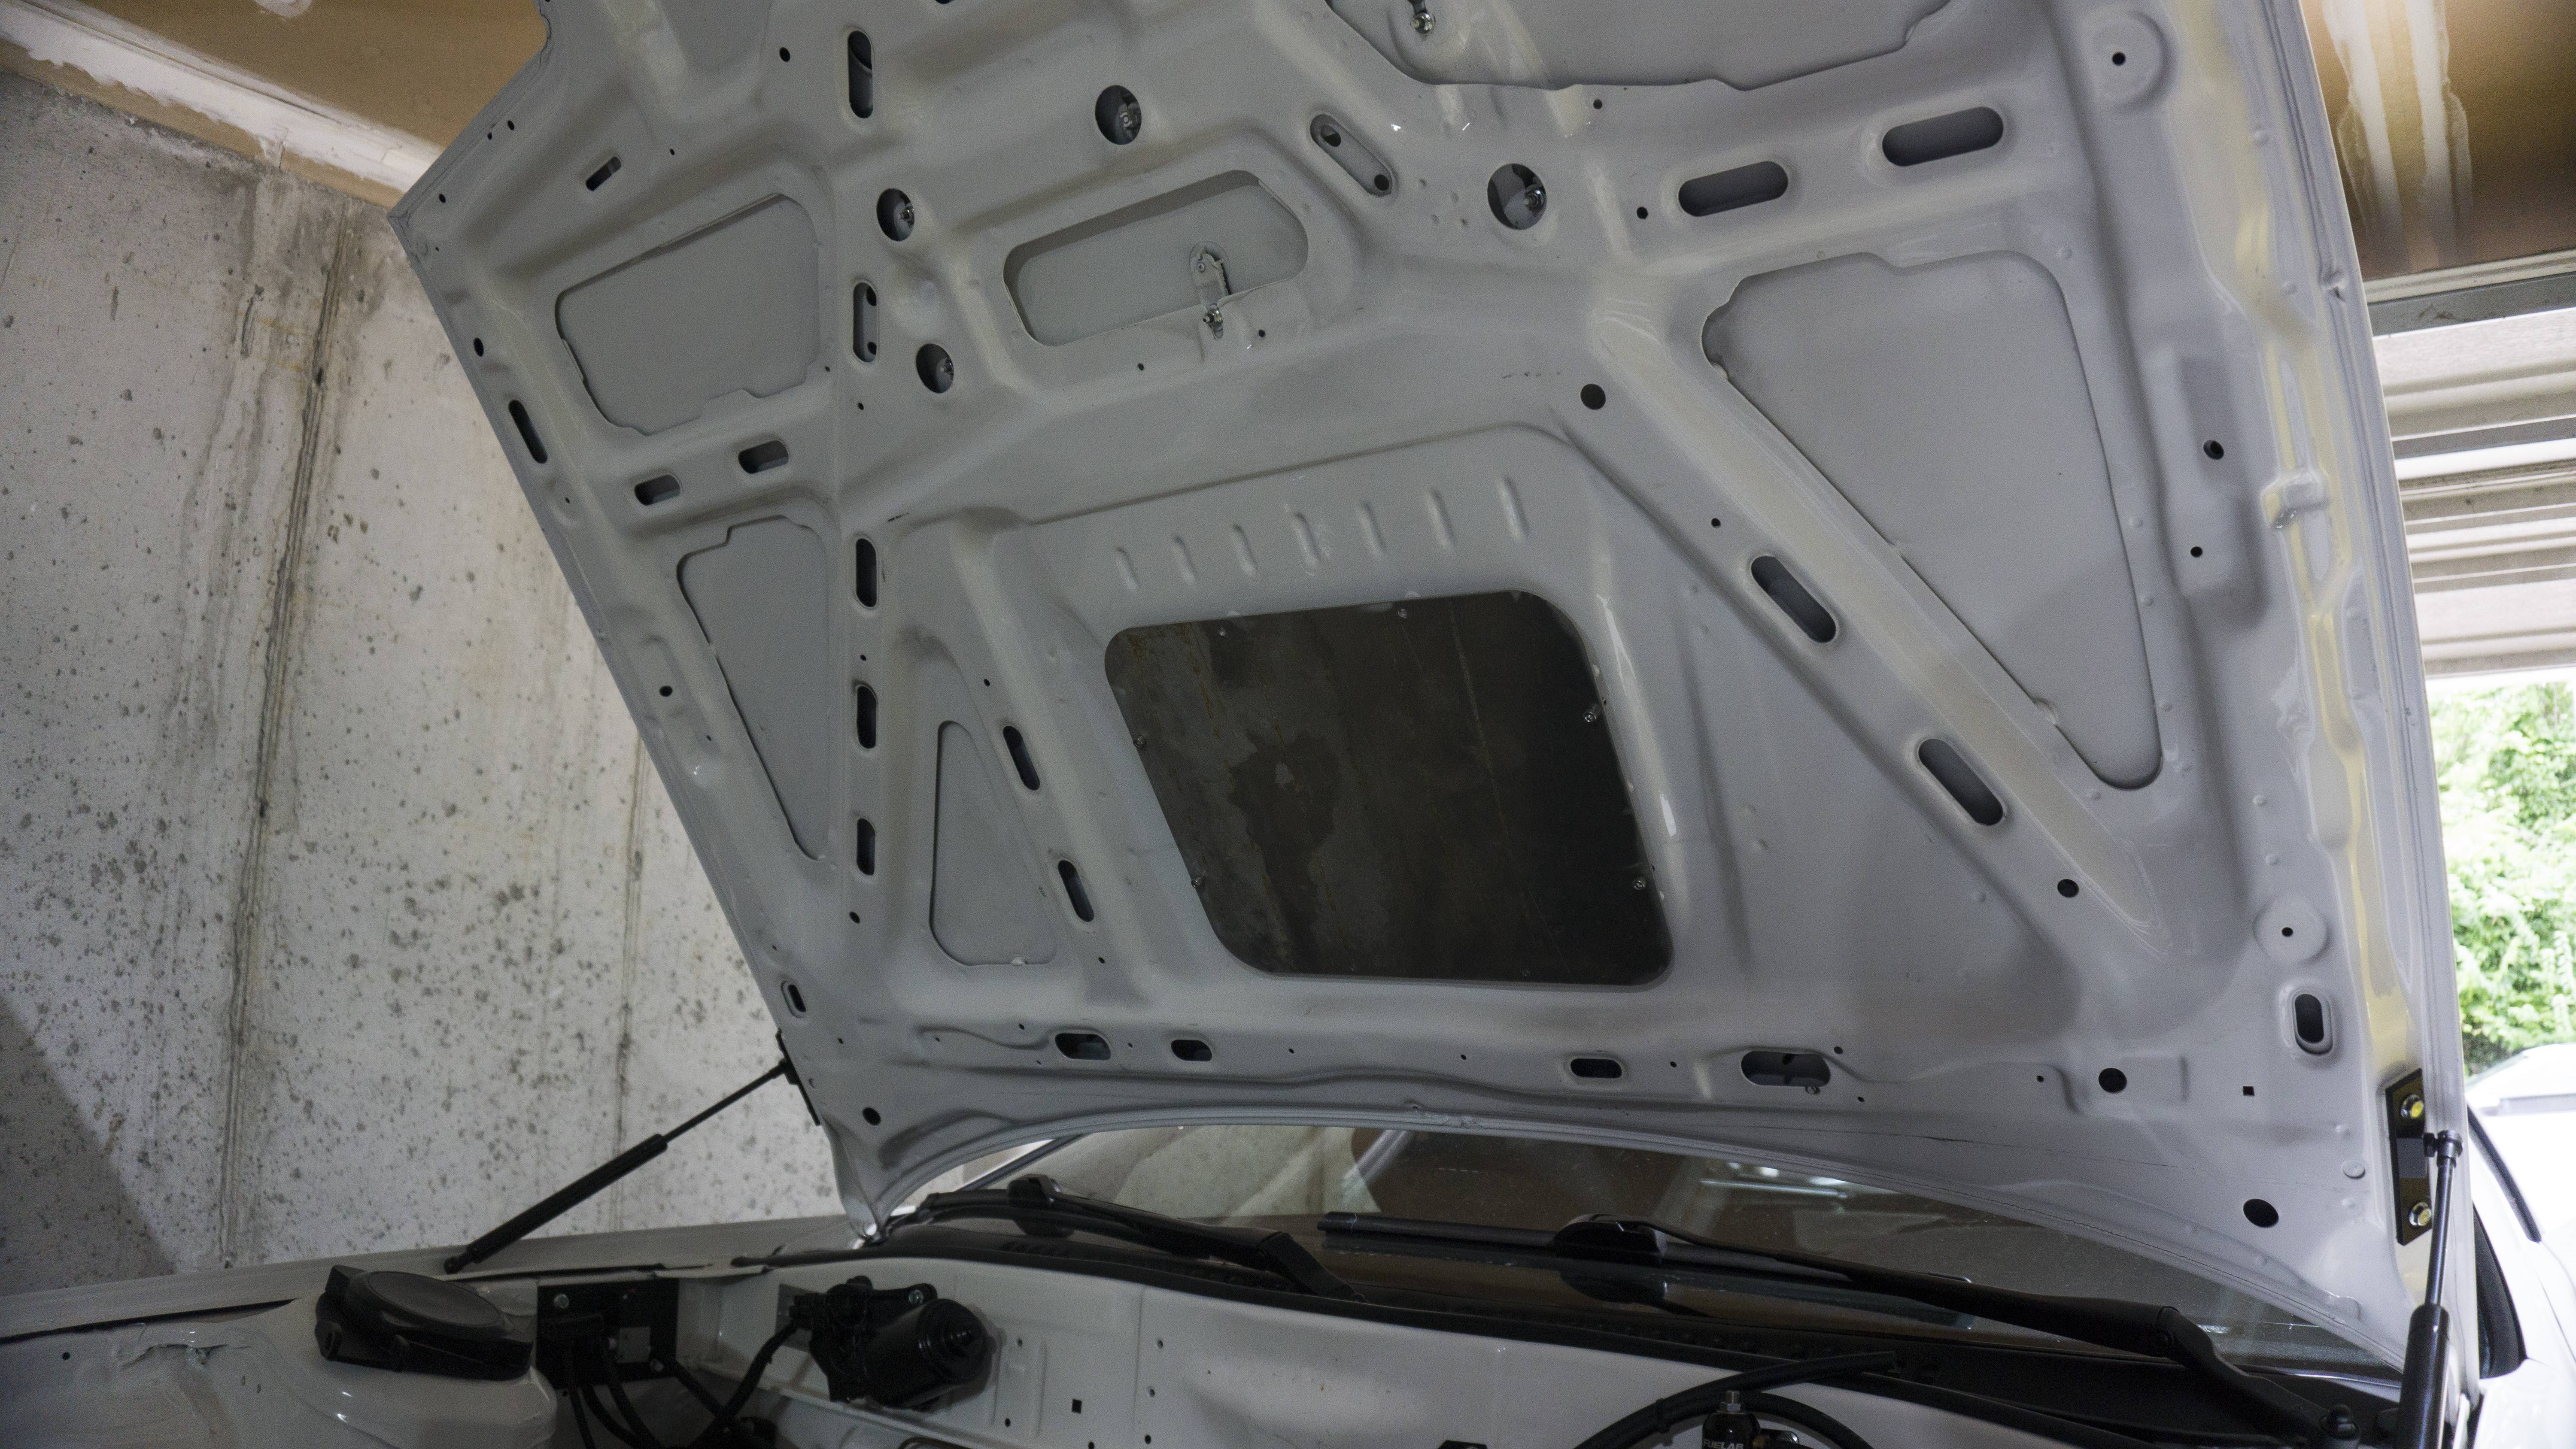
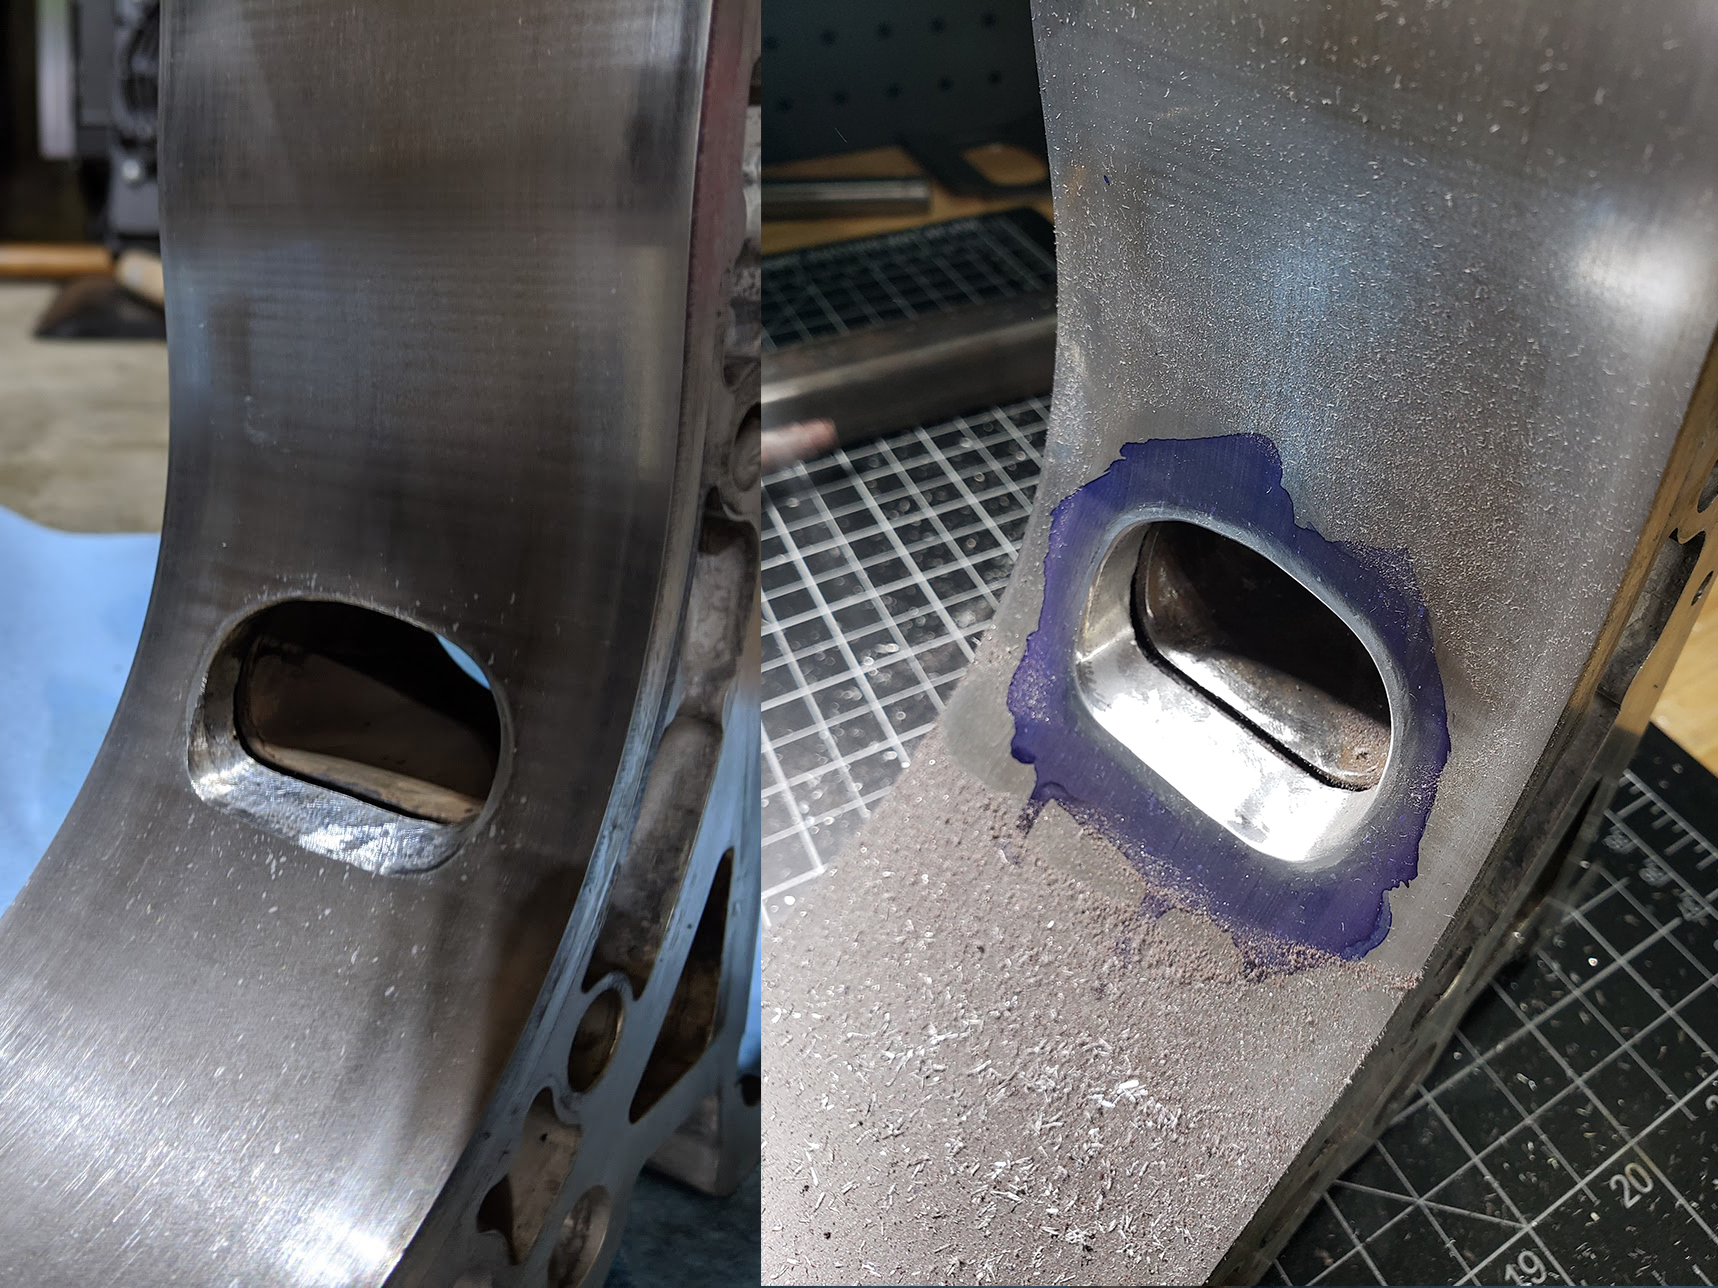
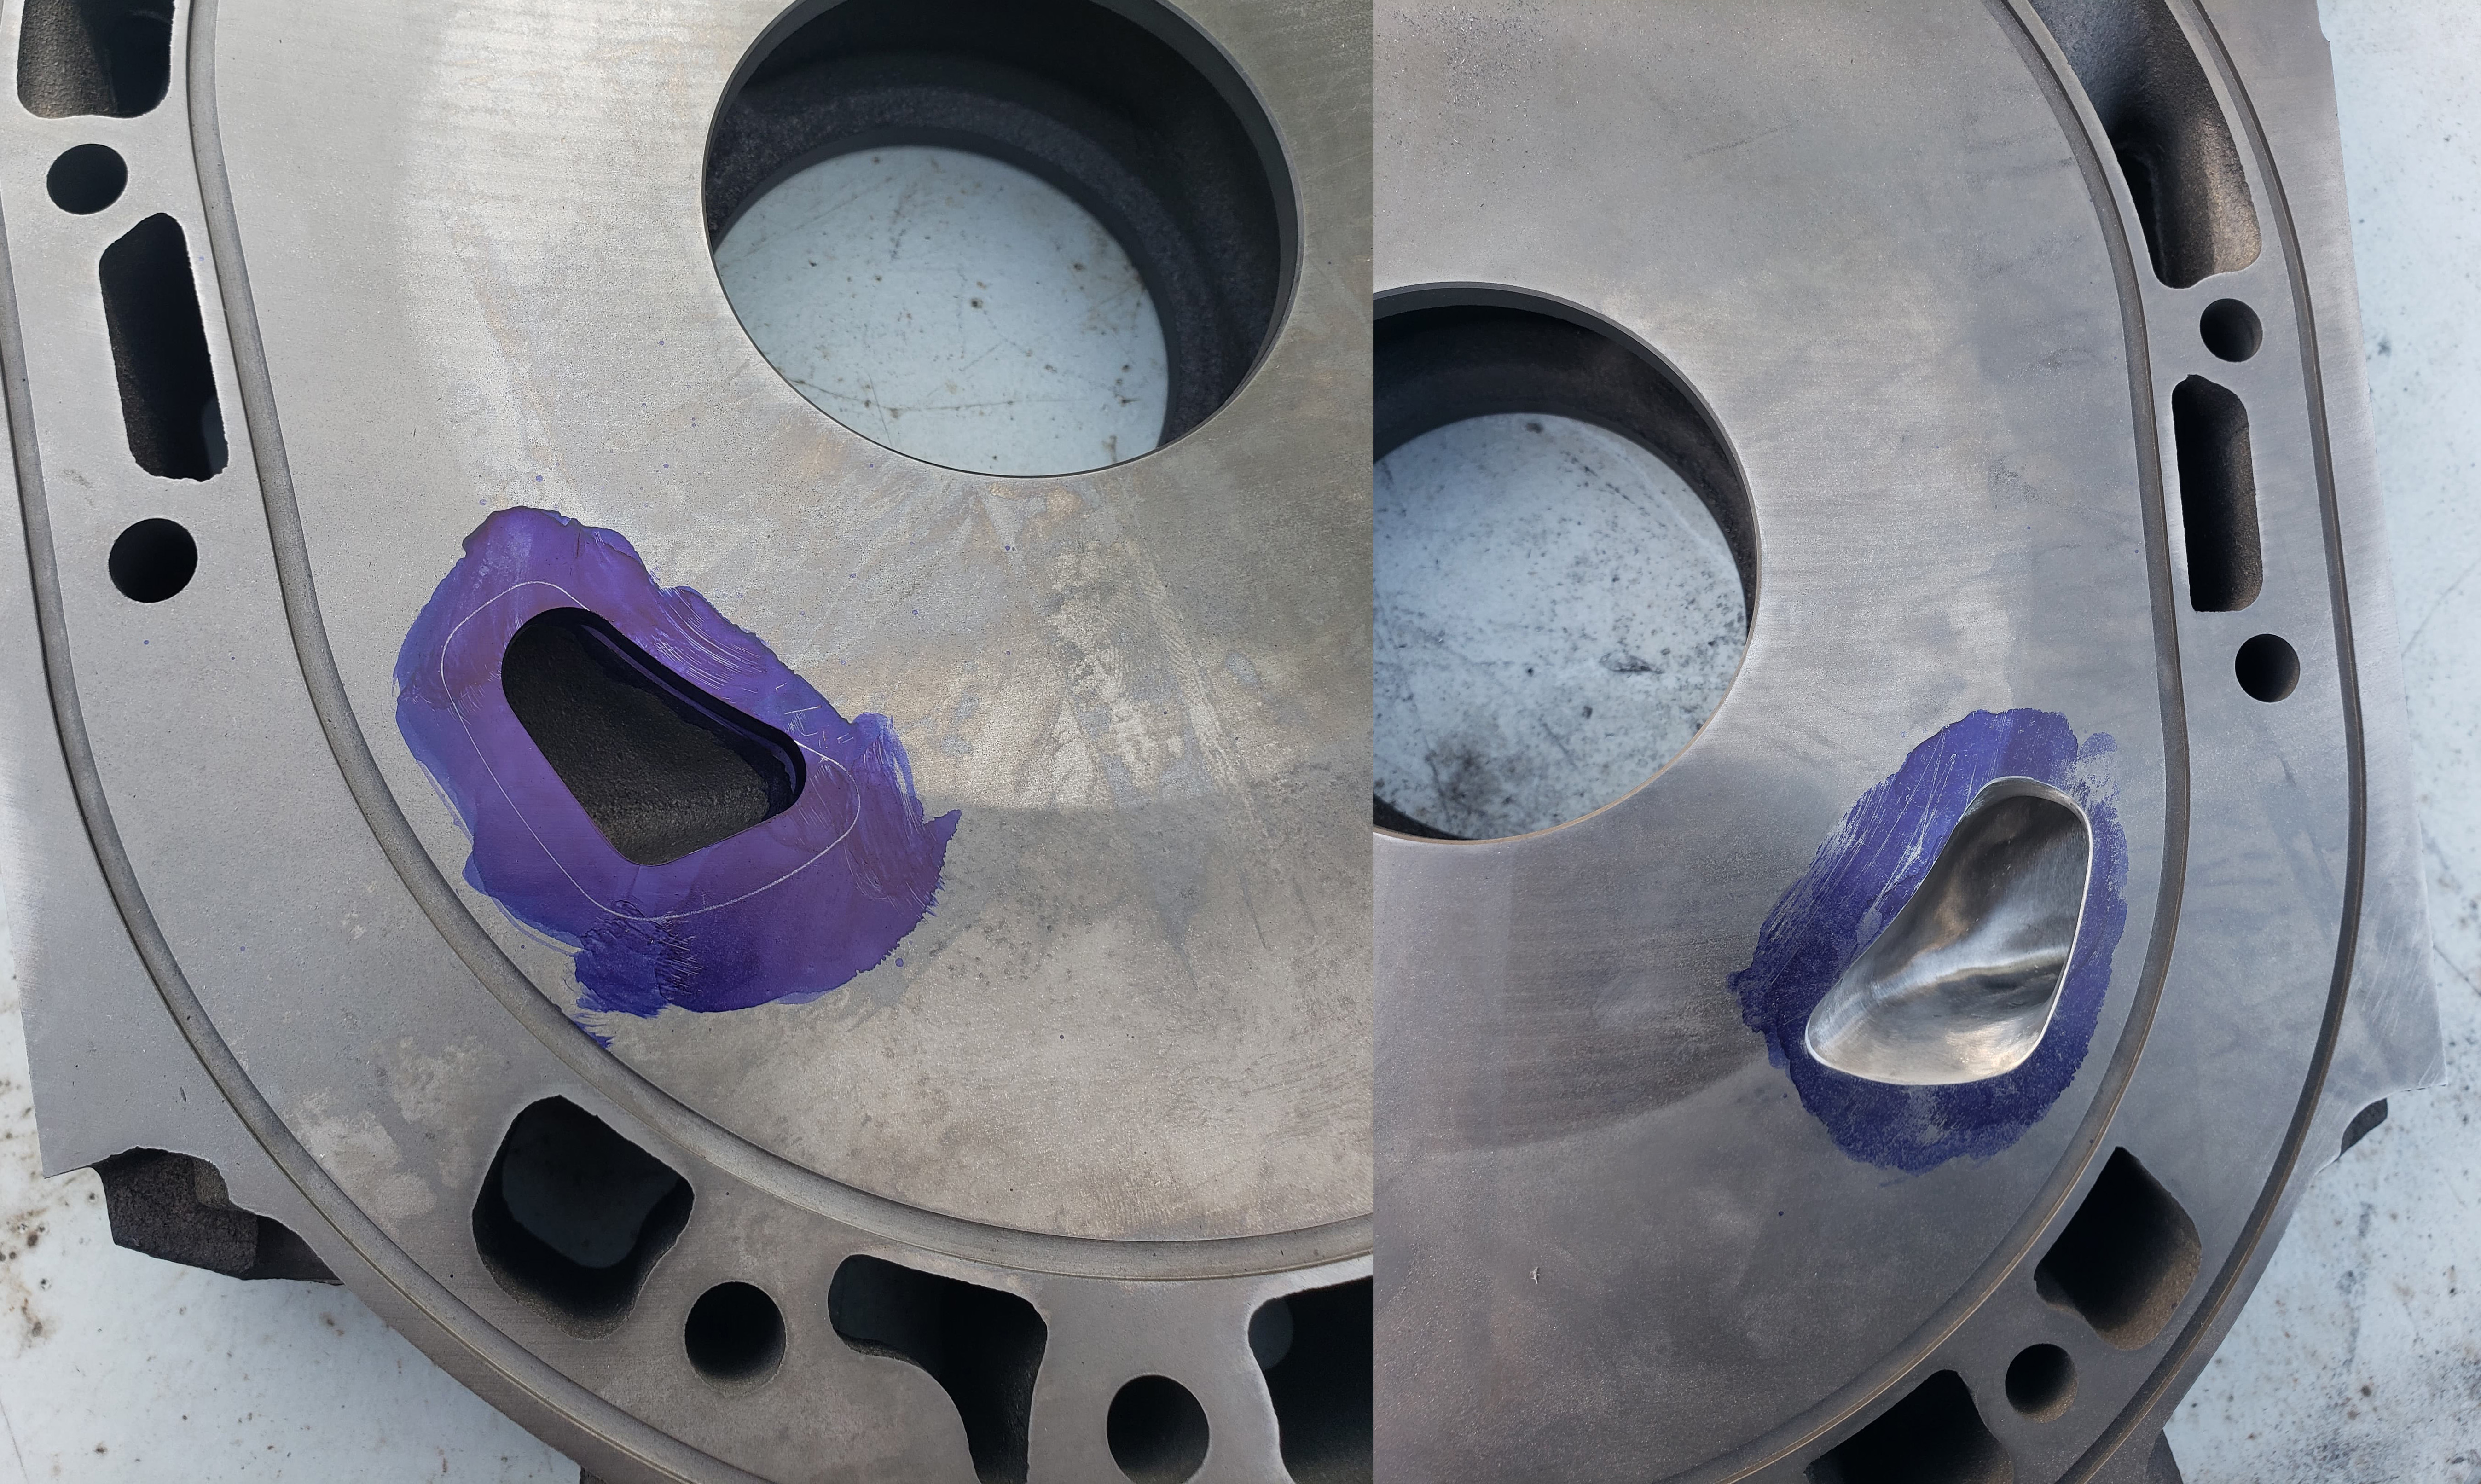
Good news! We are back in action! My friend came down and we stacked the engine and got it in during the same day. We were able to dial it in mostly before he left. I still need to fully break it in, but I went ahead and did an initial compression test - it was 95~ across the board. I did the test with zero driven miles on the engine so I expect those numbers to rise. The large street port sounds amazing and I�m incredibly happy with how it all turned out. I�ve only been able to drive it 5 miles so far, but the shifter change feels amazing. I�m doubling down on never installing a short shifter in any of my cars again. In other good news, I was able to score some FD calipers for 35 dollars! I�ve broken them completely down and will be replacing everything. New pistons, dust boots, bridge bolts - the works. It�s a little pricey to do all that so I�m just taking my time. I plan to get them powdered to closely resemble the Brembo red color. I plan to do the same with the rear too, but that can wait for a bit. I also had the issue of bugs committing suicide through my top mount and landing on the firewall. I had a block-off plate fabricated that I intend to use in tandem with foam to block the top-mount. Will probably be my last update for awhile until I move forward on some of these non-priority projects.
Until next time!
Here�s the brake breakdown

Here�s the block-off plate
Here�s the portwork (before vs now)

Here�s a short clip of first start (has more lope now that idle is dialed in)
Good news! We are back in action! My friend came down and we stacked the engine and got it in during the same day. We were able to dial it in mostly before he left. I still need to fully break it in, but I went ahead and did an initial compression test - it was 95~ across the board. I did the test with zero driven miles on the engine so I expect those numbers to rise. The large street port sounds amazing and I�m incredibly happy with how it all turned out. I�ve only been able to drive it 5 miles so far, but the shifter change feels amazing. I�m doubling down on never installing a short shifter in any of my cars again. In other good news, I was able to score some FD calipers for 35 dollars! I�ve broken them completely down and will be replacing everything. New pistons, dust boots, bridge bolts - the works. It�s a little pricey to do all that so I�m just taking my time. I plan to get them powdered to closely resemble the Brembo red color. I plan to do the same with the rear too, but that can wait for a bit. I also had the issue of bugs committing suicide through my top mount and landing on the firewall. I had a block-off plate fabricated that I intend to use in tandem with foam to block the top-mount. Will probably be my last update for awhile until I move forward on some of these non-priority projects.
Until next time!
Here�s the brake breakdown

Here�s the block-off plate
Here�s the portwork (before vs now)
Here�s a short clip of first start (has more lope now that idle is dialed in)
Last edited by Akomix; 06-07-20 at 07:15 PM.
06-08-20, 06:46 AM
#299
Such an amazing build! I thought I was the only one who bought brand new lights for my fc. Sucks about the engine build but quick work getting it back together! This thread is inspirational.
06-08-20, 08:49 PM
#300
Full Member
wow... cosmetically this thing looks amazing! Superb build man! 
However I must pick two things on it, that's actually bugged me :P and I have learnt on my own build
#1 is the electrical tape on the loom everywhere, it looks messy and when heat and water get to it over time it starts to unravel (been there done that) - Replace that with heat shrink!
#2 is the ignition wires.. although you may not see any issues atm, but if you ever want to turn it up you will get ignition break up... Having the ignition wires cross and close to together you will get spark jumping from one lead to another... you shouldn't cross them, and have a few mm apart
but overall man, holllllly!