
SCCA Super Touring U Build

Thread Starter


Joined: Nov 2006
Posts: 1,578
Likes: 288
From: Parkville, Mo
Rear Brales - Caliper Mods
The rear calipers I am using are single piston iron calipers from an FC Turbo II car. I don't know the year.
I mocked them up on the car and determined that the the E Brake portion of the caliper would not clear the panhard mount on the left side of the rear axle housing. So I decided to remove the E Brake from the calibers. This is a cool mod that ultimately makes the rear brakes easier to service (the piston screw is removed) and a little lighter. On the down side, they are no longer suitable as cores for remanufactured calipers. So make sure the calipers are in good shape BEFORE you do this.
The process starts by removing the screw adjuster assembly from the piston bore. This assembly is held in place by an internal snap ring. Once you get the snap ring out the screw adjuster pulls out from the bore. The E Brake actuator on the rear of the caliper can then be removed - it pull out too. From there the portion of the caliper casting that supports the E Brake actuator can be cut off - I used a band saw
Here is a comparison of a caliper that is cut (left side) and one that is still intact (right side).
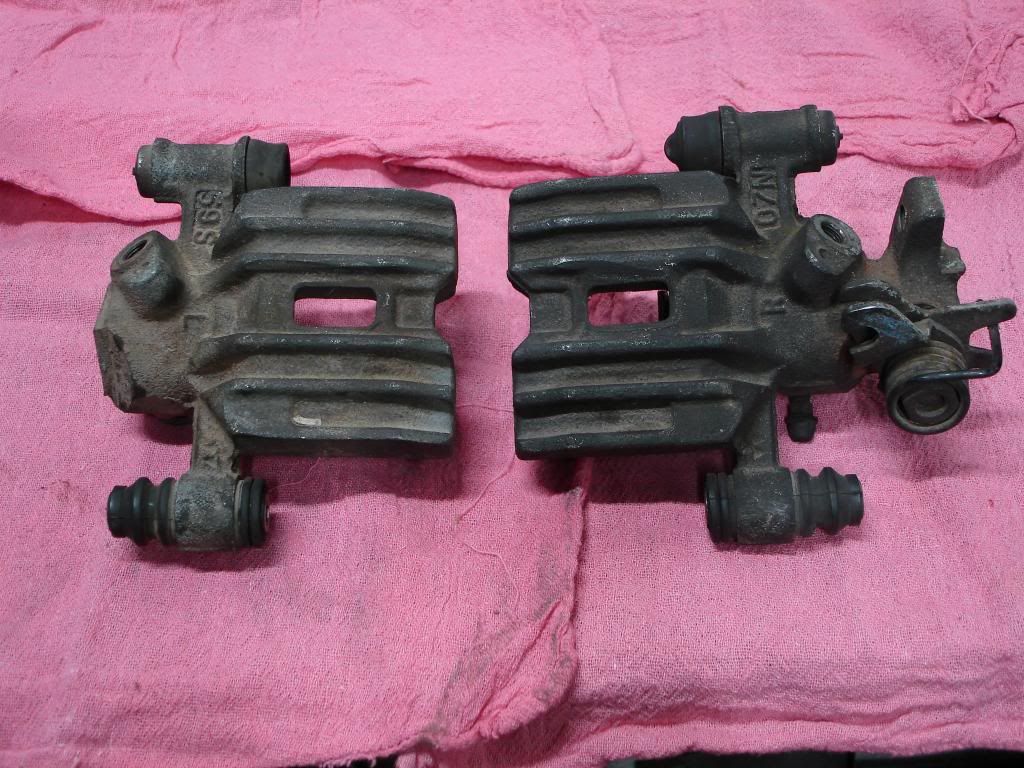
Here is a shot of what is left after the E Brake section of the caliper is sawed off - a 17MM hole. On the right is the modified caliper and all of the E Brake guts that will be discarded
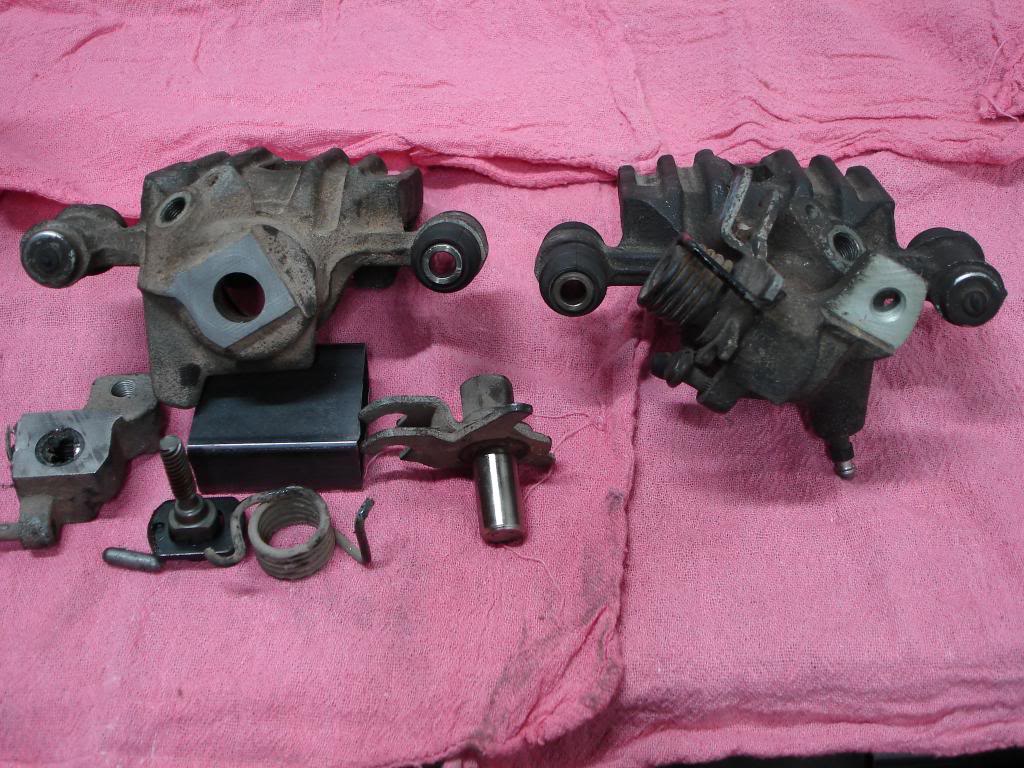
The 17MM hole will be plugged with a 1/2 NPT pipe plug. Yes, a pipe plug. This mod works and doesn't leak. I am not the first person to do this!
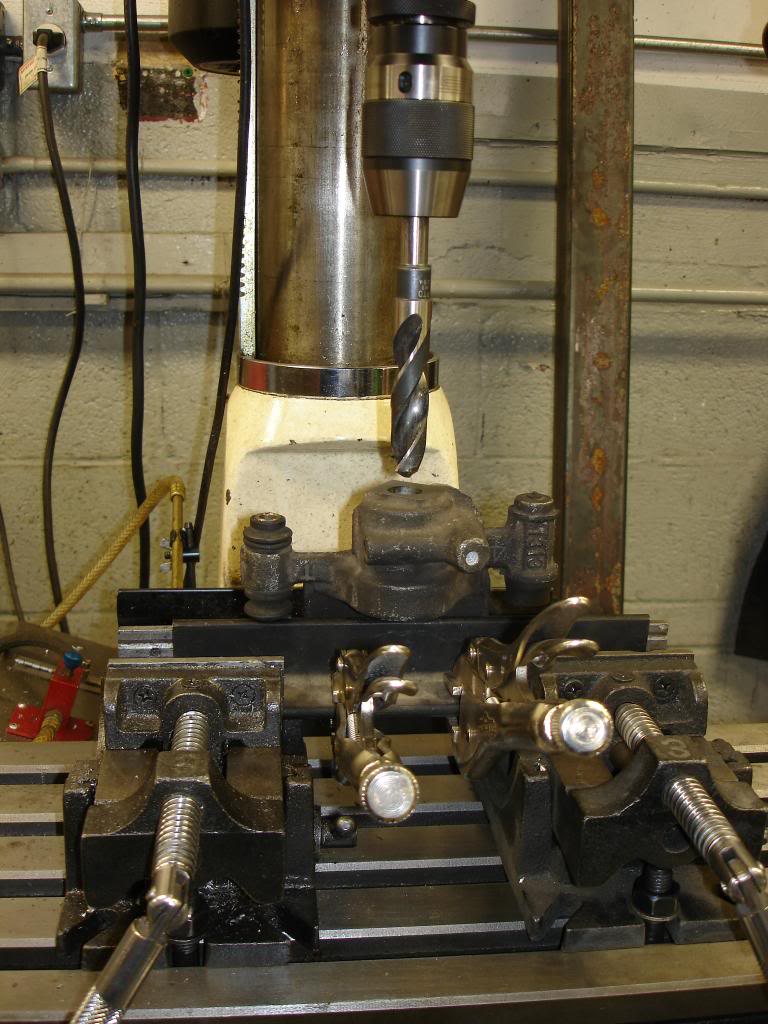
Here the caliper is being drilled out with a 47/64" drill bit to open the hole up to .734". Actually a 23/32" drill bit is recommended for a 1/2 NPT tap but this did not allow me to cut the threads as deep as I wanted in the caliper.
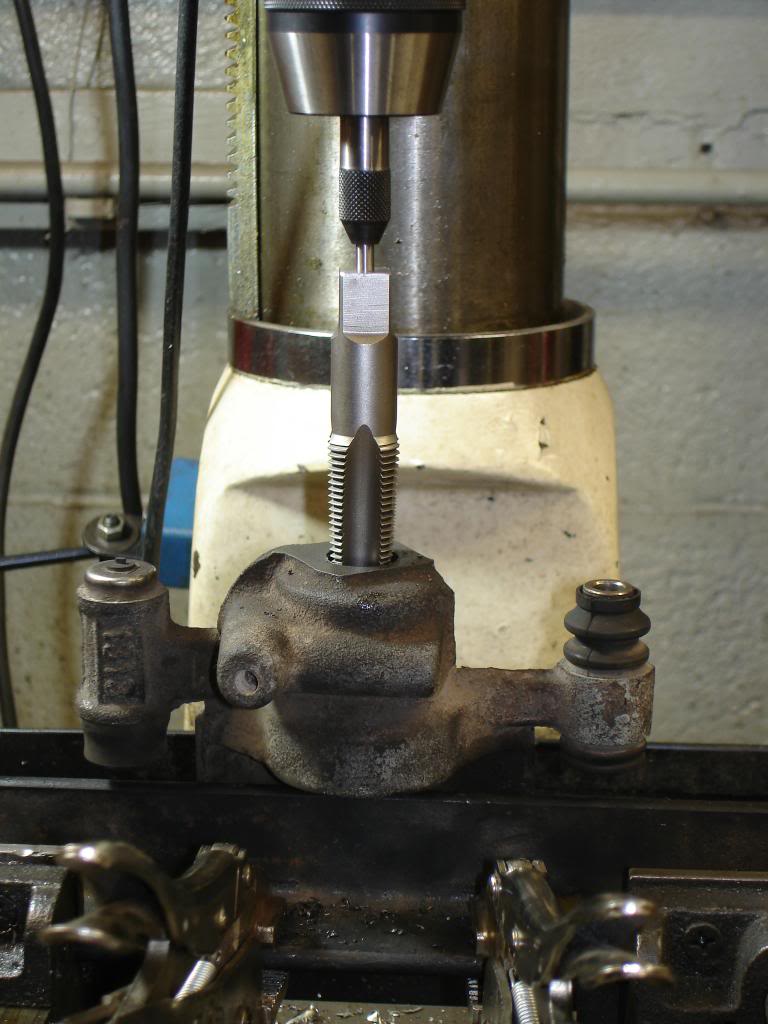
I used a spring loaded centering tool to make sure the tap went in straight. This was the hardest part of the job
I mocked them up on the car and determined that the the E Brake portion of the caliper would not clear the panhard mount on the left side of the rear axle housing. So I decided to remove the E Brake from the calibers. This is a cool mod that ultimately makes the rear brakes easier to service (the piston screw is removed) and a little lighter. On the down side, they are no longer suitable as cores for remanufactured calipers. So make sure the calipers are in good shape BEFORE you do this.
The process starts by removing the screw adjuster assembly from the piston bore. This assembly is held in place by an internal snap ring. Once you get the snap ring out the screw adjuster pulls out from the bore. The E Brake actuator on the rear of the caliper can then be removed - it pull out too. From there the portion of the caliper casting that supports the E Brake actuator can be cut off - I used a band saw
Here is a comparison of a caliper that is cut (left side) and one that is still intact (right side).

Here is a shot of what is left after the E Brake section of the caliper is sawed off - a 17MM hole. On the right is the modified caliper and all of the E Brake guts that will be discarded

The 17MM hole will be plugged with a 1/2 NPT pipe plug. Yes, a pipe plug. This mod works and doesn't leak. I am not the first person to do this!
Here the caliper is being drilled out with a 47/64" drill bit to open the hole up to .734". Actually a 23/32" drill bit is recommended for a 1/2 NPT tap but this did not allow me to cut the threads as deep as I wanted in the caliper.

I used a spring loaded centering tool to make sure the tap went in straight. This was the hardest part of the job

Thread Starter
Joined: Nov 2006
Posts: 1,578
Likes: 288
From: Parkville, Mo
Thread Starter
Joined: Nov 2006
Posts: 1,578
Likes: 288
From: Parkville, Mo
Thread Starter
Joined: Nov 2006
Posts: 1,578
Likes: 288
From: Parkville, Mo
Updates
I have made some progress on the rear brake/rear axle project.
The machine work on the calipers was completed. They are cleaned up, painted and are ready for the rebuild kit that just came in from Rock Auto.
Stainless steel -3 flex lines for the calipers have been routed and the mounts for the -3 to inverted flare adapter fittings have been welded to the axle housing. I have also added tabs that I can rivet adell clamps to for the hard lines.
I recently picked up some FOX Mustang Koni single adjustable rear shocks. These will replace the PRO Shock welded bearing shocks I have been running. This upgrade required some minor surgery on the shock mounts that I had added to rear axle housing earlier. If these shocks don't work out I can still use the PRO Shocks and put the Konis on one of my Mustangs.
I had my 4.88 rear end torn down and inspected by David Long at Santa Fe Garage www.santafegarage.com. It need to have the large side gears installed and I wanted to have Dave mic the clutch packs to make sure they were the same thickness on both sides. It turned out that the carrier bearings were bad so they were also replaced. This diff is setup extremely tight and probably not ideal for Solo but works like a champ on a road course. I'll have him set up a 4.10 for me as well.
I added urethane bump stops to the spring mounts on the chassis. I also plugged the open end of the spring adjusters on the rear axle so the bump stops have something to, well, bump up against.
Pictures later this week
Thread Starter
Joined: Nov 2006
Posts: 1,578
Likes: 288
From: Parkville, Mo
Rear End
So I finished assy of the rear axle housing. As I mentioned early, the third member was rebuilt by David Long at www.santefegarage.com Excellent service that include disassembly and the measurement of all parts including the clutch pack disks. All of this was written up for future reference.
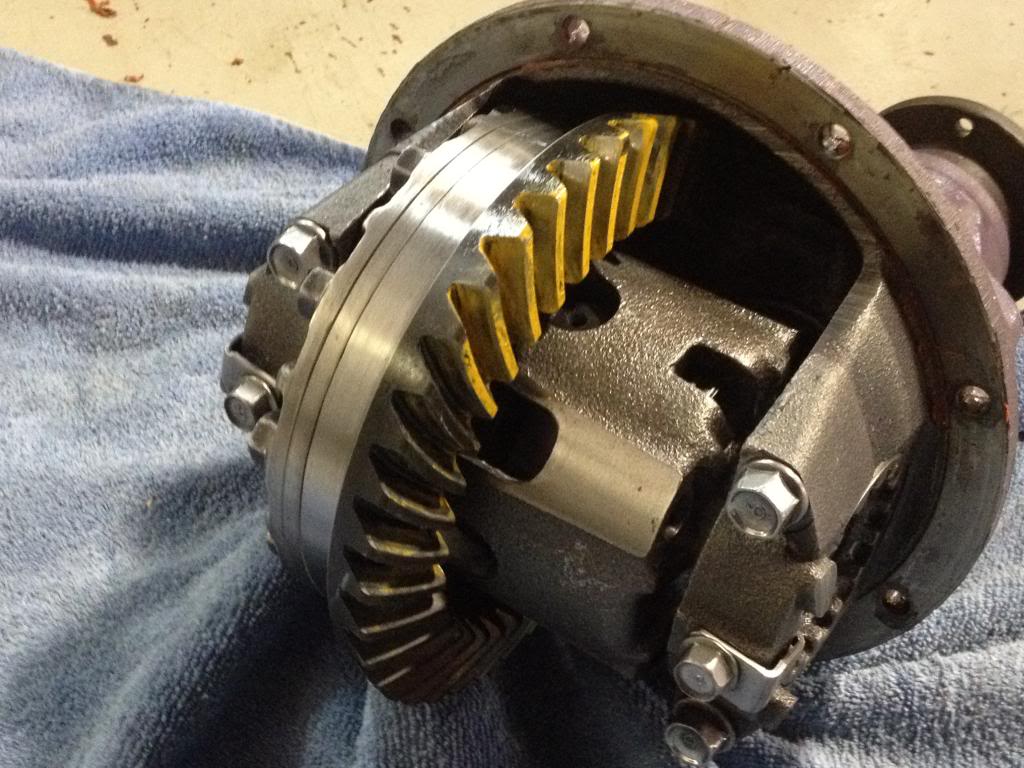
The third member has a 4.88 gear that I lightened about 6 years ago by removing a portion of the back side of the ring gear. I did this by attaching the ring gear to the diff with the ring gear bolts torqued to spec. Then the whole assy was chucked up in a lathe and material removed .010 at a pass. A very time consuming process. The net is reduced rotating weight and the ability to add about a 1/2 quart of extra lube.
Third member - note the missing metal
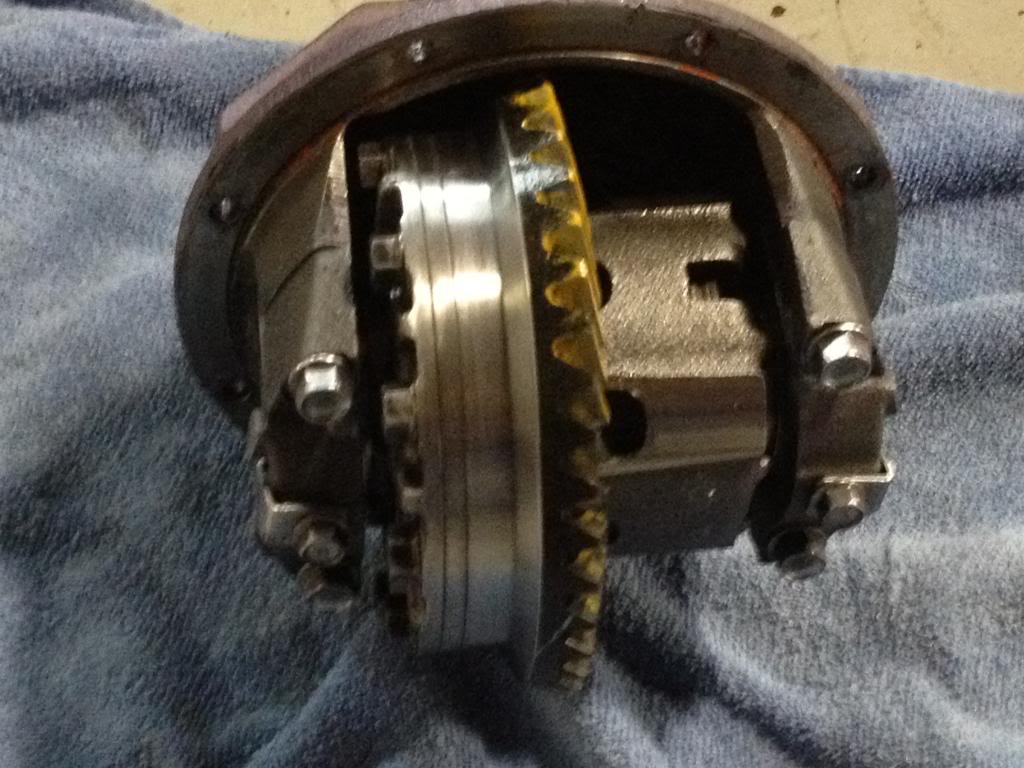
You can see that a little material was removed from the diff with the final cuts on the ring gear
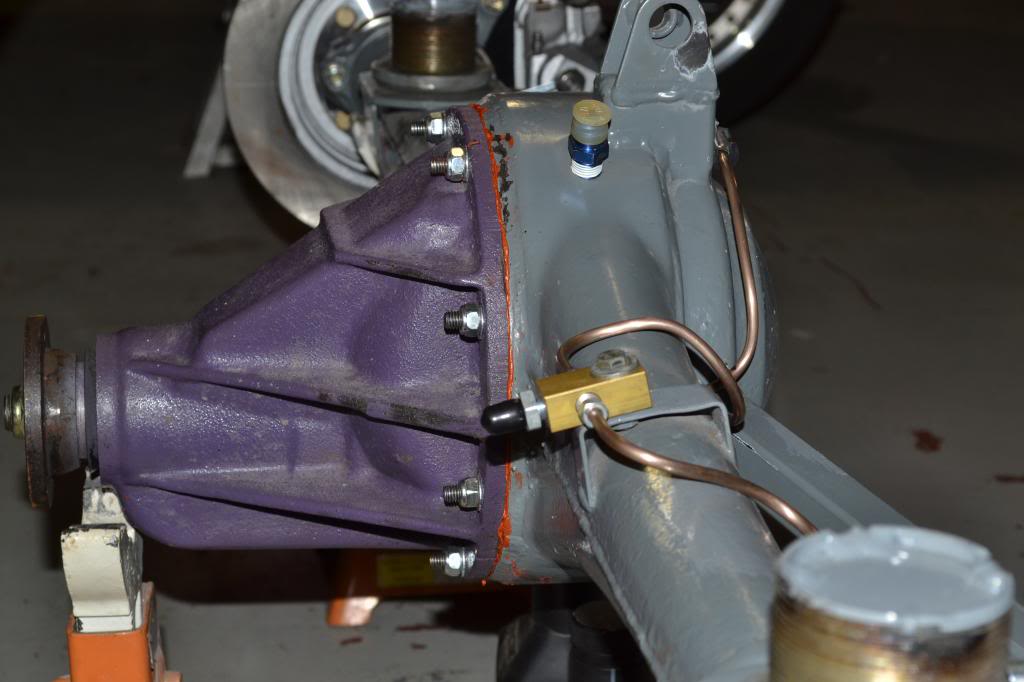
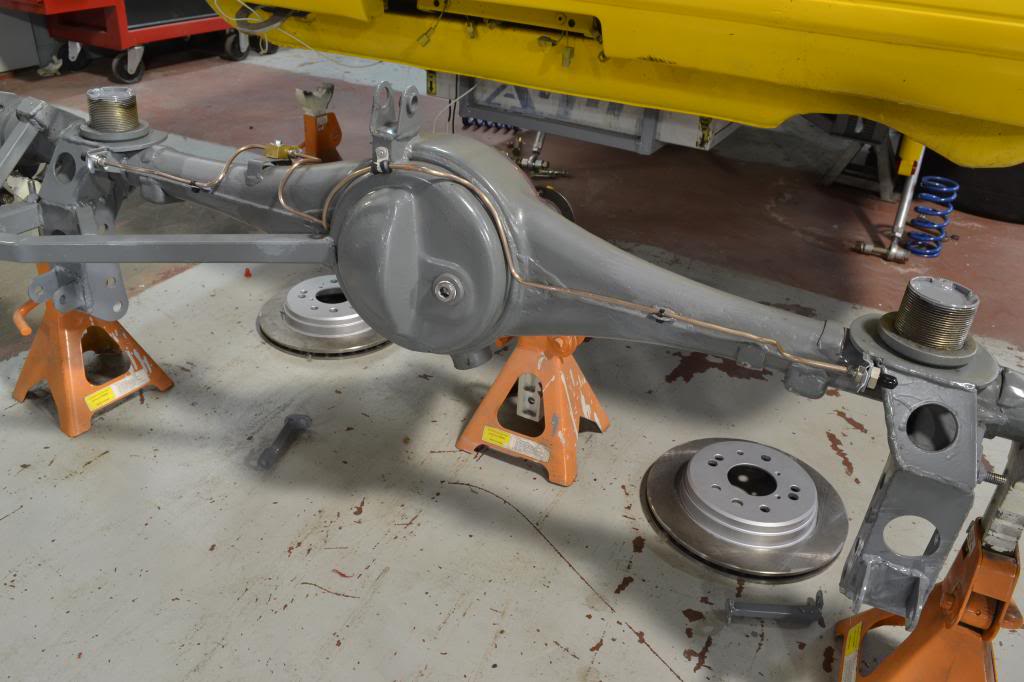
The rear end housing ready for the third member. I use studs and nylock nuts to retain the third member instead of the OE bolts. The studs make an under car third member replacement easier.
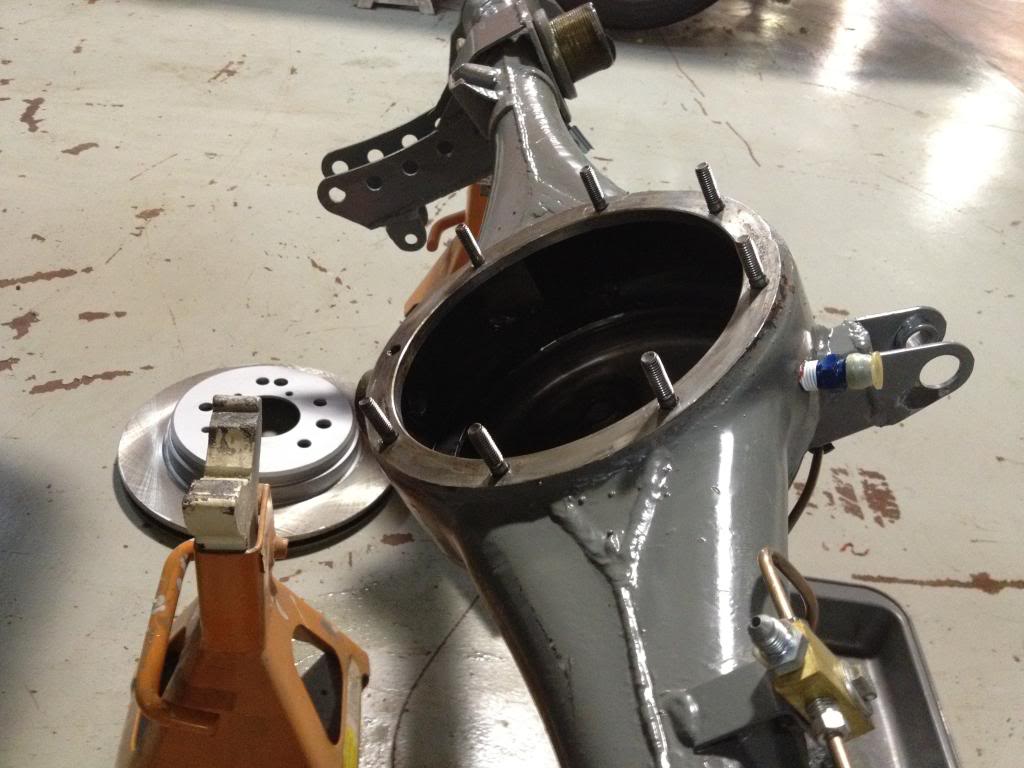
All buttoned up. The nylock nuts do not come loose like the OE bolts/lock washers do.
The third member has a 4.88 gear that I lightened about 6 years ago by removing a portion of the back side of the ring gear. I did this by attaching the ring gear to the diff with the ring gear bolts torqued to spec. Then the whole assy was chucked up in a lathe and material removed .010 at a pass. A very time consuming process. The net is reduced rotating weight and the ability to add about a 1/2 quart of extra lube.
Third member - note the missing metal

You can see that a little material was removed from the diff with the final cuts on the ring gear

The rear end housing ready for the third member. I use studs and nylock nuts to retain the third member instead of the OE bolts. The studs make an under car third member replacement easier.

All buttoned up. The nylock nuts do not come loose like the OE bolts/lock washers do.

Thread Starter
Joined: Nov 2006
Posts: 1,578
Likes: 288
From: Parkville, Mo
Brake Lines
While was waiting on caliber kits I fabricated the hard lines on the rear axle housing. I decided to use all SAE fittings because this hardware is easier to get in an emergency.
I used NiCopp - Nickel/Copper Alloy 3/16 hard line material because it is easy to work with. It can be bent to shape without a bender and is resistant to kinking. I also have access to a turret style flaring tool that is pretty much fool proof
Flaring tool
URL=http://s1273.photobucket.com/user/mustanghammer/media/New%20Car/RX7/DSC_0003_zps394f5207.jpg.html]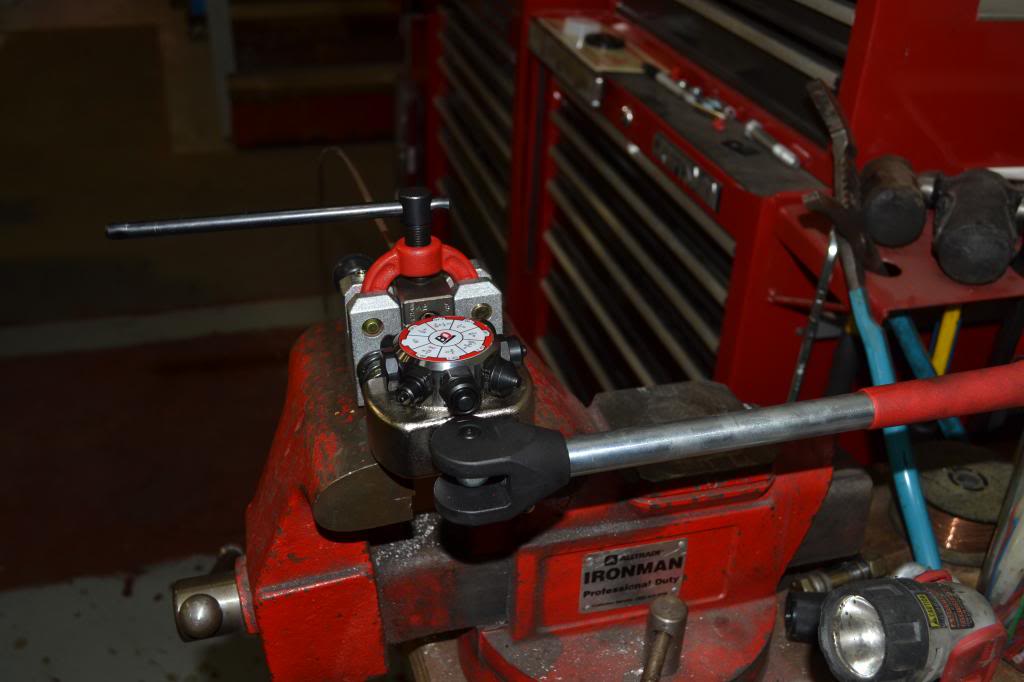 [/URL]
Left Side - the distribution block is from Russell. It adapts -3AN to 3/16 SAE and mounts to the OE location on the axle tube
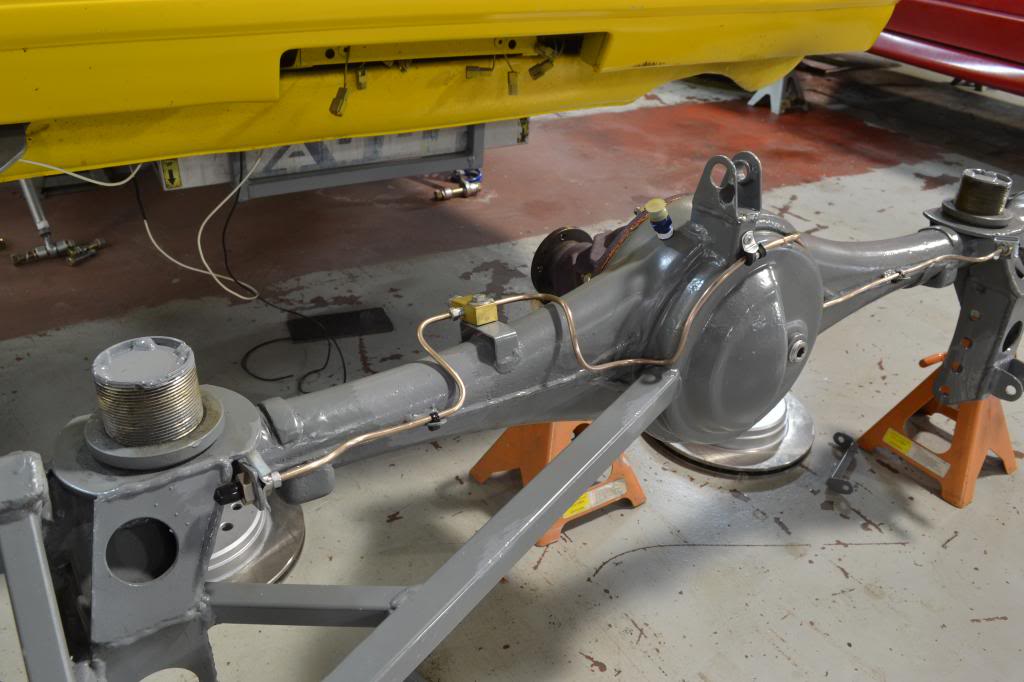
Right Side - The hard lines end at Earls brake line adapters that allow 3/16 inverted flare to connect to -3AN
I used NiCopp - Nickel/Copper Alloy 3/16 hard line material because it is easy to work with. It can be bent to shape without a bender and is resistant to kinking. I also have access to a turret style flaring tool that is pretty much fool proof
Flaring tool
URL=http://s1273.photobucket.com/user/mustanghammer/media/New%20Car/RX7/DSC_0003_zps394f5207.jpg.html]
[/URL]Left Side - the distribution block is from Russell. It adapts -3AN to 3/16 SAE and mounts to the OE location on the axle tube

Right Side - The hard lines end at Earls brake line adapters that allow 3/16 inverted flare to connect to -3AN

Thread Starter
Joined: Nov 2006
Posts: 1,578
Likes: 288
From: Parkville, Mo
Torque Braces and final assy
Based on experience with these cars and other, I have seen brake torque from high speed stops cause the caliper bracket to strike the rotor. The problem is that the OE caliper brackets on the axle flex. I didn't experience this with the GSL brakes but it is a problem on E Production cars. To combat this I built some small braces that connect the control arm mount to the bottom of the caliper bracket.
Here is the right side
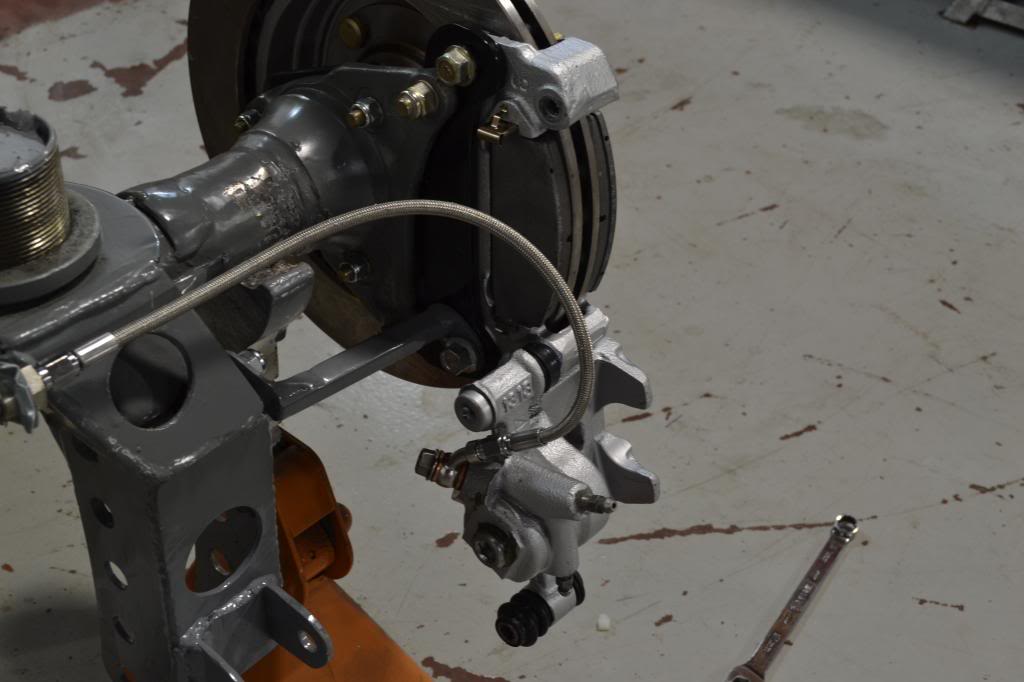
Here are some shots of the calipers installed on the axle
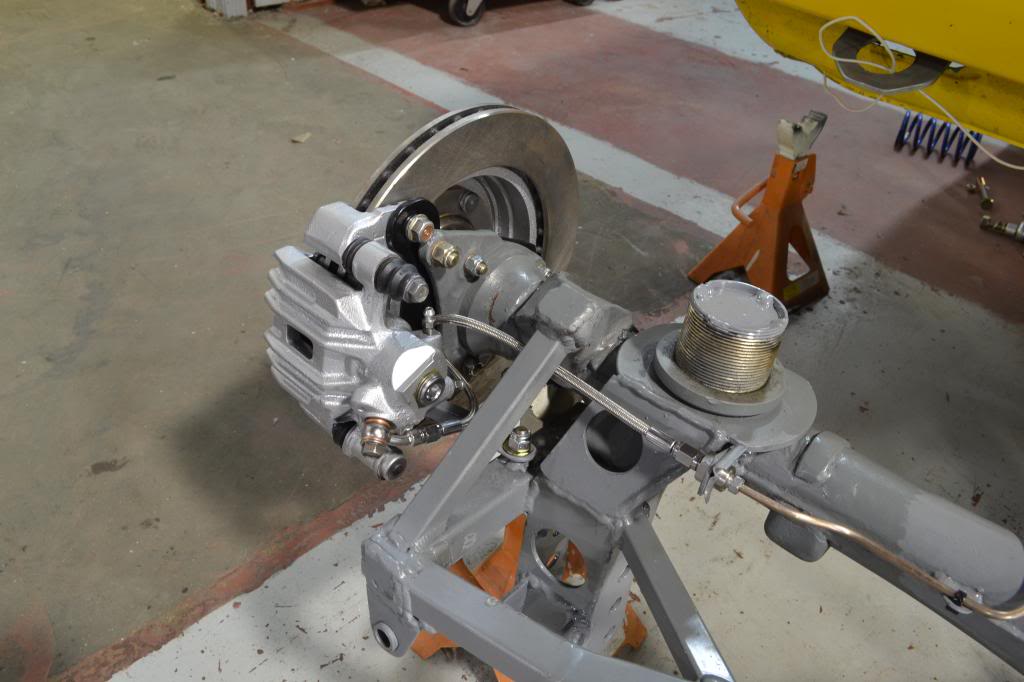
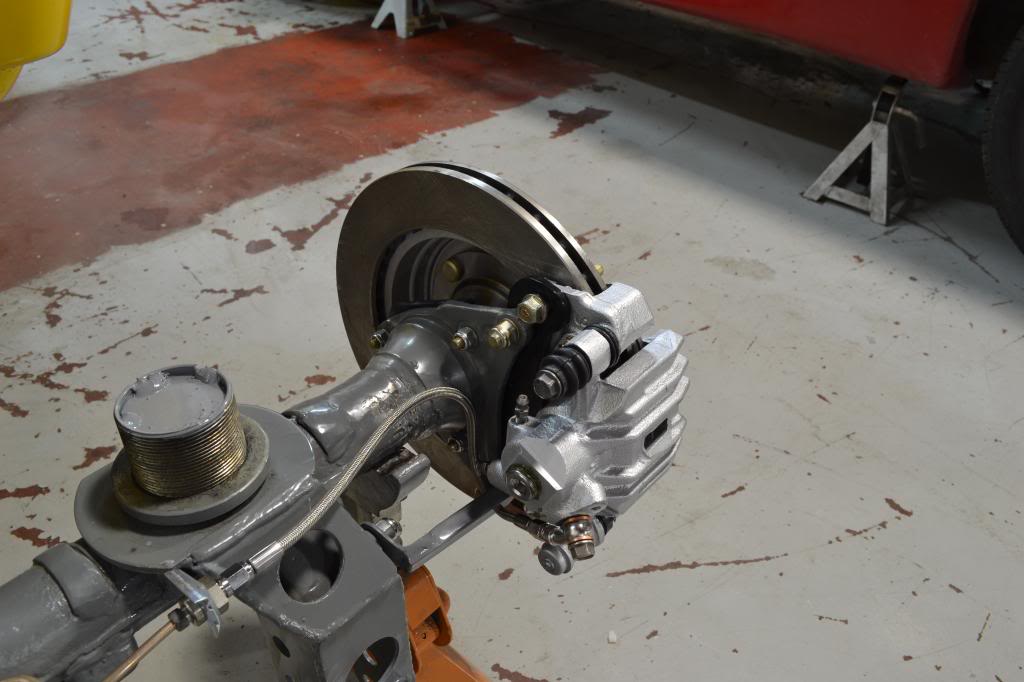
Ready for lube and install in the car. I am using Amsoil 75-140 Synthetic with no friction modifier
Here is the right side

Here are some shots of the calipers installed on the axle


Ready for lube and install in the car. I am using Amsoil 75-140 Synthetic with no friction modifier

Very nice looking setup. I went ahead and bought the Federal Hill flaring tool (very similar) and their line when doing mine. I absolutely love that thing. After all the years of fighting double flares I wish I had just bit the bullet and spent the money a long time ago. It is so much easier when you have the right tool.
FYI, since you seem to be another person with beaucoup extra Mustang parts on the shelf.
I used the Fox body Cobra Mustang caliper kit on the rear as I needed the E brake. They actually fit better than the TII calipers (had to fabricate the bracket of course). The stock E brake cables dropped right on with no modifications required and the anti-moan bracket/brace needed very little to fit. Yaay, redneck Mustang parts.
Thread Starter
Joined: Nov 2006
Posts: 1,578
Likes: 288
From: Parkville, Mo
Very nice looking setup. I went ahead and bought the Federal Hill flaring tool (very similar) and their line when doing mine. I absolutely love that thing. After all the years of fighting double flares I wish I had just bit the bullet and spent the money a long time ago. It is so much easier when you have the right tool.
FYI, since you seem to be another person with beaucoup extra Mustang parts on the shelf.
I used the Fox body Cobra Mustang caliper kit on the rear as I needed the E brake. They actually fit better than the TII calipers (had to fabricate the bracket of course). The stock E brake cables dropped right on with no modifications required and the anti-moan bracket/brace needed very little to fit. Yaay, redneck Mustang parts.
FYI, since you seem to be another person with beaucoup extra Mustang parts on the shelf.
I used the Fox body Cobra Mustang caliper kit on the rear as I needed the E brake. They actually fit better than the TII calipers (had to fabricate the bracket of course). The stock E brake cables dropped right on with no modifications required and the anti-moan bracket/brace needed very little to fit. Yaay, redneck Mustang parts.
I think it is interesting that I can use FOX body mustang parts on my RX7 project. So far I haven't found anything on the RX7 that can be retro fit on my Mustang but I will at some point!
Thread Starter
Joined: Nov 2006
Posts: 1,578
Likes: 288
From: Parkville, Mo
New Parts
Christmas in September for the RX7
Front and rear Hawk HT10 brake pads
Eibach 500lb front springs - 2.5" x 6" coilovers
QA1 250Lb rear springs - 2.5" x 7 coilovers
Stainless front brake lines
11lb Deka AGM battery
Got to play around with a few of the new parts to make sure they fit. Then spent the rest of the day flattening the rear fender lips to get some tire clearance. After that, I wire wheeled the outer portion of the inner rear fenders so I can glass over folded over inner lip. Have I mentioned that I don't like body work?
Body work
Christmas in September for the RX7
Front and rear Hawk HT10 brake pads
Eibach 500lb front springs - 2.5" x 6" coilovers
QA1 250Lb rear springs - 2.5" x 7 coilovers
Stainless front brake lines
11lb Deka AGM battery
Got to play around with a few of the new parts to make sure they fit. Then spent the rest of the day flattening the rear fender lips to get some tire clearance. After that, I wire wheeled the outer portion of the inner rear fenders so I can glass over folded over inner lip. Have I mentioned that I don't like body work?
Front and rear Hawk HT10 brake pads
Eibach 500lb front springs - 2.5" x 6" coilovers
QA1 250Lb rear springs - 2.5" x 7 coilovers
Stainless front brake lines
11lb Deka AGM battery
Got to play around with a few of the new parts to make sure they fit. Then spent the rest of the day flattening the rear fender lips to get some tire clearance. After that, I wire wheeled the outer portion of the inner rear fenders so I can glass over folded over inner lip. Have I mentioned that I don't like body work?
Thread Starter
Joined: Nov 2006
Posts: 1,578
Likes: 288
From: Parkville, Mo
Are you thinking about moving out of IT? If you are, I would recommend STL or EP over STU. STL looks like fun for a lot less money. Had the rule set been farther along when I started my project I would be in STL now.....and my car would be done too.
Thread Starter
Joined: Nov 2006
Posts: 1,578
Likes: 288
From: Parkville, Mo

Thread Starter
Joined: Nov 2006
Posts: 1,578
Likes: 288
From: Parkville, Mo
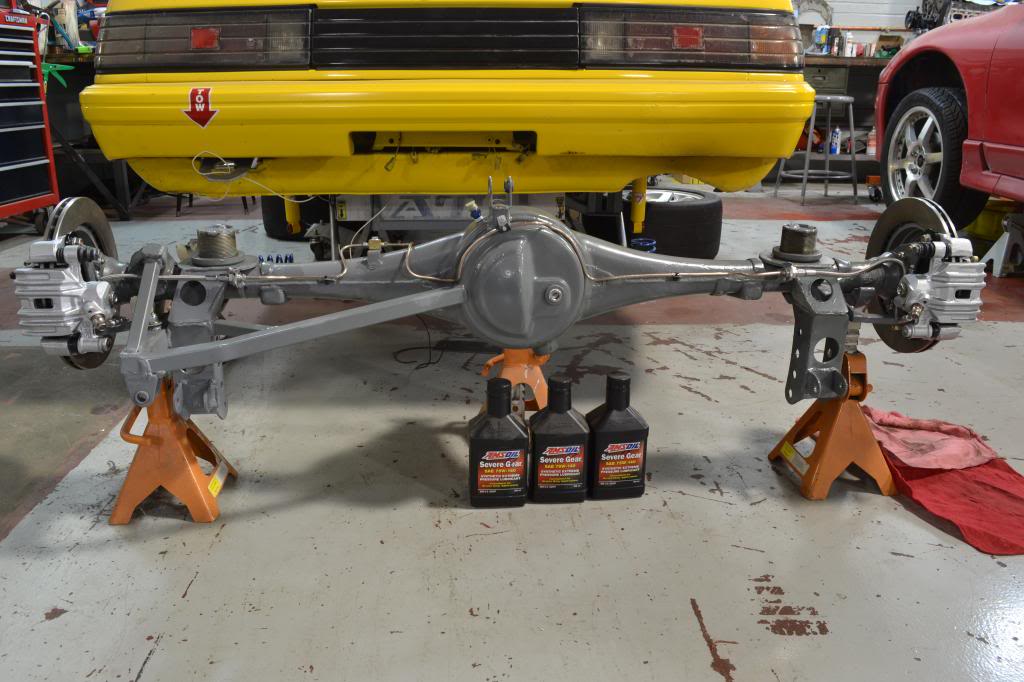
Rear axle assembly is full of lube (Amsoil 75/140) and back in the car. I spent Saturday measuring and making up the final hardware that I will use to bolt everything in. The goal is to use bolts that have shear loads on the shank and not on any of the threads. Mazda did this on the OE lower control arms if you want to see an example of what I am doing.
I am getting close to done on the back of the car. Next I will start doing final brake and suspension work on the front end. Then it is on to the engine!
I am getting close to done on the back of the car. Next I will start doing final brake and suspension work on the front end. Then it is on to the engine!
Rear end
I love that rear axle setup. I'm afraid my rear suspension is going to be the weak-link.
I'll wait until something breaks then I'm going to do something very similar to what you did. (Now that you've done such a good job of documenting it for us)
Keep up the great work.
I'll wait until something breaks then I'm going to do something very similar to what you did. (Now that you've done such a good job of documenting it for us
)Keep up the great work.
Thread Starter
Joined: Nov 2006
Posts: 1,578
Likes: 288
From: Parkville, Mo
Spent the day finishing up some re-work on the racecar. I had experimented with some silicon hose for the remote brake/clutch reservoirs that I bought from McMaster Carr. It was listed as being poly-ethylene resistant so I thought it would be fine. Anyway, I determined that brake fluid will be able to seep through it. So, I spent a couple hours replacing it with what I should of used in the first place - reservoir hose from Pegasus Racing.
On a positive note I did get the brake bias adjuster mounted in a way that keeps it away from the throttle cable. So I have that going for me
On a positive note I did get the brake bias adjuster mounted in a way that keeps it away from the throttle cable. So I have that going for me