
SCCA Super Touring U Build

Thread Starter


Joined: Nov 2006
Posts: 1,578
Likes: 288
From: Parkville, Mo
Adapting a Jerico to a Mazda Rotary
There are a couple of ways to mate a Jerico 4spd to a rotary engine. The latest method is to use a Quick Time bell housing along with a turbo flywheel. This is the method that Jerico will refer to if you call them and ask about this process. It is probably an easy way to do this especially if you haven't settled on a flywheel/clutch or you already have a good turbo setup.
For my application this is a non-starter because I already have a light weight non-turbo dual disk clutch. As a result, going the Quick Time route would cost too much. So I am going to use the old school route and have an adapter made that uses a Rotary PU bell housing.
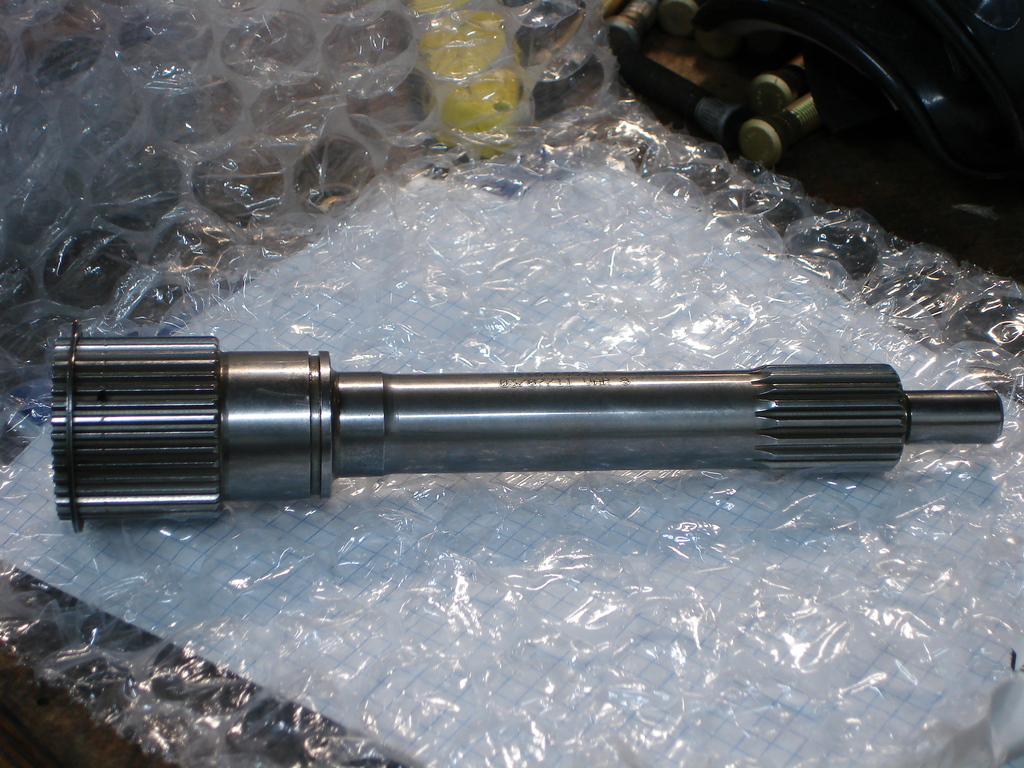
The first first step was to install a new input shaft that is designed for my approach to this problem. Part number I187635C-4 was purchased from Irv Hoerr Racing Products. This input shaft is based on a Chrysler big block 18 spline input shaft that has a pilot that fits a Mazda rotary. I actually had to buy two of them to get one that fits my main shaft - the picture below is of the first one I got but second look just like it. These things are spendy and a real Chinese Puzzle to install.
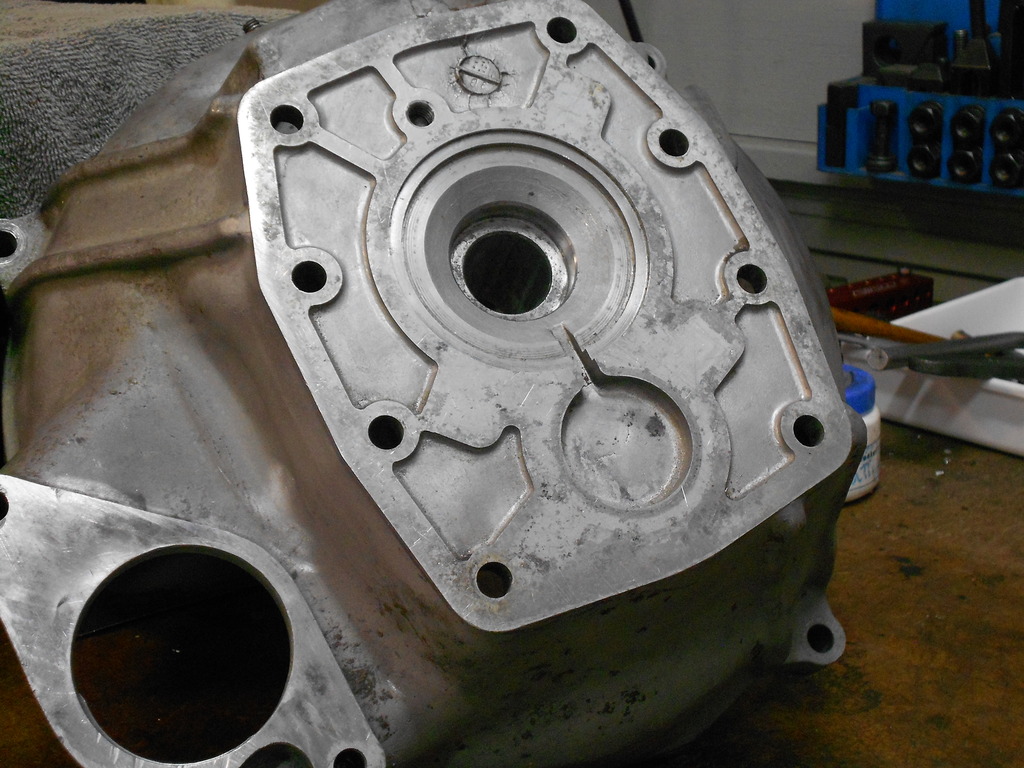
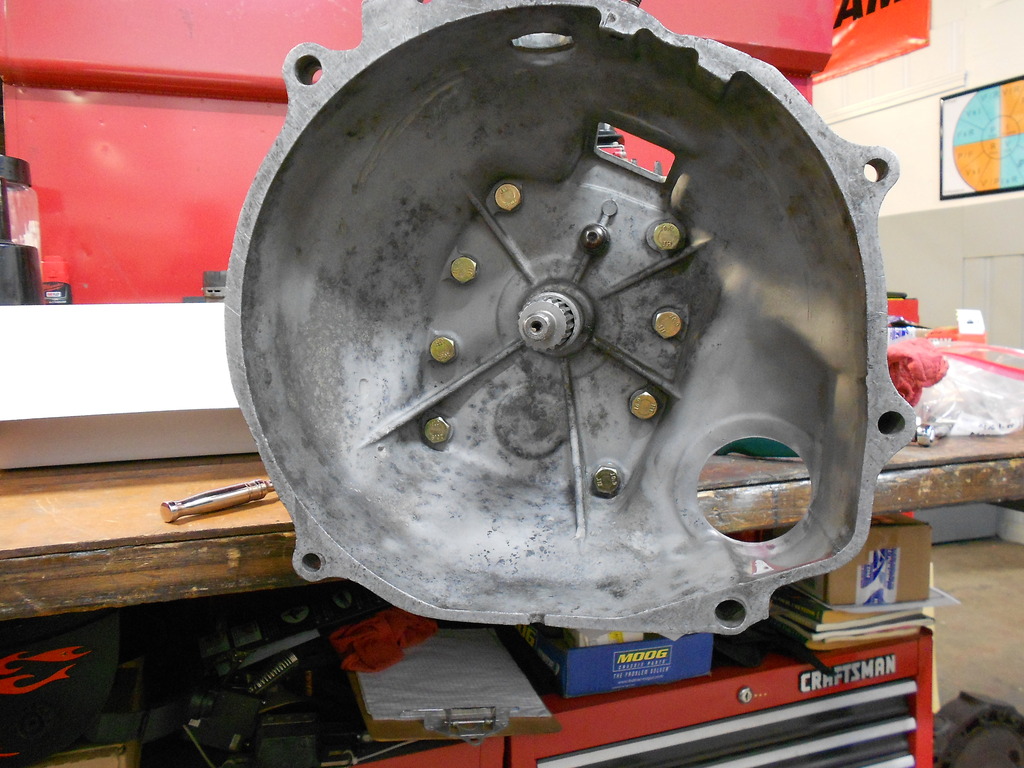
The next step was to source a Mazda Bell Housing that has a flange that I can adapt to. The bell housing used on early Mazda transmissions like the 4sp/5sp used in a rotary Pu fits the bill. These bell housings have an 8 bolt pattern that is also shared with a Turbo II transmission. Unlike the bell housing that is on a NA RX7 transmission the bell housing is not a major part of the gear box case.
The bell housing I selected had to be bored out to fit the Jerico shaft because like everything else in a Jerico it is allot bigger than the Mazda input shaft. Note that when you do this, make sure and reference off of the bearing registers on the bell housing and not the center of OE bore. The reason is that the OE bore holes are rarely centered - mine was not.
More to come.
For my application this is a non-starter because I already have a light weight non-turbo dual disk clutch. As a result, going the Quick Time route would cost too much. So I am going to use the old school route and have an adapter made that uses a Rotary PU bell housing.
The first first step was to install a new input shaft that is designed for my approach to this problem. Part number I187635C-4 was purchased from Irv Hoerr Racing Products. This input shaft is based on a Chrysler big block 18 spline input shaft that has a pilot that fits a Mazda rotary. I actually had to buy two of them to get one that fits my main shaft - the picture below is of the first one I got but second look just like it. These things are spendy and a real Chinese Puzzle to install.

The next step was to source a Mazda Bell Housing that has a flange that I can adapt to. The bell housing used on early Mazda transmissions like the 4sp/5sp used in a rotary Pu fits the bill. These bell housings have an 8 bolt pattern that is also shared with a Turbo II transmission. Unlike the bell housing that is on a NA RX7 transmission the bell housing is not a major part of the gear box case.
The bell housing I selected had to be bored out to fit the Jerico shaft because like everything else in a Jerico it is allot bigger than the Mazda input shaft. Note that when you do this, make sure and reference off of the bearing registers on the bell housing and not the center of OE bore. The reason is that the OE bore holes are rarely centered - mine was not.

More to come.
Thread Starter
Joined: Nov 2006
Posts: 1,578
Likes: 288
From: Parkville, Mo
o
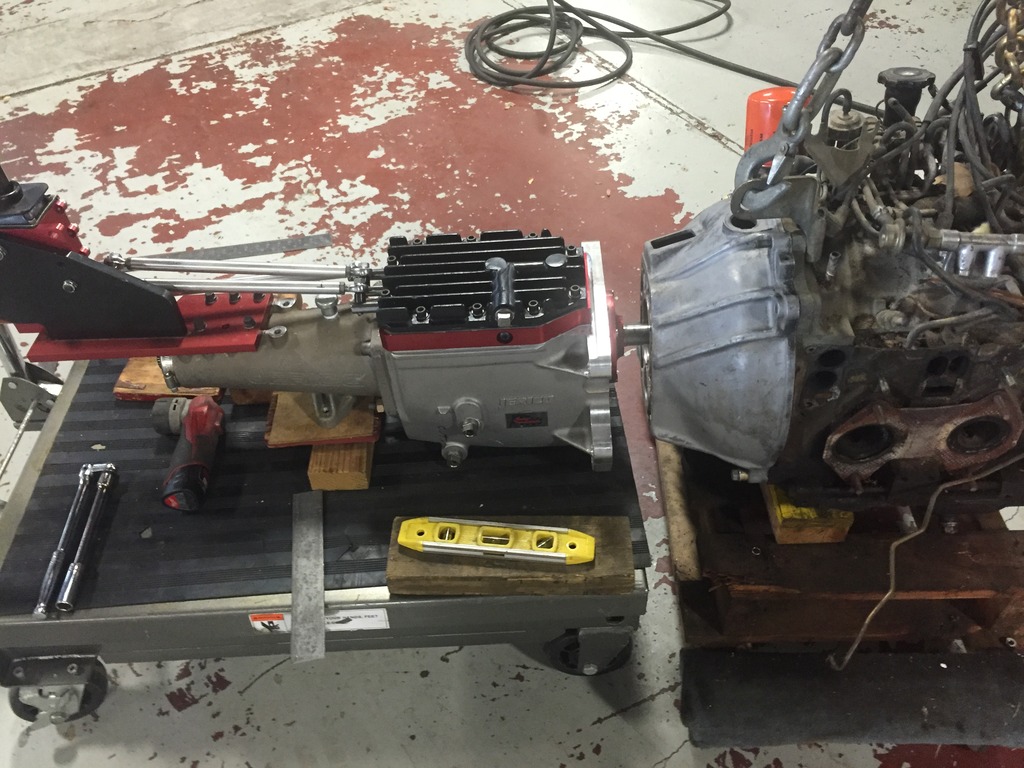
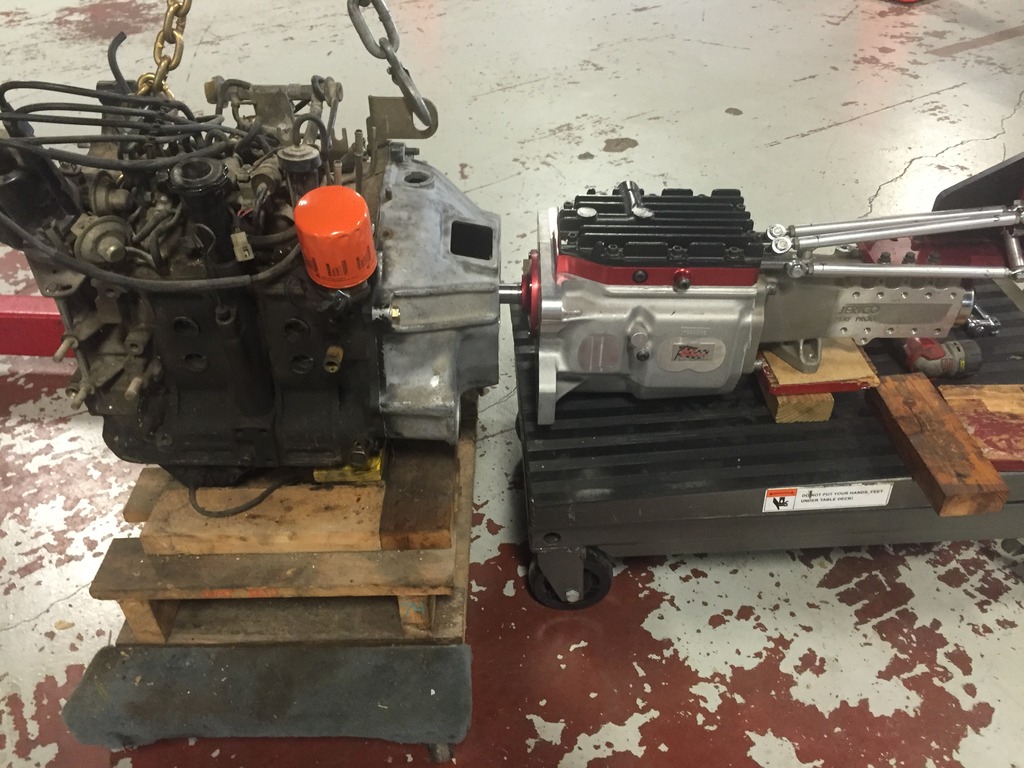
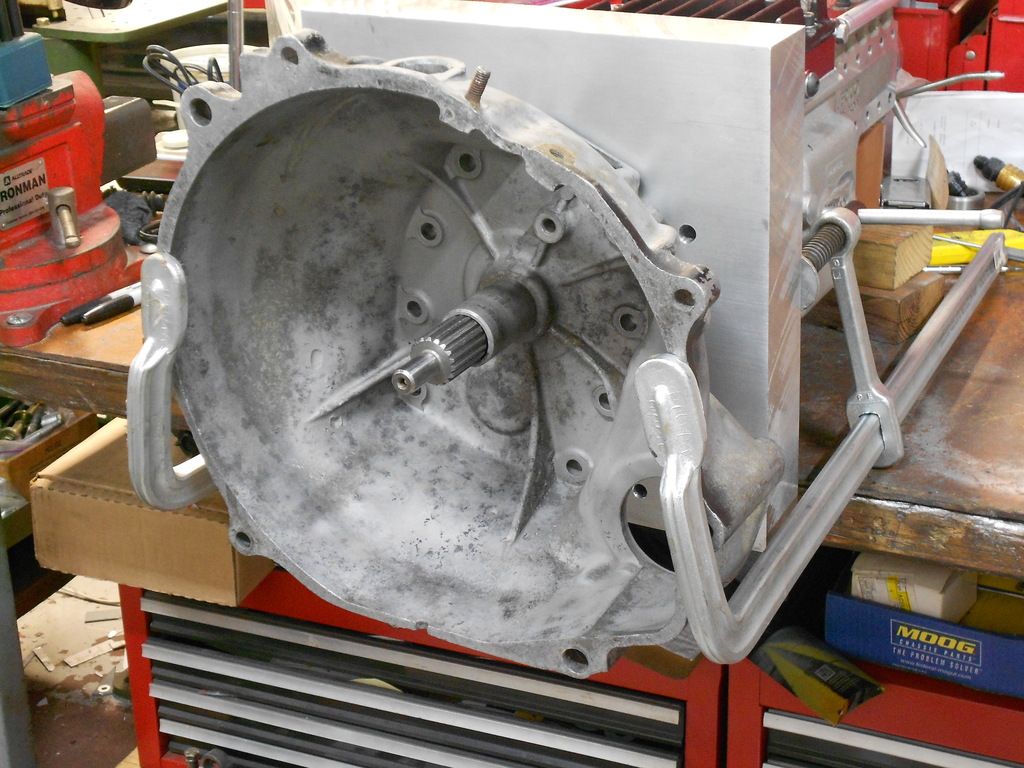
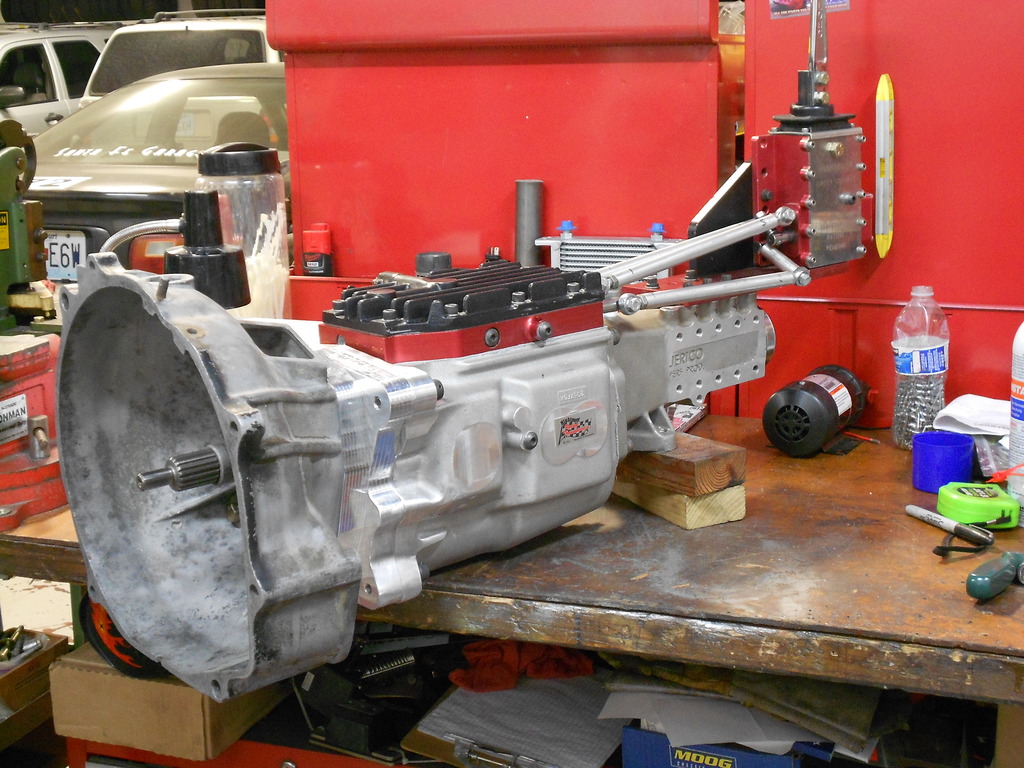
With the bell housing bored out to accept the Jerico input shaft it was time to mock things up an determine how thick the adapter will need to be. Worked out to be 2 inches. Having a core engine makes this easy.


Thread Starter
Joined: Nov 2006
Posts: 1,578
Likes: 288
From: Parkville, Mo
No it really isn't. In fact with the adapter in place between the bell housing and the transmission the trans mount is just about in the same place as the OE trans mount.
Last edited by mustanghammer; Jan 21, 2017 at 09:02 PM.
Thread Starter
Joined: Nov 2006
Posts: 1,578
Likes: 288
From: Parkville, Mo
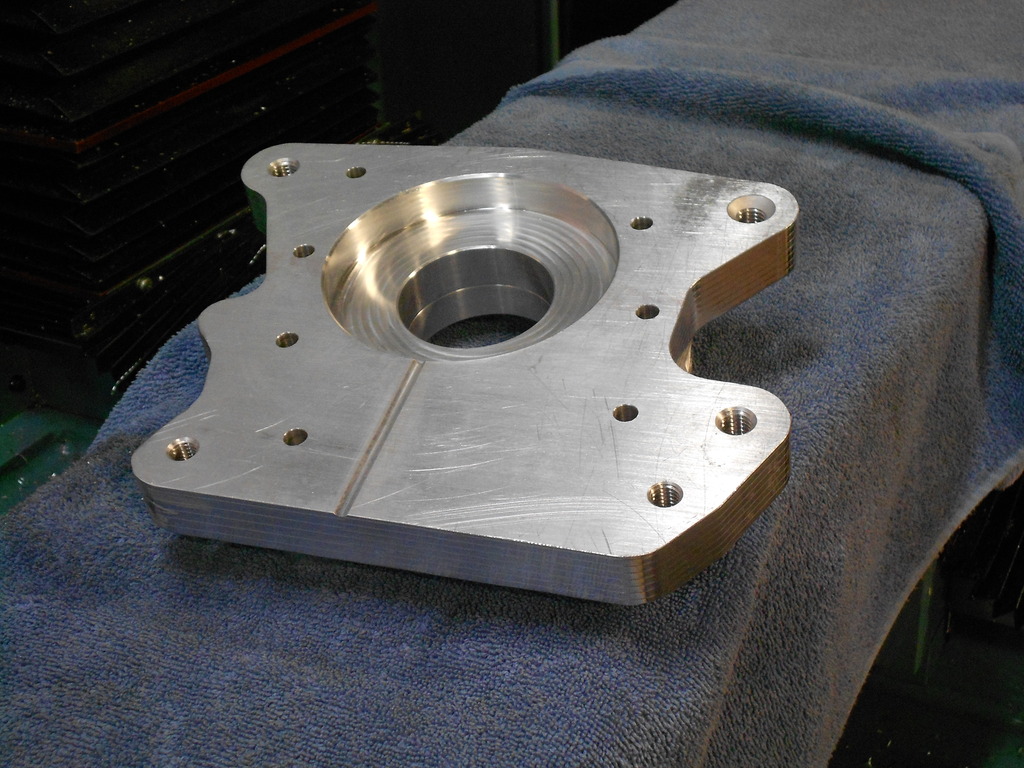
I purchased a 12x12x2" piece of 6061 T6 billet off of eBay and drafted up the center bore for the adapter. On the Jerico side the adapter registers on the bearing retainer. On the Mazda side the adapter has a sleeve that registers into back of the bell housing.
All of the bolt patterns reference off of the center of the bore so the adapter is perfectly centered on both the trans and the bell housing. The Jerico pattern was programed from a technical drawing on the Jerico Performance web site. The Mazda pattern was marked using an alignment punch.
Jerico side
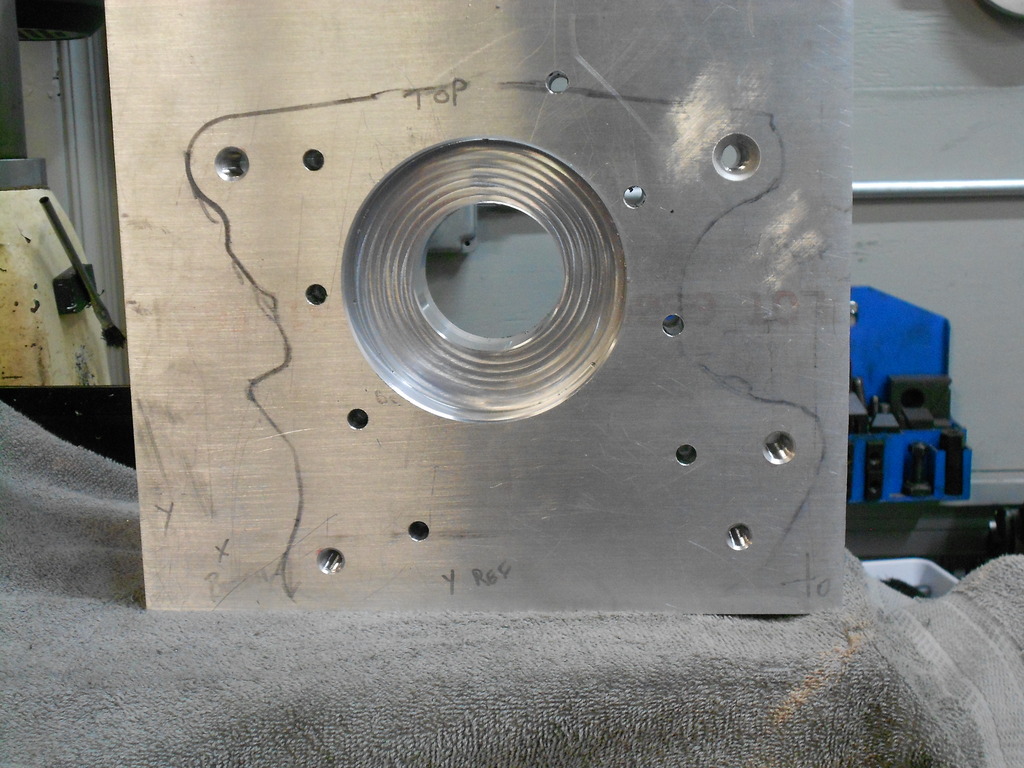
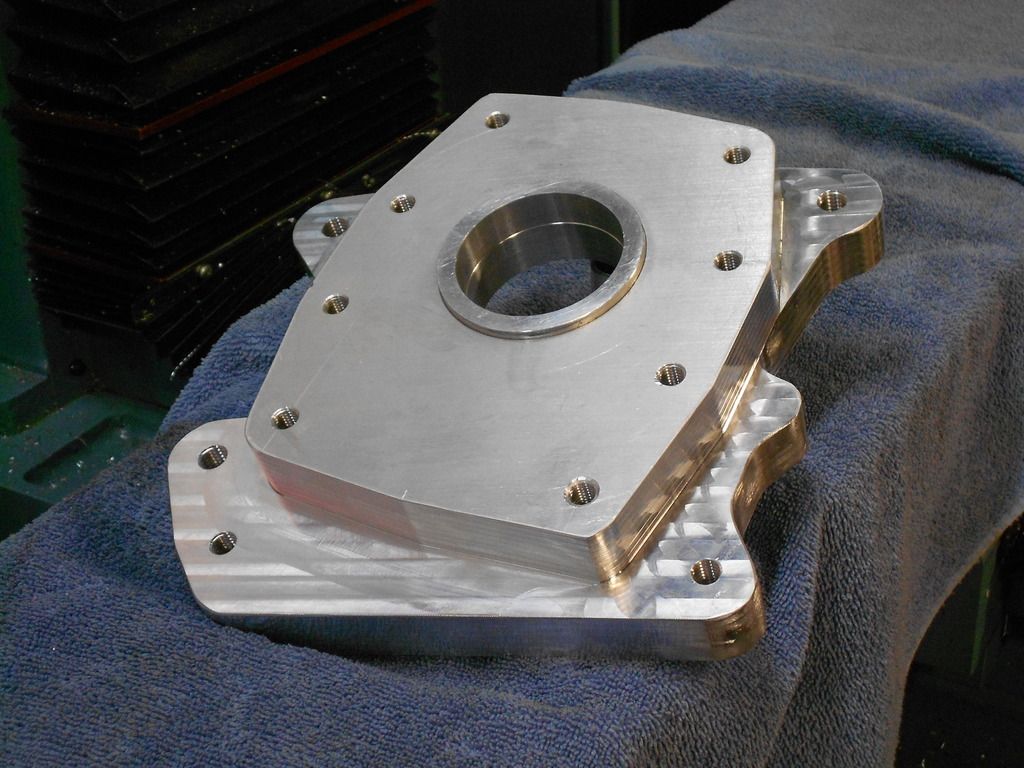
Mazda side

Bell housing clamped to the adapter to mark the pattern
All of the bolt patterns reference off of the center of the bore so the adapter is perfectly centered on both the trans and the bell housing. The Jerico pattern was programed from a technical drawing on the Jerico Performance web site. The Mazda pattern was marked using an alignment punch.
Jerico side

Mazda side

Bell housing clamped to the adapter to mark the pattern

Thread Starter
Joined: Nov 2006
Posts: 1,578
Likes: 288
From: Parkville, Mo
To make room for the starter the Jerico transmission case has to be modified. Not real hard to do but when you realize you are cutting up a virgin trans case it is sobering.
Before
After
Before

After

Thread Starter
Joined: Nov 2006
Posts: 1,578
Likes: 288
From: Parkville, Mo
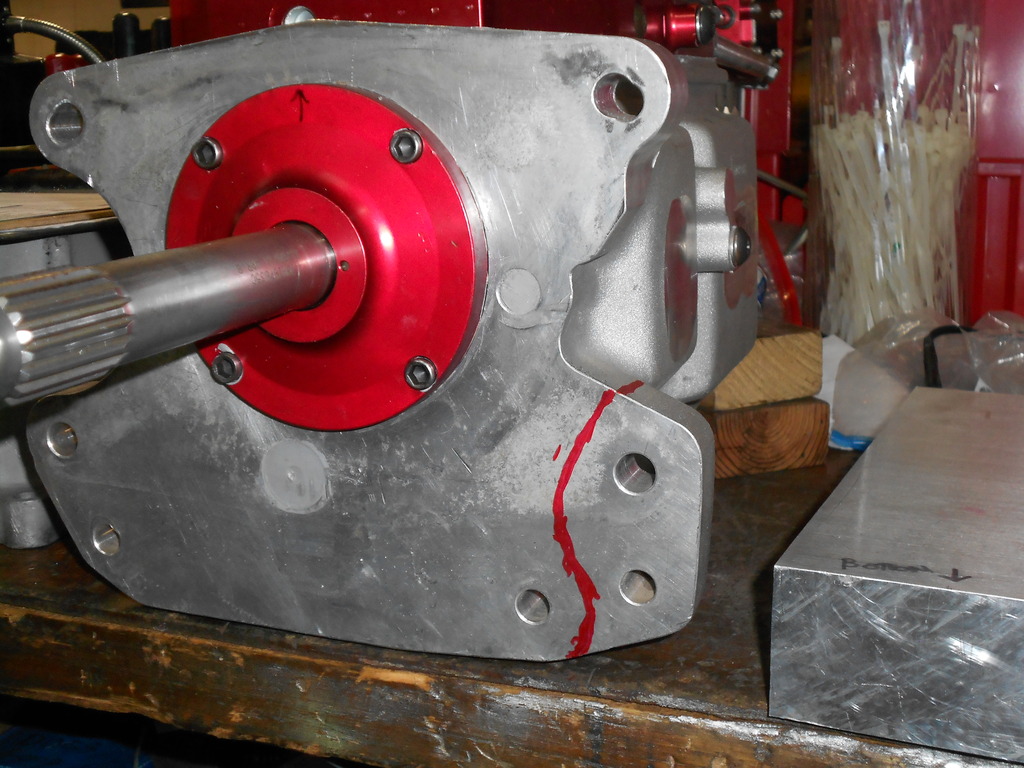
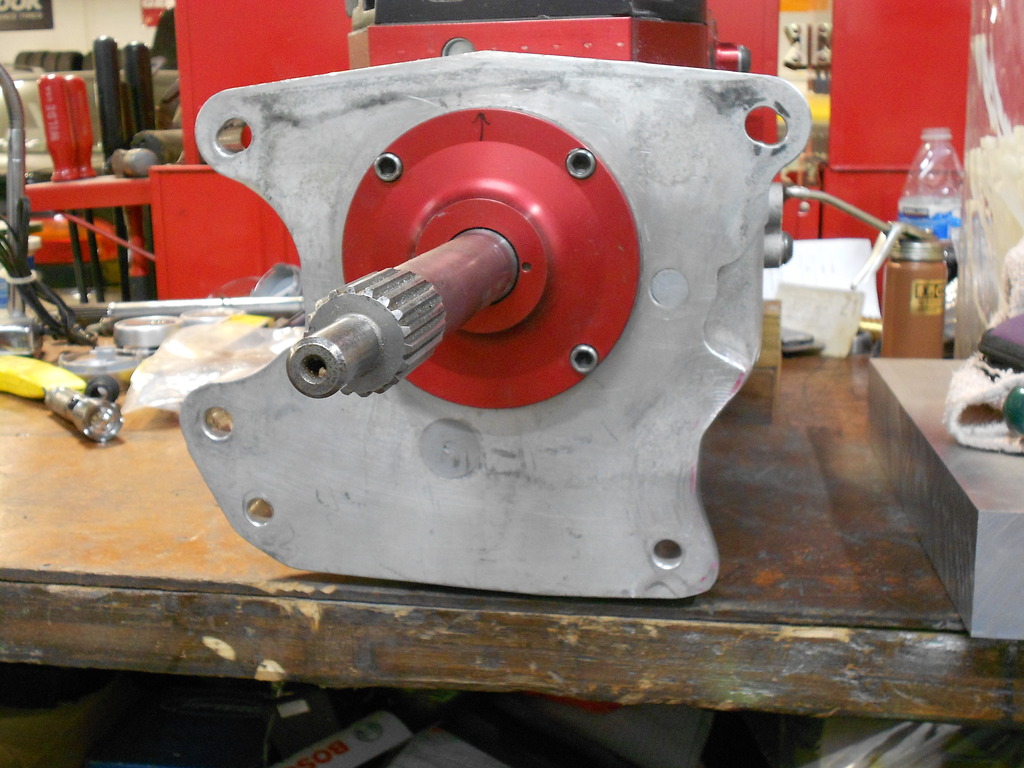
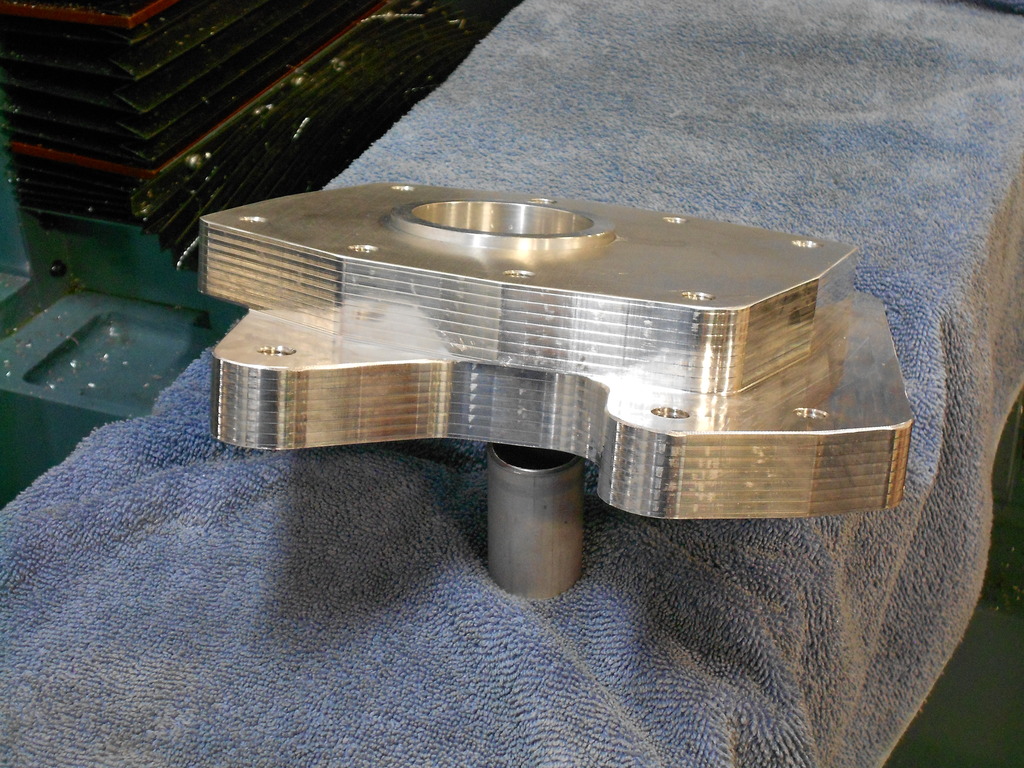
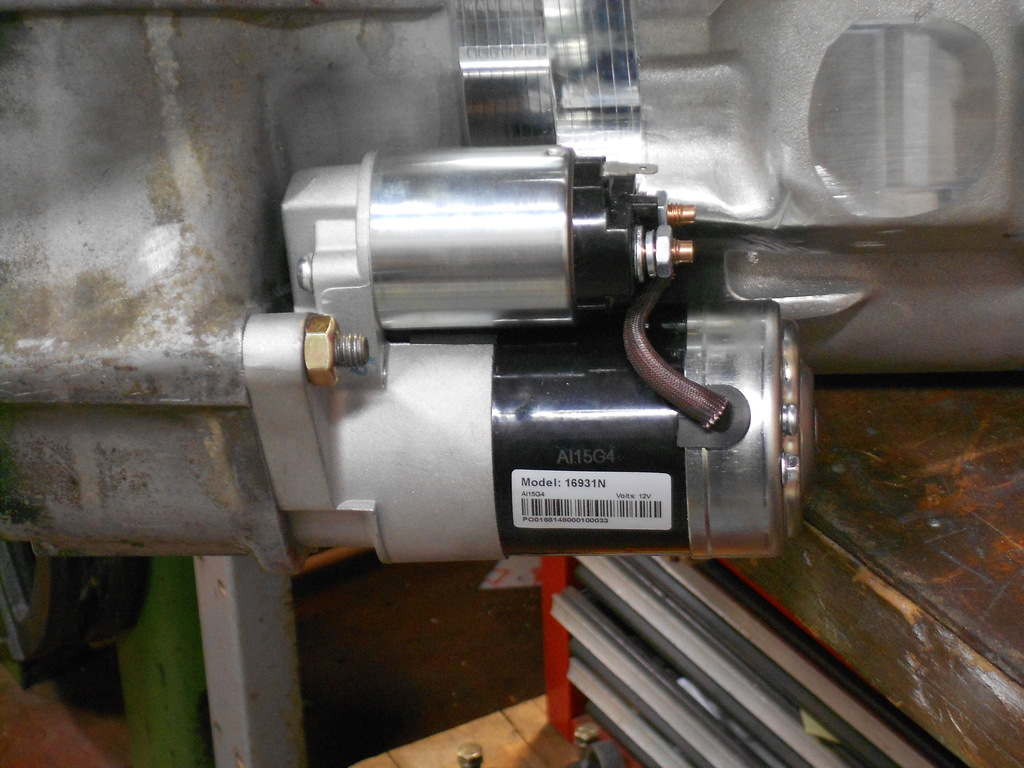
Here is the finished product created by David Long at SantaFeGarge.com using a 2 axis CNC mill.
Jerico side - note the drain slot in case of a front seal leak
Mazda side
Eye Candy
Bolted to the transmission
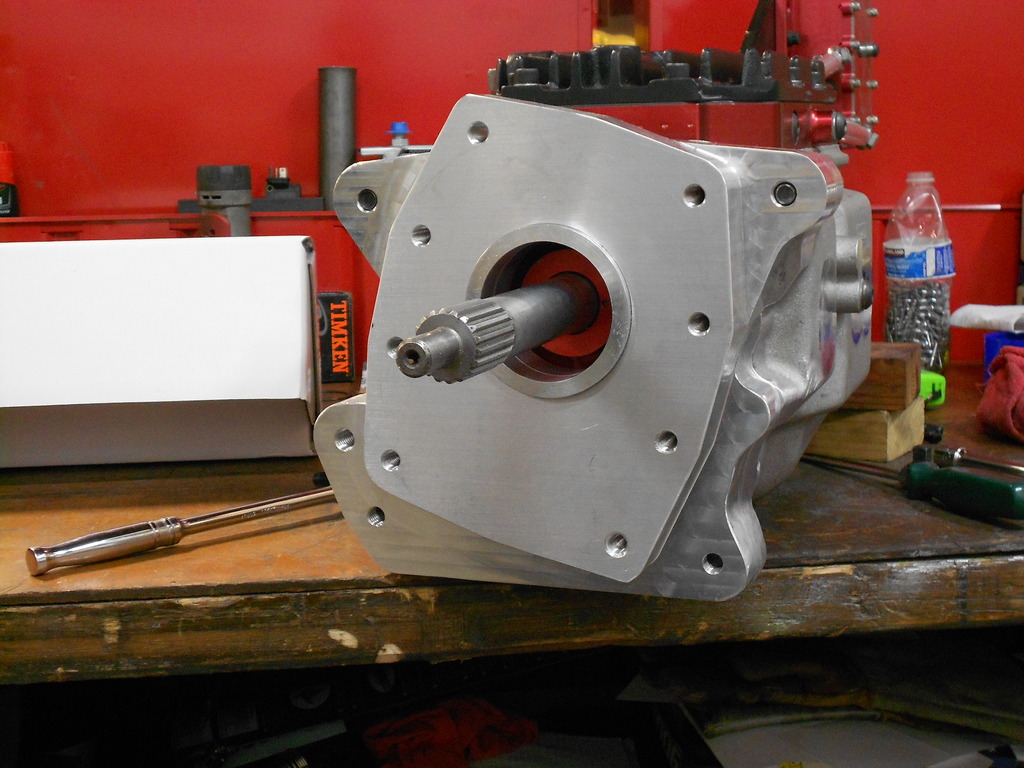
Bell housing bolted on
All together
2nd Gen NA Starter bolted on
Jerico side - note the drain slot in case of a front seal leak

Mazda side

Eye Candy

Bolted to the transmission

Bell housing bolted on

All together

2nd Gen NA Starter bolted on


Thread Starter
Joined: Nov 2006
Posts: 1,578
Likes: 288
From: Parkville, Mo
Thanks Wood!
Actually this is not a new method of adapting a rotary. 10yrs ago Jerico made and sold these adapters and you can still get them made by GForce and Sevens Only on a one off basis. We decided to try this ourselves.
Actually this is not a new method of adapting a rotary. 10yrs ago Jerico made and sold these adapters and you can still get them made by GForce and Sevens Only on a one off basis. We decided to try this ourselves.
spoon!
Joined: Sep 2002
Posts: 1,208
Likes: 50
From: Dousman, WI
That's a nice looking piece!
Because it's kind of my thing lately, I'm thinking of designing and casting a custom bellhousing to do this. I admit though that it may be mostly because I want one of the late RX-8 starters spinning an NA diameter flywheel. Well, and because I am having fun casting stuff.
Because it's kind of my thing lately, I'm thinking of designing and casting a custom bellhousing to do this. I admit though that it may be mostly because I want one of the late RX-8 starters spinning an NA diameter flywheel. Well, and because I am having fun casting stuff.
spoon!
Joined: Sep 2002
Posts: 1,208
Likes: 50
From: Dousman, WI
Well, whether or not it looks like child's play, one of us has an STU car that might be on track in 2017 and one of us doesn't.  In all seriousness, I'm trying to get to the point where I can cast low volume production race-ey parts - I'm (back to after a pause to buy a house) working on more optimized intake manifolds, and a bellhousing seems like a decent step after that.
Thinking of STU stuff though, I need to get a heater in my barn and get back to fixing the Miata unibody I have sitting on sawhorses - even if I do get stuff cast, it does me no good if there's no car to put it in.
In all seriousness, I'm trying to get to the point where I can cast low volume production race-ey parts - I'm (back to after a pause to buy a house) working on more optimized intake manifolds, and a bellhousing seems like a decent step after that.Thinking of STU stuff though, I need to get a heater in my barn and get back to fixing the Miata unibody I have sitting on sawhorses - even if I do get stuff cast, it does me no good if there's no car to put it in.

Senior Member
Joined: Sep 2013
Posts: 301
Likes: 34
From: asheville
You planning to use 3D printed patterns for your rapid castings? That is how all of our prototype turbine and compressor housings are made nowadays. It is pretty amazing that you can have complete prototype cast and machined parts in 3 weeks, we pretty much use 2 suppliers since they are the ones that work with high temp cast stainless, both are in Germany.
spoon!
Joined: Sep 2002
Posts: 1,208
Likes: 50
From: Dousman, WI
Exactly what I'm doing, yeah, just at a home foundry level. I had a thread in the Naturally Aspirated forum that I'll bump up, actually... haven't made more progress on intake manifolds themselves, but I made some other stuff to get myself back in gear.
Sorry for the derail.
Sorry for the derail.
Thread Starter
Joined: Nov 2006
Posts: 1,578
Likes: 288
From: Parkville, Mo
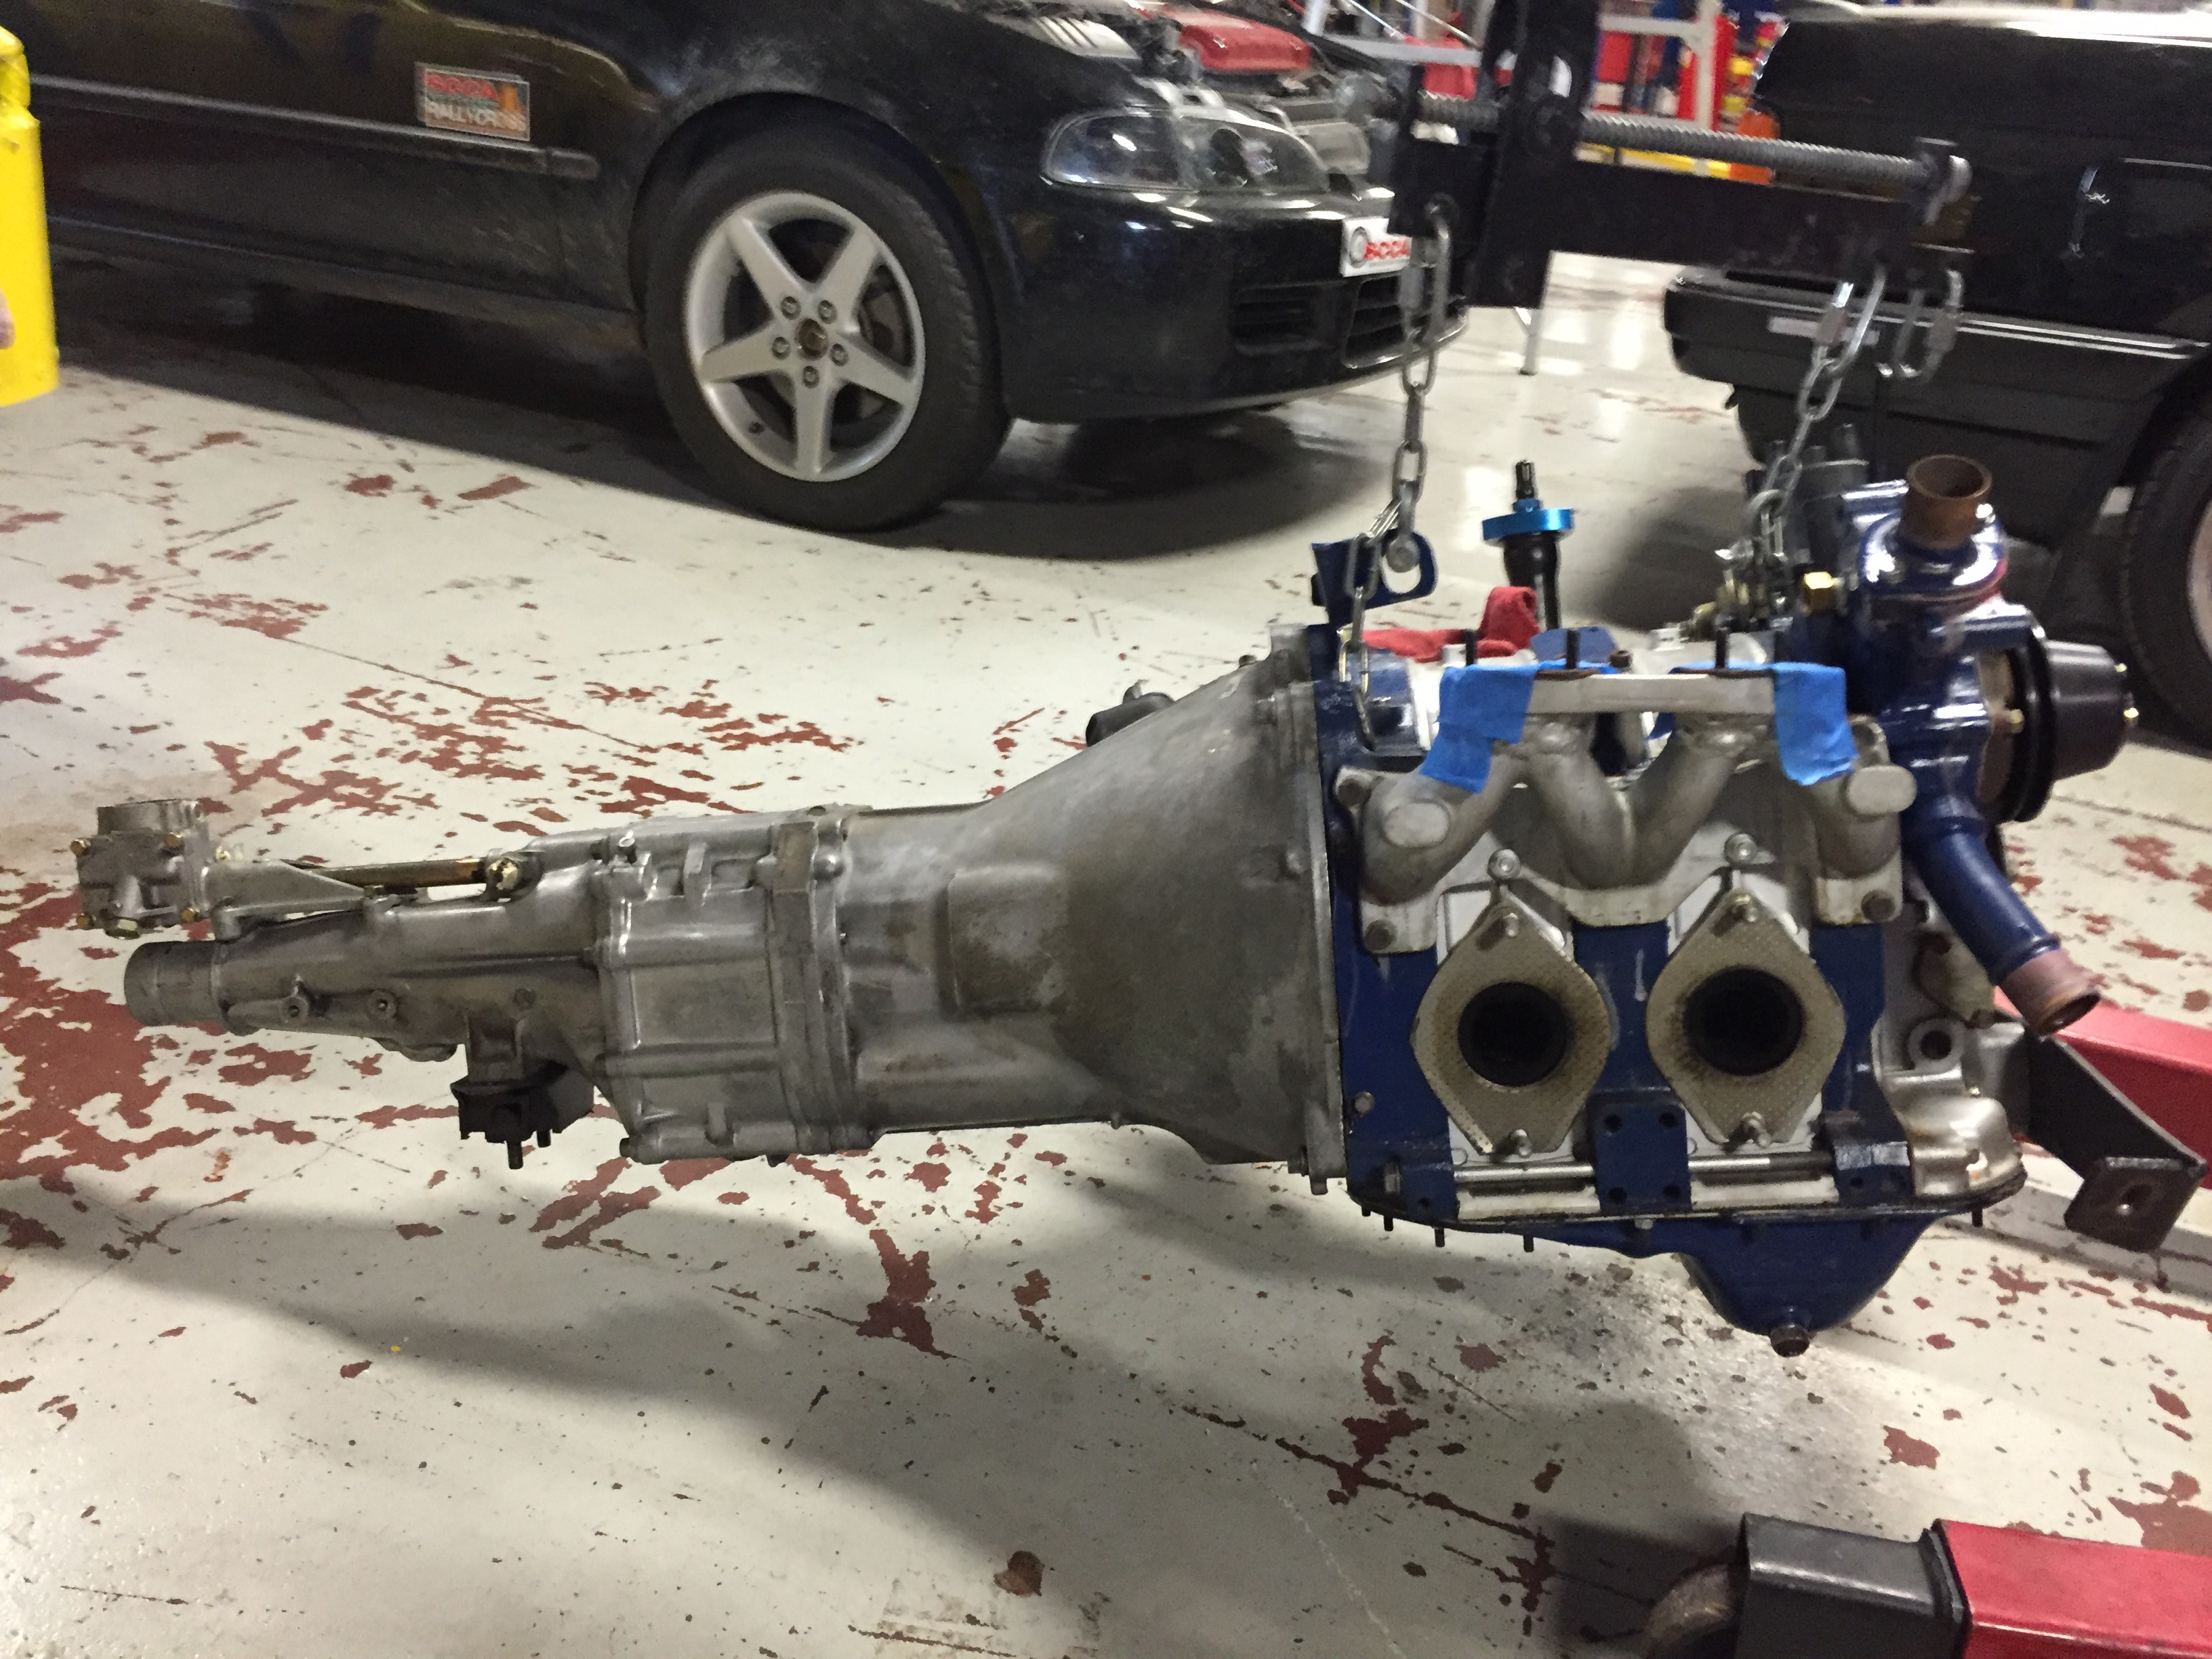
So slowly making progress. Pulled the engine and transmission a couple of weeks ago just before coming down with the flu. Once that passed I started working on things again.
I swapped the transmission (Rx7 case with Miata gear set) for a set of clutch disks that have the hemi spines my Jerico uses.
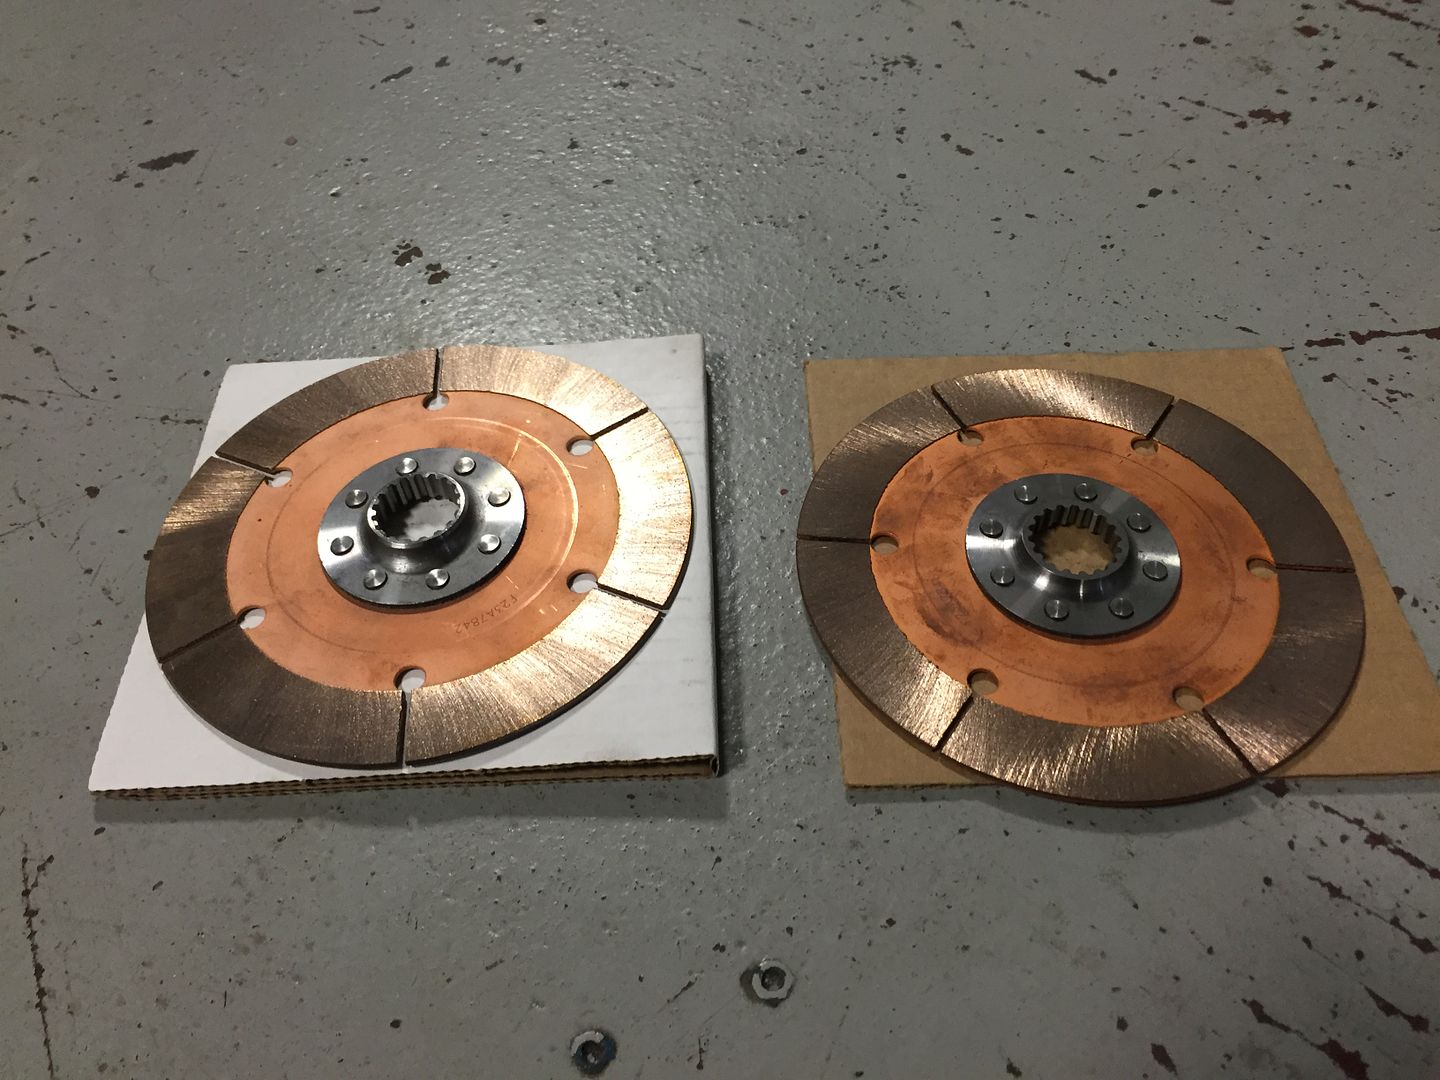
To get the clutch disks lined up I had to make an alignment tool. I picked up a plastic 18 spline Hemi/big block alignment tool and had it modified to fit a Mazda pilot. To do this I cut open the tool, filled it full of aluminum foil ***** and J B Weld and then David Long at Santa Fe Garage turned it down to fit a the Mazda pilot. I have a universal alignment tool but it doesn't work for multi-disk clutches.
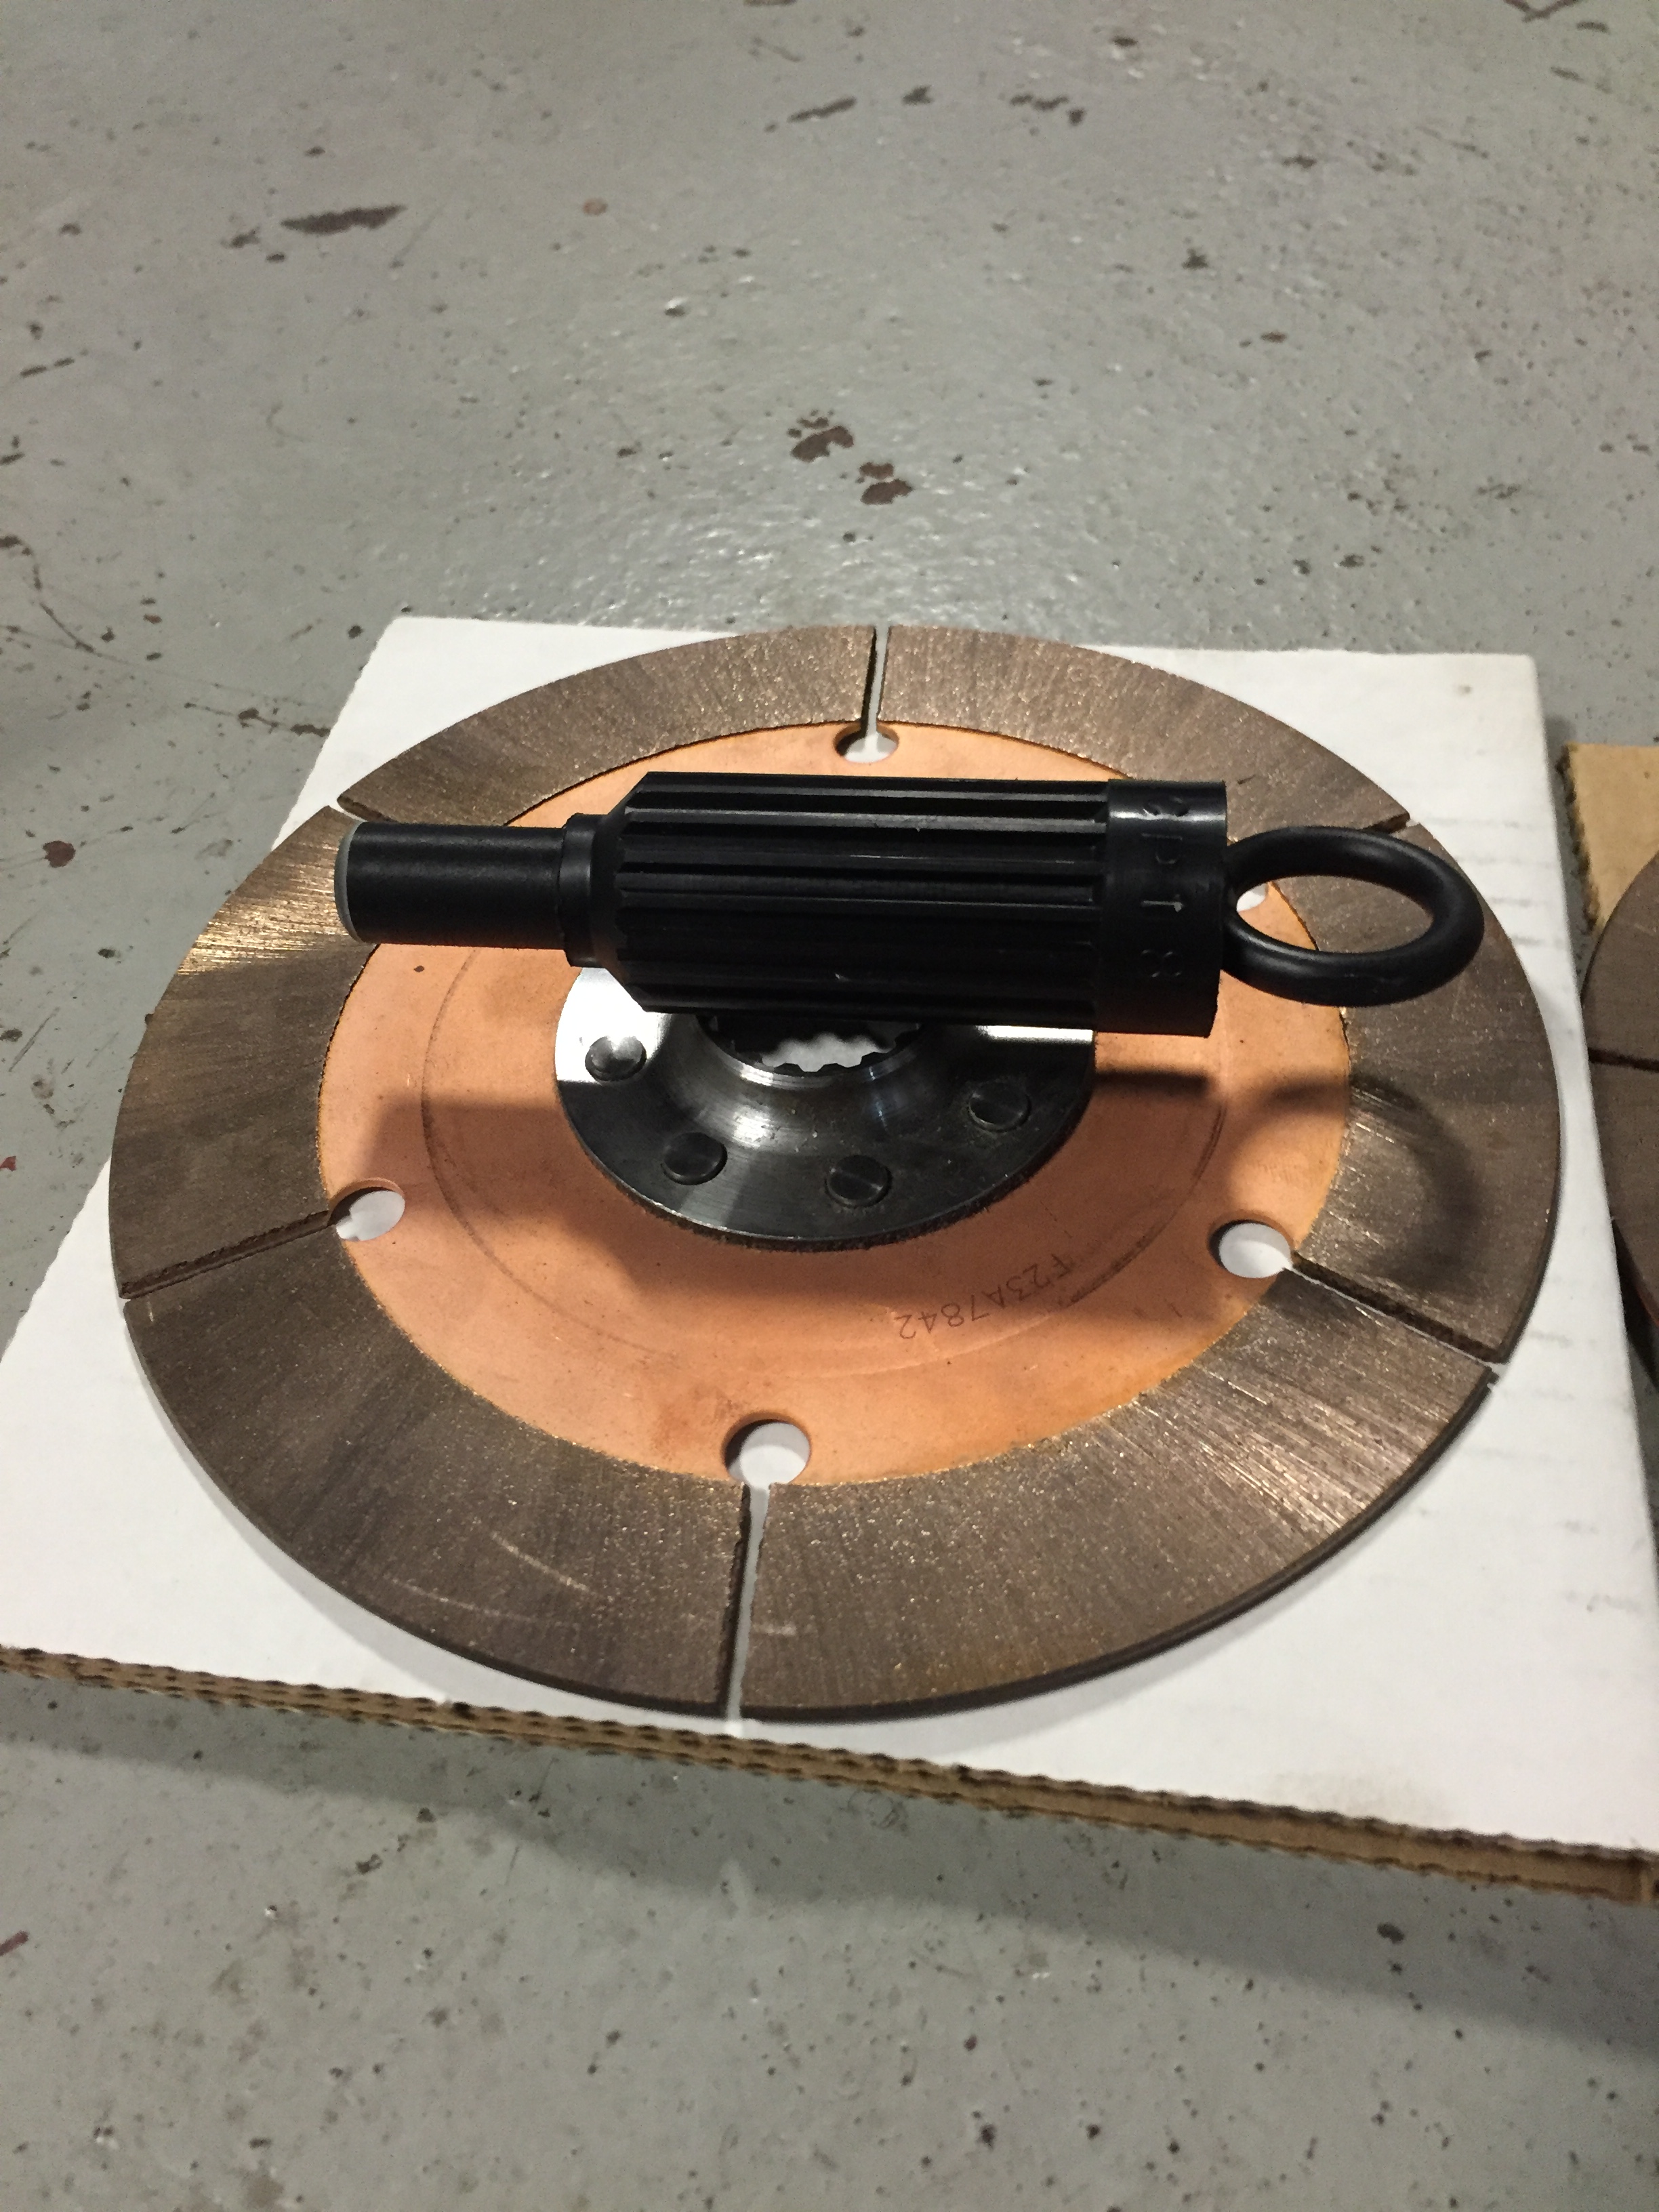
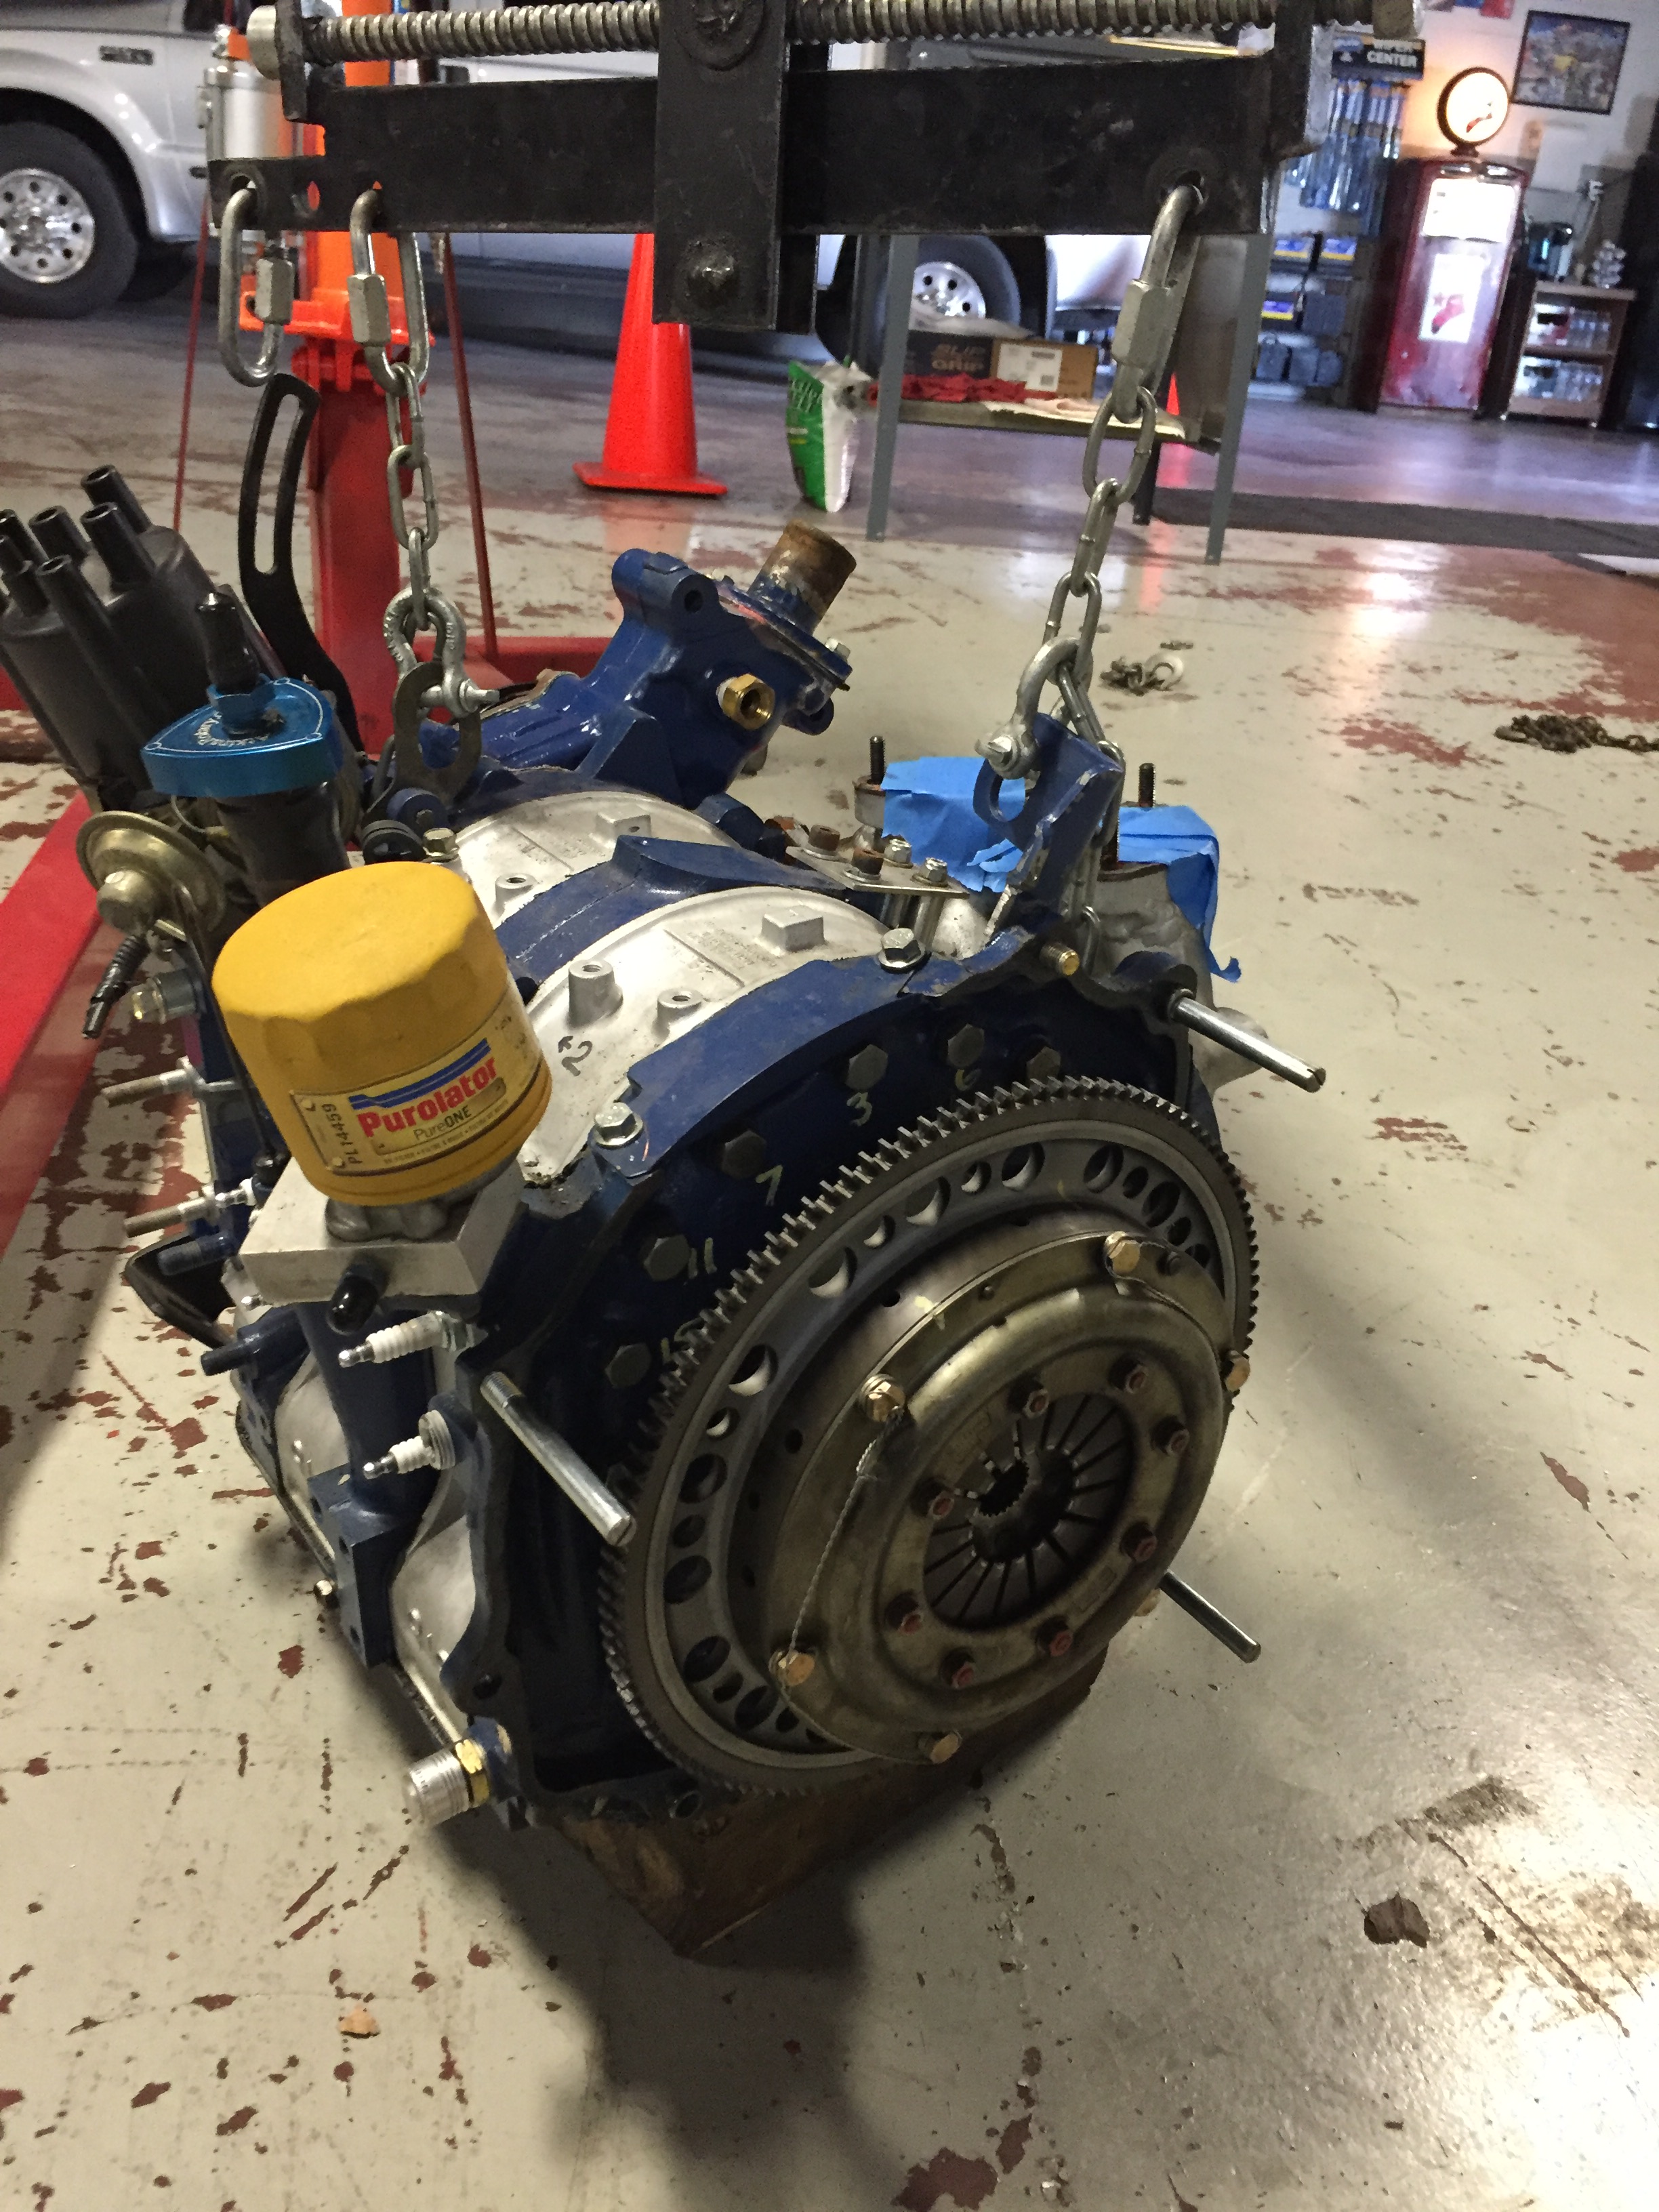
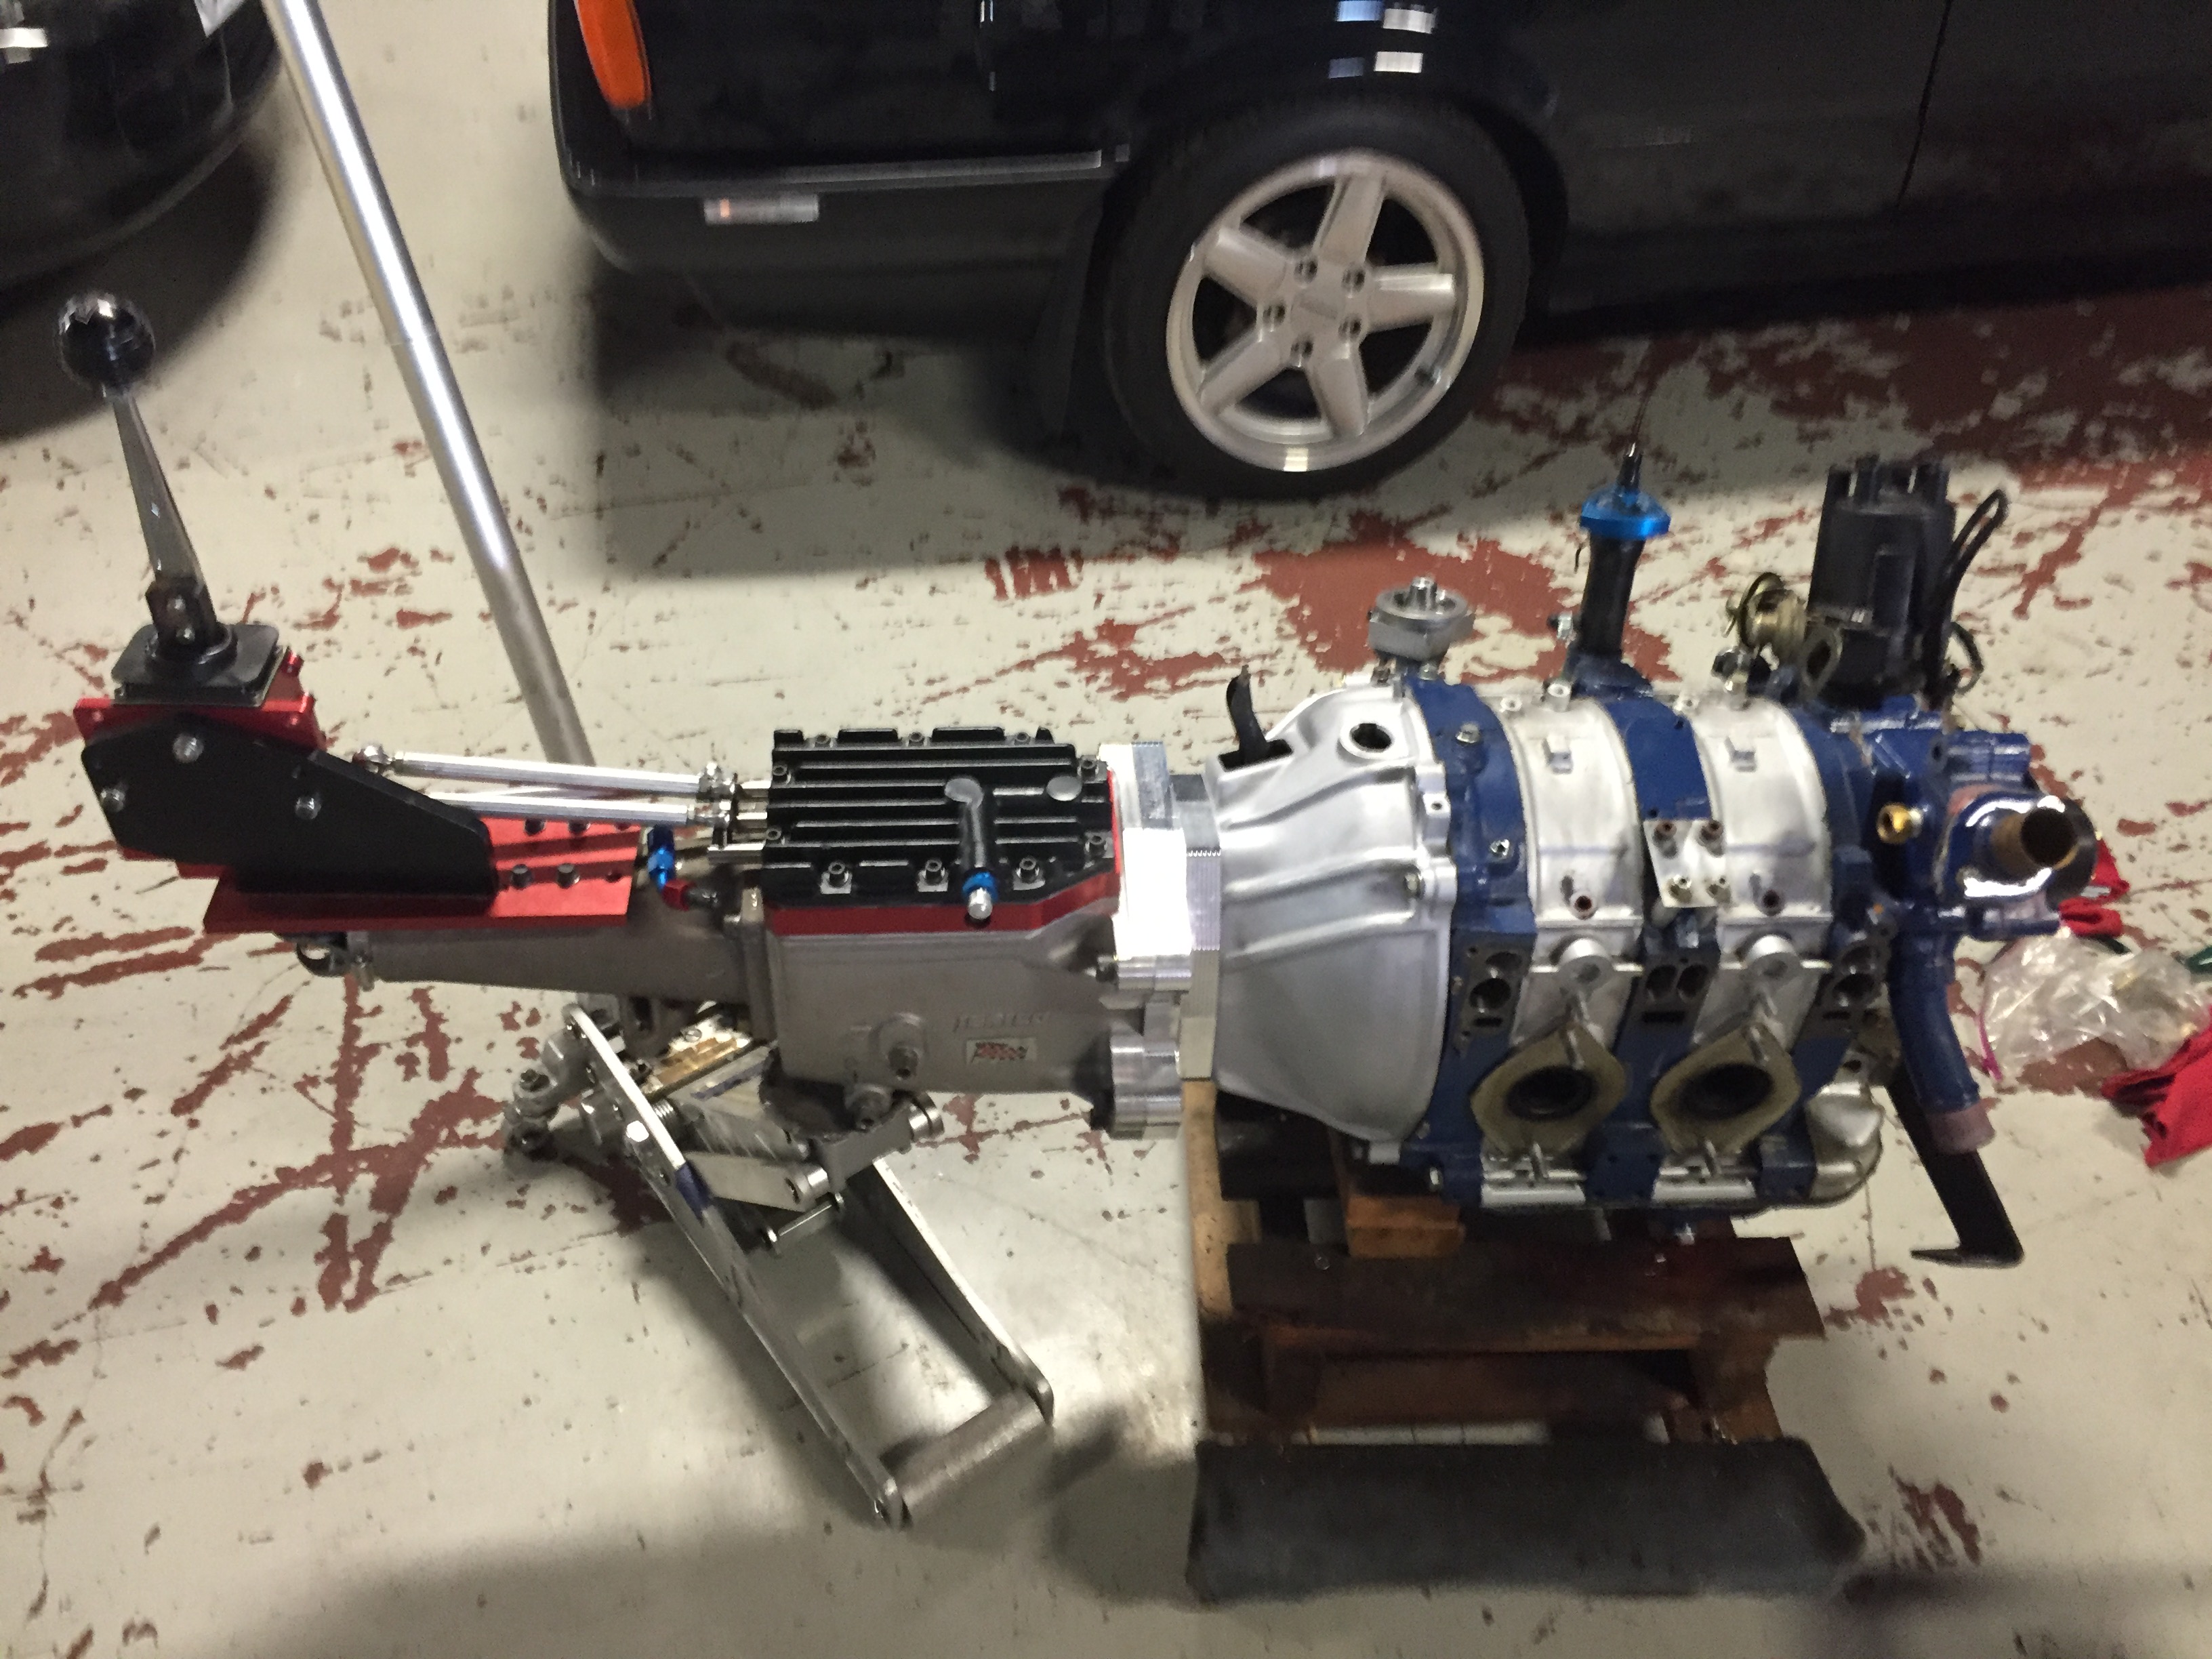
Once I had the new clutch disks installed and centered I mated the engine and the Jerico. It fits perfectly and the throw out bearing has plenty of clearance. By the way, I have some guide pins that I made out of long M10 x 1.25 pitch bolts that really make this work a breeze.


I swapped the transmission (Rx7 case with Miata gear set) for a set of clutch disks that have the hemi spines my Jerico uses.

To get the clutch disks lined up I had to make an alignment tool. I picked up a plastic 18 spline Hemi/big block alignment tool and had it modified to fit a Mazda pilot. To do this I cut open the tool, filled it full of aluminum foil ***** and J B Weld and then David Long at Santa Fe Garage turned it down to fit a the Mazda pilot. I have a universal alignment tool but it doesn't work for multi-disk clutches.

Once I had the new clutch disks installed and centered I mated the engine and the Jerico. It fits perfectly and the throw out bearing has plenty of clearance. By the way, I have some guide pins that I made out of long M10 x 1.25 pitch bolts that really make this work a breeze.


Banned. I got OWNED!!!
Joined: Aug 2012
Posts: 1,666
Likes: 88
From: San Jose, CA
Depending on the location (front or back), these are either M16 x 1.5 to -10AN (FRONT) or M18 x 1.5 to -10AN (BACK). Off the top of my head I ordered 1x M16 and 1x M18 for my Turbo II ages ago to convert it. FB/FC Oil coolers are usually the same thing. M18 x 1.5.
Racing Beat says 71-85 use these so I was going off that.
- Three (3) Racing Beat -10-to-16mm adapter fittings.
- One (1) Racing Beat -10-to- 18mm adapter fitting.
Universal Oil Cooler Hose Kit for 71-85 Chassis - Racing Beat
16mm
These fittings adapt the 16mm female metric threads in the front cover (1971-95 rotary engines) and oil cooler (1971-85 stock or factory race) to accept -10 hose ends.
18mm
These fittings adapt the 18mm female metric threads in the rear housing to accept -10 hose ends. Additionally, these 18mm female fittings also fit the 1986-1992 factory oil coolers.
Thread Starter
Joined: Nov 2006
Posts: 1,578
Likes: 288
From: Parkville, Mo
Thread Starter
Joined: Nov 2006
Posts: 1,578
Likes: 288
From: Parkville, Mo
Racing Beat says 71-85 use these so I was going off that.
- Three (3) Racing Beat -10-to-16mm adapter fittings.
- One (1) Racing Beat -10-to- 18mm adapter fitting.
Universal Oil Cooler Hose Kit for 71-85 Chassis - Racing Beat
16mm
These fittings adapt the 16mm female metric threads in the front cover (1971-95 rotary engines) and oil cooler (1971-85 stock or factory race) to accept -10 hose ends.
18mm
These fittings adapt the 18mm female metric threads in the rear housing to accept -10 hose ends. Additionally, these 18mm female fittings also fit the 1986-1992 factory oil coolers.
- Three (3) Racing Beat -10-to-16mm adapter fittings.
- One (1) Racing Beat -10-to- 18mm adapter fitting.
Universal Oil Cooler Hose Kit for 71-85 Chassis - Racing Beat
16mm
These fittings adapt the 16mm female metric threads in the front cover (1971-95 rotary engines) and oil cooler (1971-85 stock or factory race) to accept -10 hose ends.
18mm
These fittings adapt the 18mm female metric threads in the rear housing to accept -10 hose ends. Additionally, these 18mm female fittings also fit the 1986-1992 factory oil coolers.
I got the fittings from Mazdatrix a bunch of years ago which means they are probably the Racing Beat parts. I make my own -10 AN hoses
Thread Starter
Joined: Nov 2006
Posts: 1,578
Likes: 288
From: Parkville, Mo
This car was going to get all of that structure no matter what. The two tubes that come straight through the firewall on the left and right sides of the engine compartment are required by the SCCA to make this a legal Production/GT cage. The tubes that I added because of the inner fender panel removal are the vertical tubes that run parallel to the strut towers.
I raced this car allot with only a strut brace because that was all that was allowed and I can tell you that there is movement going on up front. The structure I added is noticeable and worth the weight.
The structure is also there to help protect critical suspension mounting points in case of an accident. A really hard hit would kill the car but something less hard or contact with another car hopefully will leave the car repairable.

Senior Member
Joined: Oct 2013
Posts: 749
Likes: 34
From: Clemmons, NC
No I don't think that would do the trick. I feel like the OE inner fender panels add allot of structure so if you cut them out something has to be put back in to make up for them.
This car was going to get all of that structure no matter what. The two tubes that come straight through the firewall on the left and right sides of the engine compartment are required by the SCCA to make this a legal Production/GT cage. The tubes that I added because of the inner fender panel removal are the vertical tubes that run parallel to the strut towers.
I raced this car allot with only a strut brace because that was all that was allowed and I can tell you that there is movement going on up front. The structure I added is noticeable and worth the weight.
The structure is also there to help protect critical suspension mounting points in case of an accident. A really hard hit would kill the car but something less hard or contact with another car hopefully will leave the car repairable.

Rotary Enthusiast
Joined: Jan 2005
Posts: 846
Likes: 14
From: hsv al
Engine porting continues and is starting to be a grind...pun intended. I am now understanding why a professional engine builder charges 4-5K for a street ported racing engine. Anyway, at least this is easier that porting a set of V8 heads...been there done that.
New rotor housings have been ordered along all the seals/parts I need to finish the project
Photos when things get closer to being assembled.
New rotor housings have been ordered along all the seals/parts I need to finish the project
Photos when things get closer to being assembled.
I have been curious about what it takes to get over 200hp on street ported 12As and 13Bs in SCCA classes.