
My Build thread finally 13b-REW / Ford 8.8 / FC Subframe


Thread Starter
RX-7 NUT
Joined: Aug 2007
Posts: 444
Likes: 1
From: California
So a little background. Im 22 and have owned 6 rx7's at this point my first on being a solar gold 1983 GSL that never actually ran... mainly because i was no mechanic at all and i bought it not running. Been in the US Air Force for 4.5 and just made E-5 so my present to myself is my long awaited dream. Building a 500 Wheel horse power first gen rx7 that will make every1 who makes fun of my currently little black (lawn mower as they call it) pee themselves a little =D. The car will be registered in georgia were it is emissions/inspection exempt so i can drive it street legal in California as this is going to be a weekend warrior/drive to work when i feel like it car. Not setting it up for any specific type of racing this car is going to be just for fun.
In this thread i plan on documenting everything i do as well as giving details for everyone who is planning on doing something similar. As well as documenting costs of major componets because the main question i see on this site is "How much does it cost" and every1 always says "alot". Im not on any type of budget and i plan on doing this swap right (no corner cutting even if it costs the extra $)
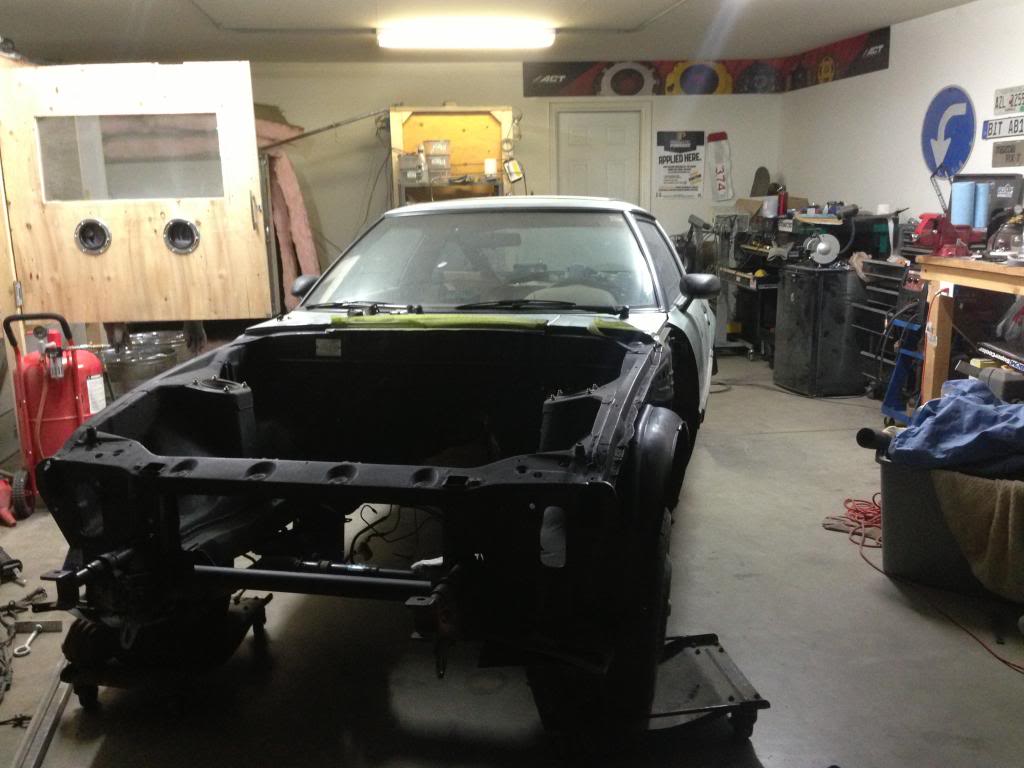
So i decided i was going to do a 13b swap on my current rx7 (83 gs) and ended up buying a 13b-REW off craigslist in pieces and getting no where with the swap. Mainly just waiting to save up some $ and get the motor put in. Then let my friend borrow it and found out it had frame damage when we were changing out a flat (bondo on the frame painted over from the PO so i didnt notice it. Needless to say that car will no longer be the donor.
Current plans for the car are as follows
Motor-
13b-REW Motor Large Street Port
Borg Warner S366 turbo
Synapse 50mm Wastegate (Might go tial 44 mm not sure yet)
Tial bov
V Mount Intercooler (Not sure on core size)
FC Oil Cooler
Aluminum Radiator
FC Oil Pan/pickup/motor mounts for FC subframe
Hockey Puck Motor Mounts
Water/Meth injection
As far as ecu's i might go megasquirt to start off but im looking into haltech or AEM not sure yet.
Suspention
Full Stainless Brake Lines
Front-
FC Subframe w/ stock FC suspension
Coilovers
Stock FC Sway Bar (for now)
T2 5 lug bolt pattern+Brakes (currently have the 4 lug stuff from a 87)
Rear-
Ford 8.8 Rear Posi out of a 94 mustang (current has 2.73's)
3.73 Gears (not sure yet)
Not shortening the axles at all (its only about 2" longer)
Custom Brackets to use Stock mount points as well as custom adjustable end links)
Fuel-
Gsl-Se fuel tank
Single Bosch 044 fuel pump (might need bigger)
No idea on FPR
Also no idea what injectors i have currently w/ the motor i know there larger than stock on a KG fuel rail
Full Stainless hard line (all -AN fittings)
Body
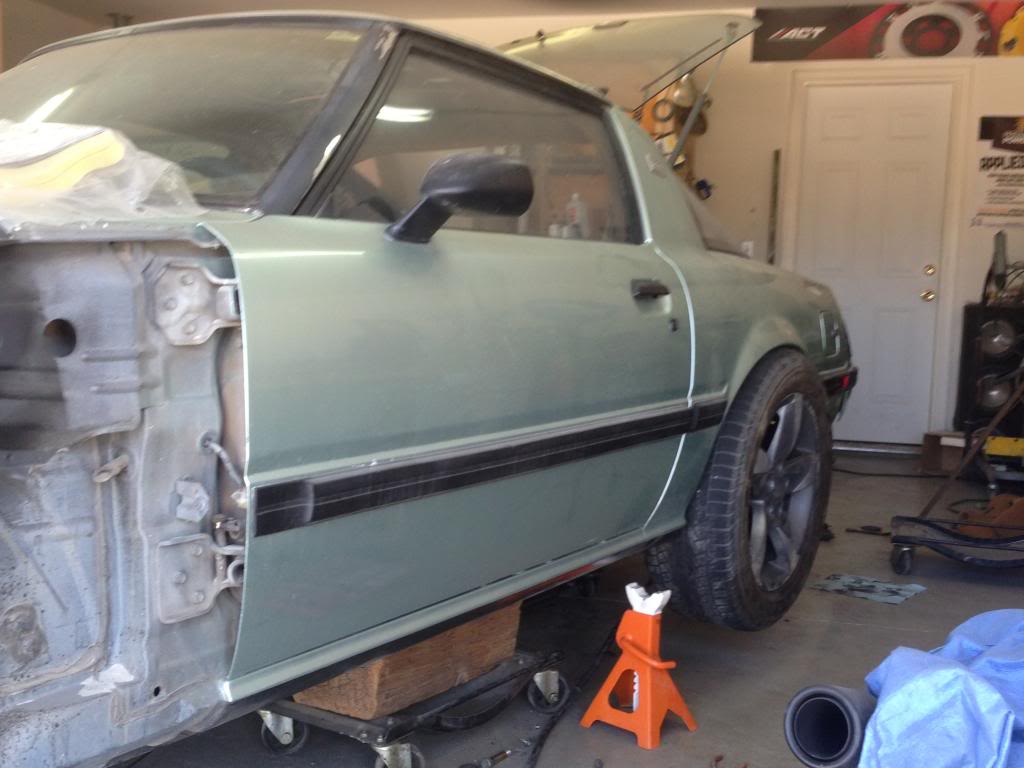
Fender Flares
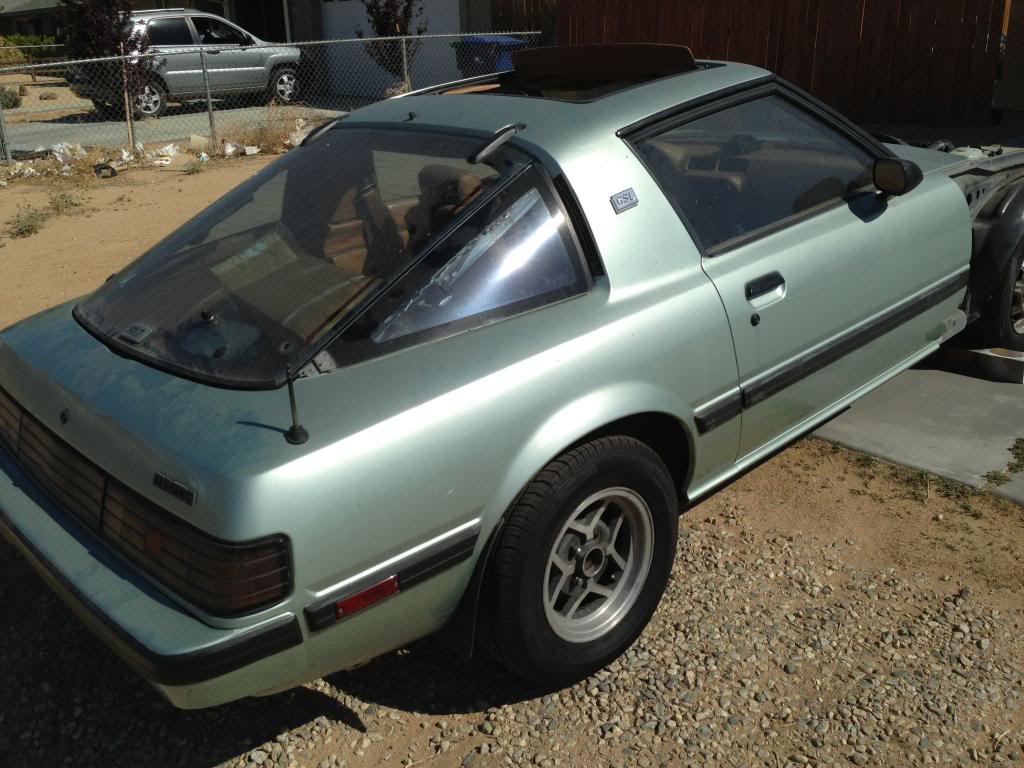
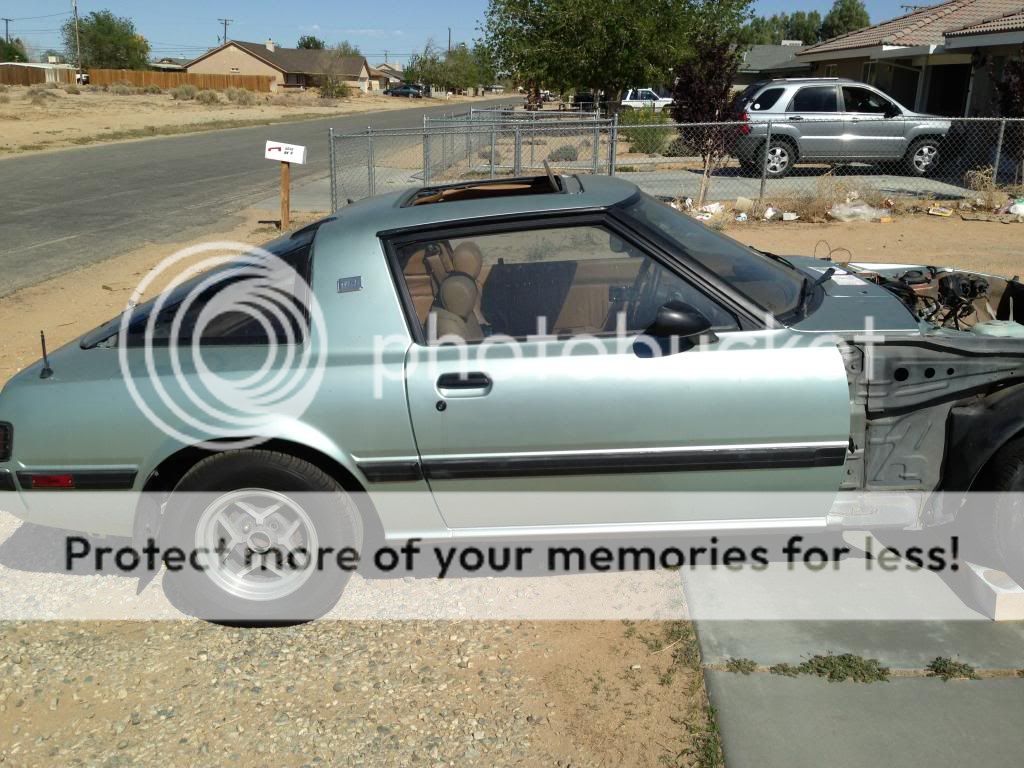
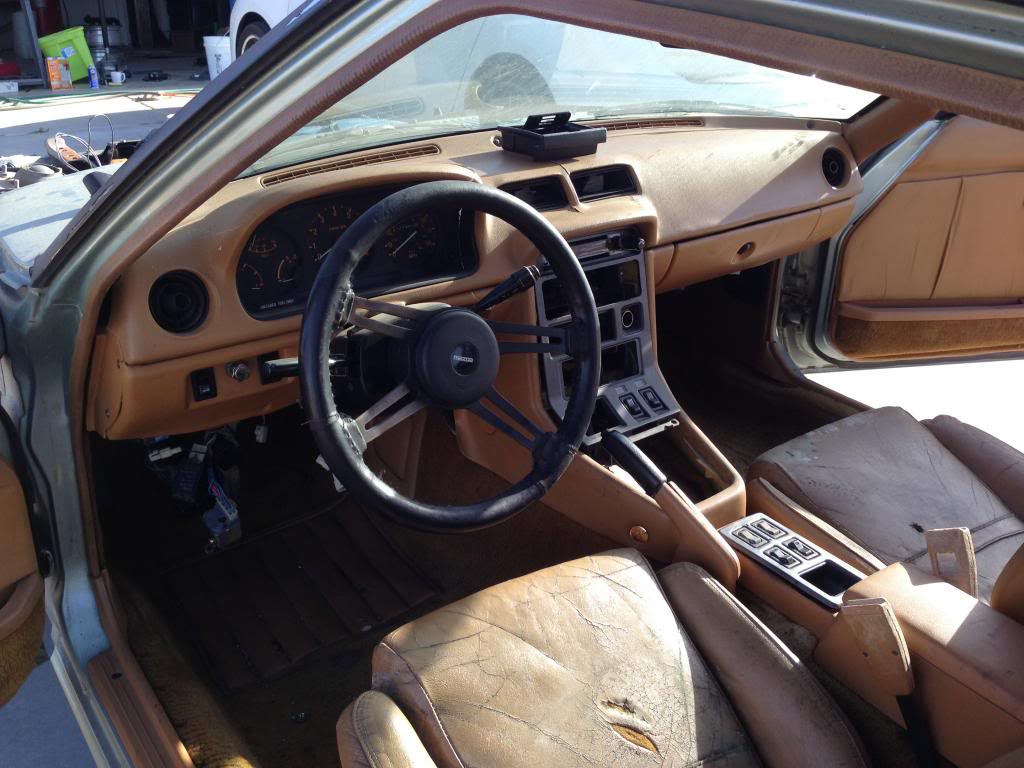
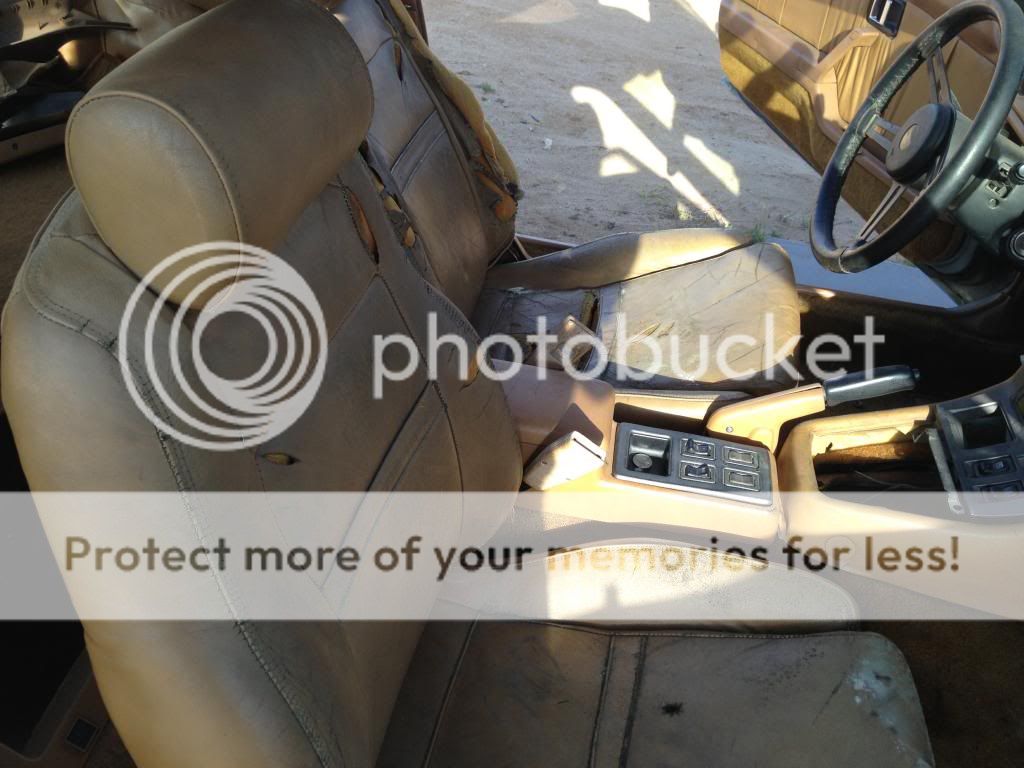
Bought this car from another guy off CL for 200$ w/ a bad engine and no front body panels (perfect espec considering i have a 1984 GSL-SE parts car in my backyard) Interiors in bad shape (as u can tell i might put my 84 gsl-se's interior in depending on how much of a pain that is)


In this thread i plan on documenting everything i do as well as giving details for everyone who is planning on doing something similar. As well as documenting costs of major componets because the main question i see on this site is "How much does it cost" and every1 always says "alot". Im not on any type of budget and i plan on doing this swap right (no corner cutting even if it costs the extra $)
So i decided i was going to do a 13b swap on my current rx7 (83 gs) and ended up buying a 13b-REW off craigslist in pieces and getting no where with the swap. Mainly just waiting to save up some $ and get the motor put in. Then let my friend borrow it and found out it had frame damage when we were changing out a flat (bondo on the frame painted over from the PO so i didnt notice it. Needless to say that car will no longer be the donor.
Current plans for the car are as follows
Motor-
13b-REW Motor Large Street Port
Borg Warner S366 turbo
Synapse 50mm Wastegate (Might go tial 44 mm not sure yet)
Tial bov
V Mount Intercooler (Not sure on core size)
FC Oil Cooler
Aluminum Radiator
FC Oil Pan/pickup/motor mounts for FC subframe
Hockey Puck Motor Mounts
Water/Meth injection
As far as ecu's i might go megasquirt to start off but im looking into haltech or AEM not sure yet.
Suspention
Full Stainless Brake Lines
Front-
FC Subframe w/ stock FC suspension
Coilovers
Stock FC Sway Bar (for now)
T2 5 lug bolt pattern+Brakes (currently have the 4 lug stuff from a 87)
Rear-
Ford 8.8 Rear Posi out of a 94 mustang (current has 2.73's)
3.73 Gears (not sure yet)
Not shortening the axles at all (its only about 2" longer)
Custom Brackets to use Stock mount points as well as custom adjustable end links)
Fuel-
Gsl-Se fuel tank
Single Bosch 044 fuel pump (might need bigger)
No idea on FPR
Also no idea what injectors i have currently w/ the motor i know there larger than stock on a KG fuel rail
Full Stainless hard line (all -AN fittings)
Body
Fender Flares
Bought this car from another guy off CL for 200$ w/ a bad engine and no front body panels (perfect espec considering i have a 1984 GSL-SE parts car in my backyard) Interiors in bad shape (as u can tell i might put my 84 gsl-se's interior in depending on how much of a pain that is)
Thread Starter
RX-7 NUT
Joined: Aug 2007
Posts: 444
Likes: 1
From: California
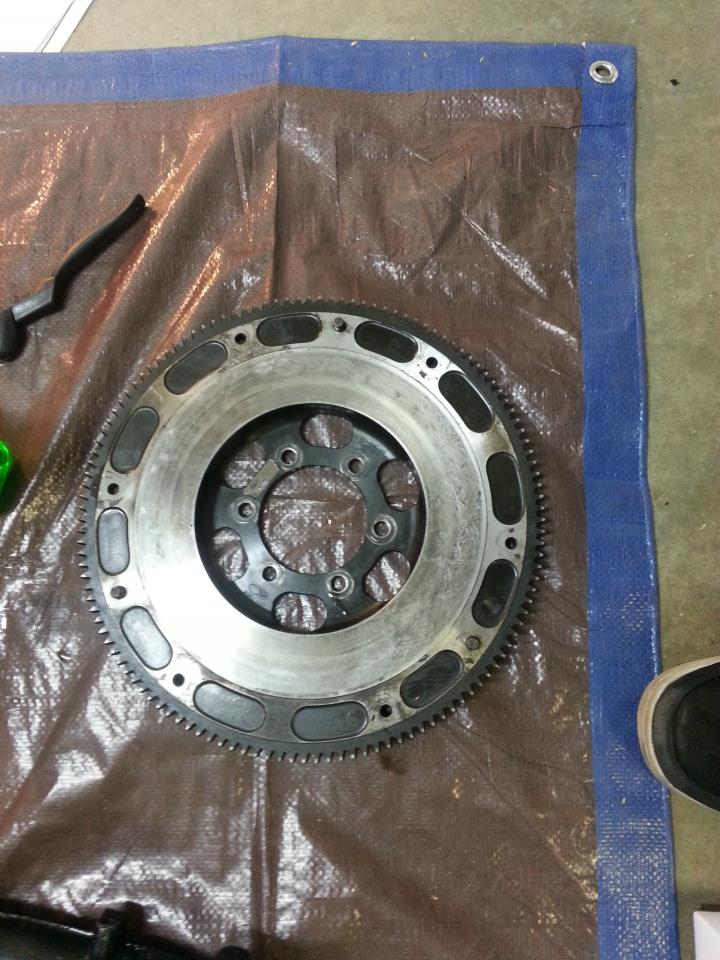
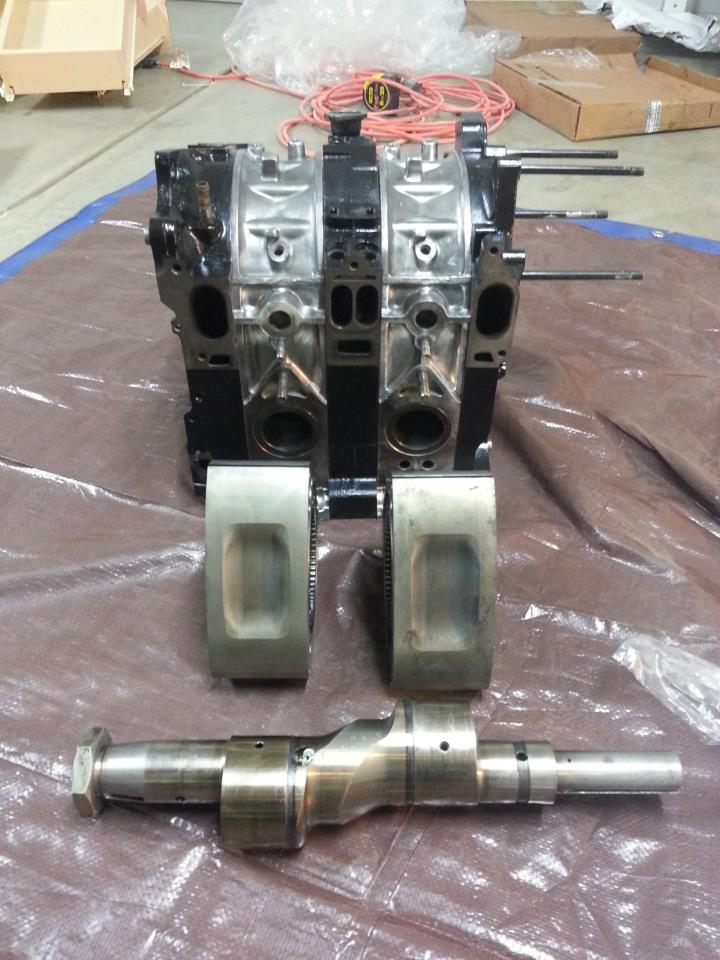
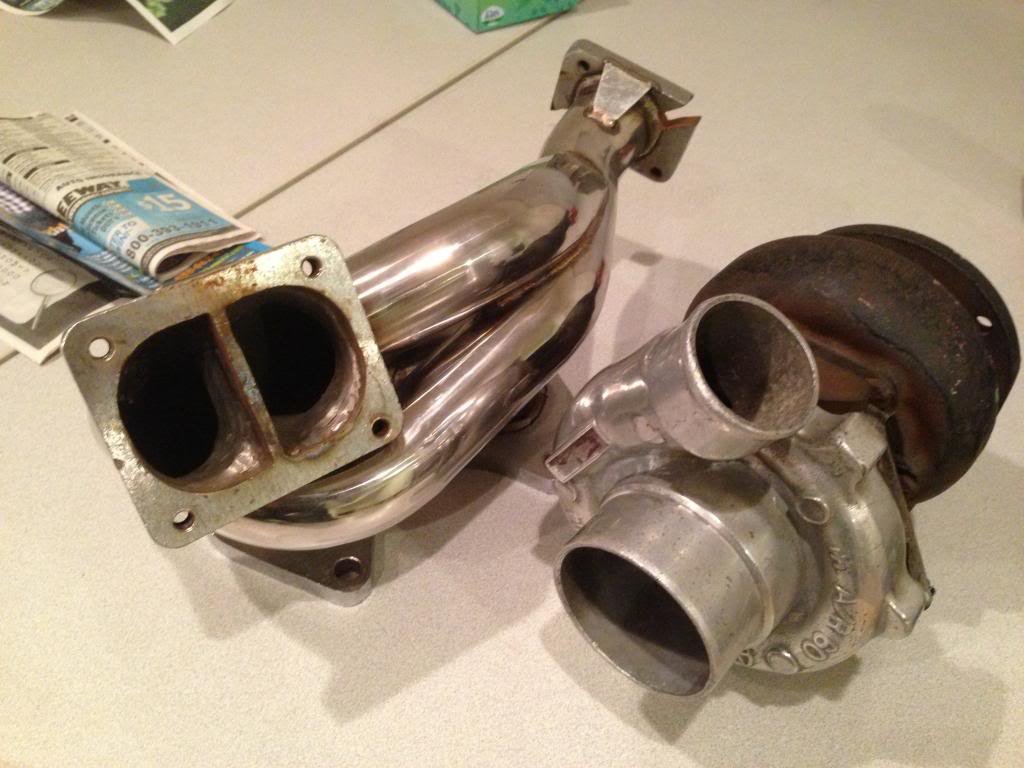
Heres the motor
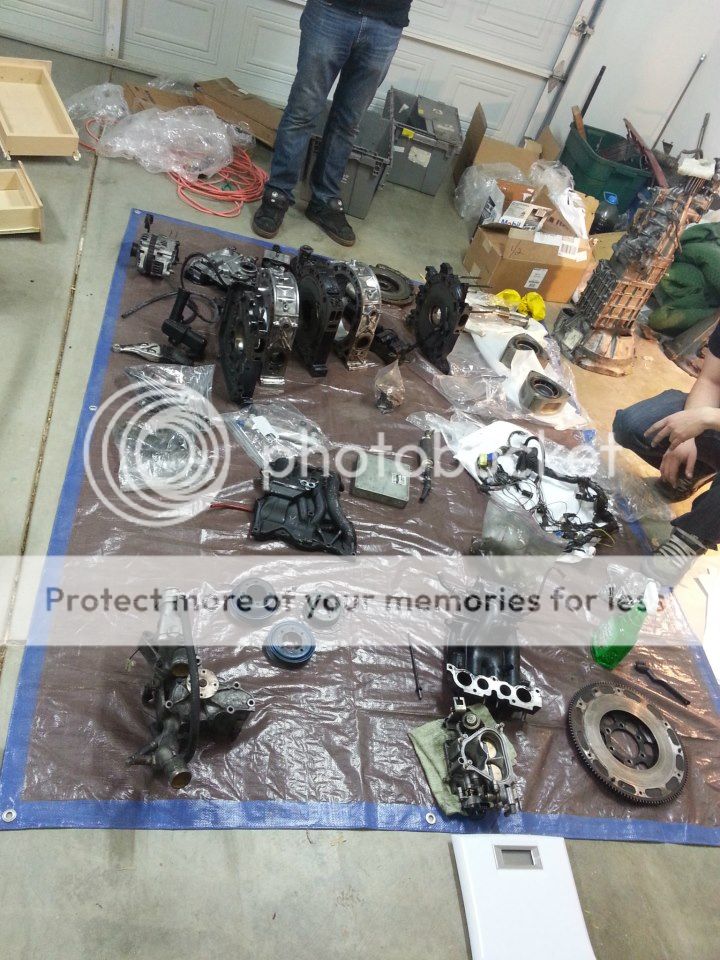
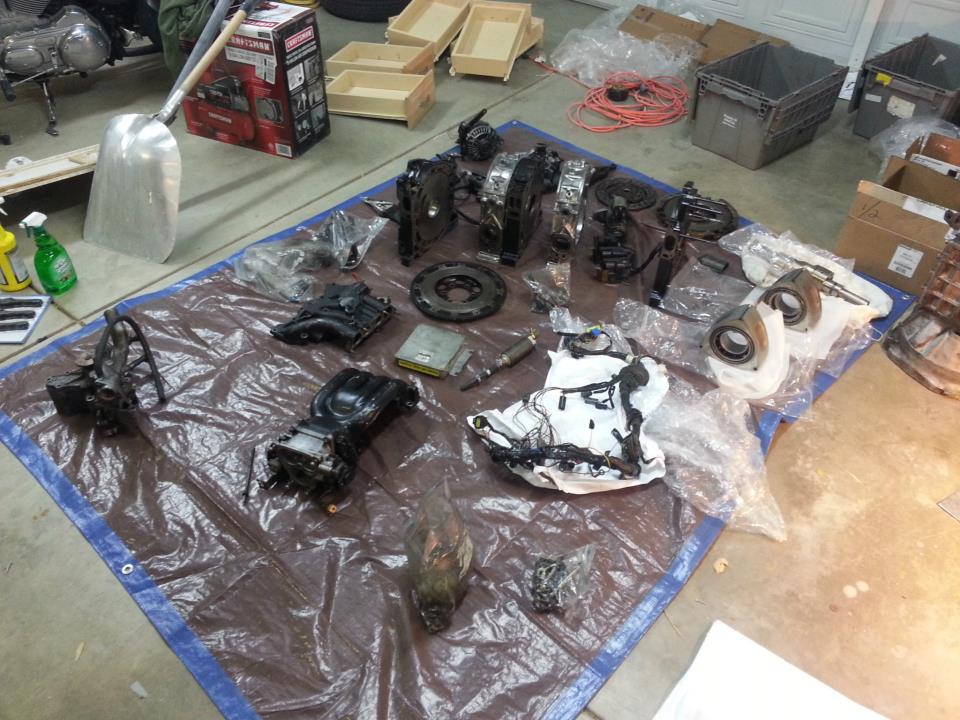
And a weekend of junkyard hopping later
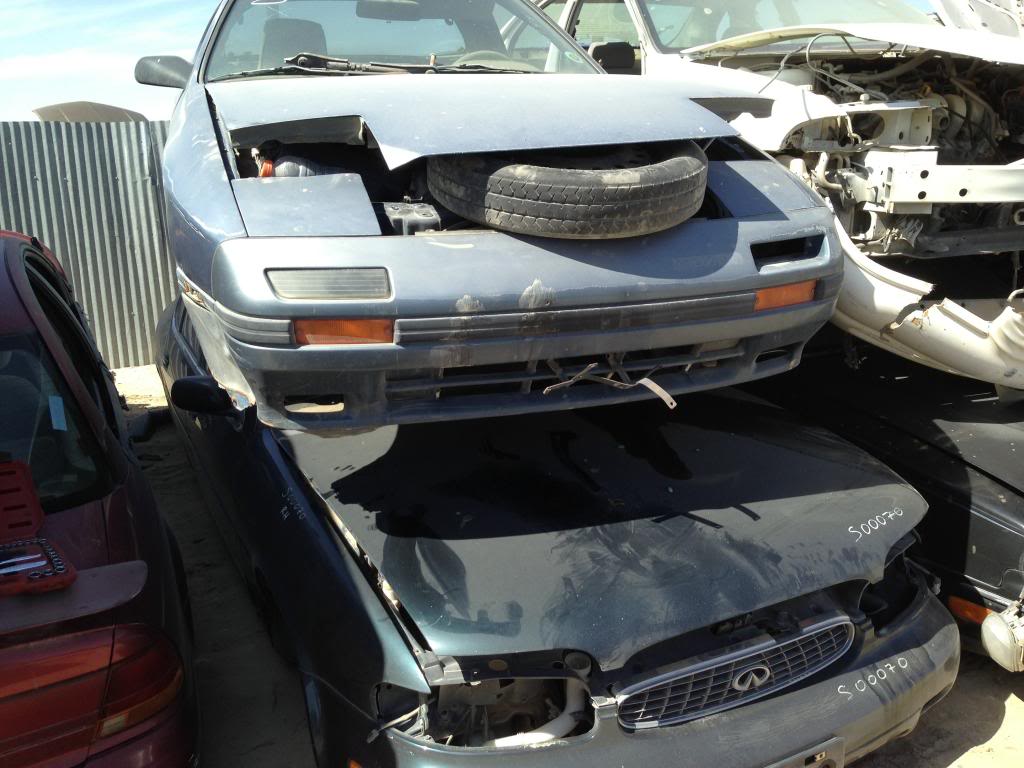
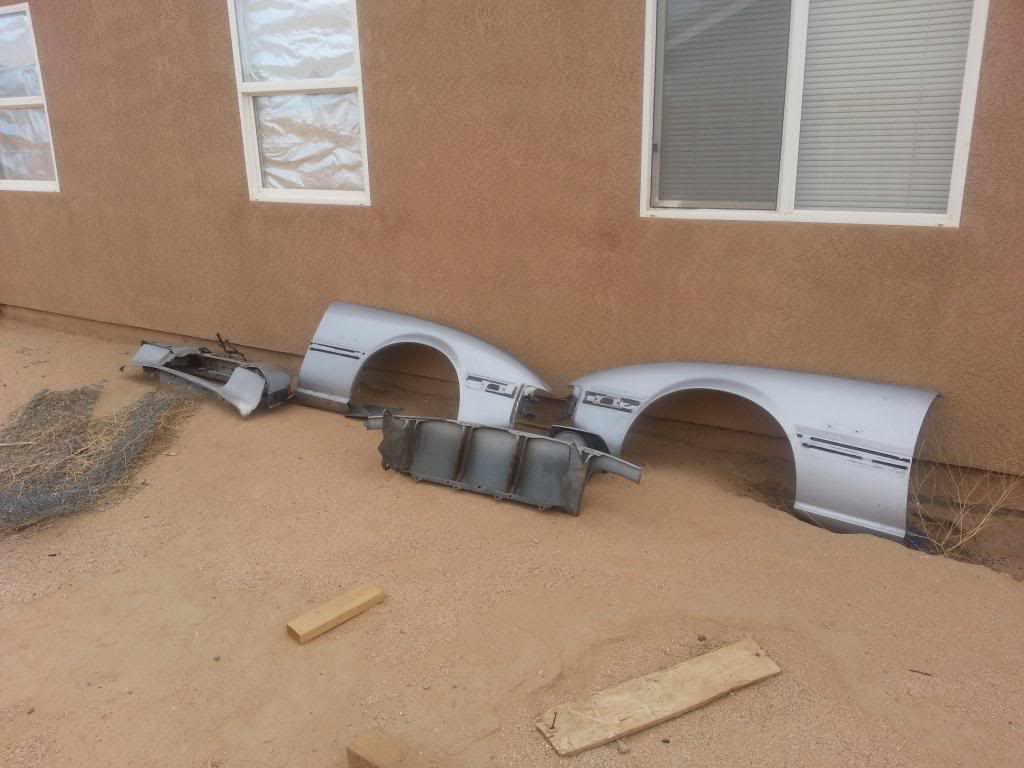
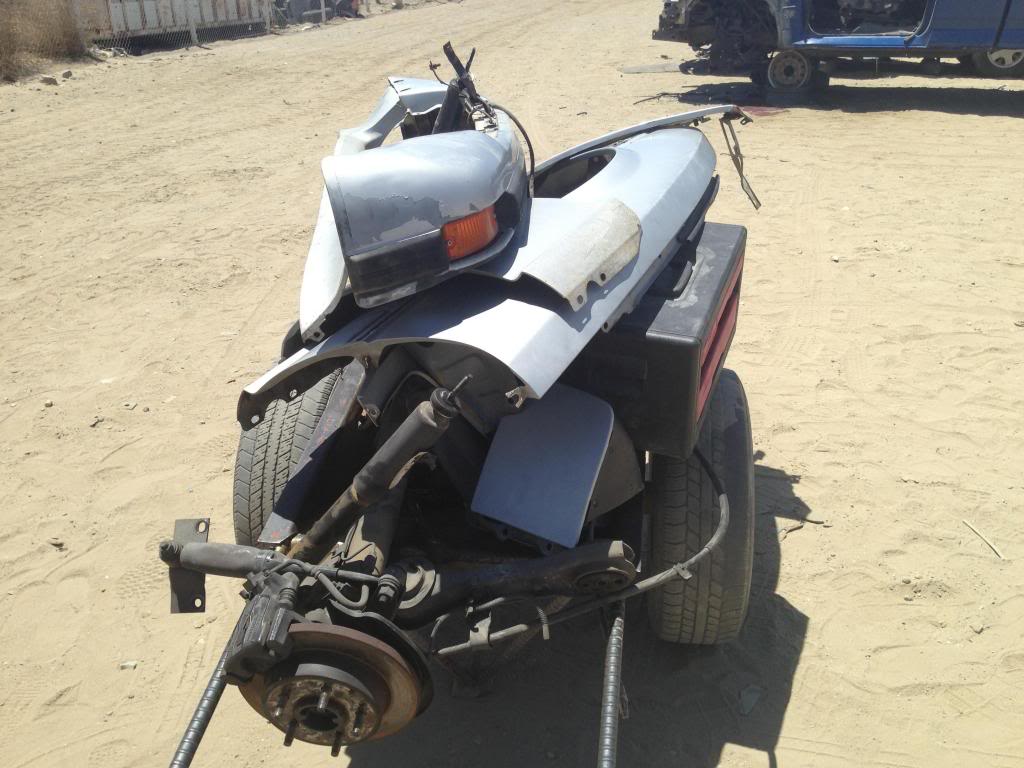
The Donor car 1987 FC. Was super sketch pulling parts like this but it was in the "were crushing it later today pile) (250$ for everything incl oil pan/subframe/motor mounts)
And the non FC parts (half off at the local junkyard 250$ for everything)
And a weekend of junkyard hopping later
The Donor car 1987 FC. Was super sketch pulling parts like this but it was in the "were crushing it later today pile) (250$ for everything incl oil pan/subframe/motor mounts)
And the non FC parts (half off at the local junkyard 250$ for everything)
Thread Starter
RX-7 NUT
Joined: Aug 2007
Posts: 444
Likes: 1
From: California
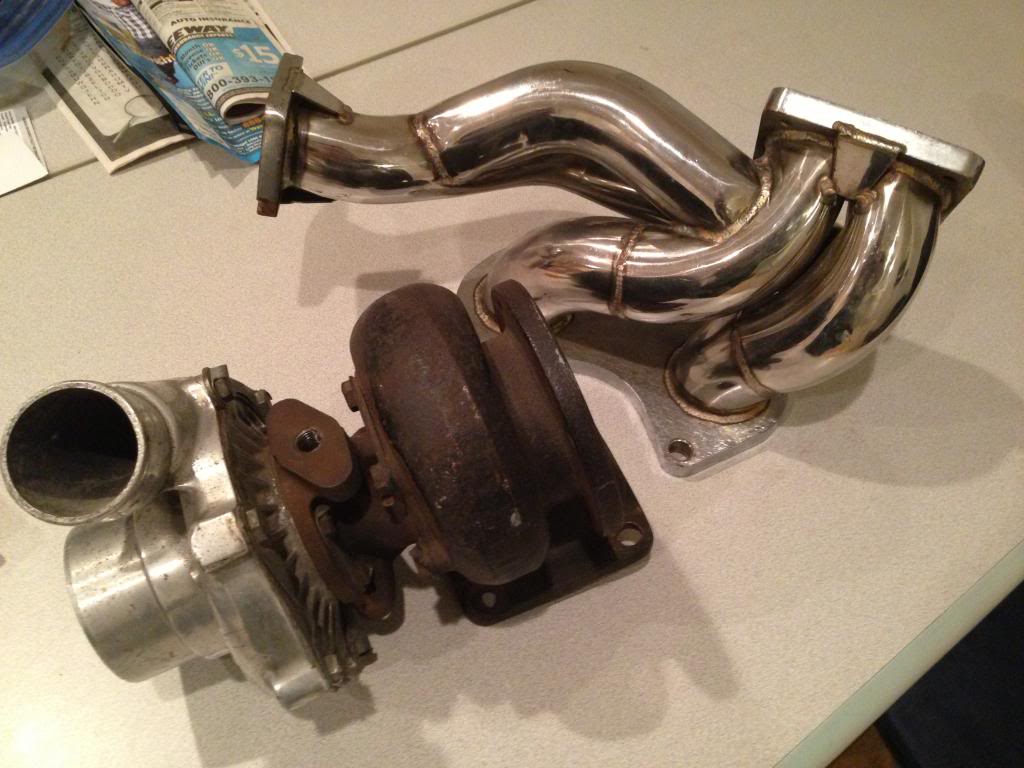
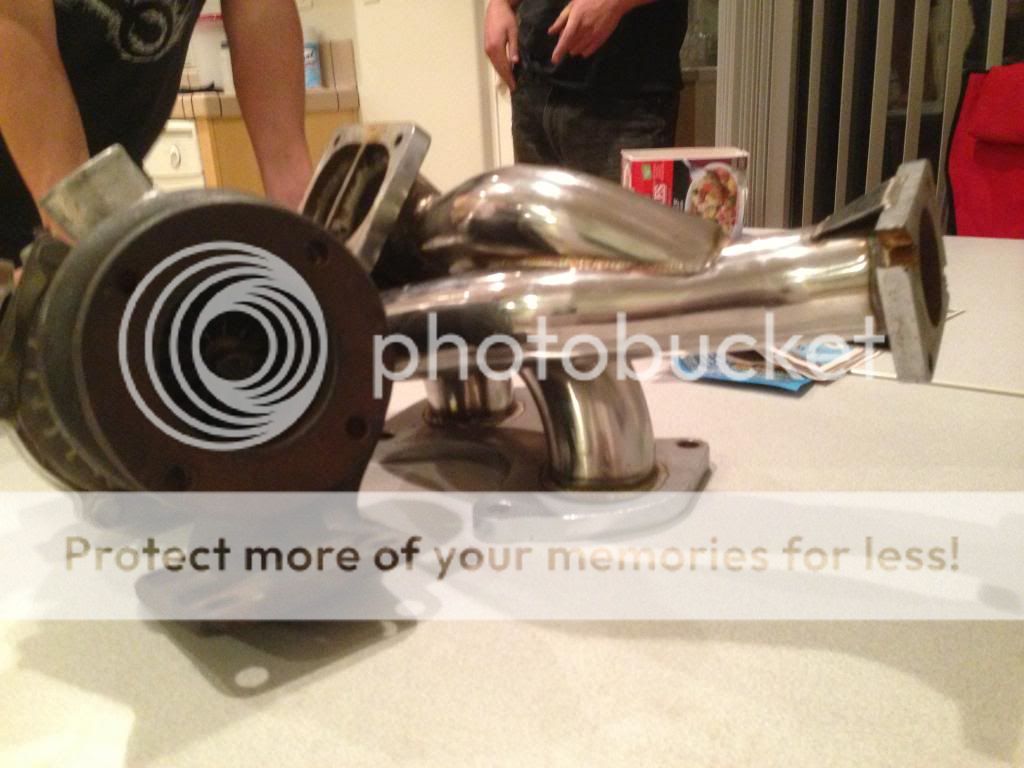
Also picked up a baby turbo w/ maifold for a FC for 200$ off craigslist. I wont be using the turbo for this project but its never bad to have a spare. t4 flange and the turbo is a CT26 equivelent almost. AirResearch turbo
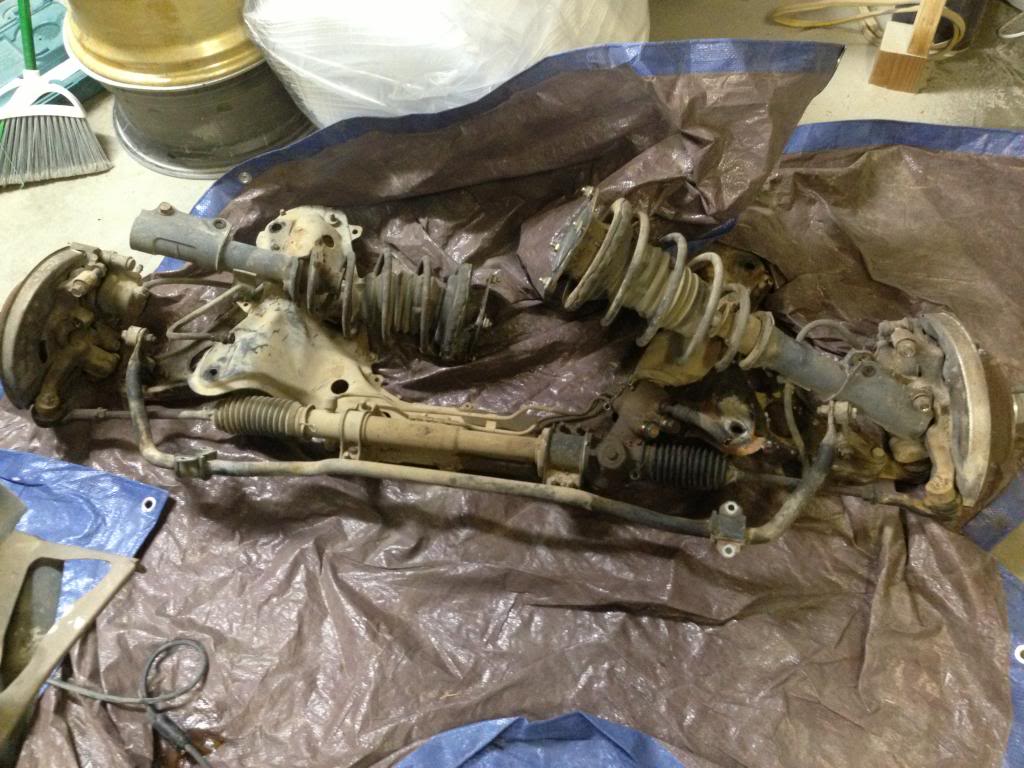
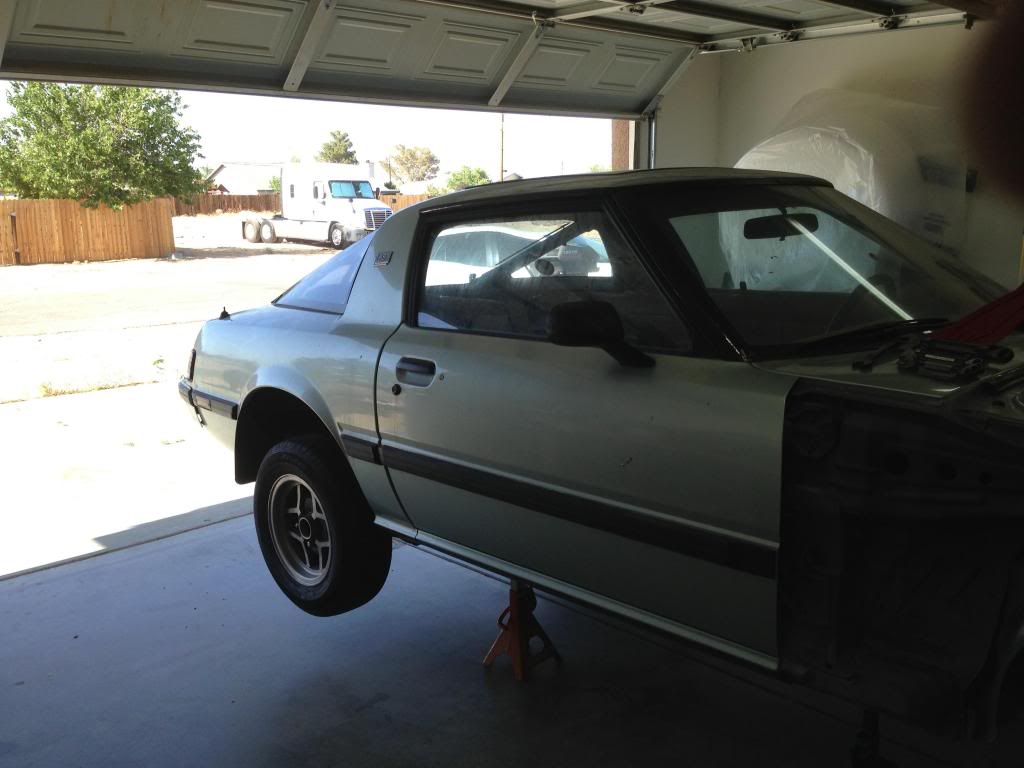
And got her pulled into the garage to work on pulling the suspension/mockup.
Ill Post more pictures tomorrow of the mockup. Thats enought writing for one night lol.
And got her pulled into the garage to work on pulling the suspension/mockup.
Ill Post more pictures tomorrow of the mockup. Thats enought writing for one night lol.


Go with either a precision or Tial WG. I had a synapse and could never ever for the life of me get it to work with the boost controller. Changed to a precision 46mm and rock solid to whatever i set BC at. No creep whatsoever.
As far as fuel system goes, you may wanna check out what i did. It's meant to feed thristy little kegs!
https://www.rx7club.com/build-thread...a-fbs-1035921/
Just a suggestion on turbos, look at the garret gt4094r. Im using one and its the most fun turbo i have ever had!! Spools like crazy and carries ALL the way thru rpm range.
Also, spend the money and get the haltech. Well worth it.
I Like the project! Good luck with this!
Trending Topics
Thread Starter
RX-7 NUT
Joined: Aug 2007
Posts: 444
Likes: 1
From: California
Thanks for the info Rotorican85 i was debating on doing that or doing a fuel cell (there about 150$ for a 12 gallon from jegs). If i did it how you were i would cut out my spare tire well so i can raise the gas tank up so you dont see the sump lines. I really dislike the look on street cars.
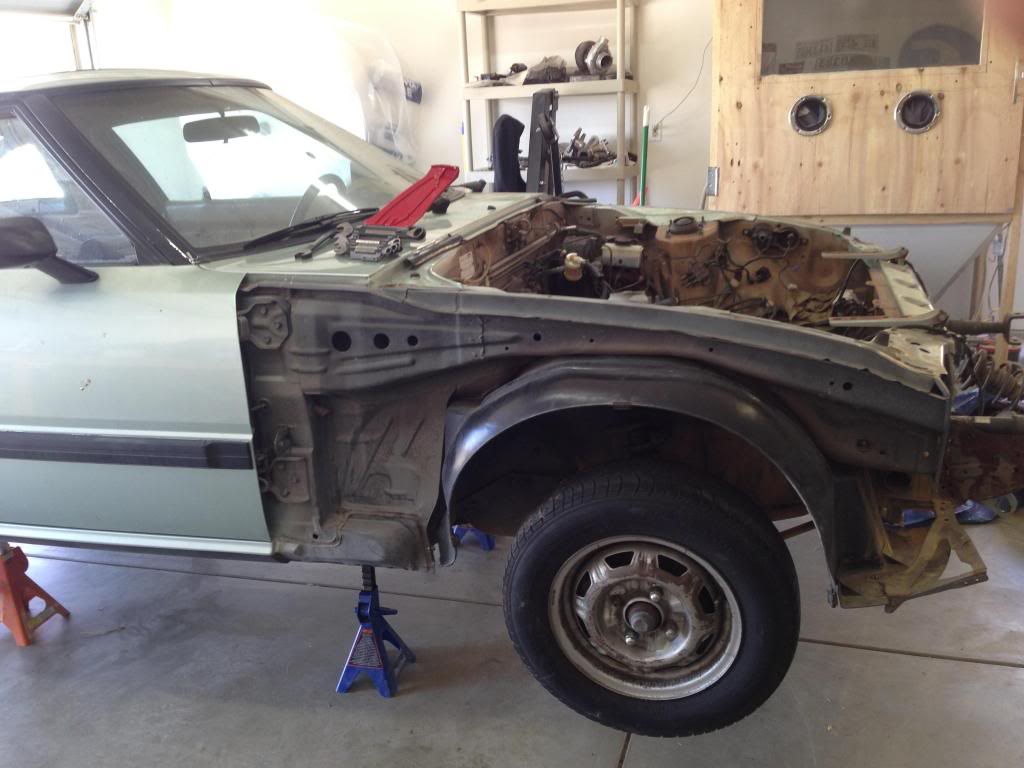
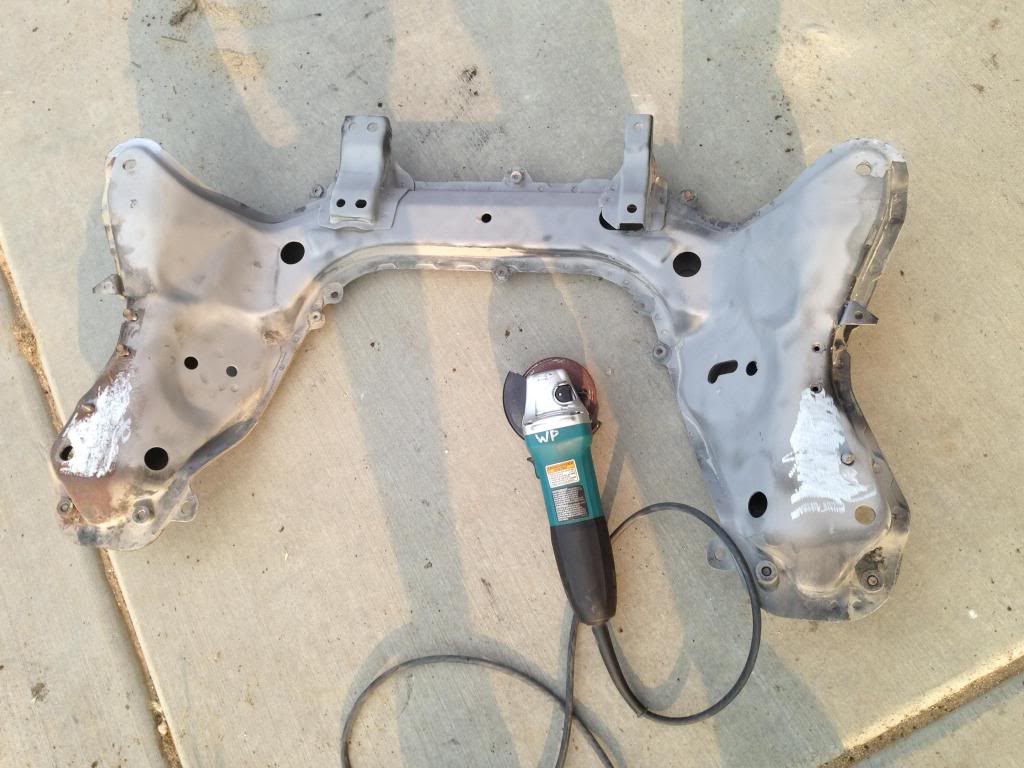
So over the weekend i started on my subframe install. I am following this writeup from 82transam that is written beautifully thanks man.
I deviated a bit from how he did it though. Insted of welding a fb/fc hybrid shock tower/coil i slotted my top mounts and installed the fc coils (will make a front strut bar a PITA but give me good options for coilovers later down the line). Ne ways heres all the pictures.
Cleaned the subframe up and threw it in the sandblaster. Have to blast it again before i powdercoat it but it got all the crud off of it.
I am a terrible welder. There not pretty but there functional. I bought a lincoln 180 gas shielded mig welder for this project and these are like weld # 5 or 6 lol. Either way i used a half inch ID tube (black gas pipe) thru the frame and thats a 1/8" plate ontop of it to beef it up. The welds wil get ground down eventually but i was just working on getting it in for suspension mockup purposes.
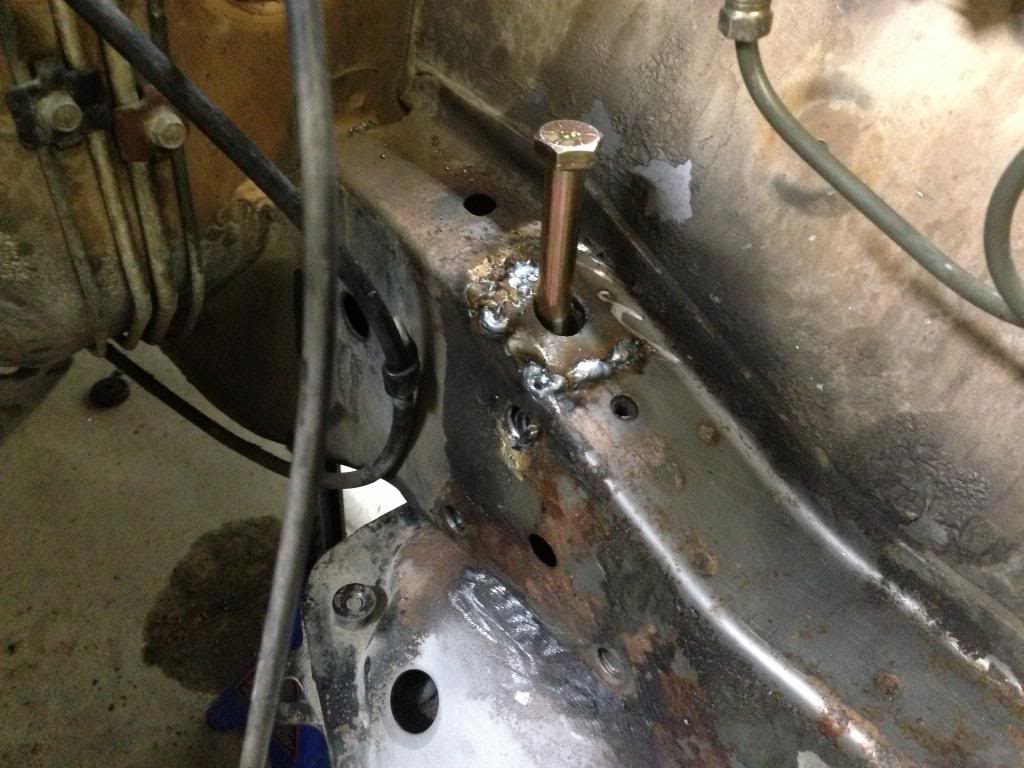
That was actually alot easier than i thought it would be. 2 Broken irwin step bits later and a weekend and i had it in. The shock tubes are installed but i dont have a picture currently. I plan on mocking up the suspension here this week.
I forgot to mention i do powdercoating on the weekends professionally in my garage as well. So i have a sandblaster i can fit huge stuff like hoods in and i will be powdercoating pretty much everything (Motor suspension ETC) only thing i probably wont coat is the rear end because its too much of a hassle to lug around on a chain.
So over the weekend i started on my subframe install. I am following this writeup from 82transam that is written beautifully thanks man.
I deviated a bit from how he did it though. Insted of welding a fb/fc hybrid shock tower/coil i slotted my top mounts and installed the fc coils (will make a front strut bar a PITA but give me good options for coilovers later down the line). Ne ways heres all the pictures.
Cleaned the subframe up and threw it in the sandblaster. Have to blast it again before i powdercoat it but it got all the crud off of it.
I am a terrible welder. There not pretty but there functional. I bought a lincoln 180 gas shielded mig welder for this project and these are like weld # 5 or 6 lol. Either way i used a half inch ID tube (black gas pipe) thru the frame and thats a 1/8" plate ontop of it to beef it up. The welds wil get ground down eventually but i was just working on getting it in for suspension mockup purposes.
That was actually alot easier than i thought it would be. 2 Broken irwin step bits later and a weekend and i had it in. The shock tubes are installed but i dont have a picture currently. I plan on mocking up the suspension here this week.
I forgot to mention i do powdercoating on the weekends professionally in my garage as well. So i have a sandblaster i can fit huge stuff like hoods in and i will be powdercoating pretty much everything (Motor suspension ETC) only thing i probably wont coat is the rear end because its too much of a hassle to lug around on a chain.
Respecognize!
Joined: Sep 2004
Posts: 4,106
Likes: 73
From: Anchor Bay, CA
ah you did it the same way i did, use the front two studs to locate the subframe. My friend did it by completely relocating the subframe to match the axle line.
basically, you might have to trim the front of the fenders to clear the wheels while turning. steering column will be kinda "far away" as well. couple ways to deal wtih that.
you will need a little spacer on the rear of the subframe because the y plane of the subframe are at different levels.
basically, you might have to trim the front of the fenders to clear the wheels while turning. steering column will be kinda "far away" as well. couple ways to deal wtih that.
you will need a little spacer on the rear of the subframe because the y plane of the subframe are at different levels.
The pic on that thread with the exposed sump was my old setup. With the new intank sump/pump assembly it goes back to a stock tank look. No exposed fuel lines at all. I also wasnt too fond of the visible sump, it attracts too much of the wrong attention. Thats why i looked around until i found the guy that does these sumps. He's also a forum member.
Thread Starter
RX-7 NUT
Joined: Aug 2007
Posts: 444
Likes: 1
From: California
Yeah gravity i put the half inch spacer on the back of it by were the tube goes through the frame to make it more level. So i have the "Y" plane covered. Does the tire sit that much farther forward?? I noticed this looking at some pictures of cars that have had this conversion done but did not think anything of it. And from what im understanding is your friend just did the same thing on the front as i did on the back?? Probably not a bad idea seems like alot more work though.
And rotor ahh. Yeh if im going in tank and dont wana spend a mint i might end up with the fuel cell as they are inexpensive from jegs. And can get a plastic one save weight and not have to worry about corrosion ^_^.
And rotor ahh. Yeh if im going in tank and dont wana spend a mint i might end up with the fuel cell as they are inexpensive from jegs. And can get a plastic one save weight and not have to worry about corrosion ^_^.
Thread Starter
RX-7 NUT
Joined: Aug 2007
Posts: 444
Likes: 1
From: California
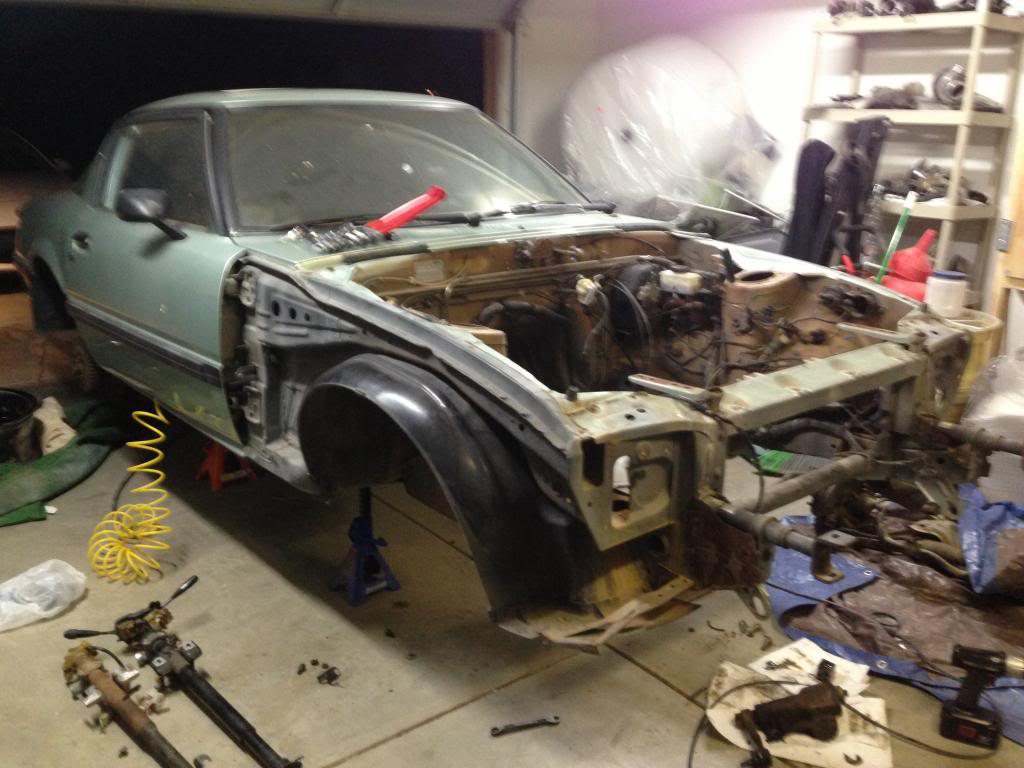
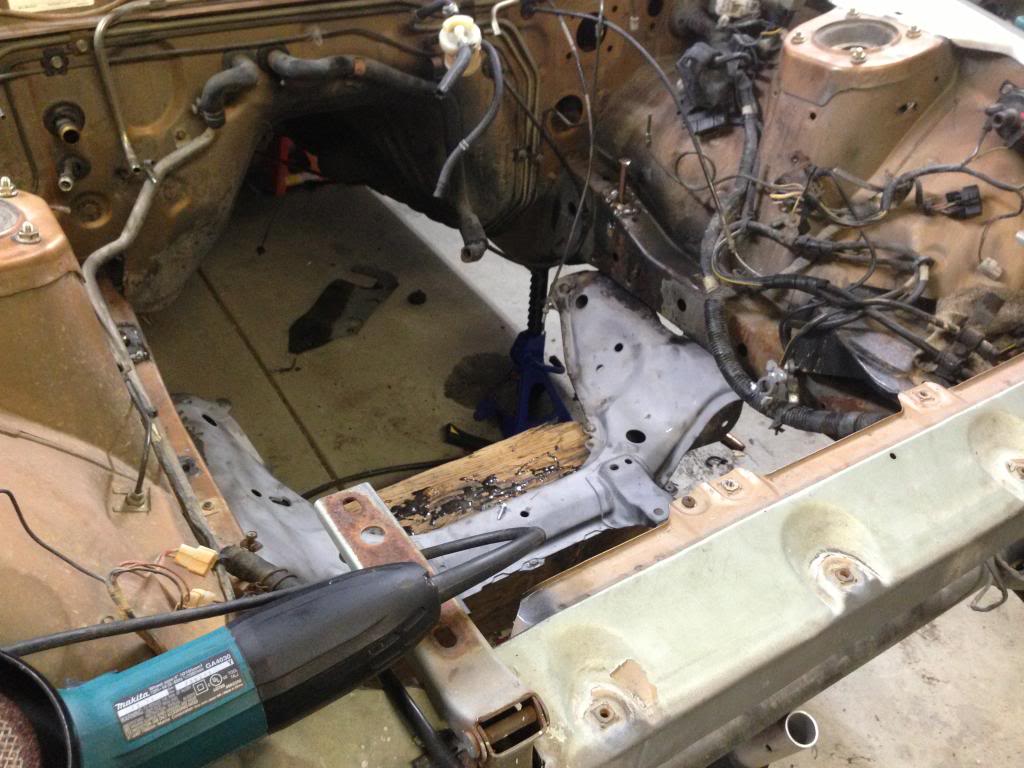
So i havent posted in a while. Been super busy with powdercoating for my buisness and working on the bay of the car. I got the bay all sandblasted, Por 15'd, and got rod ends to weld up for rear uper and lower control arms for the ford 8.8 to get it bolted in. Heres all the pics.
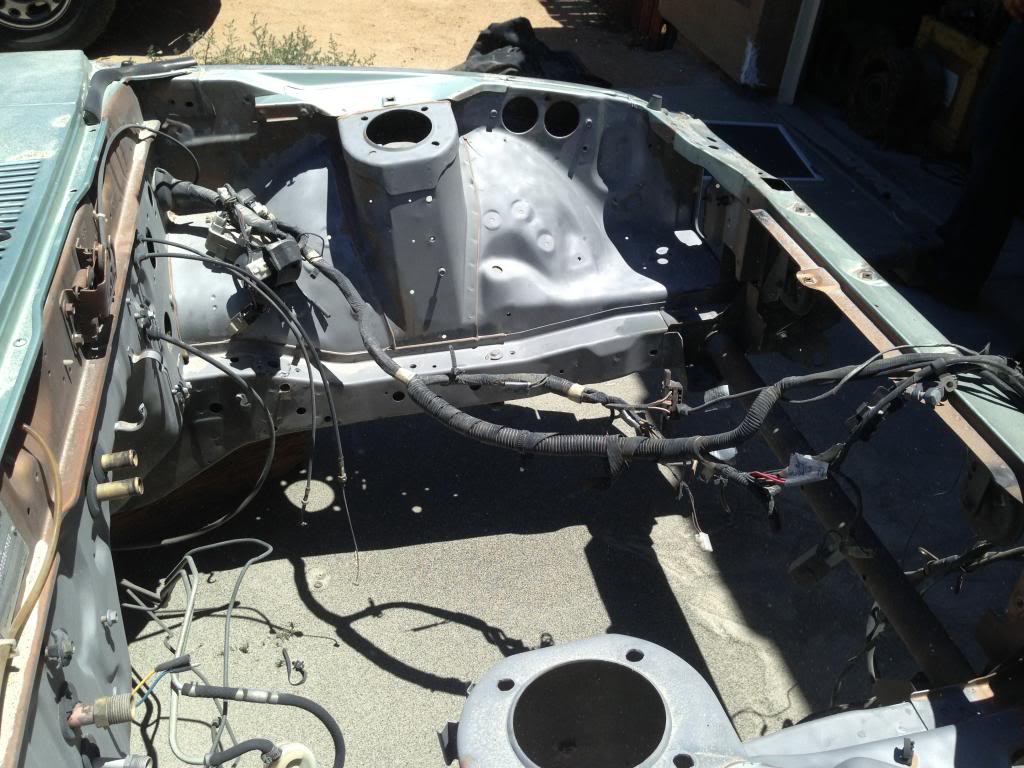
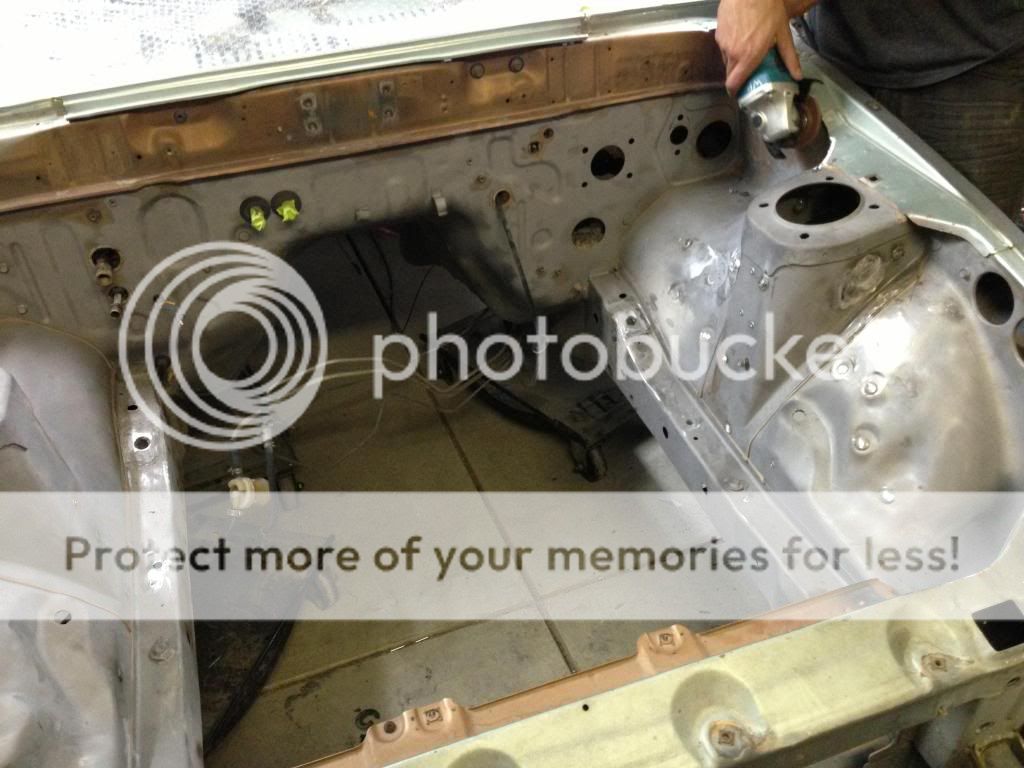
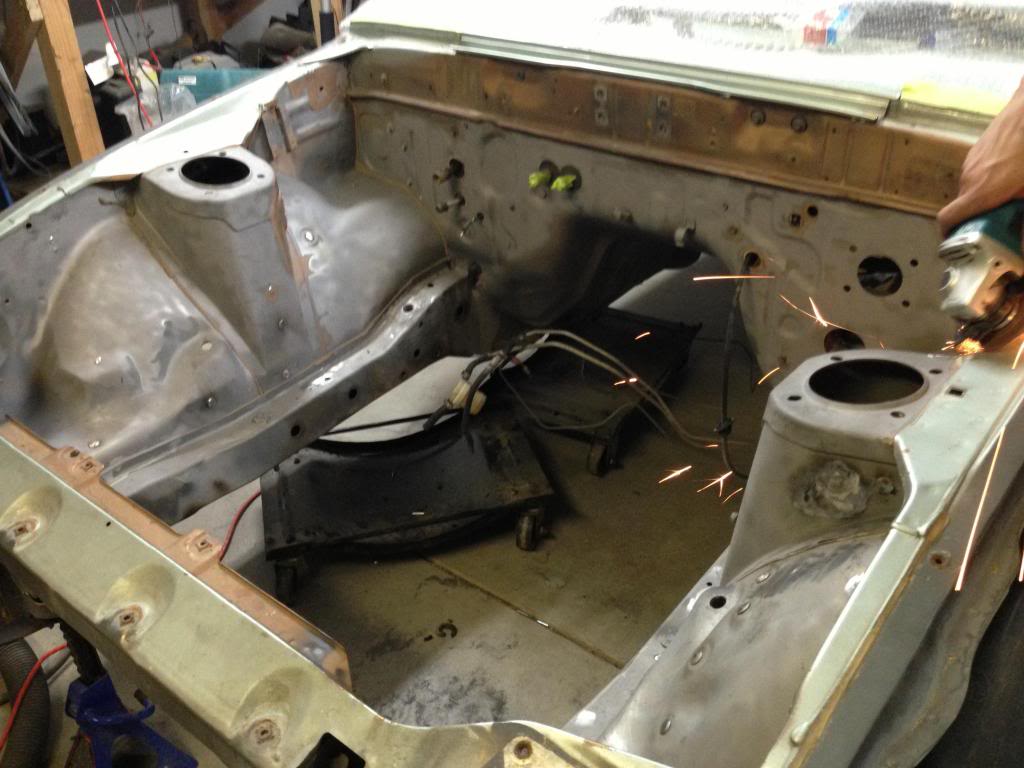
all blasted and mostly prepped. Im going to be tucking the body harness. Not 100% and shaveing the bay but enough to not have it in the way. I ended up welding in rivets for all of the holes i am no longer going to need. I was orignoally gonna just weld them up but im a terrible welder and blew a hole in the sheet metal too many times so i gave up on that idea. Looks better either way.
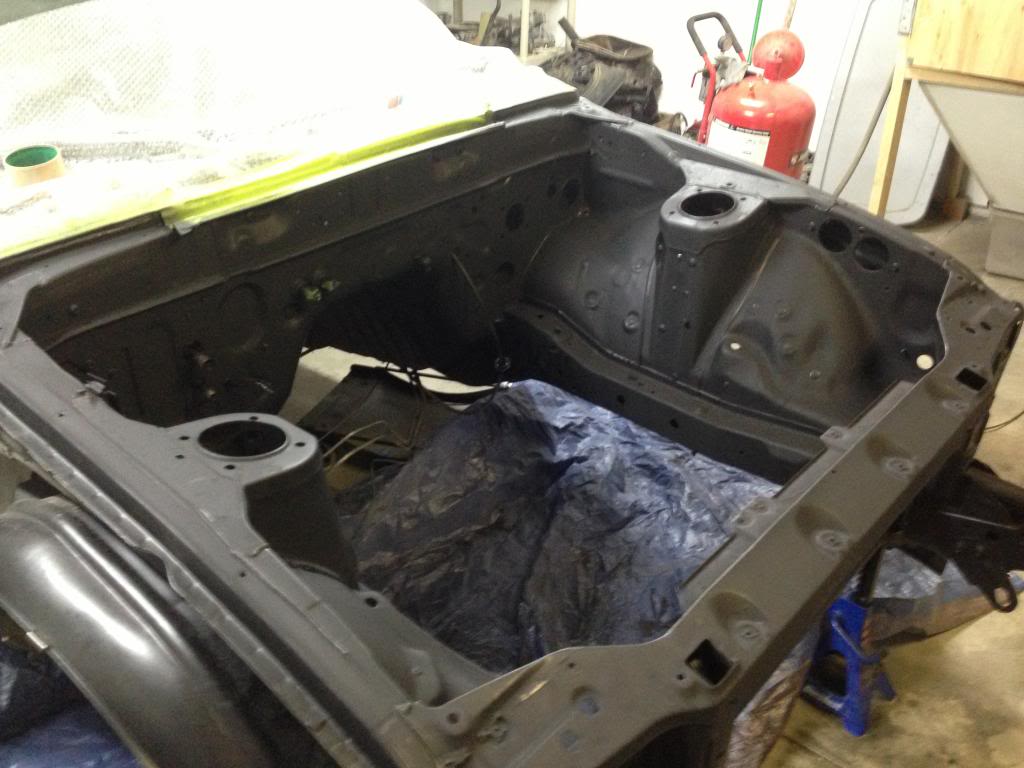
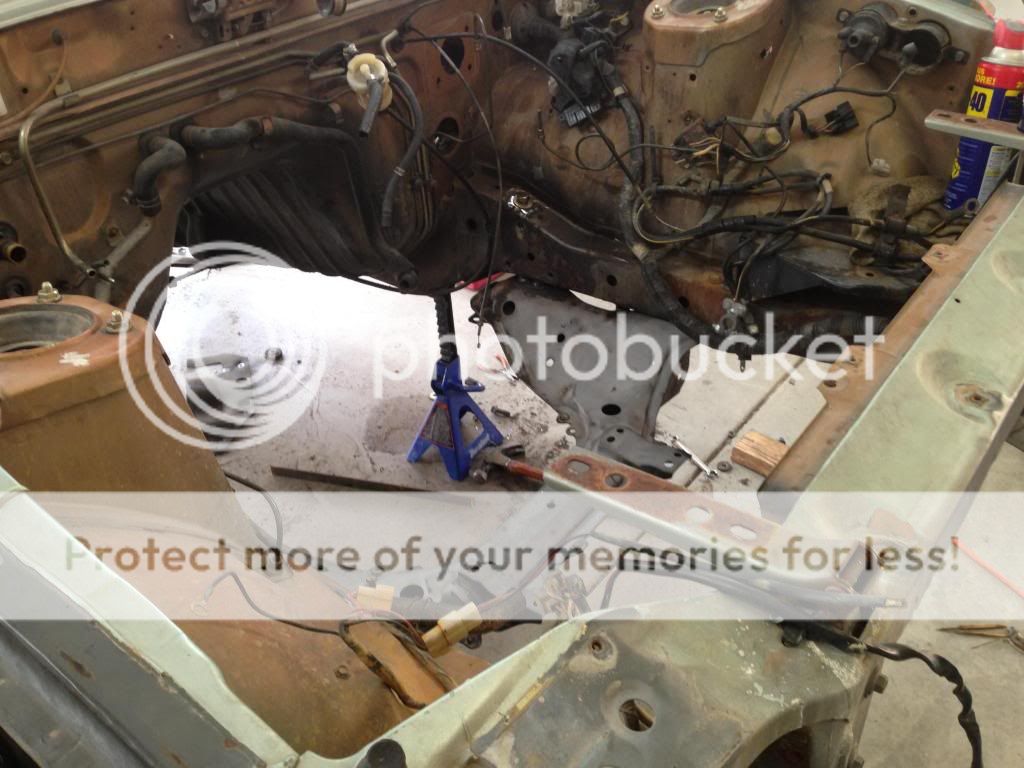
All painted. The por15 turned out like **** tbh. It says semi gloss on it with is def flat black. And it did not lay very well. granted i do not know how to HVLP gun anything but hey it looks better than blue/gold/rust/sandblasted. So im gonna take it at least for now. Worse comes to worse later down the road ill get some gloss paint and respray the bay. Plus with all my powdercoated stuff in the bay looking all pretty i dont think anyone is going to mind the por15 not being gorgeous.
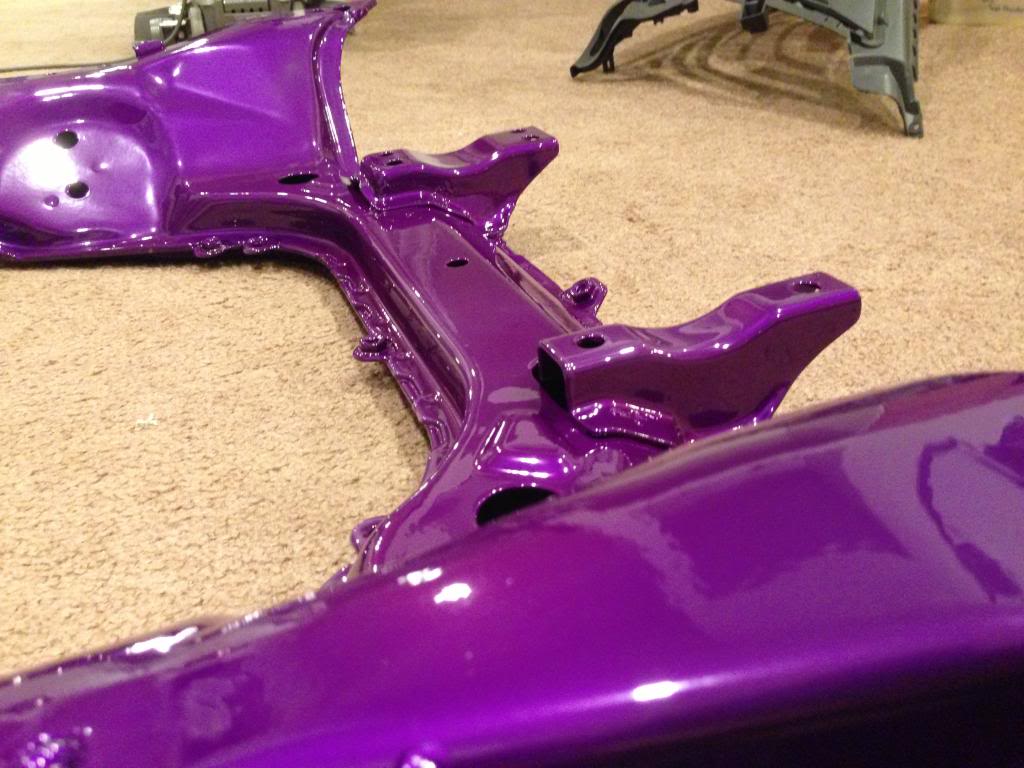
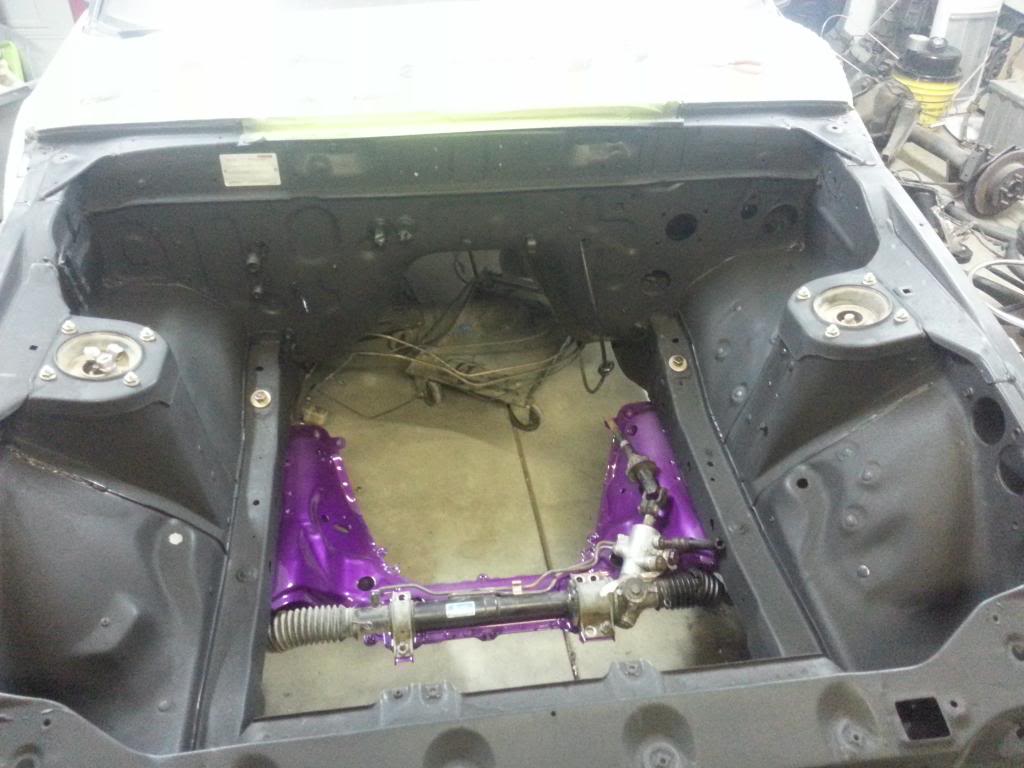
OOH and heres a preview of the subframe that i got done yesterday. Cant wait to bolt it in tonight and see it with the car should be cool (im doing purple accent's with a black/blue engine)
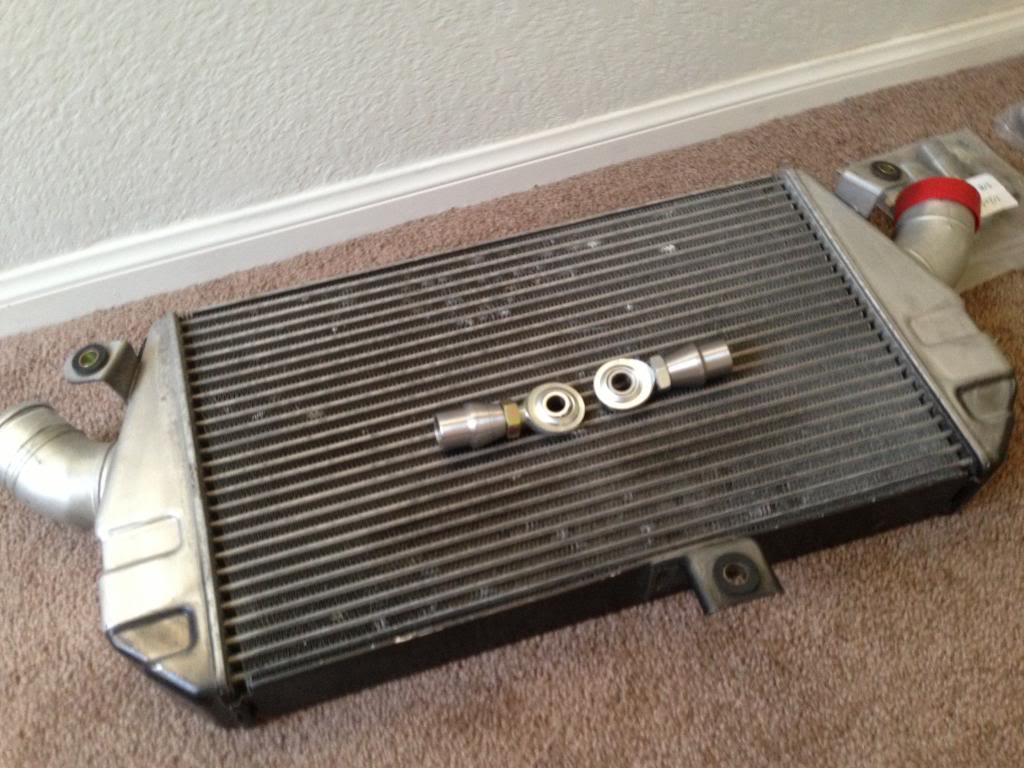
And i got a stock evo8 intercooler from a friend for 25$ haha. He jumped his car and dented the bottom in a little bit but got it pressure tested good. It may not get me to my 500HP mark but it will at least get me to 1st start up. Plus you can buy evo8 intercooler replacements al day that can handle 500hp and if its a direct replacement for that one no changing anything =D. At least thats my thought.
all blasted and mostly prepped. Im going to be tucking the body harness. Not 100% and shaveing the bay but enough to not have it in the way. I ended up welding in rivets for all of the holes i am no longer going to need. I was orignoally gonna just weld them up but im a terrible welder and blew a hole in the sheet metal too many times so i gave up on that idea. Looks better either way.
All painted. The por15 turned out like **** tbh. It says semi gloss on it with is def flat black. And it did not lay very well. granted i do not know how to HVLP gun anything but hey it looks better than blue/gold/rust/sandblasted. So im gonna take it at least for now. Worse comes to worse later down the road ill get some gloss paint and respray the bay. Plus with all my powdercoated stuff in the bay looking all pretty i dont think anyone is going to mind the por15 not being gorgeous.
OOH and heres a preview of the subframe that i got done yesterday. Cant wait to bolt it in tonight and see it with the car should be cool (im doing purple accent's with a black/blue engine)
And i got a stock evo8 intercooler from a friend for 25$ haha. He jumped his car and dented the bottom in a little bit but got it pressure tested good. It may not get me to my 500HP mark but it will at least get me to 1st start up. Plus you can buy evo8 intercooler replacements al day that can handle 500hp and if its a direct replacement for that one no changing anything =D. At least thats my thought.
Thread Starter
RX-7 NUT
Joined: Aug 2007
Posts: 444
Likes: 1
From: California
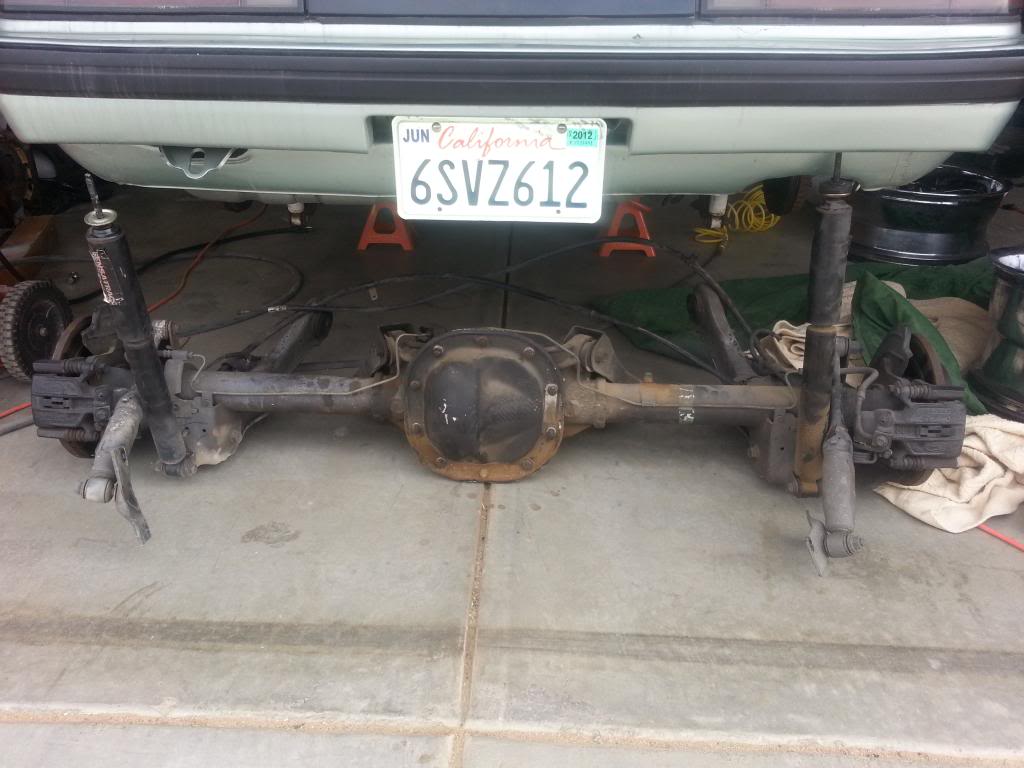
Ford 8.8 Mostly Installed
So insted of spending my day walking around at the carnival on base today while i have the day off i decided to start working on the rear end.
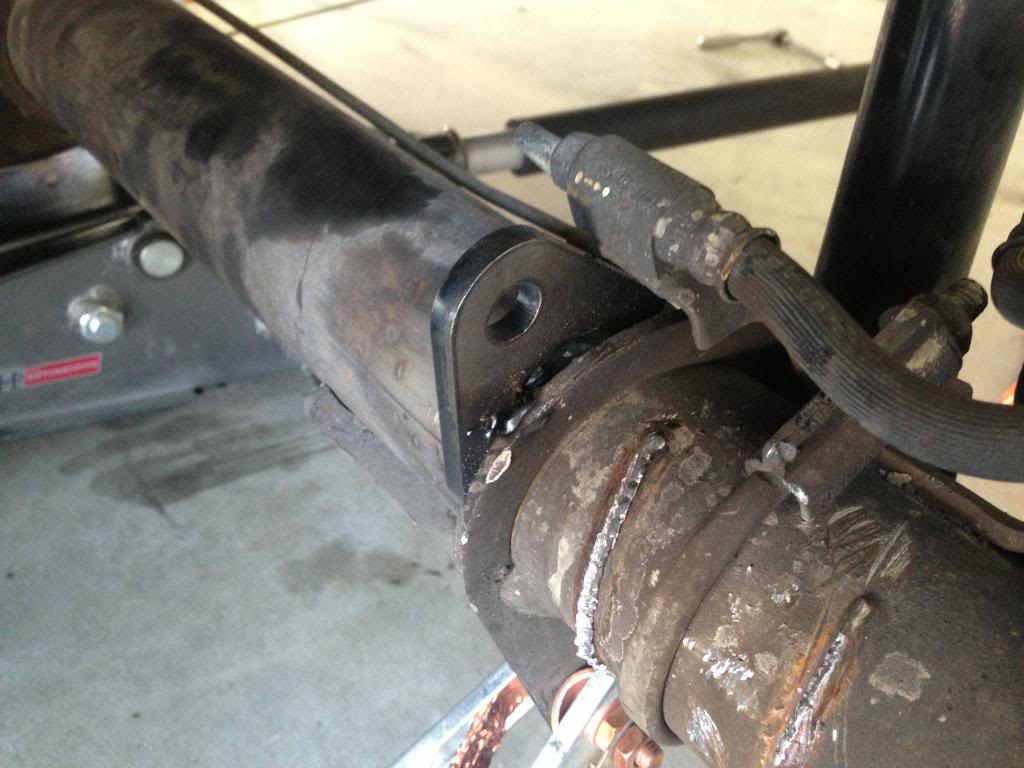
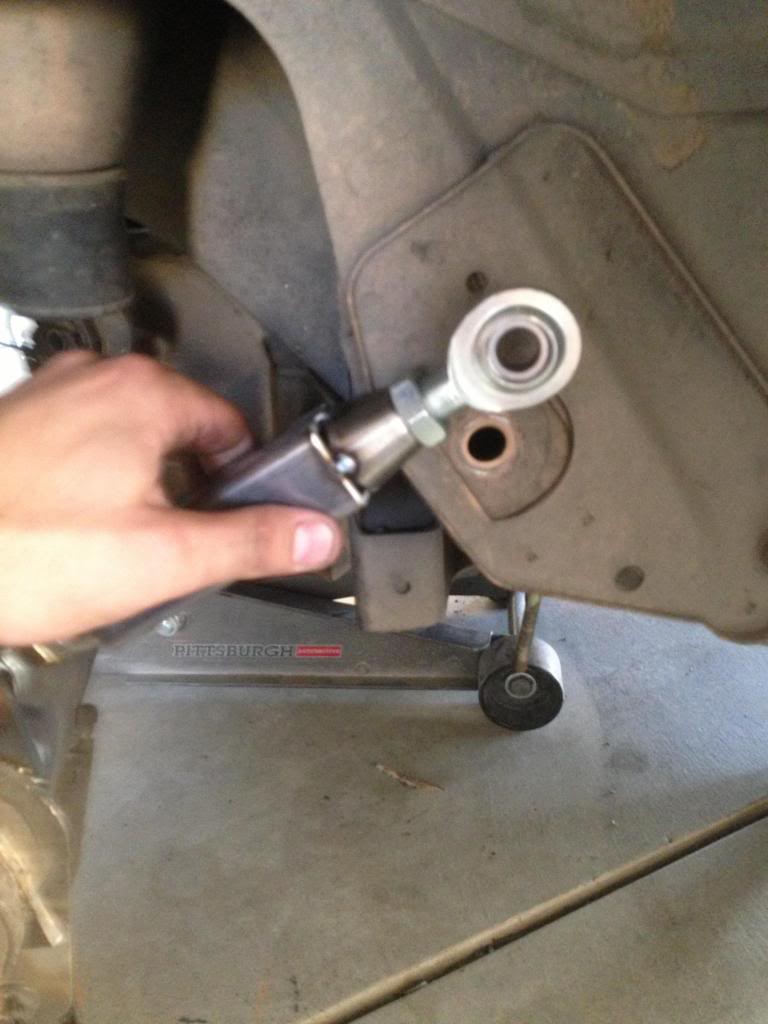
So of course with putting this in. Measure measure measure measure. Im usually a cut 2x measure none type of person but with this when it comes to pinion angle and getting the rear centered in the car it took a tonnn of measuring. You can probably guess form this picture how i did it but it was pretty straight forward. I mainly got it figured out were to mount the 1st tab and went from there.
Then from there for the 1st tab welded on =D.
I started with the upper control arms 1st and since i didnt know exactly how to start at 1st i decided "stock worked lets use stock length"
Soooo that didnt work Haha wayy too long.
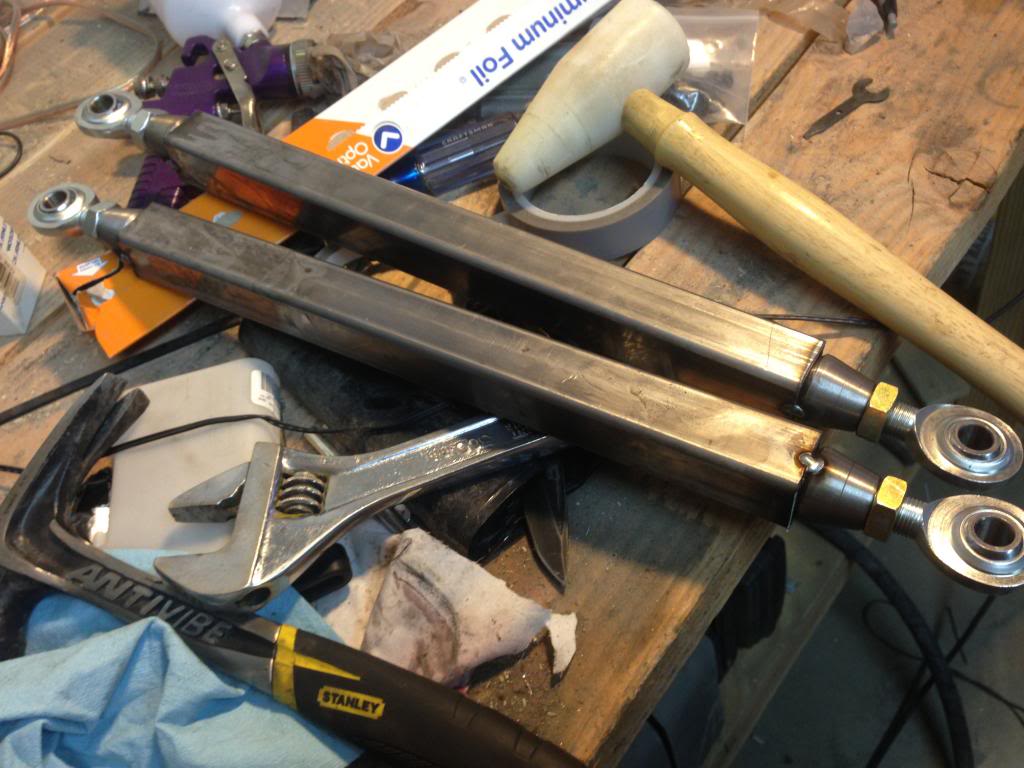
Soooo I shortened it and made the 2 of them all tacked up

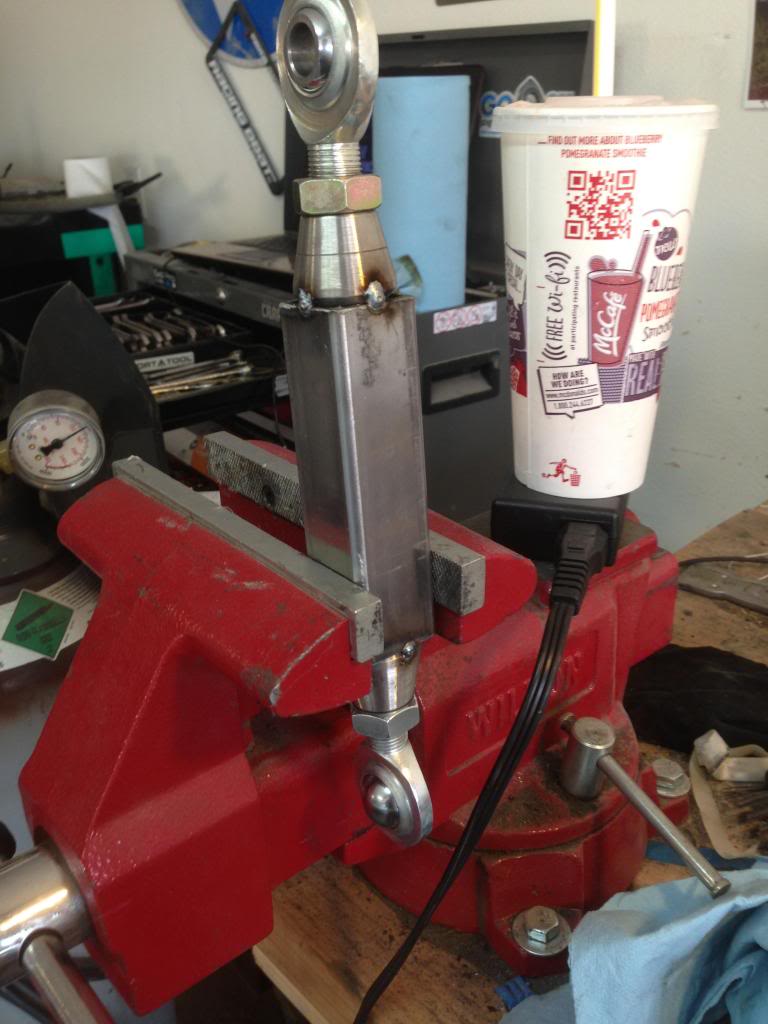
So next debate was how do i want to do the lower. At 1st i was going to removed the stock ford 8.8 lower and just weld in my own little tab. But the issue with that is if i did that i was going to have to get a new place to mount the shock. And the ford 8.8 shock mount worked really well with where it was in the car. Sooo comprimise. The rod ends i have pivot so since the stock ford 8.8 lower was at a angle and thats the reason i didnt want to use it i decided "why not" it will work why reinvent the wheel. Plus it is probably alot stronger than my welding and it makes it easier for me.
Sooo lower control arms cut and made
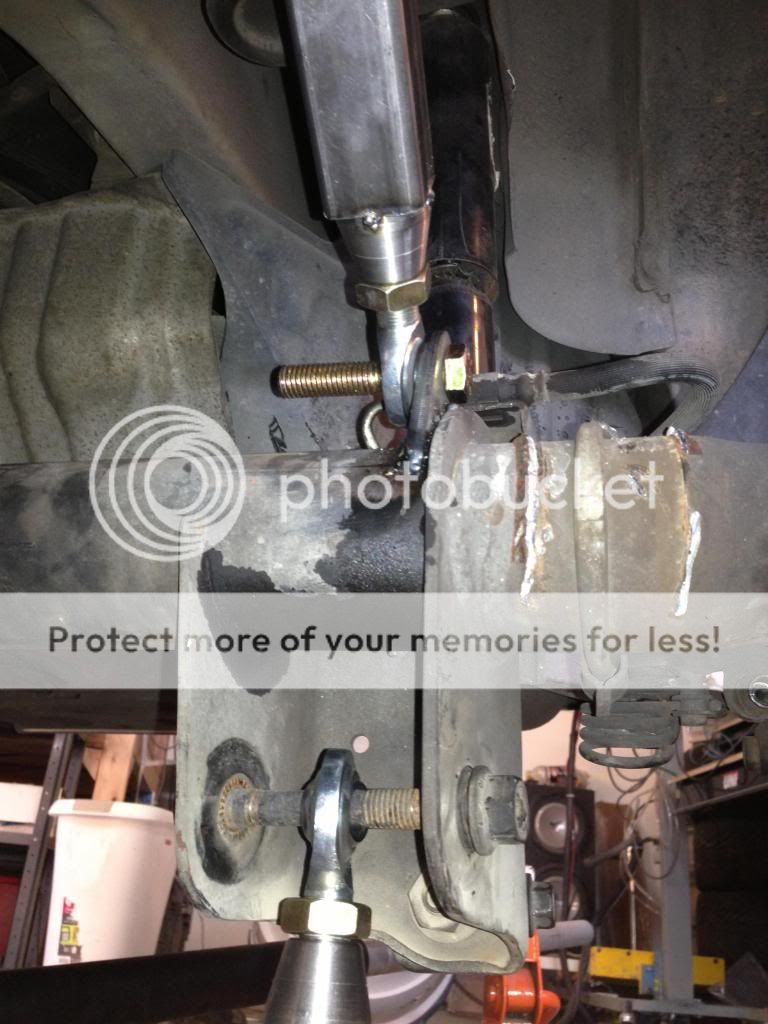
Anddddd dillemah. For some reason i thought as long as i got the pinion angle right everything would be fine... guess not. Soooo off to grinding and rewelding to get this thing centered..
I Had to shorten the upper and the lower one. The upper one is now wayy shorter than before and the lower i took about 1.25 inches off of.
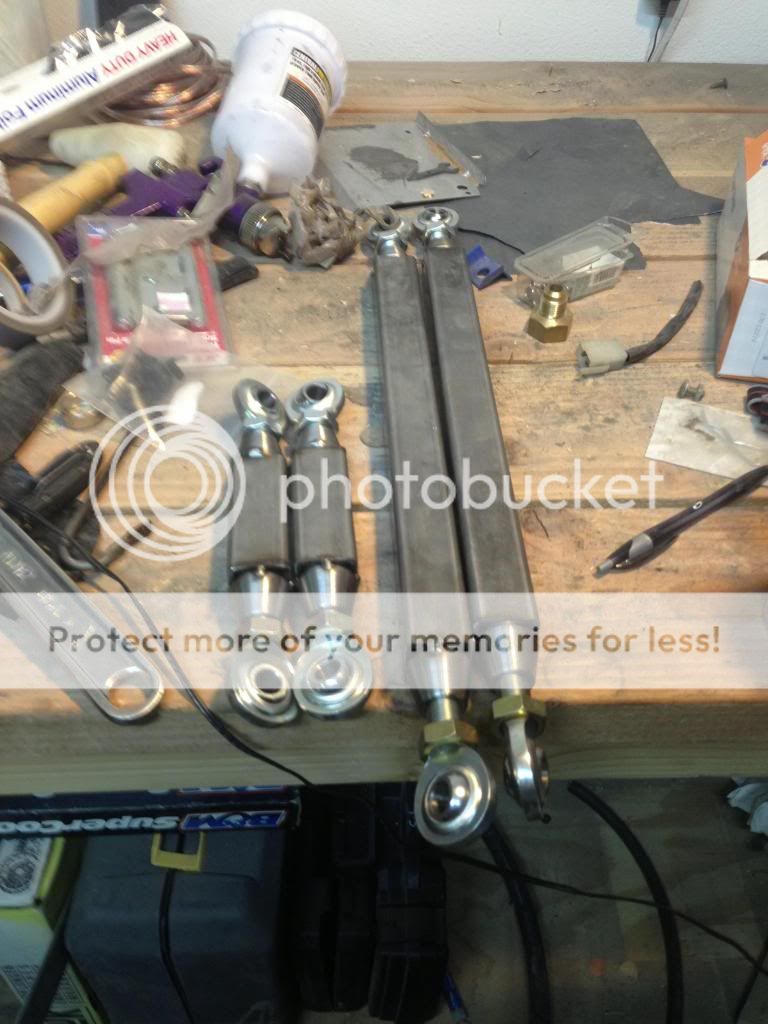
and both of the uppers and lowers together. Now that ui have my pinion angle et where i want it (there double adjustable so i dont really need to worry much about pinion angle ne ways. and the thing centered i am going to weld them up fully tomorrow and powdercoat them. Debating on purple or black. They will probably end up purple like my subframe but well c hahah. I did not mount in a spring location because i am going to be going coilovers. For the time being till they come in i will be using a block of wood to act as a spring so i can roll it around. But full rear coilovers al the way.
All i really have left to figure out is the panhard bar and rear sway bar. I think the sway bar will probably be a adjustable respeed or maybe a mustang one if im feeling froggy. But the panhard i have no idea how to make the bracket stuff as of right now.. W/e ill get it figured out tomorrow.
If any of yall have any questions feel free and i can answer them to the best of my ability.
So of course with putting this in. Measure measure measure measure. Im usually a cut 2x measure none type of person but with this when it comes to pinion angle and getting the rear centered in the car it took a tonnn of measuring. You can probably guess form this picture how i did it but it was pretty straight forward. I mainly got it figured out were to mount the 1st tab and went from there.
Then from there for the 1st tab welded on =D.
I started with the upper control arms 1st and since i didnt know exactly how to start at 1st i decided "stock worked lets use stock length"
Soooo that didnt work Haha wayy too long.
Soooo I shortened it and made the 2 of them all tacked up
So next debate was how do i want to do the lower. At 1st i was going to removed the stock ford 8.8 lower and just weld in my own little tab. But the issue with that is if i did that i was going to have to get a new place to mount the shock. And the ford 8.8 shock mount worked really well with where it was in the car. Sooo comprimise. The rod ends i have pivot so since the stock ford 8.8 lower was at a angle and thats the reason i didnt want to use it i decided "why not" it will work why reinvent the wheel. Plus it is probably alot stronger than my welding and it makes it easier for me.
Sooo lower control arms cut and made
Anddddd dillemah. For some reason i thought as long as i got the pinion angle right everything would be fine... guess not. Soooo off to grinding and rewelding to get this thing centered..
I Had to shorten the upper and the lower one. The upper one is now wayy shorter than before and the lower i took about 1.25 inches off of.
and both of the uppers and lowers together. Now that ui have my pinion angle et where i want it (there double adjustable so i dont really need to worry much about pinion angle ne ways. and the thing centered i am going to weld them up fully tomorrow and powdercoat them. Debating on purple or black. They will probably end up purple like my subframe but well c hahah. I did not mount in a spring location because i am going to be going coilovers. For the time being till they come in i will be using a block of wood to act as a spring so i can roll it around. But full rear coilovers al the way.
All i really have left to figure out is the panhard bar and rear sway bar. I think the sway bar will probably be a adjustable respeed or maybe a mustang one if im feeling froggy. But the panhard i have no idea how to make the bracket stuff as of right now.. W/e ill get it figured out tomorrow.
If any of yall have any questions feel free and i can answer them to the best of my ability.
Thread Starter
RX-7 NUT
Joined: Aug 2007
Posts: 444
Likes: 1
From: California
Thanks man. I am stationed in Edwards AFB, California about 2 hours north of LA. Ive been here 2 years now but before here i was in Spang. I miss it so much there was quite fun. Im a crew chief on F-16's. Never really dont any fab work or car building before this one so im learning as i go.
Thread Starter
RX-7 NUT
Joined: Aug 2007
Posts: 444
Likes: 1
From: California
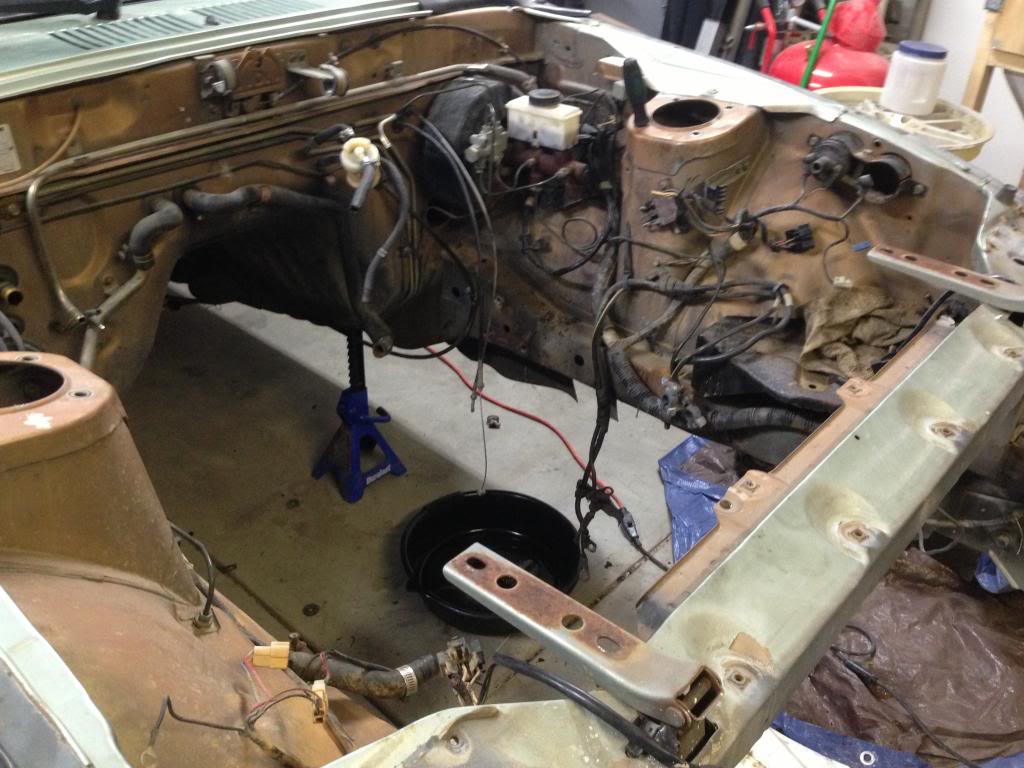
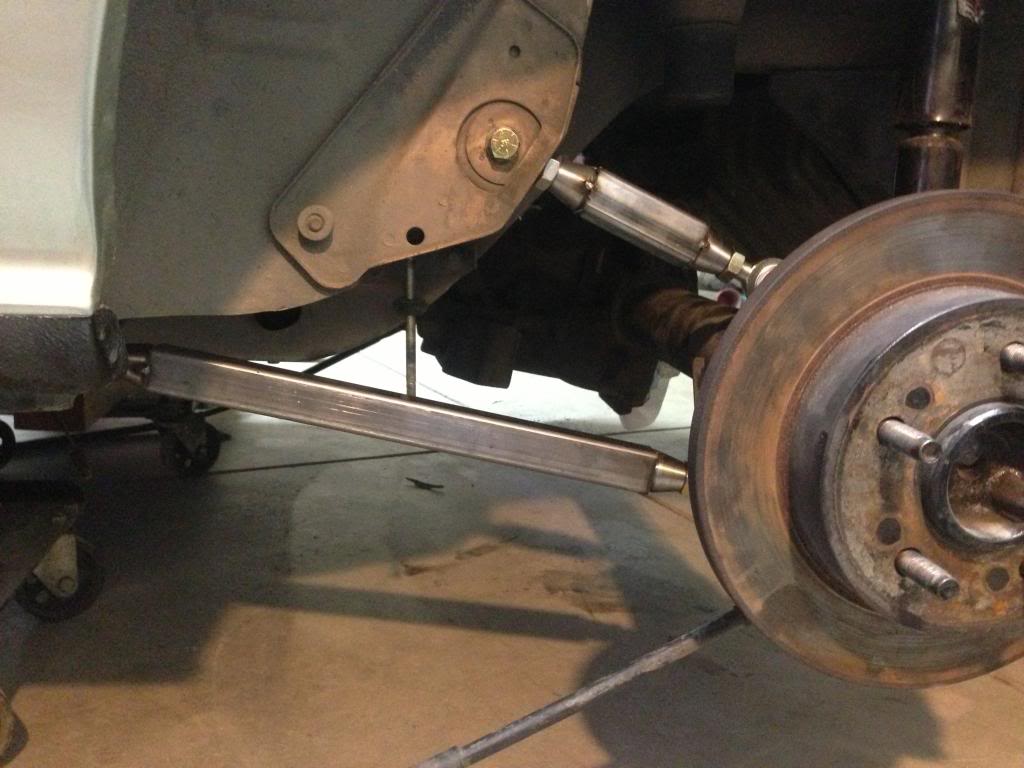
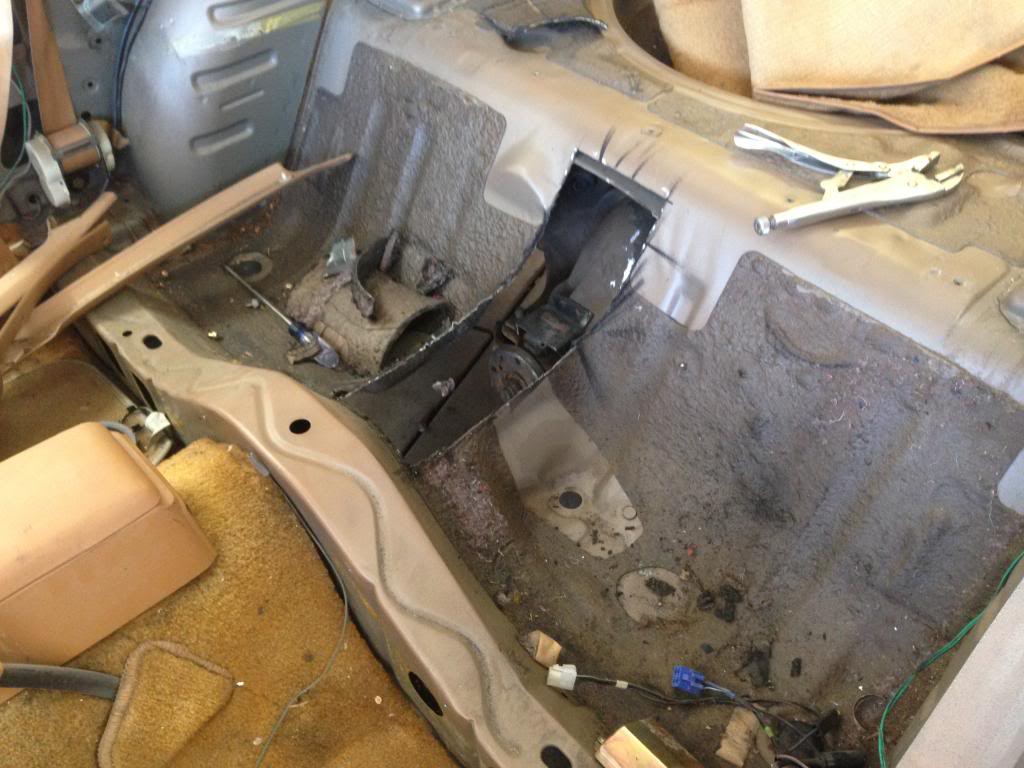
FC subframe,
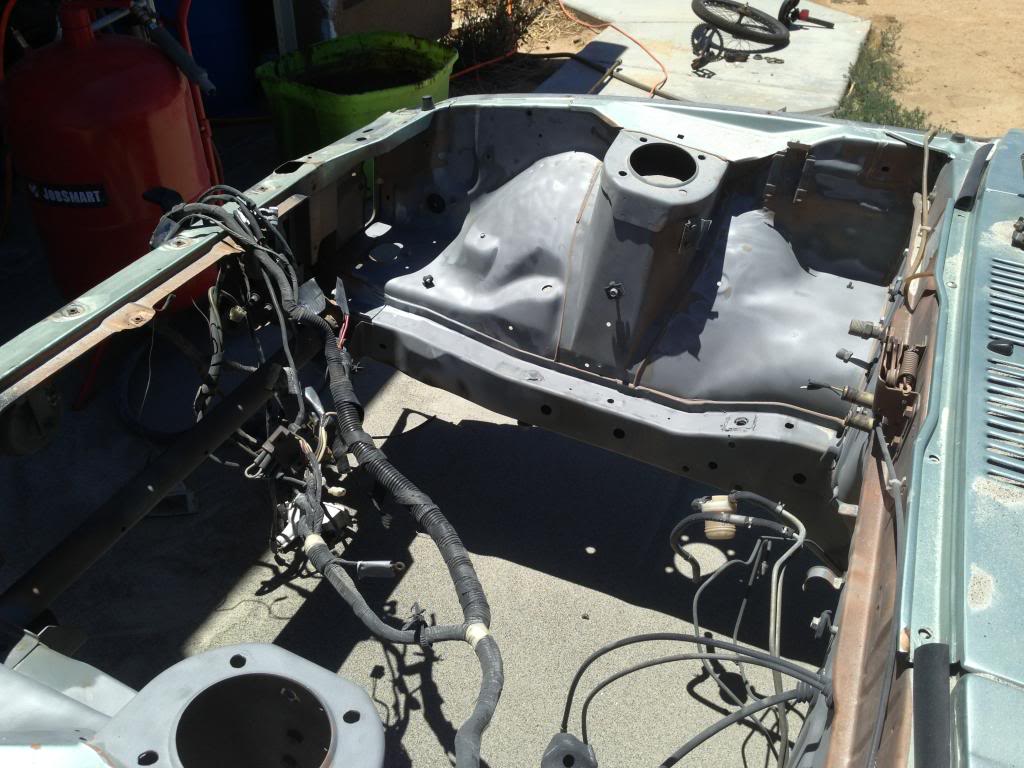
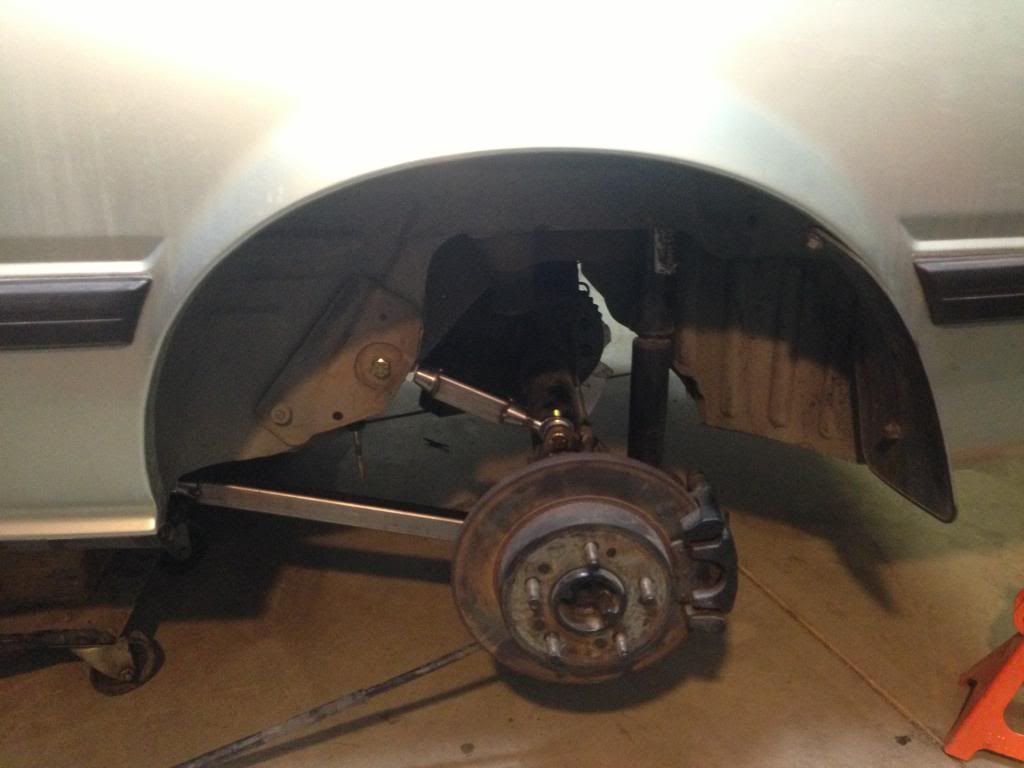
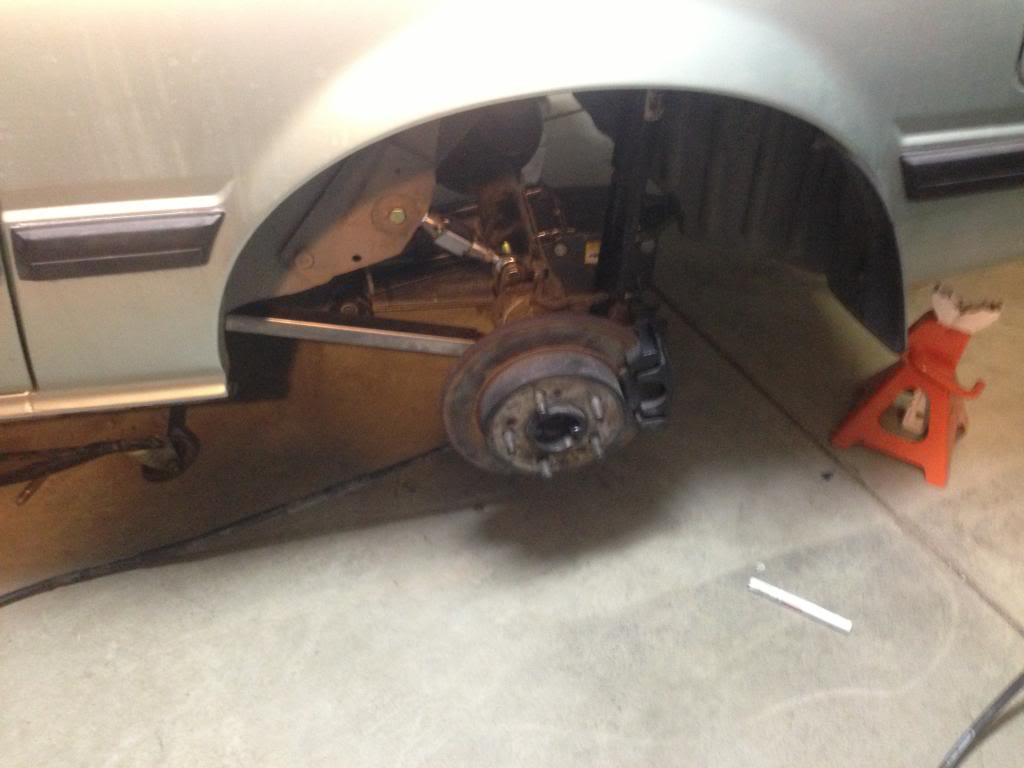
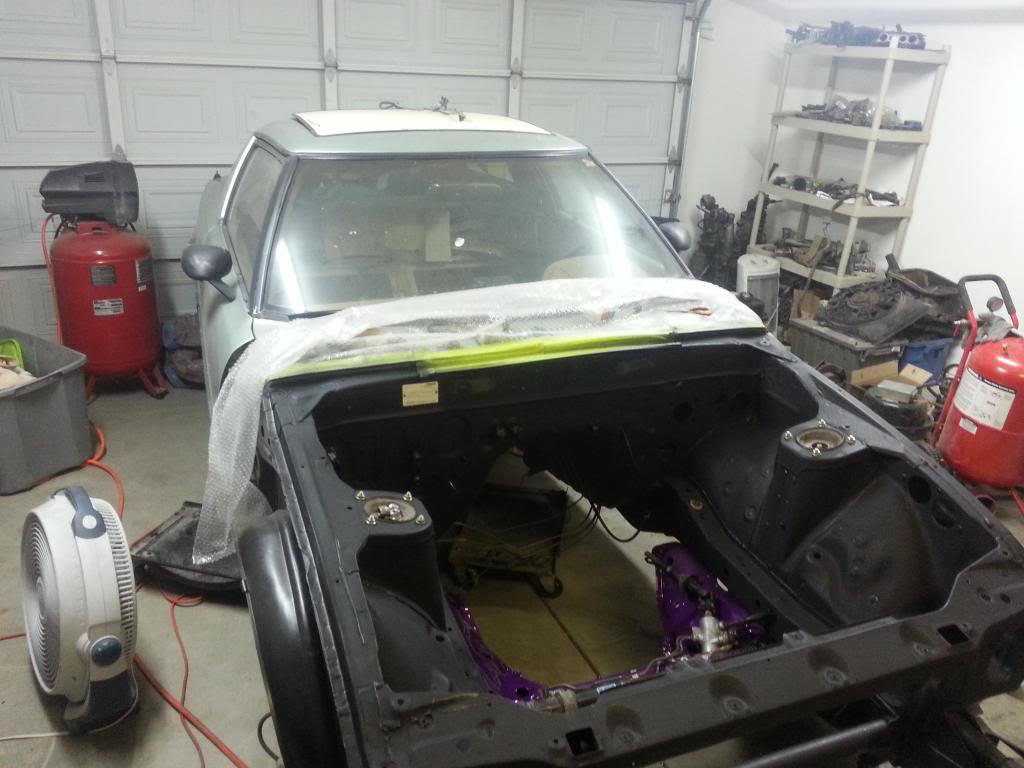
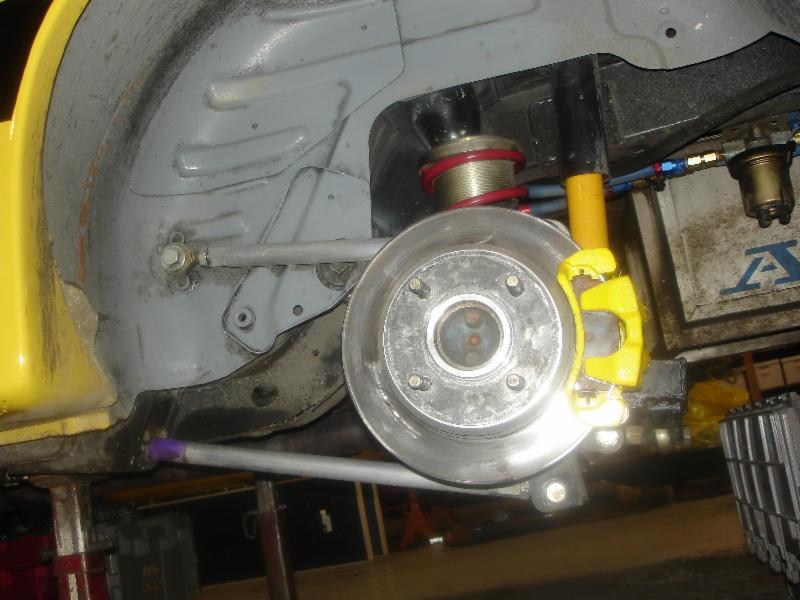
Soo i thought i allready posted this. But i got the front subframe in last weekend after powdercoating it. Still haven't put the front sway bar in or braced the lower half of the steering column but thats on the list. Felt like doing the rear insted of that i might get the front 100% completed this weekend. I have some 20"s to powdercoat this wekeend as well as some FC rear arms for a buddy at work. When all thats done i should have more time to work on the car. Ne ways here some pics
in the car
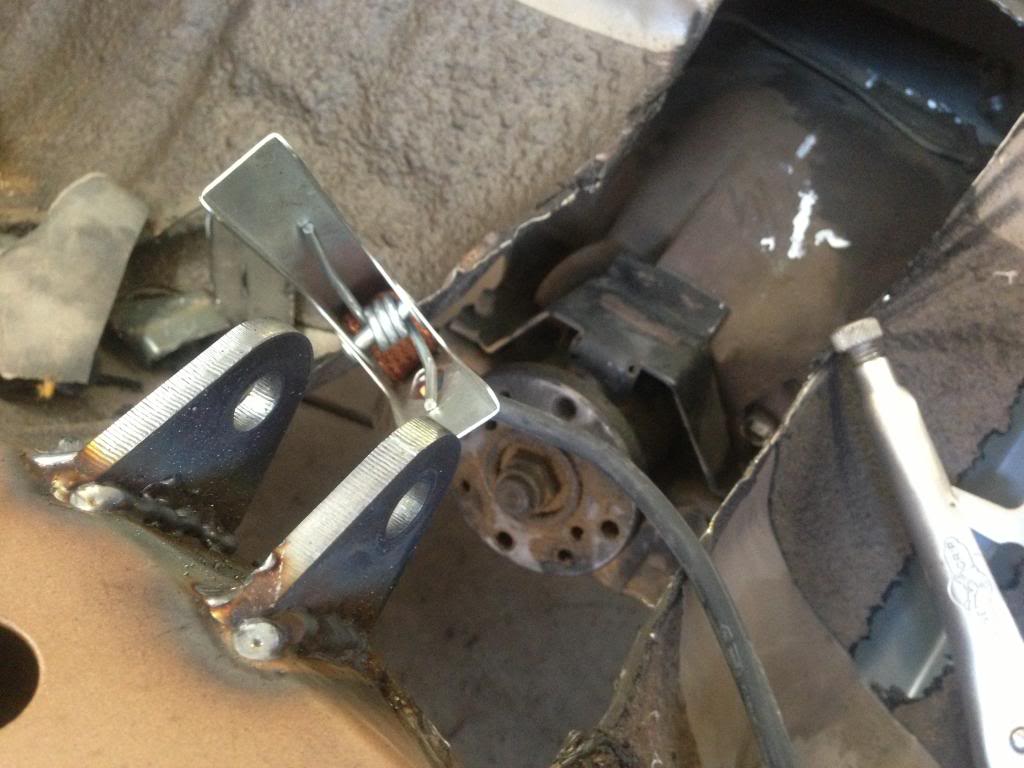
Took off the dust shield cuz i thought it looked tacky. Dont need it either way plus im powdercoating all the front suspension so youll be able to see more of the spindles w/o em.

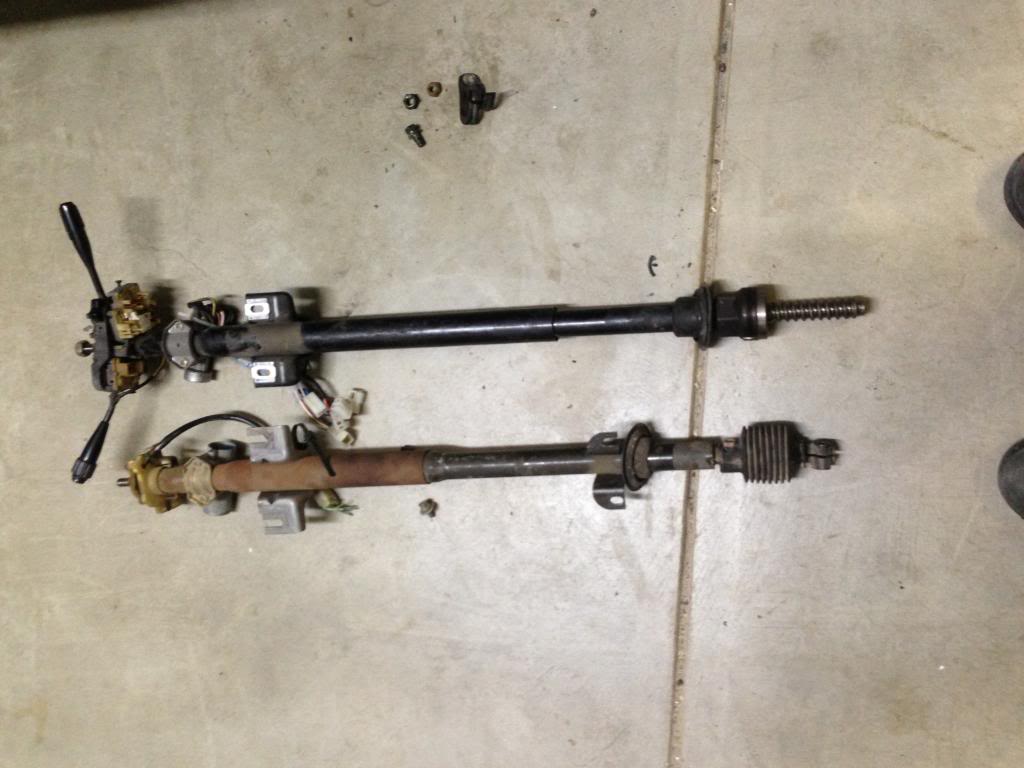
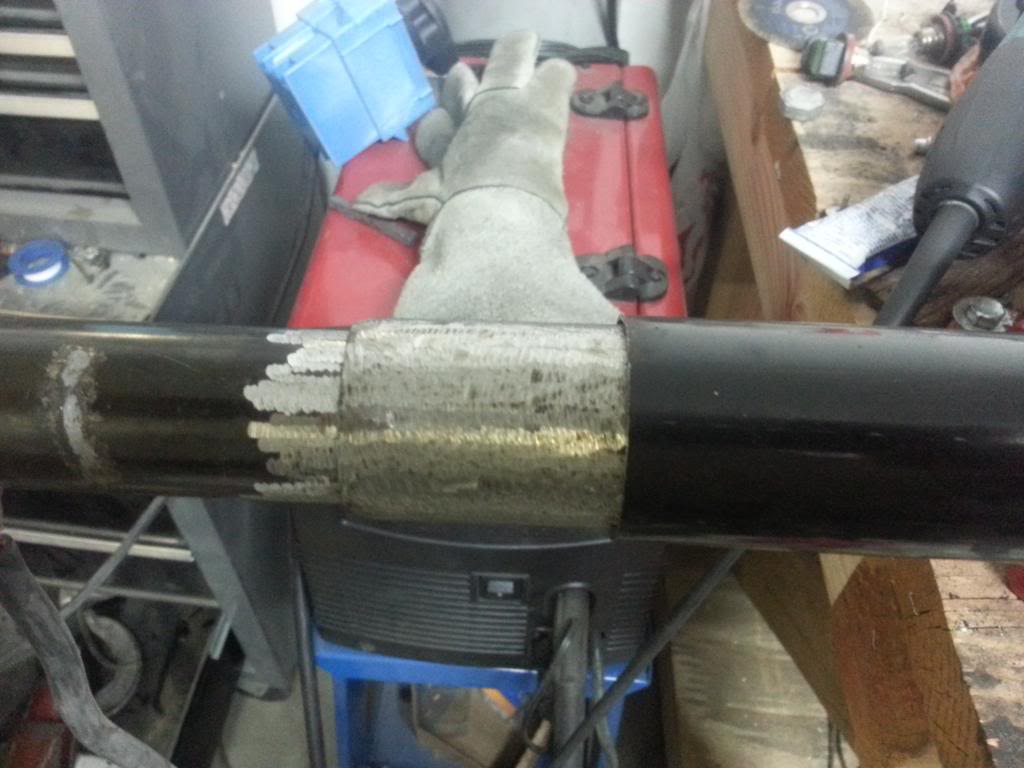
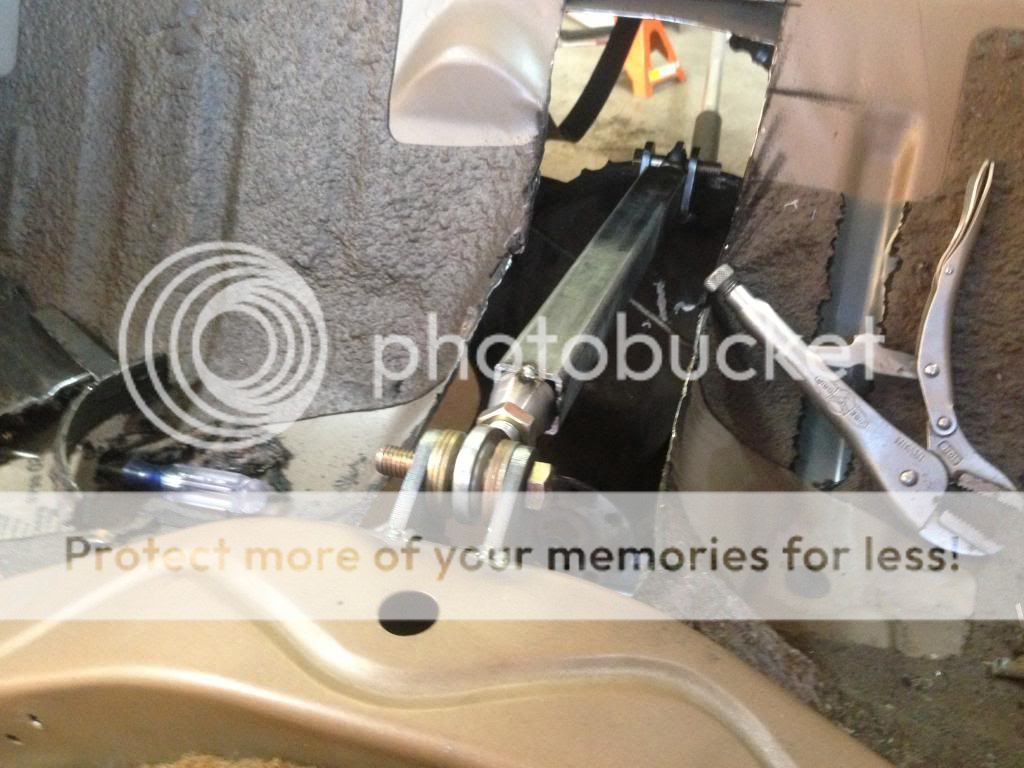
When you read the how to put the fc subframe in he doesent explain the steering column with pictures. So this part i was a bit confused on how to do origonally. But adapting the steering columns length was kind of annoying with all of the grinding but when you get it all cut it fits pretty good. (FC,FC,FB)
[img[http://i1289.photobucket.com/albums/b514/darkdrakex/20130626_212406_LLS_zpsc161dc86.jpg[/img]
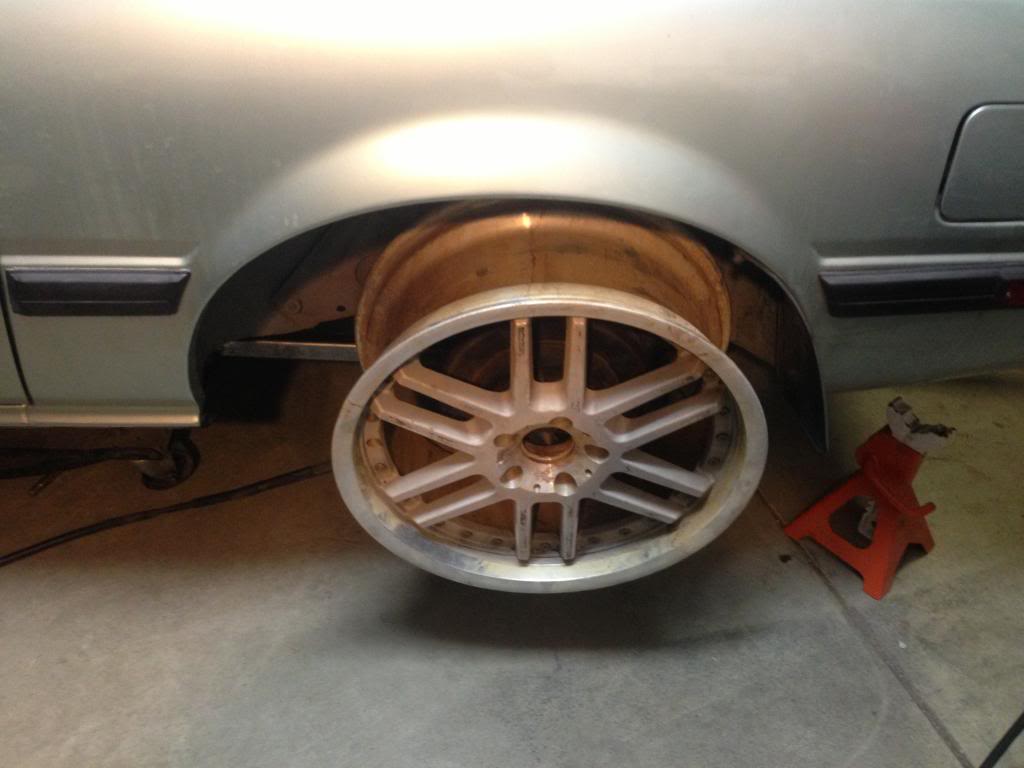
Anddd how she is sitting right now till i play with her tomorrow. I need to powdercoat some of these rims i have stripped and gte some rubber on em so i can have some rear tires. I dont have any spare 5x114 like i did 4x114's in the front.
I also ordered some t2 front brake calipers so from what i understand for the 5 lug conversion all i need left is the rotor and the 5 lug hub. Wich is proving to be a PITA to find so if anyone have a extra laying around for a good price hit me up lol ^_^.
in the car
Took off the dust shield cuz i thought it looked tacky. Dont need it either way plus im powdercoating all the front suspension so youll be able to see more of the spindles w/o em.
When you read the how to put the fc subframe in he doesent explain the steering column with pictures. So this part i was a bit confused on how to do origonally. But adapting the steering columns length was kind of annoying with all of the grinding but when you get it all cut it fits pretty good. (FC,FC,FB)
[img[http://i1289.photobucket.com/albums/b514/darkdrakex/20130626_212406_LLS_zpsc161dc86.jpg[/img]
Anddd how she is sitting right now till i play with her tomorrow. I need to powdercoat some of these rims i have stripped and gte some rubber on em so i can have some rear tires. I dont have any spare 5x114 like i did 4x114's in the front.
I also ordered some t2 front brake calipers so from what i understand for the 5 lug conversion all i need left is the rotor and the 5 lug hub. Wich is proving to be a PITA to find so if anyone have a extra laying around for a good price hit me up lol ^_^.
Joined: Aug 2011
Posts: 3,078
Likes: 42
From: Cambridge, Minnesota
I am loving this thread right now, thank you so much for posting the updates!
I have a few questions for ya that I'd personally like to know about the rear end specifically:
1. You say it's out of a 94 Mustang - I'm assuming it's a GT to be a Posi?
2. Since it's 2" longer and you're not shortening it, will you be compensating for the extra 1" on either side with offsets in rims and such?
3. How are you going to get the bottom control arm end link to stay put on the lower Ford rear end where you want it on the bolt, with nylon lock nuts or something?
4. You must be making your own Panhard I'm assumng, yes? Thinking of going tri-link at all?
5. The rear sway bar would have to mount to the stock locations on the frame I'm assuming, so if you used the FB one you'd have to figure out how to get it to fit onto the rear end?
6. You say you plan on going to coilovers in the rear, are you going to order RX-7 coilovers for the rear? I'd assume so since the length would be similar.
I'll leave it at that for now but I'll probably think of more later.
I'm told I'm needy but I don't care I'm just very interested in how you're going about the rear end swap and it looks to be by far the easiest way to get a better rear end in the car that I've seen to date. Most of the swaps need hours of cutting, measuring, and destroying the rear end of the car in order to do some funky things in getting a shortened axle and it's components in there. This looks relatively straight forward and like it makes a lot of sense
Thanks in advance!
I have a few questions for ya that I'd personally like to know about the rear end specifically:
1. You say it's out of a 94 Mustang - I'm assuming it's a GT to be a Posi?
2. Since it's 2" longer and you're not shortening it, will you be compensating for the extra 1" on either side with offsets in rims and such?
3. How are you going to get the bottom control arm end link to stay put on the lower Ford rear end where you want it on the bolt, with nylon lock nuts or something?
4. You must be making your own Panhard I'm assumng, yes? Thinking of going tri-link at all?
5. The rear sway bar would have to mount to the stock locations on the frame I'm assuming, so if you used the FB one you'd have to figure out how to get it to fit onto the rear end?
6. You say you plan on going to coilovers in the rear, are you going to order RX-7 coilovers for the rear? I'd assume so since the length would be similar.
I'll leave it at that for now but I'll probably think of more later.
I'm told I'm needy but I don't care
I'm just very interested in how you're going about the rear end swap and it looks to be by far the easiest way to get a better rear end in the car that I've seen to date. Most of the swaps need hours of cutting, measuring, and destroying the rear end of the car in order to do some funky things in getting a shortened axle and it's components in there. This looks relatively straight forward and like it makes a lot of sense Thanks in advance!
Thread Starter
RX-7 NUT
Joined: Aug 2007
Posts: 444
Likes: 1
From: California
Ill answer as best i can.
1. Yes 1994 Mustang GT that had a 5.0 in it (Last year of the 5.0)
2. For the rear being 2" wider i am going to have to compensate. I am planning on running 3.75" flares in the rear and 3.25" flares in front till i can find a group C widebody from japan for a decent price then i will be running 11.5" rear and 10.5" front tires custom 3 pieces. I could have easily gotten it shortened at a local shop for 250$ but then i would have had to buy custom axles wich would have ended up costing more than it was worth. Since im going flares ne ways it didnt matter much to me.
3. Yeh i was wondering when someone would say something about that. This is all in mockup right now i am going to use spacers/washers to center it in the stock ford rear mount point. Basically just going to center it in the stock point and it i need to move some washers/spacers around to get more left/right then i can.
4. And yes i am making my own panhard. Honestly this may sound stupid but idk much about tri link. I have seen pictures of where the center one mounts in the car but thats about my extent. I am going to do some searching and see if i come up with some sort of write up. If its worth it i might start on that as well lol.
5. Yeah i havent given the sway bar much thought. I was gonna get the stock one bolted on and then go aftermarket from there. The 2 rear ends are shaped extrememly similar when right next to eachother. So making it fit shouldent be too bad.. I hope.
6. https://www.rx7club.com/1st-generati...ssible-975939/ post # 15.
Thread Starter
RX-7 NUT
Joined: Aug 2007
Posts: 444
Likes: 1
From: California
Someone that has done tri link please chime in. So i spent the day moving the upper control arm mounts inboard so i could weld the tabs on a diff angle on the diff and hopefully make longer control arms. That was to no anvil. So basically my problem is to have the rear centered and the pinion angle correct the upper control arms are basically wayyy too short.. This makes it kind of annoying when your messing with the rear it "rolls over" if you will so the rear rolls forward and the upper control arms pivot so there straight up and down and not 90 degrees. Granted it only does this when jacking the car up and letting it hang down really far and the fact that i dont have a panhard on it yet amplifys it. My question is even tho there smaller that makes it have a more agressive arc.
Will i run into problems with the more agressive arc?? If so should i just go tri link right now before spending time welding these small ones up and trying it??? If i go tri link im not too worried about making it work. Ive looked at a ton of pictures and would do it like this guy is. https://www.rx7club.com/build-thread.../#post11512903 This car by no means iwll be a drag car am i going to benefit from a tri link or should i just use the 4 link setup and work it from there.
Thanks in advance i just dont wana do all this work and then later down the road when i have a running car redo my rear end.. espec after its all painted/powdercoated/welded. Easiest time to change my design is right now.
Thanks man. I am stationed in Edwards AFB, California about 2 hours north of LA. Ive been here 2 years now but before here i was in Spang. I miss it so much there was quite fun. Im a crew chief on F-16's. Never really dont any fab work or car building before this one so im learning as i go.
 ).
).On another note, with coilovers I'm not sure that you'll need a rear sway... I ended up disconnecting mine to manage the oversteer on my FB T2 swapped car. That being said it's nice to have the option.

Someone that has done tri link please chime in. So i spent the day moving the upper control arm mounts inboard so i could weld the tabs on a diff angle on the diff and hopefully make longer control arms. That was to no anvil. So basically my problem is to have the rear centered and the pinion angle correct the upper control arms are basically wayyy too short.. This makes it kind of annoying when your messing with the rear it "rolls over" if you will so the rear rolls forward and the upper control arms pivot so there straight up and down and not 90 degrees. Granted it only does this when jacking the car up and letting it hang down really far and the fact that i dont have a panhard on it yet amplifys it. My question is even tho there smaller that makes it have a more agressive arc.
Will i run into problems with the more agressive arc?? If so should i just go tri link right now before spending time welding these small ones up and trying it??? If i go tri link im not too worried about making it work. Ive looked at a ton of pictures and would do it like this guy is. https://www.rx7club.com/build-thread.../#post11512903 This car by no means iwll be a drag car am i going to benefit from a tri link or should i just use the 4 link setup and work it from there.
Thanks in advance i just dont wana do all this work and then later down the road when i have a running car redo my rear end.. espec after its all painted/powdercoated/welded. Easiest time to change my design is right now.
Will i run into problems with the more agressive arc?? If so should i just go tri link right now before spending time welding these small ones up and trying it??? If i go tri link im not too worried about making it work. Ive looked at a ton of pictures and would do it like this guy is. https://www.rx7club.com/build-thread.../#post11512903 This car by no means iwll be a drag car am i going to benefit from a tri link or should i just use the 4 link setup and work it from there.
Thanks in advance i just dont wana do all this work and then later down the road when i have a running car redo my rear end.. espec after its all painted/powdercoated/welded. Easiest time to change my design is right now.
I think what you are doing is inventive and you are using what you have access to. However I think you will not be pleased with the results.
Also, a piece of advice that I would give do not weld directly to the axle tubes on the rear end you are using. I have seen axle tubes on 8.8s warp. None of the mods I did to my stock rear end housing involved welding on the axle tubes.
I want to add that a 4 link rear suspension can work as long as the arms have a similar geometry. Below are some shots of a 4 link design that work great in an RX7. In fact this car won the SCCA Runoffs several years ago.
The upper arms use the factory upper mount on the axle and are relocated farther into the inner wheel well. A square tube mount with 3 adjustments is added inside the car. This mount is tied into the racecar's cage. The lower arm use the factory mount on the chassis but the mount on the rear end in 2.5" lower than the stock location. This helps the car maintain good anti-squat characteristics so the driver can hammer the throttle off of a corner.
The draw back to this design is that the upper arm crowds the tire a little. Not an issue if the car is running flares like this one is.
From inside the wheel well. The arms are extruded aluminum with Aurora rod ends
The mount inside the car. The mount features tubes that are welded through the square tube mount to add support to the single shear mount.
URL=http://s1273.photobucket.com/user/mustanghammer/media/Insidemount_zps521510c9.jpg.html]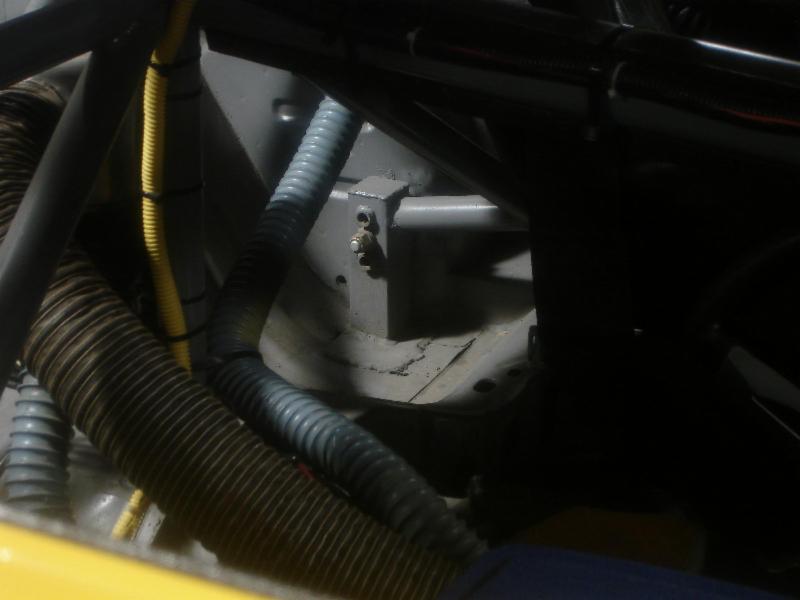 [/url]
The upper arms use the factory upper mount on the axle and are relocated farther into the inner wheel well. A square tube mount with 3 adjustments is added inside the car. This mount is tied into the racecar's cage. The lower arm use the factory mount on the chassis but the mount on the rear end in 2.5" lower than the stock location. This helps the car maintain good anti-squat characteristics so the driver can hammer the throttle off of a corner.
The draw back to this design is that the upper arm crowds the tire a little. Not an issue if the car is running flares like this one is.
From inside the wheel well. The arms are extruded aluminum with Aurora rod ends

The mount inside the car. The mount features tubes that are welded through the square tube mount to add support to the single shear mount.
URL=http://s1273.photobucket.com/user/mustanghammer/media/Insidemount_zps521510c9.jpg.html]
[/url]
Thread Starter
RX-7 NUT
Joined: Aug 2007
Posts: 444
Likes: 1
From: California
Oh wow thats pretty impressive. I didnt think of doing that at all because i didnt want to end up in the fender well but considering i am going to be running flares as well it wouldn't have been a bad idea. Im using your pictures and Elwood's pics of his toyotta 8 install to help me https://sites.google.com/site/elwood...ension-upgrade . I am going to get a lower control arm mount made like he did so i can have the multi hole adjustability. Till then im gonna use the stock 8.8 lower because it is pretty long as is.
With my buddy's stock eclipse wheels on em. I dont have a panhard installed yet so that just using a jack and eyeballing center.
I am going to beef this area up with a overplate for the tunnel and weld it all in and then tie it into my cage when i make one. But for now i can have it in the car sitting w/ just the beefup.
Thanks for all of the help so far man. Your build is amazing BTW.
Thanks - it has been a long process.
By the way - how are you attaching the third link mount to the center section of the 8.8? Since it is a cast piece I would not recommend welding to it
On my mustang I made fixture that attached to the top of the center section using 3 rear end cover bolts (the three on top) and two 1/2 bolts that attached to the ribs cast to either side of the nose of the rear end. Sort of like an upside down Griggs Racing torque arm mount only just enough material to weld a shock mount to.