
RX7 Series 6 Single Turbo project

Thread Starter
Senior Member
Joined: May 2013
Posts: 301
Likes: 0
From: Johannesburg, South Africa
Thread Starter
Senior Member
Joined: May 2013
Posts: 301
Likes: 0
From: Johannesburg, South Africa
Was doing some research and discovered my turbo is not a T61 but a T70 which Im pretty happy about, the guy who sold it to me said it was a T61 so took his word for it but after some research and looking at the model number I worked out that the s70 means its a T70, masterpower just call it a s70.

Last edited by RuffRx7; Aug 25, 2015 at 04:36 AM.
Thread Starter
Senior Member
Joined: May 2013
Posts: 301
Likes: 0
From: Johannesburg, South Africa
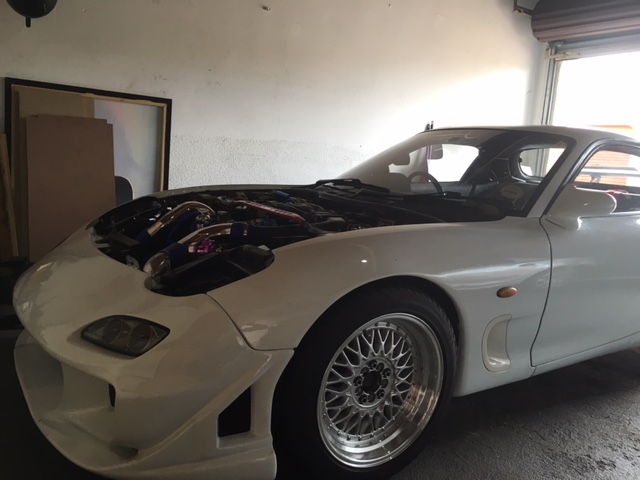
Started with a test fit of the manifold and turbo last night after finding the bag of bolts that I lost.
All fits great, going to spray the exhaust housing and manifold with VHT high heat paint in satin black to match my UIM and LIM this weekend, all is looking good to install the motor on Saturday so will send updates and pics if I manage to get it done, first time so a bit nervous
Here are some pics of the manifold and turbo mounted to the engine
Thread Starter
Senior Member
Joined: May 2013
Posts: 301
Likes: 0
From: Johannesburg, South Africa
Sup guys, so didn't get the motor installed this weekend, my clutch setup was not upgraded by my builder so just waiting for that to be done.
Sprayed the manifold and turbo exhaust housing this weekend with the VHT flame proof paint.
Before


After


Sprayed the manifold and turbo exhaust housing this weekend with the VHT flame proof paint.
Before
After
Not to be a dick but that paint will be gone the first time you run the car, the temps in the manifold and on the turbo wear it off like nothing... Coming from experience. Ceramic coating is the only thing that will hold up.
Thread Starter
Senior Member
Joined: May 2013
Posts: 301
Likes: 0
From: Johannesburg, South Africa
No stress bud, just wanted to treat it as it was rusting a bit, going to wrap the manifold in exhaust wrap and get a turbo blanket for the exhaust housing.
Thread Starter
Senior Member
Joined: May 2013
Posts: 301
Likes: 0
From: Johannesburg, South Africa
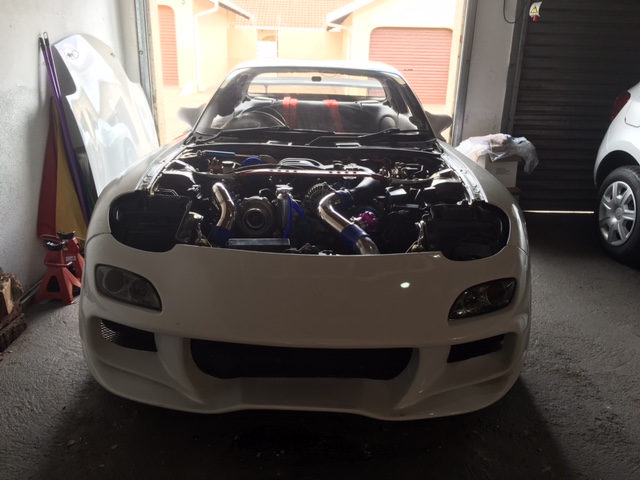
Finally got the motor in this weekend
Took about 2hrs 30mins to get it in, first time attempting to install, had a couple local guys come and help me with it and was there first time too. hahahahah engine install virgins
Everything went in well just took our time to make sure all was correct.
Enjoy the pics
On the crane


One of the guys helping it in


Install and all bolted up


Test fitted the manifold and turbo


Took about 2hrs 30mins to get it in, first time attempting to install, had a couple local guys come and help me with it and was there first time too. hahahahah engine install virgins
Everything went in well just took our time to make sure all was correct.
Enjoy the pics
On the crane
One of the guys helping it in
Install and all bolted up
Test fitted the manifold and turbo
Last edited by RuffRx7; Sep 7, 2015 at 03:32 AM.
Thread Starter
Senior Member
Joined: May 2013
Posts: 301
Likes: 0
From: Johannesburg, South Africa
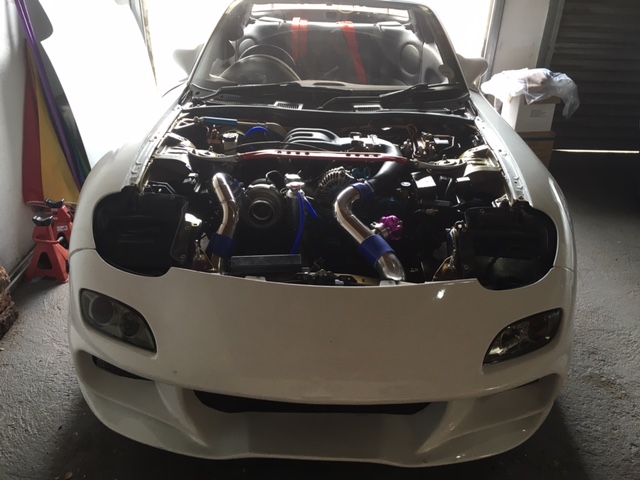
And test fitted UIM and boost pipes.


Going to install intercooler and radiator temporally so I can fit my new AST and Oil Catch can. Then need to take it all out to install injectors and fit everything with gaskets and bolt it down properly. Wiring for Apexi PFC to be done this week, button up a few more things here and there, ad oil and coolant and start her up
Going to install intercooler and radiator temporally so I can fit my new AST and Oil Catch can. Then need to take it all out to install injectors and fit everything with gaskets and bolt it down properly. Wiring for Apexi PFC to be done this week, button up a few more things here and there, ad oil and coolant and start her up
Last edited by RuffRx7; Sep 7, 2015 at 03:35 AM.
Thread Starter
Senior Member
Joined: May 2013
Posts: 301
Likes: 0
From: Johannesburg, South Africa
did some wiring this weekend, needed to add back to the harness all the plugs that where taken out for the stand alone harness on my previous ECU as I have gone with the Apexi PFC unit.
Will do the soldering this week to reconnect the wires back to the plugs and do some test fitting for length but I am a novice a soldering so might take some time.
Will do the soldering this week to reconnect the wires back to the plugs and do some test fitting for length but I am a novice a soldering so might take some time.
Thread Starter
Senior Member
Joined: May 2013
Posts: 301
Likes: 0
From: Johannesburg, South Africa
Got some more pics of the engine in and have almost finished my rewire of the harness, just waiting for 2x EV1 injector plugs for the 1680cc Bosch injectors and fetching the resistors today.
Finally fitted my Quick release steering wheel hud, looks quiet nice, just need to rewrap the steering wheel inn leather as it is looking worn.
Also going to do the Fuel Pump wiring upgrade with the Bosch relay system, picking the relay up today as well.


Some close ups of the braided sleeves


Finally fitted my Quick release steering wheel hud, looks quiet nice, just need to rewrap the steering wheel inn leather as it is looking worn.
Also going to do the Fuel Pump wiring upgrade with the Bosch relay system, picking the relay up today as well.
Some close ups of the braided sleeves
Thread Starter
Senior Member
Joined: May 2013
Posts: 301
Likes: 0
From: Johannesburg, South Africa
Car is wired up for the most part, need to do the grounding wires and all done for the ECU
Here is a pic of the interior with the Apexi Gauges installed and connected up, sorry for the poor quality pic.

Here is a pic of the interior with the Apexi Gauges installed and connected up, sorry for the poor quality pic.

Thread Starter
Senior Member
Joined: May 2013
Posts: 301
Likes: 0
From: Johannesburg, South Africa
Will take some more pic this weekend as I will be working on the car for the most part of Saturday.
More updates to come....
Thread Starter
Senior Member
Joined: May 2013
Posts: 301
Likes: 0
From: Johannesburg, South Africa
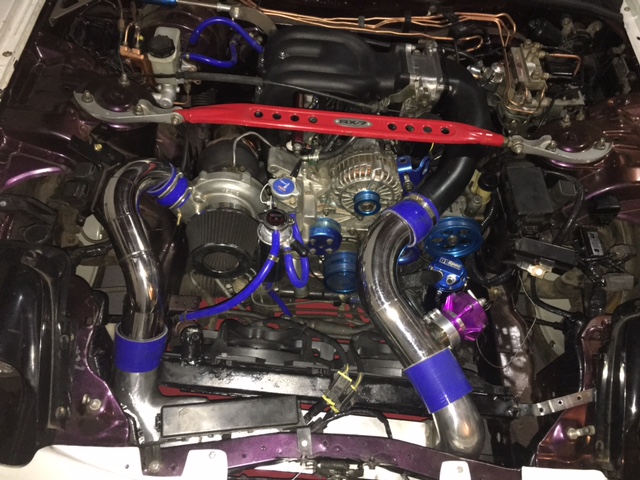
Did plenty work this weekend on the car, AST and oil catch can setup and brackets all done, piping for brake booster and clutch done, AST piping done, all wring is done, ECU plugged in, only thing I need is EV1 secondary injector plugs to complete it. I broke a bolt of my radiator and when trying to extract it cracked the side in the process, so will need to have it fixed before I can carry on  I will also need to rethink my intercooler brackets as the intercooler is sitting skew and not happy with it.
I will also need to rethink my intercooler brackets as the intercooler is sitting skew and not happy with it.
Thread Starter
Senior Member
Joined: May 2013
Posts: 301
Likes: 0
From: Johannesburg, South Africa
Been a while since I posted, had a very annoying short out and couldn't work out what it was so has slowed the project down to 0 but fortunately I found it, I was getting no power to the main fuse so did all the usual tests and found some things that I had over looked previously so all happens for a reason I suppose but ended up being a short in the driver side door wiring harness that caused me all of my swearing, sweat, tears etc...
Fitted my intercooler and done more rewiring, still need to fix my cracked radiator which a kind friend is doing for free always awesome
Here is a pic of the intercooler installed.

all I need to do now is mod my oil catch can, mount the coil packs, bleed brakes and bleed clutch, this will be done while the radiator is in for repairs.
Then attach some wires to sensors and start her up for the first time in a year
Fitted my intercooler and done more rewiring, still need to fix my cracked radiator which a kind friend is doing for free
always awesomeHere is a pic of the intercooler installed.
all I need to do now is mod my oil catch can, mount the coil packs, bleed brakes and bleed clutch, this will be done while the radiator is in for repairs.
Then attach some wires to sensors and start her up for the first time in a year
Last edited by RuffRx7; Jan 18, 2016 at 07:45 AM.
Thread Starter
Senior Member
Joined: May 2013
Posts: 301
Likes: 0
From: Johannesburg, South Africa
Hey guys, so finished off everything I needed to finish to start the car up, only thing Im waiting for is my radiator to come back from being fixed and then install and start
I fitted all my sensors and wired in all my gauges, modded my oil catch can as the company I bought it from didn't have any internals inside the catch can so made it up from some copper piping and 45 degree copper bend, then drilled some holes and surrounded the pipe with some stainless steel wool so that the can actually works, all I need now is a small breather filter.
didn't take any pics like a retard but going to take it out again to fit the filter and will snap some pics of the internals. bench tested my starter and all good to go, all gauges are working from my testing so when radiator get back will fill her up with coolant and add some oil to the motor, drain my fuel tank and put some fresh fuel in and start her up, getting really close now!!!
Hungry for the Power
Joined: Oct 2013
Posts: 191
Likes: 0
From: South Africa
Hey guys, so finished off everything I needed to finish to start the car up, only thing Im waiting for is my radiator to come back from being fixed and then install and start
I fitted all my sensors and wired in all my gauges, modded my oil catch can as the company I bought it from didn't have any internals inside the catch can so made it up from some copper piping and 45 degree copper bend, then drilled some holes and surrounded the pipe with some stainless steel wool so that the can actually works, all I need now is a small breather filter.
didn't take any pics like a retard but going to take it out again to fit the filter and will snap some pics of the internals. bench tested my starter and all good to go, all gauges are working from my testing so when radiator get back will fill her up with coolant and add some oil to the motor, drain my fuel tank and put some fresh fuel in and start her up, getting really close now!!!
I fitted all my sensors and wired in all my gauges, modded my oil catch can as the company I bought it from didn't have any internals inside the catch can so made it up from some copper piping and 45 degree copper bend, then drilled some holes and surrounded the pipe with some stainless steel wool so that the can actually works, all I need now is a small breather filter.
didn't take any pics like a retard but going to take it out again to fit the filter and will snap some pics of the internals. bench tested my starter and all good to go, all gauges are working from my testing so when radiator get back will fill her up with coolant and add some oil to the motor, drain my fuel tank and put some fresh fuel in and start her up, getting really close now!!!
Dont sell it bud so close now will fetch better money for it running.
Is your radiator still being sorted out?
Thread Starter
Senior Member
Joined: May 2013
Posts: 301
Likes: 0
From: Johannesburg, South Africa
Yeah going to get it running now and see if I will still sell it.
Radiator had a slight crack at the top so sent it to a mate to have fixed as he has an account with Silverton radiators and they owe him so he said they would do a full recon on the radiator and fix the crack for free.
Thread Starter
Senior Member
Joined: May 2013
Posts: 301
Likes: 0
From: Johannesburg, South Africa
Ok so fitted down pipe this weekend and finally put her back on all 4 tires
Test fired the fenders and front bumper so see how she is sitting and will have to do some suspension tweeking as she is not as low as I want her, need to drop the front by 10mm and back by 5mm and going to be adding 10mm spacers to the back to have the wheels sitting the same back and front as the front wheels are sticking out more than the rear.
Here are some pics of her sitting on the ground finally.
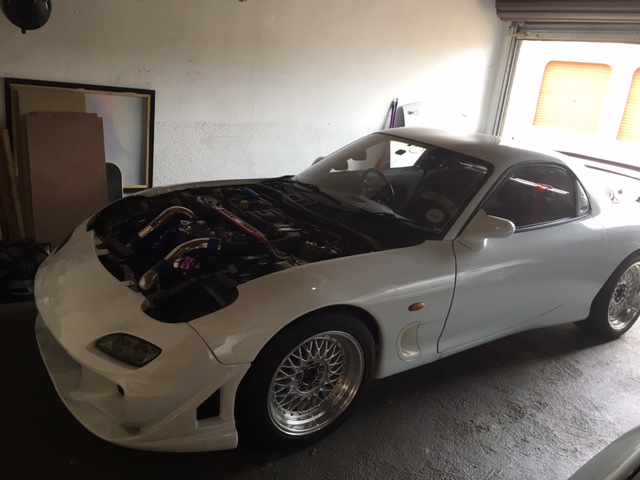
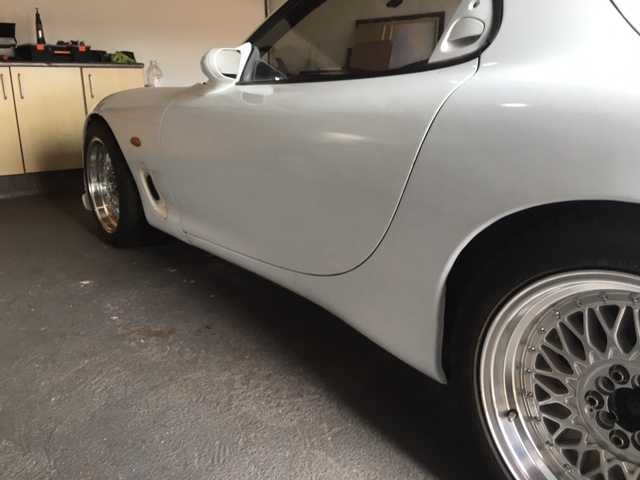
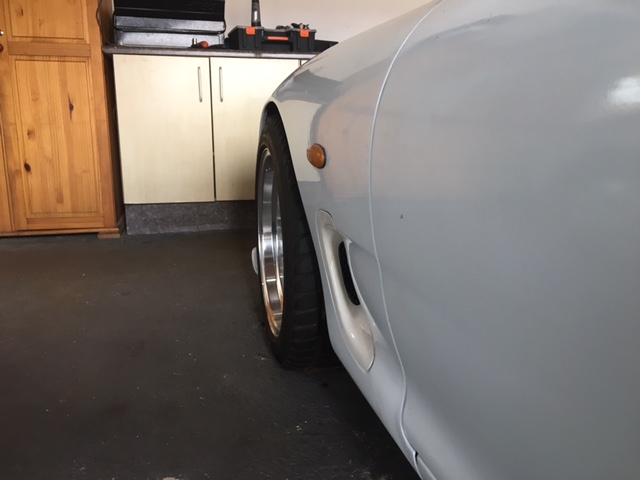
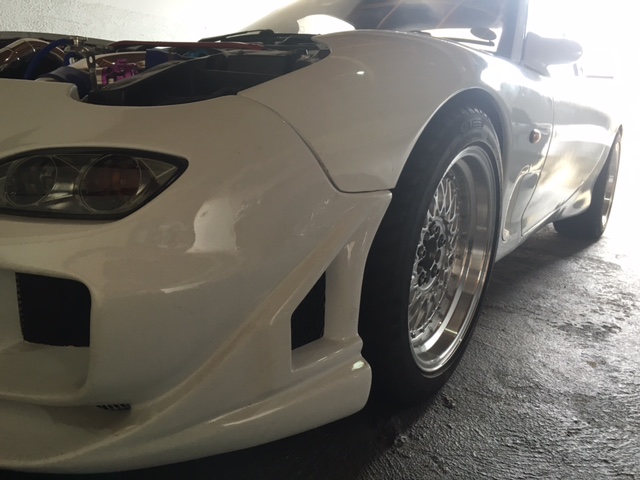
Now just waiting for the radiator which will be done today, going to try and install it during the week so I can finally start her up
Test fired the fenders and front bumper so see how she is sitting and will have to do some suspension tweeking as she is not as low as I want her, need to drop the front by 10mm and back by 5mm and going to be adding 10mm spacers to the back to have the wheels sitting the same back and front as the front wheels are sticking out more than the rear.
Here are some pics of her sitting on the ground finally.


Now just waiting for the radiator which will be done today, going to try and install it during the week so I can finally start her up


Thread Starter
Senior Member
Joined: May 2013
Posts: 301
Likes: 0
From: Johannesburg, South Africa
Radiator installed with fans installed, just cleaned out the joining pipes again as there was some residue left in them, no waiting for my V Belt to arrive which will be tomorrow as I forgot to order it.
Bought a bunch of stuff for start up:
New spark plugs
New brake/clutch fluid
new power steering fluid
engine oil
Coolant
Filled the power steering, engine oil and brake/clutch fluid last night, just need to bleed brakes and clutch.
Will install the rest of the pipes and new spark plugs tomorrow night, the new spark plugs being use are a 6 heat range just to start her up as I don't want to fowl up my other plugs because of all the building grease etc in the motor. Going to give her a once over to check that everything is tight and install correctly then do what I have been waiting to do for a long time, turn the key of joy.
Thread Starter
Senior Member
Joined: May 2013
Posts: 301
Likes: 0
From: Johannesburg, South Africa
Ok so this weekend, did all the piping for the coolant system found some places with leaks and sorted them out, connected battery and turned the key but no luck, as soon as I turn the key to start I lose power but my turbo timer stays on, lights stay on and indicators so either the cables from the battery to ground point or cable to fusible link has a fault in it, Im hoping its one of these otherwise I have a massive draw somewhere.
So again trouble shooting the electrical system
So again trouble shooting the electrical system