When you click on links to various merchants on this site and make a purchase, this can result in this site earning a commission. Affiliate programs and affiliations include, but are not limited to, the eBay Partner Network.
Seriously I don’t know how you do it. Last time I checked in you were painting the engine bay and now 500 pictures and 10 pages of notes later you are installing a roll cage. Amazing. I really like what you did with the transmission tunnel. Good work.
Holy Gigantic update Batman! Someone has been busy!
First off I missed the photos of how you cleaned up your AC lines and coolant hardliners etc. Great idea!
And your before and after pics of the engine is incredible! I wish I did that with mine before I got too far ahead.
Truly incredible all the work you�re doing. Good job man. I look forward to your next detailed update. Fun read. Thanks!
Seriously I don�t know how you do it. Last time I checked in you were painting the engine bay and now 500 pictures and 10 pages of notes later you are installing a roll cage. Amazing. I really like what you did with the transmission tunnel. Good work.
keep it up
Jason
Thank you so much sir. It was gracer7-rx7 idea for the DEI on the transmission tunnel. Yeah I was busy on the weekends with 12 hr days, sunrise to sunset. My job shut down for Christmas/New Years break so I took advantage of that too... still worked those 40 hr but at home..lol
Also I have been ordering stuff ahead of time so I almost always have what I need in stock. I learned a lot of fabrication skills running the business too. And last but not least - a ton of research on the forum to help me do what I want to do.
Originally Posted by silverTRD
Holy Gigantic update Batman! Someone has been busy!
First off I missed the photos of how you cleaned up your AC lines and coolant hardliners etc. Great idea!
And your before and after pics of the engine is incredible! I wish I did that with mine before I got too far ahead.
Truly incredible all the work you�re doing. Good job man. I look forward to your next detailed update. Fun read. Thanks!
Thank you so much sir. I'm bummed out that the chemical finished on the lines are damaged but I would rather have them cleaned then looking like I just pulled them out of the mud. I think my engine bay before and after pics look so dramatic is because of all the dirt, oil and rust from a blown battery. Im so glad I did paint the whole engine bay - I'm so lucky to have the club with all of its information on how to take things apart and where to source replacement parts - I try to give back as much as I can.
Why bummed out? Did I miss something? I hit Ray up like once a week for like 3 months straight. Wish I could have planned ahead better but that’s the way it went for me. Either way he is still the way to go, he saves you a ton on shipping alone.
I got it, the Atkins thread. Did you build your engine with his seals? If not I wouldn’t worry too much about it. We’ve all bought stuff from Atkins, now you’re aware.
Atkins has been around forever and I truly expected more from such established business.
Sometimes I'm placing orders late at night and for little things here and there I figured I just get stuff online. It's just the whole bait and switch thing about it.
It's right up there with other companies that take other people's ideas and put their name on it.
But business is business and if you have a favorite shop then yes you can buy your product from whoever you want to.
I guess when you've been in the scene since before Fast and the Furious you just stick with who made what first.
however if a company goes out of business and they stopped manufacturing a Loved product I think that product is fair game to be brought back into life.
Oh well. Next update will be some interior and fuel stuff...lol
I got the GarageAlpha FD in tank fuel baffle cover. It was packed really nice, came with stickers and even a hot wheels RX7 ! Install of this is in the Day 64 update.
A new stock fuel filter - another Day 64 install.
I got the roll cage pods in, their nice quality. Ill test fit them later.
The replacement door switches were definitely a design update. The plastic body has been replaced by a metal retainer holding the spring. I also used some zip ties between the roll cage and the body to prevent the seatbelt from hitting the switches when the seatbelts are not in the upper seat retainers.
One of my fuse box decals were ripped in half so I found a new set from Bubbletech.
Lastly was my upper steering column cover. My stock one had a hole cut out for a gauge pod that was glued in place. It was basically junk. Luckily Fritz came through again with a good condition used one. It was painted a semi-gloss black with a lot of scratches. No problem, I sanded it down and re-sprayed it flat black. It still shows a little bit of the stock chrome gauge bezel and it's not 100% color match BUT there is no hole and it looks clean enough to be a keeper.
Day 64 - Part 1.
I opened the fuel pump cover hoping to see a stock fuel baffle cover on my 12/1995 - nope no banana. Immediately ordered the GarageAlpha FD in tank fuel baffle cover. My fuel lines are in really good condition and the high and low fuel pres writing was easy to read so no worries in putting it back together. Apparently I had close to half a tank in the car and I didn't want it to go to waste. I bought a 5 gallon container so I could transfer the fuel to my mazda5 minivan (272,548 miles). I used a battery operated fluid transfer pump to get it into the container. The fuel container had all these safety features and different stages of engaging valves to get the damn thing to pour. I made a complete mess trying to get it into my van. I got fed up and pulled out the white (use your imagination) and then stuck the pump in it to get it in the van. I got 9 gallons out of it!
Day 64 - Part 2.
I finally got to install the RX7.com fuel pump. The kit came with a new filter, retainer ring, o-ring, plastic cap and an additional ground wire that just so happens to be needed for the fuel relay mod. The only thing that bugs me is the white cap that has to be pressed on causing it to split. Why can't there just be a better fitting part supplied. I looked at the stock cap and it is also spit. RX7.com even says in there instructions that this is normal and not to worry about it... okie dokie. I cleaned everything and after the pump was re-assembled I noticed the slotted bushing under the o-ring had some play up and down. The old pump did not have this, I guess this pump is a tad shorter. I ended up cutting out an aluminum piece to act as a shim. It worked out really good and the pump fits snug now. Lastly I installed a new gasket to seal the top of the fuel tank.
Day 64 - Part 3.
The GarageAlpha fuel baffle was easier (for me) that I thought it would be to install. I read about everyone getting cut up but I guess because I had the tabs I did not have to fight with the metal zip ties. I did have 3 small issues. Somehow a spider ended up in the tub and I vacuumed him out. One of the intake side baffles was covering the a corner of the bottom tray, I just bent it out of the way and then when the lid was on I bent it back over it. The other thing was my plastic tub was warped and did not immediately lines up with the tabs. The plastic tub was flexible enough to place 2 side tabs and one corner tab in place and then I used the lid to apply pressure and push the tub wall into place to get the last tab in. I bent all the tabs up and it felt really solid and secure. I was worried I would have to fight the cover to get the fuel pump and filter in but that also went really easy. You just have to hold it at an angle and the filter will slide right under the lid, just make sure your fuel level gauge clears. I did notice a slight resistance on one side and I think that is just the fuel pump hitting the rubber in the opening of the lid.
Day 64 - Part 4.
I put the fuel pump access panel back in place and hooked it up. I connected the fuel pump relay on the harness going to the fuel pump and placed the fuel relay under the driver side panel cover for easy access. I removed all the paint from the stud and connected the tapped fuel pump ground, the relay ground and the relay itself and checked the grounds at various locations with my Fluke Meter - all within 0.1 to 0.3 ohms. I ran the power wire and the tapped acc wire for the 2nd battery relay to power the gauges in a wire loom to the primary battery.
Day 64 - Part 5.
Ahh, the $%^&$#&& fuel filter. I completely missed this when the diff was out. My drive shaft and PPF are off so you think I could rotate it a little right... NOPE.. damn Greddy rear diff cover for added fluid. This was by far - in 30 years of being a shade tree mechanic - the worst fuel filter I have ever had to deal with. I fully support a relocation fuel filter kit that will allow you to abandon this thing in place. To start it all off it was raining and it played some serious mind games on me. So I'm fighting to get the 2 bolts off that hold the filter assembly to the body of the car and dirt keeps falling on my face. Next was to move the hose clamps back to get the filter out. I ended up unbolting the rear emergency brake line bracket from the diff along with pulling the U-clips to move the cable for more room. I get the clamps back with some 90 degree pliers and pull the hose off going to the straight nipple on the filter. I see fuel coming out so I turn my heard and right in my light of sight is water coming out of the roof gutter drain - talk about flinching ... I seriously thought it was gas for a moment. Then I pull the hose off the 180 degree filter pipe, those hose drops out of sight and within a minute I feel cold liquid hitting my shin. I moved my leg out of the way thinking gas was dripping on it but it was just the rain water running down the side of the car dripping on my leg. I finally get the filter out and swap the brackets over and get the filter re-installed and everything else put back together. I also wanted to see the metal vs aluminum rivnuts. The metal ones actually flared out more on the back side. The whole time I'm looking at the fuel filter on top of the diff I keep thinking of the cat/mouse/tire youtube chase.
The red paint was kinda bugging me in the rear hatch. I wanted to install the rear panels but I knew I would have to modify a few more things. I took the lower side panels off and put the rear trunk panels back in place. The upper side panels had to be rounded after the rear hatch strut bracket towards the pinch weld where the weather stripping is. Once this was pushed in the front of the trunk panels sit flush in place. I really also wanted to use these because it would allow me to use the rear strut bar covers over the shock tower. I took out the rear tire cover and placed foam under the edges to prevent any rattles and bolted it back down. I fixed another tear on the side of the center console with my leather repair kit.
Day 65 - Part 2.
I got lucky that I was able to cut the lower side pieces so they could still bolt in with the original locations. The only trick was that one side was shifted forward from the other side so I had to eyeball that difference. It's not perfect but I don't have the red paint staring at me anymore.
Day 65 - Part 3.
Time to modify the main culprit as to why I had to take out the rear panels. The back vertical LRB panel bolts to the inside strut bolt and to do this the trunk panels had to be off. Well not anymore, with everything and the carpet in place I was able to figure out where I wanted the panel and how to get it there. First I had to cut some of the sides off so it would fit in between, then I moved it forward and backward until I found where I wanted that. I cut some flat bar and drilled some holes in them. I bolted the down holding the panel in place and then I taped the bars onto the bottom flange of the panel. I welded the flat bars in place and then bolted the panel down. I was going to make a top bracket (I still might) but the vertical panel feels so solid with just those 3 lower bolted points. I really happy to have the trunk back together
Part 1 - Door sills, fender liners
Part 2 - Power harness off battery to body harness
Part 3 - Bracket for body harness painted
Part 4 - Hood Latch, body harness installed on bracket
Part 5 - What's this bracket for ???
Part 1
I broke the remaining tabs (that were not already broken) on the plastic door sills when I pulled them off. I was looking for replacements when I came across the forgotten aluminum door sills. I got lucky and picked some up from Japan. Yes they are scratched but not broken. I will have to install some rivnuts so I can screw them down. I saw a thread where Dale Clark mentions some holes being in place that need a plastic insert - but I have no holes anywhere. I laid them down in place and they go good with the silver/gold badge on my pink camo floor mats. I wish I could read Japanese so I could read the paper packing material, I think it's about someone riding a bike...lol
My car is a base with only one oil cooler but I wanted to make my dual oil cooler kit with the stock brackets if possible. I replace them when I make these kits for customers, but I just wanted to start from scratch and see what I can come up with now that I'm getting better at making stuff up. Thank you to Fritz for the passenger side oil cooler brackets. I also noticed I was missing the flat head bolt holding the plastic tanks to the frame rails on both side, I found some replacements in my stash of junkyard bolts.
It was time to put my fender liners back on. I was missing some hardware and plastic buttons. I found a metal clip and matching screw for the outer fender tab. I bought a plastic clip and button kit that came with a lot of cool stuff. I used B15 from the picture I provided, the 7mm was a little lose. It holds but when you pull the plastic hard enough it pops out - maybe equivalent to 100mph on the freeway..lol. So I wrapped some electrical tape (2 wraps) around it and popped in place and it holds nice and tight. I put it in six places. There was one tap in the middle upper position and B17 (9mm) worker perfect for that one.
I was able to install the relay bracket on the passenger side. I set it up in preparation for my HKS intake set-up. I do not have the HKS bracket which relocated 2 relays so I placed the forward bottom relay on the other side of the bracket. The bracket is also bent to bring it closer to the fender liner. Another thing I did was relocate the zip tie retainer so it holds the harness to the bracket in its new location.
Part 2
The Battery power to body harness was a big greasy mess. The tape was falling off and there was corrosion inside the wire loom. I removed all the wire loom, the bracket that goes to the battery and the ground cable. Obviously I will be running a new power wire from the battery to the fuse box but I will have the ground relocated to the battery area. I also cleaned up the fender bracket.
Part 3
The bracket originally had some foam to protect the harness as it went over it. I used some foam weather stripping that had a cloth mesh where the sticky side was at. Afterwards I wrapped it with TESA tape. I covered the screws and the padding with tape and then painted it with high temp BBQ and then with the high temp clear.. why.. because that's what I had on the shelf...lol
Part 4
The hood latch was a mess. It looks like its bent from the accident and all the grease is now like clay. I took the latch apart to clean it and re-grease it. I used white lithium grease and then some blue loctite to hold the screws for the switch. I loosely put the hood latch on so it can be adjusted later on. I replaced the ripped fuse sticker on the cover with my bubbletech sticker and put the body harness fuse box on the bracket.
Part 5
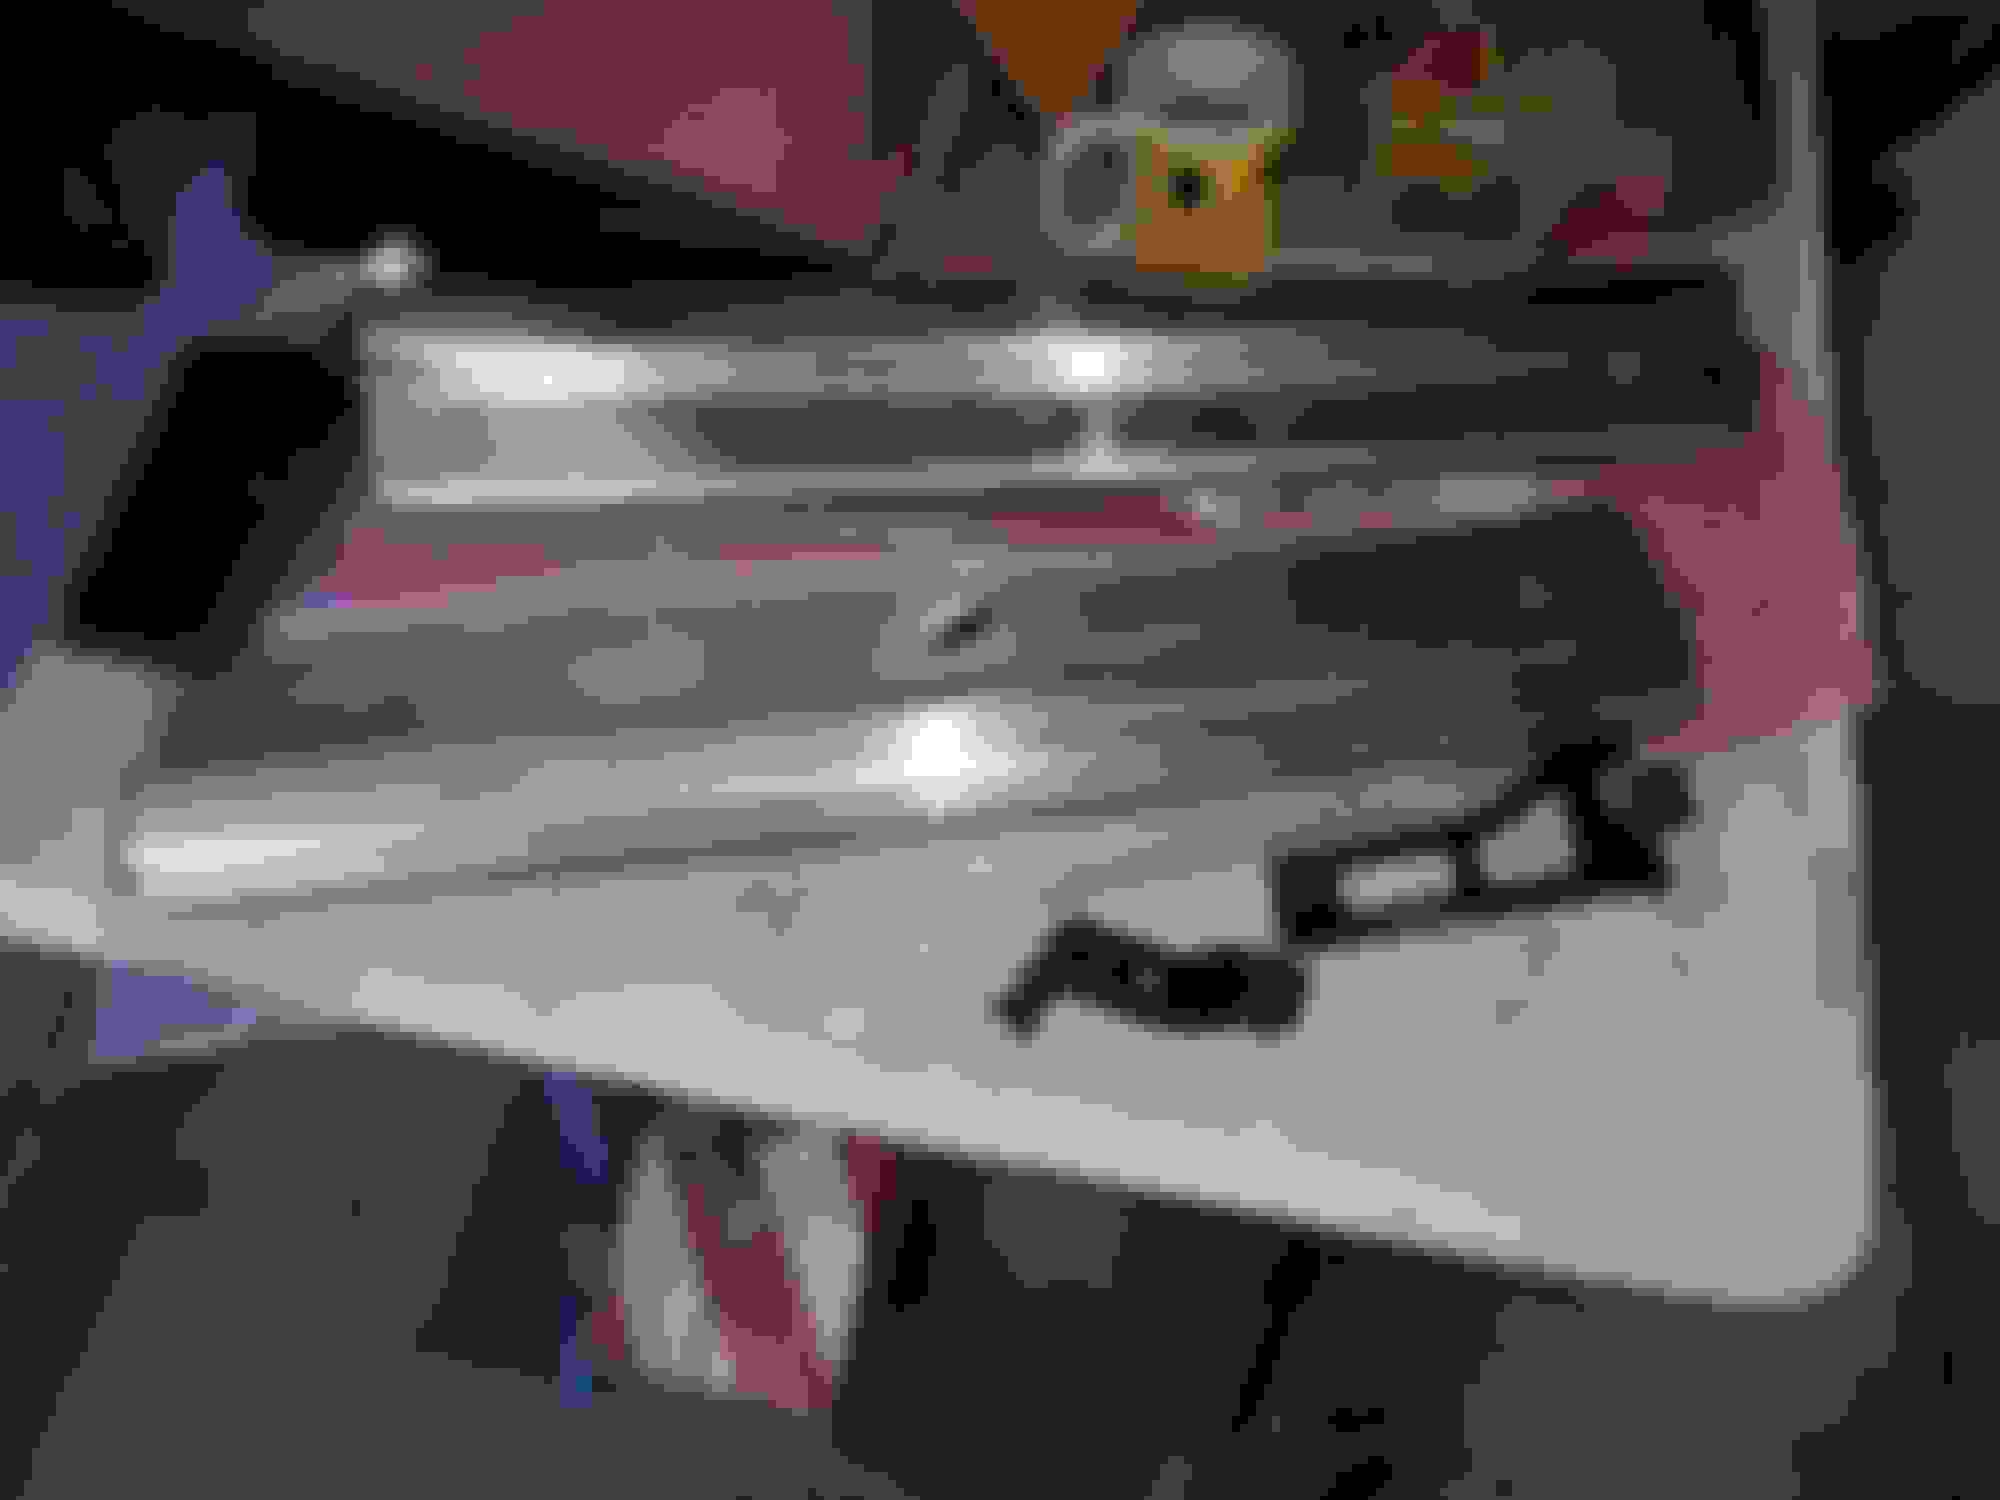
What's this bracket for ???
All I know is that this bracket was on the harness I took all the wire loom off, but I don't remember where it goes. Can you guys help me please.
What's this bracket for ???
All I know is that this bracket was on the harness I took all the wire loom off, but I don't remember where it goes. Can you guys help me please.
What's this bracket for ???
All I know is that this bracket was on the harness I took all the wire loom off, but I don't remember where it goes. Can you guys help me please.
By the spark plugs, the two holes to the bottom of the image share the studs/bolts that hold the AC/PS bracket.
I found a thread to tap the gauge for the headlight switch - ashtray light. But I have no power in my car at the moment - do you guys know if the ashtray light is an on/off thing or is it on the dimmer - which i dont want.


 12-31-20, 08:57 PM