
My Voodoo Queen (T78 build w/pics)


My Voodoo Queen (T78 build w/pics)
So here She is. My 93. I bought her about 6 years ago and I kept her garaged ever since. She is a semi-stock 5-speed with right around 100k on the clock. Her mods were HKS twin intakes, greddy pulley kit, 3" turbo-back exhaust, fuel pump, and a Pettit Racing ECU. The motor, twin turbos, intercooler, and radiator were all stock. It was a pretty faded red with a NICE black interior. No sunroof (EXACTLY what I wanted). She had some clutch issues and the motor sounded pretty bad. Around 2005, I pulled EVERYTHING off the car (motor, tranny, and all suspension/brake components). I left the interior alone.
The build has been slow. I worked for a professional race team and we won the IMSA Lites Championship in 07 or 08. We also had an 07 or 08 Pro Star Mazda formula car that we maintained (Yes, it had a peppy version of the RX-8's renesis). EVERY racecar that I maintained and setup ALWAYS finished in the top 5 and I NEVER had a DNF due to mechanical malfunction. I am VERY proud of that. Oh, and this race shop was RIGHT next door to Billy Waits @ Re-Speed. So you can ask him to vouch for my build. He actually used my motor to develop the Re-Speed FD oil filler neck. Yes.
I brought EVERY control arm up to the shop and sandblasted them. I covered EVERY ball joint, dust boot, etc. I used a clear coat enamel from Eastwood restoration (about $15 a can, and took 4-5 cans to do all of the control arms). I jumped on one of the Delrin Bushing kit group buys and installed all of my bushings with Delrin.
I cleaned the wheel wells with lots of Simple Green and brake cleaner when needed. I then used Eastwood's Chassis Black paint to re-paint the wheel wells. Really looks nice! I bolted all of the suspension back up and she sat for a WHILE.
Being in ALMS racing, our team went to Sebring, FL for the 12 hour race. I met a sexy girl down there, fell in love, and lost focus on my car for a couple years lol. So just recently, I transported my car from Oakwood, GA (ten min from Road Atlanta) to WONDERFUL, HOT Florida. Florida does not have good weather for car restorations.
Since the car has been in Florida, I had her repainted gloss black. Inside and out. I removed the taillights, wing, interior, mirrors, front wiper cowl, EVERYTHING. At this point, I purcased the Pettit Racing GT-Spec front bumper. There was some fitment issues, but luckily I did a LOT of the body fitment for the Elan DP-02 racecars. With a lil sanding and trimming, she looks great. These 2 guys that paint parts for NASA Space equipment painted my car. He wanted his son to do some airbrushing so I allowed him to airbrush a skull on both front feners coming out of the vents. Real subtle flames embrace the skull. But don't worry, the whole front end will be carbon fiber soon.
So, I have 2 rotary engines, 2 transmissions, 2 sets of twins and an LS-1 block. I was VERY tempted to convert but I LOVE my big turbos. So I began ordering my dream parts. Here is a list of what I have now:
Parts:
Delrin Bushing kit $550
Tokico Adustables $450
Hawk HP pads $125
Russell braided brake lines $125
PowerSlot rotors $400
Walbro fuel pump $100
Pettit Front bumper $600
Thermostat $15
Border FMIC and Griffin Radiator $1200
Front hubs/bearings and ARP studs $175
Lug nuts $50
Greddy BOV $85
Headlight cover $125
Intake gaskets $55
Power FC and Commander $900
Mazda OEM hardware (nuts, bolts, lines, boots, caliper rebuild kit) $262
RX7store Ultimate fuel kit $829
Greddy T78 kit (new turbo) $2,250
Banzai Racing motor mounts $125
Banzai Racing Oil Pan Brace $120
Banzai Racing OMP elimination kit $20
HKS Hi-Power Catback exhaust $350
Mocal 25-row Dual oil cooler kit $1,043 ($548.74 from RPW and $494.26 from Comprent)
Mazda OEM Fuel lines and Filter $332
Mazdatrix parts $350
Clutch master cyl and line $118
Front LCA's $358
Mazdatrix Pilot removal tool, gasket, bolts $144
Mazda OEM brake line, clutch line, etc $167
Exedy Twin-Disk Cerametallic clutch kit $1,590
Total in parts alone = $13,013 (I think, you can double-check it)
All I am waiting for is my clutch from Jason at RX7store (should be REAL soon). I will put that on, bolt up my transmission, and drop her in place. I have bolted on my Greddy manifold and T-78 and it is NICE. Now I need to get these pics up!
All I need to do now is ditch the walbro. It is brand new with the harness and it will be up for sale soon. I spoke with Jason and he said he likes to use the Supra pump in the tank with a bosch unit inline, but out of the tank with -6 lines all they way up. I will be doing this as well. I purchased my Extreme fuel kit from him as well as some other items. He has been very helpful and my parts always arrive within 2-3 days.
I also need to purchase an HKS twin power ignition module w/ harness.
I will be premixing with the Idemitsu (spelling ??) without the OMP.
I will have Cam at Pettit Racing tune the engine with my Power FC. I have done business with him and his son and they have been great as well.
After the tuning is complete, I plan on buying the Pettit Racing Coilovers (either the competition series or the Stage 3 Trak Pros. They look amazing and I have heard NOTHING but GREAT things about these coilovers. Hell, if Howard Coleman approves of them, I'll give them a shot, haha.
After that, a big brake kit will be NEEDED. I have not decided on which one I want yet.
I added the new passenger side headlight cover. I also did the fitting of the pettit GT spec front bumper. Thoroughly cleaned the engine bay with simple green, brake clean, and other good things. I have MANY pics of my work on this car, this is just a handful!
The 3rd and 4th pics are from the inside of the paint booth. Gloss black with custom airbrushing, eh. It's alright.
The 3rd and 4th pics are from the inside of the paint booth. Gloss black with custom airbrushing, eh. It's alright.
1st pic - This is a close-up of the flaming skull that the painter's 17yr old son did.
2nd pic - Front cover gasket
3rd pic - Front cover seal
4th pic - Teflon and rubber o-ring for front cover
5th pic - Front cover painted gold, was sand-blasted first with old seal in place, installed new seal and removed OMP/MOP gear inside cover
2nd pic - Front cover gasket
3rd pic - Front cover seal
4th pic - Teflon and rubber o-ring for front cover
5th pic - Front cover painted gold, was sand-blasted first with old seal in place, installed new seal and removed OMP/MOP gear inside cover
1st pic - The Right Stuff gasket maker
2nd pic - Bunch of gaskets, seal, throwout bearing, and clutch slave cylinder from Mazdatrix
3rd pic - close-up of the clutch slave and throwout bearing
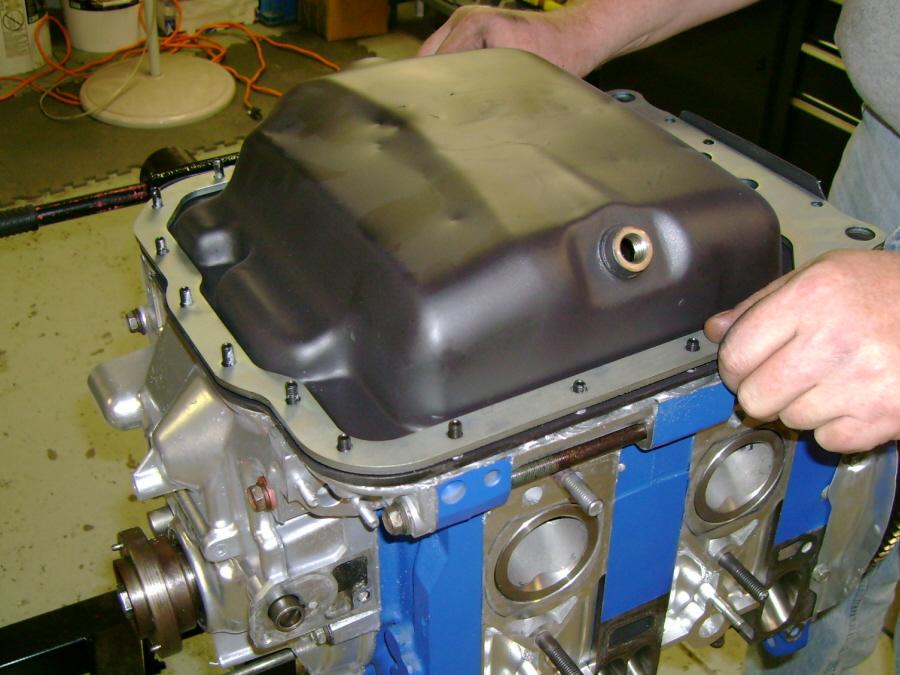
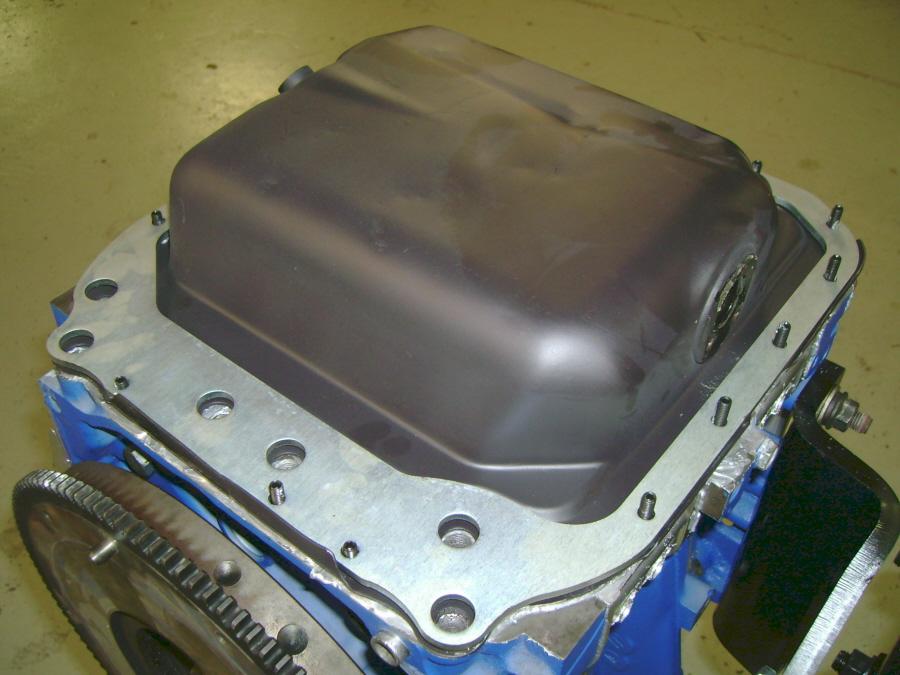
4th pic - Front cover installed. Looks GREAT!!! My irons are painted w/ Cast iron grey engine enamel and the aluminum housings are painted w/ aluminum engine enamel of course! The ceramic gold flake looks awesome.
5th pic - Engine lifting hooks powdercoated Bright Safety Red. I use old hooks to load the engine in, haha. I might install the pretty ones after it is in the car. Purely for aesthetics. But keeping it like that for my racecar feel.
2nd pic - Bunch of gaskets, seal, throwout bearing, and clutch slave cylinder from Mazdatrix
3rd pic - close-up of the clutch slave and throwout bearing
4th pic - Front cover installed. Looks GREAT!!! My irons are painted w/ Cast iron grey engine enamel and the aluminum housings are painted w/ aluminum engine enamel of course! The ceramic gold flake looks awesome.
5th pic - Engine lifting hooks powdercoated Bright Safety Red. I use old hooks to load the engine in, haha. I might install the pretty ones after it is in the car. Purely for aesthetics. But keeping it like that for my racecar feel.
1st pic - New tranny bolts, water pump gaskets
2nd pic - Pilot bearing removal tool
3rd pic - Banzai Racing oil pan brace
4th pic - Oil pan studs installed
5th pic - Double-checked the lengths on all of them to the exact mm. All were 23mm tall
2nd pic - Pilot bearing removal tool
3rd pic - Banzai Racing oil pan brace
4th pic - Oil pan studs installed
5th pic - Double-checked the lengths on all of them to the exact mm. All were 23mm tall
Trending Topics
1st pic - Banzai Racing poly motor mounts. I ground off the factory casting marks on the edges of the steel mounts. Painted black engine enamel
2nd pic - Banzai Racing oil pan brace and Mazda OEM Gasket
3rd pic - XTD 6 puck, brand new. I heard these are JUNK. Will be FOR SALE soon.
4th pic - XTD pressure plate to go with the 6 puck. Wait til you see what replaces it! haha
2nd pic - Banzai Racing oil pan brace and Mazda OEM Gasket
3rd pic - XTD 6 puck, brand new. I heard these are JUNK. Will be FOR SALE soon.
4th pic - XTD pressure plate to go with the 6 puck. Wait til you see what replaces it! haha
Here is a breakdown of where I purchased all of these items:
RX7club group buy Delrin Bushing kit $550
Billy from Re-Speed Tokico Adustables $450
Billy from Re-Speed Hawk HP pads $125
Billy from Re-Speed Russell braided brake lines $125
Billy from Re-Speed PowerSlot rotors $400
Alex from SP (Cali) Walbro fuel pump $100
Cam (of course) Pettit GT Spec Front bumper $600
Pettit Racing Thermostat $15
RX7club member Border FMIC and Griffin Radiator $1200
RX7club member Front hubs/bearings and ARP studs $175
Some Canadian store Lug nuts $50
RX7club member Greddy BOV $85
Boniface Mazda Headlight cover $125
Boniface Mazda Intake gaskets $55
Ramy Group Buy Power FC and Commander $900
Boniface Mazda OEM hardware (nuts, bolts, lines, boots, caliper rebuild kit) $262
Jason at RX7store Ultimate fuel kit $829
RX7club member Greddy T78 kit (new turbo) $2,250
Banzai Racing Poly motor mounts $125
Banzai Racing Oil Pan Brace $120
Banzai Racing OMP elimination kit $20
Billy from Re-Speed HKS Hi-Power Catback exhaust $350
Racer Parts Wholesale and Comprent Motor Sports Mocal 25-row Dual oil cooler kit $1,043 ($548.74 from RPW and $494.26 from Comprent)
Boniface Mazda OEM Fuel lines and Filter $332
Mazdatrix OEM parts, gaskets, tools, etc. $350
Pettit Racing Clutch master cyl and line $118
Japan2LA Front LCA's $358 (still haven't received these yet)
Mazdatrix Pilot bearing removal tool, gasket, bolts $144
Boniface Mazda OEM brake lines, clutch lines, etc $167
Jason at RX7store Exedy Twin-Disk Cerametallic clutch kit $1,590
Pretty much ALL of my car will be brand new. I am not done yet. This build has taken several years due to me being so busy. I have spent NUMEROUS hours doing research and shopping around for the BEST prices. All of these people had EXACTLY what I wanted and were ALL cheaper than their competitors (certain parts were cheaper at certain places). I figured this was the best "Bang for my Buck". I can build a NICE street car that has LOTS of track potential. for $30-$35k, you can EASILY build a car that outperforms a 911 GT3, Ferrari 430, or any of the "other cars" that cost $100k more than ours. We'll see how it progresses.....
 This thread is going to be a perfect referance when I finish stocking up on parts and get back from japan.


Joined: Mar 2001
Posts: 30,814
Likes: 655
From: FL-->NJ/NYC again!
For your mazda OEM parts, get in touch with Ray Crowe at Malloy Mazda, his # is 888 533 3400. He owns two FDs (a two rotor and a three rotor) so knows what parts you're looking for and I'm pretty sure he can beat the prices you've listed up above 
So today there was nice weather in the state of Florida. It was quite cool. And a lil frustrating. I decided to check out my other transmission that was originally in the car. However, it is on the engine. It was a lil tricky to remove the throwout bearing from the pressure plate, but not bad at all. I am going to try and sandblast the bellhousing and all of the Inspection covers. I have a new slave cyl that I ordered from Mazdatrix in California. Their parts always arrive fast as well. I also have the Braided Clutch line that I purchased from Pettit Racing. Tomorrow my craziest investment should arrive. My Exedy Twin Cerametallic Disk Clutch from Jason at the RX7Store.com . Pics of all parts and installation will be on here either Monday or Tuesday night.
did u do the oil pan yet? iirc you cant install the brace with the studs in... they arent 100% aligned and the pan/brace wont slip on properly...
ps after fcking up my oil pan multiple times the best techinque i found was recomended by............. i forgot but........ apply the "right stuff" and tighten the oil pan/brace lightly. once all the bolts are tightened lightly (done in an X pattern) then tighten em up fully... this allows the gasket sealer to harden a bit then when you fully tighten it it will create a good seal vs tightening it from the begin, it will all ooze out... also once tightened down run you finger along the edge of the pan to create the final seal..
works like a charm since x2
On our 911 GT3 Cup cars, we would paint the wheel wells White or something bright so that you could see if the tires ever scrubbed anywhere. That is when we were trying out larger tires and different setups.
My clutch should also arrive tomorrow! I just hope I have a torque wrench that goes high enough for the flywheel nut! Haha
Oh yeah, I am about to order my Re-Speed oil filler neck tonight or tomorrow! Every car should have one of these. Just my 2 cents. I believe this group buy is over, but check back in on them every once in a while!
Last edited by Banzai-Racing; Oct 7, 2010 at 06:41 AM.

Yes, updates: The install on the Banzai Racing oil pan brace was smooth and simple, NO fitment issues at all. I installed that, as well as the motor mounts. I let it sit for 48 hours and re-torqued the bolts to double-check things. My Exedy Twin disk arrived Monday, just as Jason said it would. And WOW, This is one of the nicest clutches I have EVER seen. I am PROUD of this clutch lol. It is a shame that you can't see it when it is in the car and operating! I am trying to upload pics, but they are not working for some reason....
What would you like to know? It is a 76. I bought it a few years ago from a buddy of mine. I saw it at Road Atlanta SEVERAL times and I wanted to purchase it but I never had the funds. Once I had the cash, I traced it down and bought her.
Coincidentally, when I was working at the race shop, I was showing my co-workers pics of her. An older man (John Stephens) came up and told me everything about it. Come to find out, his buddy was in the Air Force in the late 70's. He purchased the car in Europe and shipped it over to the U.S. In the early 80's, John Stephens acquired the car from his Air Force buddy, made her a lil quicker and has some SWEET stories with the car. I still own it and I will probably NEVER sell her. She is one of a kind and honestly, the car of my dreams. My FD is a CLOSE second though... not really, but you know...
Coincidentally, when I was working at the race shop, I was showing my co-workers pics of her. An older man (John Stephens) came up and told me everything about it. Come to find out, his buddy was in the Air Force in the late 70's. He purchased the car in Europe and shipped it over to the U.S. In the early 80's, John Stephens acquired the car from his Air Force buddy, made her a lil quicker and has some SWEET stories with the car. I still own it and I will probably NEVER sell her. She is one of a kind and honestly, the car of my dreams. My FD is a CLOSE second though... not really, but you know...