
Mannykillers/ AAPARKAH Street/time Attack/Drift Build (heavy Pics) #Thisisthewolf

Looks just amazing really wish I could see it in person! , I'd go almost the same setup but for a non track only car, those bosch just would annoy the he'll out of me on the street. I wish they could of been able to do the walbro pumps setup like your, but going to have to do the duel walbro in the multi pump tank.. wonder if I can get it to fit where the spare tire goes to so I can hide it under the carpet.

#Thisisthewolf

Looks just amazing really wish I could see it in person! , I'd go almost the same setup but for a non track only car, those bosch just would annoy the he'll out of me on the street. I wish they could of been able to do the walbro pumps setup like your, but going to have to do the duel walbro in the multi pump tank.. wonder if I can get it to fit where the spare tire goes to so I can hide it under the carpet.

Joined: Aug 2004
Posts: 4,786
Likes: 146
From: Colorado Springs, CO
I totally understand that. I have these pumps in my tank too and I have a sensor on each line mounted to the subframe that will put the car into limp mode if one of them sees a loss of pressure. So far I haven't had any problems though.
The only reason I started looking into upgrading the fuel system about three years ago was because you tagged me in that post about the new Bosch pumps that Paul Yaw is helping them with and I got excited about them. Aaaaaaand we're still waiting on those pumps lol.
The only reason I started looking into upgrading the fuel system about three years ago was because you tagged me in that post about the new Bosch pumps that Paul Yaw is helping them with and I got excited about them. Aaaaaaand we're still waiting on those pumps lol.

Junior Member
Joined: Aug 2010
Posts: 20
Likes: 0
From: somewhere in kansas
Holy cow i haven't been on the forum for awhile! I remember your original build thread. It took me about a week to go through this one while at work lol. Amazing job man! car came out super sick. Its also given me the motivation to get back into mine and finish it. Keep up the good work.
I totally understand that. I have these pumps in my tank too and I have a sensor on each line mounted to the subframe that will put the car into limp mode if one of them sees a loss of pressure. So far I haven't had any problems though.
The only reason I started looking into upgrading the fuel system about three years ago was because you tagged me in that post about the new Bosch pumps that Paul Yaw is helping them with and I got excited about them. Aaaaaaand we're still waiting on those pumps lol.
The only reason I started looking into upgrading the fuel system about three years ago was because you tagged me in that post about the new Bosch pumps that Paul Yaw is helping them with and I got excited about them. Aaaaaaand we're still waiting on those pumps lol.
Thats progress right? I like your Set up!! I remember you telling me about it a while back!
Holy cow i haven't been on the forum for awhile! I remember your original build thread. It took me about a week to go through this one while at work lol. Amazing job man! car came out super sick. Its also given me the motivation to get back into mine and finish it. Keep up the good work.

Full Member
Joined: Oct 2004
Posts: 87
Likes: 0
From: Tustin, CA
Holy ****. I've been keeping up with your posts on IG, but had no idea you were putting in this much work.
And damn, you're in Costa Mesa now? I'm right off the 55 and 5. If you ever need any help or anything I'd be down to like...hold a screw or something.
And damn, you're in Costa Mesa now? I'm right off the 55 and 5. If you ever need any help or anything I'd be down to like...hold a screw or something.
Update: "Rise and Grind"
Jams:
Get up early!!! Get Motivated!! Get work done! No one else is going to order your parts, no one else is going to shoot e-mails out, no one else is going to plan your budget, no one else is going to make sure parts arrive on time...or make sure they are correct when they come in, or install them! But the cool thing is that we can all do these things on our own! I'm sure there will be a point when it's not going to work. But for where I'm at.... That is what I do!!
After finishing up the fuel system.. I went to take my fresh fire wall out and BAM Disaster struck.
Cracked the **** out of it...
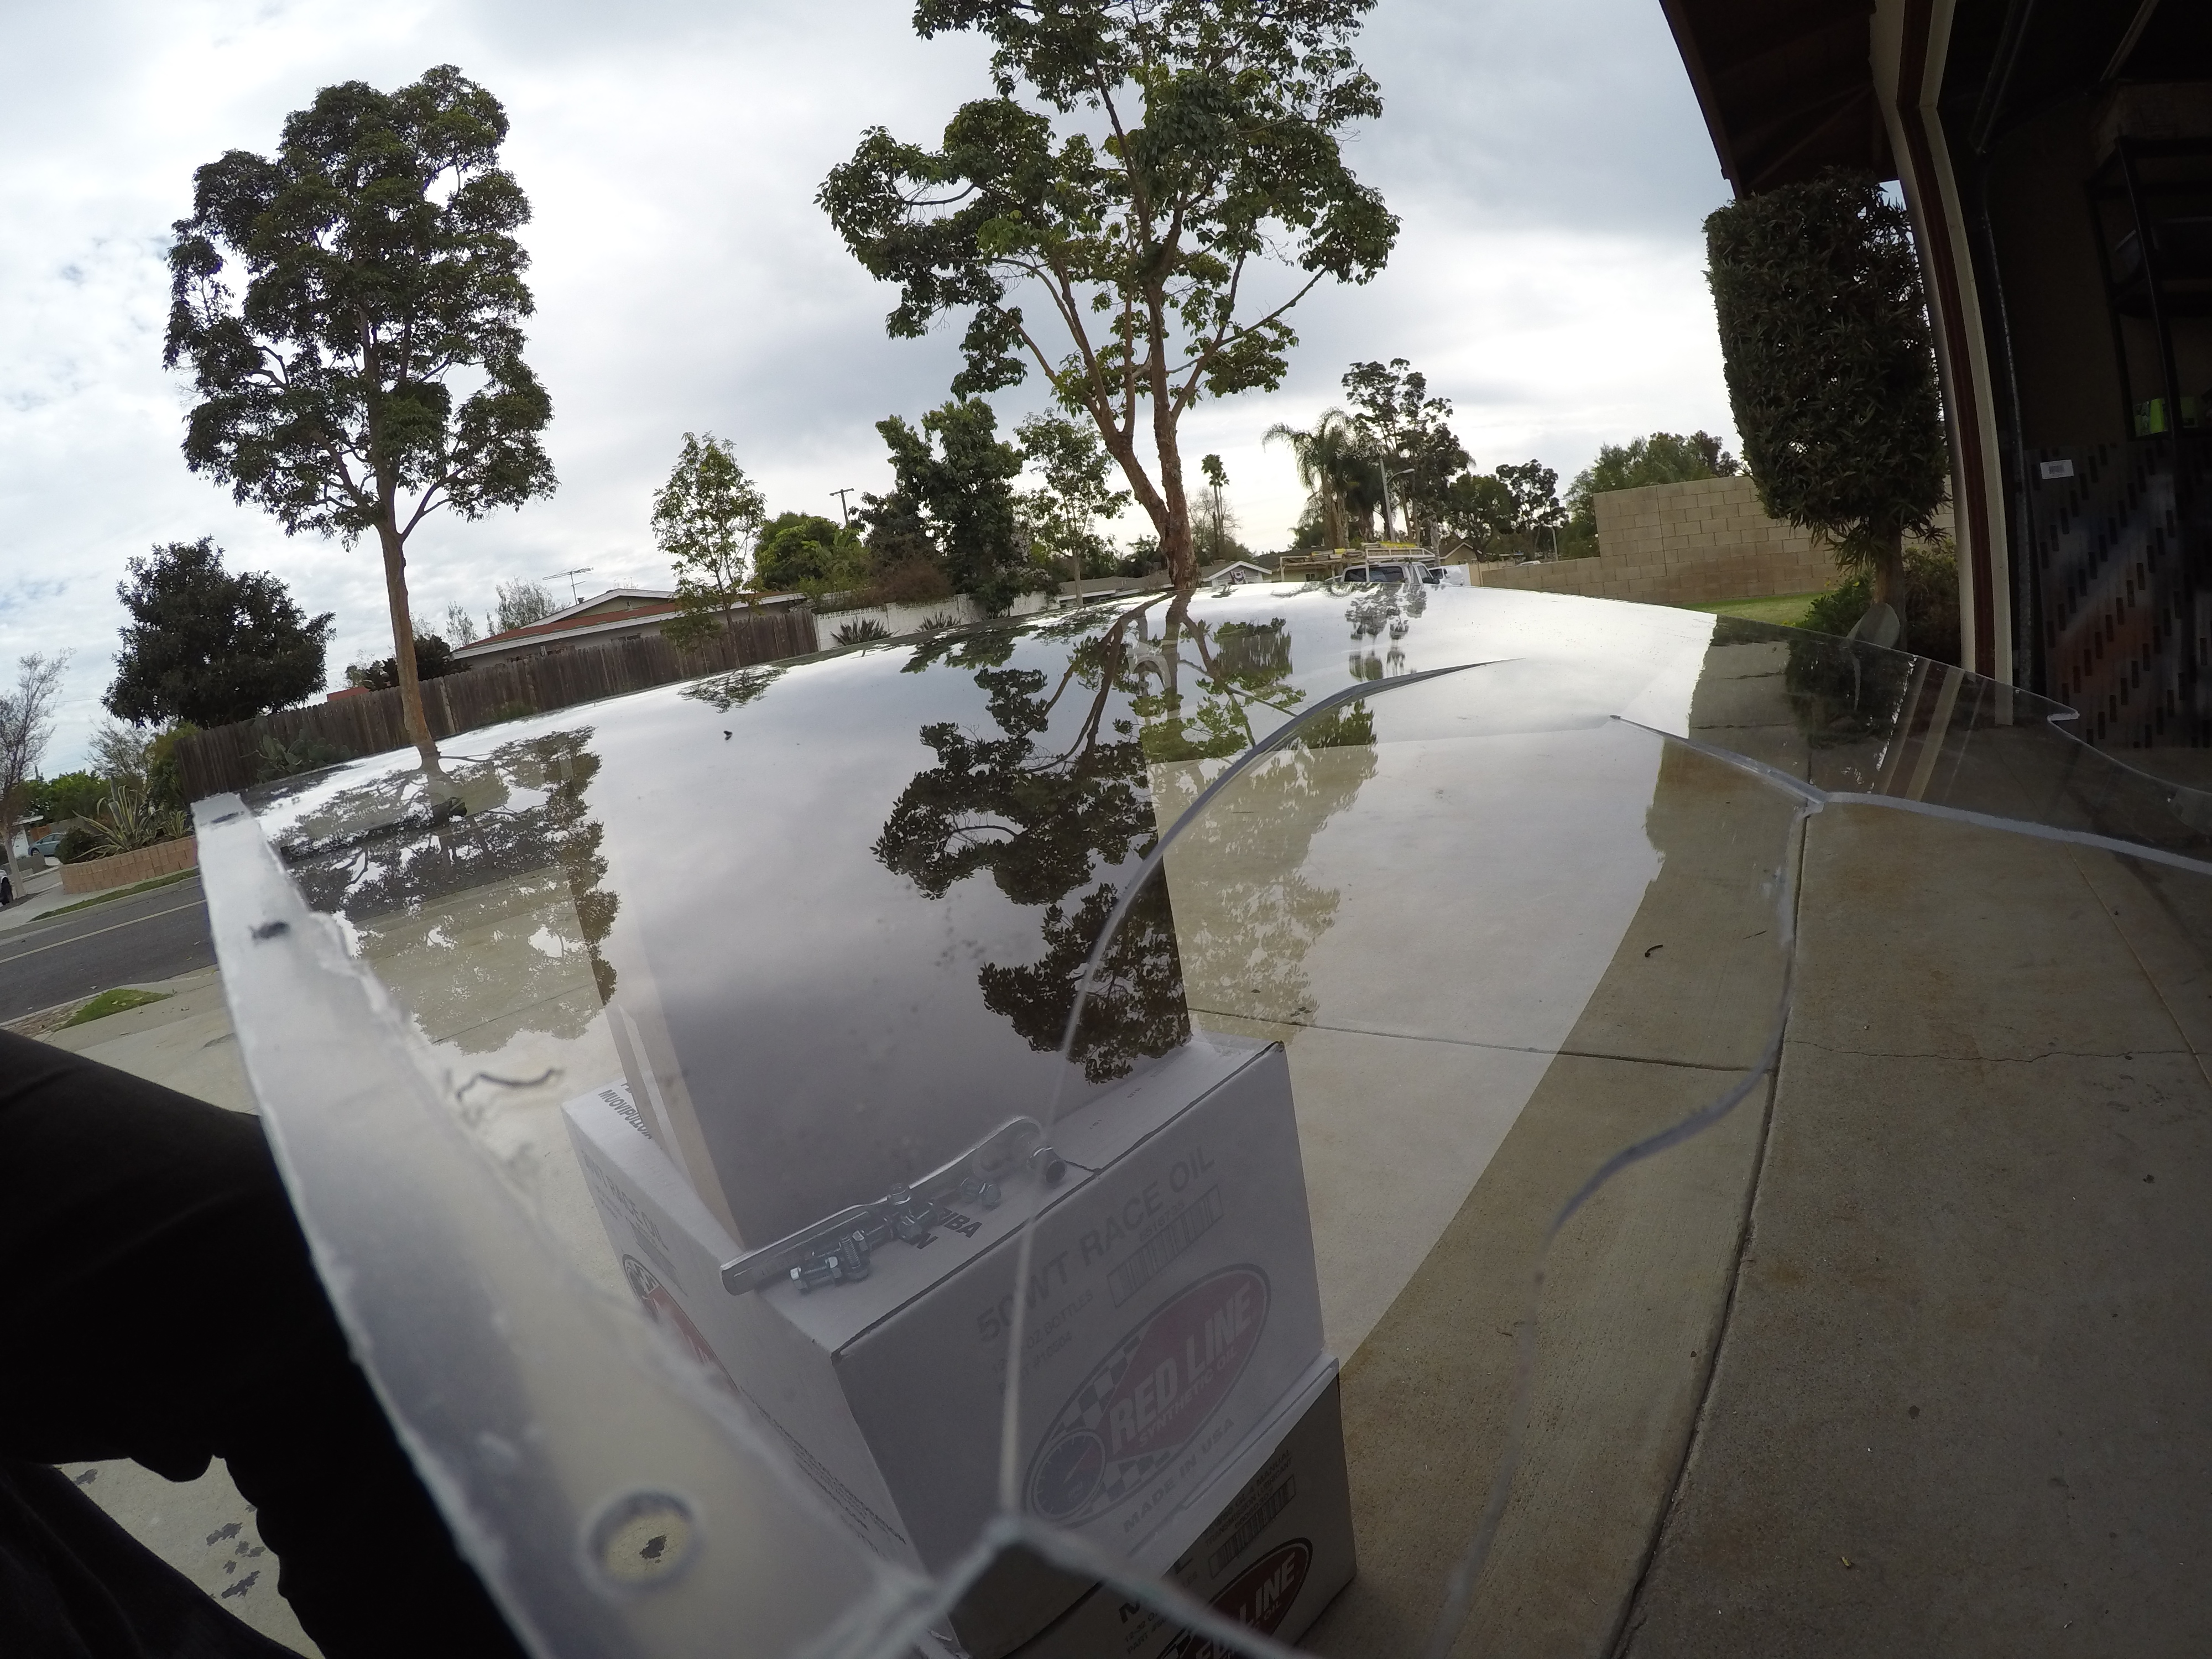
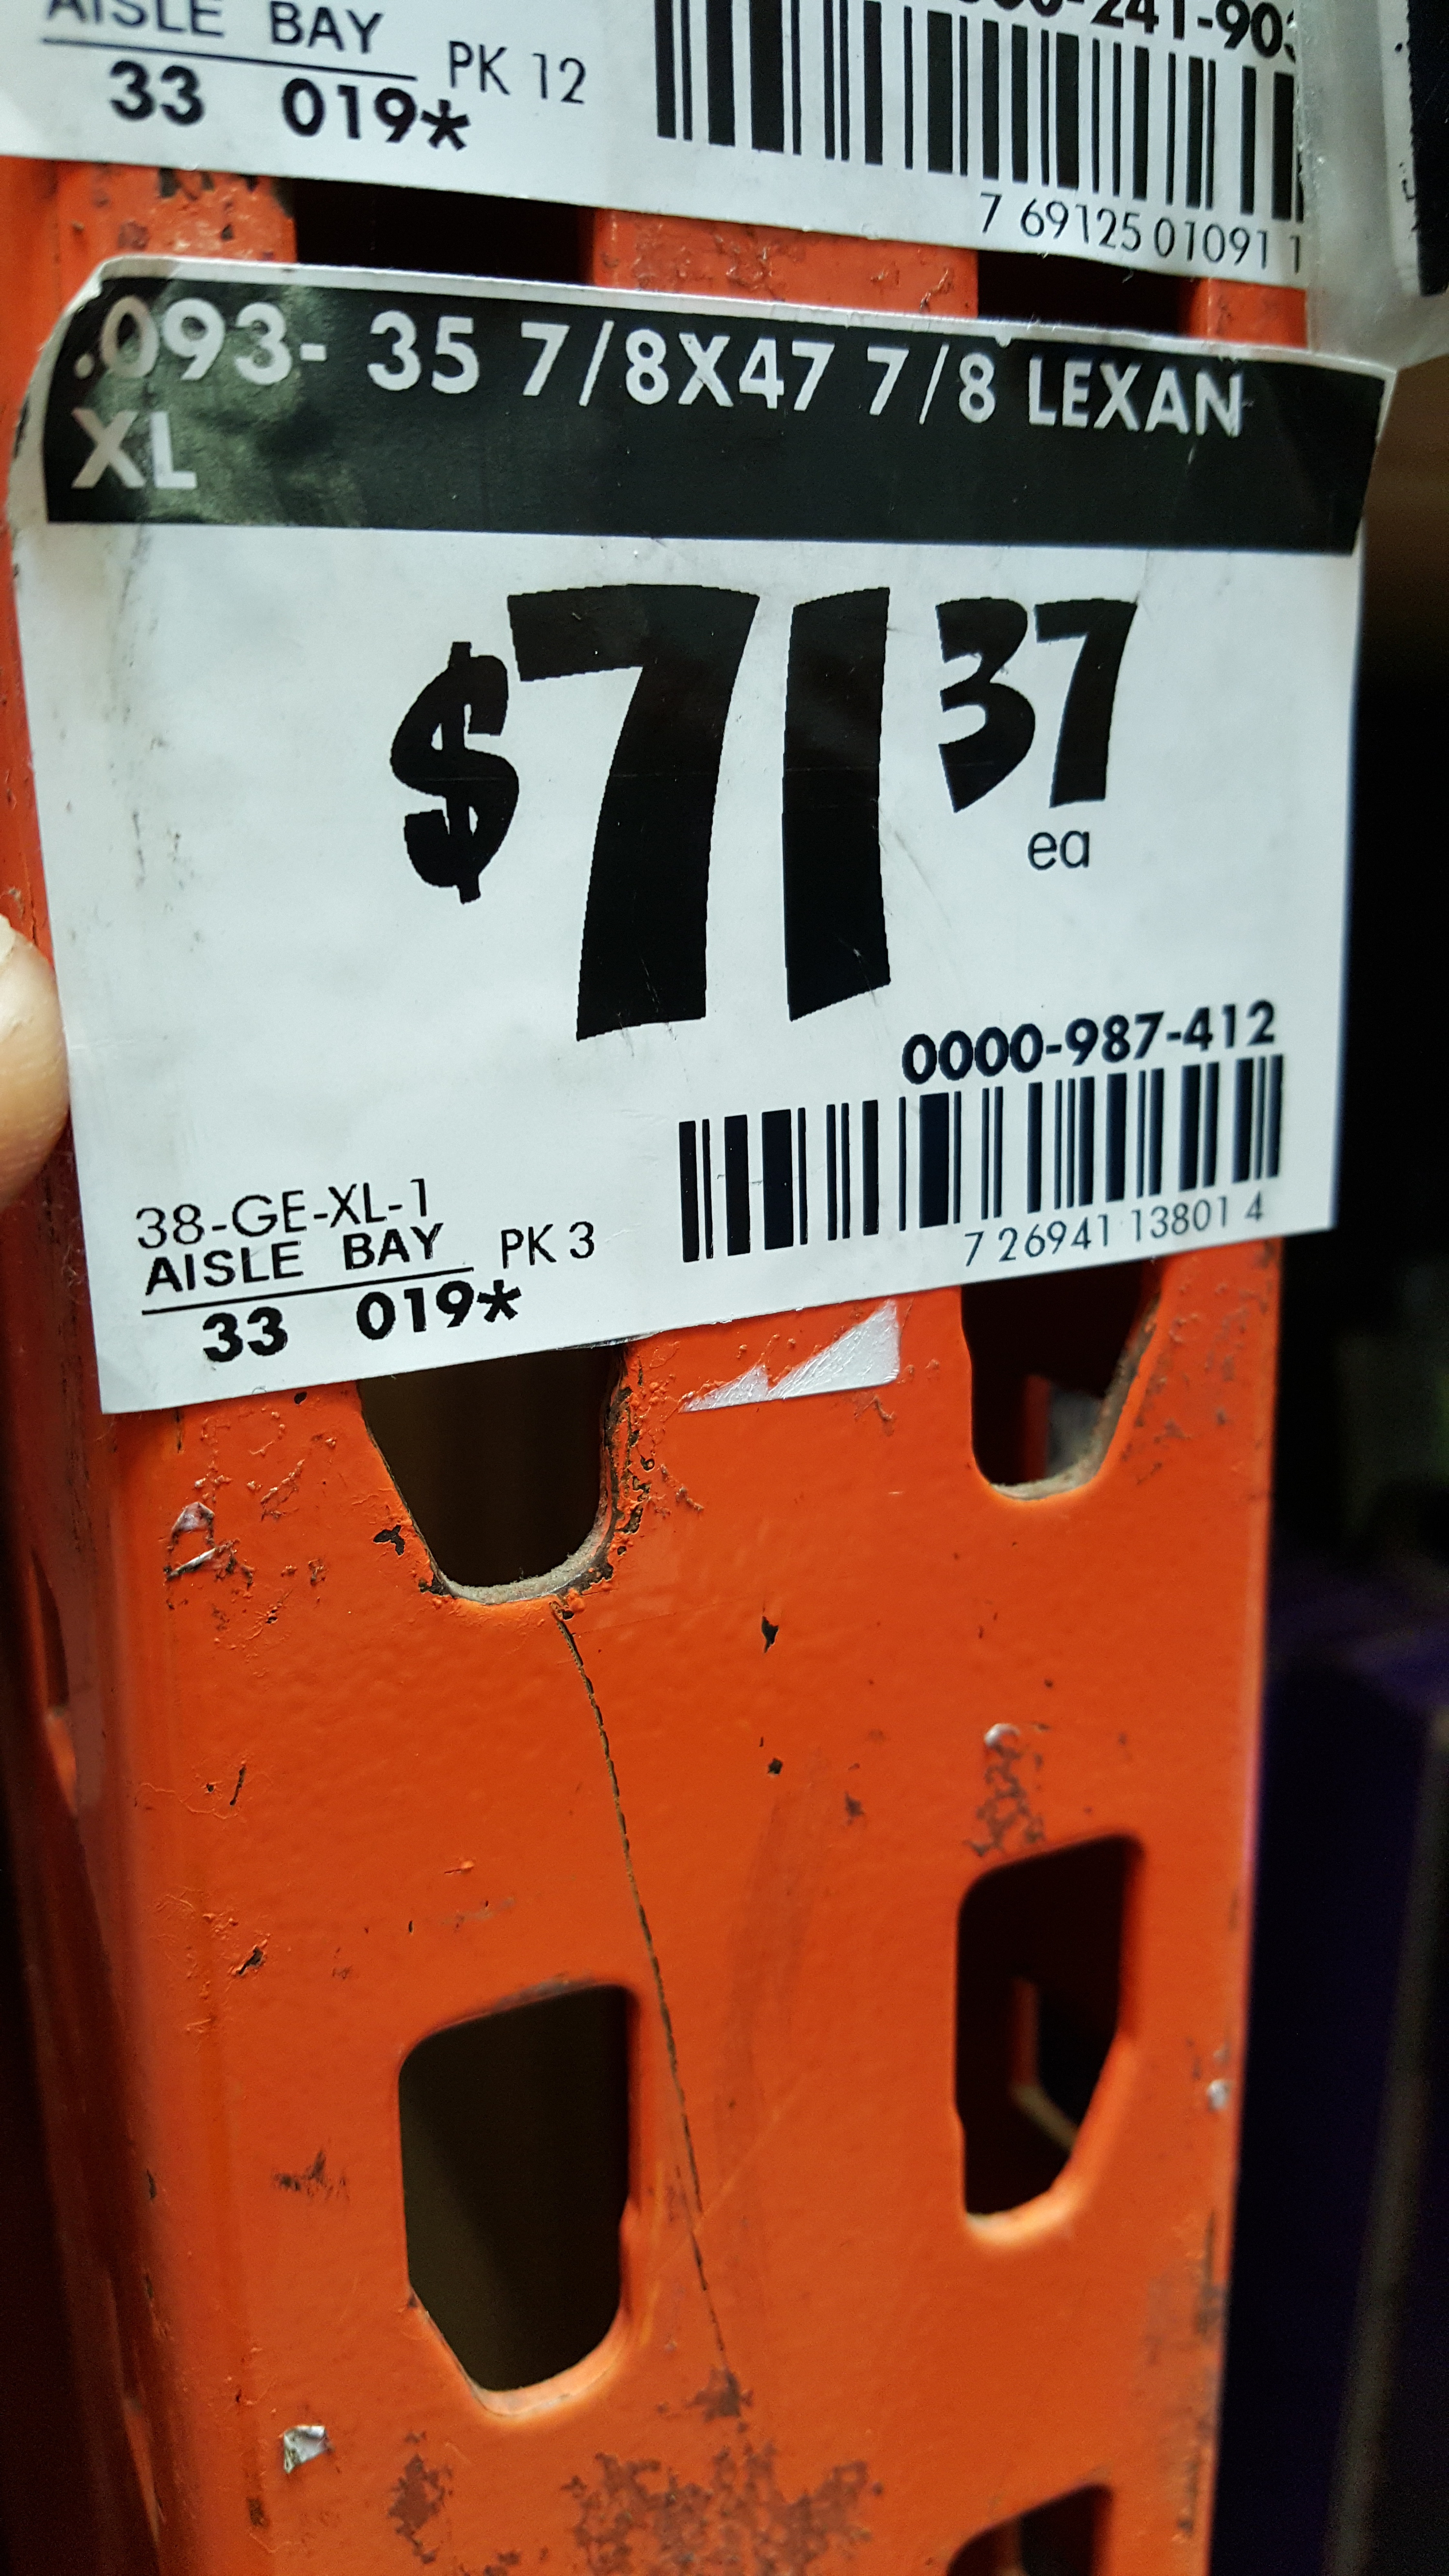
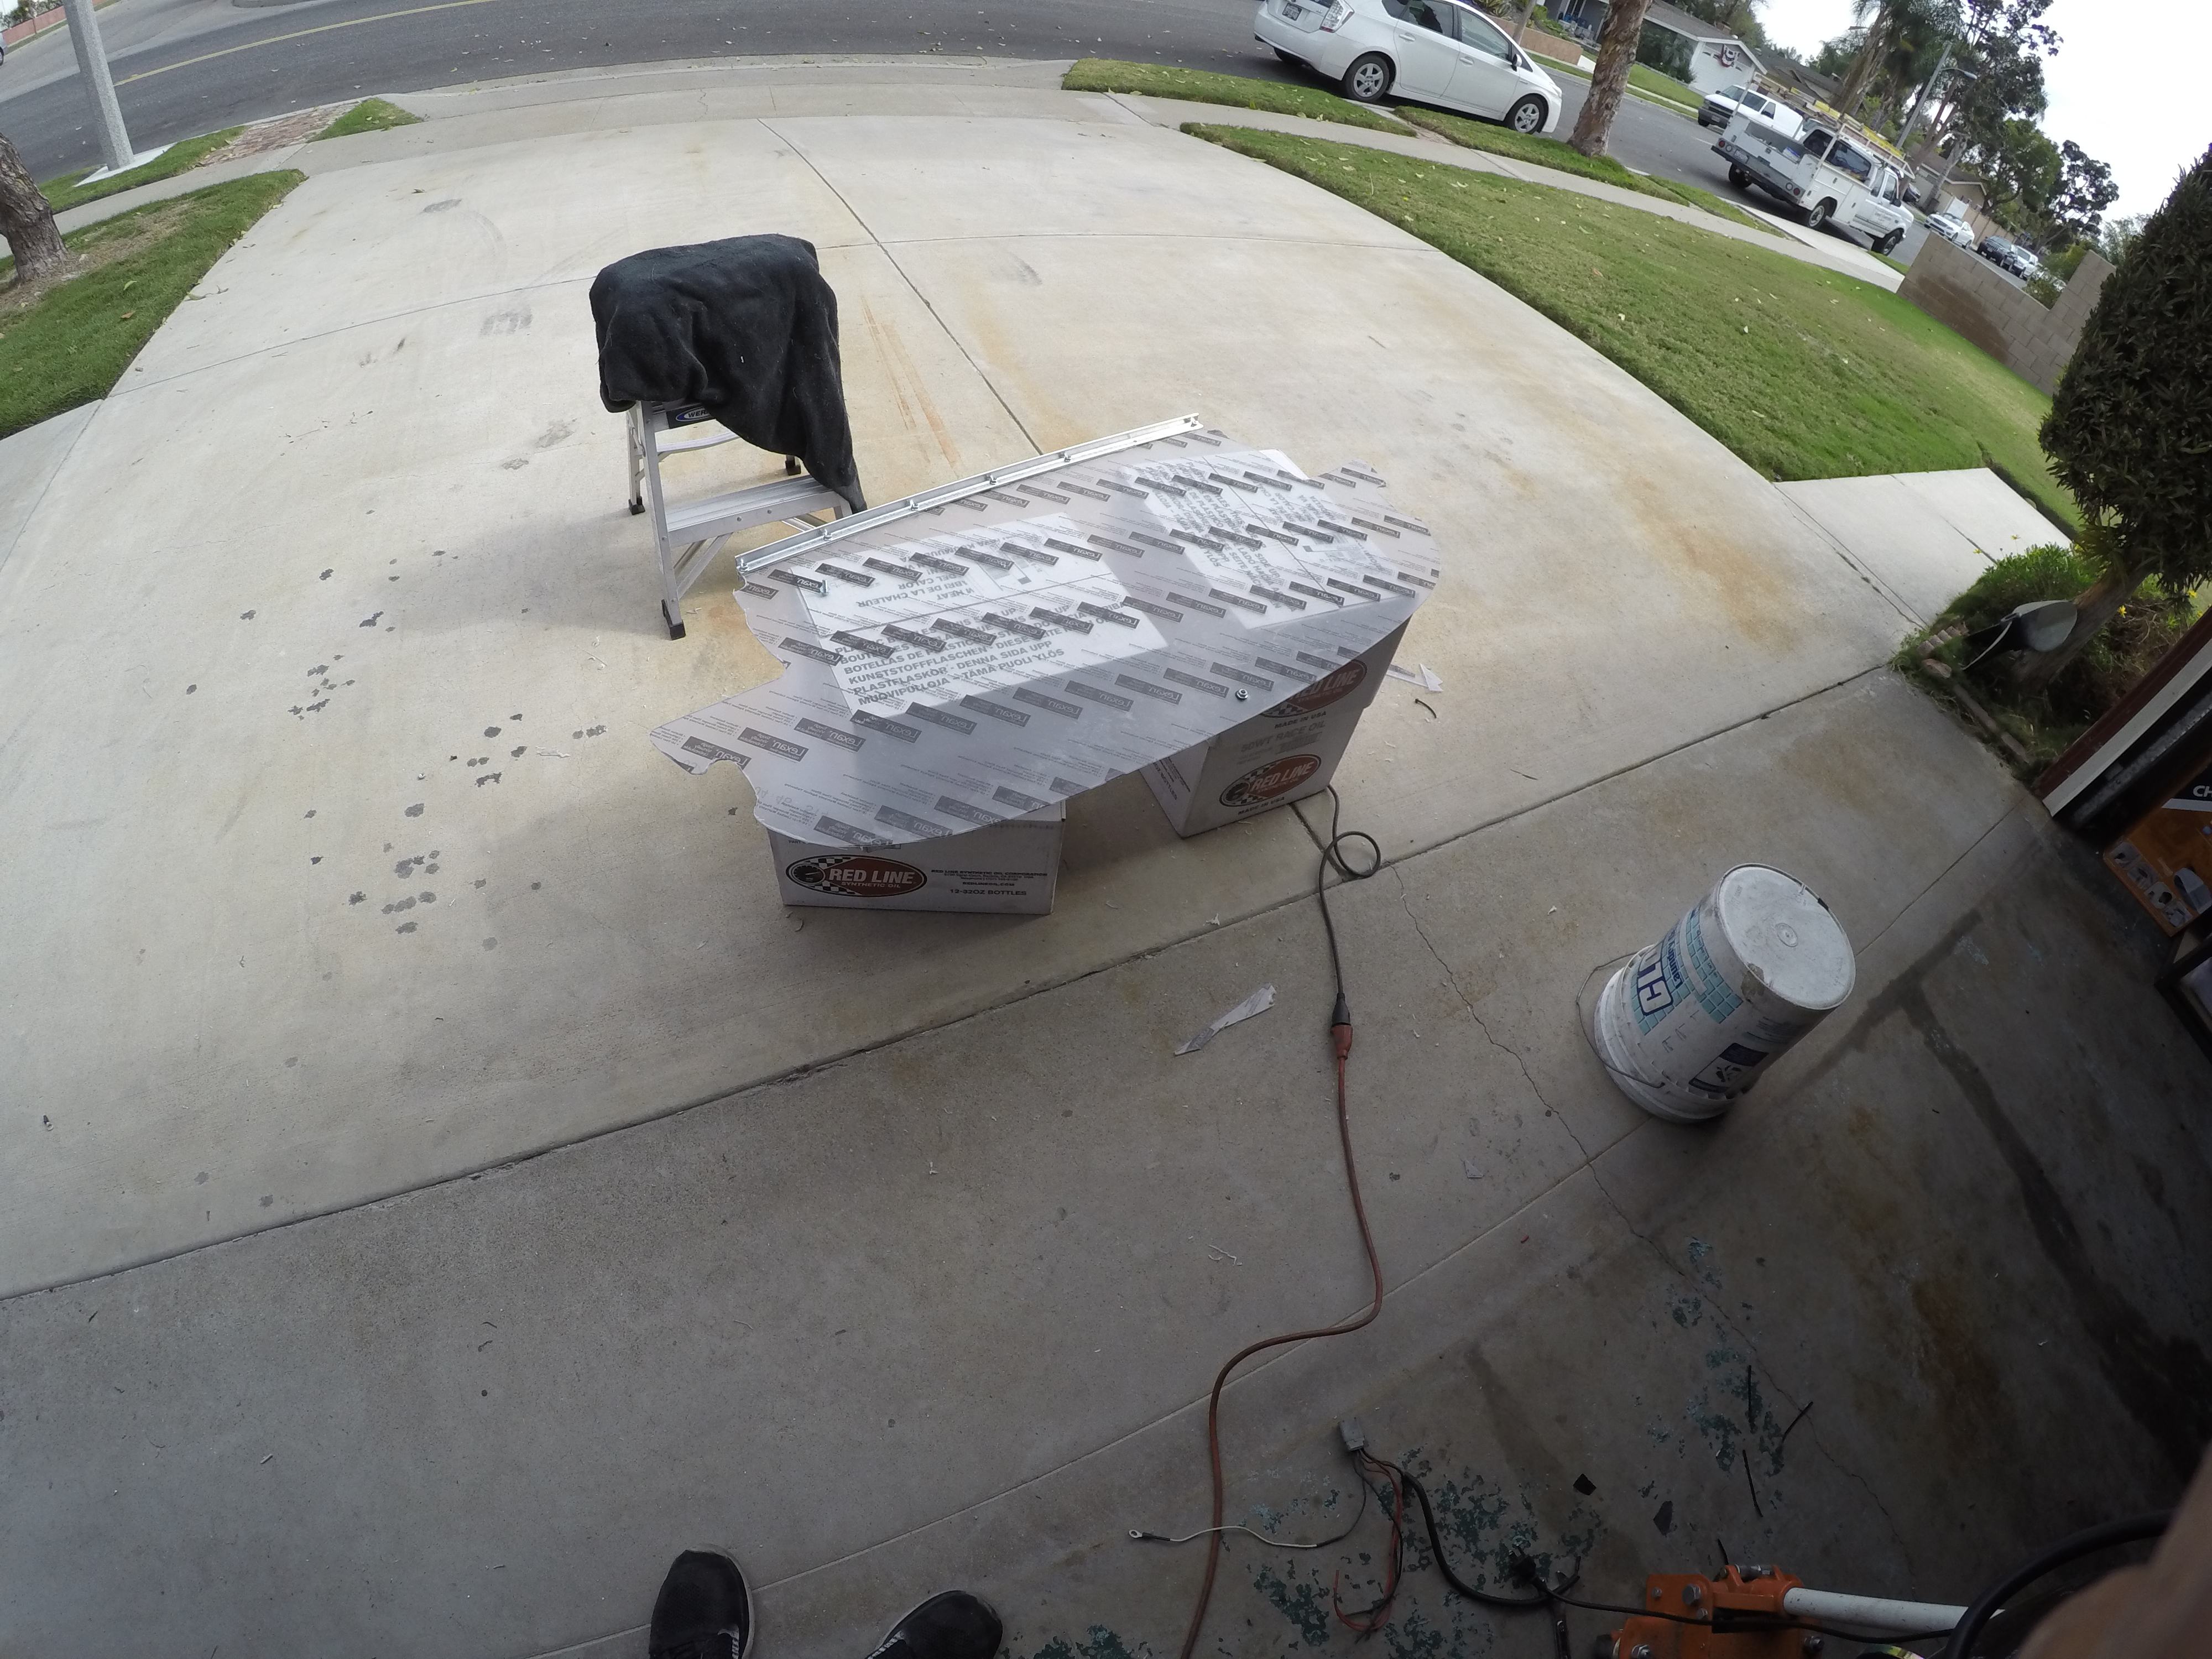
This sucked. But I looked at where it cracked and it was the only small corner that I hadn't used my dremel on. So it was a sharp edge... On top of that, it had a little bit of pressure on it because it was touching the Passenger side Strut Mount. Sometimes you have to learn the hard way! Soooo Off to Home Depot I went. Grabbed another sheet and headed up to the cashier.... But after they rung it up It came up much cheaper than The last Sheet I had purchased. The guy at the register assured me it was the right one.. But I had just purchased this exact same item days before. So I asked him politely to check. He just looked at me and gave me some "Get out of here, I don't feel like dealing with this right now" answer... So I went back and was looking at the Sheets. Well The label for my sheet was wrong. What I thought was Lexan.. was actually "Acrylic." Lexan is a bit more expensive... but the sheet that I had cracked was charged as Lexan... Not the cheaper Acrylic. Luckily the guy who had pointed me in the direction of the sheets days before was working... So I approached him and told him what had happened... and he said "Oh man....no worries, that happens all the time." In my head I was like... "what?"...as if it's ok to over charge people all the time? haha. But Whatever.. He ended up taking care of me and giving me the real "Lexan" Sheet that was wayyy larger.. for only 73 Bucks! Because normally it's about $103. Phewwww!!! Anyways.. I went home.. used the broken glass as a template and kept it in case I need to make another one ever.
RE-making the REAL Lexan Fire wall haha
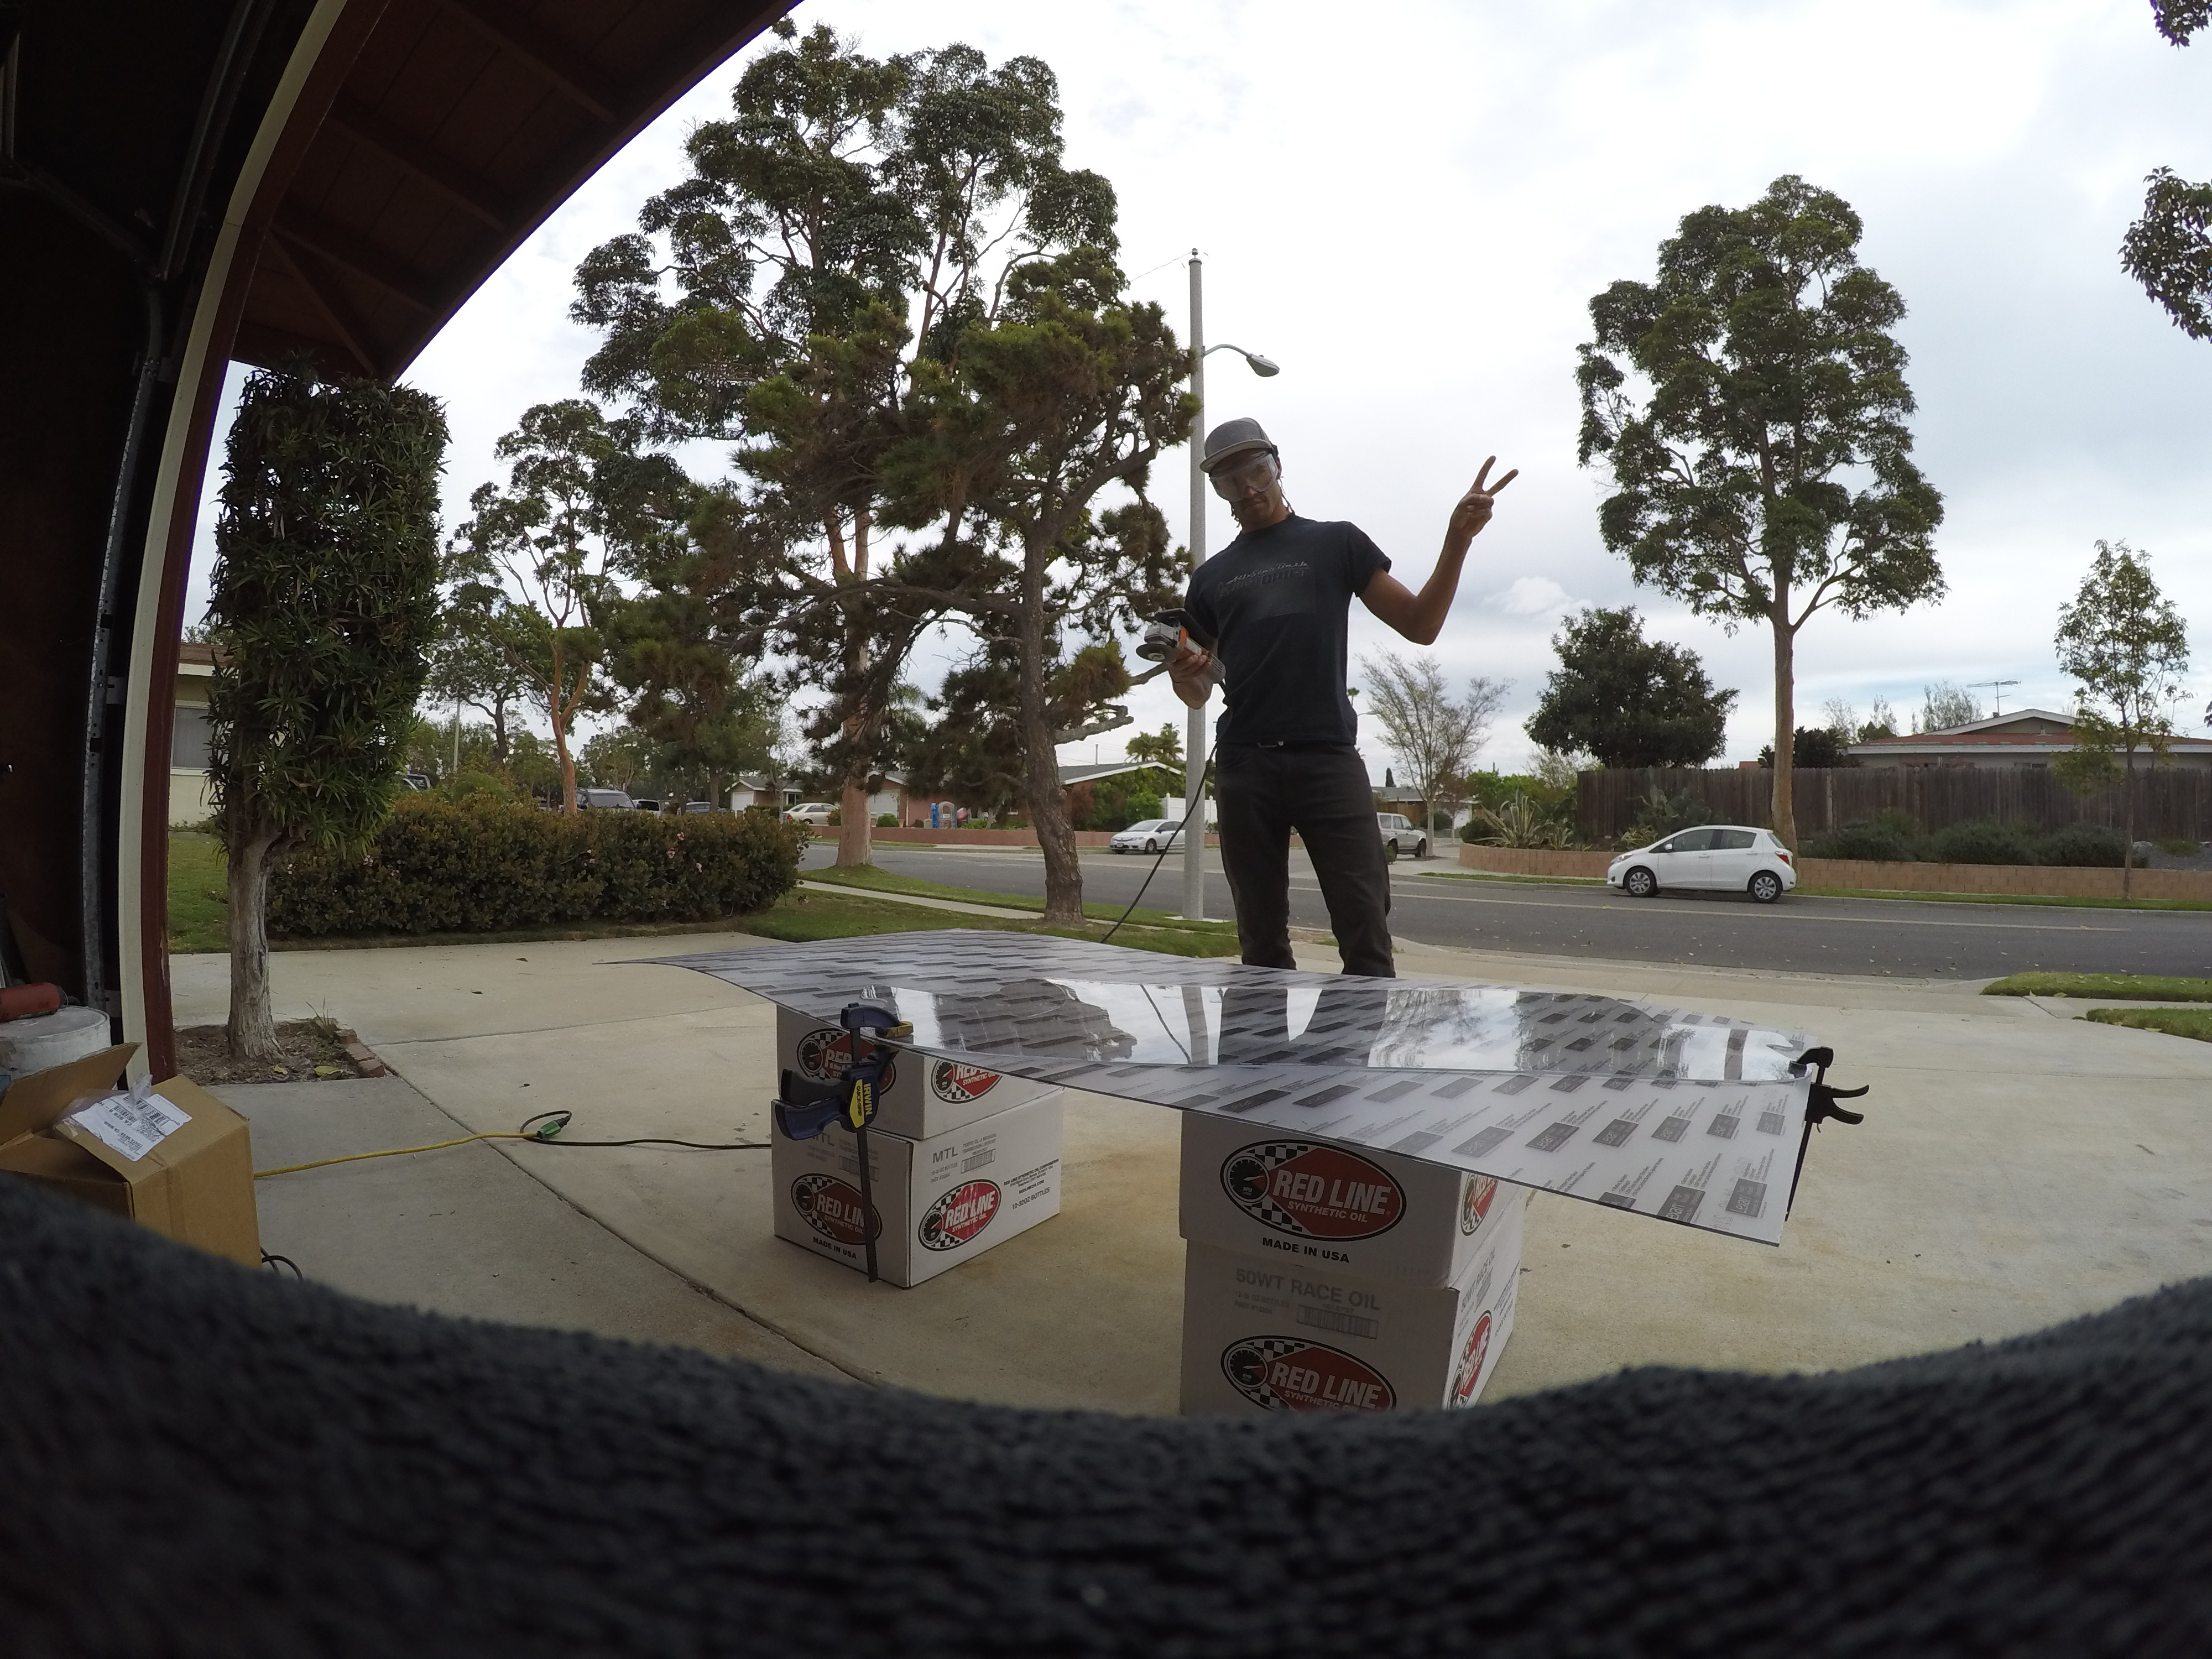
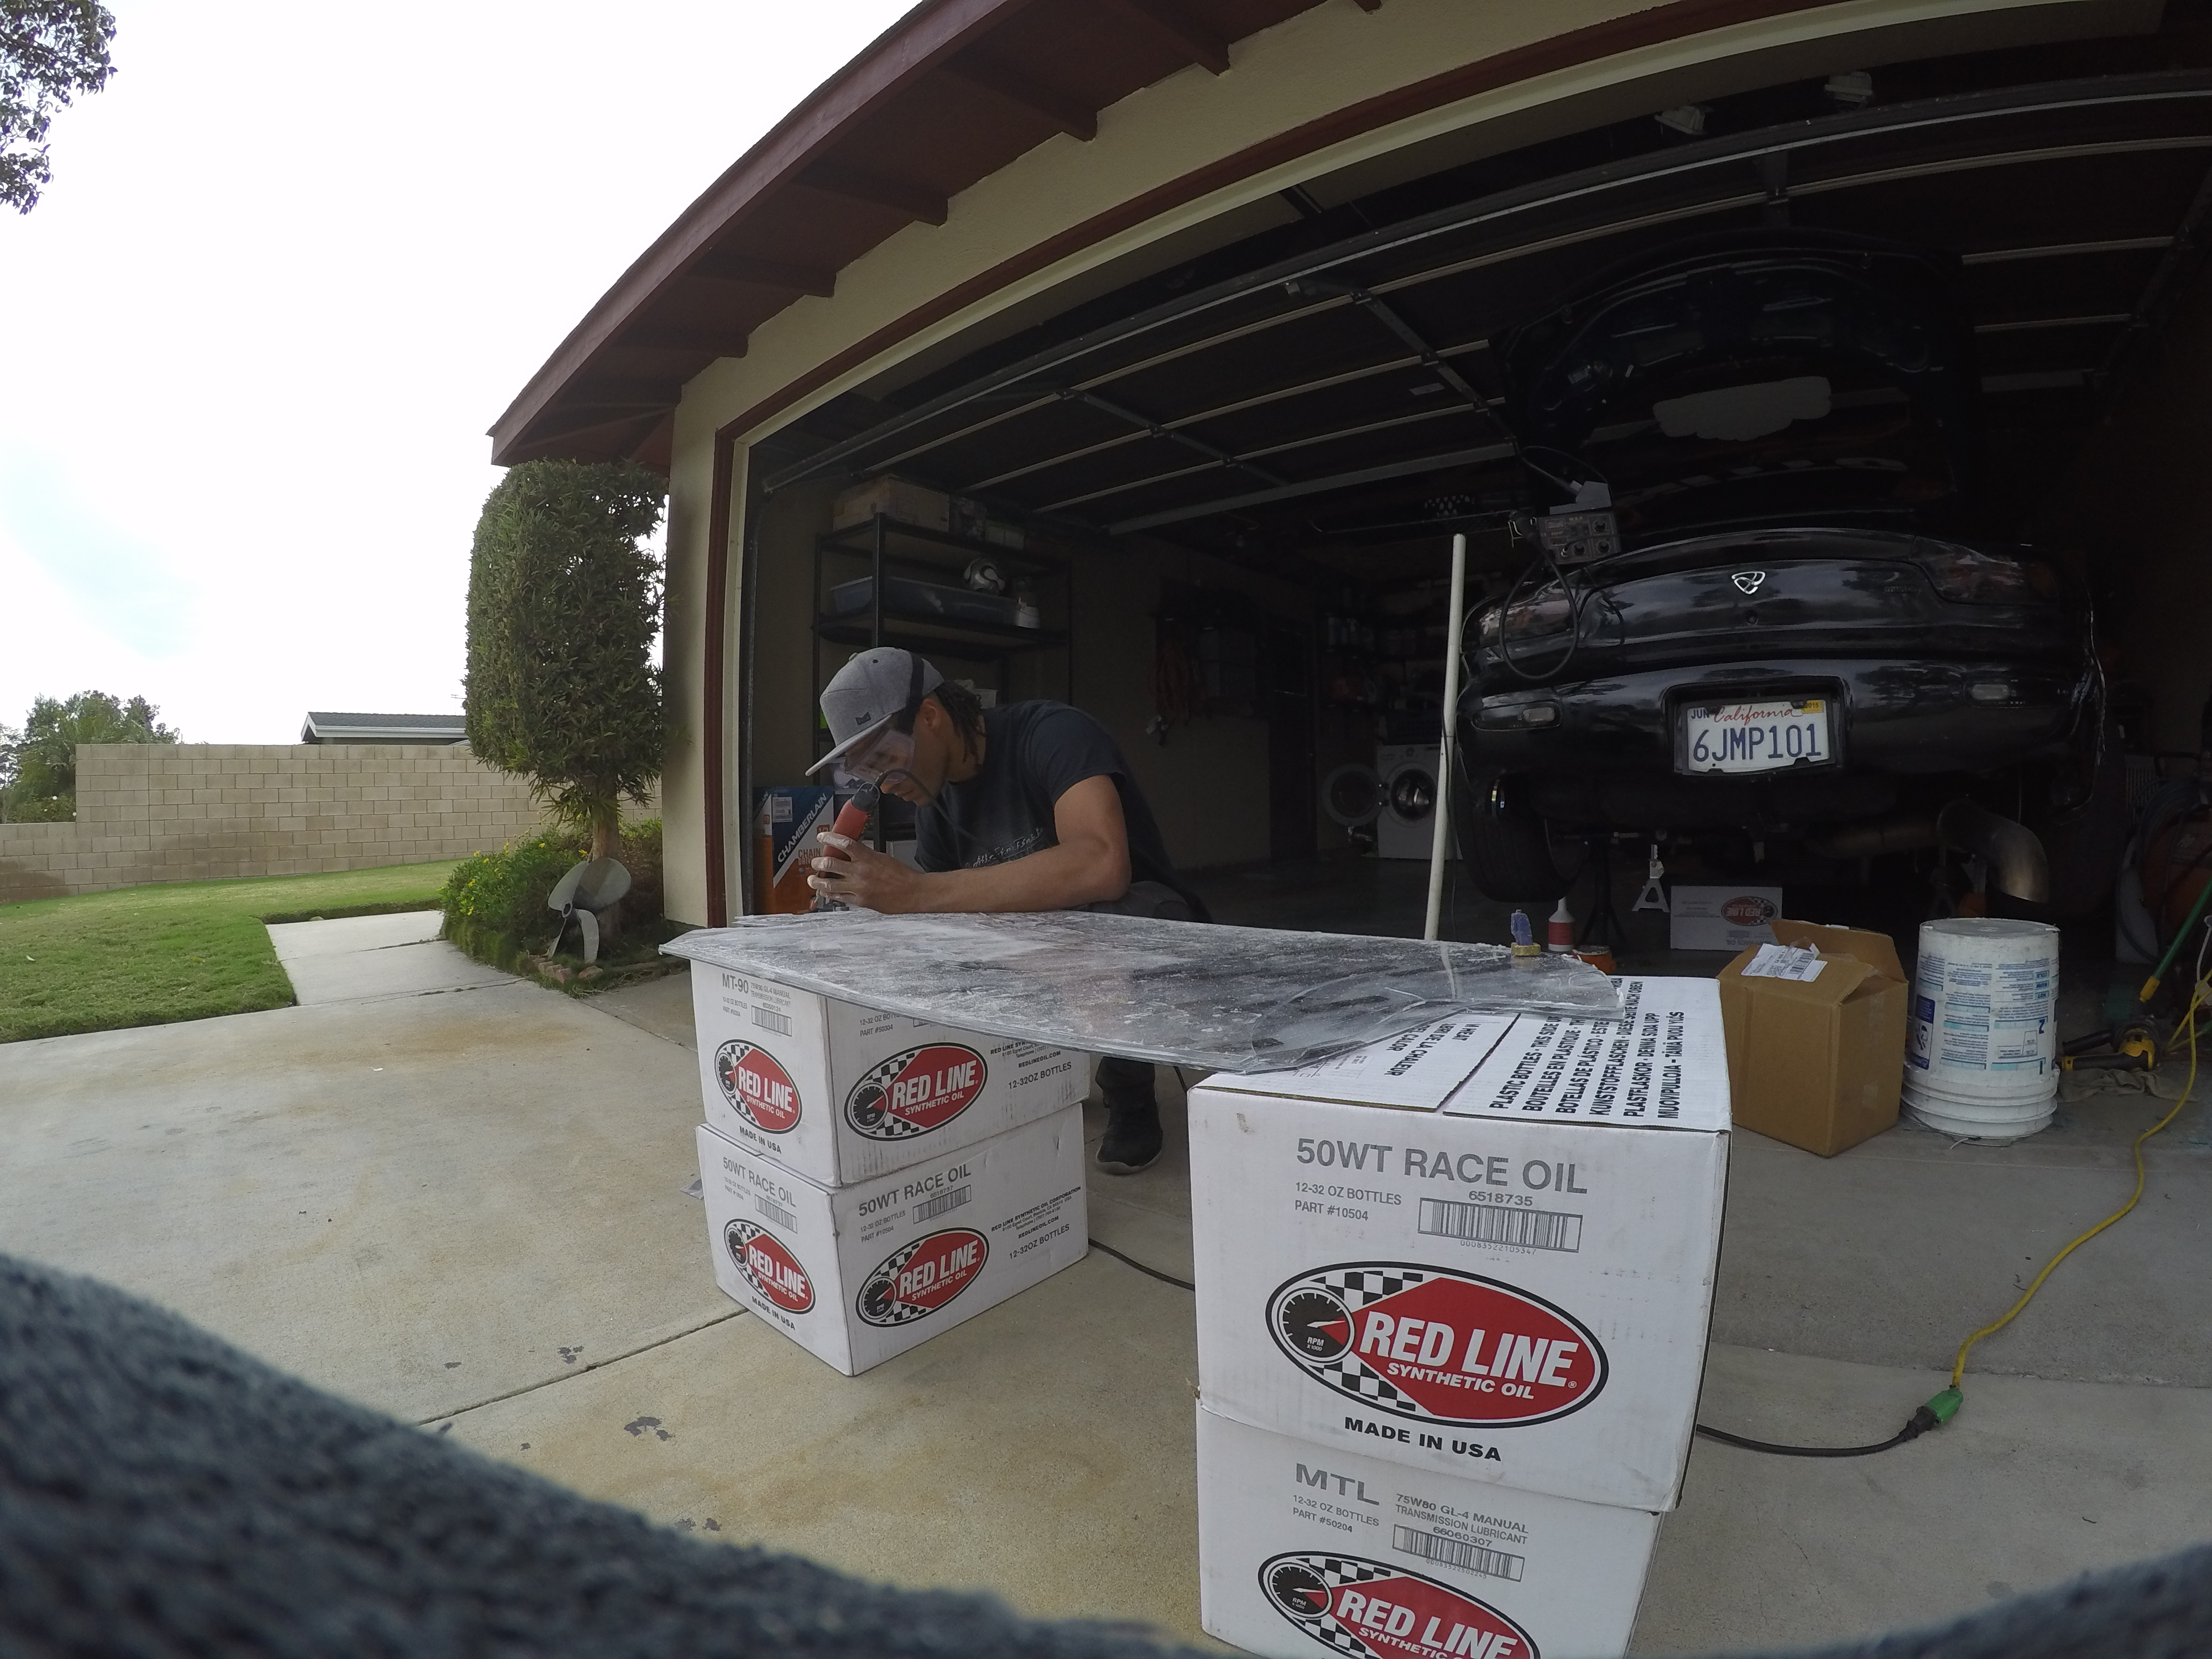
Then I took the Lexan to a local window Tint place. I wanted to get the Lexan Tinted so that it would be protected from scratches..because this stuff scratches very easily. .. The Guy wouldn't tint it for me.. but he also wouldn't necessarily tell me why. I kept asking prodding questions but he wasn't being very helpful. Things weren't really going my way that day. But anyways... I finally just asked him to sell me some and I'd do it on my own. I paid 20 bucks.. he cut two sheets for me and I was on my way.
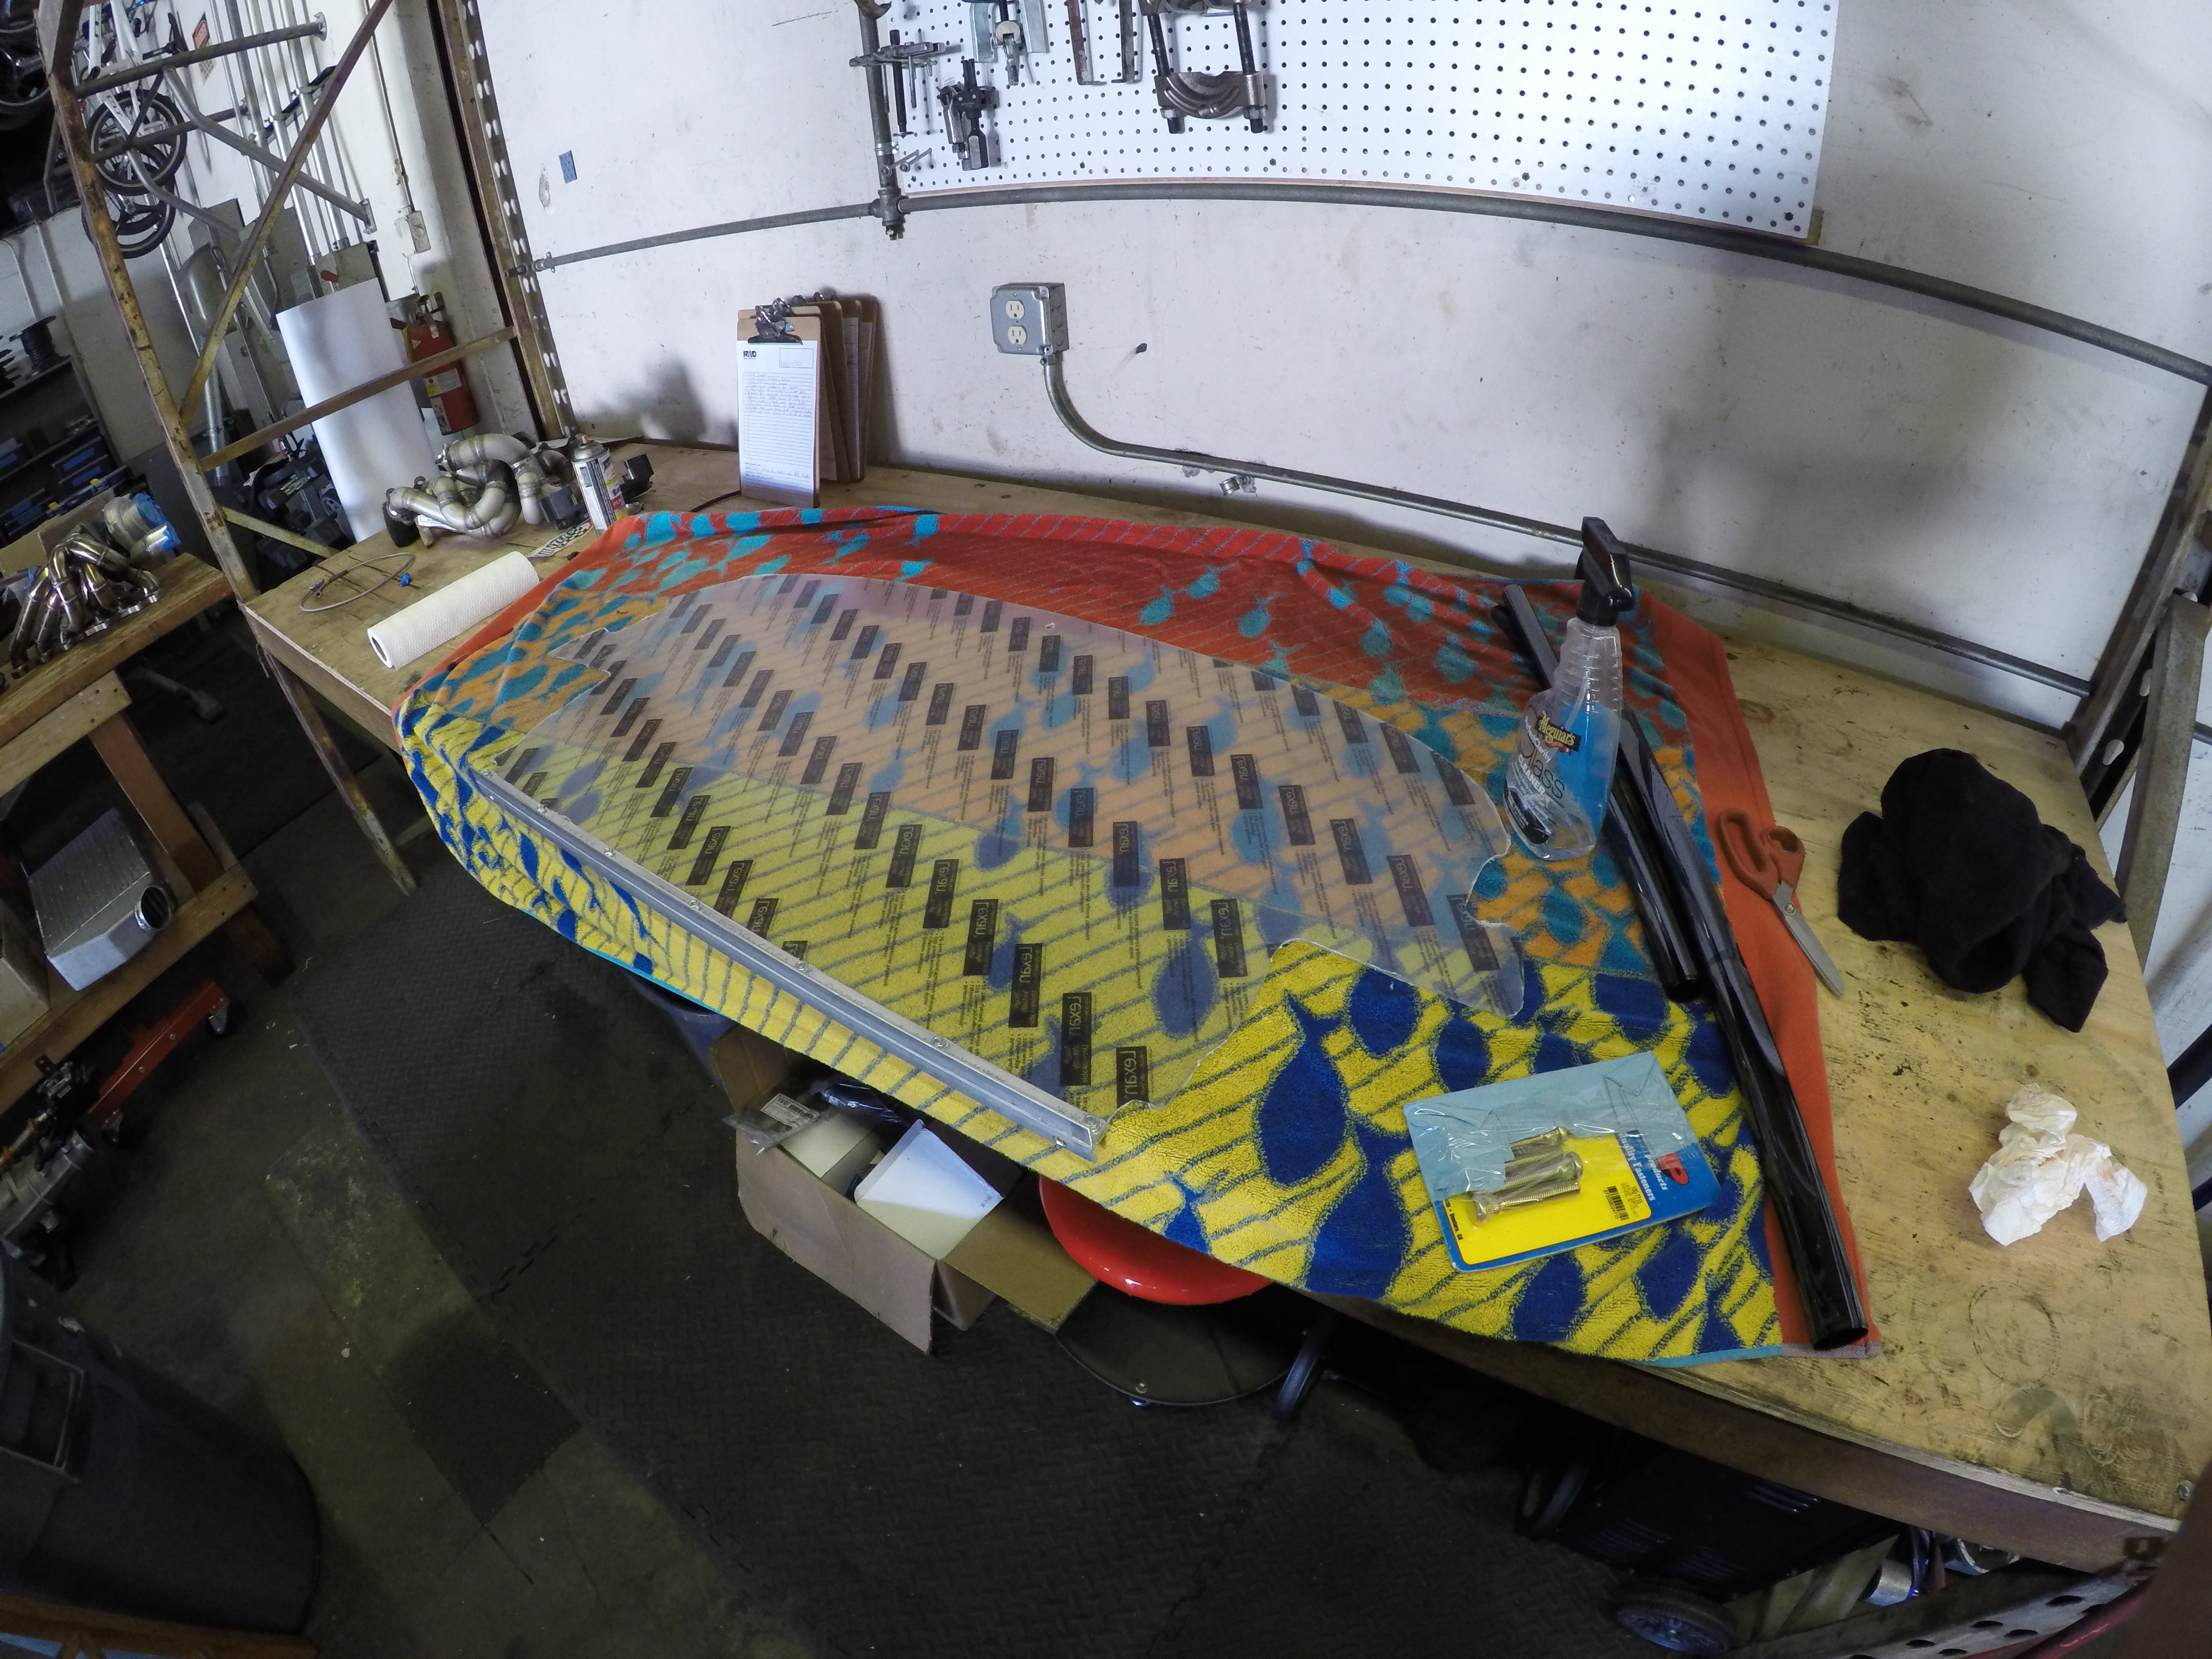
Putting the Tint on... Took my time here.. and it actually came out pretty damn good.
Check it
Then Disaster again.... I don't know if there is a compatibility issue with Lexan and the type of Tint I was using. But After I was finished... I used 4 pieces of tape to secure the tint for a day. Because they always say your not supposed to touch it for a day or so. The next day.. I go check on the tint.. and it had come off 100%. The only thing holding it in place was the electrical tape. LAAAMEEE!! THINGS WEREN'T GOING MY WAY. I felt like going and asking the guy if the stuff was compatible. But it wouldn't do anything but waste more time..and plus.. I don't necessarily like working with people who aren't helpful. It may or may not have been compatible with Lexan...but I wasted 20 bucks and about 4 Hours after driving around, buying it, cutting it carefully, securing it etc.. All down the drain. ....except Knowledge... that may be worth more than actually having the piece tinted.
Anyways... Threw the tint in the trash and decided to install it and deal with it getting scratched eventually.
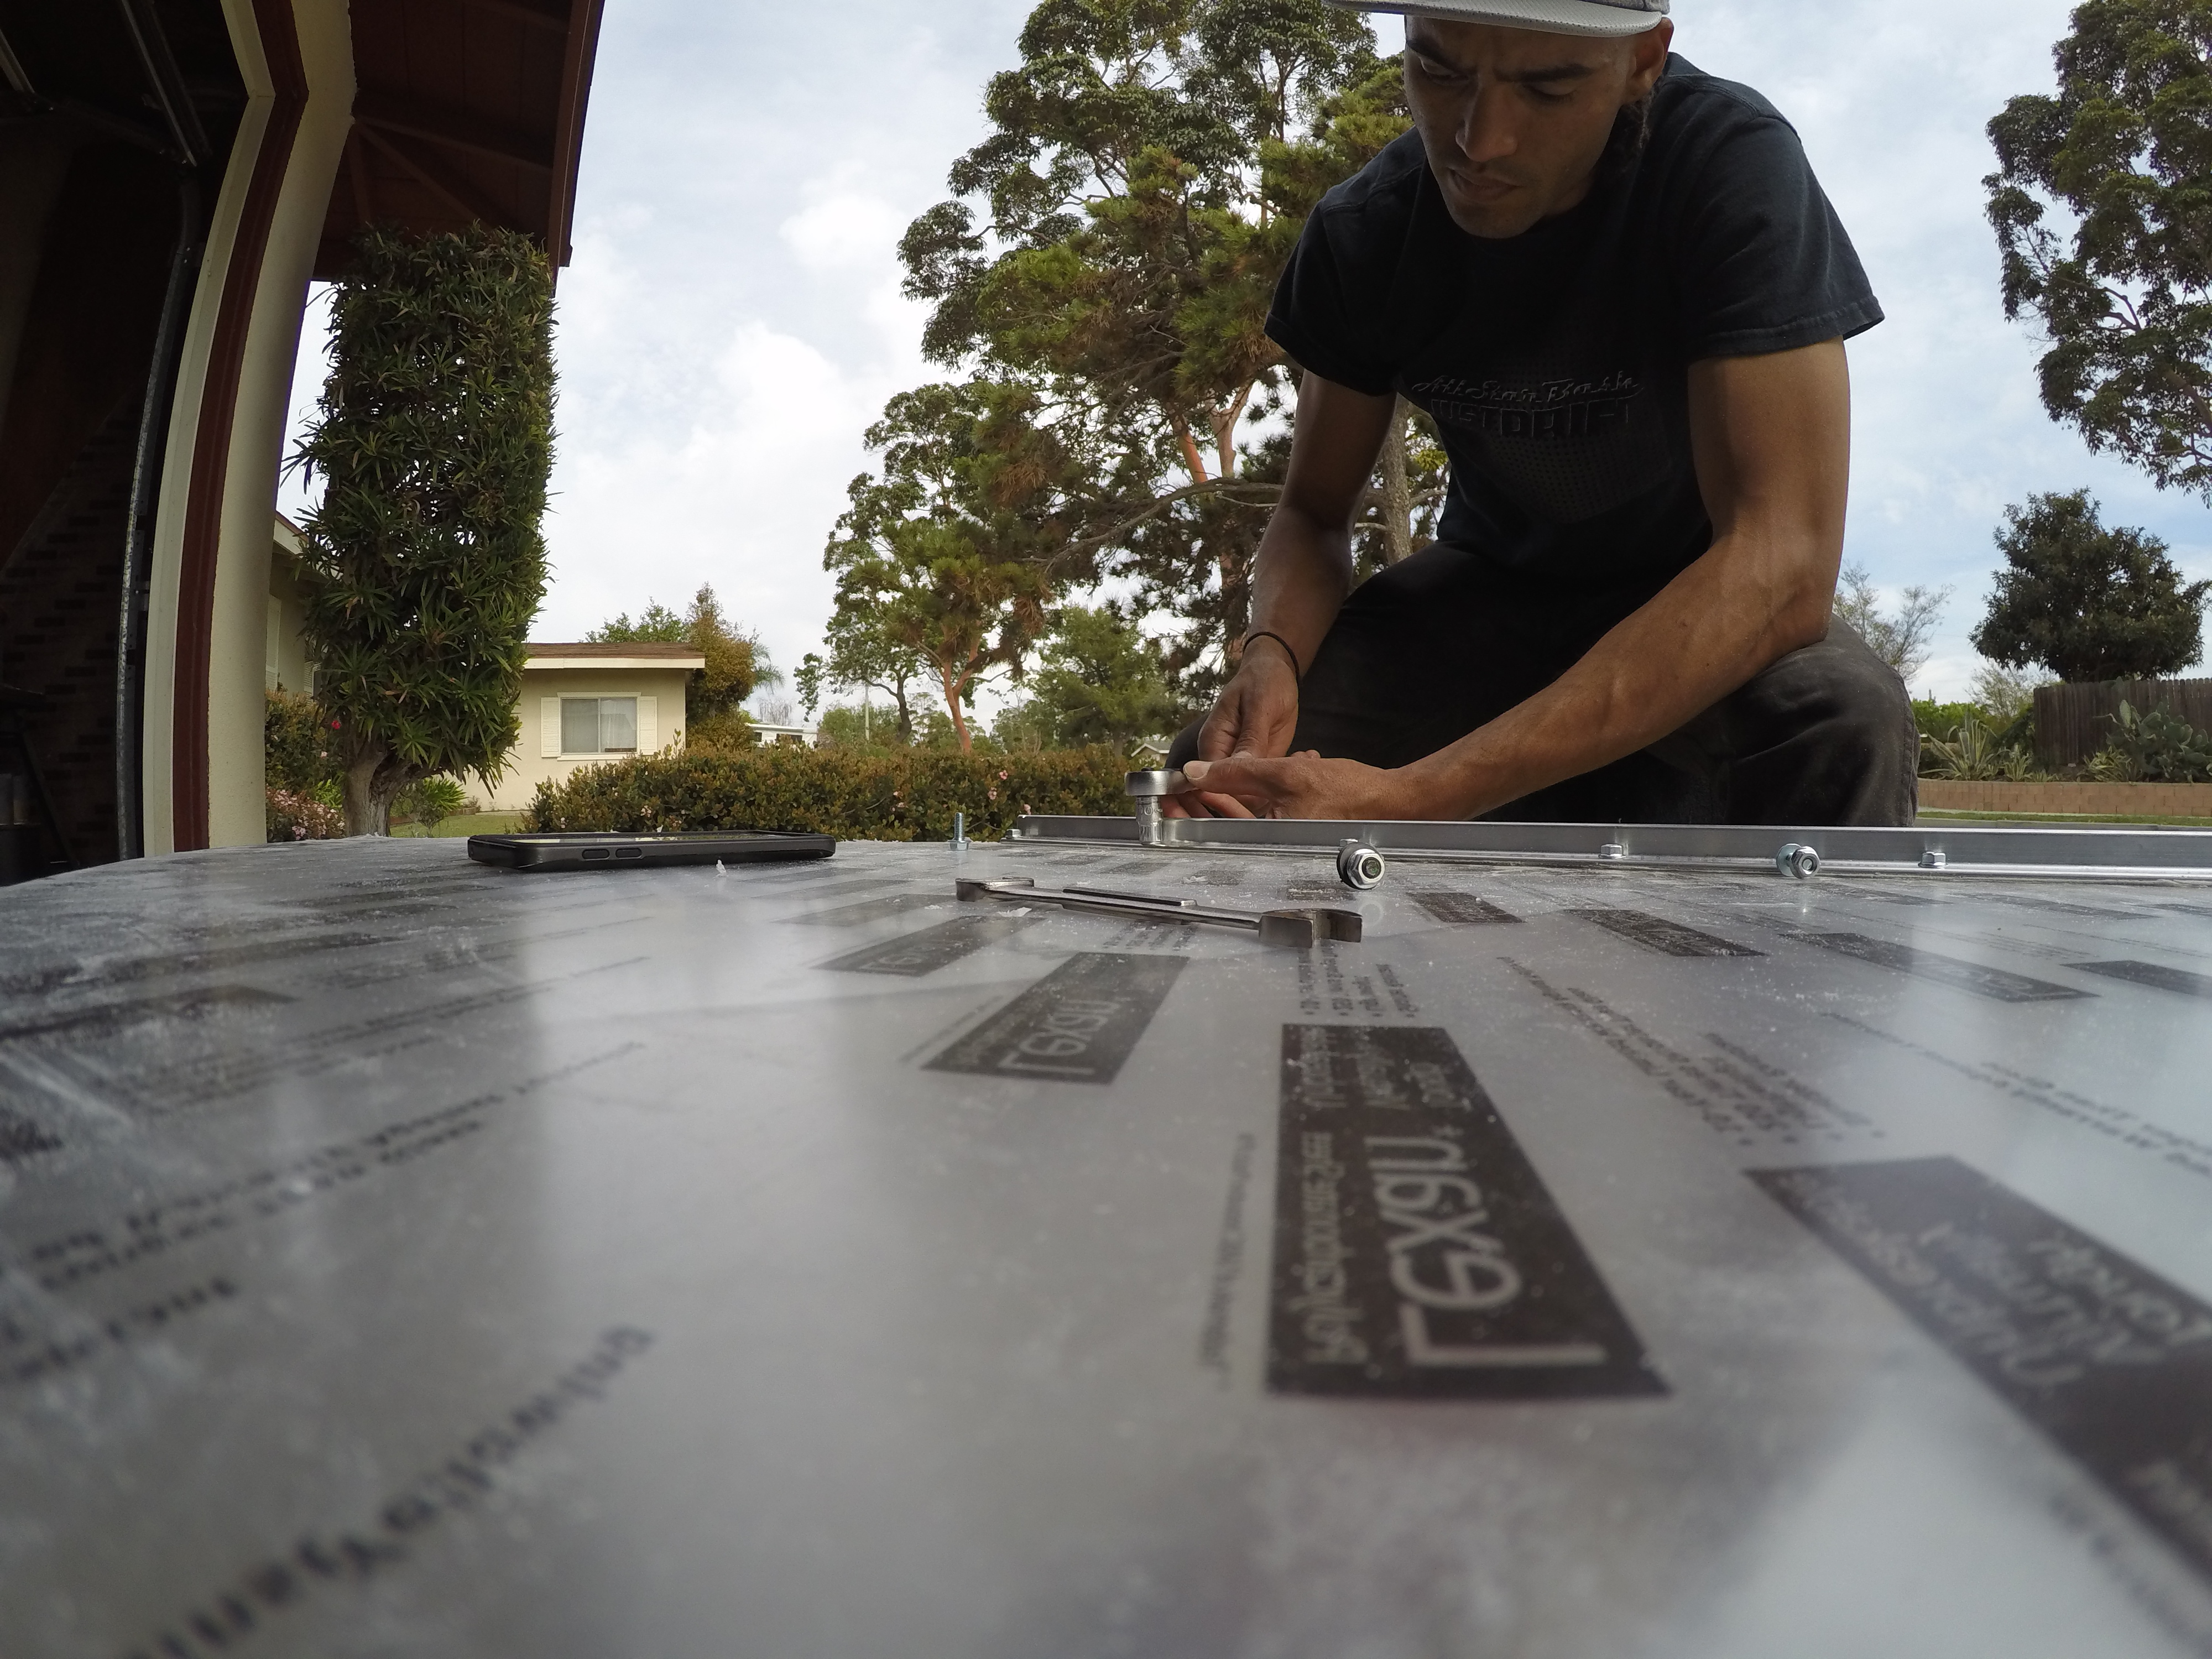
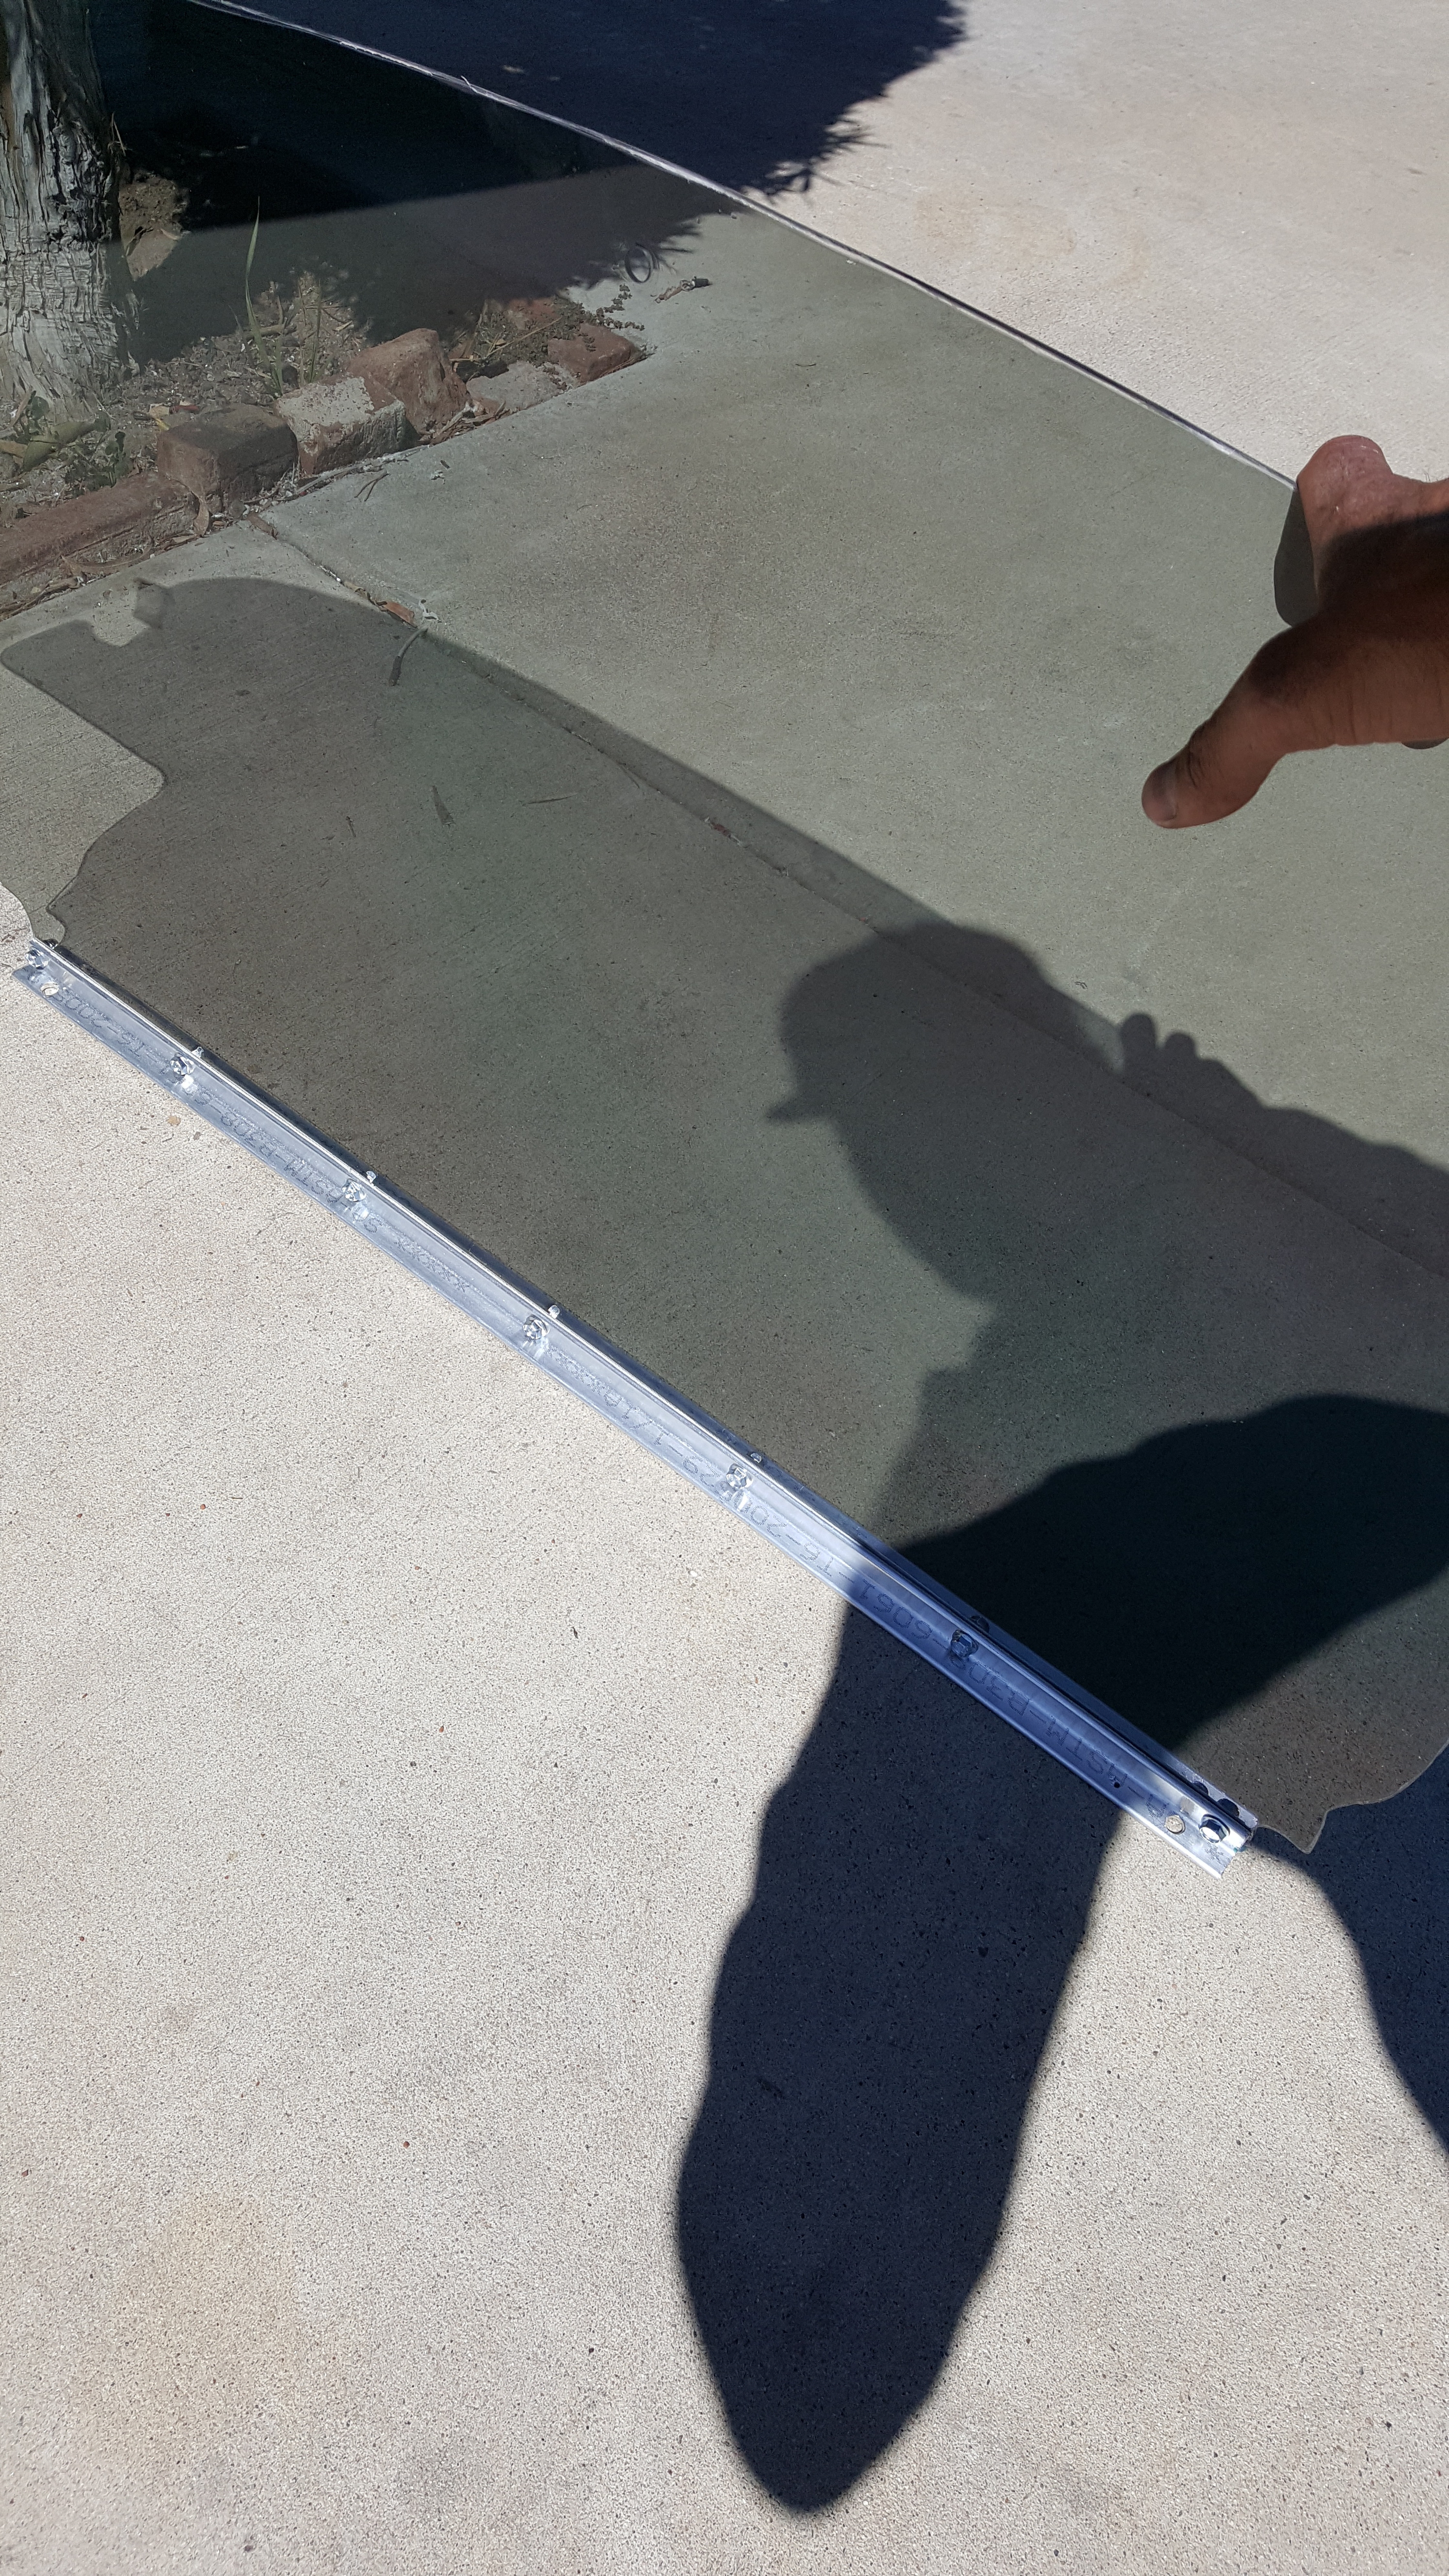
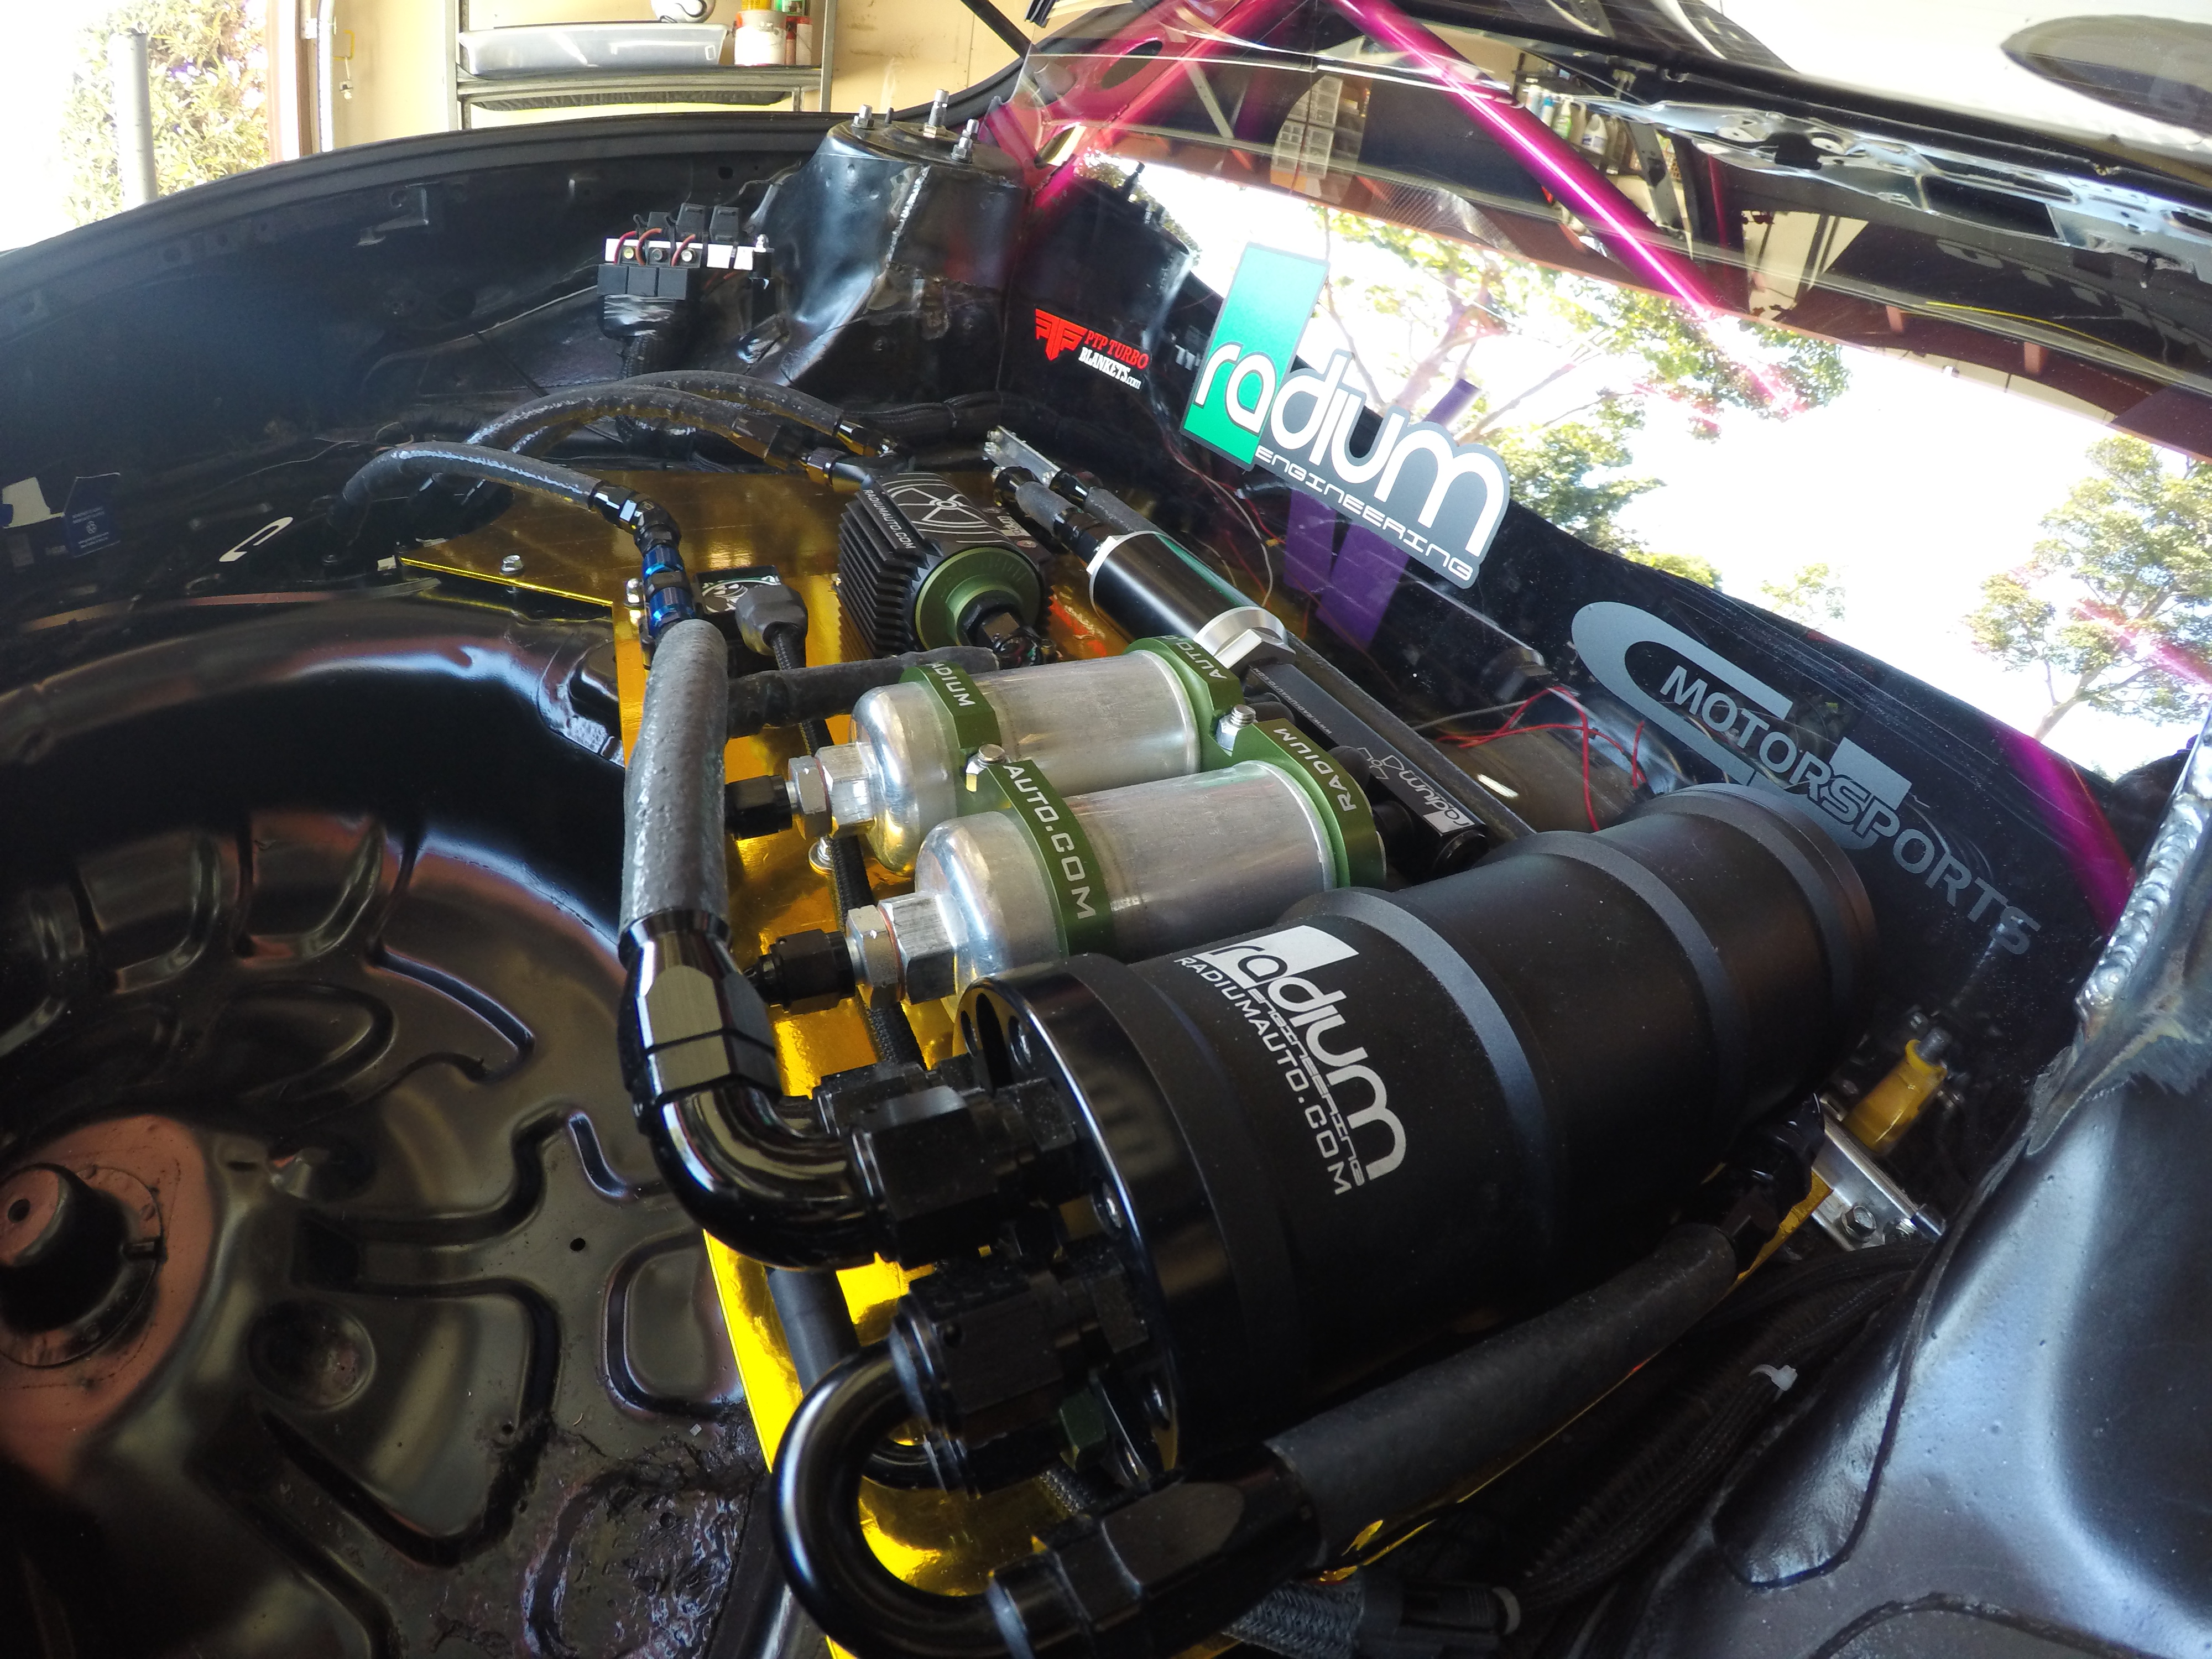
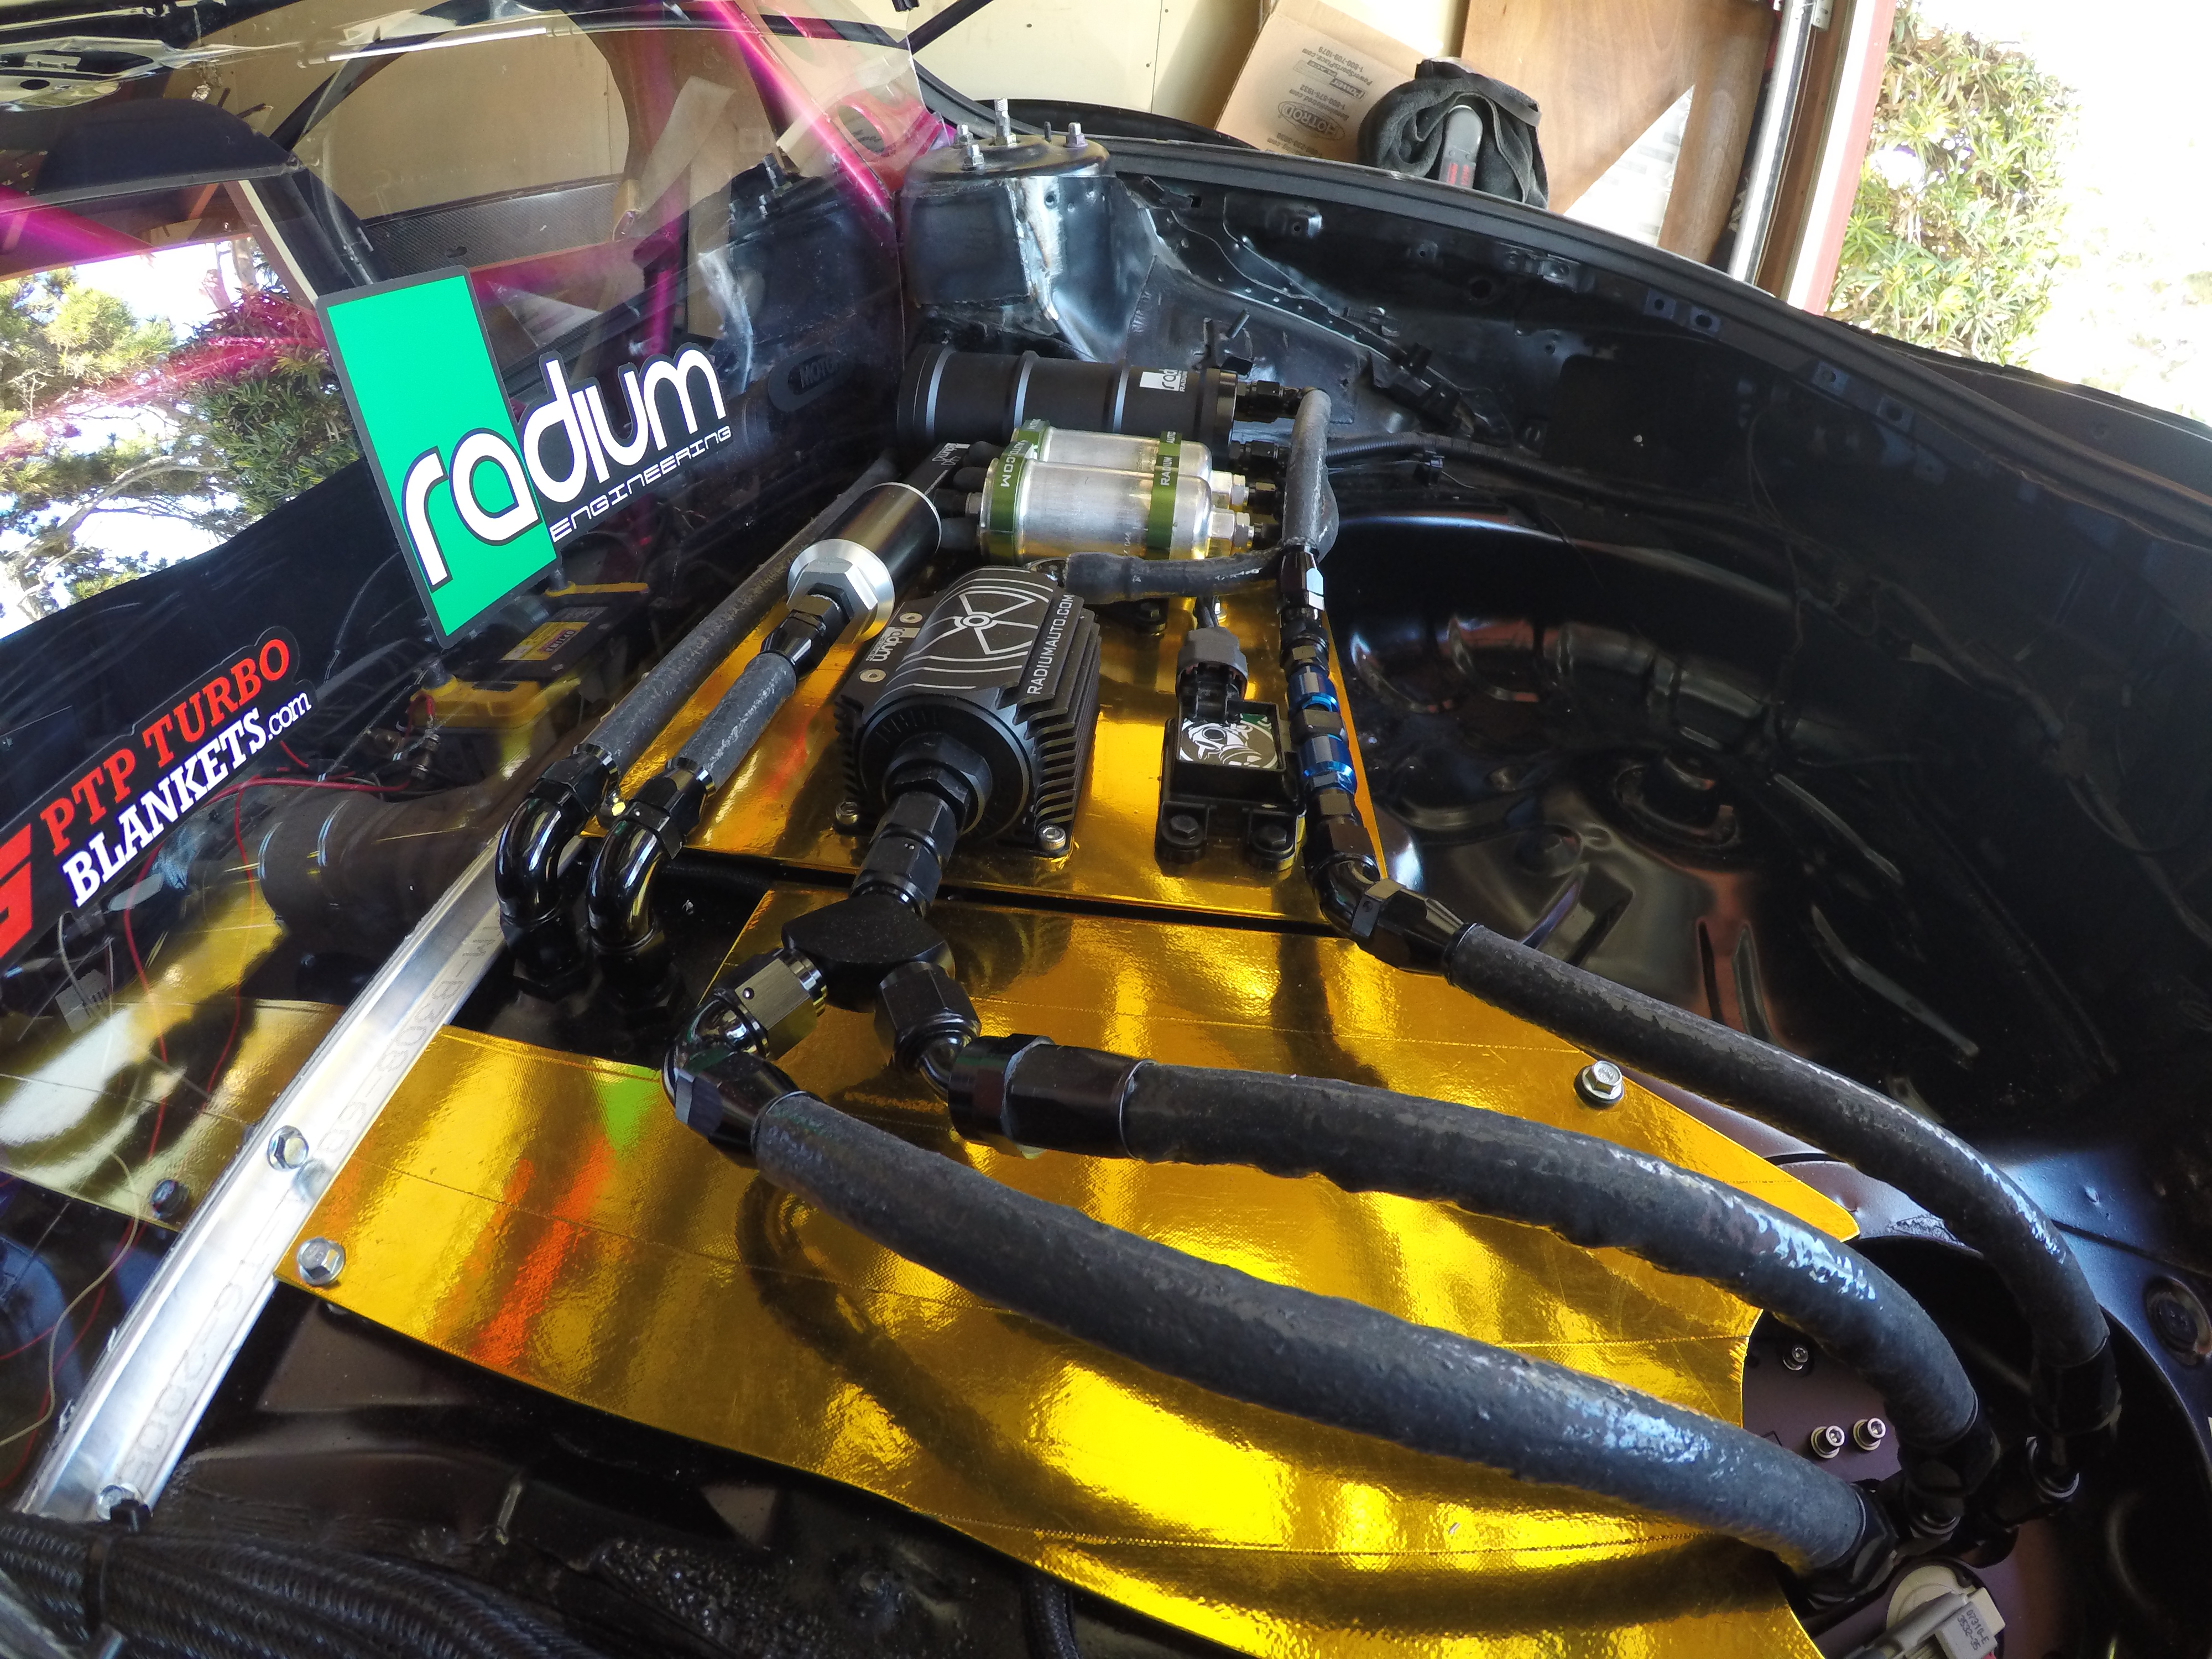
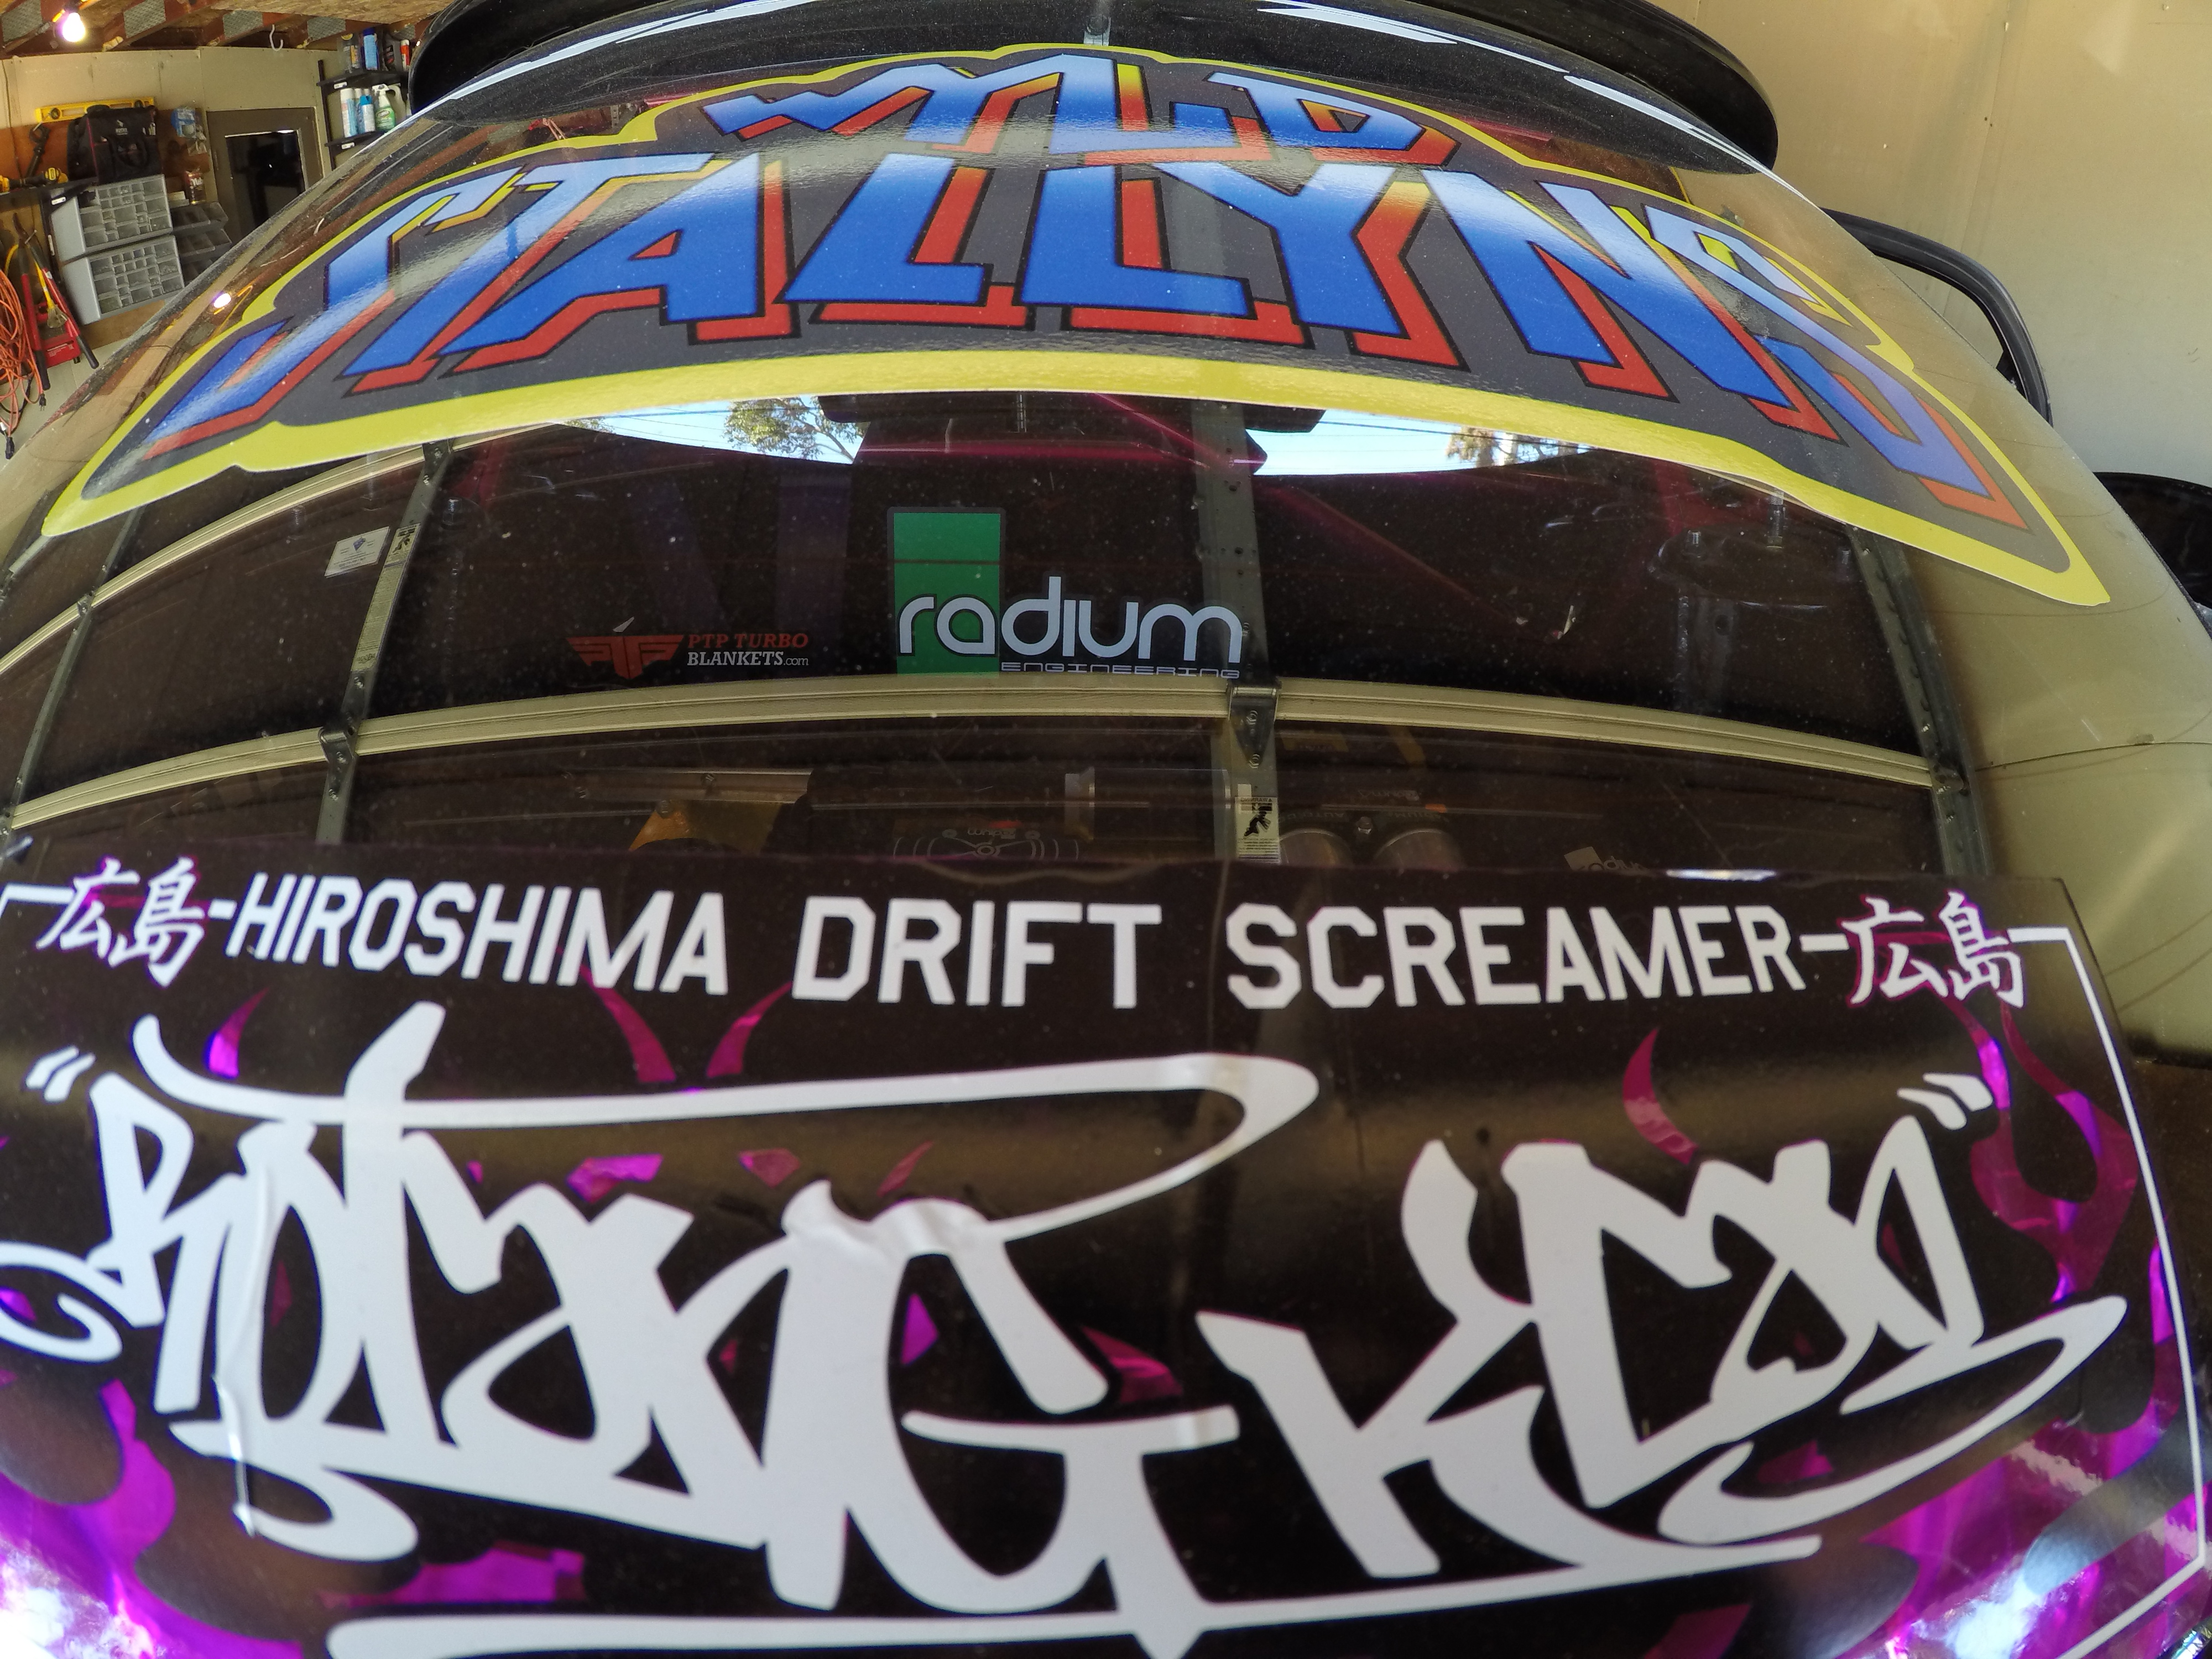
Put on a Radium Engineering, CJ-Motorsports and PTP Turbo Blankets stickers...and Installed the Lexan. Made sure to trim the 1/8" edge that was touching the strut tower and also rounded all edges with my dremel.
I also forgot to add... While I had the tint on the Lexan "Curing" overnight.. I moved my flex fuel wiring from the engine bay.....all the way to the back of the car. This took me about 2 hours because I wanted to make sure I routed it nicely through the dash.. and into the loom that was housing the rest of the wires that ran to the back of the car. I also put an additional relay in for the Walbro E85 pump on the CJ-Motorsports Hanger, This pump will be on a 20A Fuse. Both Bosch 044's are on their own Individual Relays as well, but they're fused with a 30A. Anyways! Check it!
FINALLY FINISHED!
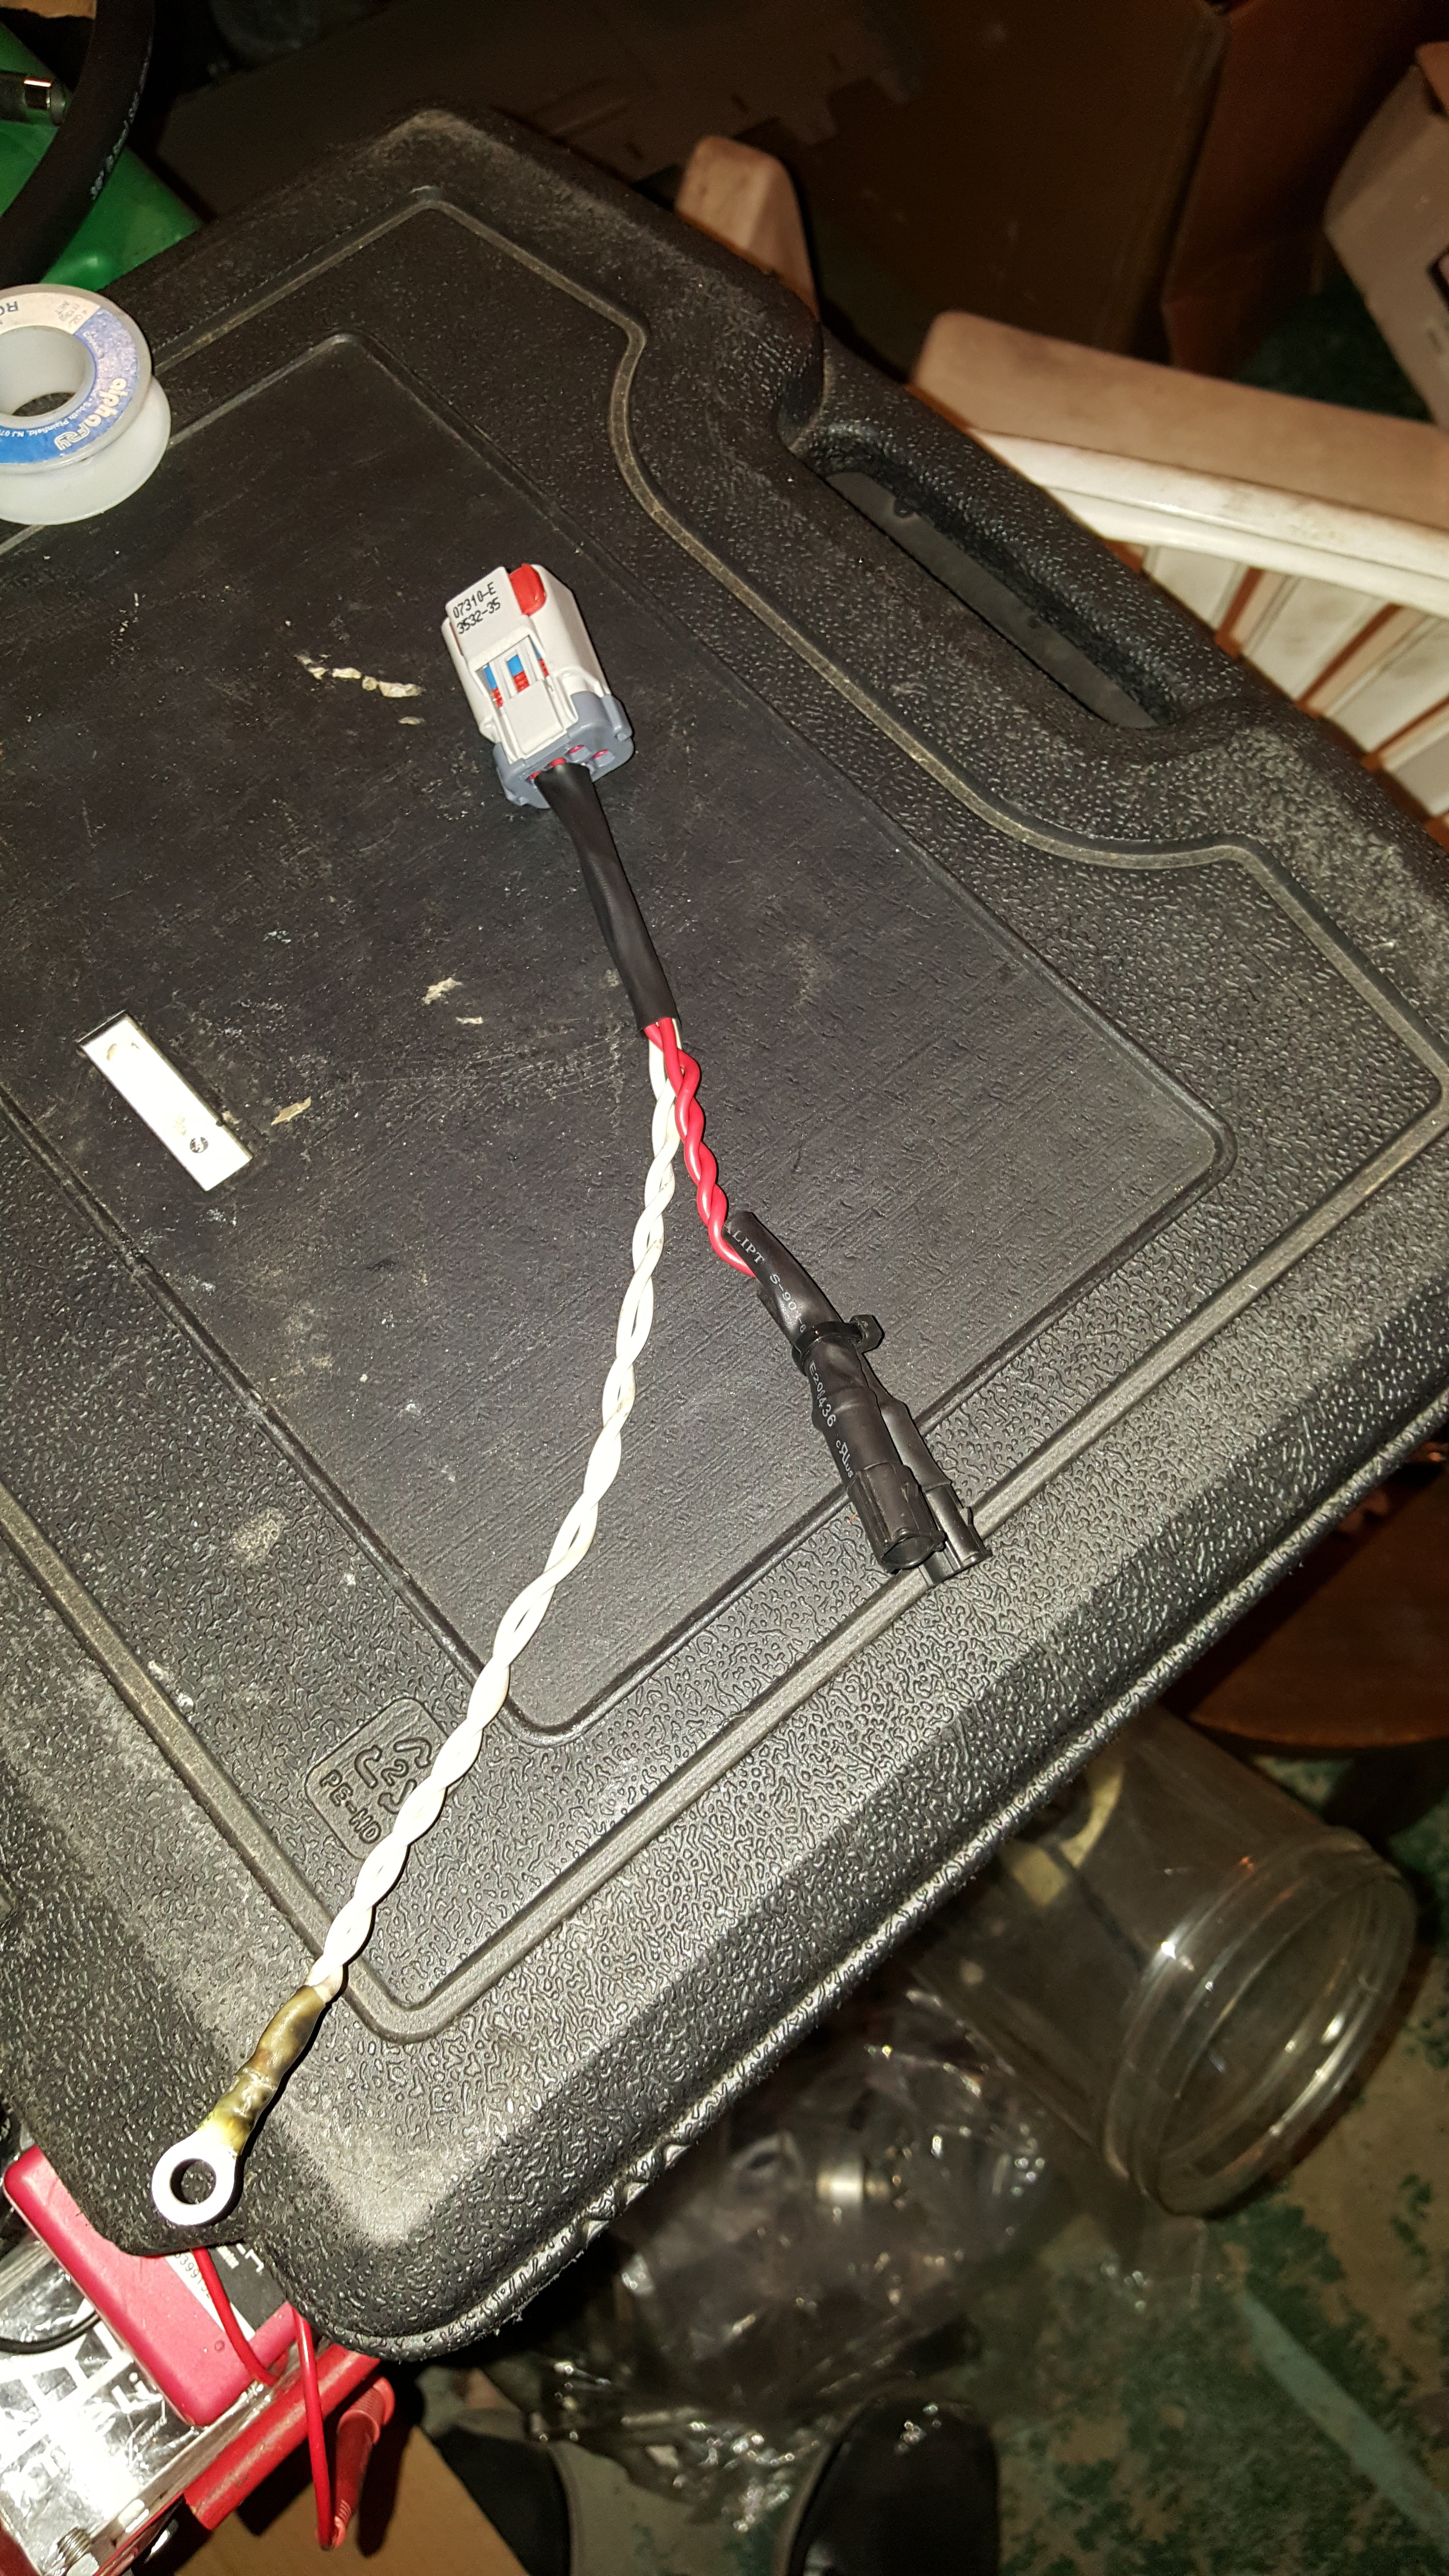
Added this little radium sticker to the ugly Flex Fuel Sensor. and had to use some extra large heat shrink to hide the ugly puke colored pinkish orange connector hahaha
And Last Full Shot!
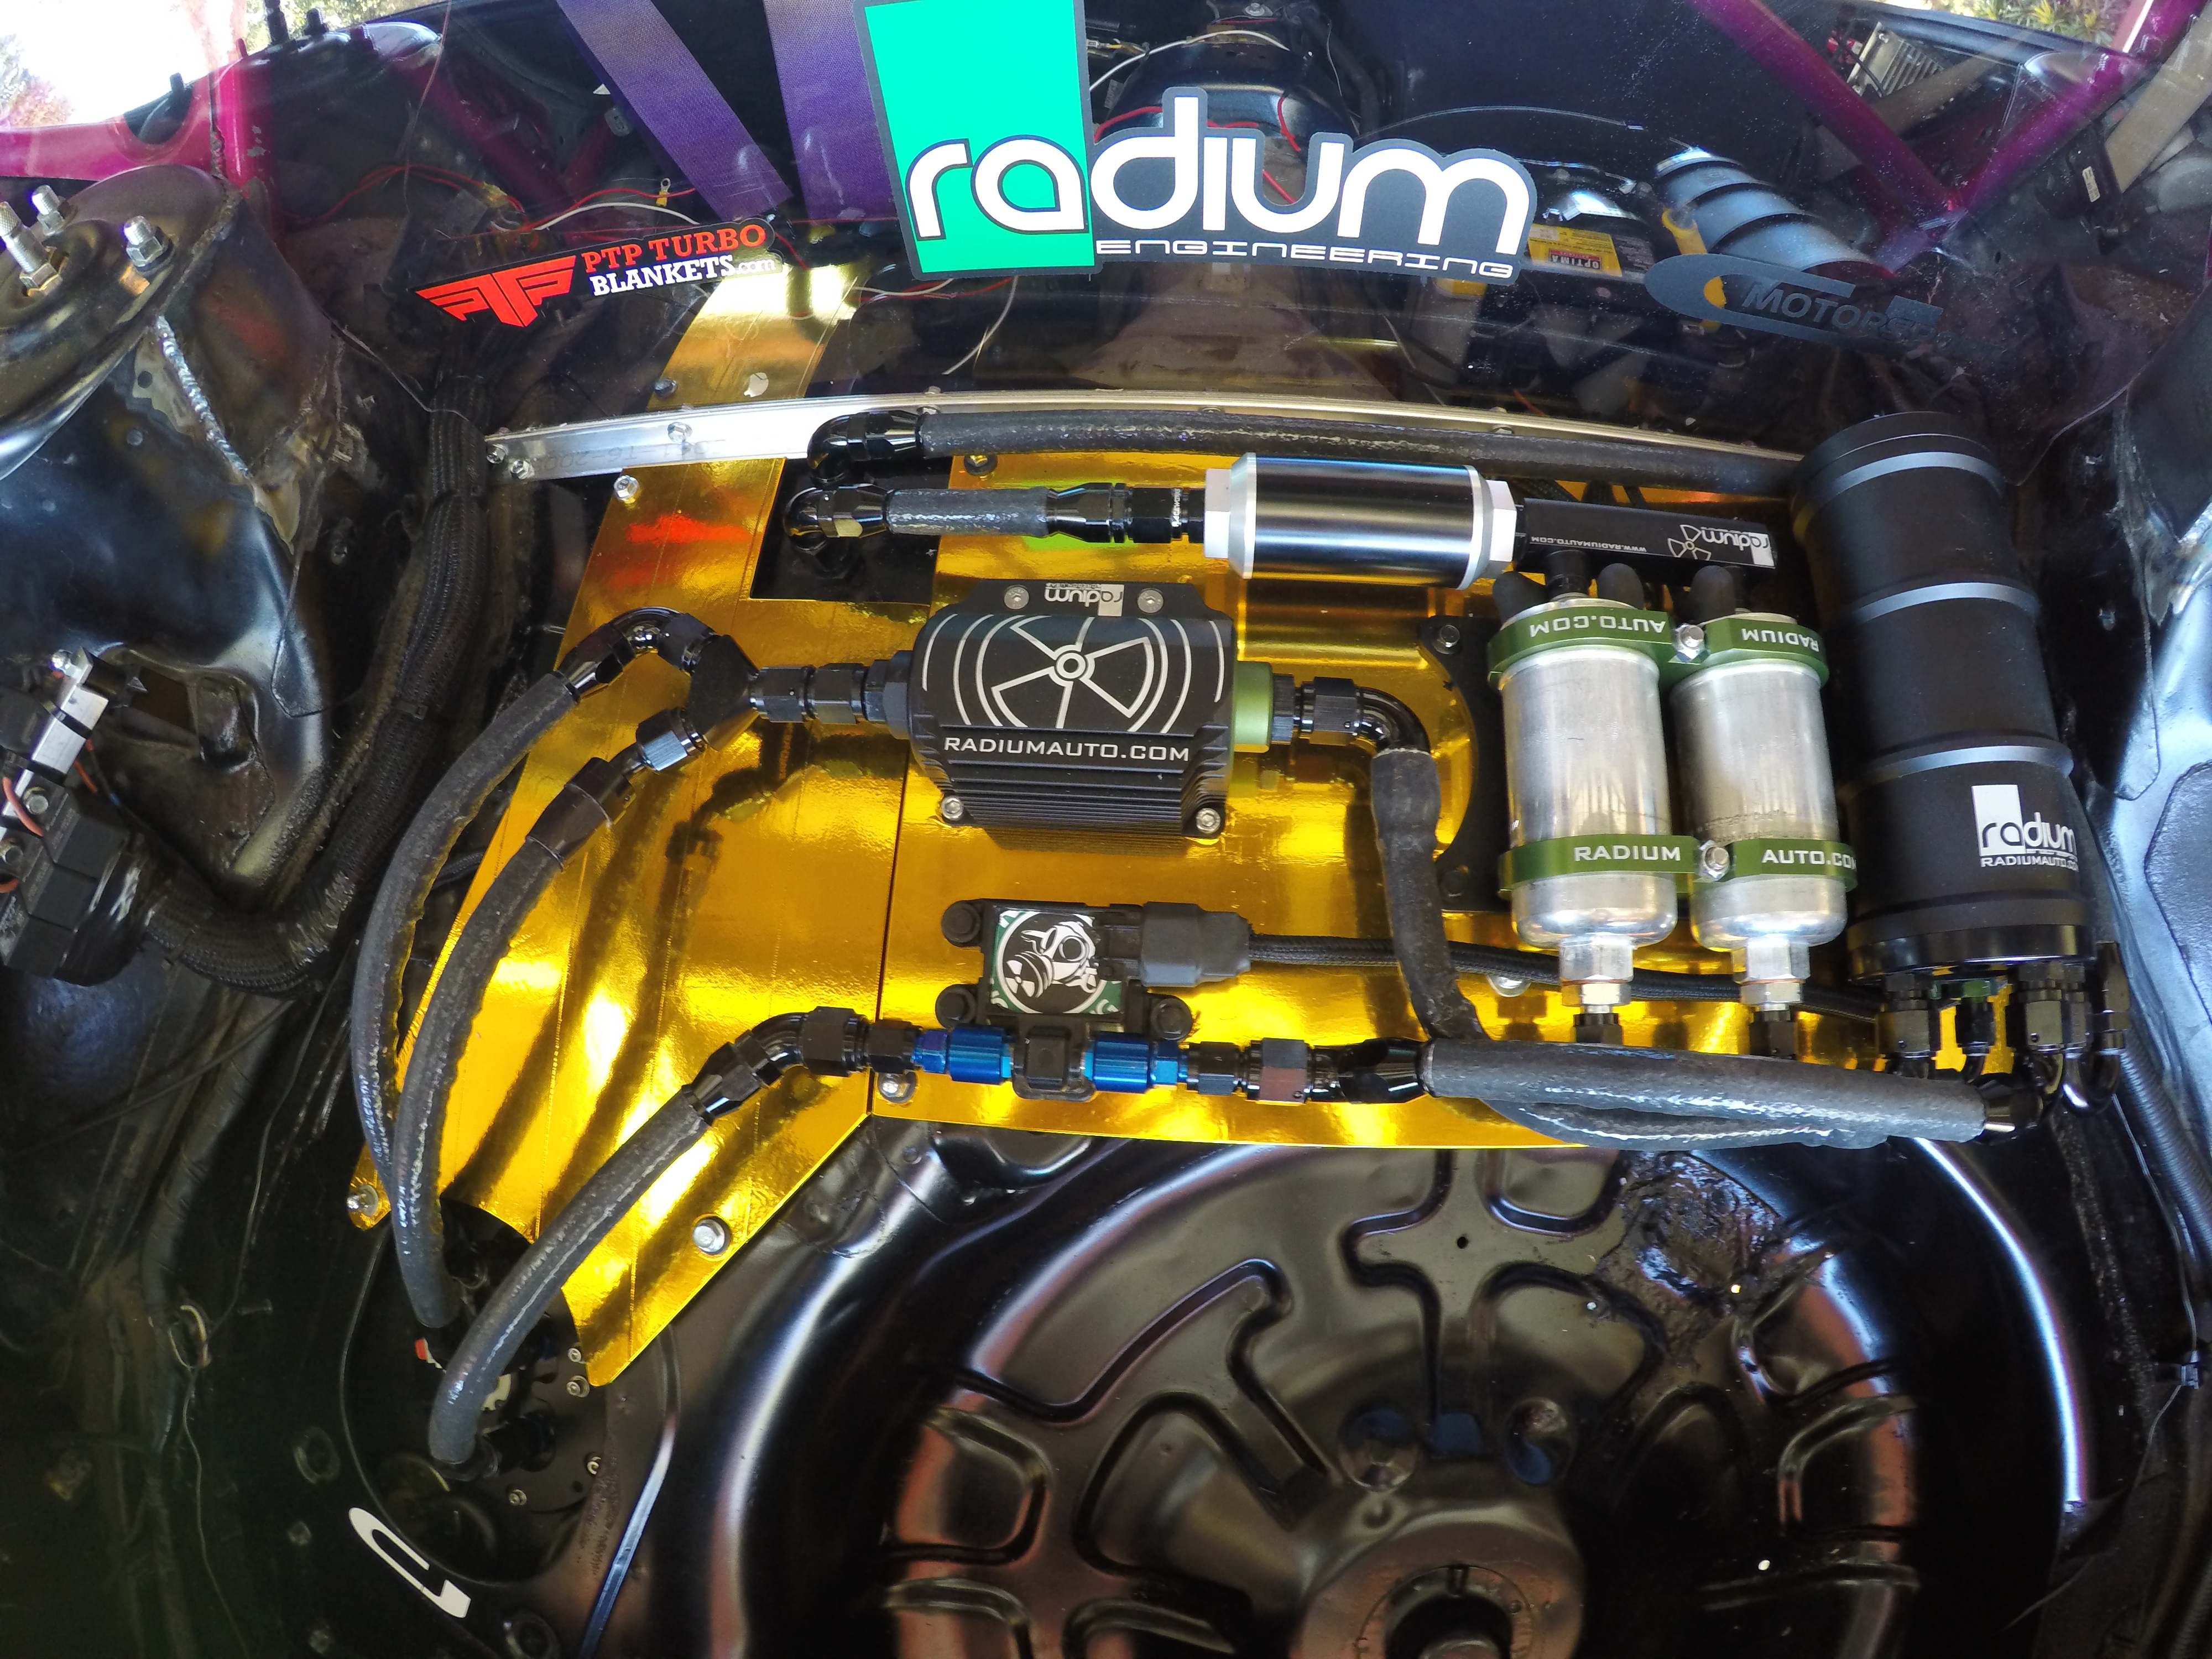
Wired up the Pump Connector for the CJ-Motorsports Dual Pump hanger. So this is how I did it. Both Walbro's are connected and ready to "Work." All they need is Power and Ground. Both are Connected and fully "Pinned," to the CJ-Motorsports bulkhead. But only one of the pumps will ever be working. The other one will be on Stand By. I thought about putting it on a switch. But I didn't really feel like running yet another Relay, and wiring all of that up. Plus, it's an easy job to supply the surge tank with fuel. The Bosch 044's will be doing the Grunt work. But I hate opening up the OE fuel tank..It's a pain. So In the case that the in tank pump isn't working. I can simply un-plug the additional 2-pin power and ground... Plug in the other Pumps power and ground... and it'll be as simple as that. But thats only if the "In tank walbro Pump #1" fails. Otherwise.... I may turn on the other pump here or there...just to make sure it works once every few months but it may spend it's life doing nothing. Better safe than sorry IMO, ....especially at the track.
Here's the Dual Pump Harness I made with Left over 2-pin Connectors I had. The big light grey/white connectors is supplied with pins from CJ-Motorsports. It comes with the Hanger!
Jams:
Get up early!!! Get Motivated!! Get work done! No one else is going to order your parts, no one else is going to shoot e-mails out, no one else is going to plan your budget, no one else is going to make sure parts arrive on time...or make sure they are correct when they come in, or install them! But the cool thing is that we can all do these things on our own! I'm sure there will be a point when it's not going to work. But for where I'm at.... That is what I do!!
After finishing up the fuel system.. I went to take my fresh fire wall out and BAM Disaster struck.
Cracked the **** out of it...
This sucked. But I looked at where it cracked and it was the only small corner that I hadn't used my dremel on. So it was a sharp edge... On top of that, it had a little bit of pressure on it because it was touching the Passenger side Strut Mount. Sometimes you have to learn the hard way! Soooo Off to Home Depot I went. Grabbed another sheet and headed up to the cashier.... But after they rung it up It came up much cheaper than The last Sheet I had purchased. The guy at the register assured me it was the right one.. But I had just purchased this exact same item days before. So I asked him politely to check. He just looked at me and gave me some "Get out of here, I don't feel like dealing with this right now" answer... So I went back and was looking at the Sheets. Well The label for my sheet was wrong. What I thought was Lexan.. was actually "Acrylic." Lexan is a bit more expensive... but the sheet that I had cracked was charged as Lexan... Not the cheaper Acrylic. Luckily the guy who had pointed me in the direction of the sheets days before was working... So I approached him and told him what had happened... and he said "Oh man....no worries, that happens all the time." In my head I was like... "what?"...as if it's ok to over charge people all the time? haha. But Whatever.. He ended up taking care of me and giving me the real "Lexan" Sheet that was wayyy larger.. for only 73 Bucks! Because normally it's about $103. Phewwww!!! Anyways.. I went home.. used the broken glass as a template and kept it in case I need to make another one ever.
RE-making the REAL Lexan Fire wall haha
Then I took the Lexan to a local window Tint place. I wanted to get the Lexan Tinted so that it would be protected from scratches..because this stuff scratches very easily. .. The Guy wouldn't tint it for me.. but he also wouldn't necessarily tell me why. I kept asking prodding questions but he wasn't being very helpful. Things weren't really going my way that day. But anyways... I finally just asked him to sell me some and I'd do it on my own. I paid 20 bucks.. he cut two sheets for me and I was on my way.
Putting the Tint on... Took my time here.. and it actually came out pretty damn good.
Check it
Then Disaster again.... I don't know if there is a compatibility issue with Lexan and the type of Tint I was using. But After I was finished... I used 4 pieces of tape to secure the tint for a day. Because they always say your not supposed to touch it for a day or so. The next day.. I go check on the tint.. and it had come off 100%. The only thing holding it in place was the electrical tape. LAAAMEEE!! THINGS WEREN'T GOING MY WAY. I felt like going and asking the guy if the stuff was compatible. But it wouldn't do anything but waste more time..and plus.. I don't necessarily like working with people who aren't helpful. It may or may not have been compatible with Lexan...but I wasted 20 bucks and about 4 Hours after driving around, buying it, cutting it carefully, securing it etc.. All down the drain. ....except Knowledge... that may be worth more than actually having the piece tinted.
Anyways... Threw the tint in the trash and decided to install it and deal with it getting scratched eventually.
Put on a Radium Engineering, CJ-Motorsports and PTP Turbo Blankets stickers...and Installed the Lexan. Made sure to trim the 1/8" edge that was touching the strut tower and also rounded all edges with my dremel.
I also forgot to add... While I had the tint on the Lexan "Curing" overnight.. I moved my flex fuel wiring from the engine bay.....all the way to the back of the car. This took me about 2 hours because I wanted to make sure I routed it nicely through the dash.. and into the loom that was housing the rest of the wires that ran to the back of the car. I also put an additional relay in for the Walbro E85 pump on the CJ-Motorsports Hanger, This pump will be on a 20A Fuse. Both Bosch 044's are on their own Individual Relays as well, but they're fused with a 30A. Anyways! Check it!
FINALLY FINISHED!
Added this little radium sticker to the ugly Flex Fuel Sensor. and had to use some extra large heat shrink to hide the ugly puke colored pinkish orange connector hahaha
And Last Full Shot!
Wired up the Pump Connector for the CJ-Motorsports Dual Pump hanger. So this is how I did it. Both Walbro's are connected and ready to "Work." All they need is Power and Ground. Both are Connected and fully "Pinned," to the CJ-Motorsports bulkhead. But only one of the pumps will ever be working. The other one will be on Stand By. I thought about putting it on a switch. But I didn't really feel like running yet another Relay, and wiring all of that up. Plus, it's an easy job to supply the surge tank with fuel. The Bosch 044's will be doing the Grunt work. But I hate opening up the OE fuel tank..It's a pain. So In the case that the in tank pump isn't working. I can simply un-plug the additional 2-pin power and ground... Plug in the other Pumps power and ground... and it'll be as simple as that. But thats only if the "In tank walbro Pump #1" fails. Otherwise.... I may turn on the other pump here or there...just to make sure it works once every few months but it may spend it's life doing nothing. Better safe than sorry IMO, ....especially at the track.
Here's the Dual Pump Harness I made with Left over 2-pin Connectors I had. The big light grey/white connectors is supplied with pins from CJ-Motorsports. It comes with the Hanger!
Continued:
Spent all yesterday Tidying up a bunch of loose ends.
Installed the new EGT sensors from "The Sensor Connection." Here's the link to the sensors I got
All EGT Probes 2-Stroke
Installed my New Innovate Motorsports MTX-L Wideband
Re-Routed a lot of Wiring that had been a little neglected over the last season.
Took a pic of the rear hatch....looking through the glass into the rear compartment..
...because I like the pic hah
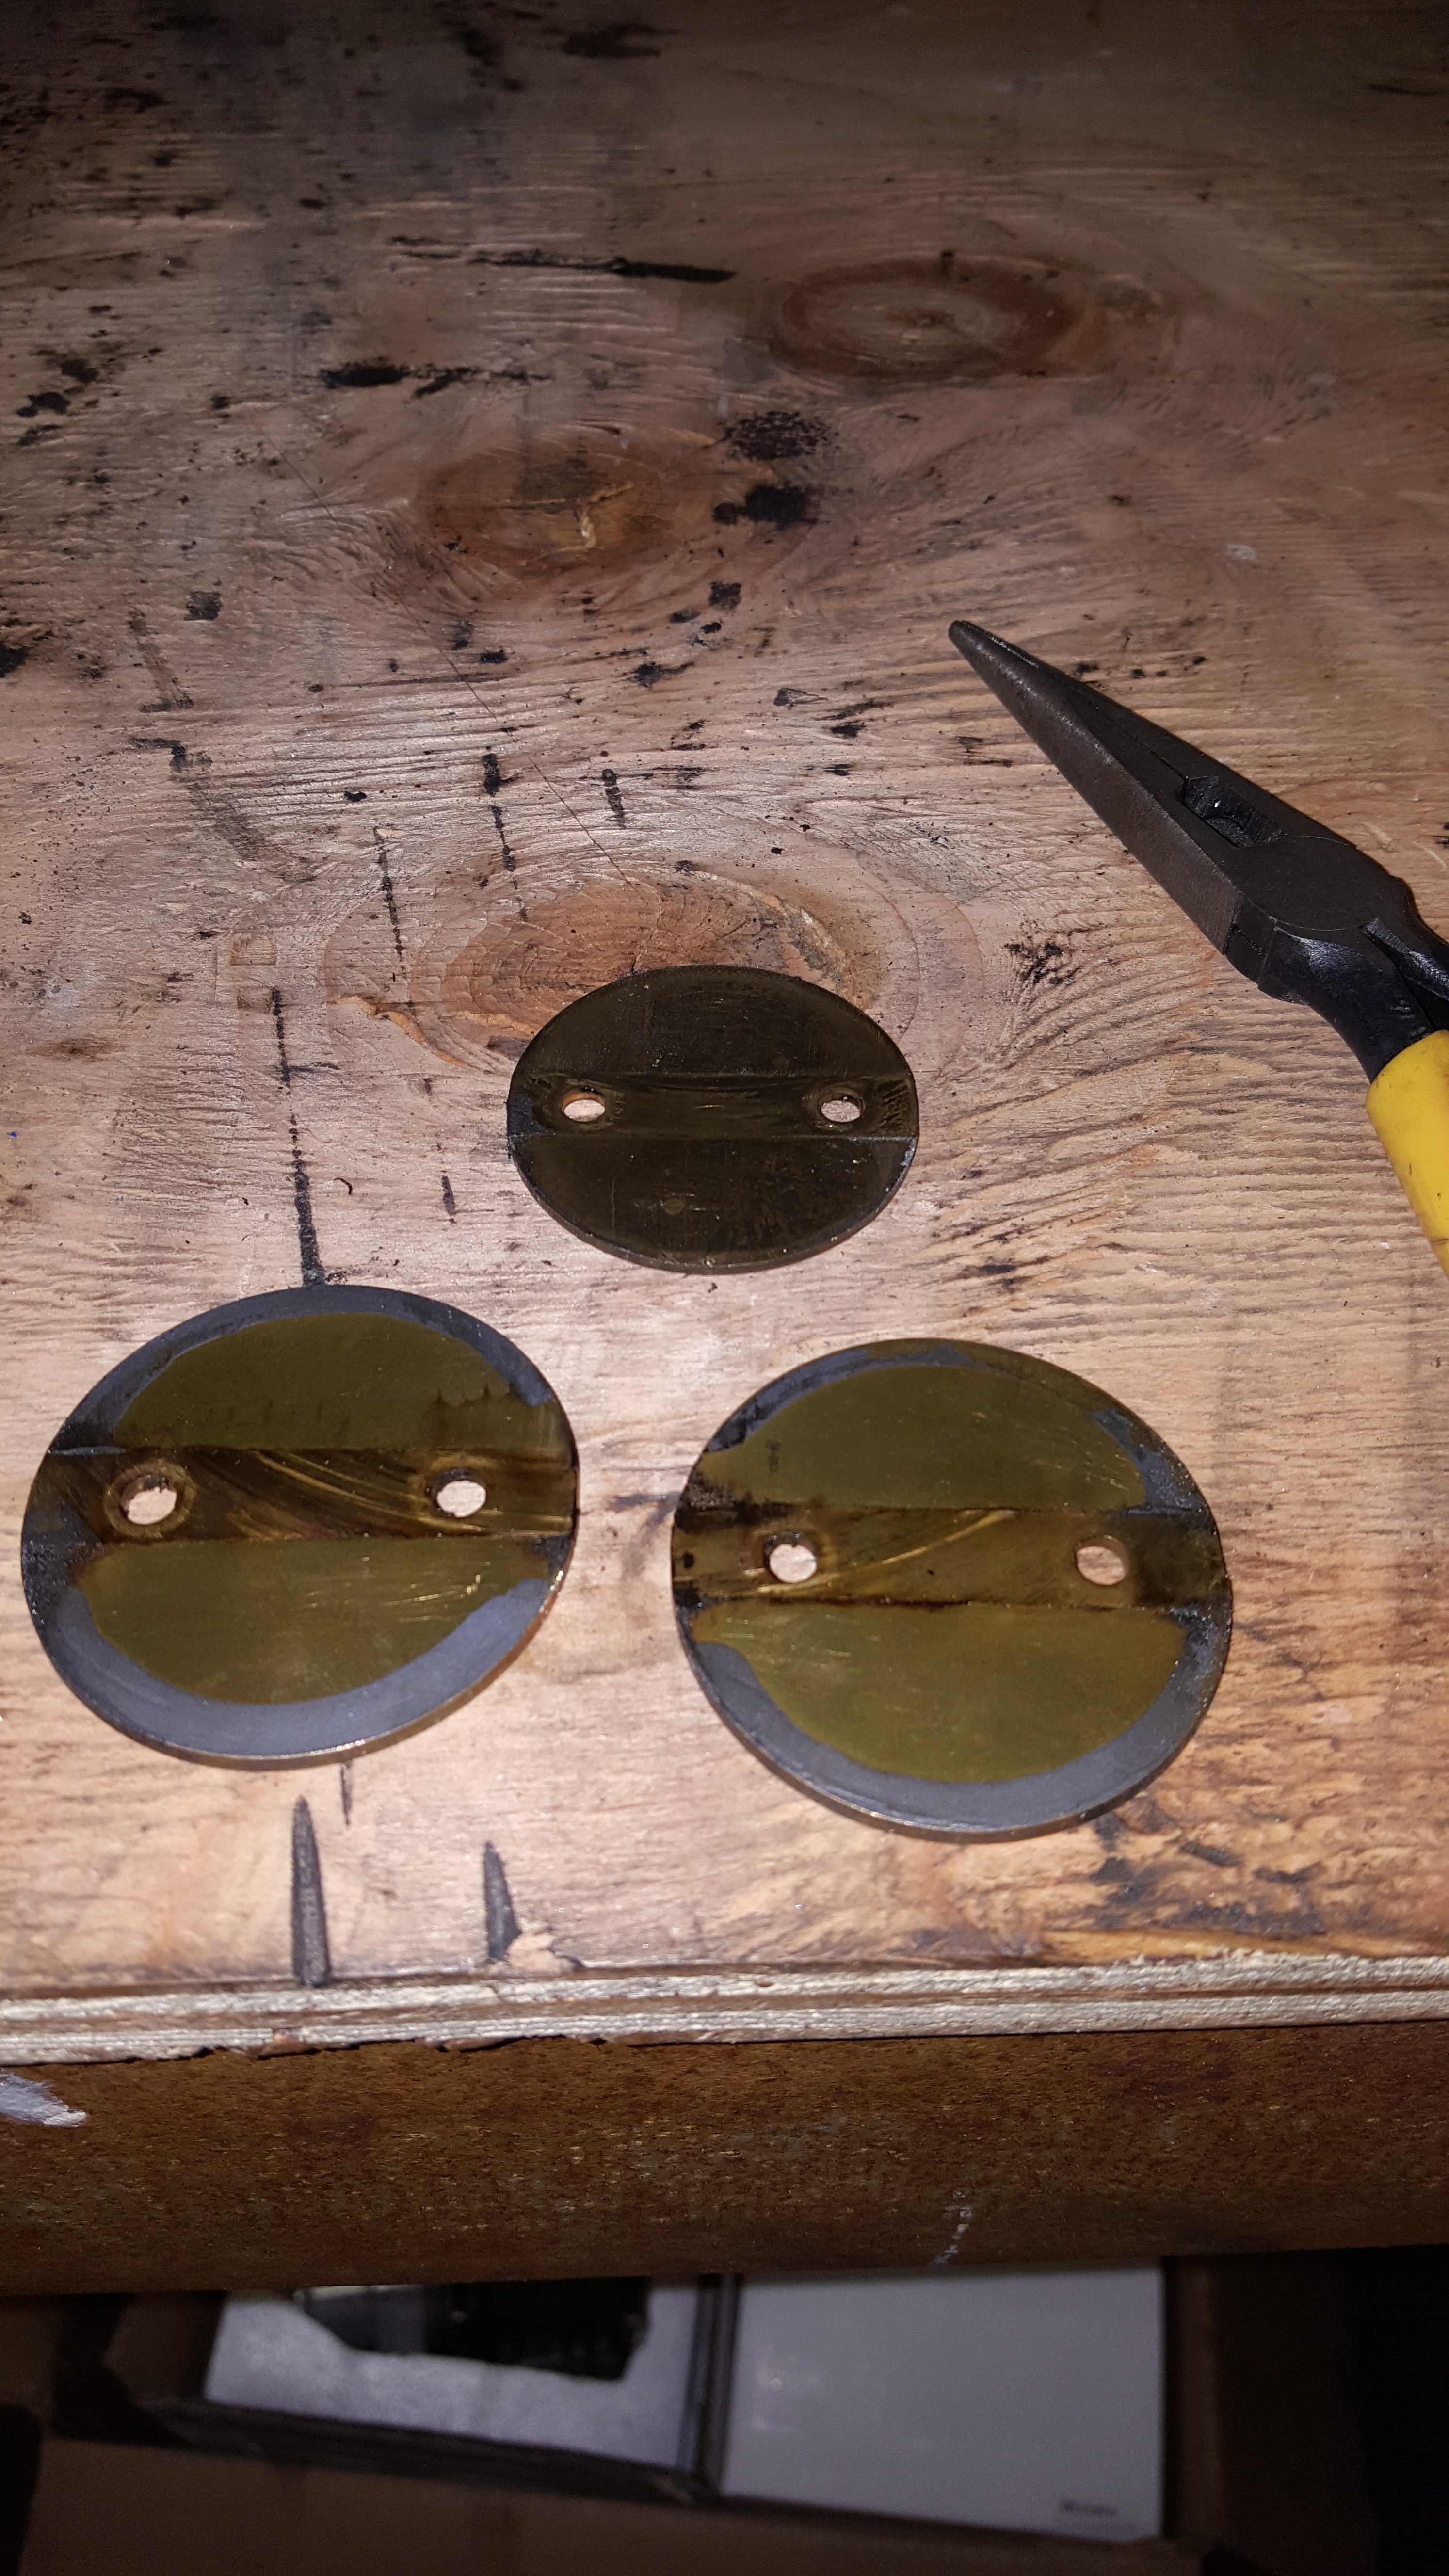
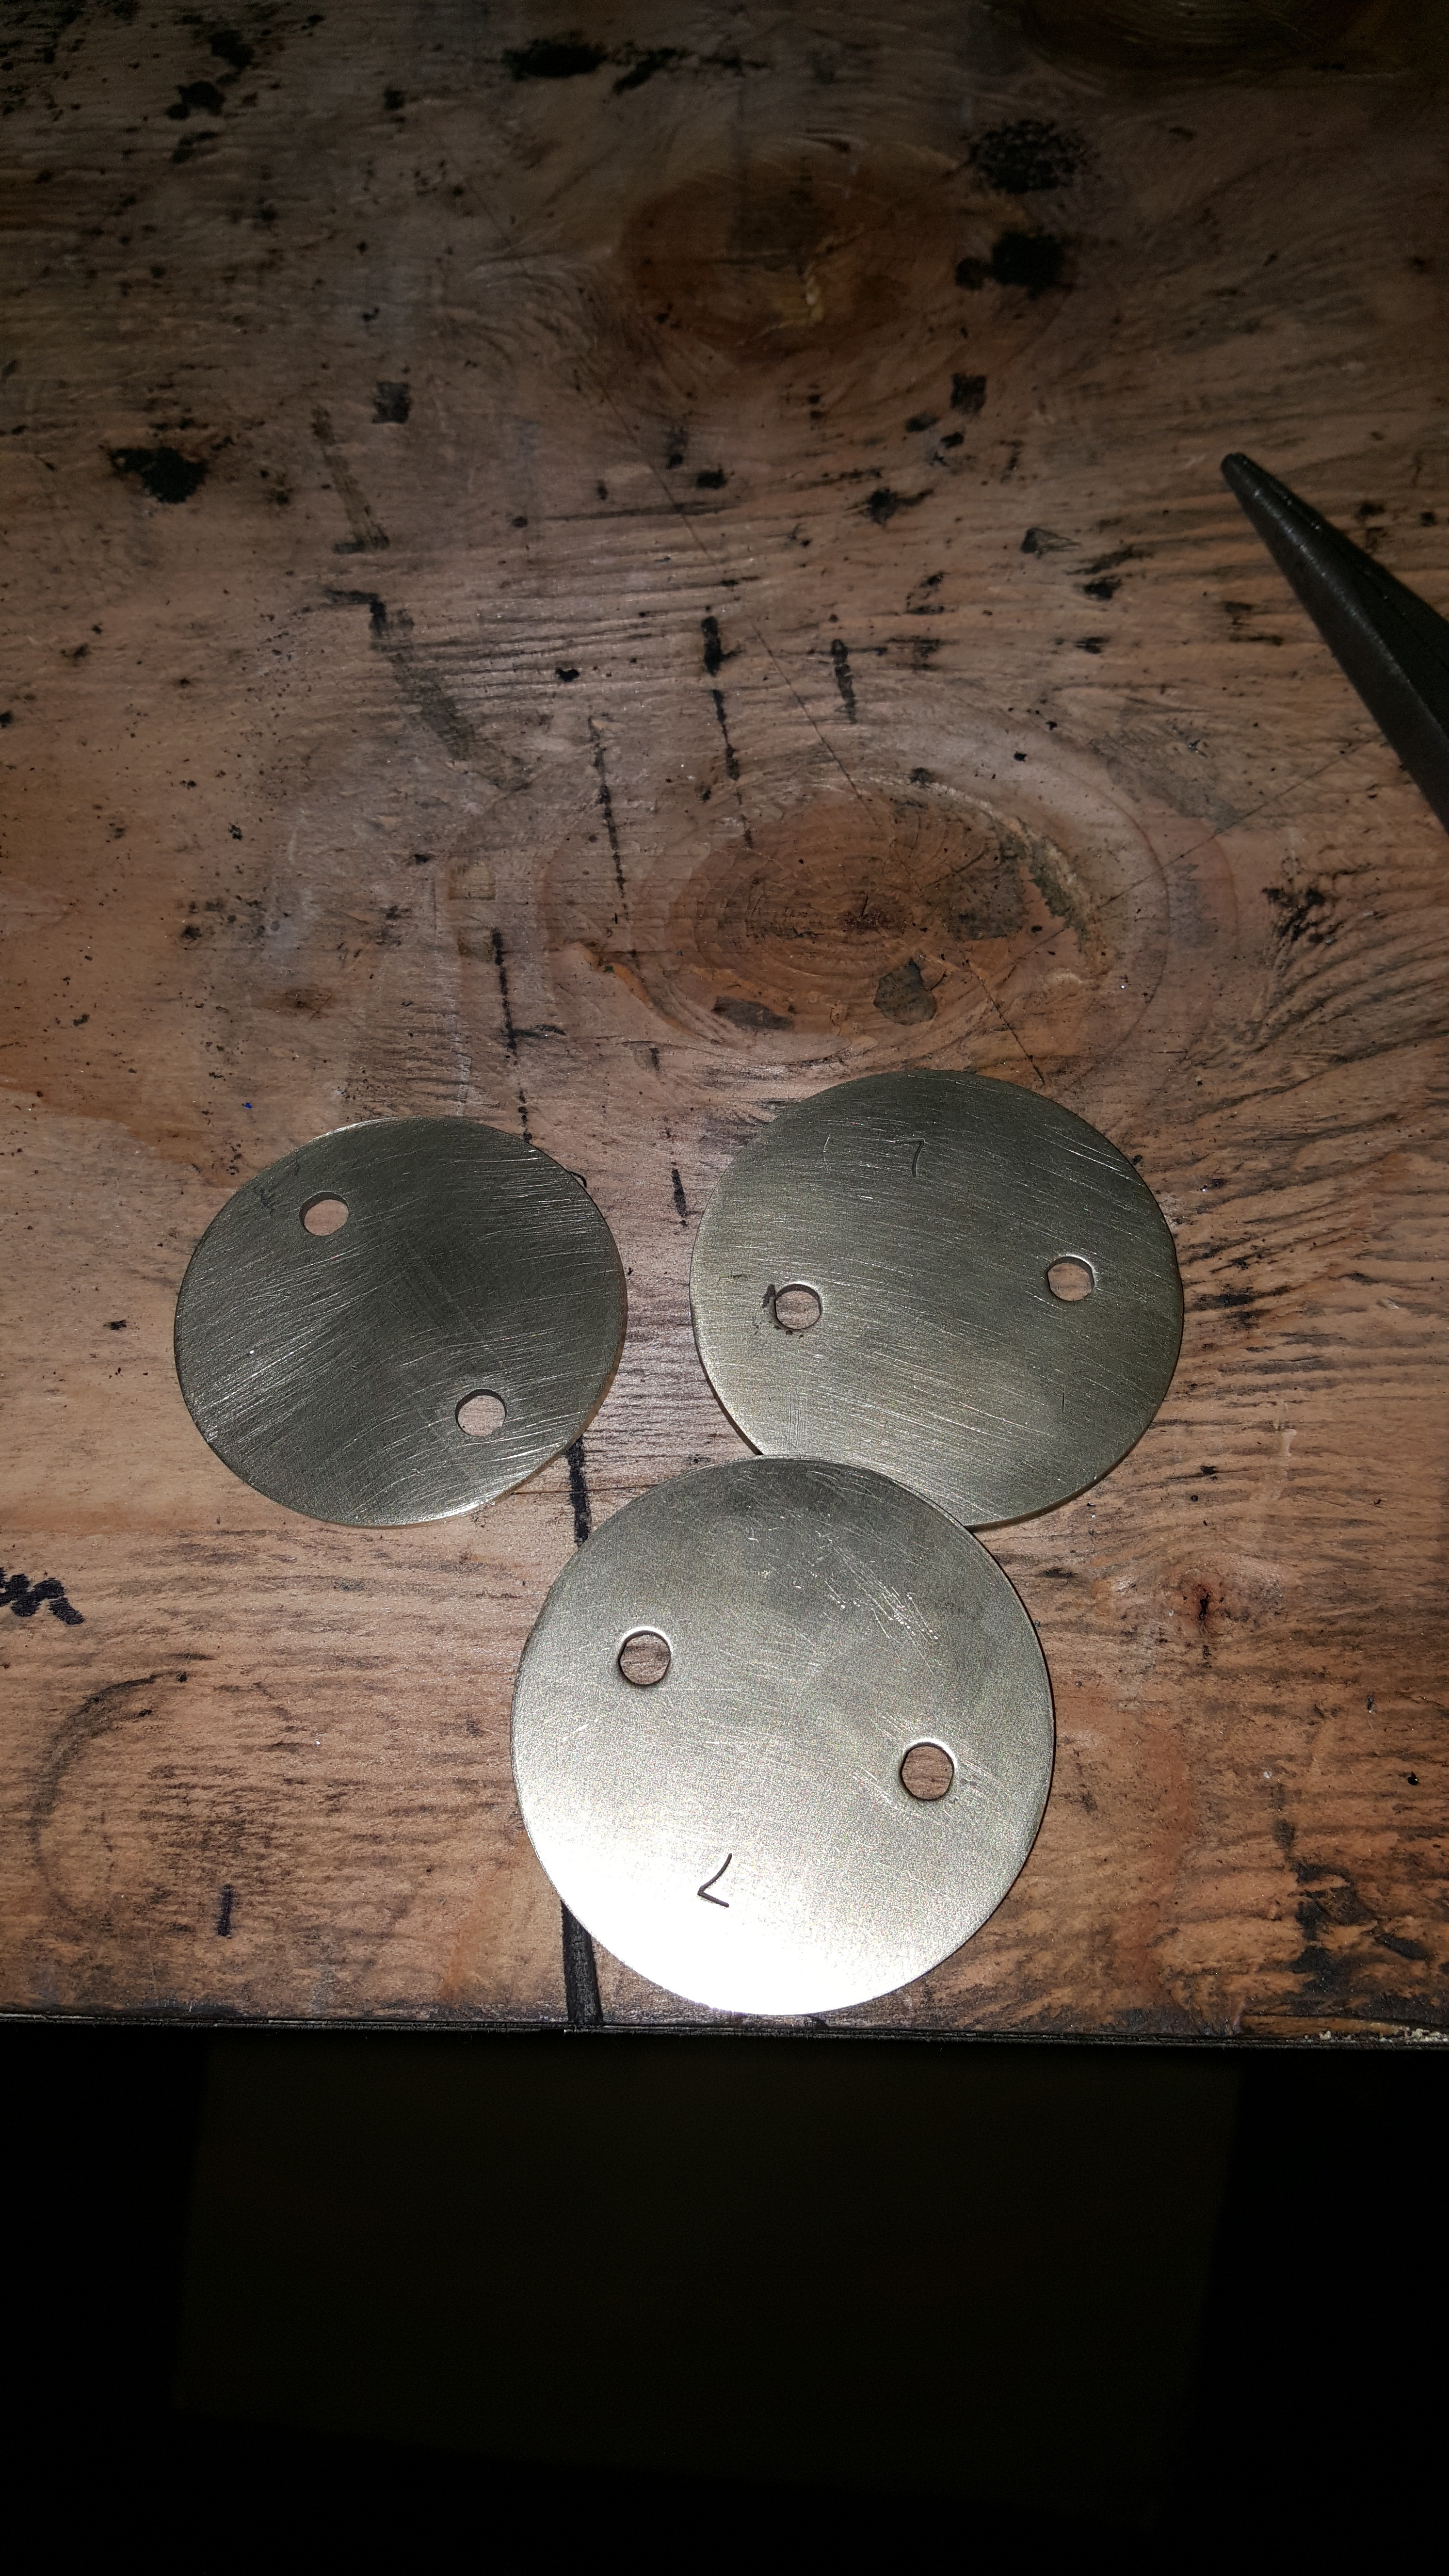
Sat in my drivers seat and realized that there was a little bit of "Slop" in my Hydro E-brake Handle and Wilwood master cyl... So I pulled it apart and Re-Shimmed it with brass Washers. I was going to use steel..but figured the Handle is Alum..and I didn't want the steel to eat away at the Alum...so brass should be soft enough to give way first...
Felt good to have it nice and clean though
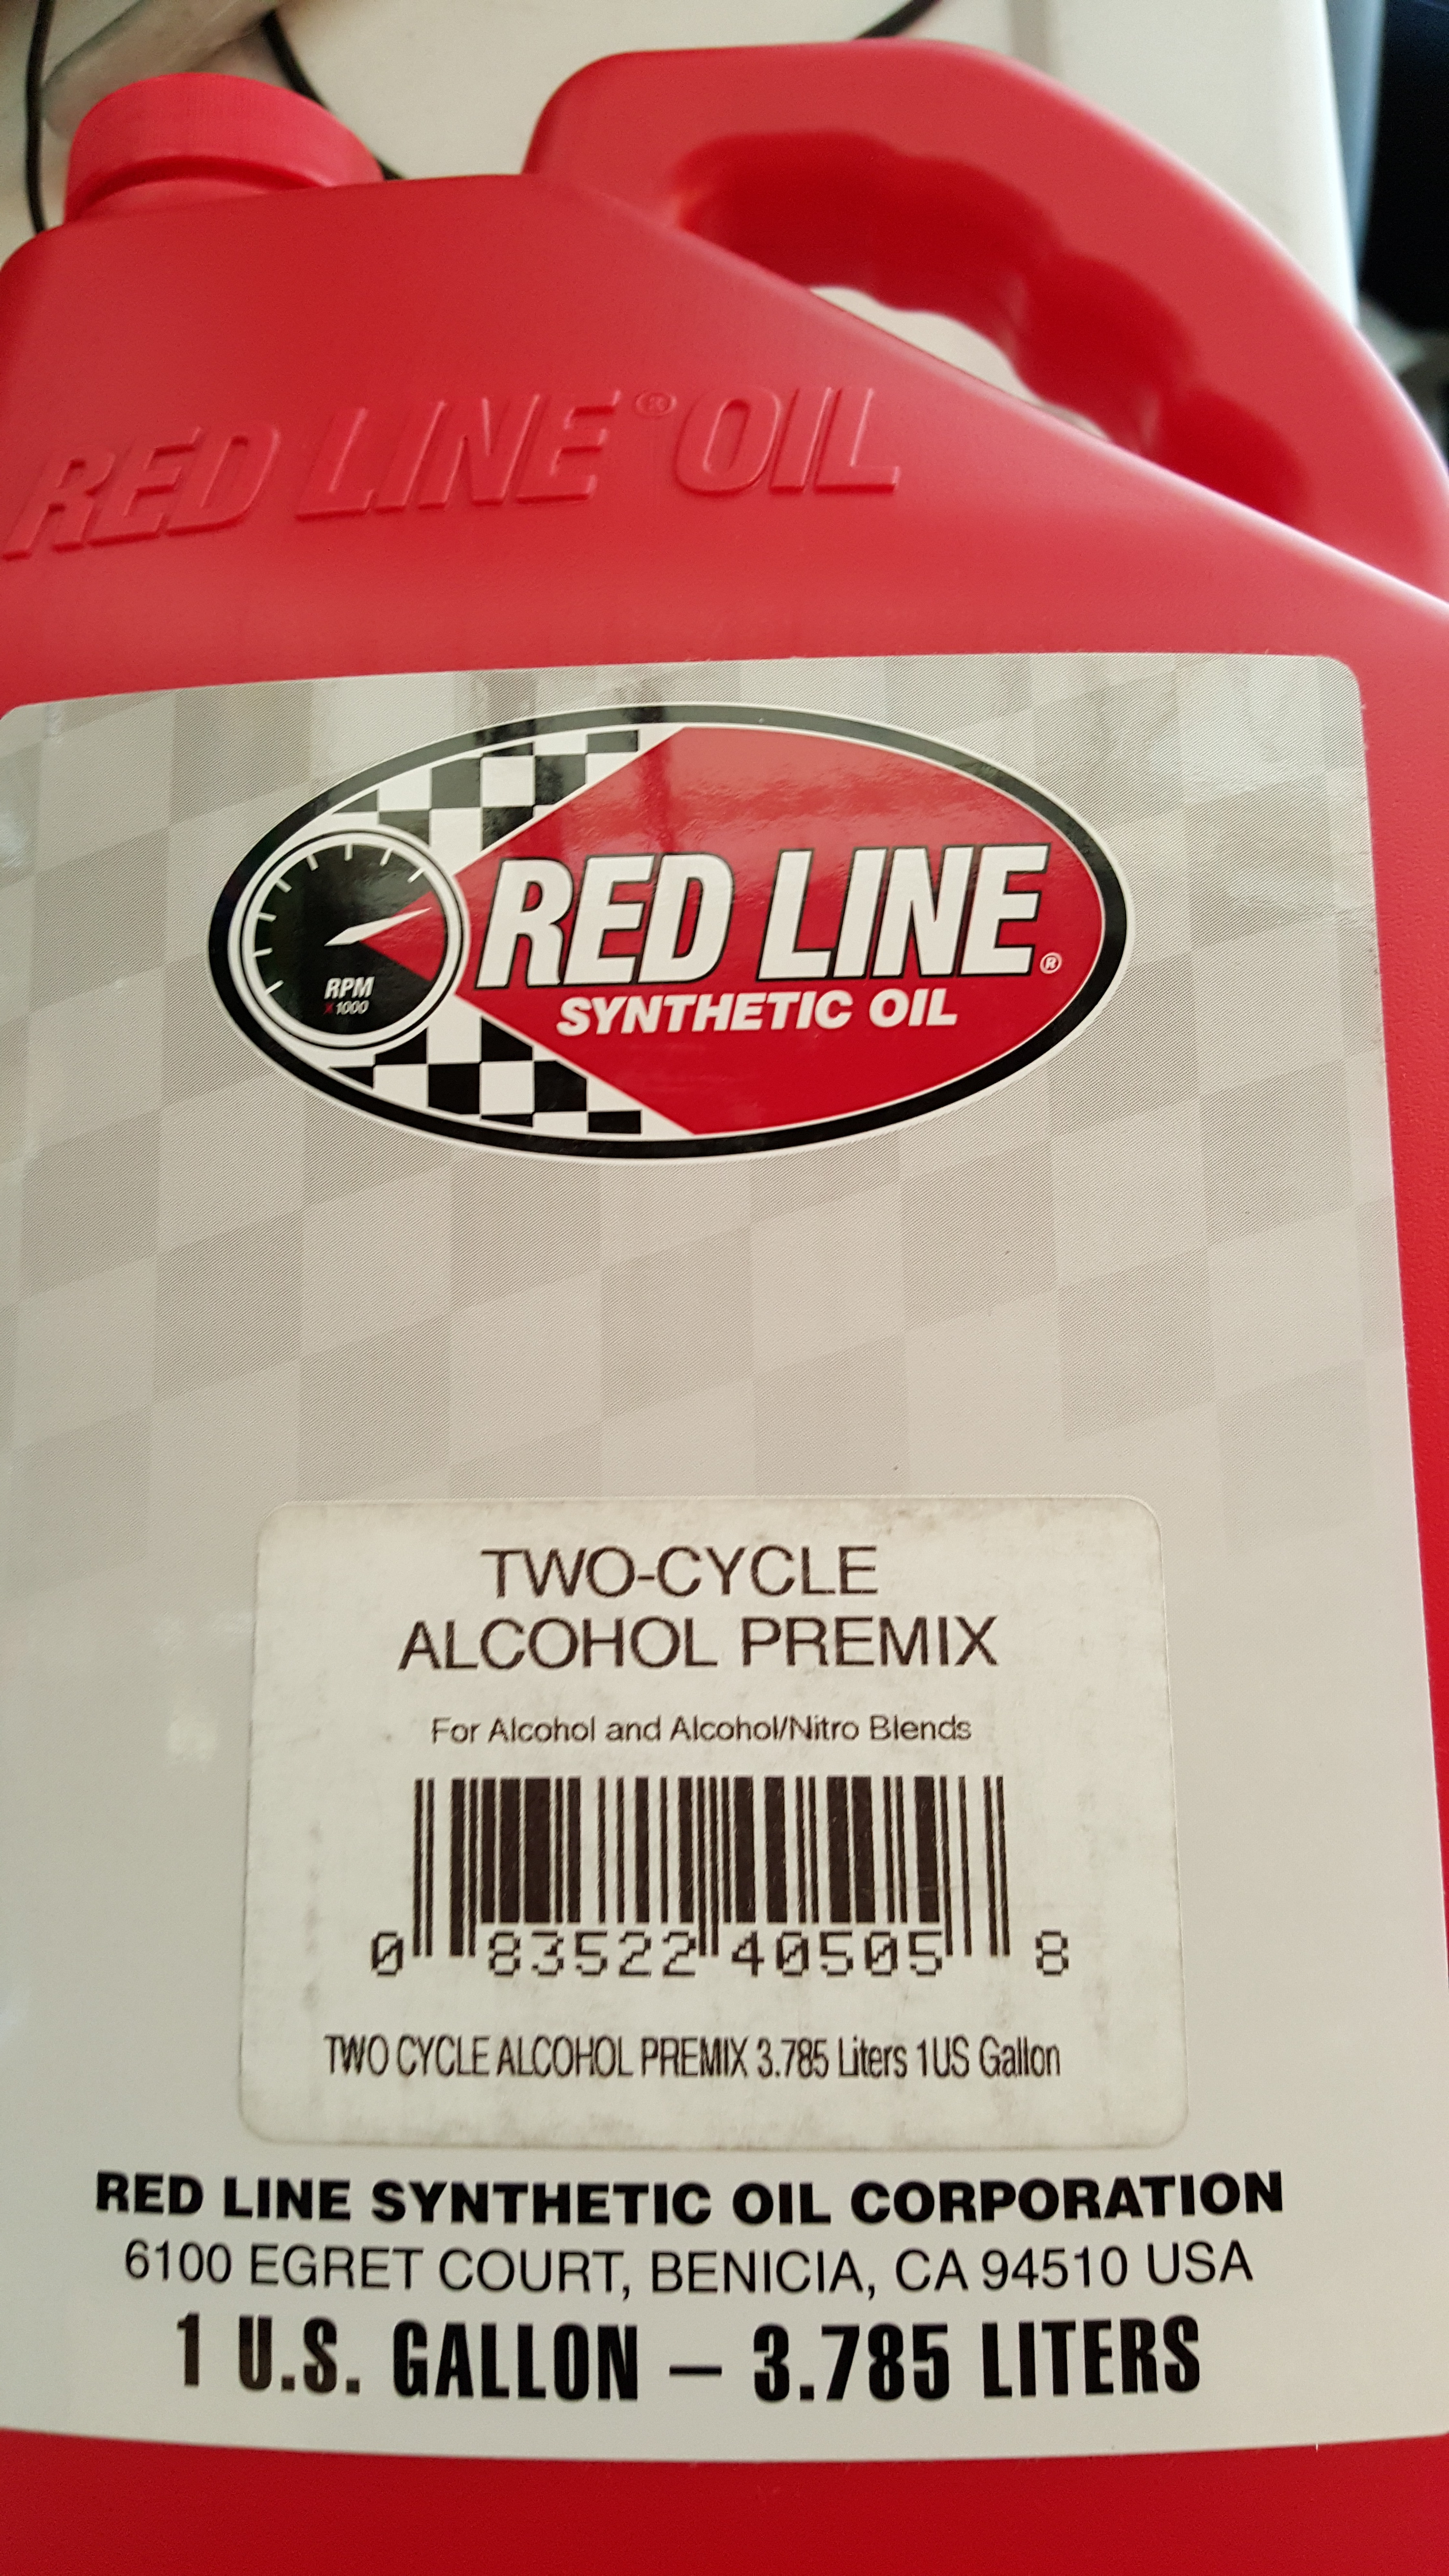
Got another Care Package from Redline Synthetic Oils!!!
And this should be it guys!!! No more BS Castor sludge in my tank, or in my Engine Ever again!
Talking to the Owner and Lead Tech on the Phone about our issues with previous Pre-Mixes...Straight from the Owner and Lead Tech at Redline Synthetic Oils.... This stuff won't leave Residual crap in the fuel tank, Lines, or oil systems.
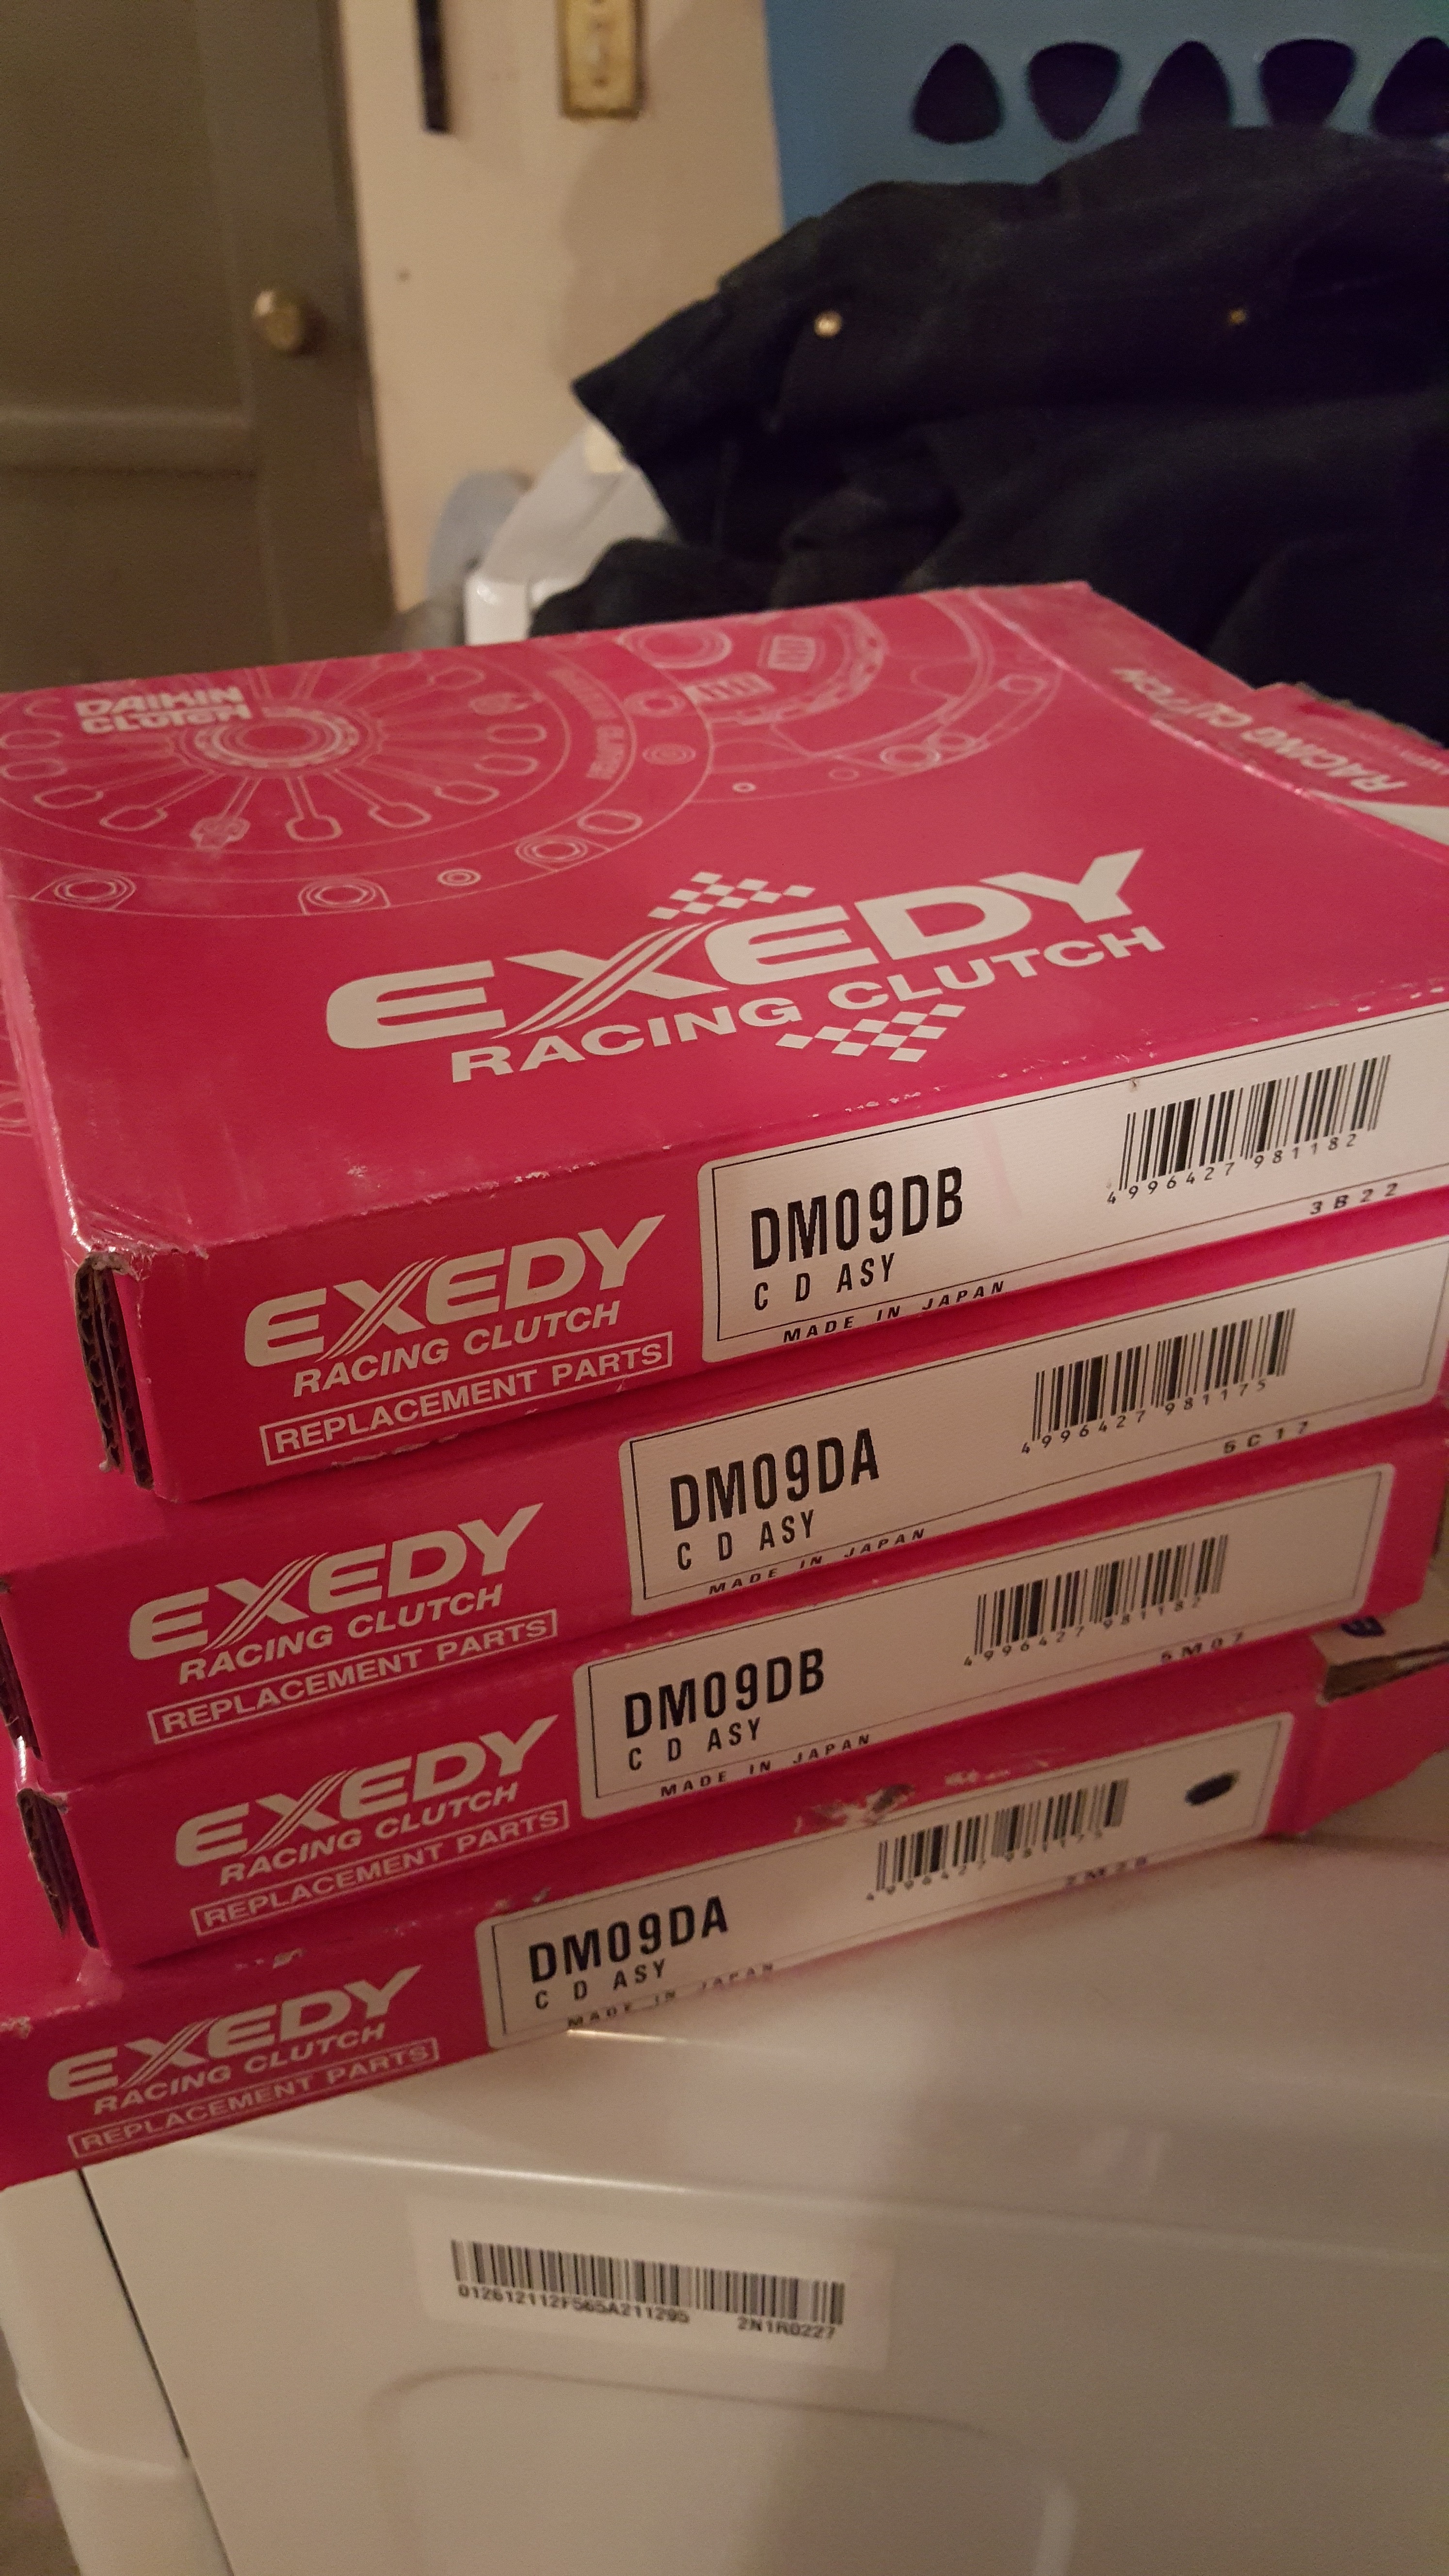
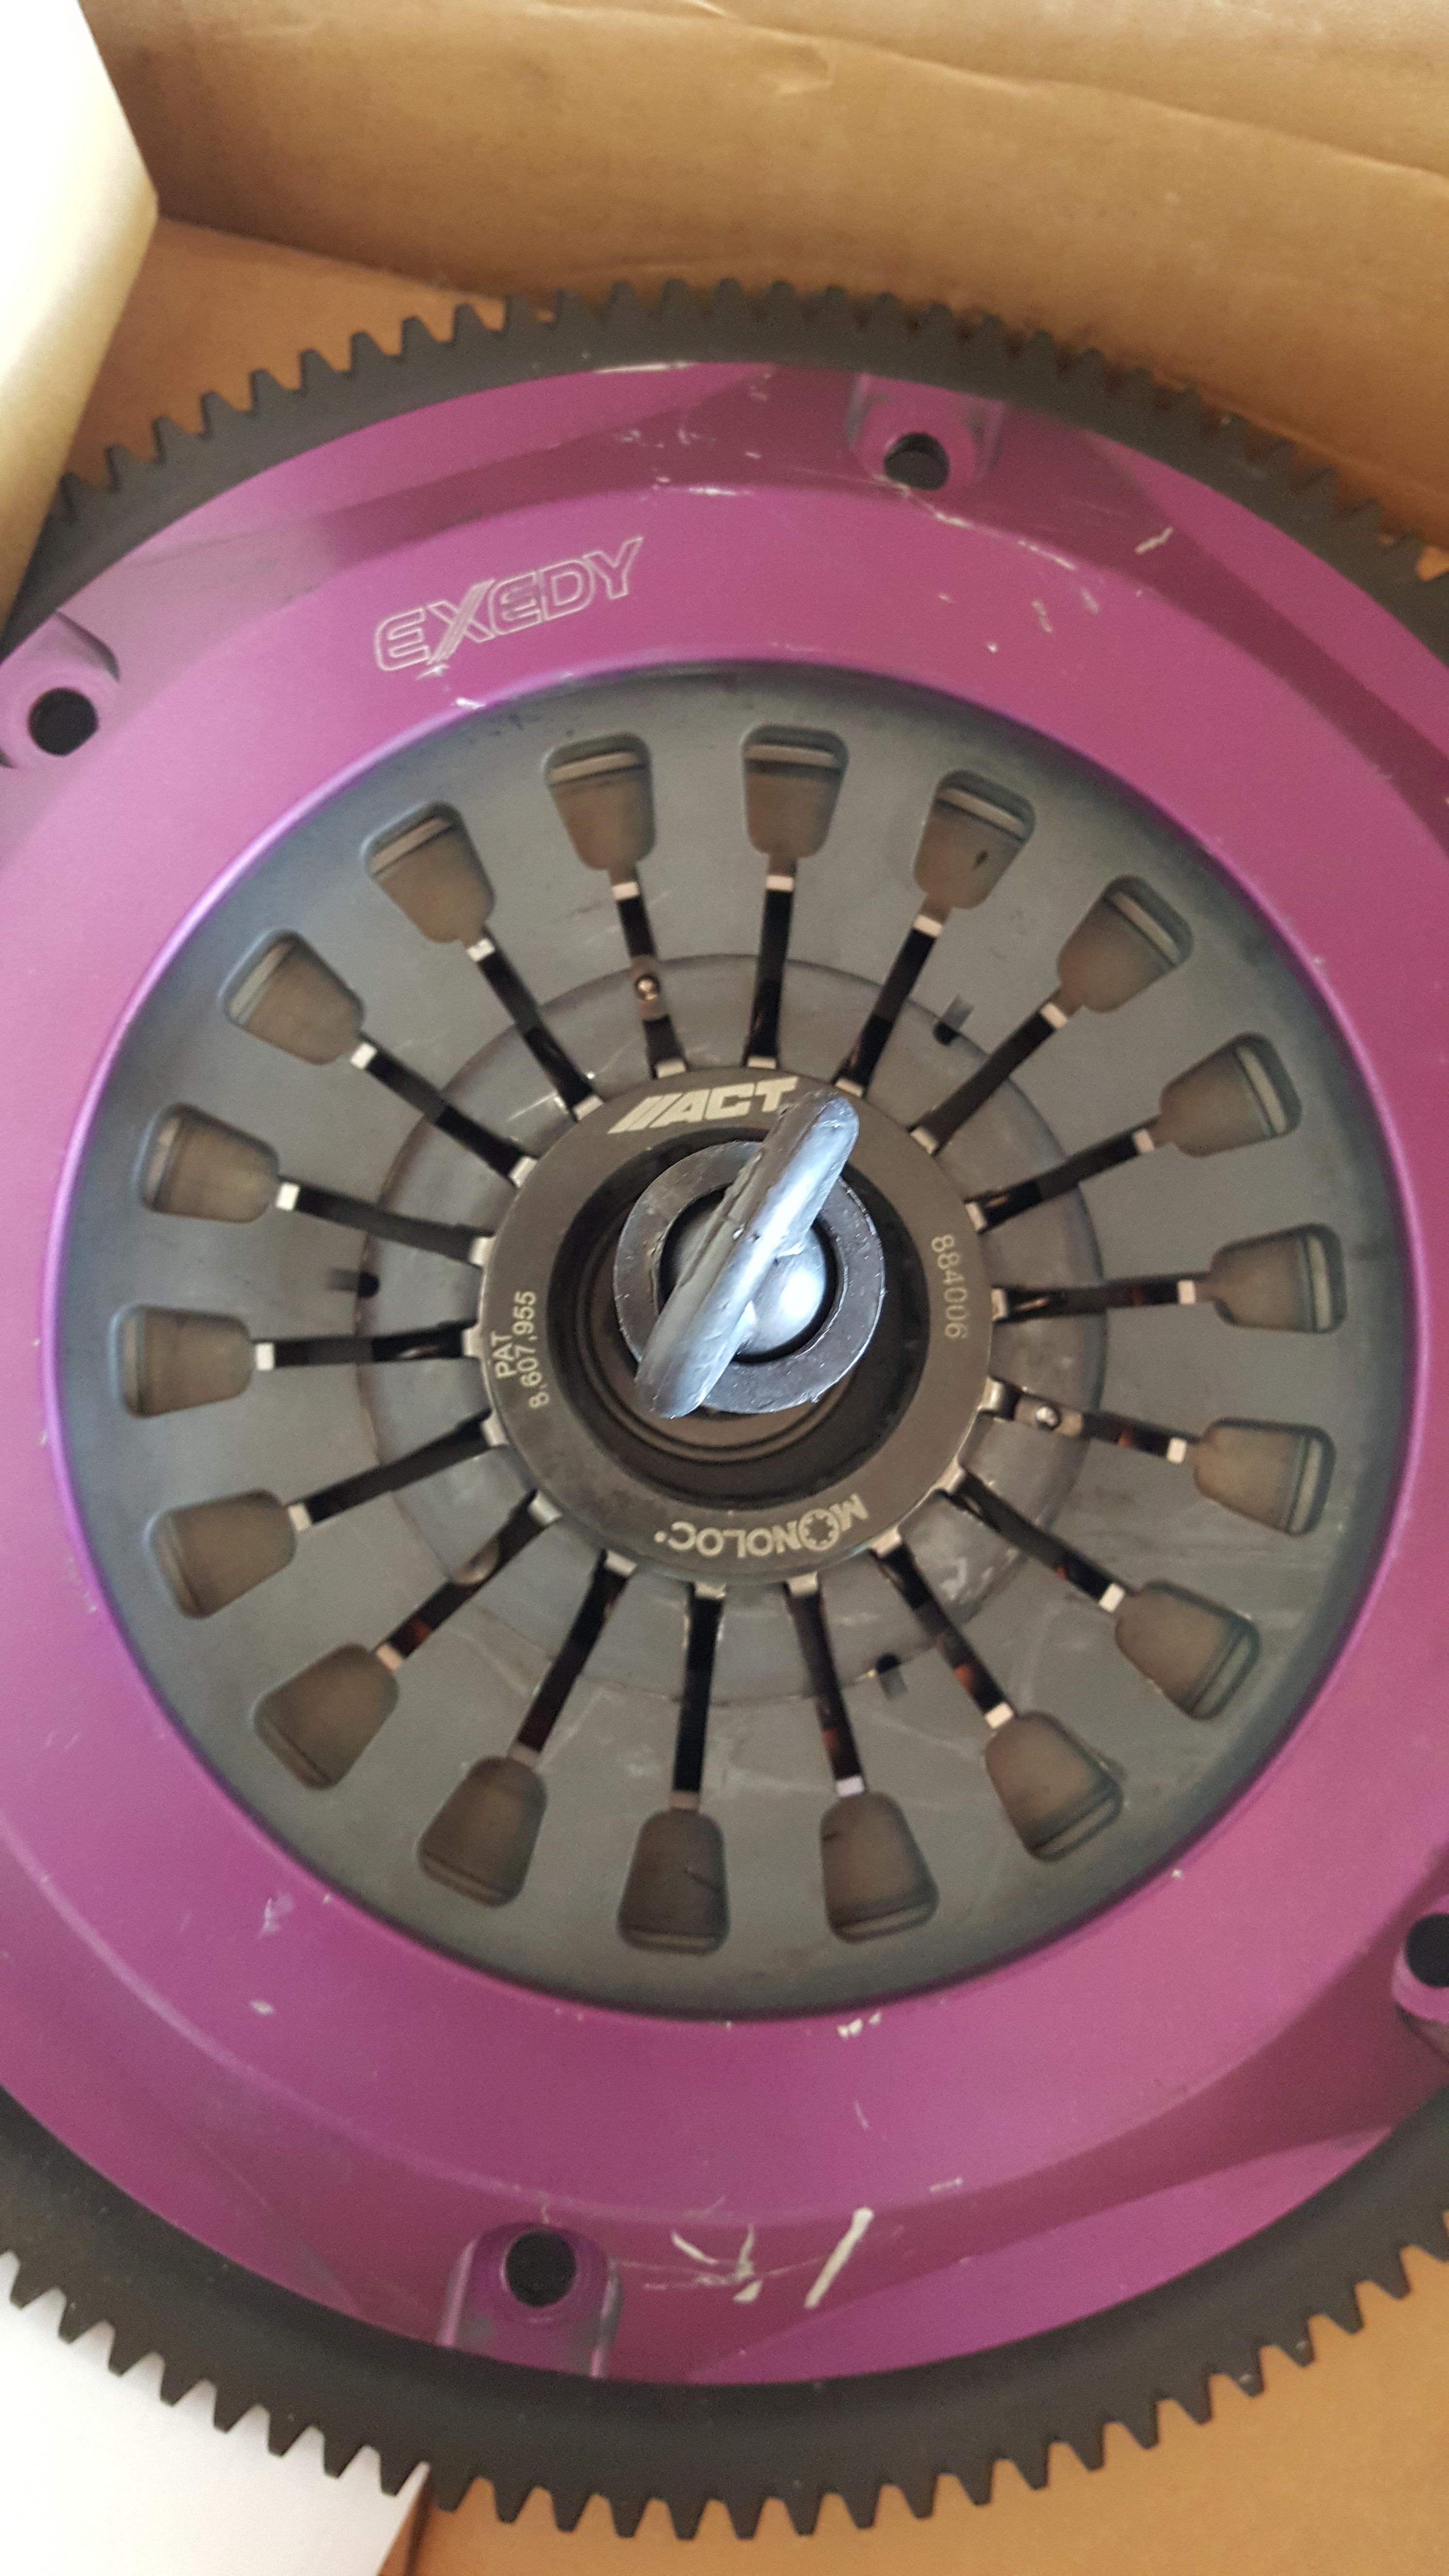
I finally got some time to put together my New parts onto my Existing Exedy Cerametallic Twin Disc Clutch. The Intermediate plate was soo warped!!!! Wouldn't even fit on the flywheel Ring
But check out the difference from a new Disc to an Old one!!
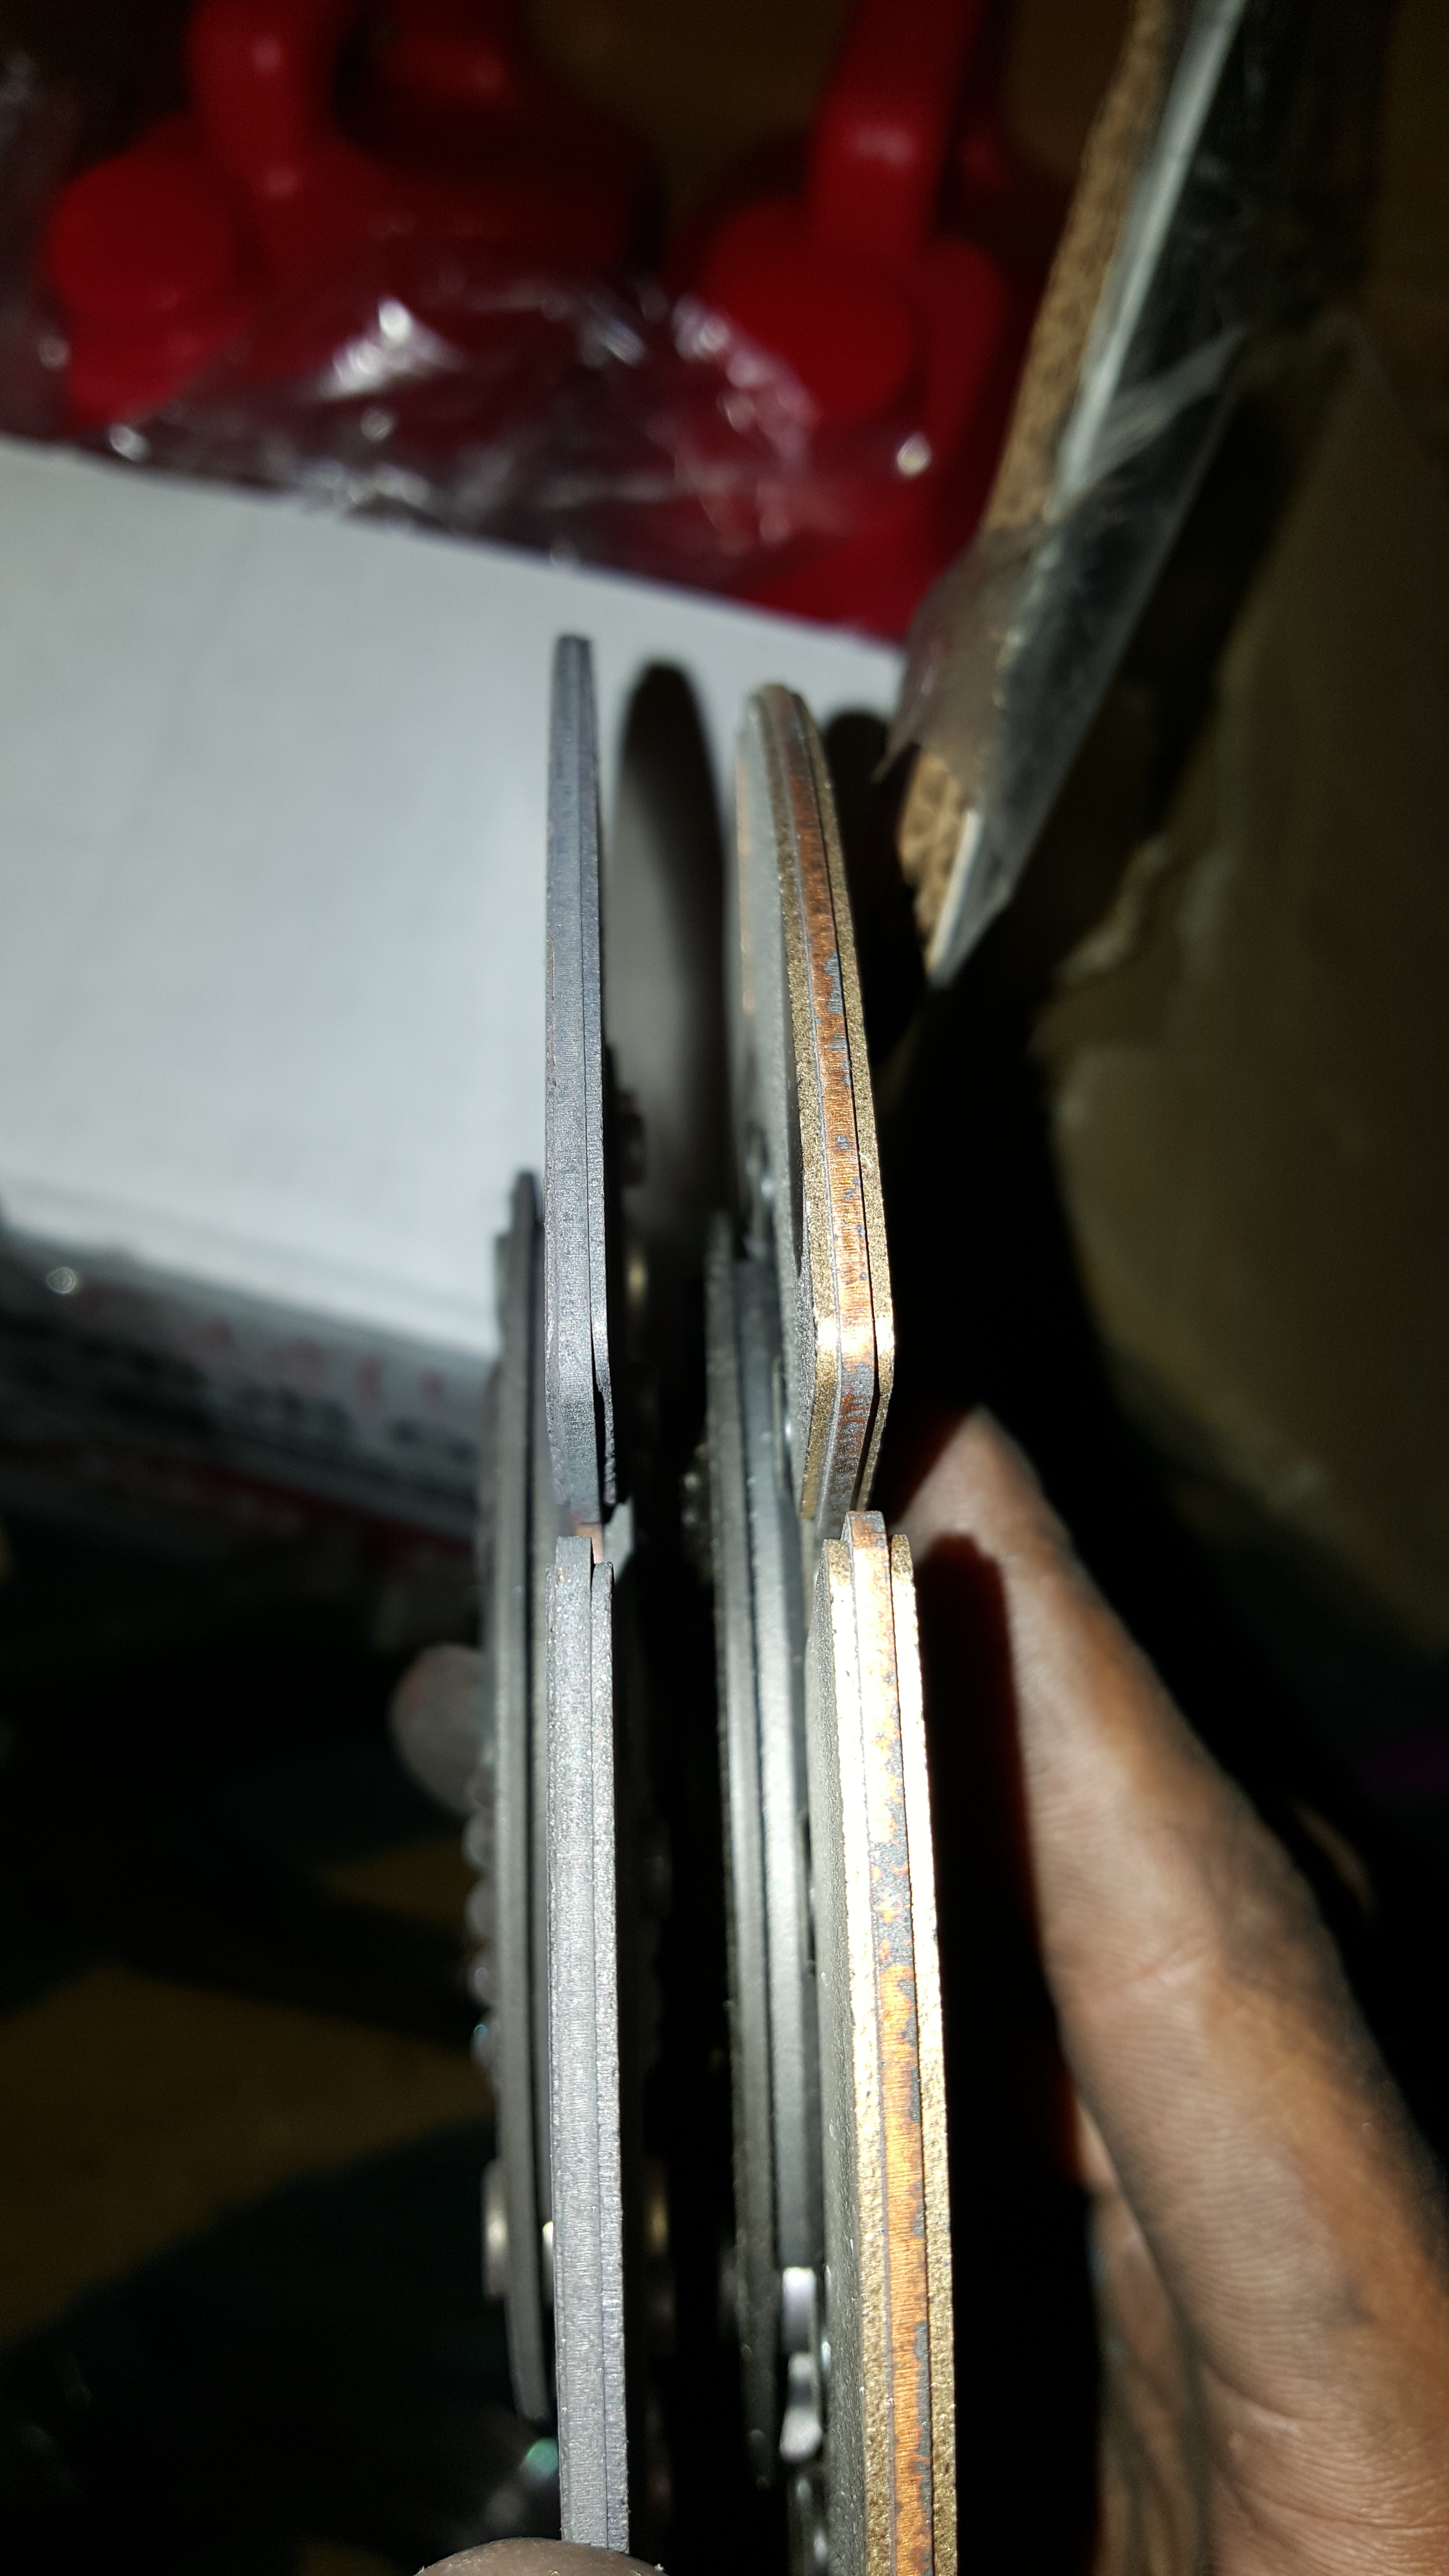
It's always nice to see new parts!!
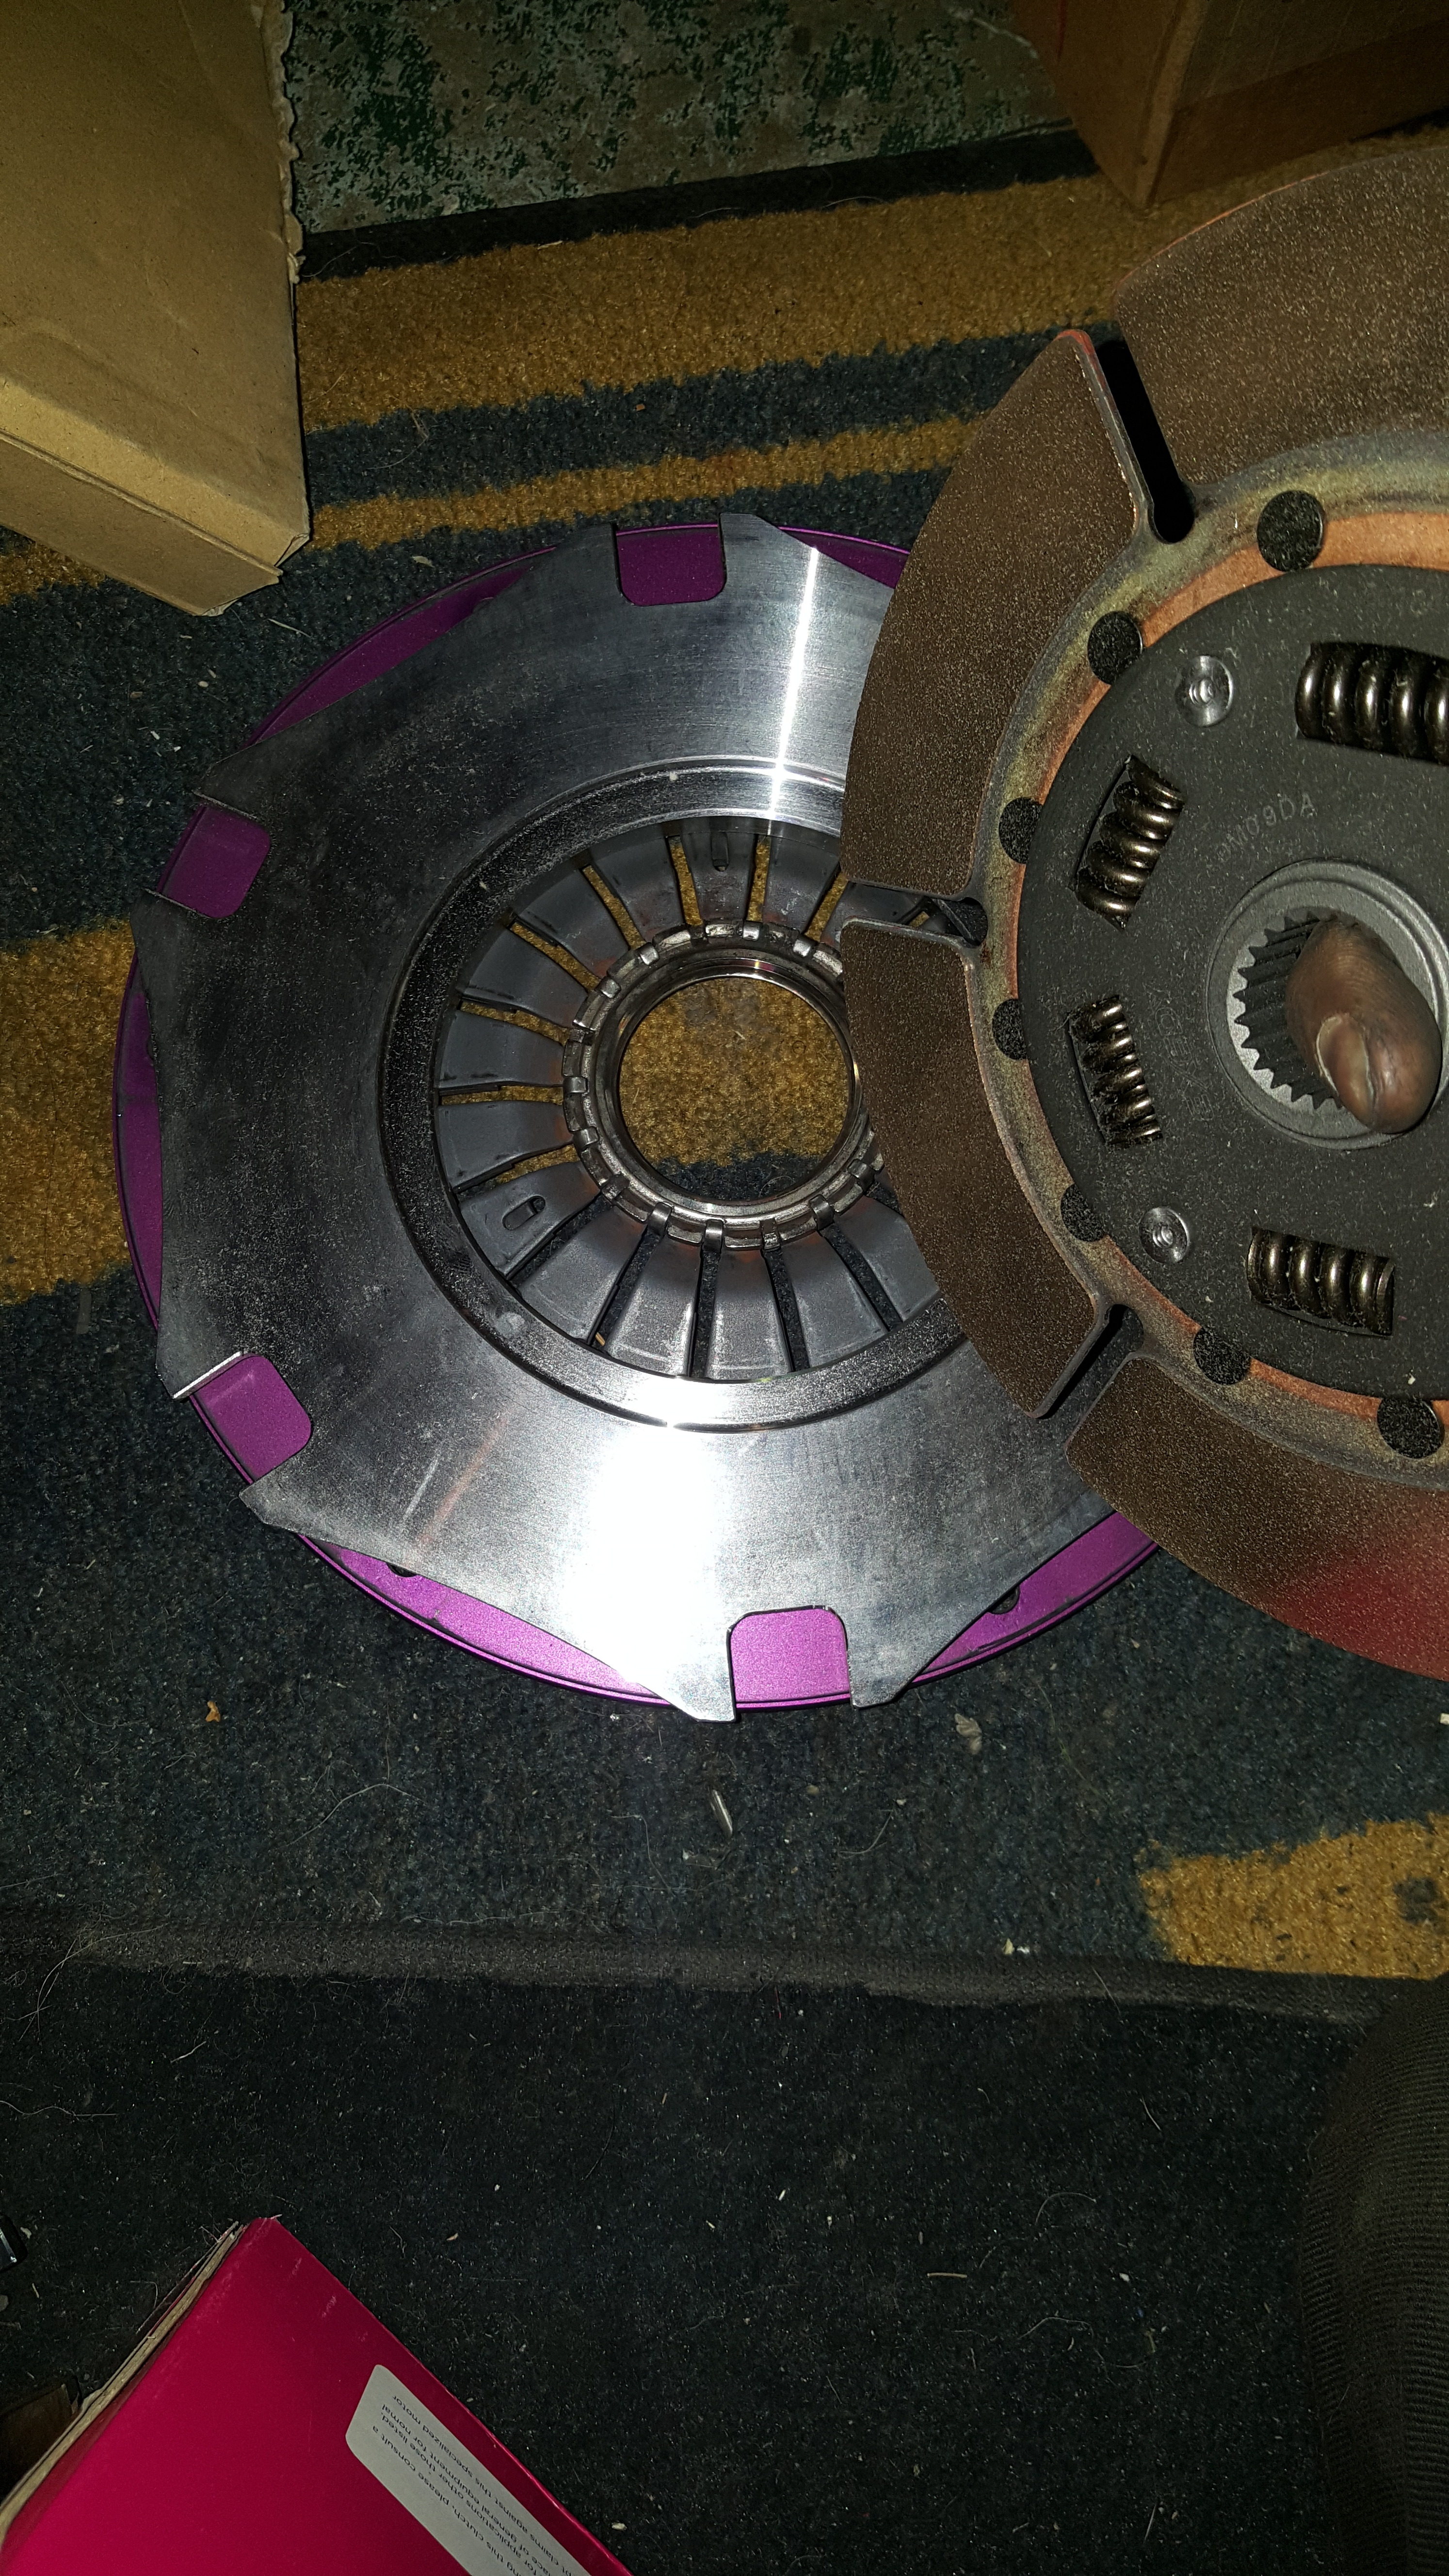
But it doesn't mean that makes it any easier to pay for LOL
Drift Lyfe
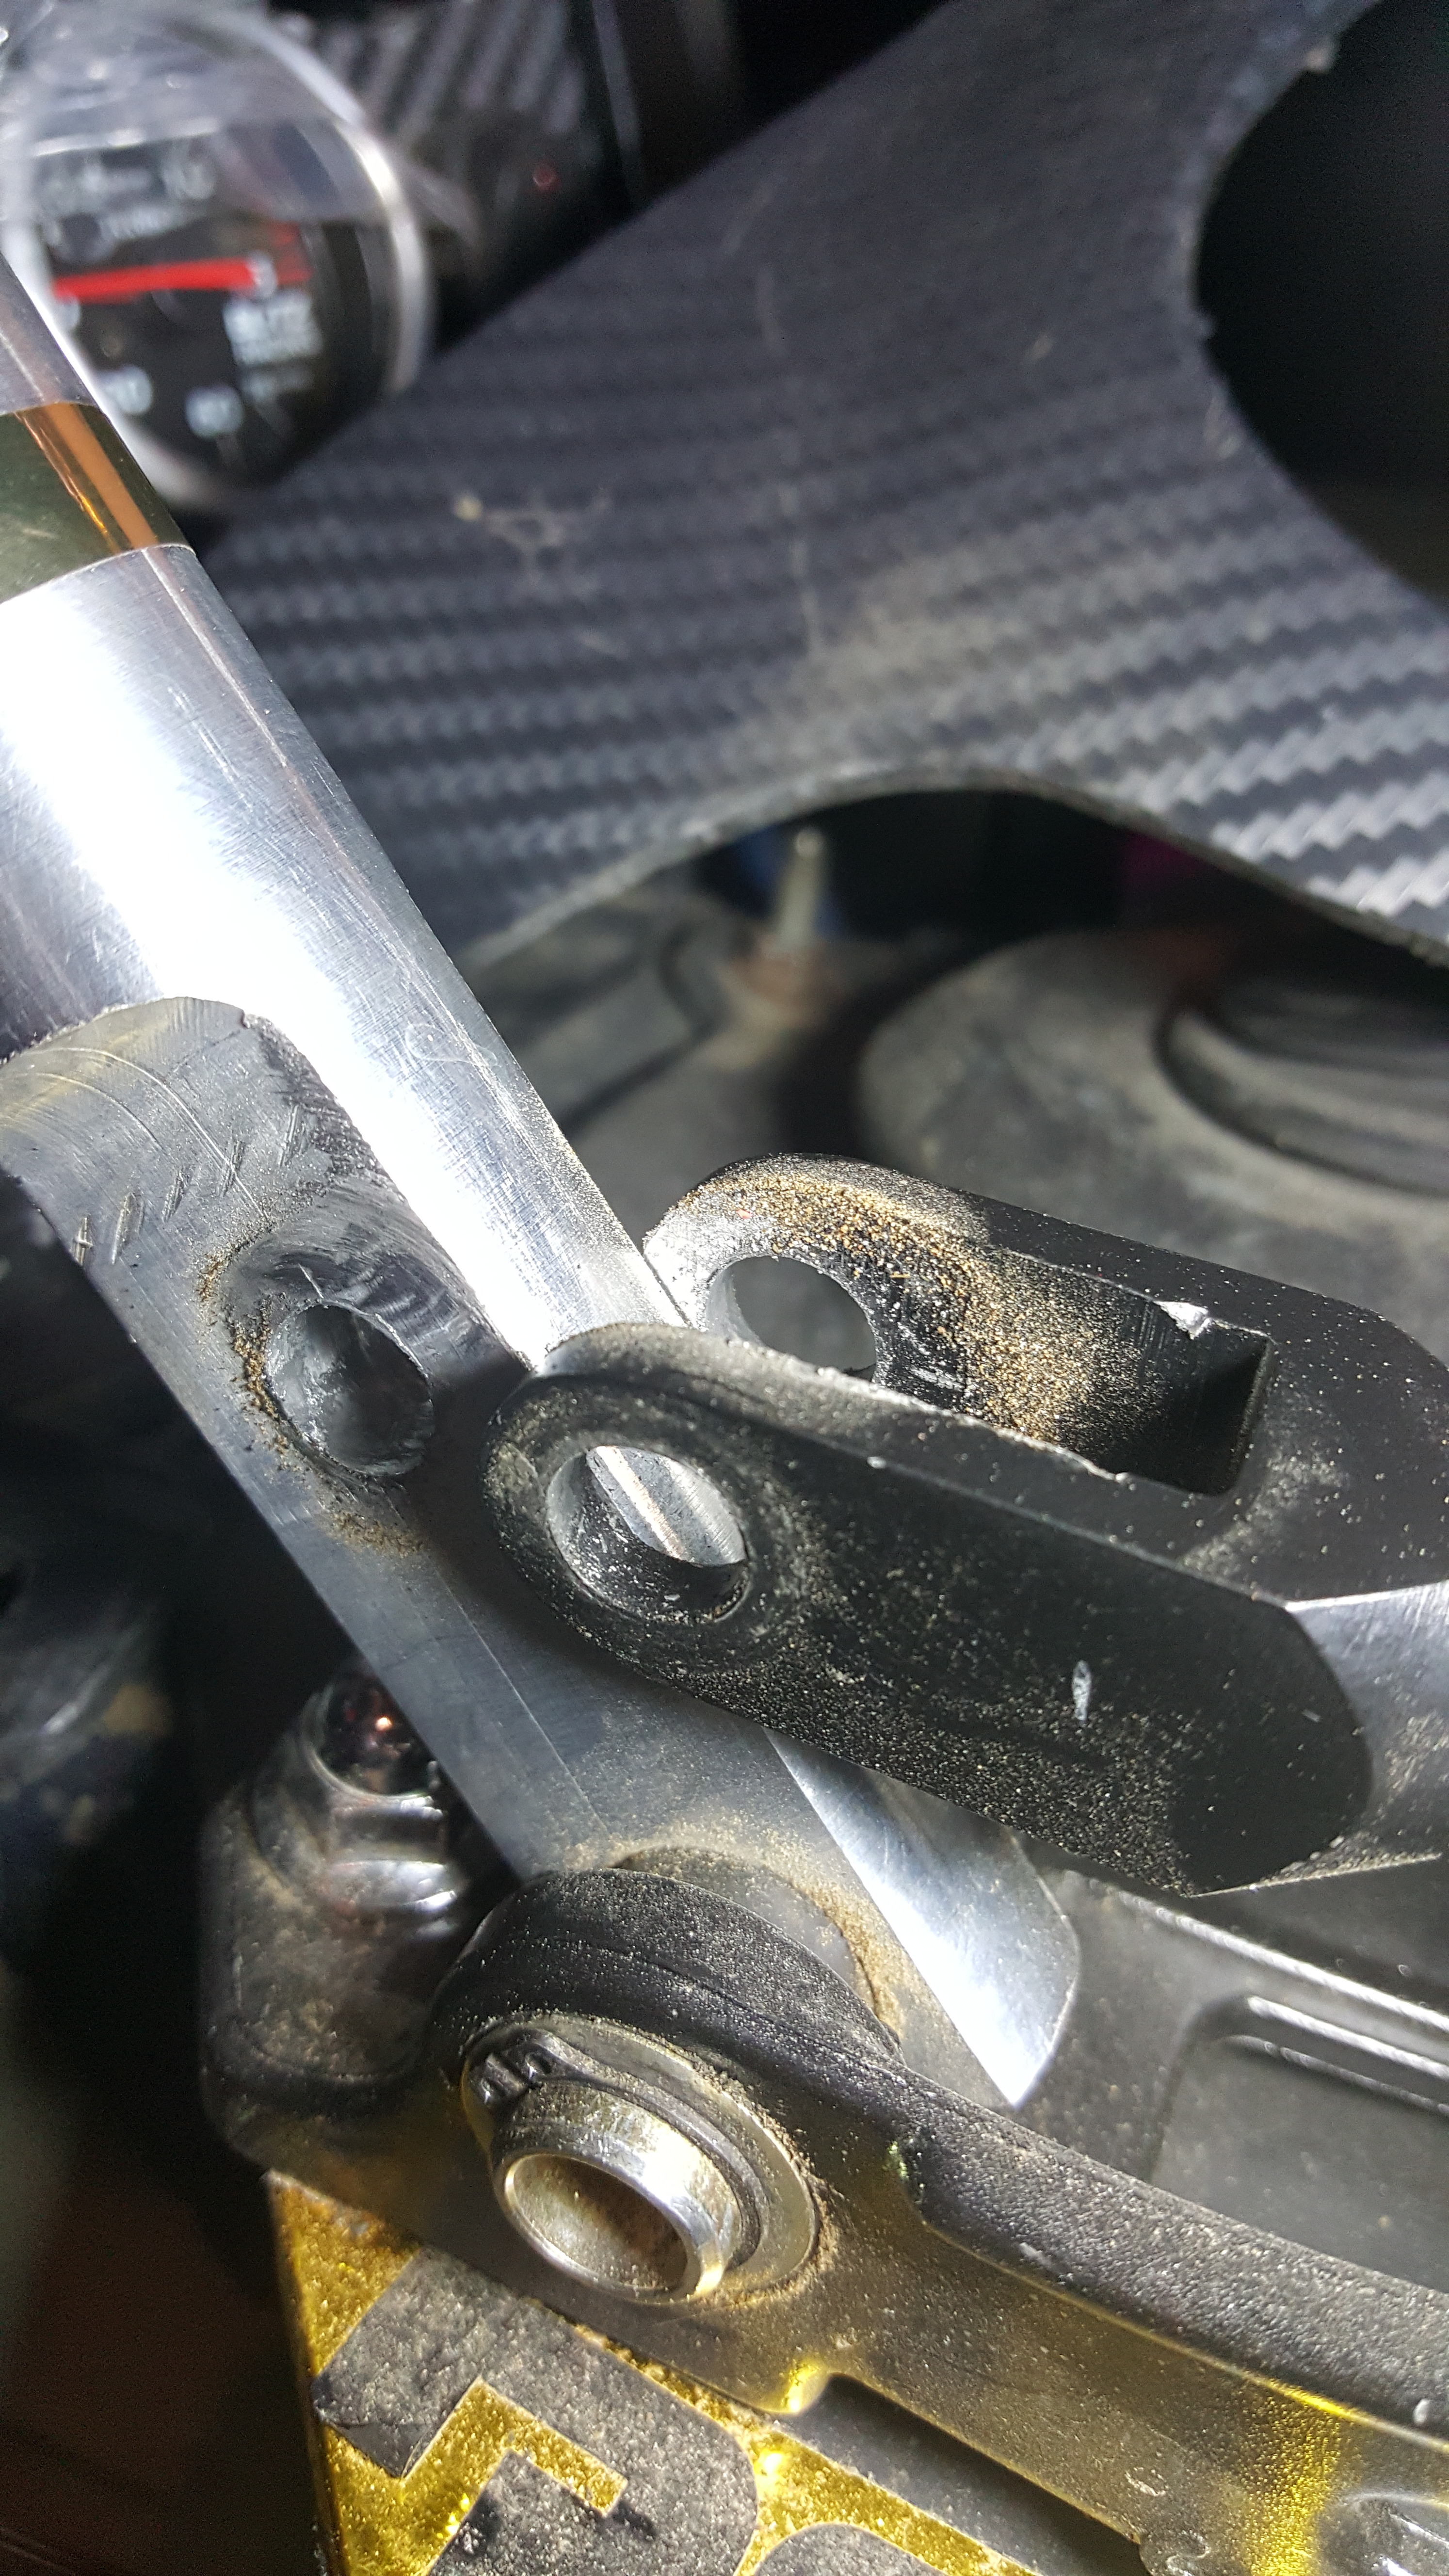
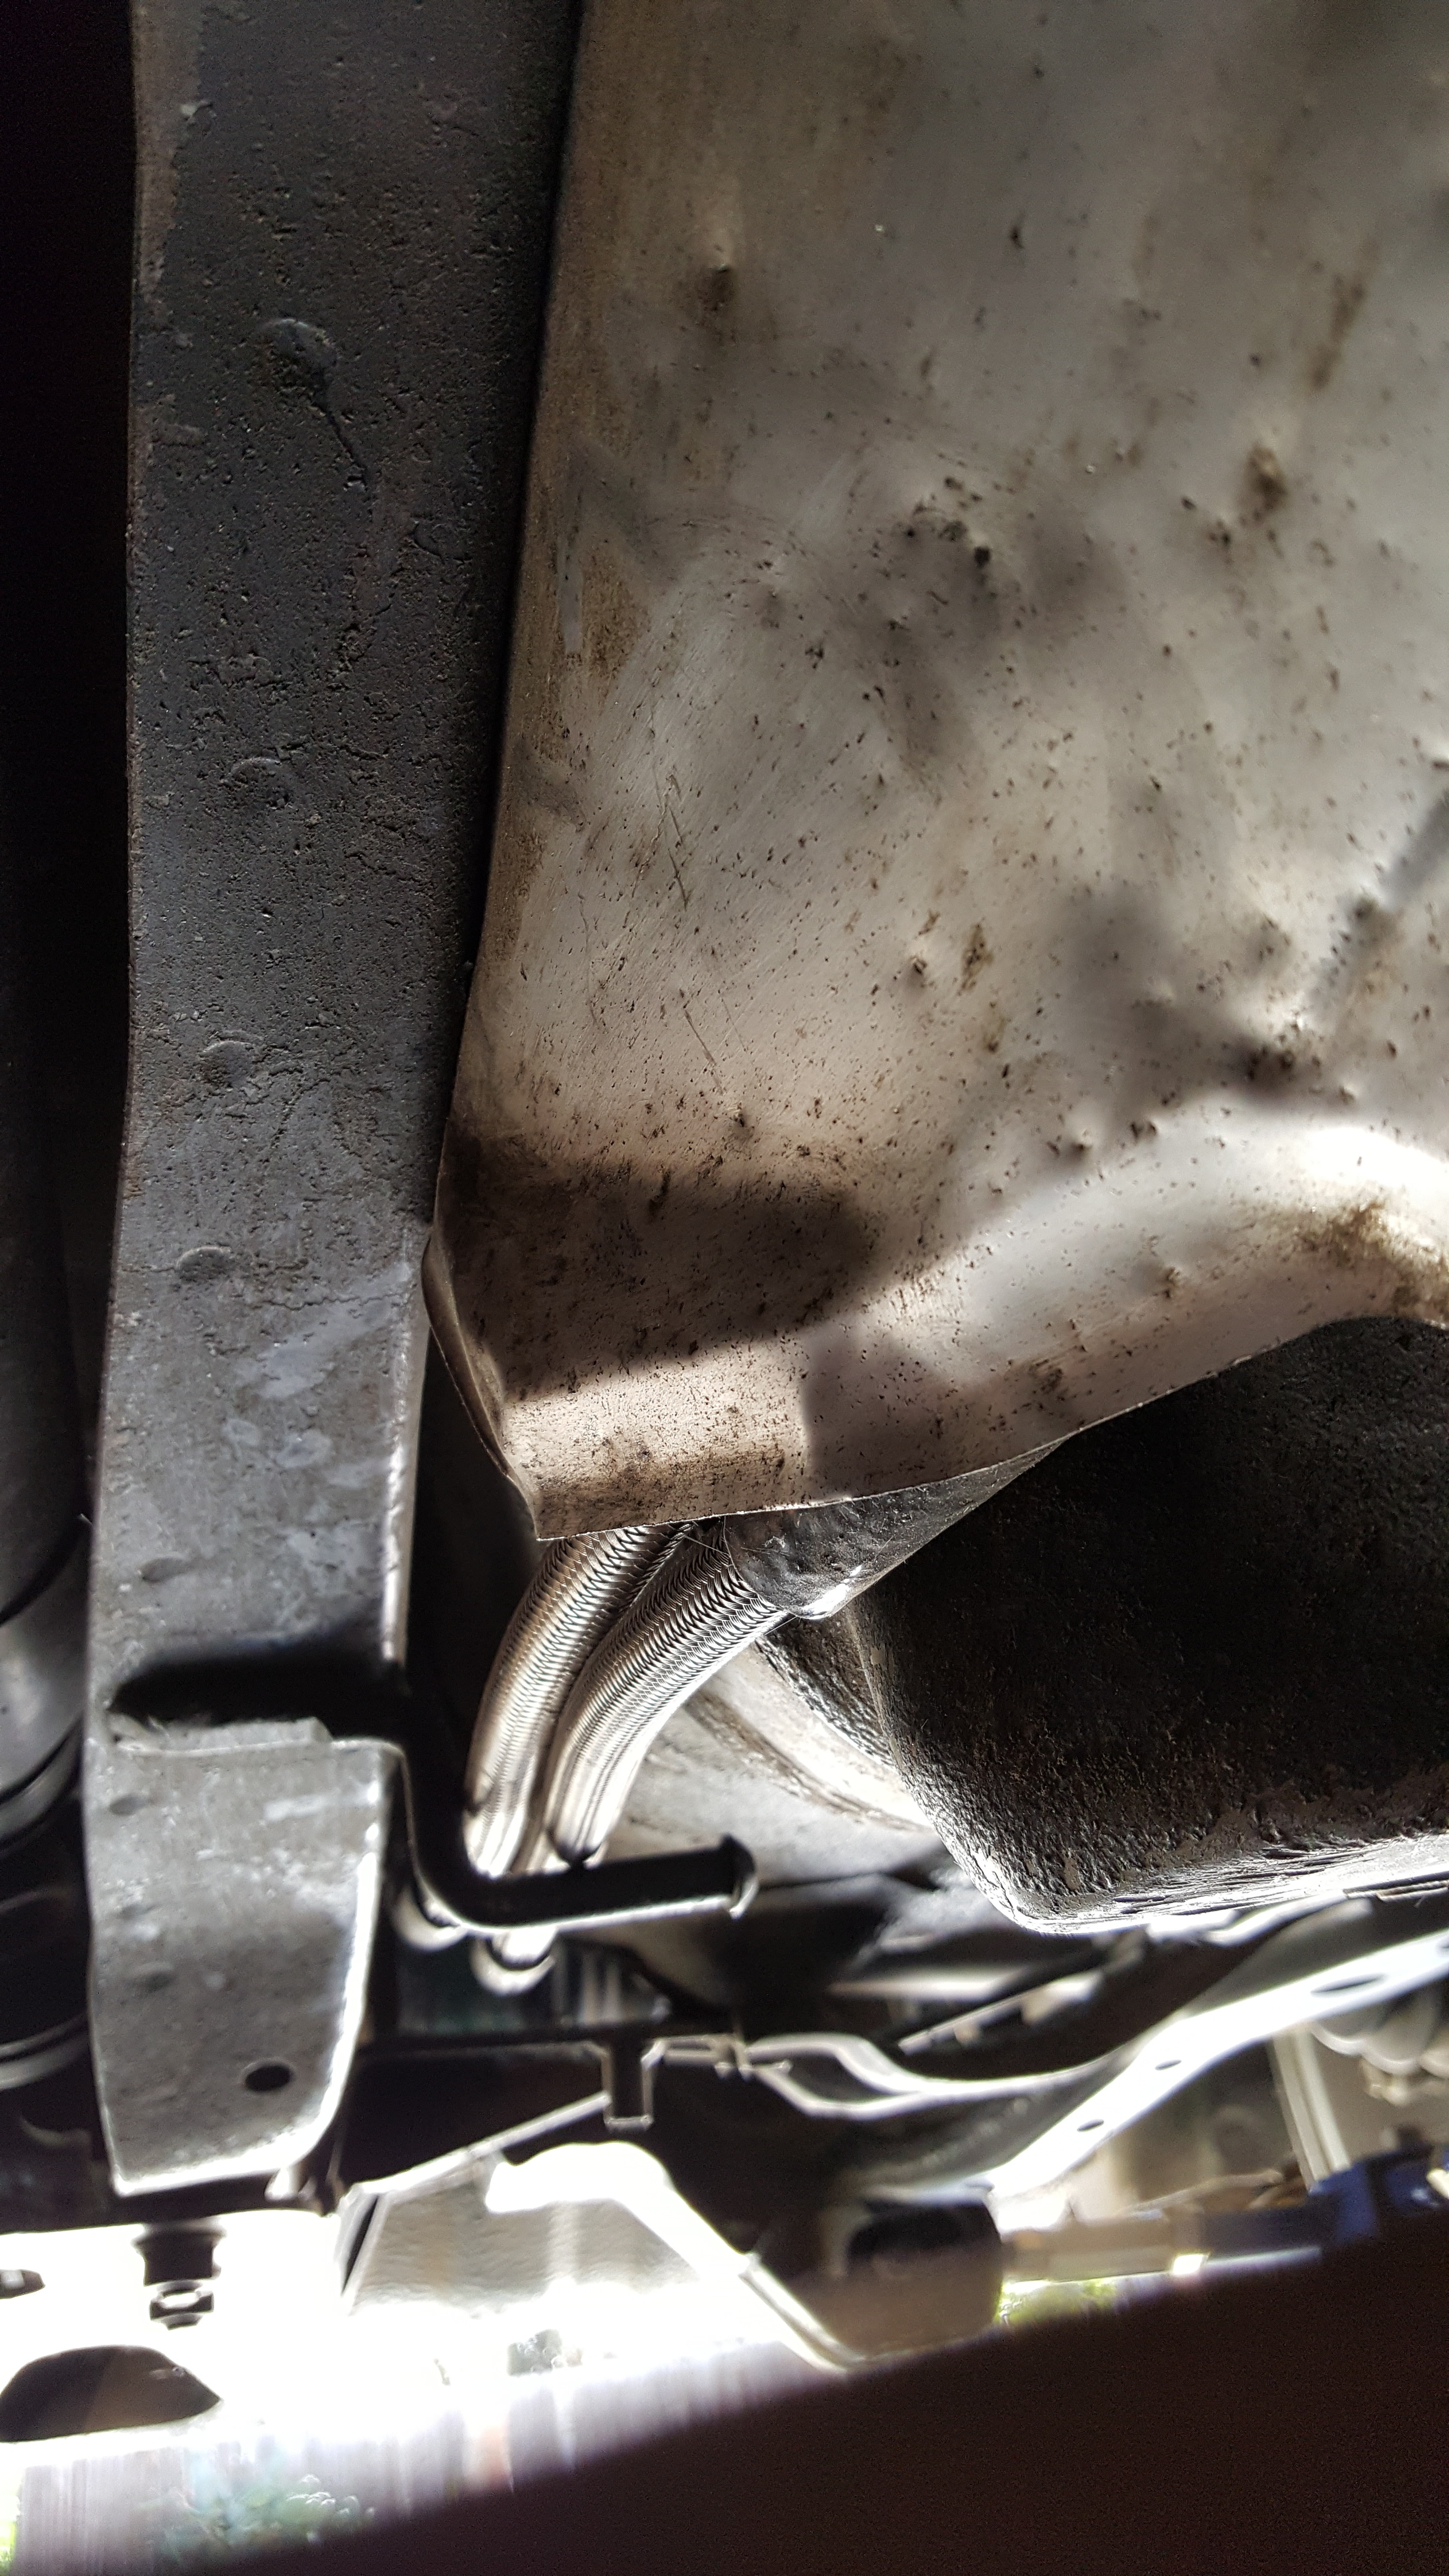
And I finished up ithis morning running New AN-8 PTFE Fuel Hose to the Bulkhead Fittings. I didn't want to run the fuel lines in the factory Location under the car... so I moved them over to run parallel to the Transmission Tunnel. This way if anything ever scrapes alongside the bottom of the car..I won't be relying on luck, to whether or not they'll get hit. This keeps them protected much better.
Bulkhead
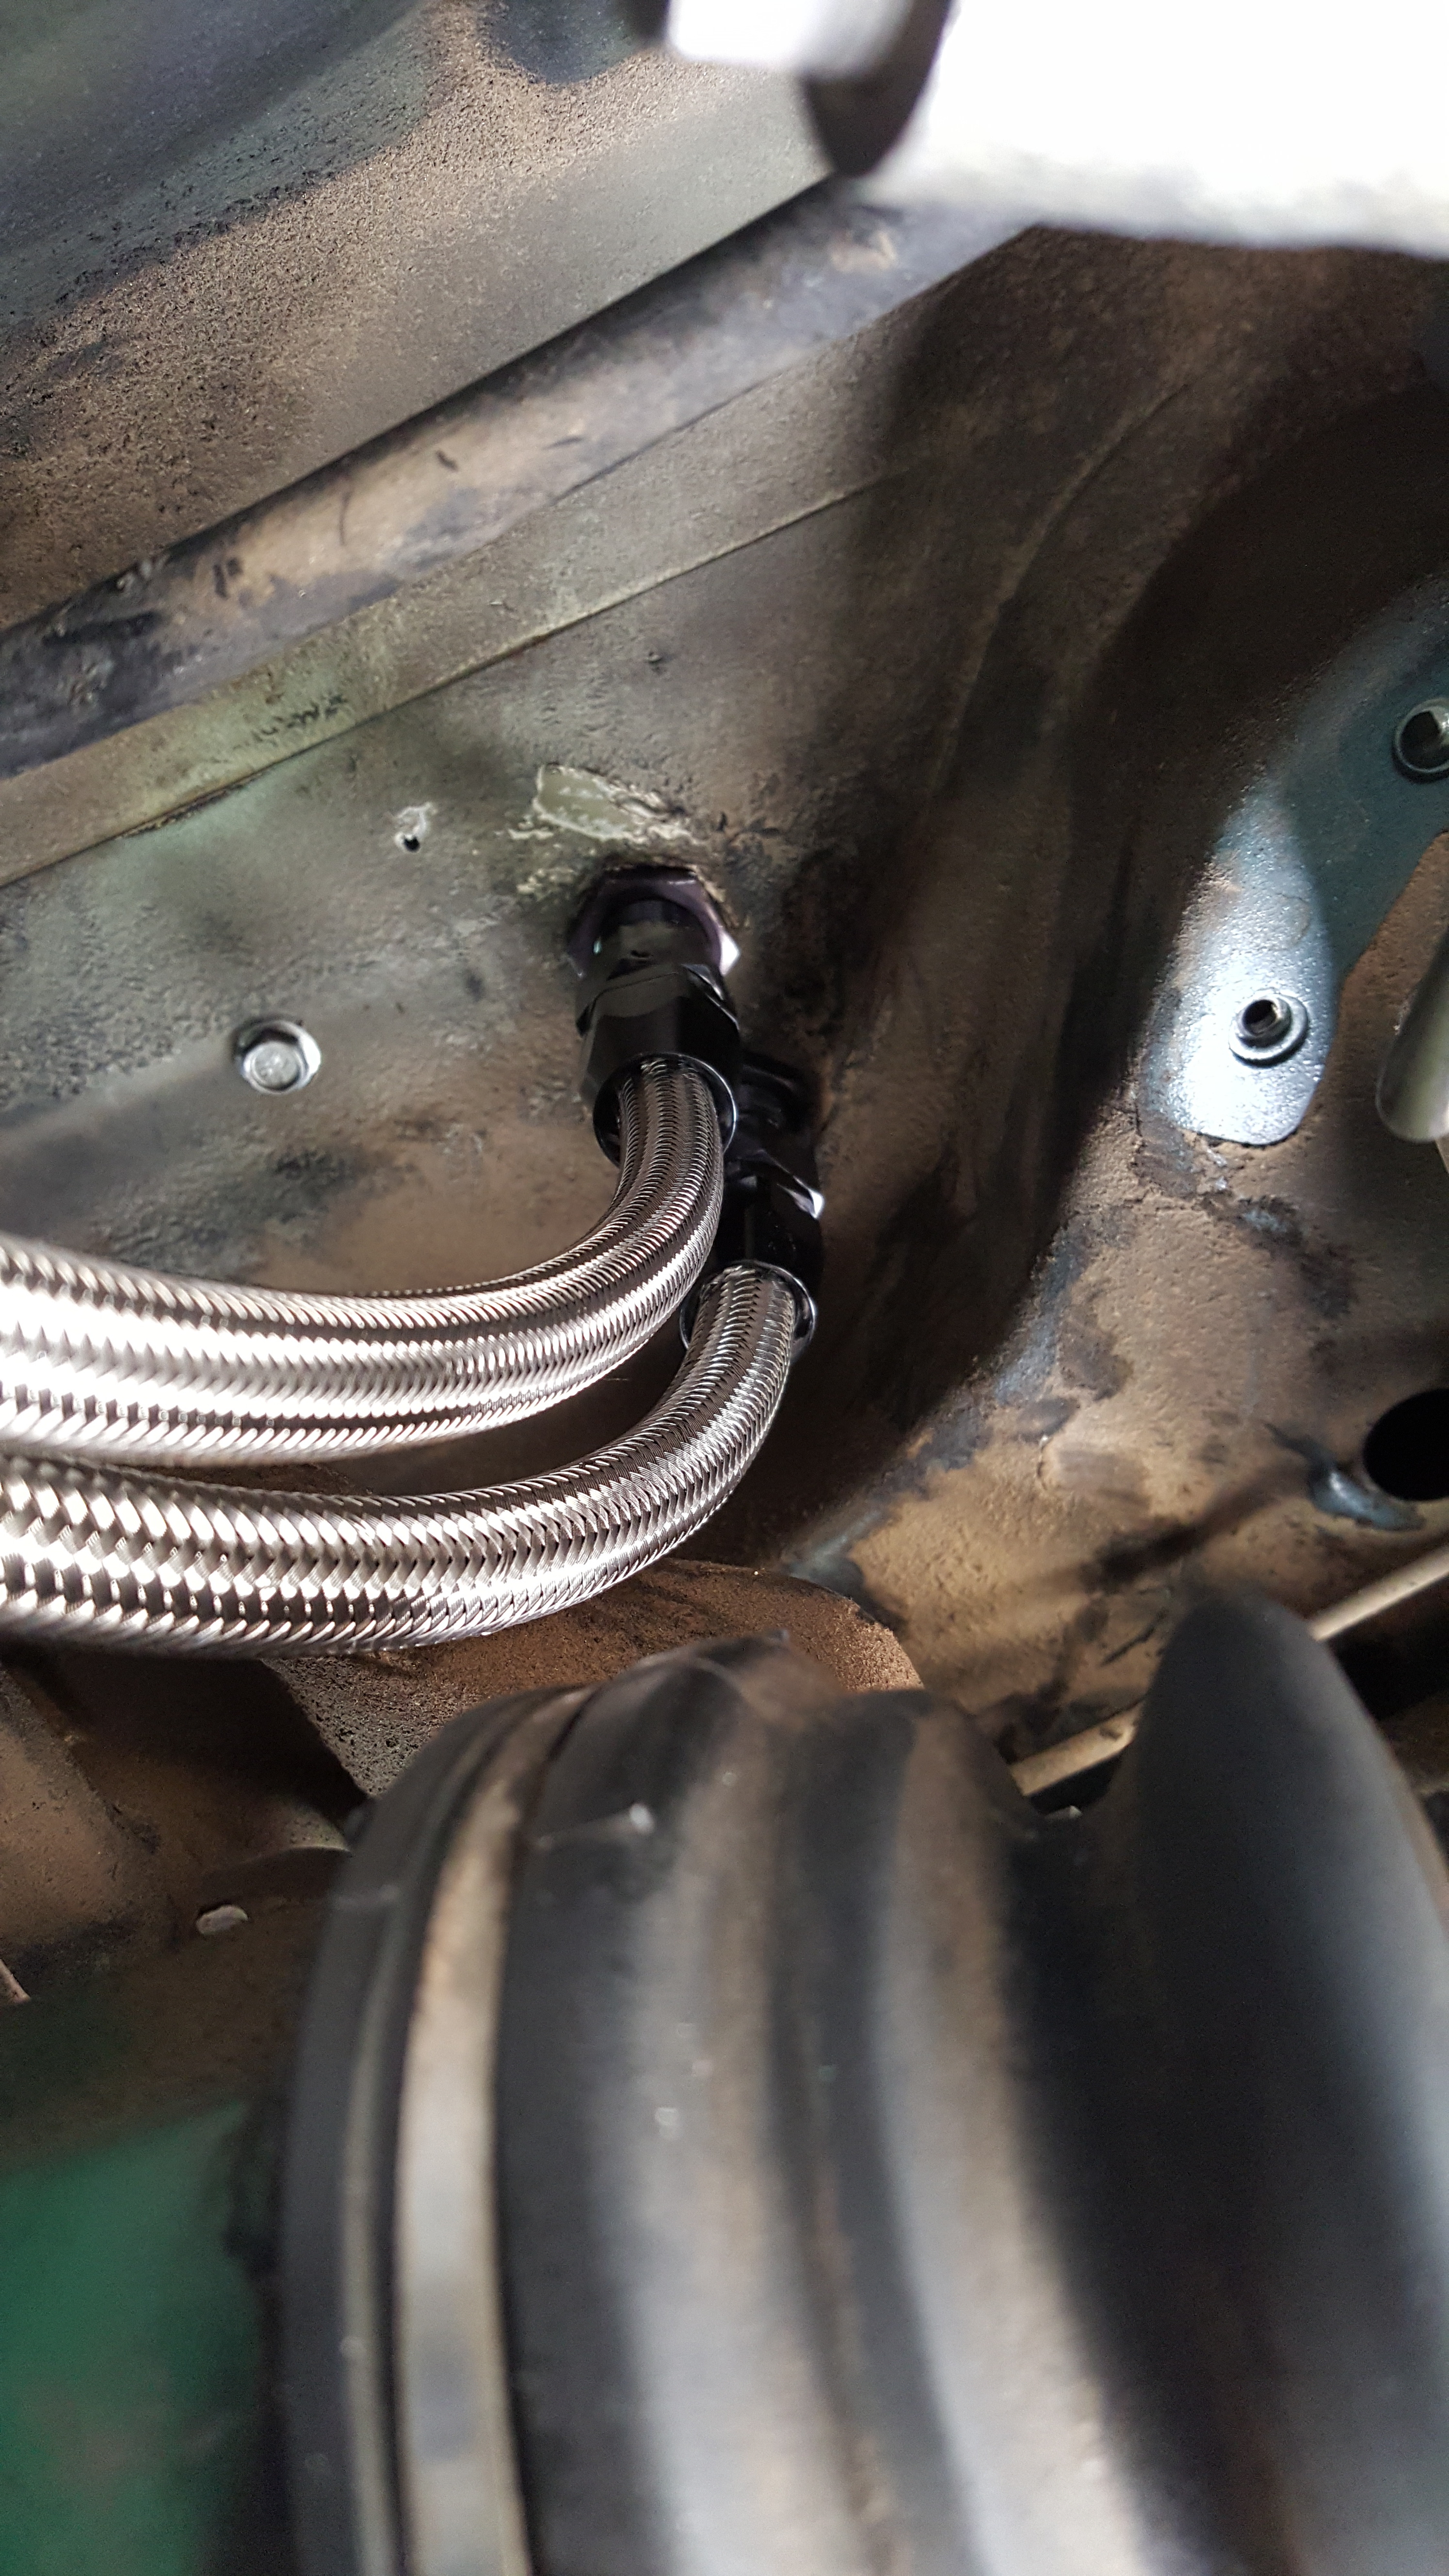
In, under and Parallel alongside the trans tunnel
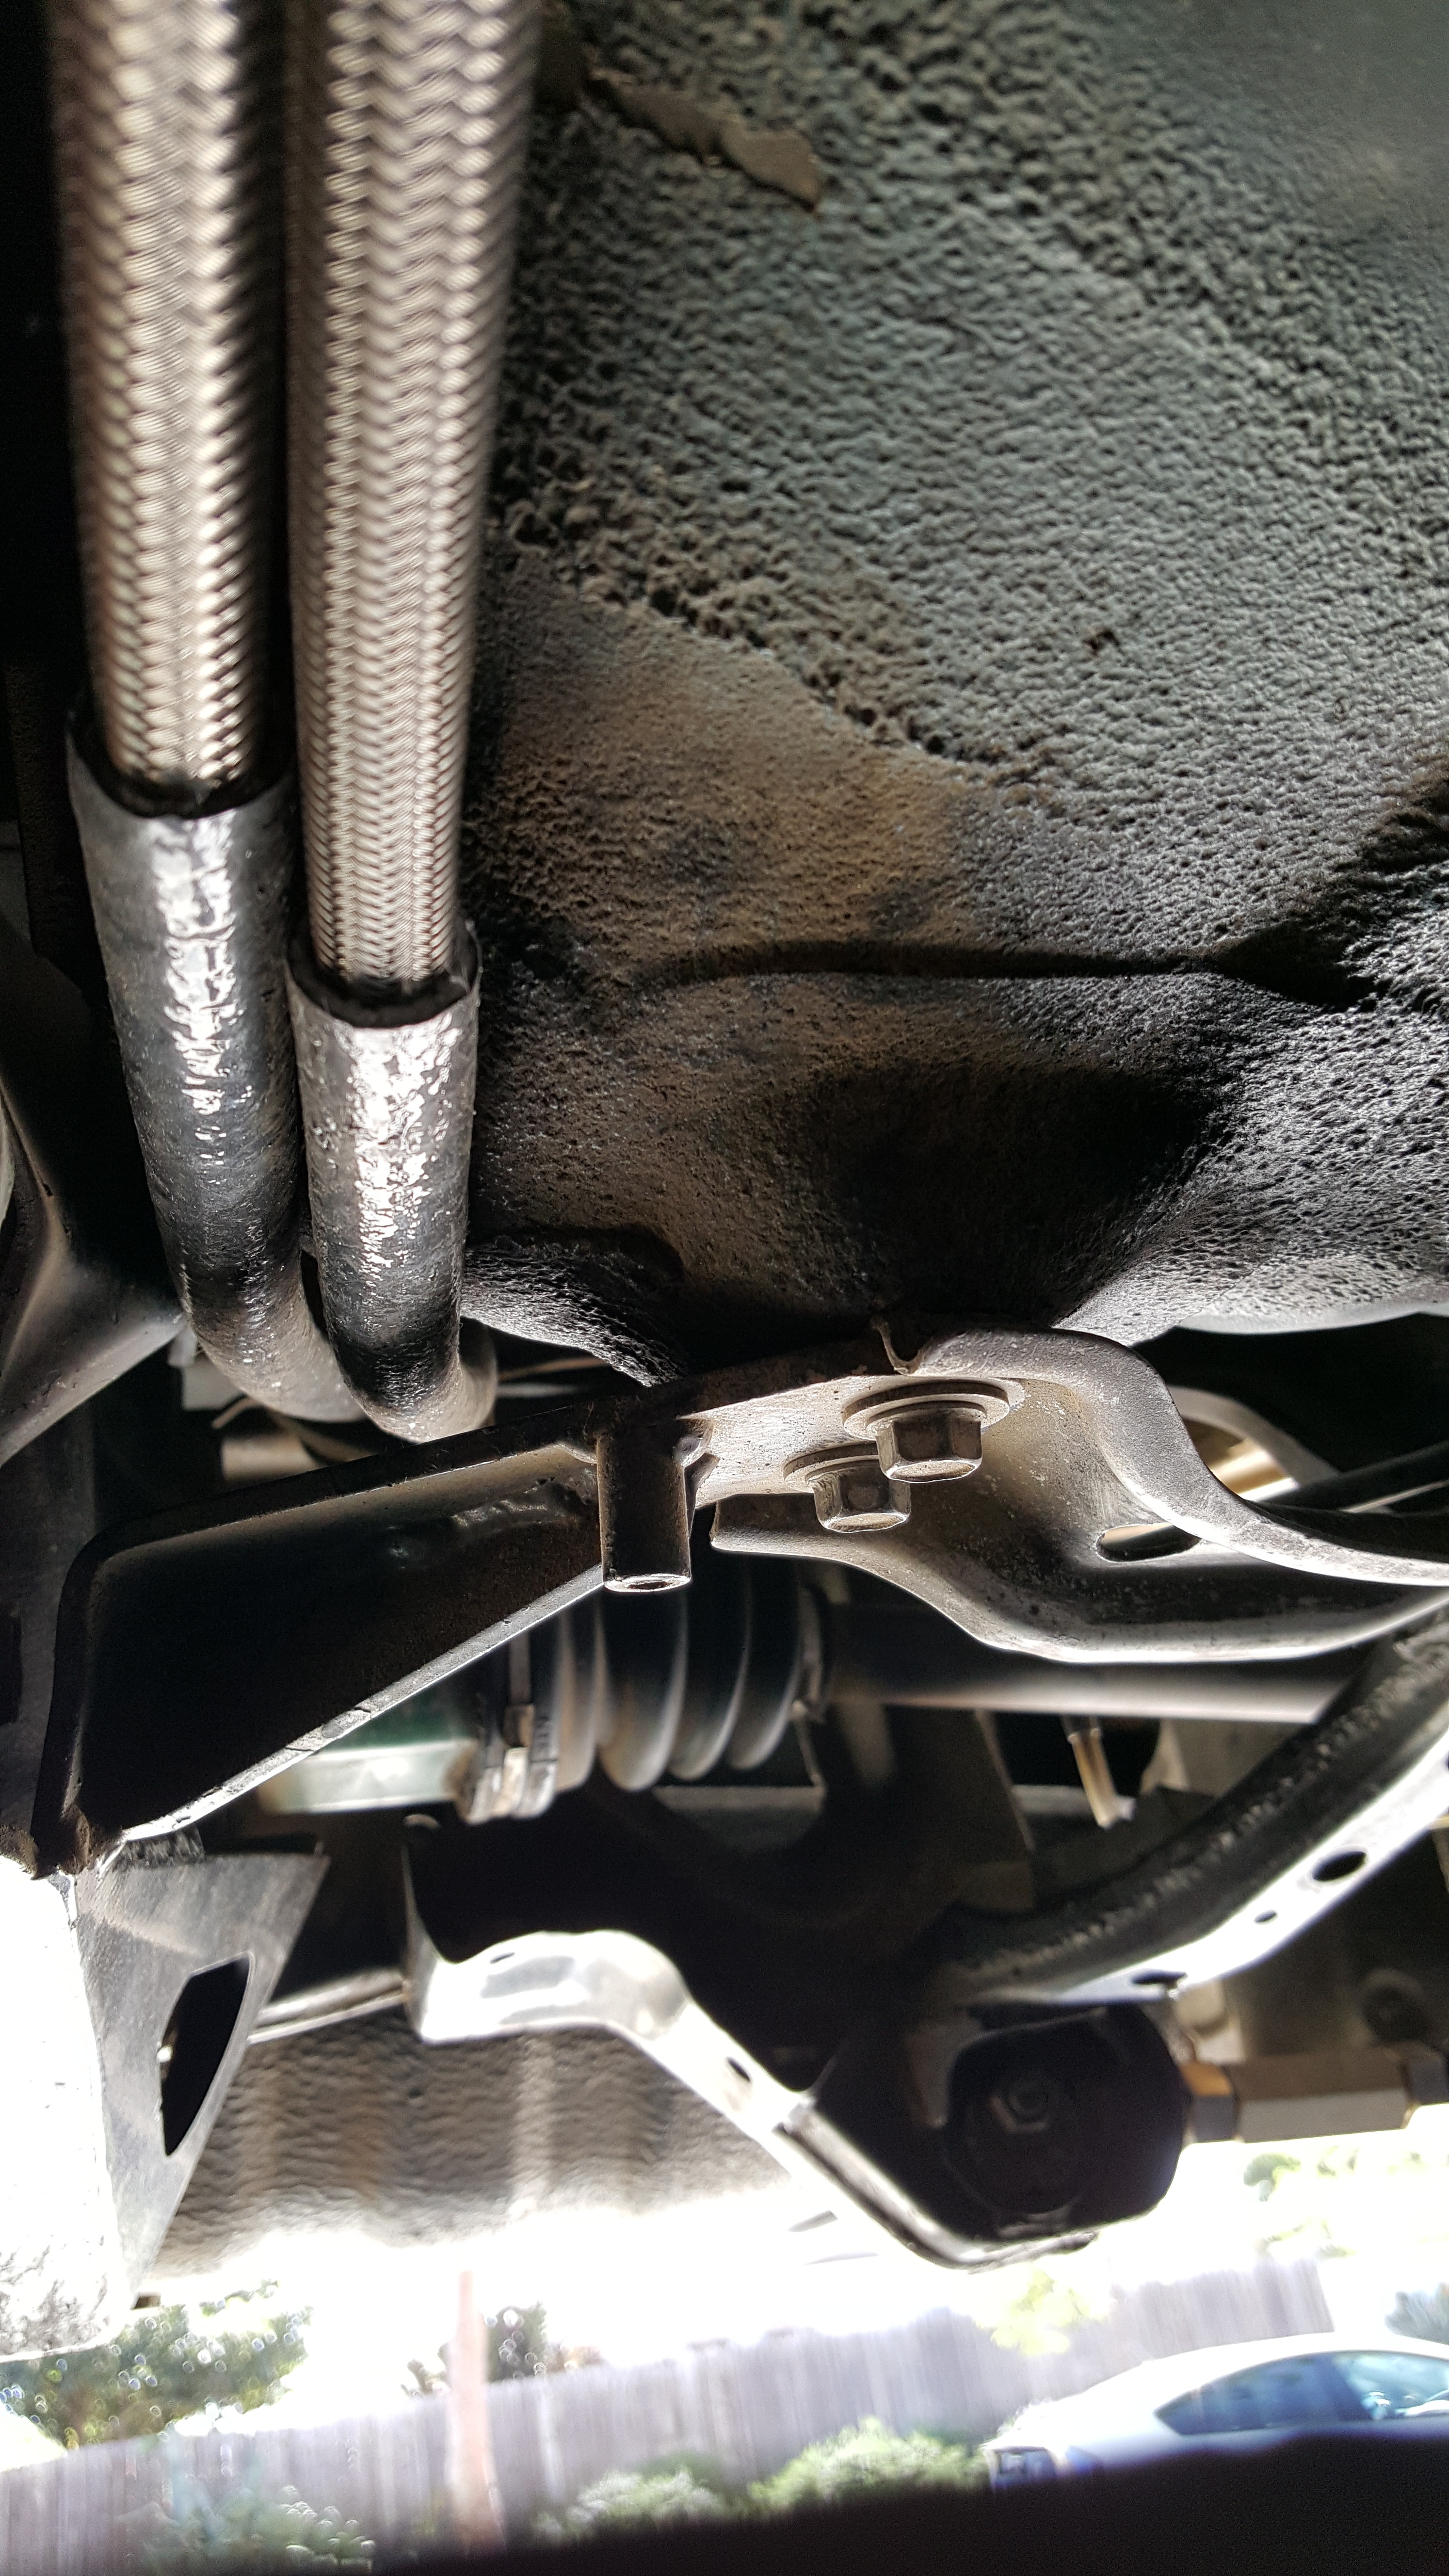
Behind one of the drivers side Stock Heat Shields
And that brings me just about current to where I'm at right now. Literally just got some PTFE Heat Shrink, that I'll be putting on the Posi/Neg wires Inside my Fuel tank...and taking off the Raychem DR-25 because it's not Compatible to be submerged in E85.
Stay Tuned for more updates soon!!
Thanks guys!!
#Thisisthewolf
Spent all yesterday Tidying up a bunch of loose ends.
Installed the new EGT sensors from "The Sensor Connection." Here's the link to the sensors I got
All EGT Probes 2-Stroke
Installed my New Innovate Motorsports MTX-L Wideband
Re-Routed a lot of Wiring that had been a little neglected over the last season.
Took a pic of the rear hatch....looking through the glass into the rear compartment..
...because I like the pic hah
Sat in my drivers seat and realized that there was a little bit of "Slop" in my Hydro E-brake Handle and Wilwood master cyl... So I pulled it apart and Re-Shimmed it with brass Washers. I was going to use steel..but figured the Handle is Alum..and I didn't want the steel to eat away at the Alum...so brass should be soft enough to give way first...
Felt good to have it nice and clean though
Got another Care Package from Redline Synthetic Oils!!!
And this should be it guys!!! No more BS Castor sludge in my tank, or in my Engine Ever again!
Talking to the Owner and Lead Tech on the Phone about our issues with previous Pre-Mixes...Straight from the Owner and Lead Tech at Redline Synthetic Oils.... This stuff won't leave Residual crap in the fuel tank, Lines, or oil systems.
I finally got some time to put together my New parts onto my Existing Exedy Cerametallic Twin Disc Clutch. The Intermediate plate was soo warped!!!! Wouldn't even fit on the flywheel Ring
But check out the difference from a new Disc to an Old one!!
It's always nice to see new parts!!
But it doesn't mean that makes it any easier to pay for LOL
Drift Lyfe
And I finished up ithis morning running New AN-8 PTFE Fuel Hose to the Bulkhead Fittings. I didn't want to run the fuel lines in the factory Location under the car... so I moved them over to run parallel to the Transmission Tunnel. This way if anything ever scrapes alongside the bottom of the car..I won't be relying on luck, to whether or not they'll get hit. This keeps them protected much better.
Bulkhead
In, under and Parallel alongside the trans tunnel
Behind one of the drivers side Stock Heat Shields
And that brings me just about current to where I'm at right now. Literally just got some PTFE Heat Shrink, that I'll be putting on the Posi/Neg wires Inside my Fuel tank...and taking off the Raychem DR-25 because it's not Compatible to be submerged in E85.
Stay Tuned for more updates soon!!
Thanks guys!!
#Thisisthewolf
The only thing I can think of for your plex issue would be to use transparent vinyl wrap. It sticks to just about anything....is it better than tint I guess it depends on you but it would probably be just as good as tint if not better at protecting from scratches.
Looking good bud keep up the hard work!
Looking good bud keep up the hard work!


So Aaron,
When I follow your link for EGT sensors and click on the one recommended for 2 stroke engines, it clearly says in the product description "Not recommended for Rotary Engines or mounting pre-turbo (choose a 3/16" OD or 1/4" OD probe)." Where's your probe mounting location? Mine are in my turbo manifold, 4 inches from the manifold flange. Just curious!
When I follow your link for EGT sensors and click on the one recommended for 2 stroke engines, it clearly says in the product description "Not recommended for Rotary Engines or mounting pre-turbo (choose a 3/16" OD or 1/4" OD probe)." Where's your probe mounting location? Mine are in my turbo manifold, 4 inches from the manifold flange. Just curious!
The only thing I can think of for your plex issue would be to use transparent vinyl wrap. It sticks to just about anything....is it better than tint I guess it depends on you but it would probably be just as good as tint if not better at protecting from scratches.
Looking good bud keep up the hard work!
Looking good bud keep up the hard work!
So Aaron,
When I follow your link for EGT sensors and click on the one recommended for 2 stroke engines, it clearly says in the product description "Not recommended for Rotary Engines or mounting pre-turbo (choose a 3/16" OD or 1/4" OD probe)." Where's your probe mounting location? Mine are in my turbo manifold, 4 inches from the manifold flange. Just curious!
When I follow your link for EGT sensors and click on the one recommended for 2 stroke engines, it clearly says in the product description "Not recommended for Rotary Engines or mounting pre-turbo (choose a 3/16" OD or 1/4" OD probe)." Where's your probe mounting location? Mine are in my turbo manifold, 4 inches from the manifold flange. Just curious!
 If you want to be safe... You can always go with one of the Larger Sensors with the 3/16" - 1/4" OD Probe. I just didn't want to have something that big in my Exhaust track. It may or may not make a huge difference..I just didn't like the thought of it. I also chose the Closed tip design because I always think of the worst...and I imagine getting a 97% inspected sensor that was on the line of passing their quality control...and then the tip breaking off and ruining my BW EFR. Man that would suck. Hope that helps!!! HOpe all is well!
Also forgot to add some Links to components I used!!
You can get the Radium Surge tanks in different configurations here:
Universal Fuel Surge Tanks
CJ-Motorsports Dual Pump Hanger:
CJM Twin Pump, FD RX7 | CJ Motorsports
PTP Turbo Blankets Fire Sleeve:
http://ptpturboblankets.com/Fire-Sleeves/
You can get the Radium Surge tanks in different configurations here:
Universal Fuel Surge Tanks
CJ-Motorsports Dual Pump Hanger:
CJM Twin Pump, FD RX7 | CJ Motorsports
PTP Turbo Blankets Fire Sleeve:
http://ptpturboblankets.com/Fire-Sleeves/
Hey Thats a really Good Idea!! Didn't think of that,..Thank you! I'm on it!!
Hey Hey! Ok, So when I ordered them, I talked to the Sensor Connection Tech for a bit because I saw the same thing. He assured me that the 1/8" closed tip Probes that I linked above would work Just fine, even for my track car. I had asked him a couple specific questions... the first was your question.. where he assured me they were fine as long as I wasn't boosting 30+ psi for extended periods of time. Then I asked him about my fuel not being Gasoline....But Ethanol.. And he said That's not an issue either. It's still Inconel... they just recommend the 3/16" or 1/4" probes due to drag racers...Retarding Ignition/generating high EGT's/Launch control, Anti-Lag..and High Boost Pressures. None of the following categories the wolf falls into If you want to be safe... You can always go with one of the Larger Sensors with the 3/16" - 1/4" OD Probe. I just didn't want to have something that big in my Exhaust track. It may or may not make a huge difference..I just didn't like the thought of it. I also chose the Closed tip design because I always think of the worst...and I imagine getting a 97% inspected sensor that was on the line of passing their quality control...and then the tip breaking off and ruining my BW EFR. Man that would suck. Hope that helps!!! HOpe all is well!
Hey Hey! Ok, So when I ordered them, I talked to the Sensor Connection Tech for a bit because I saw the same thing. He assured me that the 1/8" closed tip Probes that I linked above would work Just fine, even for my track car. I had asked him a couple specific questions... the first was your question.. where he assured me they were fine as long as I wasn't boosting 30+ psi for extended periods of time. Then I asked him about my fuel not being Gasoline....But Ethanol.. And he said That's not an issue either. It's still Inconel... they just recommend the 3/16" or 1/4" probes due to drag racers...Retarding Ignition/generating high EGT's/Launch control, Anti-Lag..and High Boost Pressures. None of the following categories the wolf falls into
If you want to be safe... You can always go with one of the Larger Sensors with the 3/16" - 1/4" OD Probe. I just didn't want to have something that big in my Exhaust track. It may or may not make a huge difference..I just didn't like the thought of it. I also chose the Closed tip design because I always think of the worst...and I imagine getting a 97% inspected sensor that was on the line of passing their quality control...and then the tip breaking off and ruining my BW EFR. Man that would suck. Hope that helps!!! HOpe all is well!Thanks for that reply. So, did you have any issues with the EGT probes that came with your Parts Shop Max setup (which I'm currently running)? Just wanting to be aware if I need to be concerned, that's all. Thanks again Aaron. Best of luck with the Wolf in 2016. Will you be helping Mike again this season?
Thanks so much for the Support! I'm pushing hard! The car will def be at Seven stock FOR SURE this year! I'll make arrangements to get it there even if i'm time crunchin again.
Also...Yes!!! I will be working with Mike again this year!!! We've kept in touch over the break, and the MX is looking HAWWWT with the new ND AERO Kit!! Some Exciting things. But We're doing Every Round this year including Montreal!! And a couple other events as well as the Drift Shifters Event in NZ In December at the end of the year!! Should be awesome!! I'm Pretty Excited! But as we speak..the MX is somewhere in the Pacific on it's way over!! Probably pretty close by now!

Full Member
Joined: Jan 2013
Posts: 234
Likes: 0
From: NZ
so you coming down our ways for a working holiday at end of year? radness.
the wolf is getting the full treatment. always enjoy your updates. always seem to get across the time management aspect of getting things done.
redline and ngk sent you a small fortune of plugs and oil sweet hook up there. have they supplied you a year's worth.the 7420s in nz are $50nzd each. and knowing there endurance you wouldn't go though to many when engine dialed in.
now in what state is engine currently?
are you staying with the adaptronic again this year? potentially upgrading to the modular models?
I can't wait till December!! Should be a good time. Glad to hear you like the Updates!! trying my hardest to keep em coming strong! Plugs last me 3 Events.. I can stretch them to 4 if need be...but i'd rather not. The best part about NGK is they understand racing. They specifically said they want me to protect my investment, and if they can help me with my dream, then why not?! So they said they want new plugs when I go to every event, practice, fun event, demo's, dyno's you name it
So There's a bit of a sad story behind the engine. I'll post up after this

I'll be staying with my current ECU for the time being. The New Modular comes out soon, but I'd like to re-wire the car 100% before installing it! Should be a good time there too!
Update: "Unavoidable Circumstances"
Well I'm sure some of you guys have been wondering why I havn't gotten to the engine. Well it is a bit of a touchy subject. But the engine has been apart for about 3 Months now. We dropped off my housings at the machinist the same week. Although I didn't know the guy, he's been very reliable and a perfectionist for Abel for over 15 Years. Well, I was driving on a parts run one evening when I got a call from Abel. He sounded really sad and told me he had some really bad news. His long time family friend and machinist had passed away a couple nights before that. It was an out of the blue sort of thing and it came as a shock to a lot of his family and friends. I had only ever met him once but he seemed like a really good guy, with a perfectionists skill, hard working and very reliable. Sad to see someone pass. And my thoughts and prayers go out to his family and friends.
We sat on it for a few days and due to respect, it was another week before we contacted them to try and get my housings back from the shop. Well that was un-successful and it fast turned into a nightmare of a situation. Getting my housings back took nearly this entire time. Meanwhile, the rest of the engine is sitting and waiting to be assembled, and Round one is this weekend March 18-19th. We finally got the housings back Thursday morning. Thankfully work hadn't been done to them. But that left us with finding a new Machinist who was capable of doing a pretty precise job. luckily Abel had that figured out and sorted by the time we got the housings back, so we were able to drop the housings off at the new machinist on Saturday. But due to the time constraints and the fact that there is still work to be done with the new set up... I'm making the call, and sadly I won't be making round 1 with the Wolf. It's a HUGE blow to me, and I've been stressed out more than any other time in my life. But sometime's you can't plan for certain things. And that threshold can only cover so much any ways. So it was a hard decision, but it's better to make sure everything is right with the set up than rush it and end up missing something important which could result in failure.
I have a car that I MIGHT be able to drive... It is being dropped off at the Fab shop today which we were assured it would only take 2 days to complete. But as always, I'm not 100% sure it's going to work out. But I am hopeful with it and it's a good guy so things are looking up for it.
Anyways! On to Updates for the car!!
Due to the above.. I have been able to tackle a lot of little things I had been meaning to do on the car but never got around to.
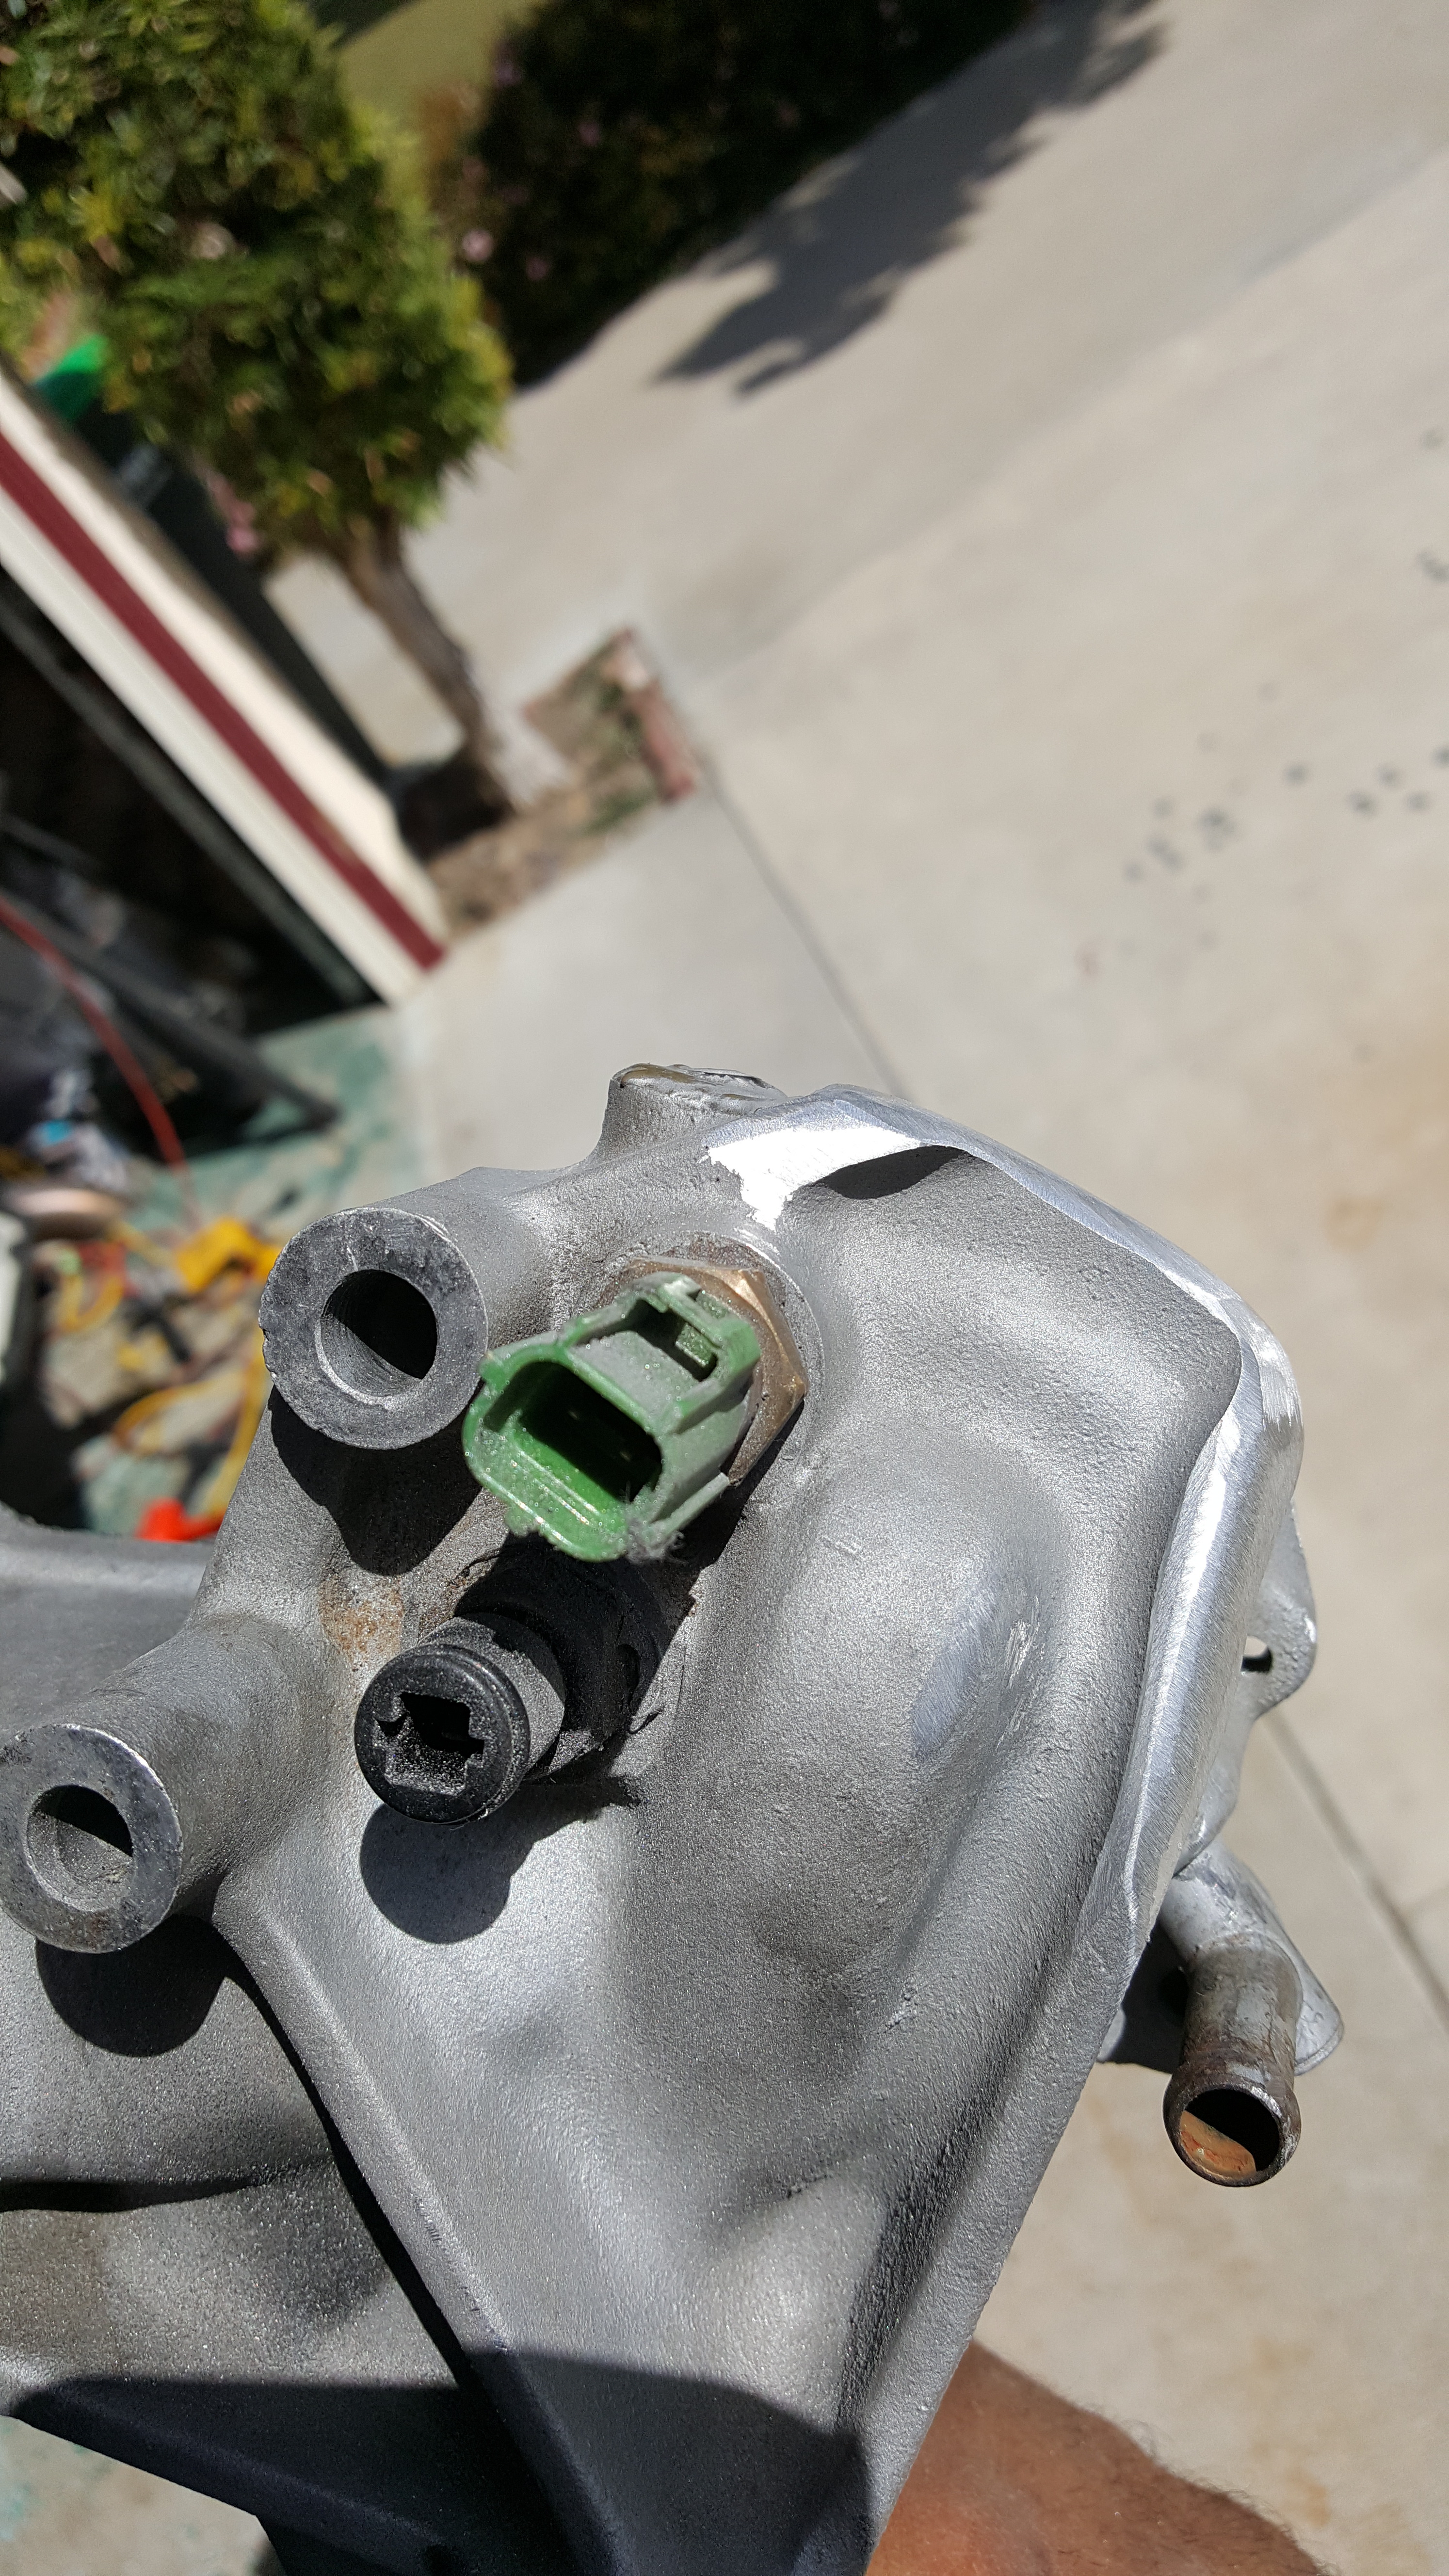
Went ahead and Shaved off the Air Pump "Ear" on the water pump housing. It was annoying and would make for a cleaner look and more room to get my hands in under the UIM or near the FPR if need be.
I do all of this with my Angle Grinder haha... Just takes a bit of time to get "Right"
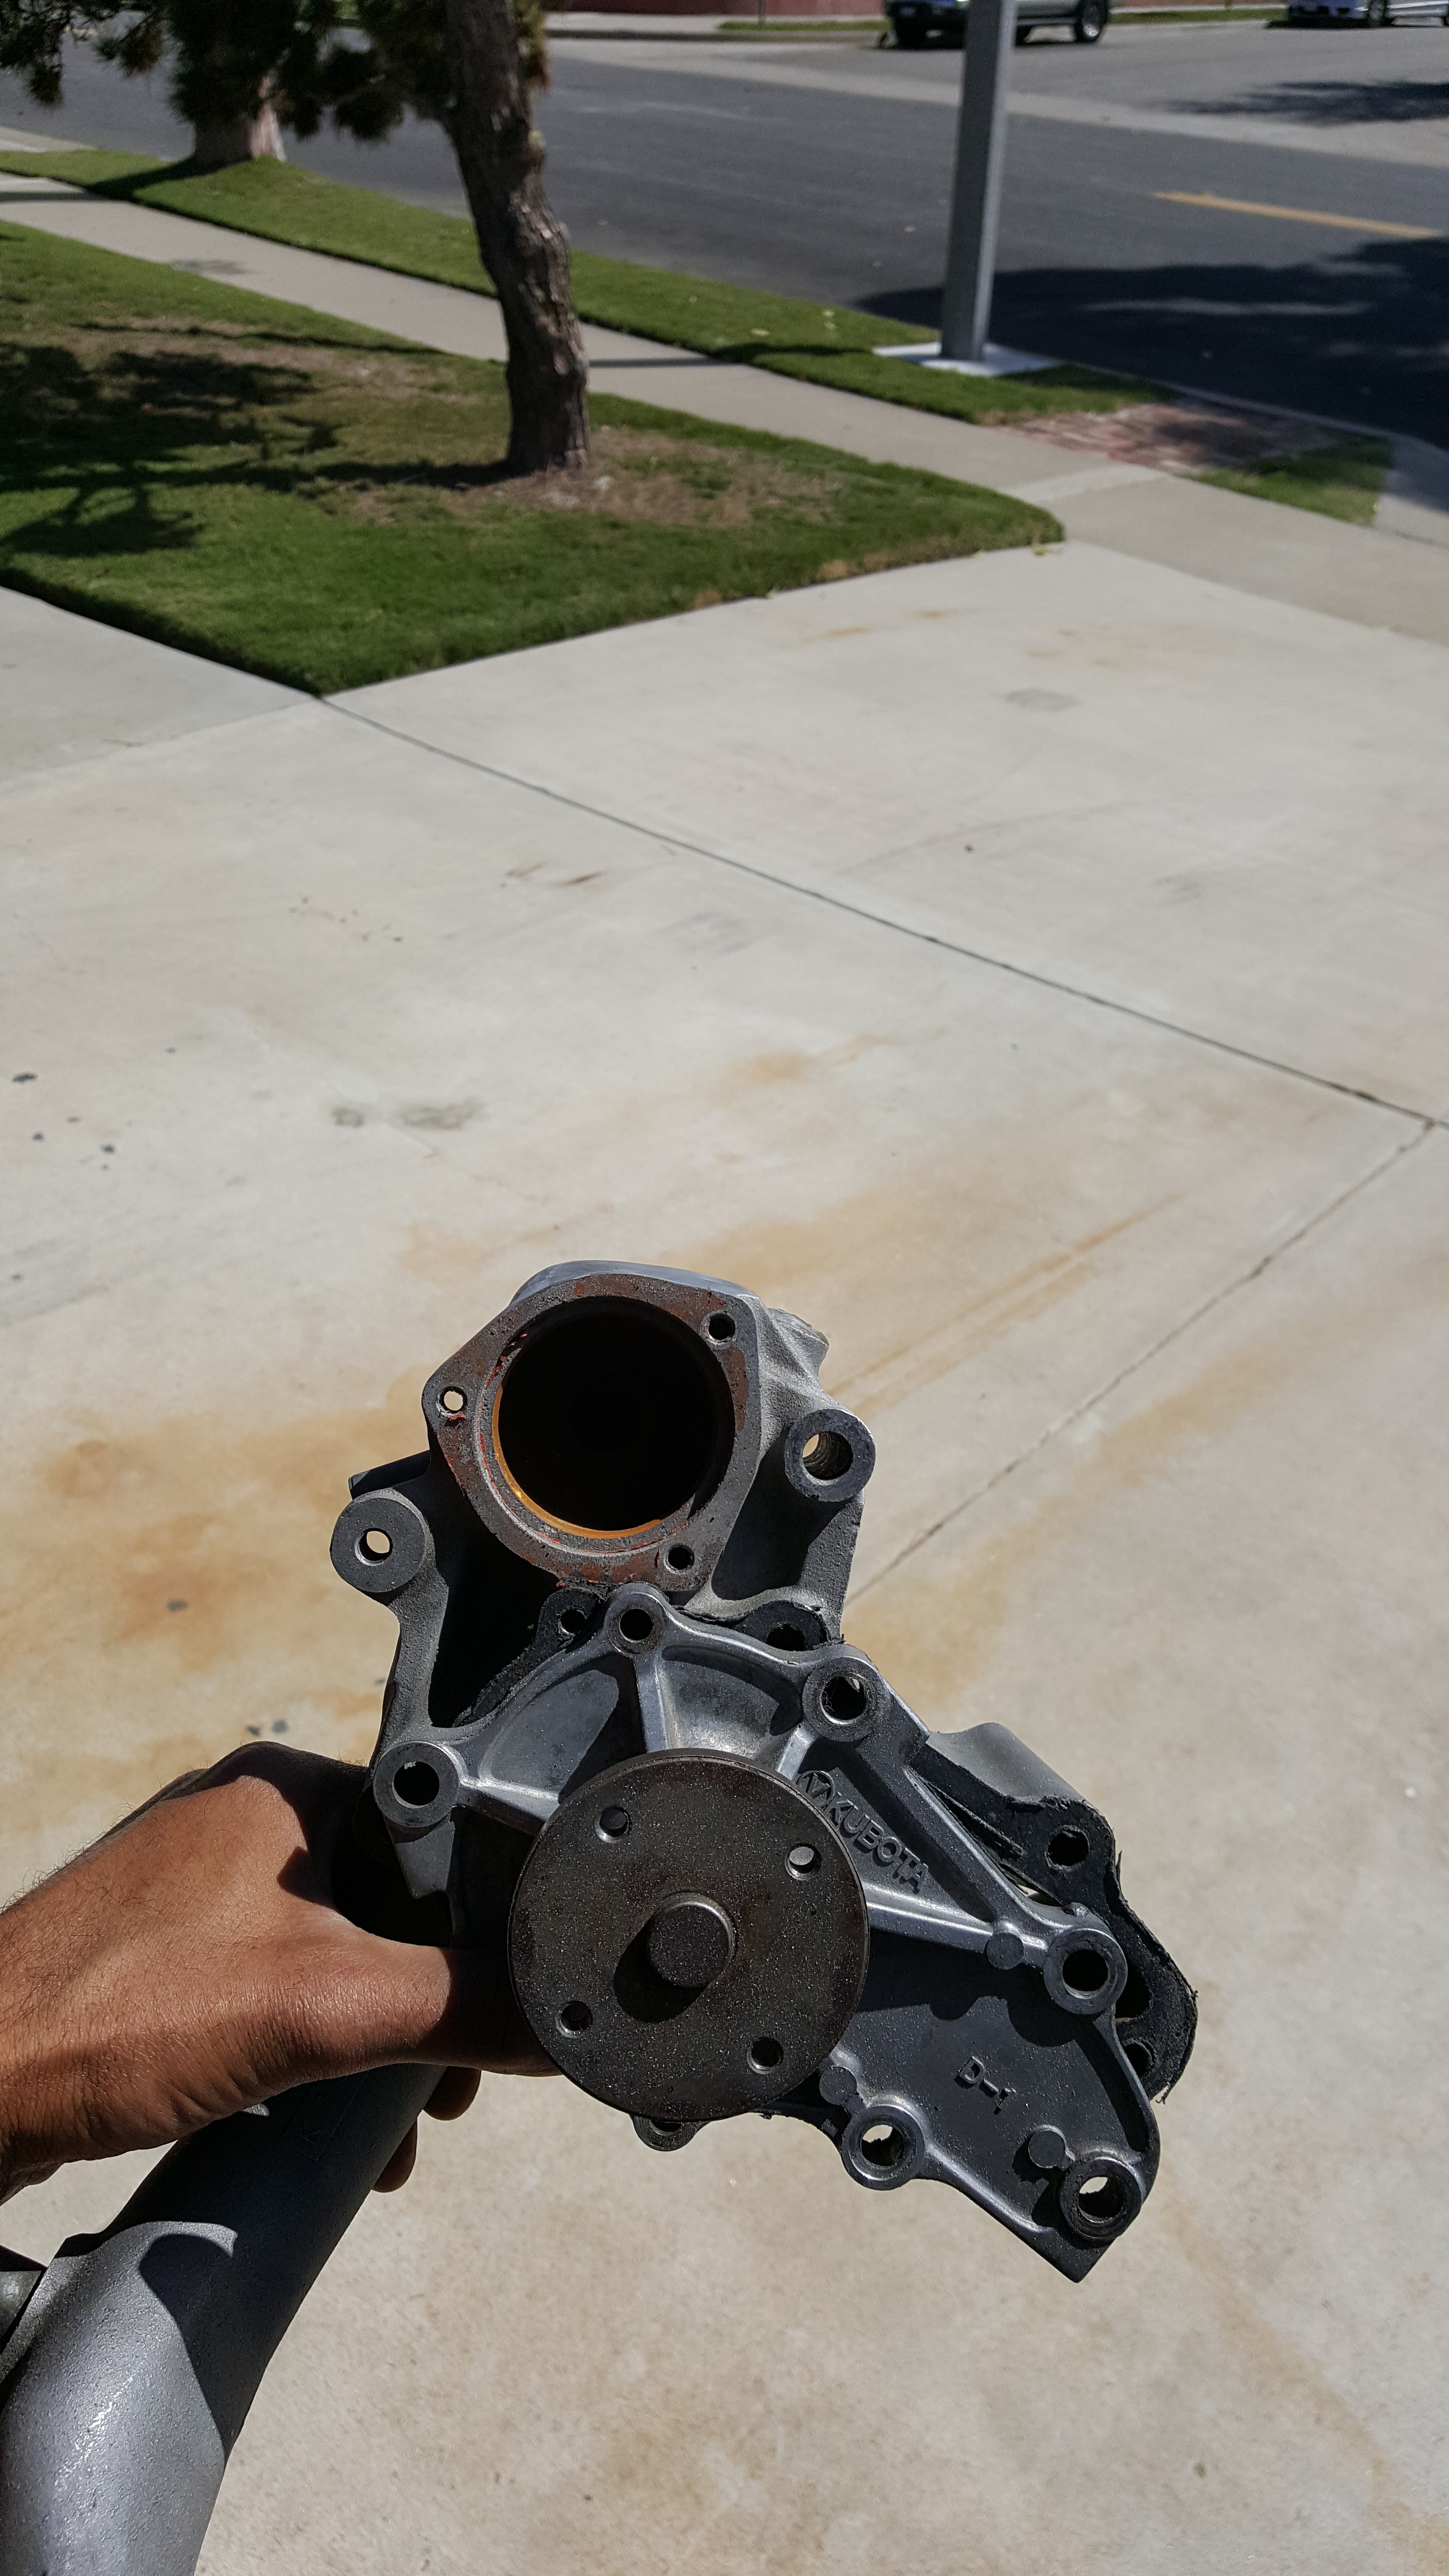
Top
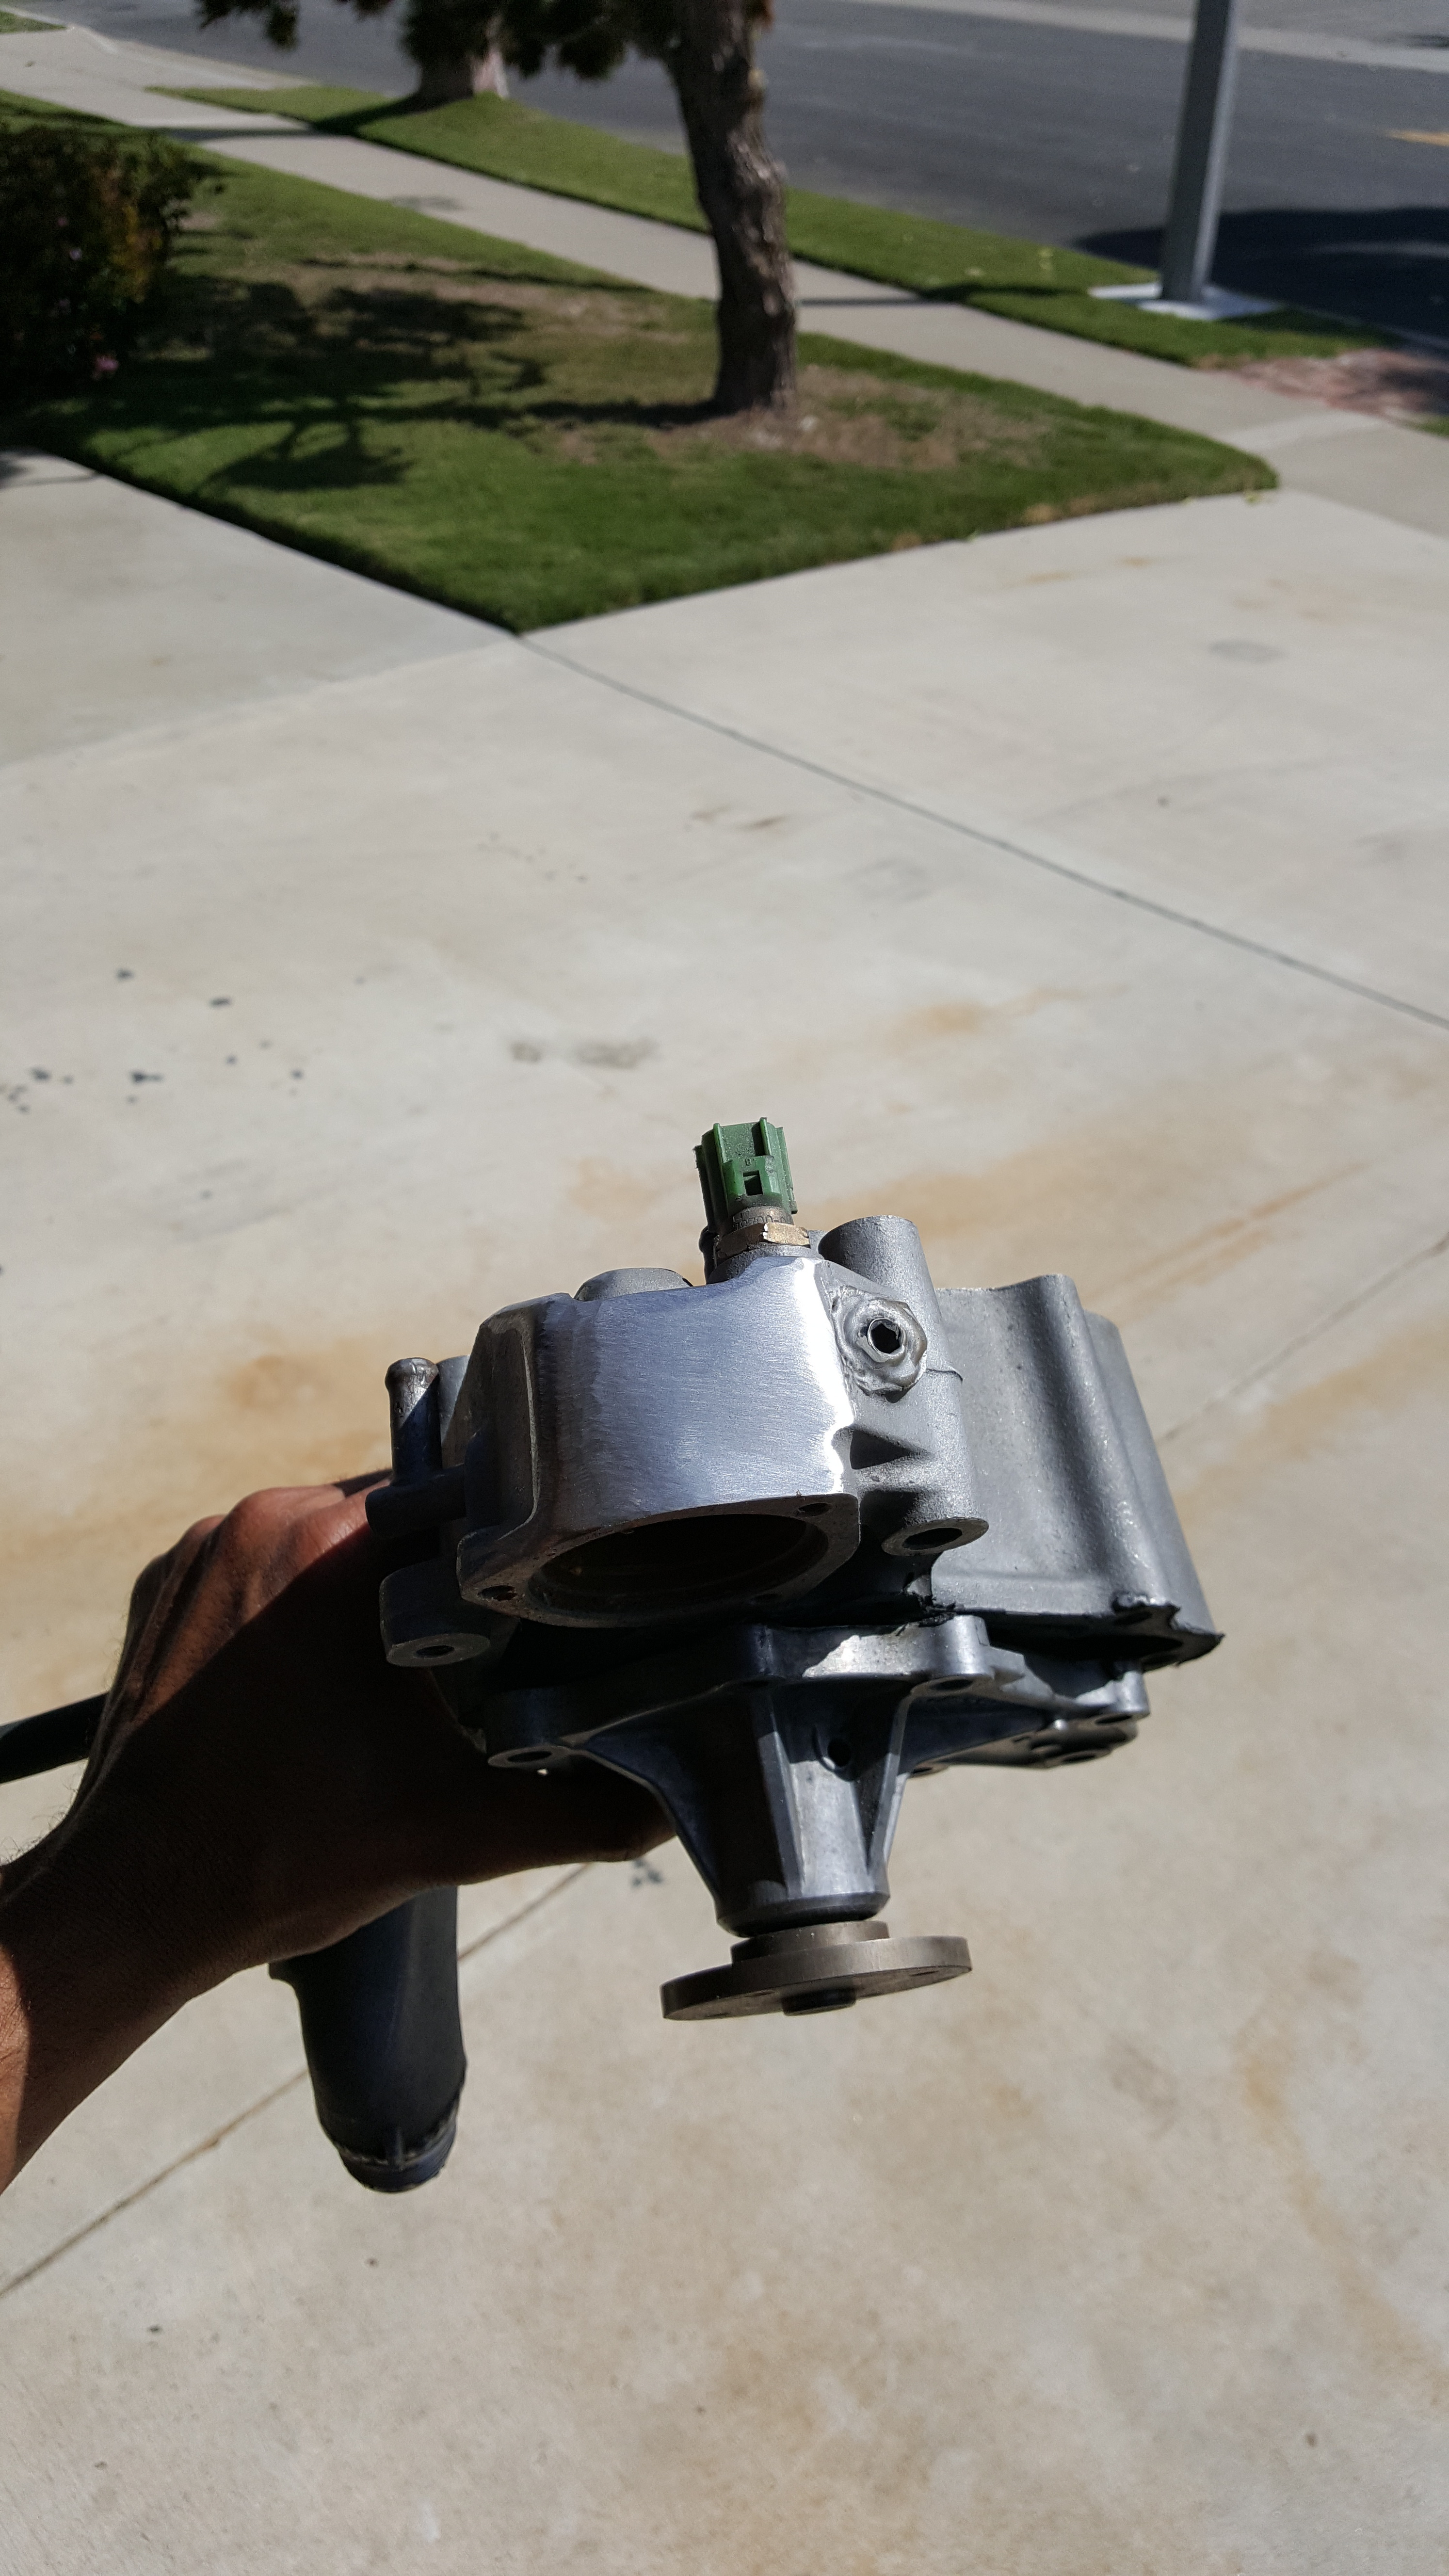
Rear
By the way.. Does anyone know where I can Purchase a New Thermo Fan Switch Harness Side Connector AND pin? I've literally looked for months.
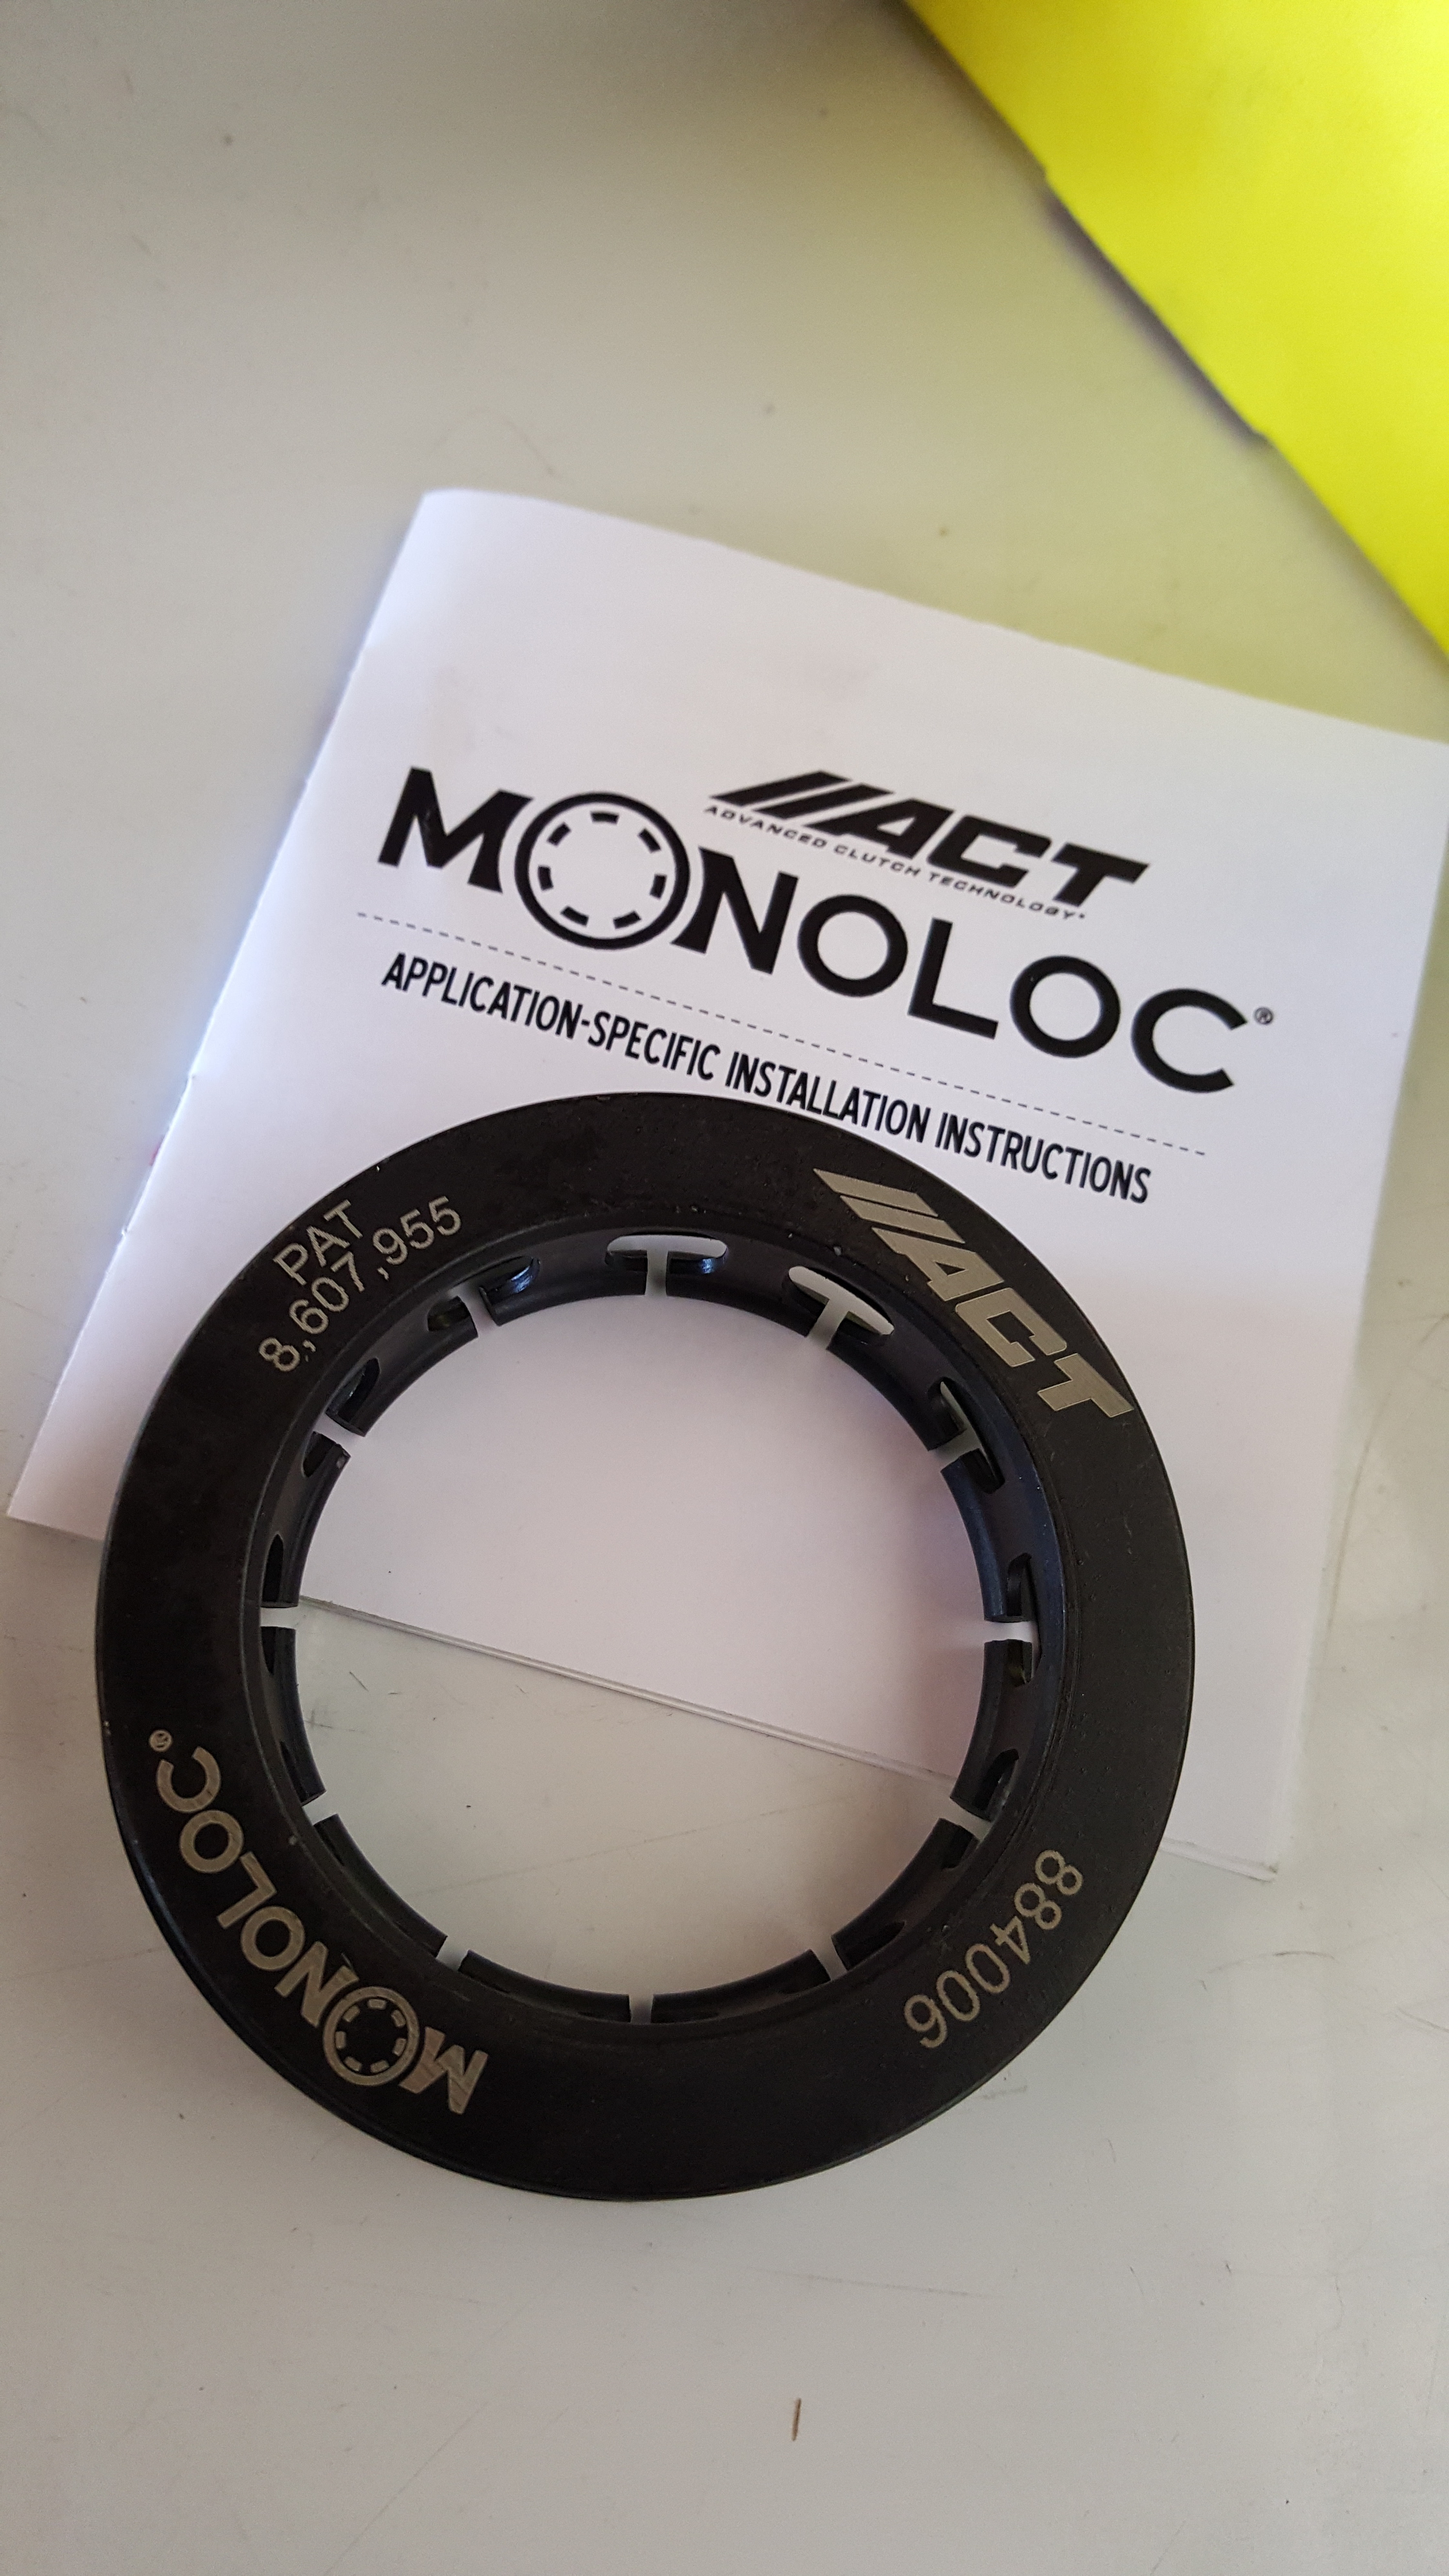
Purchased a new ACT mono-Lock for my Clutch. These have great Reviews!! Lets hope it does what it's supposed to!!
Sacrilegious.. But Sometimes you've got to do what you've got to do is best for the car/Budget and Performance
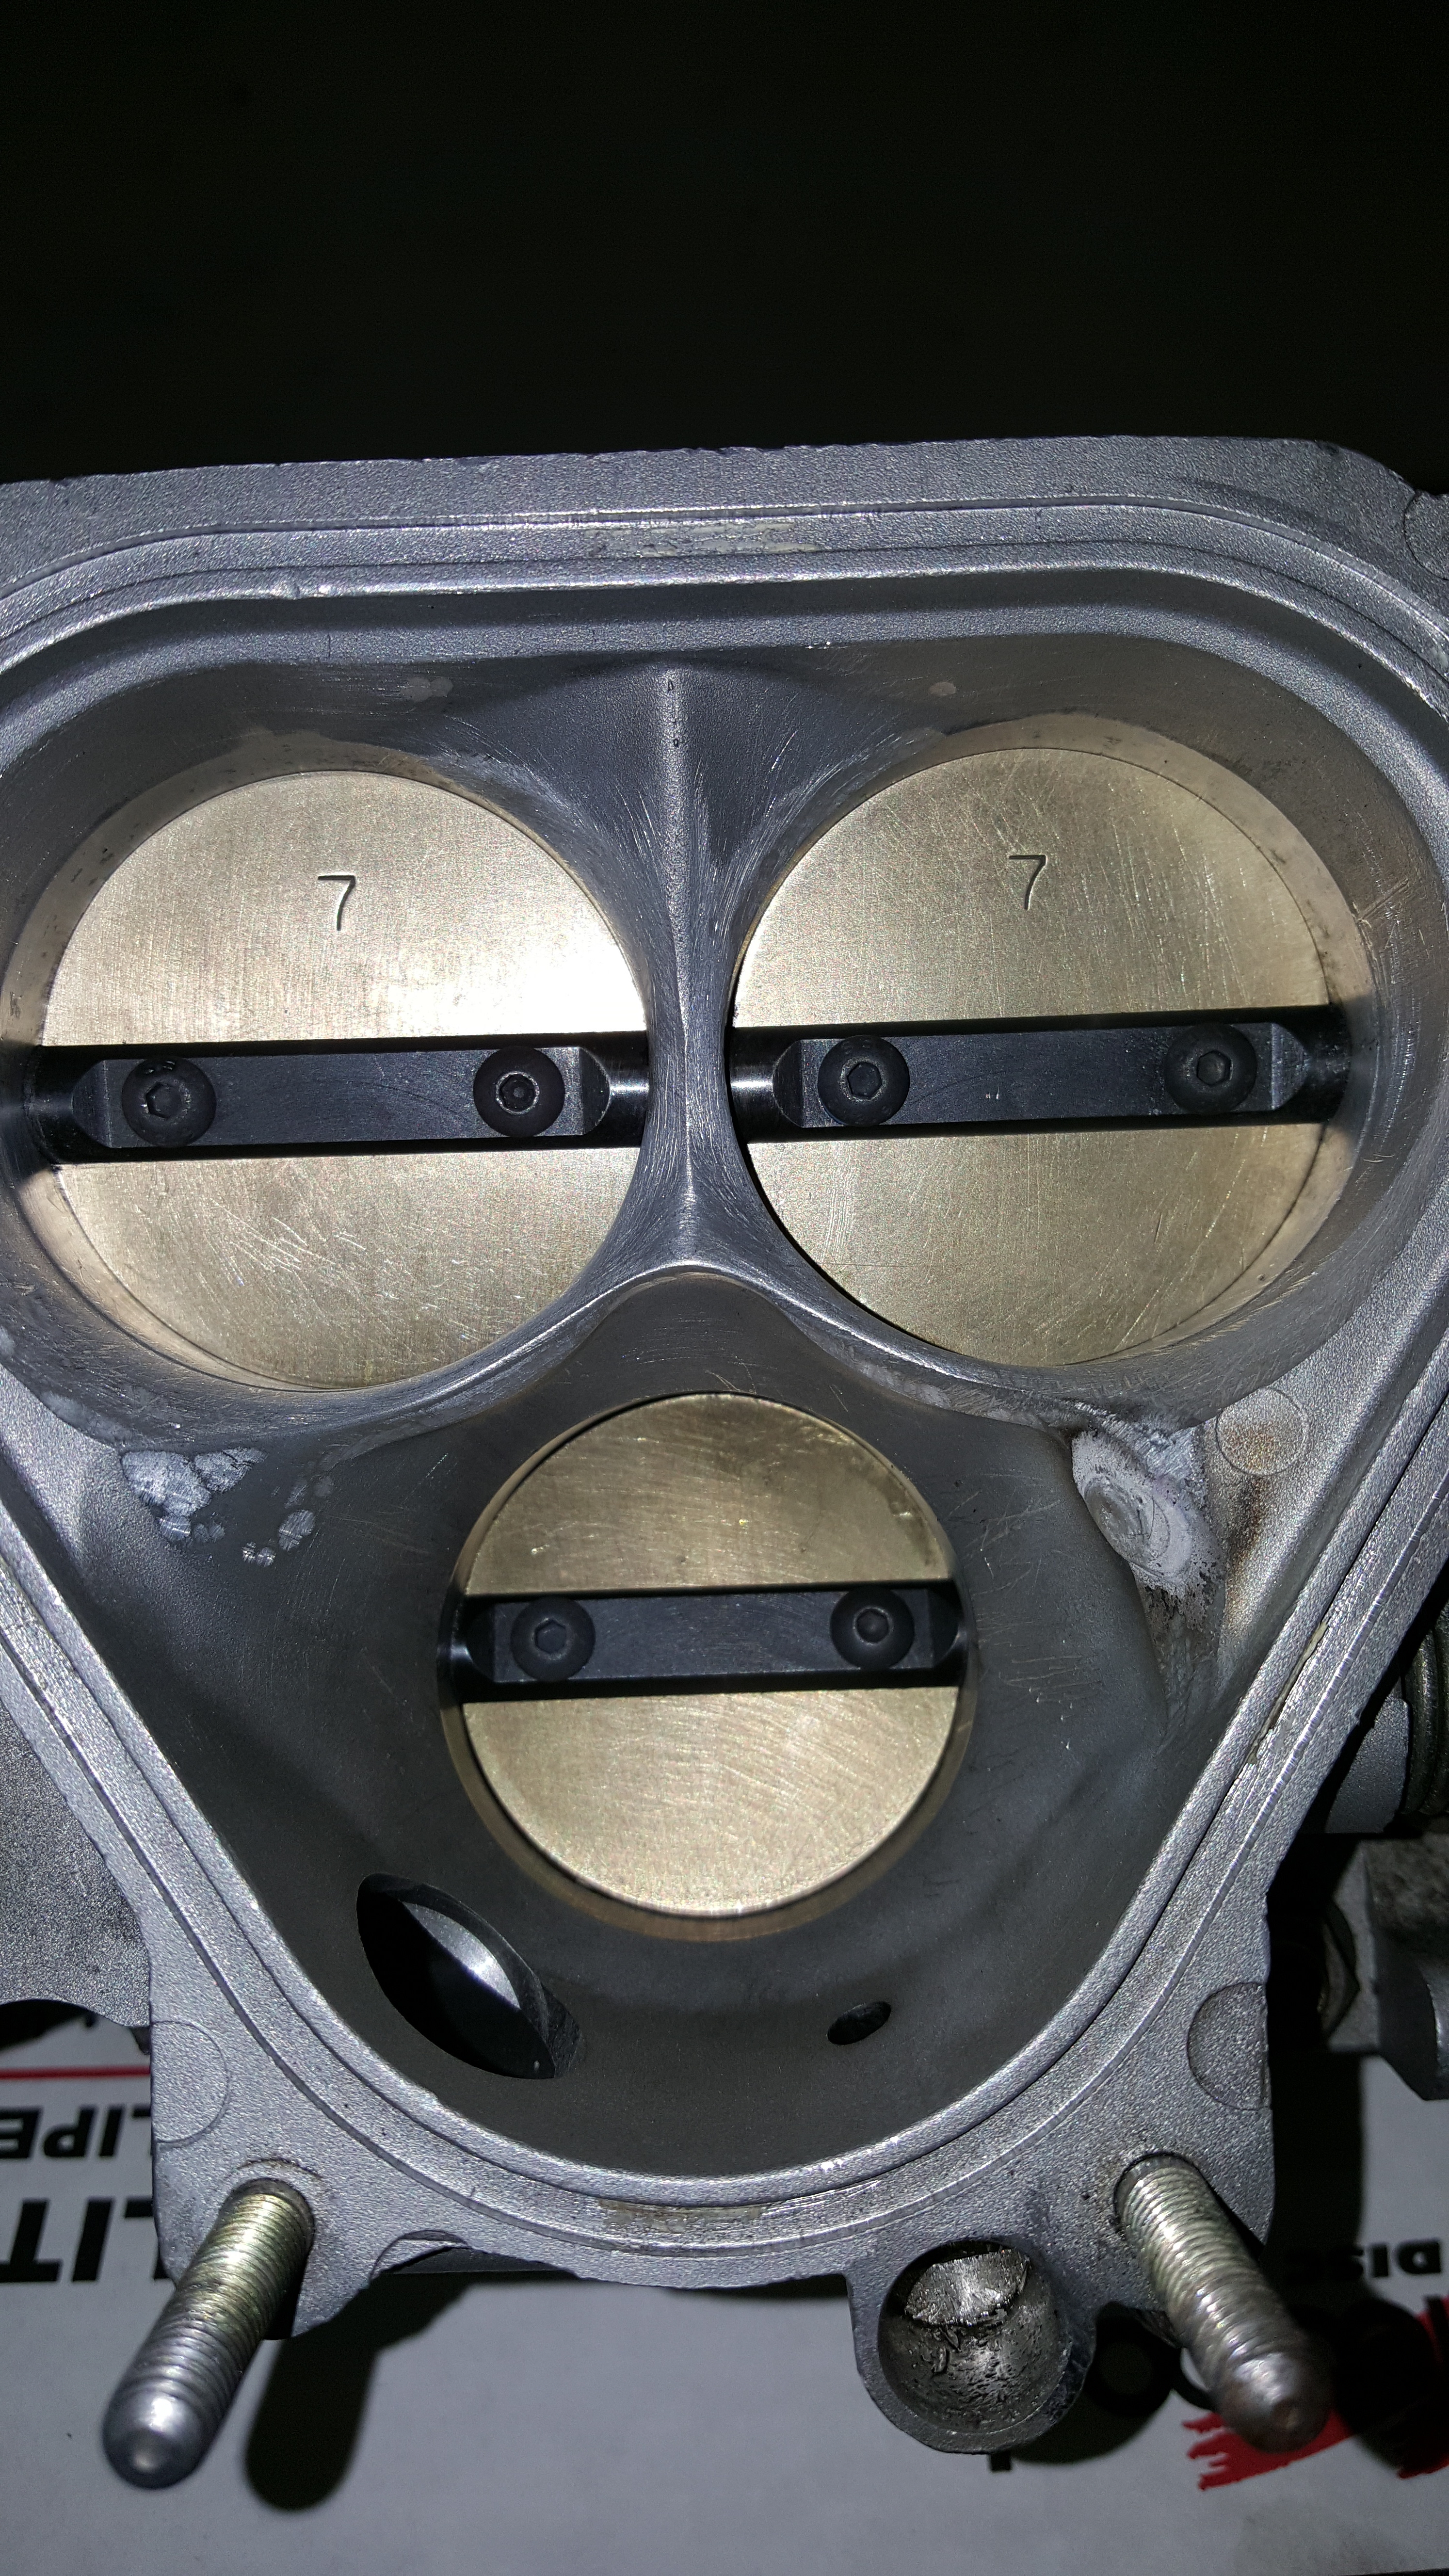
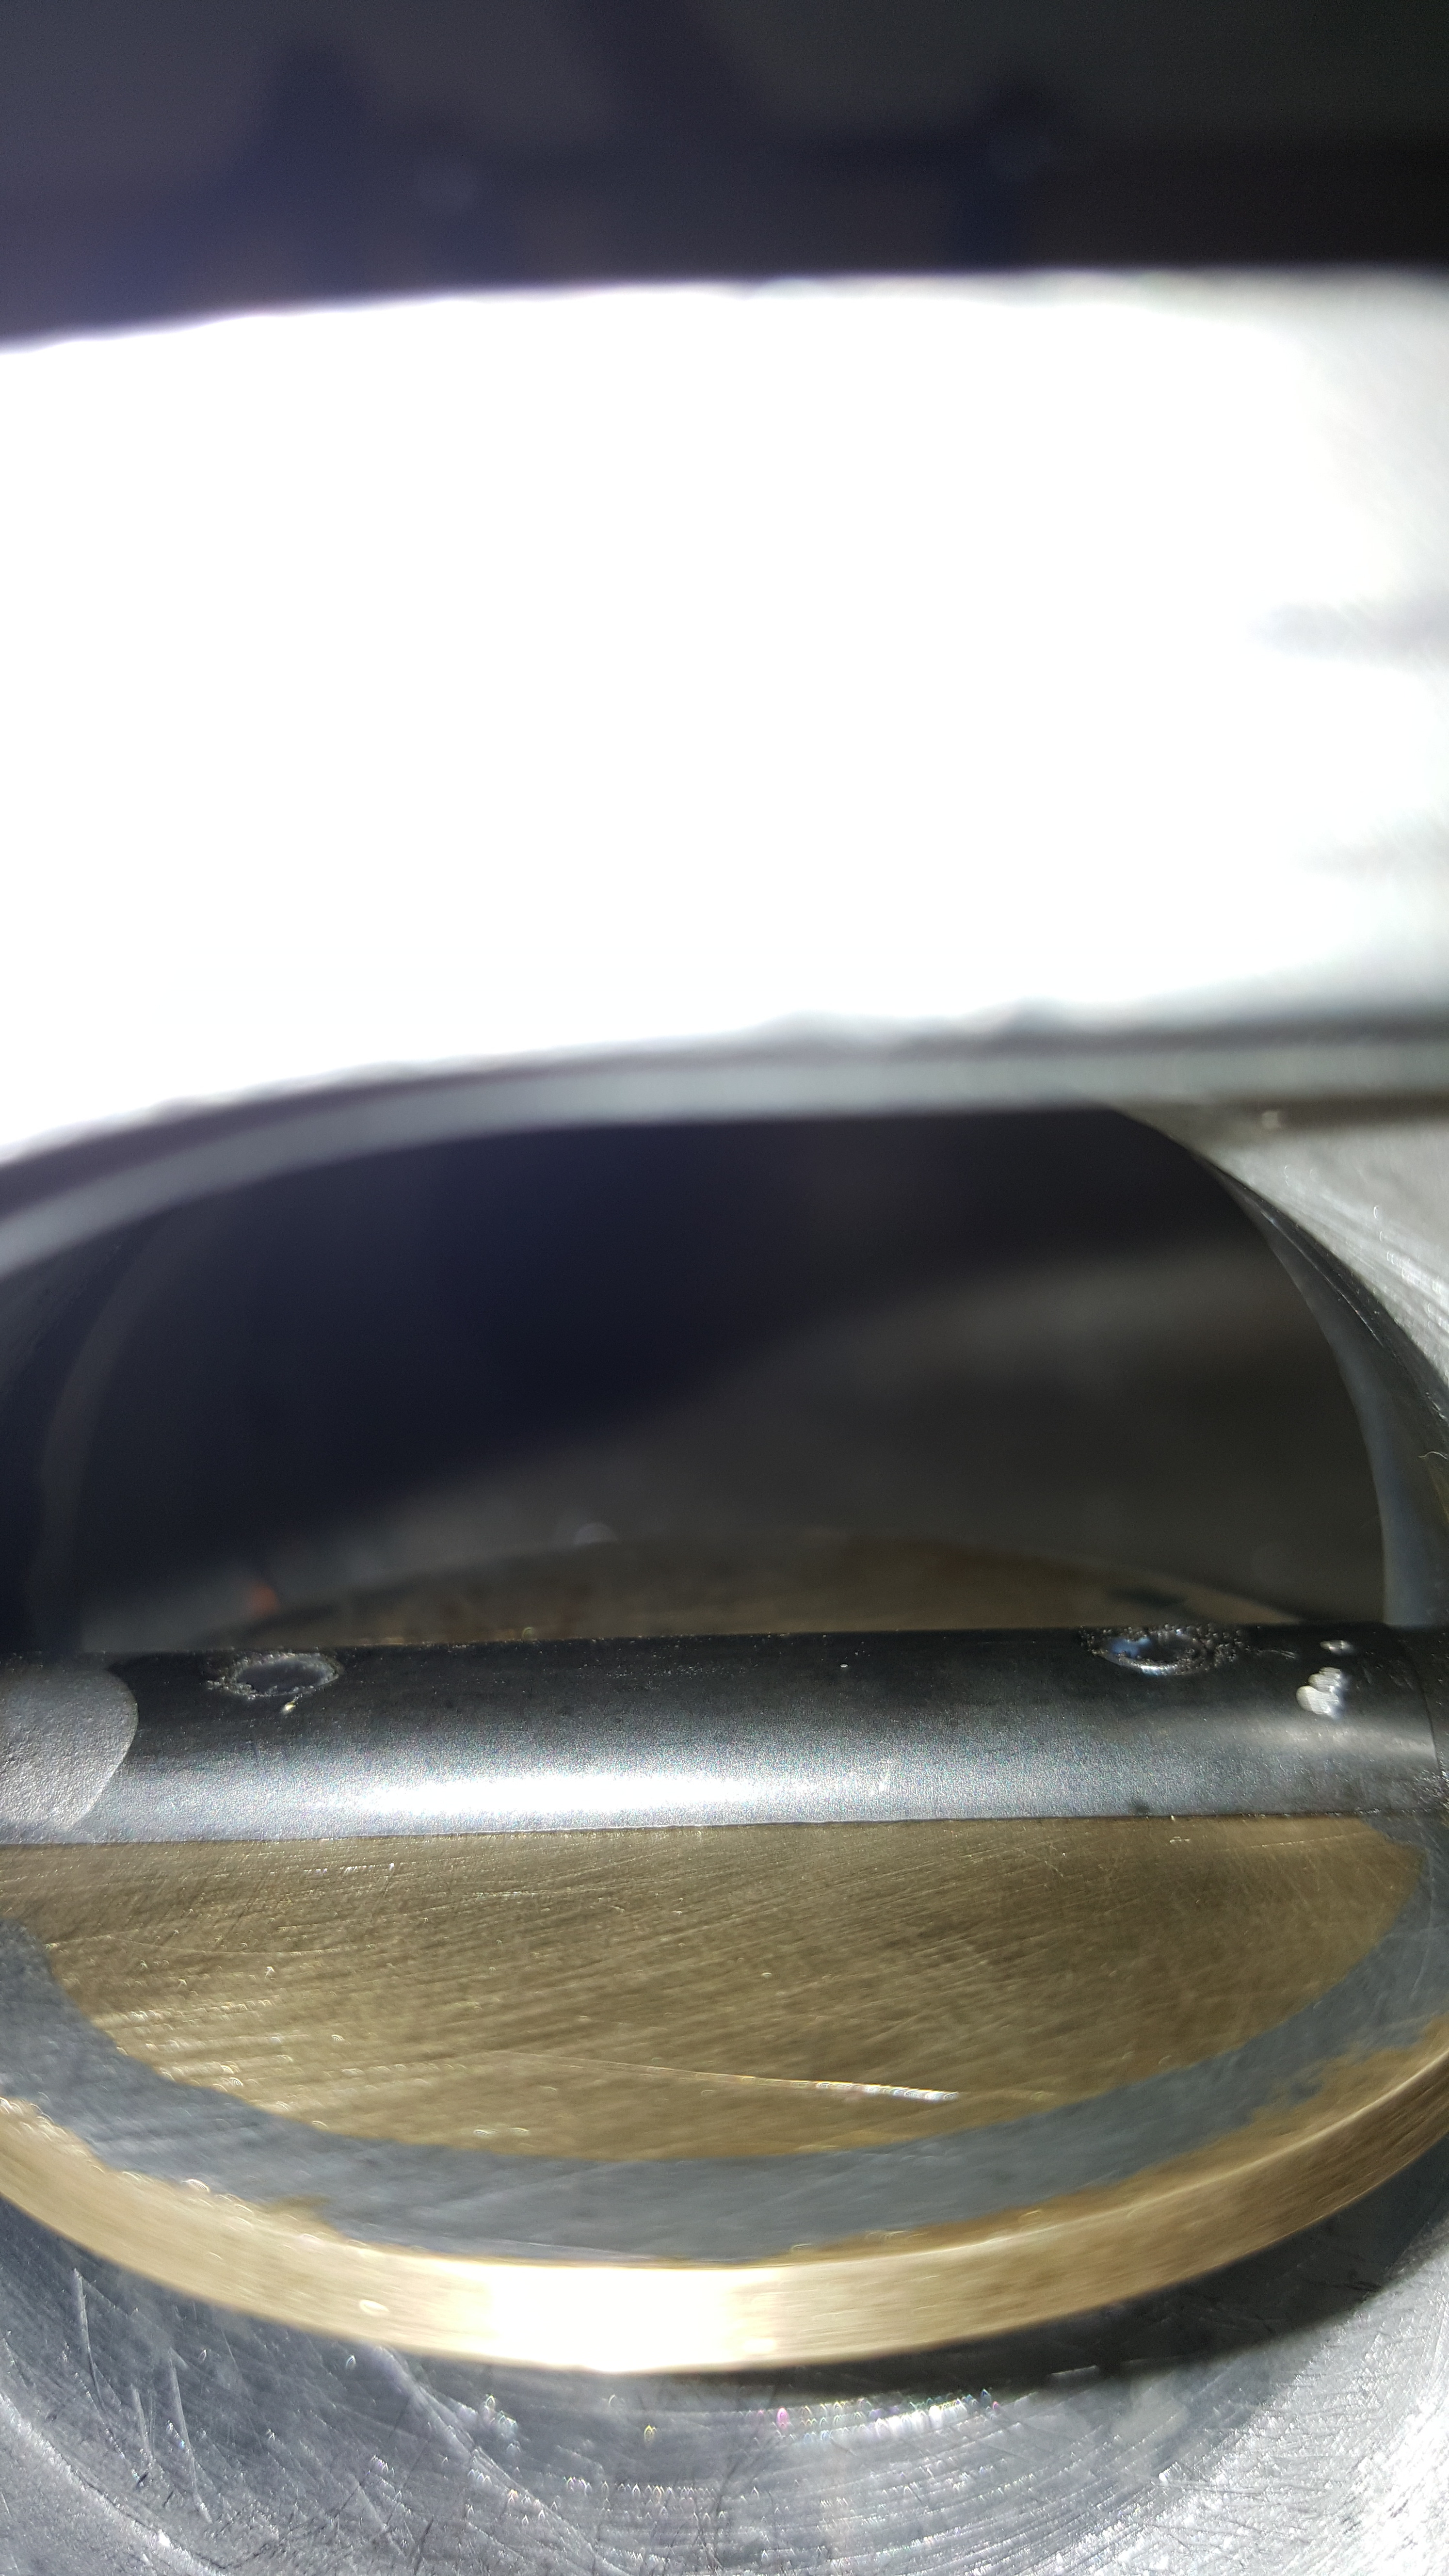
Then I got to porting my Throttle Body. I ended up porting through what I think... is a coolant port.. but I didn't care much to check it out. So I had to have Dan Dab weld it and smooth it out.
Heres what I started with
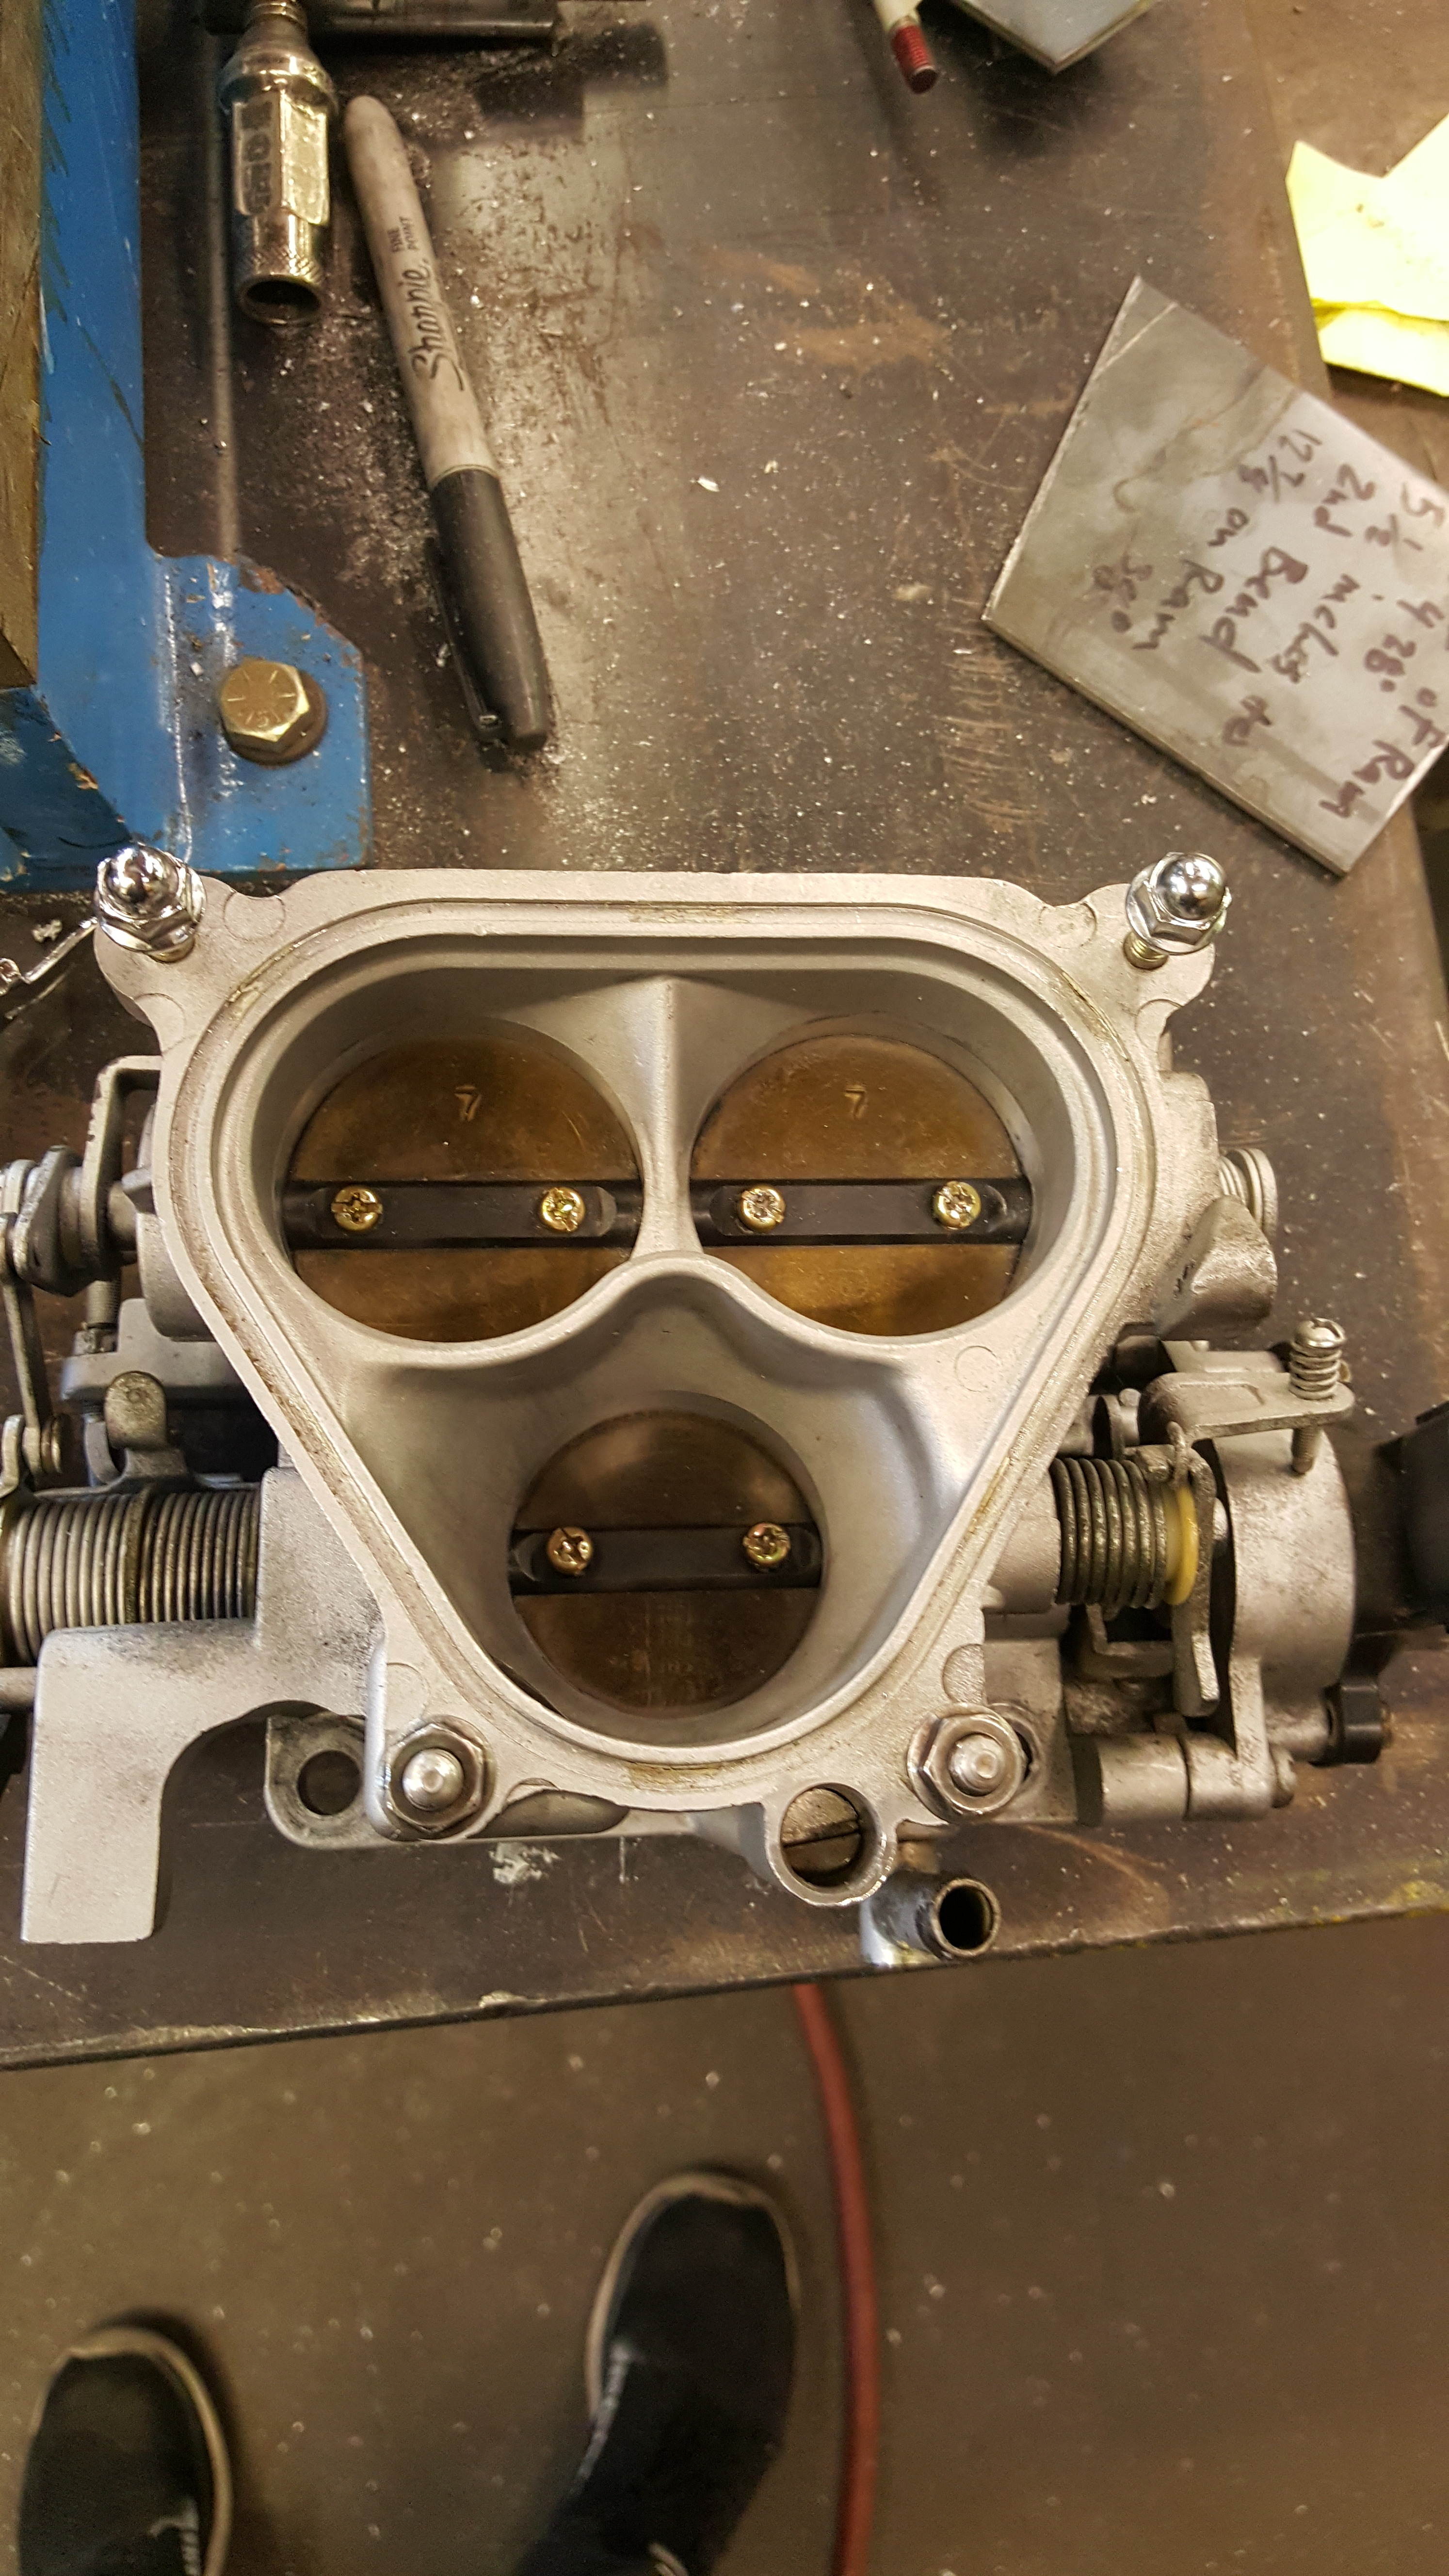
And here's where i ended...with the exception of finishing it off with some nice fine sand paper. Sorry I forgot to take pics!!
I get a lot of crap for doing stuff like this. I know people say it's pointless, and that it really isn't helping that much. But if I can make it that much easier to make power... Less stress. Less "Work" on any aspect of the engine/turbo/boost control... I'm going to do it. It took me a good hour...because I had to be careful to to skip the bit or go to deep. Plus I wanted it all to be symmetrical. But I feel like it's worth it =-)
Dan Fixing my mistake
Was able to watch some FD Japan late one night
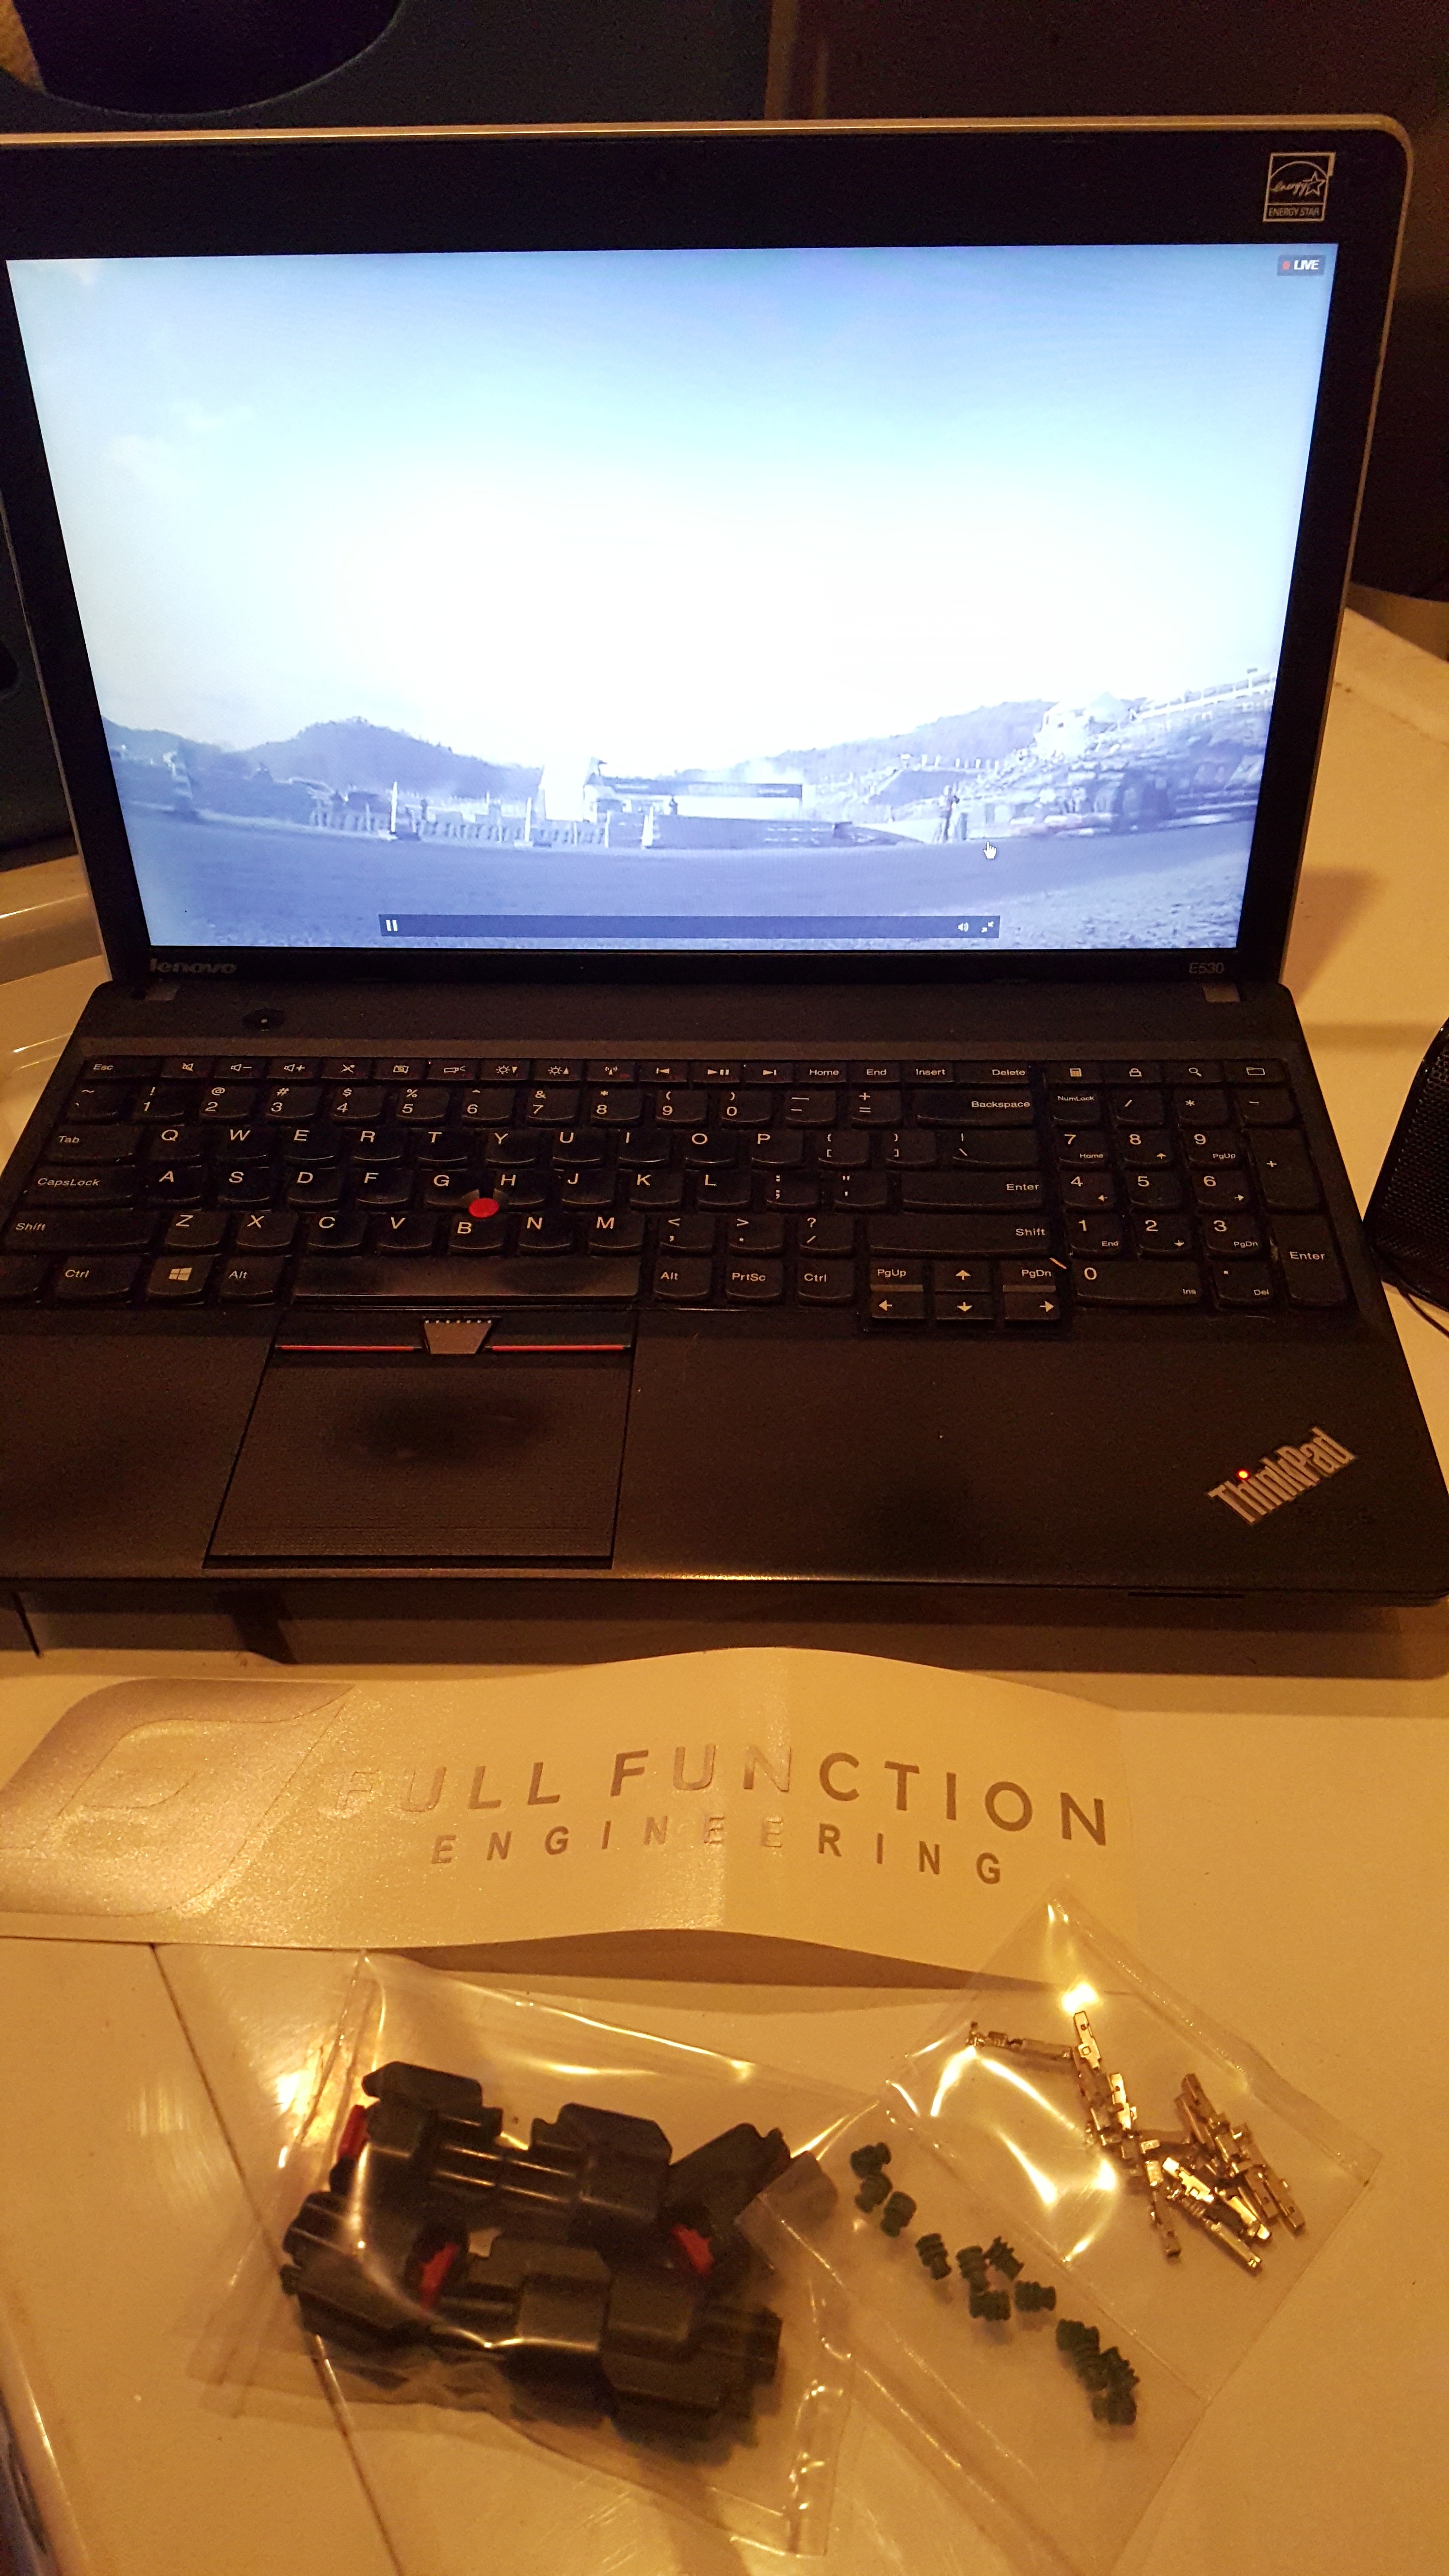
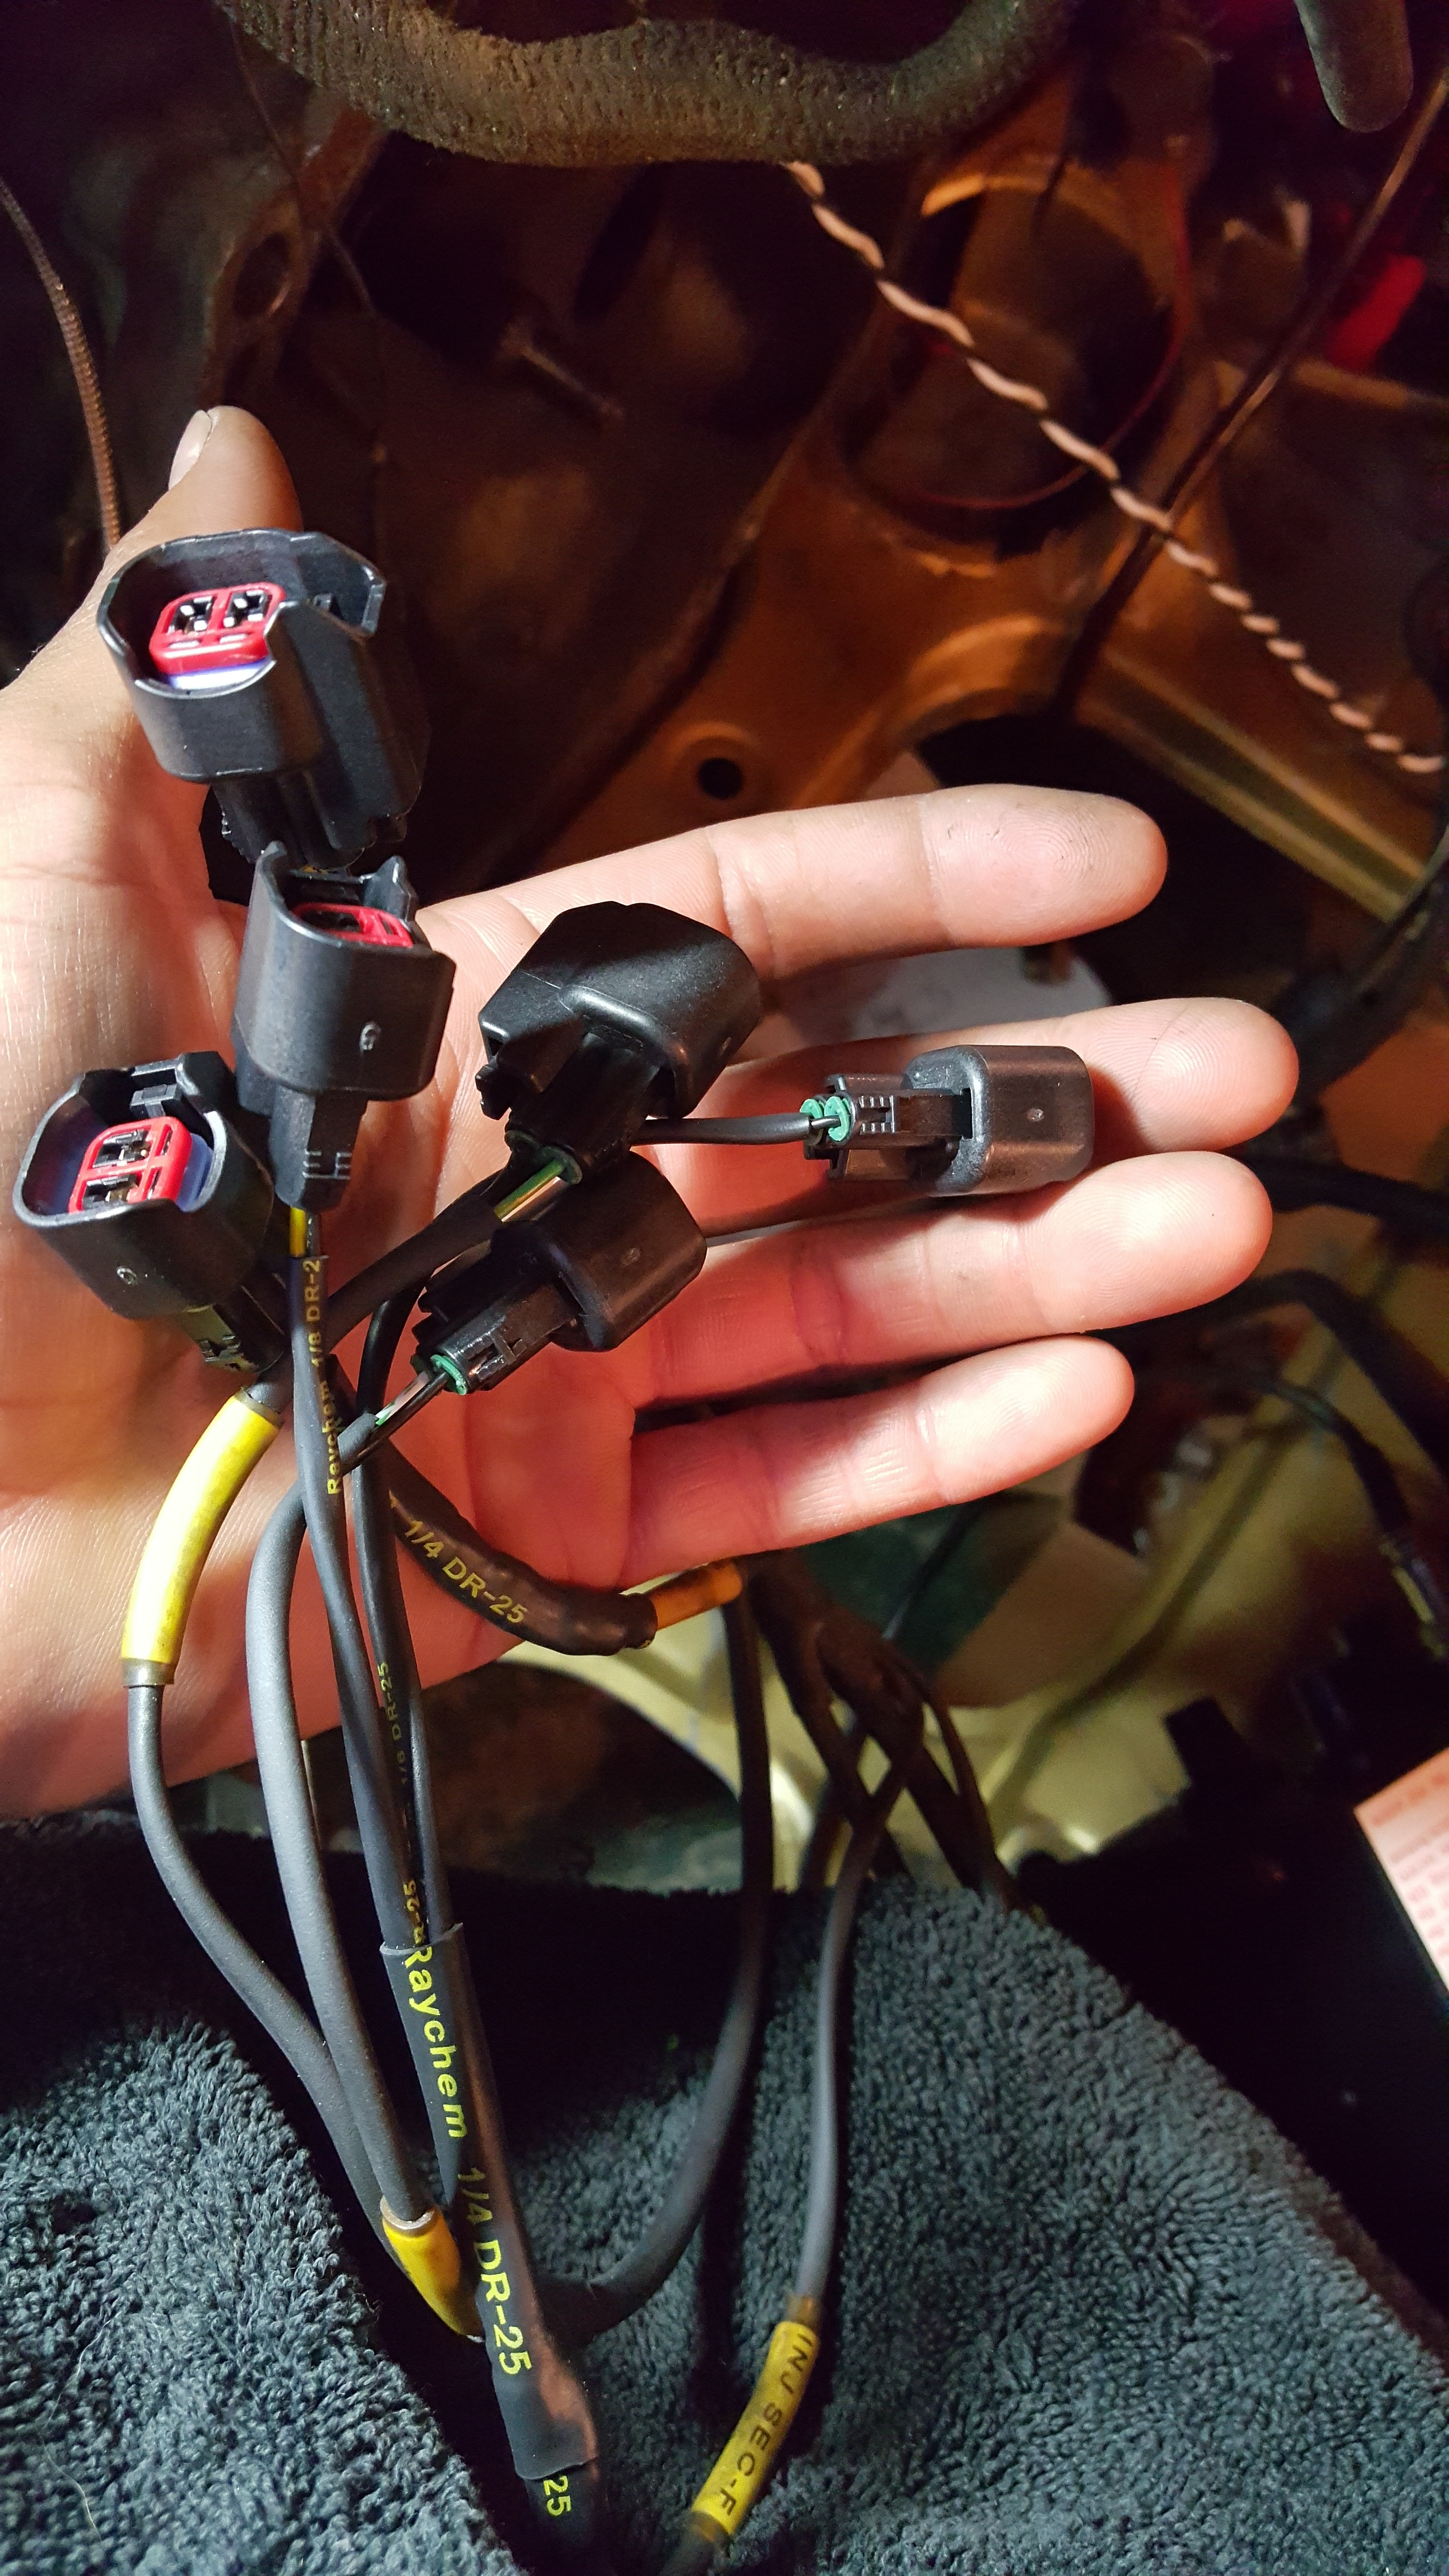
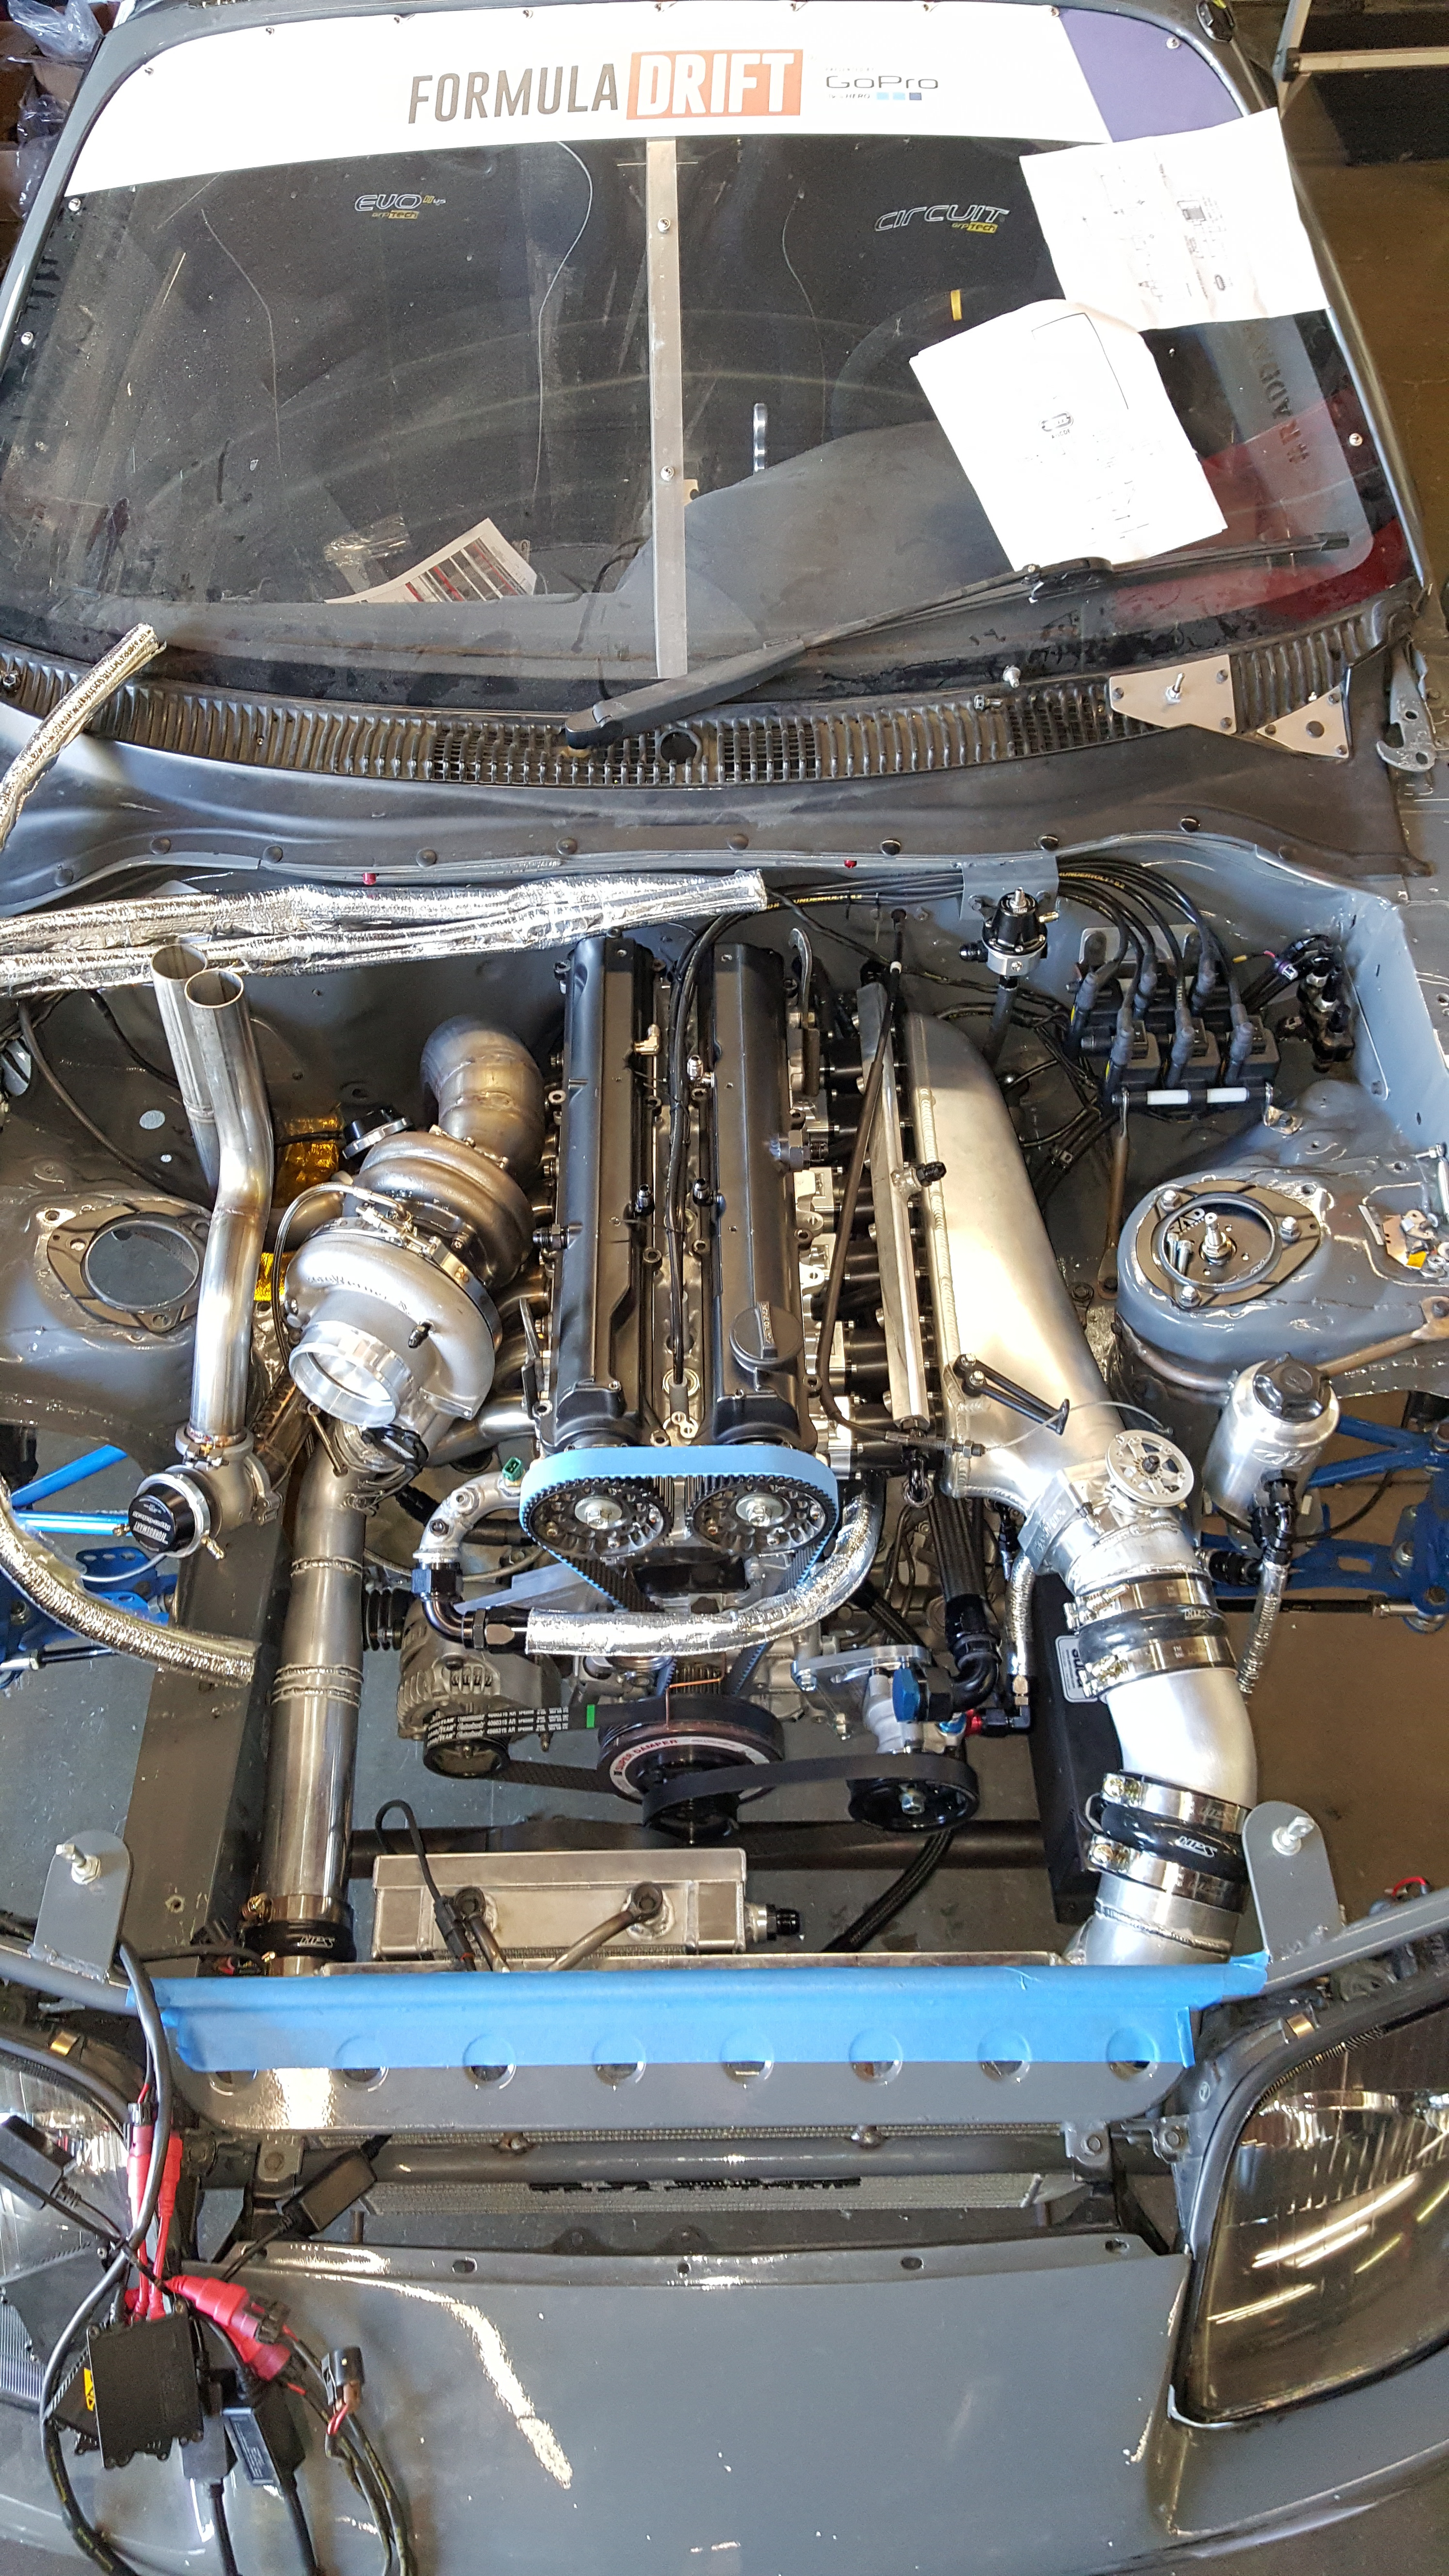
And Last night I spent a while Wiring in my New Injector clips into the Engine Harness. My set up will fire both additional sets of injectors as one. ...or in other words Batch Firing. So Primaries will have 1 Inj each. Rear (1) 1300/Front (1) 1300. Secondaries will have Rear (2) 1300's / Front (2) 1300's for a total of 6 Injectors with Secondaries Batch firing together.
Spent a long time measuring and getting wire lengths right..and it came out great. I'll have to take pics when they're actually on the manifold and clipped in
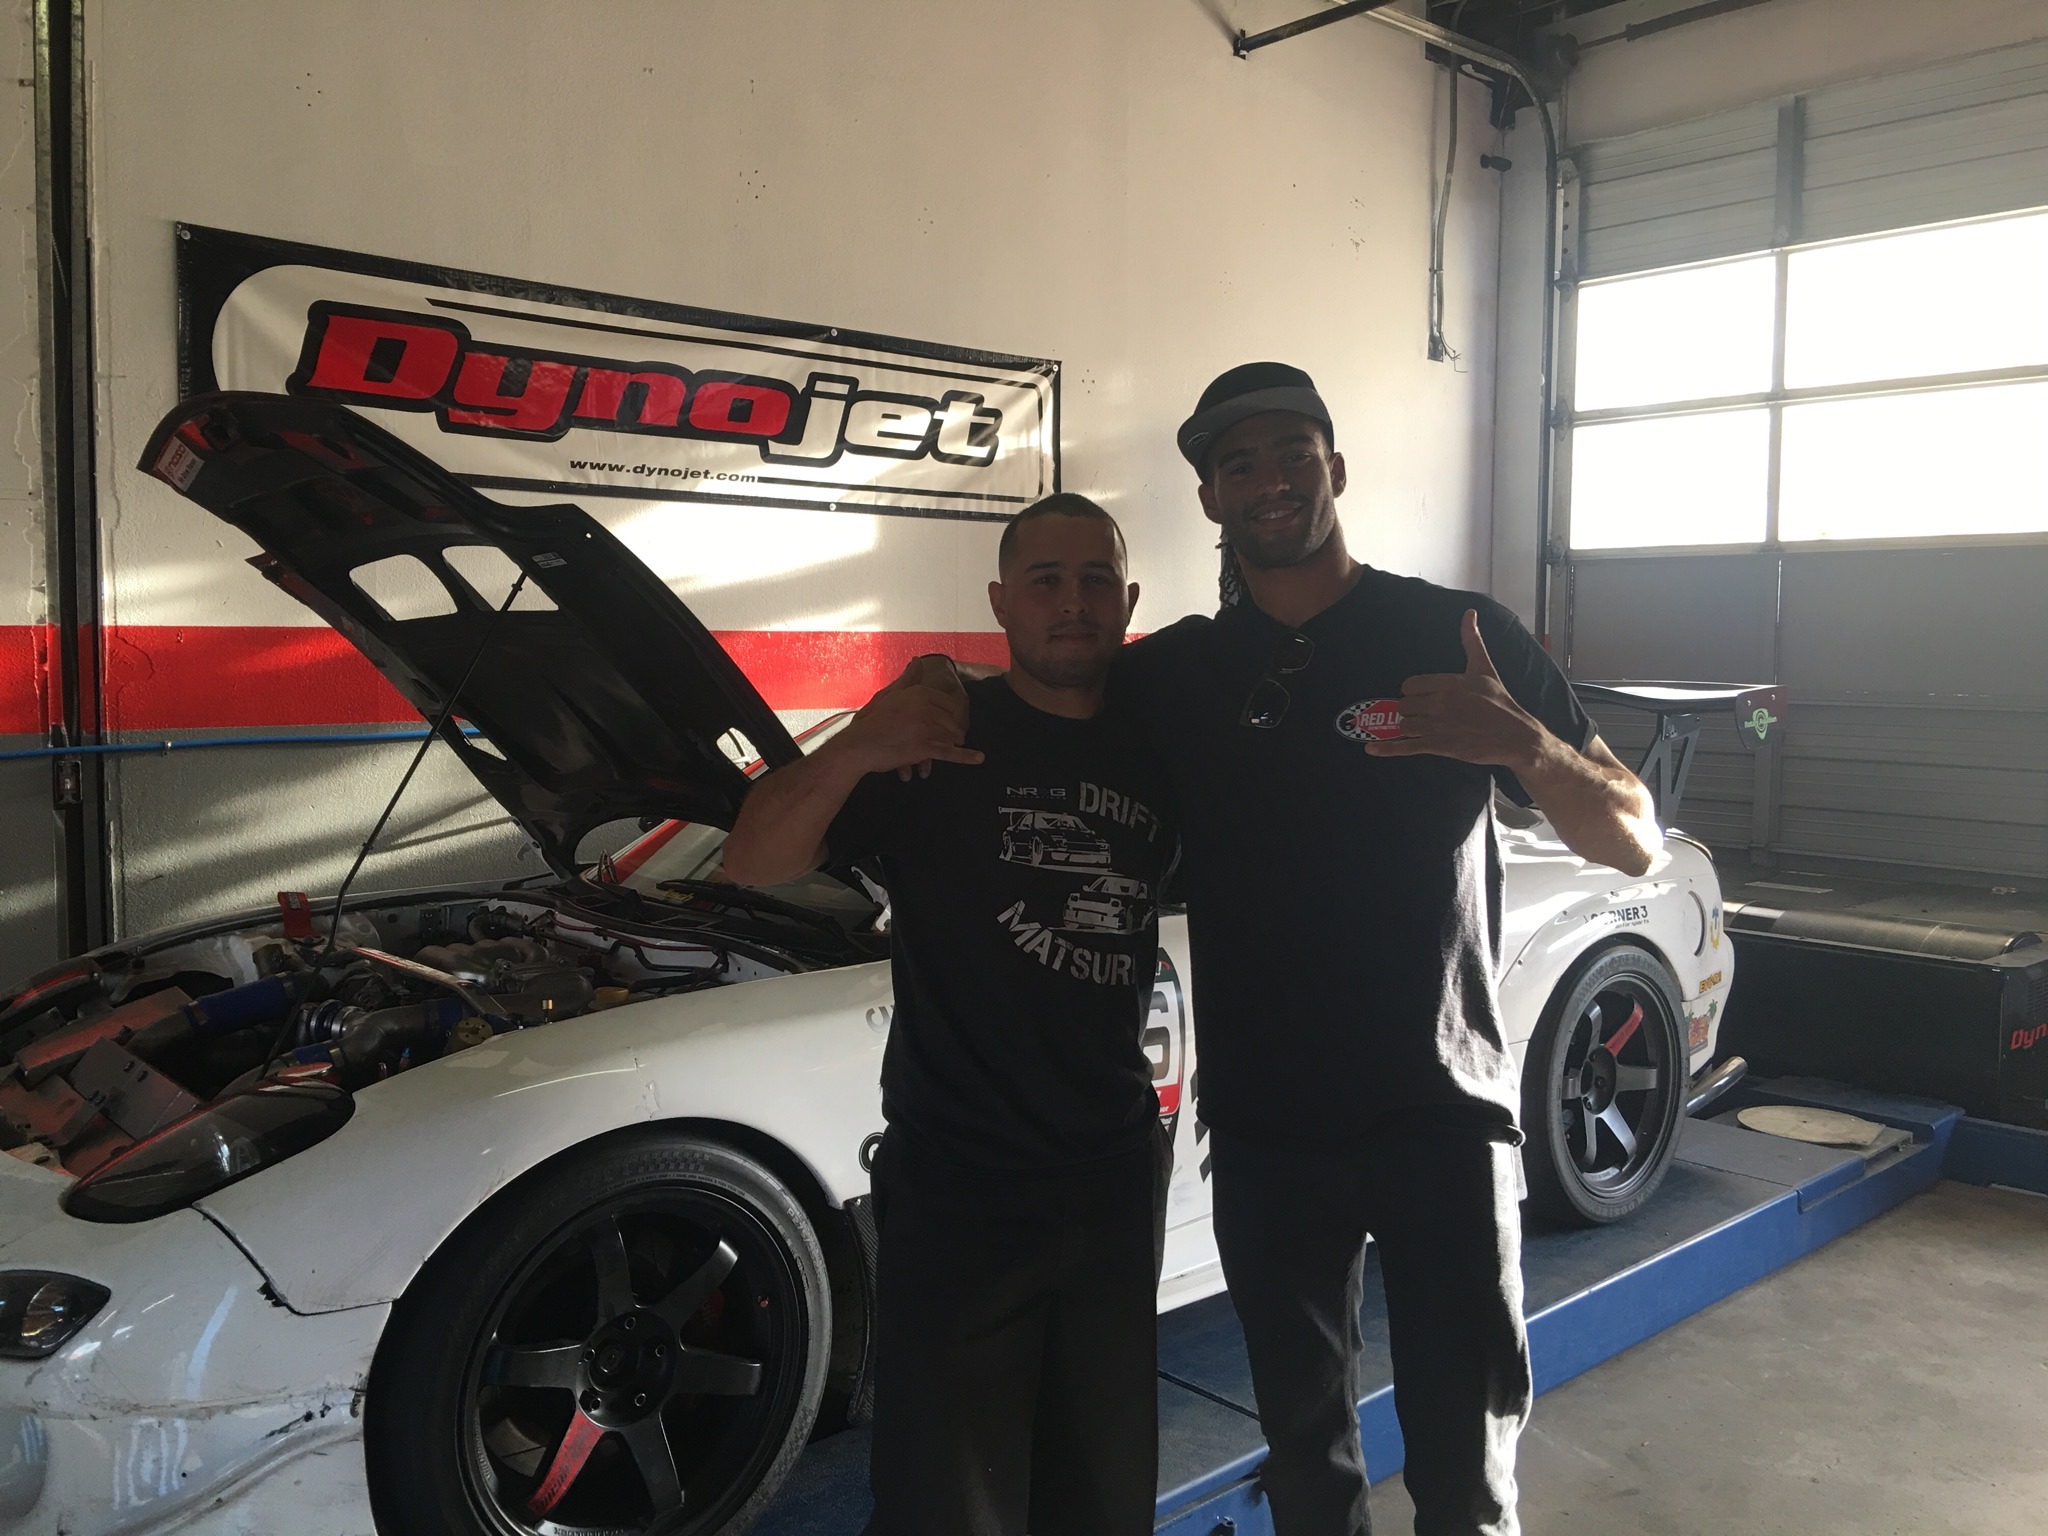
And I was able to stop by Local Rx7Club Member Alex Rodriguez's new shop in Corona. We'll be using his Dyno as it's much closer to us and very convenient!
I wanted to leave off on a positive note. Although there were circumstances I couldn't have prevented or even known were going to happen. I think it's important to learn from experiences. And what I learned was that If I want to continue to work with the Rotary engine.. I need to make sure that I handle things like this with utmost promptness, and also make sure that this doesn't happen again. I do try and take pride in being ready for each and every situation that repeats it's self in drifting. Things like having extra parts etc.. back up's included. If I would have had a nice set of back up housings to use.. I could have prevented this. So if I don't have money to purchase back up housings... then I need to work harder. In my opinion...if I work hard enough...I can make the funds needed to provide for this dream. So that is what i'll do. Never giving up and pushing to the limit!!!
Stay tuned!!
More Updates soon!
#Thisisthewolf
Well I'm sure some of you guys have been wondering why I havn't gotten to the engine. Well it is a bit of a touchy subject. But the engine has been apart for about 3 Months now. We dropped off my housings at the machinist the same week. Although I didn't know the guy, he's been very reliable and a perfectionist for Abel for over 15 Years. Well, I was driving on a parts run one evening when I got a call from Abel. He sounded really sad and told me he had some really bad news. His long time family friend and machinist had passed away a couple nights before that. It was an out of the blue sort of thing and it came as a shock to a lot of his family and friends. I had only ever met him once but he seemed like a really good guy, with a perfectionists skill, hard working and very reliable. Sad to see someone pass. And my thoughts and prayers go out to his family and friends.
We sat on it for a few days and due to respect, it was another week before we contacted them to try and get my housings back from the shop. Well that was un-successful and it fast turned into a nightmare of a situation. Getting my housings back took nearly this entire time. Meanwhile, the rest of the engine is sitting and waiting to be assembled, and Round one is this weekend March 18-19th. We finally got the housings back Thursday morning. Thankfully work hadn't been done to them. But that left us with finding a new Machinist who was capable of doing a pretty precise job. luckily Abel had that figured out and sorted by the time we got the housings back, so we were able to drop the housings off at the new machinist on Saturday. But due to the time constraints and the fact that there is still work to be done with the new set up... I'm making the call, and sadly I won't be making round 1 with the Wolf. It's a HUGE blow to me, and I've been stressed out more than any other time in my life. But sometime's you can't plan for certain things. And that threshold can only cover so much any ways. So it was a hard decision, but it's better to make sure everything is right with the set up than rush it and end up missing something important which could result in failure.
I have a car that I MIGHT be able to drive... It is being dropped off at the Fab shop today which we were assured it would only take 2 days to complete. But as always, I'm not 100% sure it's going to work out. But I am hopeful with it and it's a good guy so things are looking up for it.
Anyways! On to Updates for the car!!
Due to the above.. I have been able to tackle a lot of little things I had been meaning to do on the car but never got around to.
Went ahead and Shaved off the Air Pump "Ear" on the water pump housing. It was annoying and would make for a cleaner look and more room to get my hands in under the UIM or near the FPR if need be.
I do all of this with my Angle Grinder haha... Just takes a bit of time to get "Right"
Top
Rear
By the way.. Does anyone know where I can Purchase a New Thermo Fan Switch Harness Side Connector AND pin? I've literally looked for months.
Purchased a new ACT mono-Lock for my Clutch. These have great Reviews!! Lets hope it does what it's supposed to!!
Sacrilegious.. But Sometimes you've got to do what you've got to do is best for the car/Budget and Performance
Then I got to porting my Throttle Body. I ended up porting through what I think... is a coolant port.. but I didn't care much to check it out. So I had to have Dan Dab weld it and smooth it out.
Heres what I started with
And here's where i ended...with the exception of finishing it off with some nice fine sand paper. Sorry I forgot to take pics!!
I get a lot of crap for doing stuff like this. I know people say it's pointless, and that it really isn't helping that much. But if I can make it that much easier to make power... Less stress. Less "Work" on any aspect of the engine/turbo/boost control... I'm going to do it. It took me a good hour...because I had to be careful to to skip the bit or go to deep. Plus I wanted it all to be symmetrical. But I feel like it's worth it =-)
Dan Fixing my mistake
Was able to watch some FD Japan late one night
And Last night I spent a while Wiring in my New Injector clips into the Engine Harness. My set up will fire both additional sets of injectors as one. ...or in other words Batch Firing. So Primaries will have 1 Inj each. Rear (1) 1300/Front (1) 1300. Secondaries will have Rear (2) 1300's / Front (2) 1300's for a total of 6 Injectors with Secondaries Batch firing together.
Spent a long time measuring and getting wire lengths right..and it came out great. I'll have to take pics when they're actually on the manifold and clipped in
And I was able to stop by Local Rx7Club Member Alex Rodriguez's new shop in Corona. We'll be using his Dyno as it's much closer to us and very convenient!
I wanted to leave off on a positive note. Although there were circumstances I couldn't have prevented or even known were going to happen. I think it's important to learn from experiences. And what I learned was that If I want to continue to work with the Rotary engine.. I need to make sure that I handle things like this with utmost promptness, and also make sure that this doesn't happen again. I do try and take pride in being ready for each and every situation that repeats it's self in drifting. Things like having extra parts etc.. back up's included. If I would have had a nice set of back up housings to use.. I could have prevented this. So if I don't have money to purchase back up housings... then I need to work harder. In my opinion...if I work hard enough...I can make the funds needed to provide for this dream. So that is what i'll do. Never giving up and pushing to the limit!!!
Stay tuned!!
More Updates soon!
#Thisisthewolf
Junior Member
Joined: Jun 2011
Posts: 47
Likes: 0
From: membrilla(espa�a)
hey aaron
Took time without going through here but had seen something in fb, these often work carried out. All parts are .... incredible, the exhaust manifold, the intake manifold, system of fuel!! surprising!! I think not lack fuel hahahaha
a greeting and to continue so !!!
Took time without going through here but had seen something in fb, these often work carried out. All parts are .... incredible, the exhaust manifold, the intake manifold, system of fuel!! surprising!! I think not lack fuel hahahaha
a greeting and to continue so !!!


I get a lot of crap for doing stuff like this. I know people say it's pointless, and that it really isn't helping that much. But if I can make it that much easier to make power... Less stress. Less "Work" on any aspect of the engine/turbo/boost control... I'm going to do it. It took me a good hour...because I had to be careful to to skip the bit or go to deep. Plus I wanted it all to be symmetrical. But I feel like it's worth it =-)
Love the build.
hey aaron
Took time without going through here but had seen something in fb, these often work carried out. All parts are .... incredible, the exhaust manifold, the intake manifold, system of fuel!! surprising!! I think not lack fuel hahahaha
a greeting and to continue so !!!
Took time without going through here but had seen something in fb, these often work carried out. All parts are .... incredible, the exhaust manifold, the intake manifold, system of fuel!! surprising!! I think not lack fuel hahahaha
a greeting and to continue so !!!
WOOHOO!!! THank you!!
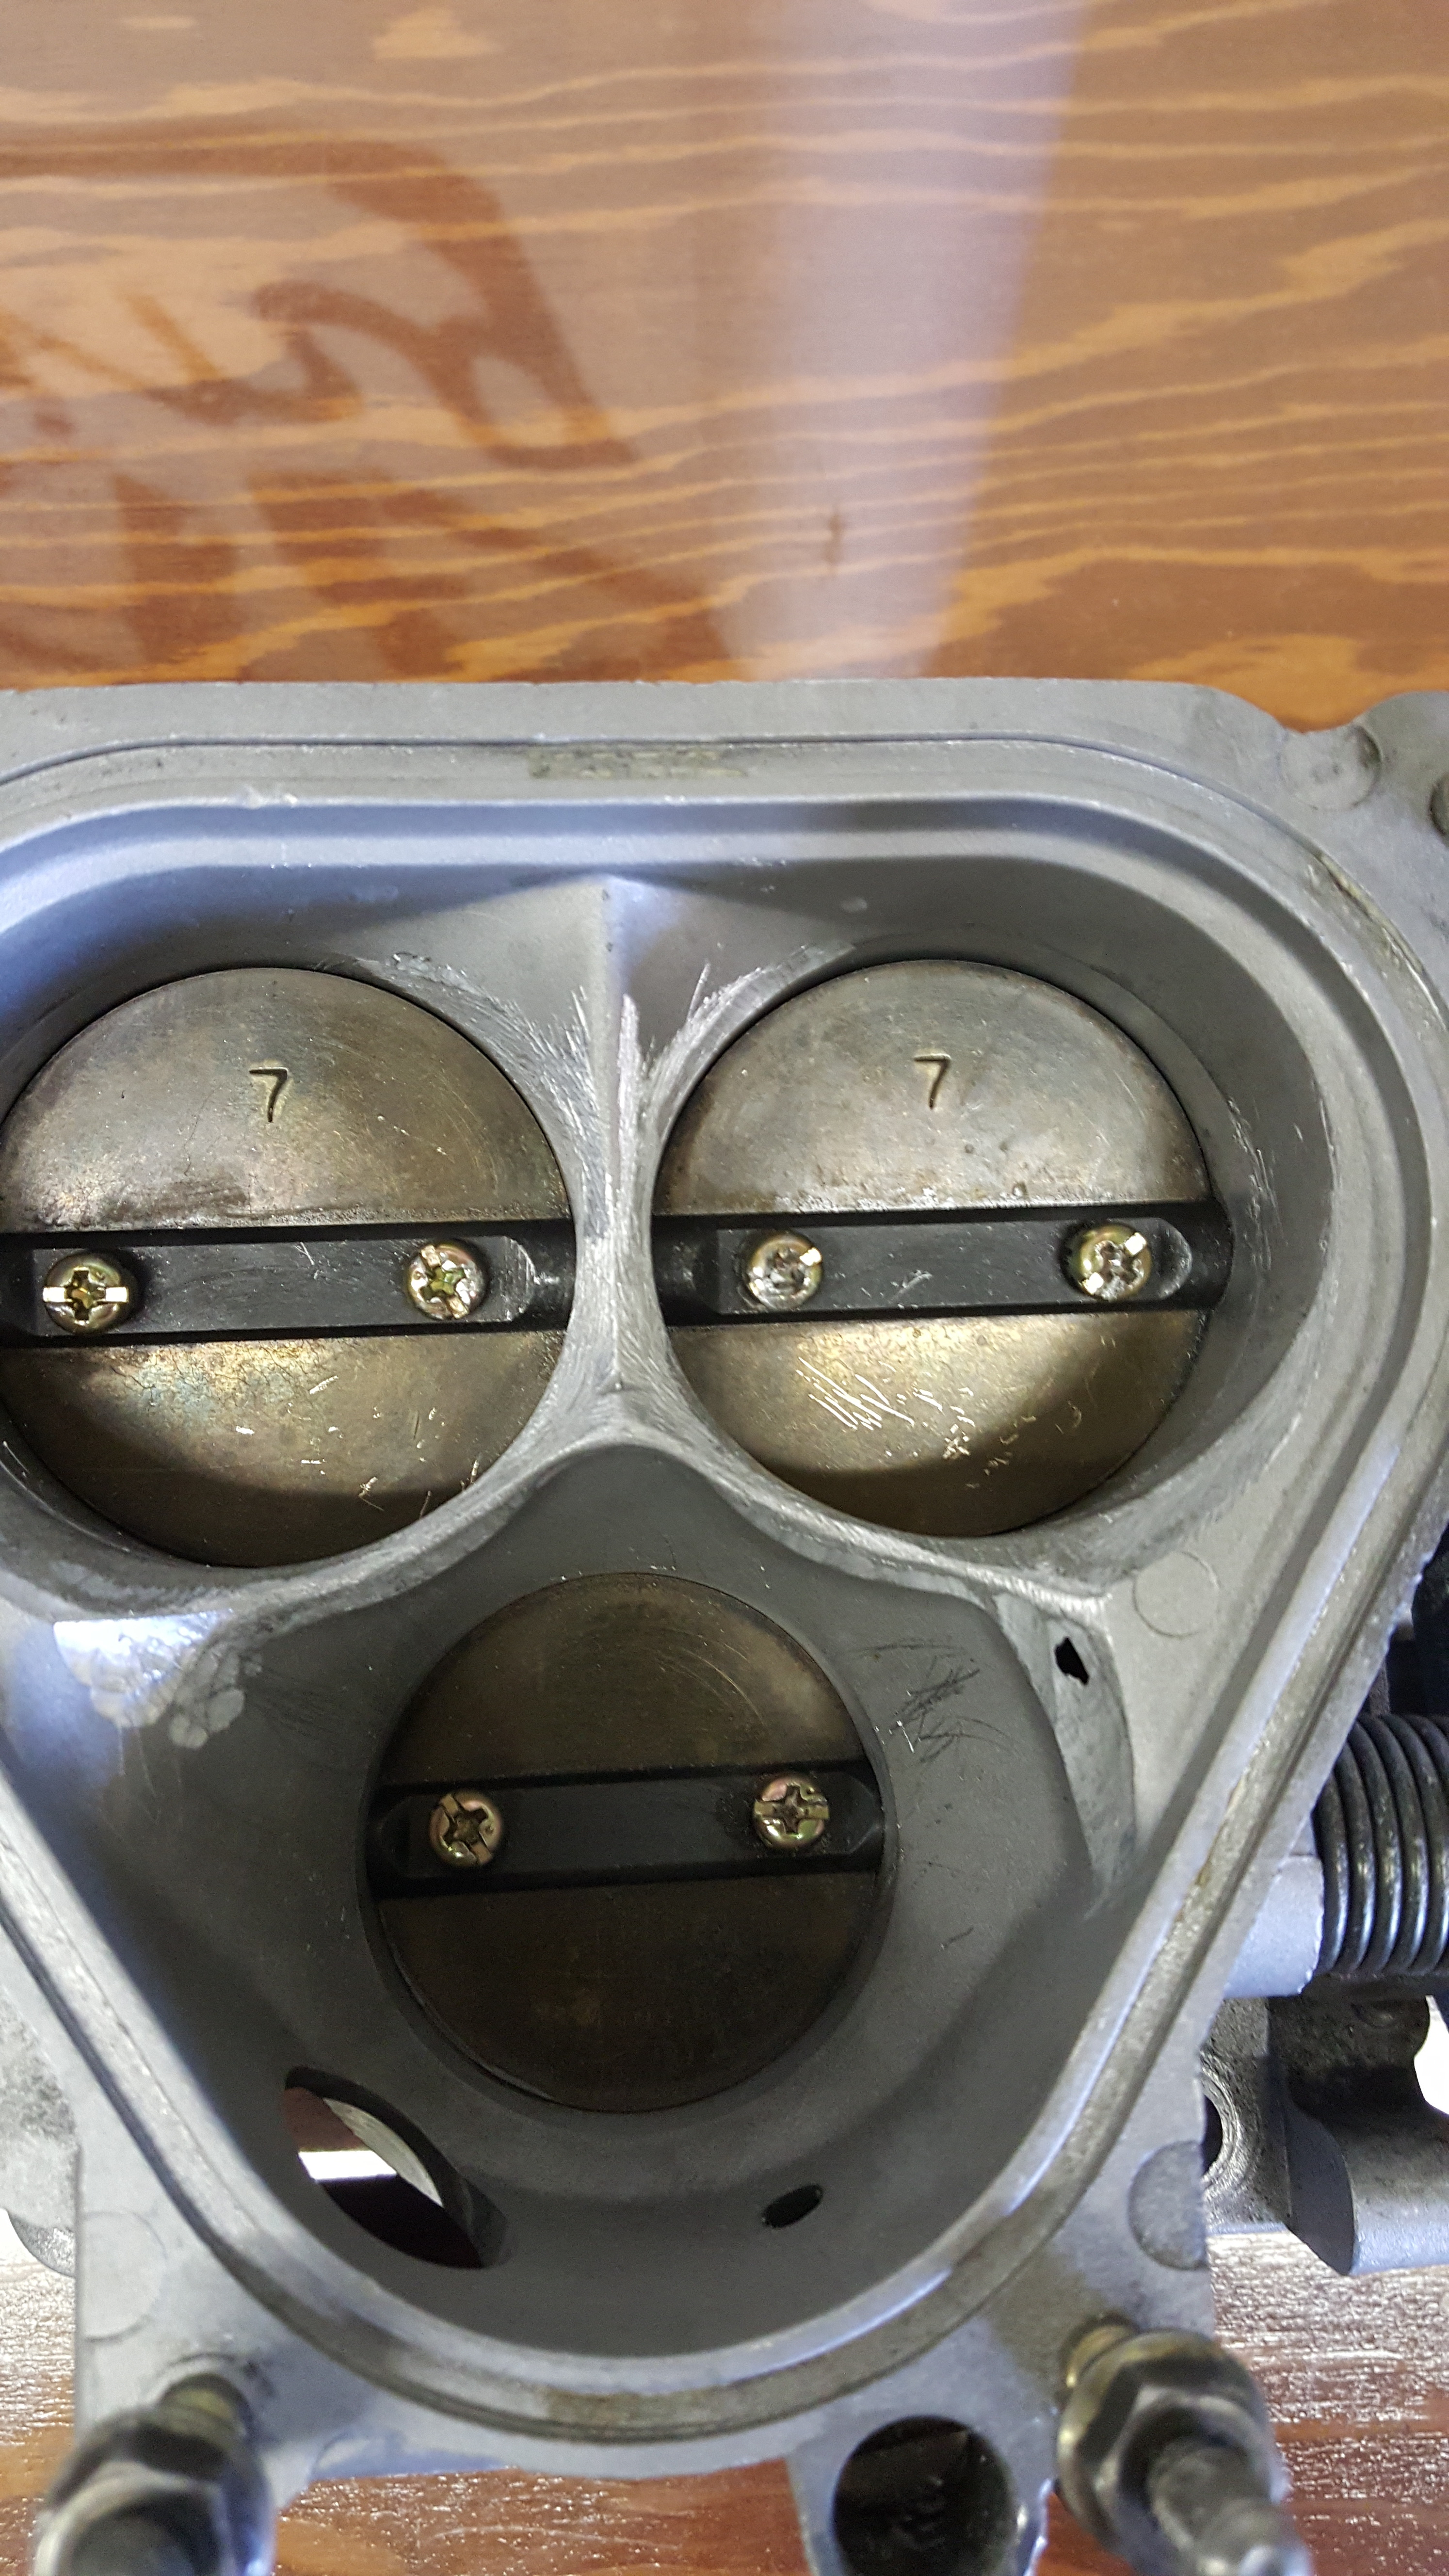
How so? I need to take a picture of the finished product but I feel like it came out pretty good. Only thing, is I didn't touch the upper partition that separates both Secondary butterfly ports. I'll most likely smooth it out. I pulled it out again to clean the butterflies and swap the old bubbly hardware to some smoother allen head hardware I got at Mcfaddendale.
Update: Sorry I've been Busy!!!
Wasn't too happy with my Throttle Body Hardware so I pulled it apart and went to Mcfaddendale to grab some nicer stuff.
Dirty Butterflies
Clean Butterflies
Old long hardware vs New shorter smoother Hardware
Finished (but still thinking of going back through and smoothing the Primary Butter fly Divider)
The new hardware doesn't protrude out past the threading. It sits flush. And the Allen heads are more attractive, aerodynamic and don't strip immediately when you touch them with a tool.
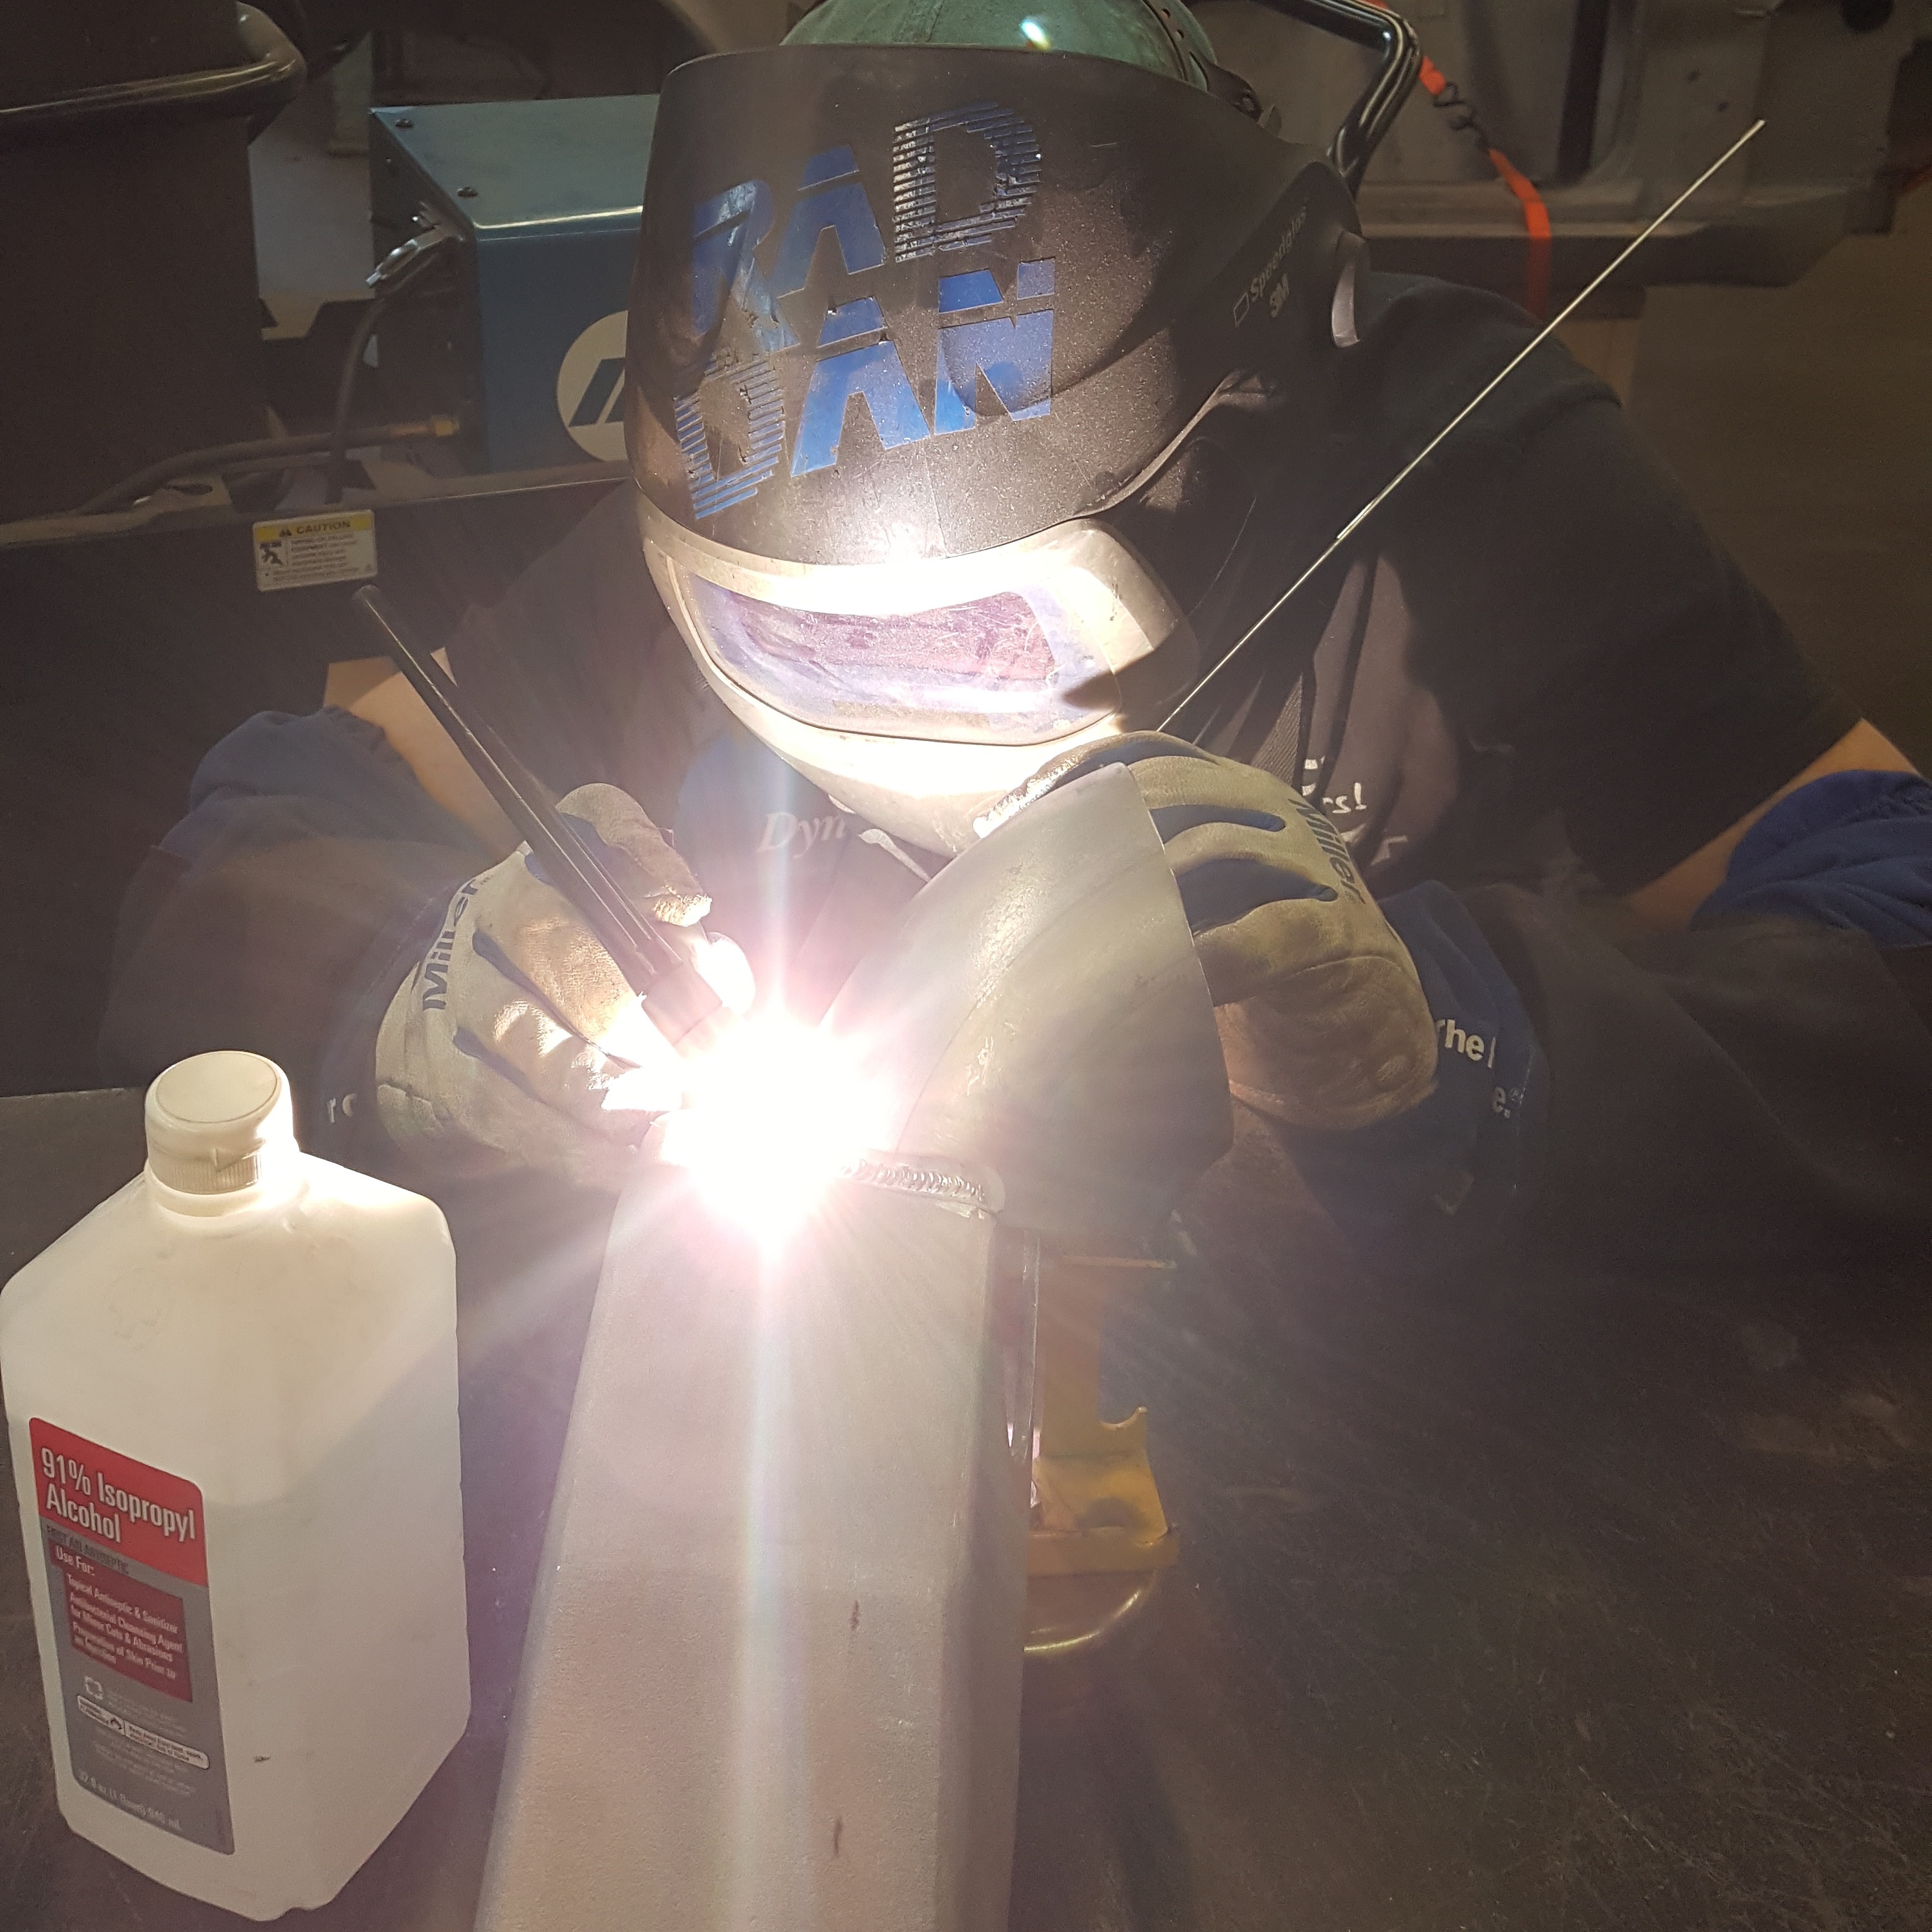
Did some Ignition Wiring on Rad Dan Burkett's Supra using all Dr-25 and Tefzel.. All AEM Smart Coils this year. I hate The connector plugs they supply with these coils. They're a royal Pain! But it came out nice!! We actually got the car started last night. I'll take more pics soon!
Not sure If i had posted this year...But Mikes Gen II PPRE Built Radbull 4-Rotor twin Turbo came off the boat and we've got some little tid bits here and there before Round 1 Formula Drift Long Beach Next Weekend. PPRE Made some SOLID improvements to the car for this season! I'm really looking forward to Next week!
Picked up some new Aero!
Wasn't too happy with my Throttle Body Hardware so I pulled it apart and went to Mcfaddendale to grab some nicer stuff.
Dirty Butterflies
Clean Butterflies
Old long hardware vs New shorter smoother Hardware
Finished (but still thinking of going back through and smoothing the Primary Butter fly Divider)
The new hardware doesn't protrude out past the threading. It sits flush. And the Allen heads are more attractive, aerodynamic and don't strip immediately when you touch them with a tool.
Did some Ignition Wiring on Rad Dan Burkett's Supra using all Dr-25 and Tefzel.. All AEM Smart Coils this year. I hate The connector plugs they supply with these coils. They're a royal Pain! But it came out nice!! We actually got the car started last night. I'll take more pics soon!
Not sure If i had posted this year...But Mikes Gen II PPRE Built Radbull 4-Rotor twin Turbo came off the boat and we've got some little tid bits here and there before Round 1 Formula Drift Long Beach Next Weekend. PPRE Made some SOLID improvements to the car for this season! I'm really looking forward to Next week!
Picked up some new Aero!
Continued:
Made some solid Deals!!

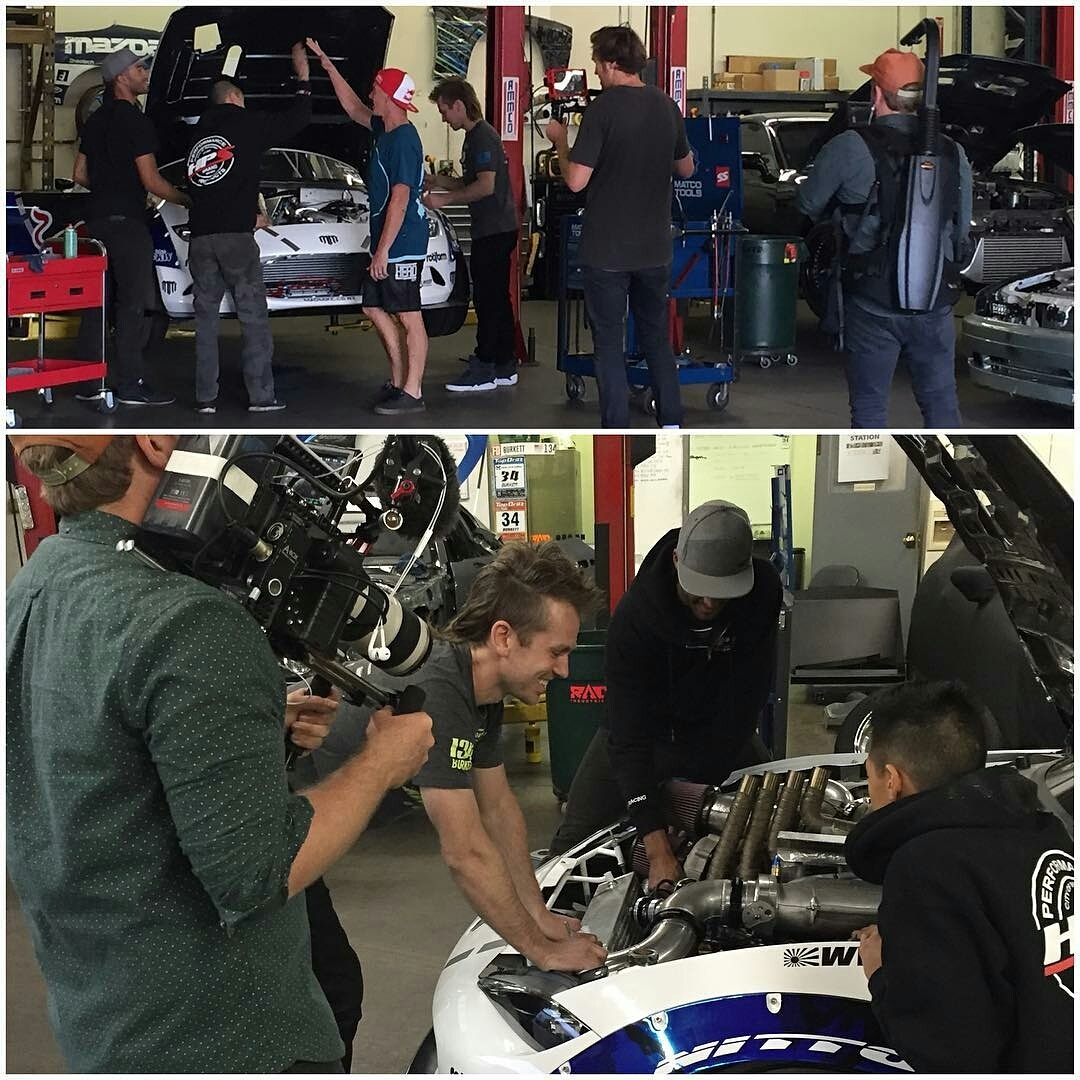
Did some Filming with Mike,Dan and Jeff at Rad Industries!
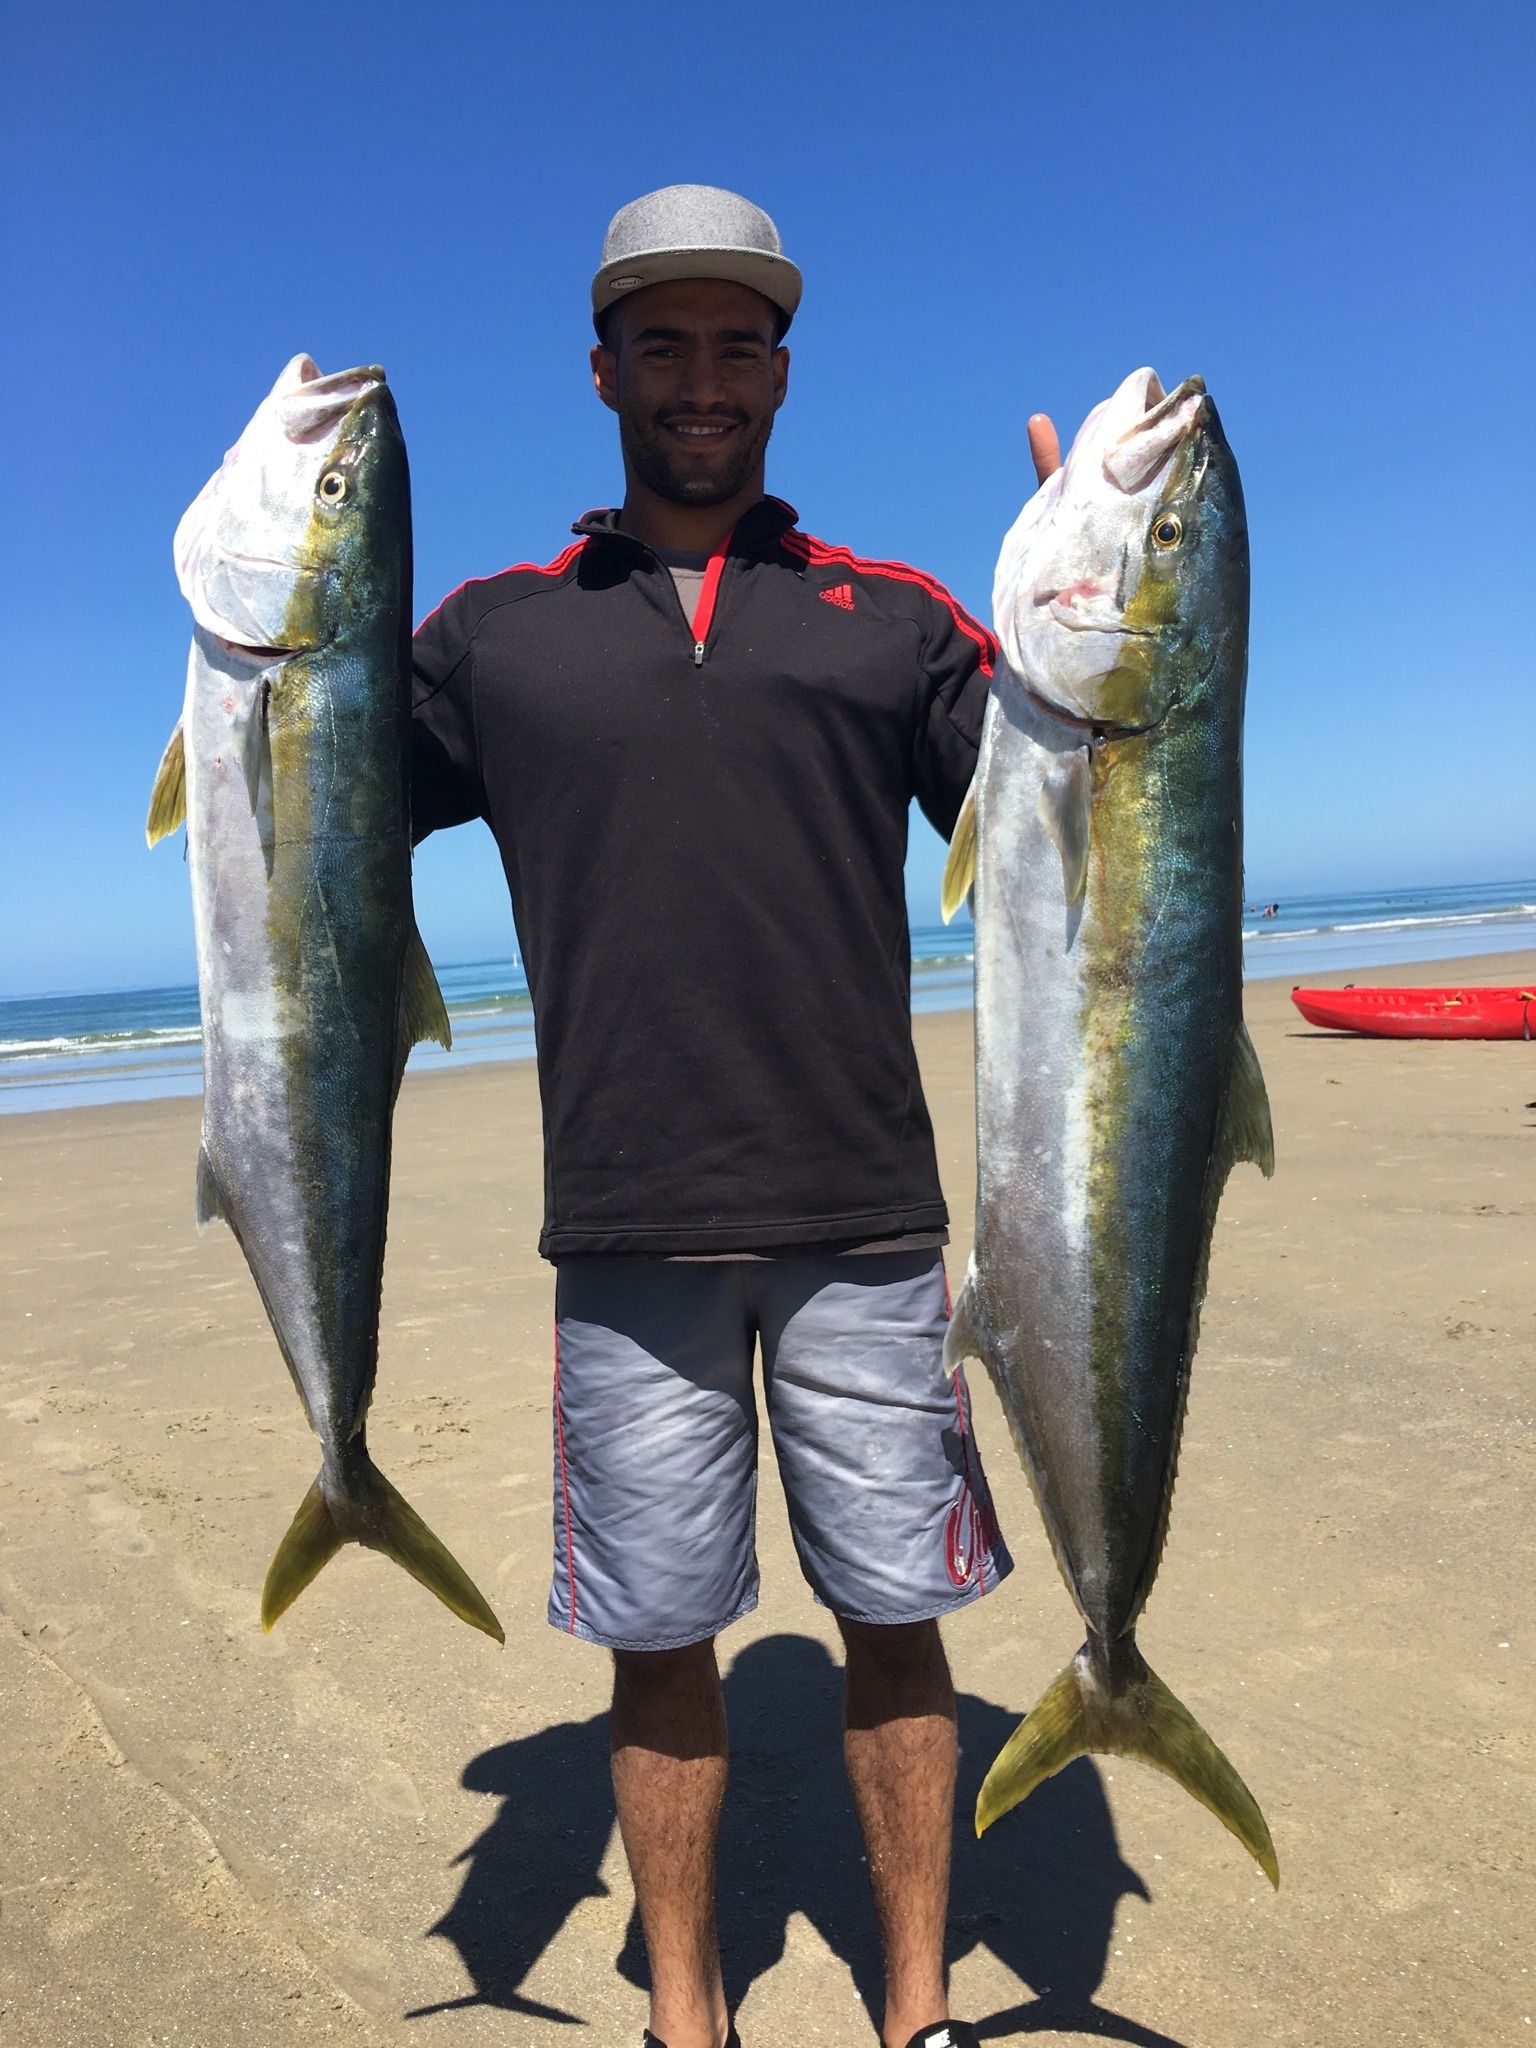
Caught some more fish in Lajolla with my buddy Nam!!
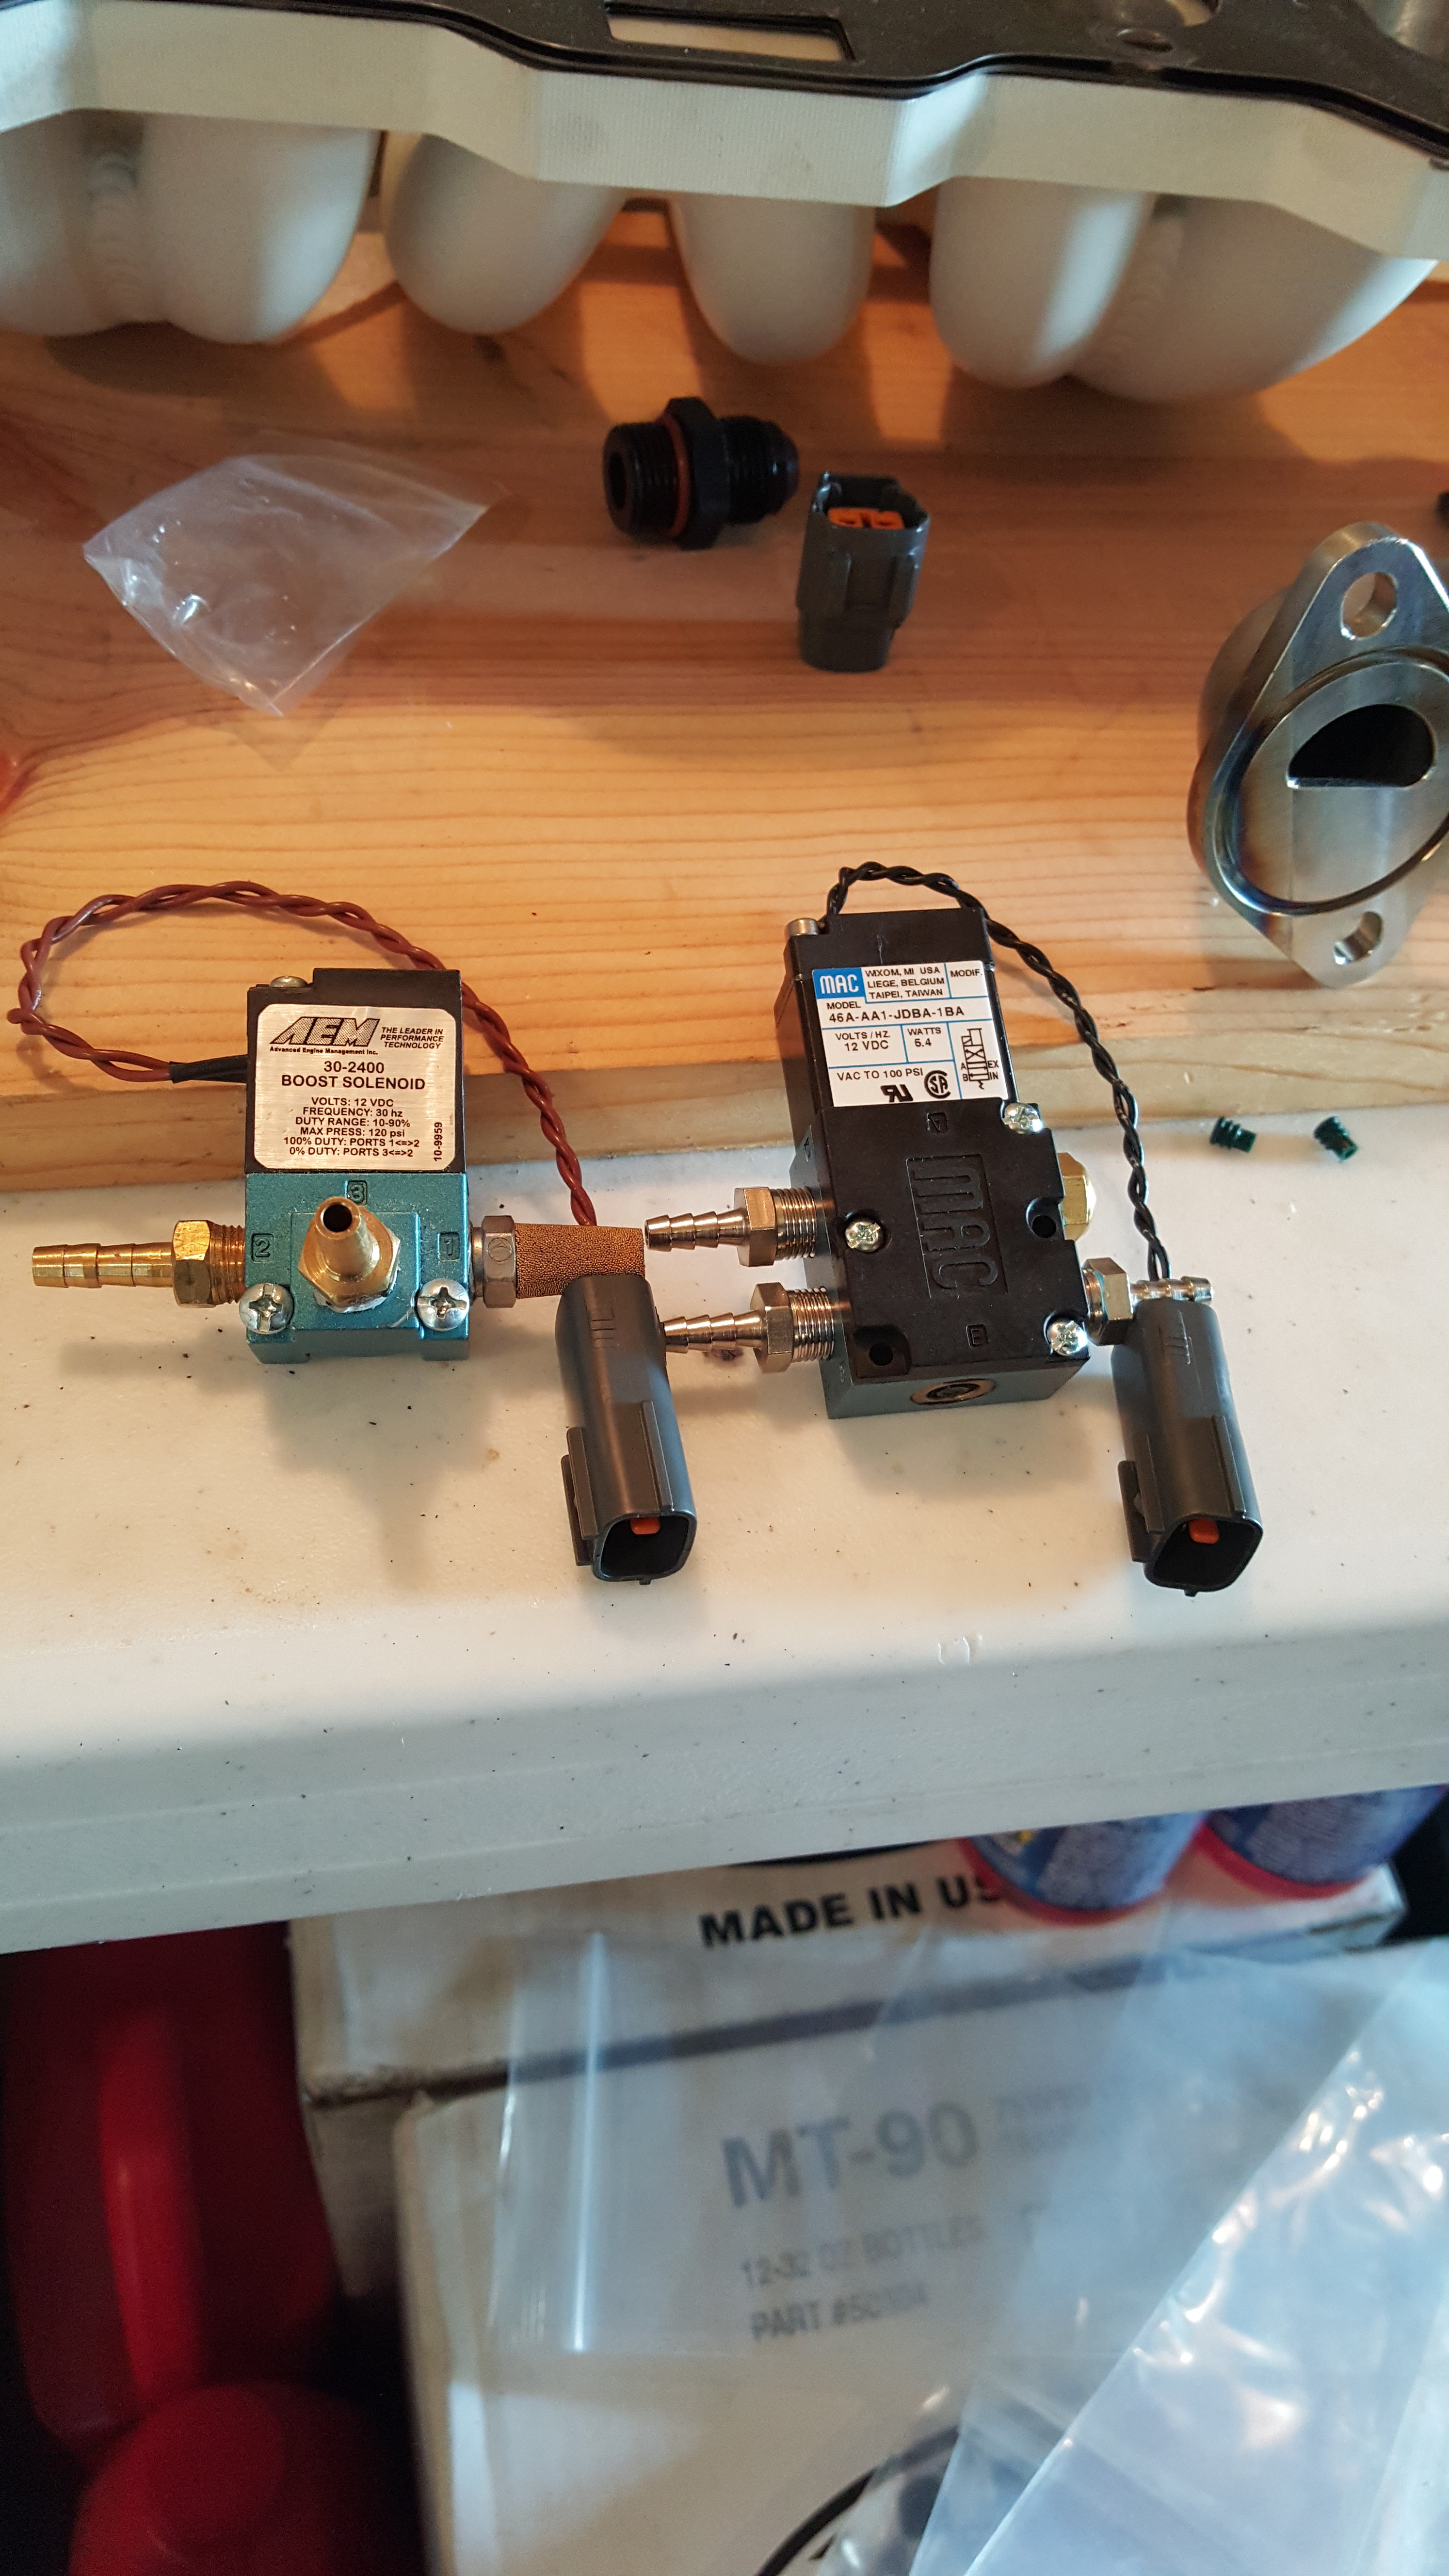
Did some wiring on my Boost Control Solenoids 4-port and 3-port
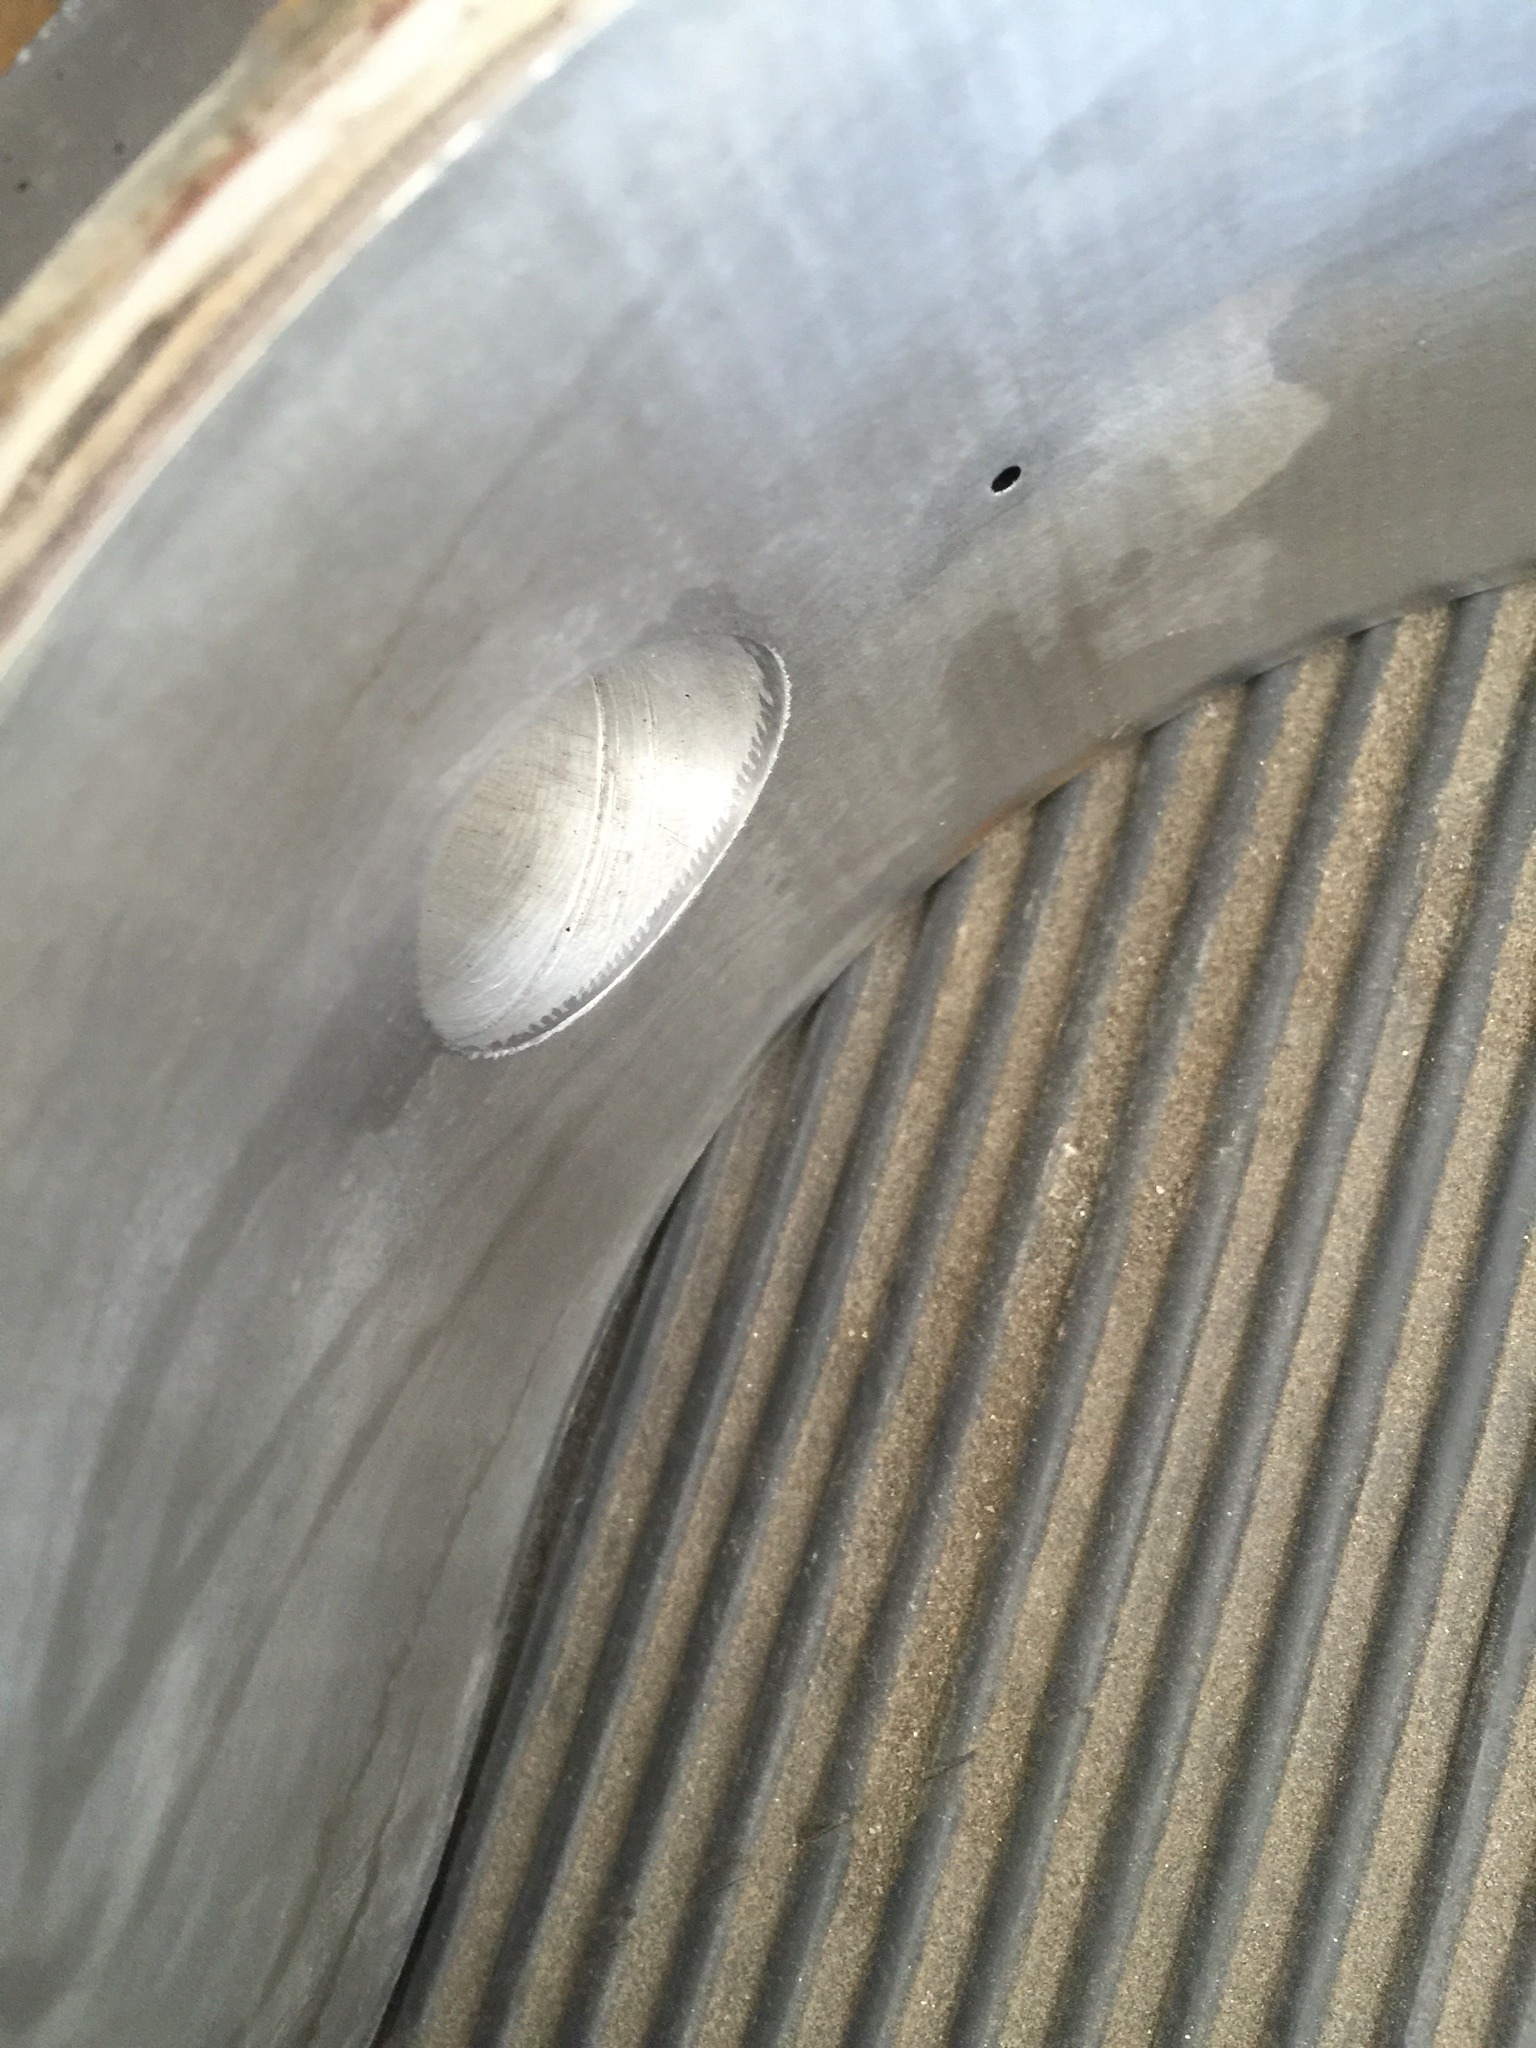
And Finally got these Housings Back!!! WOOOHOOO!!! LETS GOO!!!
More Updates soon!! Stay Tuned!!!
Thanks guys!
#Thisisthewolf
Made some solid Deals!!
Did some Filming with Mike,Dan and Jeff at Rad Industries!
Caught some more fish in Lajolla with my buddy Nam!!
Did some wiring on my Boost Control Solenoids 4-port and 3-port
And Finally got these Housings Back!!! WOOOHOOO!!! LETS GOO!!!
More Updates soon!! Stay Tuned!!!
Thanks guys!
#Thisisthewolf