Mannykillers/ AAPARKAH Street/time Attack/Drift Build (heavy Pics) #Thisisthewolf
 01-24-16, 06:05 PM
#2451

mean fish. we have yellow tail king fish down here in NZ. best recreational fish. I bet that was a blast in a kayak.
that hardware for the exhaust housing is sweet. what brand is that? do you use similar on the turbo to mani bolts?
syked your working for Mike agaun
is he doing more rounds then last year? or is he still doing his other commitments also?
that hardware for the exhaust housing is sweet. what brand is that? do you use similar on the turbo to mani bolts?
syked your working for Mike agaun
is he doing more rounds then last year? or is he still doing his other commitments also?
 01-24-16, 10:27 PM
#2452
mean fish. we have yellow tail king fish down here in NZ. best recreational fish. I bet that was a blast in a kayak.
that hardware for the exhaust housing is sweet. what brand is that? do you use similar on the turbo to mani bolts?
syked your working for Mike agaun
is he doing more rounds then last year? or is he still doing his other commitments also?
that hardware for the exhaust housing is sweet. what brand is that? do you use similar on the turbo to mani bolts?
syked your working for Mike agaun
is he doing more rounds then last year? or is he still doing his other commitments also?
It was actually sent from Borg Warner... I actually have been using the Full Race Inconel hardware, studs/nuts.
And Yes! He'll be doing all Formula Drift pro 1 Rounds this year! Going for that championship!!
01-31-16, 06:05 PM
#2453
Update: "ALL Moved in!"
Well this past week has been pretty crazy. Between moving all my stuff and parts coming in etc. It was a real pain to put off working on the car to take care of all the moving stuff. It was also a bit of a pain to keep track of everything. While I'm working on things I always like to keep certain things in the same spot. I don't leave tools out but sometimes I'll leave hardware grouped in areas so that I don't mix up with other hardware. But anyways, I took all my garage stuff last and finally the Wolf the very last trip so that I wouldn't have to worry about working around it etc. I wanted to make sure the garage was set up 100% I'm finally all moved in and i was finally able to get the car set up and ready for work!!
#Thisisthewolf
And SO here she is... Not an Xcessive.....Not panspeed, not Feed...and not RE...not projay..But she'll sure as hell do the job! Got the Manifold from Rene Franco
Semi Peripheral Lower Intake Manifold. Nice clean porting and solid welds. Flange is Nice and thick too!!
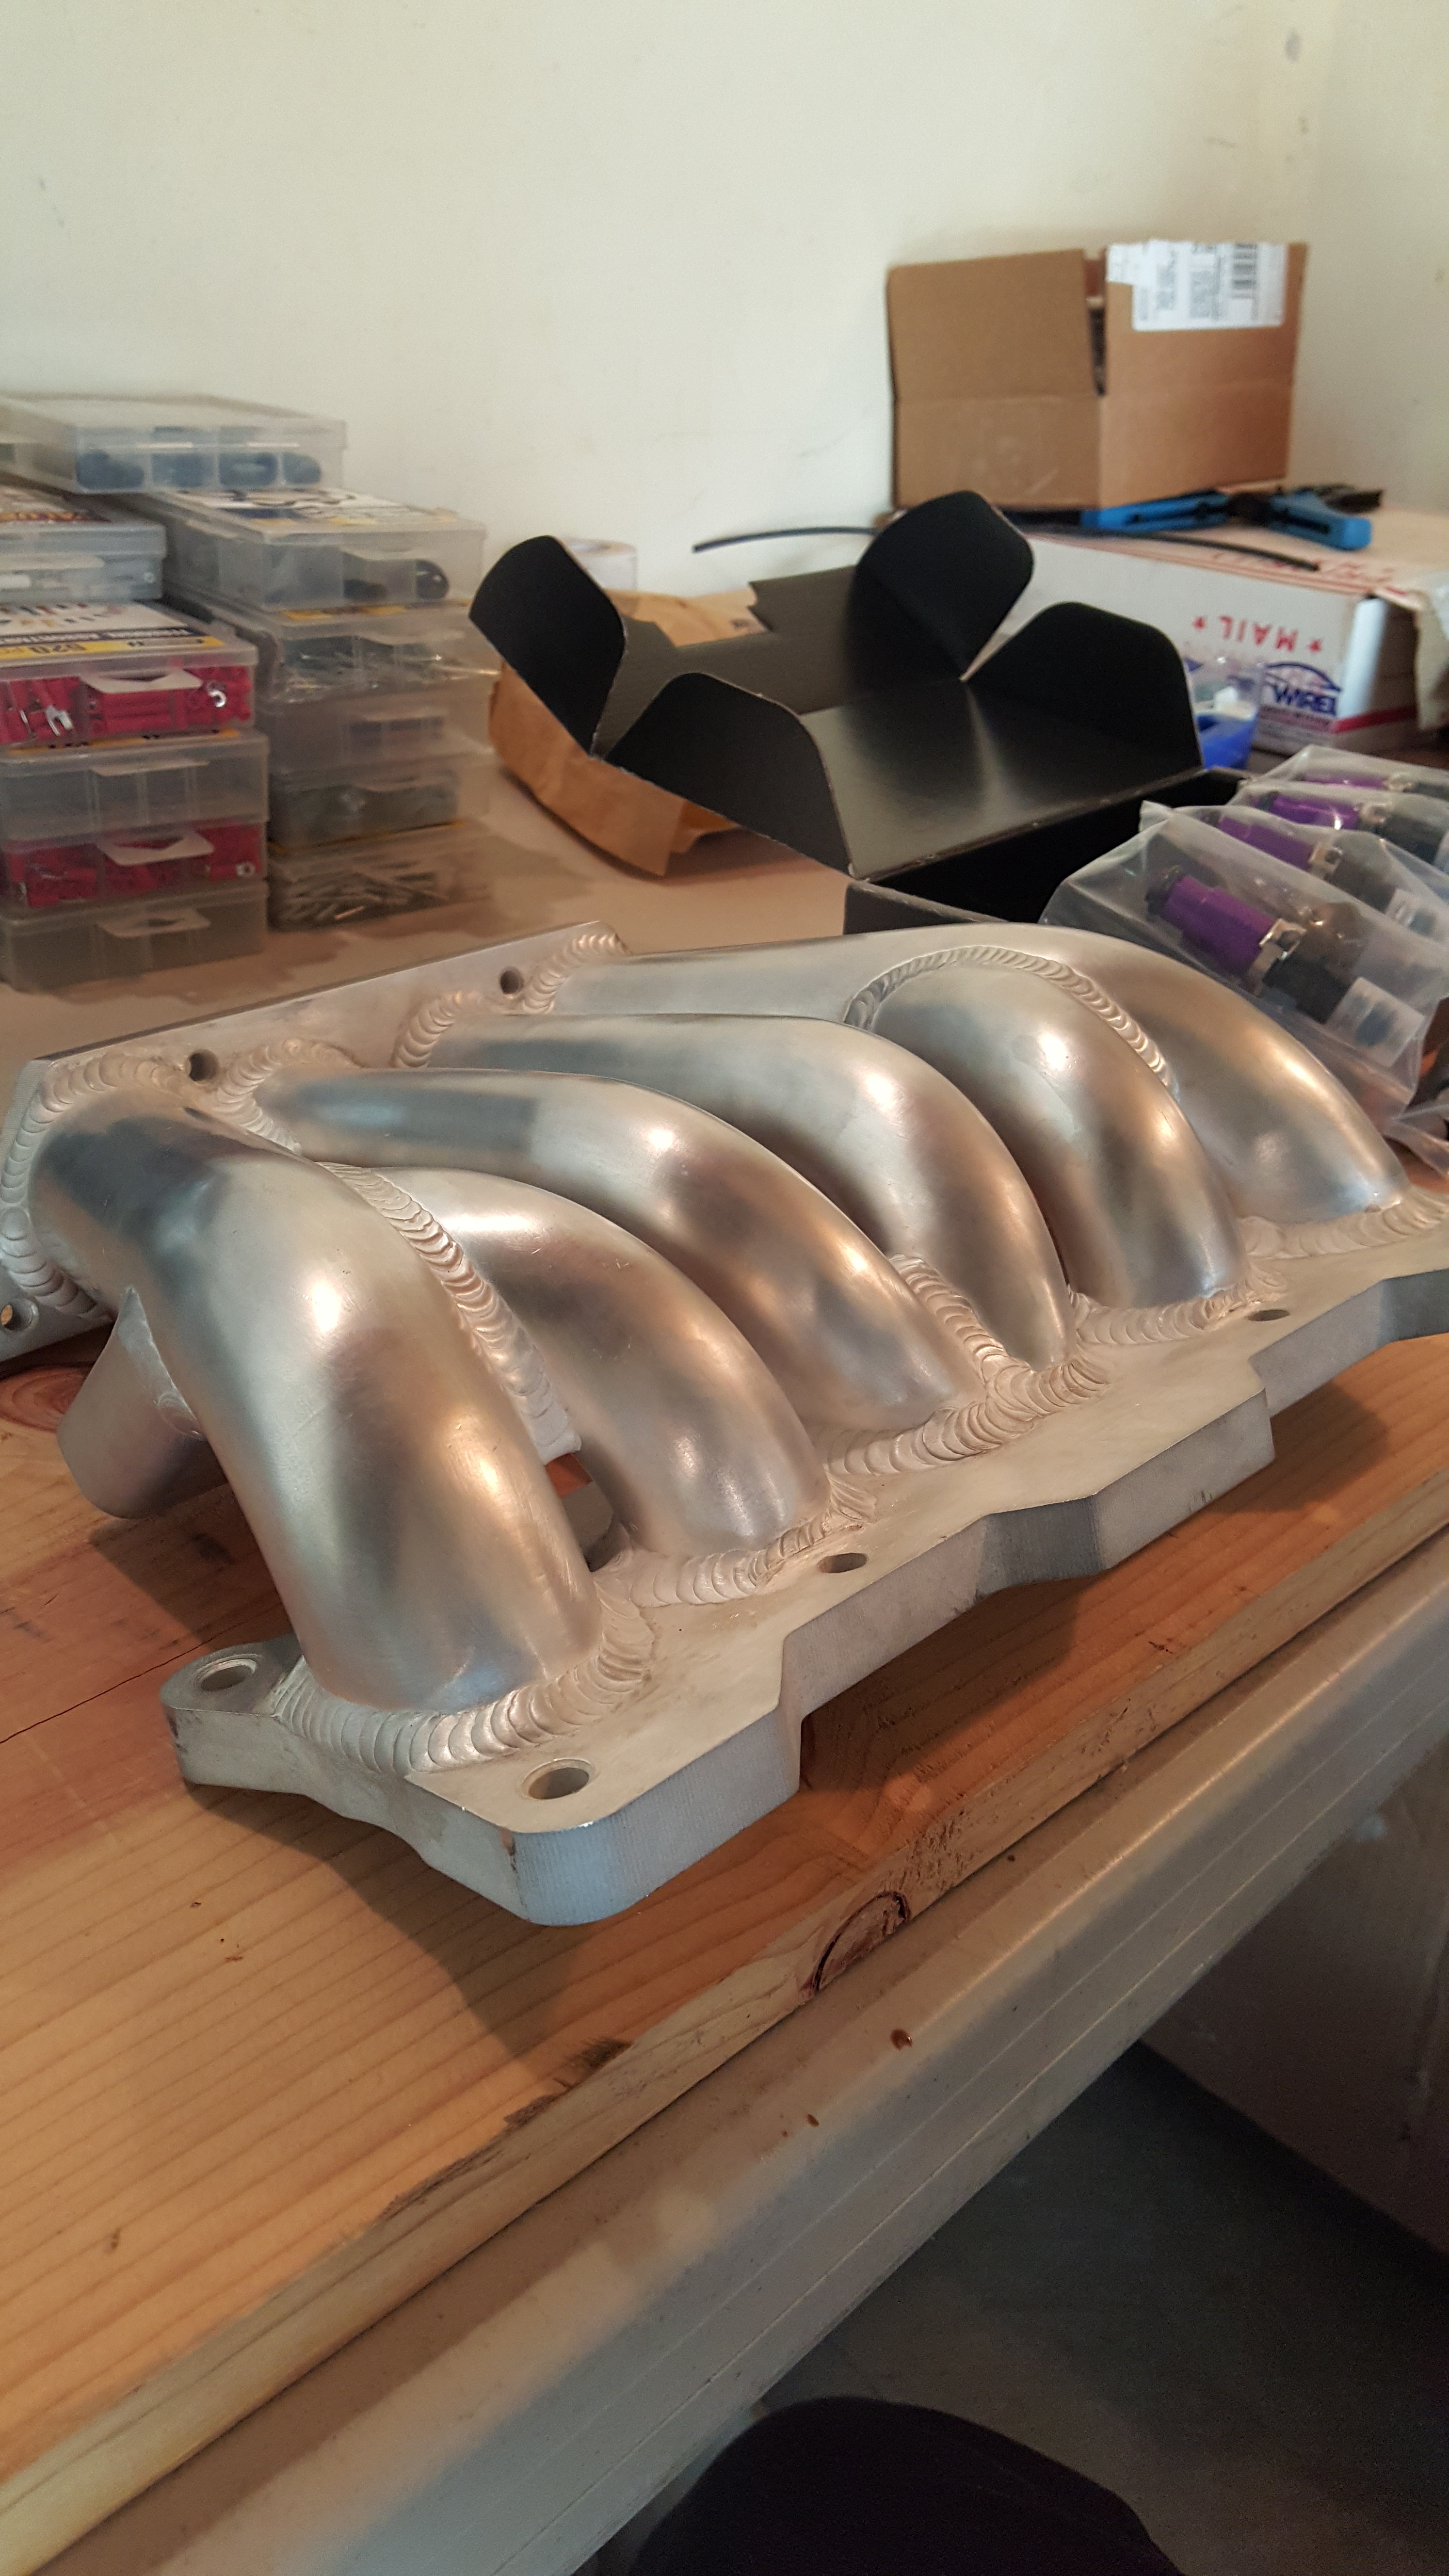
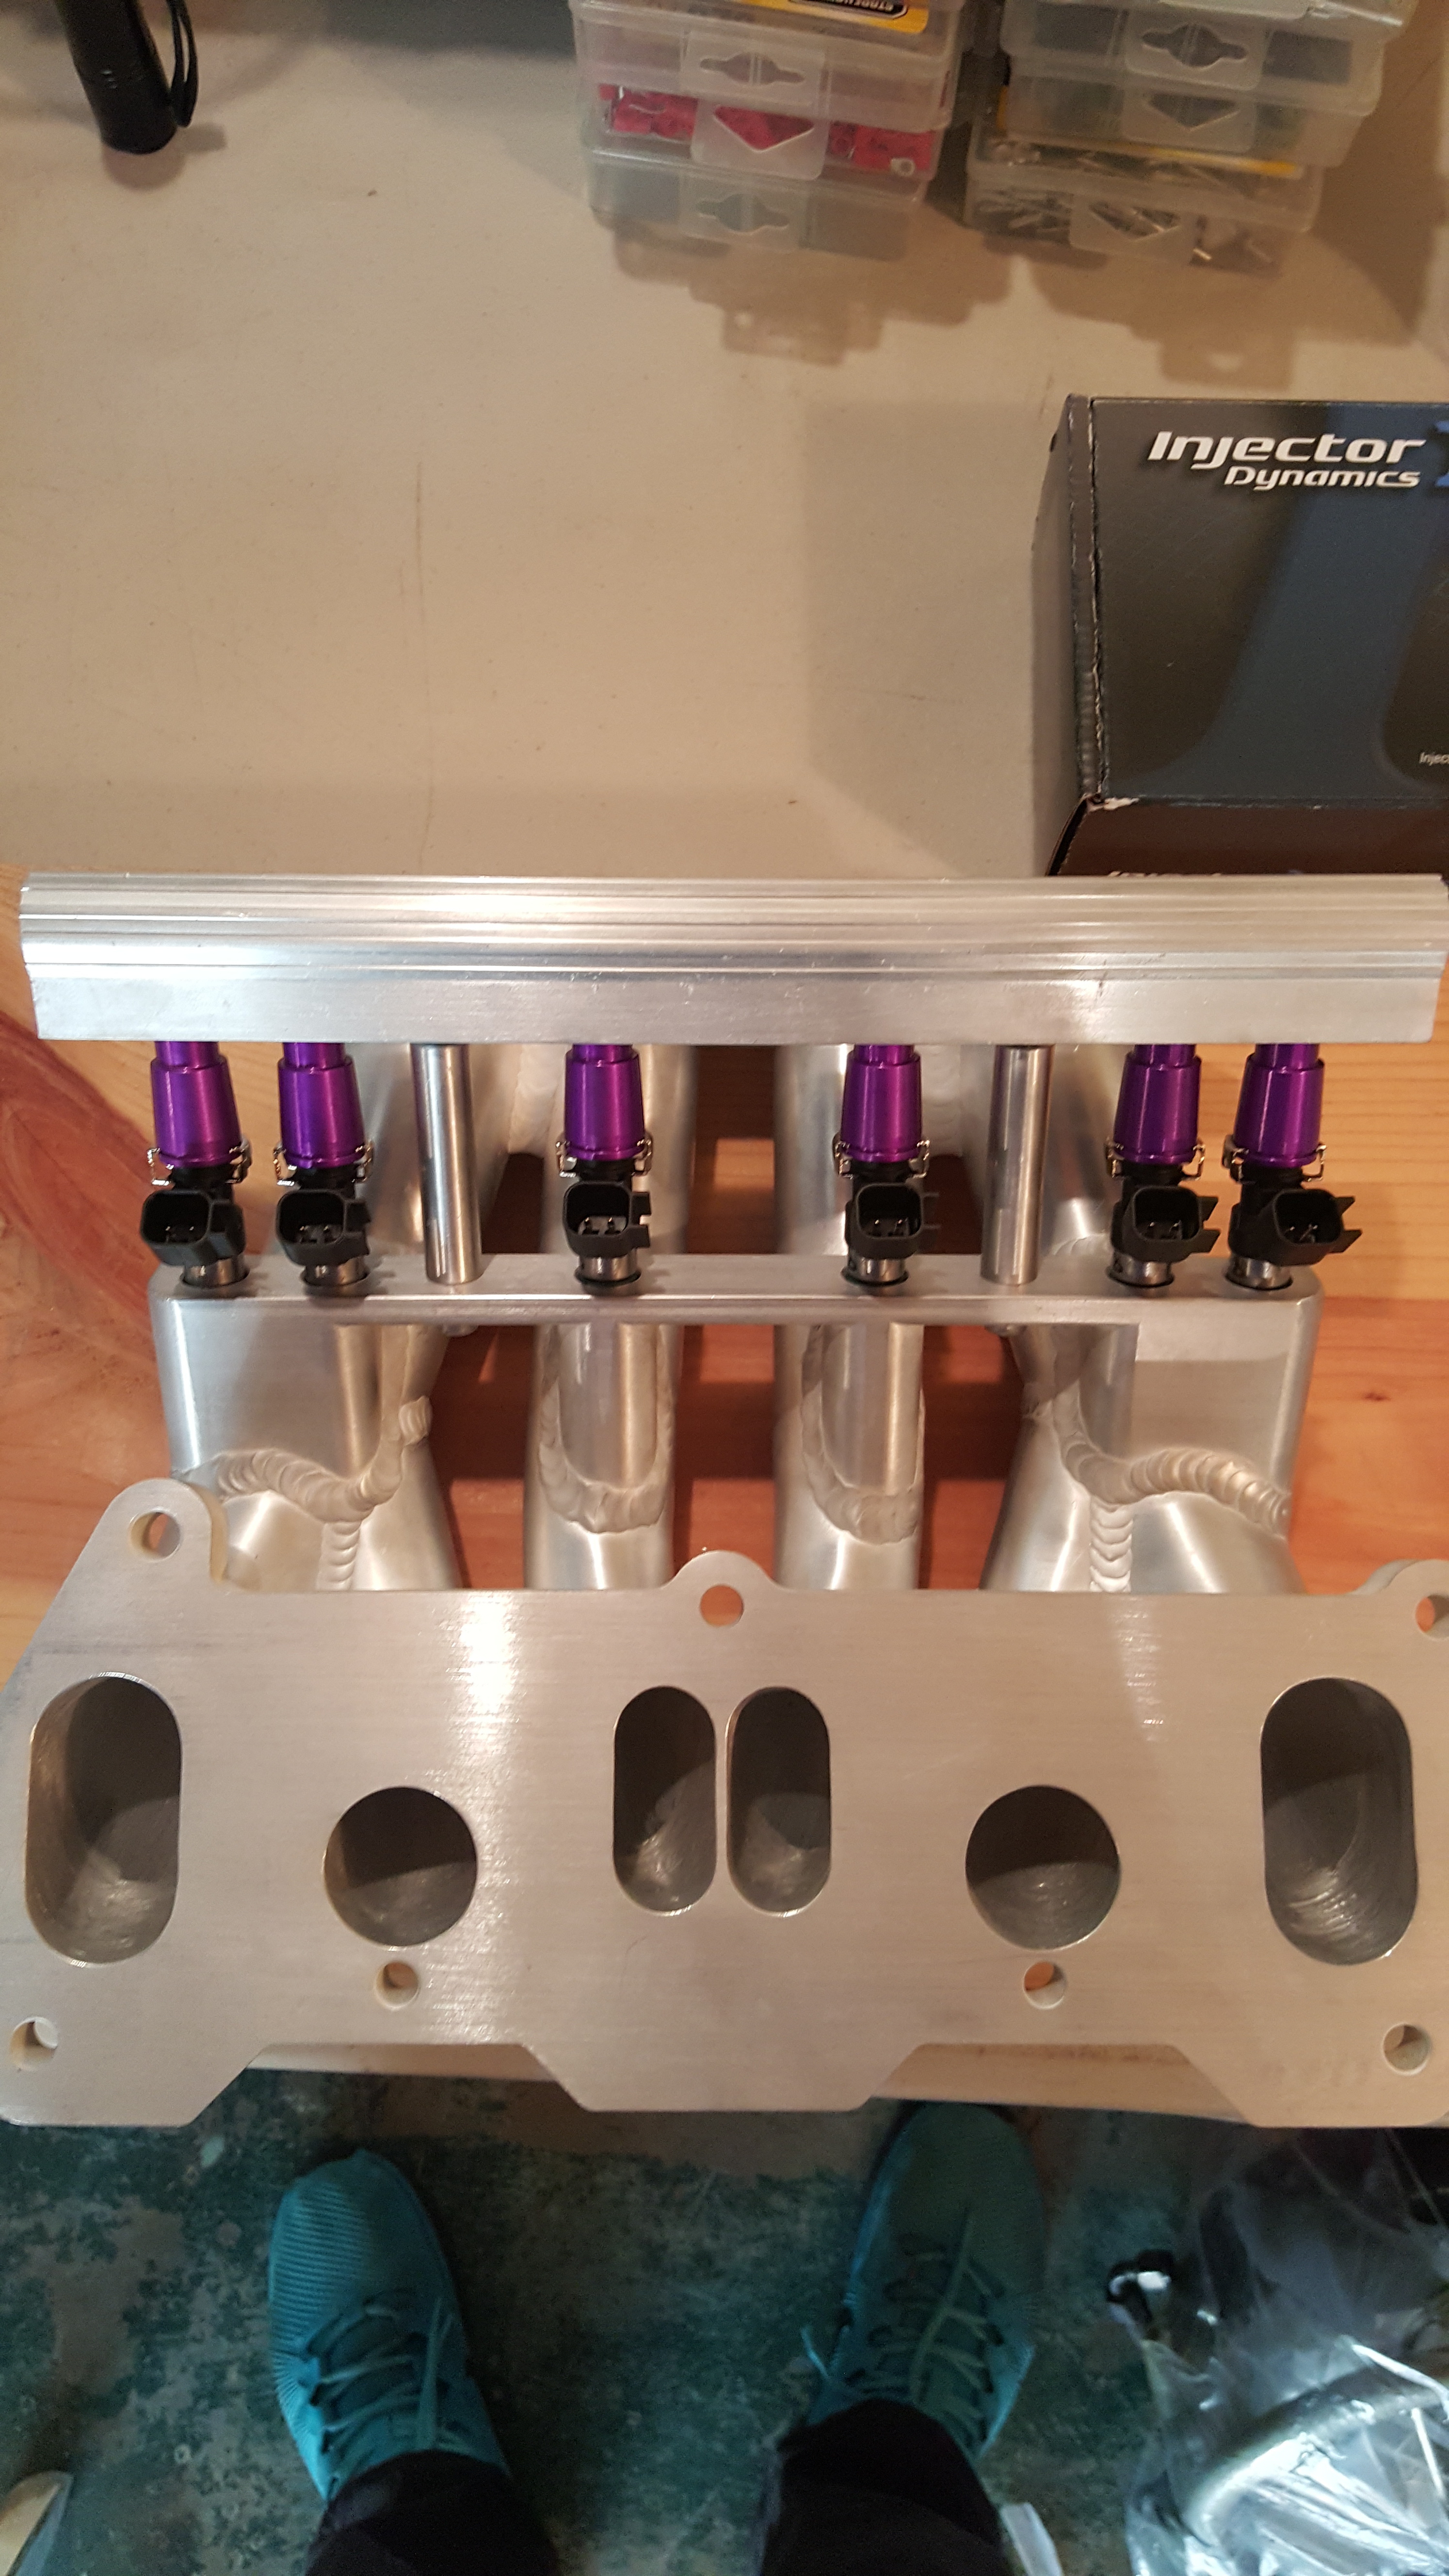
After giving the LIM a solid inspection... I started looking at the hardware and was pretty impressed with the design of the rail bracket and how it fastens. Looks Great!! and I've got solid piece of mind!! No leaky Injectors here!!
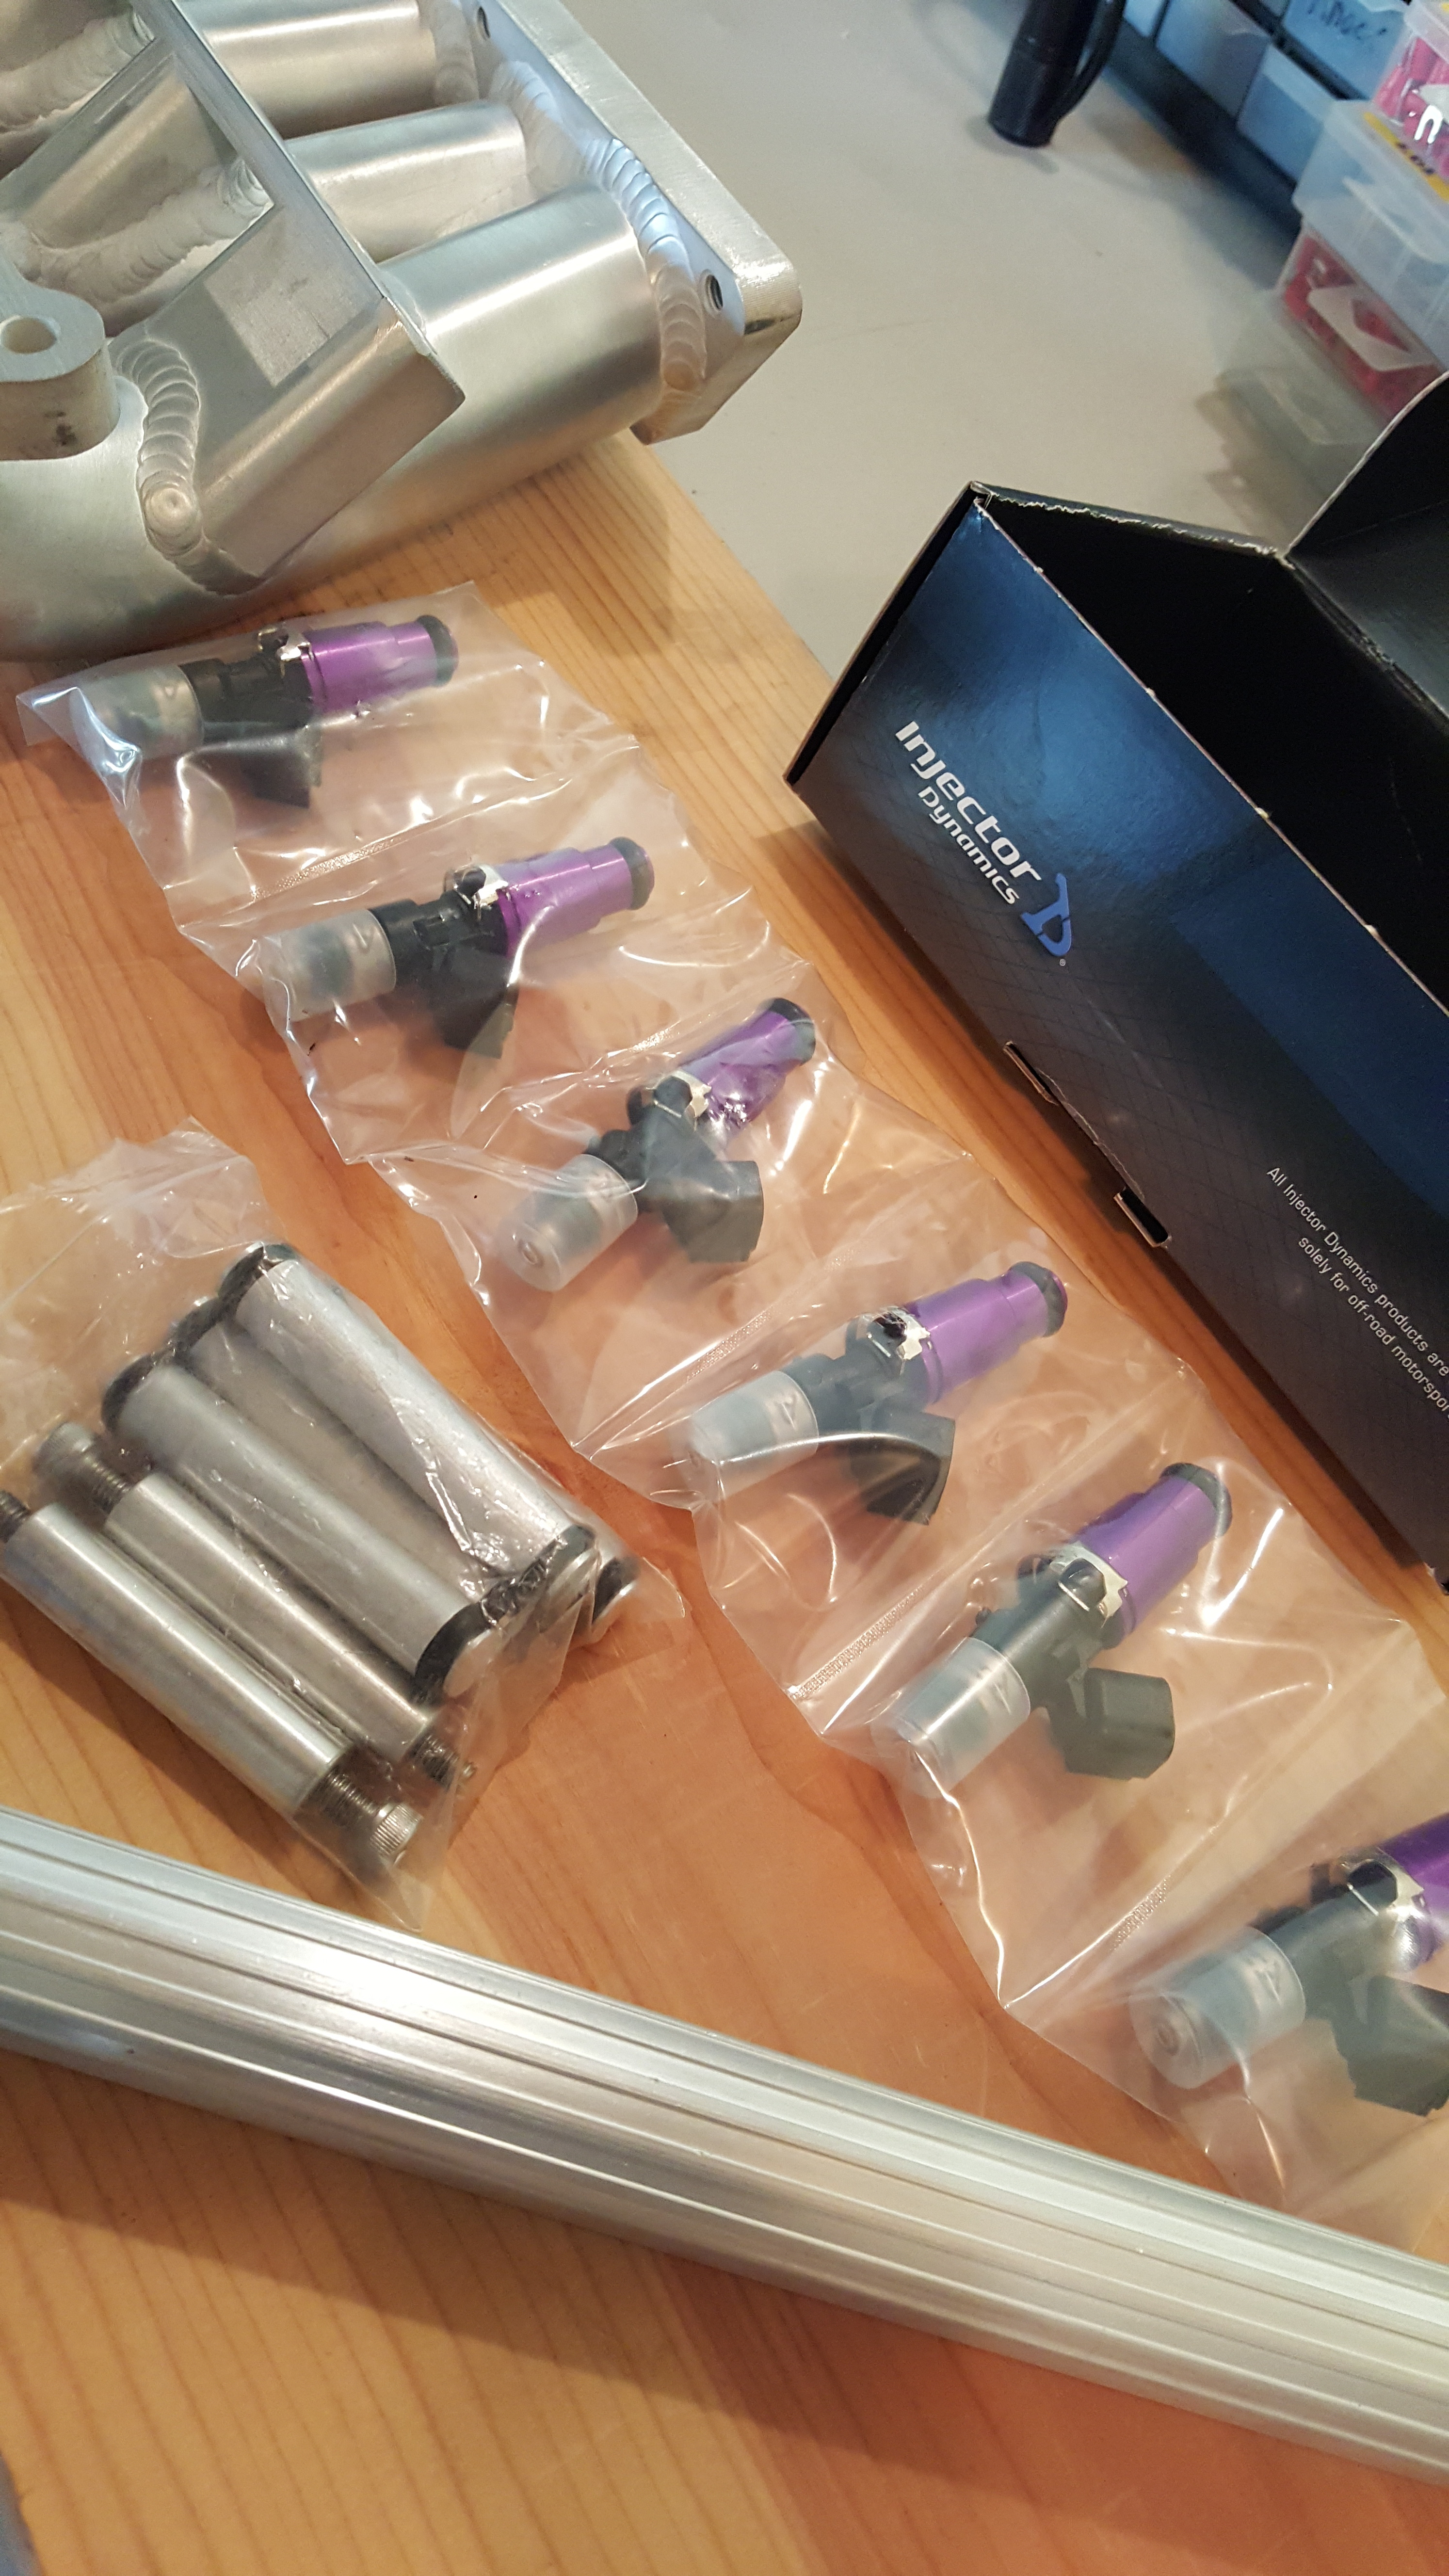
I also got all my injectors in from Full Function Engineering! ALL 6 Injectors!! 1300's or 1700's ...Can you tell?!
Thanks again to Aaron At Full Function Engineering!!!! If anyone needs injectors fuel rails or pumps... go check out their website!!!
Looks SOOO Nice!!
Still needs some golden love...but i'll get to it!
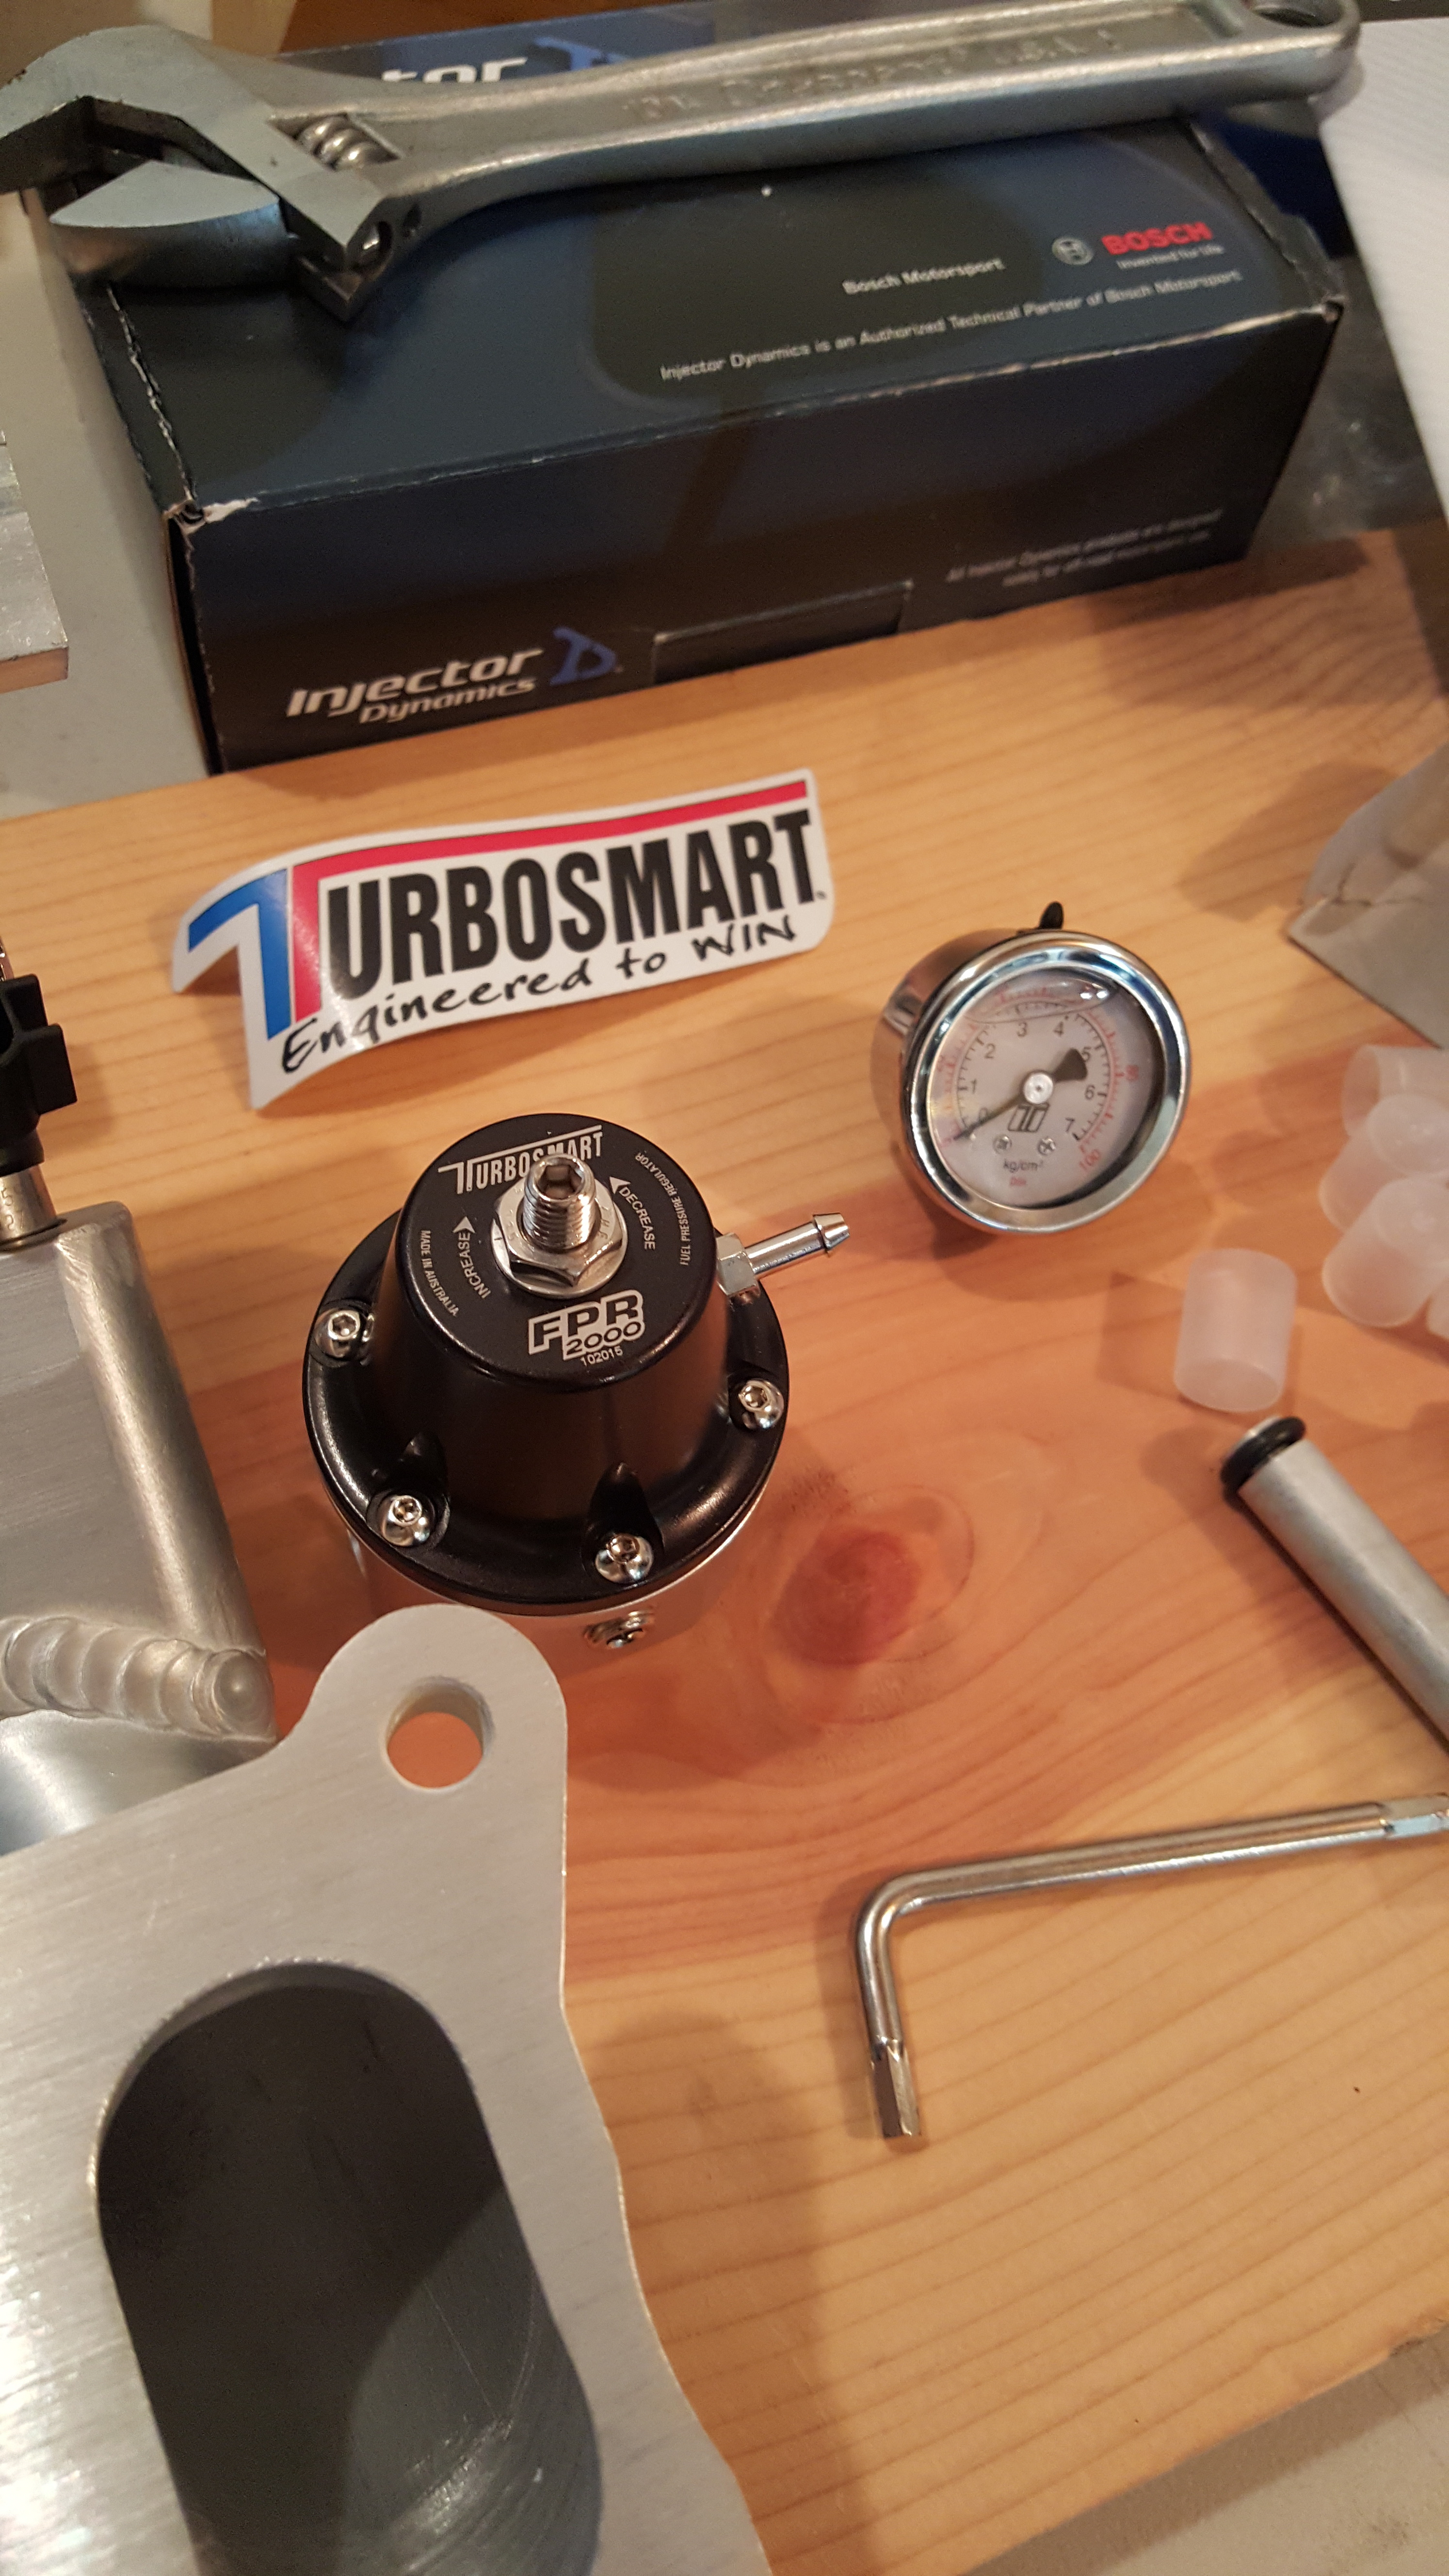
And Lastly! all my turbosmart gear came in!! This stuff rocks!! Here's the new Fuel Pressure Regulator FPR2000 In black!!! and the mech gauge as well =-)
Well I'm gonna start sorting this stuff out but I'll continue soon! More post on the way!
So Stay tuned while More parts come in!!
Let the Updates Roll in!!
Well this past week has been pretty crazy. Between moving all my stuff and parts coming in etc. It was a real pain to put off working on the car to take care of all the moving stuff. It was also a bit of a pain to keep track of everything. While I'm working on things I always like to keep certain things in the same spot. I don't leave tools out but sometimes I'll leave hardware grouped in areas so that I don't mix up with other hardware. But anyways, I took all my garage stuff last and finally the Wolf the very last trip so that I wouldn't have to worry about working around it etc. I wanted to make sure the garage was set up 100% I'm finally all moved in and i was finally able to get the car set up and ready for work!!
#Thisisthewolf
And SO here she is... Not an Xcessive.....Not panspeed, not Feed...and not RE...not projay..But she'll sure as hell do the job! Got the Manifold from Rene Franco
Semi Peripheral Lower Intake Manifold. Nice clean porting and solid welds. Flange is Nice and thick too!!
After giving the LIM a solid inspection... I started looking at the hardware and was pretty impressed with the design of the rail bracket and how it fastens. Looks Great!! and I've got solid piece of mind!! No leaky Injectors here!!
I also got all my injectors in from Full Function Engineering! ALL 6 Injectors!! 1300's or 1700's ...Can you tell?!
Thanks again to Aaron At Full Function Engineering!!!! If anyone needs injectors fuel rails or pumps... go check out their website!!!
Looks SOOO Nice!!
Still needs some golden love...but i'll get to it!
And Lastly! all my turbosmart gear came in!! This stuff rocks!! Here's the new Fuel Pressure Regulator FPR2000 In black!!! and the mech gauge as well =-)
Well I'm gonna start sorting this stuff out but I'll continue soon! More post on the way!
So Stay tuned while More parts come in!!
Let the Updates Roll in!!
 02-01-16, 01:59 AM
#2455
Make an assessment...

iTrader: (3)
I JUST saw that LIM this weekend for the first time ever. Never knew it existed lol. Pretty nice, and looks solid. Being able to see through it kinda freaks me out a little because I'm used to all that being closed off, but as long as it performs and lasts, who cares? lol
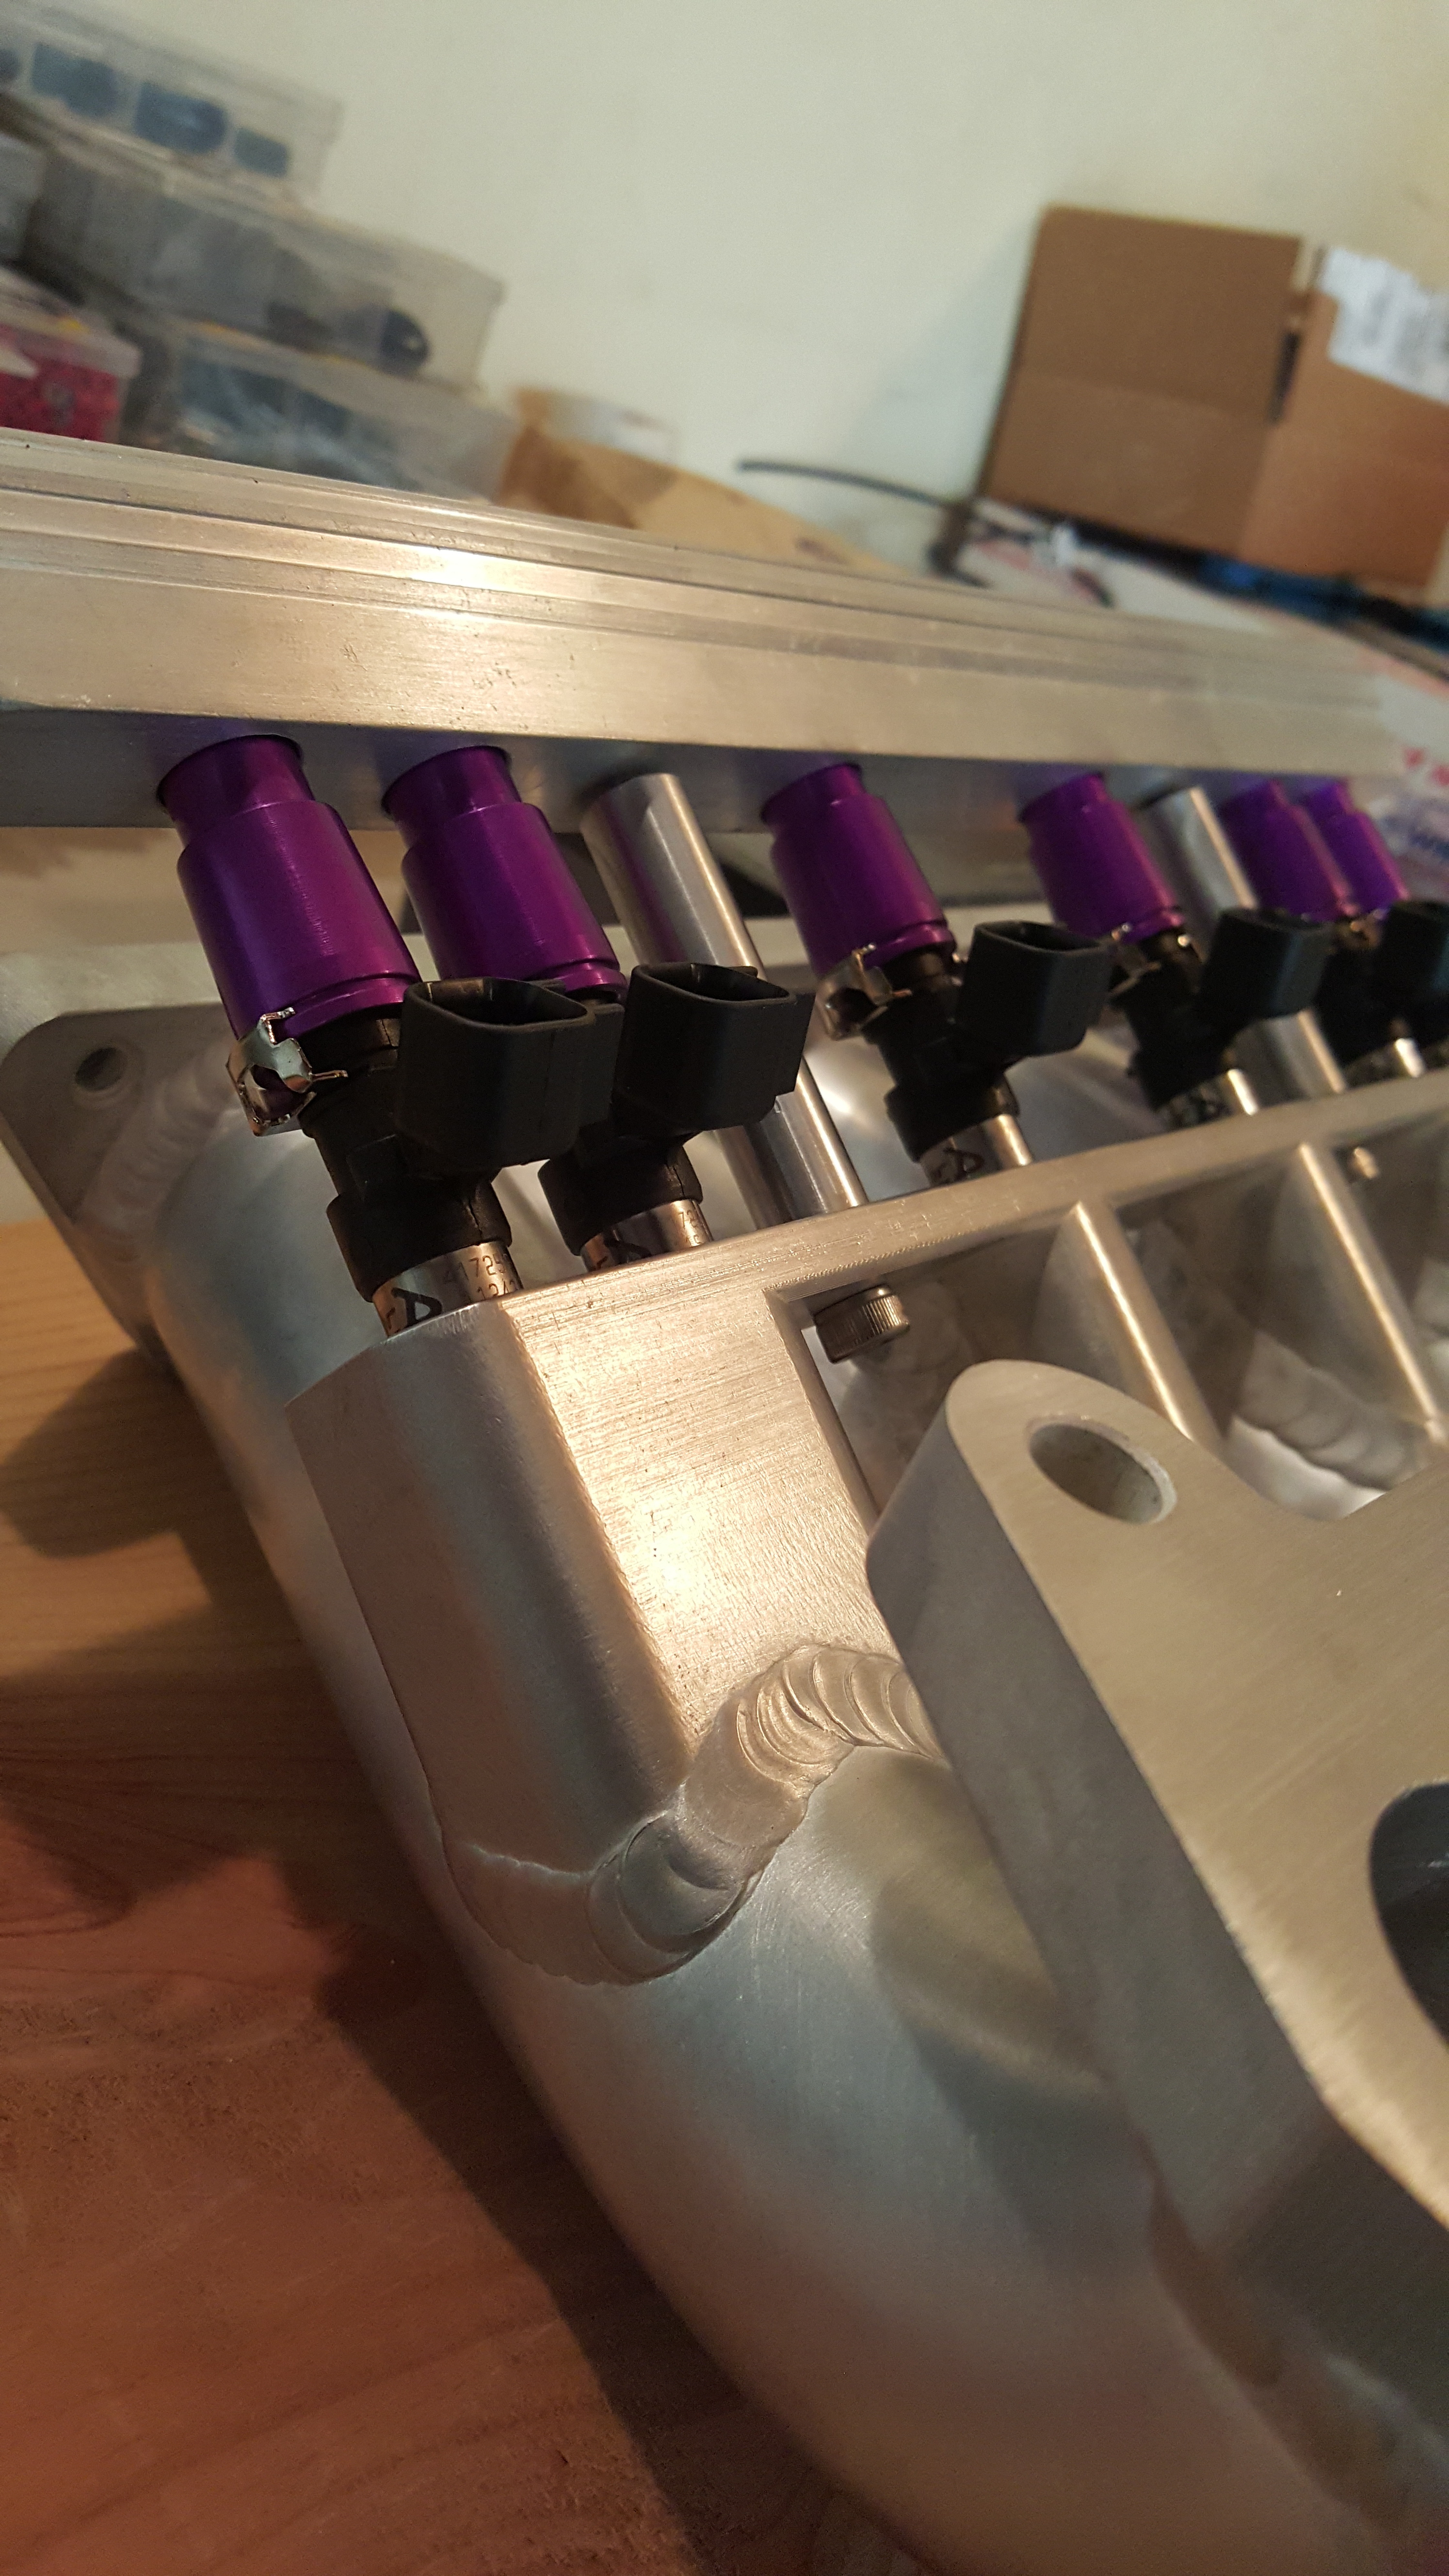
Do the two injectors on each end both spray into both the regular port and the semi port or are they separated somehow? I assume this deletes the primary injectors, or are you using those too?
Do the two injectors on each end both spray into both the regular port and the semi port or are they separated somehow? I assume this deletes the primary injectors, or are you using those too?
 02-01-16, 12:30 PM
#2456
It's definitely a nice piece for the price!!!! I did have to clean up a few parts of it internally... but that might just be because I'm **** about little things like that

It is fairly new.....within the past 9months or so. But I'm thinking of making a heat shield to keep it fully isolated against the exhaust. Hopefully i'll have time.
So they are sitting about 50/50 divided between the two. I'm sure the whole "path of least resistance will come into play here...but as long as the fuel makes it into the housing...I think for my needs...it'll do just fine. But no I won't be using the primary injectors at all. I'll be blocking them off for sure. imagine 8 injectors.... LOL Going for 1000+ HP!!! Hows your car brotha?!!
I JUST saw that LIM this weekend for the first time ever. Never knew it existed lol. Pretty nice, and looks solid. Being able to see through it kinda freaks me out a little because I'm used to all that being closed off, but as long as it performs and lasts, who cares? lol
Do the two injectors on each end both spray into both the regular port and the semi port or are they separated somehow? I assume this deletes the primary injectors, or are you using those too?
Do the two injectors on each end both spray into both the regular port and the semi port or are they separated somehow? I assume this deletes the primary injectors, or are you using those too?
So they are sitting about 50/50 divided between the two. I'm sure the whole "path of least resistance will come into play here...but as long as the fuel makes it into the housing...I think for my needs...it'll do just fine. But no I won't be using the primary injectors at all. I'll be blocking them off for sure. imagine 8 injectors.... LOL Going for 1000+ HP!!!
Hows your car brotha?!!
02-01-16, 11:48 PM
#2457
Make an assessment...
iTrader: (3)
It is fairly new.....within the past 9months or so. But I'm thinking of making a heat shield to keep it fully isolated against the exhaust. Hopefully i'll have time.
So they are sitting about 50/50 divided between the two. I'm sure the whole "path of least resistance will come into play here...but as long as the fuel makes it into the housing...I think for my needs...it'll do just fine. But no I won't be using the primary injectors at all. I'll be blocking them off for sure. imagine 8 injectors.... LOL Going for 1000+ HP!!! Hows your car brotha?!!
So they are sitting about 50/50 divided between the two. I'm sure the whole "path of least resistance will come into play here...but as long as the fuel makes it into the housing...I think for my needs...it'll do just fine. But no I won't be using the primary injectors at all. I'll be blocking them off for sure. imagine 8 injectors.... LOL Going for 1000+ HP!!!
Hows your car brotha?!!It's alright. I started tearing it down about a week ago. Swapping to the 8374 IWG and a bunch of other things. And you know how it is, always running into issues lol. I'm thinking about going ahead and swapping my lugs to longer ARP since I'm doing the brakes again and hubs/wheel bearings. How long did you get? If I remember right you got them fairly long, I don't think I'll need to go that long, just a bit longer than stock probably lol.
02-02-16, 10:59 AM
#2458
Oh I was just wondering if they somehow put a piece in the runner to separate the two. I can't think of why they would, just curious. Do it! Go for 8 injectors lol.
It's alright. I started tearing it down about a week ago. Swapping to the 8374 IWG and a bunch of other things. And you know how it is, always running into issues lol. I'm thinking about going ahead and swapping my lugs to longer ARP since I'm doing the brakes again and hubs/wheel bearings. How long did you get? If I remember right you got them fairly long, I don't think I'll need to go that long, just a bit longer than stock probably lol.
It's alright. I started tearing it down about a week ago. Swapping to the 8374 IWG and a bunch of other things. And you know how it is, always running into issues lol. I'm thinking about going ahead and swapping my lugs to longer ARP since I'm doing the brakes again and hubs/wheel bearings. How long did you get? If I remember right you got them fairly long, I don't think I'll need to go that long, just a bit longer than stock probably lol.
So at the time...I'm not sure they had any other lengths other than OE or Long. The Long ones are rad though man... Plus they look sick on the wheels and if for any reason you ever want to run an additional spacer...you won't ever need a bolt on hub spacer. I've never had to use them, even with my crazy stacks of spacers and wheel set up. If they do have different lengths..let me know though. Thats good info.
Lastly, a good tip....I ended up going to autozone and getting the replacement hubs from them... they've got lifetime warranties!!! and they're cheap. So Unless your buying new race wheel bearings...which imho..are wayyyyy overkill for any of us...You can save yourself a pretty penny by going with autozone units
02-03-16, 02:41 AM
#2459
Make an assessment...
iTrader: (3)
Oh OK. Well I'll look at ARP and see what I can find then.
You're saying you bought the rear hub from Autozone, or the front hub? I already got front hubs and rear bearings from Rock Auto, along with all the nuts, washers, and cotter pins.
You're saying you bought the rear hub from Autozone, or the front hub? I already got front hubs and rear bearings from Rock Auto, along with all the nuts, washers, and cotter pins.
02-04-16, 01:56 PM
#2461
Update: "Back into the Grime"
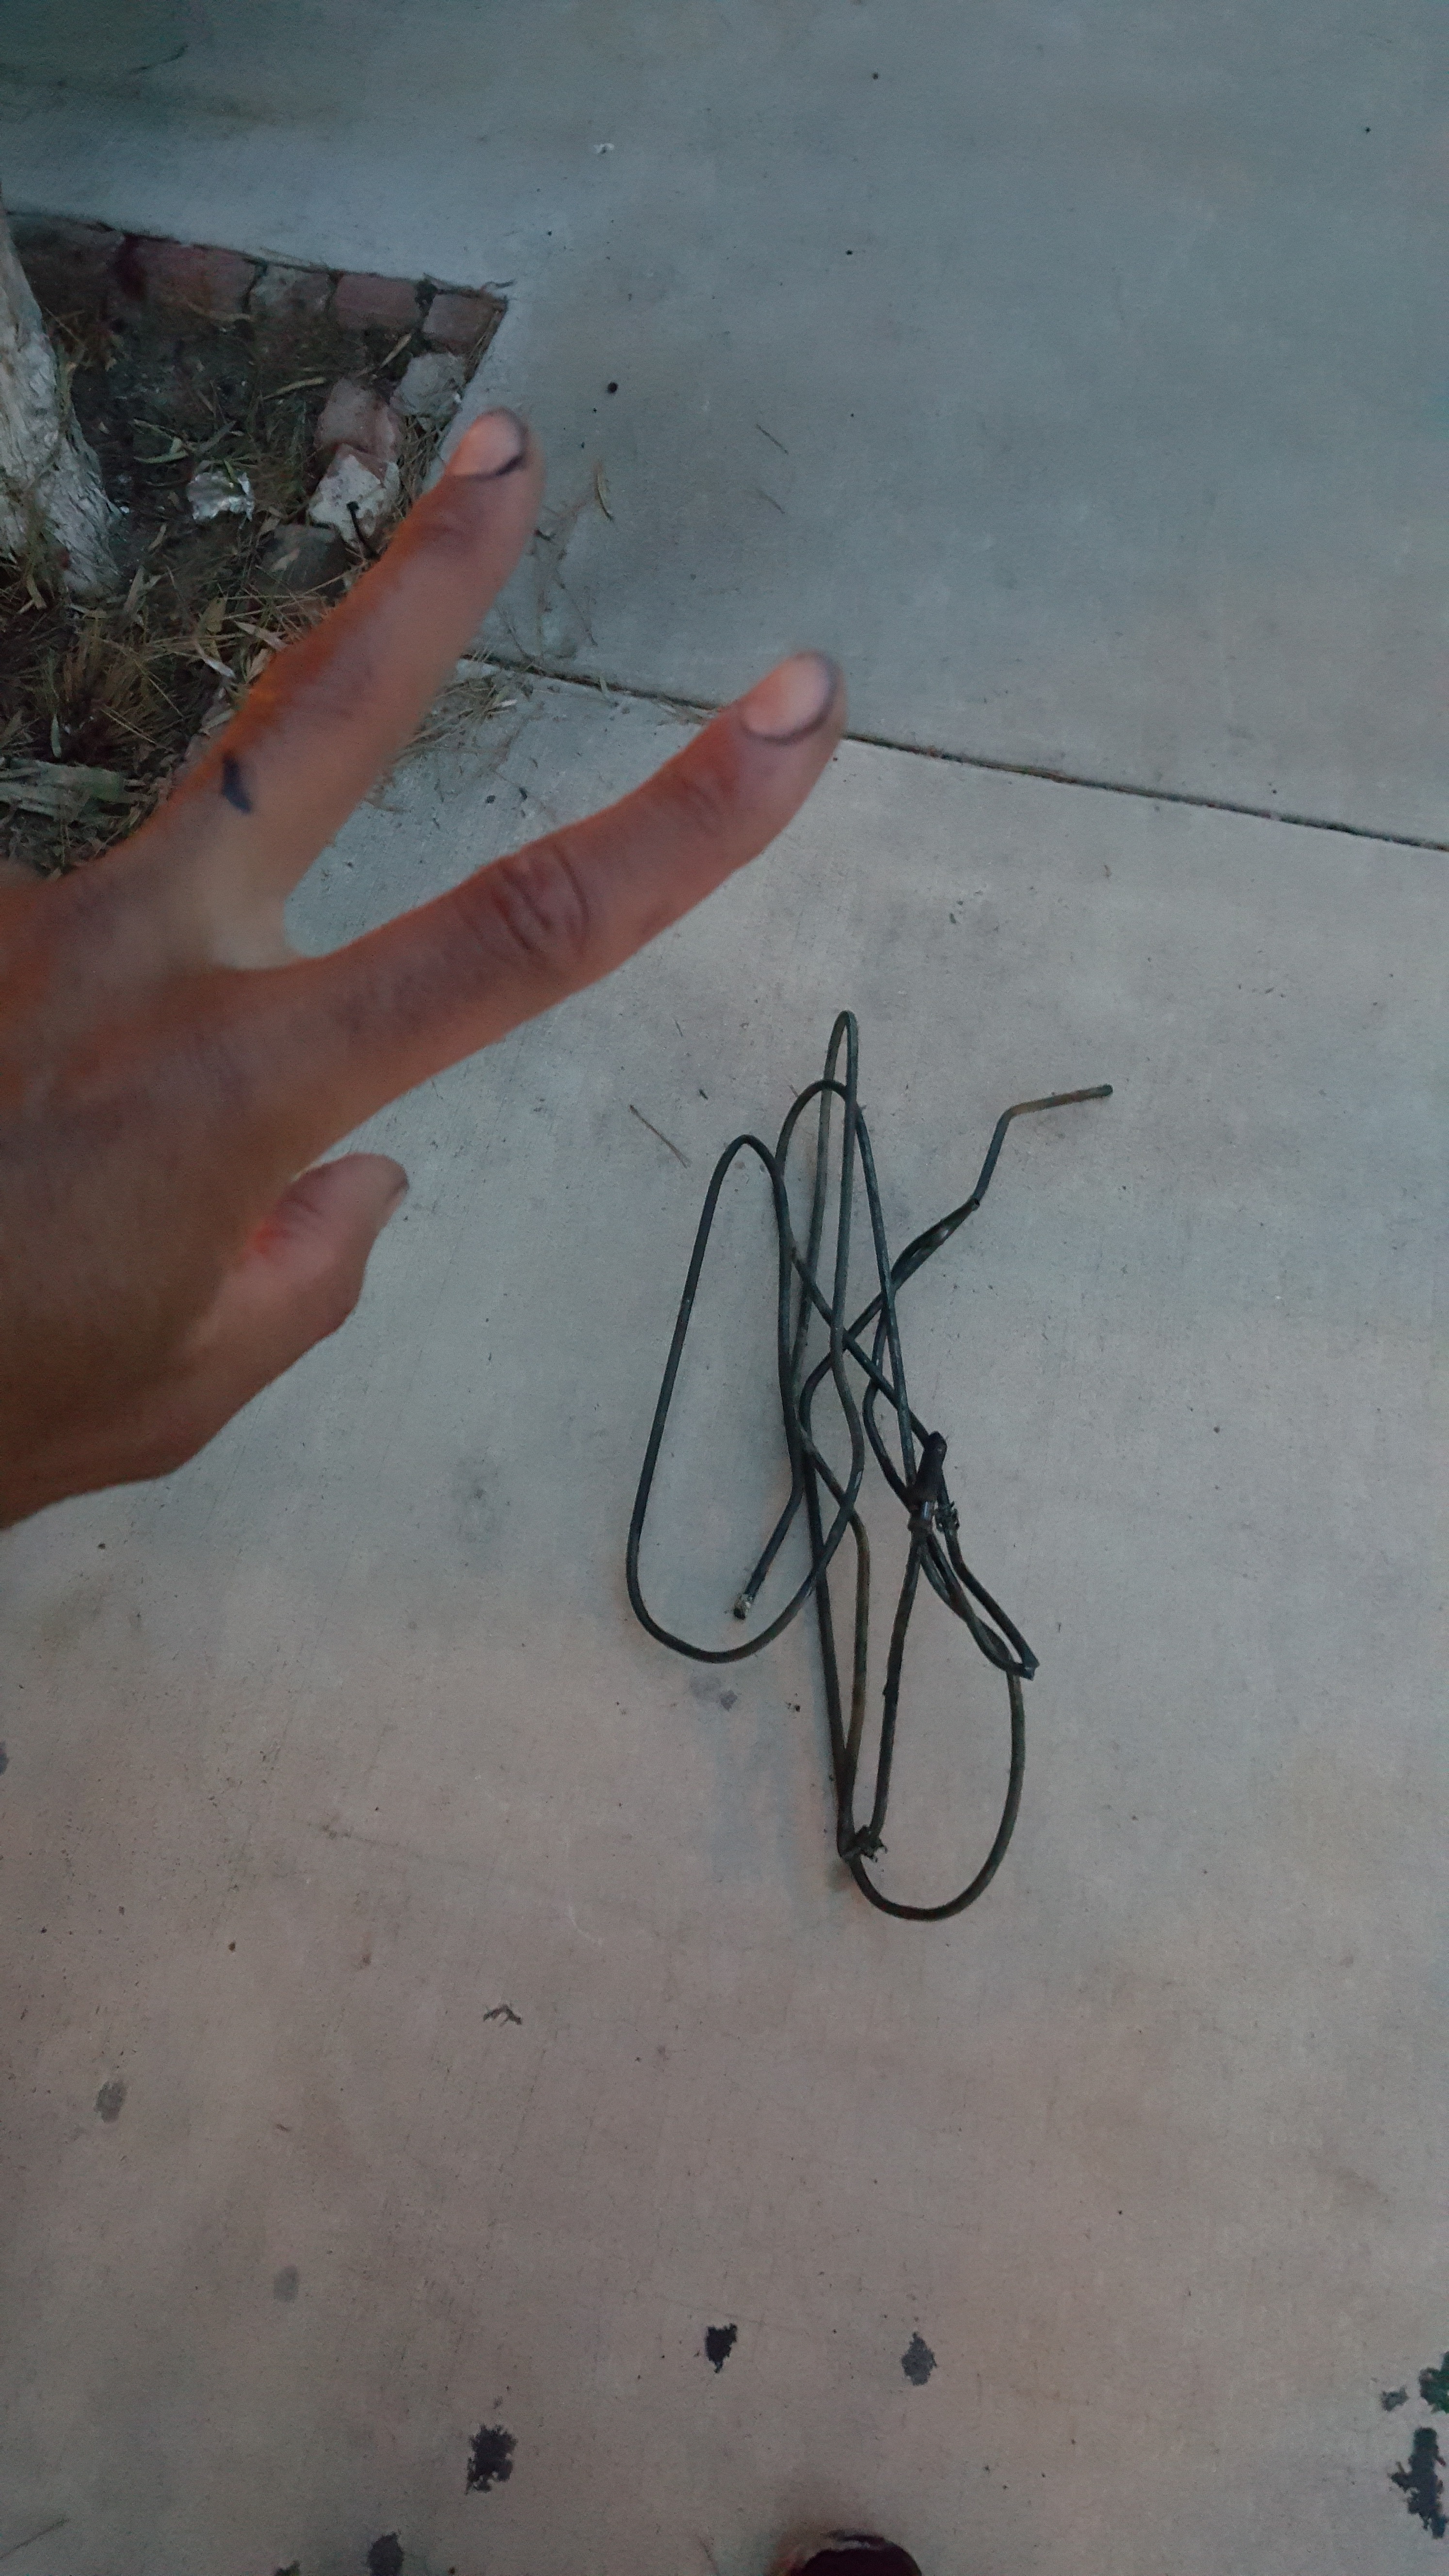
If there's one thing I have slightly lost sight of.... its the fact that I've kind of stepped away from getting dirty for a bit of time now. Believe it or not....i've missed it quite a bit. Theres nothing like getting nice and dirty under the car. Still....to this day...I know that there is no better way to learn your car better than getting down and dirty with it. To remove something and put it back in good solid shape is sometimes much more involved than a lot of people would think. With the wolf.... I've found this is the best way to find things that might be on their way out..or things that look as if they need to be replaced or even worse..have failed or broke. I Found one of my rear adjustable arms had come loose.. the trailing arm actually... I knew something looked off. "Trust you gut," I always tell myself. I remember looking at it and thinking it didn't look right. But to stay in tune with the car... you HAVE to have gotten down and dirty with her ;-)
But anyways....I got a lot of work done yesterday. I started to box up a couple wide bands to ship out to Innovate Motorsports to be repaired.....but then as I was writing the address on the small box..I realized that they were located about 12 miles from my place. So I just drove over there and handed them the box with the RMA. Shouldn't take too long to get them back.
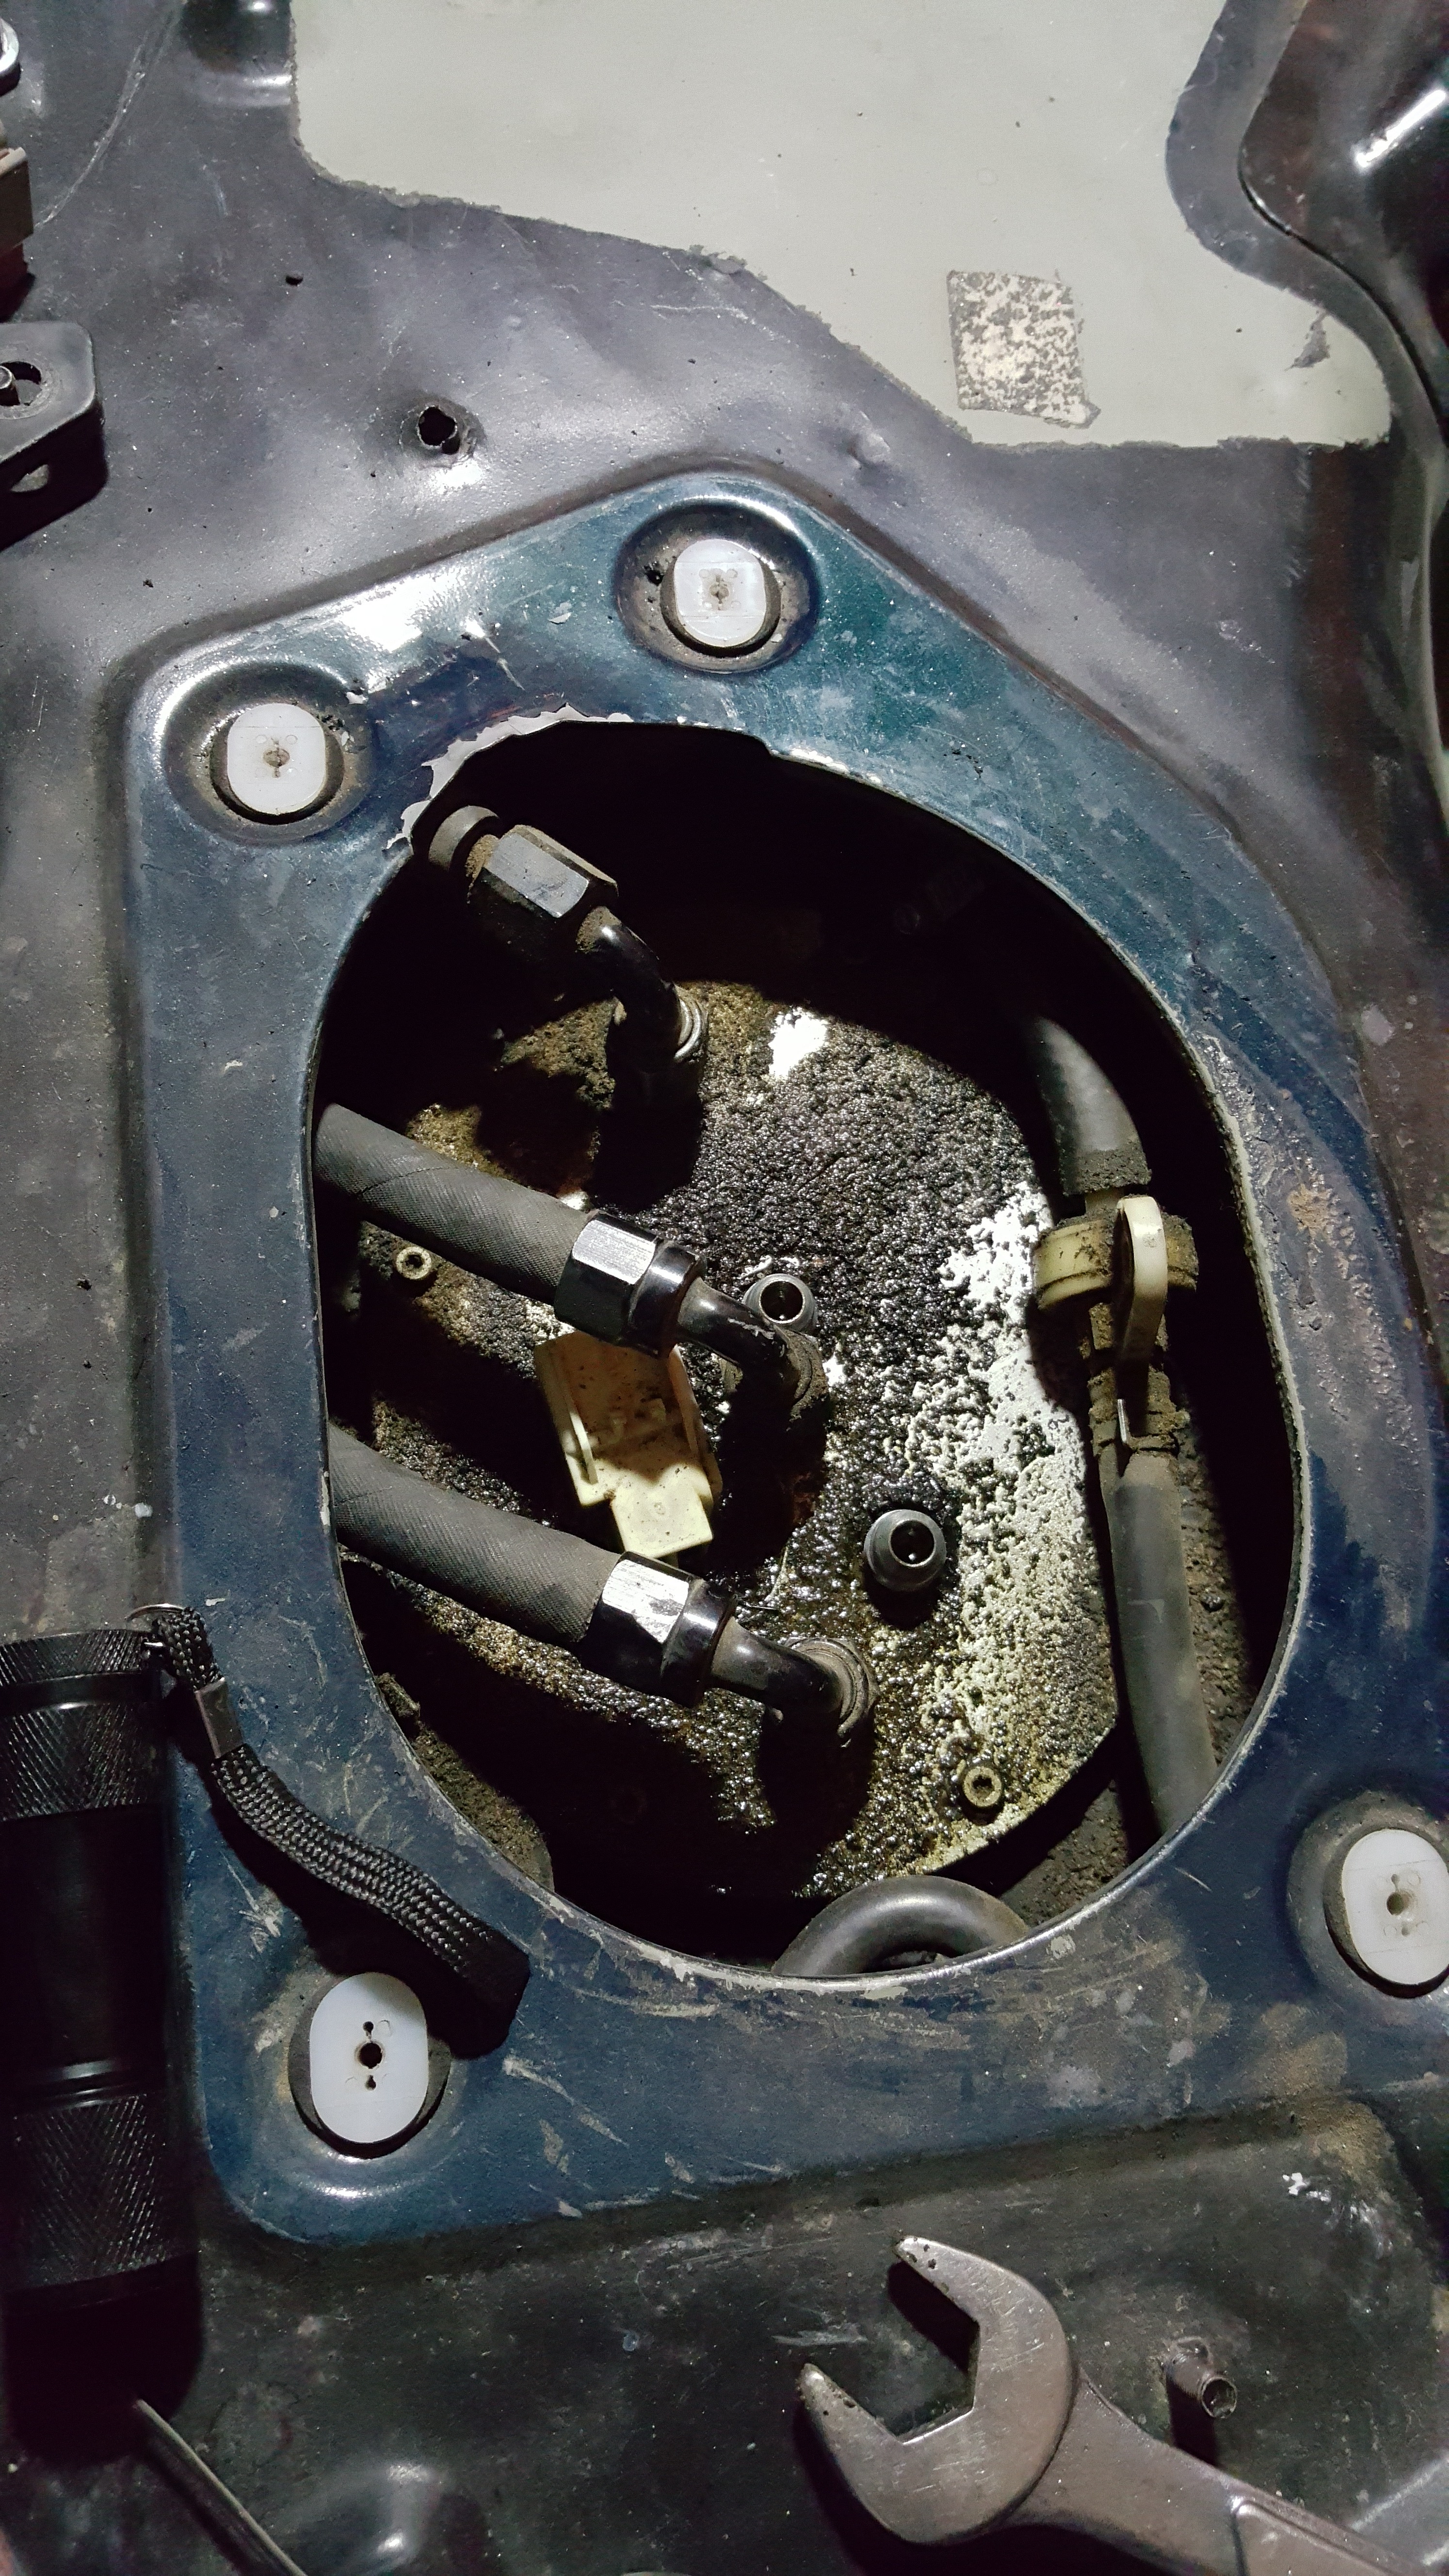
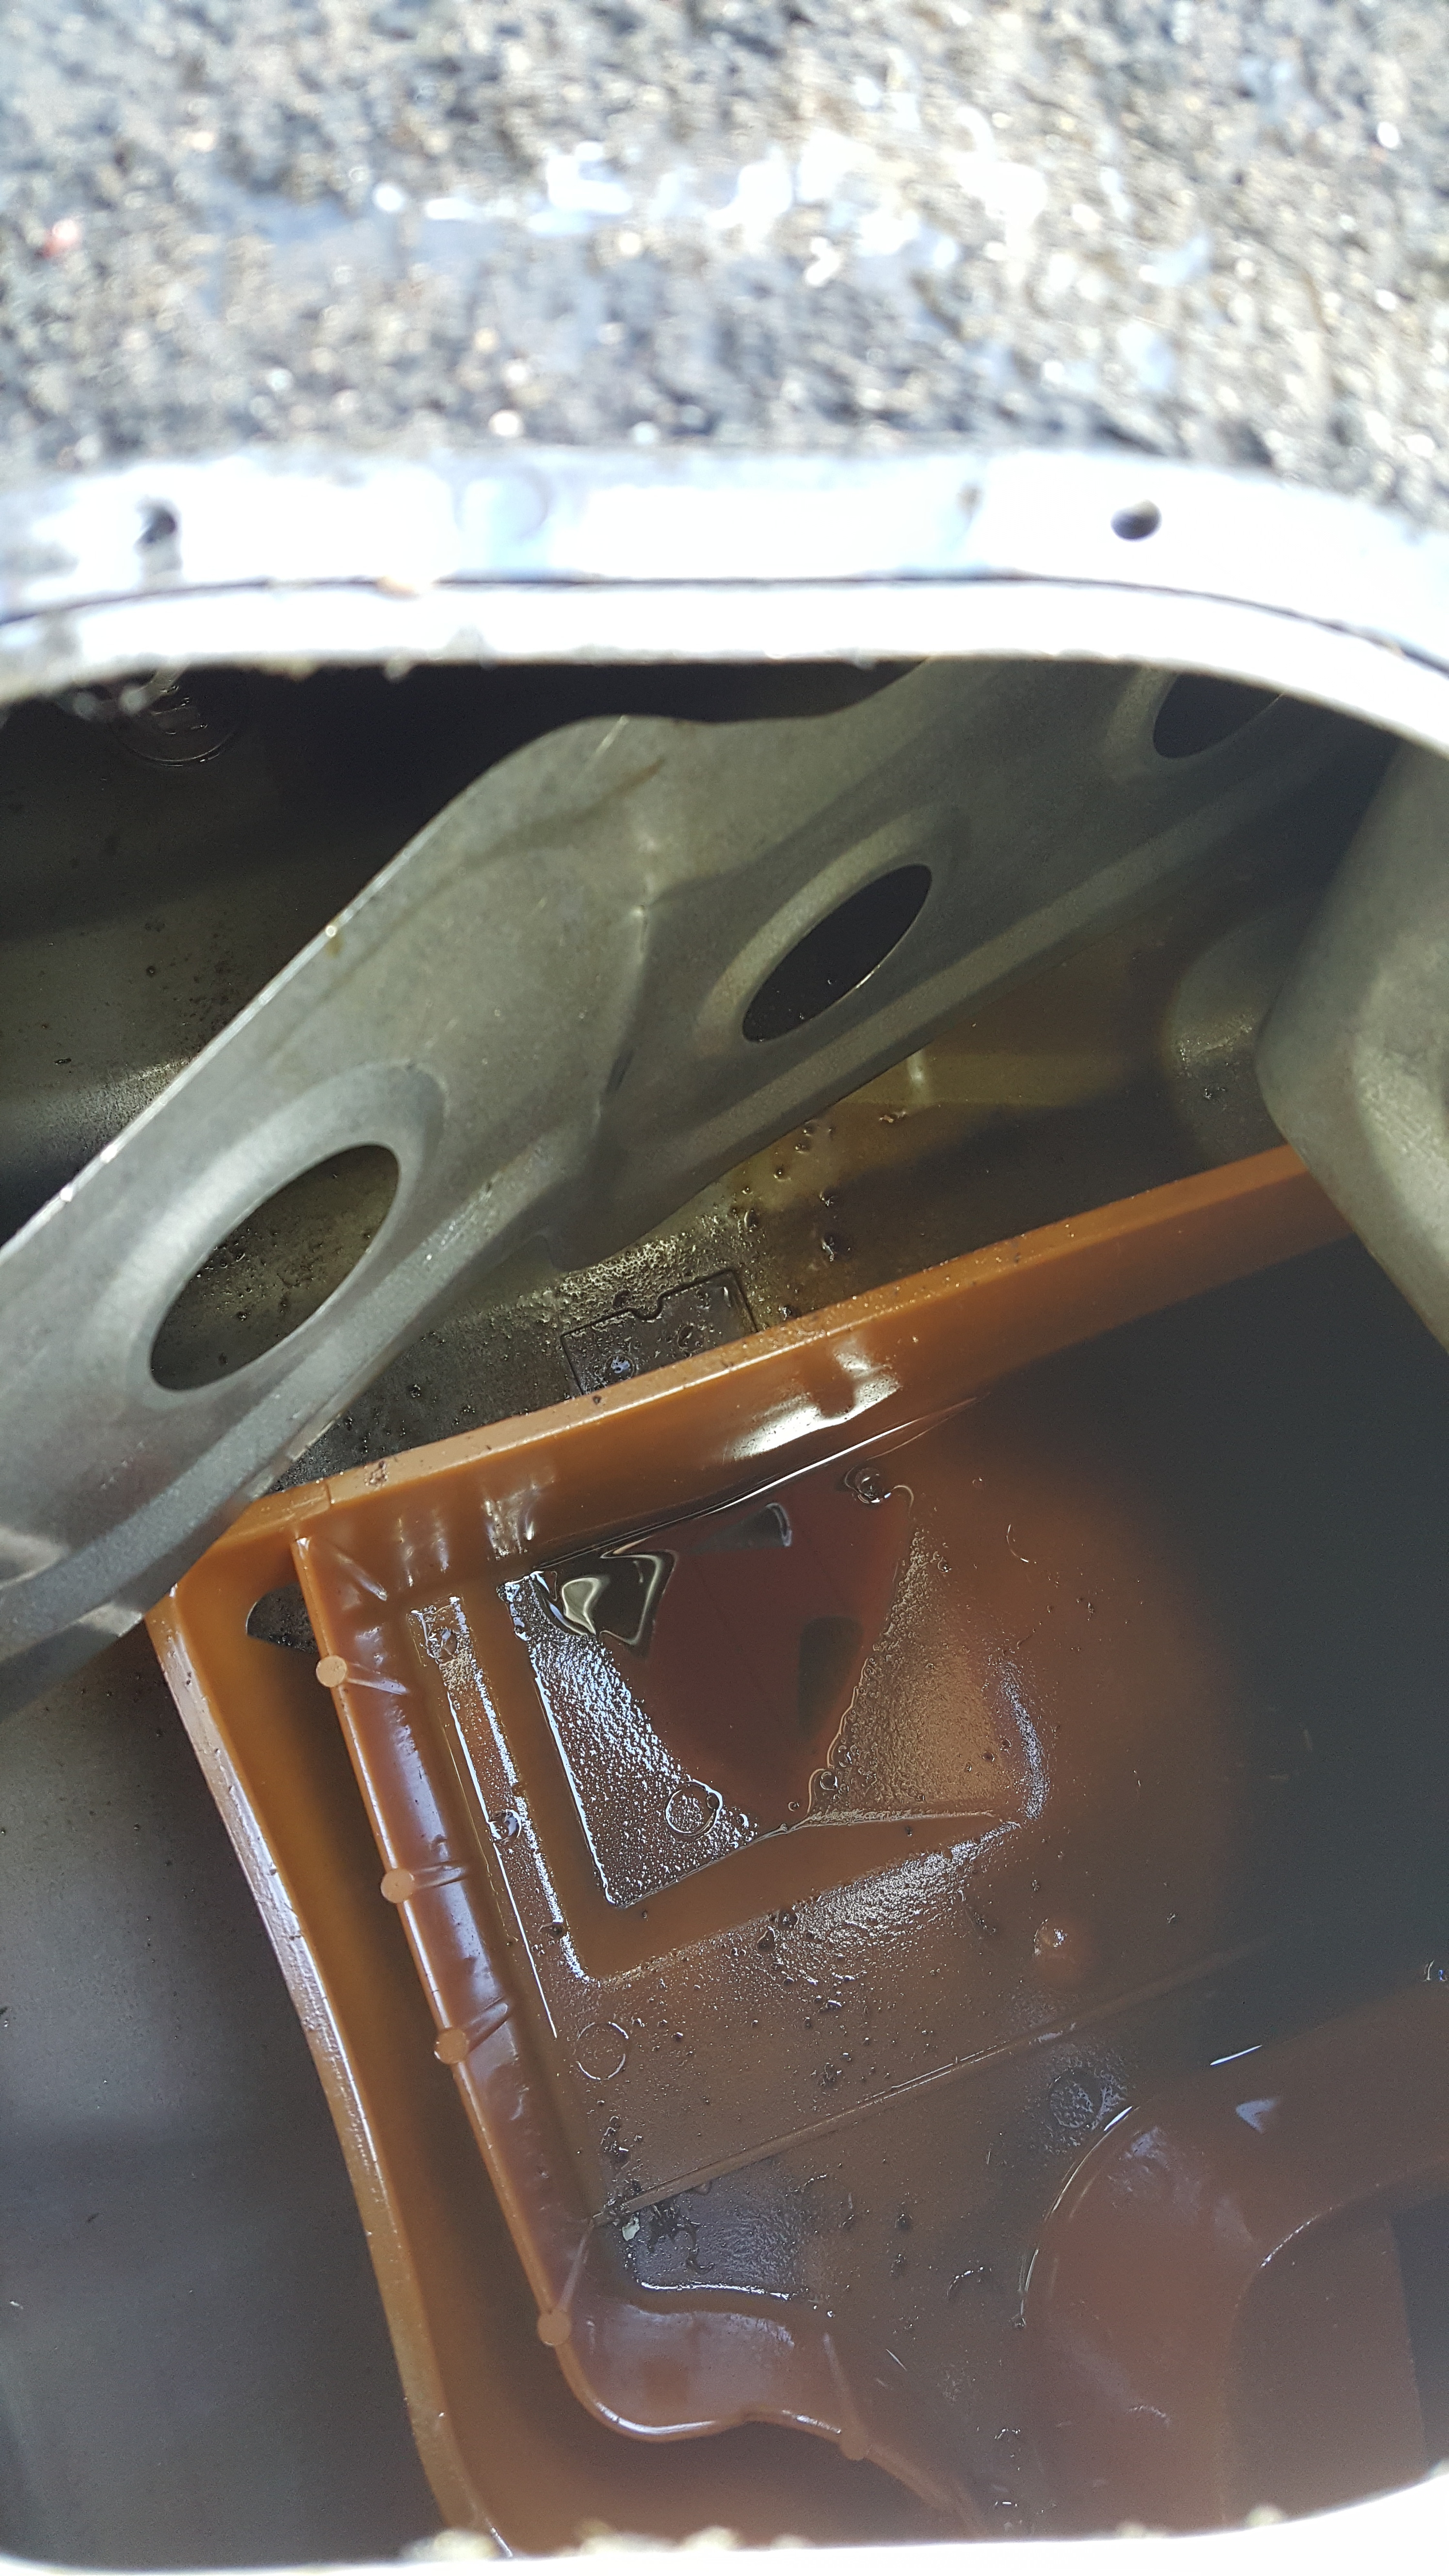
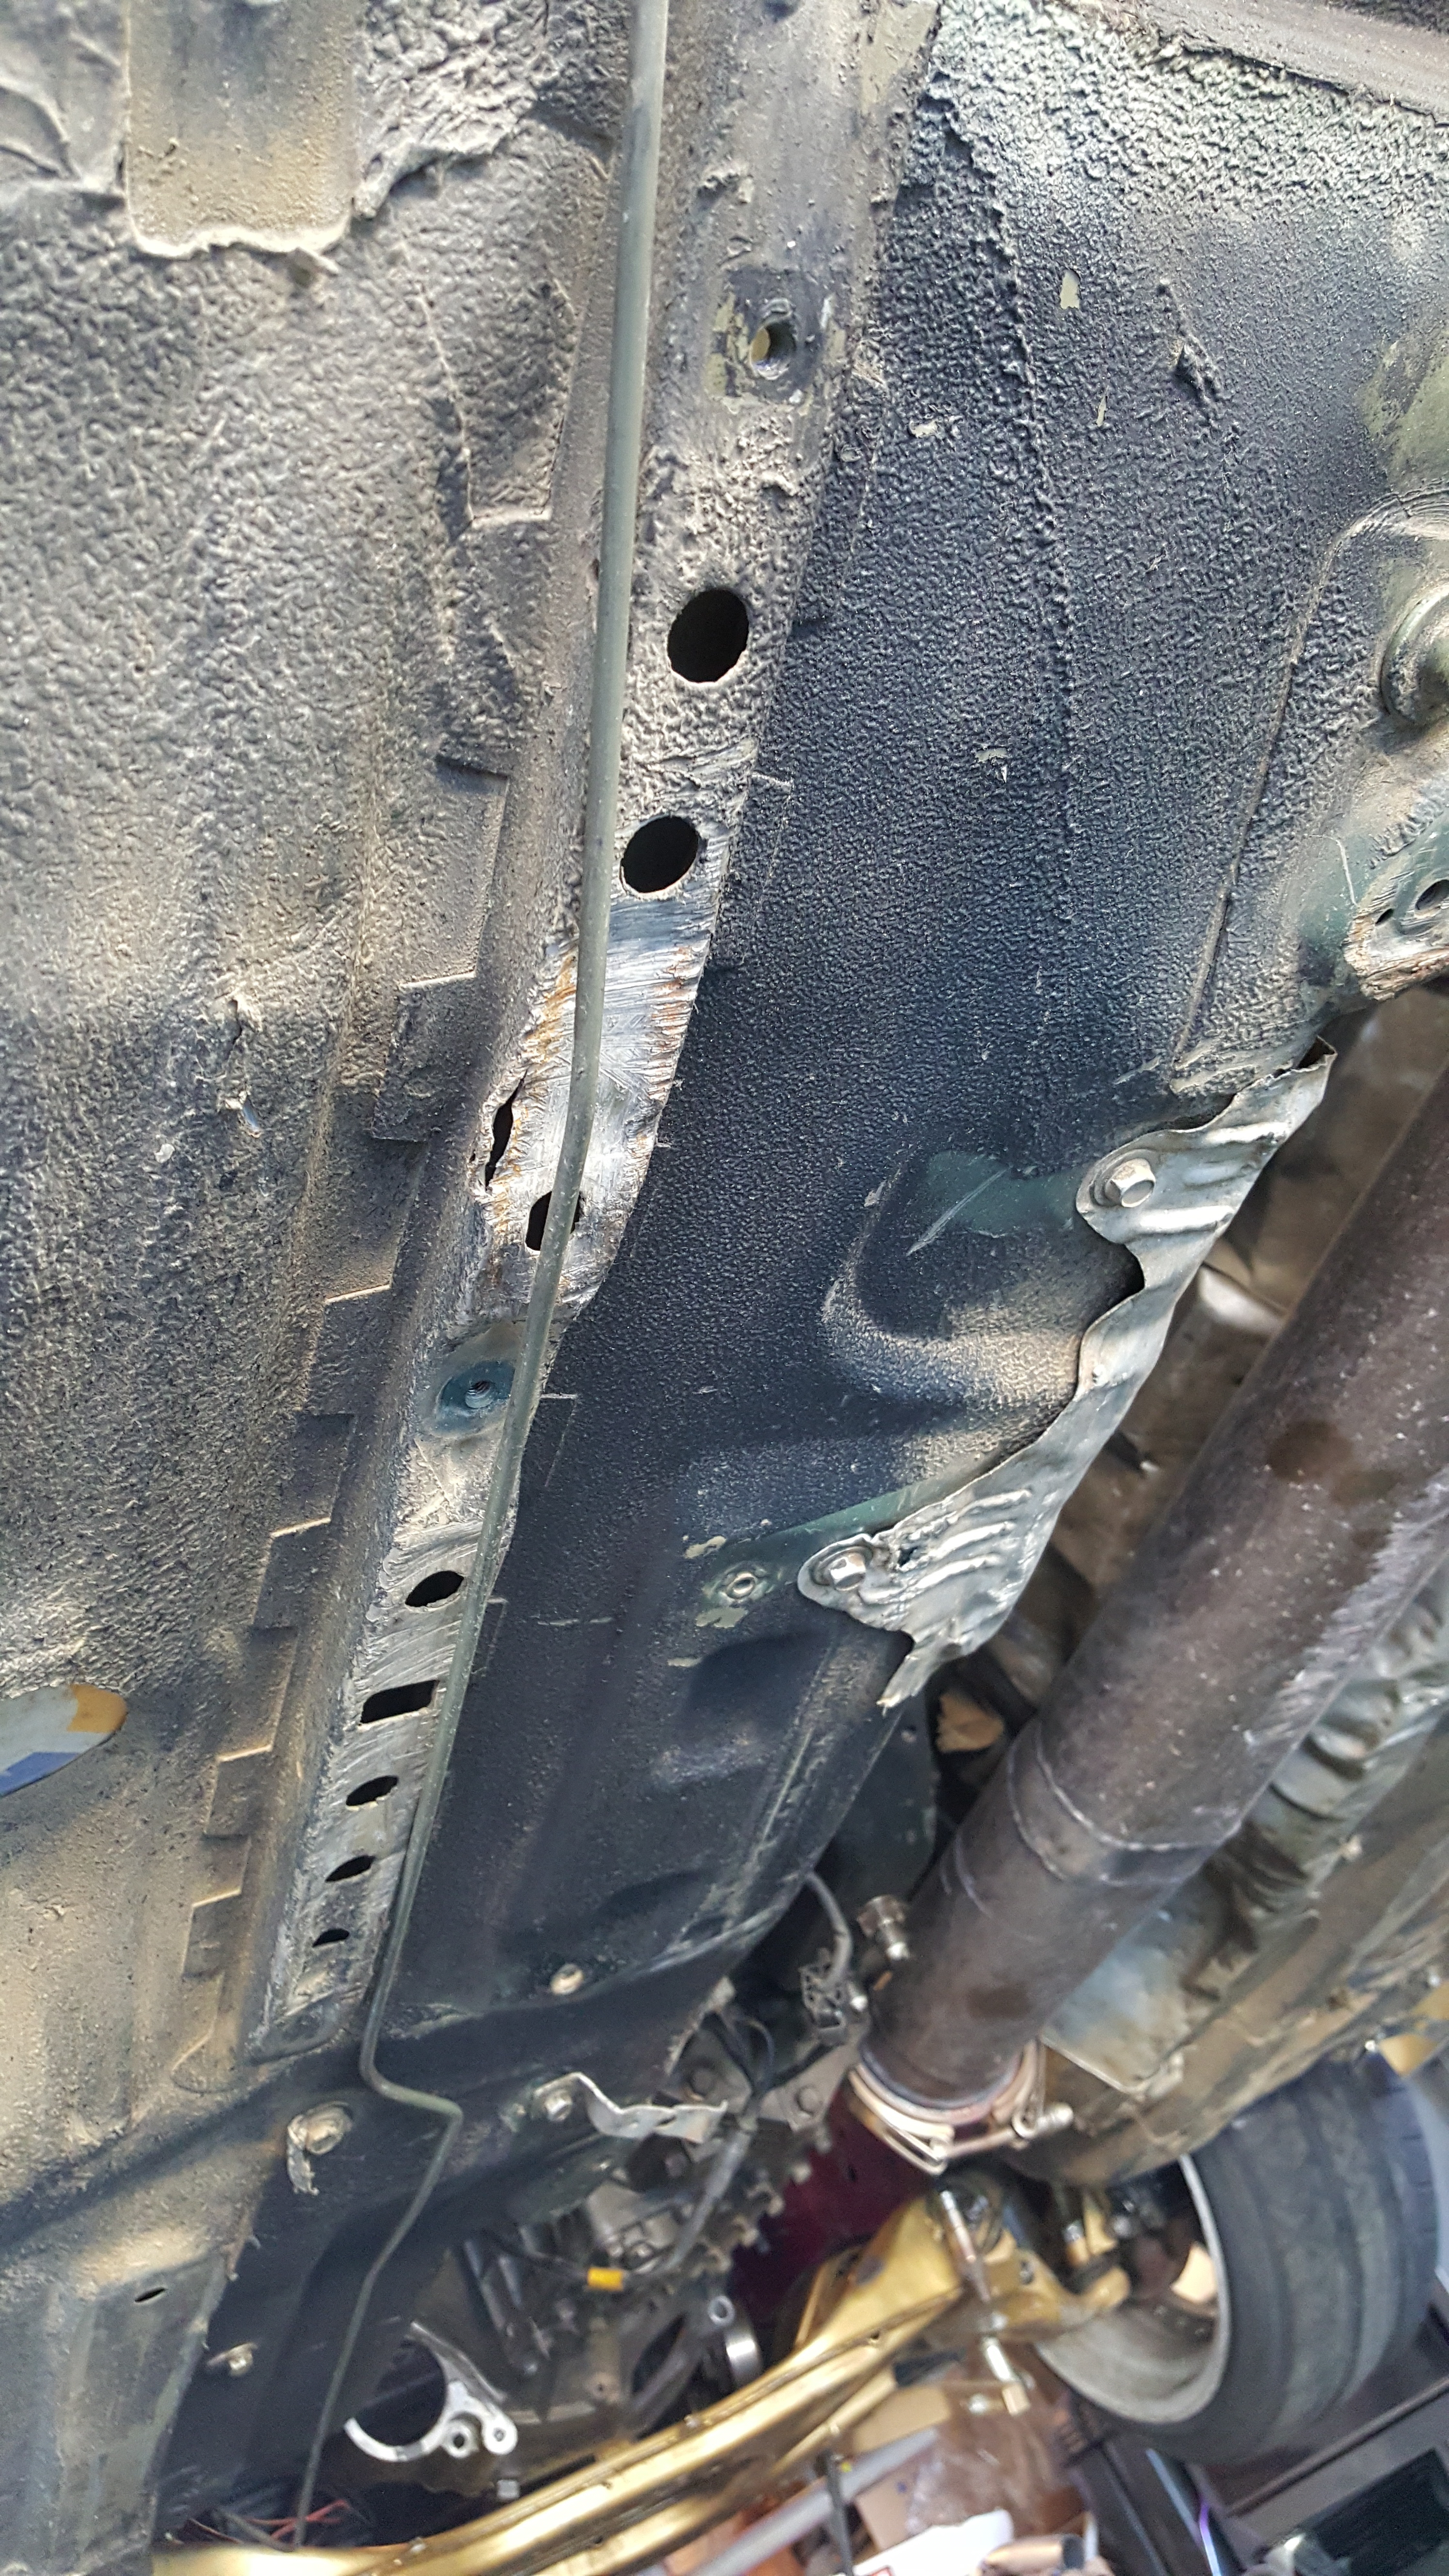
I also got to work on my fuel tank and lines. Once I got under there I realized that simply cleaning it wouldn't do... Plus I wanted to make sure that everything was in good solid shape under it as well. But after I got the cover off the fuel bulkhead I knew I was in for it....
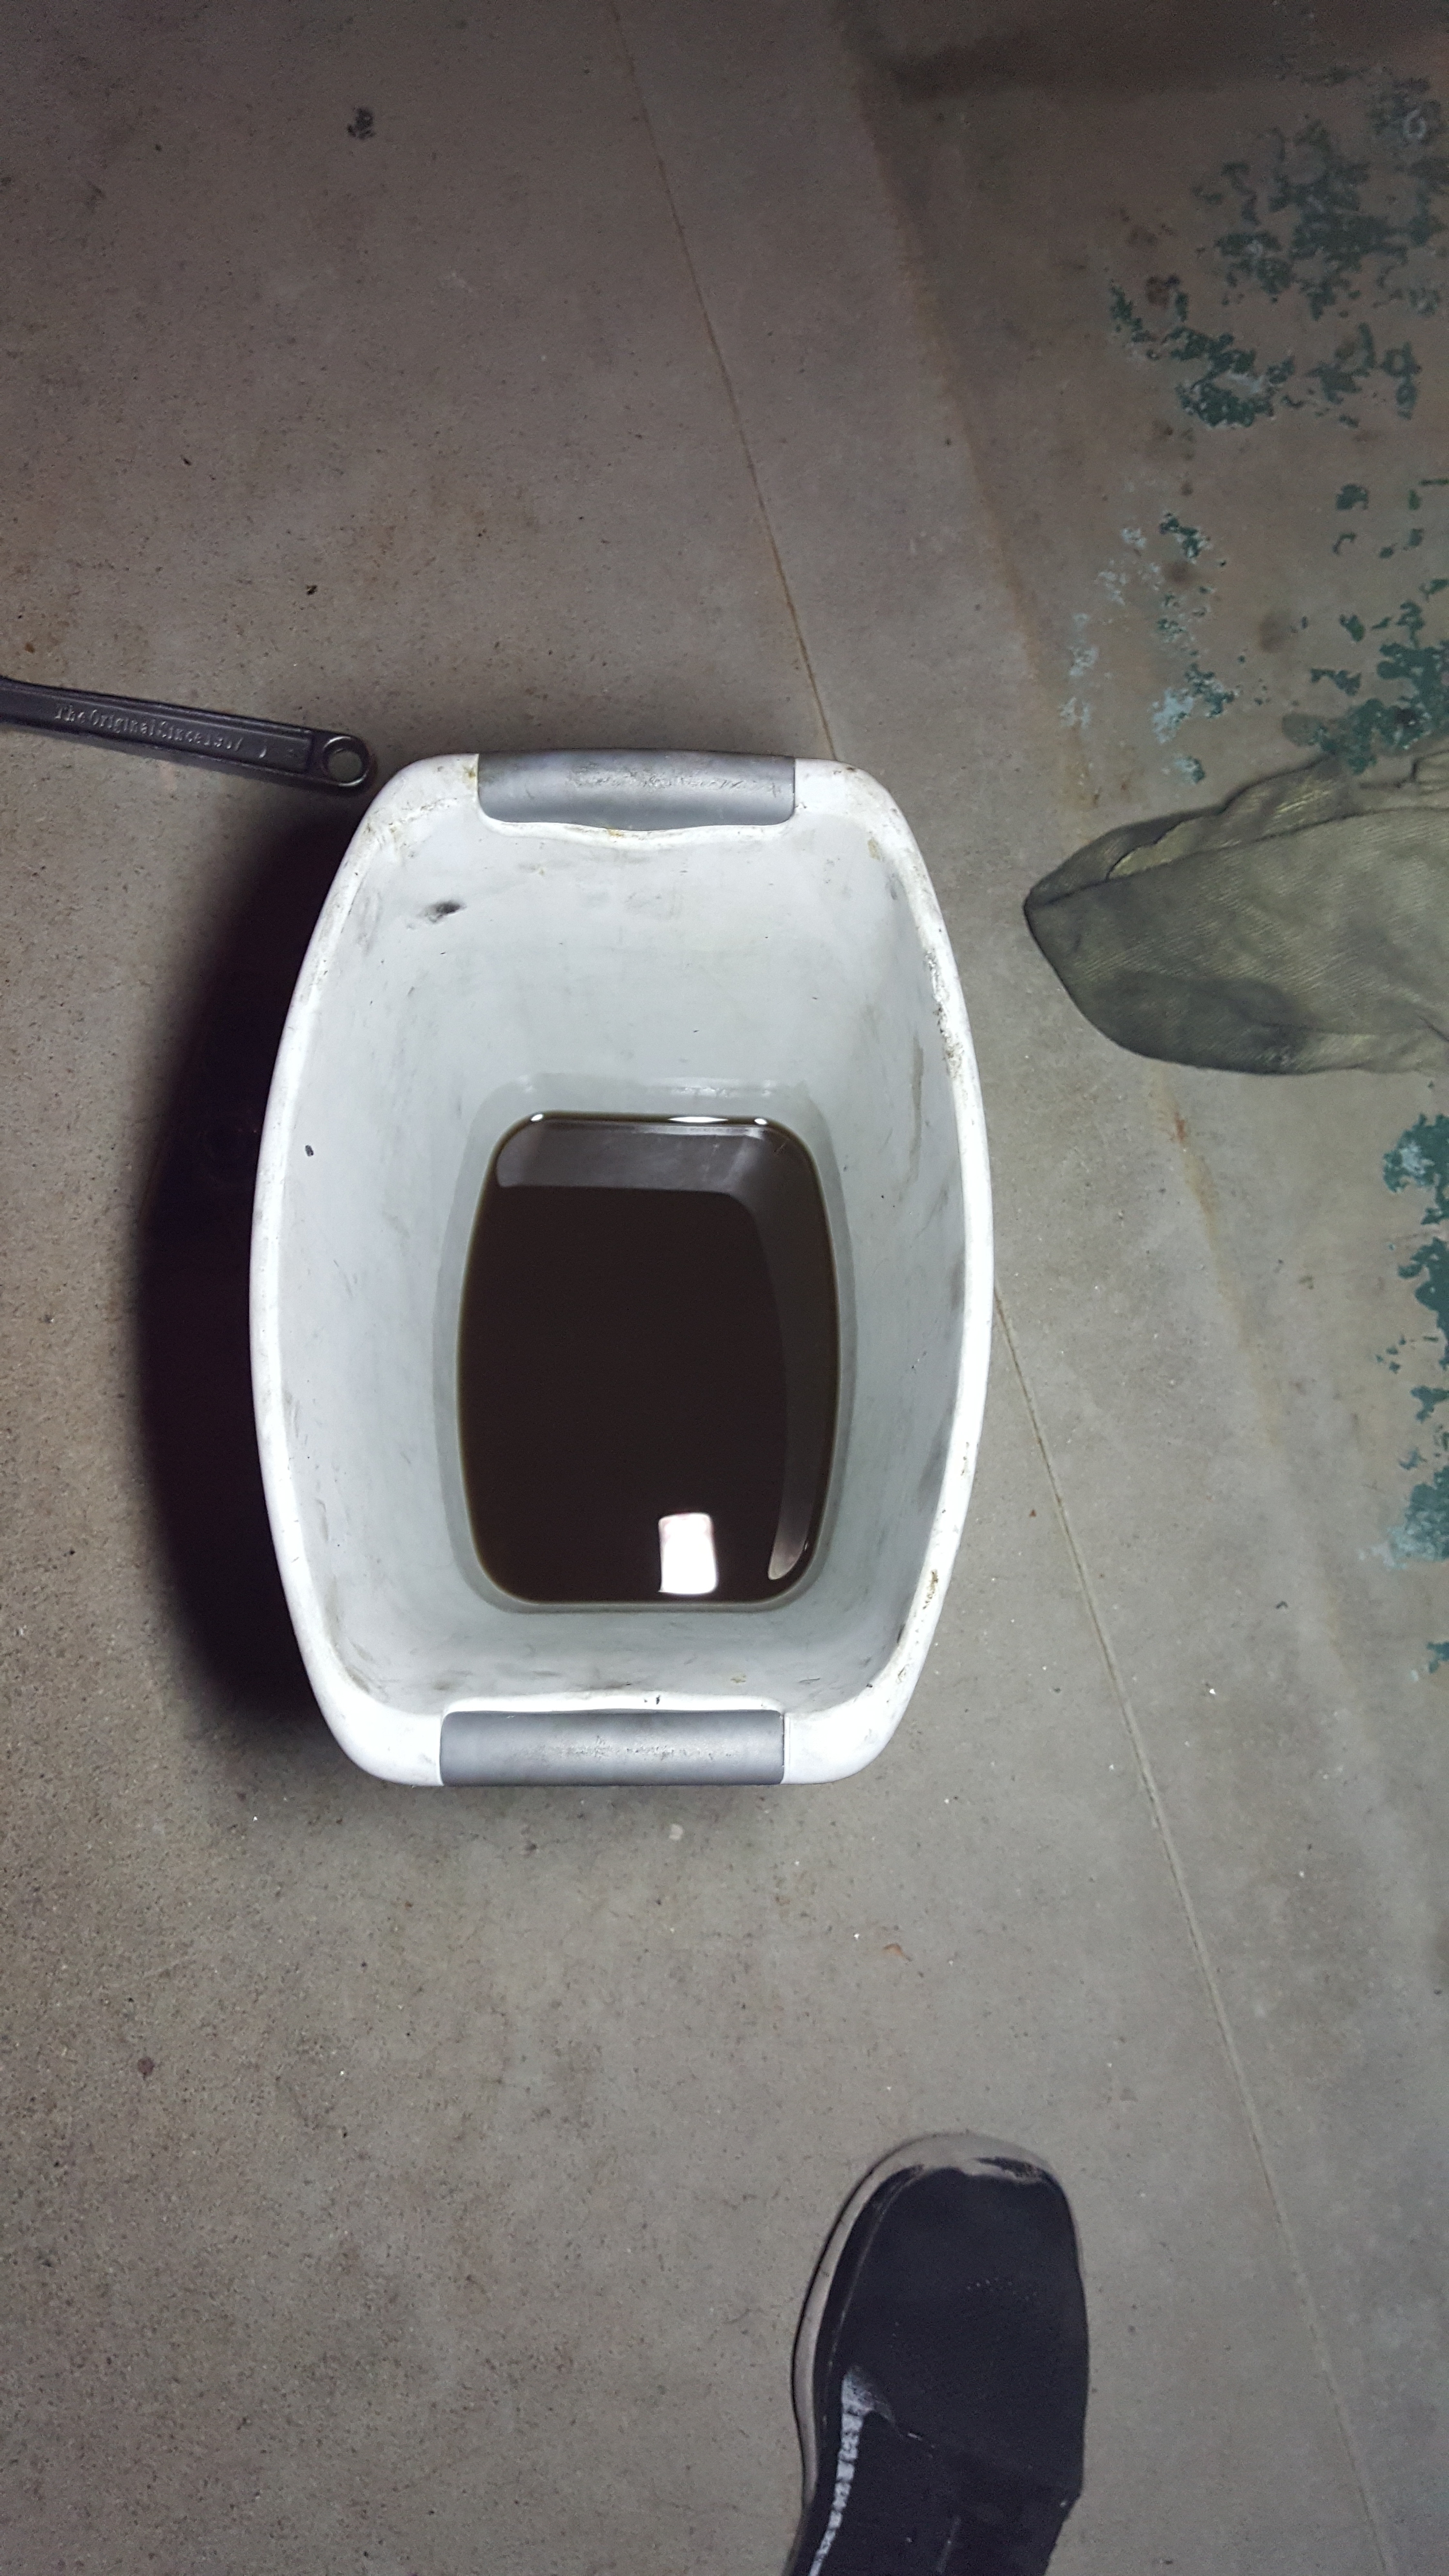
First I had to Drain the stagnant #E85 out of the tank as it had been sitting for around 2.5-3ish months. Had to be done either way...
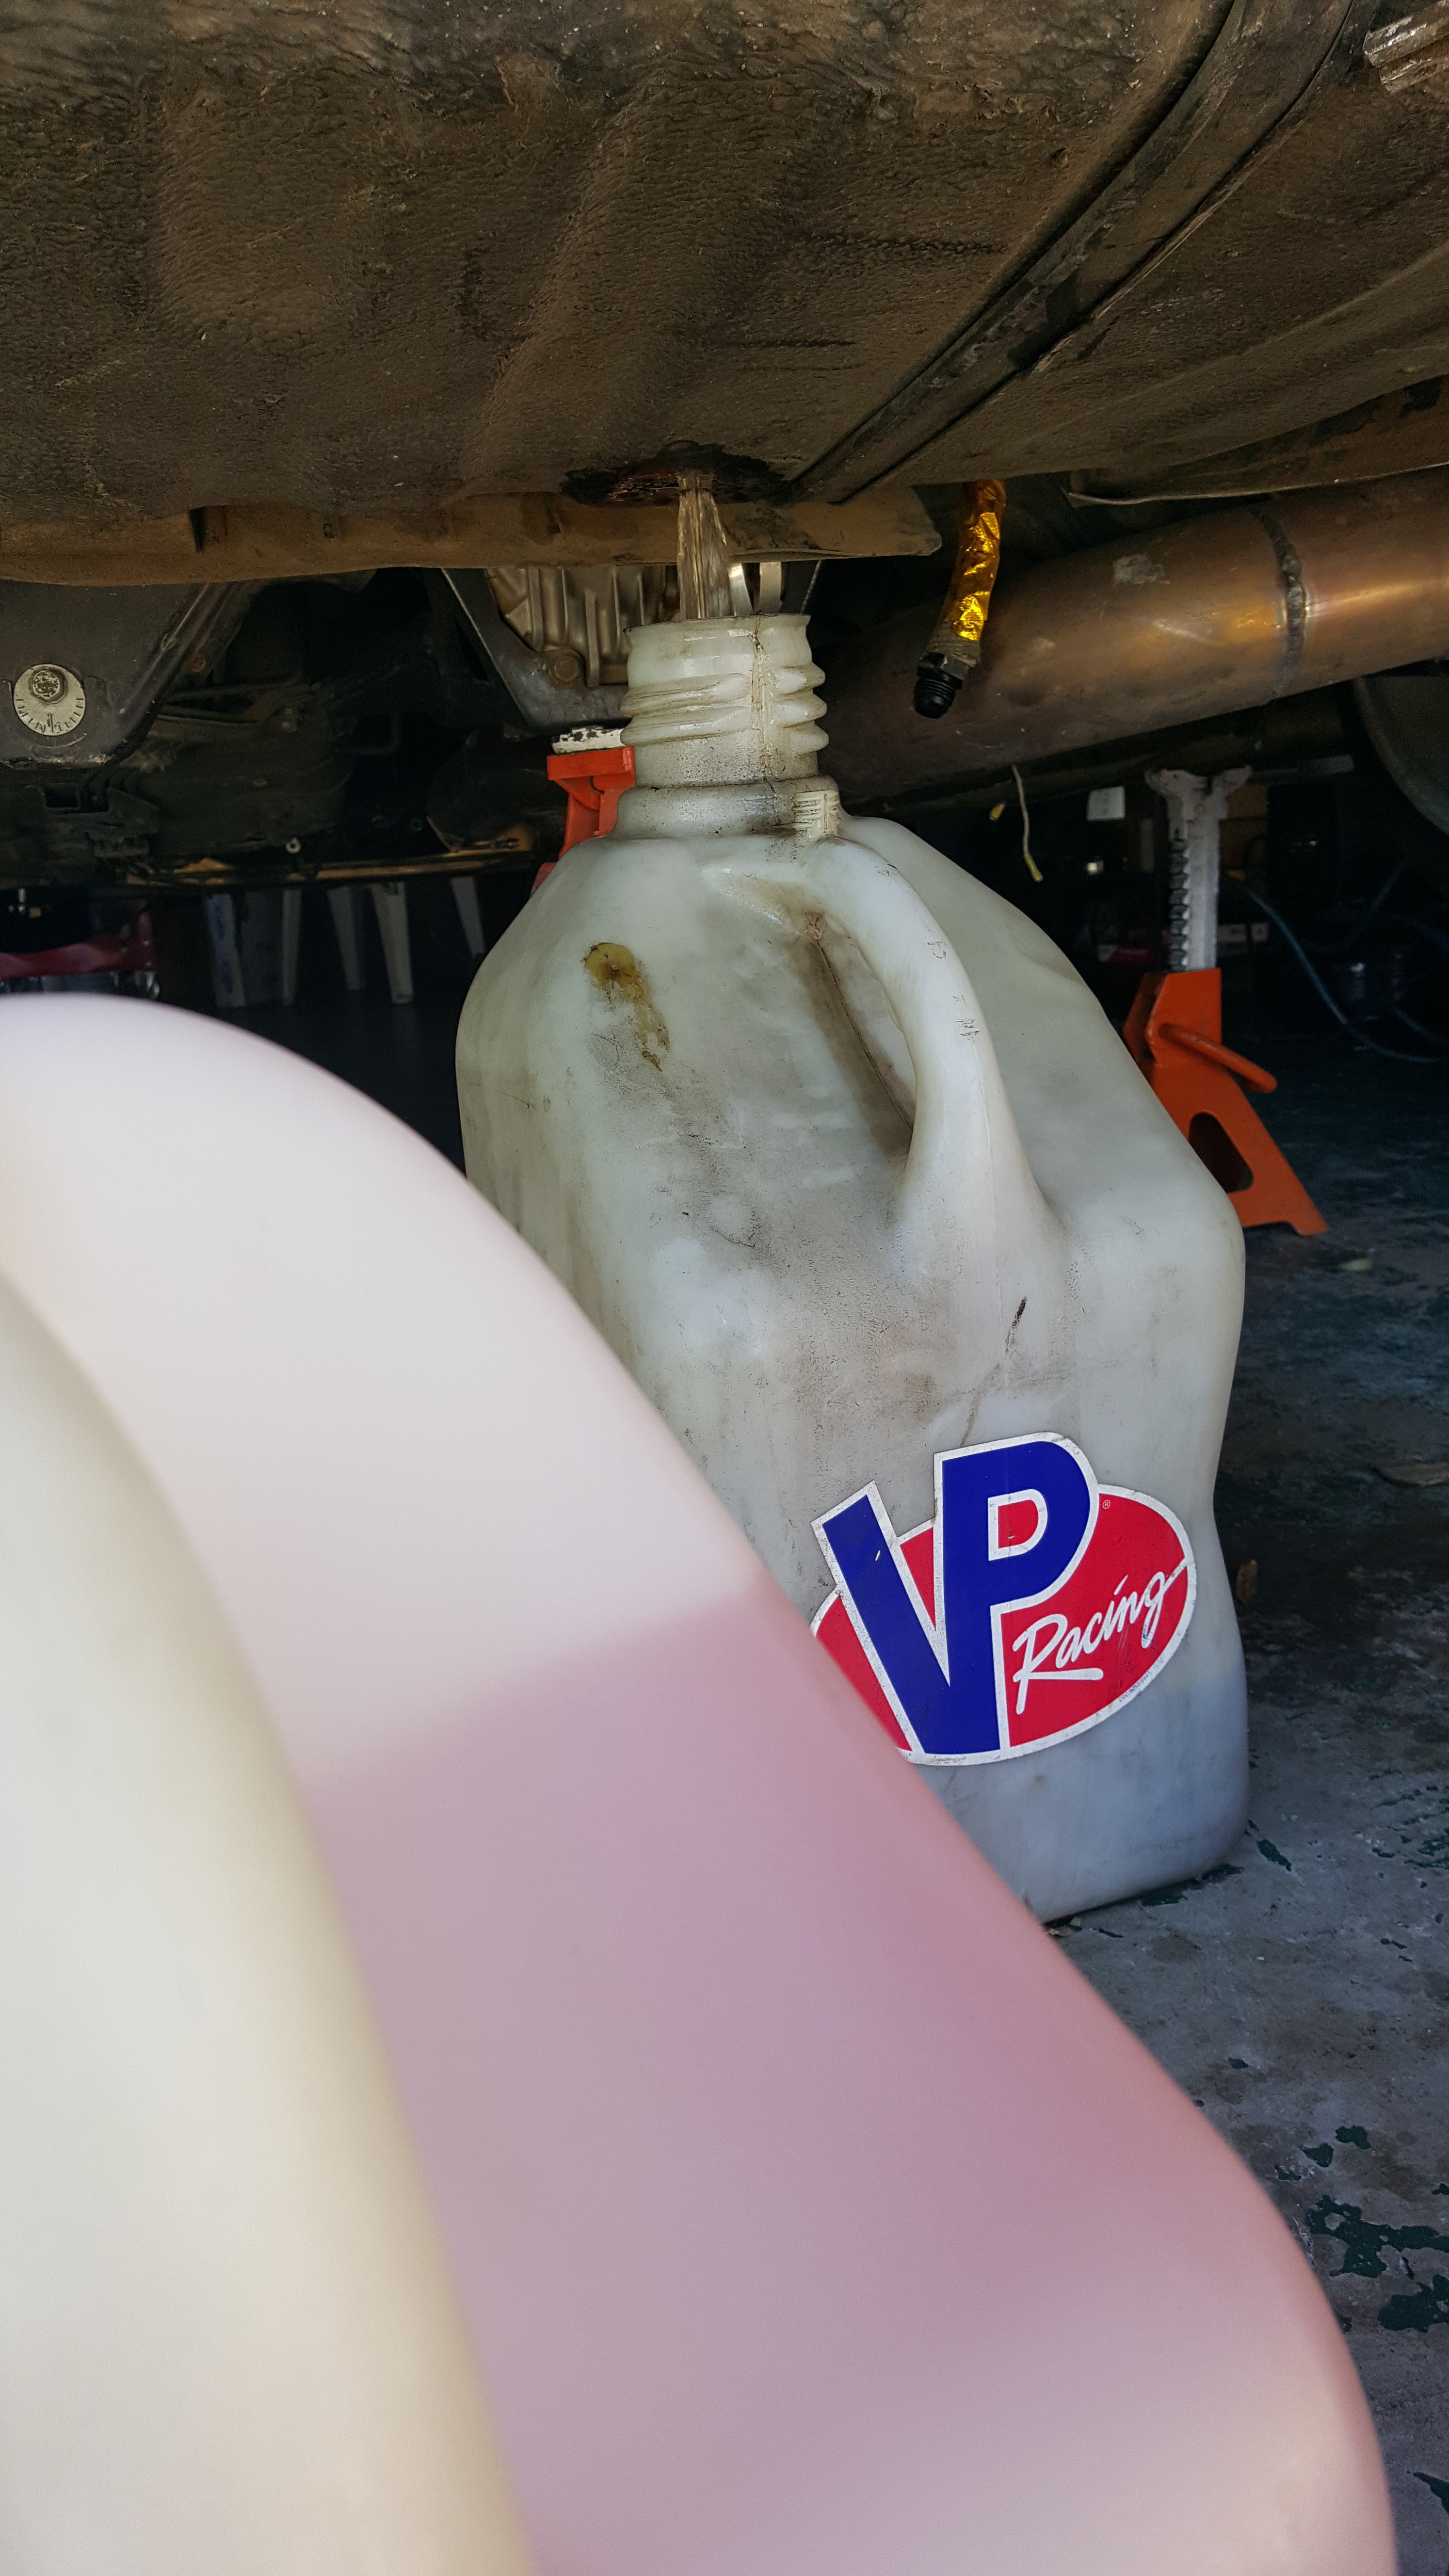
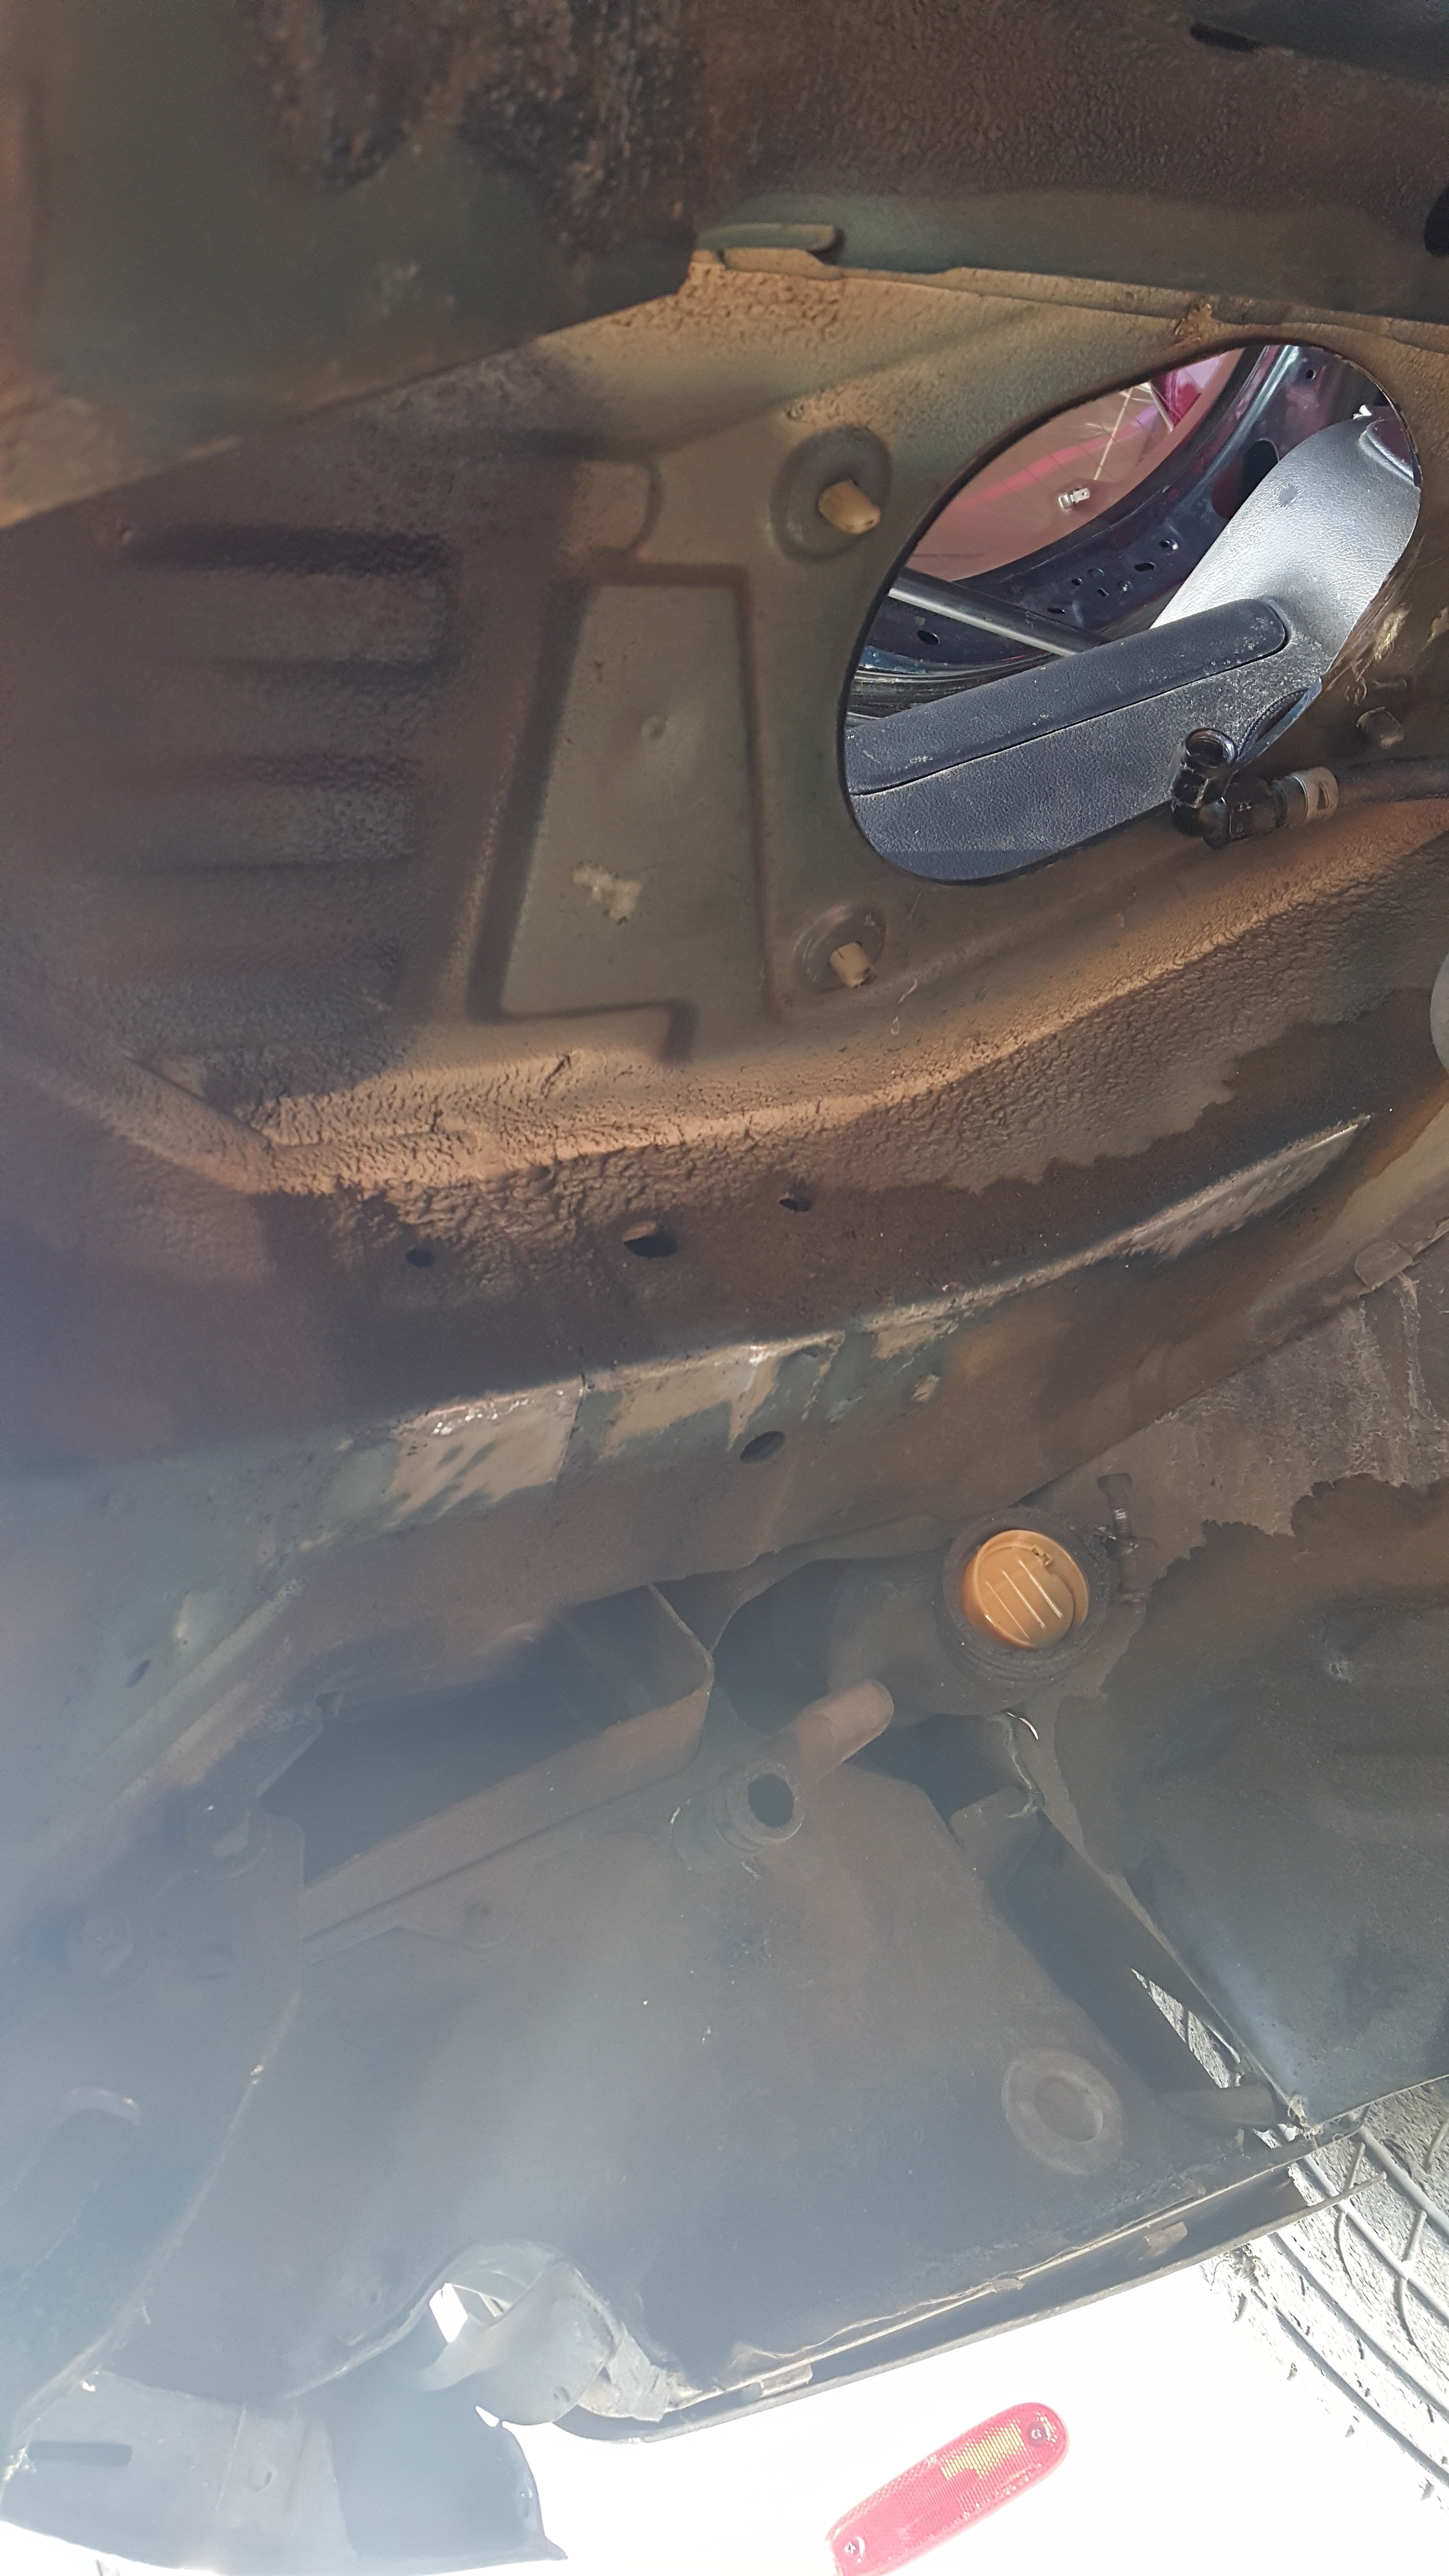
There ended up being about 13 Gal of the mean green in there. So I Got under the car and pulled the tank which was fairly easy.. two straps, the fuel filler neck and 2 other hoses, One vent and One overflow return from the filler neck. But holy crap, talk about disgusting. Needless to say there had to have been a leak. So putting it back together will consist of making sure there aren't any leaks again!
Check it
Even worse.....Inside
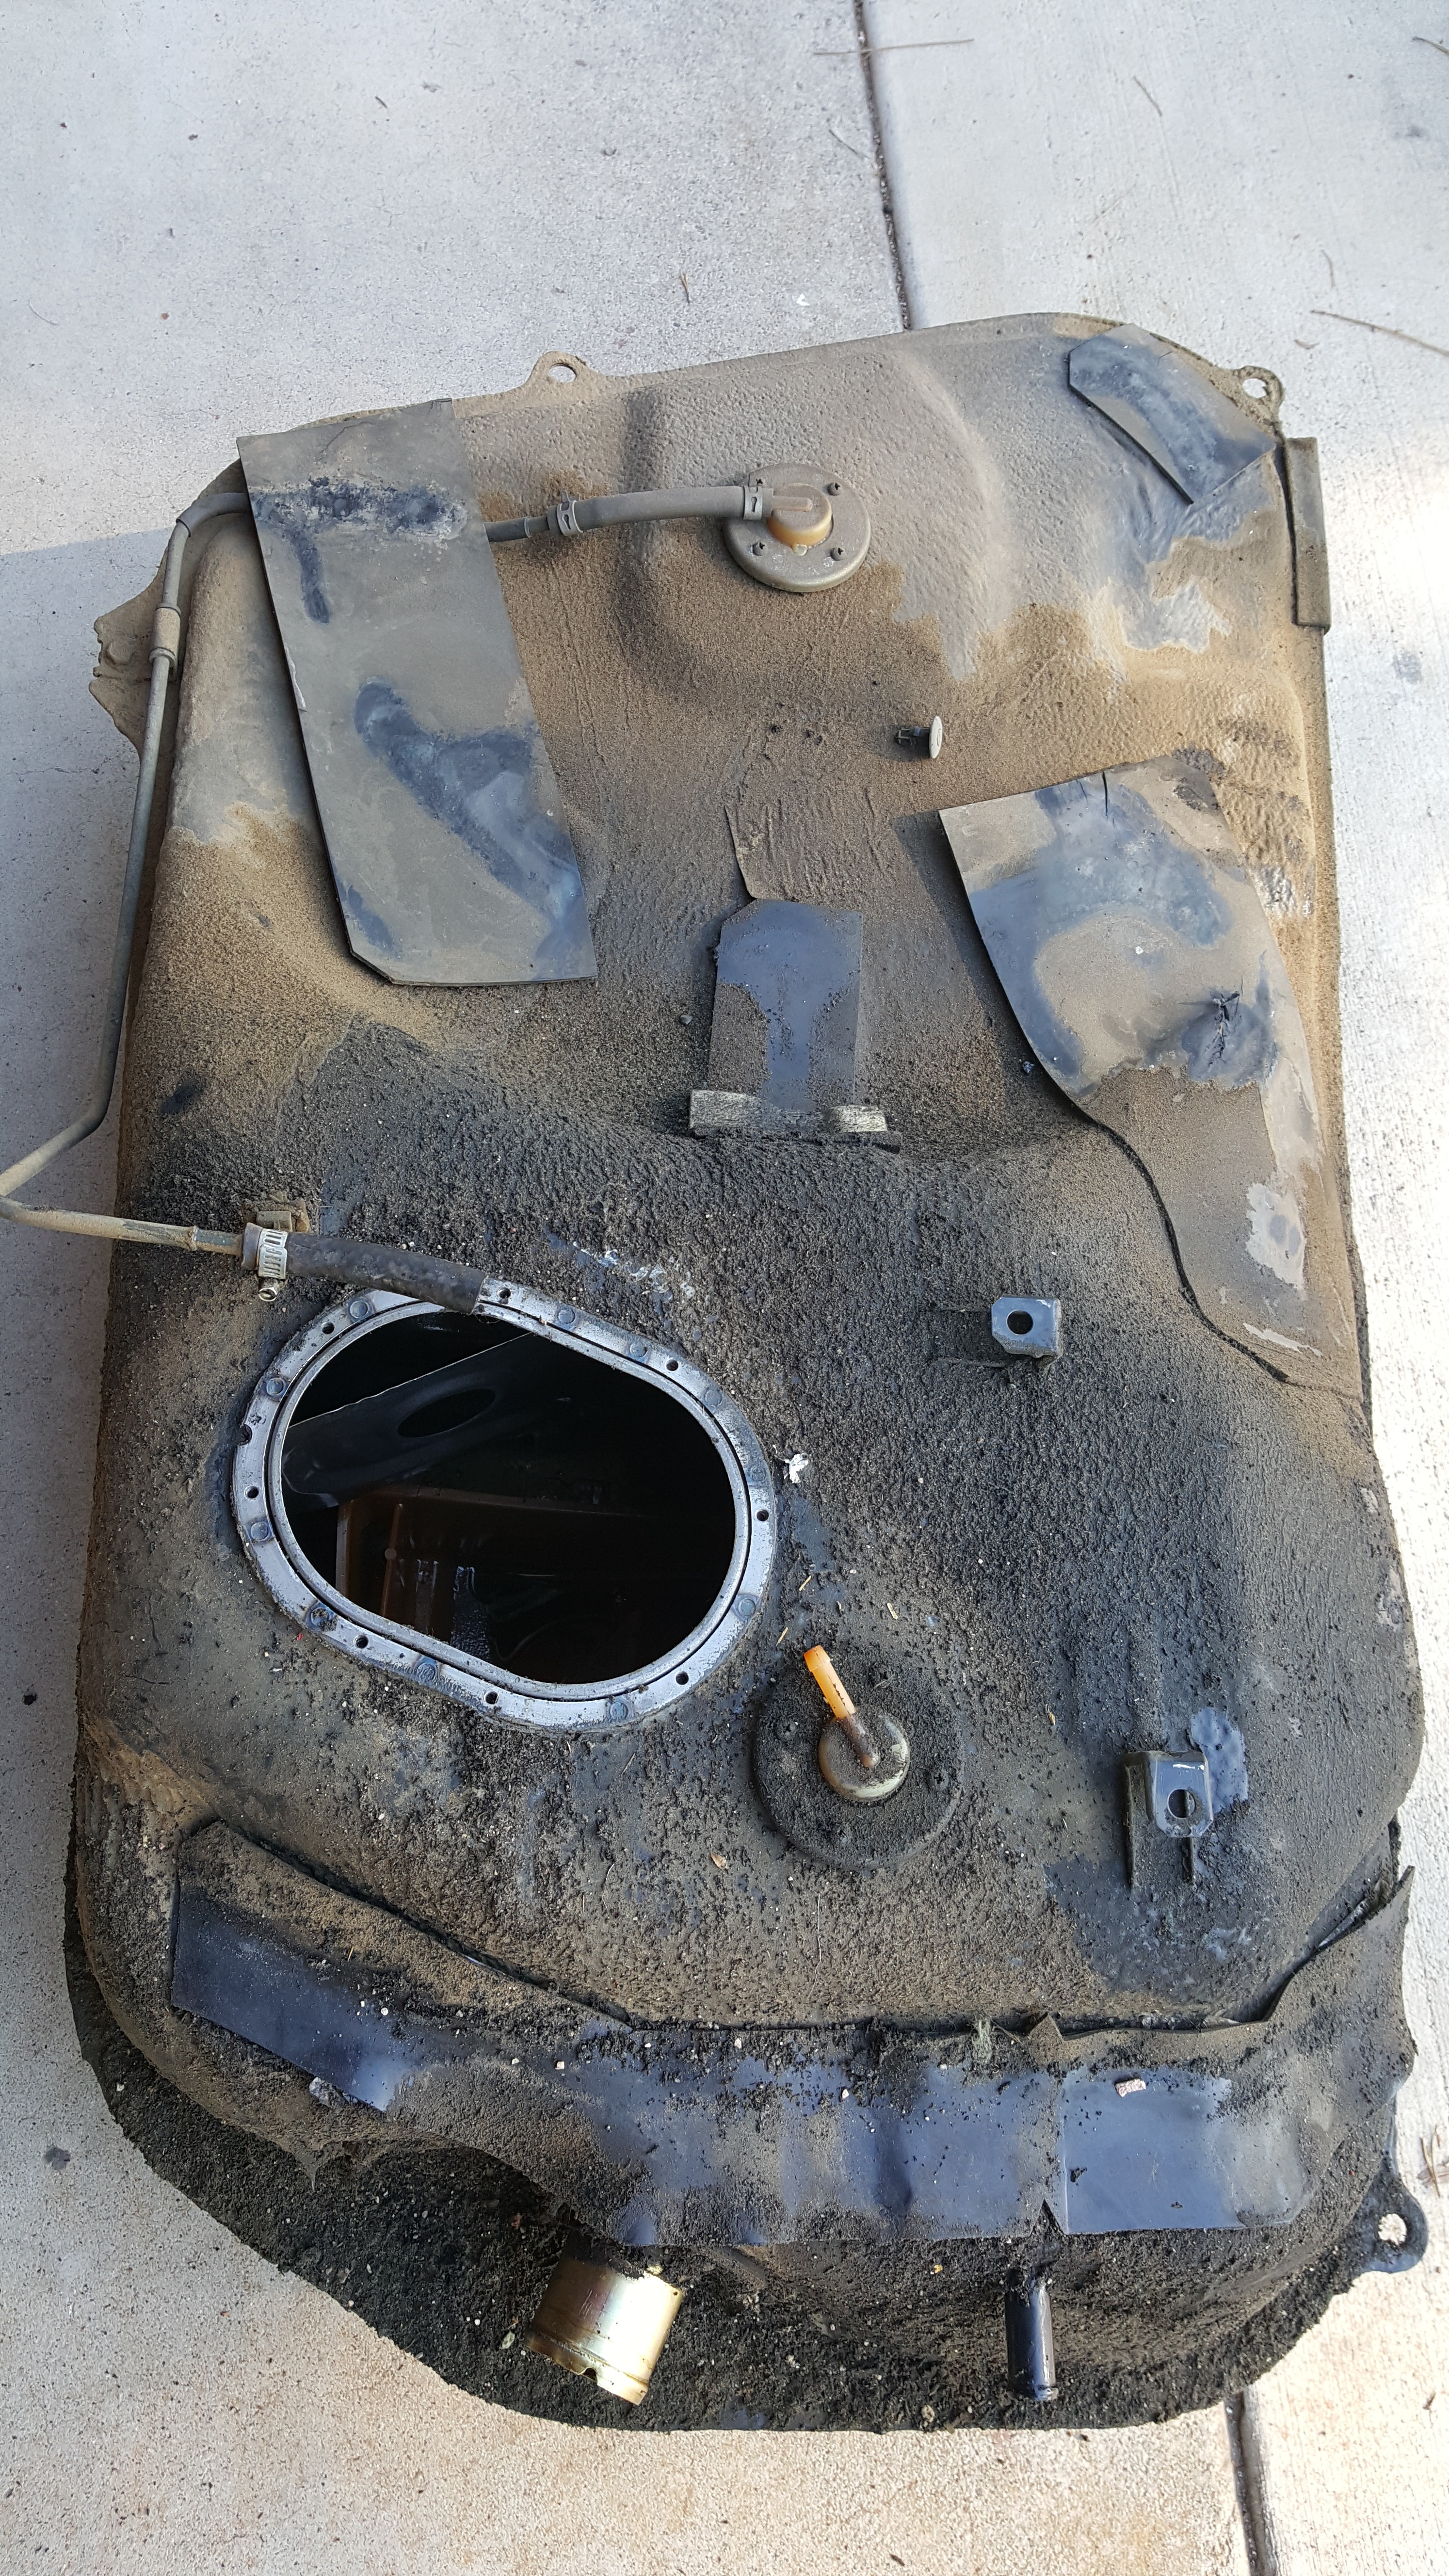
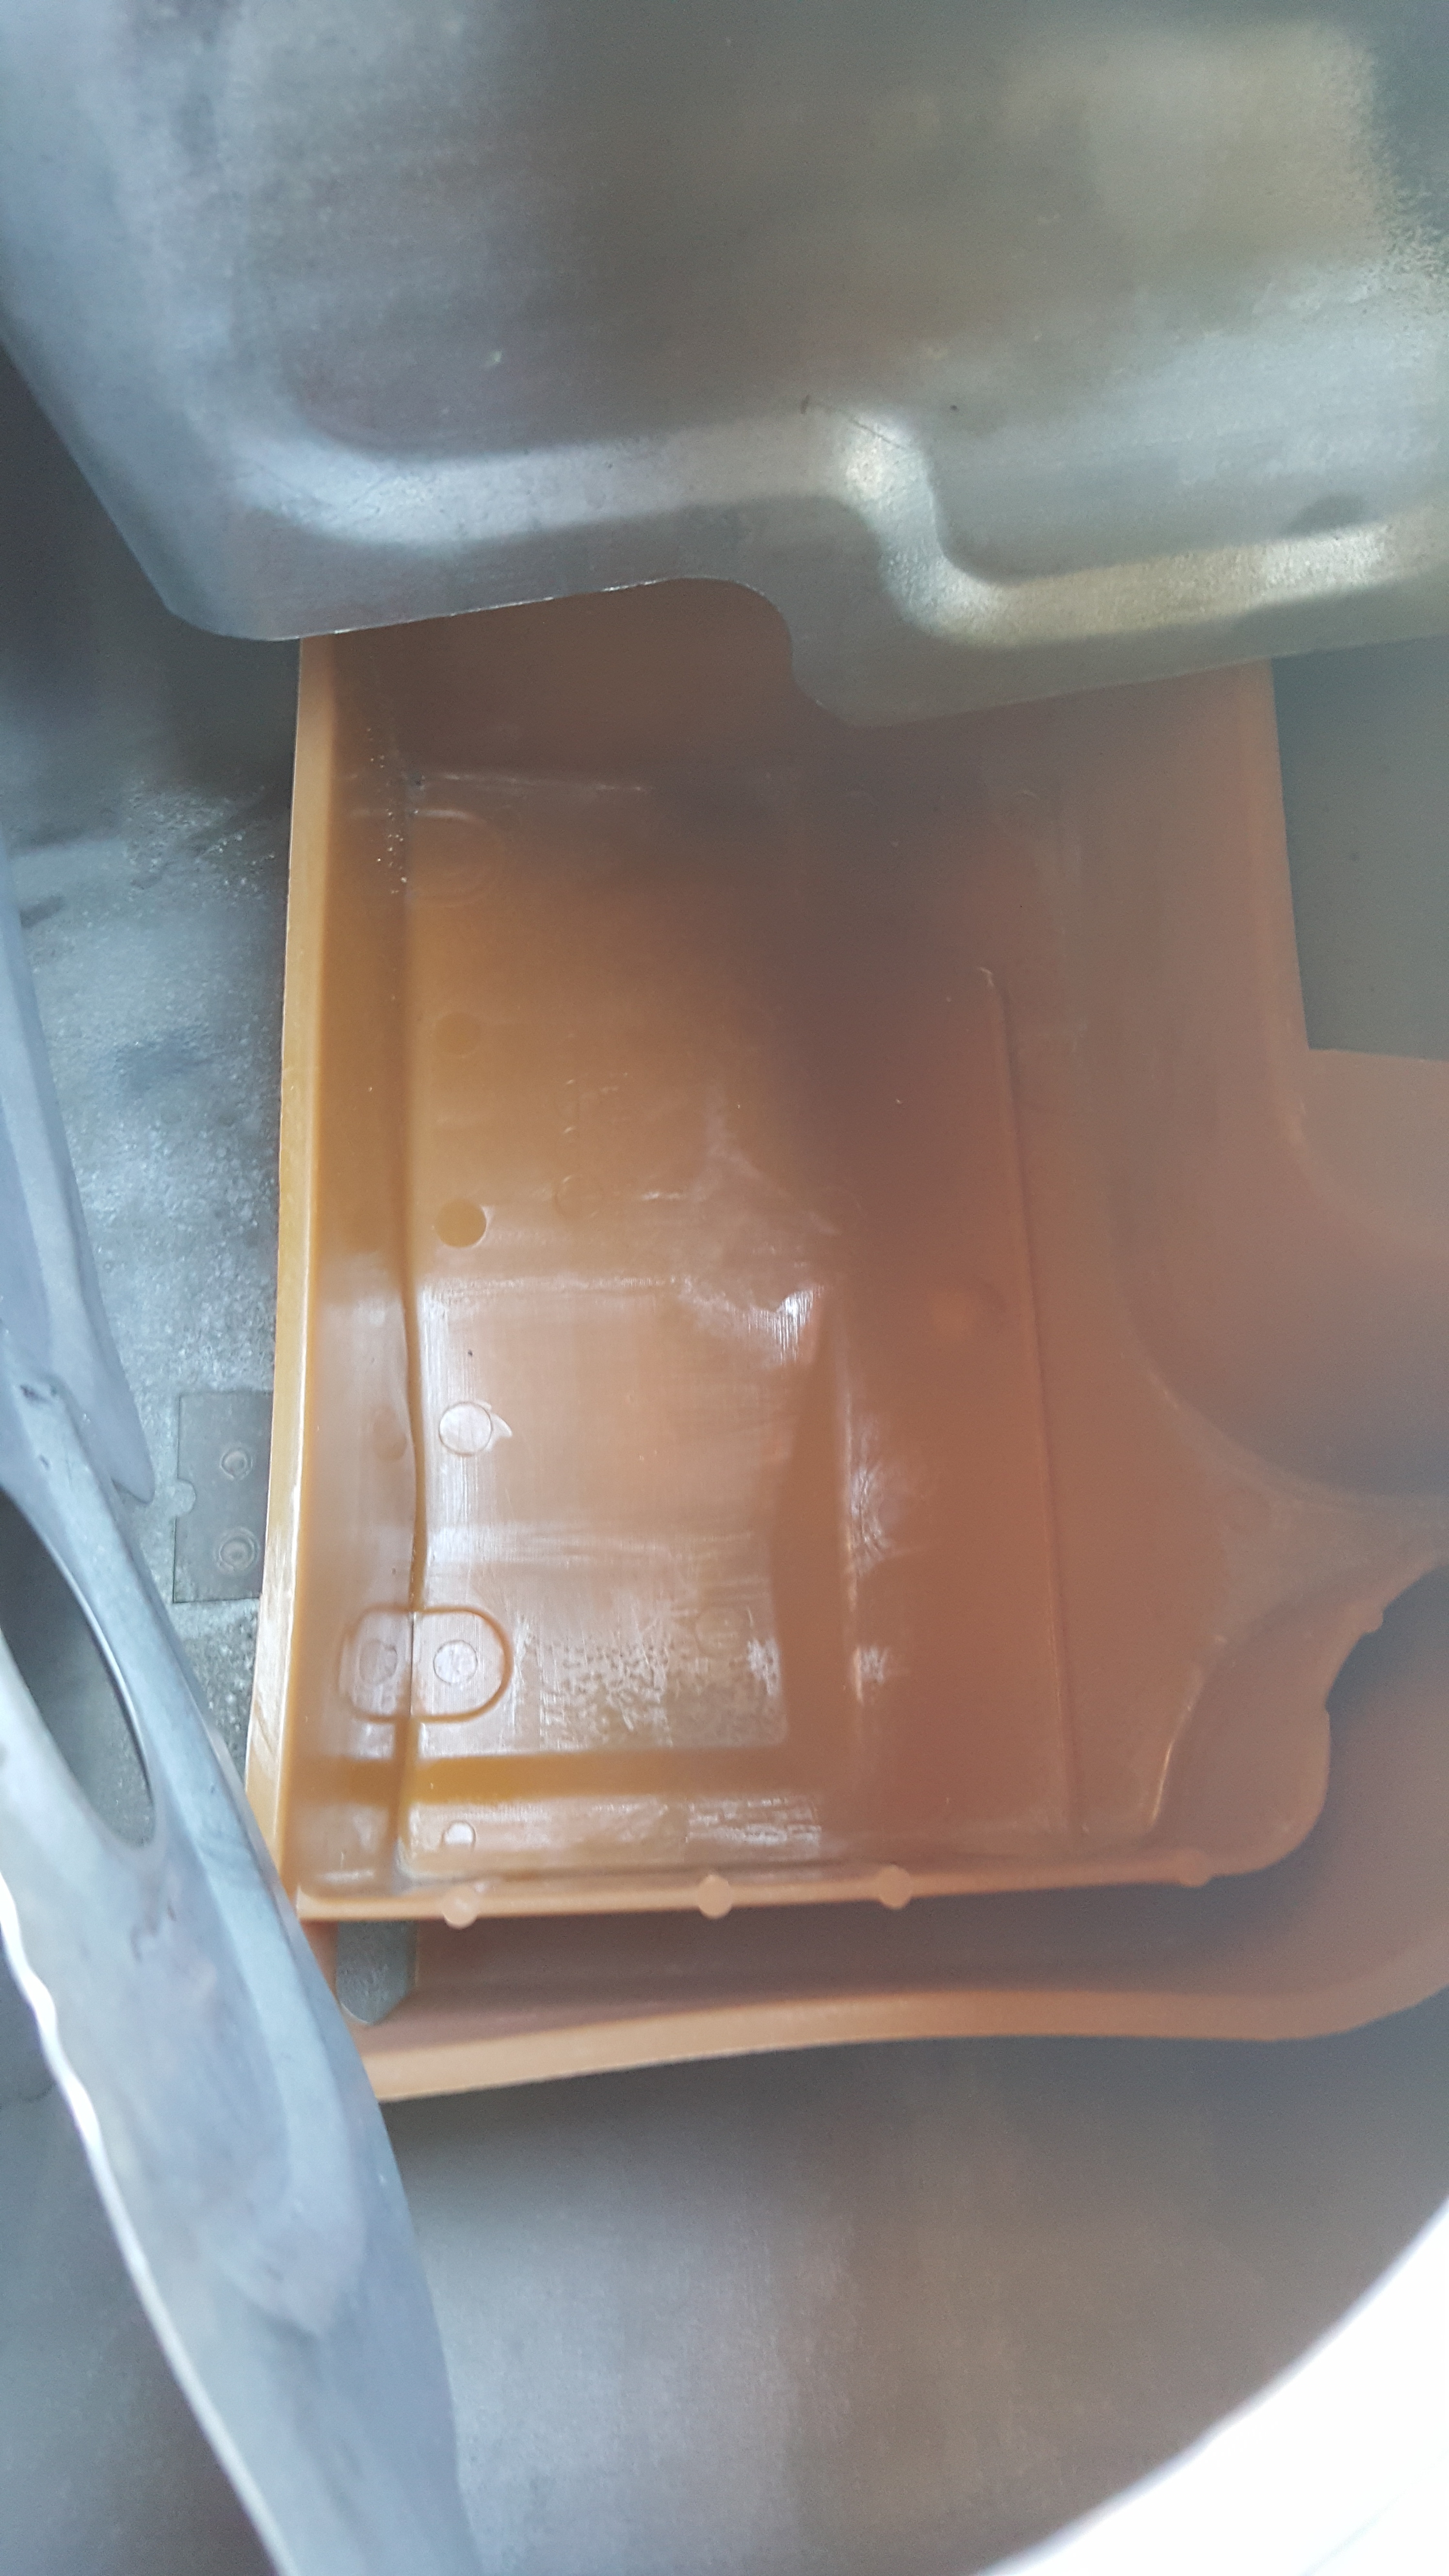
Under the car where the Tank usually sits:
Nice Clean Tank!!! This took me about an hour and a half. Filled the tank with regular gasoline and sloshed it around over and over again, and used the same gasoline to clean the exterior of the tank as well. It came out really nice, but here it's still slightly wet in spots.
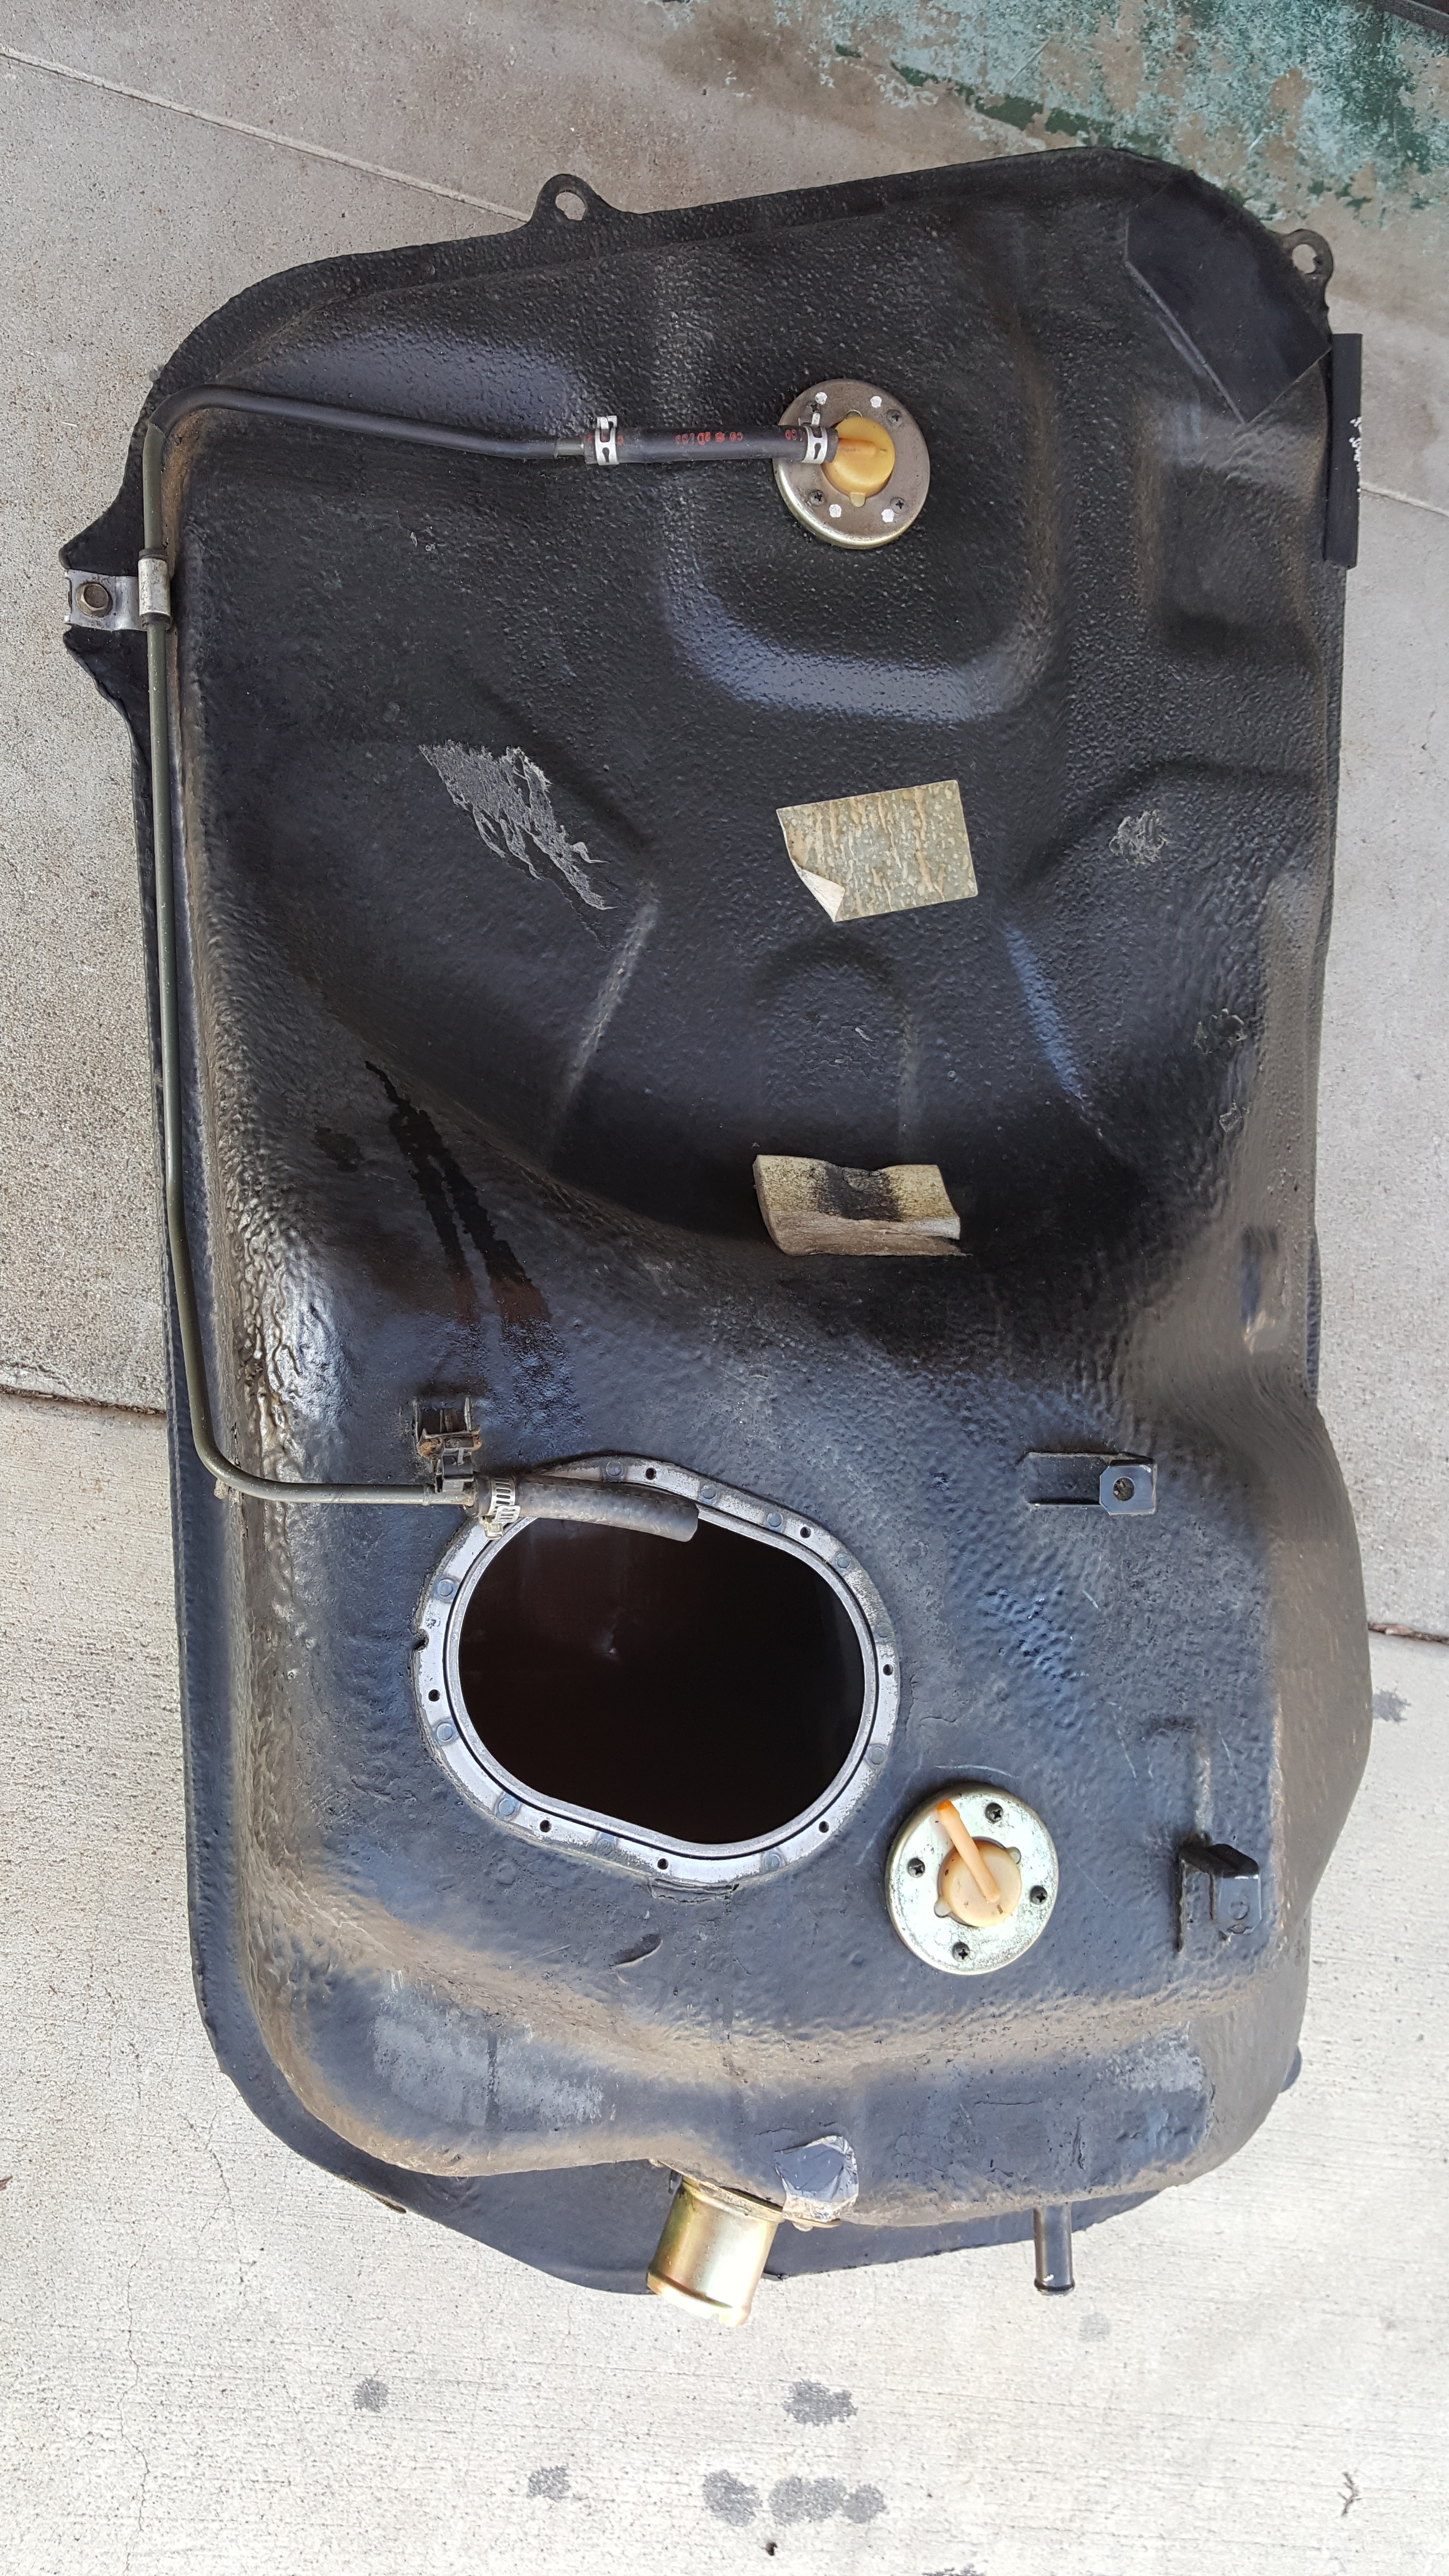
I took a long time cleaning the inside of the tank as well. I really wanted to make sure that there wasn't any debris in there, rocks, dirt, soot, or anything else that'd be sucked up by the pumps.
Came out Nice!
My tried and trusty Bosch 044's were also caked in the castor crap from premix. This stuff could possibly be theeee worrrst stickiest **** in car history.....ever. If you get it on your hands... only Gasoline will get it off. Not even Fast Orange will cut it. Sucks soaking your hands in gas too.
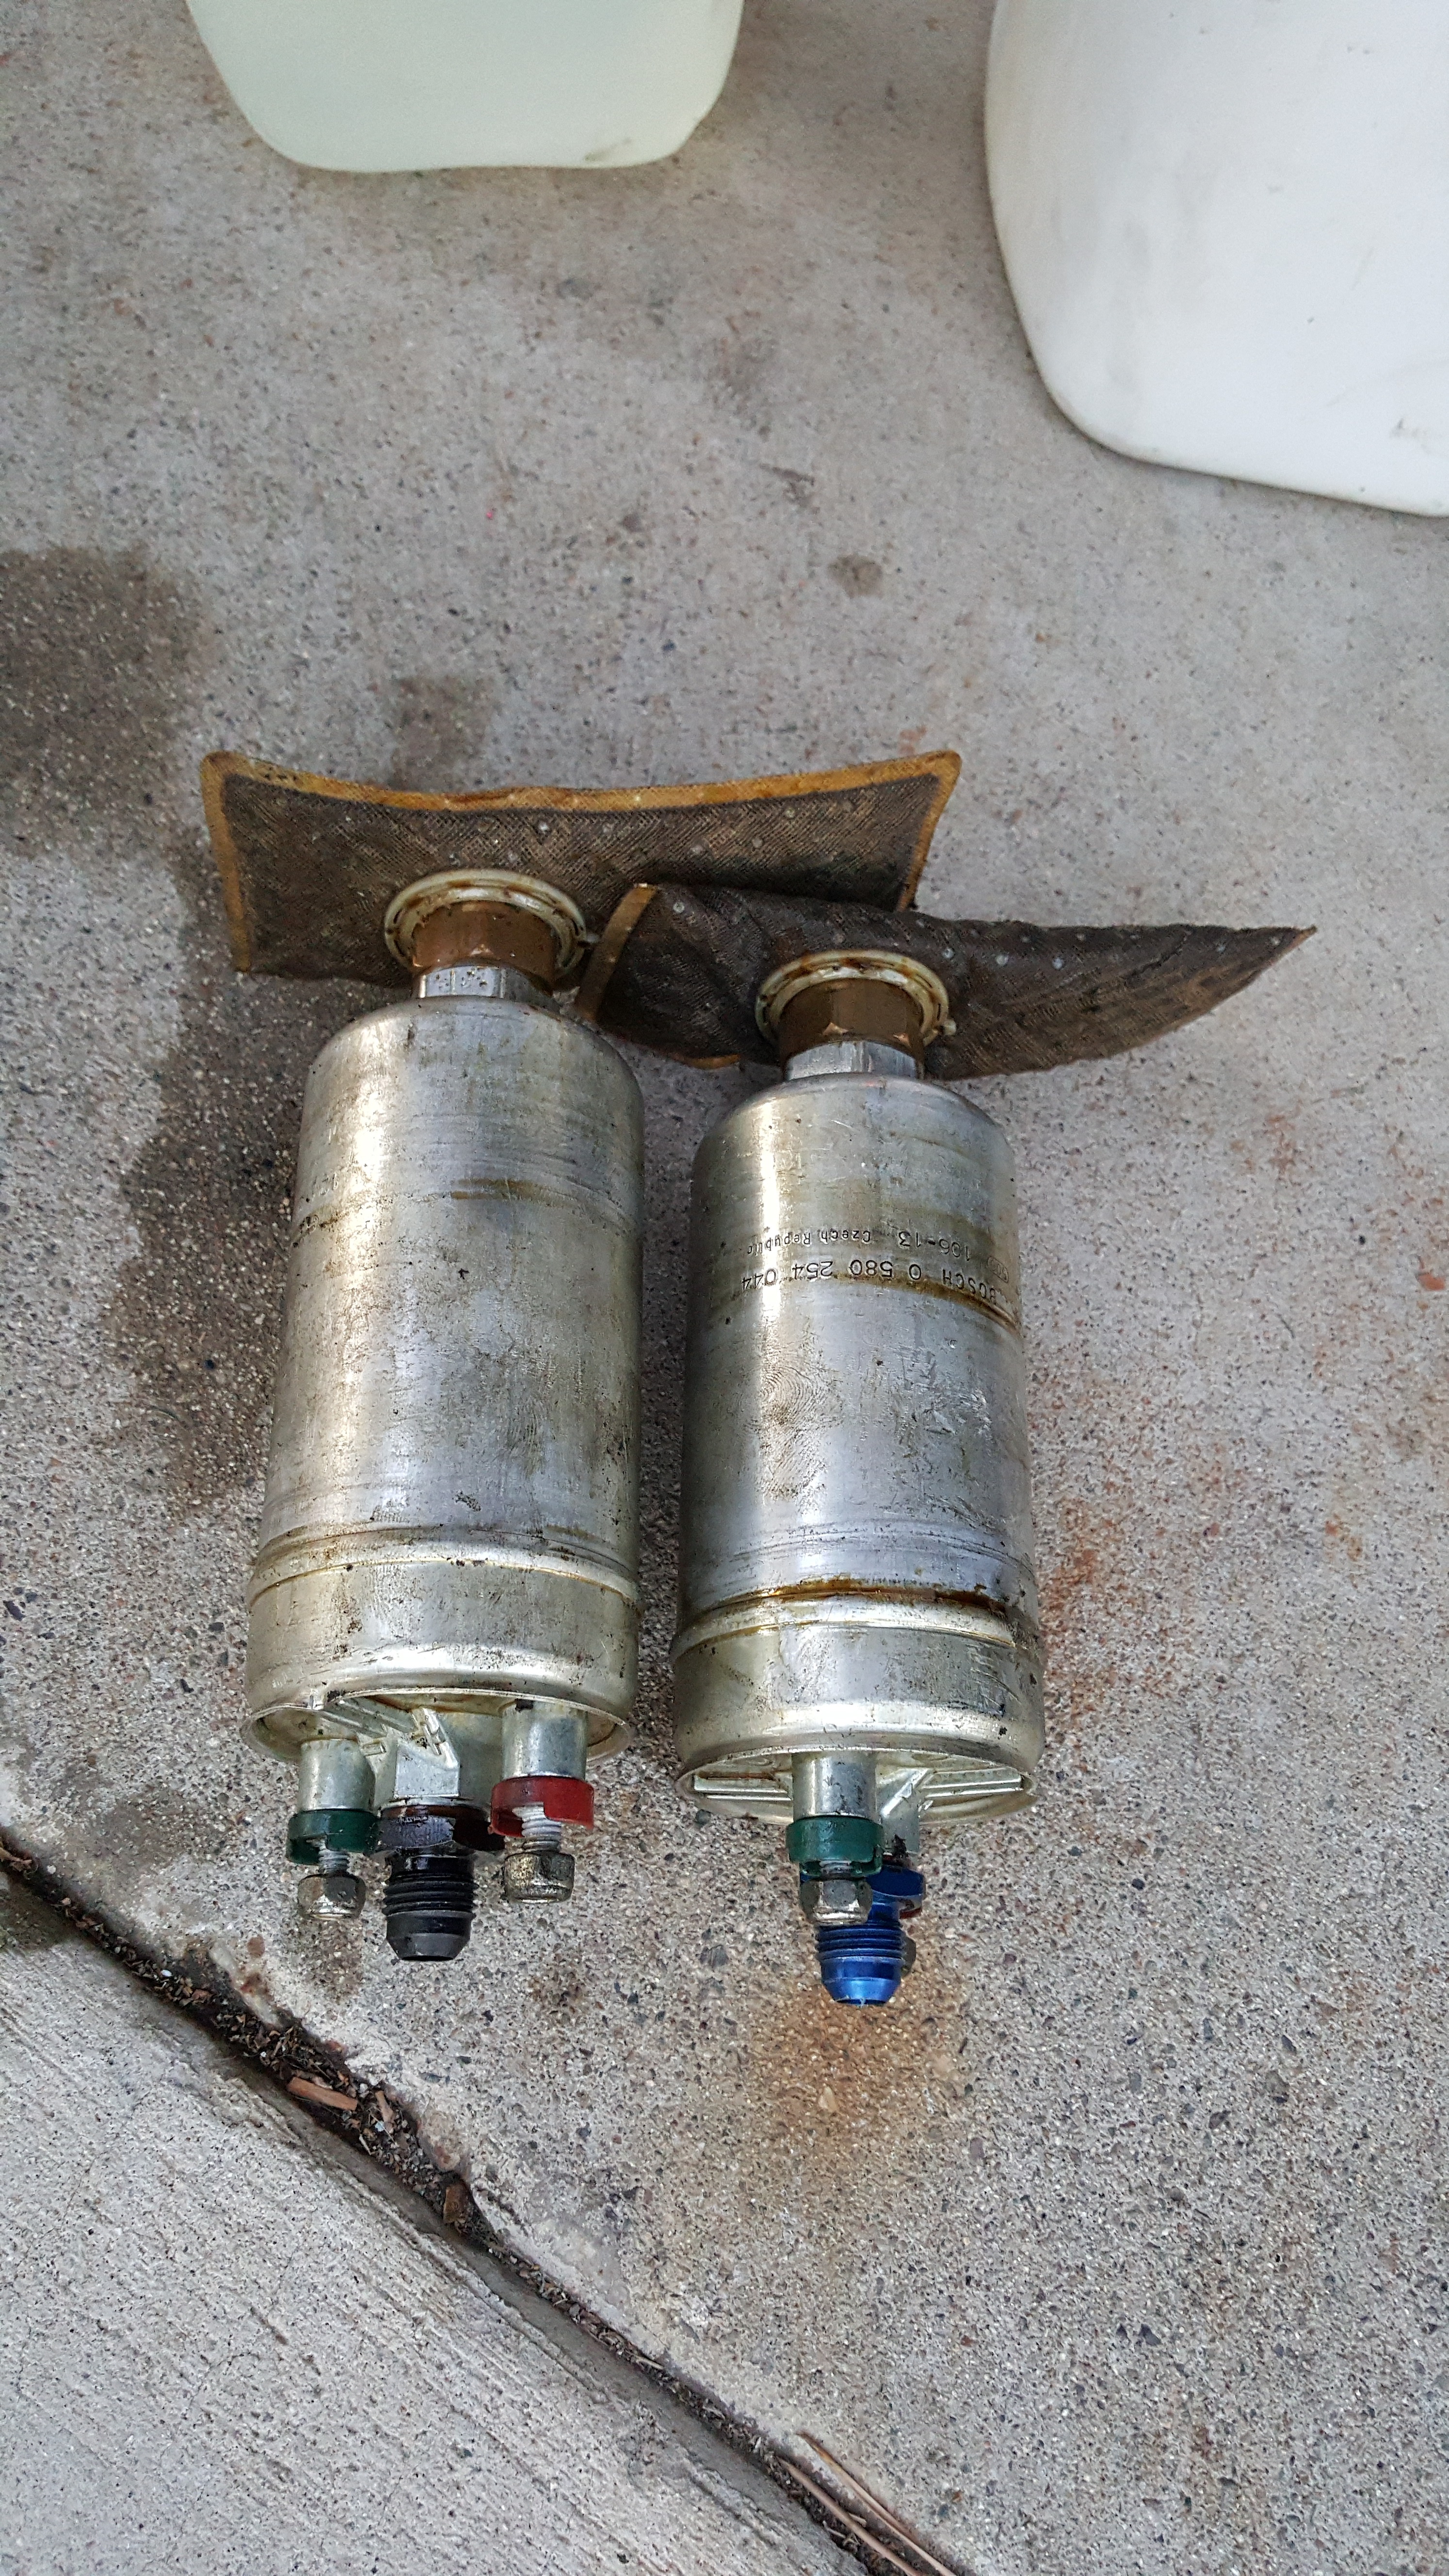
I wanted to make sure they were nice and clean so I soaked and sloshed them around in a regular gas bath for a day and a half to make sure all the goo was dissolved.
minutes after
and a full day JEEEEZE
If there's one thing I have slightly lost sight of.... its the fact that I've kind of stepped away from getting dirty for a bit of time now. Believe it or not....i've missed it quite a bit. Theres nothing like getting nice and dirty under the car. Still....to this day...I know that there is no better way to learn your car better than getting down and dirty with it. To remove something and put it back in good solid shape is sometimes much more involved than a lot of people would think. With the wolf.... I've found this is the best way to find things that might be on their way out..or things that look as if they need to be replaced or even worse..have failed or broke. I Found one of my rear adjustable arms had come loose.. the trailing arm actually... I knew something looked off. "Trust you gut," I always tell myself. I remember looking at it and thinking it didn't look right. But to stay in tune with the car... you HAVE to have gotten down and dirty with her ;-)
But anyways....I got a lot of work done yesterday. I started to box up a couple wide bands to ship out to Innovate Motorsports to be repaired.....but then as I was writing the address on the small box..I realized that they were located about 12 miles from my place. So I just drove over there and handed them the box with the RMA. Shouldn't take too long to get them back.
I also got to work on my fuel tank and lines. Once I got under there I realized that simply cleaning it wouldn't do... Plus I wanted to make sure that everything was in good solid shape under it as well. But after I got the cover off the fuel bulkhead I knew I was in for it....
First I had to Drain the stagnant #E85 out of the tank as it had been sitting for around 2.5-3ish months. Had to be done either way...
There ended up being about 13 Gal of the mean green in there. So I Got under the car and pulled the tank which was fairly easy.. two straps, the fuel filler neck and 2 other hoses, One vent and One overflow return from the filler neck. But holy crap, talk about disgusting. Needless to say there had to have been a leak. So putting it back together will consist of making sure there aren't any leaks again!
Check it
Even worse.....Inside
Under the car where the Tank usually sits:
Nice Clean Tank!!! This took me about an hour and a half. Filled the tank with regular gasoline and sloshed it around over and over again, and used the same gasoline to clean the exterior of the tank as well. It came out really nice, but here it's still slightly wet in spots.
I took a long time cleaning the inside of the tank as well. I really wanted to make sure that there wasn't any debris in there, rocks, dirt, soot, or anything else that'd be sucked up by the pumps.
Came out Nice!
My tried and trusty Bosch 044's were also caked in the castor crap from premix. This stuff could possibly be theeee worrrst stickiest **** in car history.....ever. If you get it on your hands... only Gasoline will get it off. Not even Fast Orange will cut it. Sucks soaking your hands in gas too.
I wanted to make sure they were nice and clean so I soaked and sloshed them around in a regular gas bath for a day and a half to make sure all the goo was dissolved.
minutes after
and a full day JEEEEZE
Last edited by mannykiller; 02-04-16 at 01:59 PM.
02-04-16, 02:08 PM
#2462
Continued:
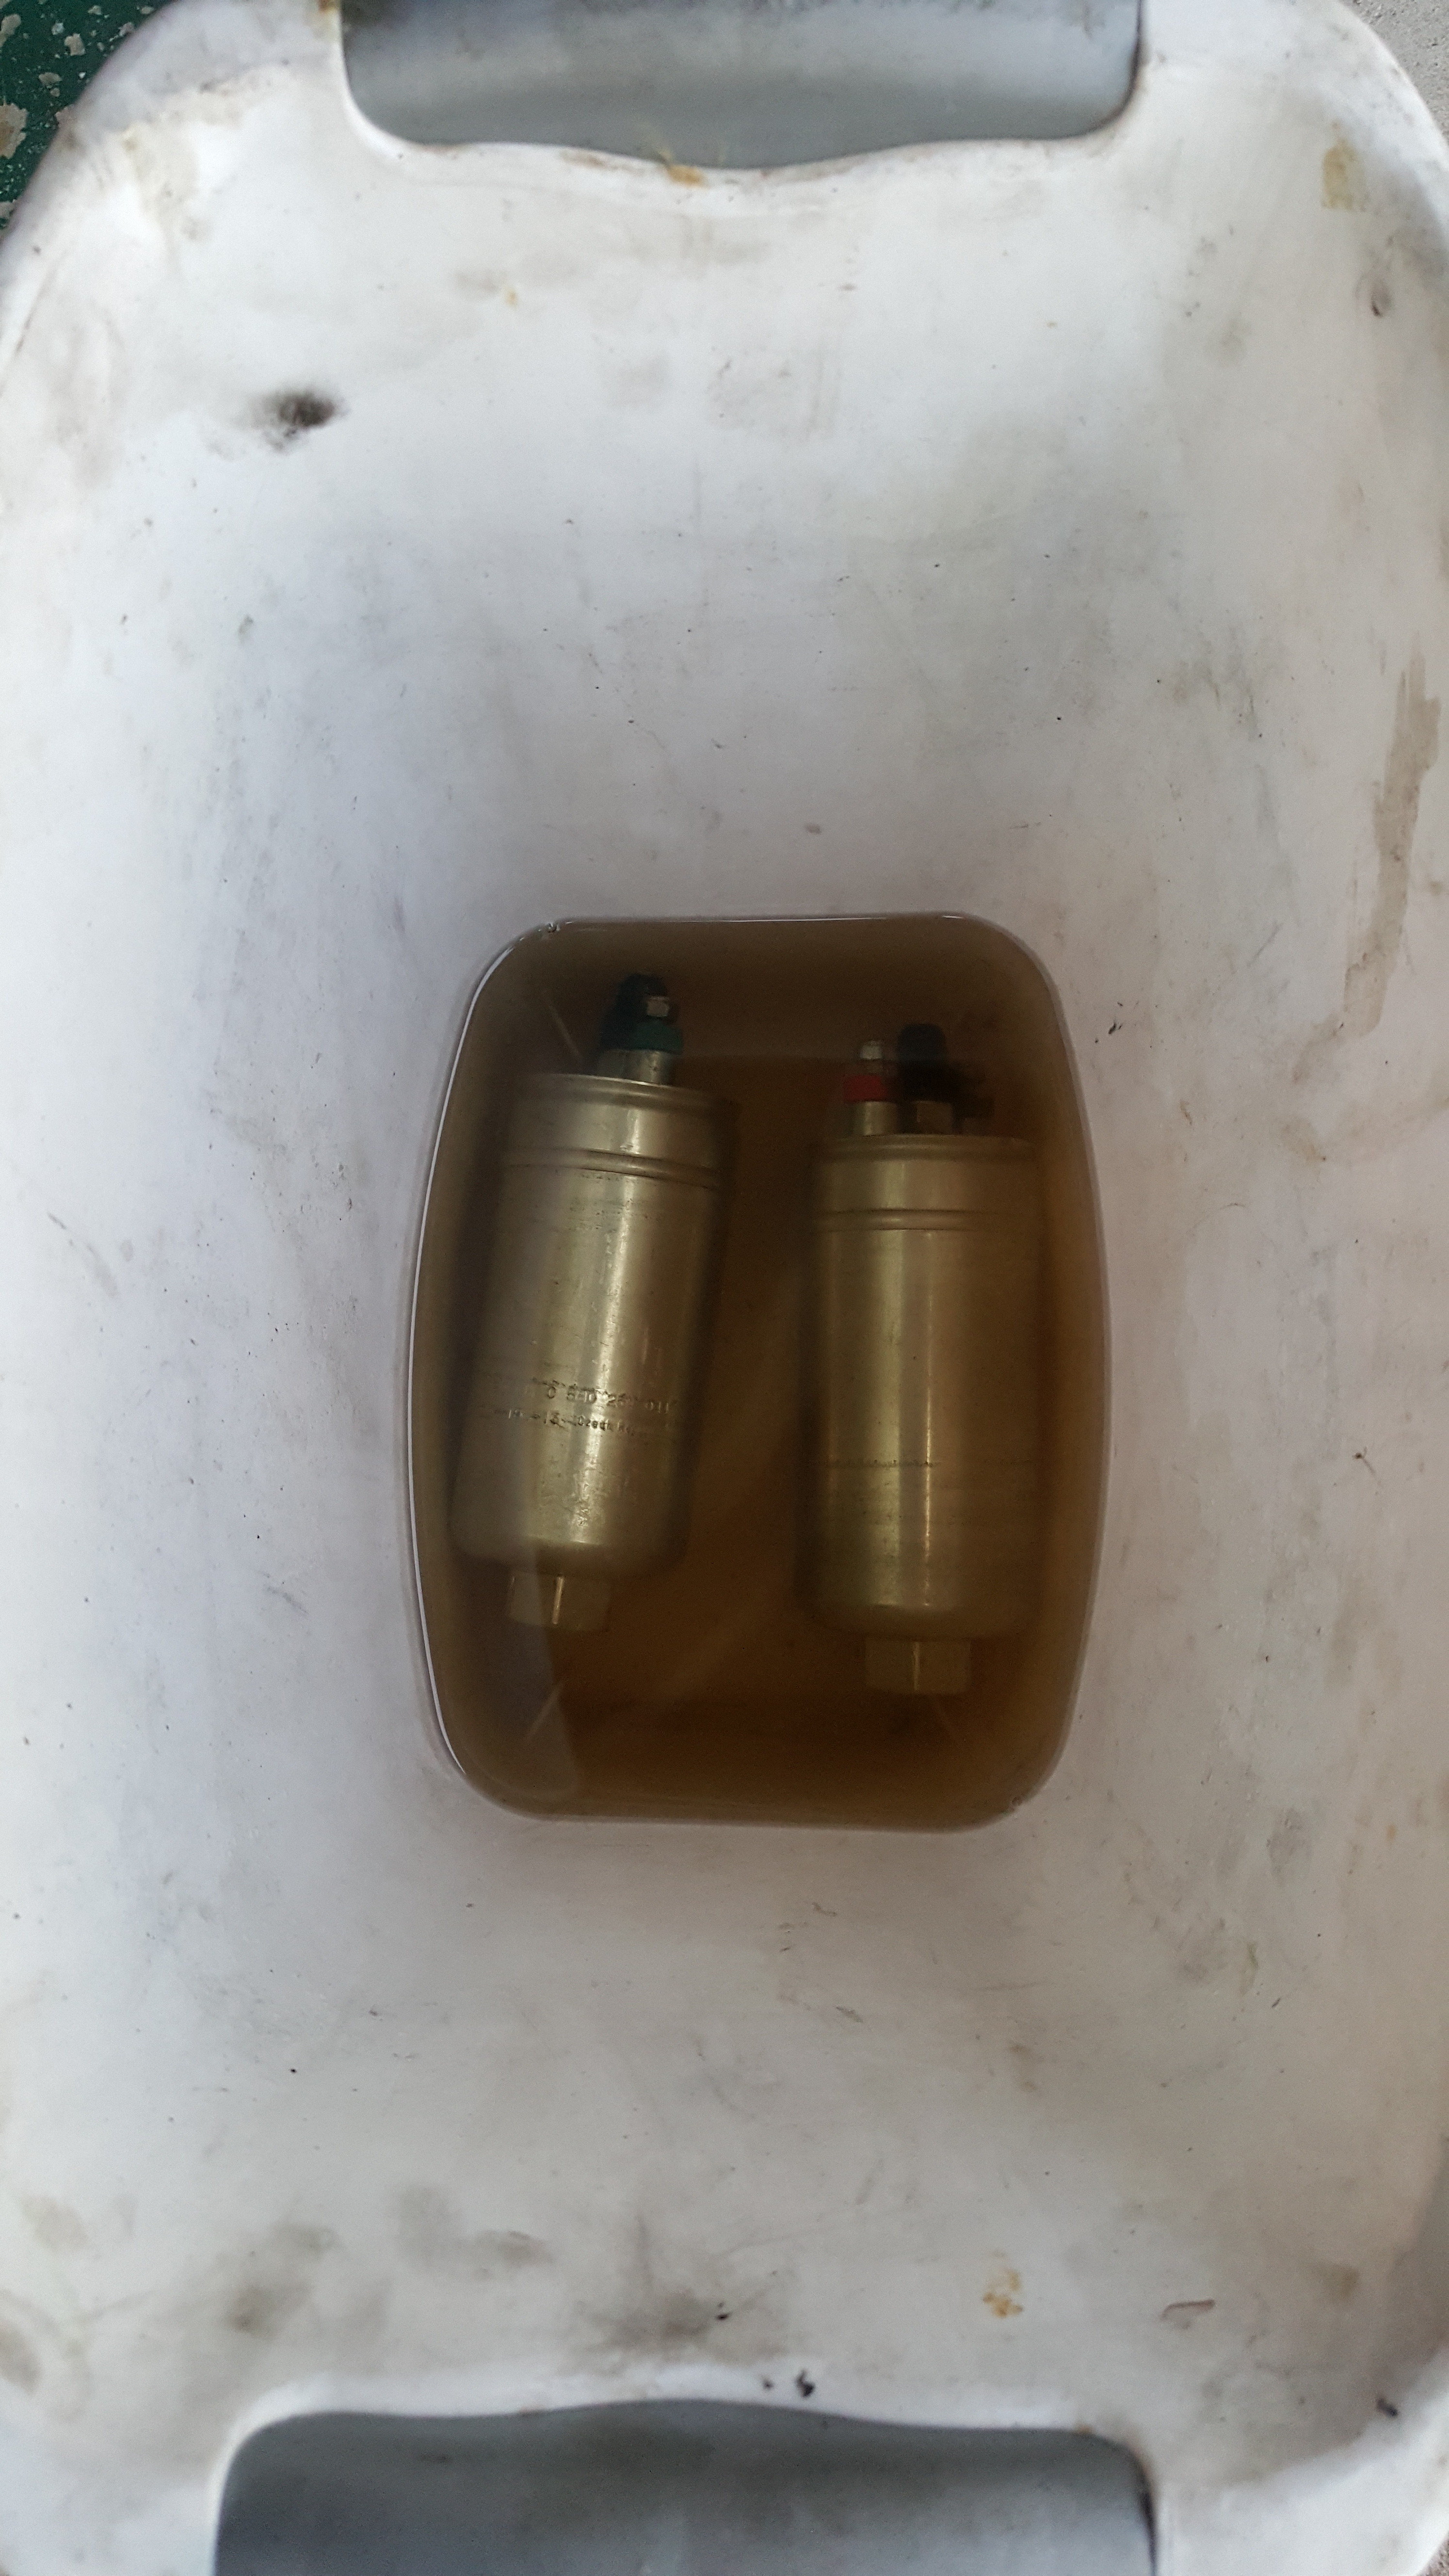
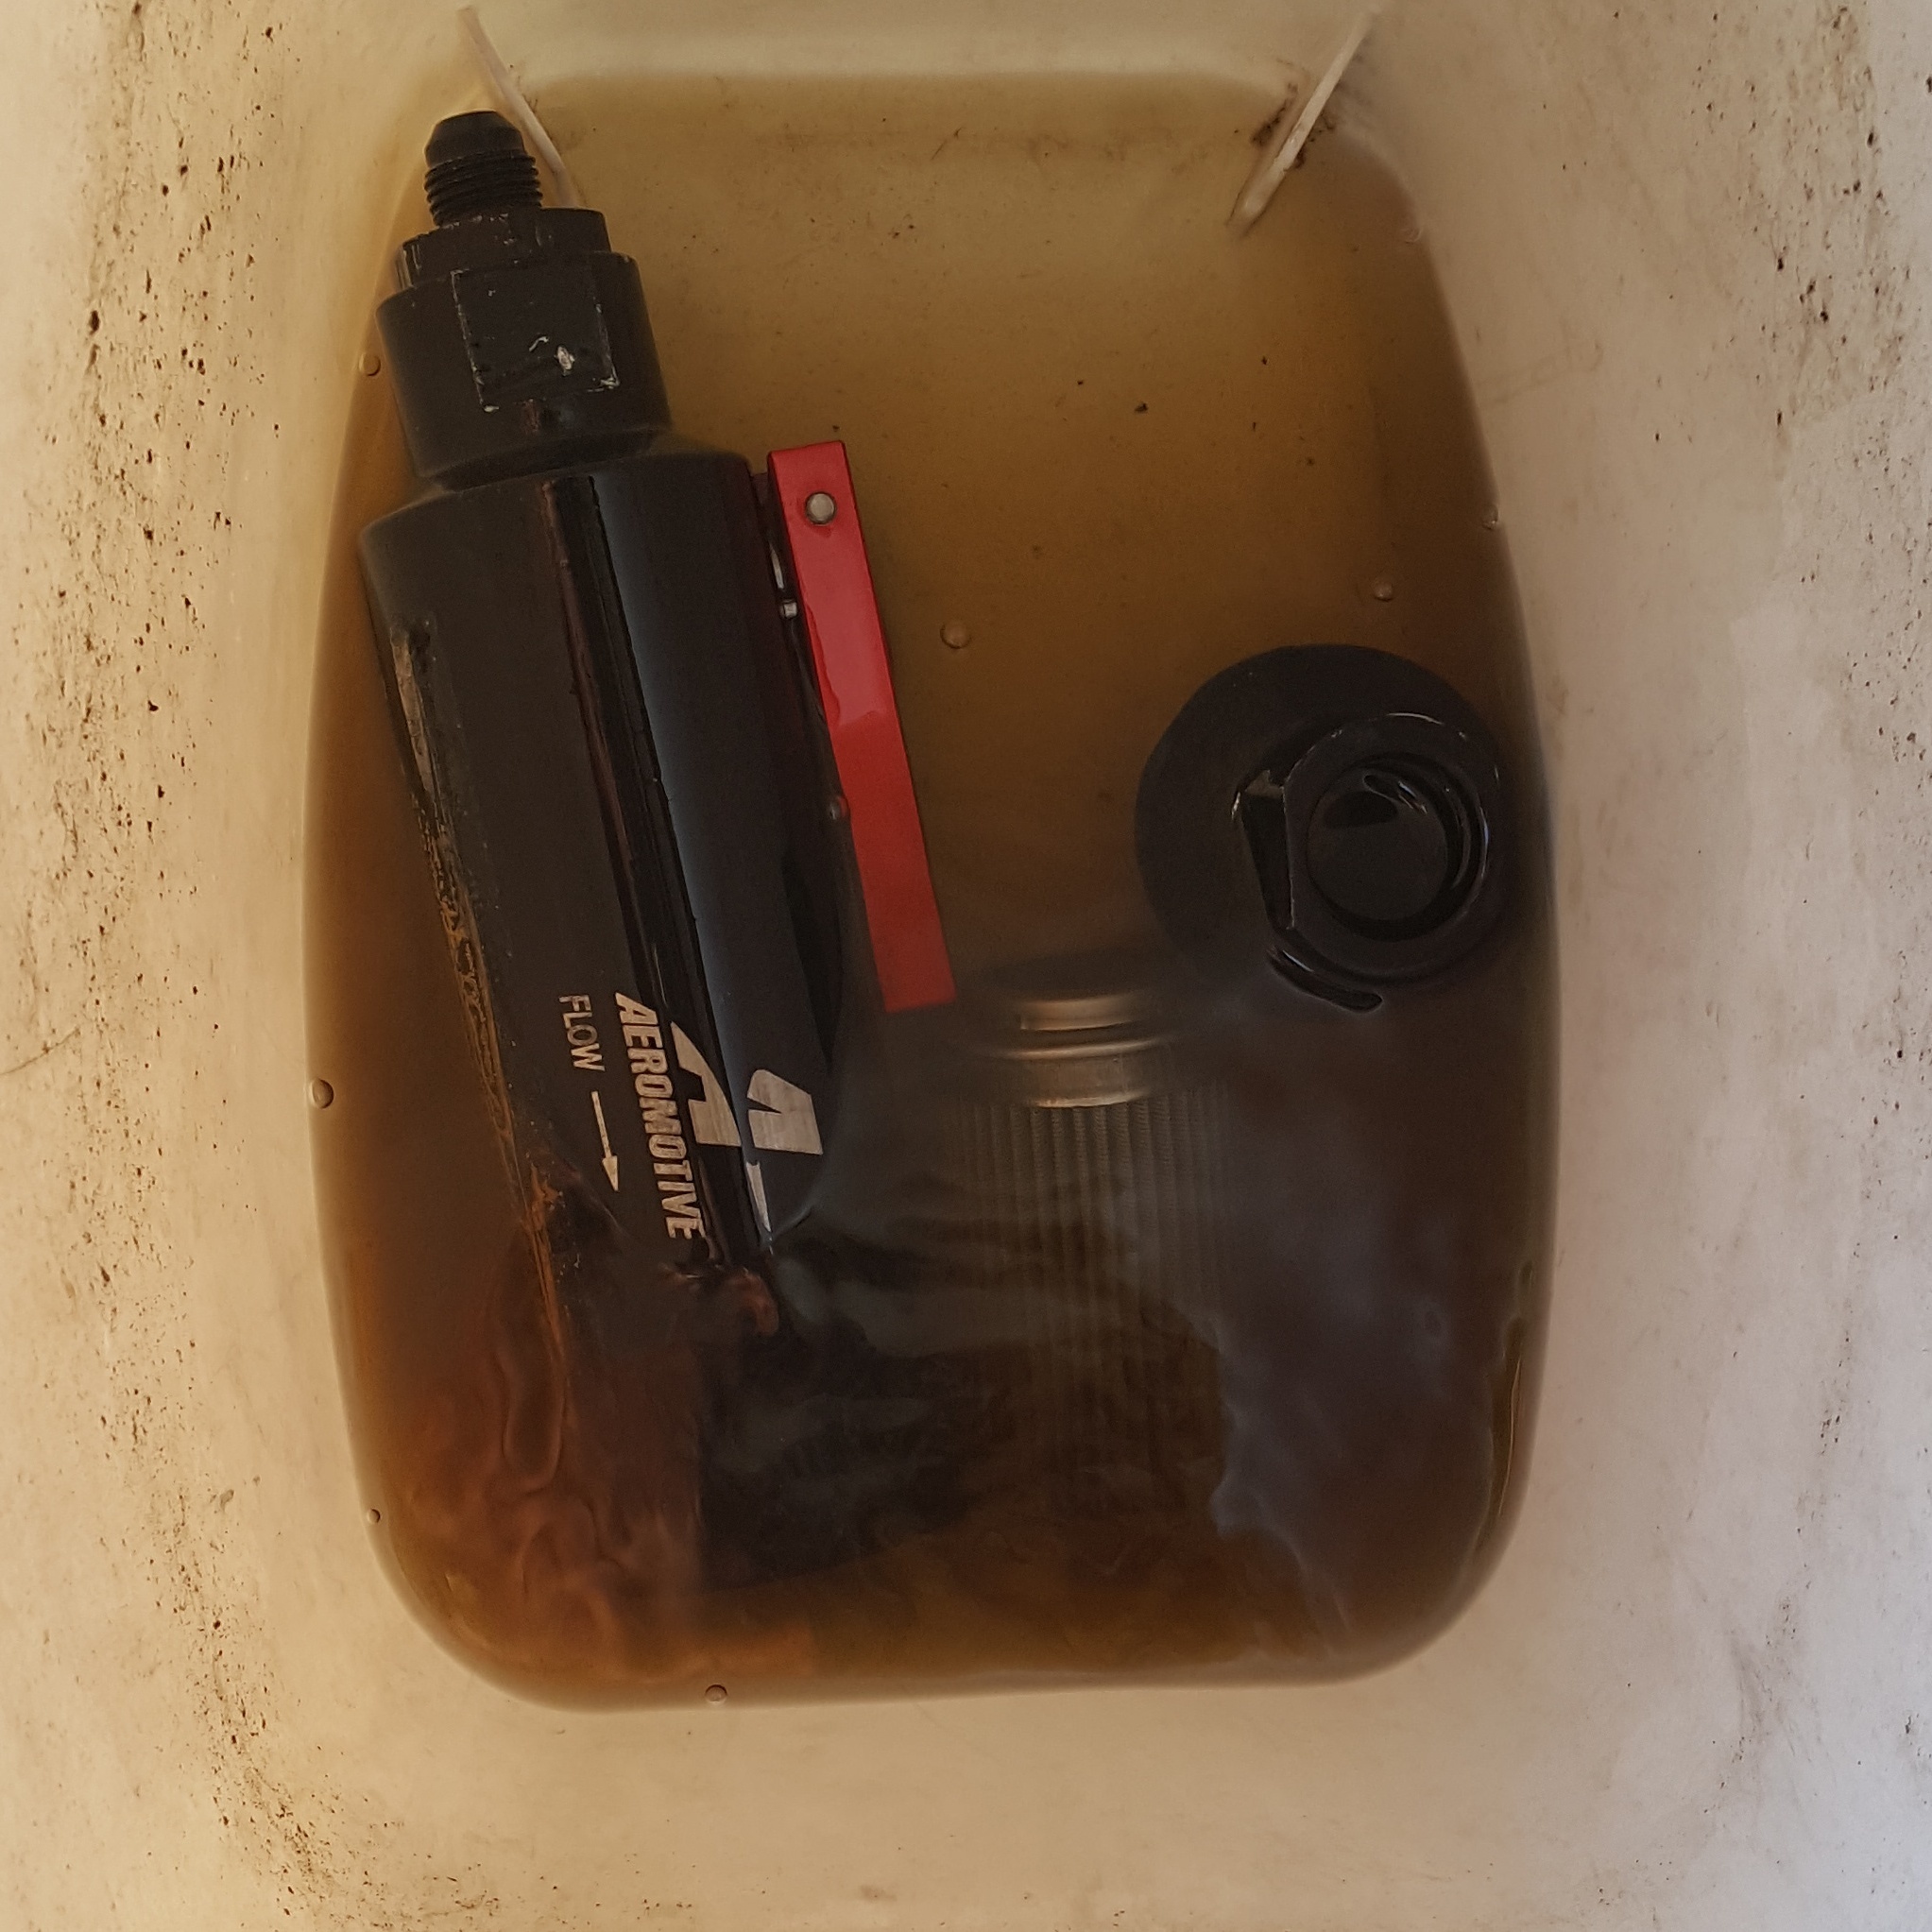
I also cleaned My Aeromotive 40 Micron Filter with stainless mesh out and It was just as dirty inside. It had goo starting to accumulate on the bottom pre filter on the inside.
Funny how it works out...when I originally ordered this filter I messed up and got the AN-8 ports... Well here I am...and guess what I'm swapping to? All An-8 HaHa....sometimes things happen for a reason ay?! I gave the filter a bath of it's own and fully dis-assembled it to inspect the stainless element. Looks Great!
Gave the Bosch 044's an additional dip in some gasoline and brake cleaner just to be safe,...because you never can be too cautious.. and pulled out all my Radium Engineering Surge Gear to have a solid look at all the components and get it assembled to start planning on where it'll be set up in the rear of the car.
Gotta Love new parts!!! The Fuel Pumps came out damn near new looking as well!!

More Updates Soon!!! Stay Tuned!!
#Thisisthewolf
I also cleaned My Aeromotive 40 Micron Filter with stainless mesh out and It was just as dirty inside. It had goo starting to accumulate on the bottom pre filter on the inside.
Funny how it works out...when I originally ordered this filter I messed up and got the AN-8 ports... Well here I am...and guess what I'm swapping to? All An-8 HaHa....sometimes things happen for a reason ay?! I gave the filter a bath of it's own and fully dis-assembled it to inspect the stainless element. Looks Great!
Gave the Bosch 044's an additional dip in some gasoline and brake cleaner just to be safe,...because you never can be too cautious.. and pulled out all my Radium Engineering Surge Gear to have a solid look at all the components and get it assembled to start planning on where it'll be set up in the rear of the car.
Gotta Love new parts!!! The Fuel Pumps came out damn near new looking as well!!
More Updates Soon!!! Stay Tuned!!
#Thisisthewolf
 02-10-16, 12:27 PM
#2465
Update: "On a roll"
So i've been practically non-stop for the past 4 days... hammering away at tasks involving the wolf, parts, cleaning/planning/engine stuff, organizing and even industry related relationship stuff regarding companies and products!!! I havn't been able to spend as much time on the car as I wanted to but I was able to knock out a bunch of stuff!!
I wanted to make sure the under carriage of the car wasn't soooo dirty. I hate that... especially with the new fuel system/lines going in under there.. I'd hate to install it over dirty everything haha. So It took some commitment..but I got some safety goggles a long sleeve and some solid practice breathing out of my nose, laying on my back under the car and scrubbing away to get all the crap off. I'm thinking I may even use the rubberized under-spray depending on how it looks today. But check it...
Before on the left.. after on the right
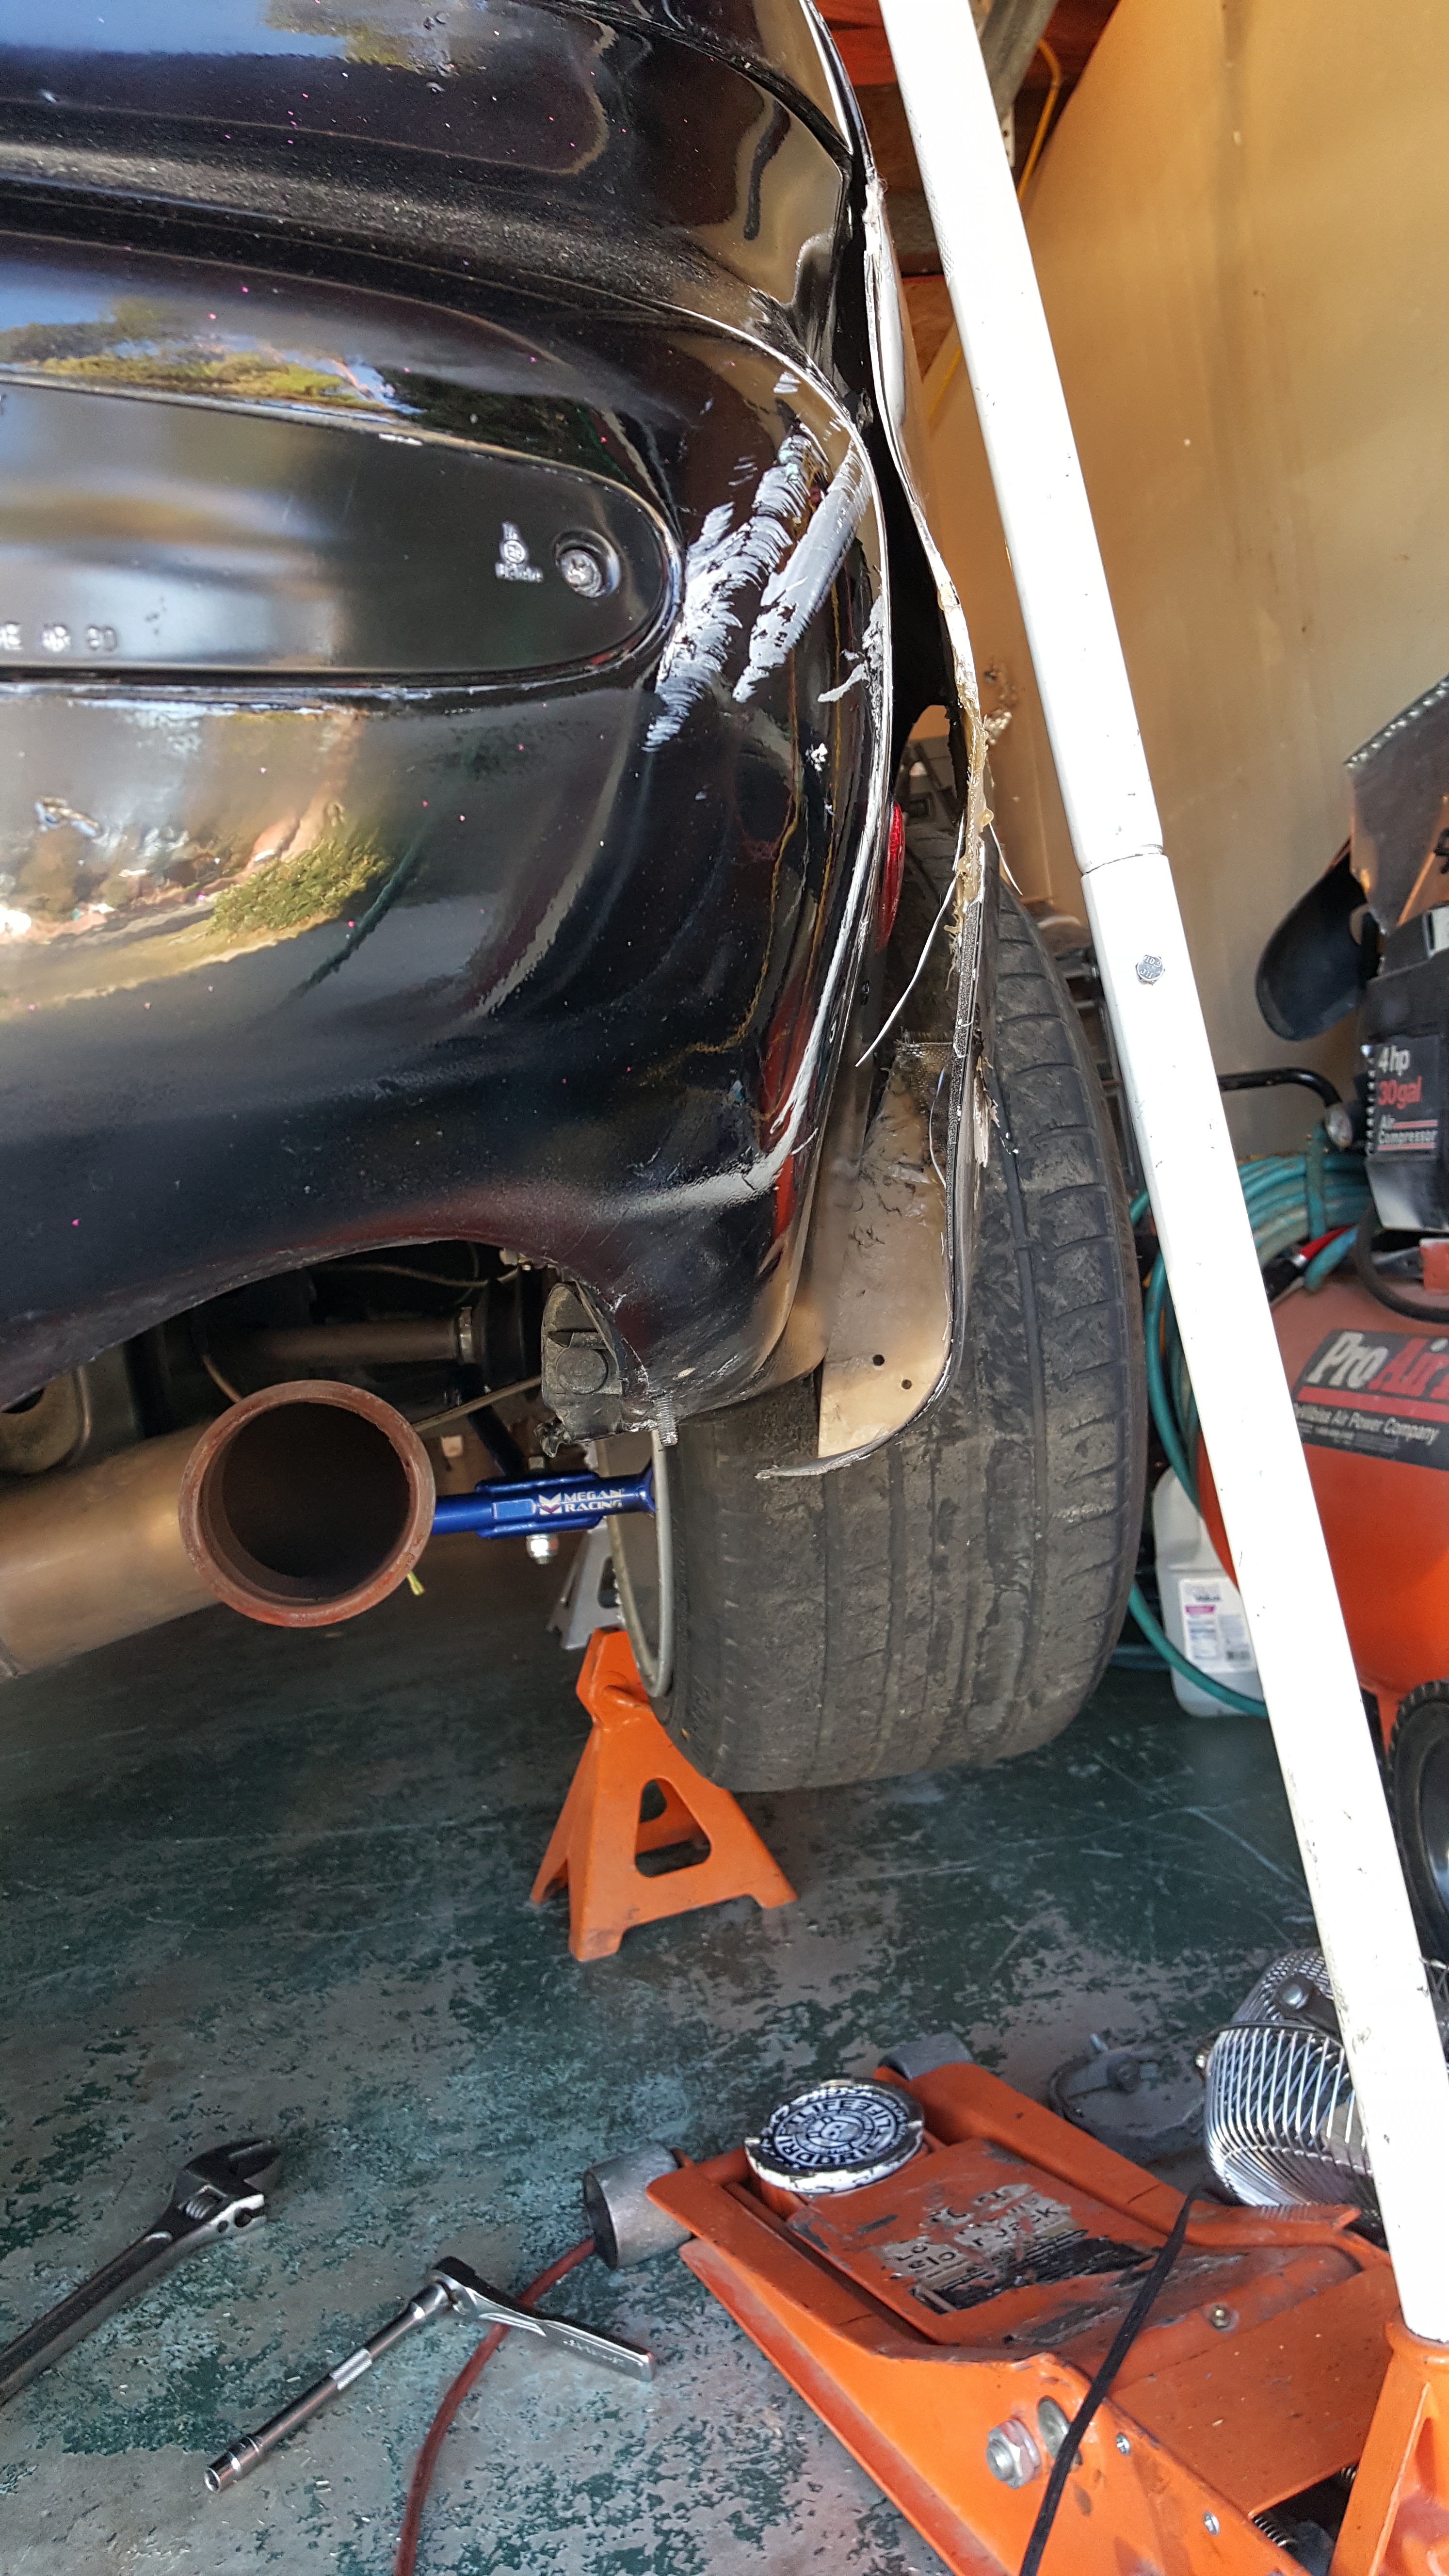
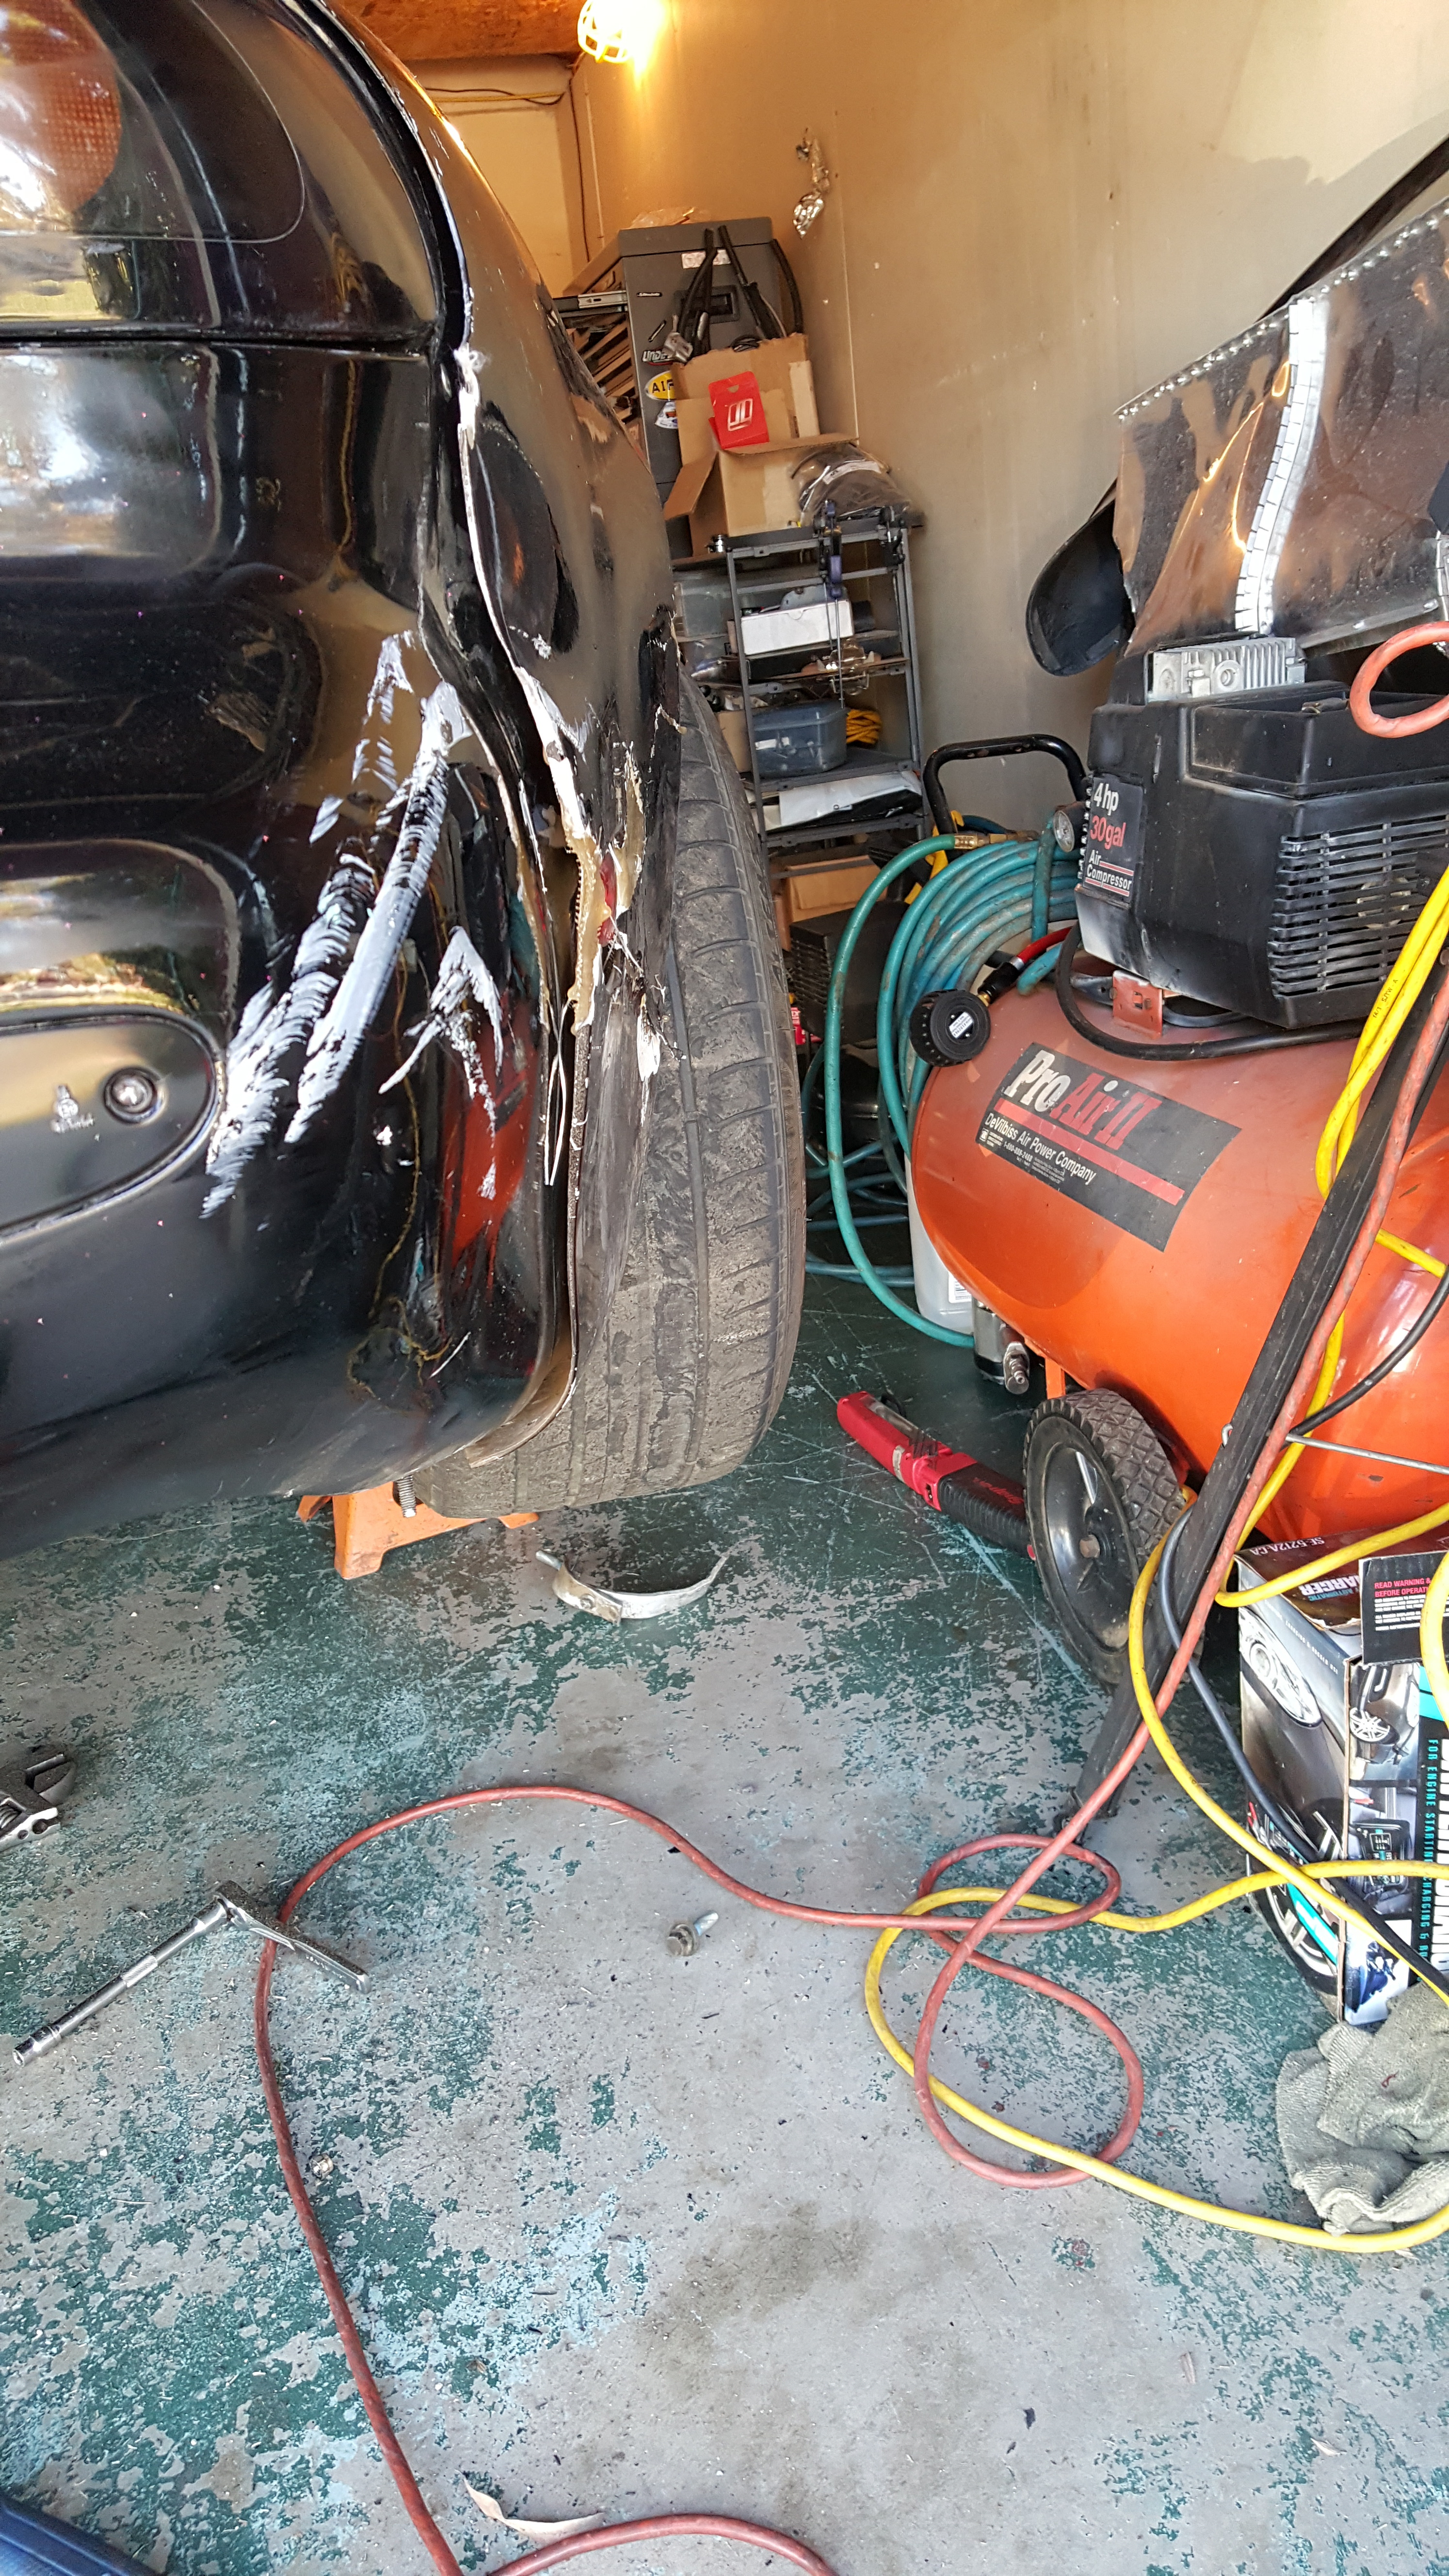
Then I got distracted with some body alignment stuff. My buddy Ryan hit me at ASB and pushed the passenger side quarter panel in....about 4". It took a ton of work to get it back to where it needs to be.
Before
After =-)
I also got really fed up with looking at the rear trunk compartment being so ugly and mis-matched with green and raw tanish metal looking patches from the sound deadening all over the place. So I masked off the rest of the car and hit the compartment with some good ol gloss black rustoleum.
Not the highest quality stuff but definitely better than what it was.

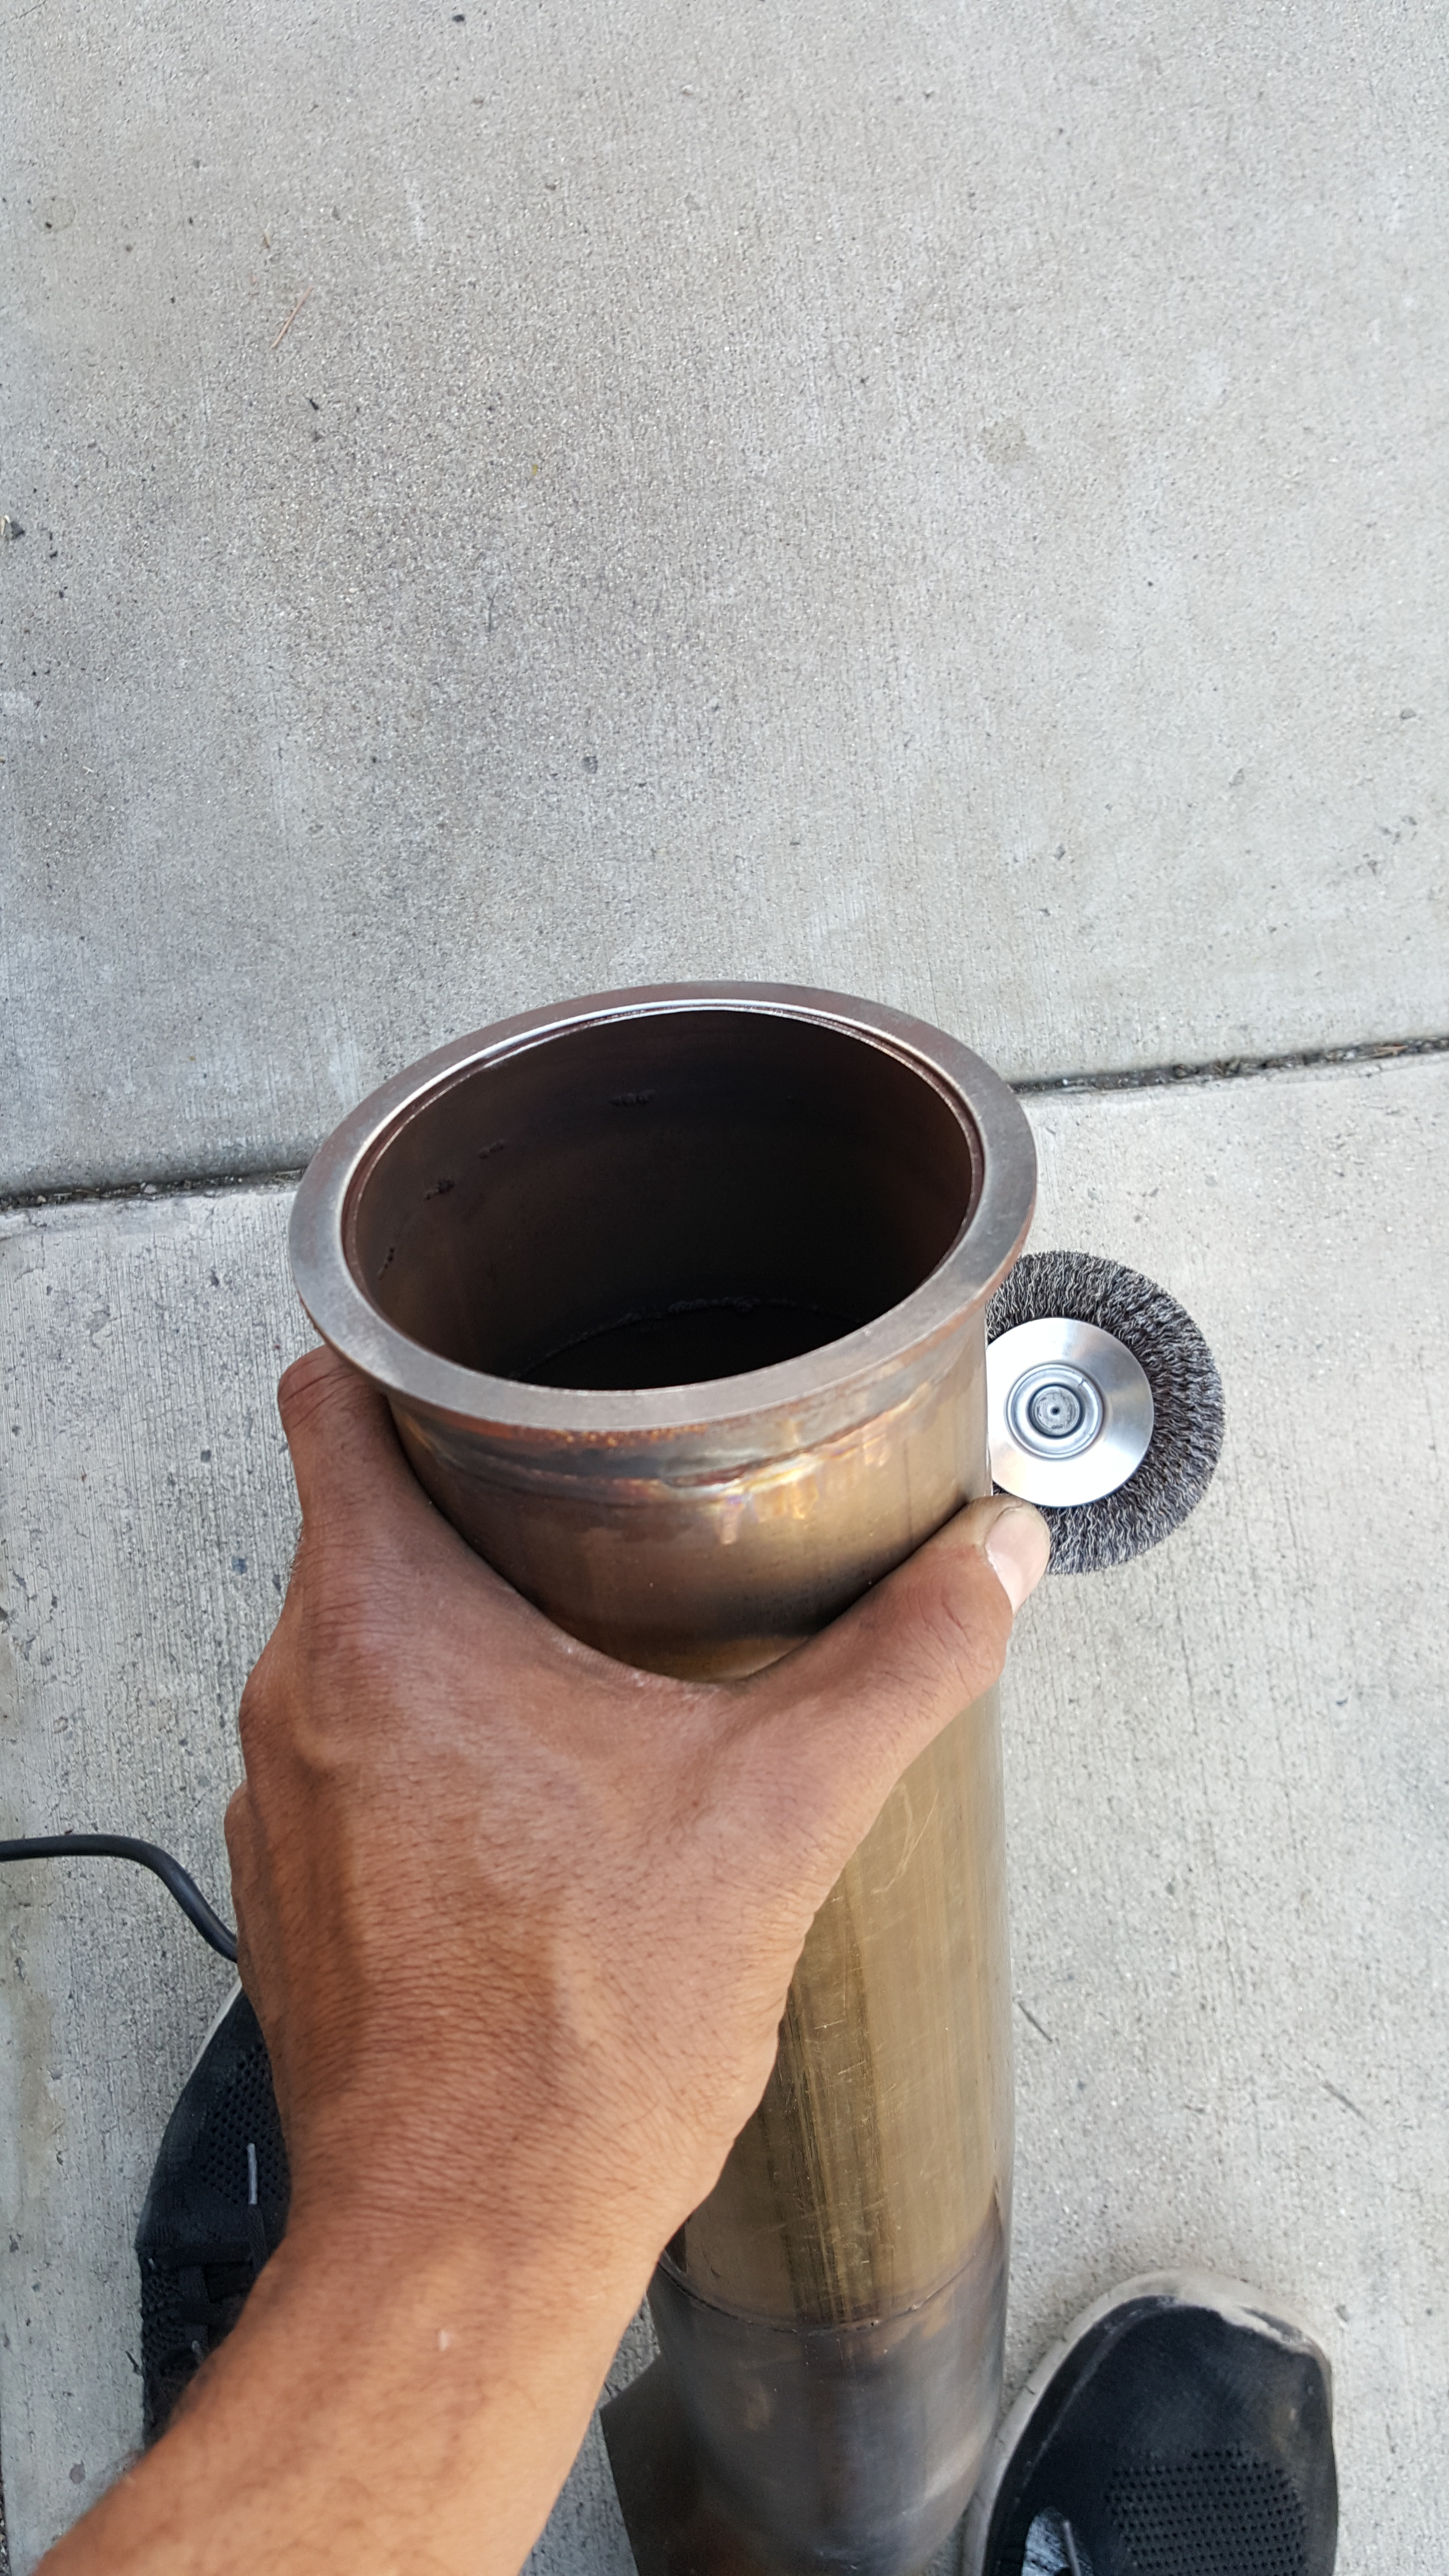
While I was working on the passenger side rear quarter panel.. I pulled off my 4" turn down Exhaust tip that Rad Industries has made for me. Needed some cleaning up for sure. The V-band mating surface was all mucked up. Nothing a quick wire wheel wouldn't fix though!
Before
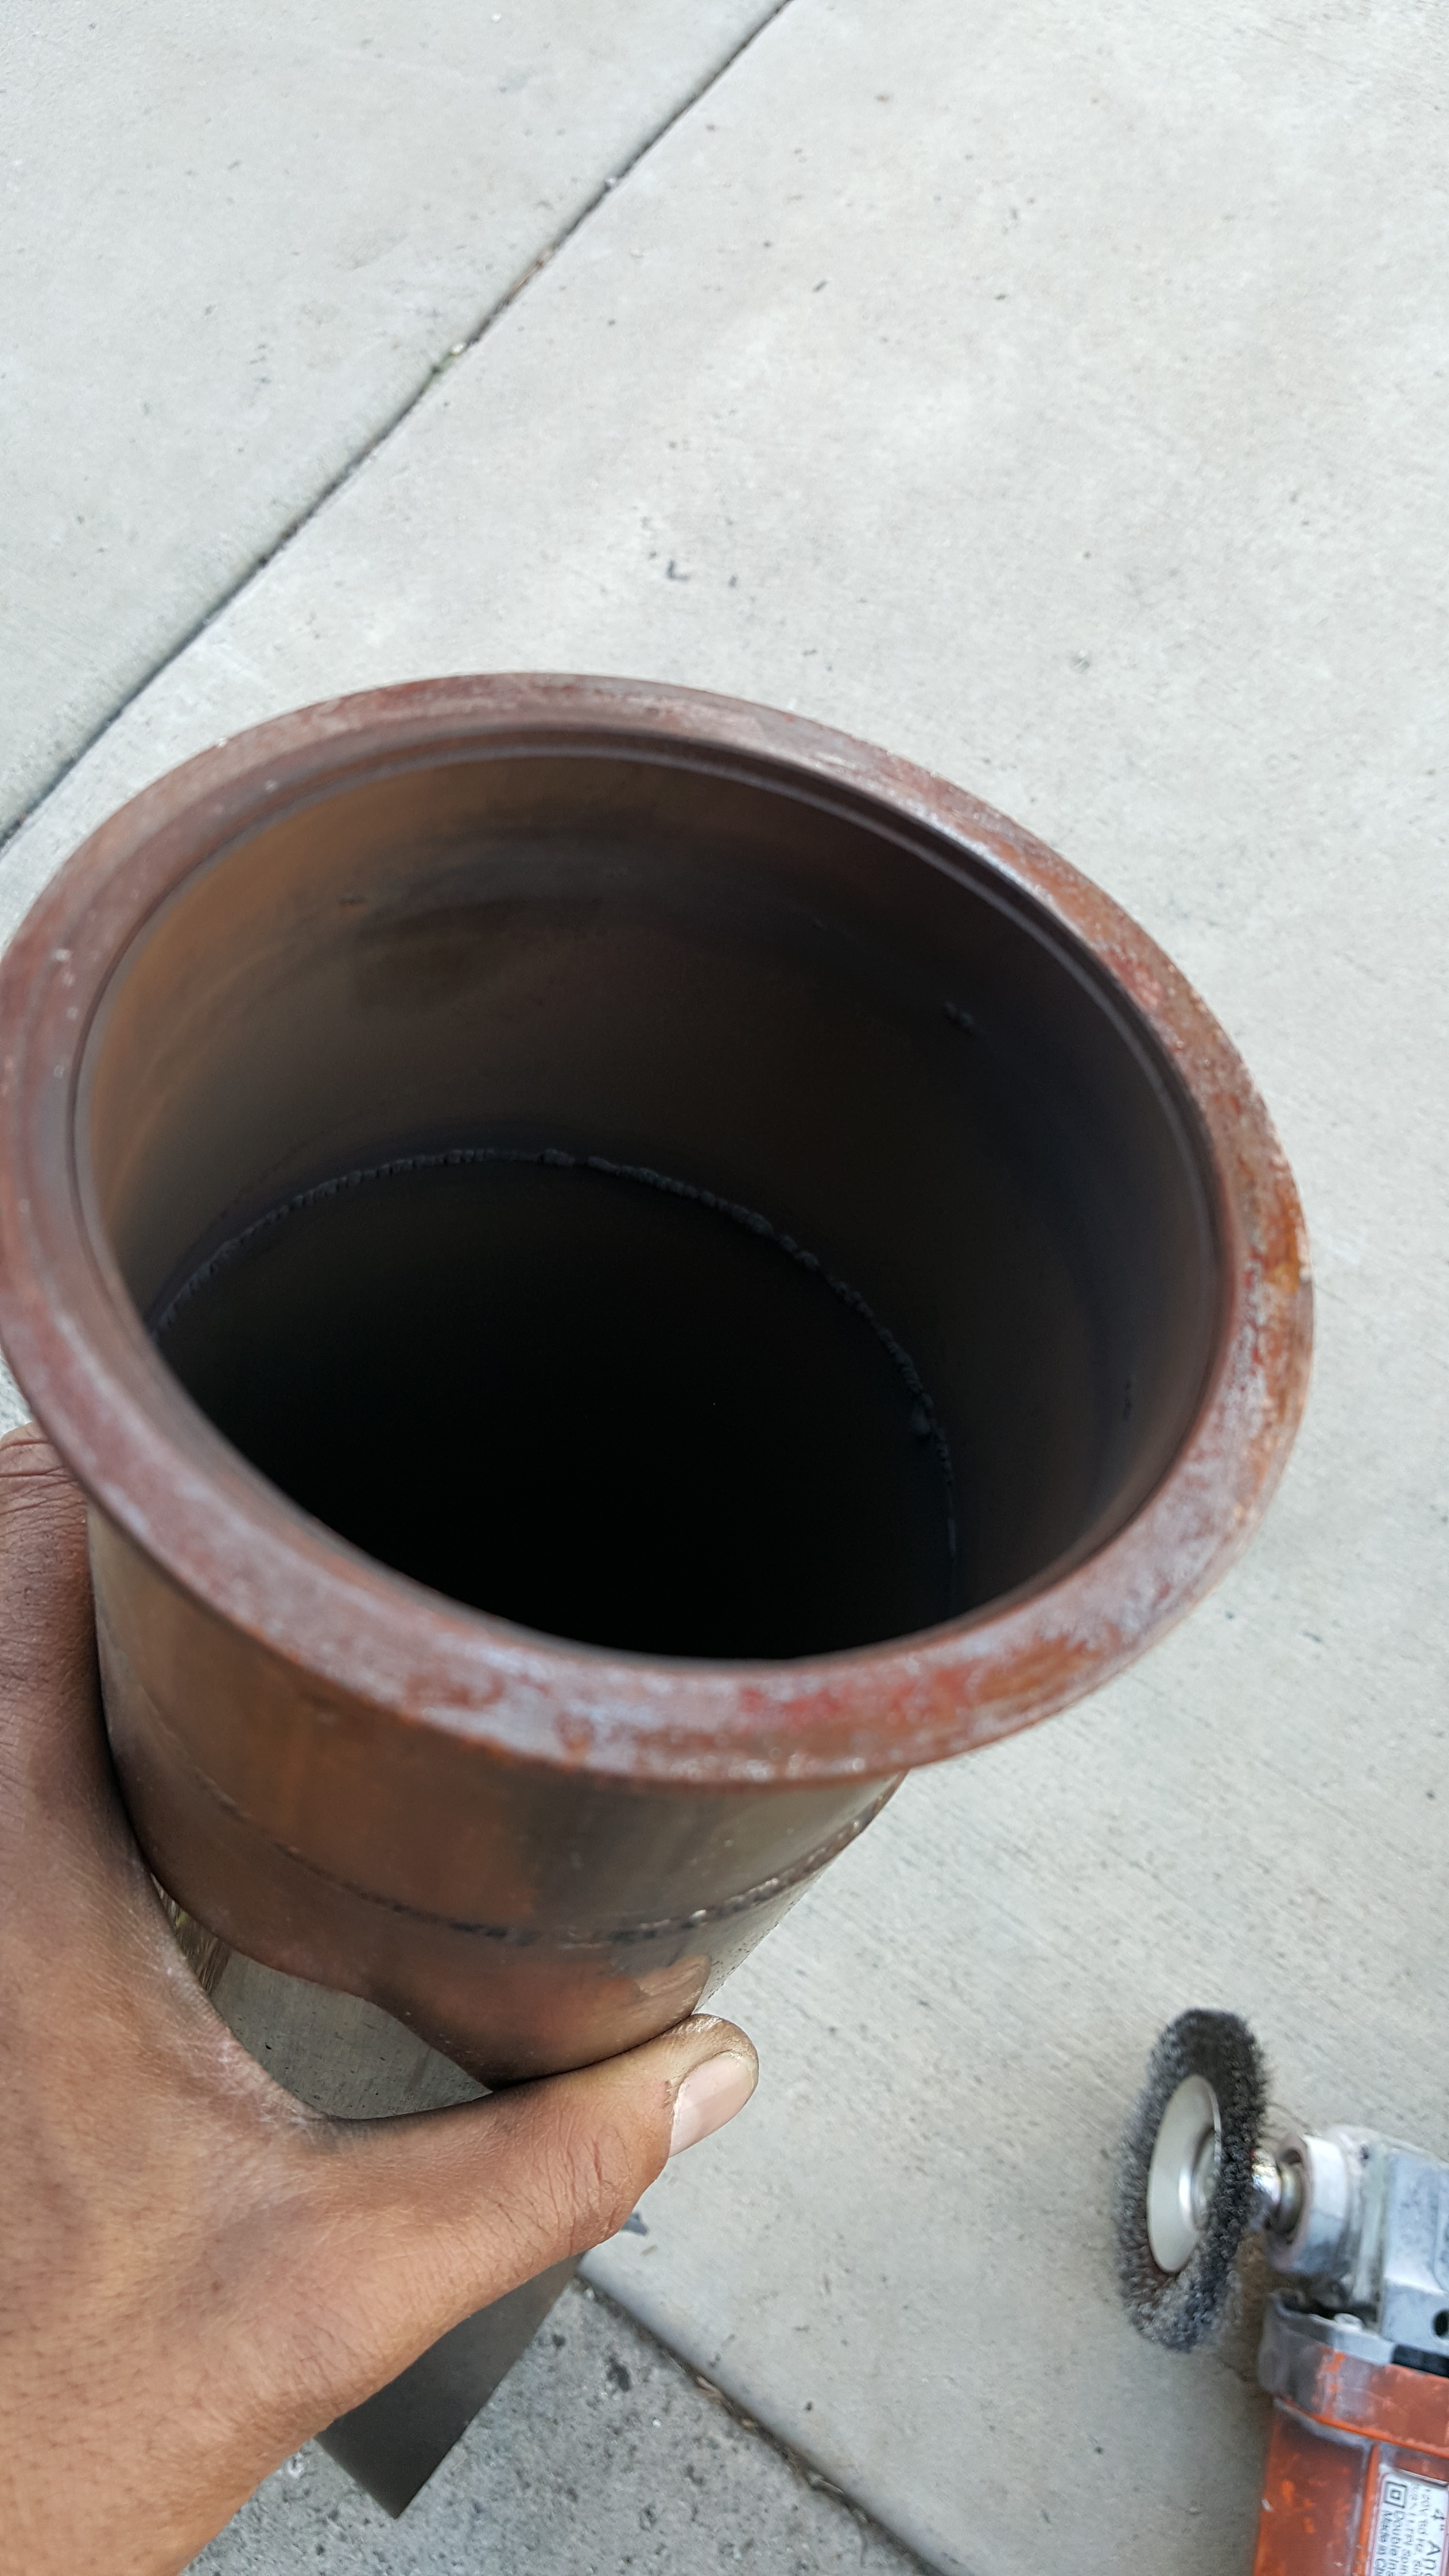
After
Usually when the sun goes down...I switch to working with the nice new stuff... its less noisy and I can spend as long as I want on the stuff in the garage at night. Just getting in the zone.
I got this fitting from Summit..I'll be using it so I can run a standalone fuel pressure gauge as well as a mechanical gauge in the engine bay for convenience and a Full Function Engineering Fuel Pressure Sensor to the ECU for the business side of things. I know a lot of people think that it may be over kill. But I can�t count how many times this combo has come in handy. Once in trouble shooting a faulty sensor, and another time when I actually melted some autozone braided sleeving on one of my bosch 044 fuel pump relays. The plastic material wasn�t trimmed as well as it should have been and it had actually found its way up to touch one of the terminals on the relay. Well�.it melted..and worked its way in and around the terminal preventing it from making contact. This set up helped me figure out what was going on =-)
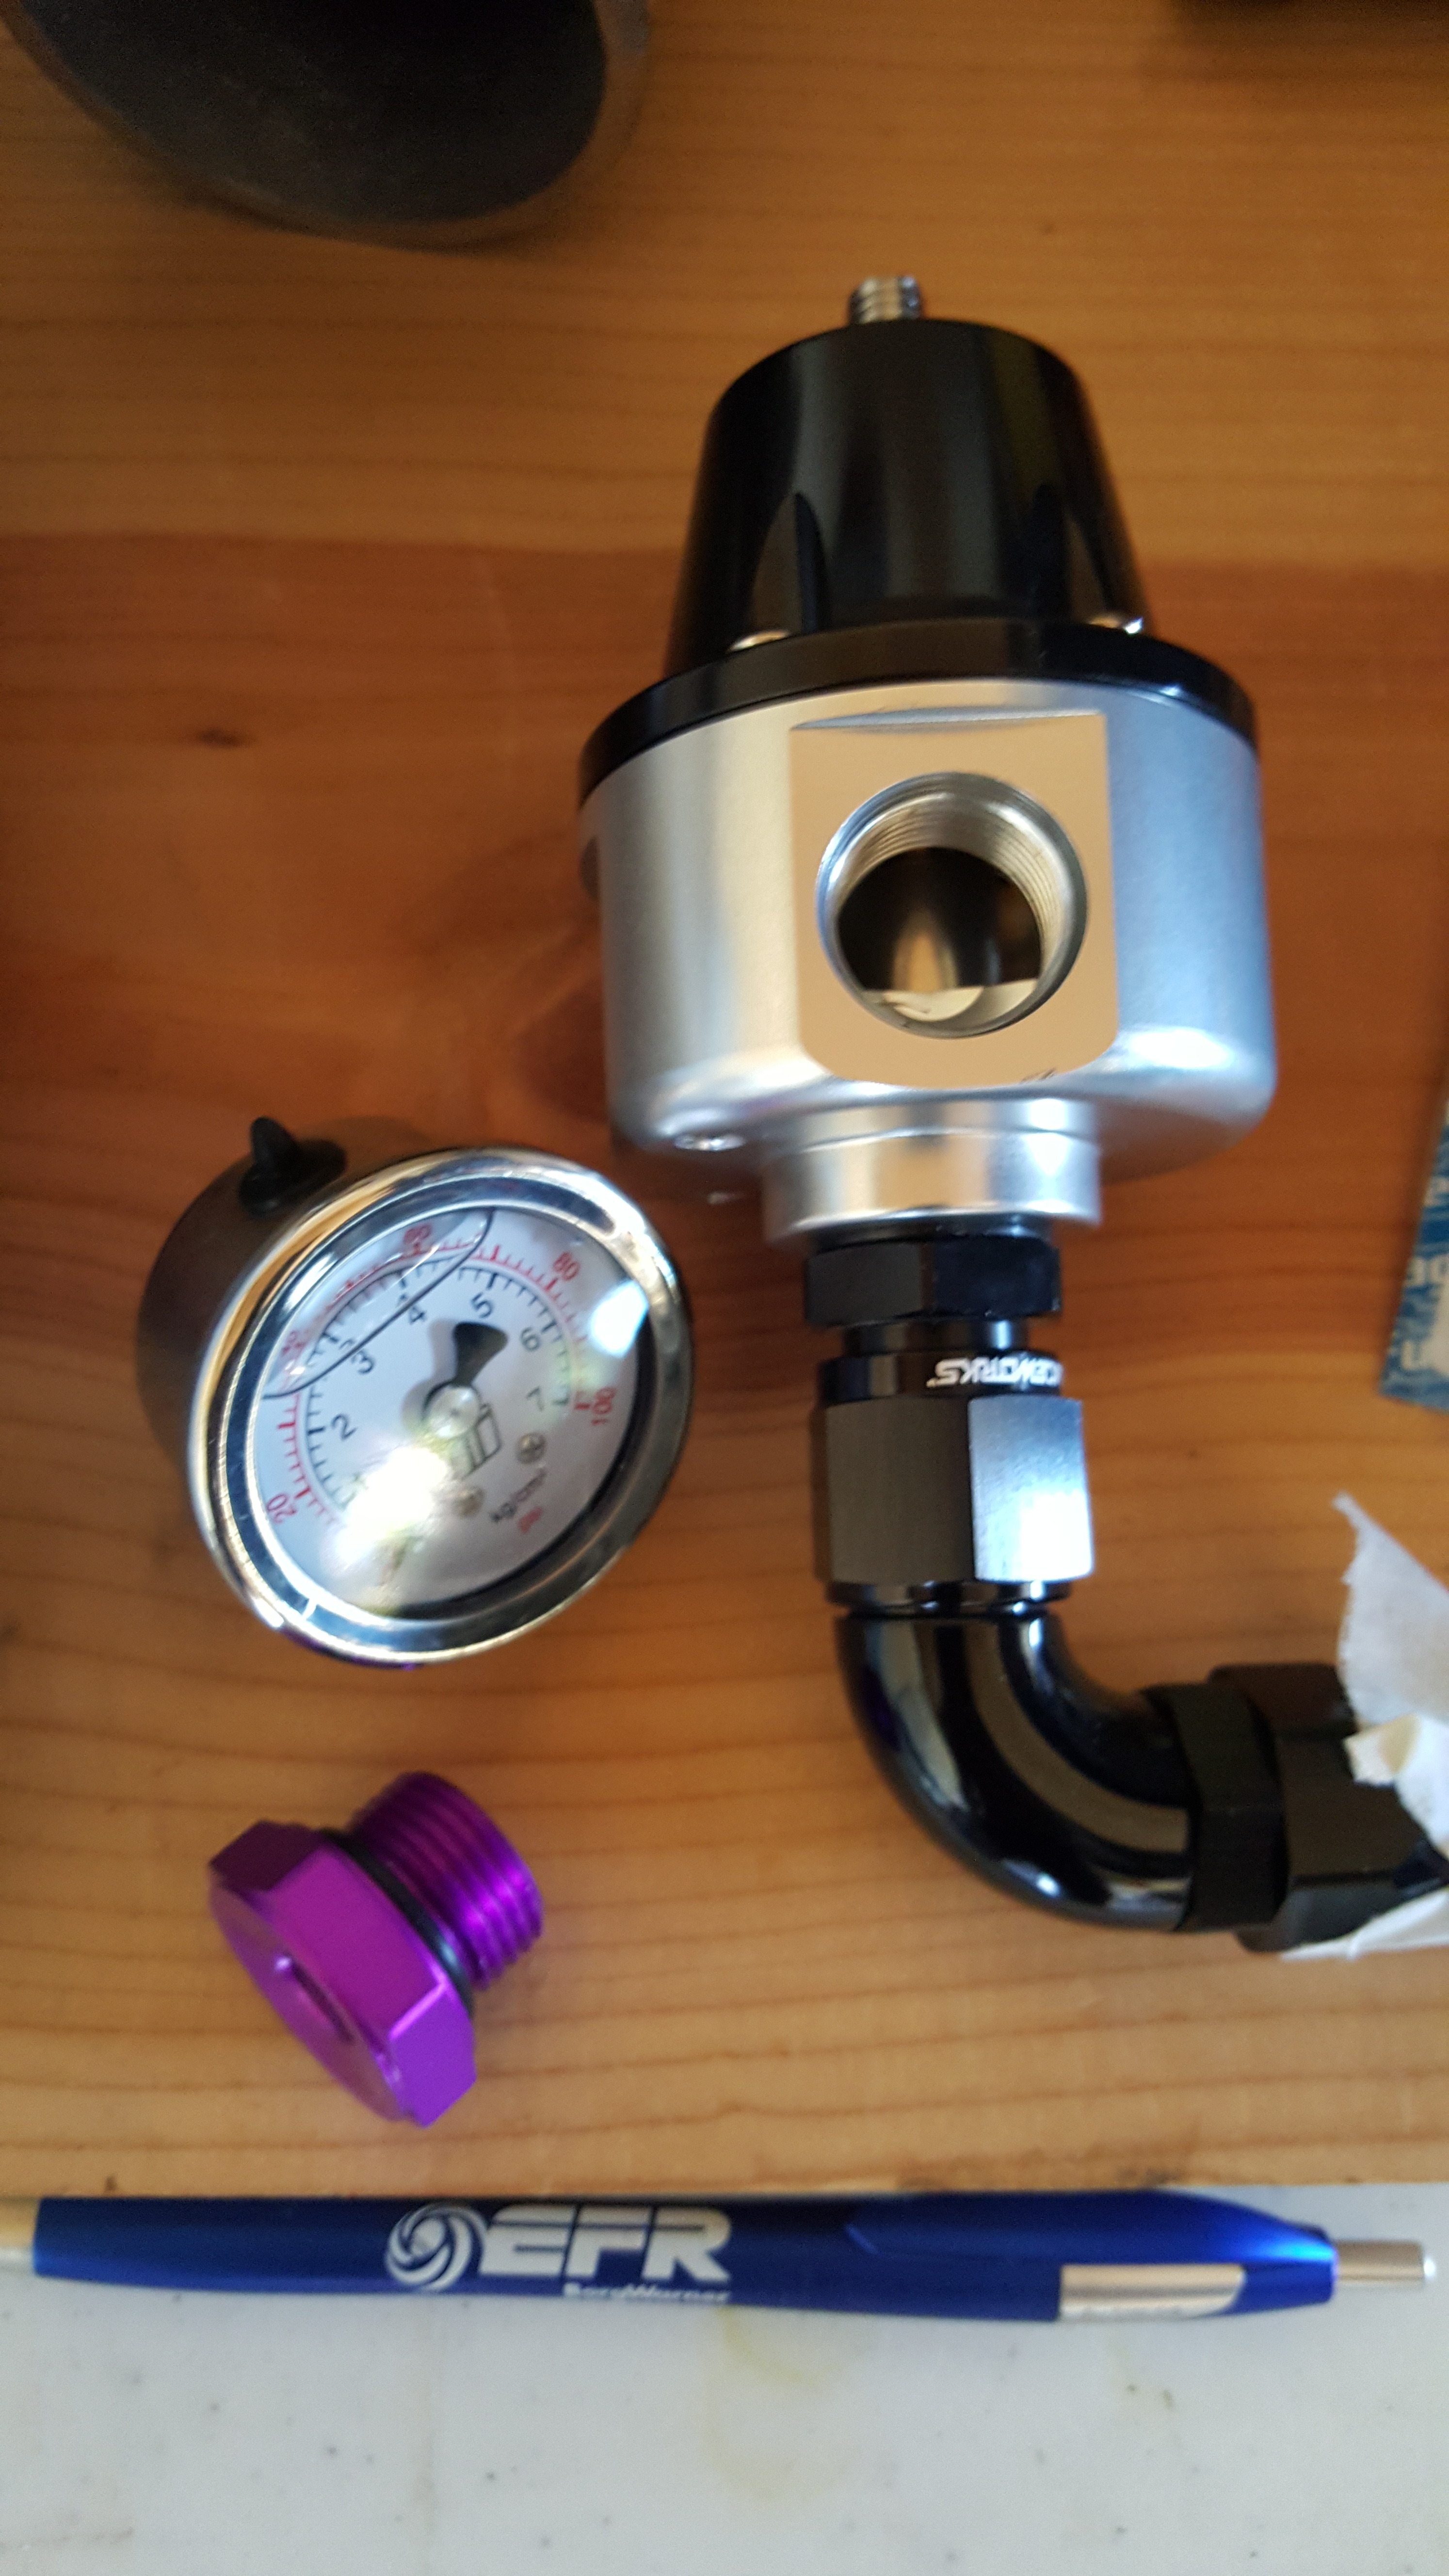
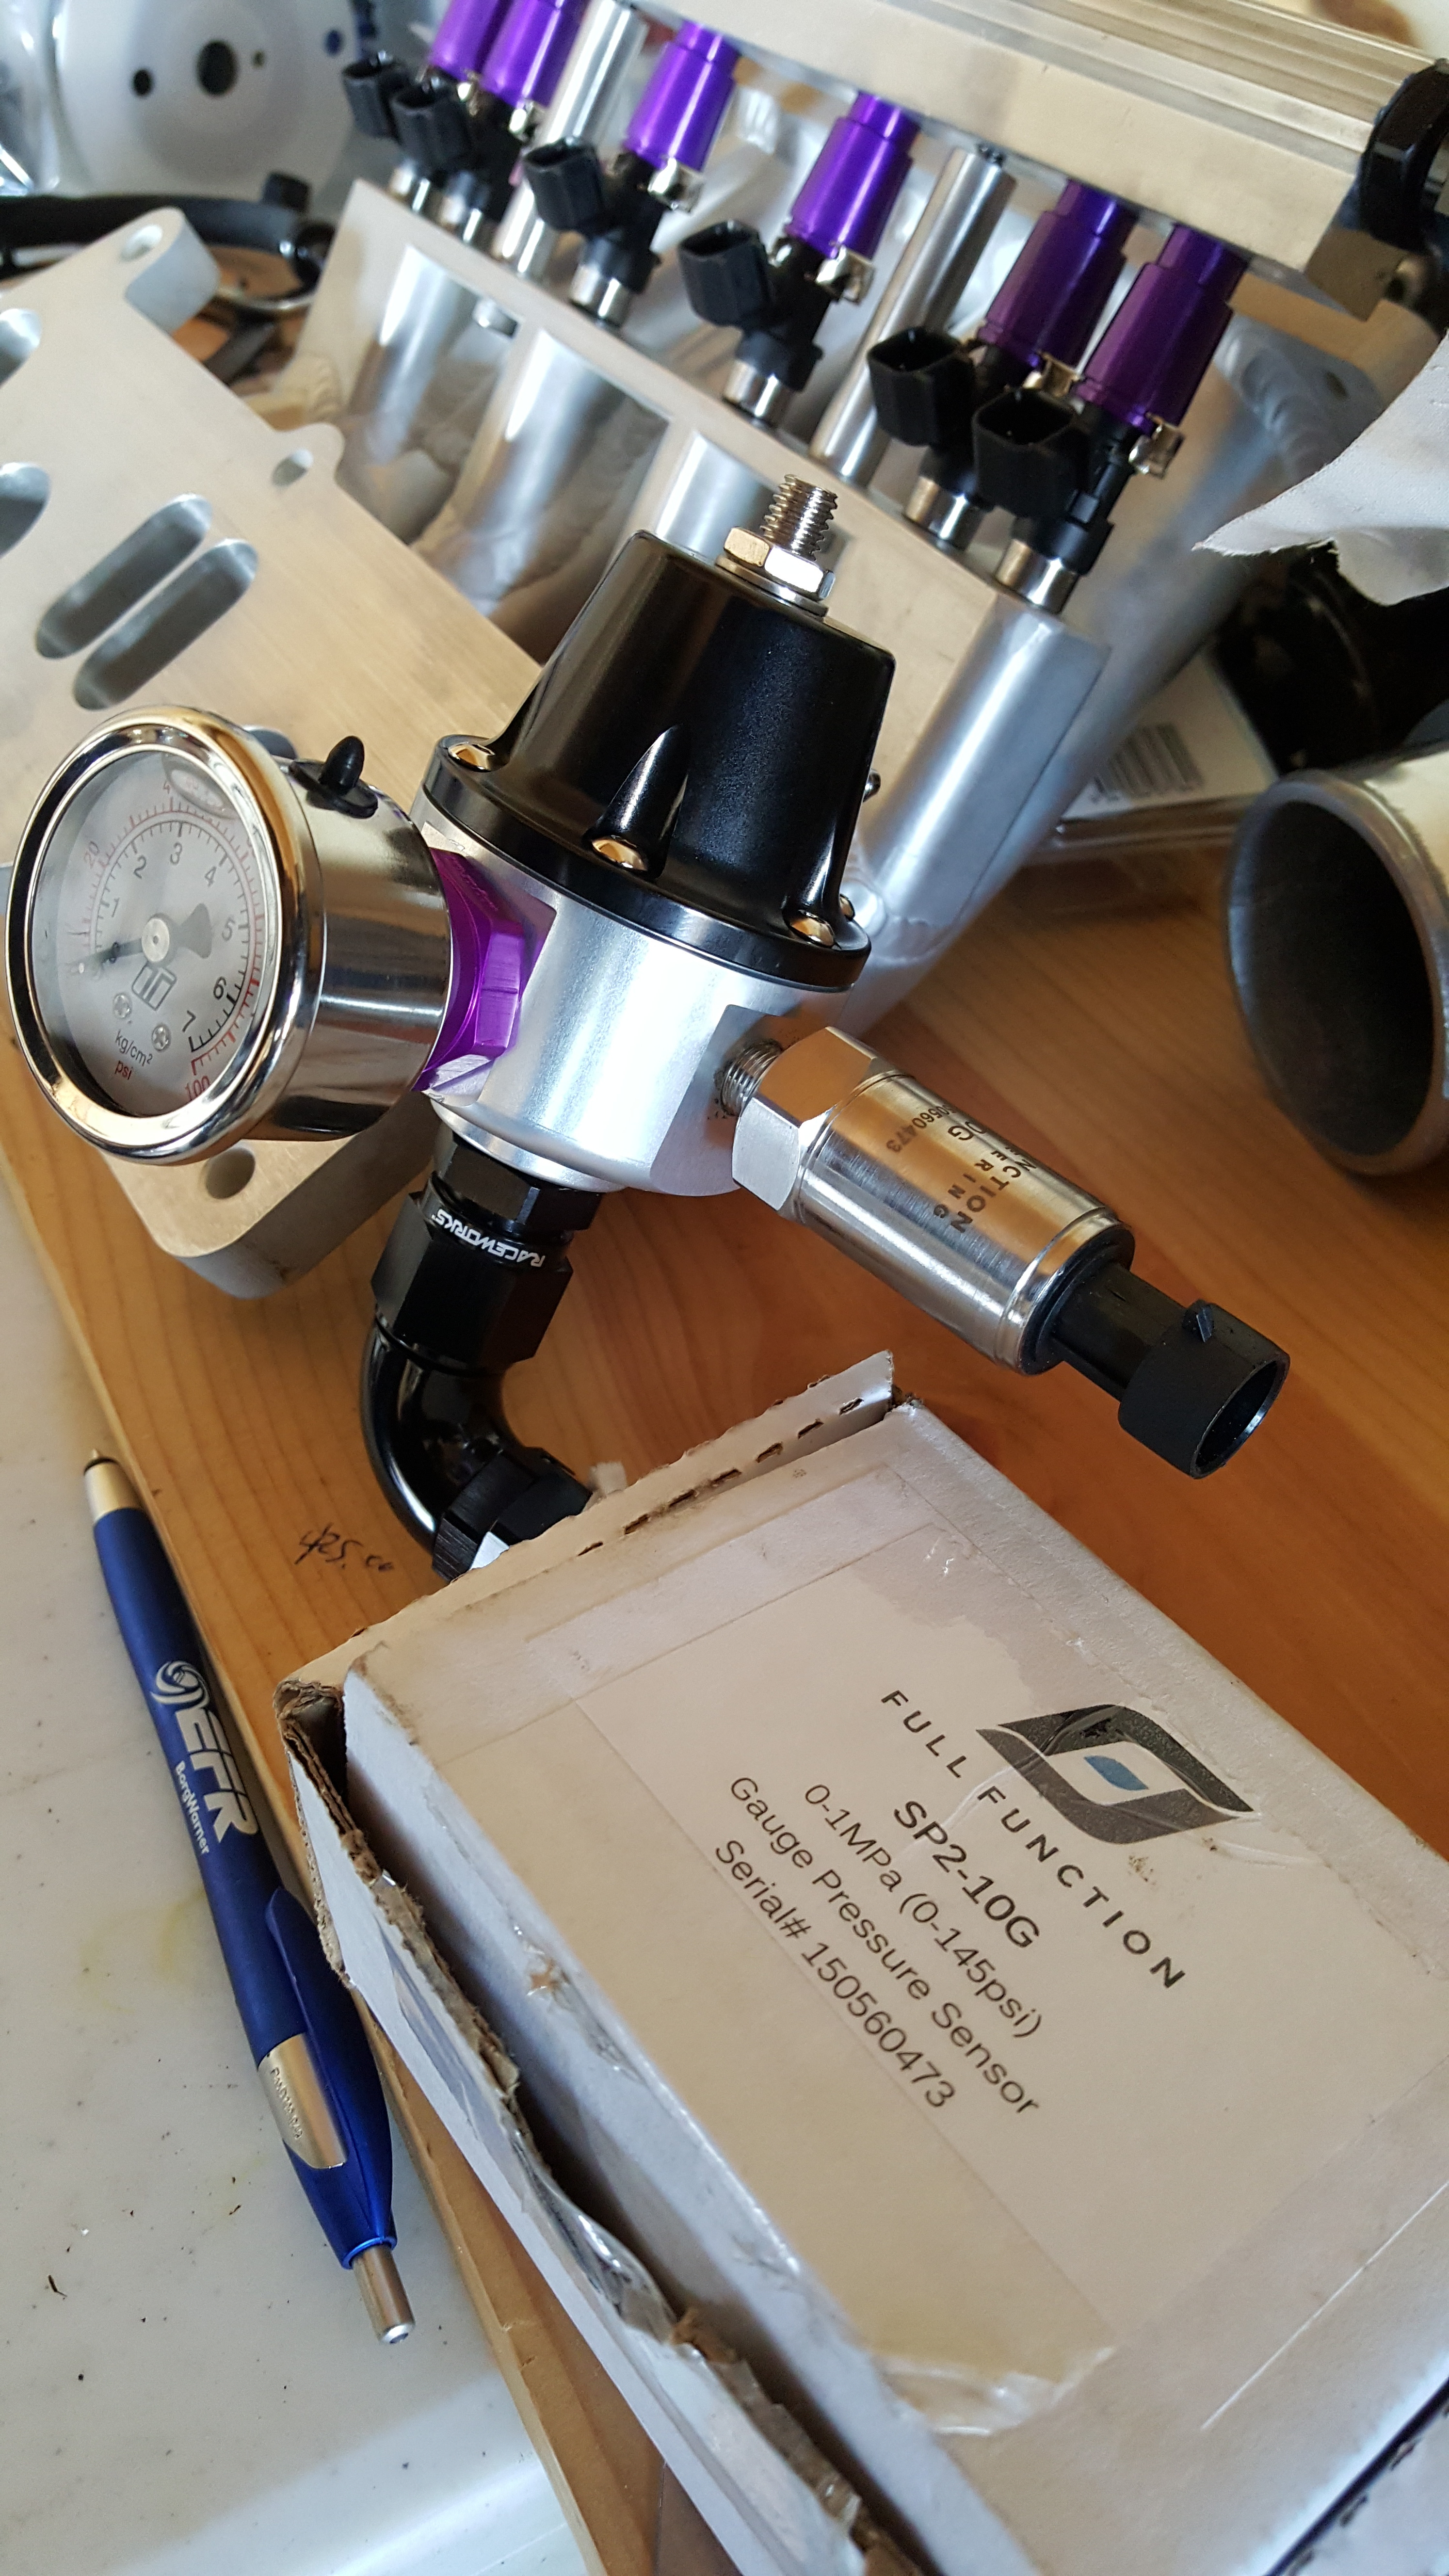
Finally got the additional 1/8 npt swivel fitting. Not entirely sure I like the busy-ness of the set up...and or the location. But once the engine is in i'll address those things as well.
check it..
So i've been practically non-stop for the past 4 days... hammering away at tasks involving the wolf, parts, cleaning/planning/engine stuff, organizing and even industry related relationship stuff regarding companies and products!!! I havn't been able to spend as much time on the car as I wanted to but I was able to knock out a bunch of stuff!!
I wanted to make sure the under carriage of the car wasn't soooo dirty. I hate that... especially with the new fuel system/lines going in under there.. I'd hate to install it over dirty everything haha. So It took some commitment..but I got some safety goggles a long sleeve and some solid practice breathing out of my nose, laying on my back under the car and scrubbing away to get all the crap off. I'm thinking I may even use the rubberized under-spray depending on how it looks today. But check it...
Before on the left.. after on the right
Then I got distracted with some body alignment stuff. My buddy Ryan hit me at ASB and pushed the passenger side quarter panel in....about 4". It took a ton of work to get it back to where it needs to be.
Before
After =-)
I also got really fed up with looking at the rear trunk compartment being so ugly and mis-matched with green and raw tanish metal looking patches from the sound deadening all over the place. So I masked off the rest of the car and hit the compartment with some good ol gloss black rustoleum.
Not the highest quality stuff but definitely better than what it was.
While I was working on the passenger side rear quarter panel.. I pulled off my 4" turn down Exhaust tip that Rad Industries has made for me. Needed some cleaning up for sure. The V-band mating surface was all mucked up. Nothing a quick wire wheel wouldn't fix though!
Before
After
Usually when the sun goes down...I switch to working with the nice new stuff... its less noisy and I can spend as long as I want on the stuff in the garage at night. Just getting in the zone.
I got this fitting from Summit..I'll be using it so I can run a standalone fuel pressure gauge as well as a mechanical gauge in the engine bay for convenience and a Full Function Engineering Fuel Pressure Sensor to the ECU for the business side of things. I know a lot of people think that it may be over kill. But I can�t count how many times this combo has come in handy. Once in trouble shooting a faulty sensor, and another time when I actually melted some autozone braided sleeving on one of my bosch 044 fuel pump relays. The plastic material wasn�t trimmed as well as it should have been and it had actually found its way up to touch one of the terminals on the relay. Well�.it melted..and worked its way in and around the terminal preventing it from making contact. This set up helped me figure out what was going on =-)
Finally got the additional 1/8 npt swivel fitting. Not entirely sure I like the busy-ness of the set up...and or the location. But once the engine is in i'll address those things as well.
check it..
02-10-16, 01:30 PM
#2466
Continued:
Decided to assemble my Radium Engineering Dual Bosch 044 Pump Set up...and All I can say about it is "WOW." I've already looked over the parts and handled them quite a bit but I really wanted to share with you guys just how well thought out this set up is. You can tell that the guys over at Radium are passionate about what they do and the products speak for themselves. But anyways.. After discussing my power goals and the type of use the car would be used for, we chose this set up over a fuel cell for a couple different reasons.
1) If i run a fuel cell....i'll be disqualified to run in the "Limited" class at just drift. And the street class is too valuable to let go. The more i'm driving....the better!
2) It'll allow me to showcase my techy side. I really do love the building process...and doing things the correct way ya know?!
3) Revamping this system is an excellent way to further improve it and make sure that everything is in good condition in terms of maintenance/wear and tear. You get to see things you wouldn't normally take note of...simply by having to move a heat shield under the car etc...
But okay okay.. Back to pics!
The Fuel Surge tank comes as a full package. The price blows some other surge tanks out of the water as well...and the fact that it's a full package isn't given enough praise. So when I say a "full package," that Meaning you don't need to spend countless hours looking for fittings, lines, and hardware or mounting solutions. The set up comes with a sick Black Alum Back plate that makes mounting the set up easy and convenient. I chose to go with the horizontal set up because It fit my application easier, but both set ups perform equally well! The lines are the highest quality PTFE lined smooth bore outer -6AN with Crimped hose ends. Best of the best! The only tough part is matching the quality of lines for the rest of the set up haha!
My trusty bosch 044's came out pretty clean after their countless bathing sessions in gas lol. Installing the crimped AN-6 lines.. Bosch 044 adapter fittings Included with the Radium Surge kit!!! they really went out of their way to make this as plug and play as possible!
Pumped on this set up!!
ANd I finally got to ordering up the rest of the AN fittings/line that i'll need to complete the rest of the fuel system. I don't really like to complain...but this process is a royal pain. And with AN fittings... there's never as much space as you think...so if you put things too close.. making the line may be impossible... or it might come out....all wonky looking. My Goal is to make sure that doesn't happen. So I'd measure 2-3 times... and then go back and make sure that I would need a certain angled fitting. Sometimes i'd think I could use a 45 degree fitting when really I needed a 90...and Vice Verse. I literally spent roughly 4 hours doing this. And although I know The end product will come out good... There are always mistakes when "visualizing" the system vs getting the fittings installed etc. I made a list about 4 times and made revisions back and forth countless times. A total Headache. Anyways.. Gotta do what you gotta do to get things done!!
Cant wait to get these parts in and start running line etc!
Also got a care package from PTP Turbo Blankets! I ran their Lava Blanket last year with so much success that I couldn't help but compliment them while at SEMA/PRI. I can honestly say that after using the LAVA Blanket on my EFR....I no longer had that Infamous blast of heat rolling into me every time I opened the hood of the wolf. And what sold me on it was while we were at Abel's shop. We were working on his Rx2 Semi P EFR9180 and while we were tuning... He urged me to touch the turbo blanket while the turbo header and Hotside were glowing red. I told him he was out of his mind. He said watch... and he did it. And not just with a finger. He rested his hand on the Lava Blanket for about 5 seconds and only moved it because we were busy doing other things. So I did the same thing.. I won't lie.. it was warm...but after 5 seconds... I could've gone another 5 seconds without any grief. The Blanket workds Exceptionally well. And even after an abusive season of heat.. it held up great. But Things went well and I got a nice little walk through of all their products at the event and After a few back and forths.. I would like to announce that I'll be using only PTP Turbo Blanket Heat products on the Wolf. PTP Turbo Blankets is now on board The Wolfs racing program for the 2016 Season!! They have more than just nice turbo blankets. They've got protective oil/fuel line heat barriers, electrical protection, high heat sheets, and virtually everything you could use to deflect and or protect engine/cabin vitals...especially my favorite gold foil =-)!!!!
Cant wait to start installing this stuff!!
Stay tuned for more updates soon as we get closer to assembly of the #Heartofthewolf!
More Updates soon!
 02-13-16, 12:28 PM
#2469
Yezzir!! I had the SP800 with dual Walbro 400's. I actually never installed the surge tank. There were some....complications with that situation. I can Say that I did mock up the set up though. So I an give you some feedback on that in terms of the ease of install though!
So with the Radium Surge tank set up.... I was able to choose if I wanted to have the tank standing up vertical or laying down horizontal. This made "Planning" the install easier as well because I was able to visualize where I wanted it and how I wanted to distribute the weight/how I wanted to run the lines. There's nothing wrong with a vertical set up. But I don't line vertical set ups because the lines always seem to look jumbled and theres almost no real "Neat" way to get it installed without it looking excessive and busy. If you lay the surge tank horizontal..there are distinct in and outs... but again that is my Opinion. It's easier to work on and requires less AN hose when it's laying on its side. So in terms of mounting..the Radium Surge Tank has far more options...as you can get it both standing and laying on its side. But again for me... The visual layout of the set up is important, and I think once it's all set up...you'll see why

Also, this may not be an issue for some people, but the power terminals and grounds on the AI tank are a bit close for my liking, ....and on top of that I may be nit-picking, but they're also fastened with a nylon kind of washer. It's probably okay...and I the chances of it leaking are small. But there really is still a chance that vapor can get through there... and its going to exit via that port for the posi/neg terminals. Not my fav feature. Those terminals also have to be covered for our events. Which when sitting on top of the tank like they do, usually doesn't look too nice unless you can find some cool little rubber boots.
But You'll see the new set up as soon as my hose comes in!! I cant wait to show you guys the set up!! It's going to look great!!
02-13-16, 05:48 PM
#2471
Update: "Titanium Goodness"
A few weeks ago I came across this newer company called Argon Bubble after stumbling across some really attractive pics of a titanium Hood Prop... I hit them up to order one ASAP!! Believe it or not...I've been looking for a good one as i've been using a bare metal rod haha since I lost my OEM one.
But check this piece of mastery out!! TITANIUM!!!
sooo fresh
So the group buy is open till the 29th and they're already at 26 So the price point for them is currently at $80 Bucks!!!
I'm pretty pumped that companies like this keep popping up on our forum to offer cool products. But you can get the Titanium Hood Props in the group buy below...
https://www.rx7club.com/group-buy-ce.../#post12023265
02-14-16, 02:04 AM
#2472
Make an assessment...
iTrader: (3)
That hood prop looks cool. Perfectly bent to mimic the stock one. How much does it weigh? Does it even register on the scale? lol Are you going to paint it? LOL I kid, I kid.
I've been planning to quiet down my car so I got an RB dual to replace my GReddy Ti, but when I was taking off the GReddy I starting having second thoughts because it's so stupid light lol. I wish I could afford to make so many things out of titanium.
As for the surge tanks, have you seen the Holley Hydramat? I've been thinking about using some of those and skipping a surge tank altogether.
02-14-16, 06:46 PM
#2473
Mannykillers/ AAPARKAH Street/time Attack/Drift Build (heavy Pics) #Thisisthewolf
Yeah, it was dumb, I know. It's my specialty. LOL
That hood prop looks cool. Perfectly bent to mimic the stock one. How much does it weigh? Does it even register on the scale? lol Are you going to paint it? LOL I kid, I kid.
I've been planning to quiet down my car so I got an RB dual to replace my GReddy Ti, but when I was taking off the GReddy I starting having second thoughts because it's so stupid light lol. I wish I could afford to make so many things out of titanium.
As for the surge tanks, have you seen the Holley Hydramat? I've been thinking about using some of those and skipping a surge tank altogether.
Also, looking to get rid of your GReddy Ti
 02-15-16, 01:27 AM
#2474
Make an assessment...
iTrader: (3)
Search it up. The holley hydramat would of been perfect for our cars. But the only issue is that it won't work with premix, it would get caught up in the filter... test me I rather spend the money on something like that and not have to spend the extra on a surge tank/pumps
Also, looking to get rid of your GReddy Ti
Also, looking to get rid of your GReddy Ti

 Well, ****. There goes my idea lol. I really wanted to keep the interior of the car looking stock. I have the HPP in-tank-surge-tank, but I feel like it's gonna be such a PITA to install lol.
Nah, I might actually keep it on the car haha. And I wasn't planning on selling it either way, I just can't let it go haha. Sorry man.
02-15-16, 01:33 PM
#2475
Are you shitting me??? FAAAAACCCCKKKK! Well, ****. There goes my idea lol. I really wanted to keep the interior of the car looking stock. I have the HPP in-tank-surge-tank, but I feel like it's gonna be such a PITA to install lol.
Nah, I might actually keep it on the car haha. And I wasn't planning on selling it either way, I just can't let it go haha. Sorry man.
Well, ****. There goes my idea lol. I really wanted to keep the interior of the car looking stock. I have the HPP in-tank-surge-tank, but I feel like it's gonna be such a PITA to install lol.Nah, I might actually keep it on the car haha. And I wasn't planning on selling it either way, I just can't let it go haha. Sorry man.
You can do what I plan too.. I plan on getting my surge tank. And mount it in front of the gas tank on the subframe (driverside), just to keep the inside of the car looking clean and no fuel hoses or wires in the way...
I have the RB dual tip aswell, sounds good for daily driving car , nice and low with my magna flow mid pipe, but I'm either going to change it to a single tip ( not sure what exhaust to go with) or go 4inches all the way back. As my downpipe is 4inches that goes to 3 inches , I may just do 4 all the way.. I feel like the RB is restrictive for high hp cars. ..
Hey arron, is there any reason you went with the bosh setup vs other pumps they had? Also is there any rules or regulations for having a surge tank in the car ? Not saying it will happen, but in a senario you get hit or flip the car, wouldn't it be a hazard since our trunks aren't separated from the inside of the car and could leak gas all inside?