Mannykillers/ AAPARKAH Street/time Attack/Drift Build (heavy Pics) #Thisisthewolf
 02-15-16, 10:09 PM
#2476
Make an assessment...

iTrader: (3)
I have the RB dual tip aswell, sounds good for daily driving car , nice and low with my magna flow mid pipe, but I'm either going to change it to a single tip ( not sure what exhaust to go with) or go 4inches all the way back. As my downpipe is 4inches that goes to 3 inches , I may just do 4 all the way.. I feel like the RB is restrictive for high hp cars. ..
 02-17-16, 12:28 PM
#2477

Did a little more skimming through the thread.
I didn't know you knew Marco! He was a good friend of mine as well.
I also saw you at the last thursday night drift, but didn't get a chance to introduce myself.
I didn't know you knew Marco! He was a good friend of mine as well.
I also saw you at the last thursday night drift, but didn't get a chance to introduce myself.
02-19-16, 12:12 PM
#2478
Yeah, it was dumb, I know. It's my specialty. LOL
That hood prop looks cool. Perfectly bent to mimic the stock one. How much does it weigh? Does it even register on the scale? lol Are you going to paint it? LOL I kid, I kid.
I've been planning to quiet down my car so I got an RB dual to replace my GReddy Ti, but when I was taking off the GReddy I starting having second thoughts because it's so stupid light lol. I wish I could afford to make so many things out of titanium.
As for the surge tanks, have you seen the Holley Hydramat? I've been thinking about using some of those and skipping a surge tank altogether.
02-19-16, 01:59 PM
#2479
Update: �Full Steam Ahead�
Whenever I work on anything involving The Wolf or drifting� hell� whenever I DO anything�there�s a good chance I�m listening to music. I love music�. It really helps me focus and I�ve noticed my productivity goes up quite a bit if I�m listening to something. So I urge you guys to open up another window on your Computers� and listen to this jam. It keeps popping up into my head�..even when I�m without headphones.
Jams: Tatreal � �Show me Your Attention�
I also like to label my posts because it�s really important for me to set the tone of how and what�s going on in between each post. I�m also pretty happy to get back to posting here on the Forum!
Anyways, here is what has been going on!
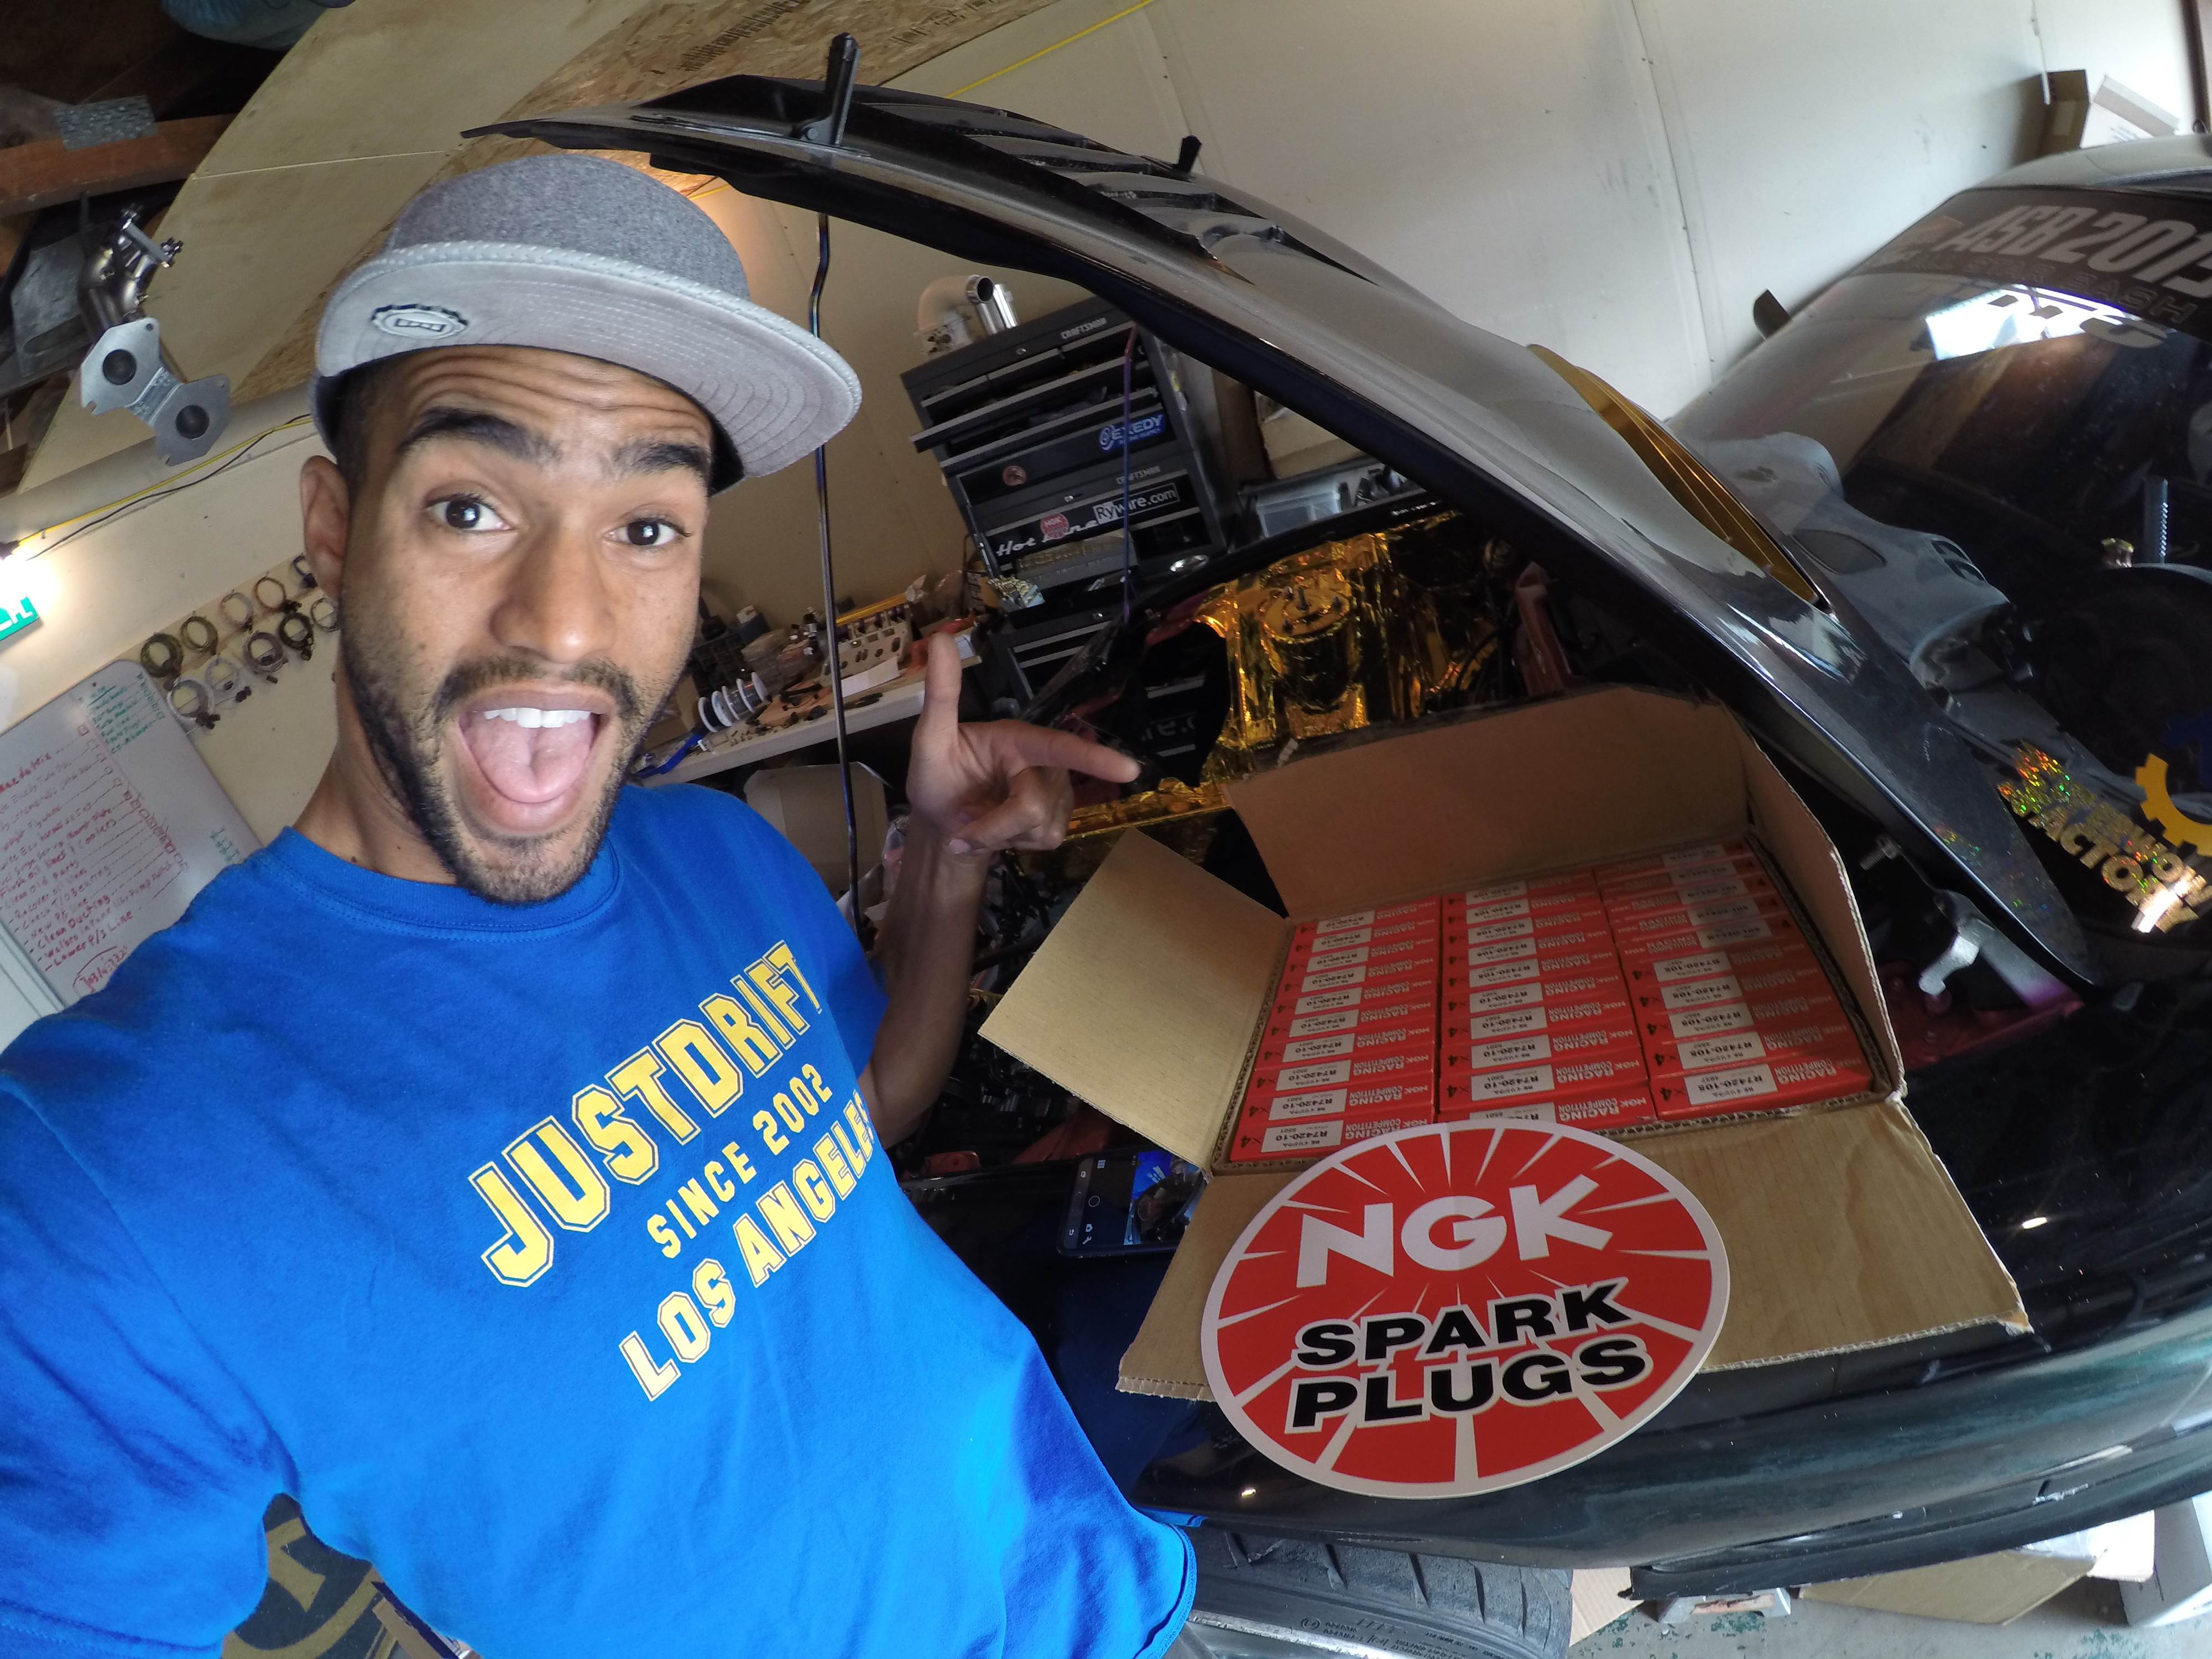
Last week I was writing down a list of parts I would need to complete my fuel set up when I got a phone call from an unknown number. I answered the phone rudely because I have been getting phone calls from some scam artist trying to get me to give up my credit info etc to �Update an account,� pfft�. But I Answer the phone rudely and sharply because it was from the same area code. The guy hesitates�and says�. �Hiiiiiiiiiiii�.. This is XXXX XXXX from NGK Spark Plugs, may I speak to Aaron Parker?� My stomach dropped LMAO. I apologized and we continued phone chat. After going over the details and fine print etc.. It�s to my great pleasure to announce a partnership I�ve been pursuing for well over a year with one of my favorite companies. I can�t tell you how excited I am to announce My Sponsorship with NGK Spark Plugs!! I couldn�t be any more grateful.
Getting The Wolf to each event is a struggle all on it�s own and If I broke down the costs, I think most of you guys would literally slap the **** out of me. But this is a Huge deal for me and I�m really pumped to be part of their team and them to be part of my program!!
I�ll be using the NGK R7420-10 in the Leading Position and the NGK R7420-10.5 In the Trailing position for the new Semi-Peripheral EFR Powered Set up!!! So Pumped!!
Got More Goodies in from Radium Engineering. E85 Safe Walbro 400 Fuel Pump Filter Socks!!
These Bad Boys are going to help me keep everything nice and clean from the start! I also ordered a few Radium AN-8 Bulkhead fittings from the CJ-Motorsports Hanger to the Radium Surge tank so that I could use all my AN-8 Lines. I wanted to keep sizes uniform as MUCH as possible throughout the whole system!
Installed..nice and simple
Done and capped ready for install when the rest of the parts show up!
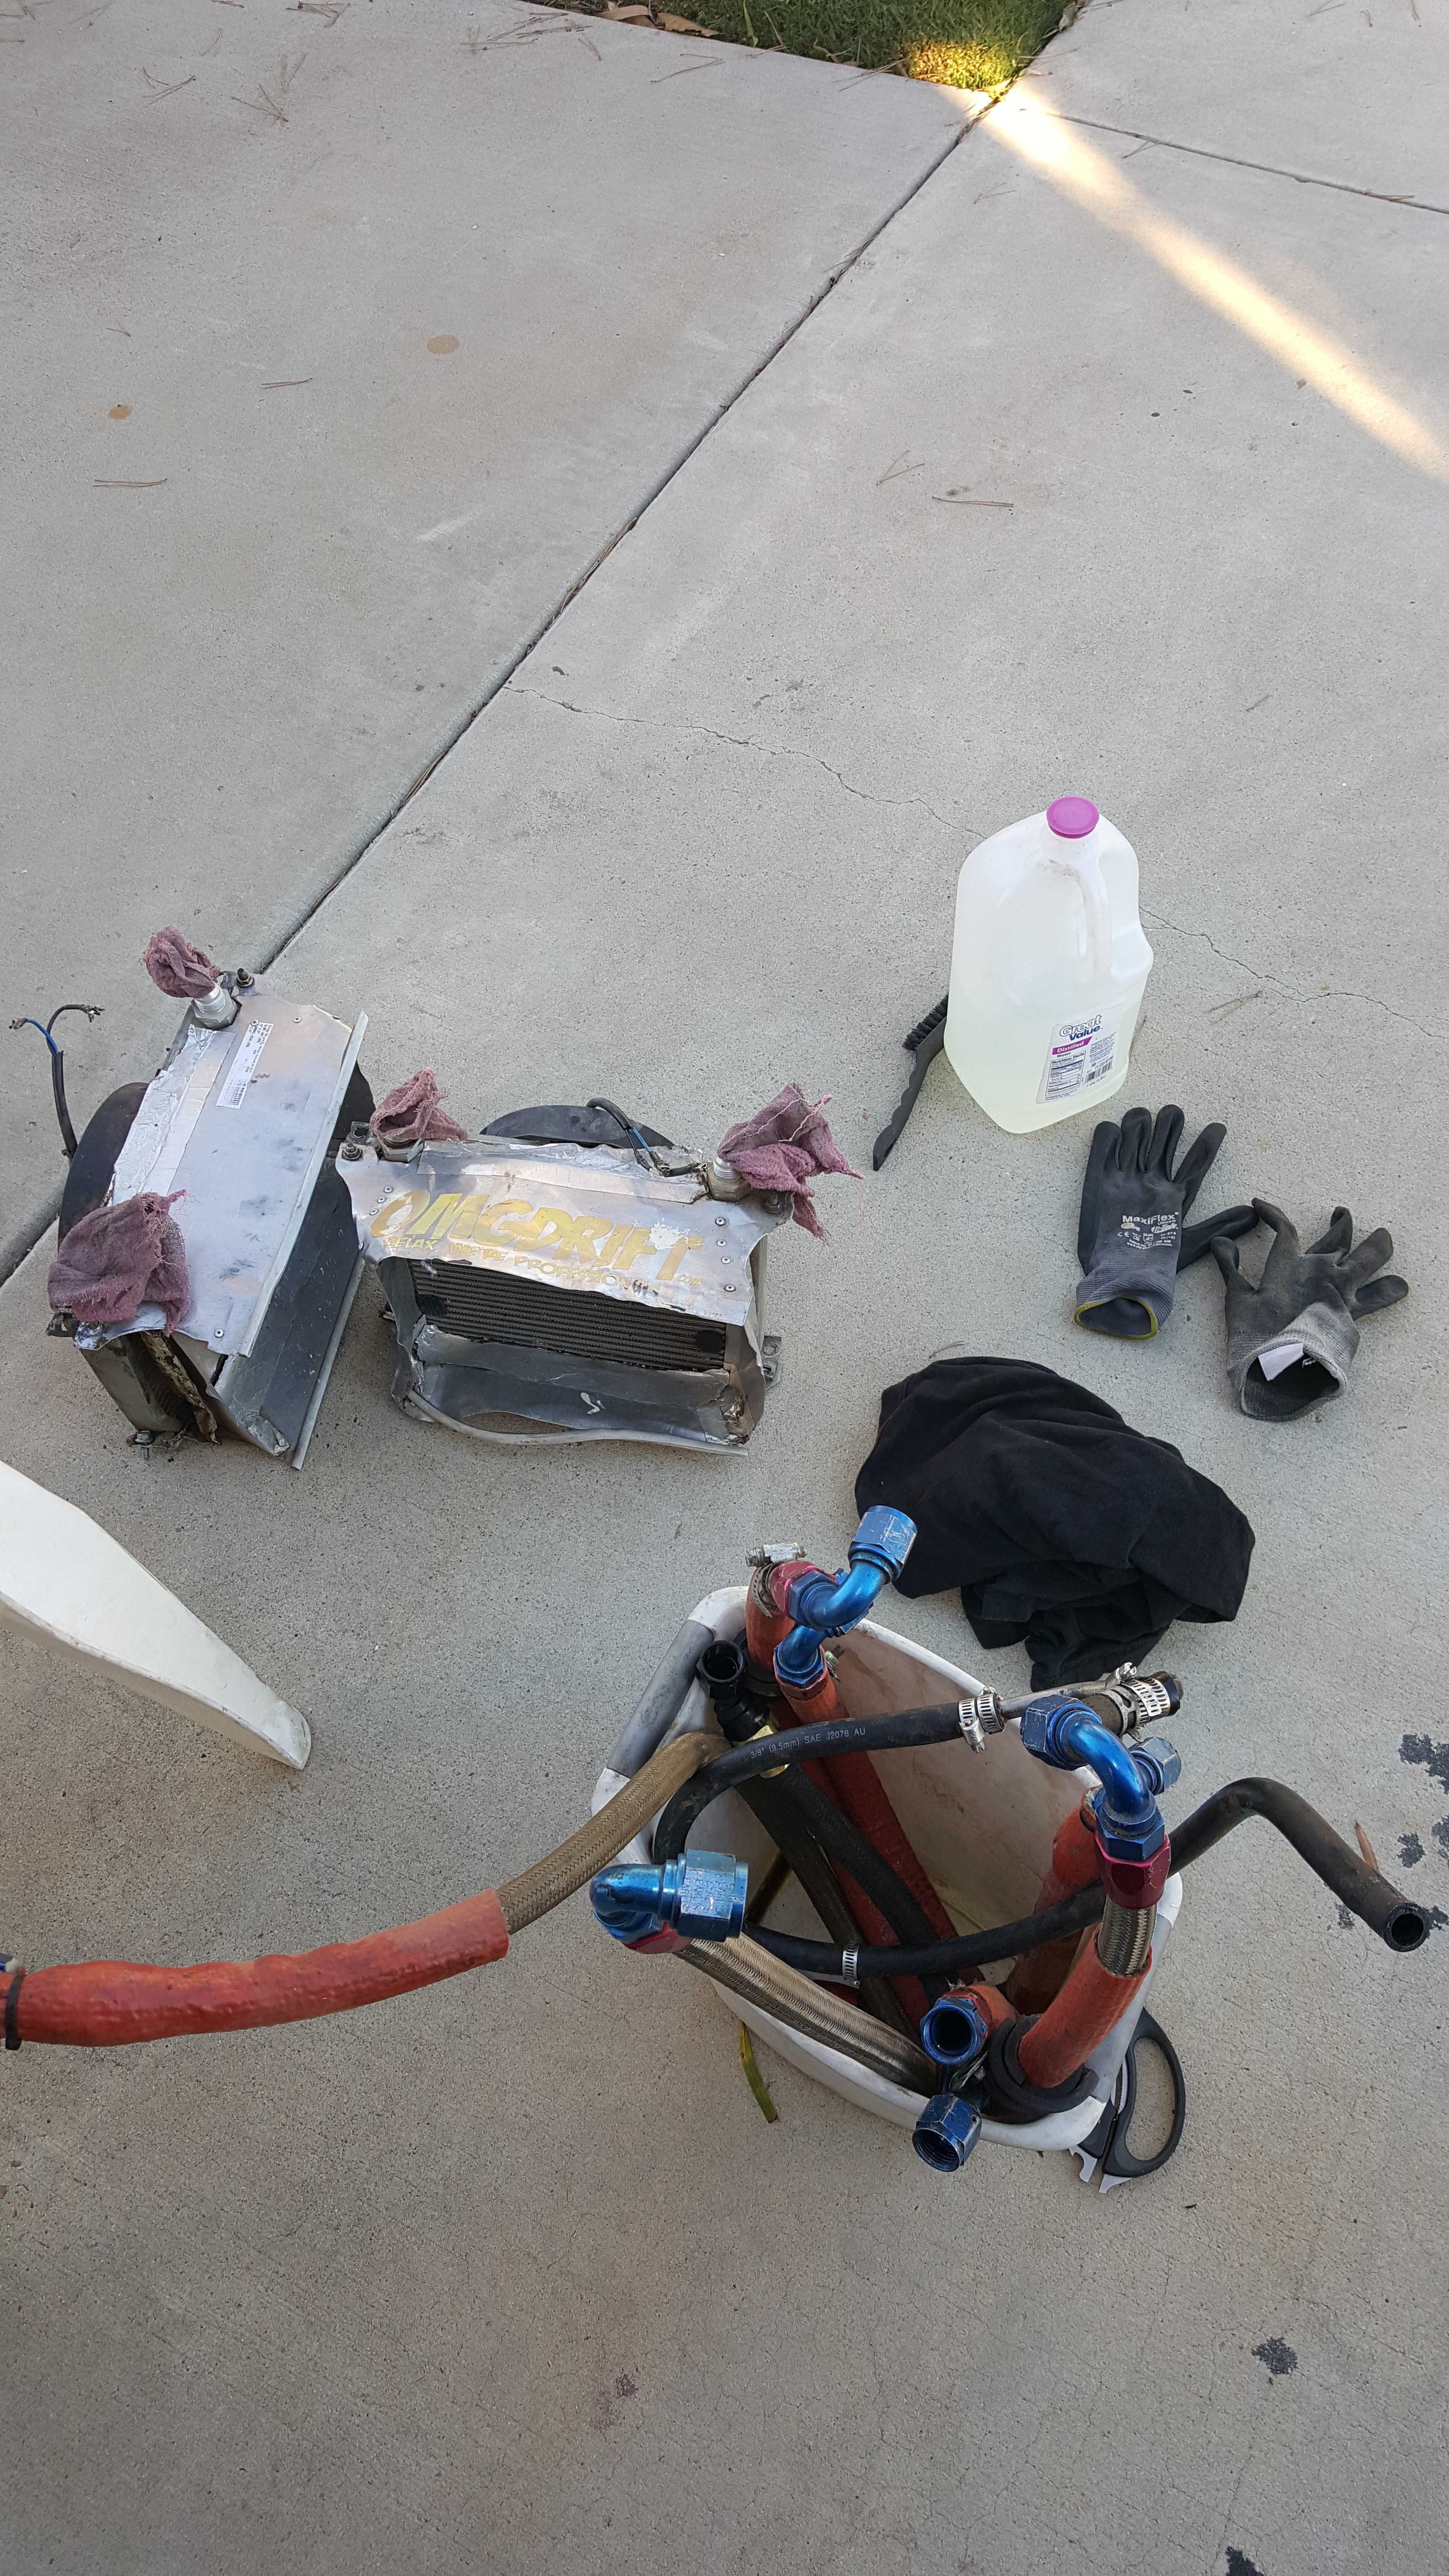
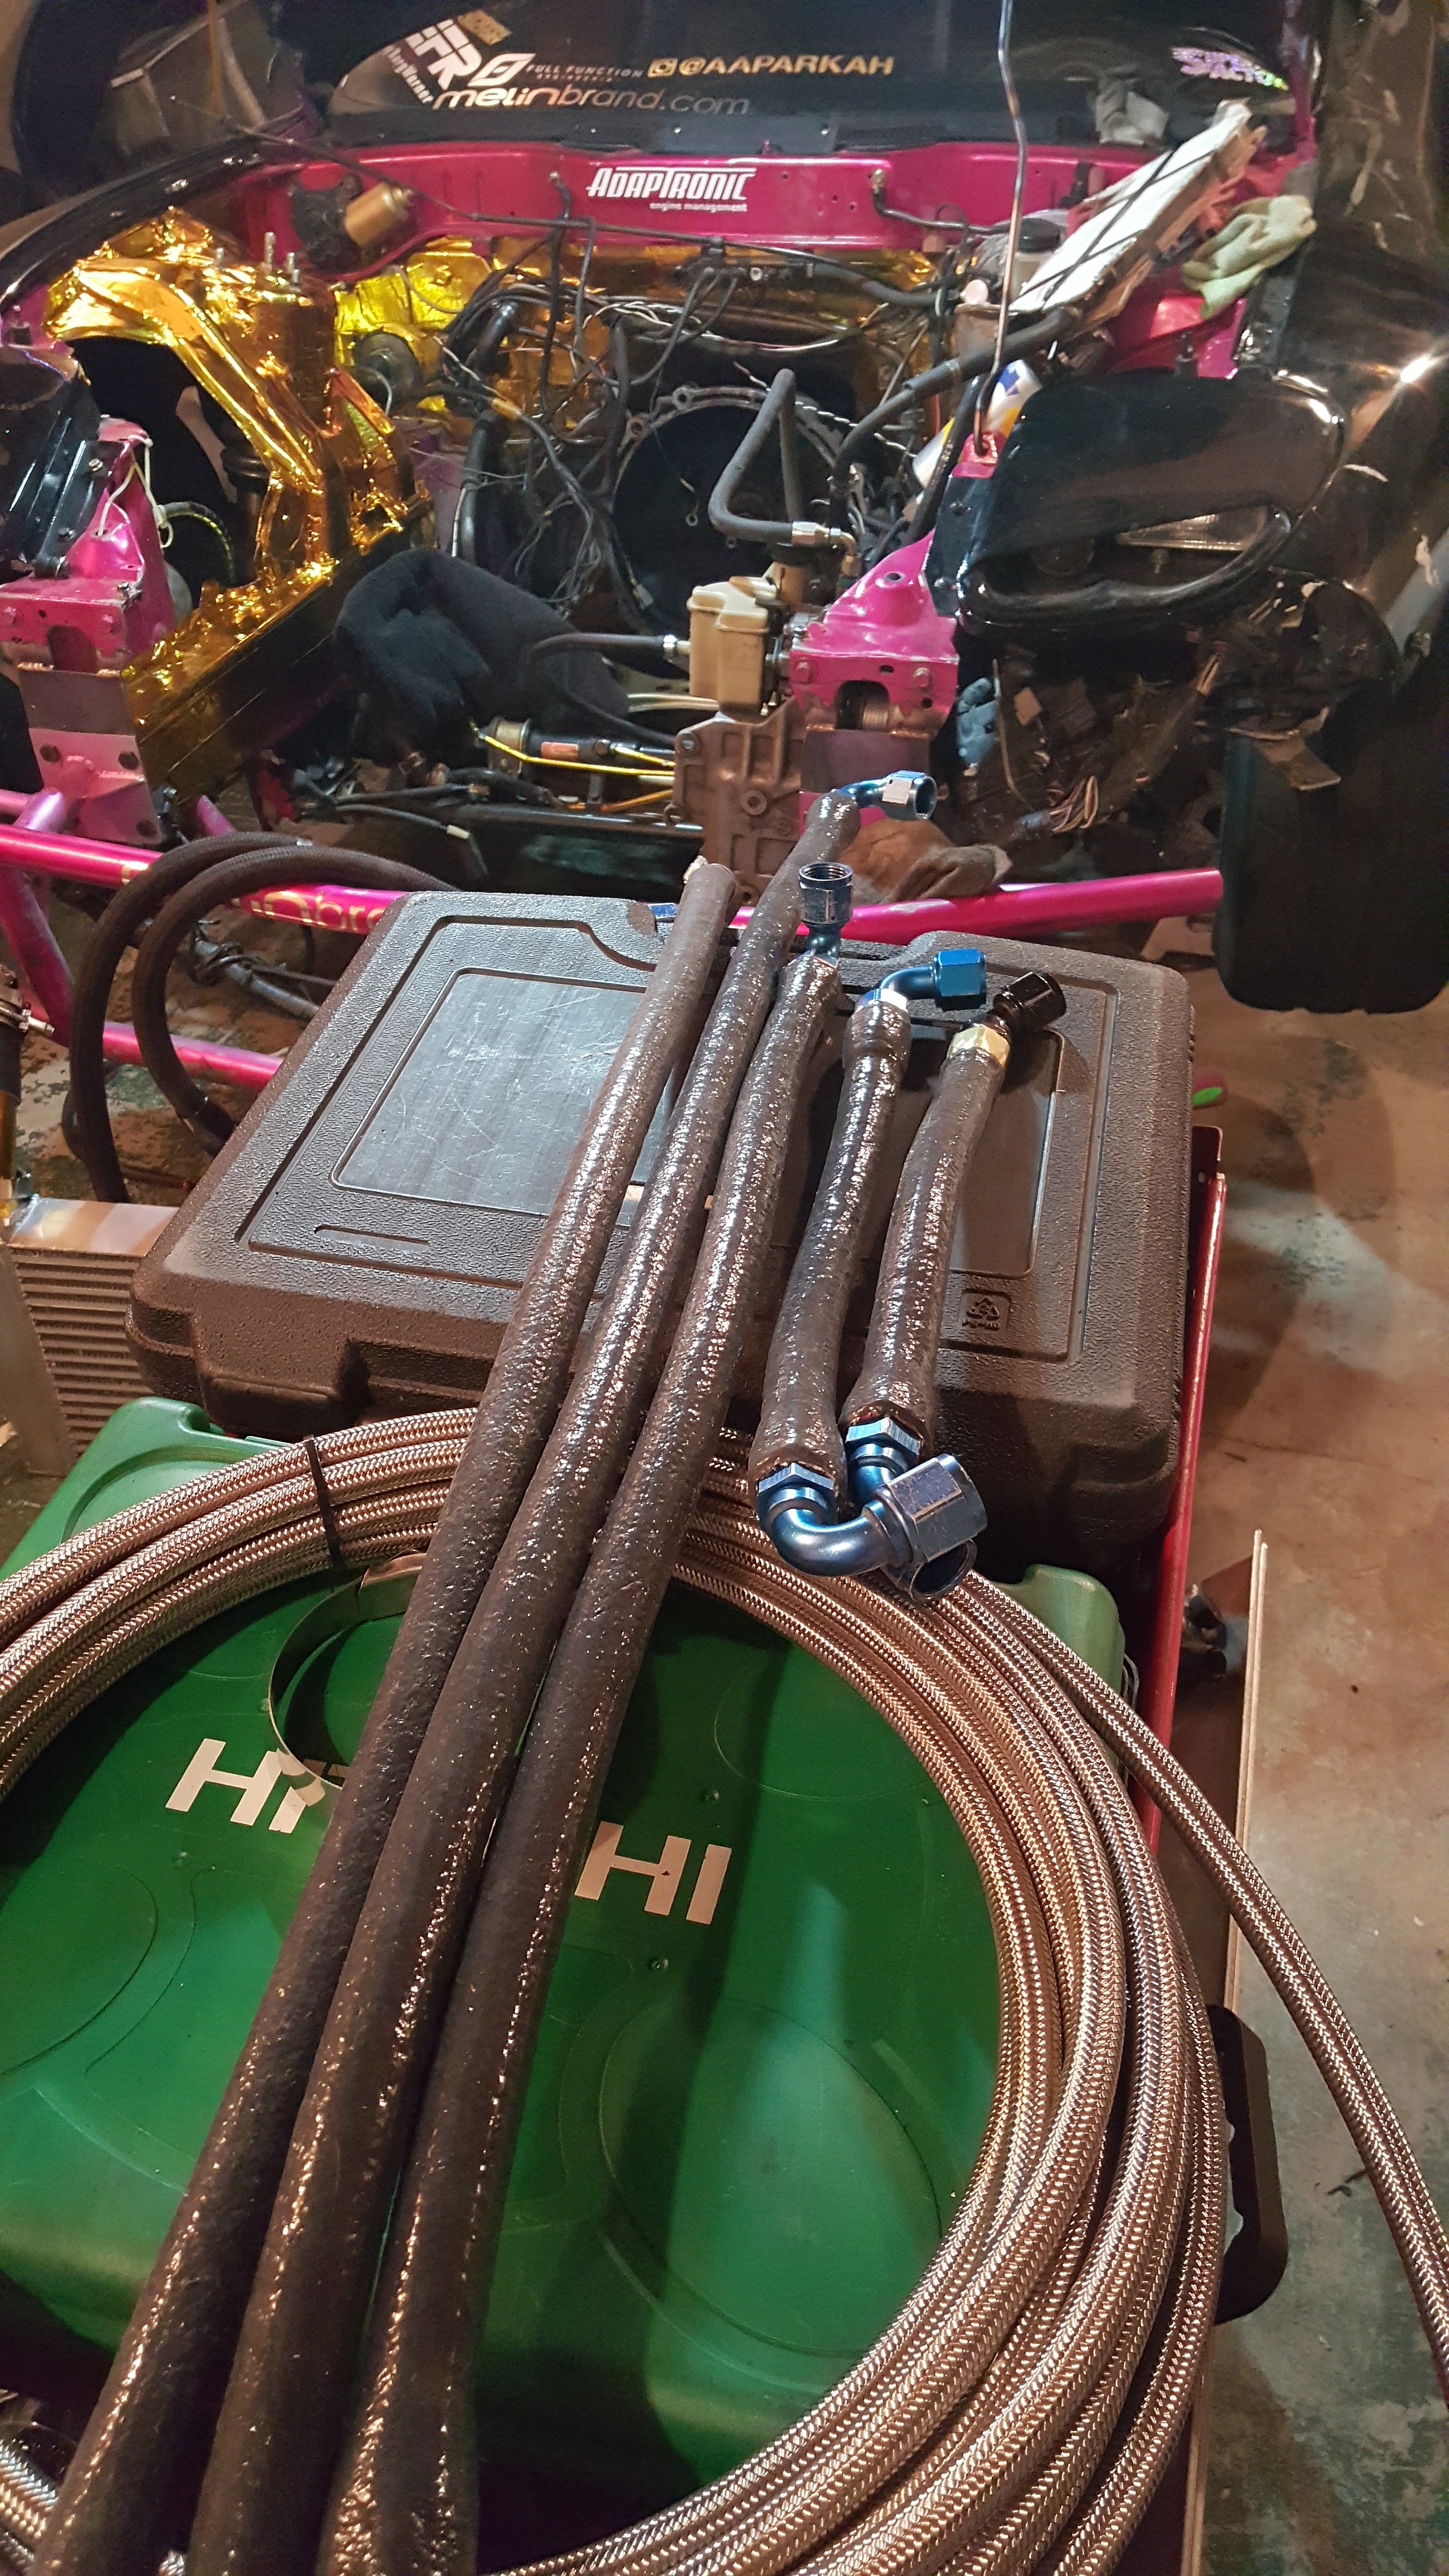
Then I ended up pulling ALL the oil lines and dual coolers of the wolf for a nice solid refresh. These things have been put through hell and back and they needed to be cleaned to get all that sticky BS out of the bottom. Don�t want any of that crap going through the new set up. Although Everything was Healthy, I still don�t want that stuff in the system�I feel like if you let that get bad enough�it would definitely lead to some type of failure. Plus, its all piece of mind knowing there�s a clean system and everything is fresh.
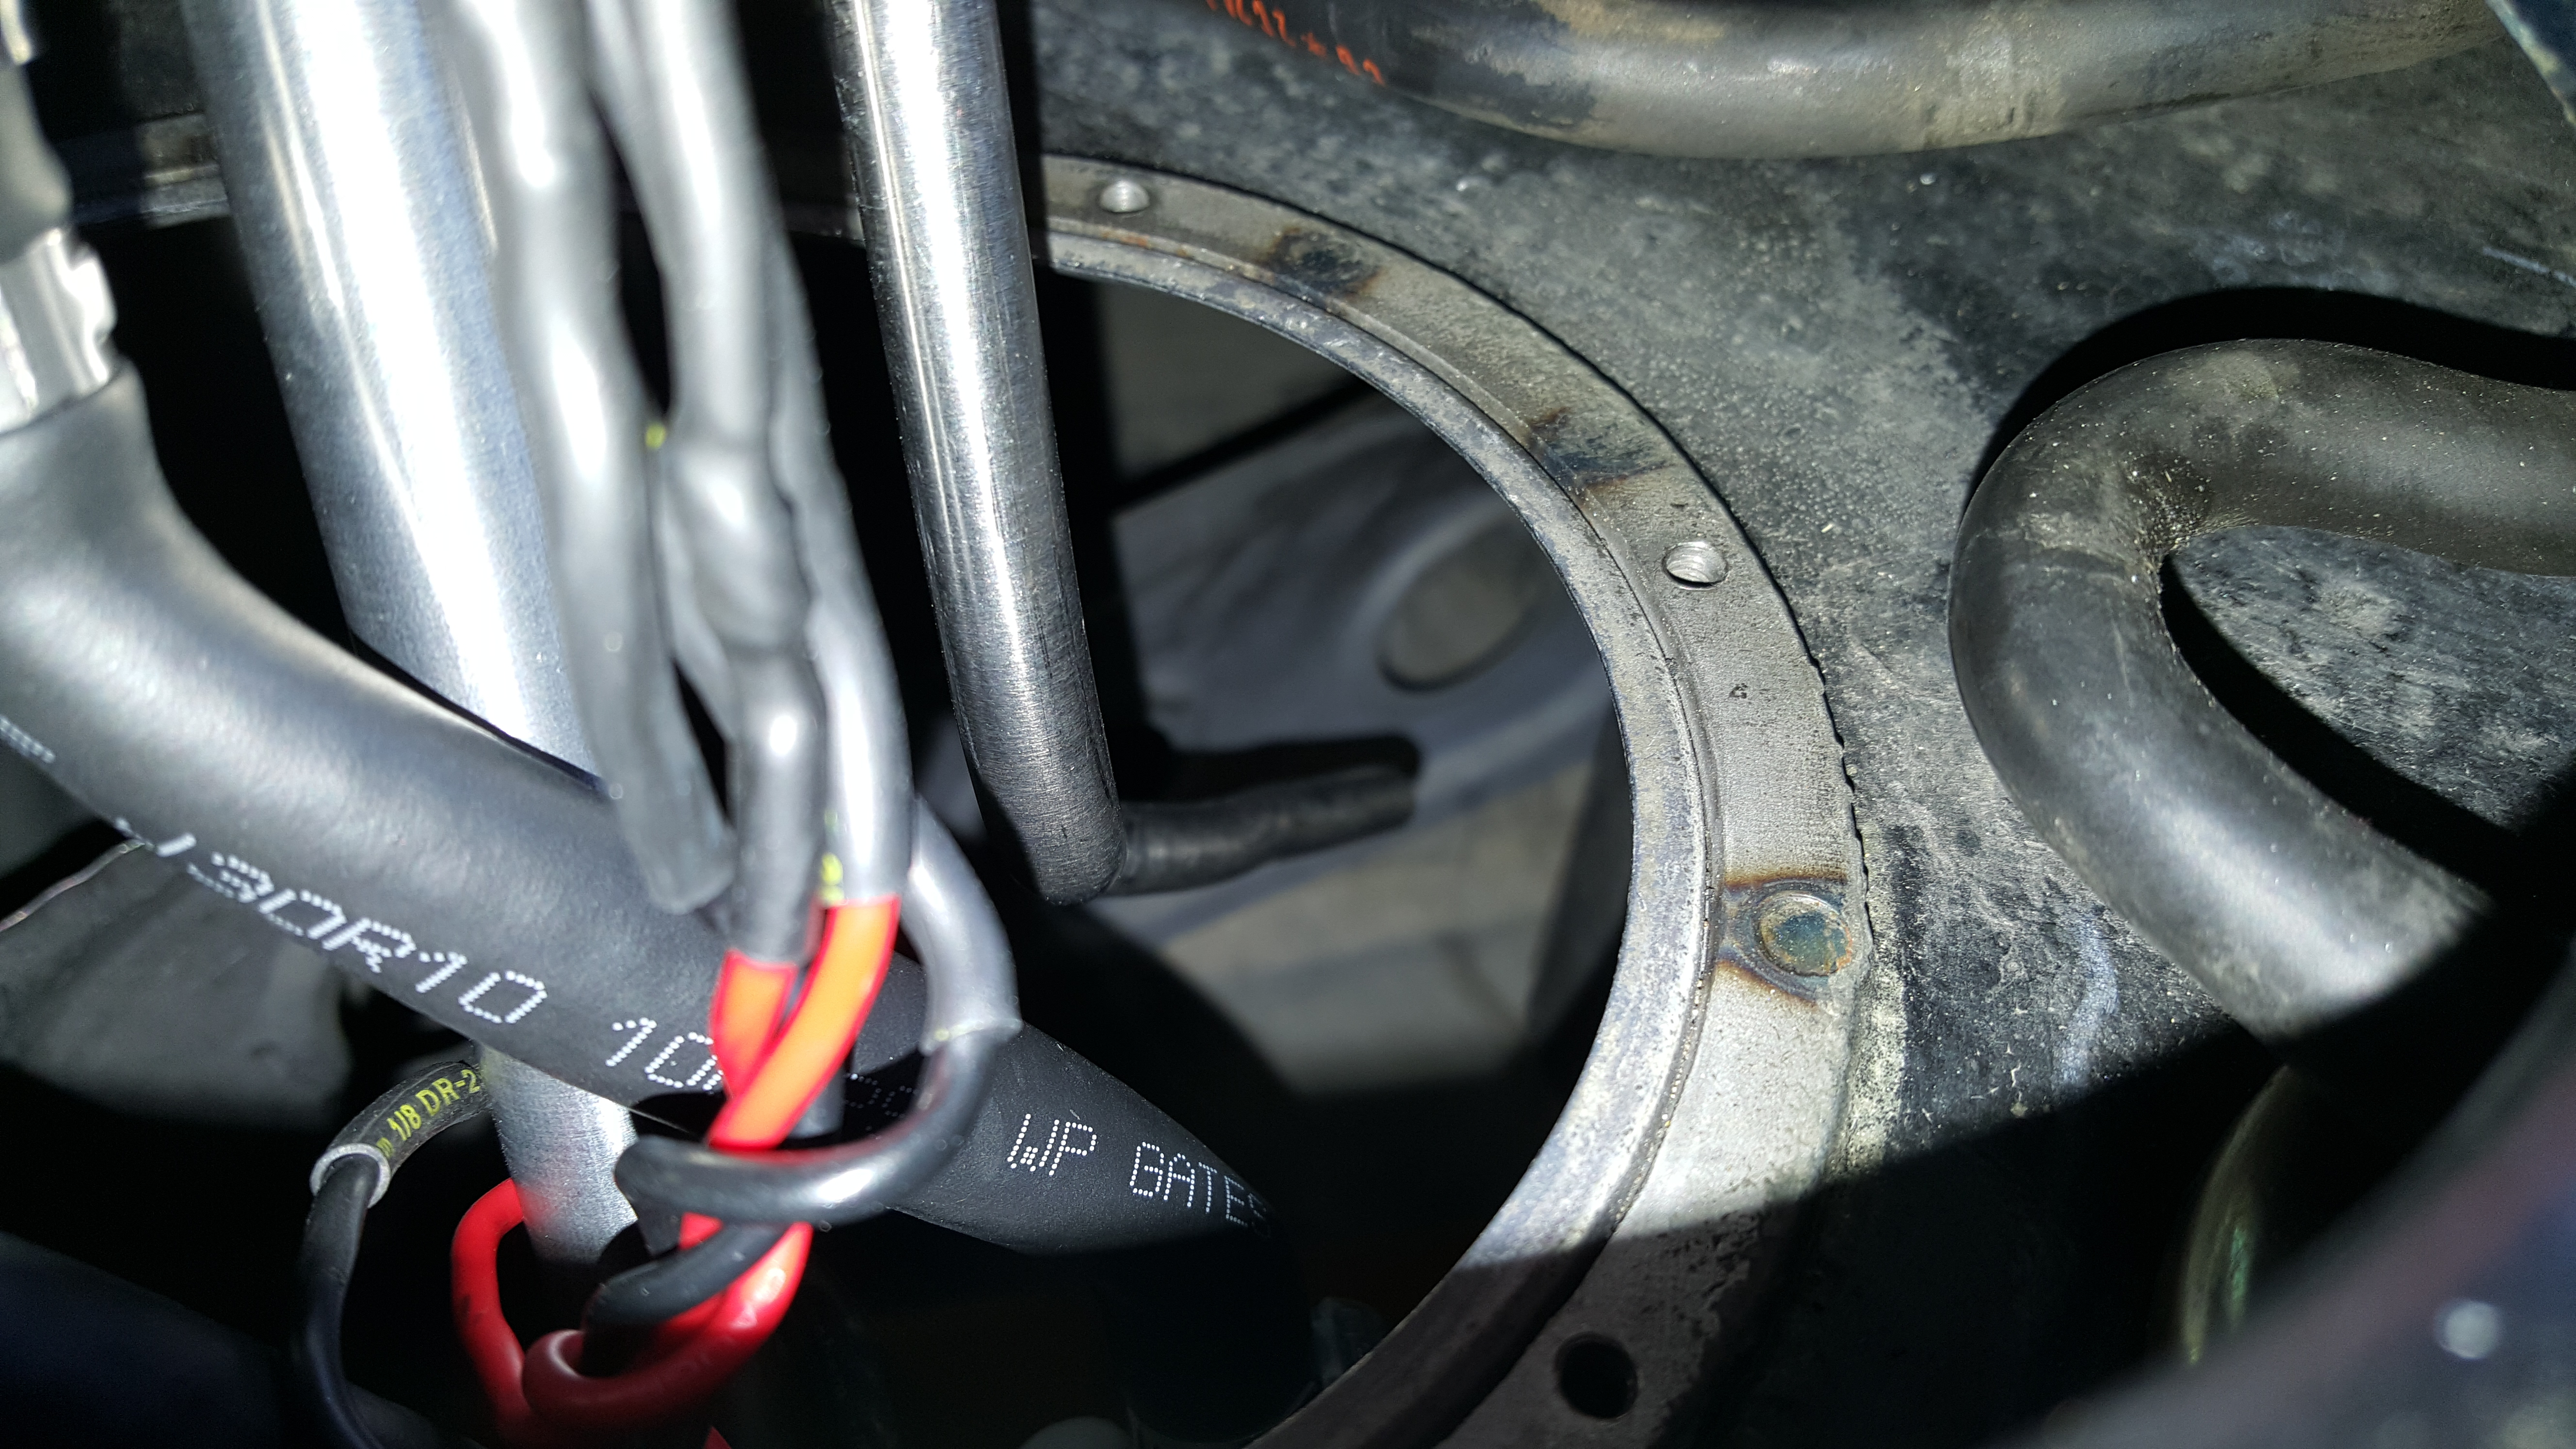
This took a long time. Draining them all, Pulling lines off, draining the coolers, cleaning the inside of the lines in Gasoline, then water, then Gasoline and then Brake cleaner, and letting sit in the sun to dry. Took the better part of the afternoon and into the next day. I also pulled off the old orange stuff in favor of the new PTP Turbo Blankets Black High Temp Hose Protection. You can get this stuff on PTP Turbo Blankets Website. Comes in the perfect sizes as well, and they have a chart that matches AN to standard sizes!
Who Says this stuff doesn�t do good? Protects from Heat as well as keeps all the dirt and grime off the lines for longevity! (protect your investments!!)
After soaking in a Gasoline over night� look at all the crap the gas free�d up! Gross
After cleaning the inside of the hoses out.. I went back through each line and put some good old fashioned Elbow Grease into a bucket of soapy water with a scrub brush and made sure to clean all the exterior of the lines thoroughly. Can�t be having dirty components going back on the car. This is my favorite thing to do because truthfully�there�s nothing worse than having to jump to work on something in the bay or mechanical in general and it�s covered in sticky dirty BS when your trying to get something done. I hate that. Won�t be the case�Preventative Measures!!
Finally..Nice Freshly Covered in PTP Turbo Blanket Black Thermal Hose Protectant..All my Oil Lines and Fittings Nice and clean! Ready to be installed back onto the Wolf!!
Got a Call from Mike over from NZ. Seems the boys at Pulse Performance NZ have been busy getting Rad Bull Ready for the 2016 Formula Drift Season! Testing at Hampton Downs Raceway went VERY well and the I can�t wait to share with you guys Mikes New Aero� he really has an EYE for Attractive lines!!! Get Ready for the Season!!!! And Updates!!
Whenever I work on anything involving The Wolf or drifting� hell� whenever I DO anything�there�s a good chance I�m listening to music. I love music�. It really helps me focus and I�ve noticed my productivity goes up quite a bit if I�m listening to something. So I urge you guys to open up another window on your Computers� and listen to this jam. It keeps popping up into my head�..even when I�m without headphones.
Jams: Tatreal � �Show me Your Attention�
I also like to label my posts because it�s really important for me to set the tone of how and what�s going on in between each post. I�m also pretty happy to get back to posting here on the Forum!
Anyways, here is what has been going on!
Last week I was writing down a list of parts I would need to complete my fuel set up when I got a phone call from an unknown number. I answered the phone rudely because I have been getting phone calls from some scam artist trying to get me to give up my credit info etc to �Update an account,� pfft�. But I Answer the phone rudely and sharply because it was from the same area code. The guy hesitates�and says�. �Hiiiiiiiiiiii�.. This is XXXX XXXX from NGK Spark Plugs, may I speak to Aaron Parker?� My stomach dropped LMAO. I apologized and we continued phone chat. After going over the details and fine print etc.. It�s to my great pleasure to announce a partnership I�ve been pursuing for well over a year with one of my favorite companies. I can�t tell you how excited I am to announce My Sponsorship with NGK Spark Plugs!! I couldn�t be any more grateful.
Getting The Wolf to each event is a struggle all on it�s own and If I broke down the costs, I think most of you guys would literally slap the **** out of me. But this is a Huge deal for me and I�m really pumped to be part of their team and them to be part of my program!!
I�ll be using the NGK R7420-10 in the Leading Position and the NGK R7420-10.5 In the Trailing position for the new Semi-Peripheral EFR Powered Set up!!! So Pumped!!
Got More Goodies in from Radium Engineering. E85 Safe Walbro 400 Fuel Pump Filter Socks!!
These Bad Boys are going to help me keep everything nice and clean from the start! I also ordered a few Radium AN-8 Bulkhead fittings from the CJ-Motorsports Hanger to the Radium Surge tank so that I could use all my AN-8 Lines. I wanted to keep sizes uniform as MUCH as possible throughout the whole system!
Installed..nice and simple
Done and capped ready for install when the rest of the parts show up!
Then I ended up pulling ALL the oil lines and dual coolers of the wolf for a nice solid refresh. These things have been put through hell and back and they needed to be cleaned to get all that sticky BS out of the bottom. Don�t want any of that crap going through the new set up. Although Everything was Healthy, I still don�t want that stuff in the system�I feel like if you let that get bad enough�it would definitely lead to some type of failure. Plus, its all piece of mind knowing there�s a clean system and everything is fresh.
This took a long time. Draining them all, Pulling lines off, draining the coolers, cleaning the inside of the lines in Gasoline, then water, then Gasoline and then Brake cleaner, and letting sit in the sun to dry. Took the better part of the afternoon and into the next day. I also pulled off the old orange stuff in favor of the new PTP Turbo Blankets Black High Temp Hose Protection. You can get this stuff on PTP Turbo Blankets Website. Comes in the perfect sizes as well, and they have a chart that matches AN to standard sizes!
Who Says this stuff doesn�t do good? Protects from Heat as well as keeps all the dirt and grime off the lines for longevity! (protect your investments!!)
After soaking in a Gasoline over night� look at all the crap the gas free�d up! Gross
After cleaning the inside of the hoses out.. I went back through each line and put some good old fashioned Elbow Grease into a bucket of soapy water with a scrub brush and made sure to clean all the exterior of the lines thoroughly. Can�t be having dirty components going back on the car. This is my favorite thing to do because truthfully�there�s nothing worse than having to jump to work on something in the bay or mechanical in general and it�s covered in sticky dirty BS when your trying to get something done. I hate that. Won�t be the case�Preventative Measures!!
Finally..Nice Freshly Covered in PTP Turbo Blanket Black Thermal Hose Protectant..All my Oil Lines and Fittings Nice and clean! Ready to be installed back onto the Wolf!!
Got a Call from Mike over from NZ. Seems the boys at Pulse Performance NZ have been busy getting Rad Bull Ready for the 2016 Formula Drift Season! Testing at Hampton Downs Raceway went VERY well and the I can�t wait to share with you guys Mikes New Aero� he really has an EYE for Attractive lines!!! Get Ready for the Season!!!! And Updates!!
 02-19-16, 02:56 PM
#2481
Continued:
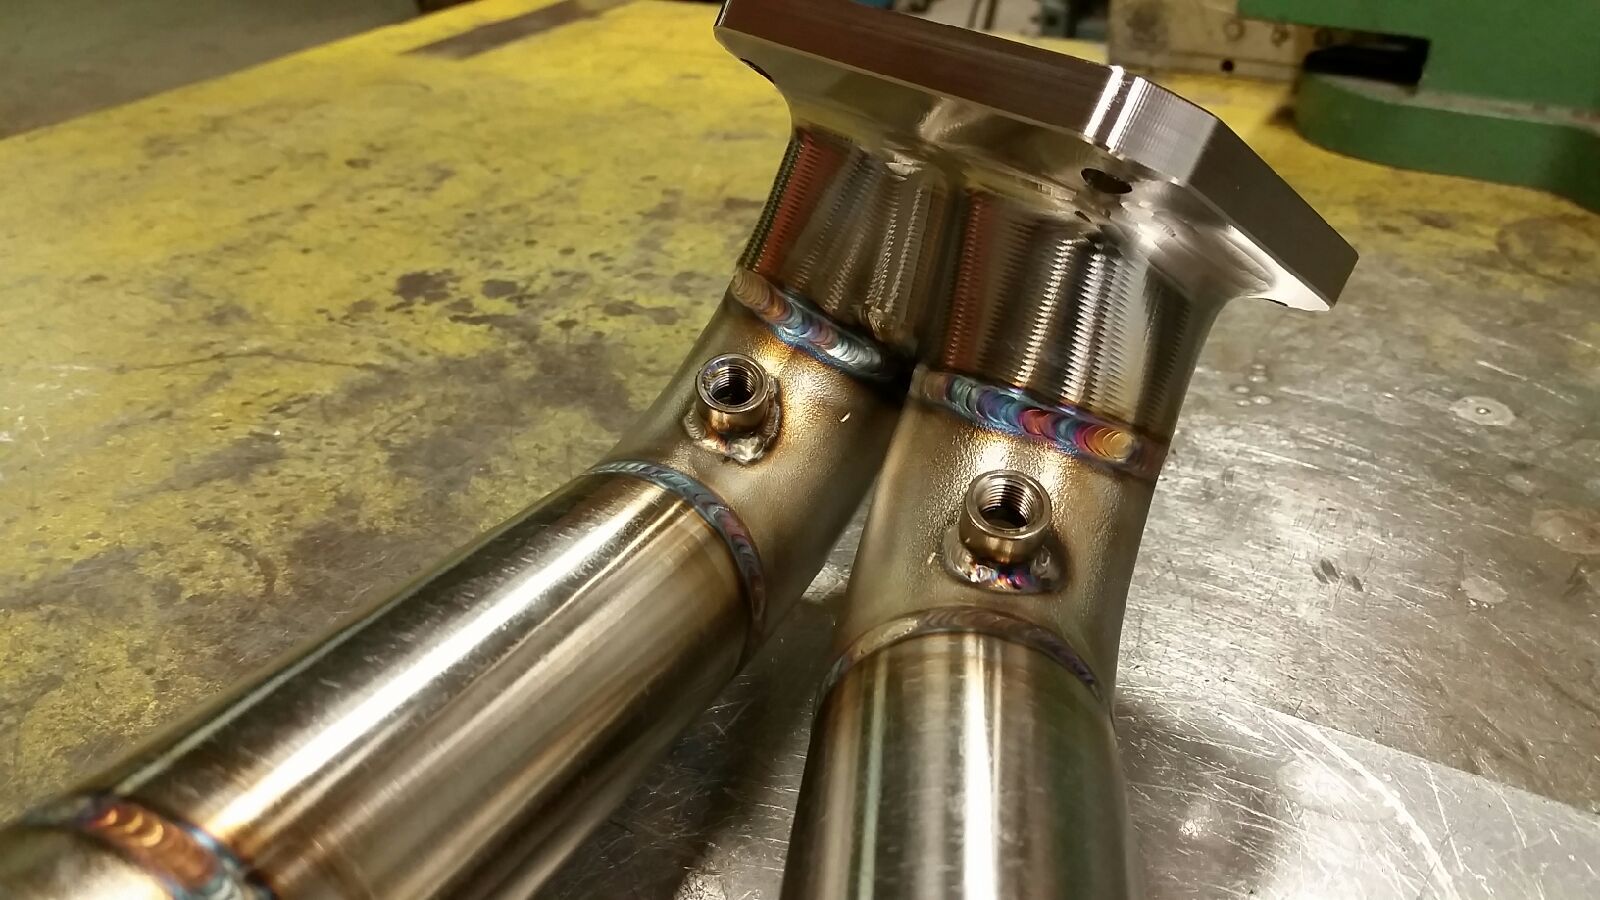
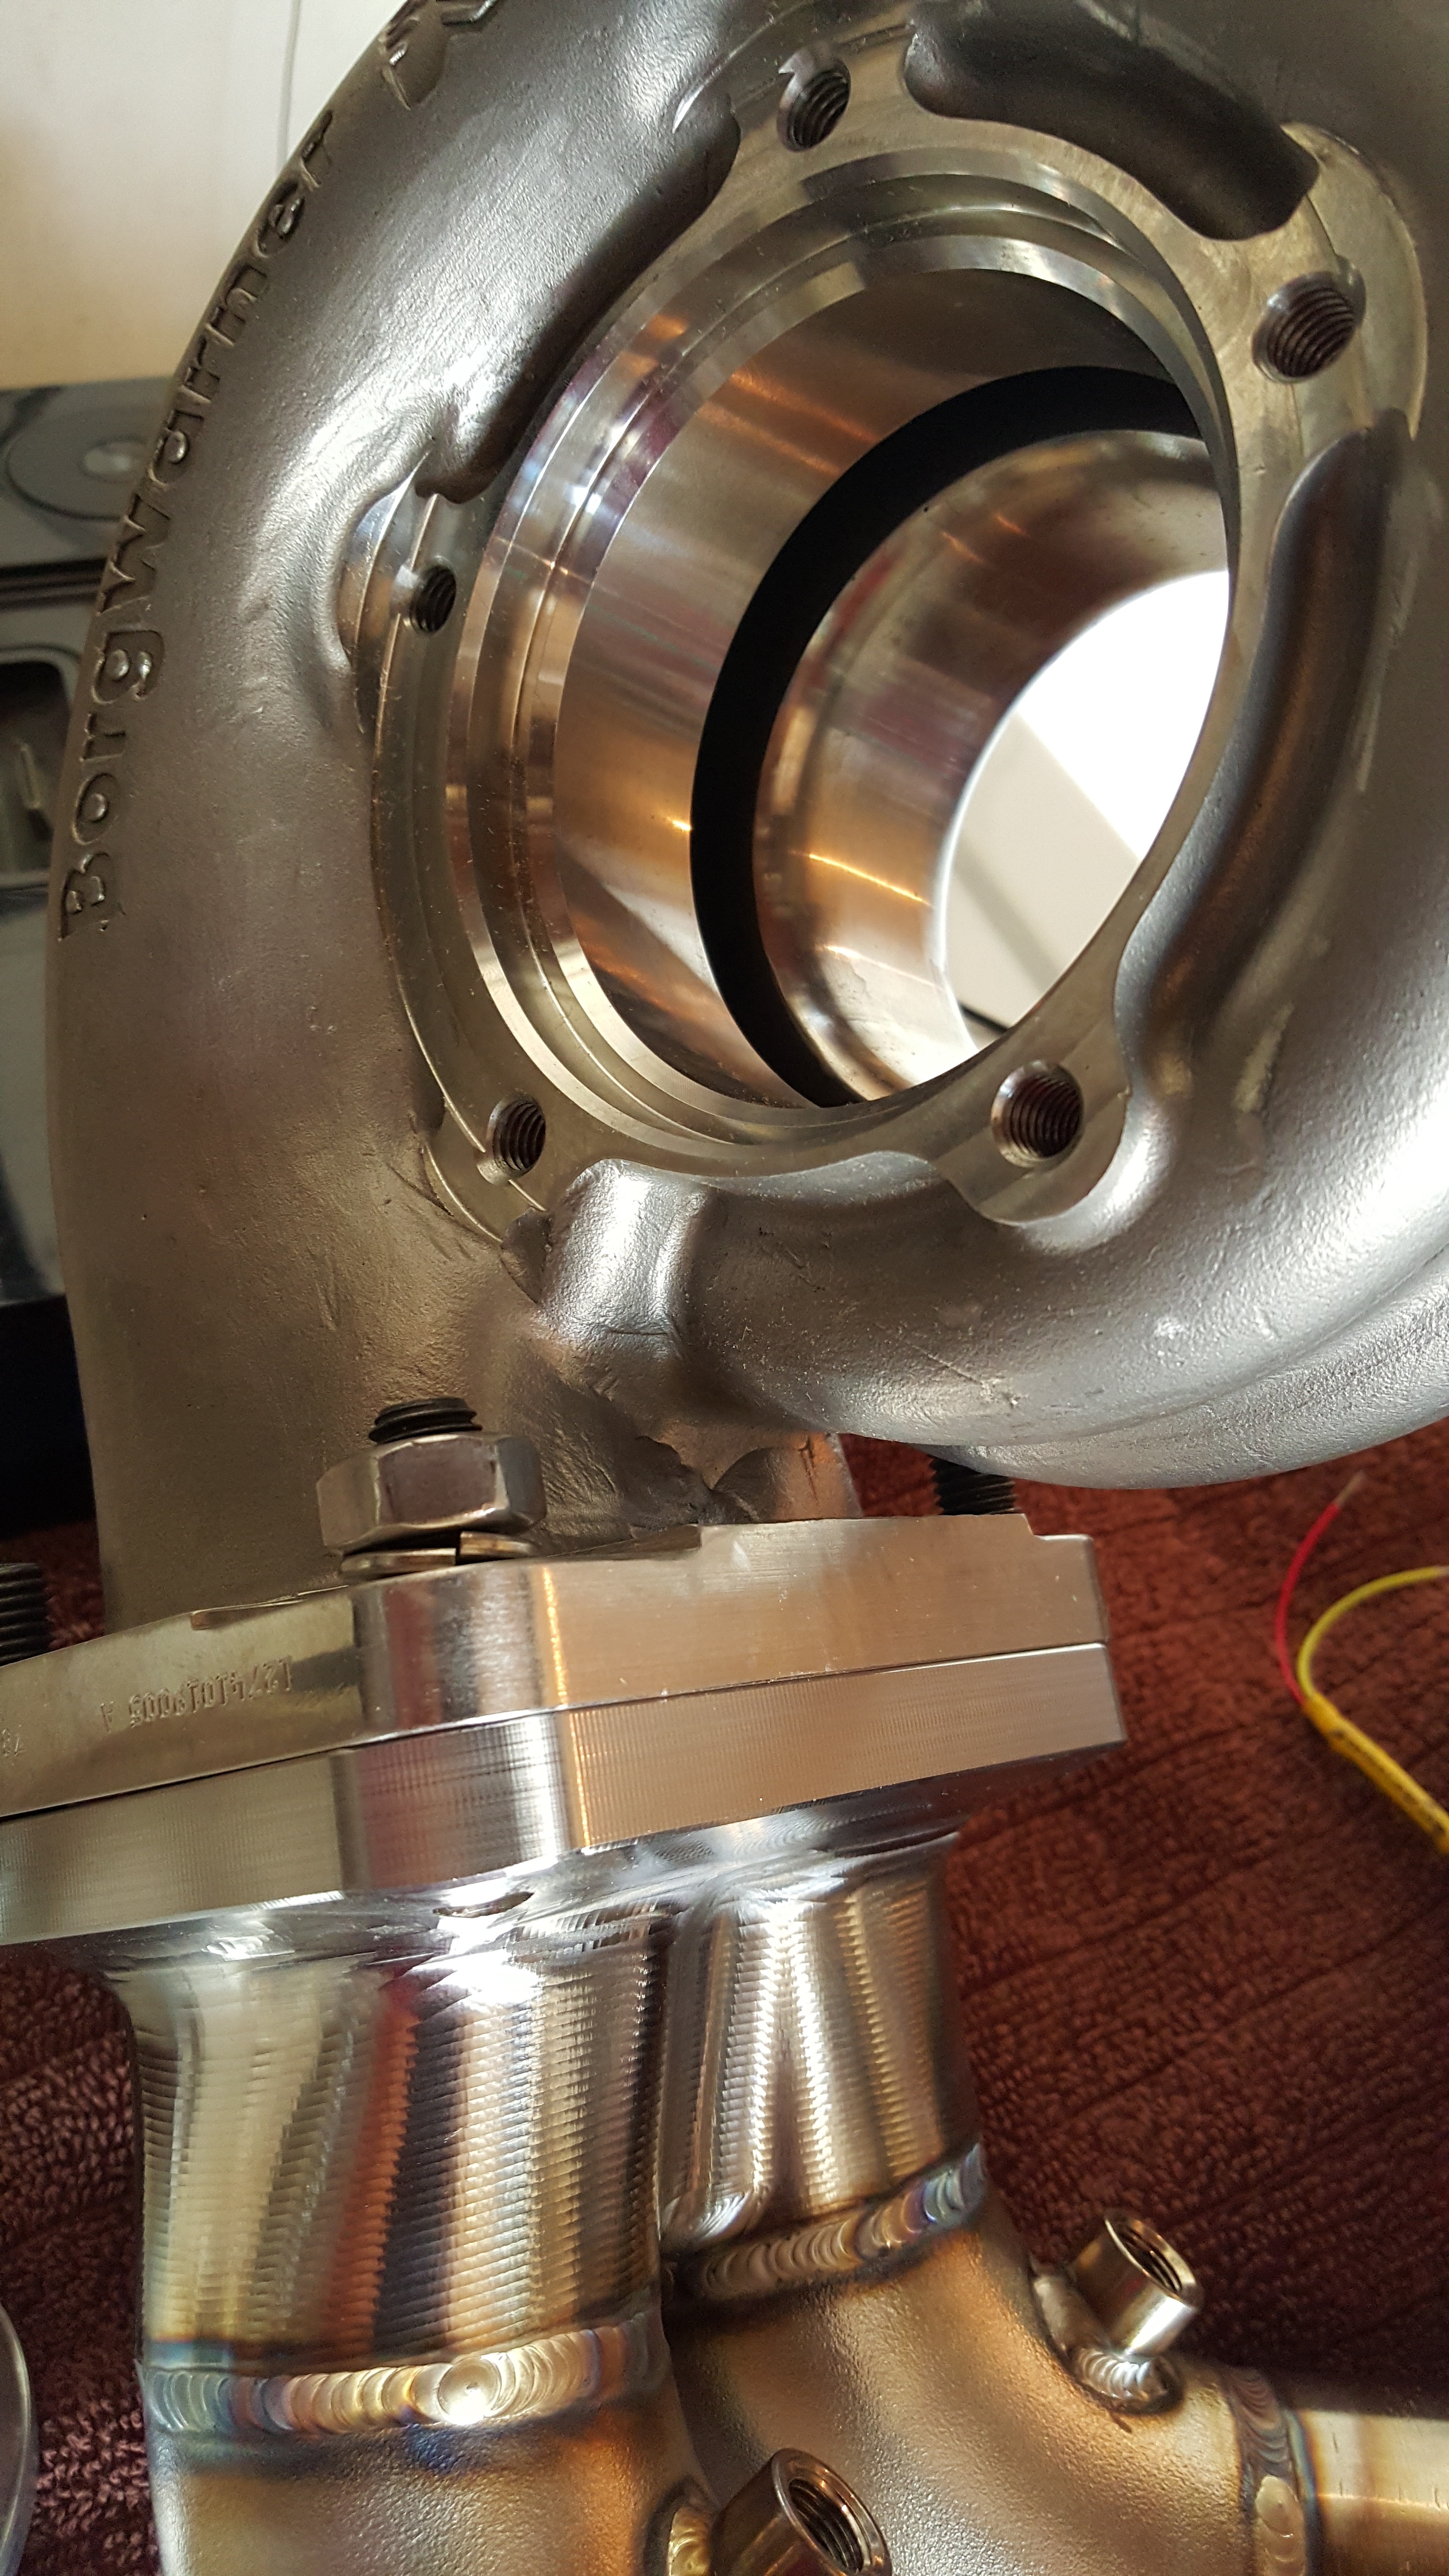
I really wanted to showcase the next piece of Metal Art Hardware� As it truly is the Nicest Manifold I�ve ever seen. And I�m Excited to install it on the New Semi-Peripheral Borg Warner EFR Powered Race Engine Me and Abel are building!
Introducing Glease Manufacturing�s Billet Series Long Runner Turbo Manifolds. Sit back and enjoy the Pure Quality that goes into each one of these manifolds.
It all starts as a piece of solid 304 Stainless�
Engine to Manifold Flage�.Designed with everything in mind. Making those �In engine bay,� Installs and Repairs nice and easy. The notches on the lower Mounting holes truly is a simple yet Genius Idea and execution is 100% Quality..
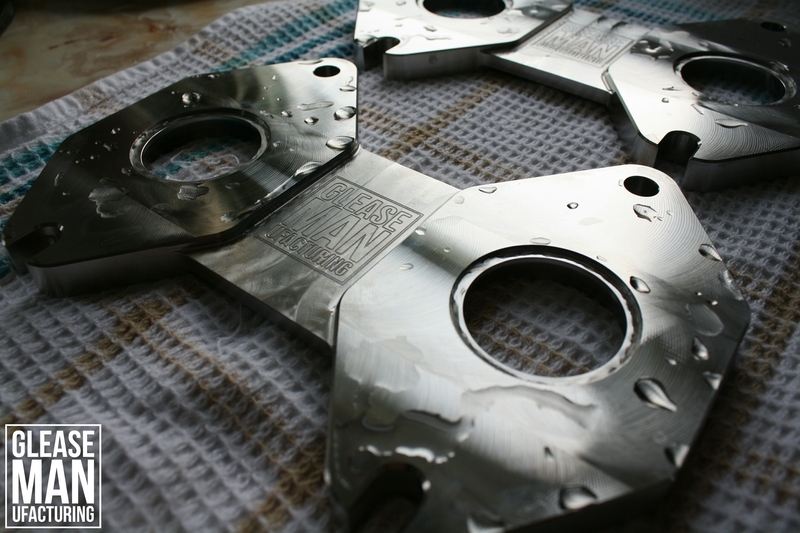
Truly Cream of the Crop.. You can tell John is Passionate about what he does....
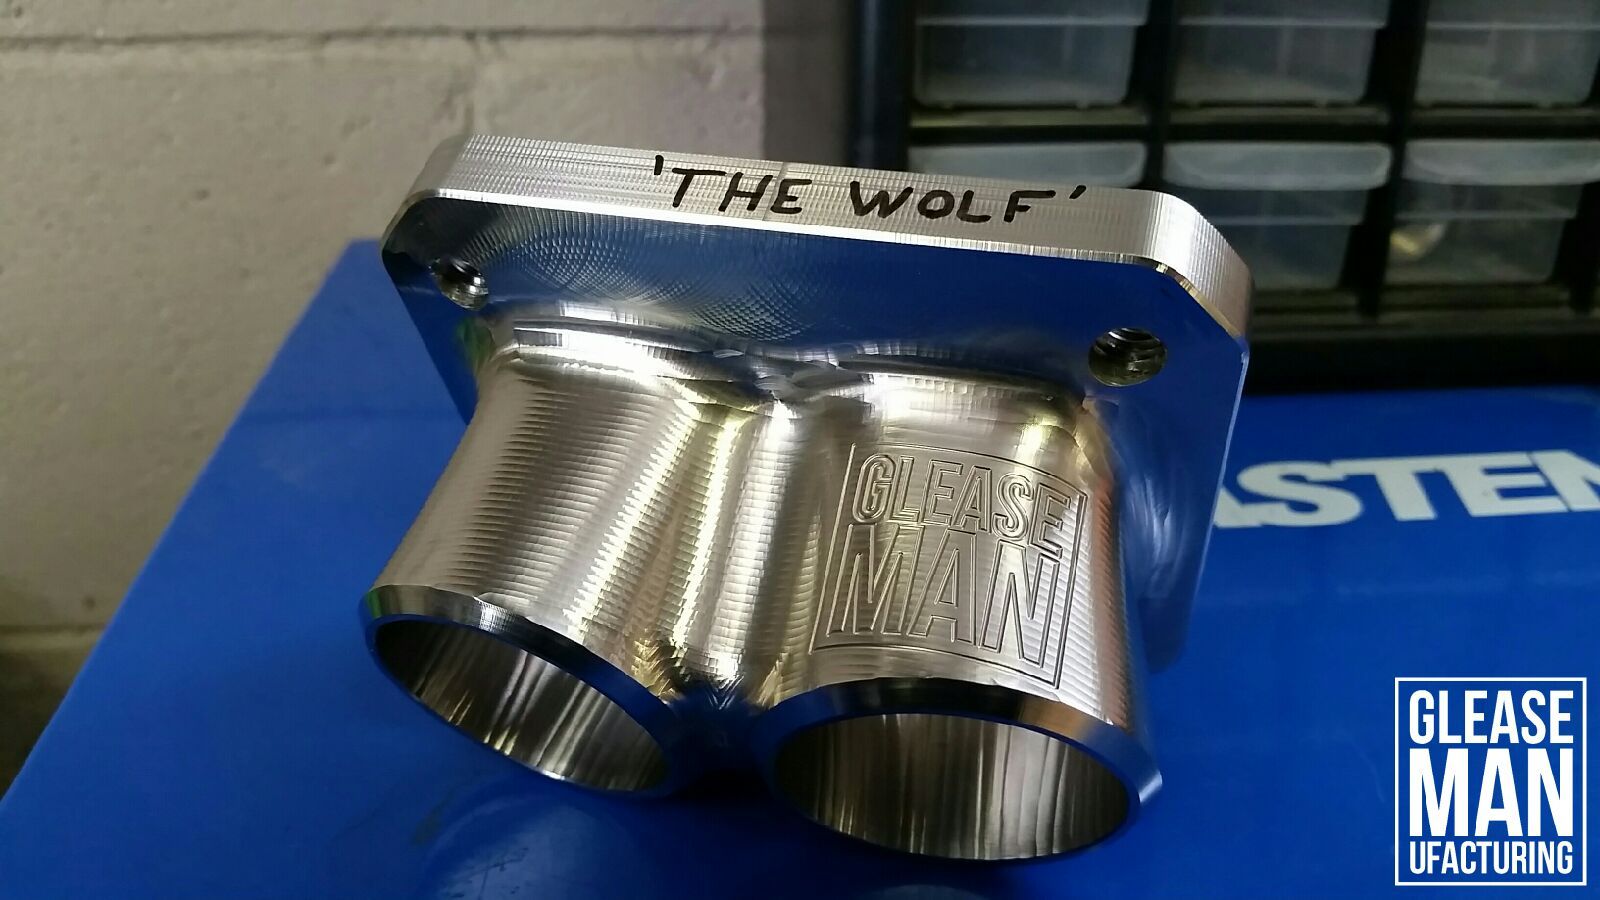
As is the Merge Collector� Billet�Beautiful��Un-matched Quality
This pic Gets me EVERY TIME..

Coming Together
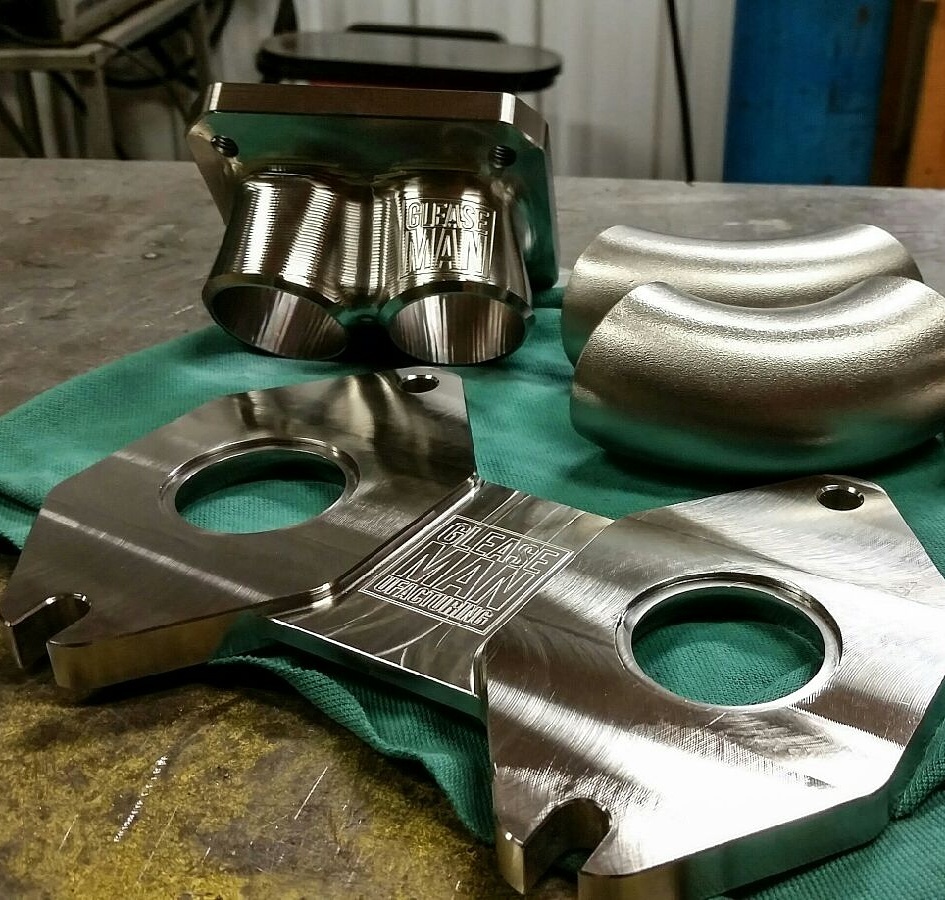
Sometimes if you look at a picture long enough� you can actually pull traits from it. And from this pic�I see a perfectionist, with an excellent eye for all the fine details

More�.
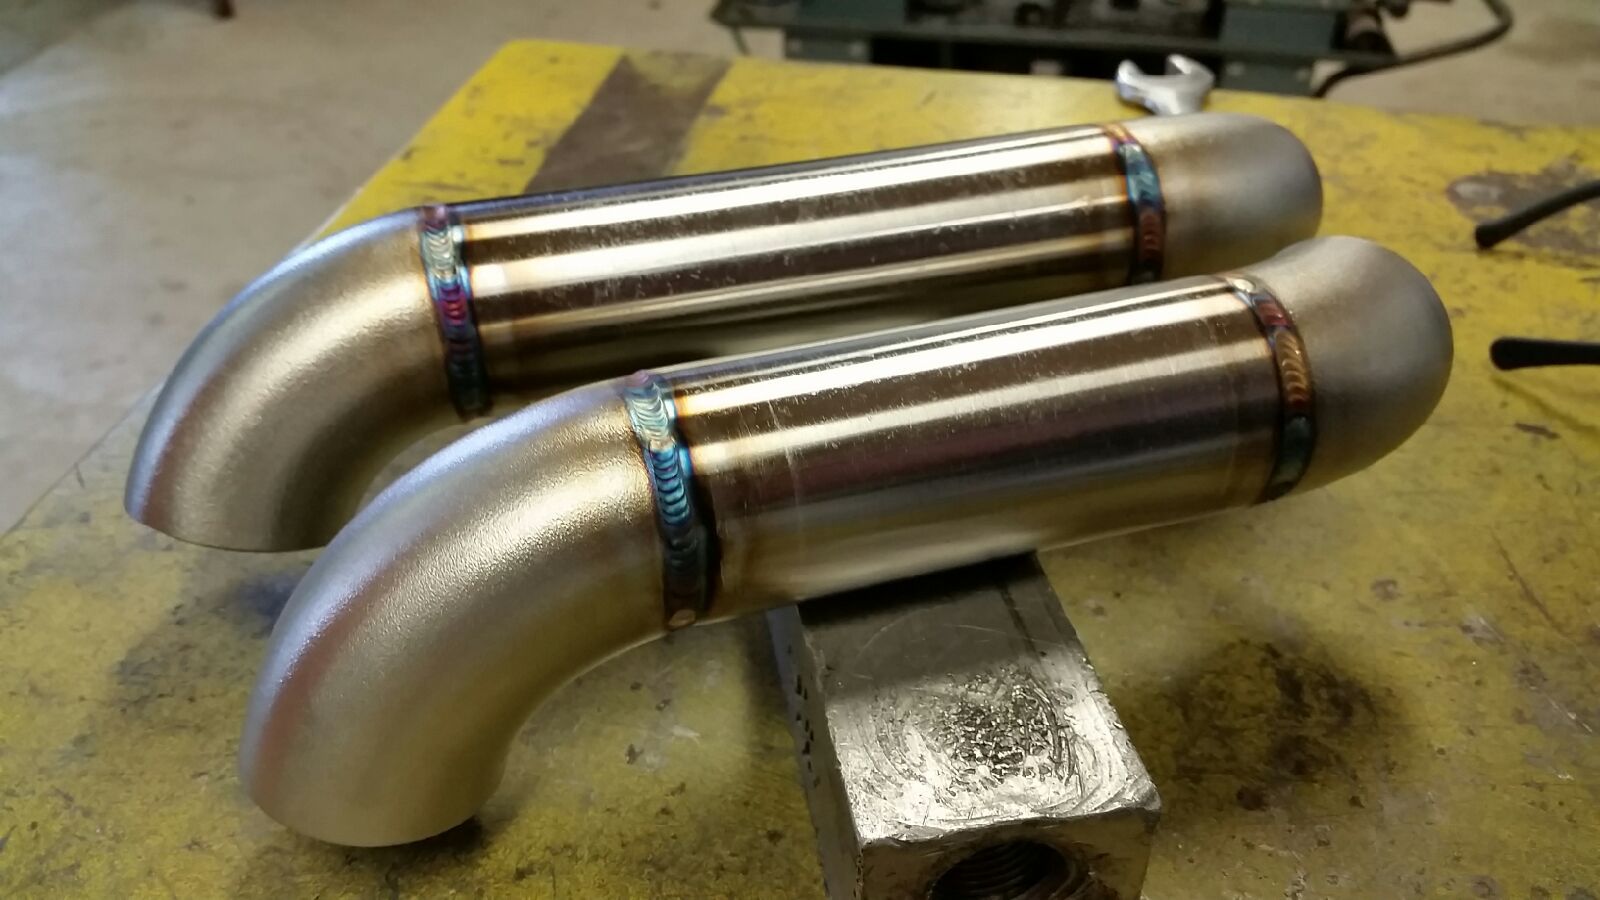
Seriously Just look at this Masterpiece� I keep staring at it.. Like it should go on the wall in a glass case!!
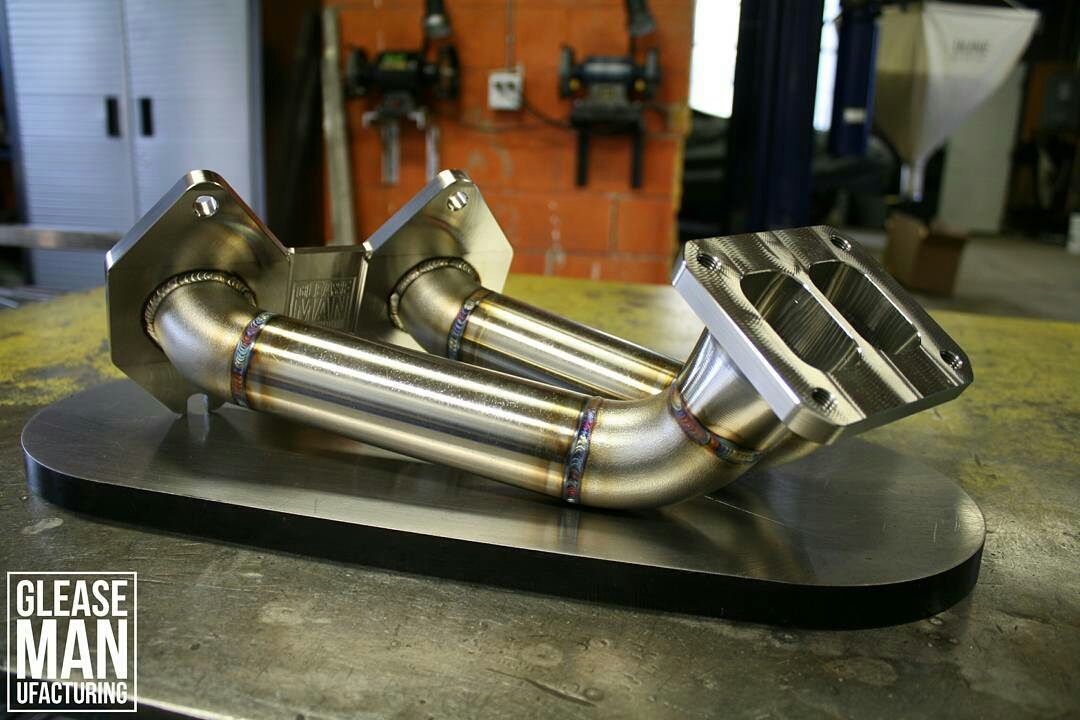
With all the Bells and Whistles!!! Dual 1/8 NPT EGT (Exhaust Gas Temp) Bungs All Logged Via my Adaptronic ECU�and a new Addition to my Tech Set up�Dual EMAP 1/8 NPT Bungs as well (Exhaust Manifold Absolute Pressure) YEEEOOOWWW!!!!
EGT
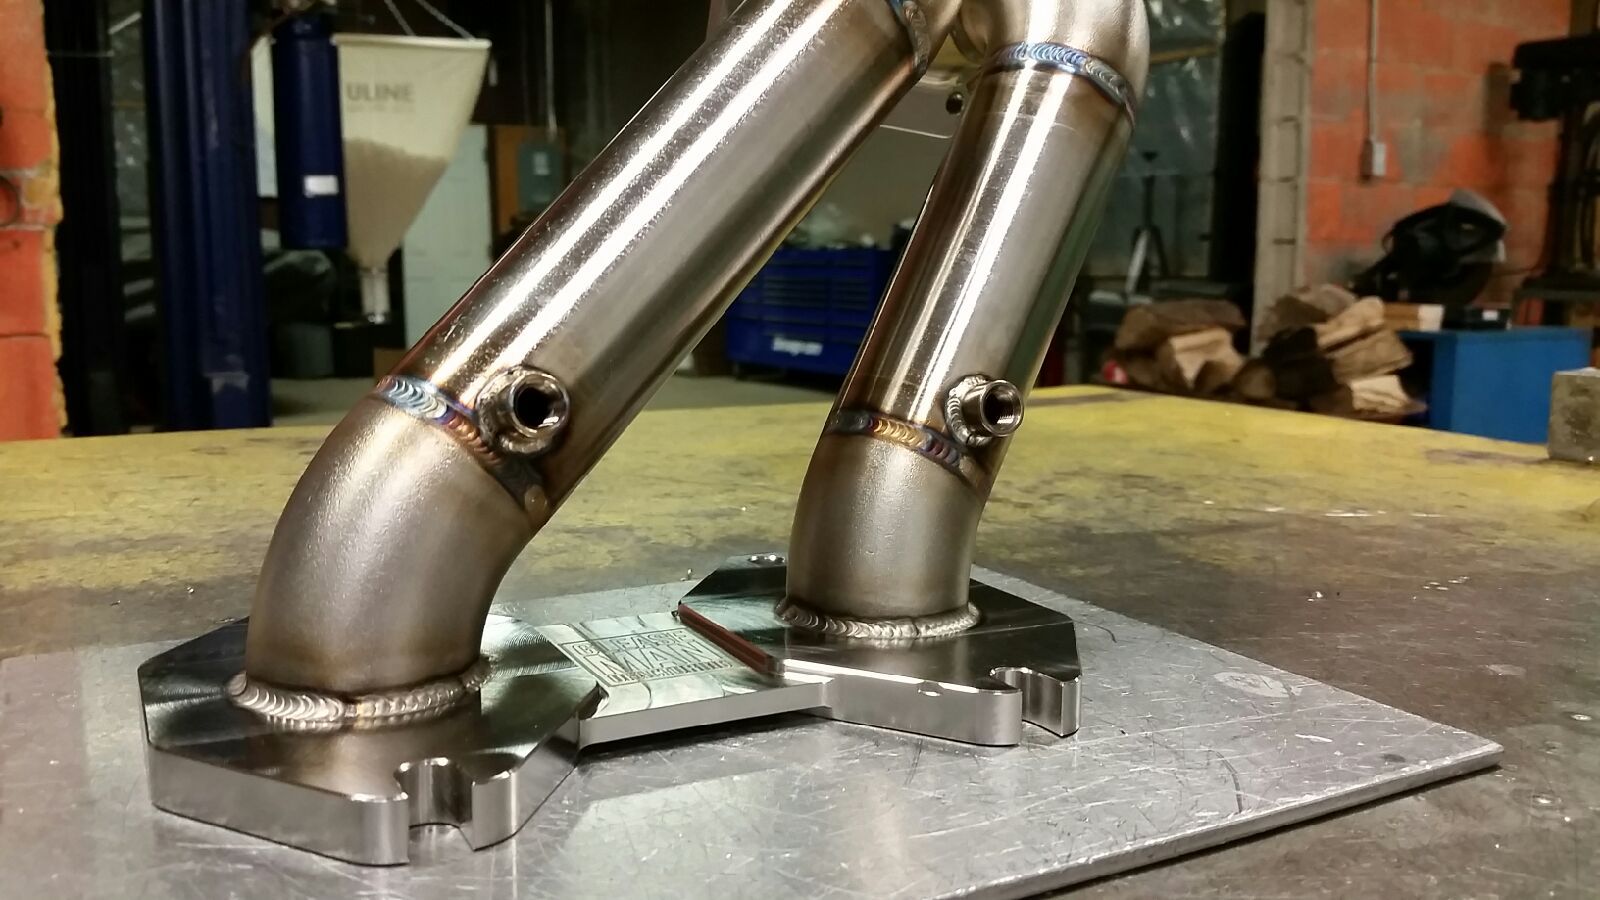
EMAP
I�m pretty damn excited to get my hands on this piece of art and install it on The Wolf!! The set up is going to rip, and Me and Abel are waiting on a couple small parts to come in so we can assemble the Engine This next week!! If anyone has any questions about the manifold� you can ask me or The Master behind the construction himself as he is a vendor here on Rx7 Club. The link to his Group buy is here:
https://www.rx7club.com/vendor-class...npipe-1085128/
and more info on the Billet Series Flanges and Merge Collectors:
https://www.rx7club.com/vendor-class...nside-1091491/
Or
Glease Manufacturing
Stay Tuned for Heavy Updates on the Fuel System And Engine Assembly!!
More Updates Soon!!
#ThisIsTheWolf
#Heartofthewolfbuild
I really wanted to showcase the next piece of Metal Art Hardware� As it truly is the Nicest Manifold I�ve ever seen. And I�m Excited to install it on the New Semi-Peripheral Borg Warner EFR Powered Race Engine Me and Abel are building!
Introducing Glease Manufacturing�s Billet Series Long Runner Turbo Manifolds. Sit back and enjoy the Pure Quality that goes into each one of these manifolds.
It all starts as a piece of solid 304 Stainless�
Engine to Manifold Flage�.Designed with everything in mind. Making those �In engine bay,� Installs and Repairs nice and easy. The notches on the lower Mounting holes truly is a simple yet Genius Idea and execution is 100% Quality..
Truly Cream of the Crop.. You can tell John is Passionate about what he does....
As is the Merge Collector� Billet�Beautiful��Un-matched Quality
This pic Gets me EVERY TIME..
Coming Together
Sometimes if you look at a picture long enough� you can actually pull traits from it. And from this pic�I see a perfectionist, with an excellent eye for all the fine details
More�.
Seriously Just look at this Masterpiece� I keep staring at it.. Like it should go on the wall in a glass case!!
With all the Bells and Whistles!!! Dual 1/8 NPT EGT (Exhaust Gas Temp) Bungs All Logged Via my Adaptronic ECU�and a new Addition to my Tech Set up�Dual EMAP 1/8 NPT Bungs as well (Exhaust Manifold Absolute Pressure) YEEEOOOWWW!!!!
EGT
EMAP
I�m pretty damn excited to get my hands on this piece of art and install it on The Wolf!! The set up is going to rip, and Me and Abel are waiting on a couple small parts to come in so we can assemble the Engine This next week!! If anyone has any questions about the manifold� you can ask me or The Master behind the construction himself as he is a vendor here on Rx7 Club. The link to his Group buy is here:
https://www.rx7club.com/vendor-class...npipe-1085128/
and more info on the Billet Series Flanges and Merge Collectors:
https://www.rx7club.com/vendor-class...nside-1091491/
Or
Glease Manufacturing
Stay Tuned for Heavy Updates on the Fuel System And Engine Assembly!!
More Updates Soon!!
#ThisIsTheWolf
#Heartofthewolfbuild
02-20-16, 03:36 PM
#2483
A company with as much history and reputation as NGK wouldn't necessarily need to go out looking for racers to sponsor. I'm sure they do have a department that handles Motorsports. But as the company grows they start receiving applications. Then eventually they set up an entire system for sponsorship on a web based platform that gets reviewed by the necessary people who will then filter through each submission. So if your lucky, you get a phone interview. My Number was on my app 
02-20-16, 04:05 PM
#2484
Nice, i completely forgot ppl apply for sponsorships and thought they just looked you up somehow. Can't wait to see your surge tank setup... I may end up going with radium since it looks easy enough and it works with the 2 walbro I already have. Would just need to get one for a lift pump. (Good thing I know a guy). But it seems the only one that can do 2 walbro pumps is the multi pump tank(fits up to 3 pumps).. the standard doesn't I guess fit 2 walbros or doesn't offer the option on their website.. i see 2 walbros for your setup and I thought I saw you with the standard tank so I'm not to sure 
02-21-16, 01:29 AM
#2485
Make an assessment...
iTrader: (3)
BangShift.com PRI 2014: MUST SEE! Holley's HydraMat Just Changed The Fuel System Game In A Big Way! - BangShift.com

Wait, are the regular socks not E85 safe?? I built the whole system to what I thought would be safe, but I never thought about the socks. WTF!
I love that helmet, too.
Damn, that sure is gorgeous. He does some great work! I could stare at this all day lol.
 02-27-16, 02:31 AM
#2487
Update: "On the Grind."
While I wait for a few key parts to show up, I got a whole lot done on some smaller parts of the big puzzle.
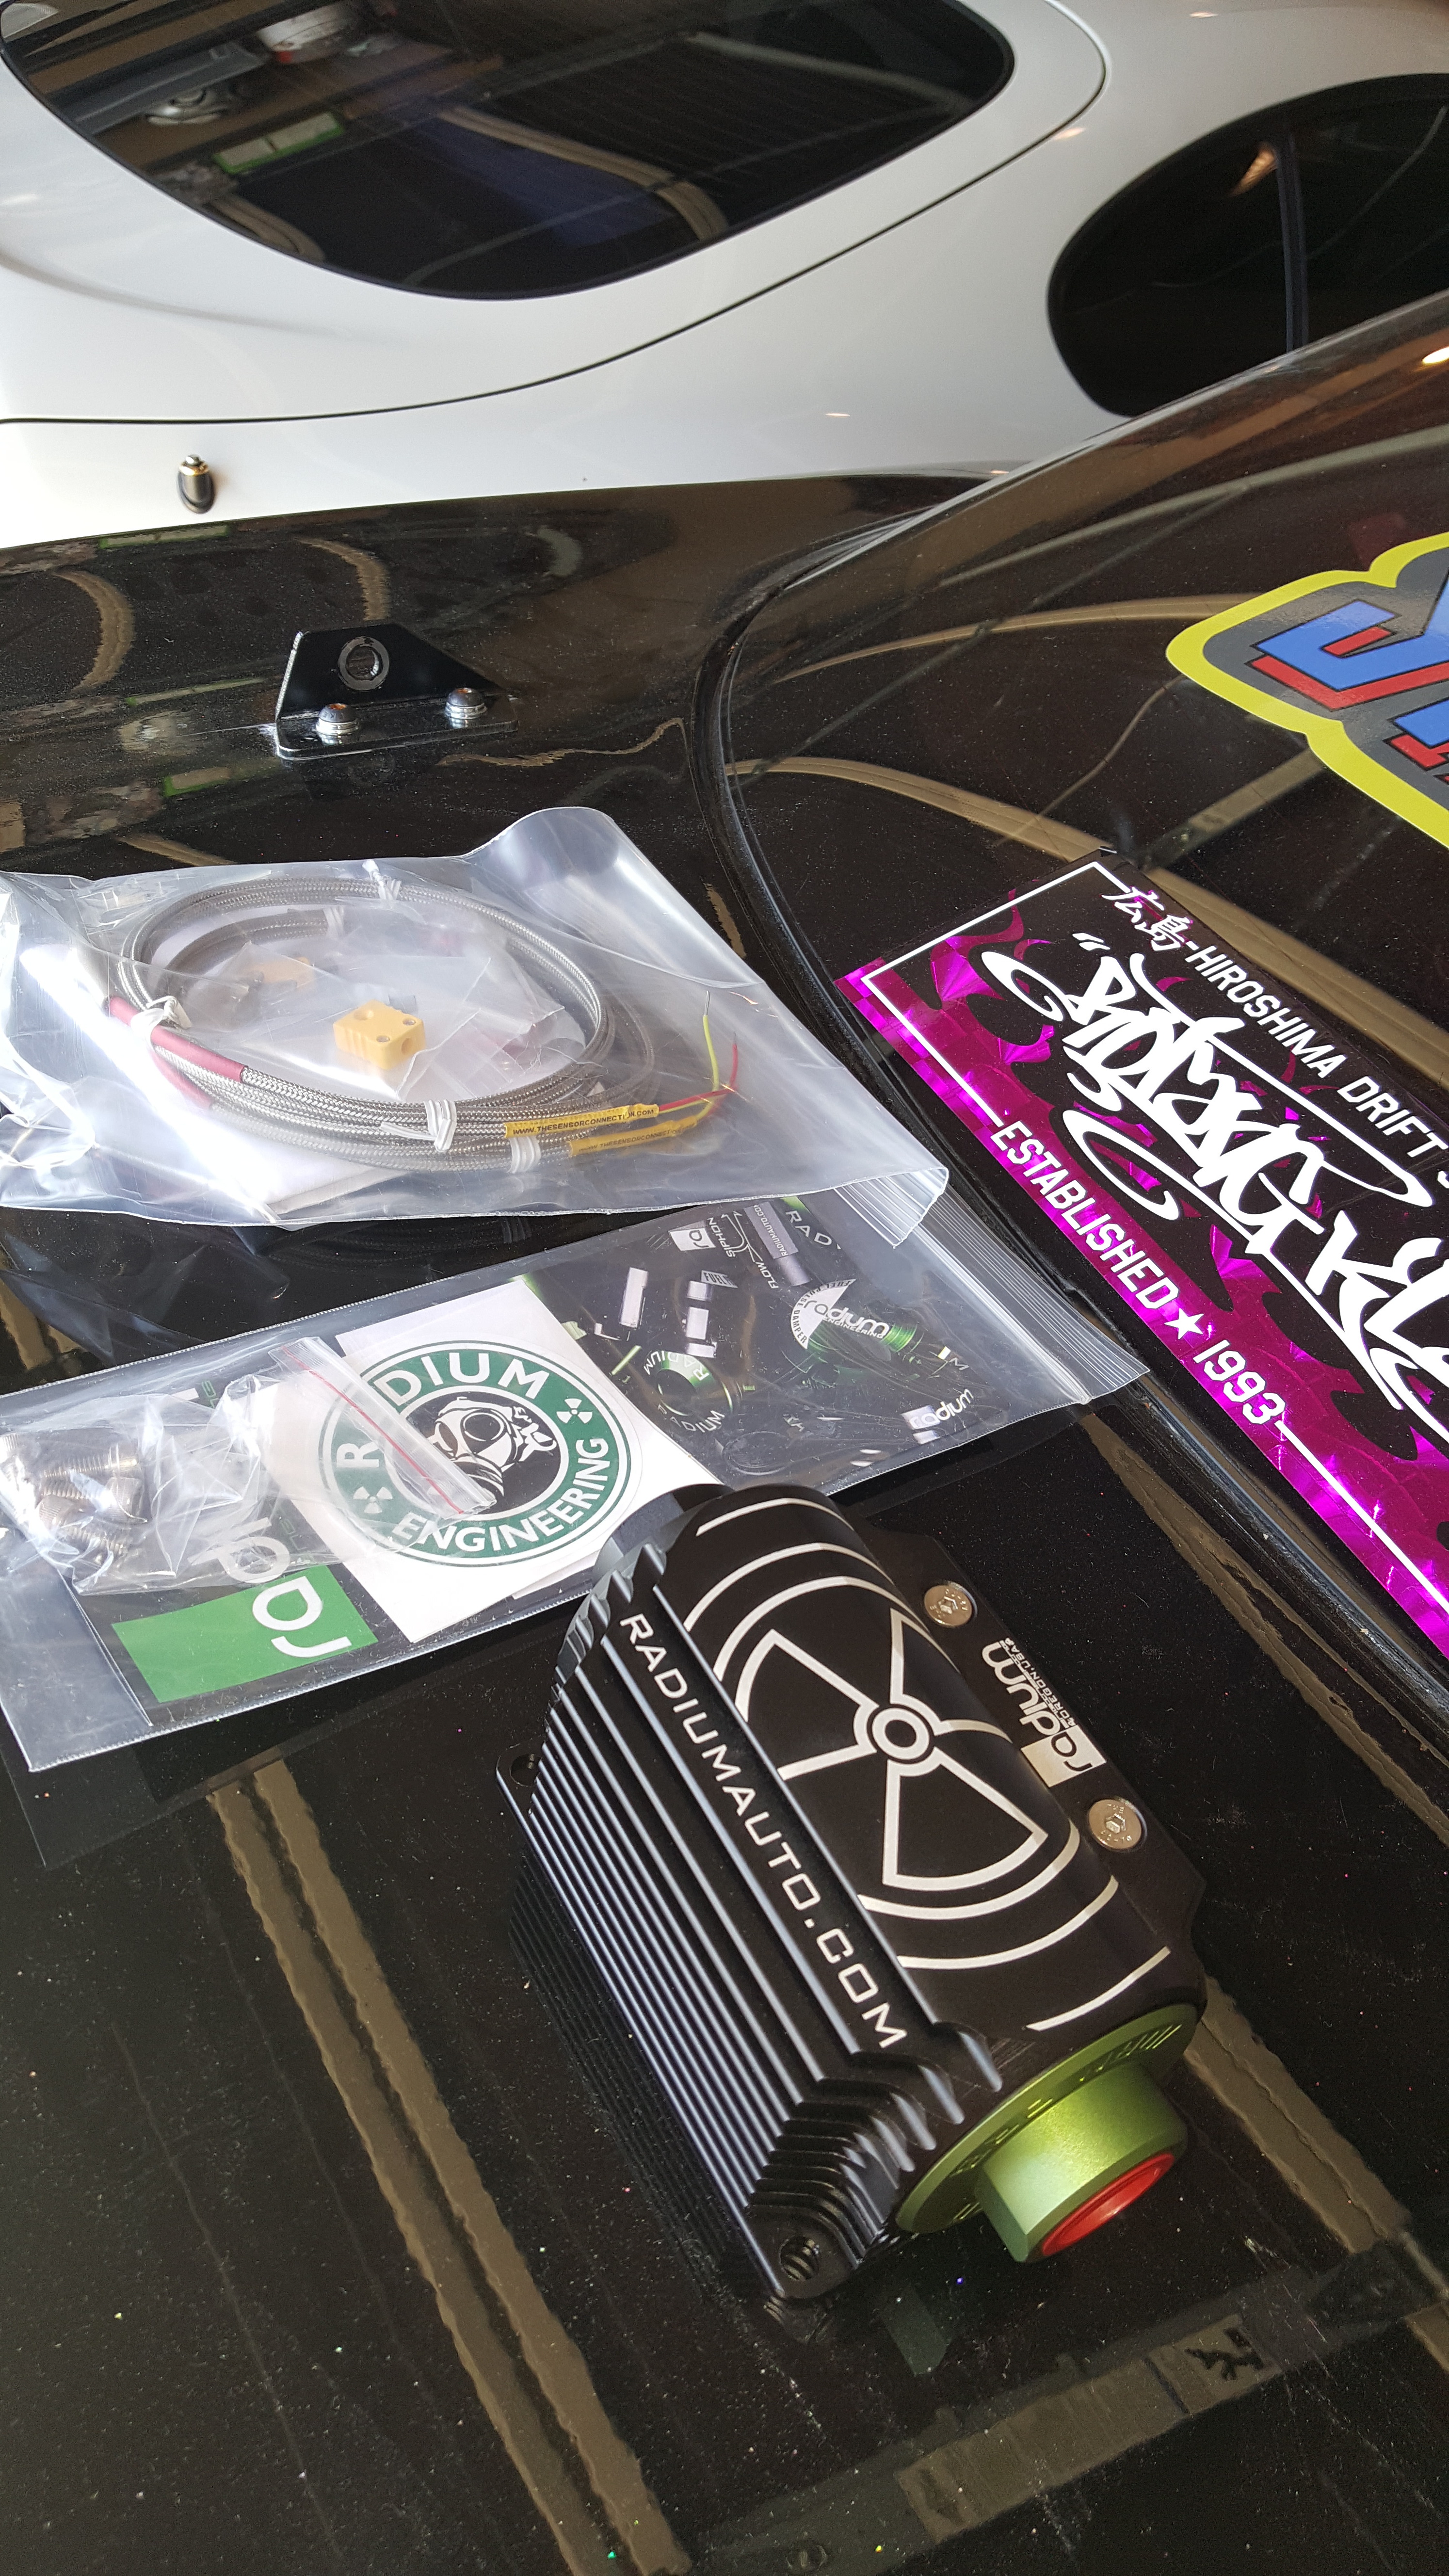
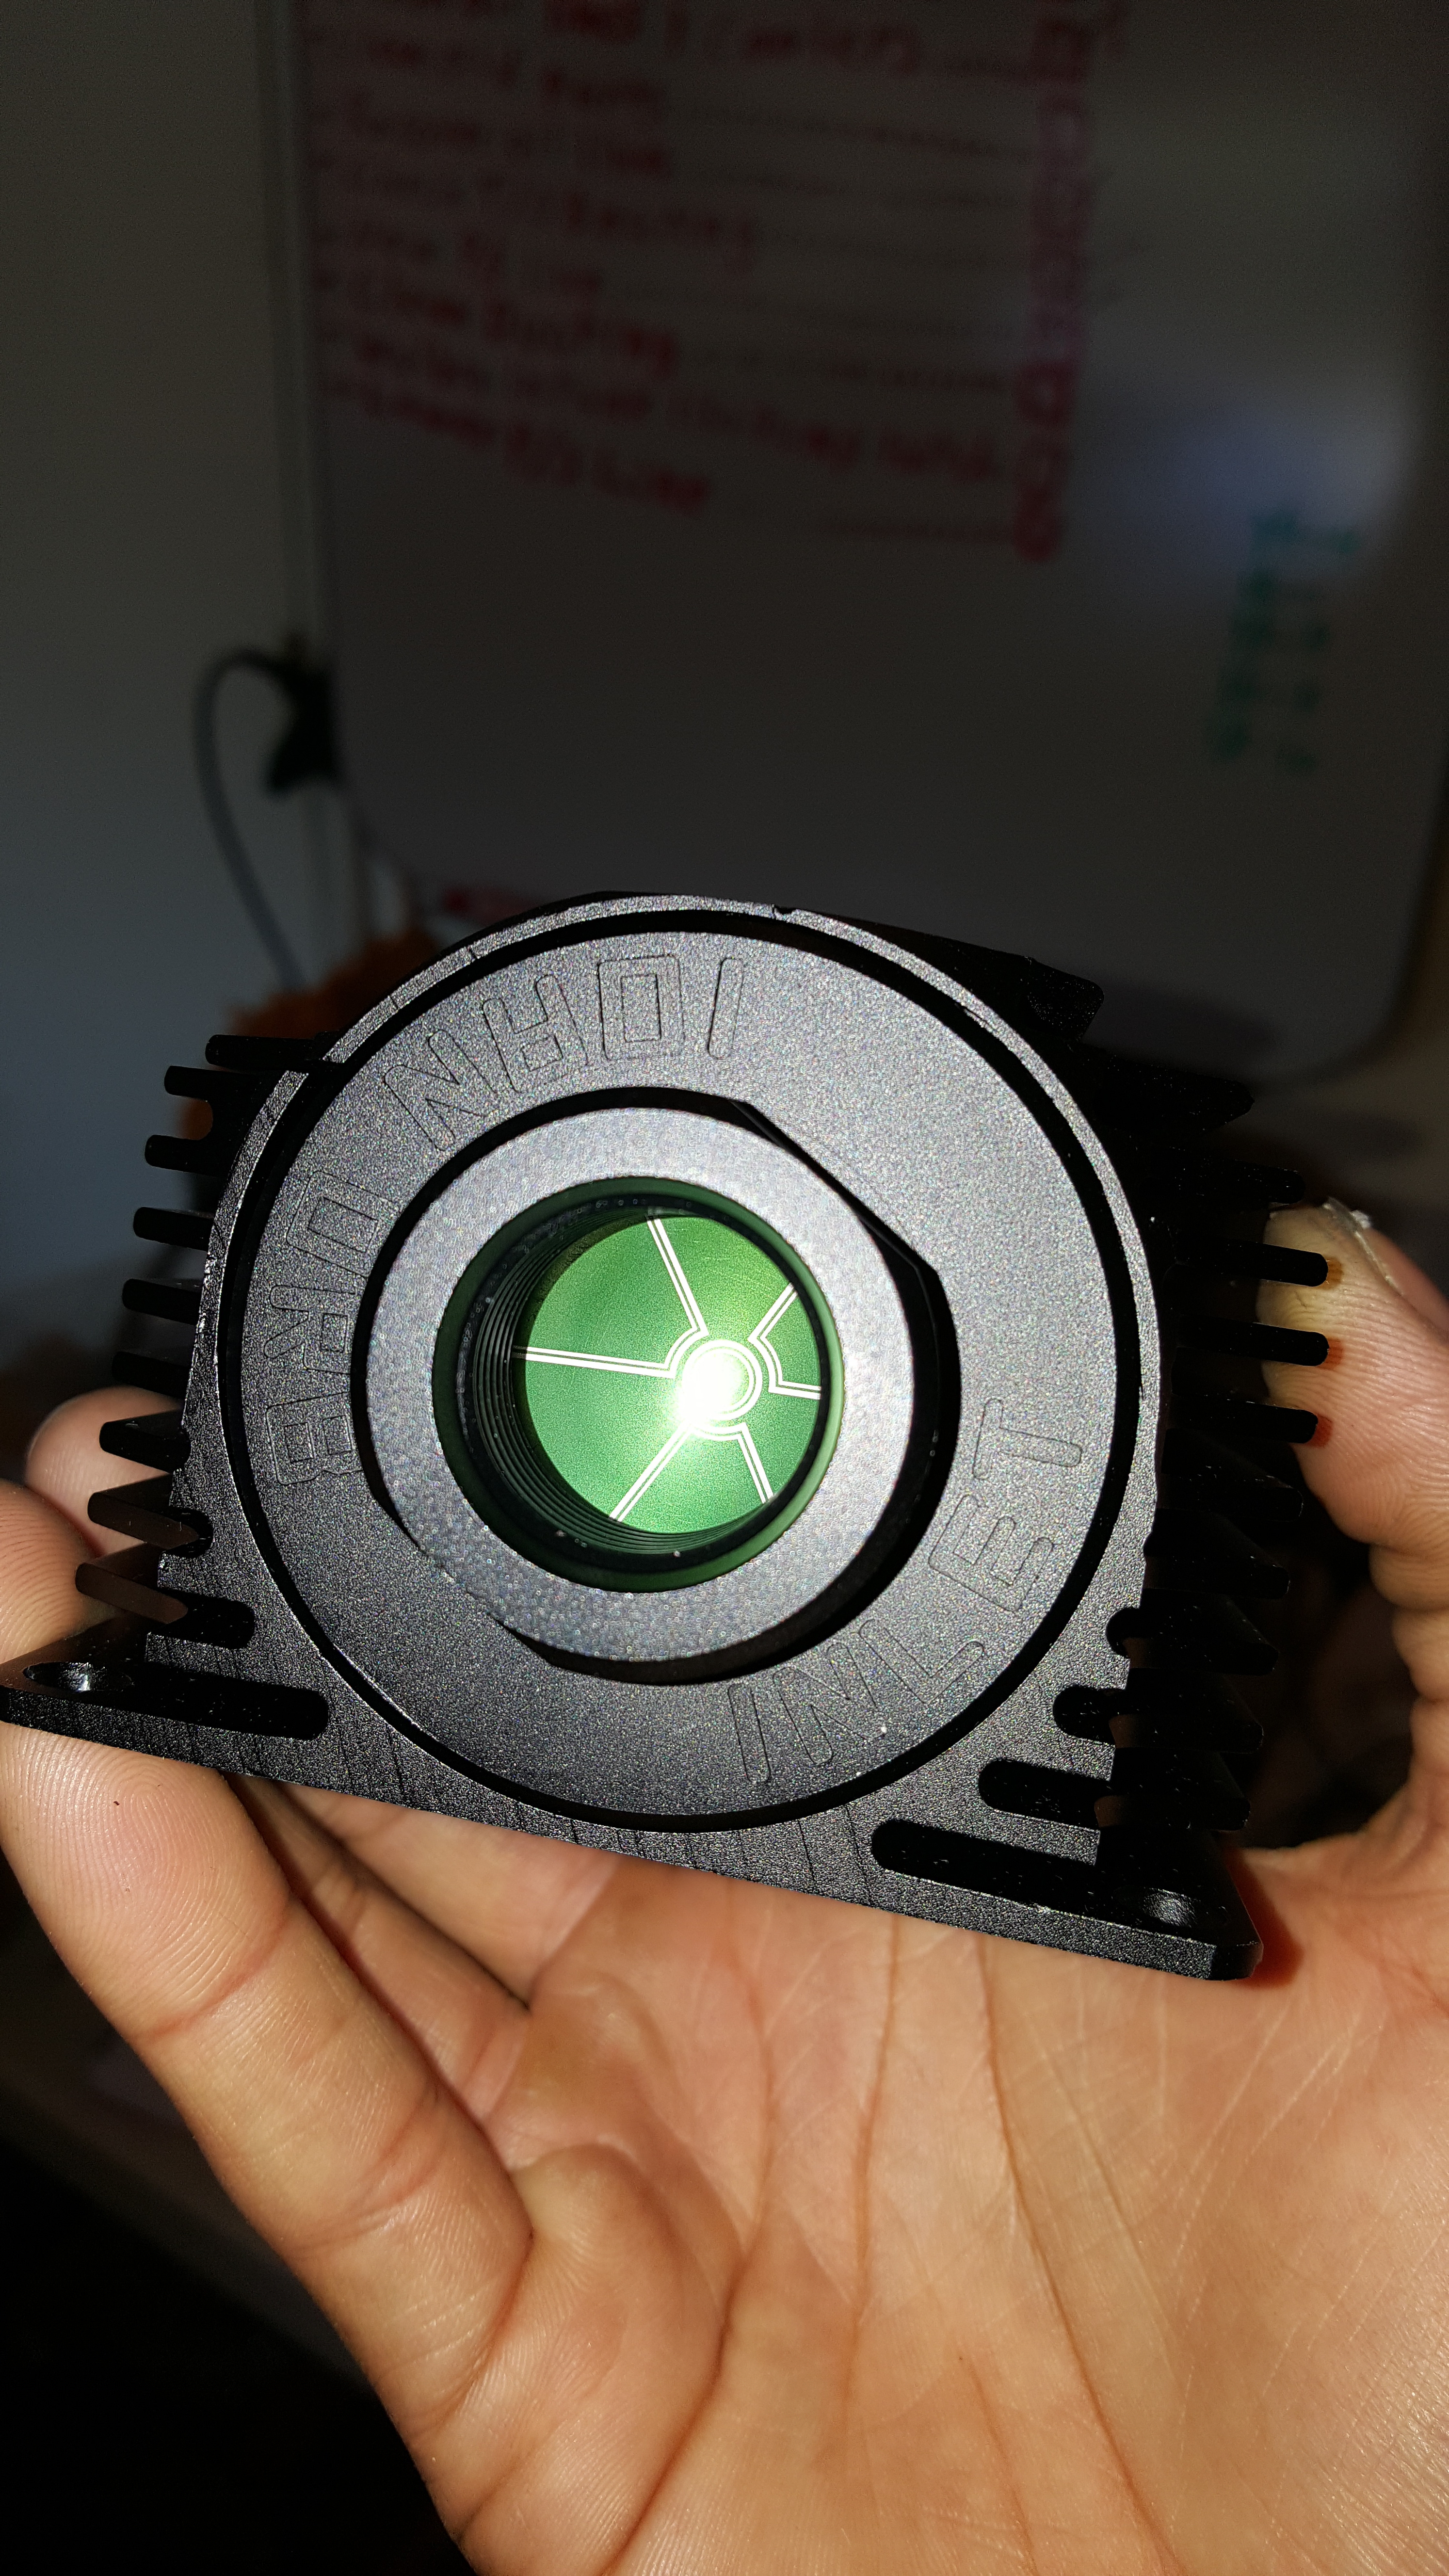
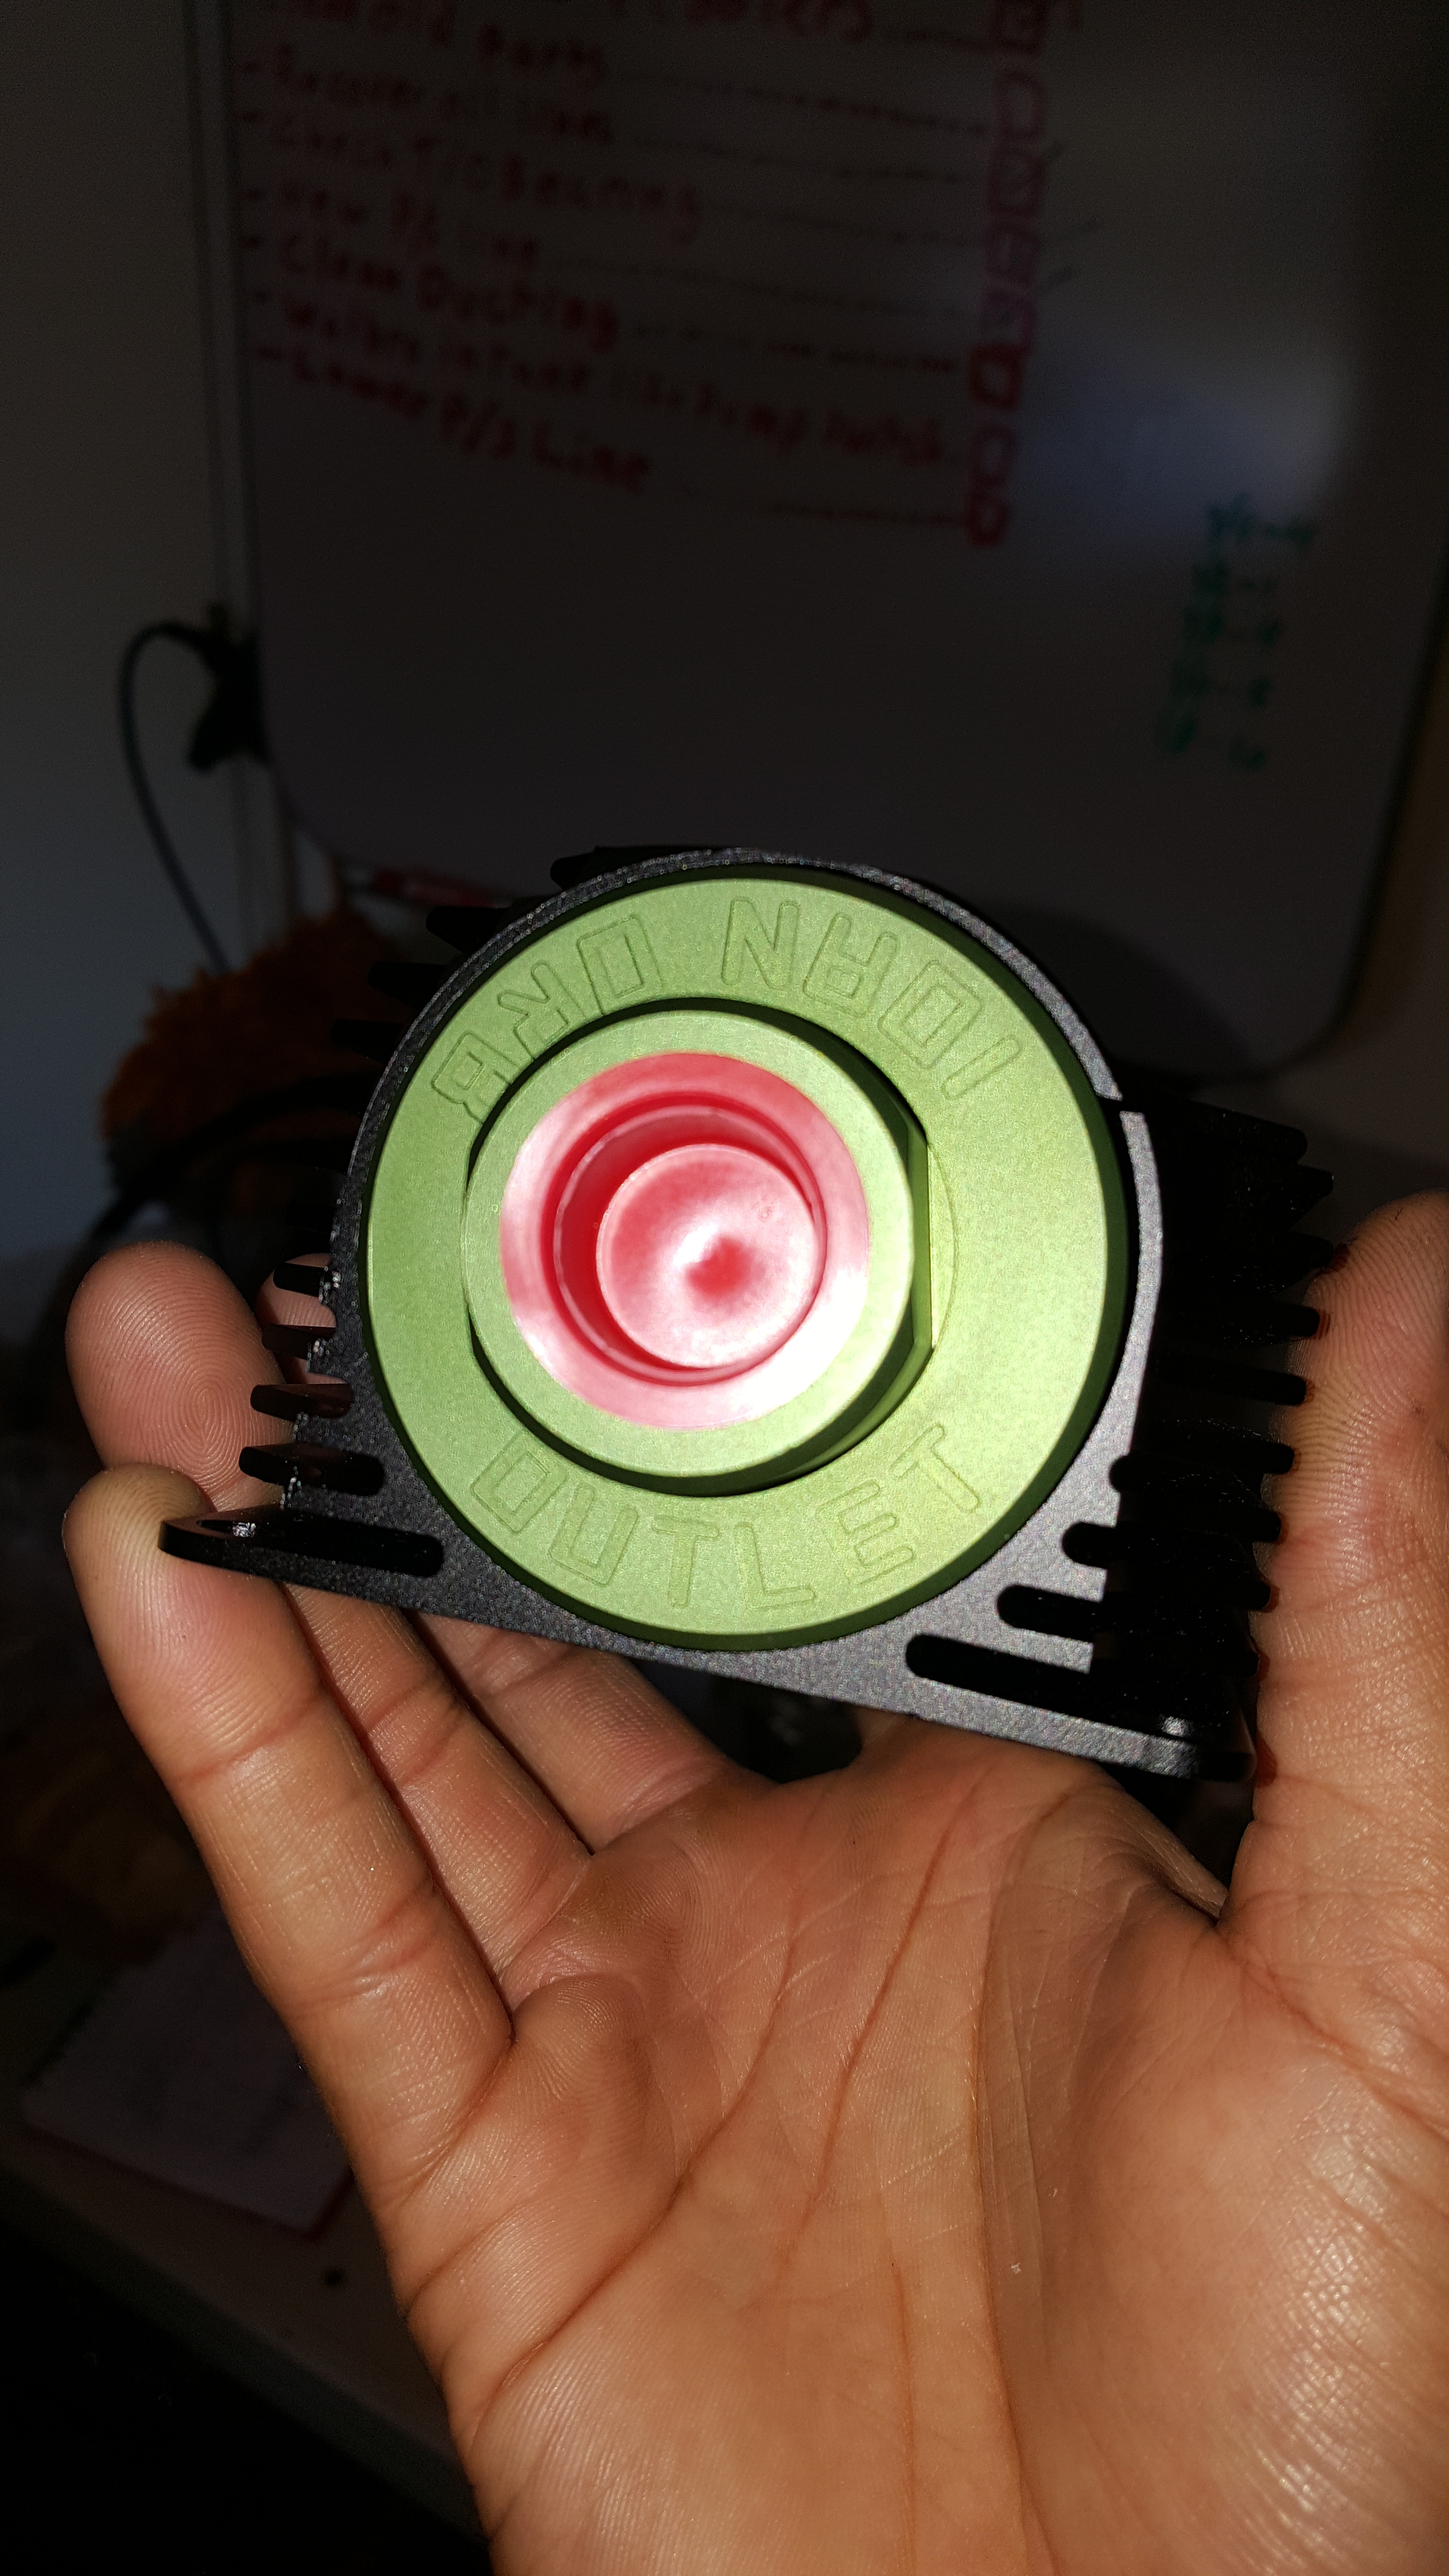
I ended up going with one of the new Radium Engineering 10 Micron Stainless Steel Mesh Filters with the Heat Sink Mount as well. This thing is SICK! Pure quality and precision machining! Solid machined labels into the filter so that there's no way to mix up the Direction of Flow In/Out. I also got my New EGT sensors in. Pretty trick too!...2 Stroke Specific 1/8 NPT Closed Tip (for better Longevity) K-Type EGT Sensors!! Pumped on these!!
New Parts!!
Then I was able to roughly Visualize exactly how I wanted to lay the whole set up out. I feel like it's important to do some pre-brain storming so that you have an idea of what you may want it to look like... But sometimes things change when you get all the parts. So I ran through a couple different set ups and figured I liked this lay-out the best..
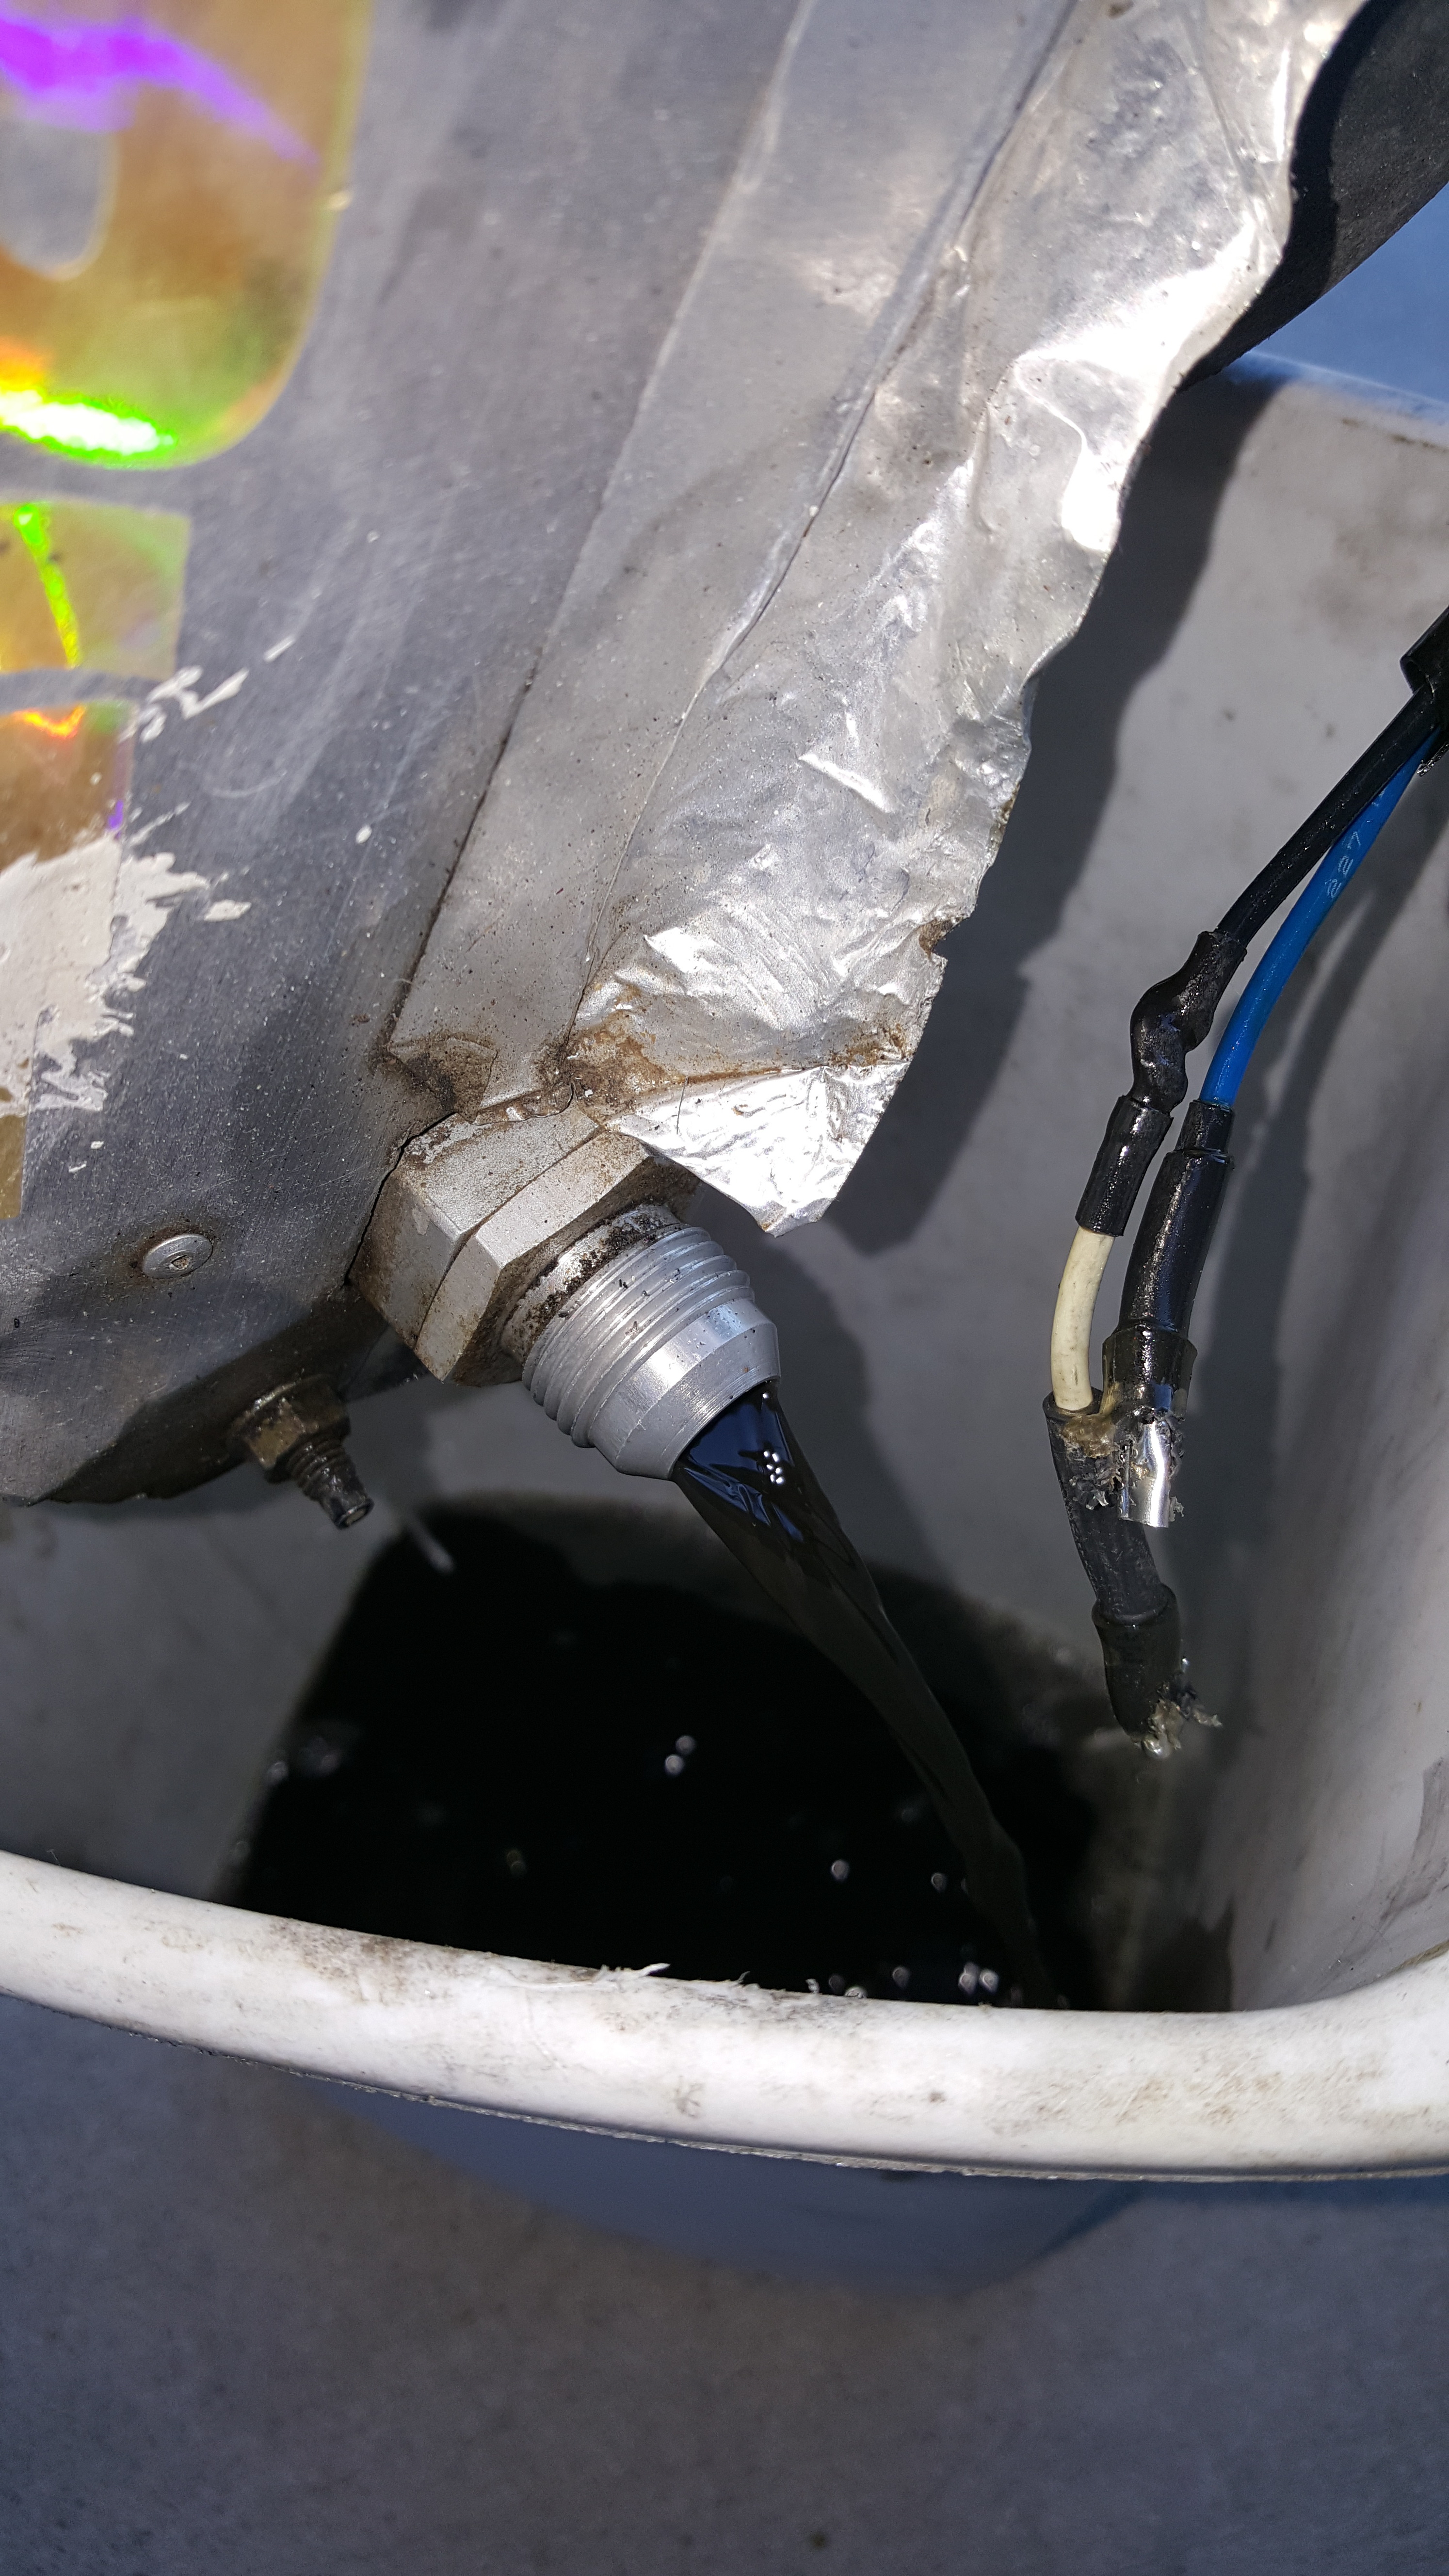
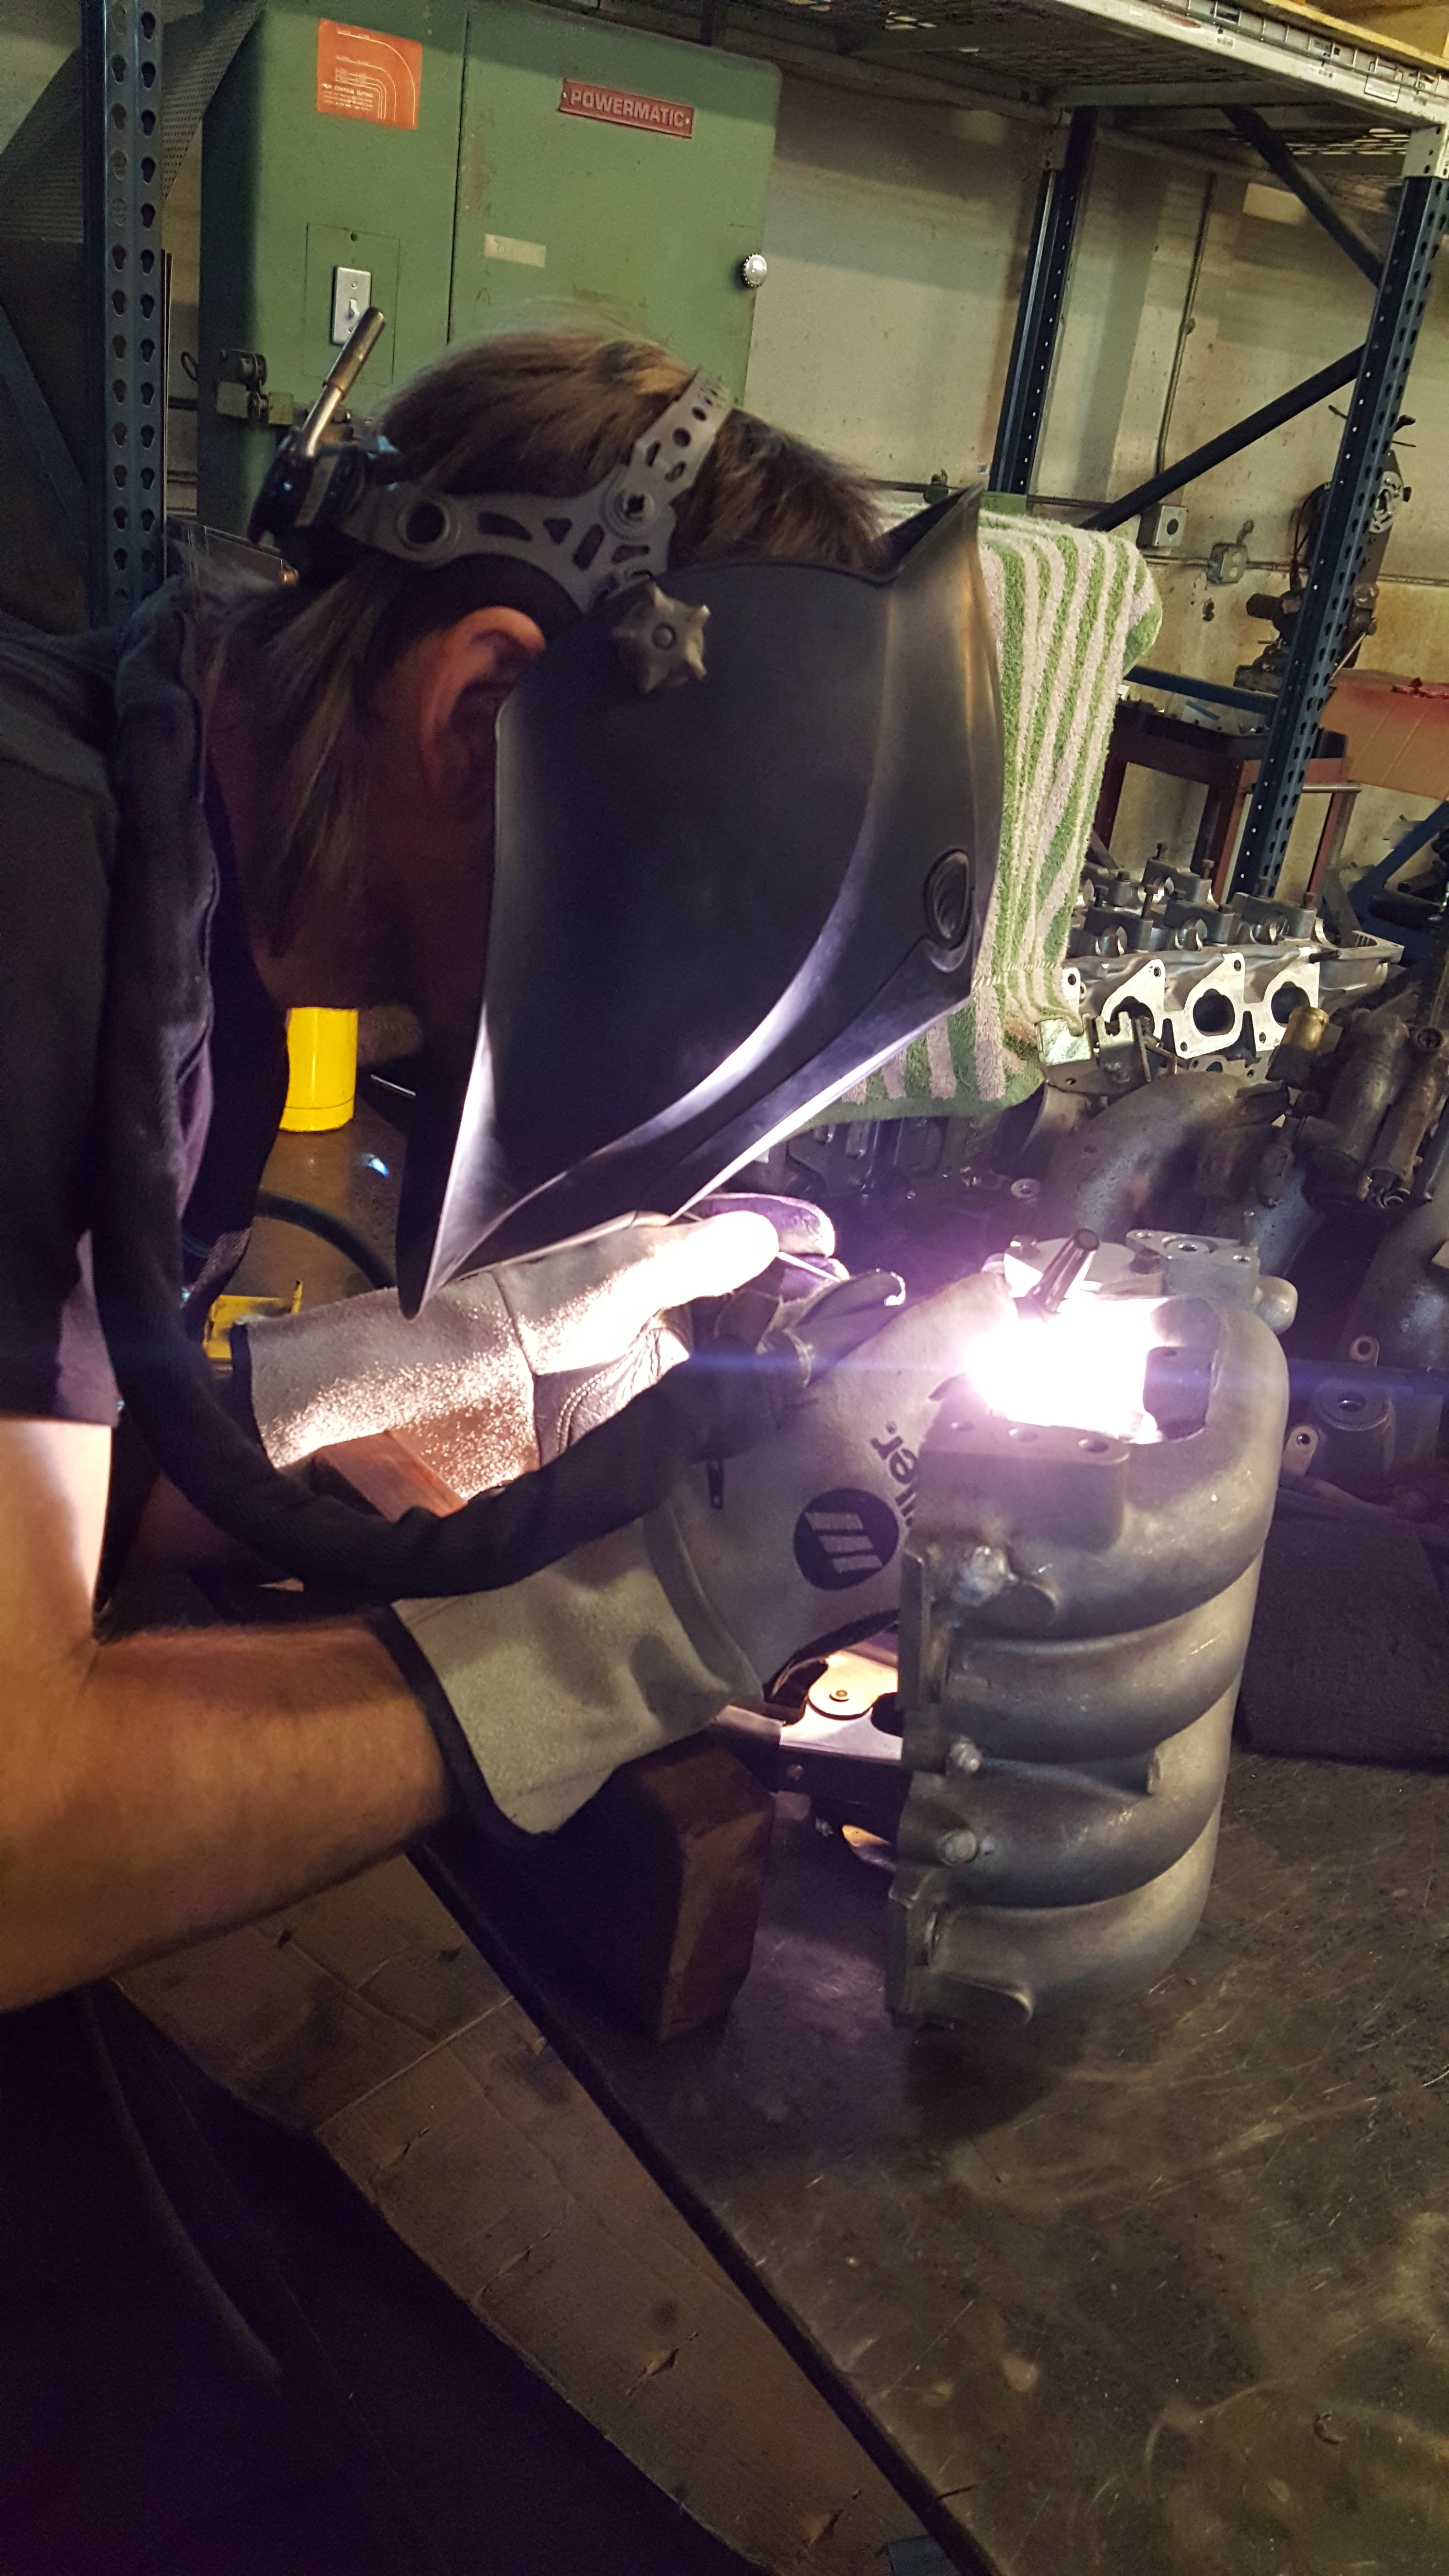
Since I had everything apart.. I decided to get rid of all my block off plates and make sure I don't have to deal with any potential leaks again. Had Dan at Rad Industries Weld up the Upper Intake Manifold Vac Ports. You know you got a good one when they don't just pull out of the Alum... This took me the better part of an hour to remove all of them. Even used a Torch!
Dan Welding up the Vac Ports
Off topic a bit.... It seems like no matter how well I try to plan things... It's almost impossible to order ALL AN fittings at once and come away with the everything fitting perfect. Had to make a couple changes with my list... And one of these had to be ordered as well: 180 degree XRP PTFE Hose end... Really nice quality too!
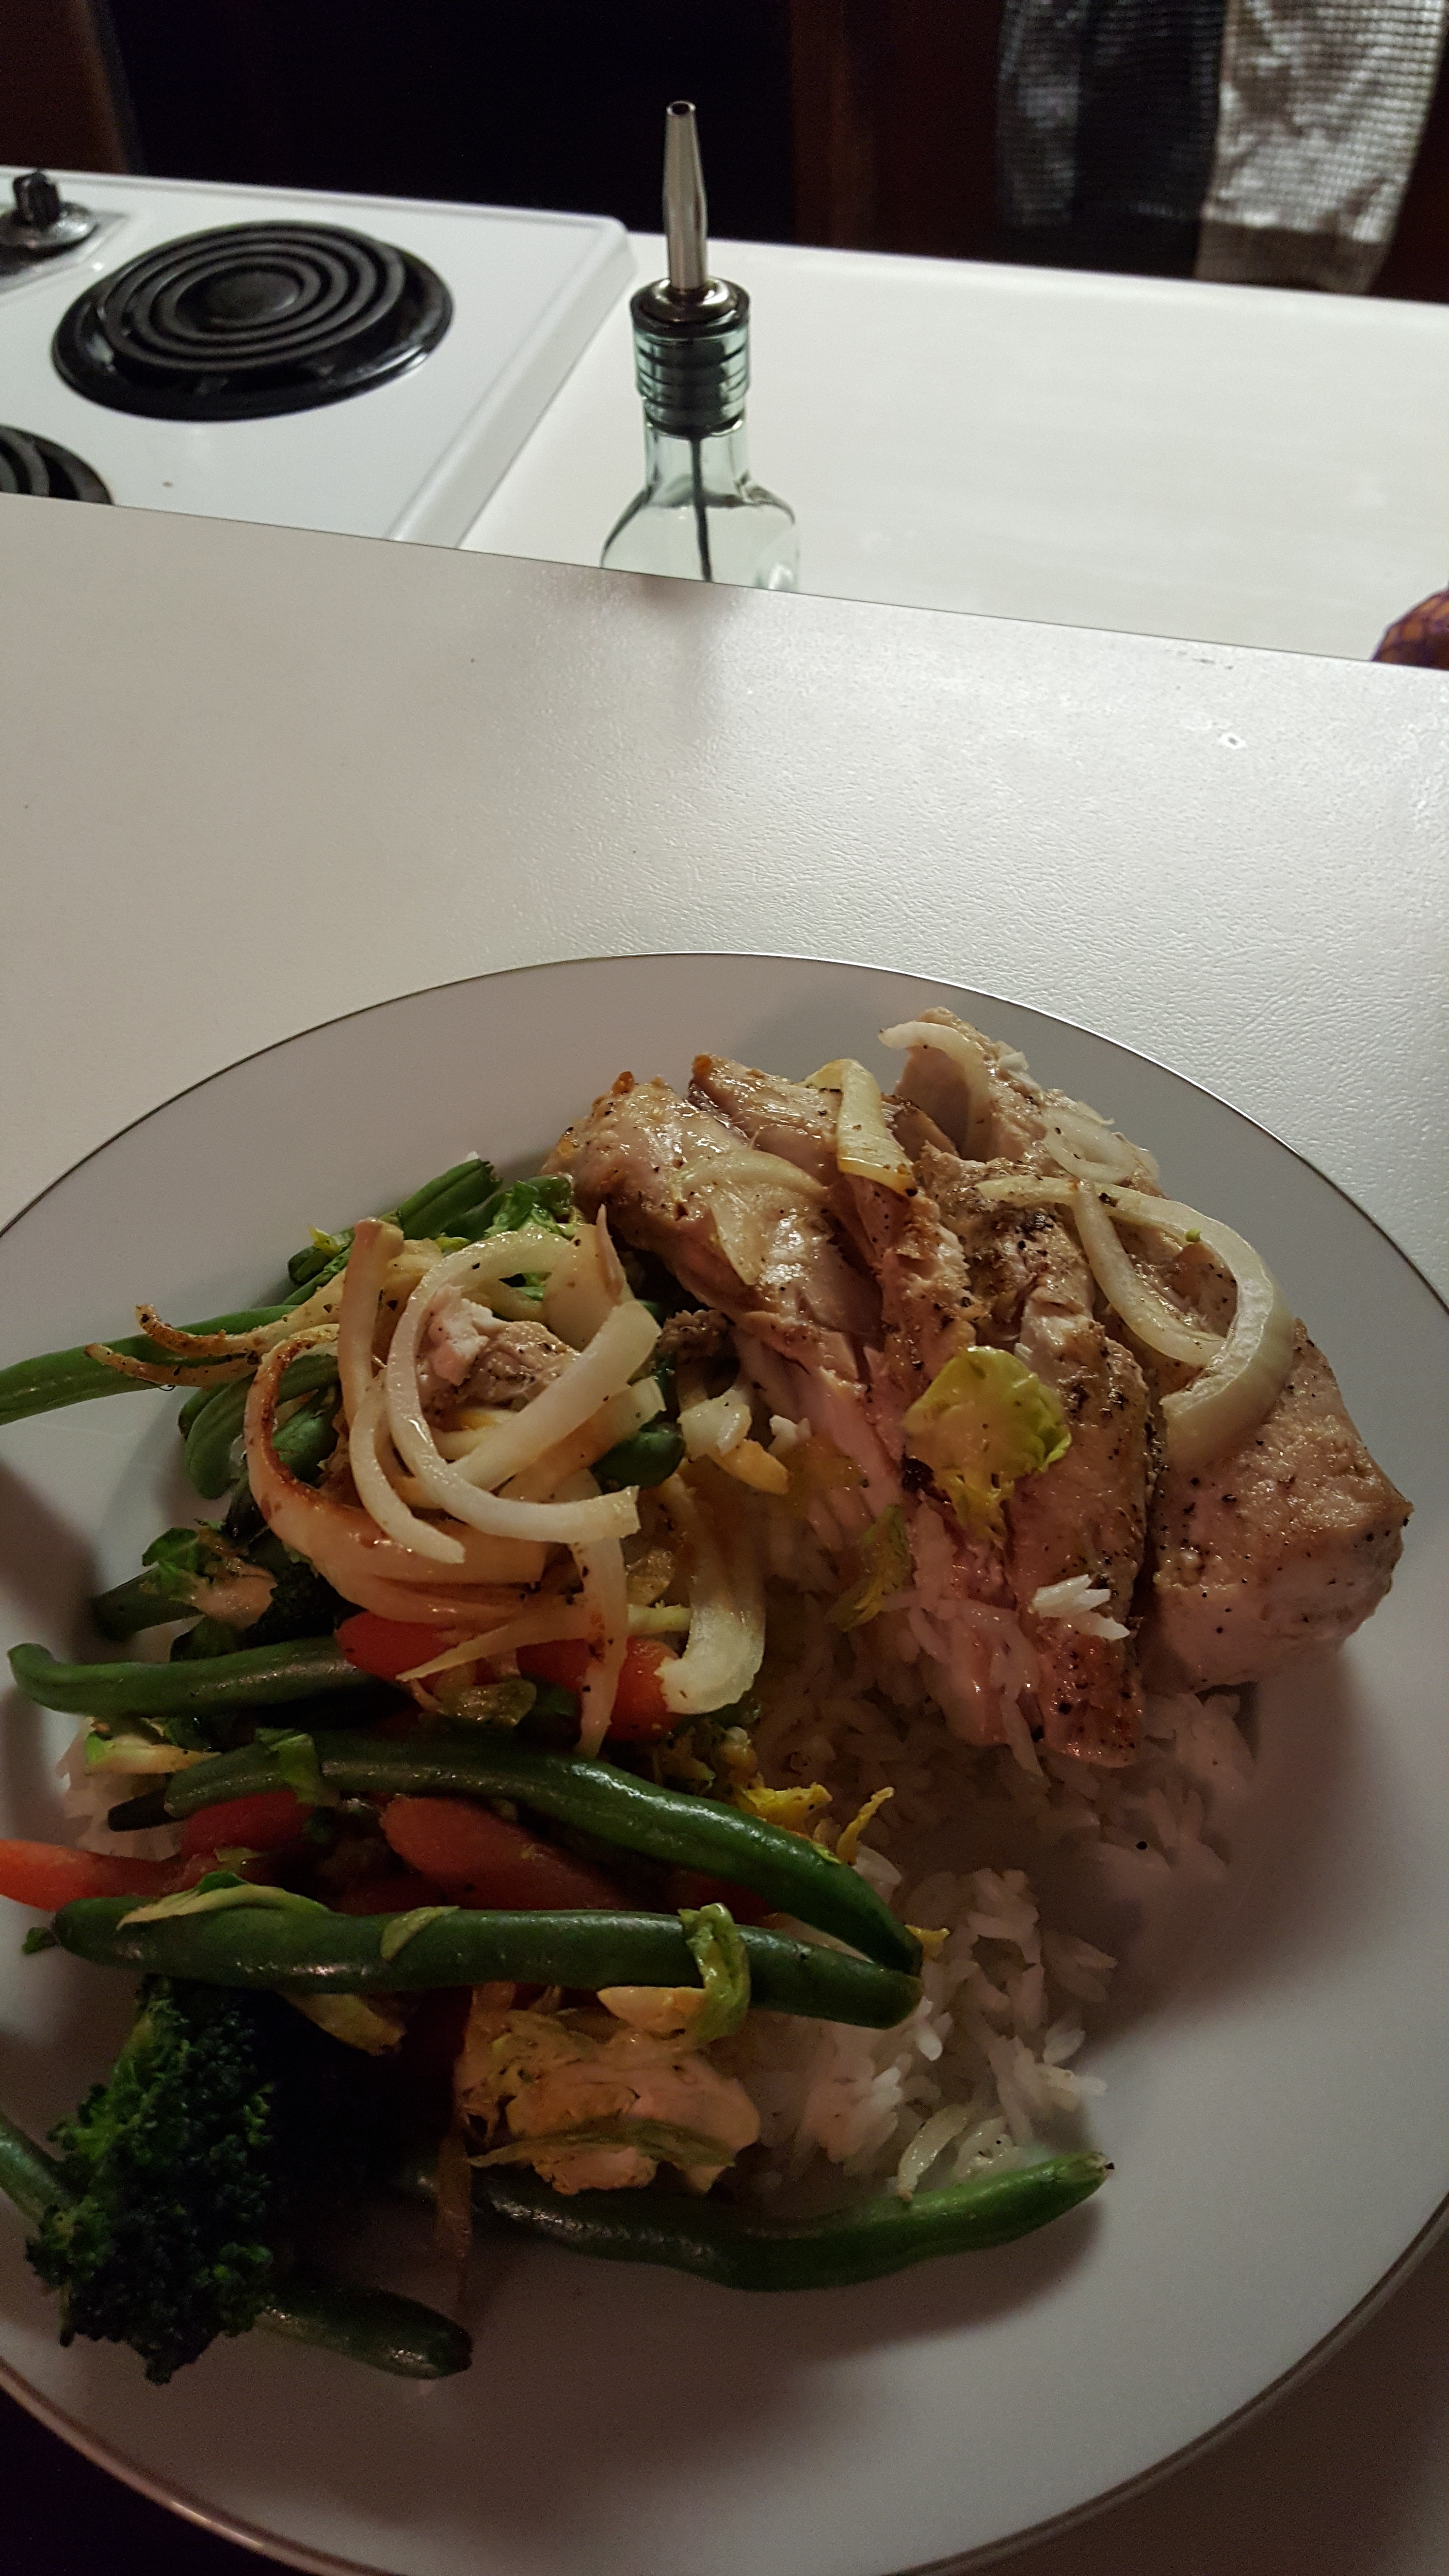
Made some dinner
.... and woke up nice and early to get a head start on coating some Engine Parts with High Temp Ceramic Coating. I've always been really interested in how this stuff is going to hold up. Although I'm not going to put it on anything exhaust related...the LIM will at least...be very close to one of the hottest parts of the set up.
Taping everything up takes time!... I usually wait till later on at night when I have to respect our neighbors and be quiet to do the noiseless stuff!
I got a new Shop hand.... His name is Turbo, he literally loves sitting right there for hours on end!
Sprayed the parts with the Exhaust Coating and got started with the install of the new fuel system.
All AN-8 Lines to and from the rail. This meant going through the Factory Sheet metal with some Bulk-head AN Fittings. Got these from Summit Racing. Measured twice..and cut once!
Turned out pretty good! But finding the correct spacing so that I could still fasten them both down despite the other being installed...and Planning for the future Fire-partition took a lot of time. Either the fittings were too close...or they were too close to the frame rail under the car. Finding the correct placement was a little more time consuming than I was hoping..but it's all part of the process.
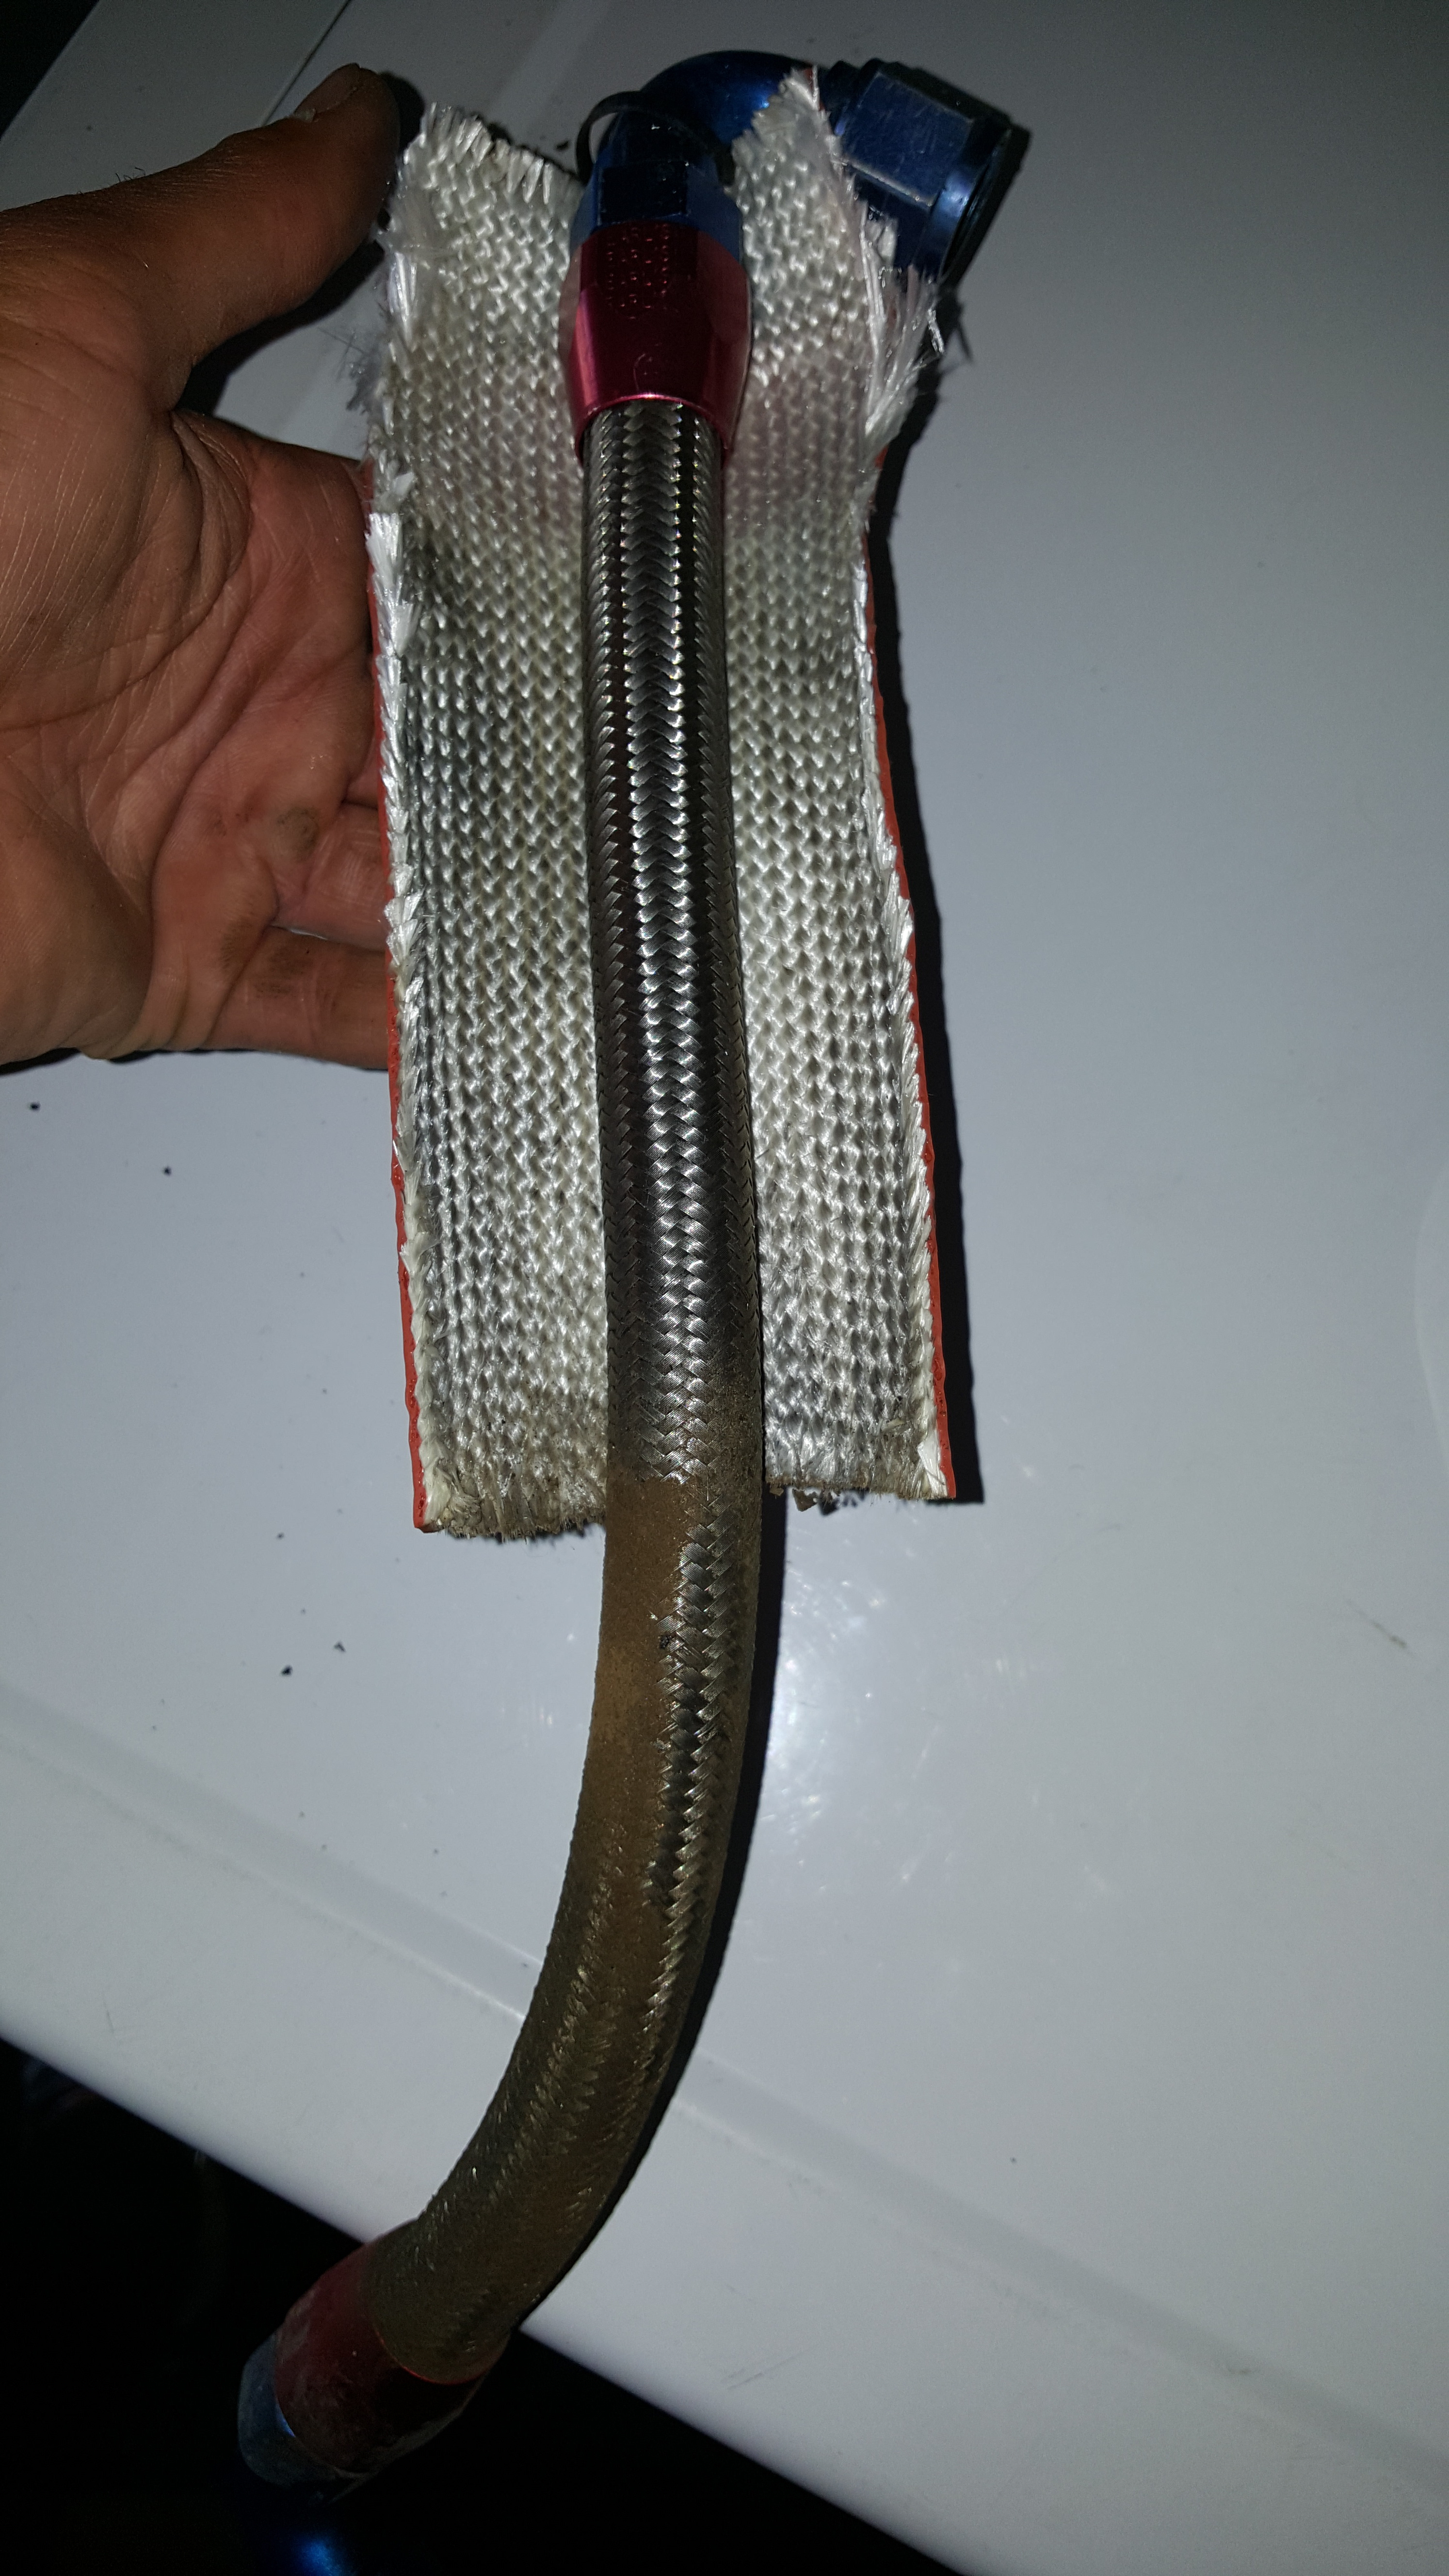
Made some more Fuel lines and was able to cover them in PTP Turbo Blankets Fire Sleeve
This stuff works Great and is just as high quality as all their other products. It also installs VERY well! Easier than the old stuff.
Then I relized I didn't like where the new fuel set up was sitting.
More Updates in the morning... I'm passing out as I type this.
While I wait for a few key parts to show up, I got a whole lot done on some smaller parts of the big puzzle.
I ended up going with one of the new Radium Engineering 10 Micron Stainless Steel Mesh Filters with the Heat Sink Mount as well. This thing is SICK! Pure quality and precision machining! Solid machined labels into the filter so that there's no way to mix up the Direction of Flow In/Out. I also got my New EGT sensors in. Pretty trick too!...2 Stroke Specific 1/8 NPT Closed Tip (for better Longevity) K-Type EGT Sensors!! Pumped on these!!
New Parts!!
Then I was able to roughly Visualize exactly how I wanted to lay the whole set up out. I feel like it's important to do some pre-brain storming so that you have an idea of what you may want it to look like... But sometimes things change when you get all the parts. So I ran through a couple different set ups and figured I liked this lay-out the best..
Since I had everything apart.. I decided to get rid of all my block off plates and make sure I don't have to deal with any potential leaks again. Had Dan at Rad Industries Weld up the Upper Intake Manifold Vac Ports. You know you got a good one when they don't just pull out of the Alum... This took me the better part of an hour to remove all of them. Even used a Torch!
Dan Welding up the Vac Ports
Off topic a bit.... It seems like no matter how well I try to plan things... It's almost impossible to order ALL AN fittings at once and come away with the everything fitting perfect. Had to make a couple changes with my list... And one of these had to be ordered as well: 180 degree XRP PTFE Hose end... Really nice quality too!
Made some dinner
.... and woke up nice and early to get a head start on coating some Engine Parts with High Temp Ceramic Coating. I've always been really interested in how this stuff is going to hold up. Although I'm not going to put it on anything exhaust related...the LIM will at least...be very close to one of the hottest parts of the set up.
Taping everything up takes time!... I usually wait till later on at night when I have to respect our neighbors and be quiet to do the noiseless stuff!
I got a new Shop hand.... His name is Turbo, he literally loves sitting right there for hours on end!
Sprayed the parts with the Exhaust Coating and got started with the install of the new fuel system.
All AN-8 Lines to and from the rail. This meant going through the Factory Sheet metal with some Bulk-head AN Fittings. Got these from Summit Racing. Measured twice..and cut once!
Turned out pretty good! But finding the correct spacing so that I could still fasten them both down despite the other being installed...and Planning for the future Fire-partition took a lot of time. Either the fittings were too close...or they were too close to the frame rail under the car. Finding the correct placement was a little more time consuming than I was hoping..but it's all part of the process.
Made some more Fuel lines and was able to cover them in PTP Turbo Blankets Fire Sleeve
This stuff works Great and is just as high quality as all their other products. It also installs VERY well! Easier than the old stuff.
Then I relized I didn't like where the new fuel set up was sitting.
More Updates in the morning... I'm passing out as I type this.
02-27-16, 01:11 PM
#2488
Continued:
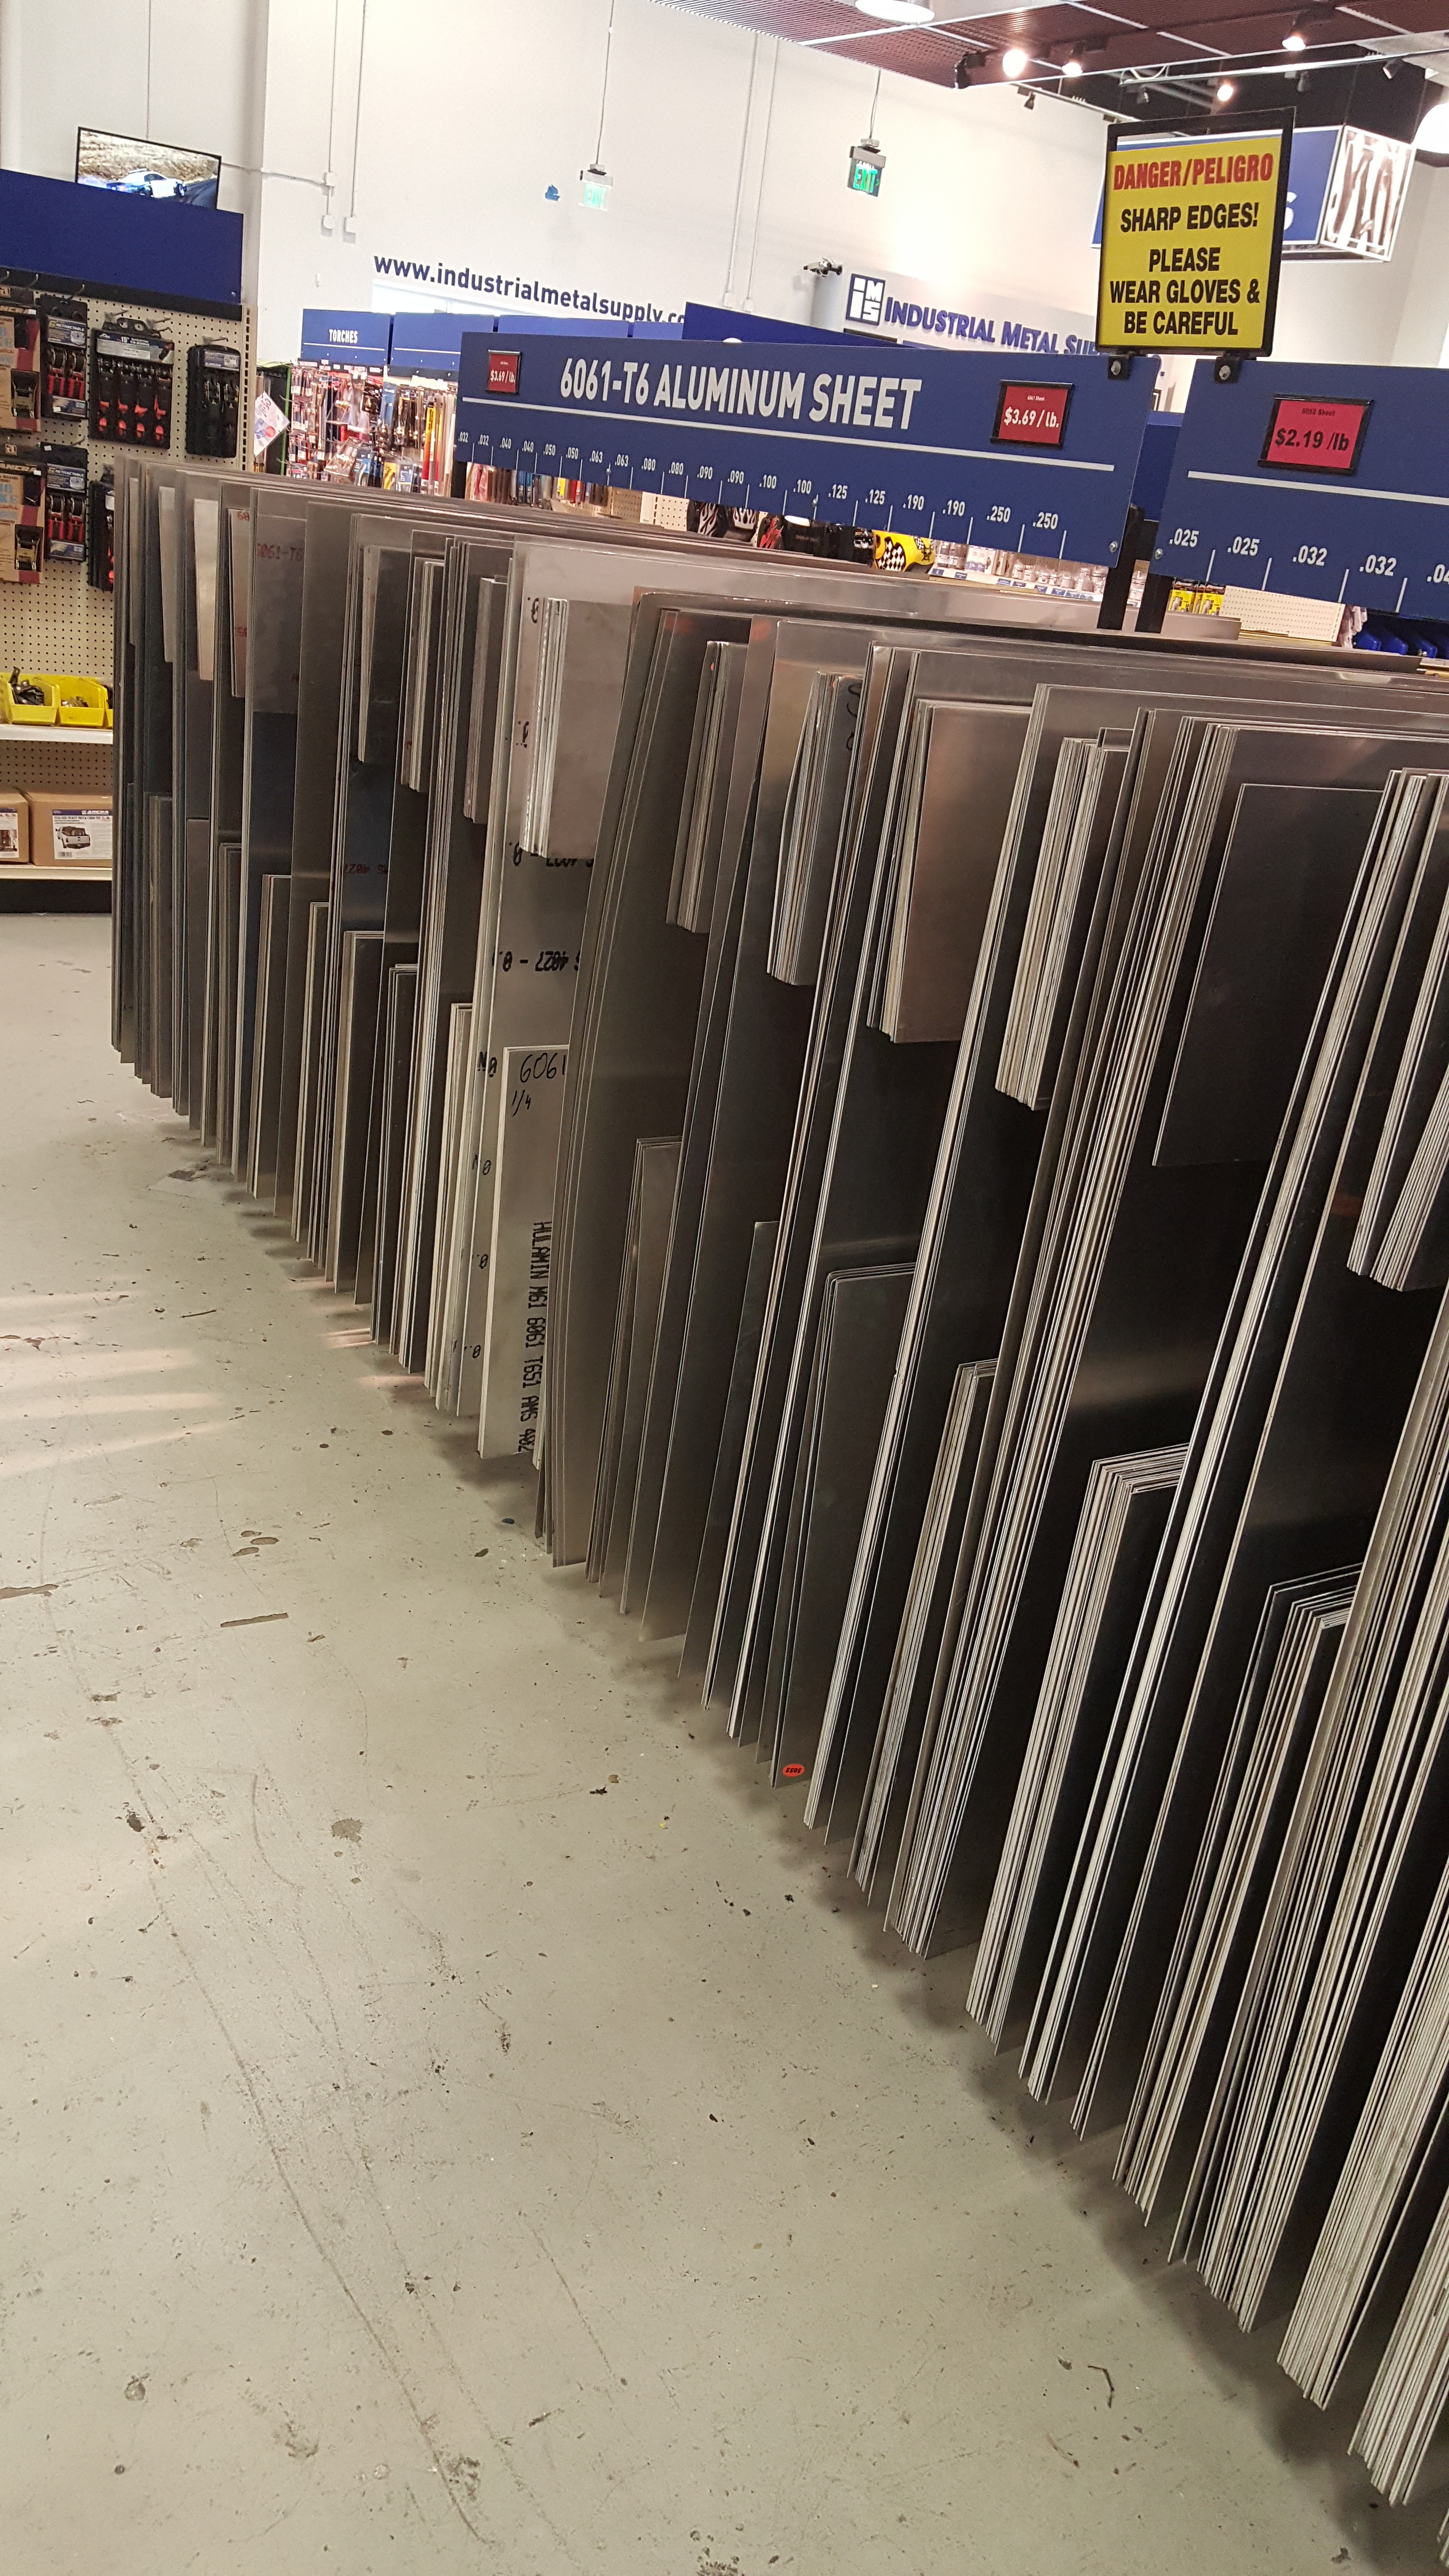
Went to a place in Orange that has a TON of industrial Metal! Check it!
Picked up some 1/8" Alum Sheet..
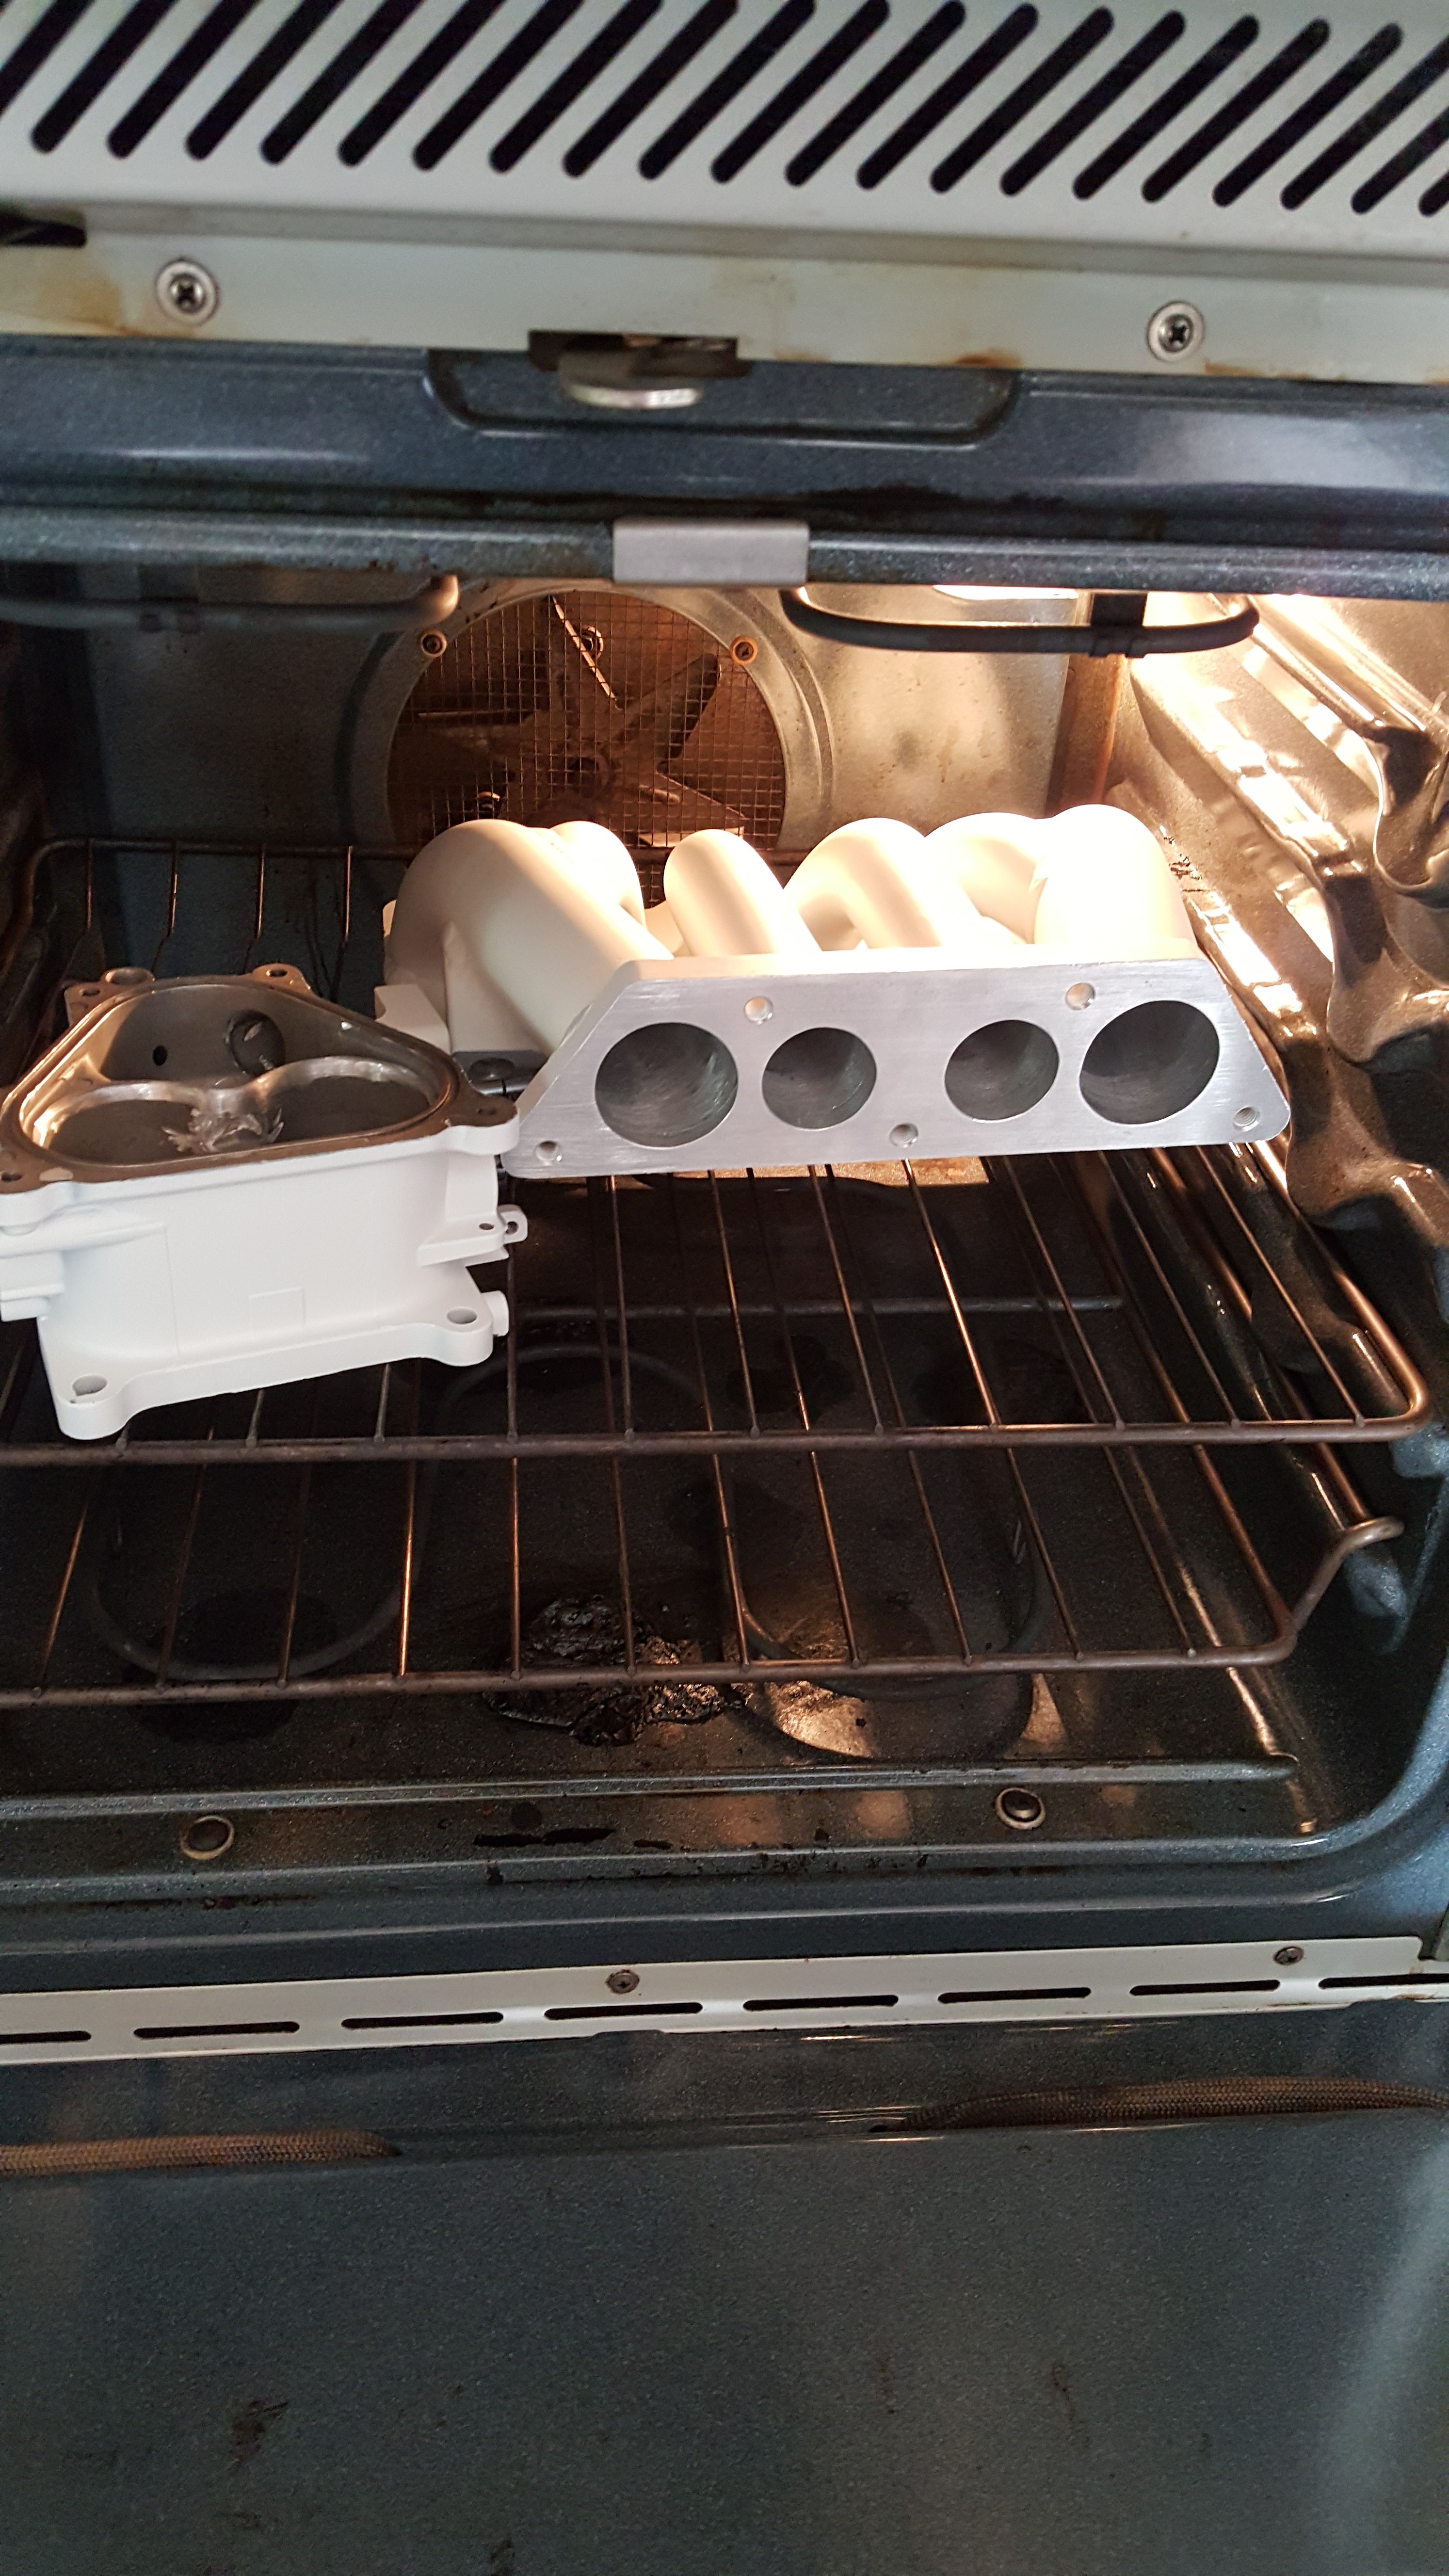
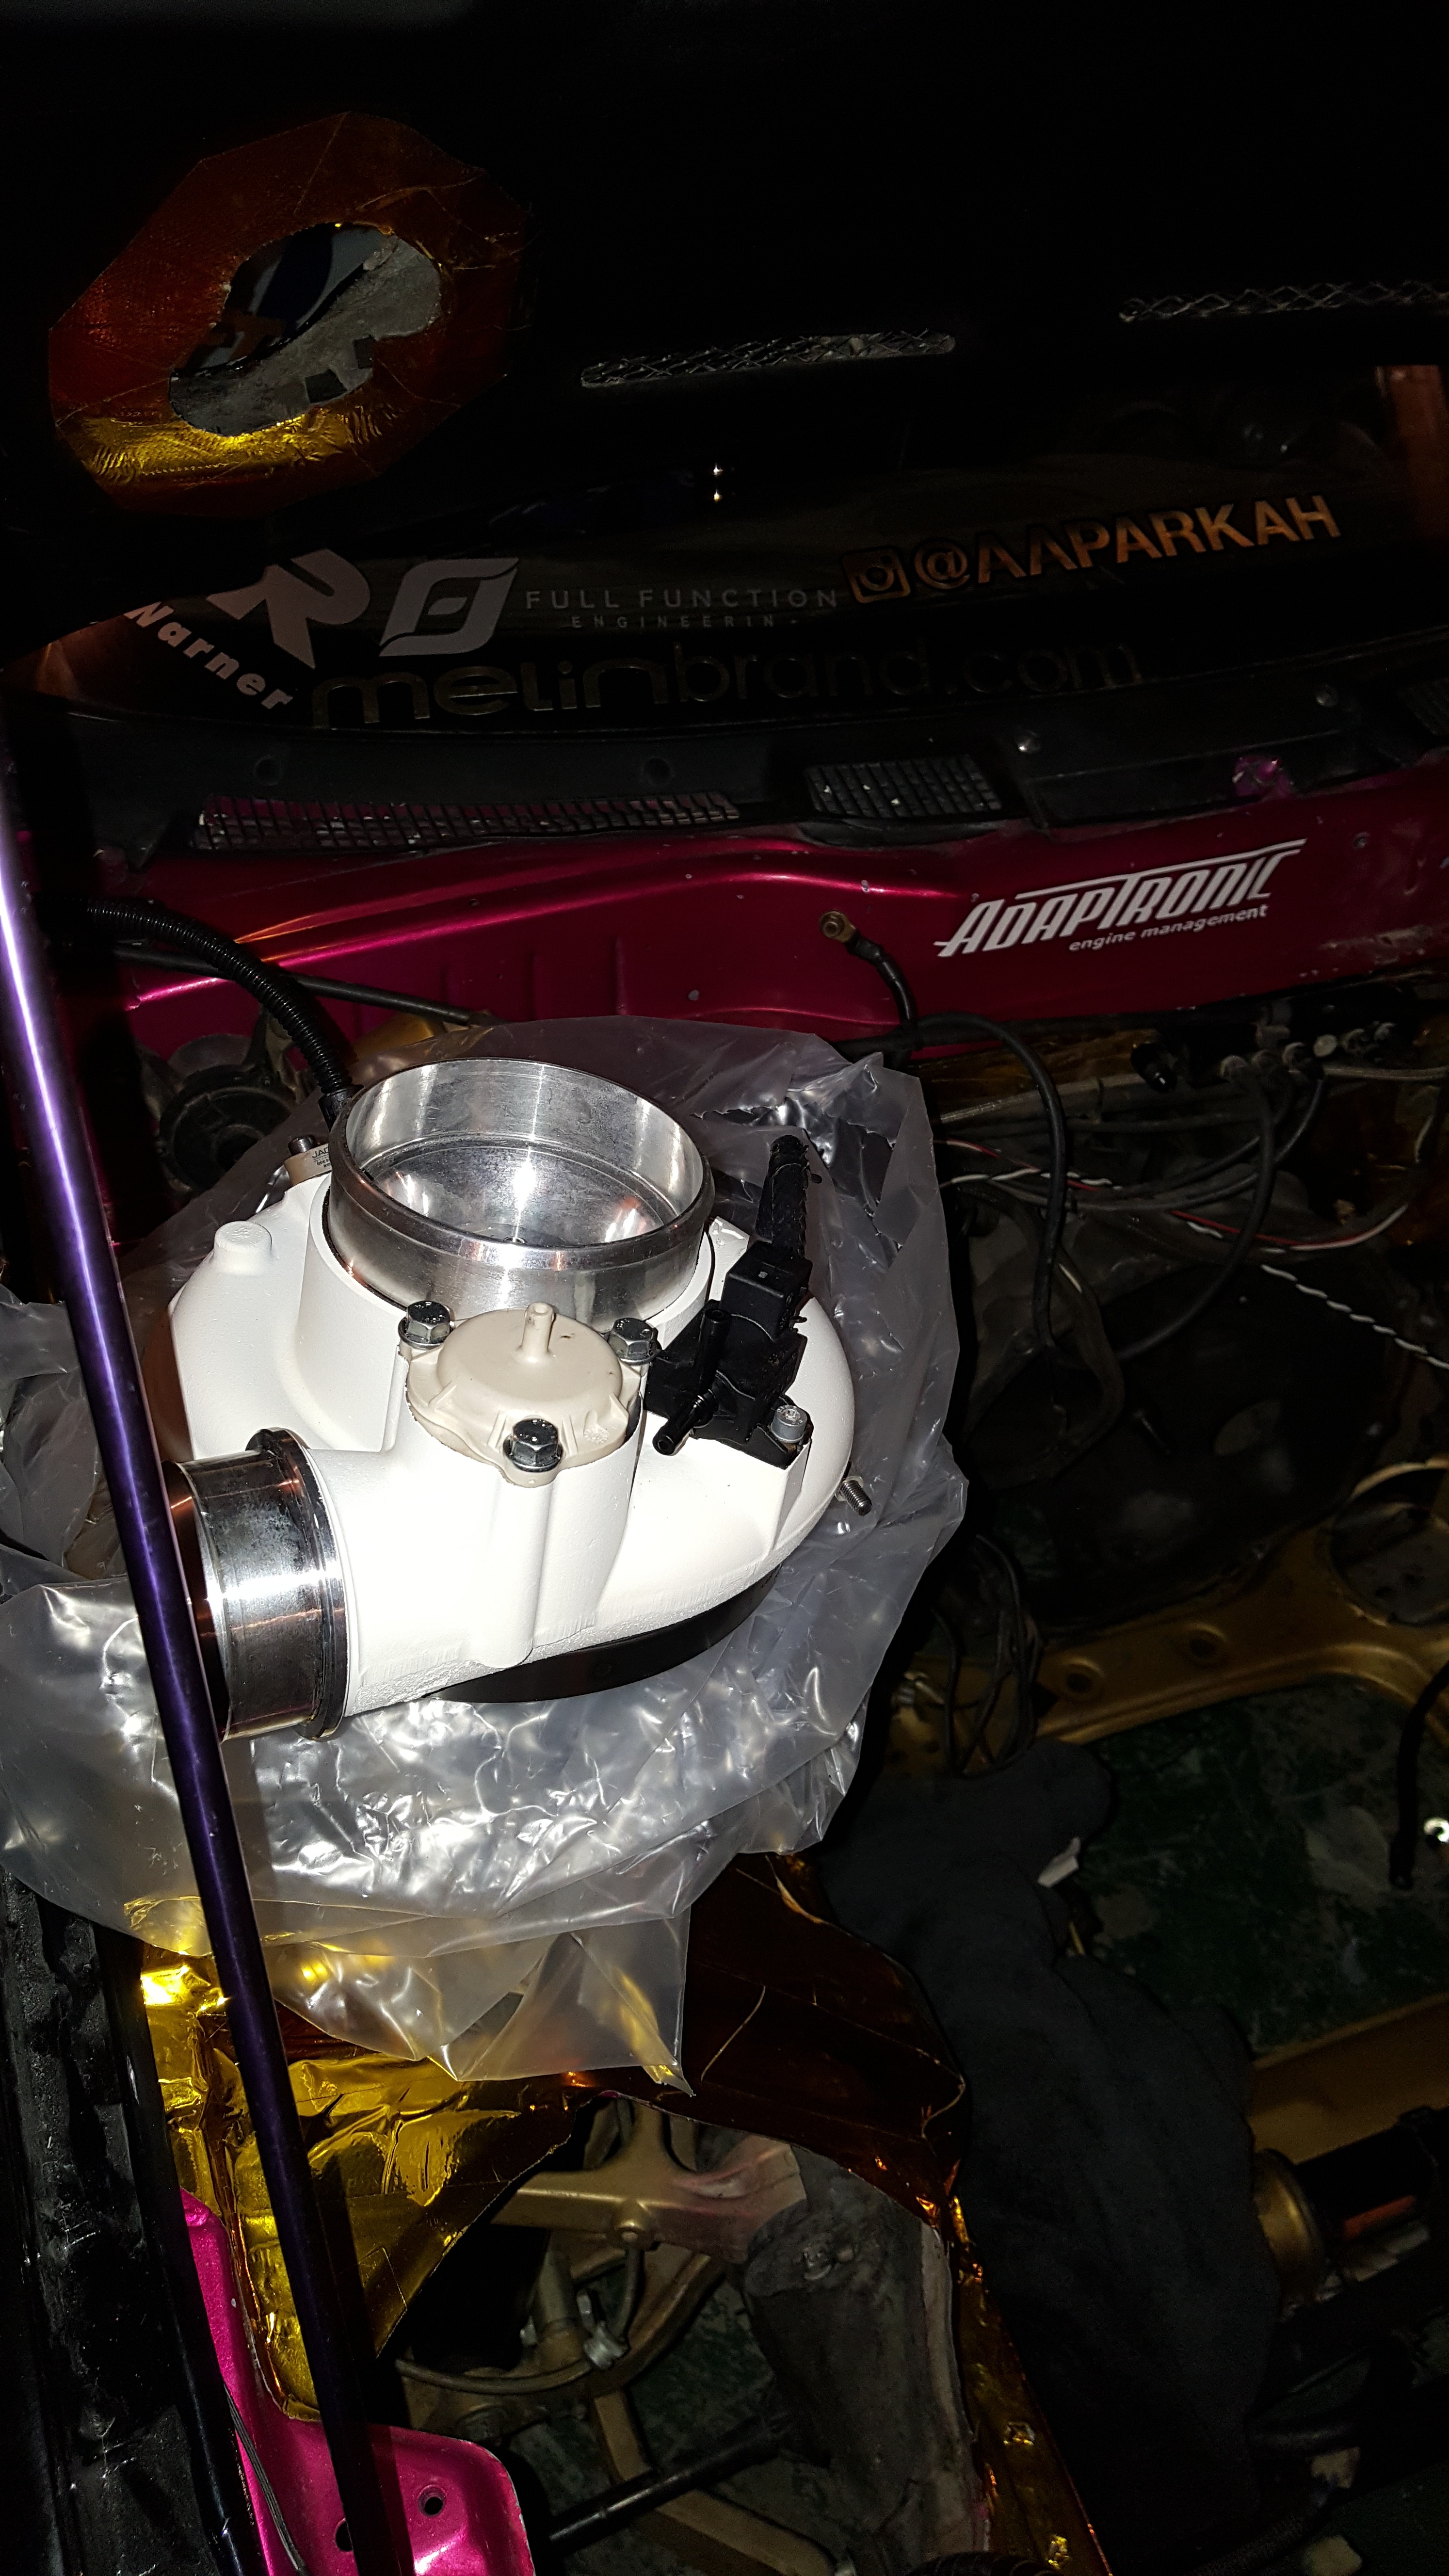
And Threw all the Ceramic painted Accessories in the Oven for a 3 part process. Time consuming... and tedius...but FAR cheaper than dropping the parts off to get Ceramic Coated. I Did the Throttle Body, Lower Intake Manifold, Upper Intake Manifold and Greddy Elbow
More on that later....
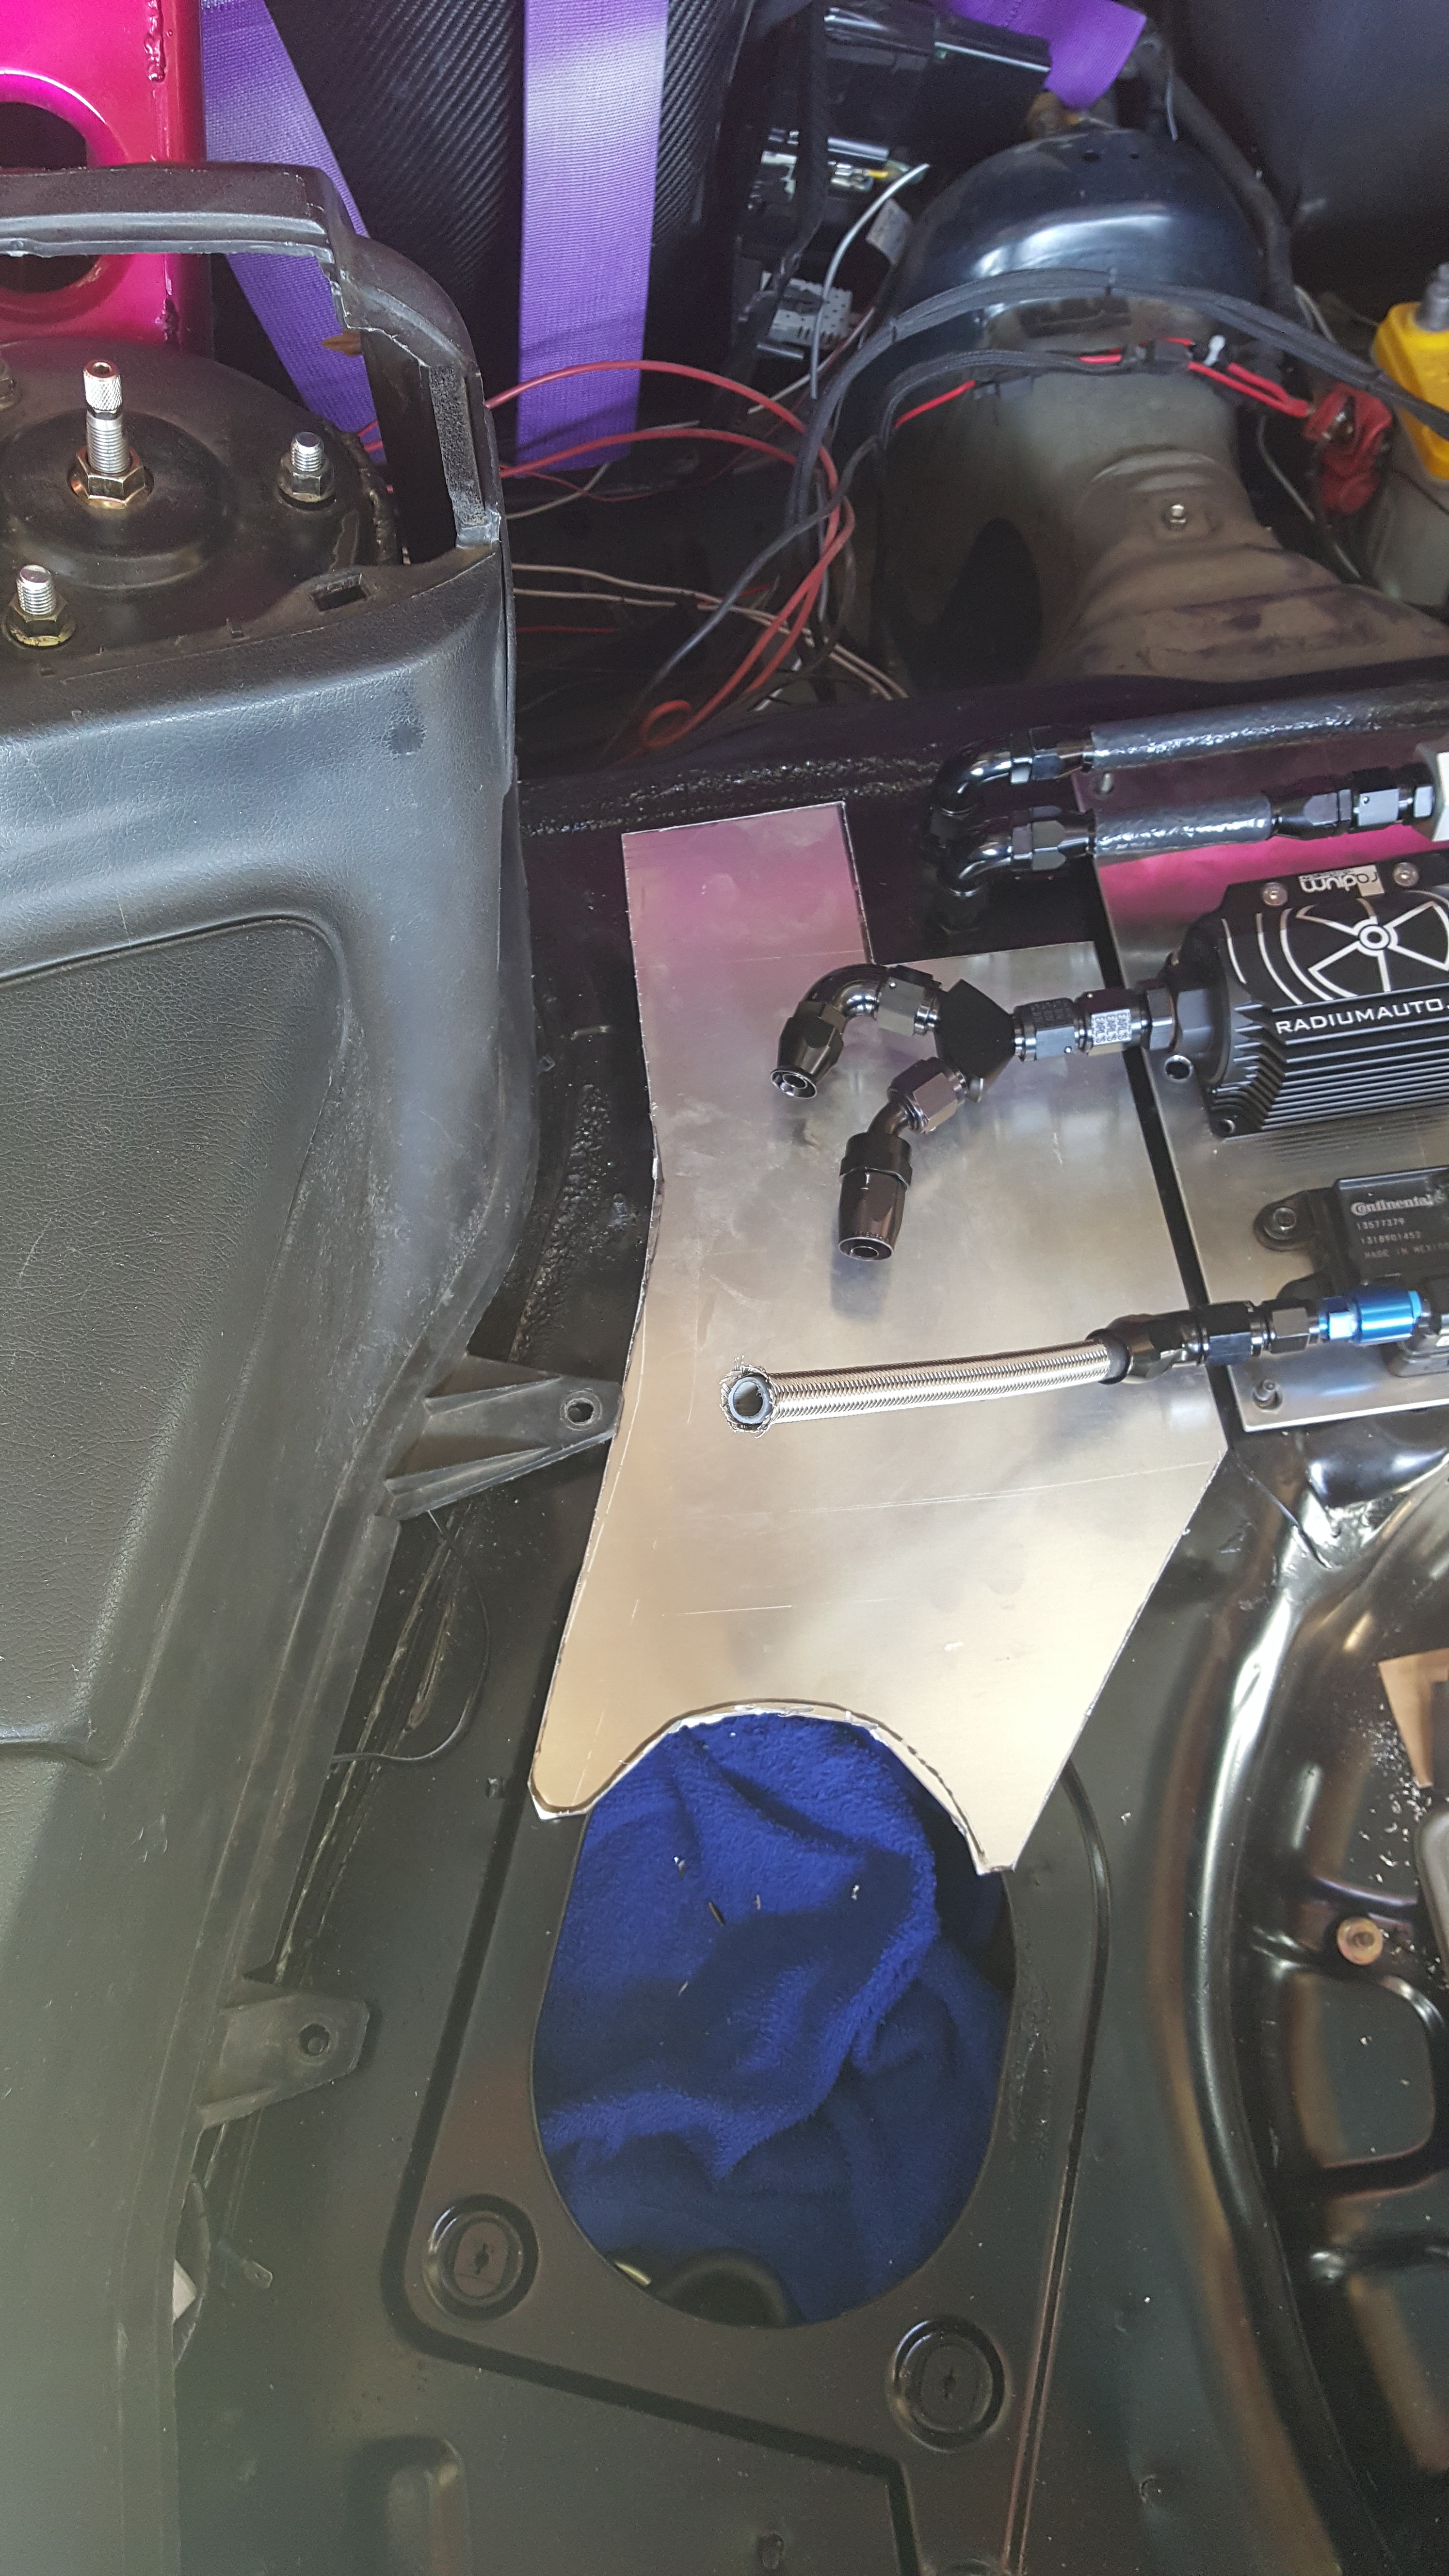
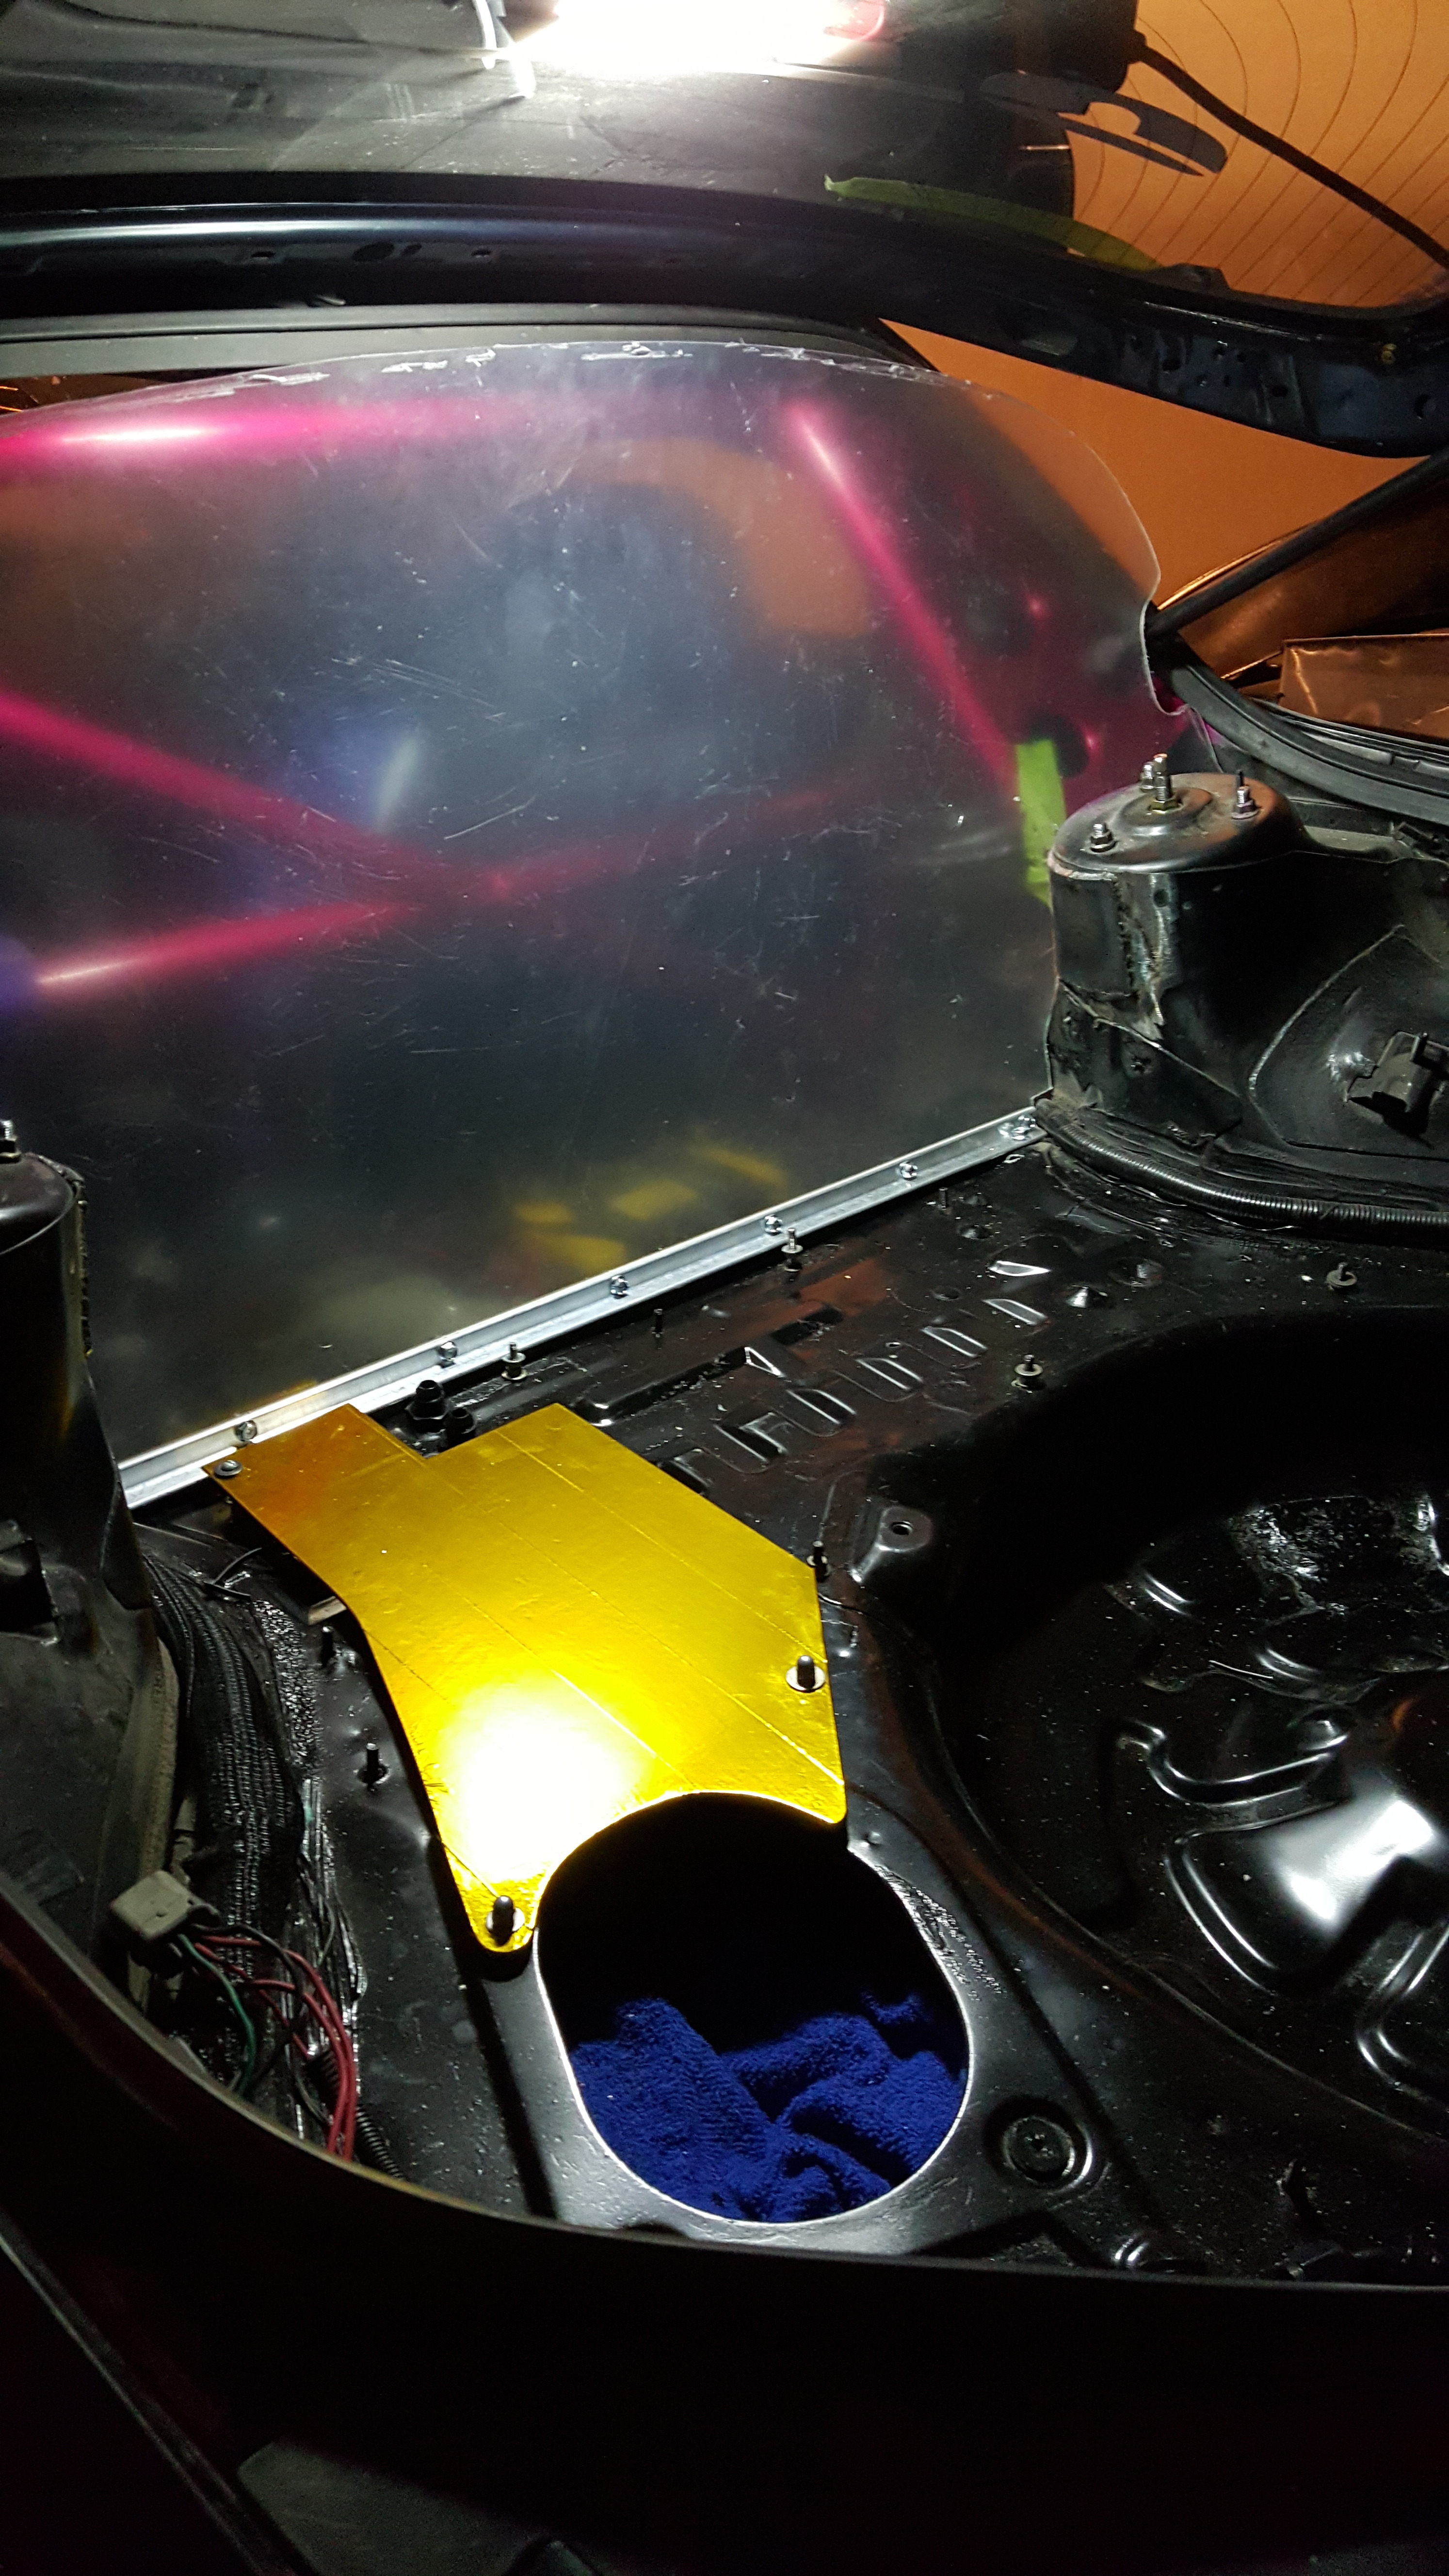
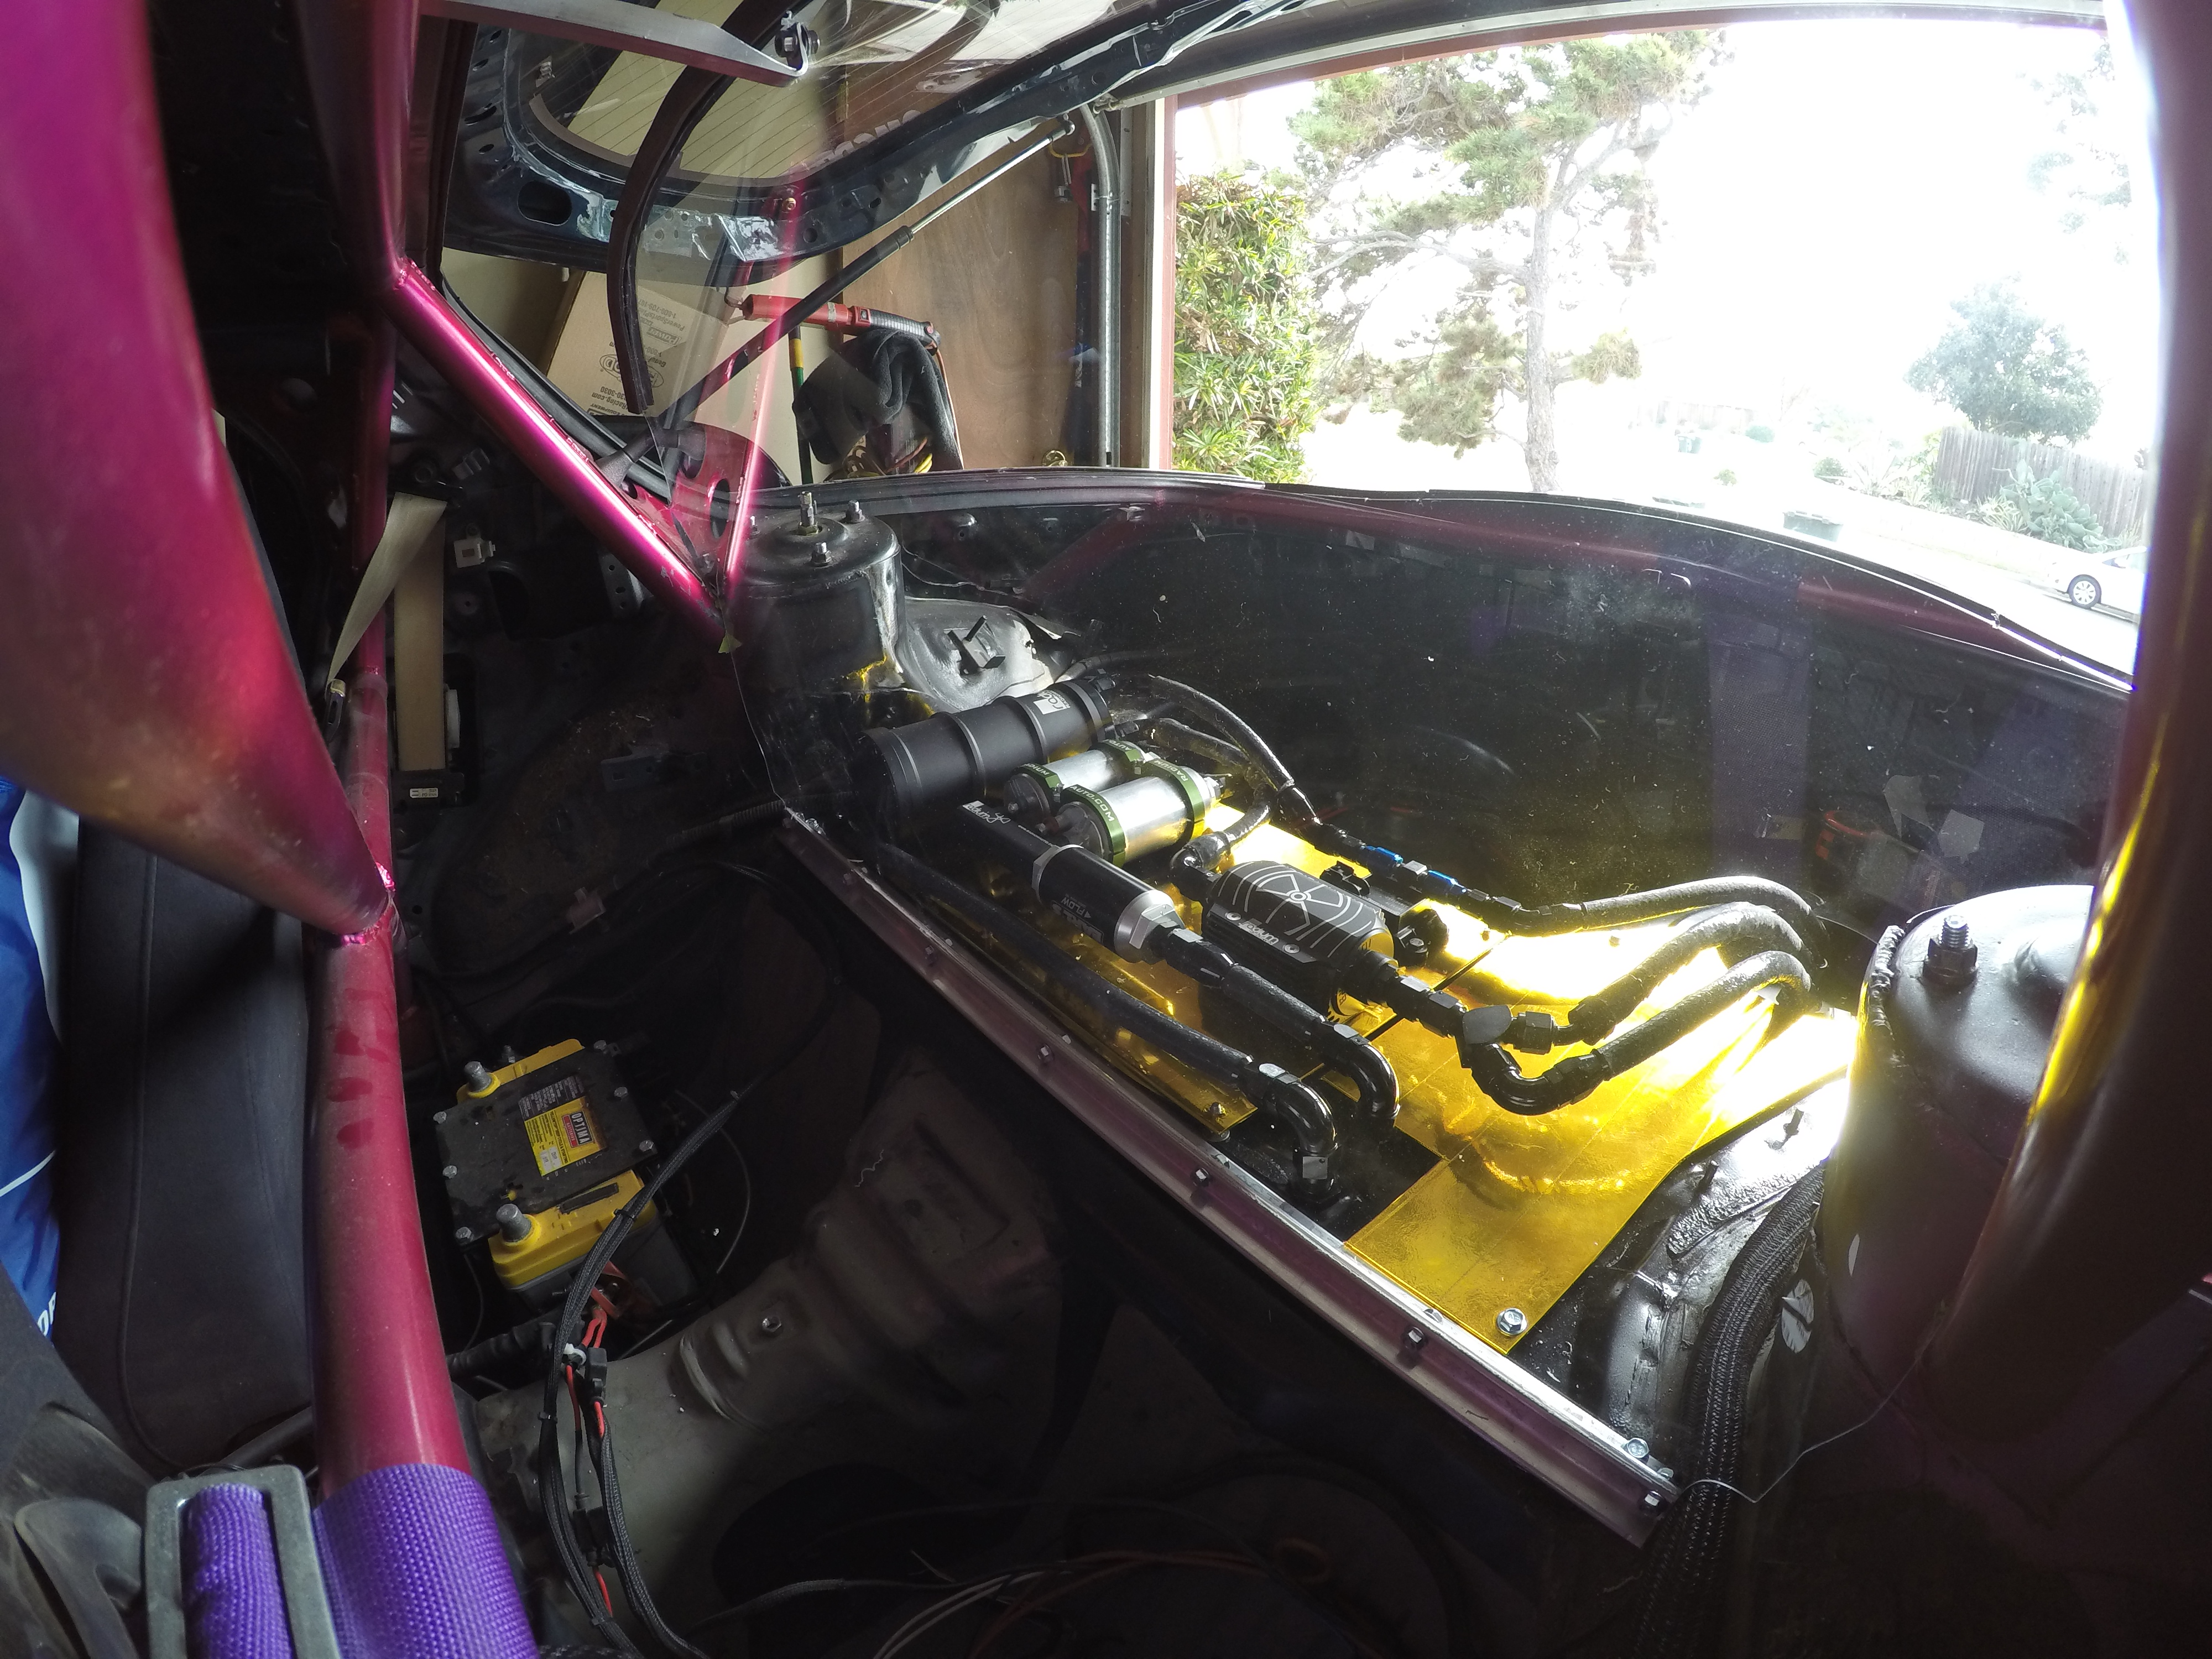
I made an initial Mock up of where I wanted my Fuel Surge Set up Plate to sit
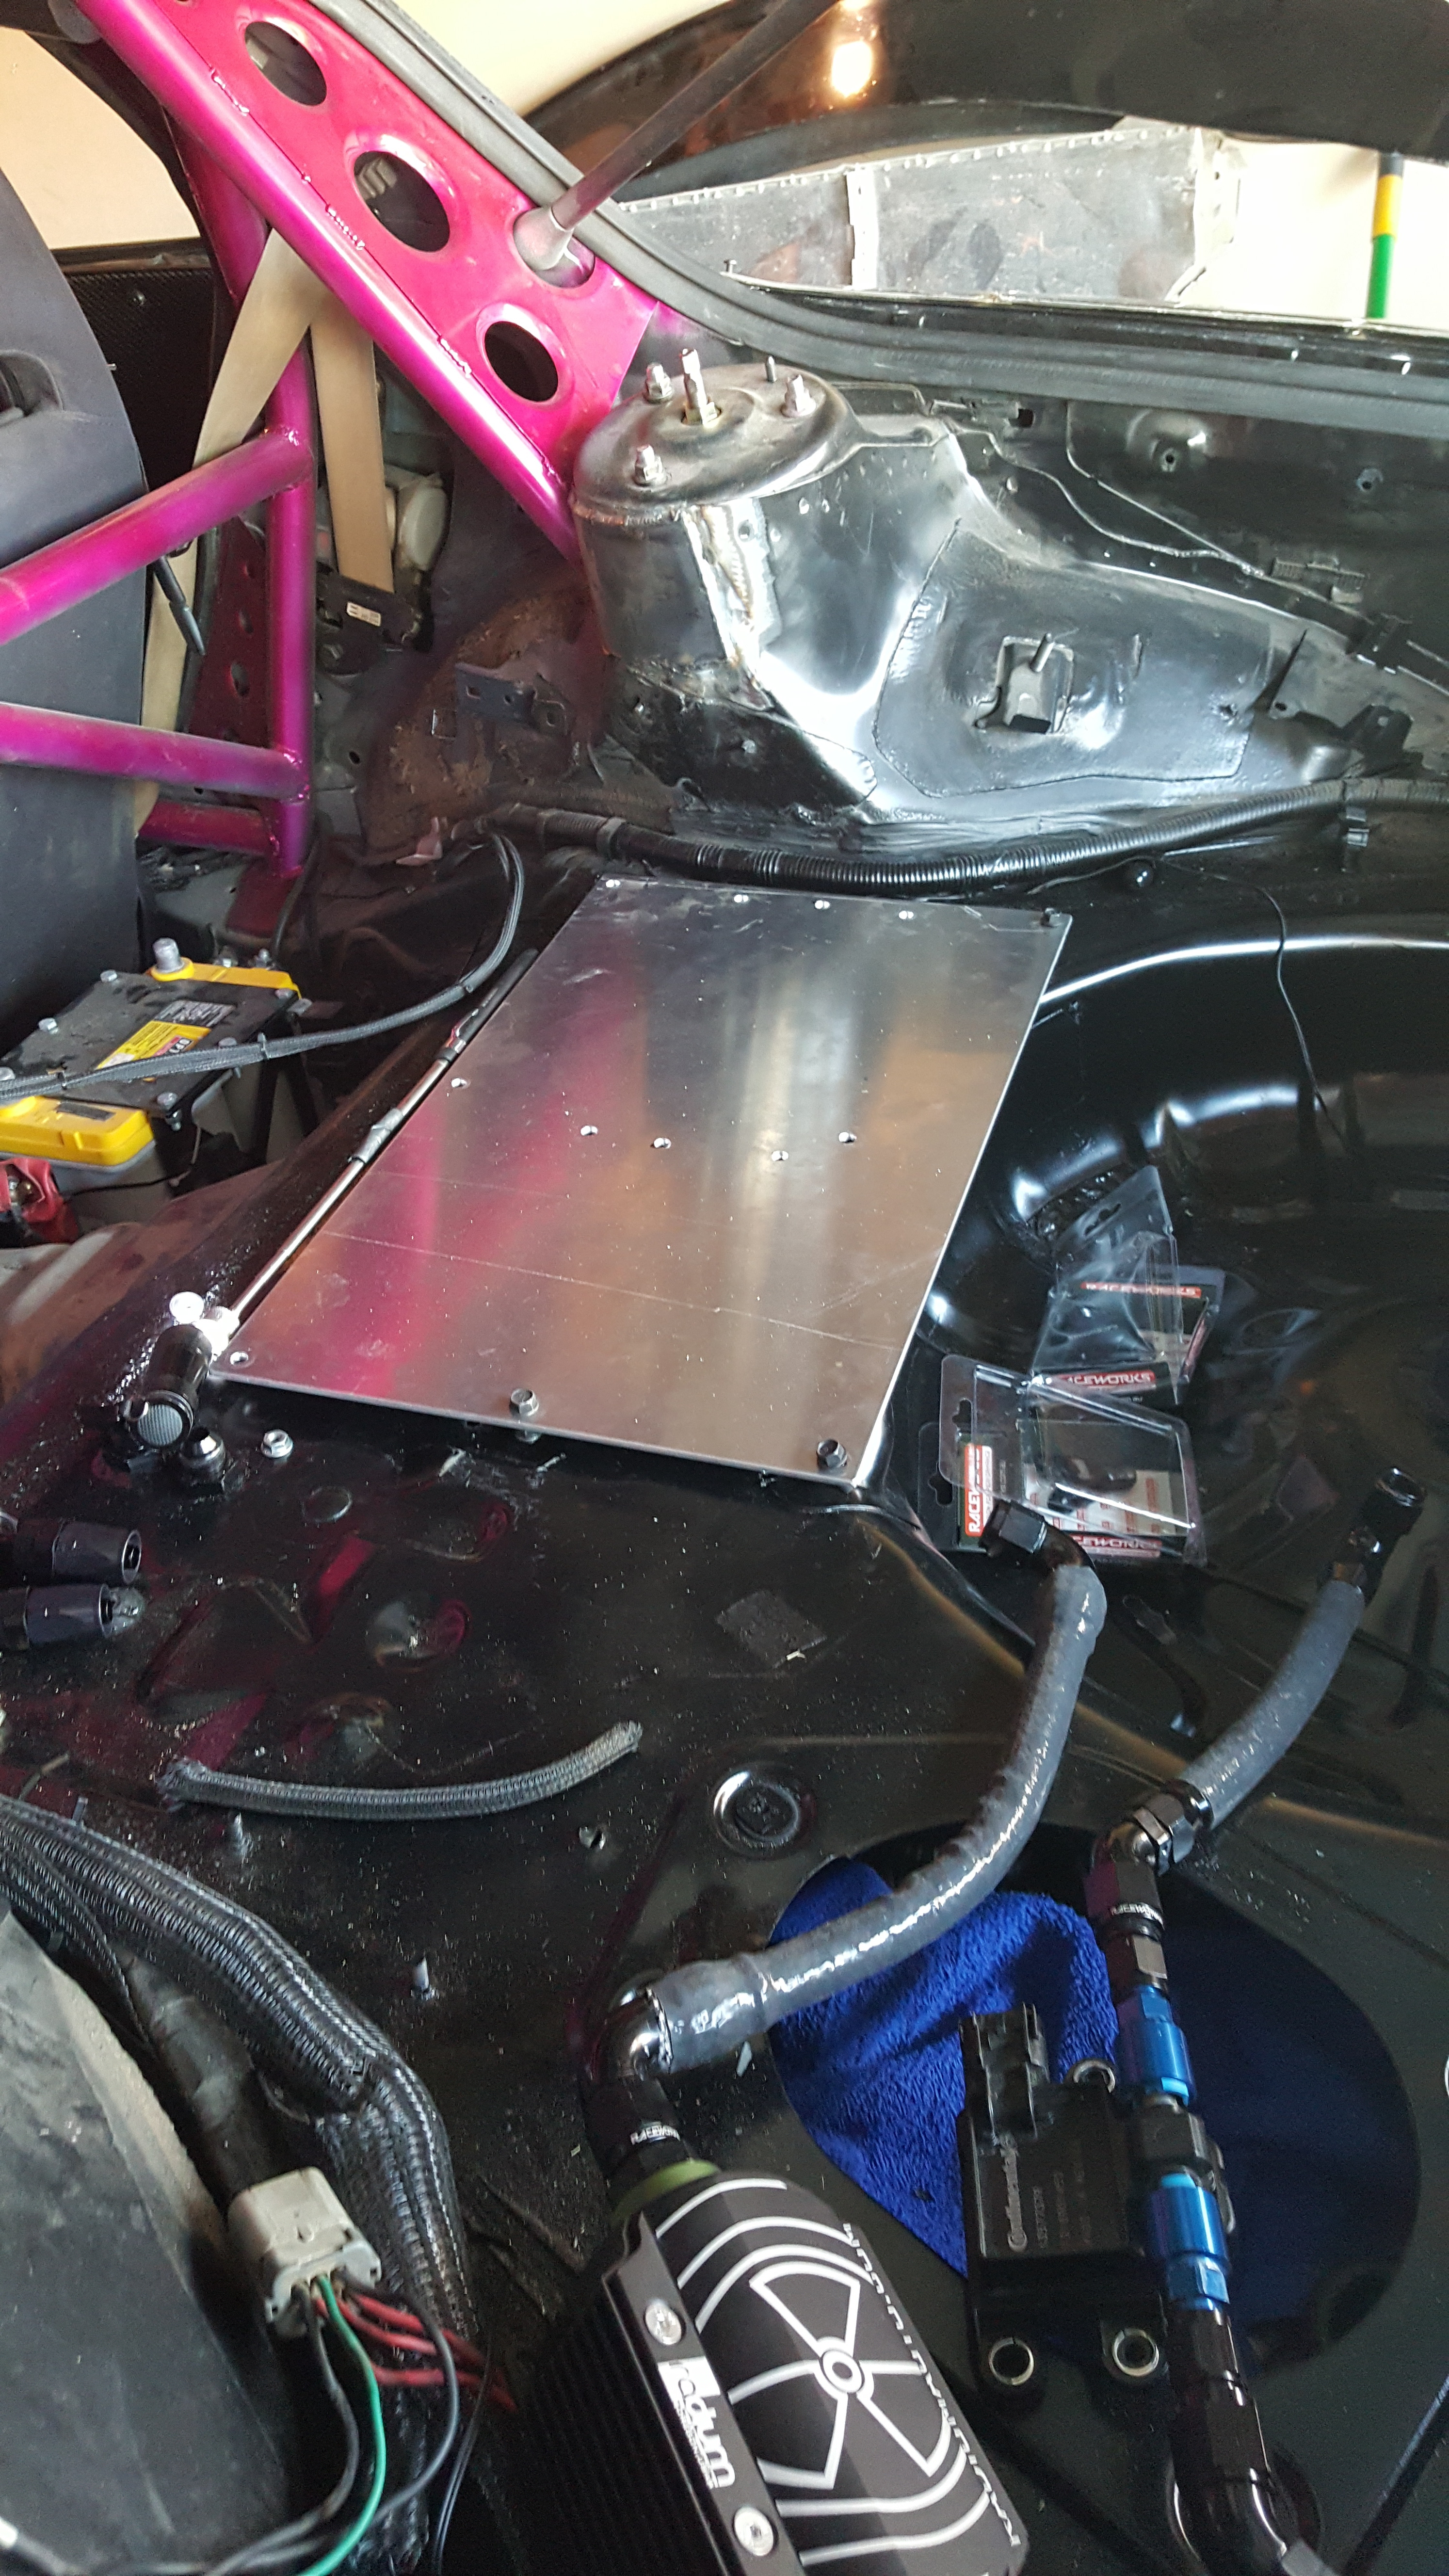
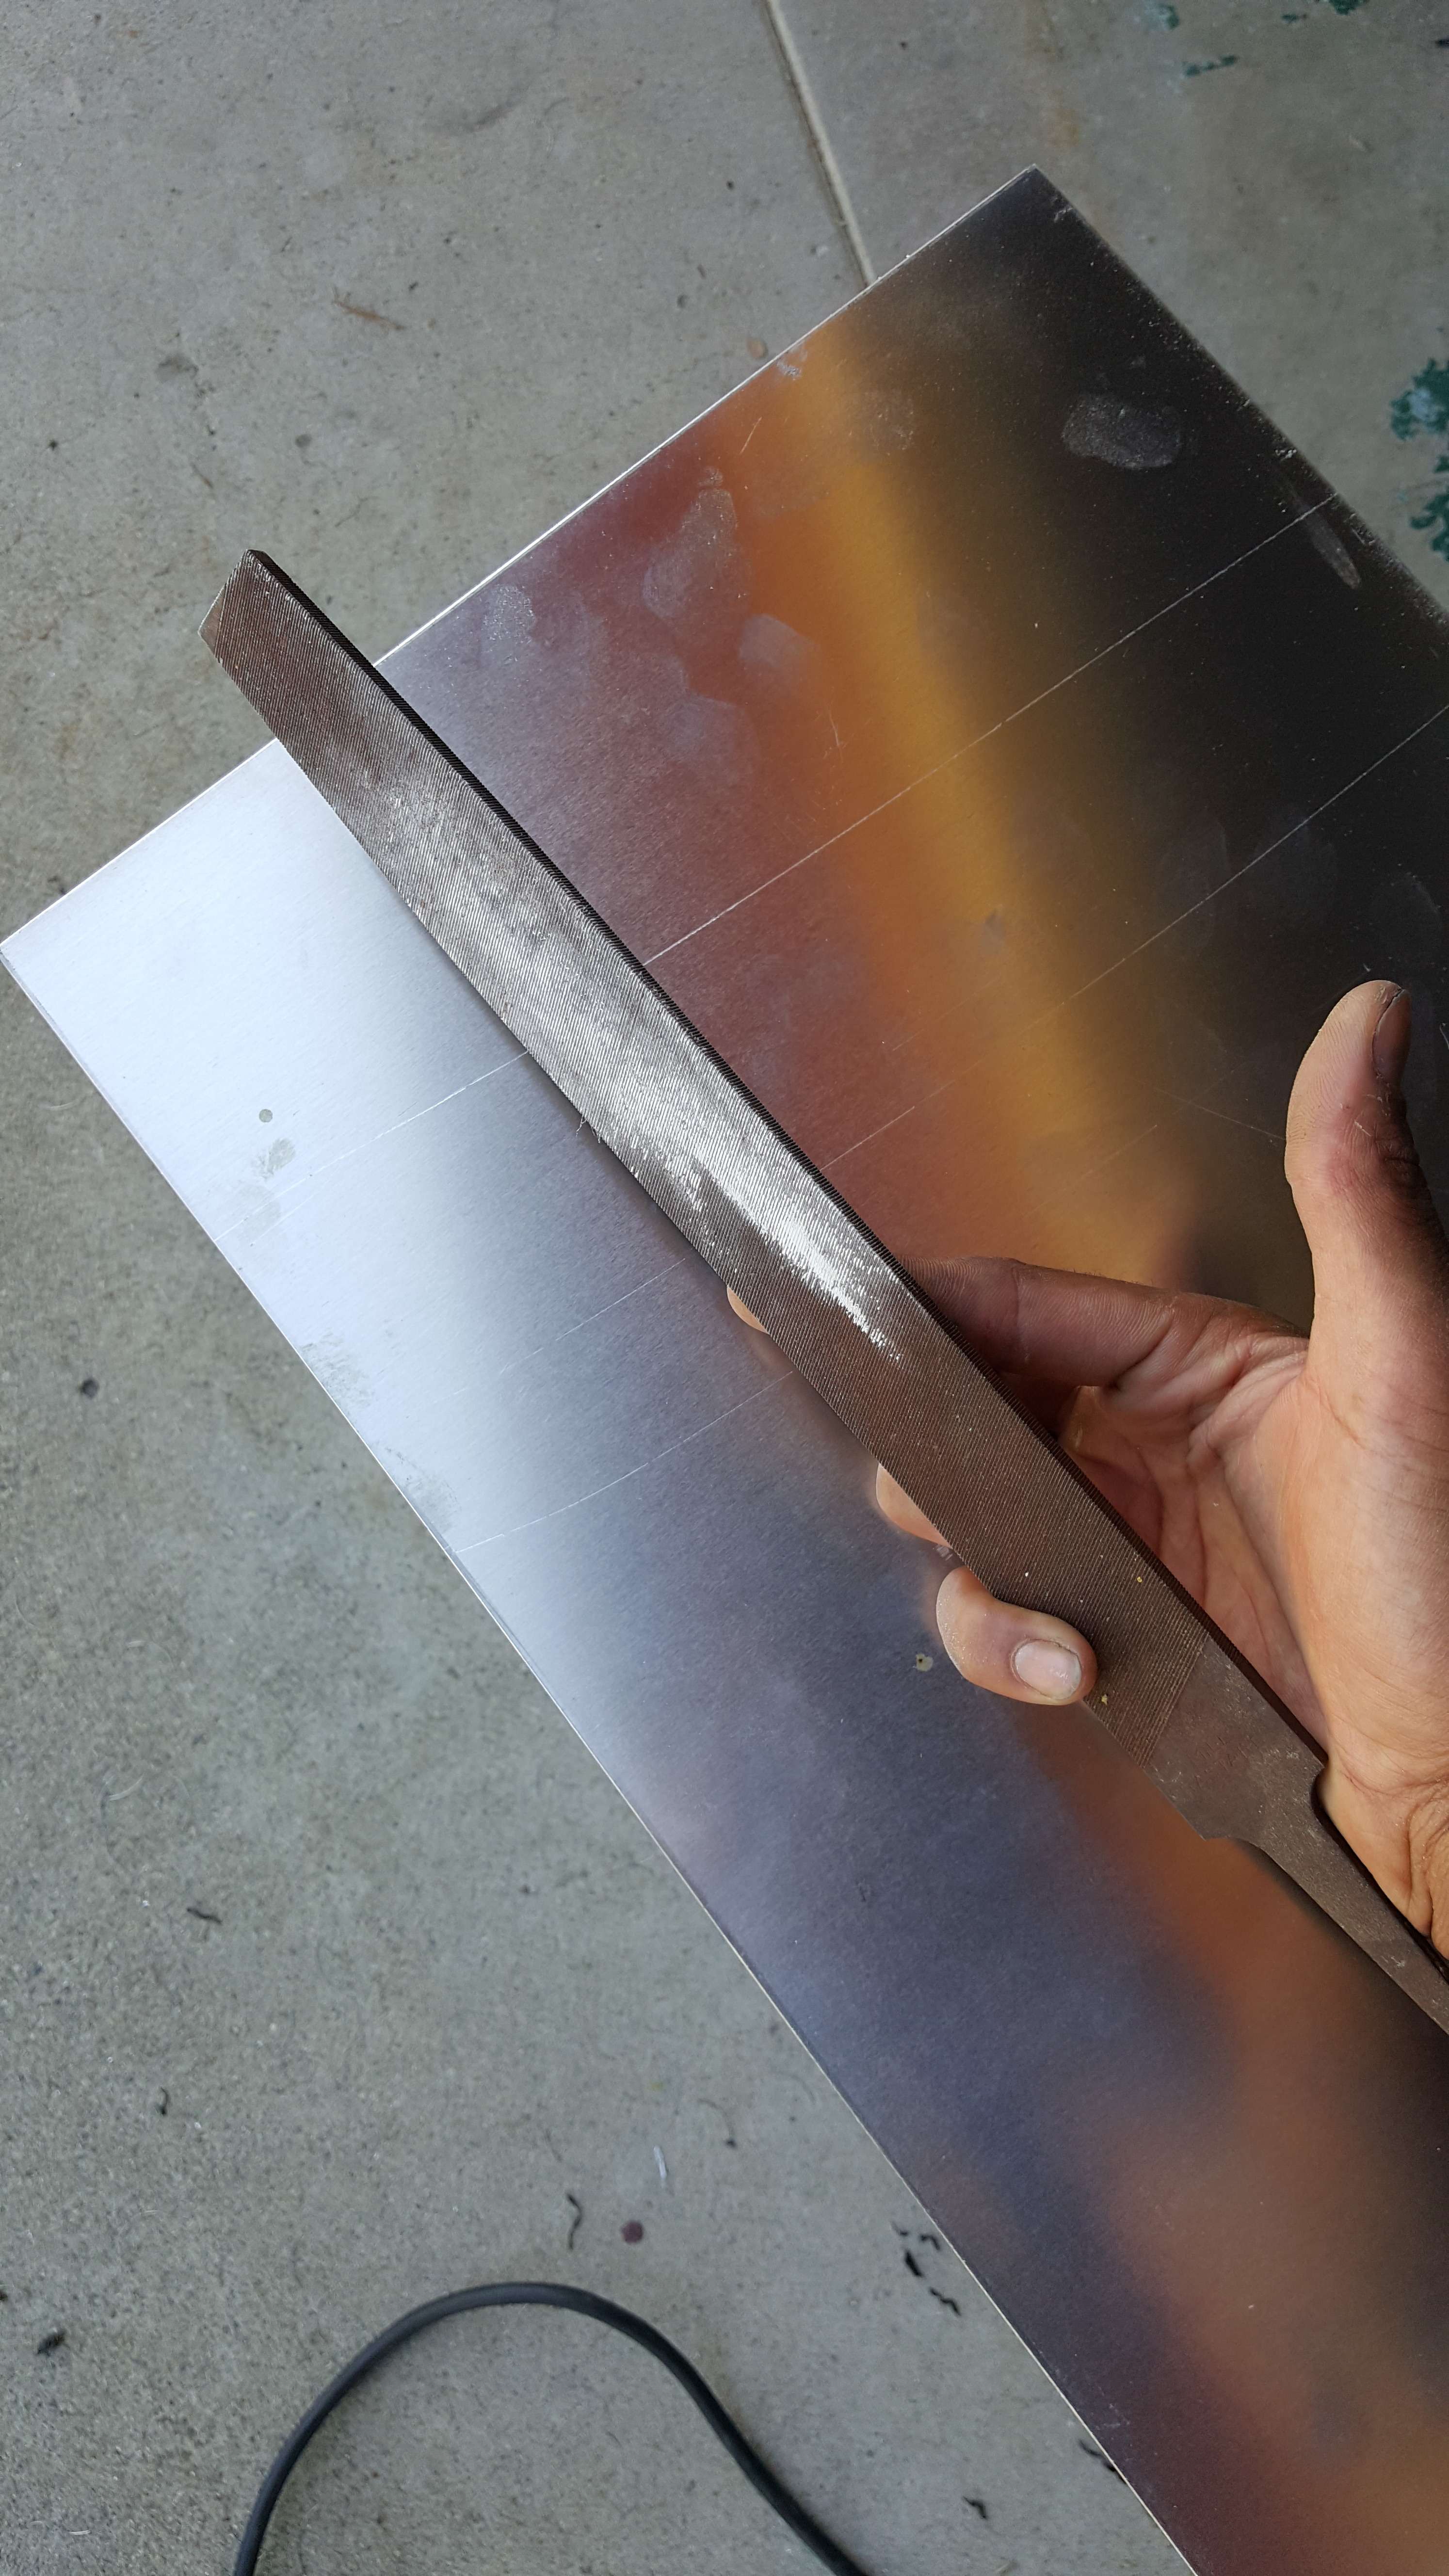
Takes some time to cut measure, and de burr...
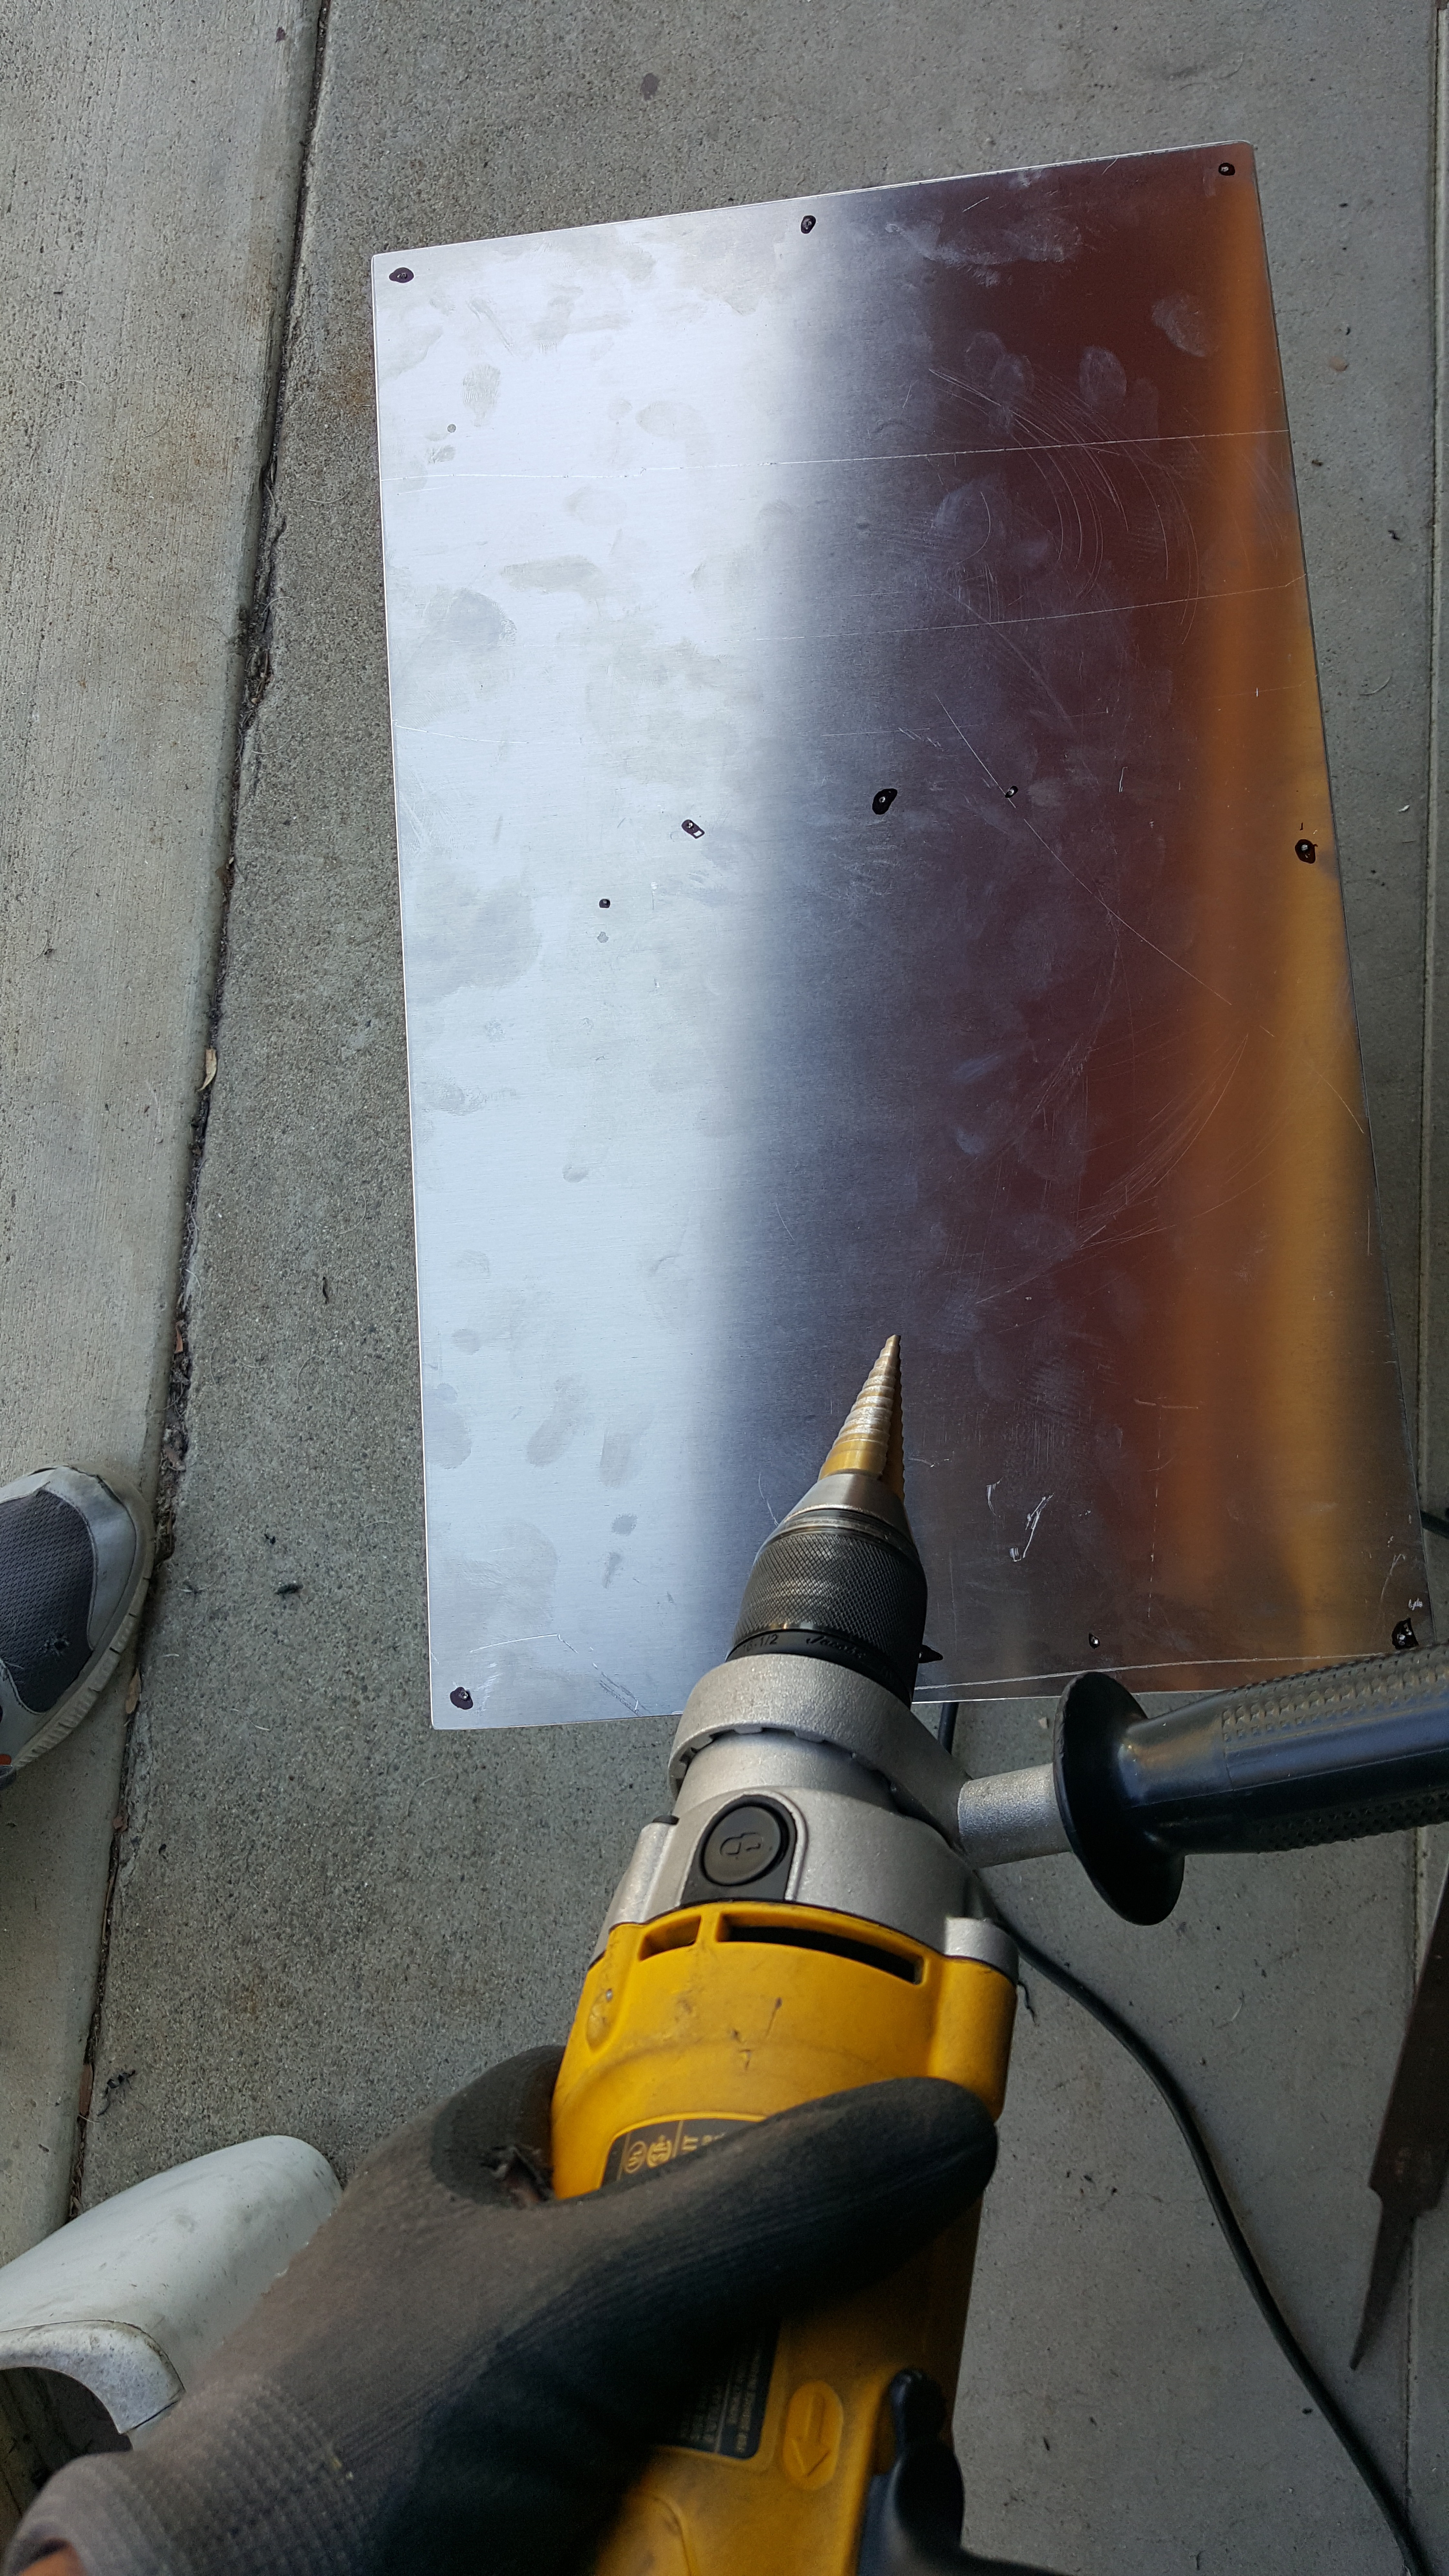
Then the mocking of mounting the components..and drilling mount holes...
I had to cut off a lot of welded studs in the rear Compartment to have an un-hindered area to mount the Plate. There are a lot of sheet metal reinforcements in the rear that are there for strength and rigidity....that make mounting something flat...really difficult. It took a while to get the plate to sit Flat.
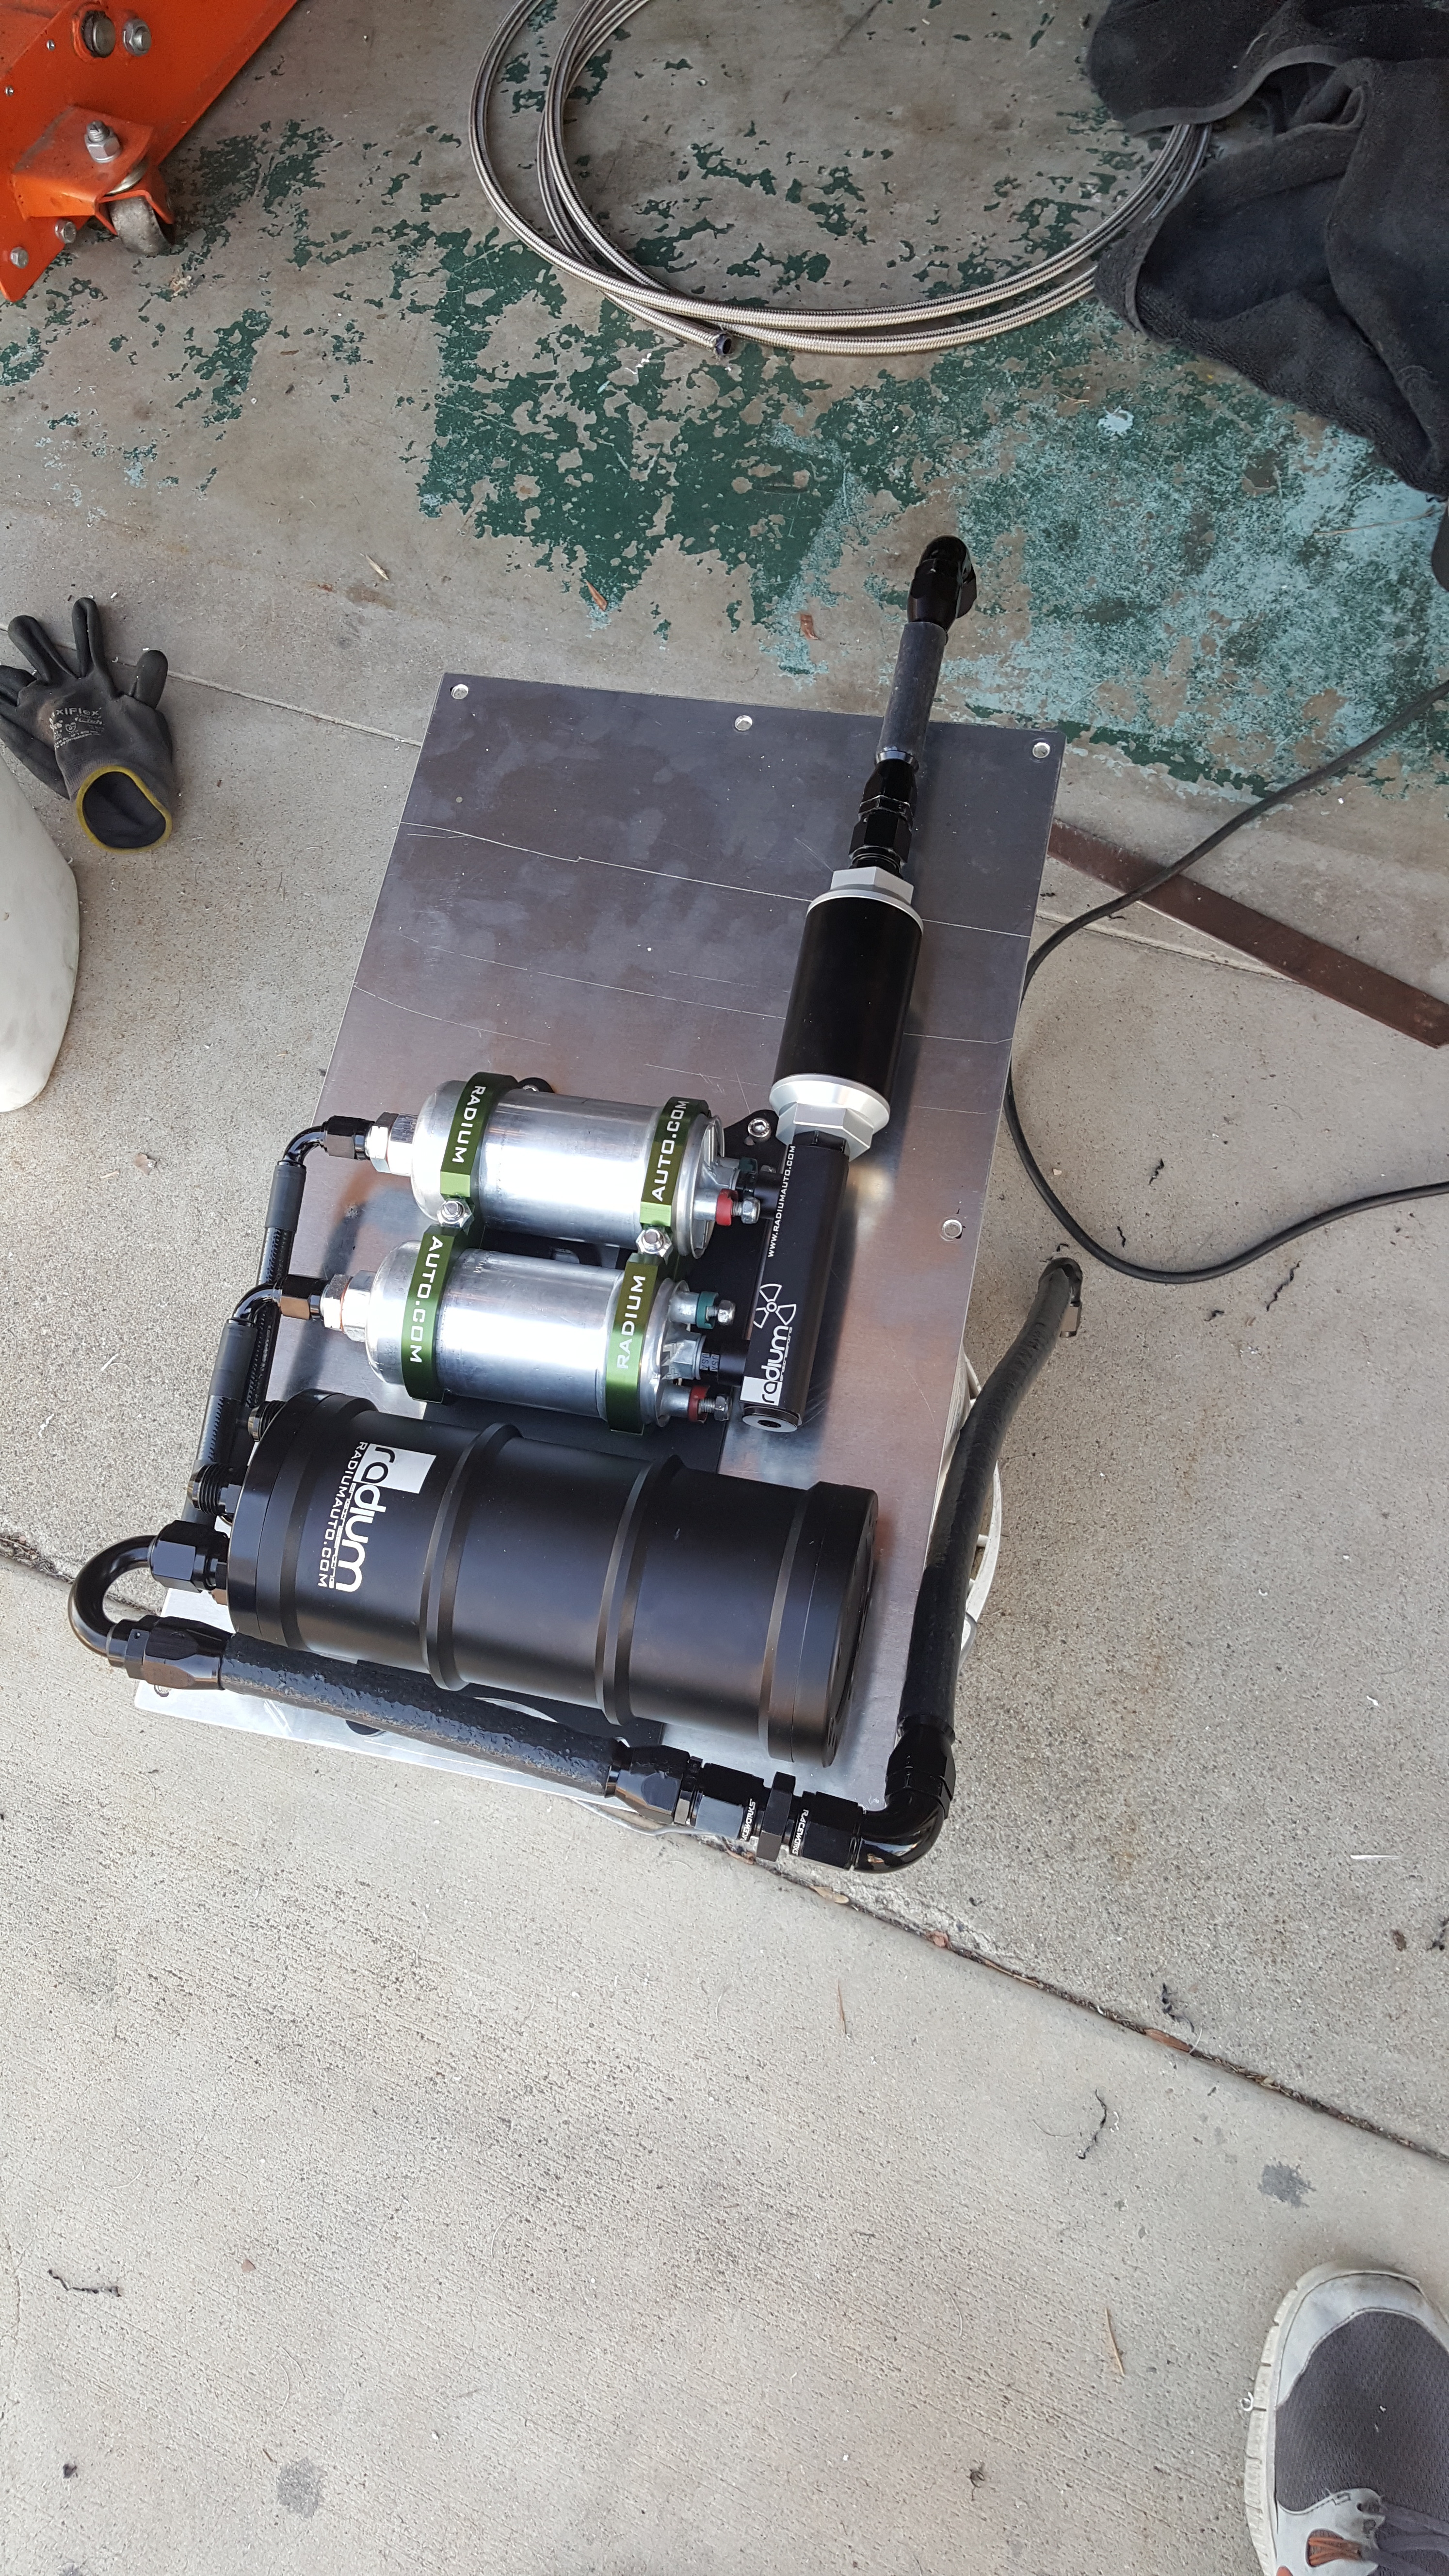
Progress!!

Flex Fuel Sensor Mounted!
Not sure If I like the next piece... But I made it because the mount plate looked a little bit lonely there in the back. This one kind of tied it all together.. More decorative...but I guess I could say it's a heat barrier haha.
Rough Cut Mock
More Updates Soon!!
Should be almost complete Tonight!
Went to a place in Orange that has a TON of industrial Metal! Check it!
Picked up some 1/8" Alum Sheet..
And Threw all the Ceramic painted Accessories in the Oven for a 3 part process. Time consuming... and tedius...but FAR cheaper than dropping the parts off to get Ceramic Coated. I Did the Throttle Body, Lower Intake Manifold, Upper Intake Manifold and Greddy Elbow
More on that later....
I made an initial Mock up of where I wanted my Fuel Surge Set up Plate to sit
Takes some time to cut measure, and de burr...
Then the mocking of mounting the components..and drilling mount holes...
I had to cut off a lot of welded studs in the rear Compartment to have an un-hindered area to mount the Plate. There are a lot of sheet metal reinforcements in the rear that are there for strength and rigidity....that make mounting something flat...really difficult. It took a while to get the plate to sit Flat.
Progress!!
Flex Fuel Sensor Mounted!
Not sure If I like the next piece... But I made it because the mount plate looked a little bit lonely there in the back. This one kind of tied it all together.. More decorative...but I guess I could say it's a heat barrier haha.
Rough Cut Mock
More Updates Soon!!
Should be almost complete Tonight!
02-28-16, 10:59 PM
#2490
Update: "The tedius Lexan Devil"
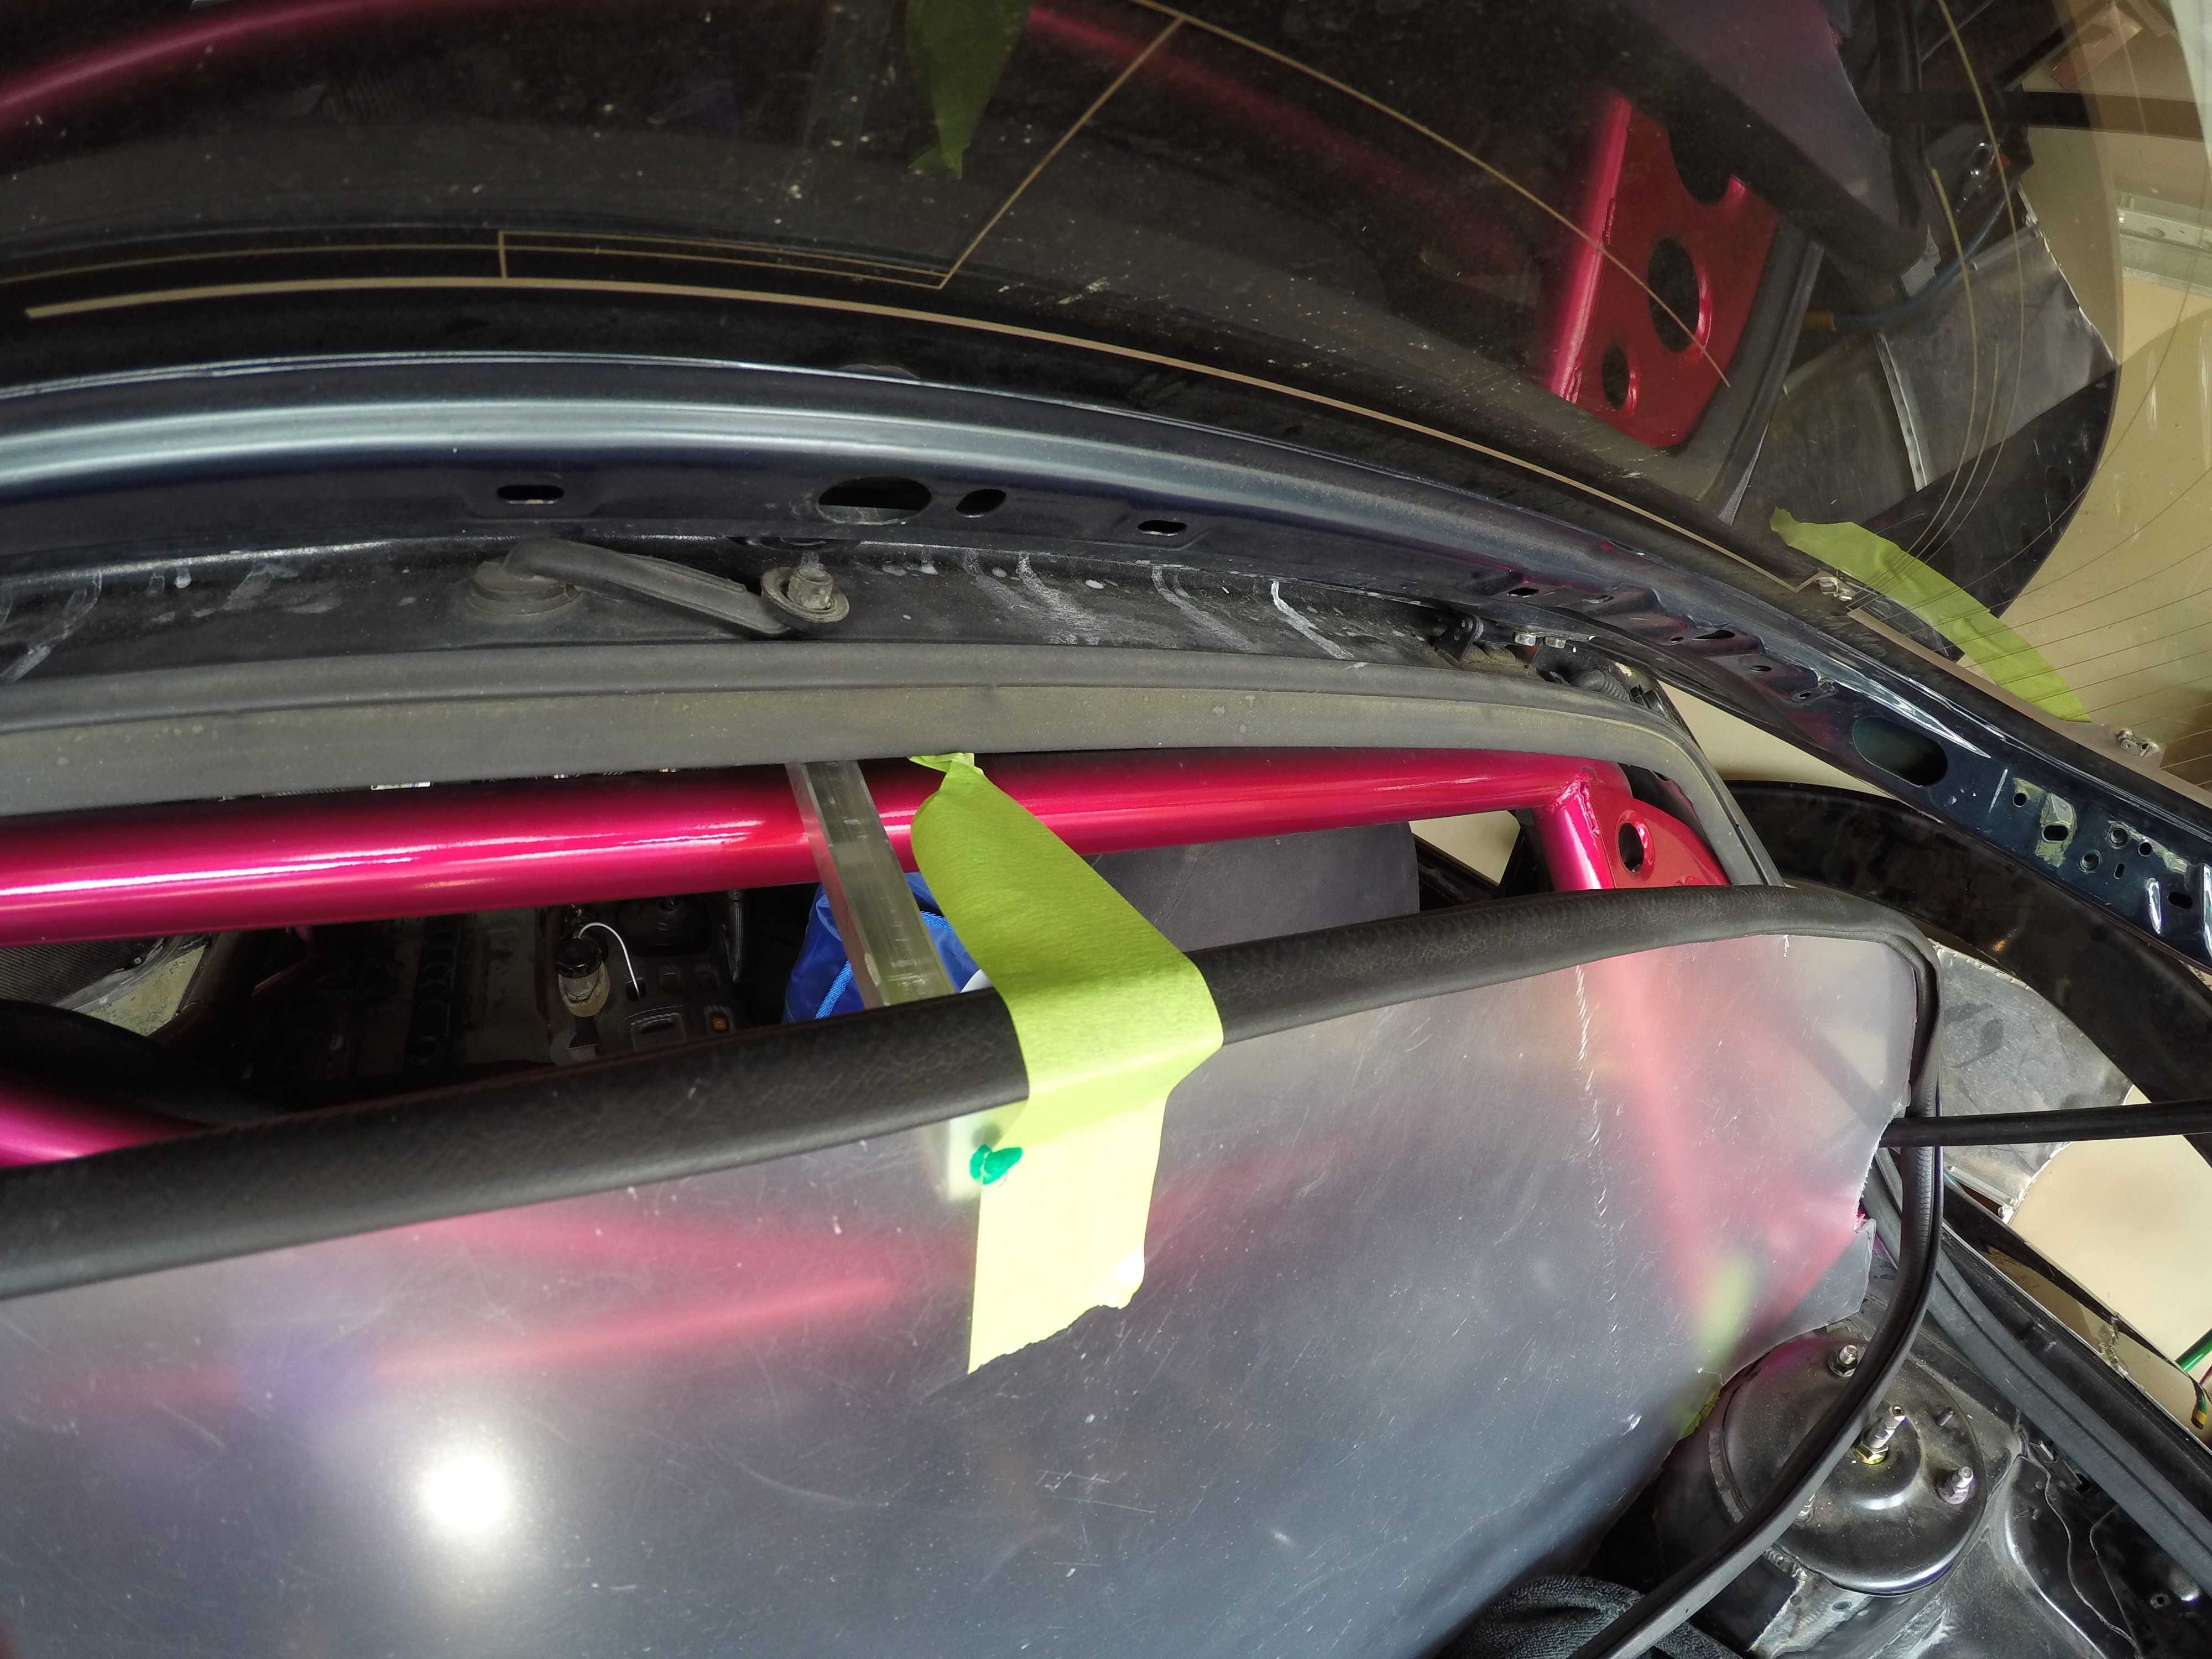
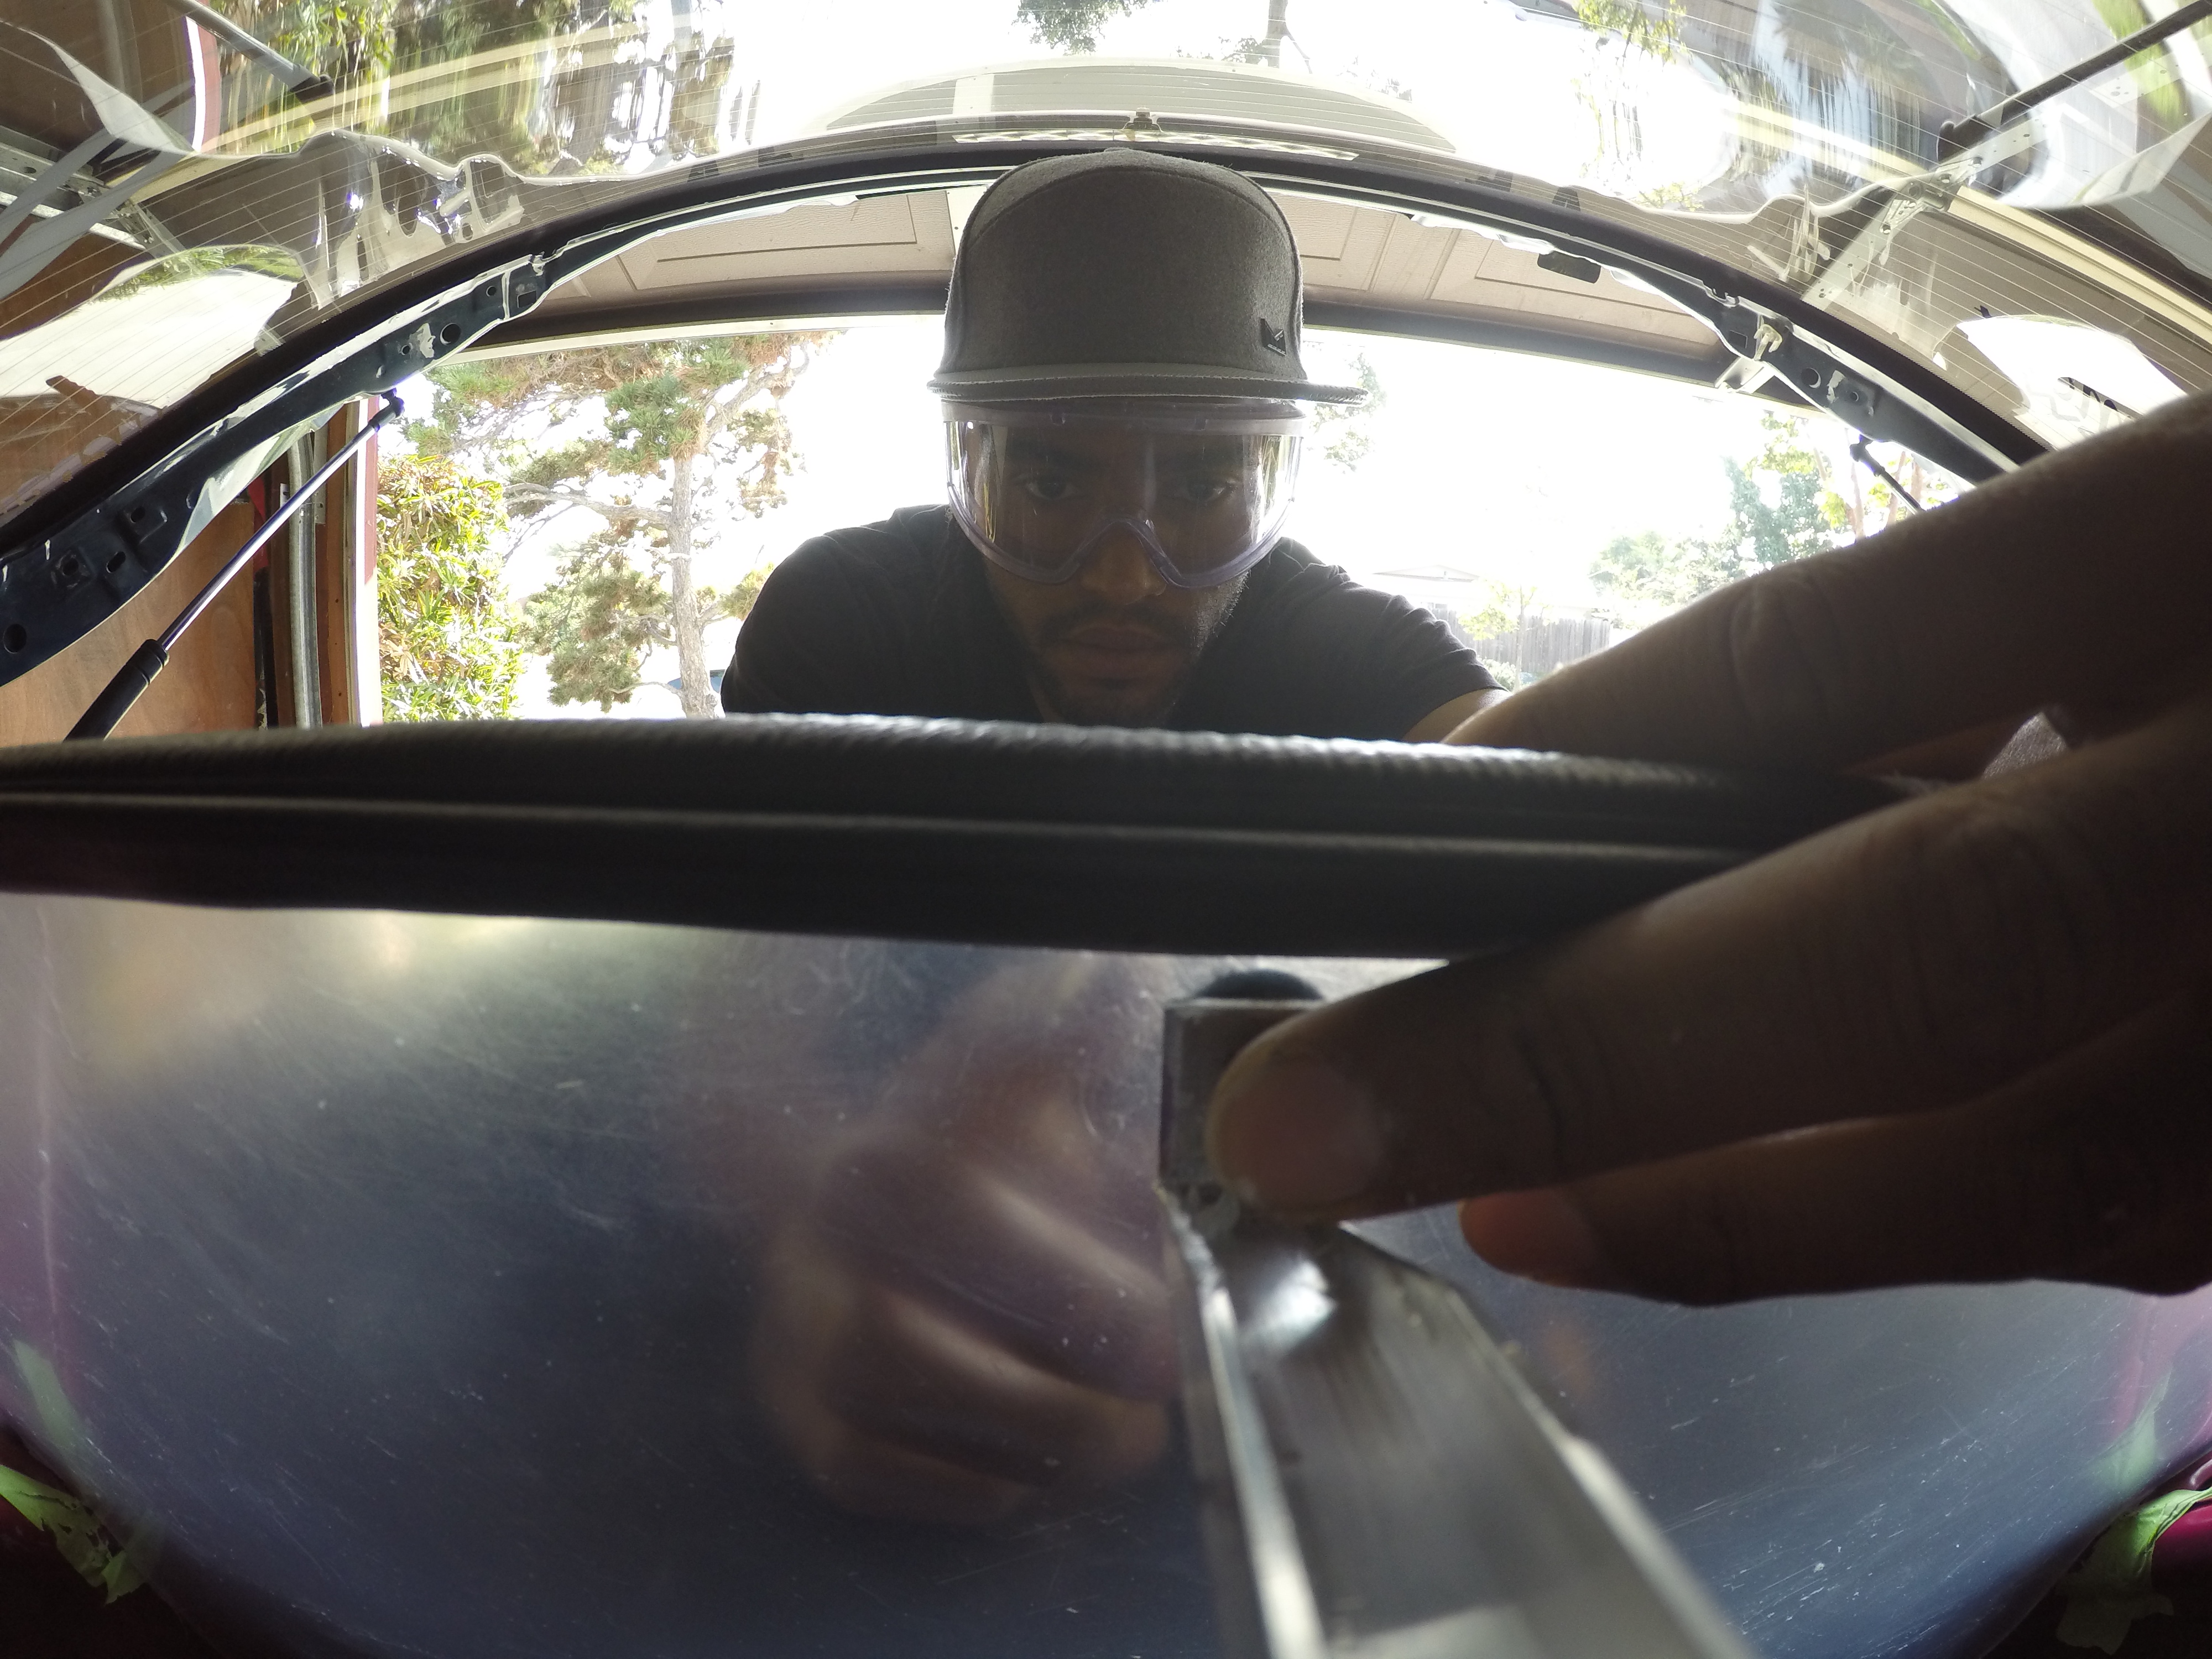
Despite the title of this log.... I've actually made really good progress on the Fuel system. I'm only waiting on my revised CJ-Motorsports dual Pump Hanger, My Clutch....and one more ORB-8 to AN-8 Union. But dear god I hope I never have to fit a piece of lexan to partition anything ever again. There are a few things that test me and the tediusness of pulling the lexan in and out of the car over and over....and over almost put me over. Must've done it over 50 times to make sure it was right and not hitting anything. Things like making sure it clears the rear hatch shocks all the way...and fits the contour of the rear window.. take a lot time. At first I started with a Template...but after a few attemps...and realizing that it wasn't rigid enough... I ended up using the lexan itself.
Anyways on the Fuel system first...
Cleaned up the Cuts on the decorative plate and here are the finished plates with all Mount holes drilled. Don't mind all the fingerprints. This was a bit tedius as well...
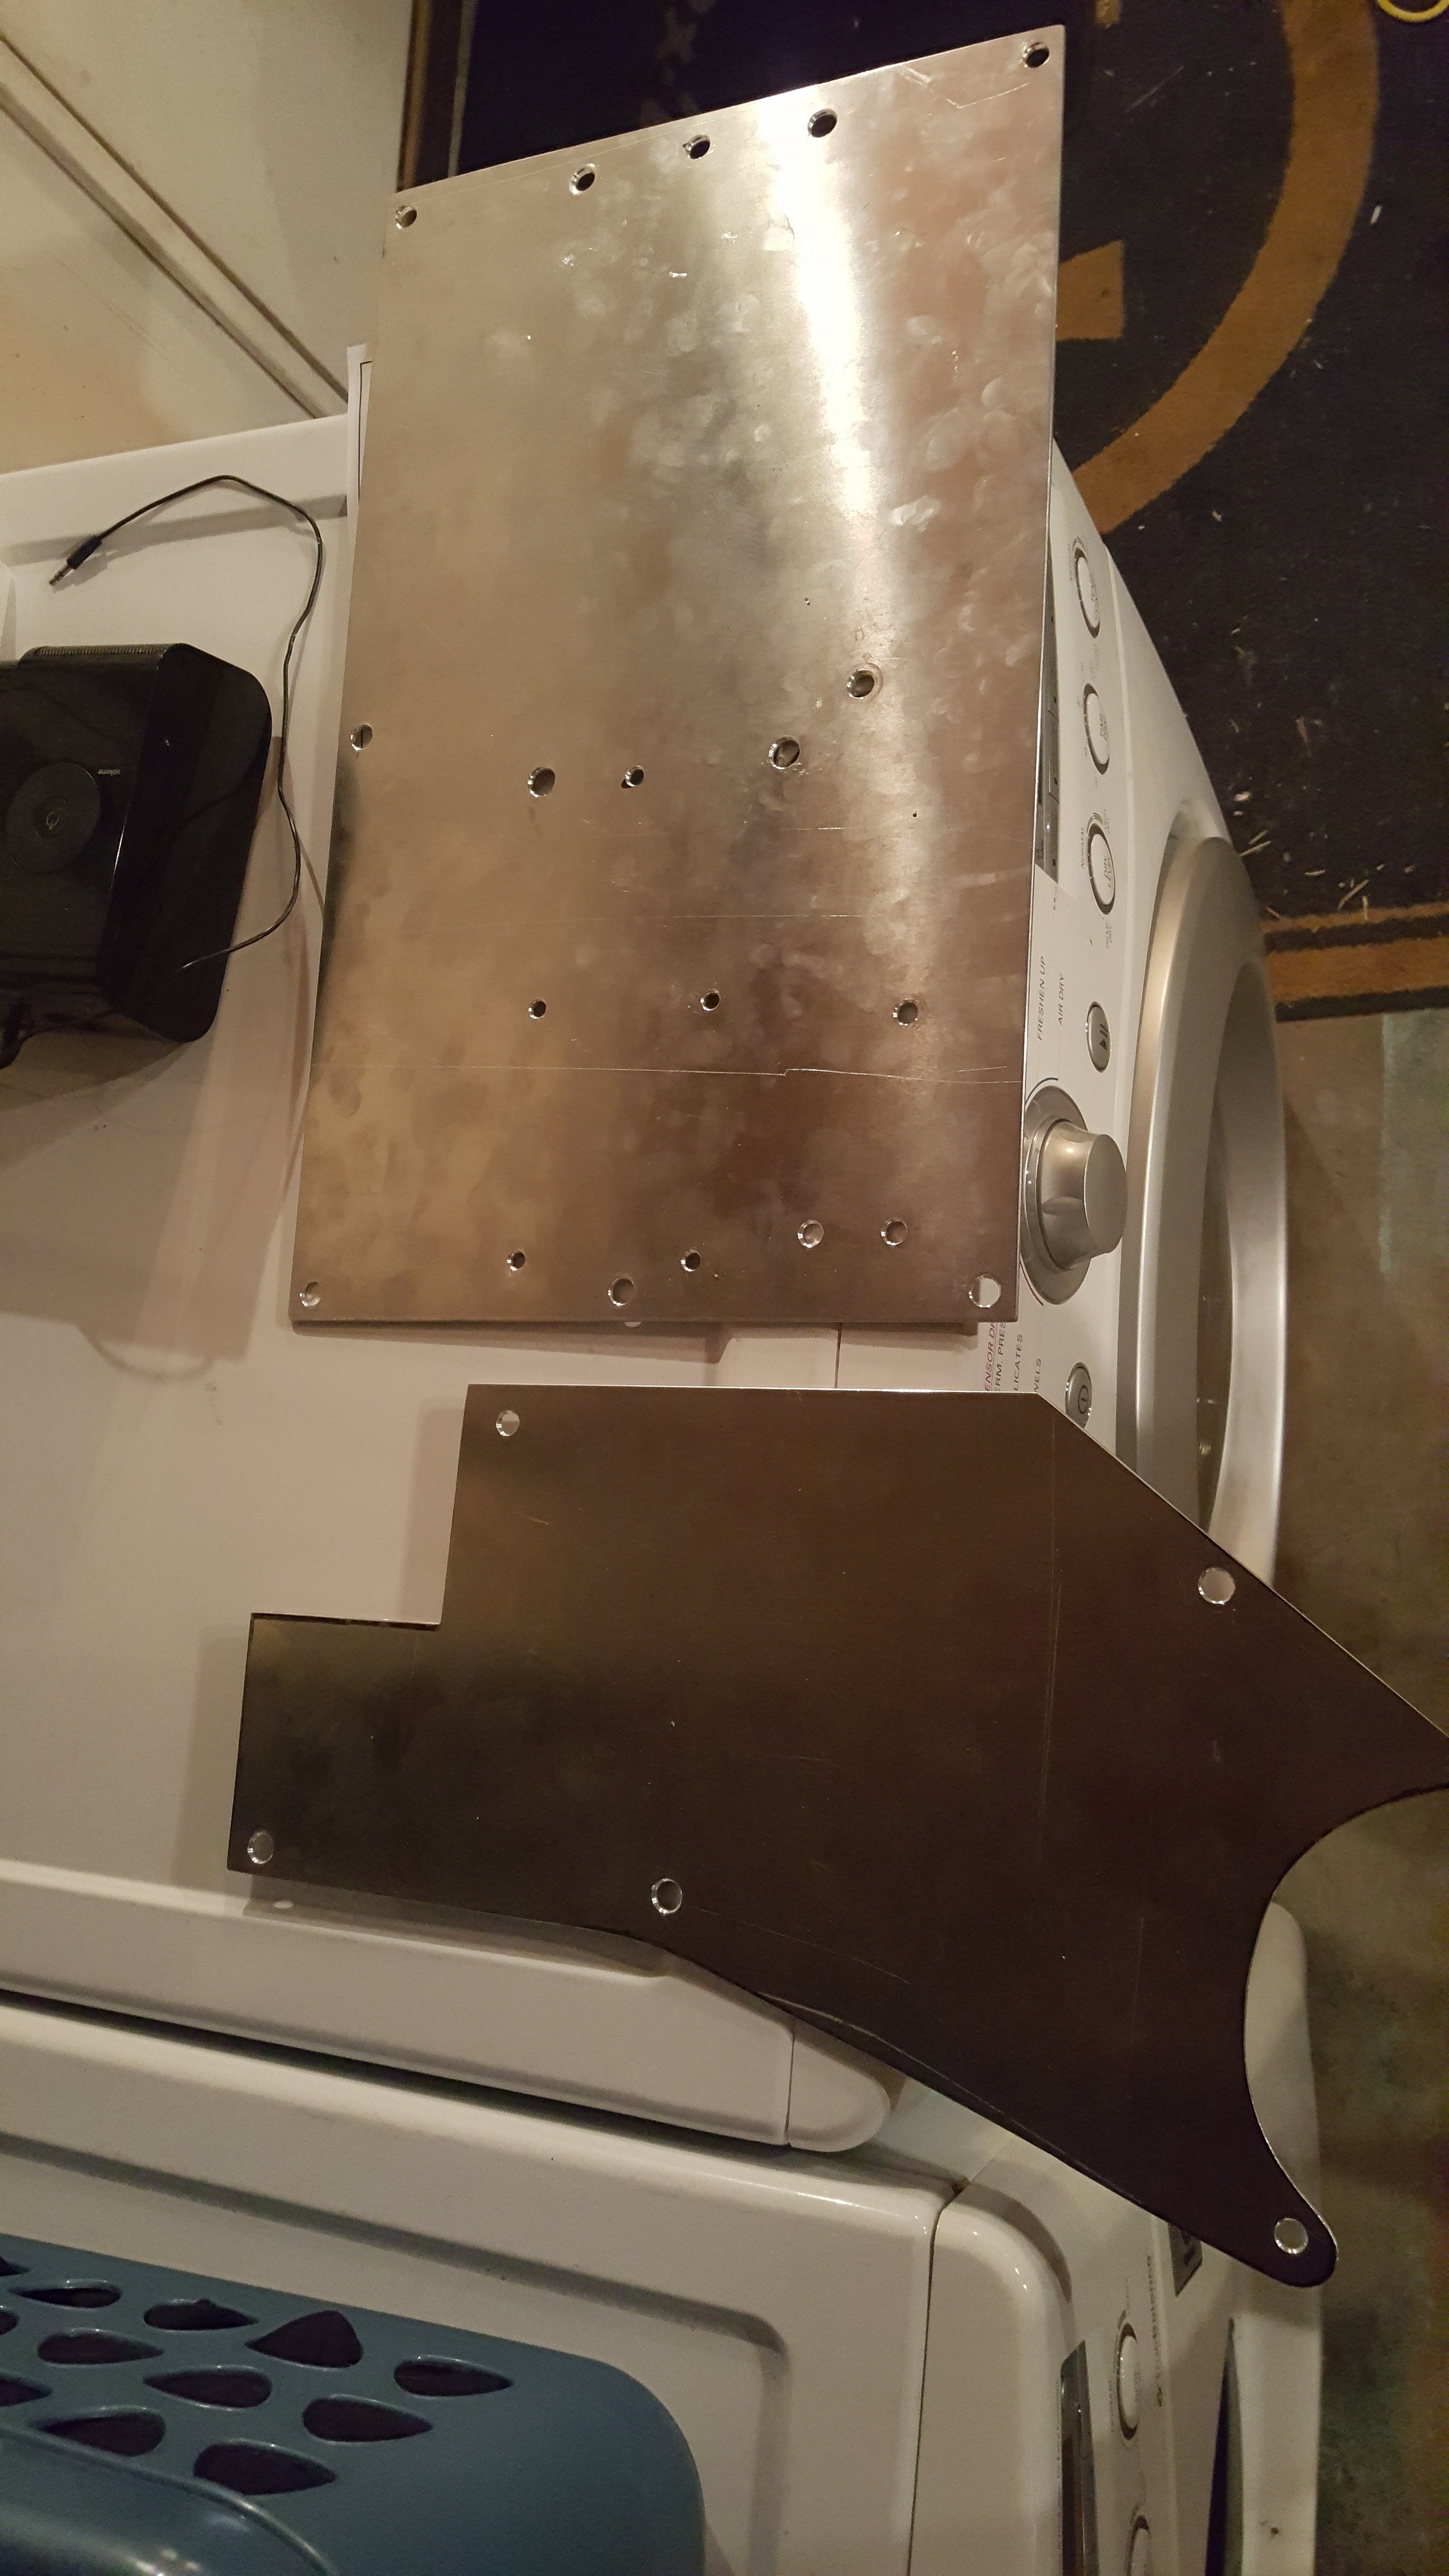
Cleaned all the fingerprints off the alum and I just had to..... Add some good ol Gang Bustin Wolf Mojo to the mix...HAH!!
I was hoping my CJ-M hanger would come yesterday but I mis read the tracking. It should be here tomorrow, then I can finish up the 2 Pump Lines... and the return. It'll be nice to see it all Finished!!
So Because there is now an external Surge Tank in the Cabin of the car. And our Cars don't have dedicated cabins that are separated from the trunk space... In Most Pro-Am Series....you have to have a Fire-Barrier that seals the fuel system off from the main cabin of the car. You can use a few different Materials. But I've seen everything from Steel Sheet, Alum Sheet, Lexan and even carbon. I chose to go with a sheet of Lexan. I didn't go with the hardened "Scratch Proof" stuff...but the price difference was significant...nearly 60 bucks for the 2. I figured I might end up Putting some Window Tint on it to try and shade the cockpit off from the sun a little. ....and that should help with scratches etc.
So heres what I started with
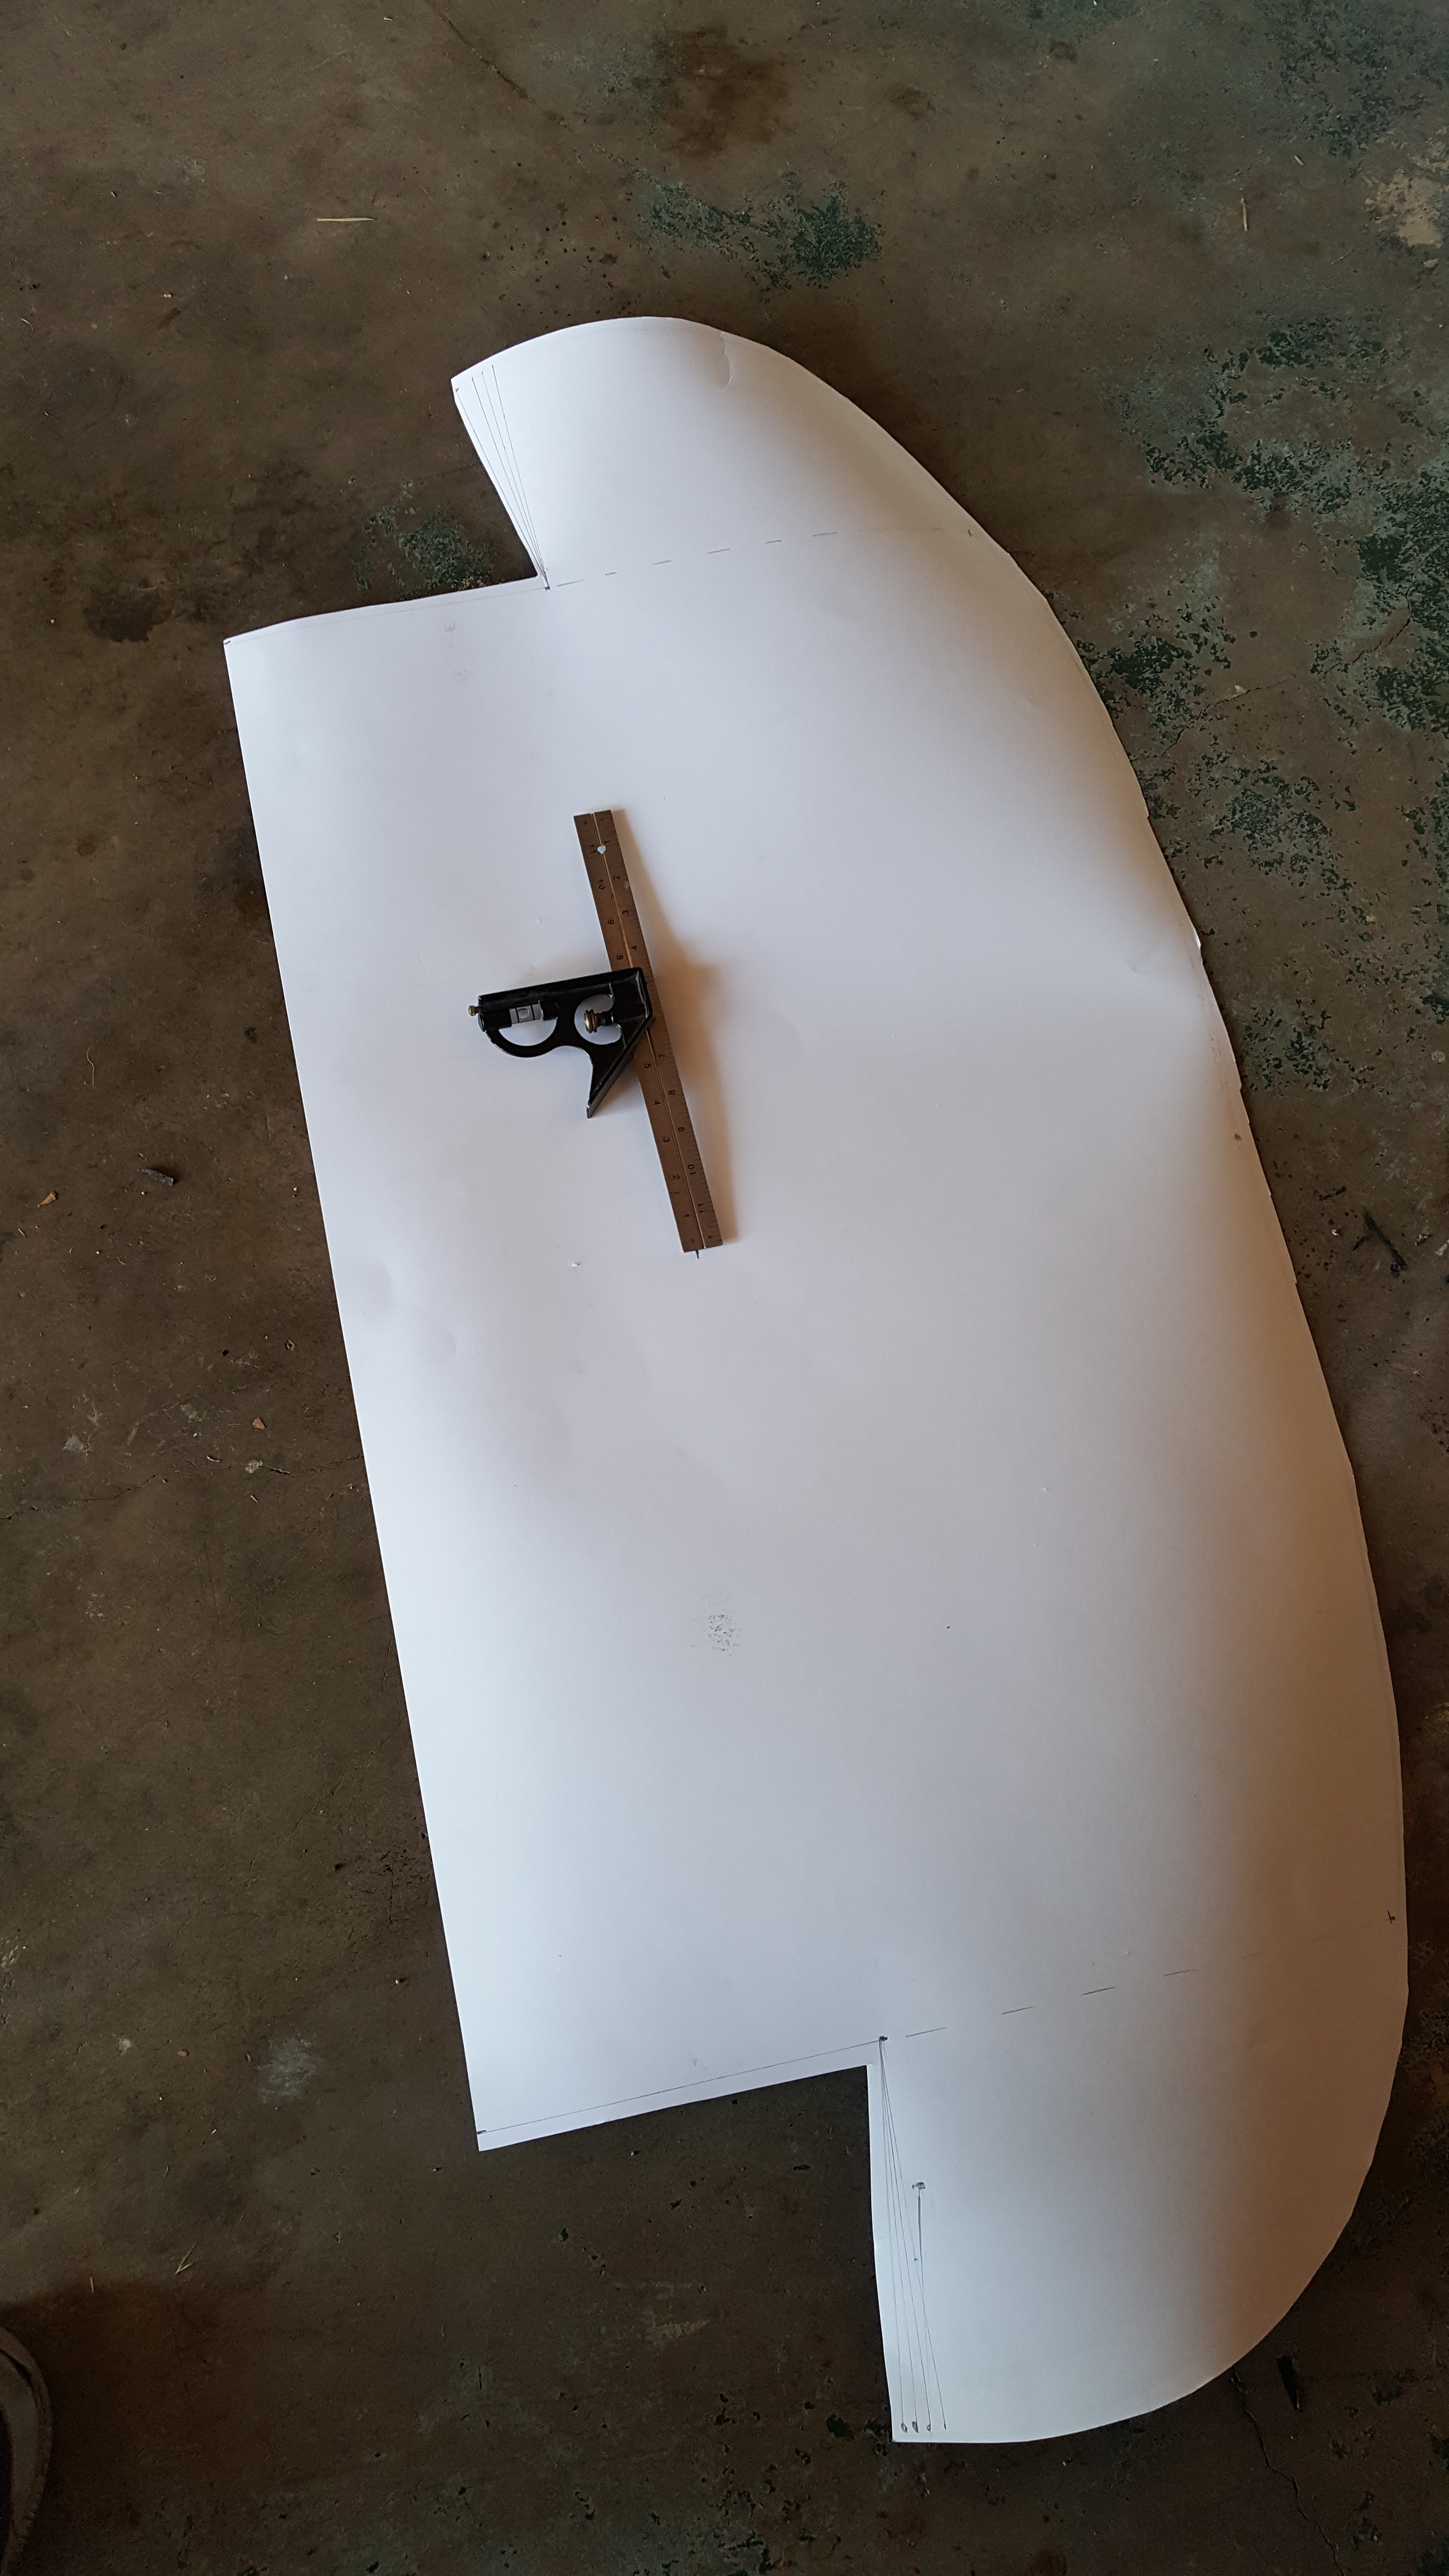
This was my Template I made from all of my measurements of the area I would be fitting the Lexan sheet. I measured 3 or 4 times before making cuts and actually left 1/4" More all the way around just to make sure I didn't go too small.
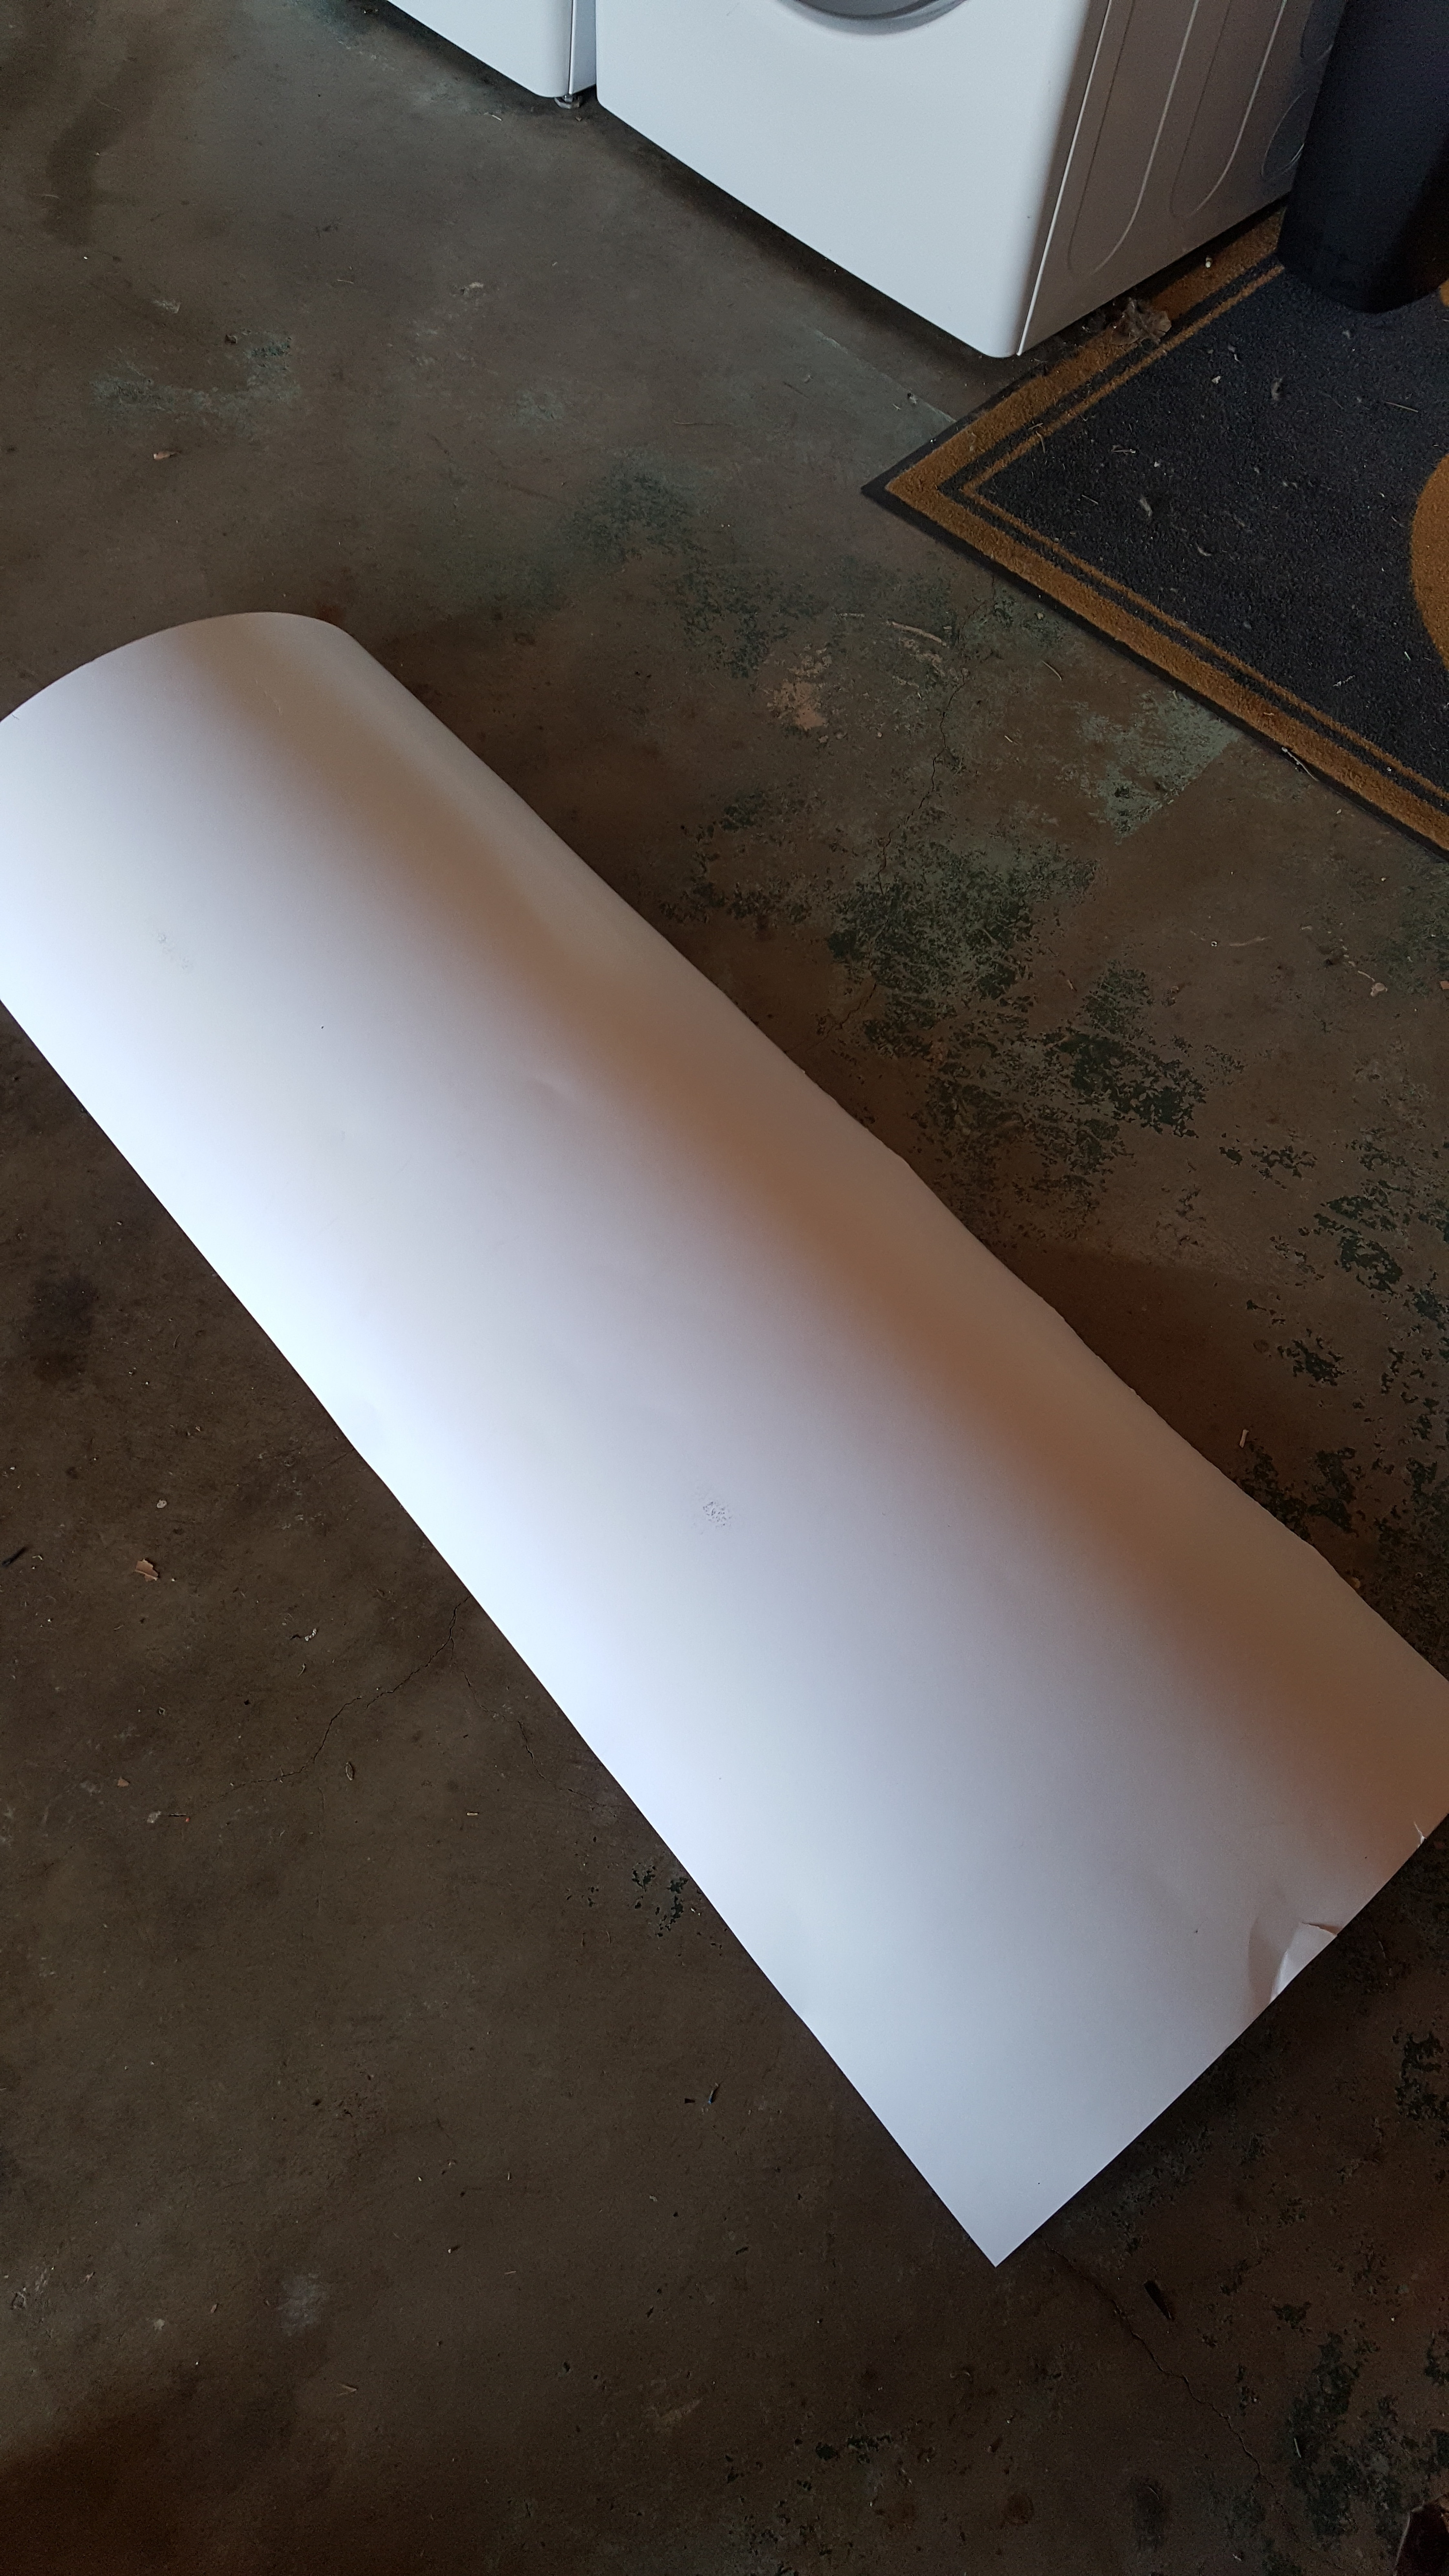
I cut that piece straight down the middle and purchased a Giant Sheet of lexan for about 36 bucks.
Traced my Paper Template on to the Lexan and went to cut it out. I used my Skill Saw but wasn't paying attention to the blade and got about 7"in when I cracked the Lexan through my "needed" area. Luckily I was only 7" in... So I flipped my Giant Template and was able to avoid the crack. Put my skill saw back and decided to play it safe and use my Angle Grinder. I always joke with people and tell them I Built my whole car with an angle grinder and Channel Locks LOL. But the Angle grinder worked much better, but it made a HUGE mess of Lexan sand Everywhere. So I did everything out in the driveway.
Got it all cut out And decided to to give it the initial Test fit.
Which is where it got interesting... I can't say whether or not I would have left the 1/4" extra lexan around the whole template again...if I were or had to be forced to do this ever again. on one hand...i'm happy I did it because it came out well. On the other hand... I'm not joking when I say that this must've taken me over 6 Hours. So... The lexan sheet may have only cost me 36 Bucks...but I'll sell the paper template for $150 Bucks to whoever would love to trace it onto a piece of lexan HaHaHa. Jkjk
Progress
And Although it doesn't look much different. This is where I left off.... one thing I didn't want was for the sheet to be rattling and vibrating un-controllably the whole time the car is on. So I made the sheet fit straight across on the bottom...but the top will have Juuuuust enough Bend in it to bow the sheet in towards the cabin...just slightly enough to add some strength and rigidity. Then when I go to mount it..I can make the Mounts hold that position. This should cut down on the annoying Vibrating flimsly look I'm trying to avoid.
I had to stop after this for a mental break. I'll make the Alum Mounts tomorrow. I'm thinking Nut-serts for sure!!
....okay okay I had to stop with the lexan..but I just moved in the garage and started putting all my accessories back together.
After Baking the High Temp Ceramic Paint 3 times in raising temps..... The stuff is actually hard enough that my nail doesn't pull anything away when I scrape at it! I've always wanted to go White..but I didn't want it to come out cheezy.... But I think it came out pretty cool so far!
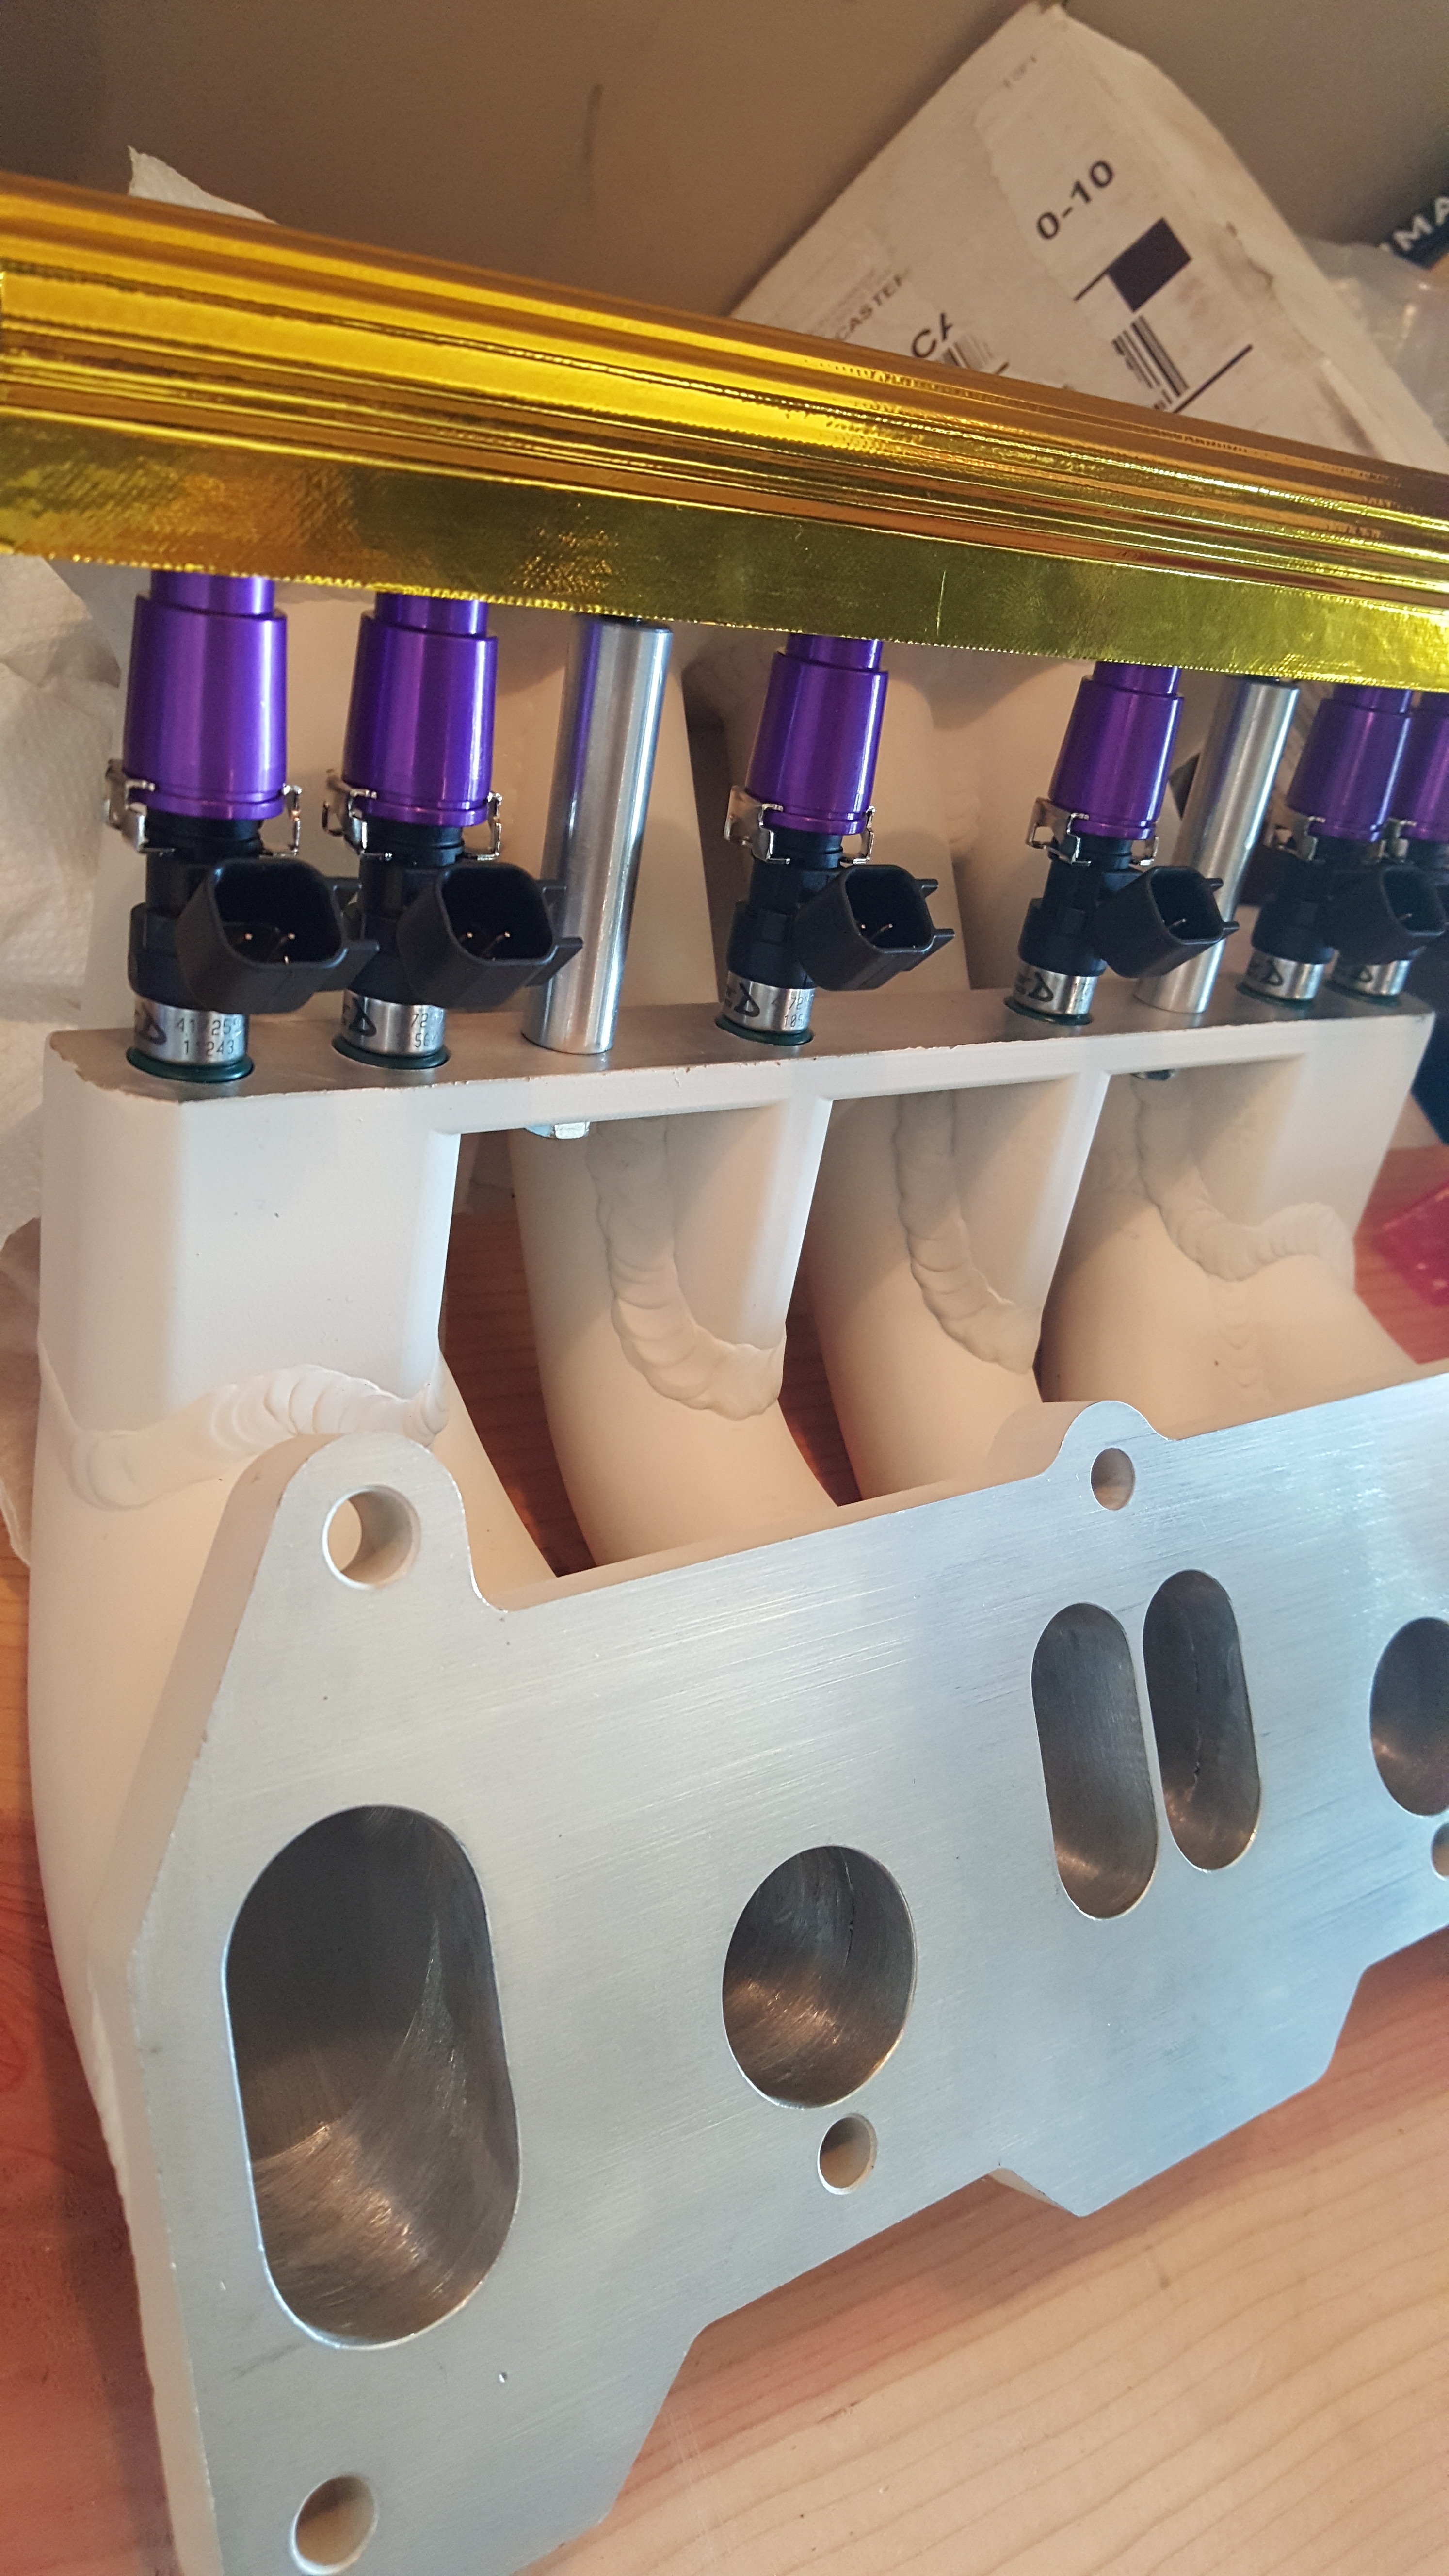
Peripheral Port Lower Intake Manifold, I.D.1300's and Rail
Borg Warner EFR9174...Comp Cover Coated and Baked!
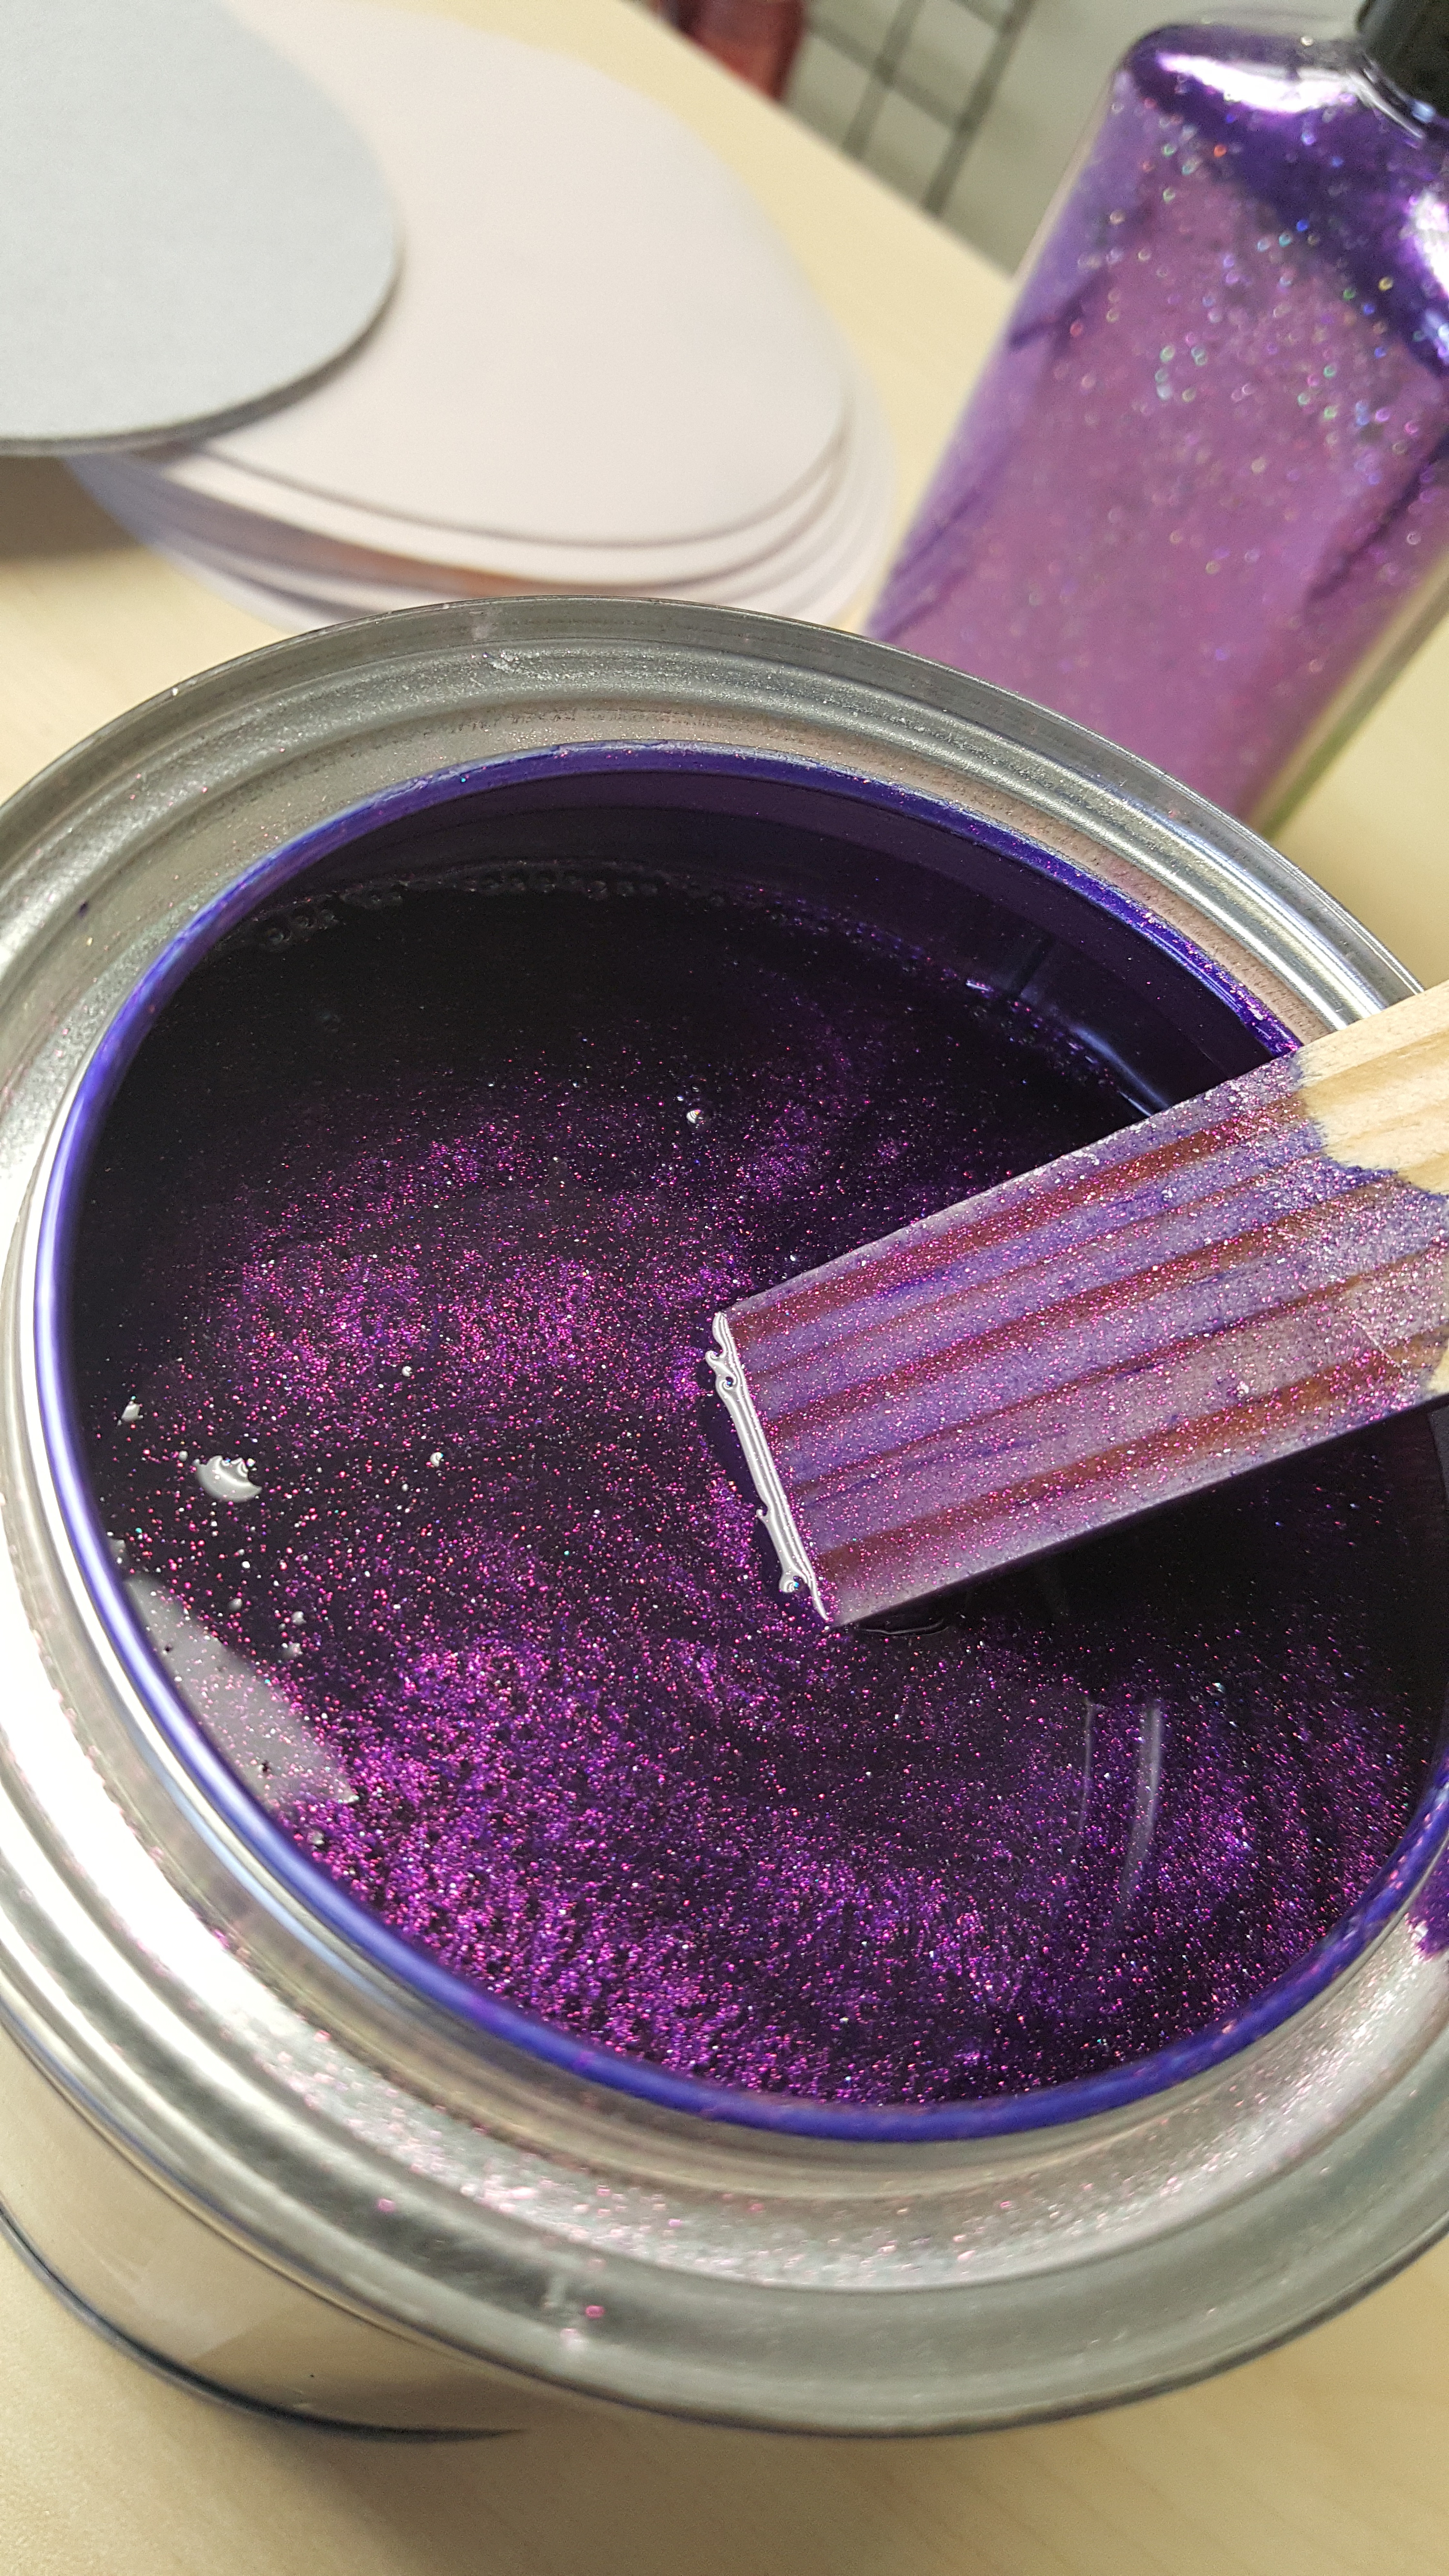
Lastly Have you guys ever heard of Epic Colorz Paint?
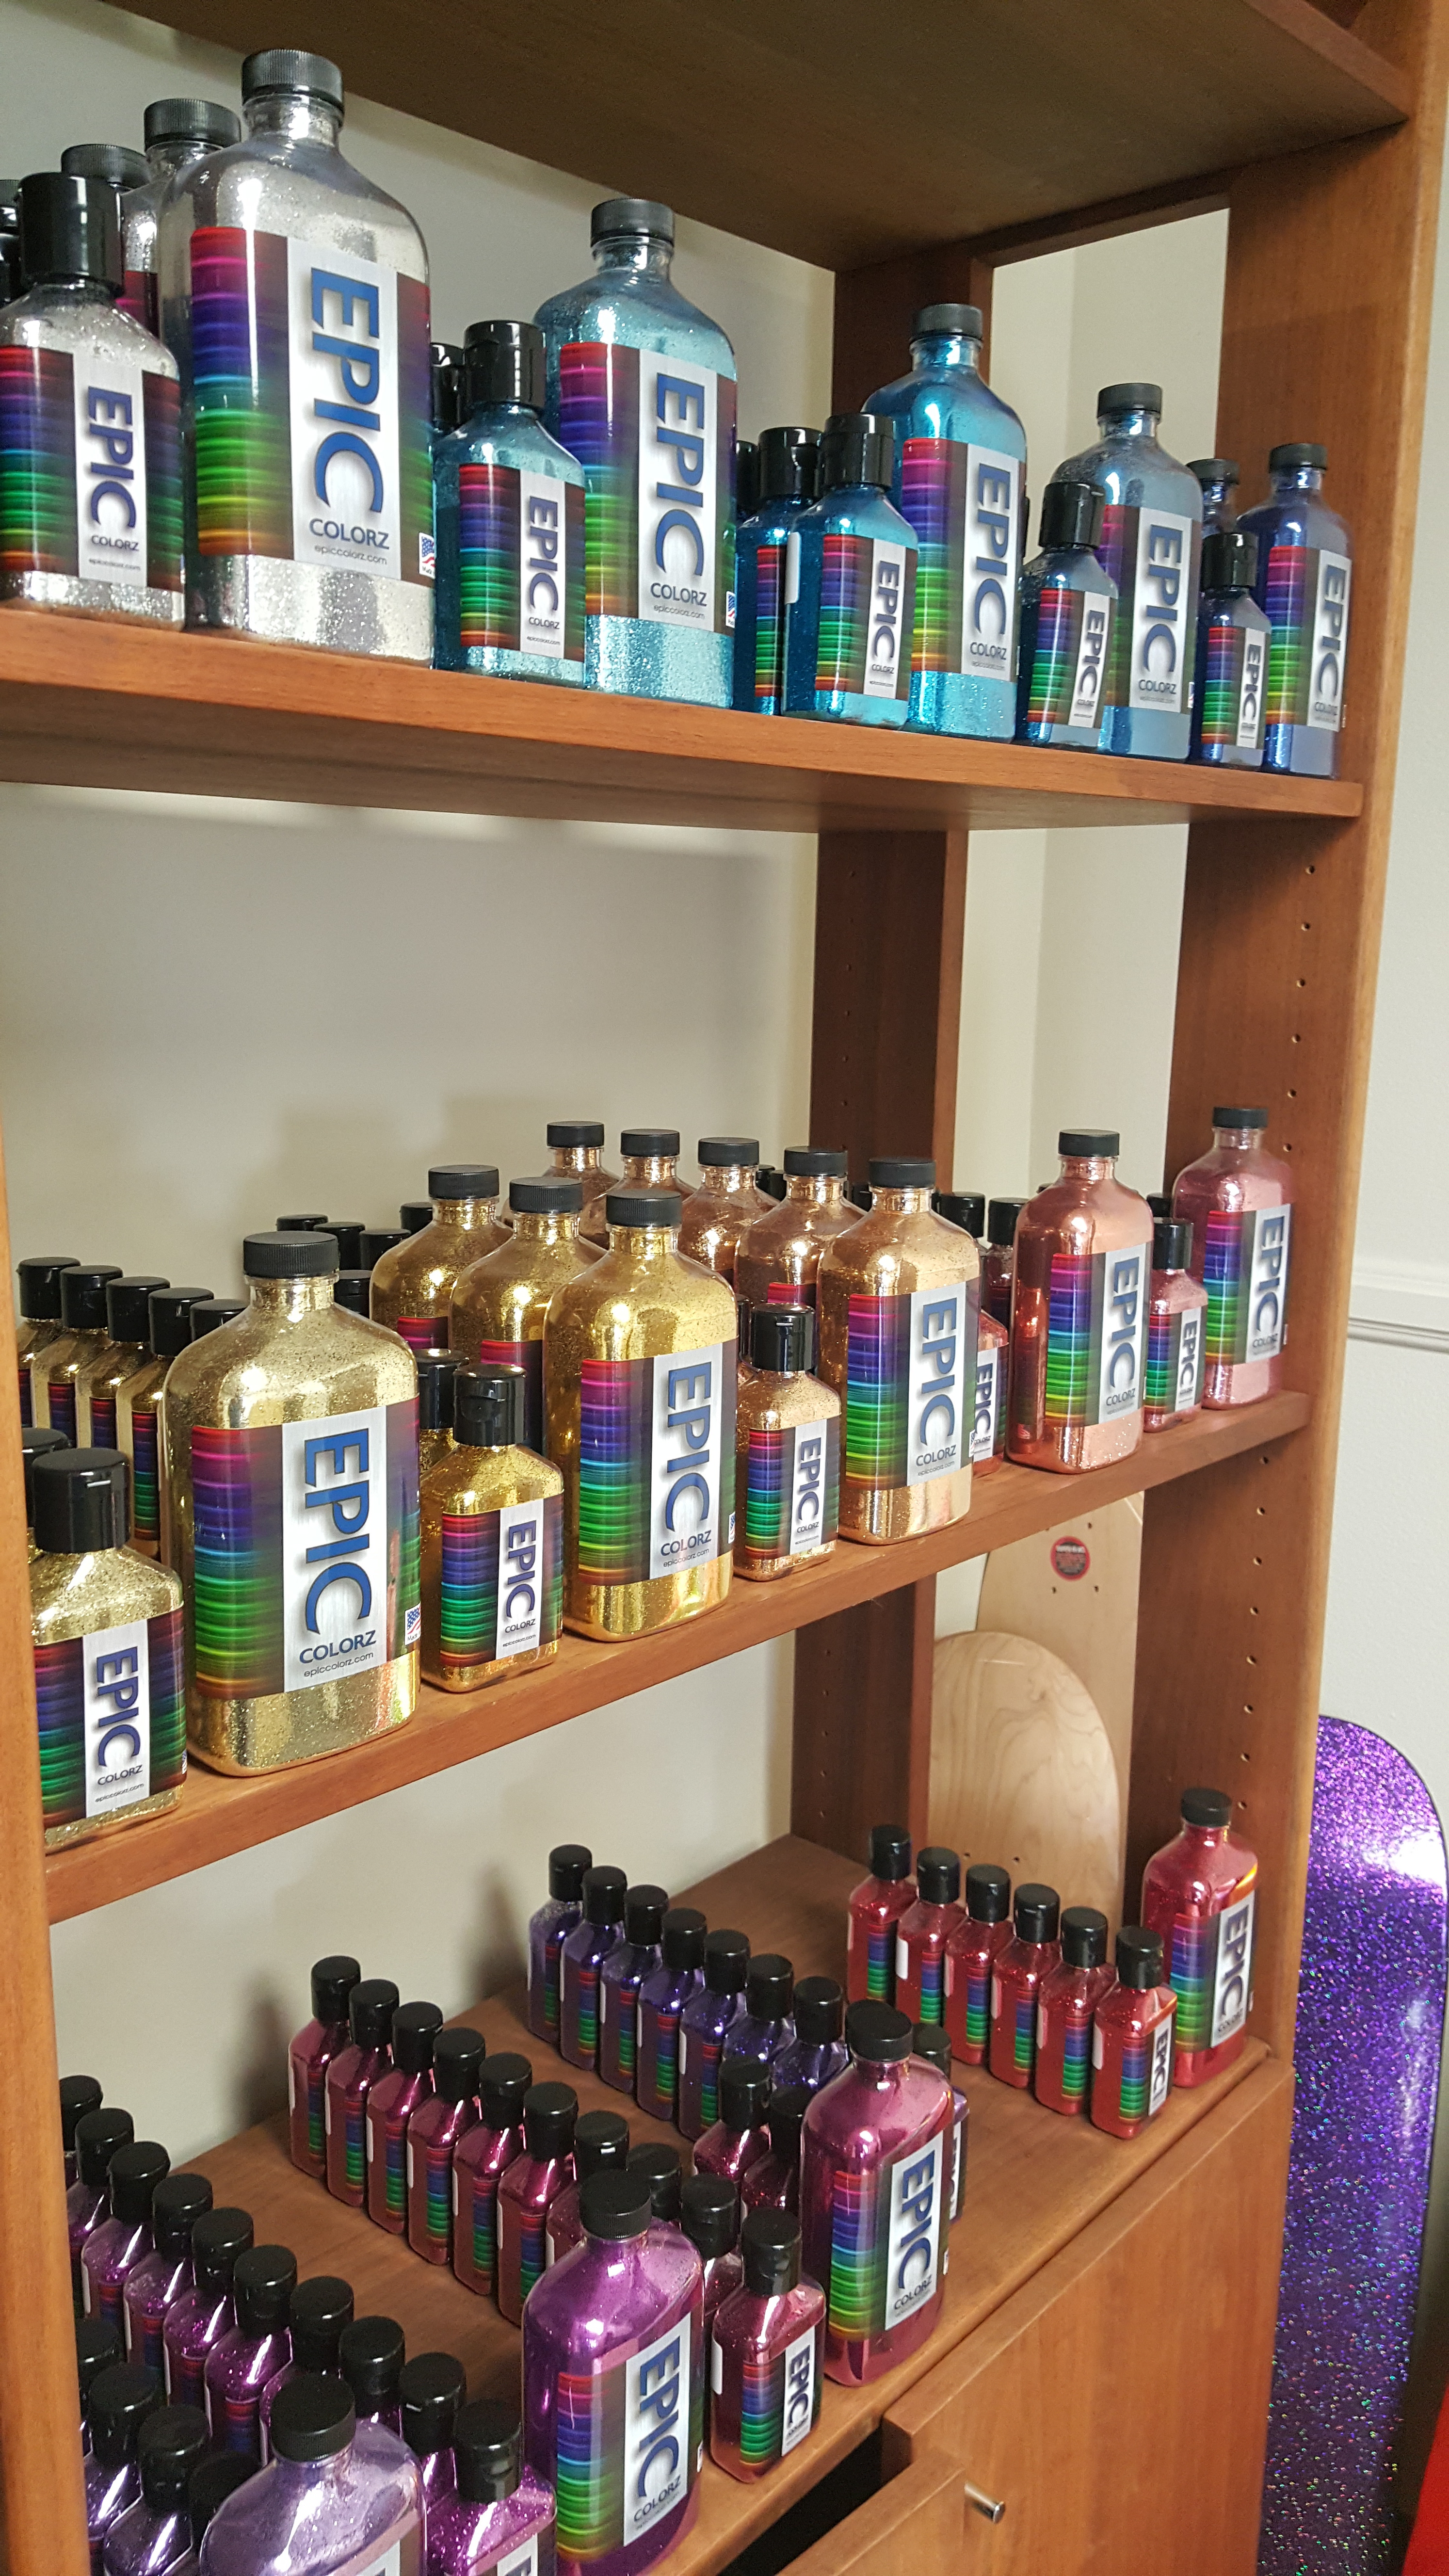
And what do you think of this color? =-).....
More Updates soon!
Stay Tuned!!
#ThisIsTheWolf
Despite the title of this log.... I've actually made really good progress on the Fuel system. I'm only waiting on my revised CJ-Motorsports dual Pump Hanger, My Clutch....and one more ORB-8 to AN-8 Union. But dear god I hope I never have to fit a piece of lexan to partition anything ever again. There are a few things that test me and the tediusness of pulling the lexan in and out of the car over and over....and over almost put me over. Must've done it over 50 times to make sure it was right and not hitting anything. Things like making sure it clears the rear hatch shocks all the way...and fits the contour of the rear window.. take a lot time. At first I started with a Template...but after a few attemps...and realizing that it wasn't rigid enough... I ended up using the lexan itself.
Anyways on the Fuel system first...
Cleaned up the Cuts on the decorative plate and here are the finished plates with all Mount holes drilled. Don't mind all the fingerprints. This was a bit tedius as well...
Cleaned all the fingerprints off the alum and I just had to..... Add some good ol Gang Bustin Wolf Mojo to the mix...HAH!!
I was hoping my CJ-M hanger would come yesterday but I mis read the tracking. It should be here tomorrow, then I can finish up the 2 Pump Lines... and the return. It'll be nice to see it all Finished!!
So Because there is now an external Surge Tank in the Cabin of the car. And our Cars don't have dedicated cabins that are separated from the trunk space... In Most Pro-Am Series....you have to have a Fire-Barrier that seals the fuel system off from the main cabin of the car. You can use a few different Materials. But I've seen everything from Steel Sheet, Alum Sheet, Lexan and even carbon. I chose to go with a sheet of Lexan. I didn't go with the hardened "Scratch Proof" stuff...but the price difference was significant...nearly 60 bucks for the 2. I figured I might end up Putting some Window Tint on it to try and shade the cockpit off from the sun a little. ....and that should help with scratches etc.
So heres what I started with
This was my Template I made from all of my measurements of the area I would be fitting the Lexan sheet. I measured 3 or 4 times before making cuts and actually left 1/4" More all the way around just to make sure I didn't go too small.
I cut that piece straight down the middle and purchased a Giant Sheet of lexan for about 36 bucks.
Traced my Paper Template on to the Lexan and went to cut it out. I used my Skill Saw but wasn't paying attention to the blade and got about 7"in when I cracked the Lexan through my "needed" area. Luckily I was only 7" in... So I flipped my Giant Template and was able to avoid the crack. Put my skill saw back and decided to play it safe and use my Angle Grinder. I always joke with people and tell them I Built my whole car with an angle grinder and Channel Locks LOL. But the Angle grinder worked much better, but it made a HUGE mess of Lexan sand Everywhere. So I did everything out in the driveway.
Got it all cut out And decided to to give it the initial Test fit.
Which is where it got interesting... I can't say whether or not I would have left the 1/4" extra lexan around the whole template again...if I were or had to be forced to do this ever again. on one hand...i'm happy I did it because it came out well. On the other hand... I'm not joking when I say that this must've taken me over 6 Hours. So... The lexan sheet may have only cost me 36 Bucks...but I'll sell the paper template for $150 Bucks to whoever would love to trace it onto a piece of lexan HaHaHa. Jkjk
Progress
And Although it doesn't look much different. This is where I left off.... one thing I didn't want was for the sheet to be rattling and vibrating un-controllably the whole time the car is on. So I made the sheet fit straight across on the bottom...but the top will have Juuuuust enough Bend in it to bow the sheet in towards the cabin...just slightly enough to add some strength and rigidity. Then when I go to mount it..I can make the Mounts hold that position. This should cut down on the annoying Vibrating flimsly look I'm trying to avoid.
I had to stop after this for a mental break. I'll make the Alum Mounts tomorrow. I'm thinking Nut-serts for sure!!
....okay okay I had to stop with the lexan..but I just moved in the garage and started putting all my accessories back together.
After Baking the High Temp Ceramic Paint 3 times in raising temps..... The stuff is actually hard enough that my nail doesn't pull anything away when I scrape at it! I've always wanted to go White..but I didn't want it to come out cheezy.... But I think it came out pretty cool so far!
Peripheral Port Lower Intake Manifold, I.D.1300's and Rail
Borg Warner EFR9174...Comp Cover Coated and Baked!
Lastly Have you guys ever heard of Epic Colorz Paint?
And what do you think of this color? =-).....
More Updates soon!
Stay Tuned!!
#ThisIsTheWolf
02-29-16, 01:35 AM
#2491
Make an assessment...
iTrader: (3)

Also, what kind of ceramic coat are you using? What other colors do they have?
02-29-16, 10:56 AM
#2492
The Ceramic Coating I got at Autozone. it was 10 bucks a can and I got 3 of them. The process was a pain. But you have to bake it 3 times. 30 min each, in varying oven temps from 275 to 400 to 600. My oven only got to 550 though. I'll Look for the brand and can so I can shoot you a pic of it. I think they have a few different colors but I'd have to look next time I go to Autozone. I'll remember though and get back to you on it.
03-01-16, 01:30 AM
#2493
Make an assessment...
iTrader: (3)
Well your Autozone probably has it in stock because where you live apparently has EVERYTHING in stock. LOL I've never seen any ceramic coating in any of our local Autozones but I'll look next time I go in there. I probably just haven't been paying attention. I'm eager to see how it holds up. I've been looking into having it done when I have the rest of my stuff powder coated, and Applied Plastics in Denver has different types of ceramic coat, some that sheds heat and some that holds it in. So I'm kinda looking into that.
Thanks!
Thanks!
03-04-16, 12:17 AM
#2494
Update:
PROGRESS!!
Picking up where I left off...
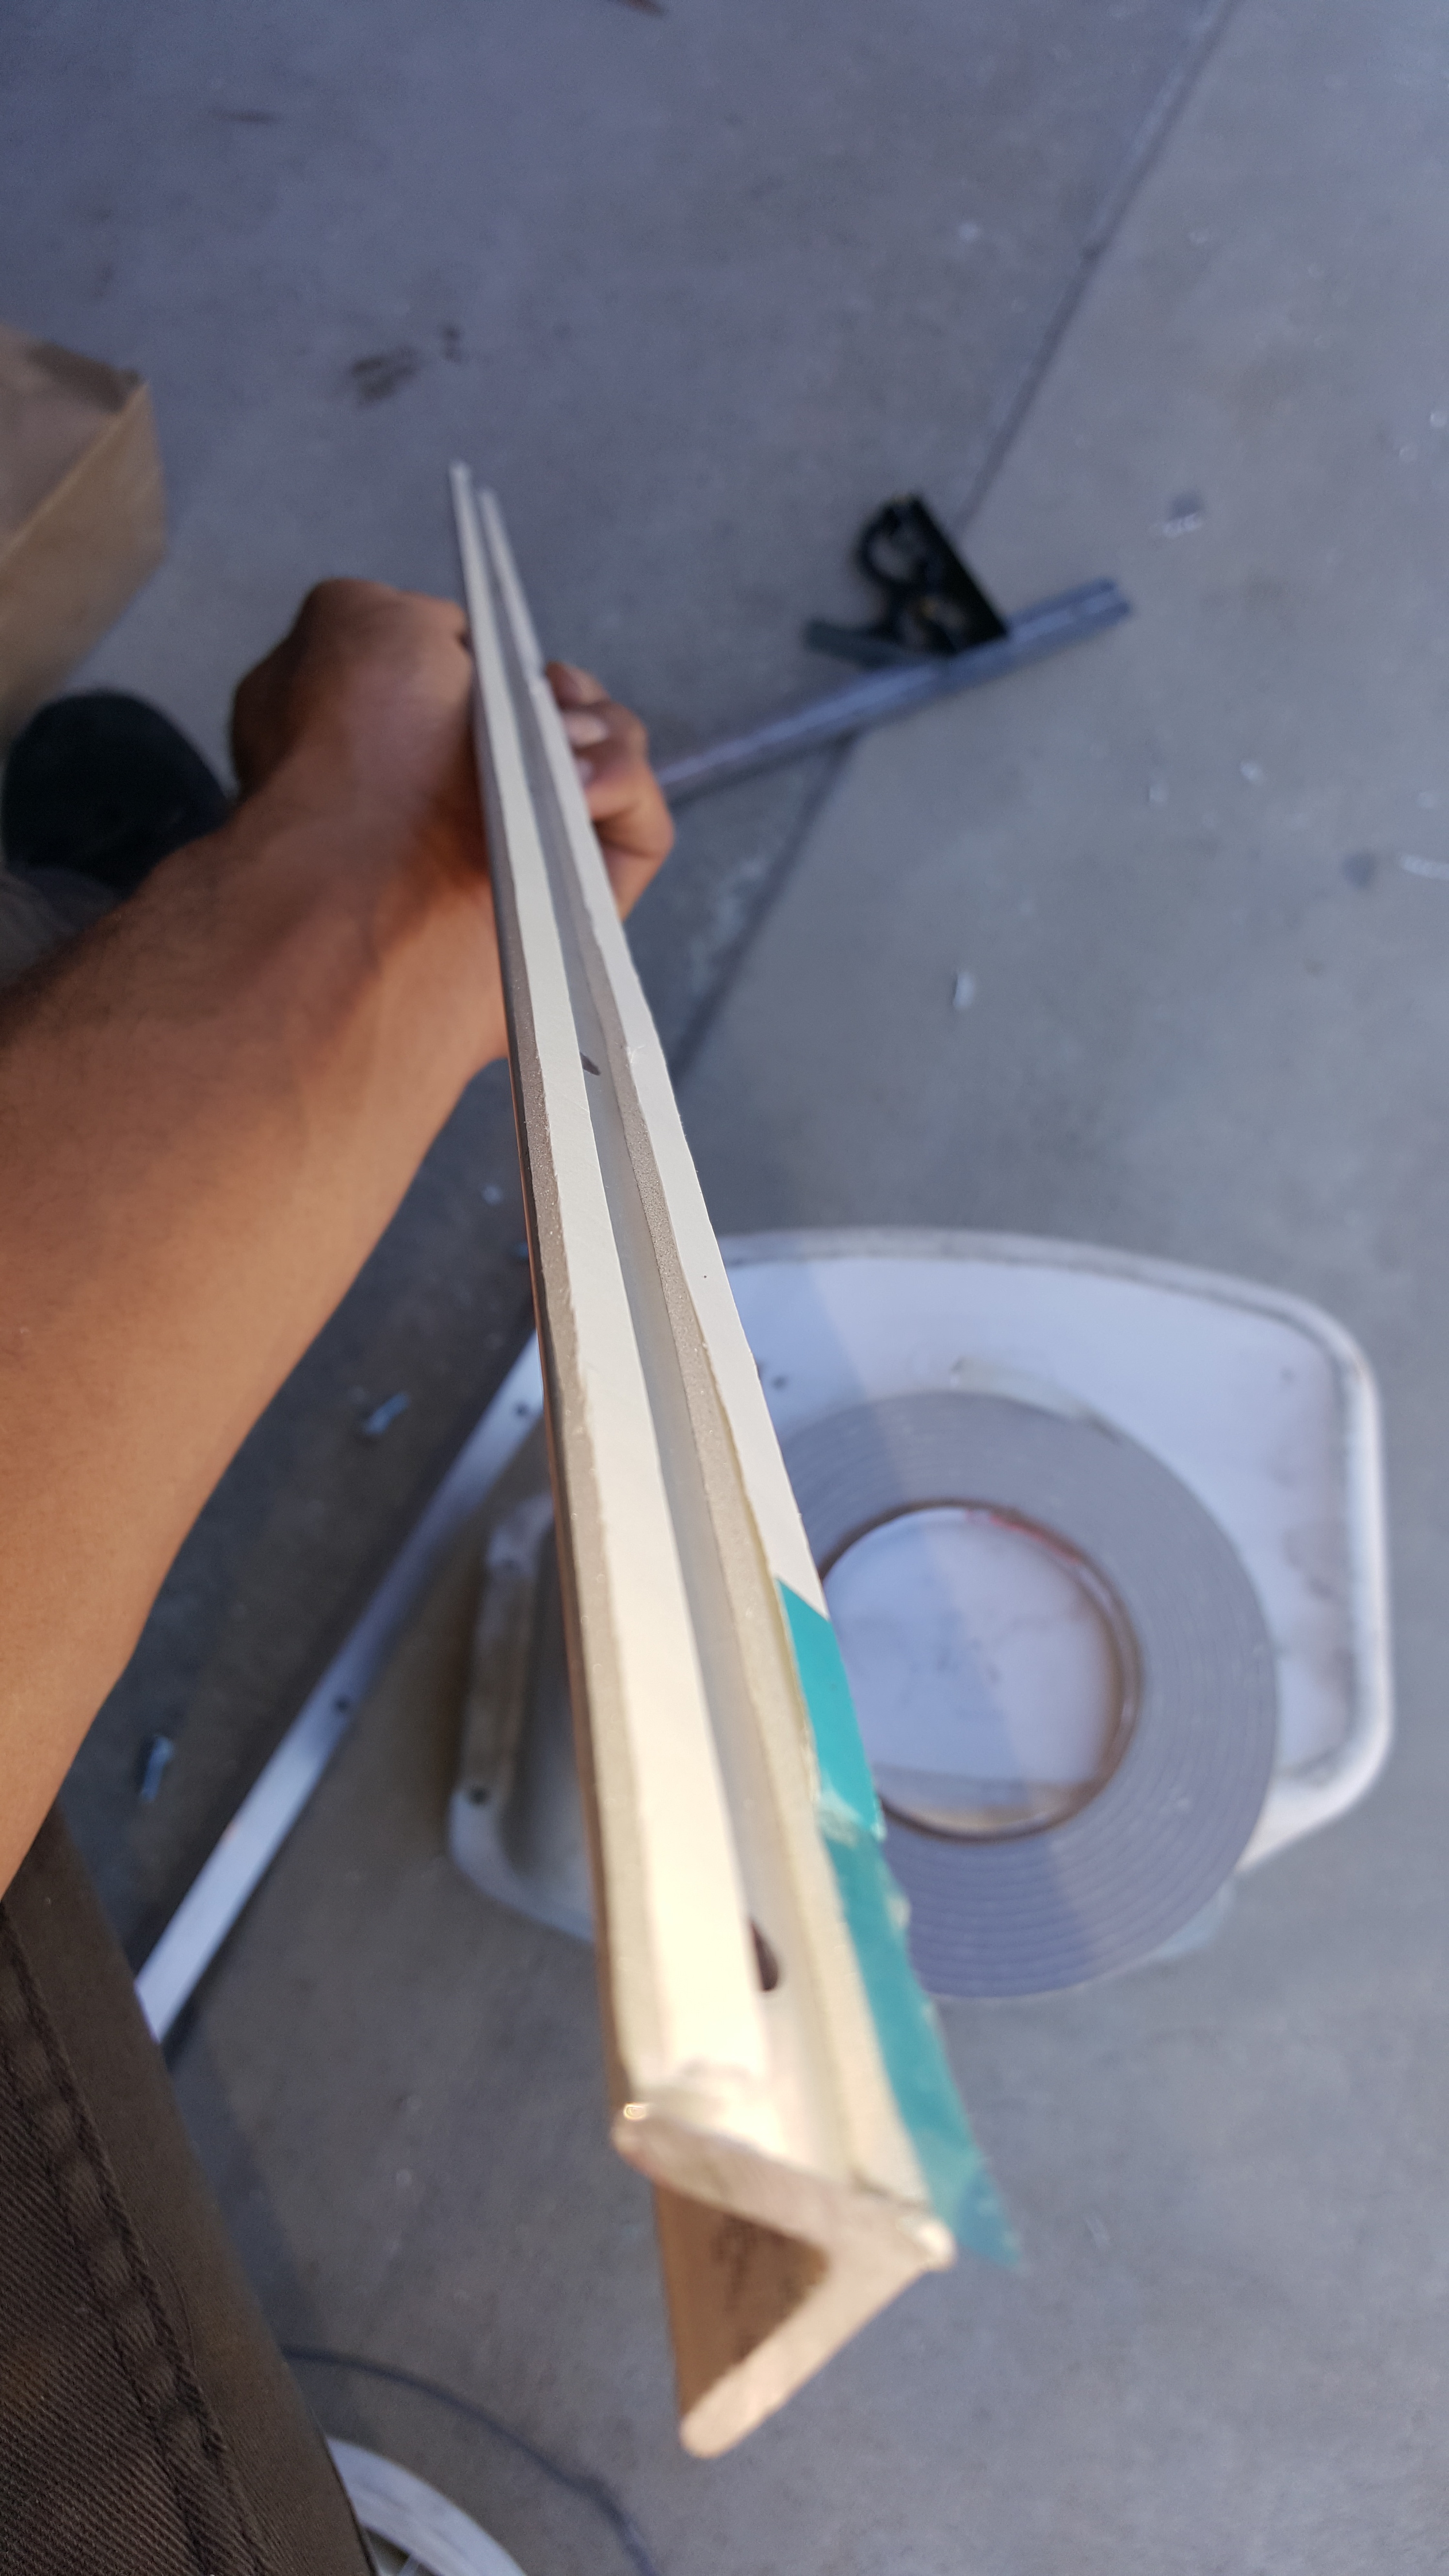
Once I was able to get the Lexan where I wanted it. It was time to start thinking about how I was going to mount it. In my head....I had this idea that I was going to make it as sturdy as possible...so I tried to replicate most of the sliding windows I saw in houses. Immediately thought about using double sided tape...just without removing the adhesive cover...between the lexan and the metal mounts. But when I was at the Hardware store... I came across this ultra thin stuff that was meant to do what I wanted... and it was really cheap!!
Check it out!
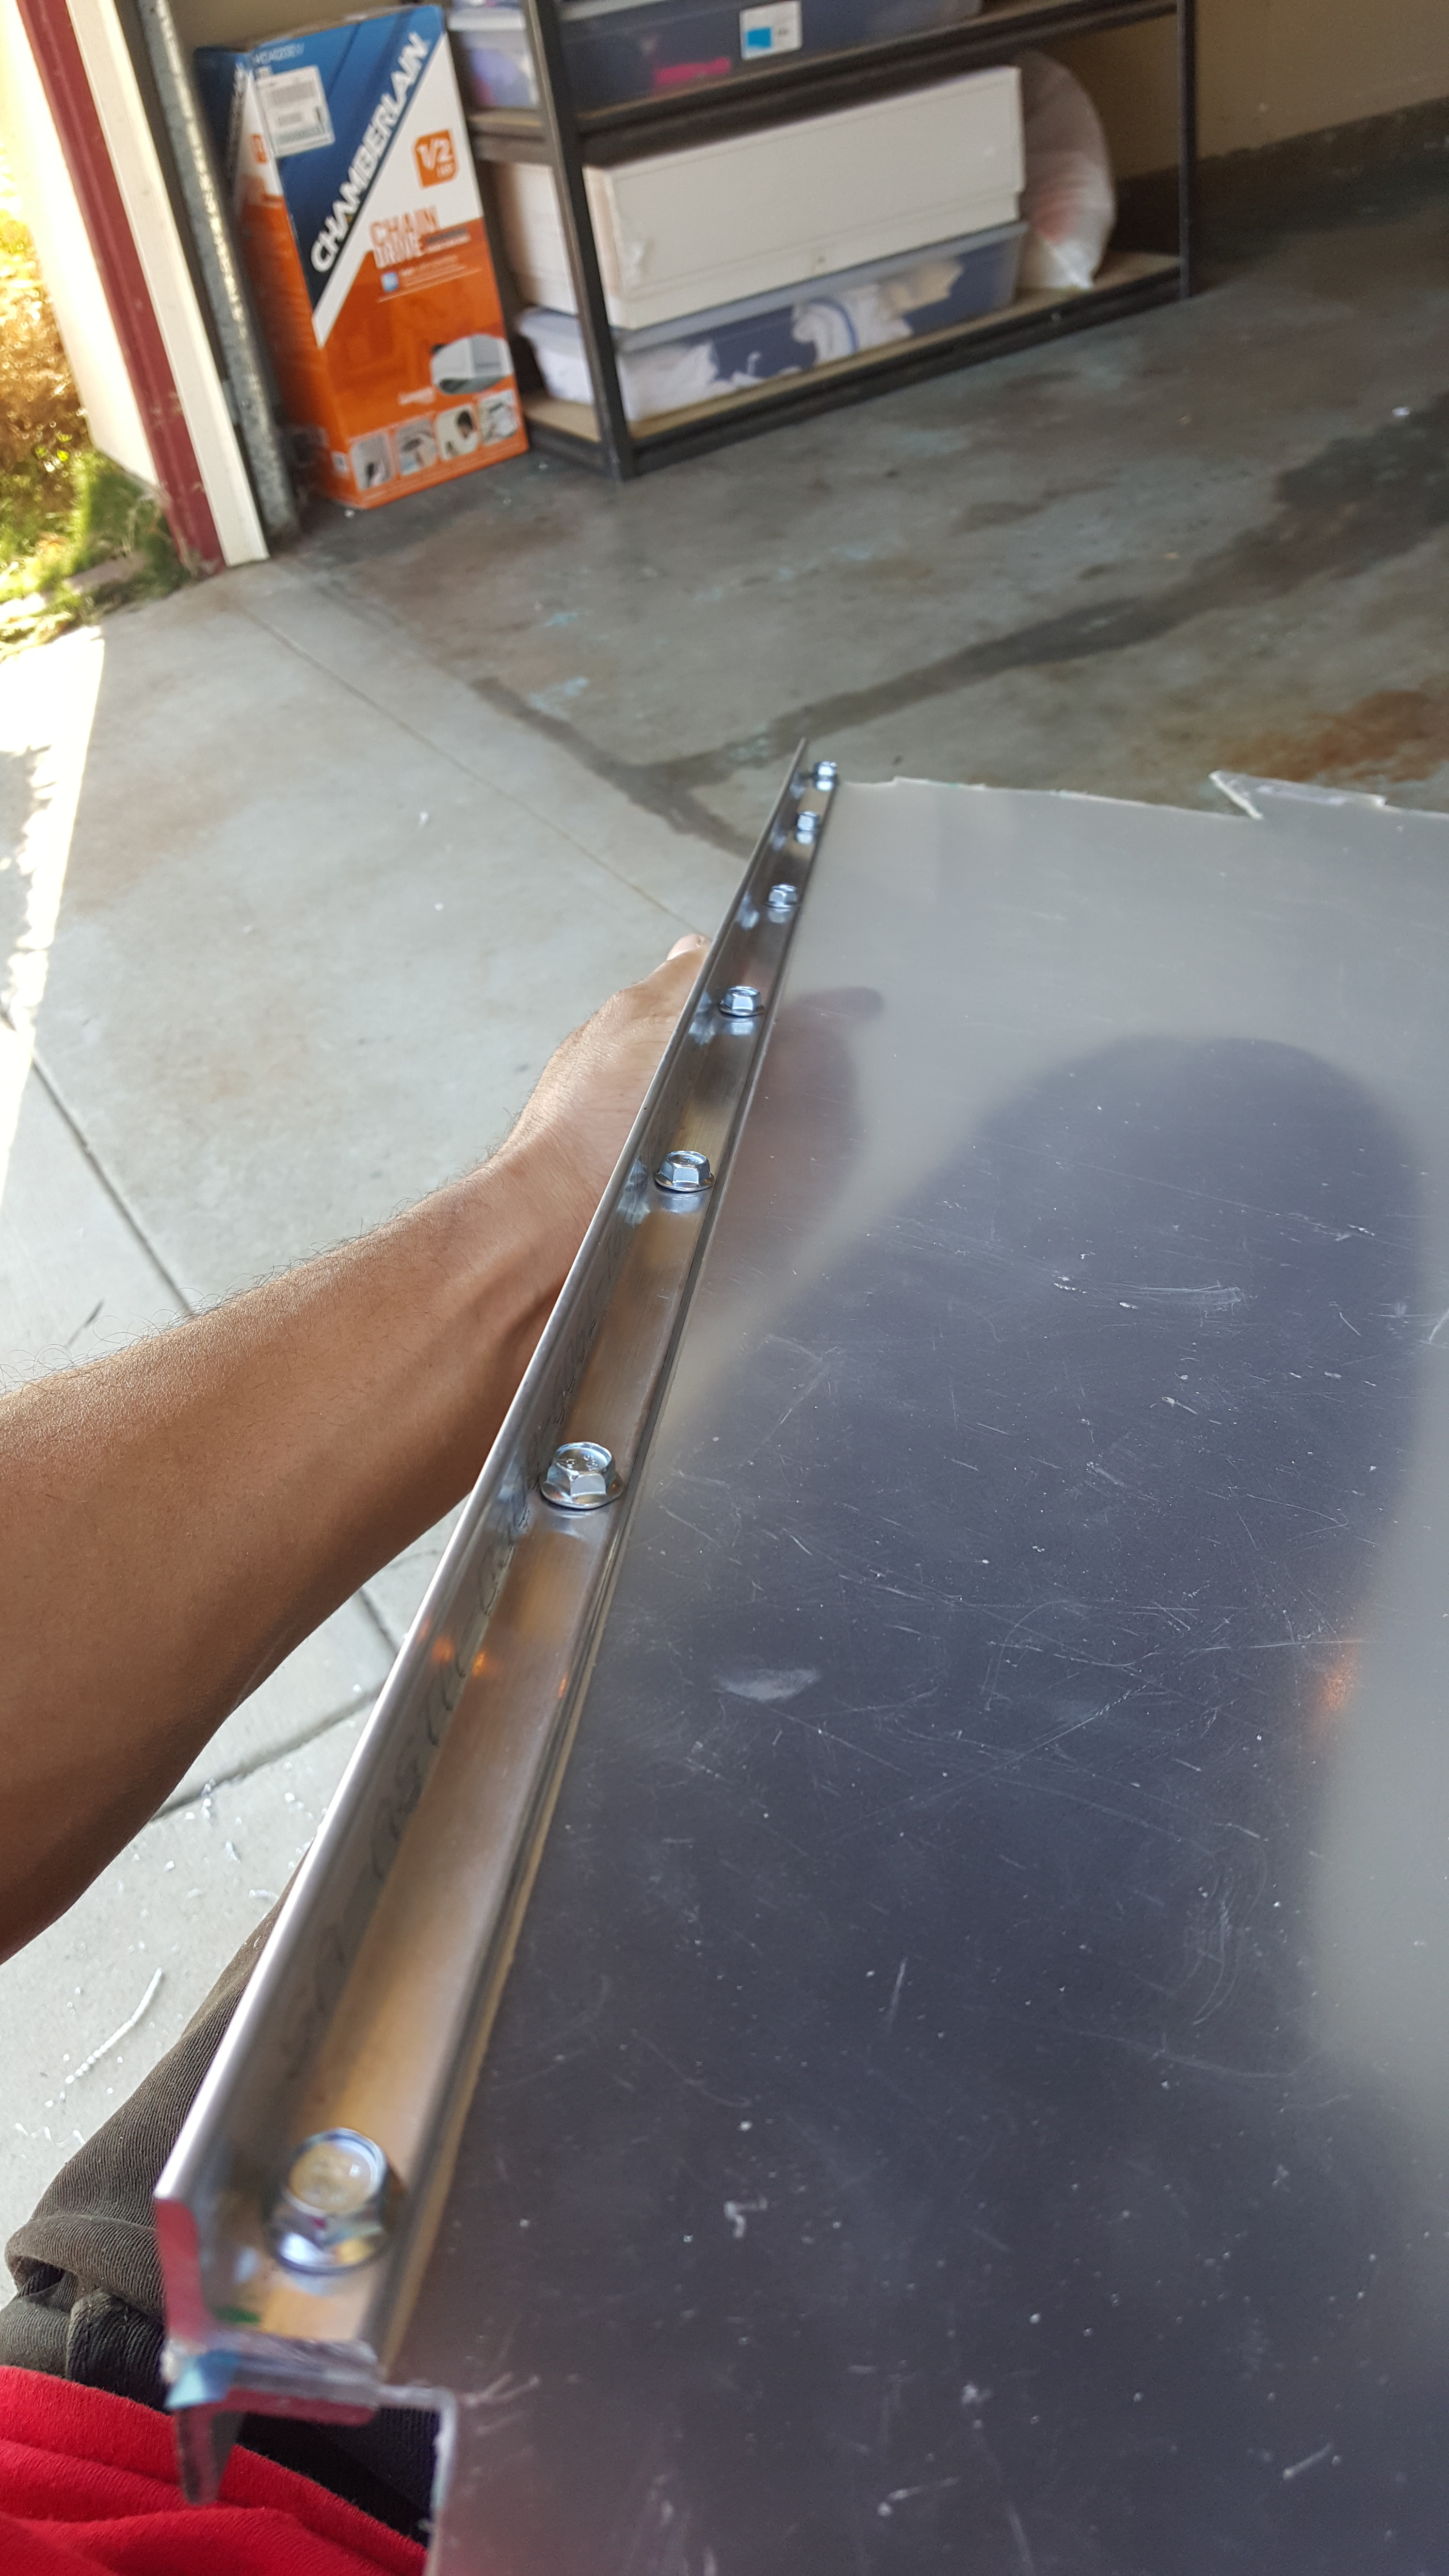
Purchased this L bracketed Alum stock..measured it and cut to length.
Used 2 rows of this tape..leaving a gap in the middle.....not just because it was thin..but also so I didn't need to worry about picking holes in it while pushing the mount bolts through (would've pushed it off the alum and made it hard to line up.
Used some Padded c-clamps to hold everything in place while measured then drilled holes.
http://i804.photobucket.com/albums/y...pscty6pzm5.jpg
Pushed the bolts through...fastened the hardware and Whaaalahhh!!
Test Fit Number gazillion
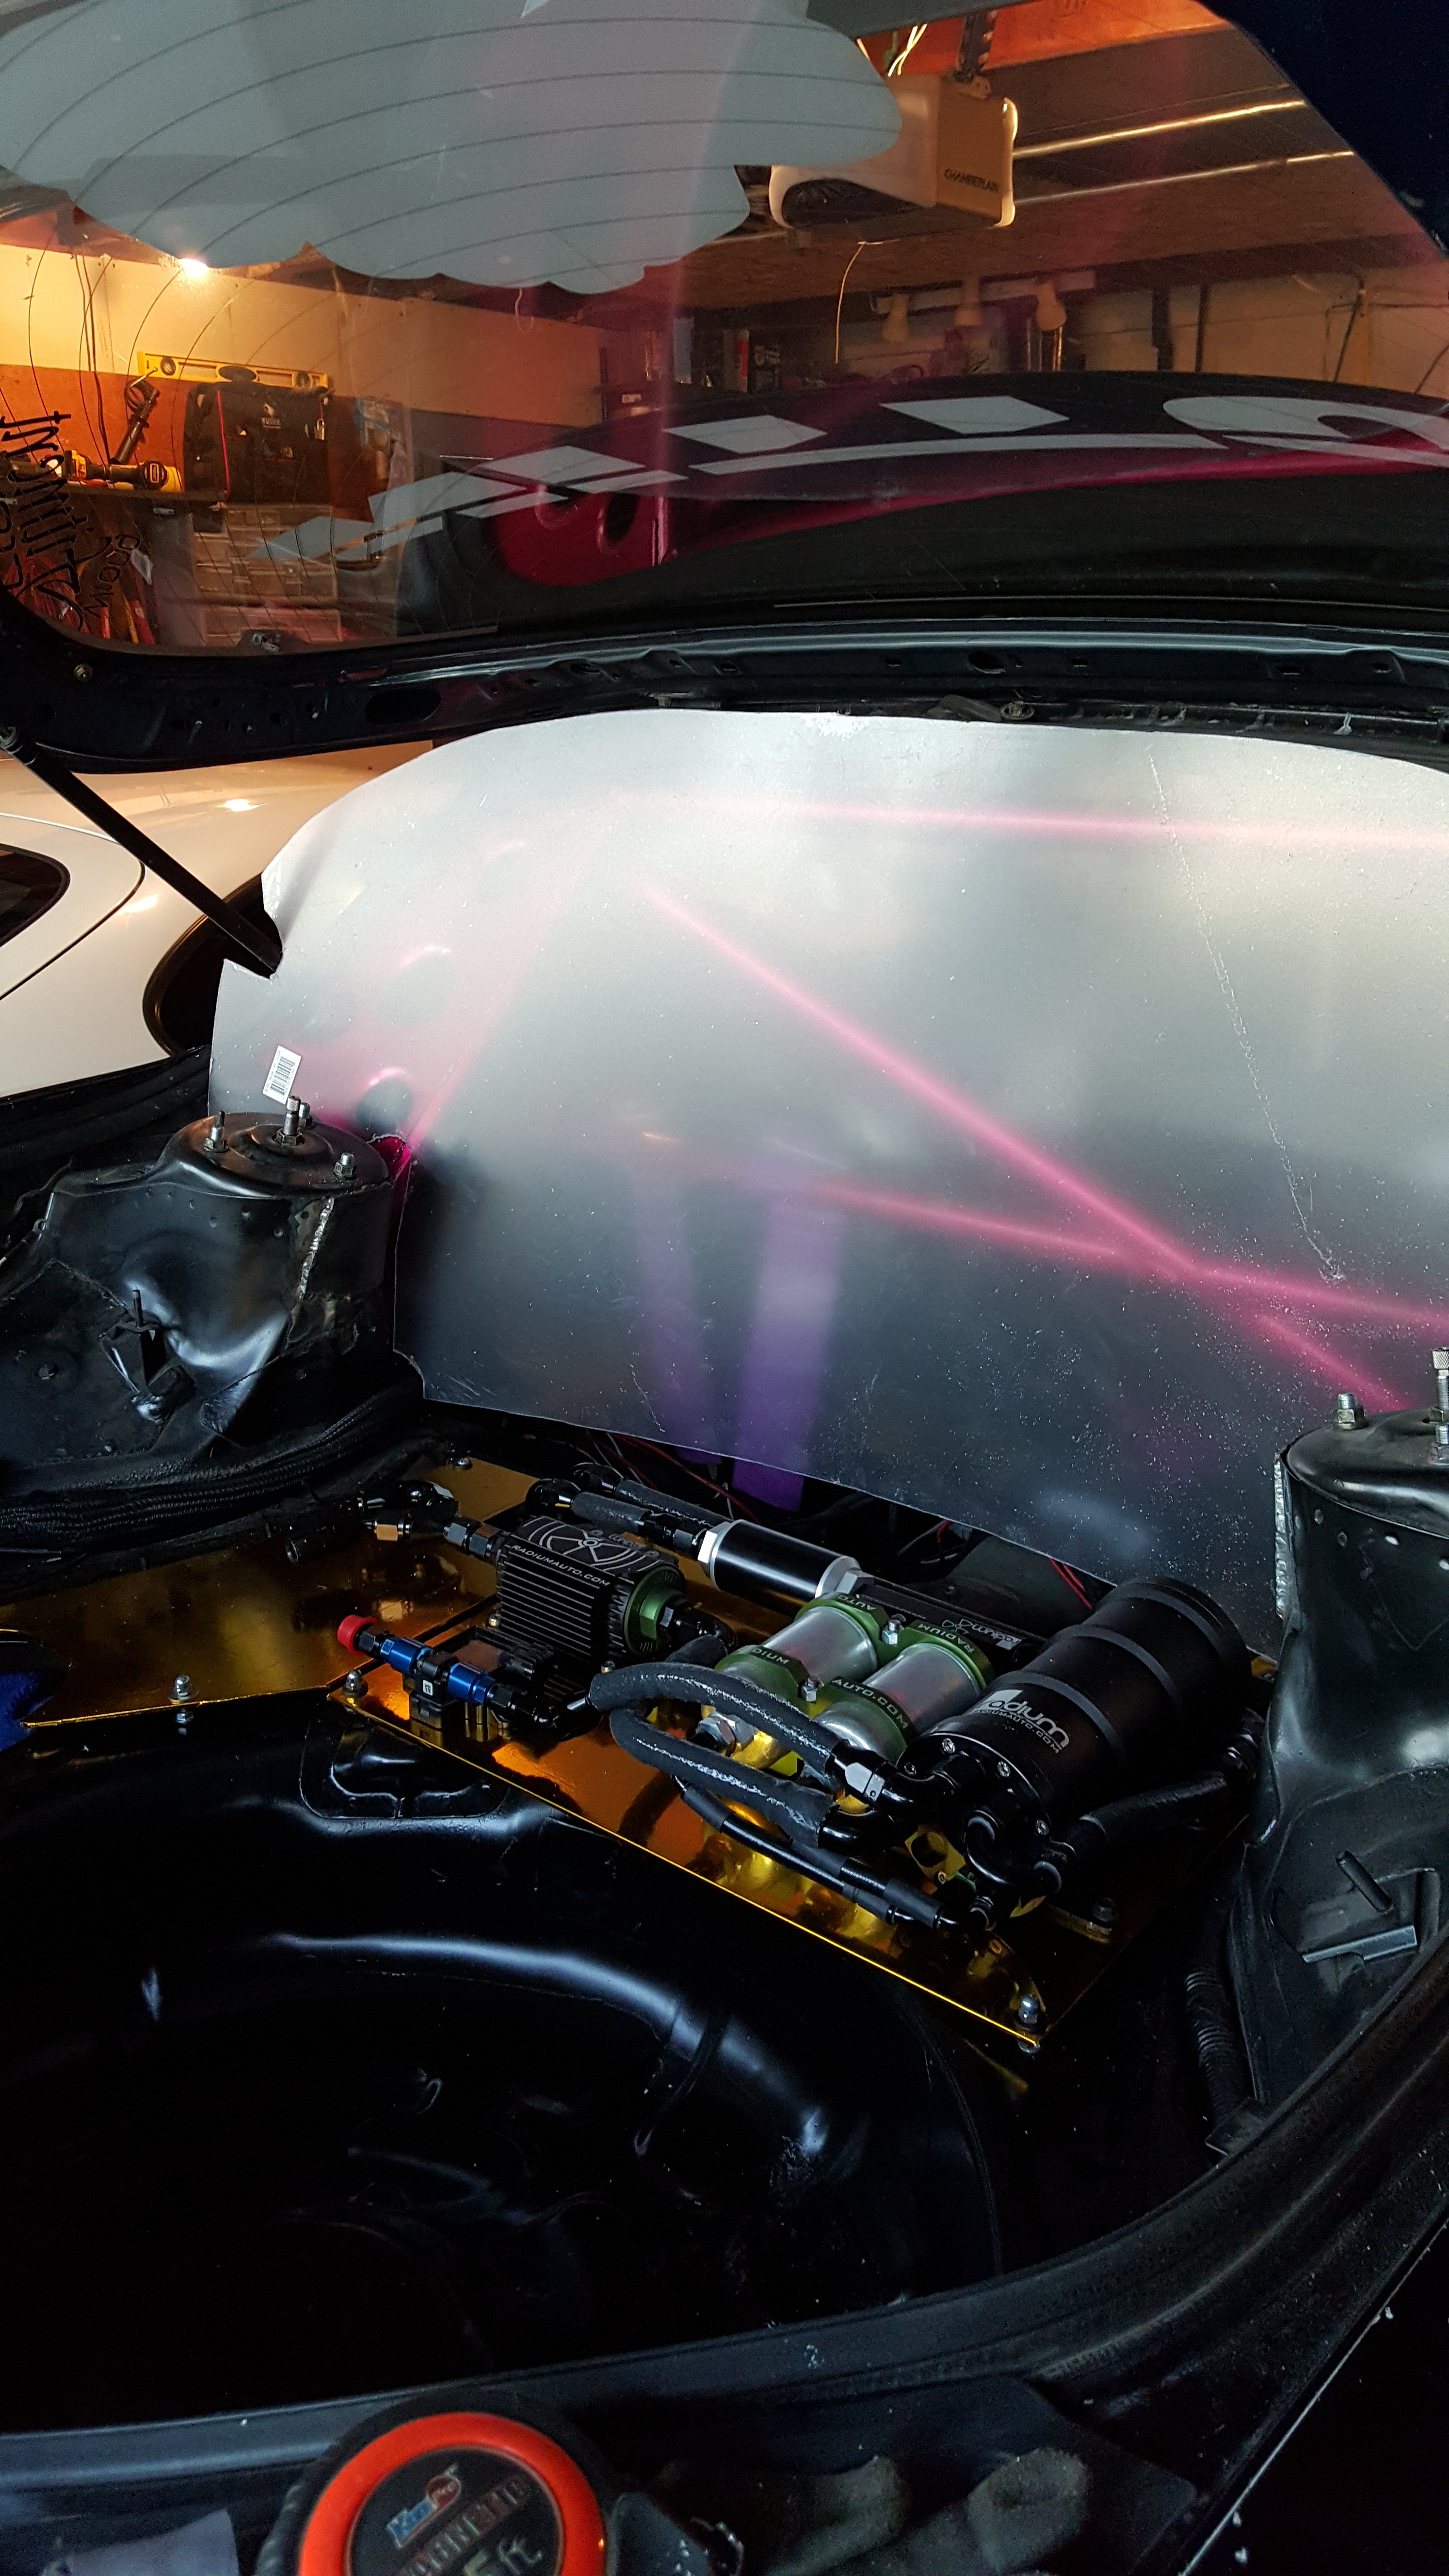
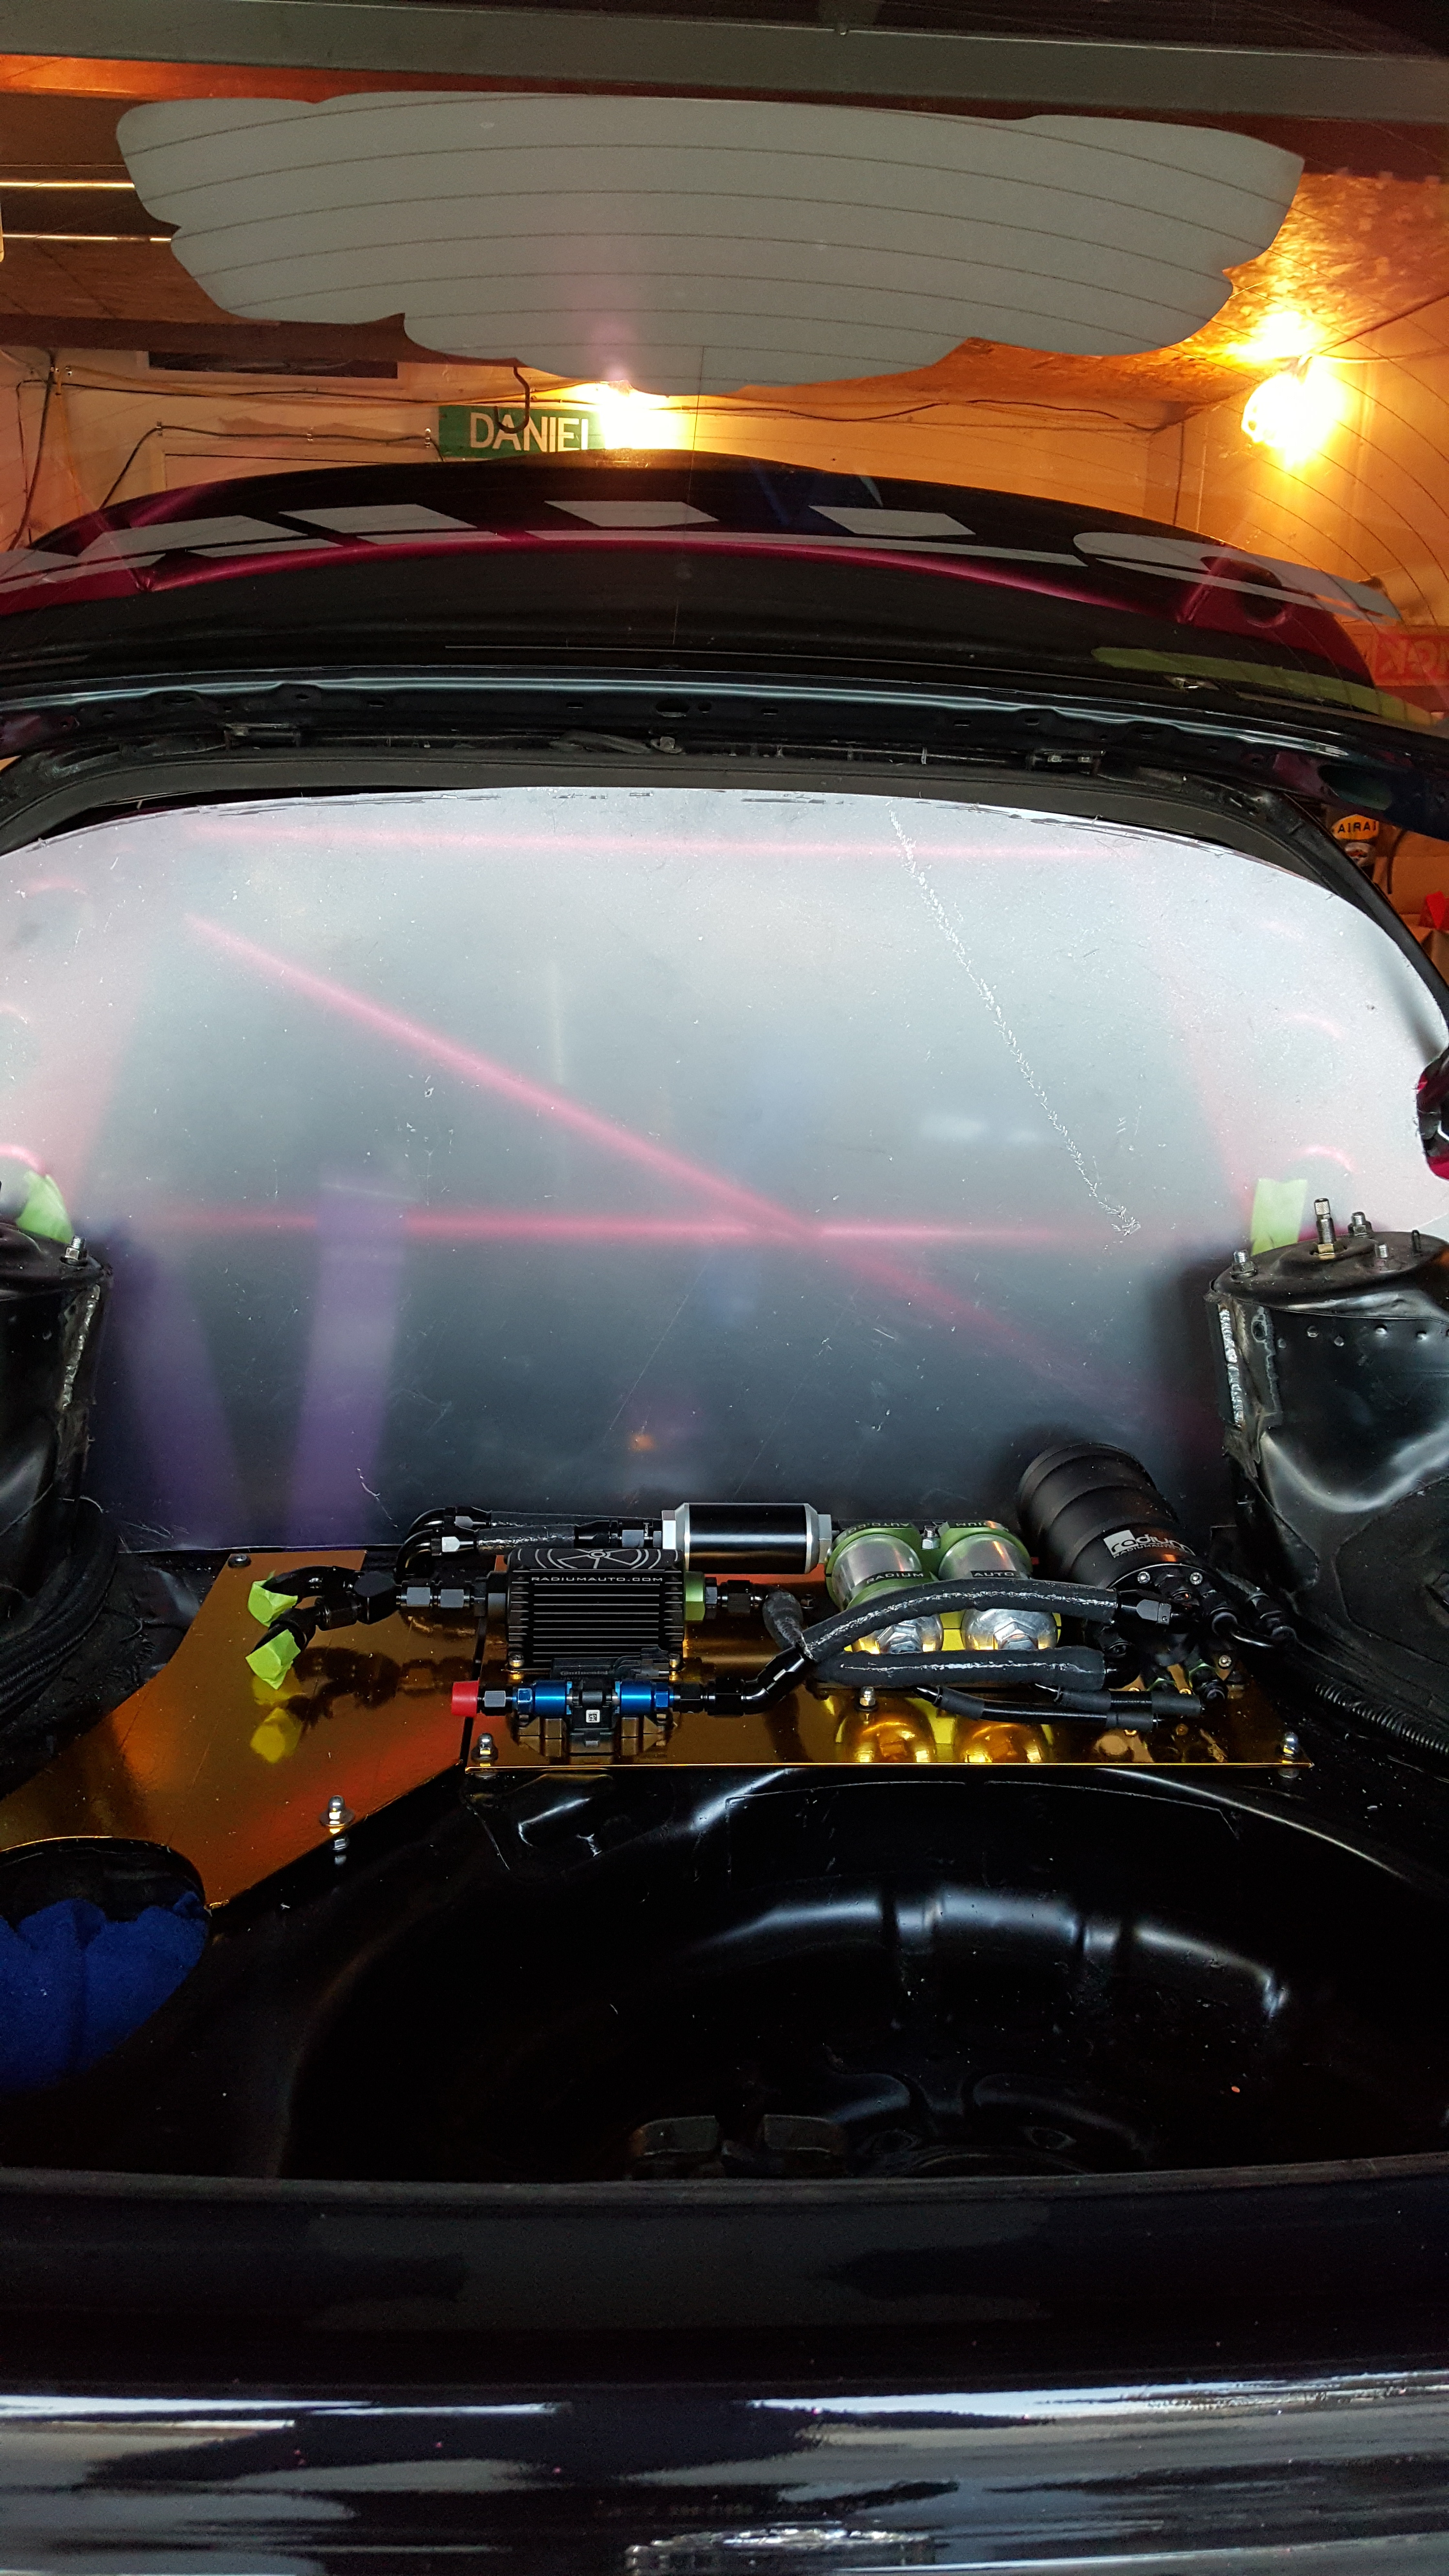
Pulled my Surge mount plate out so I could focus on the Lexan Fire Barrier
Used some Tape to position the top end of the Lexan... Although the mount on the bottom is sturdy.. I wanted to make sure vibration was in check.. So I fabbed up this little straight bracket out of some left over stock I had laying around from my ducting skeleton.
From the Bottom

From the top
Used my trusty Dremel to put a hole in the Lexan where it mounted up top. This stuff cracks fairly easy.. So i wanted to make sure I didn't get any cracks.....especially this far into it.

Ayooooo!!!!!
Then I used some Extra Door Molding to seal the top edge of the Lexan. This way there was a nice solid seal when the Rear Hatch Closes.
BTW to get the shape of the rear glass... Juuuust right for the lexan. It was as tedious a job as Ive ever done. Definitely tested my patience.
And WhaaaLahhh!!! Finished!!
Finished!!! I really Like it!!. Came out great! I don't know if anyone is interested.. But I'm willing to sell the Template of the Lexan Glass for $40 Bucks shipped!! All Monies earned will be going to my Tire fund this year haha!!
sorry for the crap pic
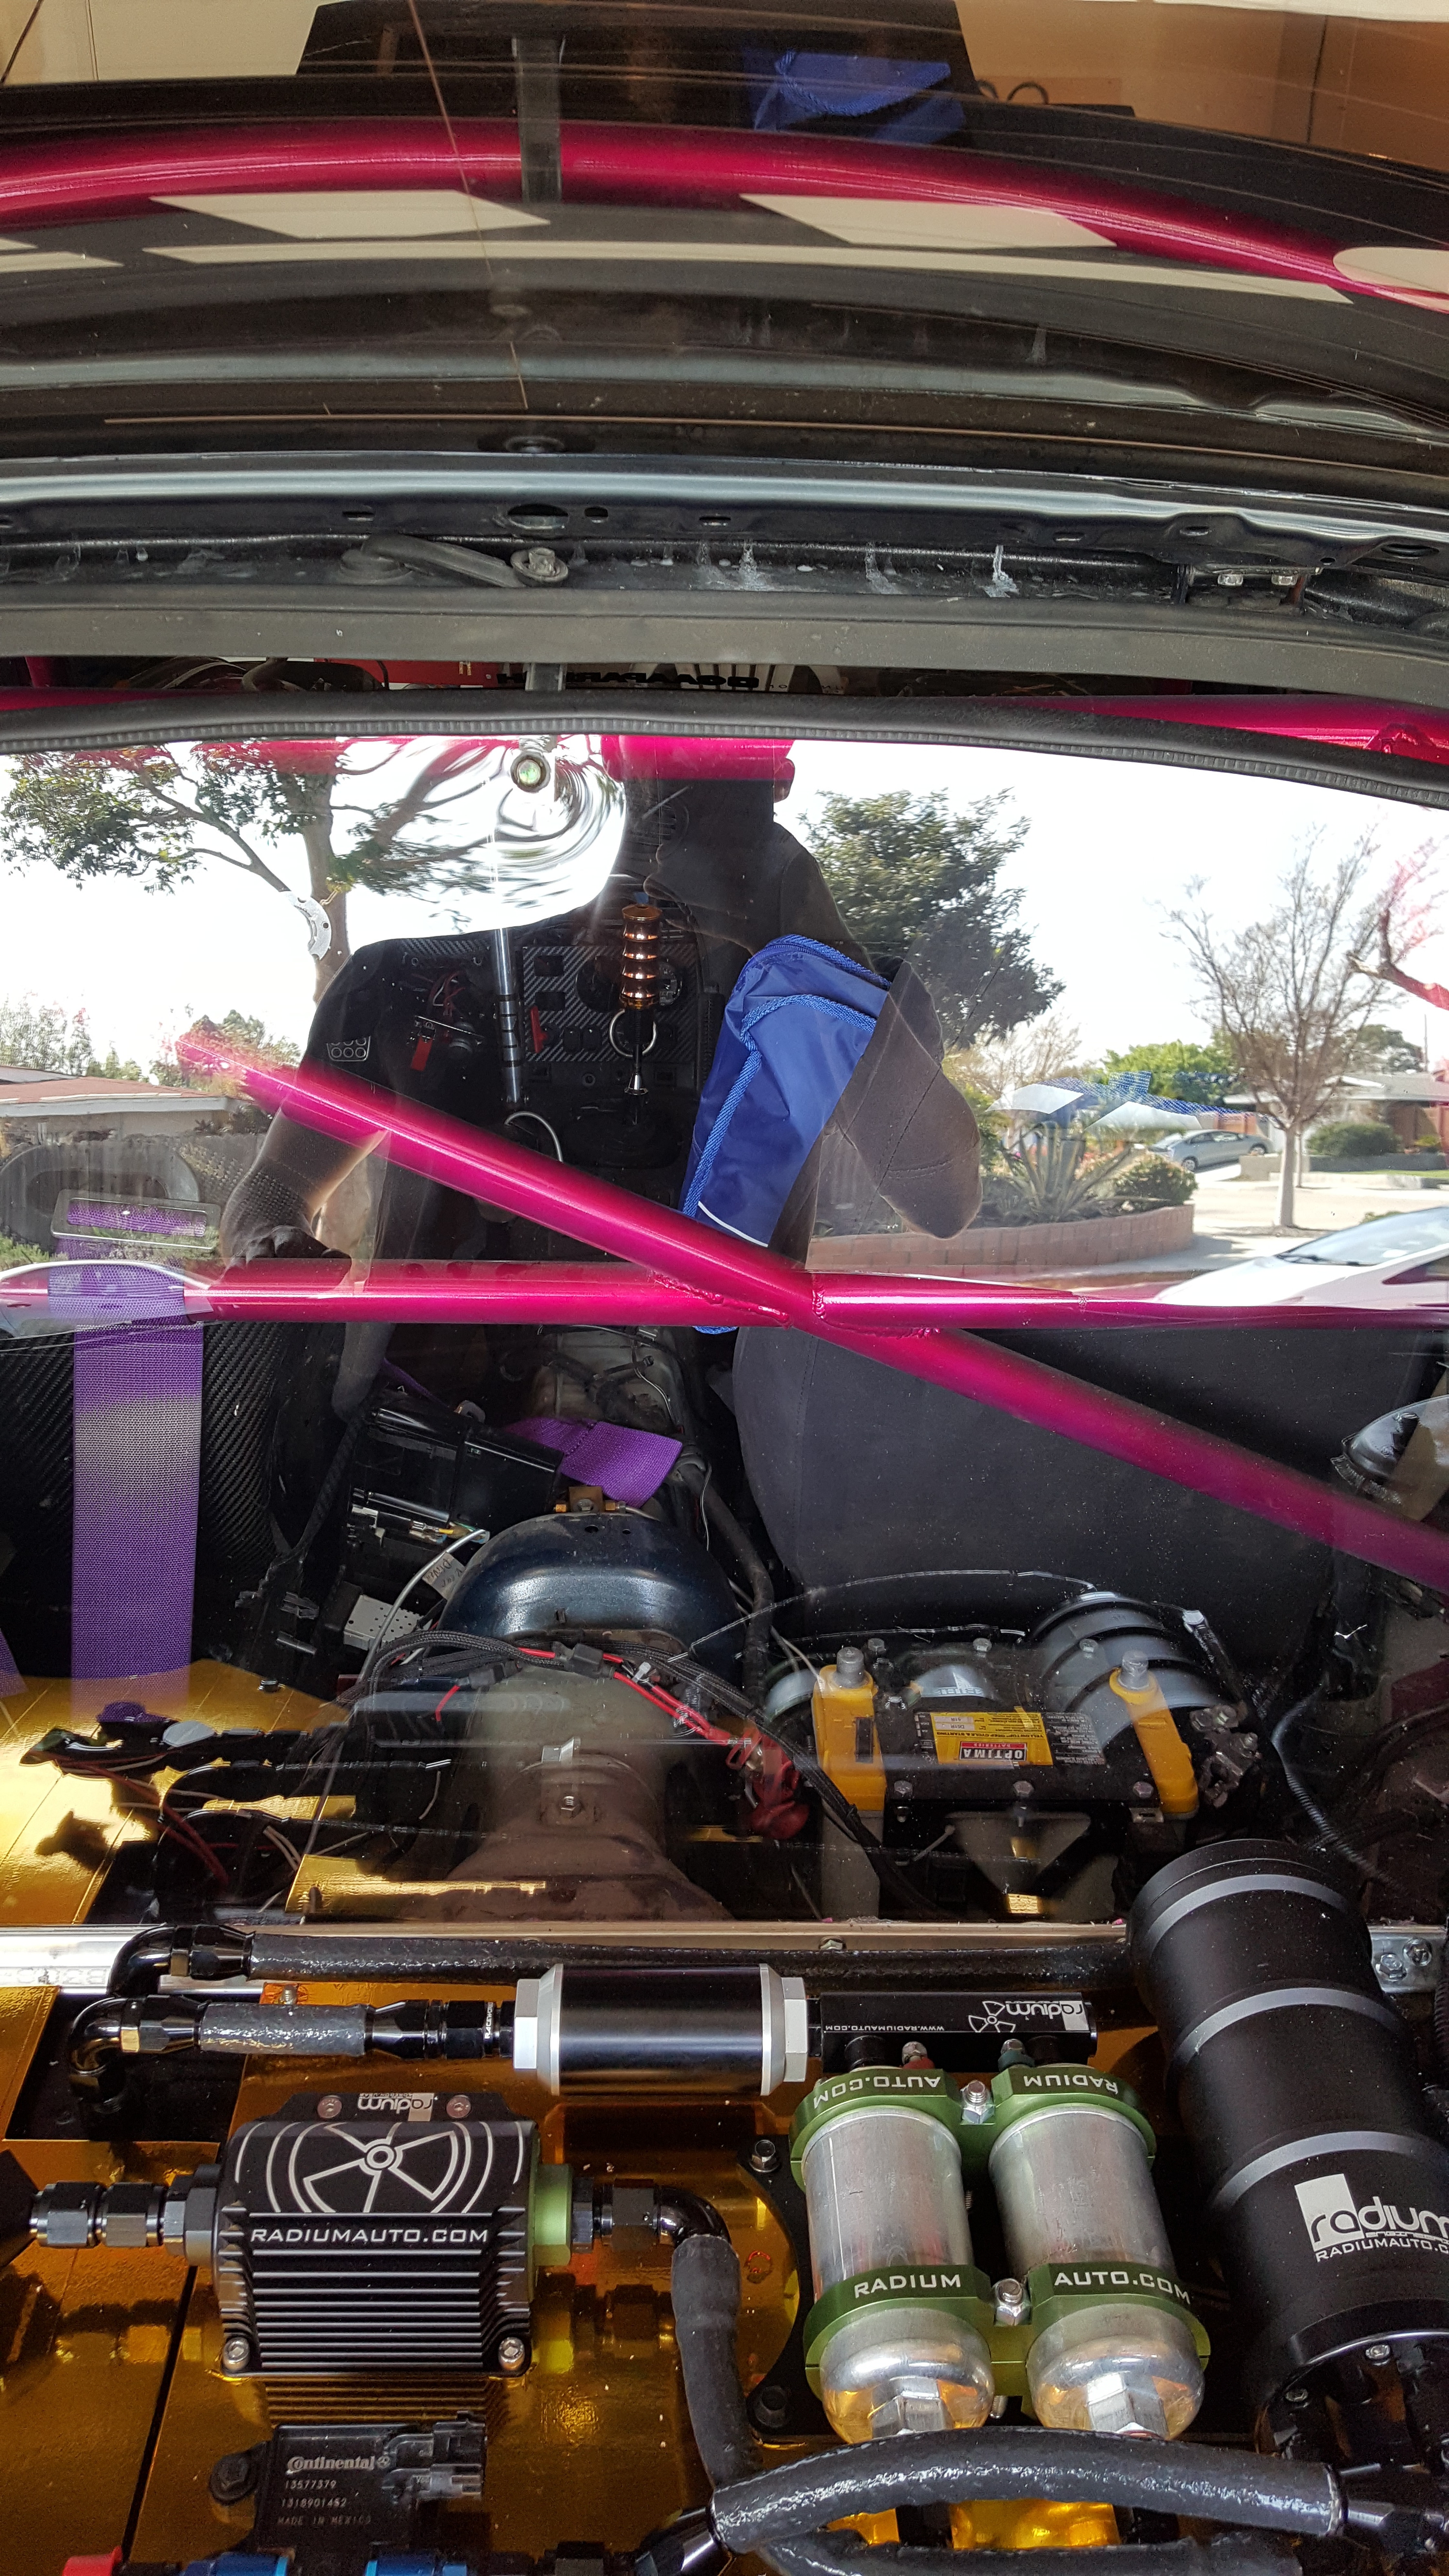
Went back into the garage to look at the set up again... Looks awesome through the Glass!!
You can't even see the Lexan. .....well right now you can't. I might put some Window Tint on it to keep it clear and prevent it front getting All Scratched up.
A little Youtube Video I made of the Process!!
PROGRESS!!
Picking up where I left off...
Once I was able to get the Lexan where I wanted it. It was time to start thinking about how I was going to mount it. In my head....I had this idea that I was going to make it as sturdy as possible...so I tried to replicate most of the sliding windows I saw in houses. Immediately thought about using double sided tape...just without removing the adhesive cover...between the lexan and the metal mounts. But when I was at the Hardware store... I came across this ultra thin stuff that was meant to do what I wanted... and it was really cheap!!
Check it out!
Purchased this L bracketed Alum stock..measured it and cut to length.
Used 2 rows of this tape..leaving a gap in the middle.....not just because it was thin..but also so I didn't need to worry about picking holes in it while pushing the mount bolts through (would've pushed it off the alum and made it hard to line up.
Used some Padded c-clamps to hold everything in place while measured then drilled holes.
http://i804.photobucket.com/albums/y...pscty6pzm5.jpg
Pushed the bolts through...fastened the hardware and Whaaalahhh!!
Test Fit Number gazillion
Pulled my Surge mount plate out so I could focus on the Lexan Fire Barrier
Used some Tape to position the top end of the Lexan... Although the mount on the bottom is sturdy.. I wanted to make sure vibration was in check.. So I fabbed up this little straight bracket out of some left over stock I had laying around from my ducting skeleton.
From the Bottom
From the top
Used my trusty Dremel to put a hole in the Lexan where it mounted up top. This stuff cracks fairly easy.. So i wanted to make sure I didn't get any cracks.....especially this far into it.
Ayooooo!!!!!
Then I used some Extra Door Molding to seal the top edge of the Lexan. This way there was a nice solid seal when the Rear Hatch Closes.
BTW to get the shape of the rear glass... Juuuust right for the lexan. It was as tedious a job as Ive ever done. Definitely tested my patience.
And WhaaaLahhh!!! Finished!!
Finished!!! I really Like it!!. Came out great! I don't know if anyone is interested.. But I'm willing to sell the Template of the Lexan Glass for $40 Bucks shipped!! All Monies earned will be going to my Tire fund this year haha!!
sorry for the crap pic
Went back into the garage to look at the set up again... Looks awesome through the Glass!!
You can't even see the Lexan. .....well right now you can't. I might put some Window Tint on it to keep it clear and prevent it front getting All Scratched up.
A little Youtube Video I made of the Process!!
03-04-16, 01:42 AM
#2496
Monster Post Continued:
Came across this photo online.... This was ASB last year. Man she took a beating. I've got a lot of work to do to make her look good again!!

I Also got quite a few parts in!! The Masterpiece showed up.... John Gleasmans Billit Series 321 EFR Manifold.. Freshly Coated Borg Warner 9174 Comp Cover... Speed Sensor Installed....Dual Closed tip Two Stroke Specific EGT Probes, and Full Function Engineering EMAP Canister... Geese just gotta Love New Parts!! Gets me everytime!
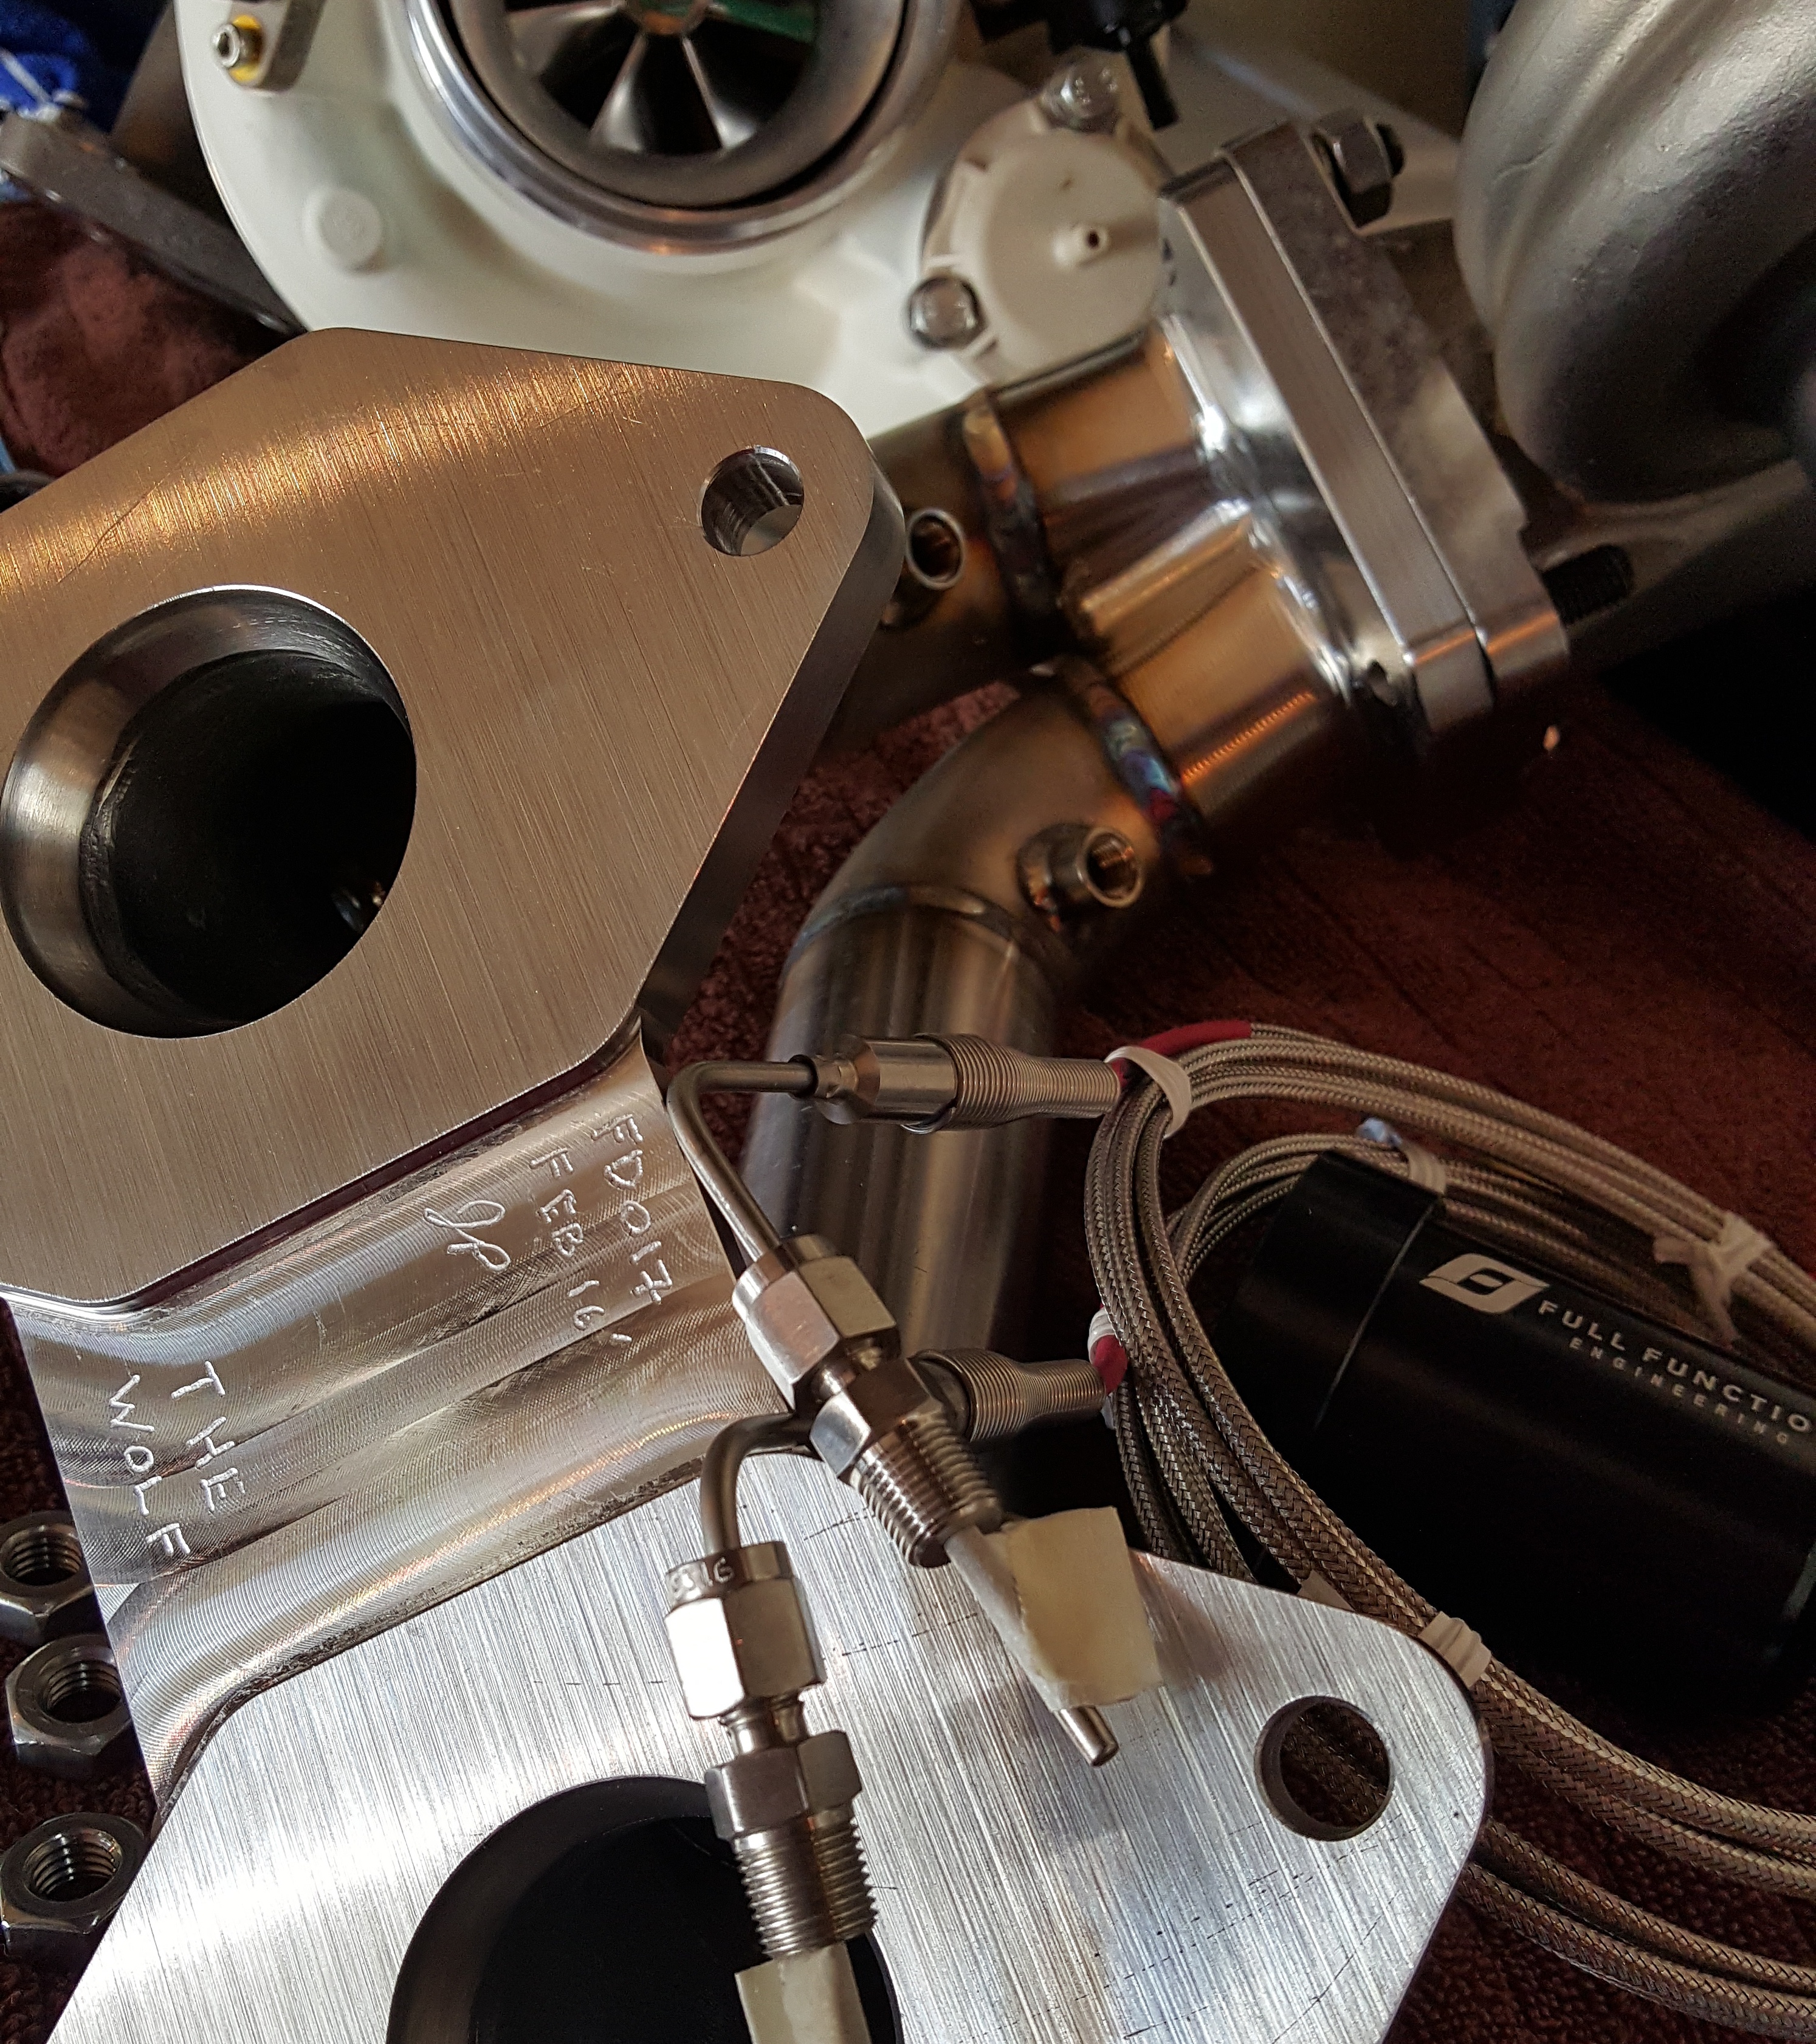
Inconel Hardware!!! I could stare at this picture all day long. Borg Warner 1.45 A/R Turbine Housing!
Due to my budget this year...I decided to purchase replacement parts for my current Clutch... I could have gone with the ACT...and I really like the guys there... but At this point... I know this clutch works with my driving style.. and the replacement parts were a little more forgiving budget wise than the act. Hopefully When I move to a new Car/Driveline set up..I can go with something a little more heavy duty.
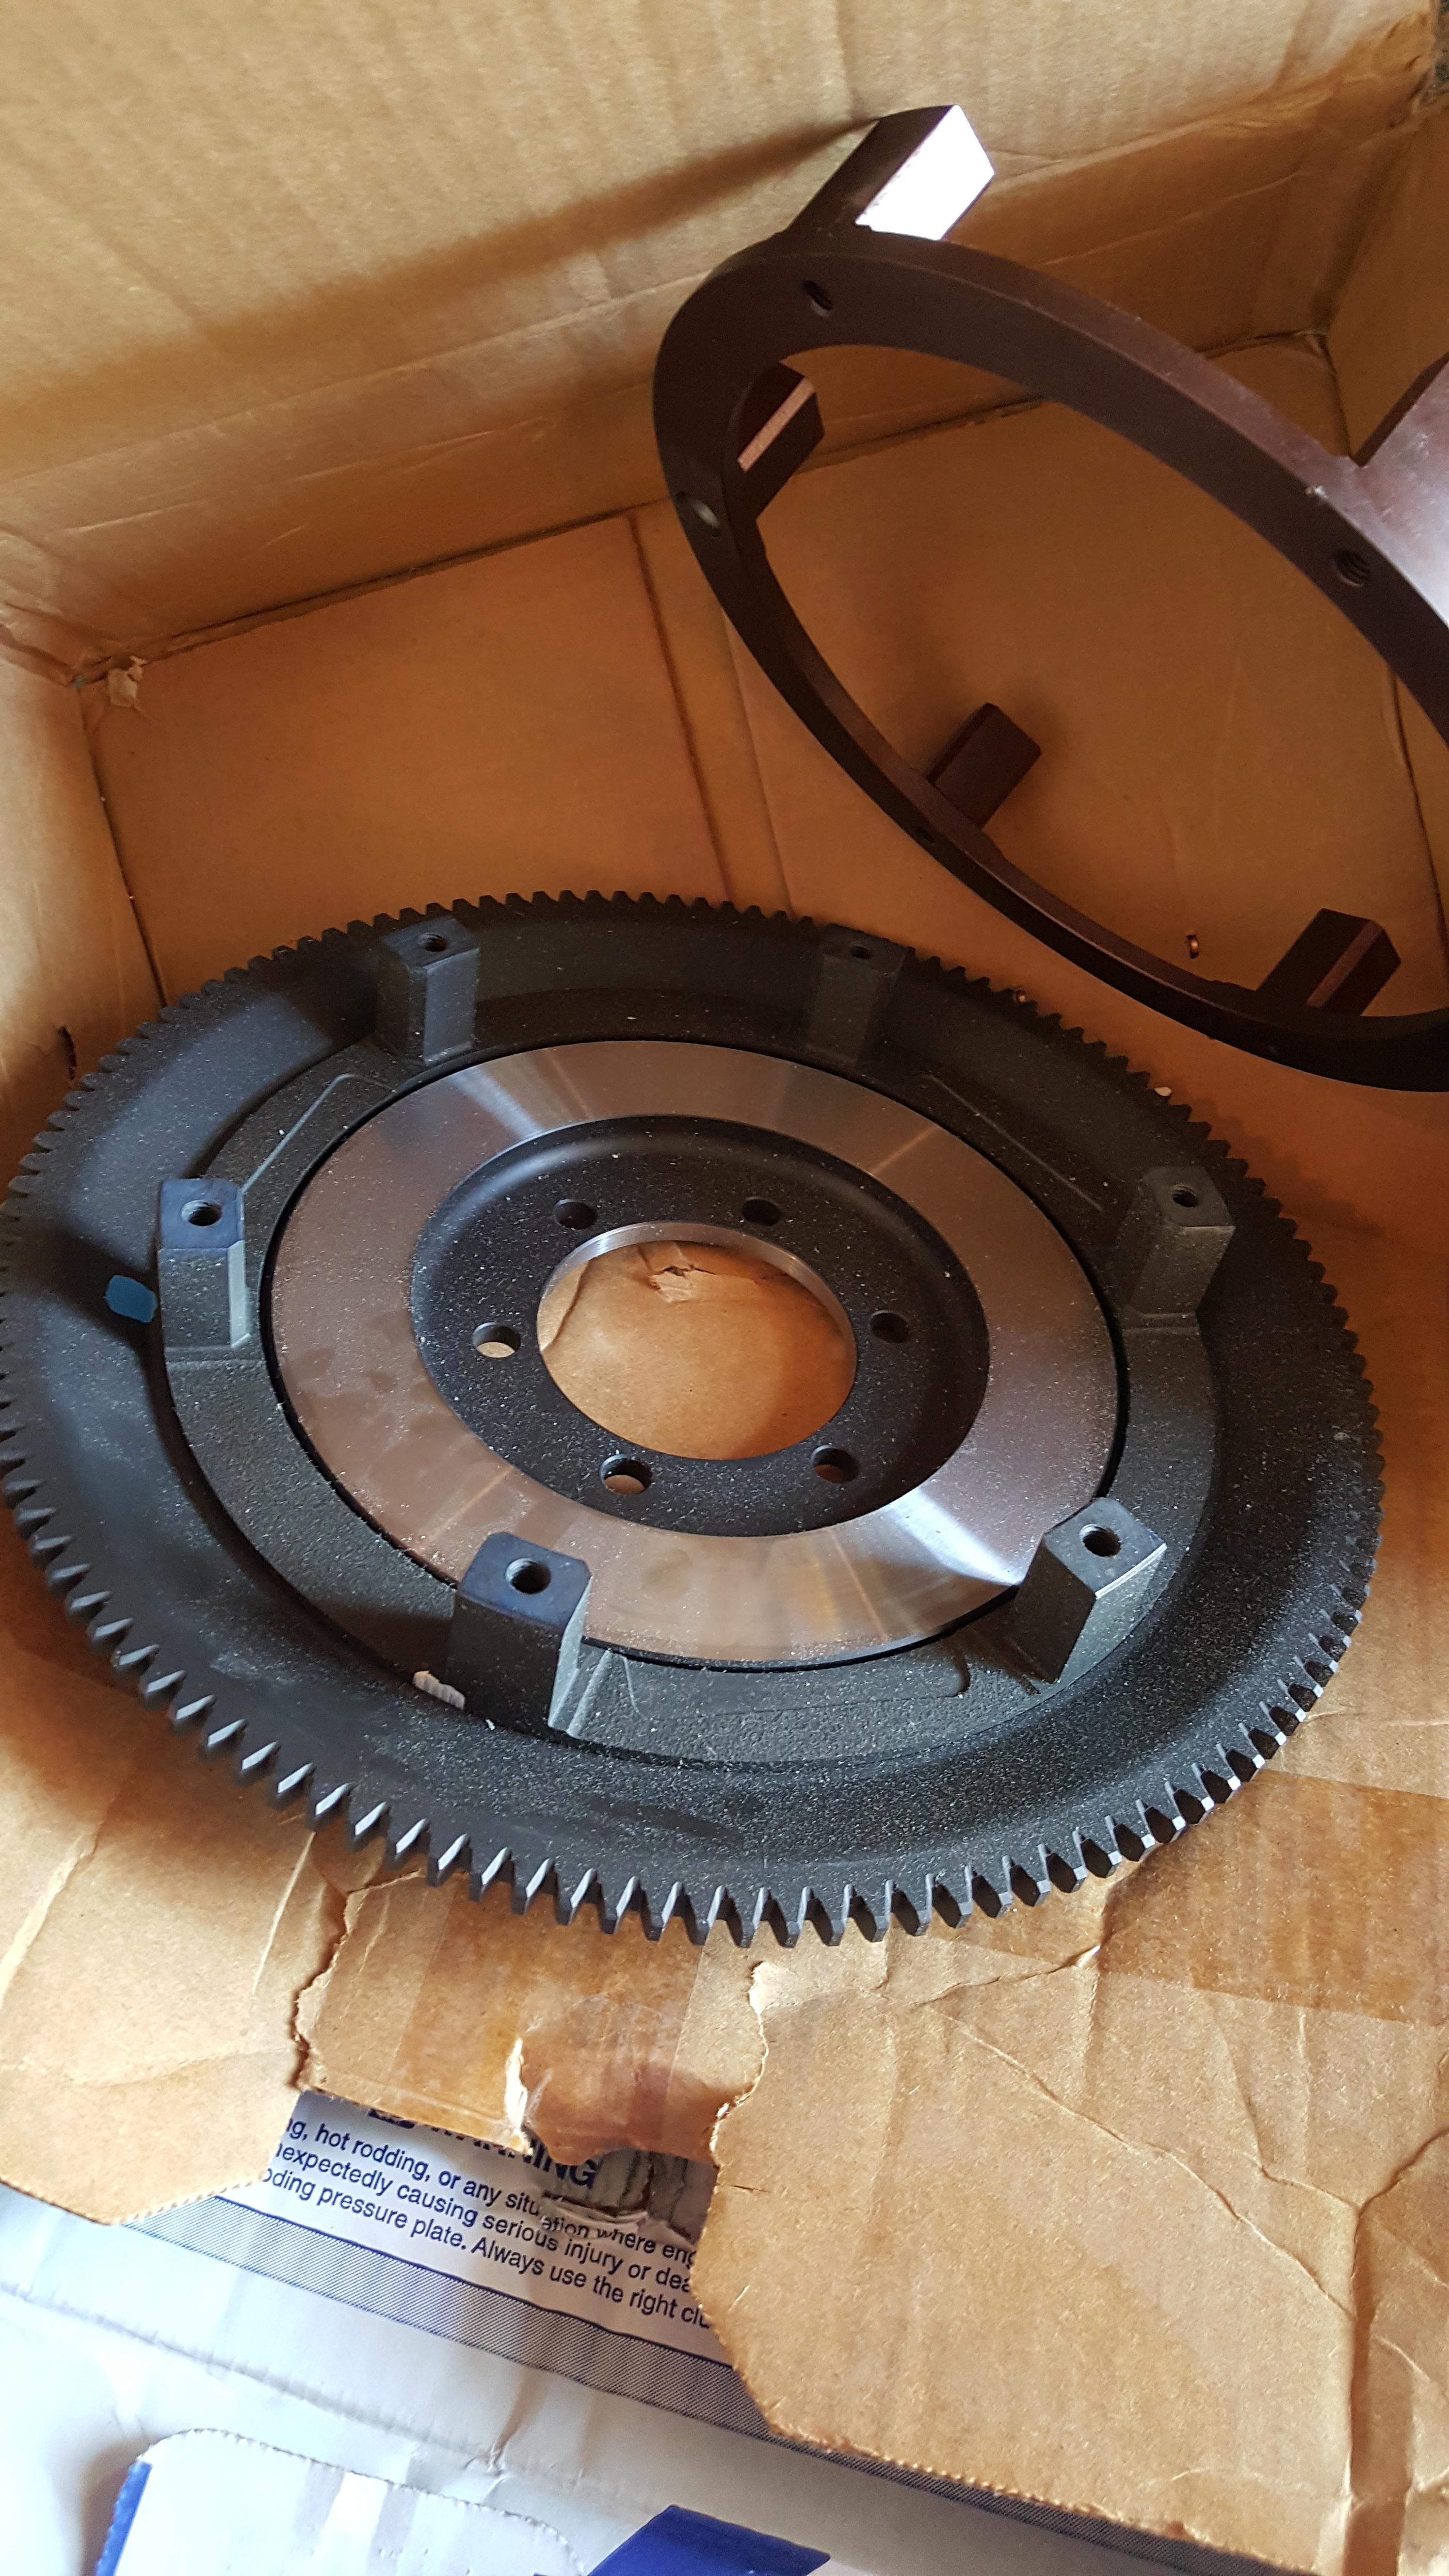
Exedy Lightweight Flywheel and spare disc Ring. My old one was sooo warped we couldn't get the thick vented Intermediate plate off without using a mallet.
Massive thanks and eternally grateful to NGK for giving me a chance to represent them! This is truly a dream!! I love Spark Plugs. NGK R7420 10's leading 10.5 Trailing! #NGKALLDAY
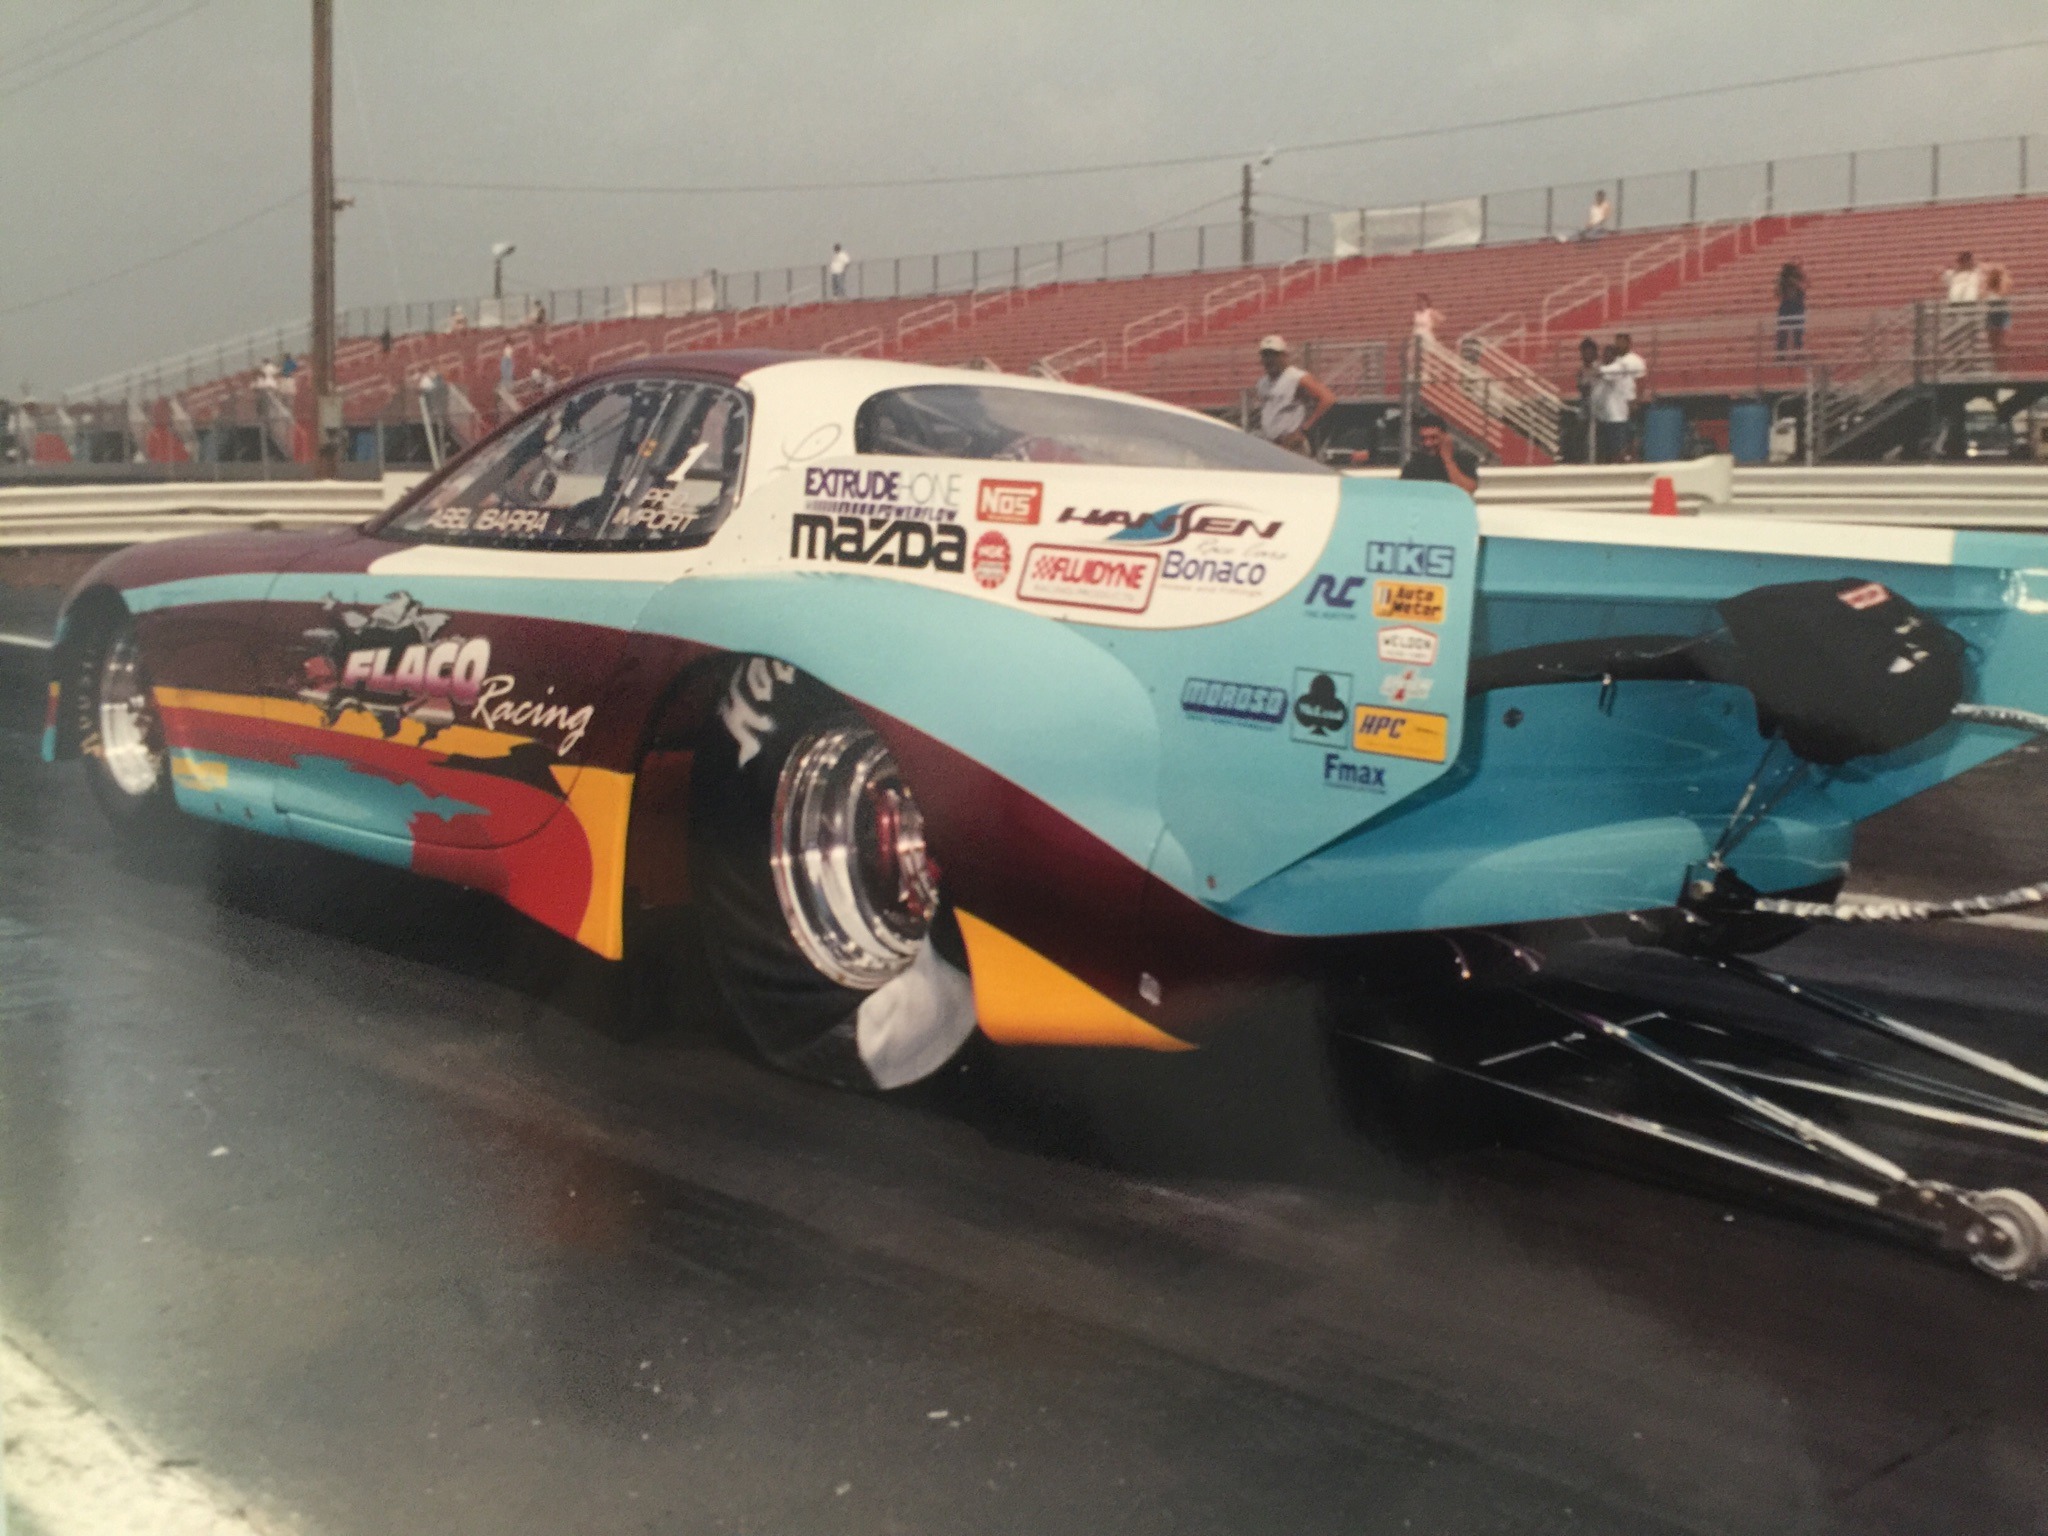
Check this Bad *** Pic out! Here is Abels Fd Rx7 Drag Car Way back in the day... "Pro Import"...and check out the sick little round sticker sitting closer to the rear of his wheel! Like Mentor Like Padowan haha. #NGKALLDAY!!!!!
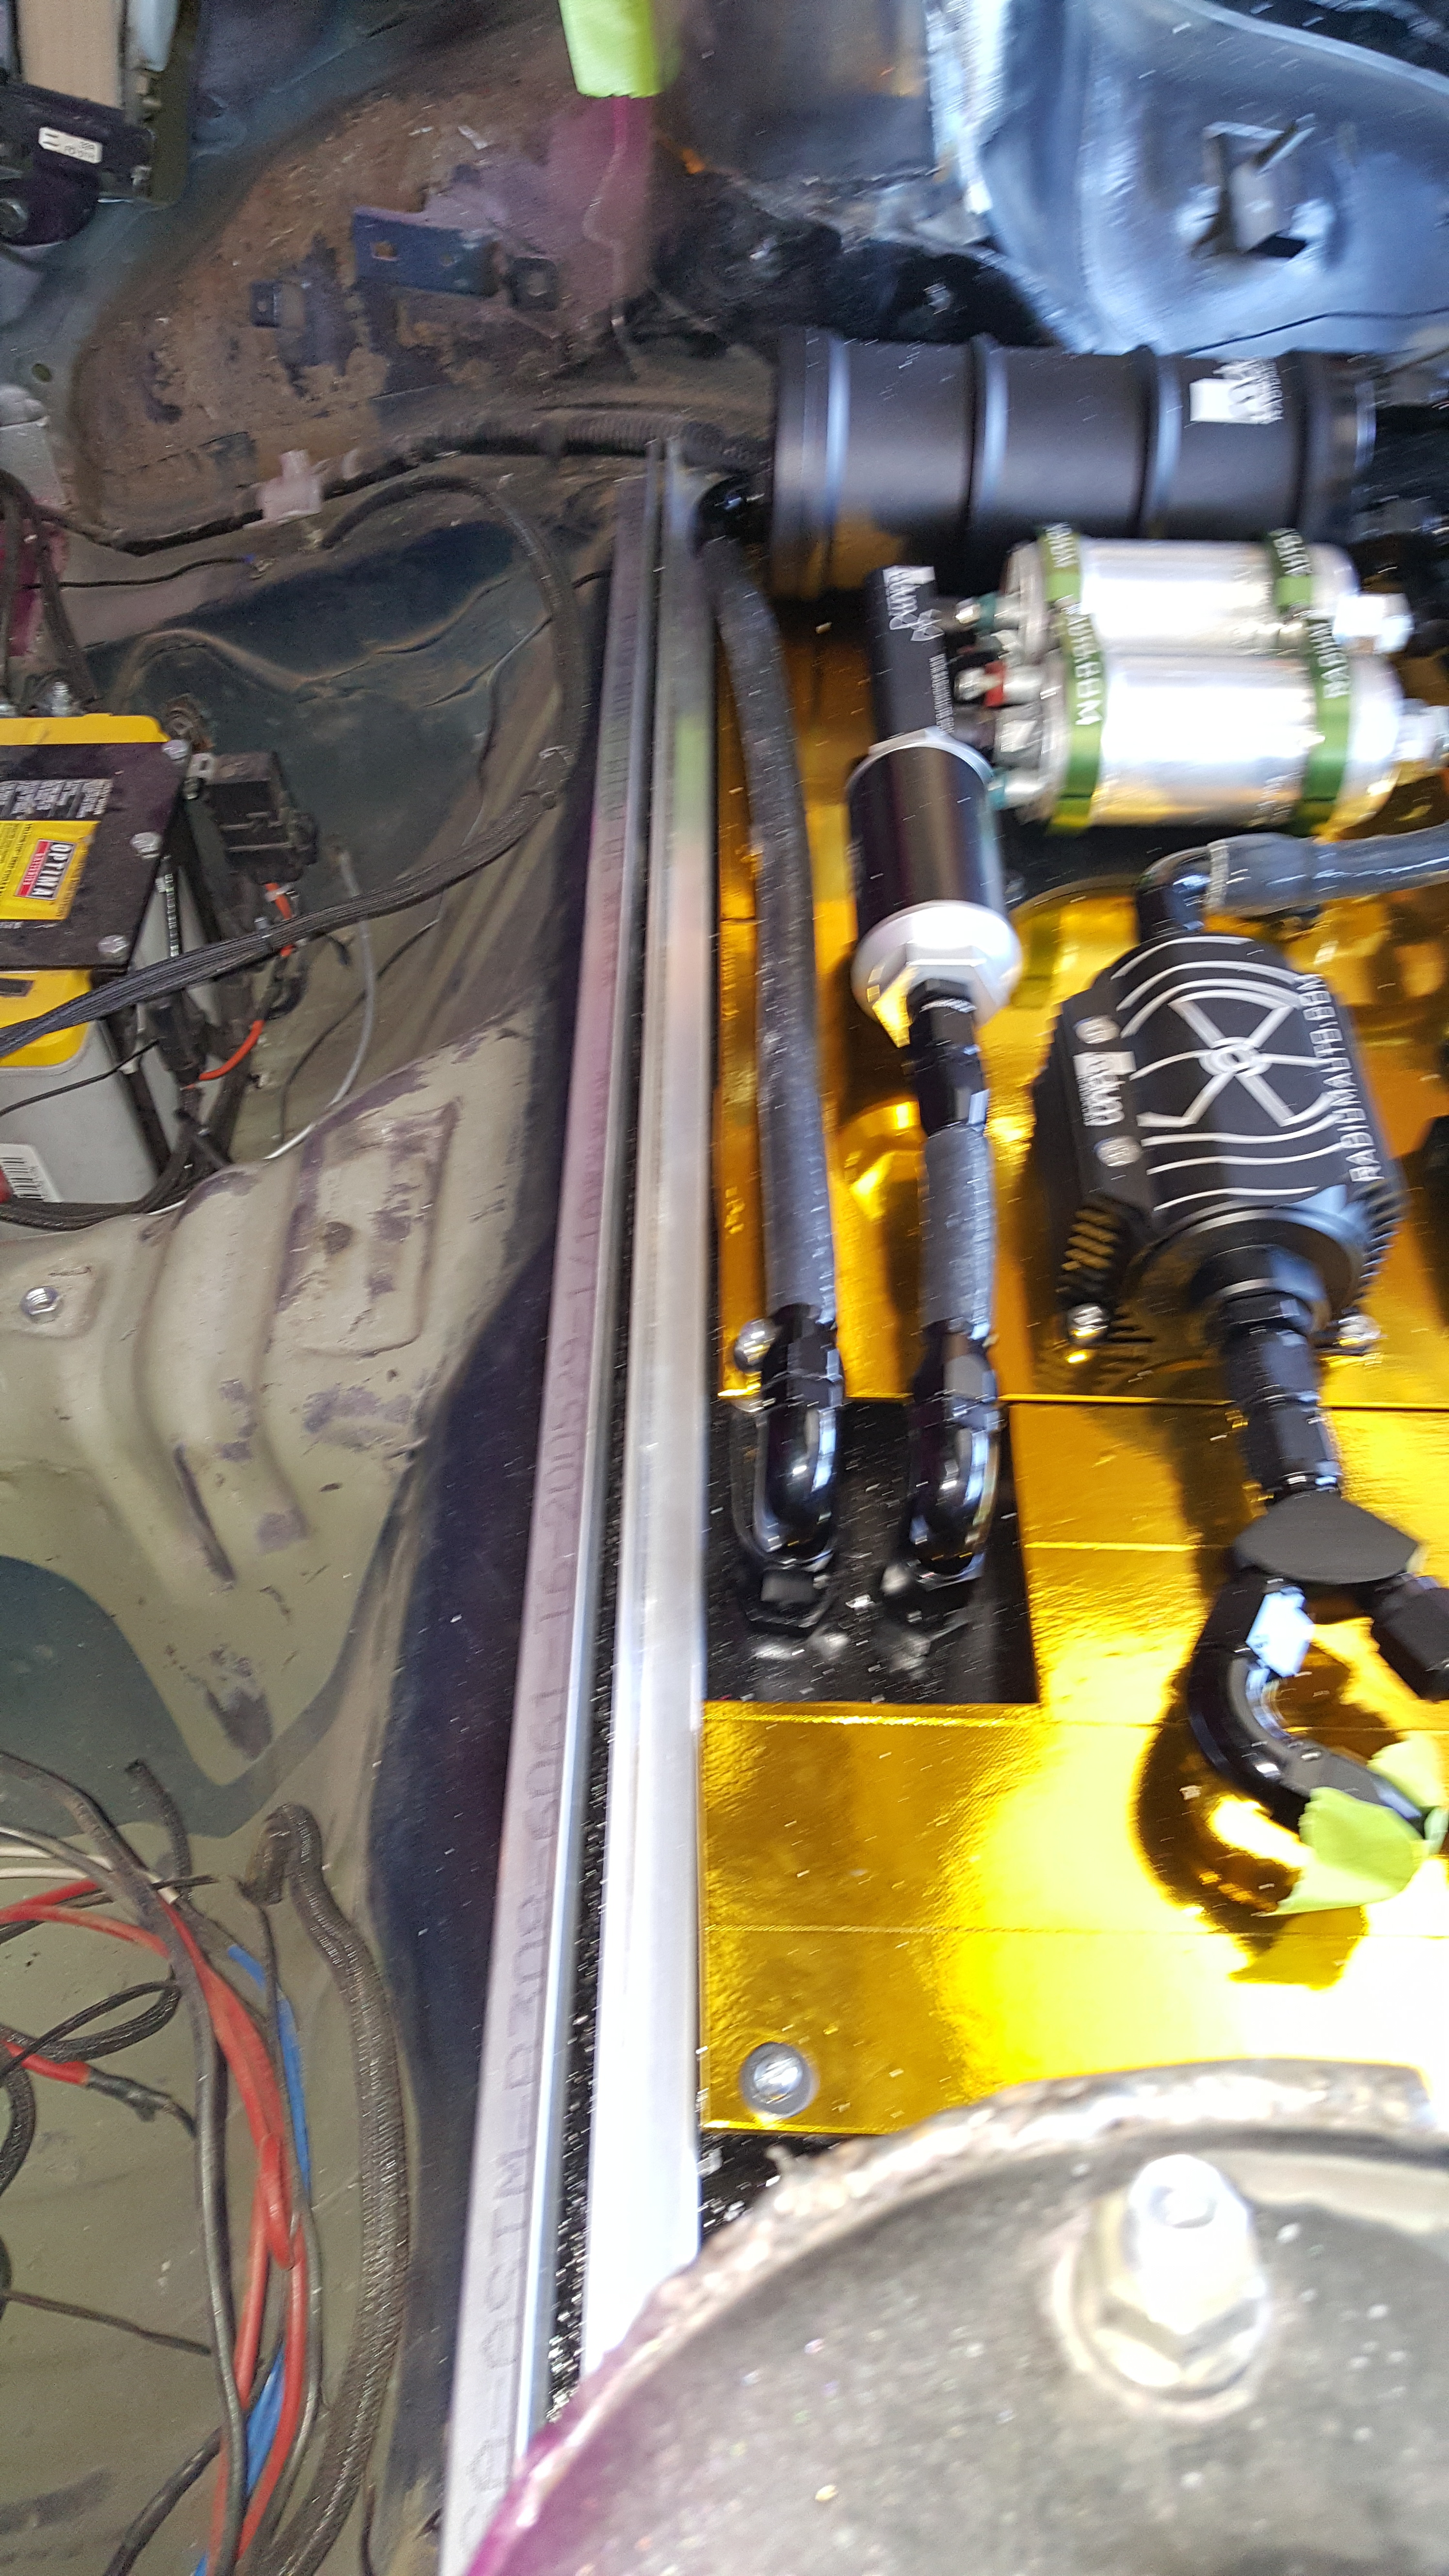
Also got in my New Revised CJ-Motorsports Dual Pump Hanger. I chose to go with (2) Walbro E85 400's. These Pumps would draw less than my beloved Bosch grunts. But they also won't need to work as hard either. THey'll be sitting nice and comfy down in the bottom of this piece of art. CJ-M really did a good job on this piece. The Revised unit...seems to weigh at least a third lighter than the older unit. The Revised unit is also a bit easier to put together... has some good looking CNC work on it and ....is over-all Thinner. Check it out!!
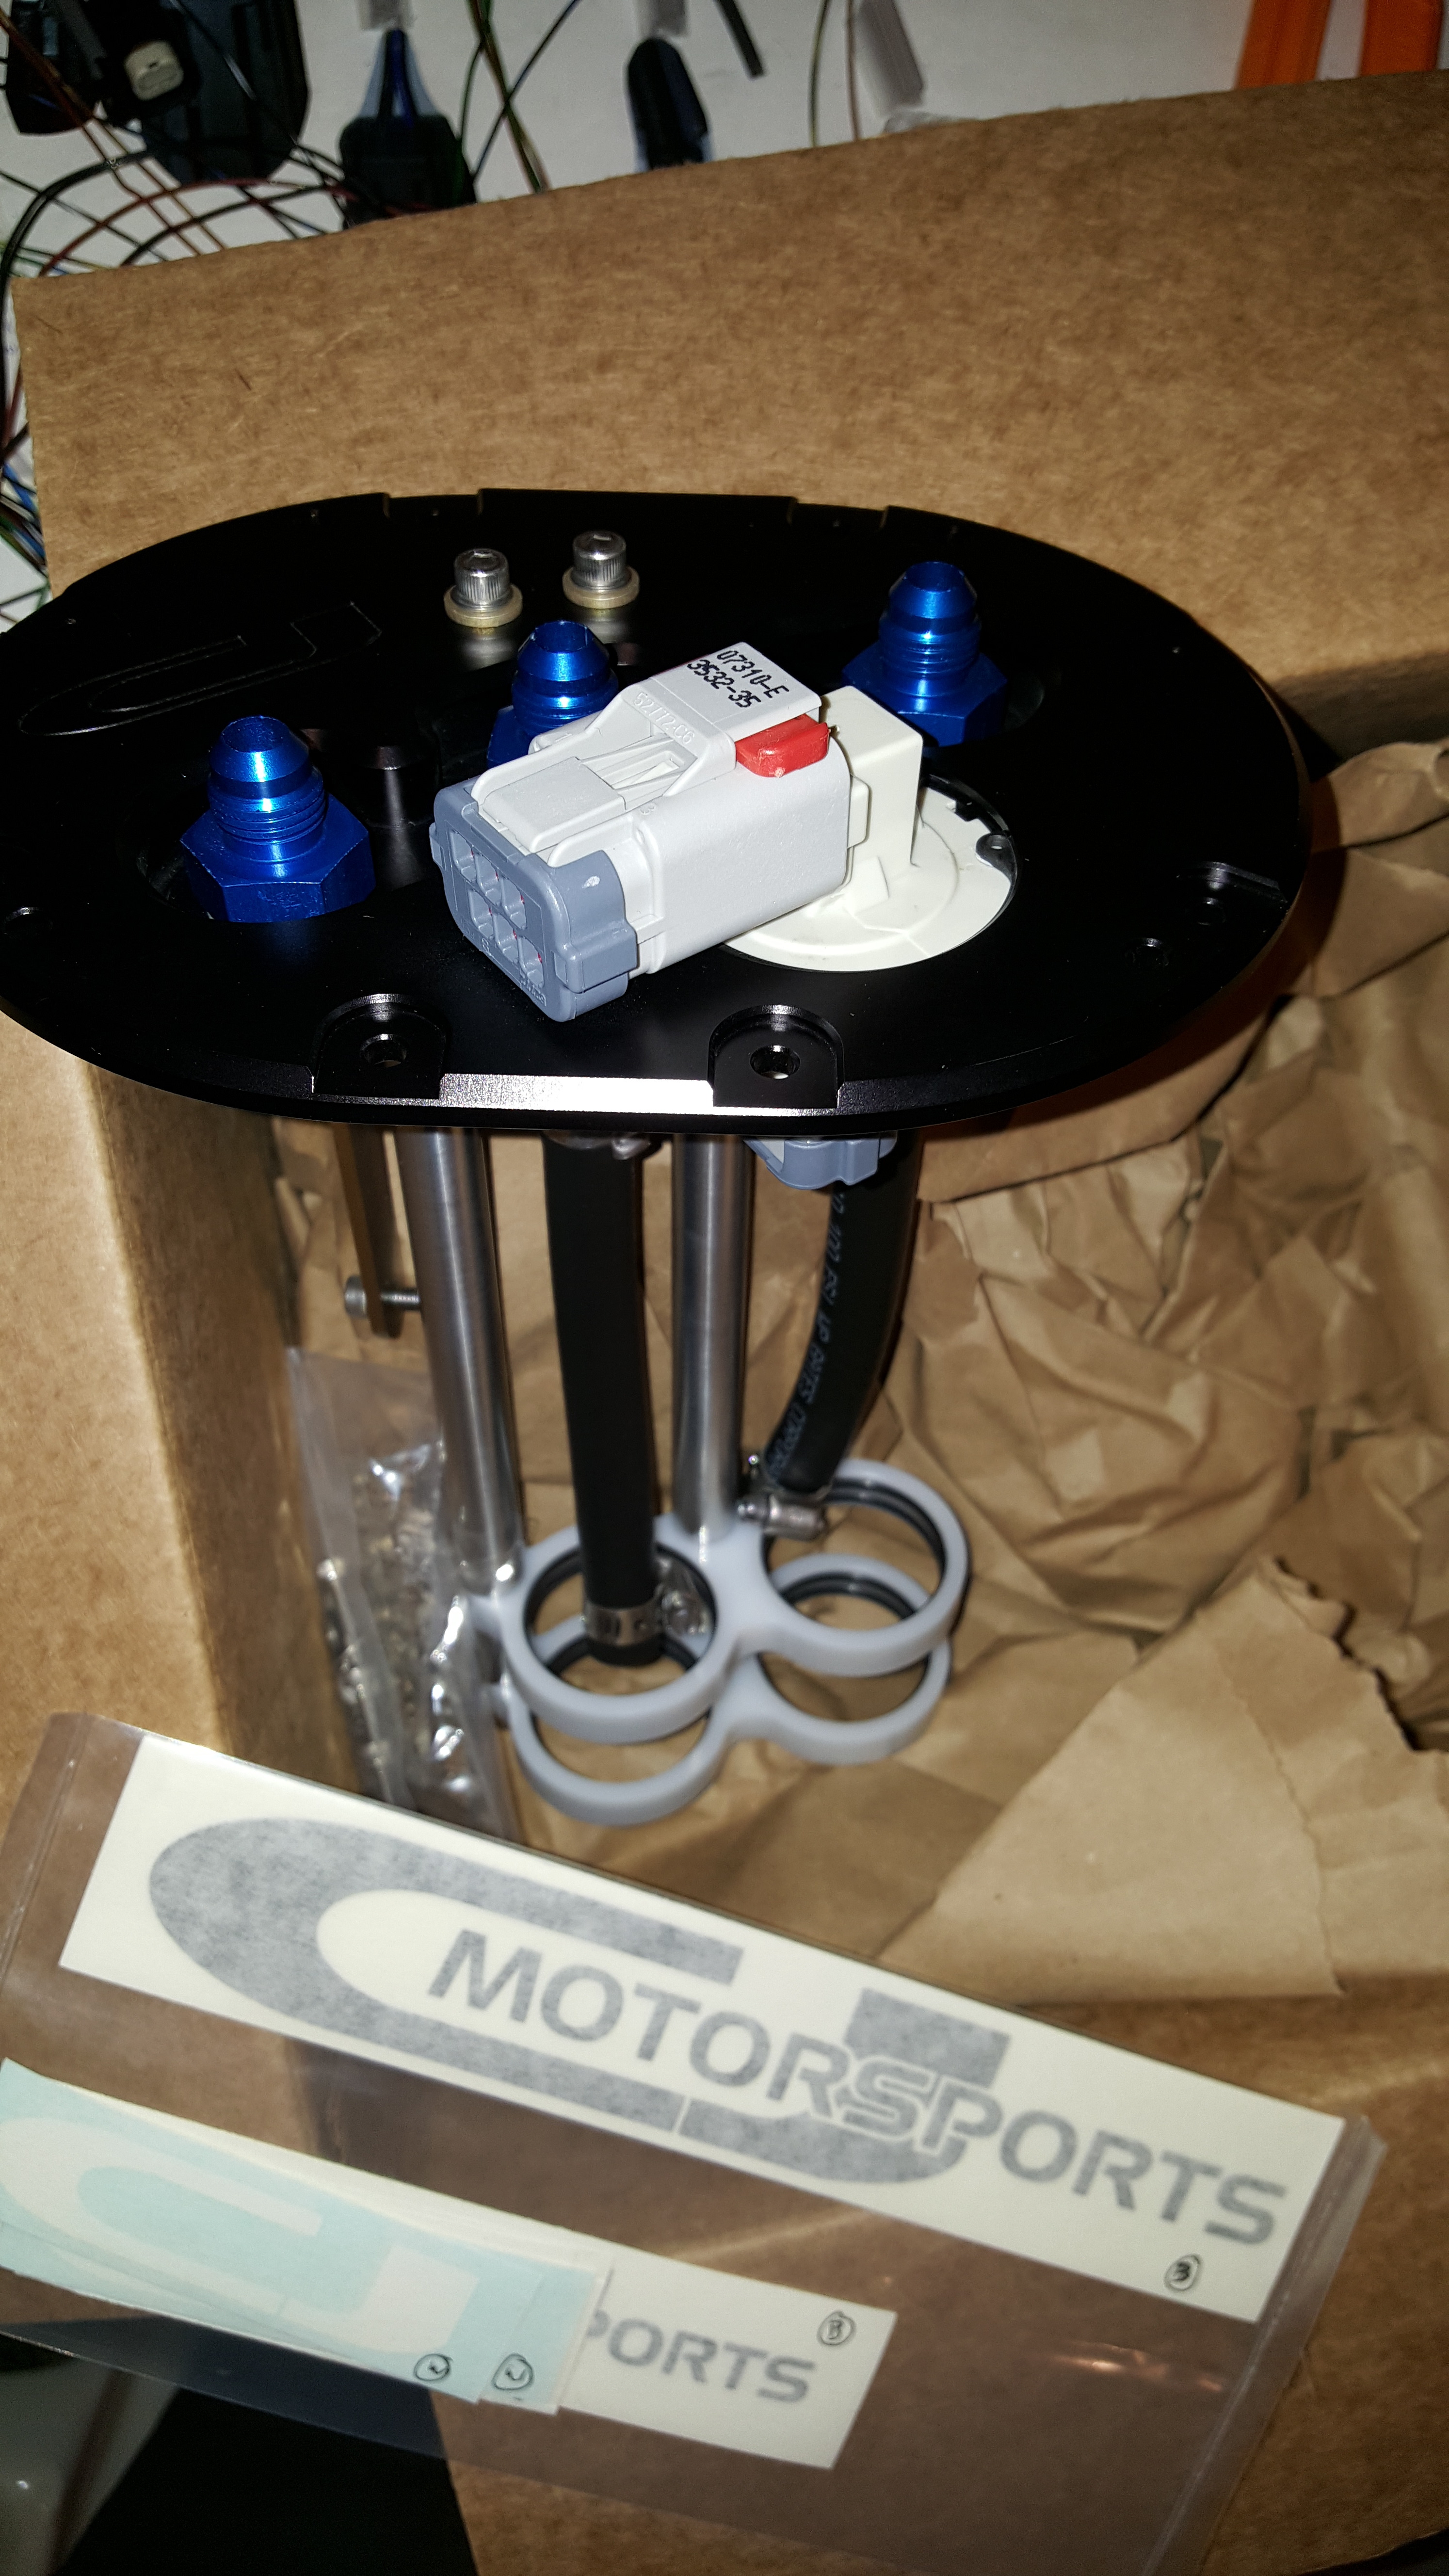
Put my pumps in place and Wired it up!
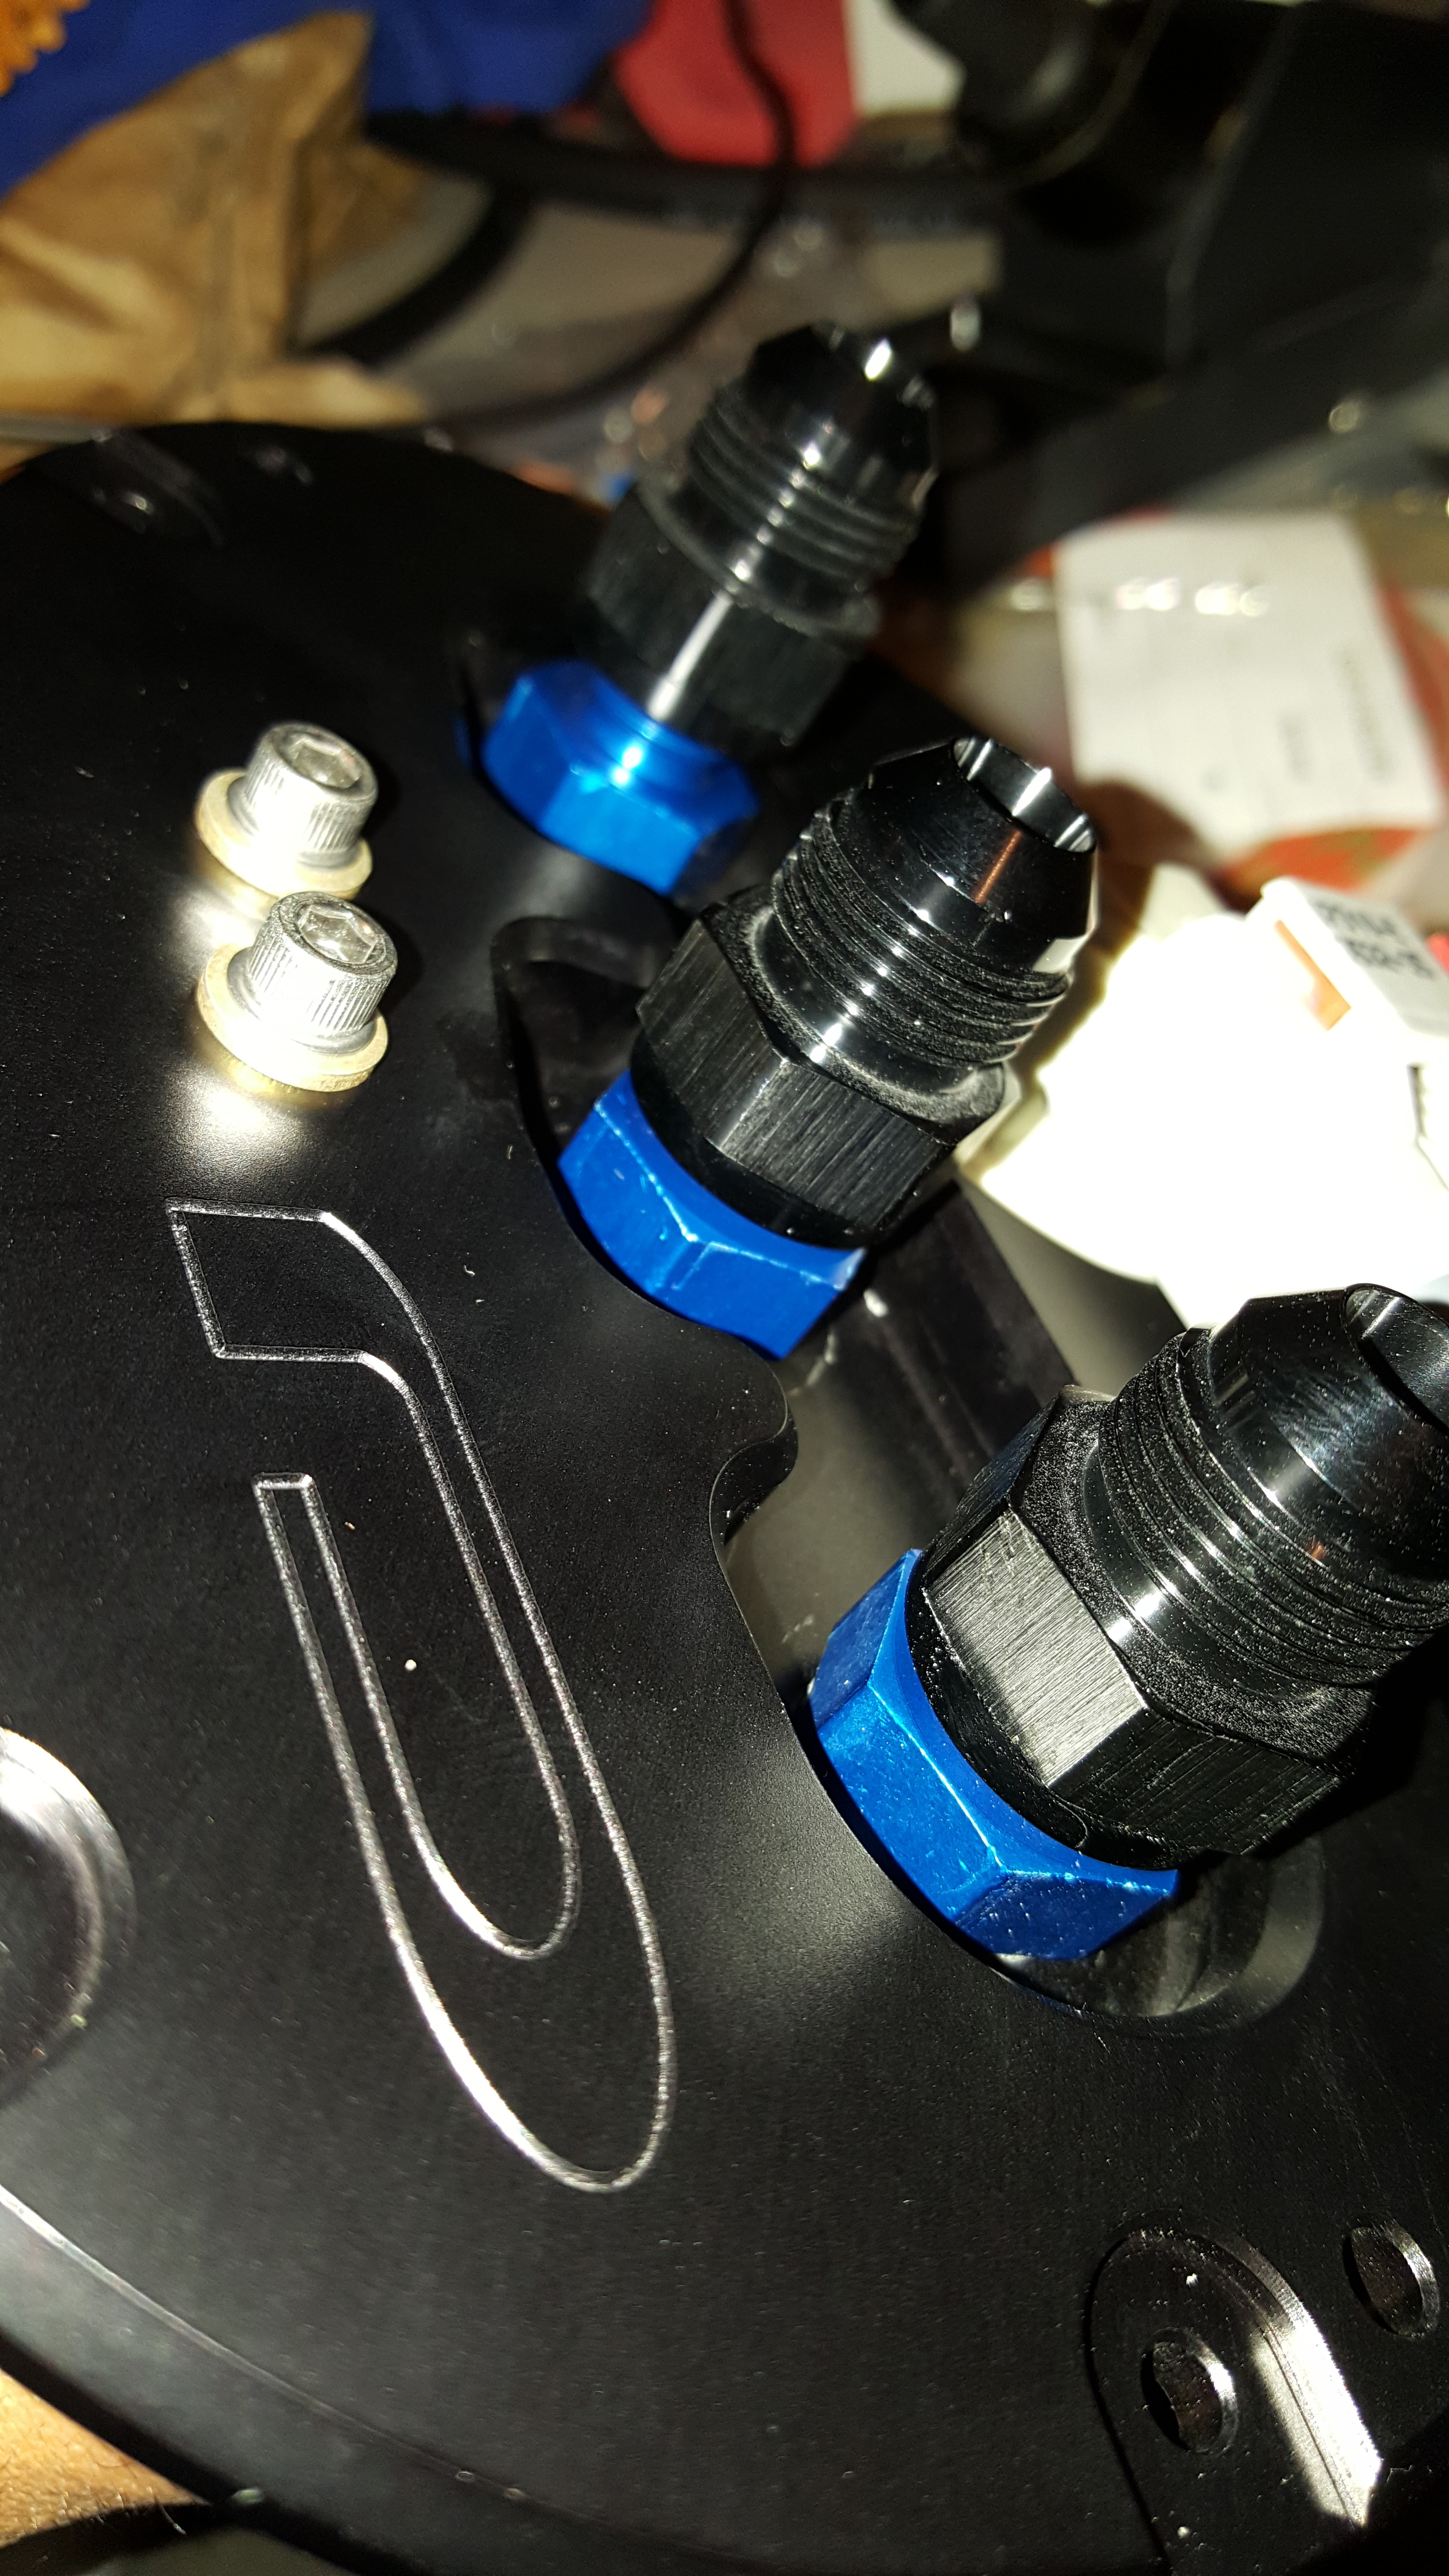
Converted to all AN-8 Lines!!
Also.....Just so everyone knows.. I read somewhere on the forum that people thought the CJ-M hanger had the pumps sitting too low in the tank. Well I Measured... From the Bottom of the FLAT plastic in the OEM tank.. Not including the pump pick up indent that actually sinks lower than the rest of the pan.. It Measures 11.25" The CJ-Motorsports Hanger puts the pumps over at 11.35... So there is a tad over 1/4" of void space below the walbro Fuel pump sock pick-up. Perfect!! Good work on them for paying attention to important Details!
Check it:

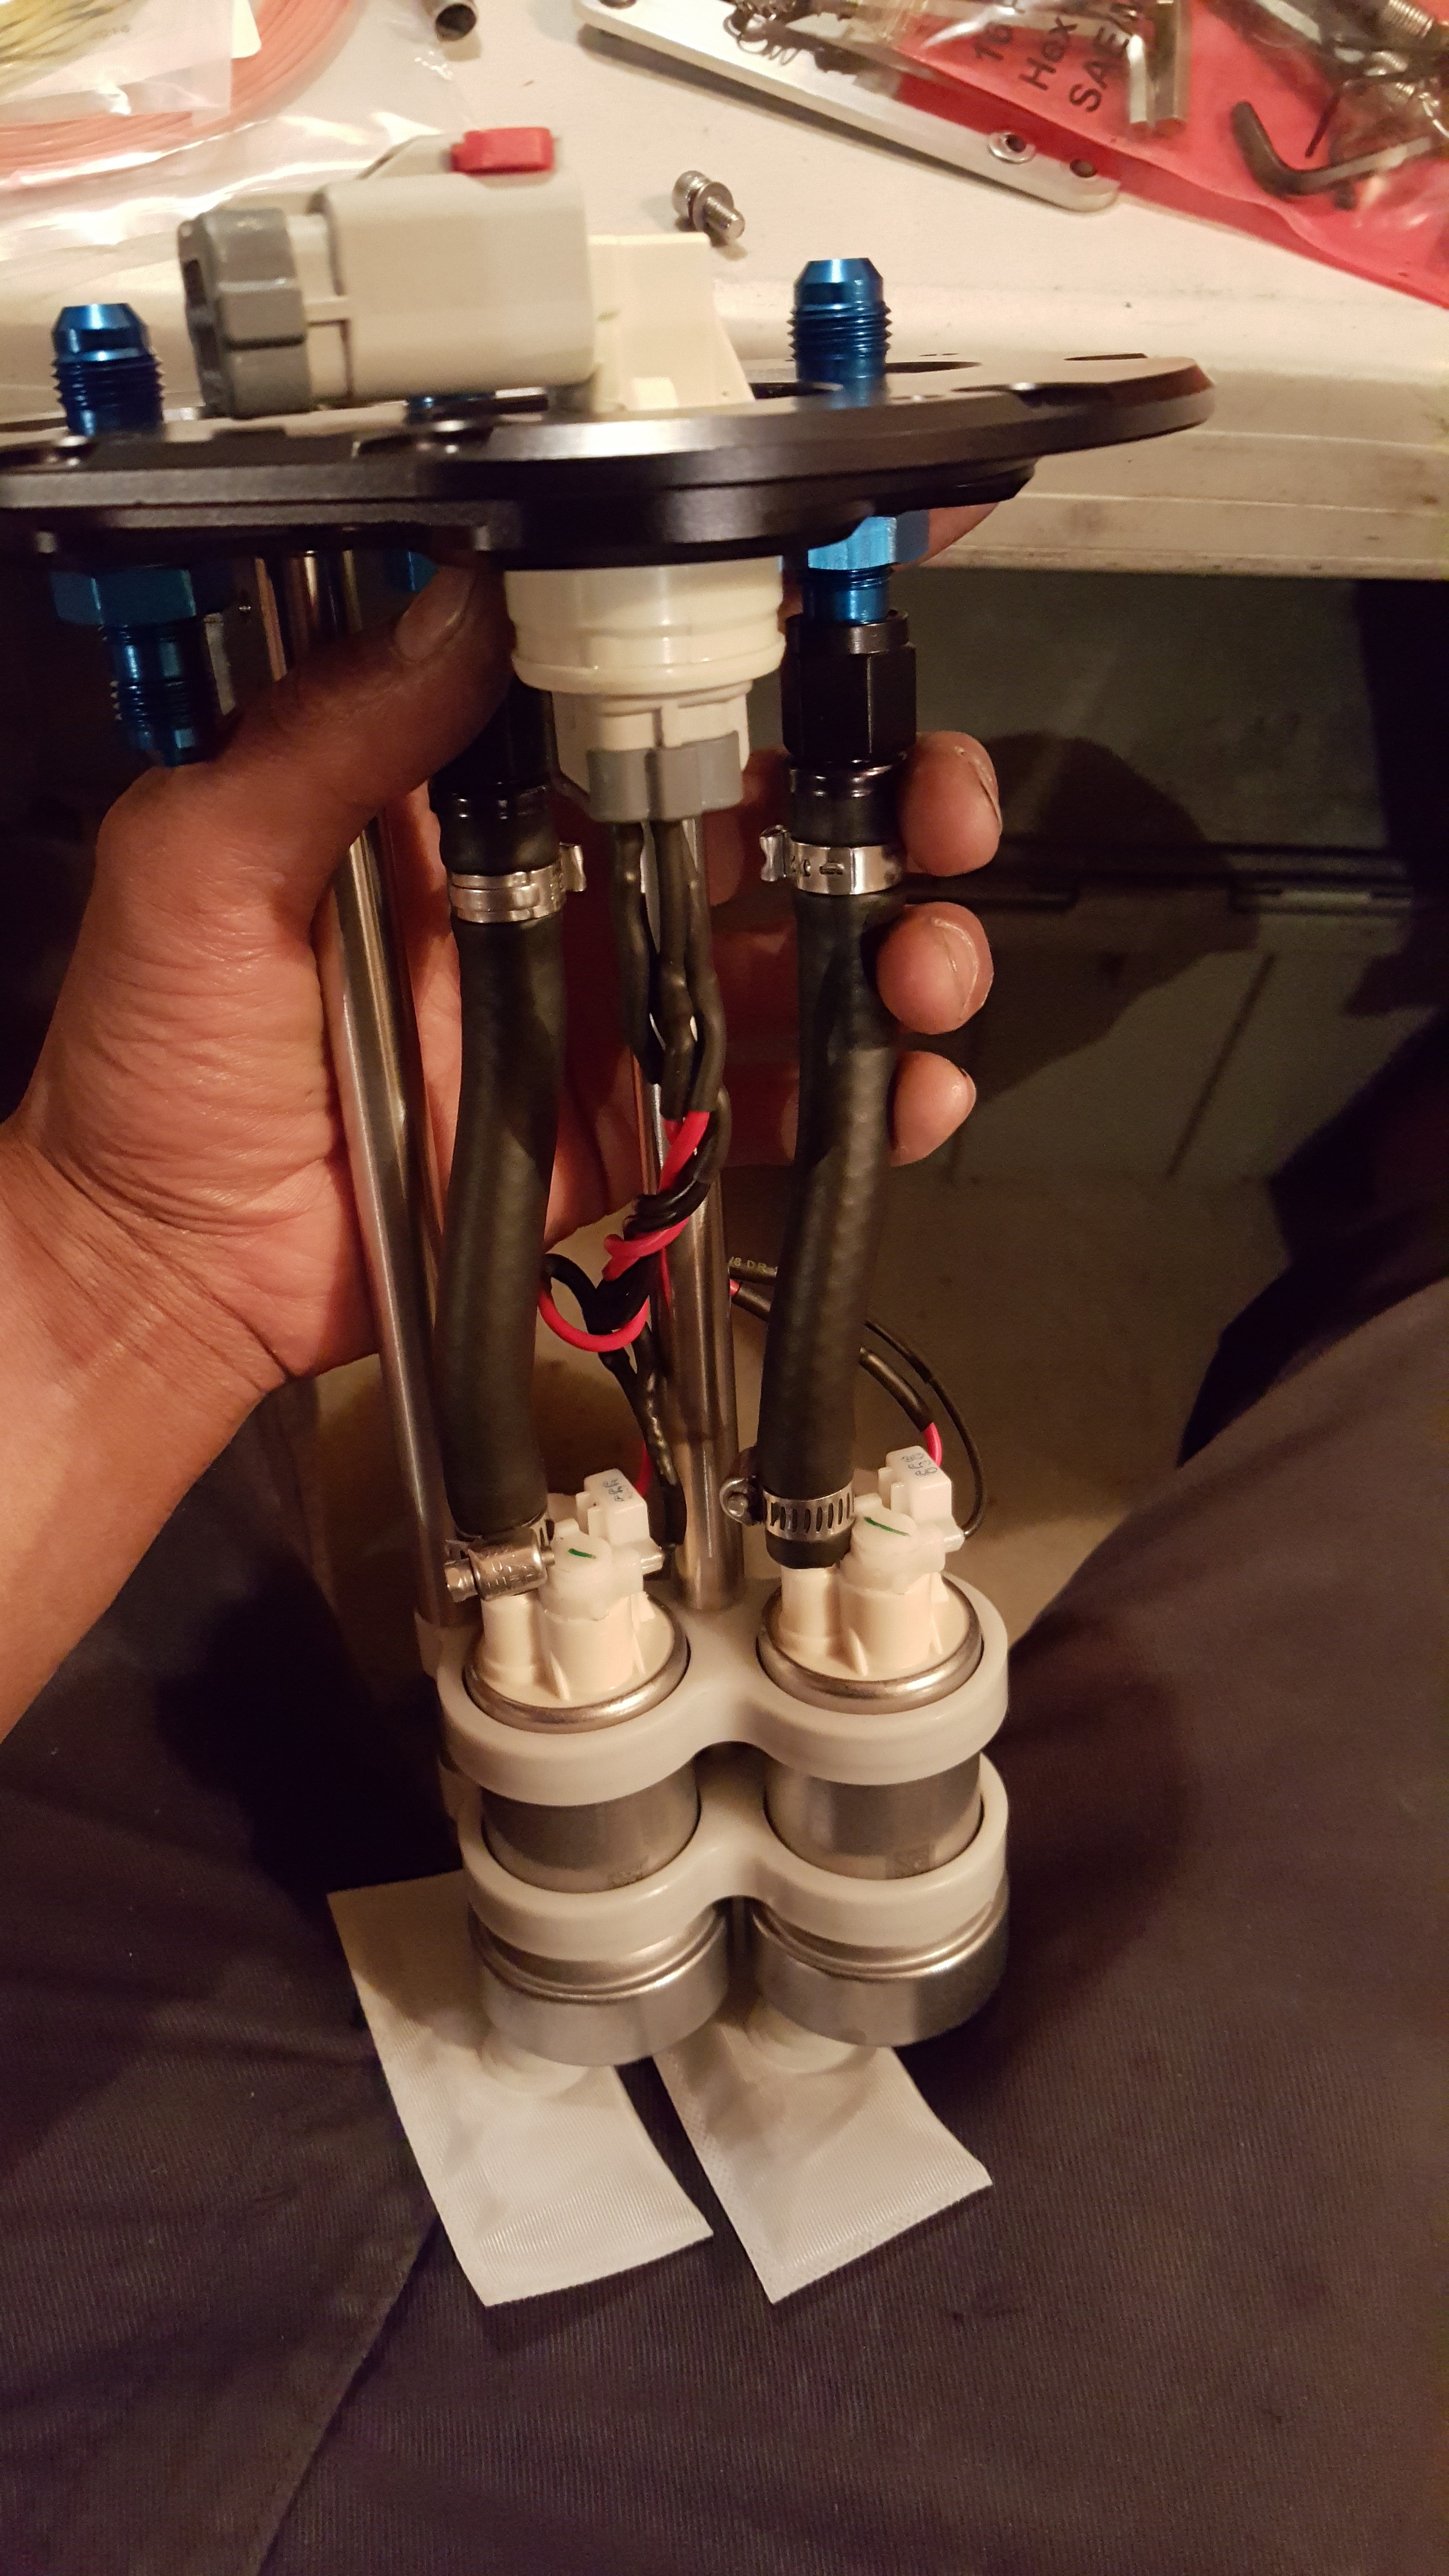
When you look inside the tank.. all the stock baffle plates kind of block off any place to put a good return. I wanted to put my return away from the Plastic Sump bucket. I was able to angle and rotate my return back pointing to the rear center of the tail light.... Inside the tank. This is the only area away from the plastic sump bucket that doesn't have baffle plates around it. It was a little hard to position correctly. But I got it eventually!
Looong day!!!
I'll continue in the morning!!!
Stay Tuned!!!!
More Updates in the AM!!!
#Thisisthewolf
Came across this photo online.... This was ASB last year. Man she took a beating. I've got a lot of work to do to make her look good again!!
I Also got quite a few parts in!! The Masterpiece showed up.... John Gleasmans Billit Series 321 EFR Manifold.. Freshly Coated Borg Warner 9174 Comp Cover... Speed Sensor Installed....Dual Closed tip Two Stroke Specific EGT Probes, and Full Function Engineering EMAP Canister... Geese just gotta Love New Parts!! Gets me everytime!
Inconel Hardware!!! I could stare at this picture all day long. Borg Warner 1.45 A/R Turbine Housing!
Due to my budget this year...I decided to purchase replacement parts for my current Clutch... I could have gone with the ACT...and I really like the guys there... but At this point... I know this clutch works with my driving style.. and the replacement parts were a little more forgiving budget wise than the act. Hopefully When I move to a new Car/Driveline set up..I can go with something a little more heavy duty.
Exedy Lightweight Flywheel and spare disc Ring. My old one was sooo warped we couldn't get the thick vented Intermediate plate off without using a mallet.
Massive thanks and eternally grateful to NGK for giving me a chance to represent them! This is truly a dream!! I love Spark Plugs. NGK R7420 10's leading 10.5 Trailing! #NGKALLDAY
Check this Bad *** Pic out! Here is Abels Fd Rx7 Drag Car Way back in the day... "Pro Import"...and check out the sick little round sticker sitting closer to the rear of his wheel! Like Mentor Like Padowan haha. #NGKALLDAY!!!!!
Also got in my New Revised CJ-Motorsports Dual Pump Hanger. I chose to go with (2) Walbro E85 400's. These Pumps would draw less than my beloved Bosch grunts. But they also won't need to work as hard either. THey'll be sitting nice and comfy down in the bottom of this piece of art. CJ-M really did a good job on this piece. The Revised unit...seems to weigh at least a third lighter than the older unit. The Revised unit is also a bit easier to put together... has some good looking CNC work on it and ....is over-all Thinner. Check it out!!
Put my pumps in place and Wired it up!
Converted to all AN-8 Lines!!
Also.....Just so everyone knows.. I read somewhere on the forum that people thought the CJ-M hanger had the pumps sitting too low in the tank. Well I Measured... From the Bottom of the FLAT plastic in the OEM tank.. Not including the pump pick up indent that actually sinks lower than the rest of the pan.. It Measures 11.25" The CJ-Motorsports Hanger puts the pumps over at 11.35... So there is a tad over 1/4" of void space below the walbro Fuel pump sock pick-up. Perfect!! Good work on them for paying attention to important Details!
Check it:
When you look inside the tank.. all the stock baffle plates kind of block off any place to put a good return. I wanted to put my return away from the Plastic Sump bucket. I was able to angle and rotate my return back pointing to the rear center of the tail light.... Inside the tank. This is the only area away from the plastic sump bucket that doesn't have baffle plates around it. It was a little hard to position correctly. But I got it eventually!
Looong day!!!
I'll continue in the morning!!!
Stay Tuned!!!!
More Updates in the AM!!!
#Thisisthewolf
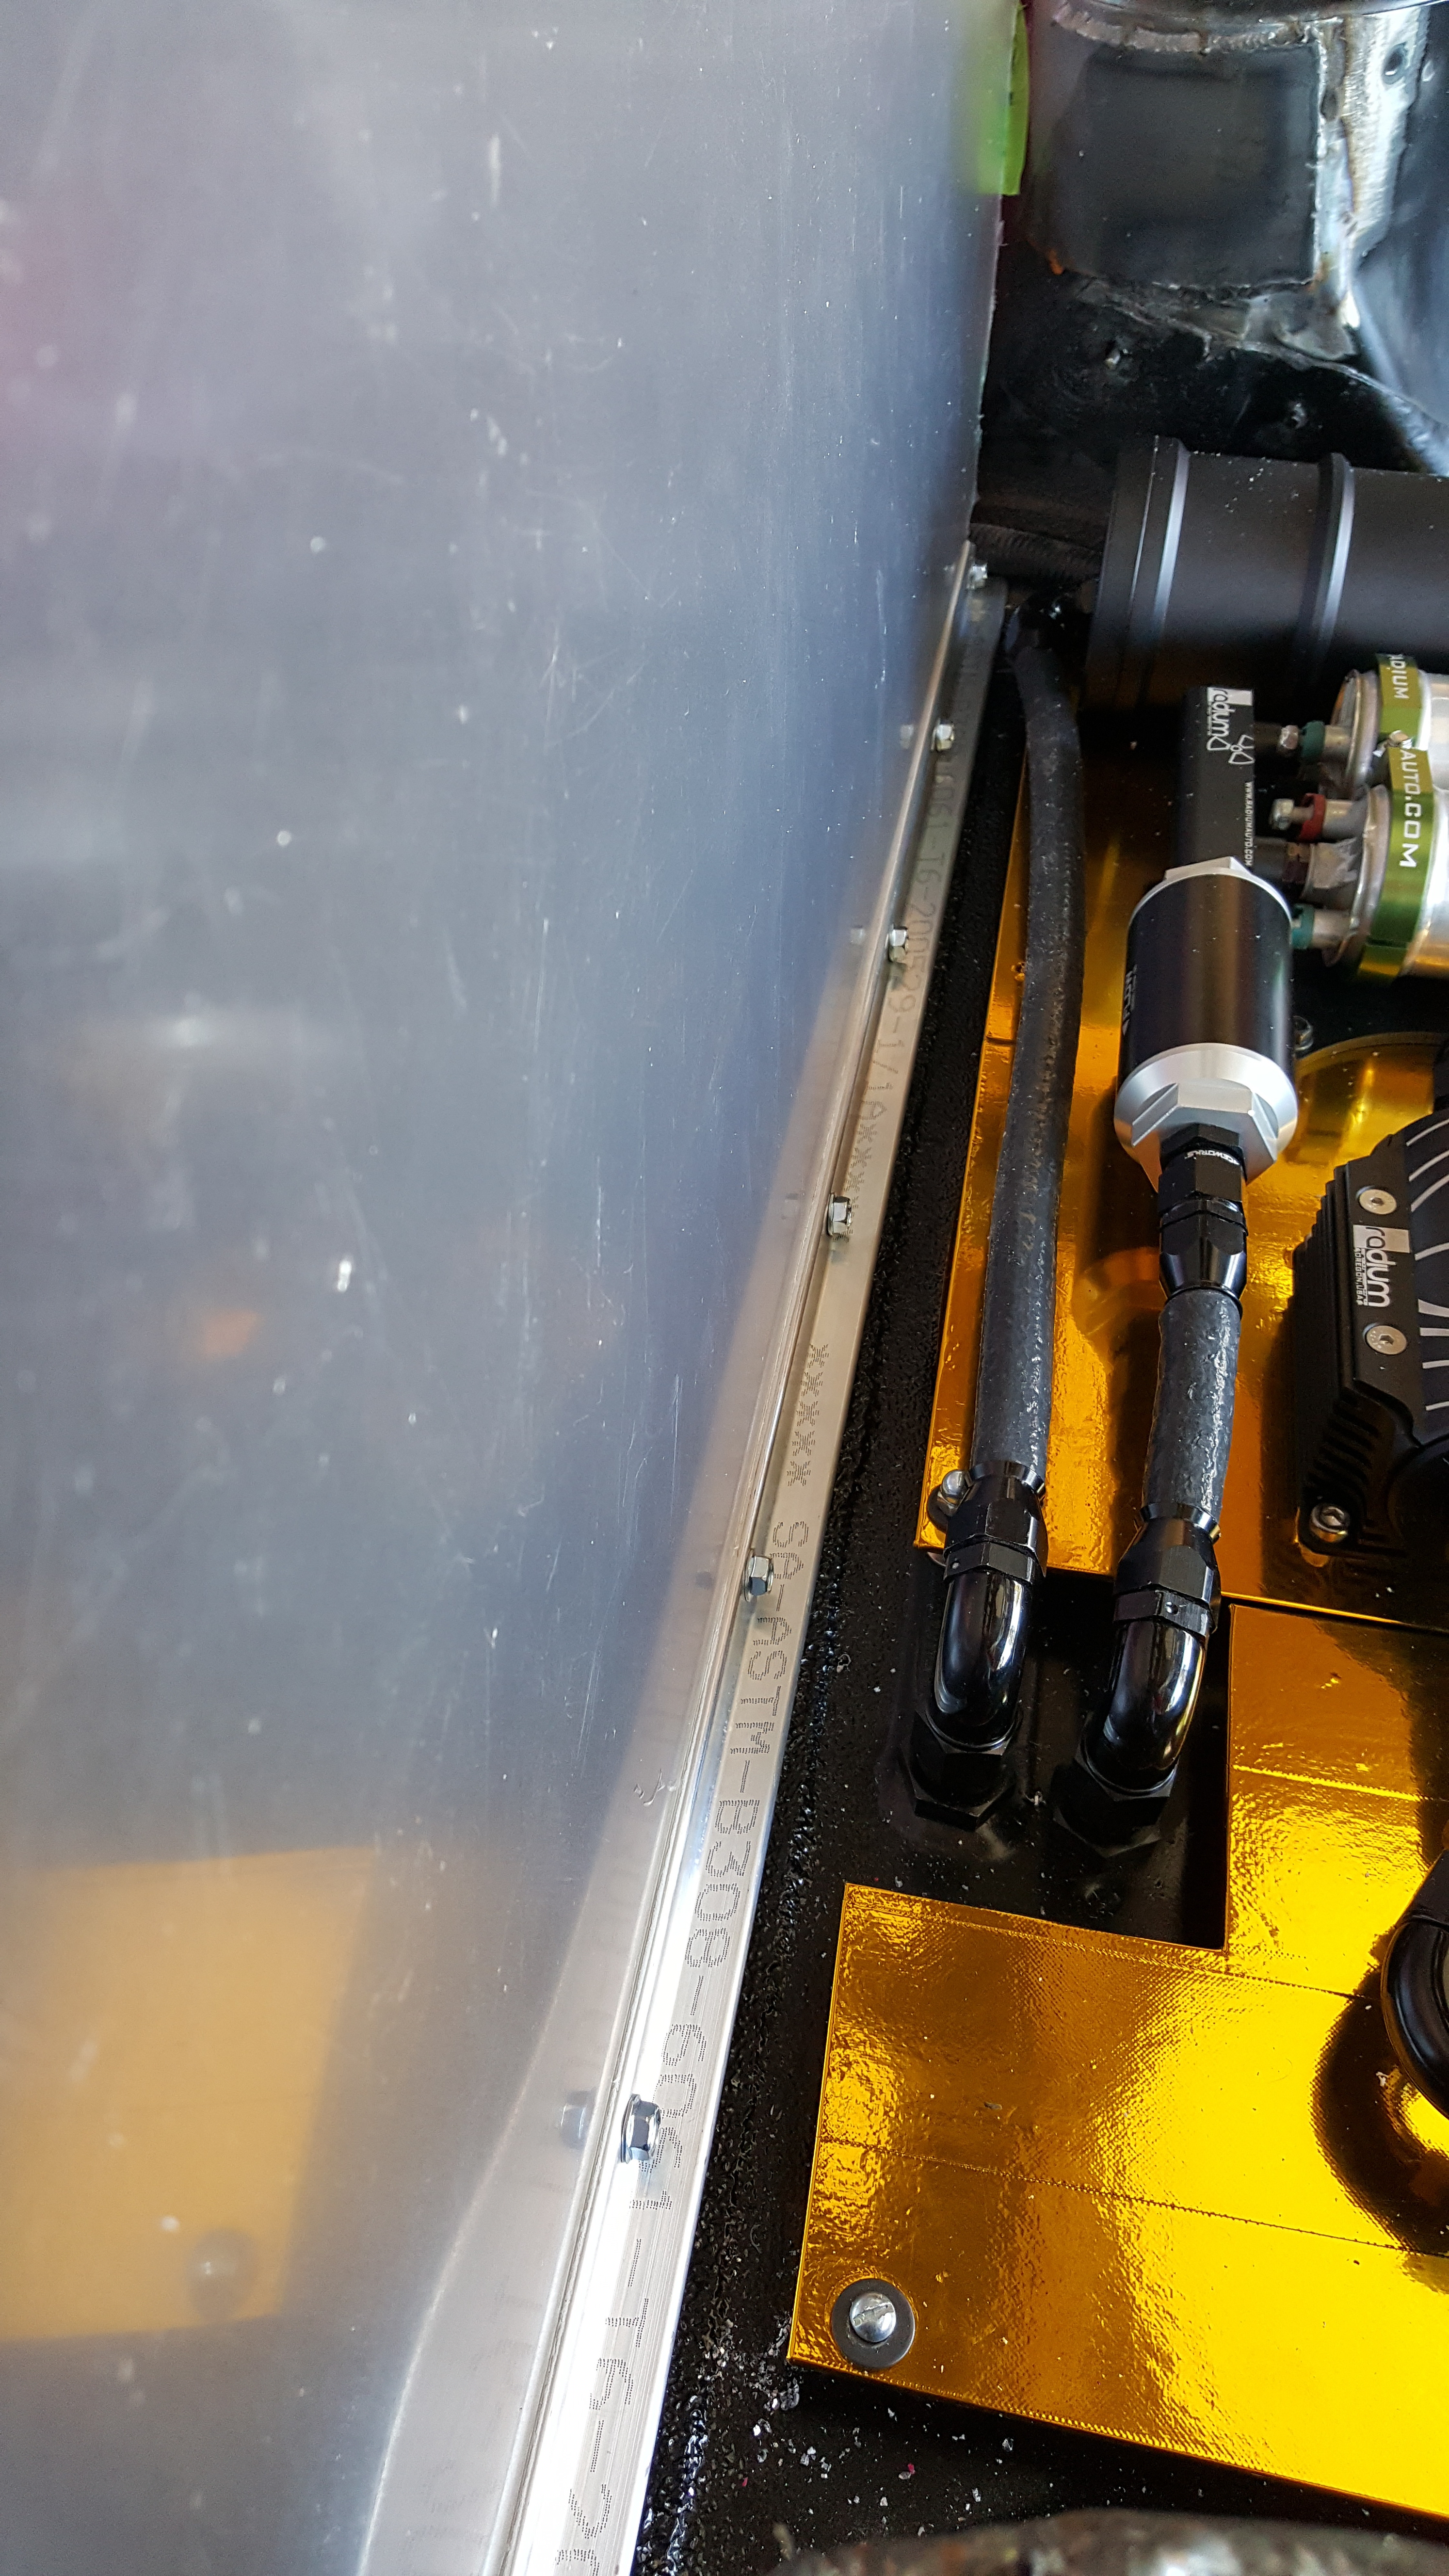
03-04-16, 10:05 AM
#2497
Continued!!!
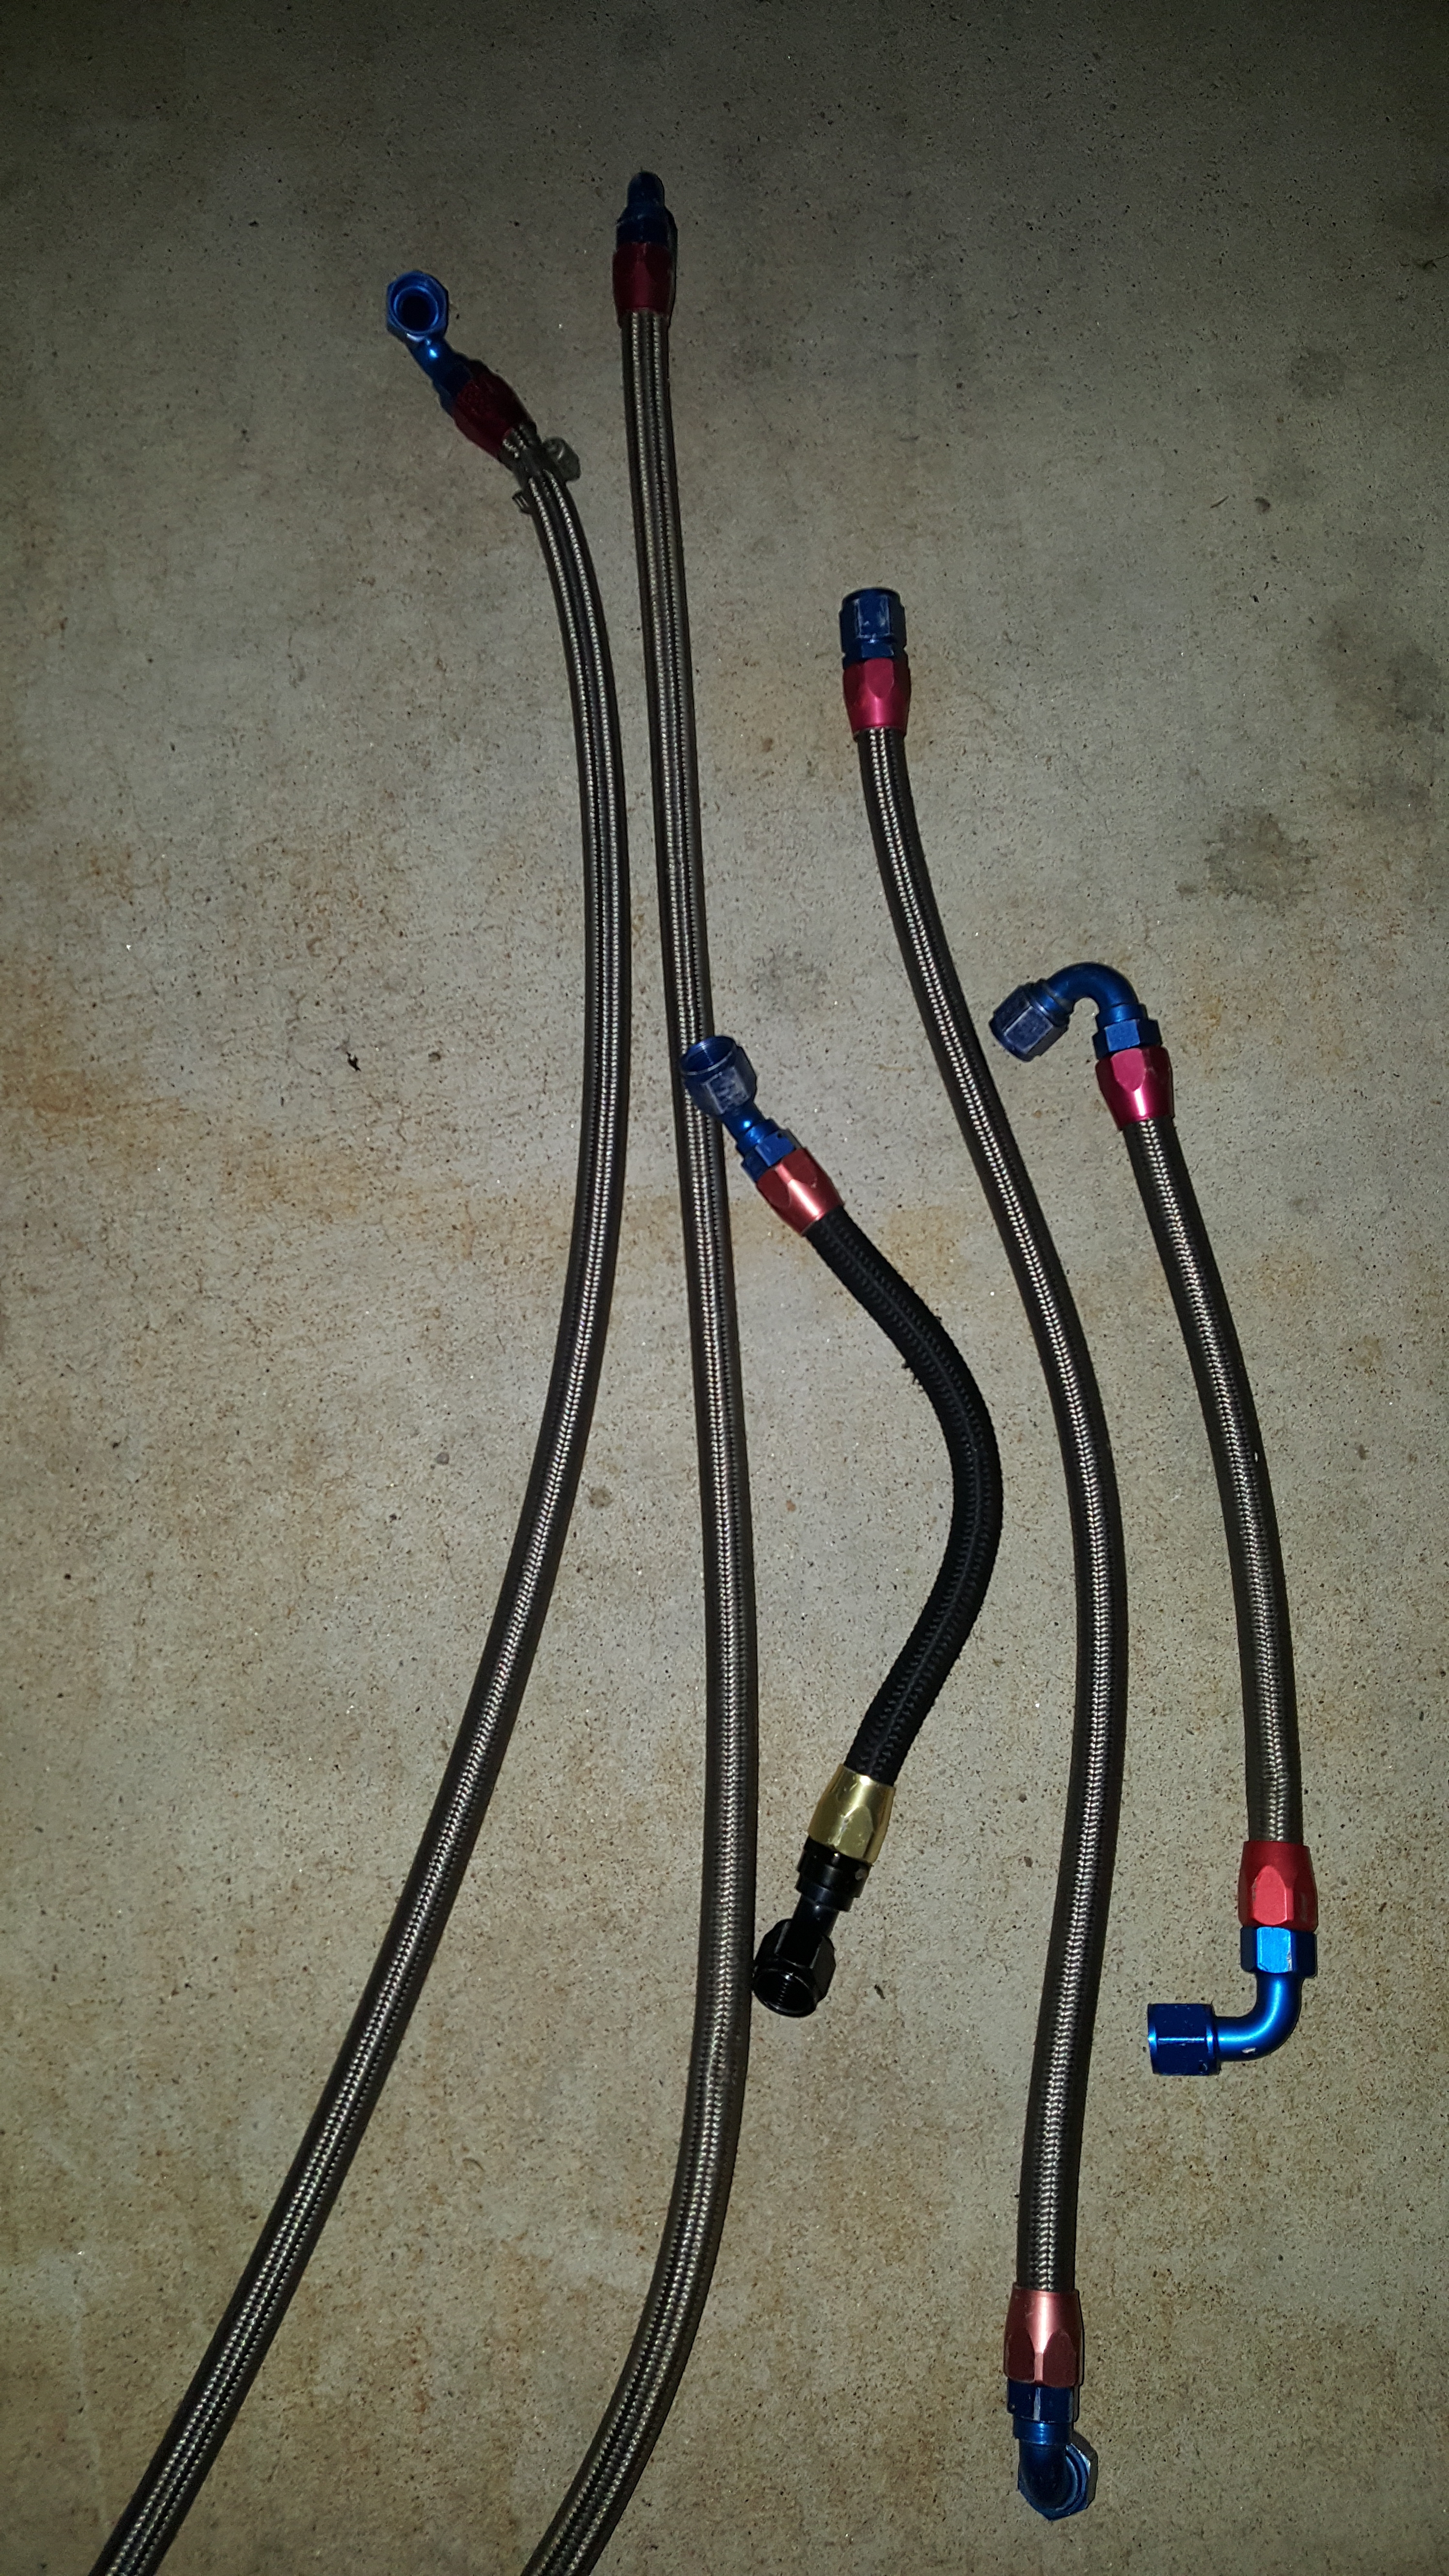
Mocked it up and Made my Lines!
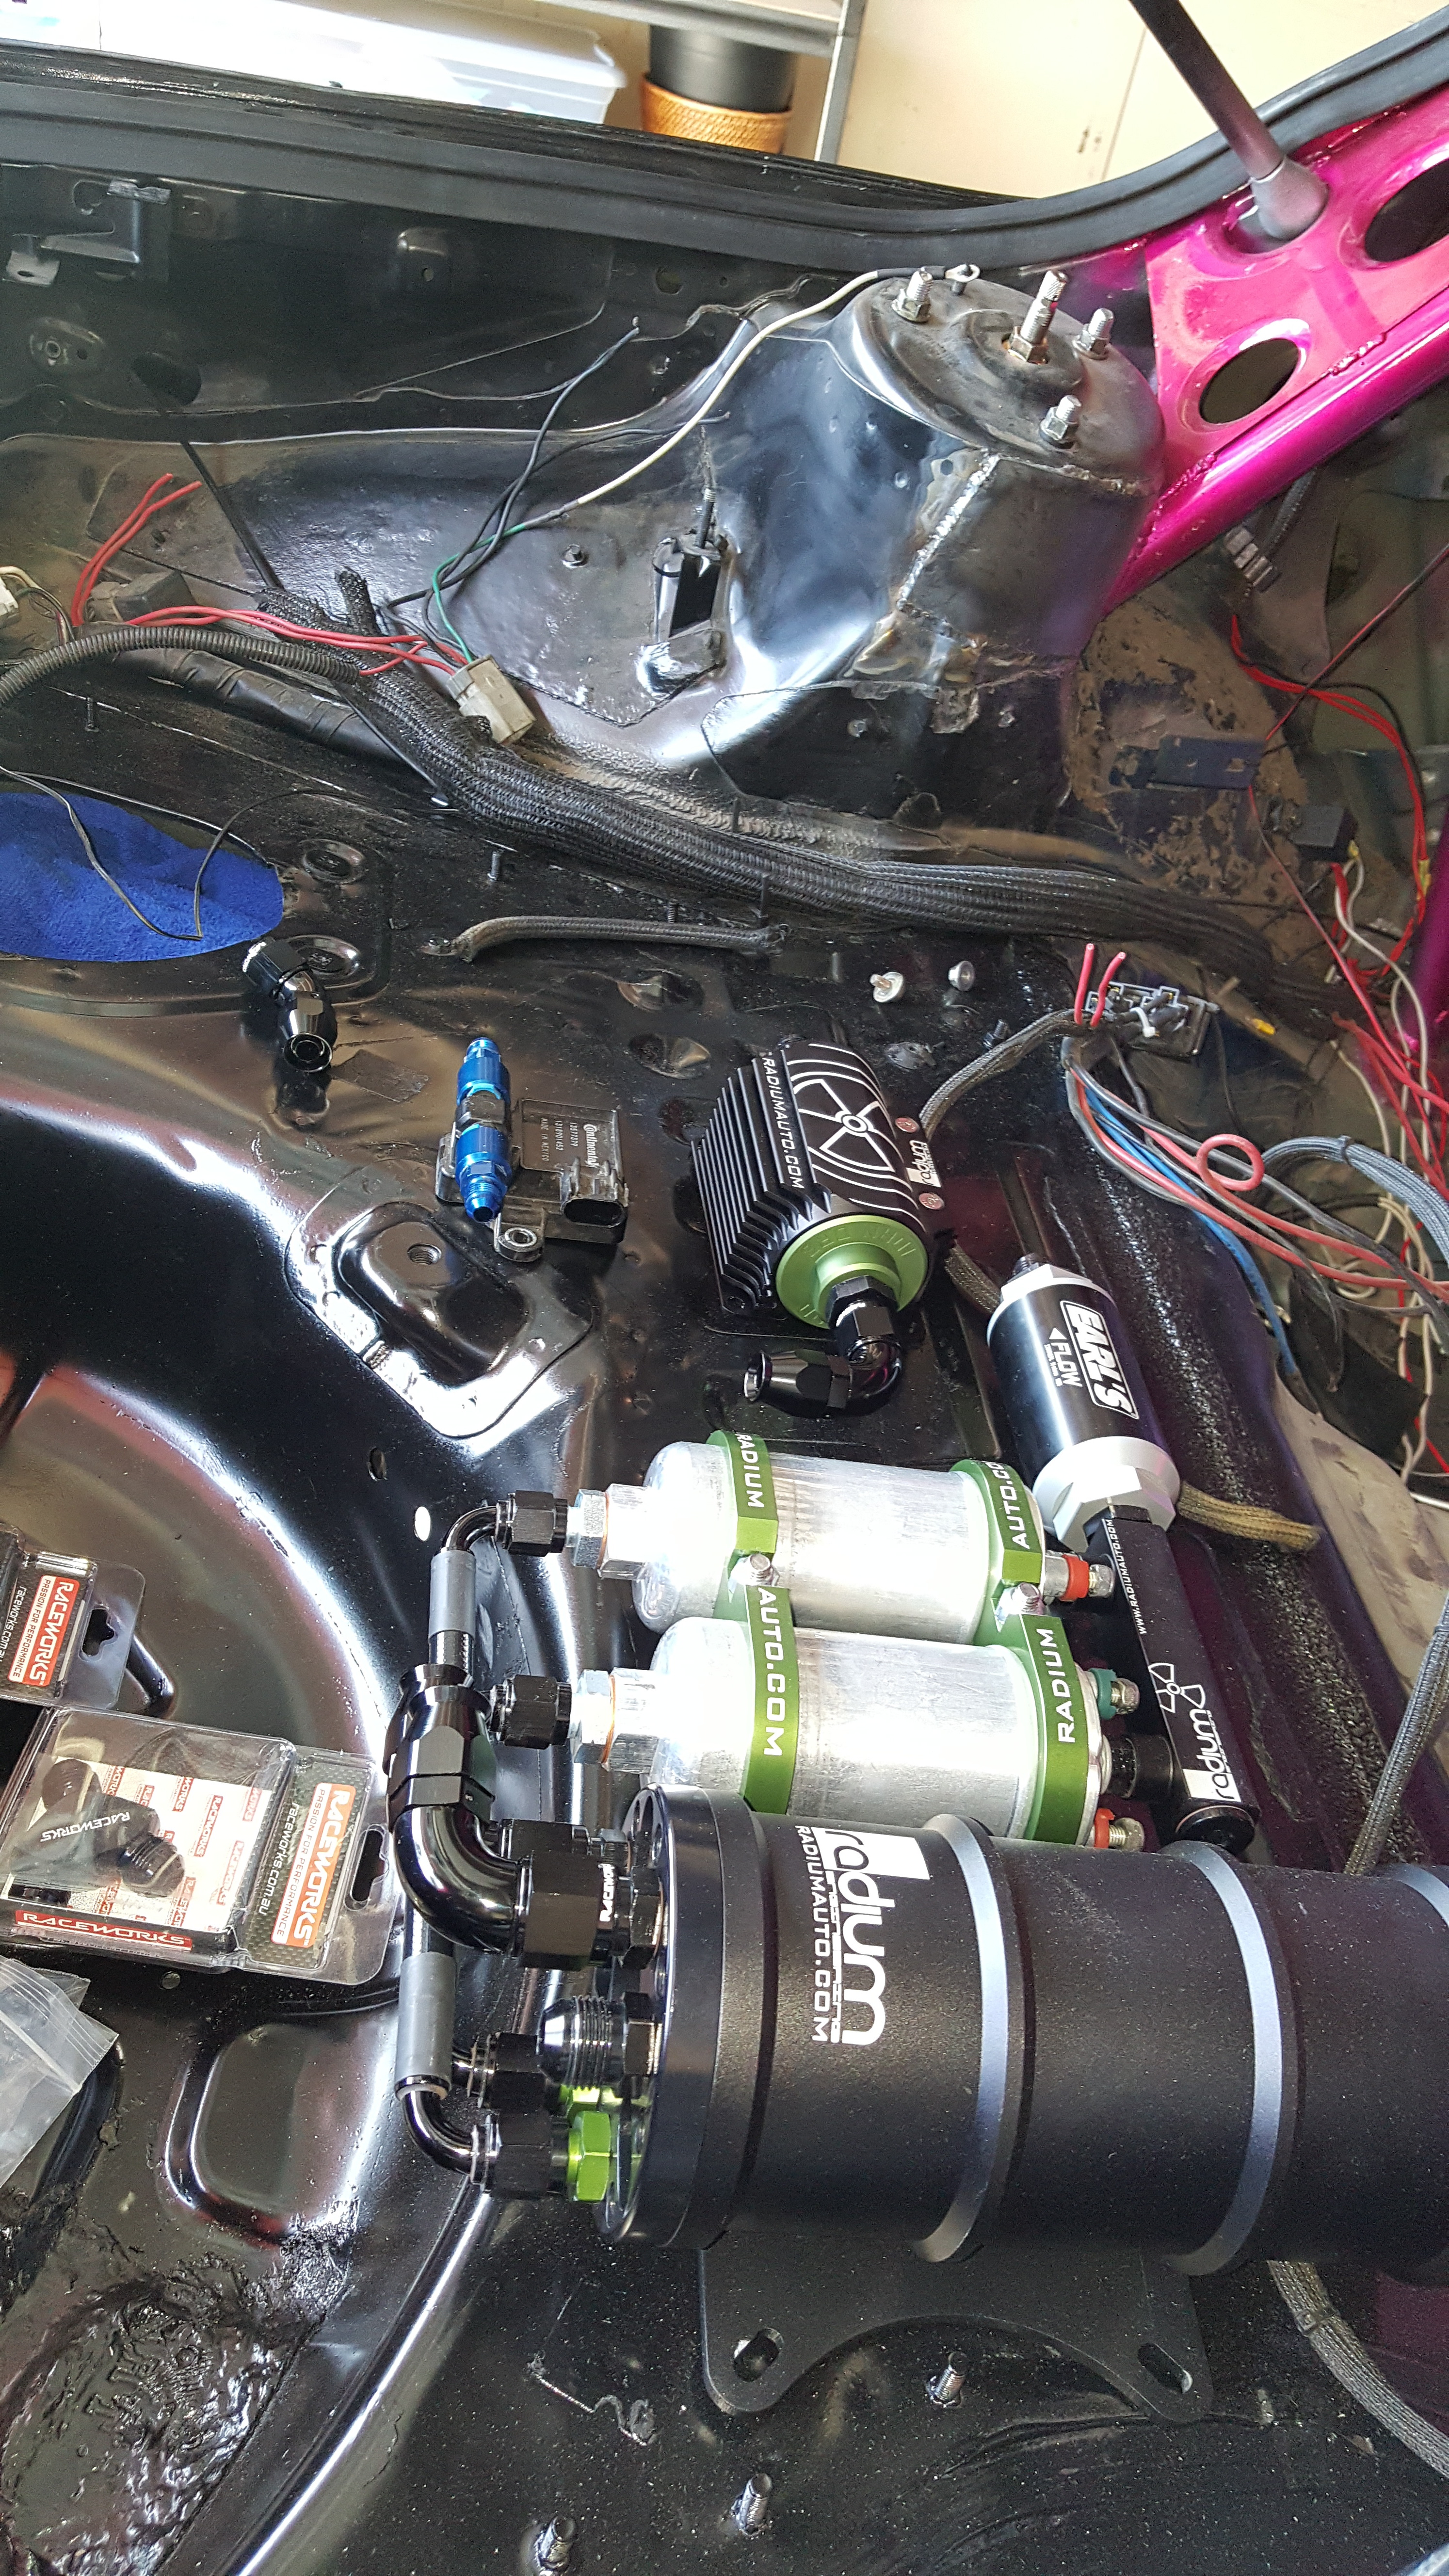
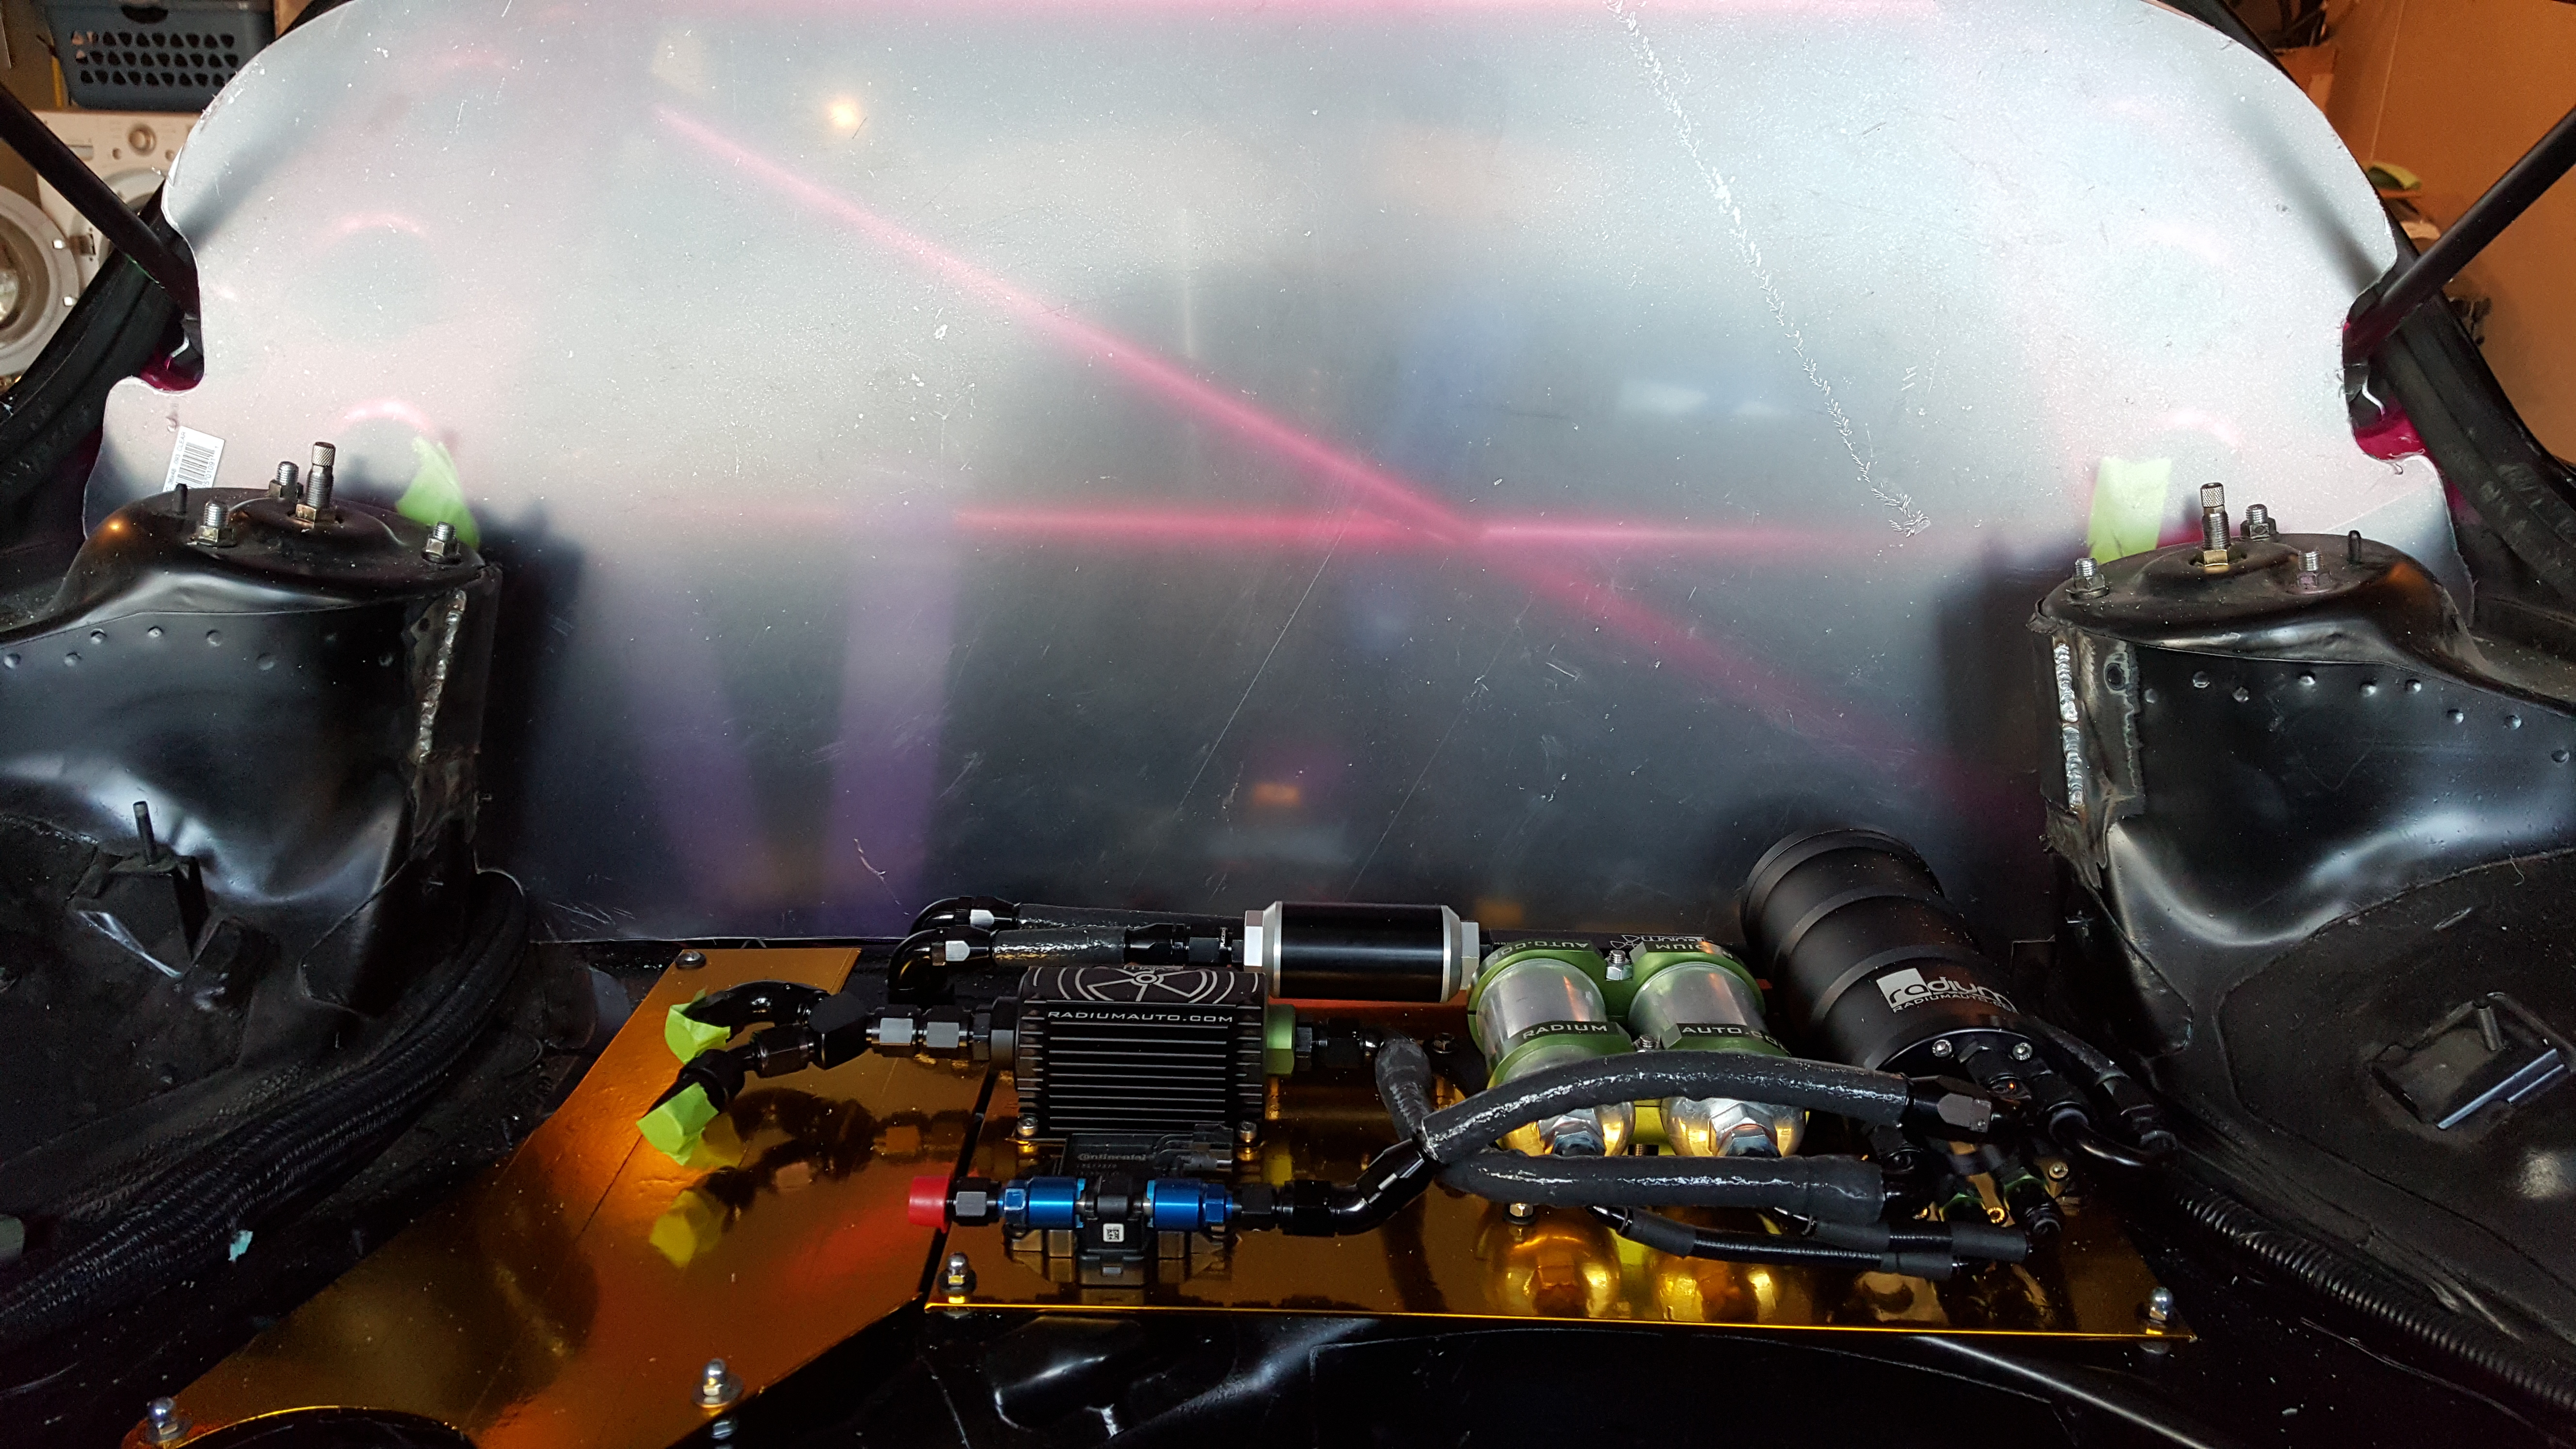
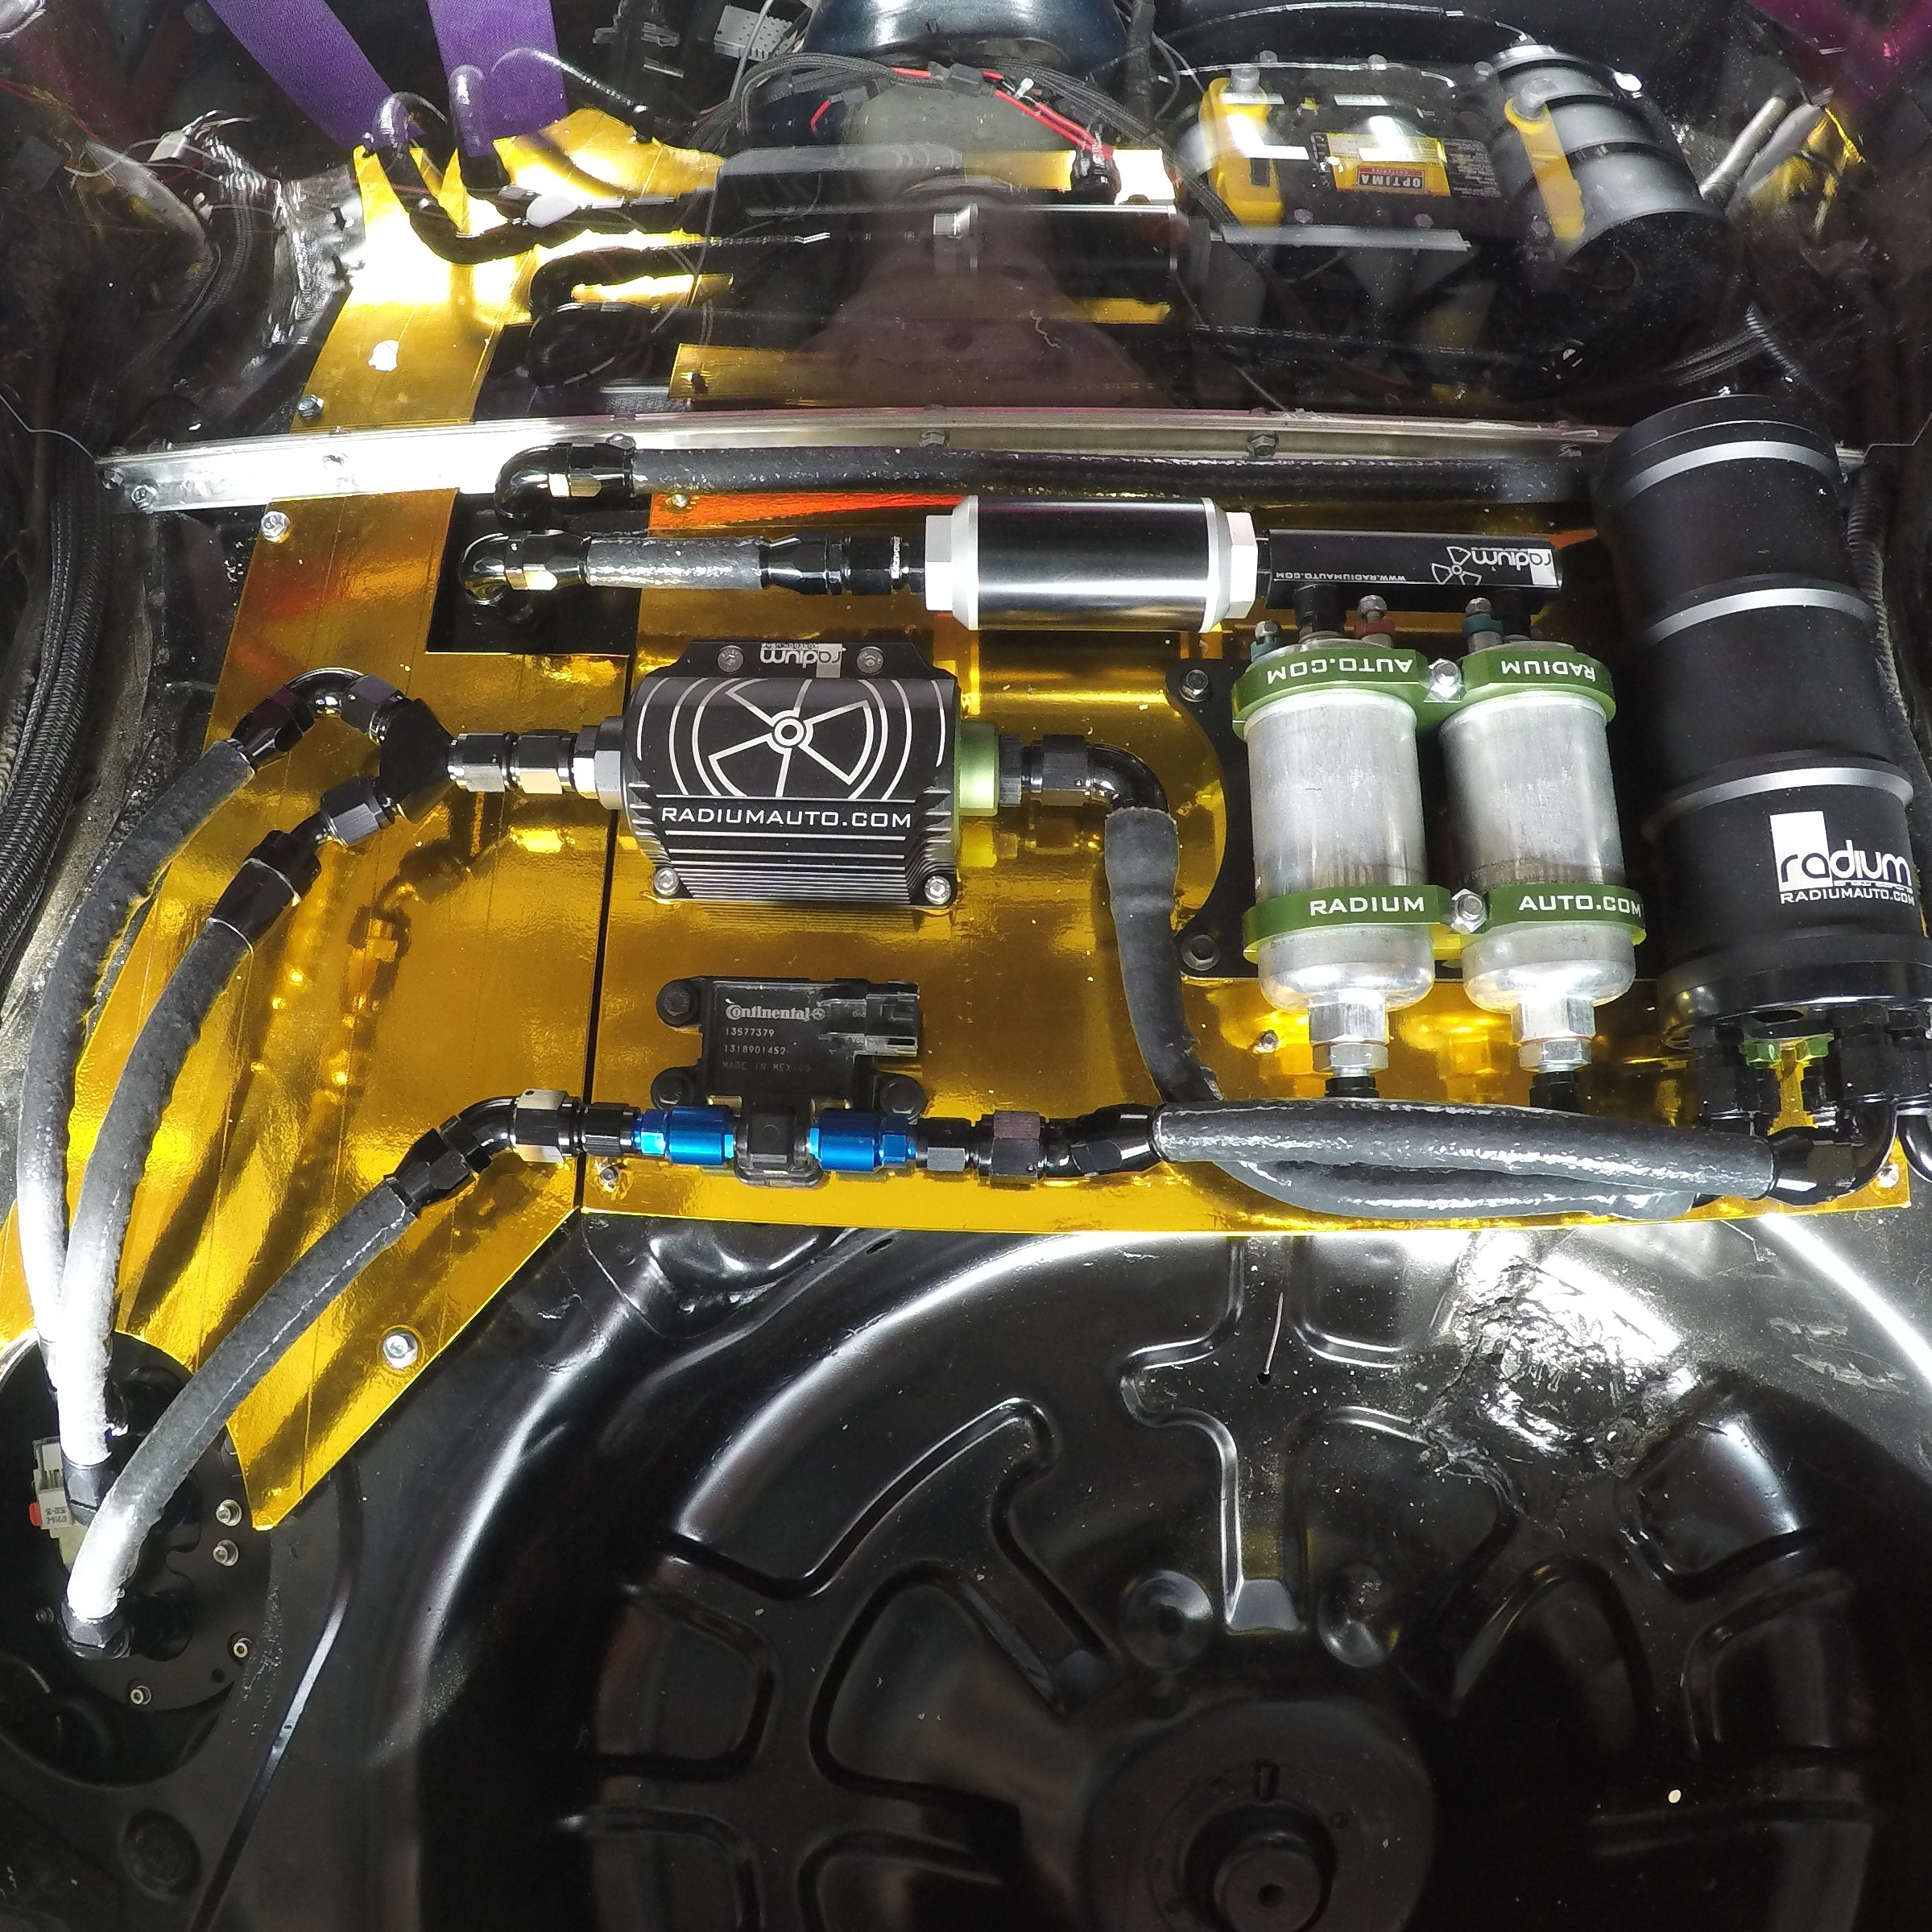
And Finally Finished!
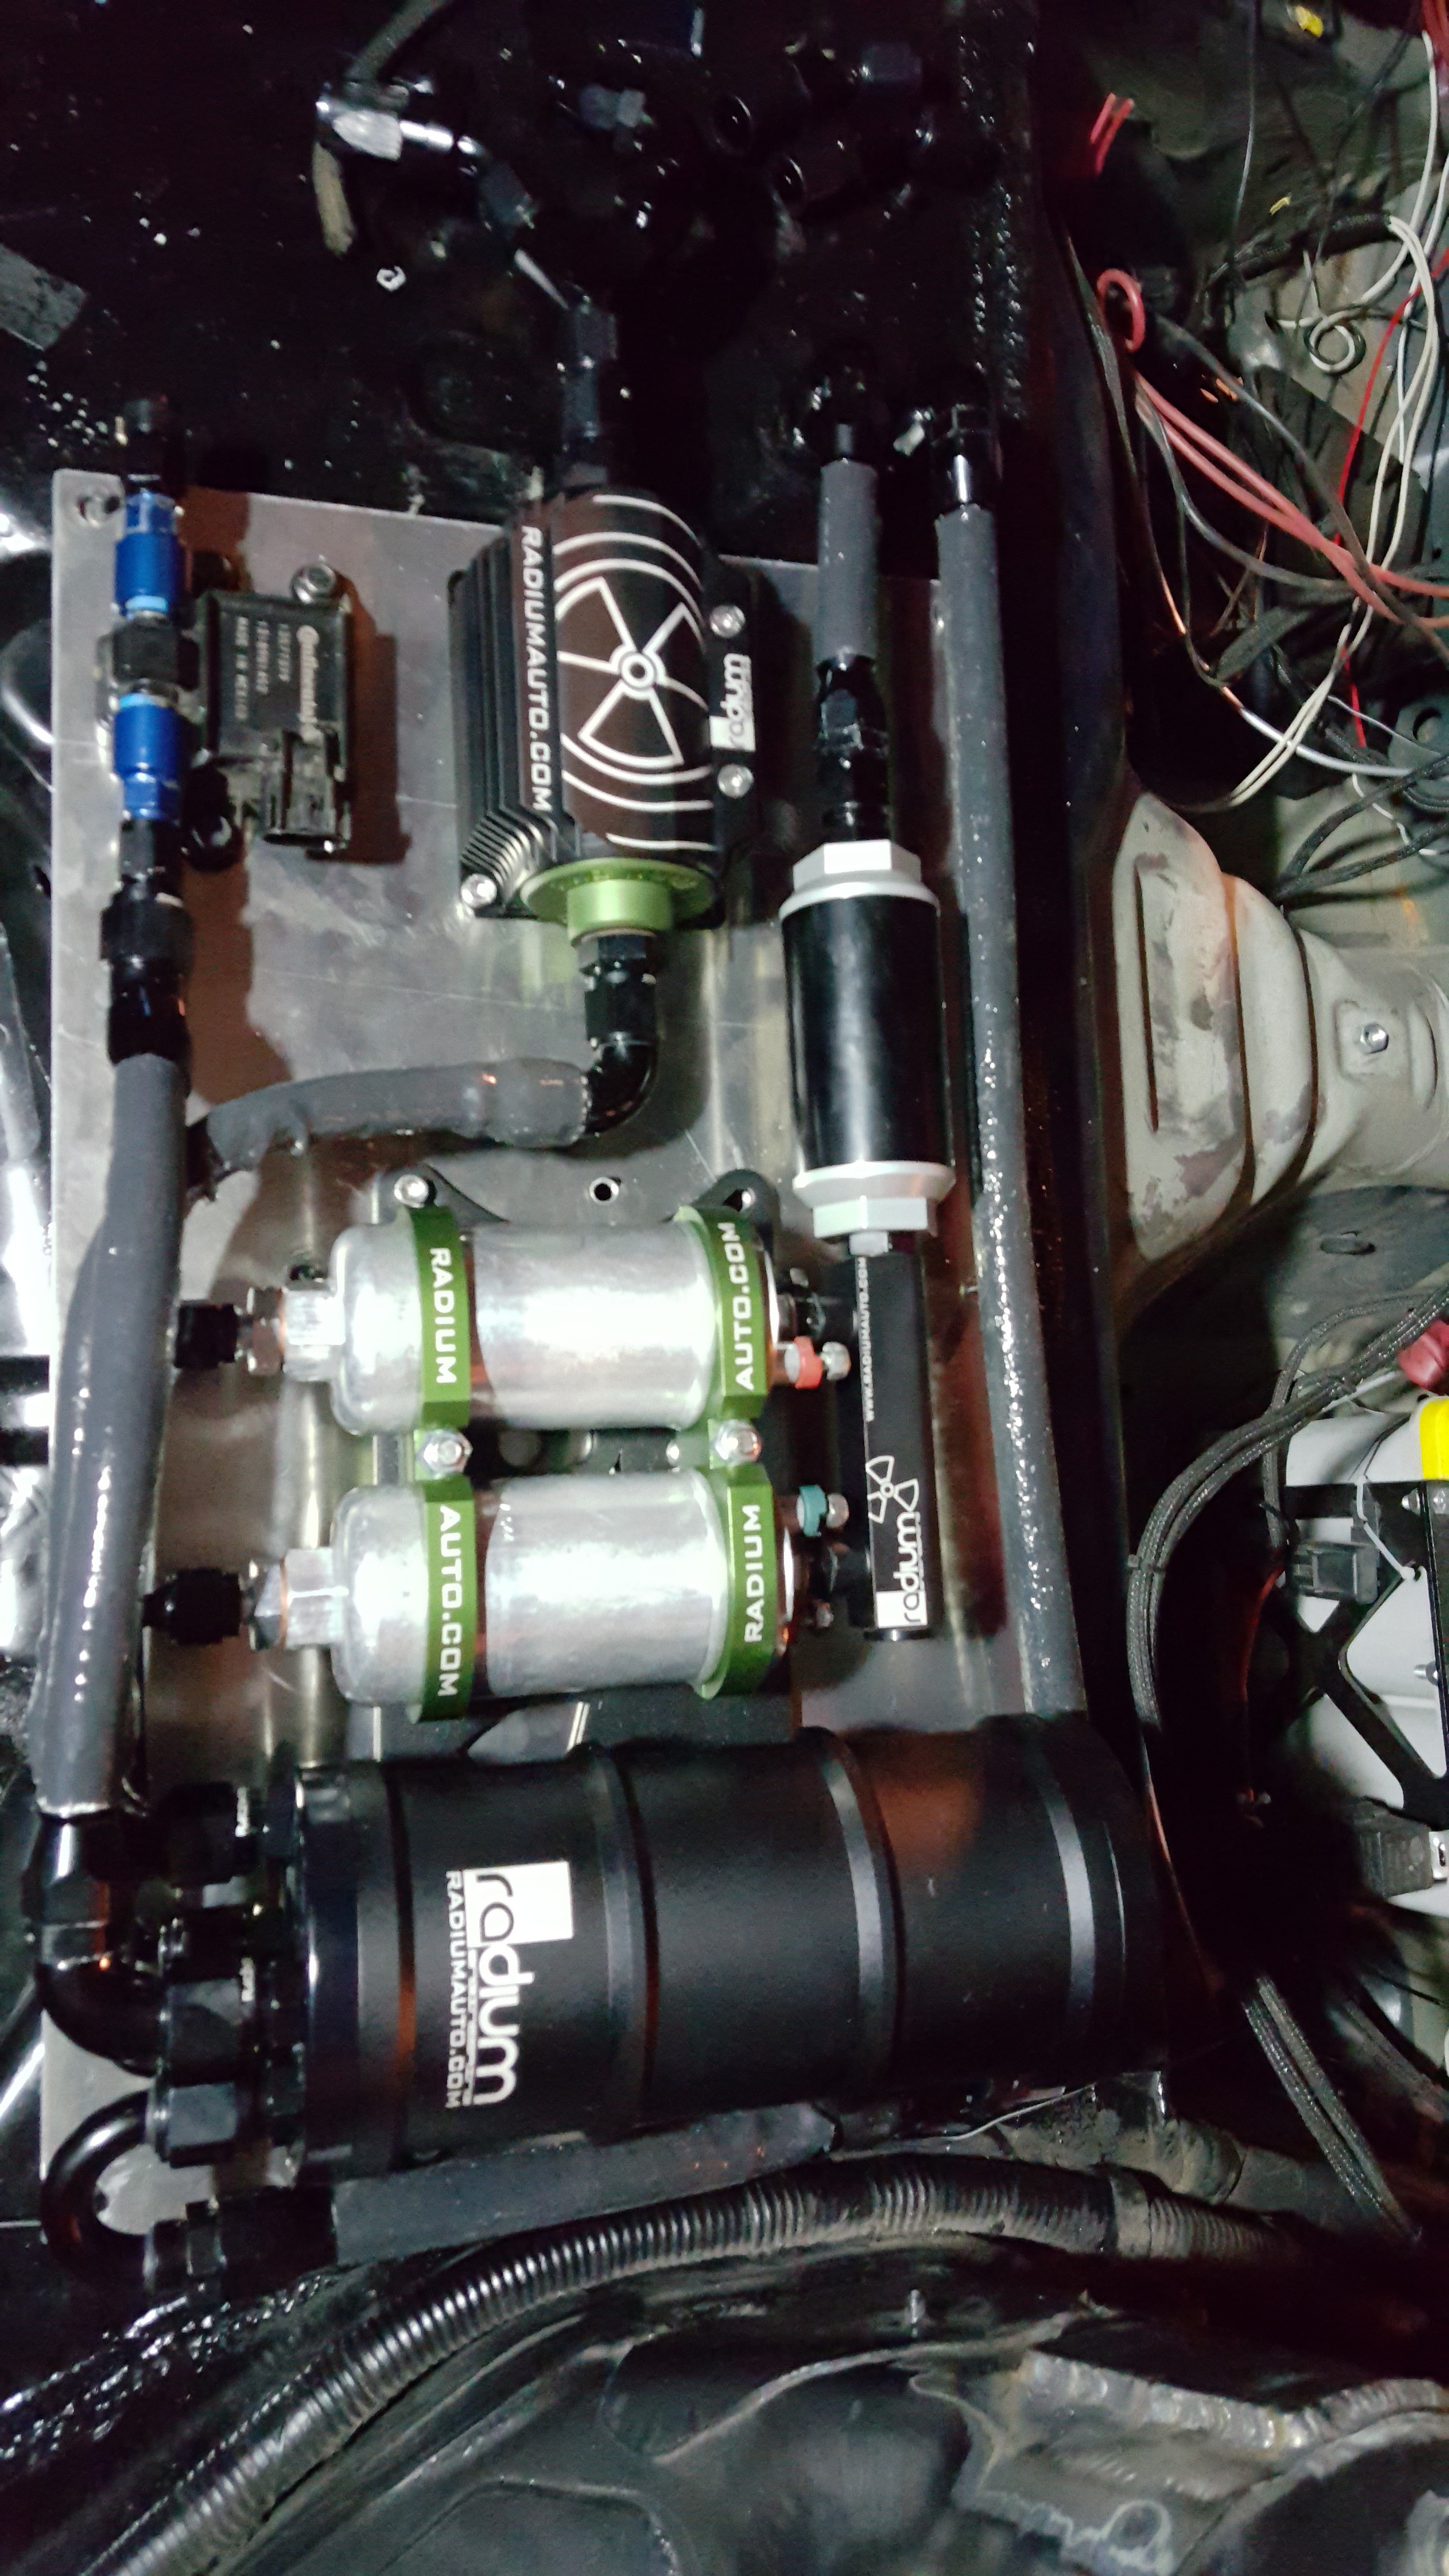
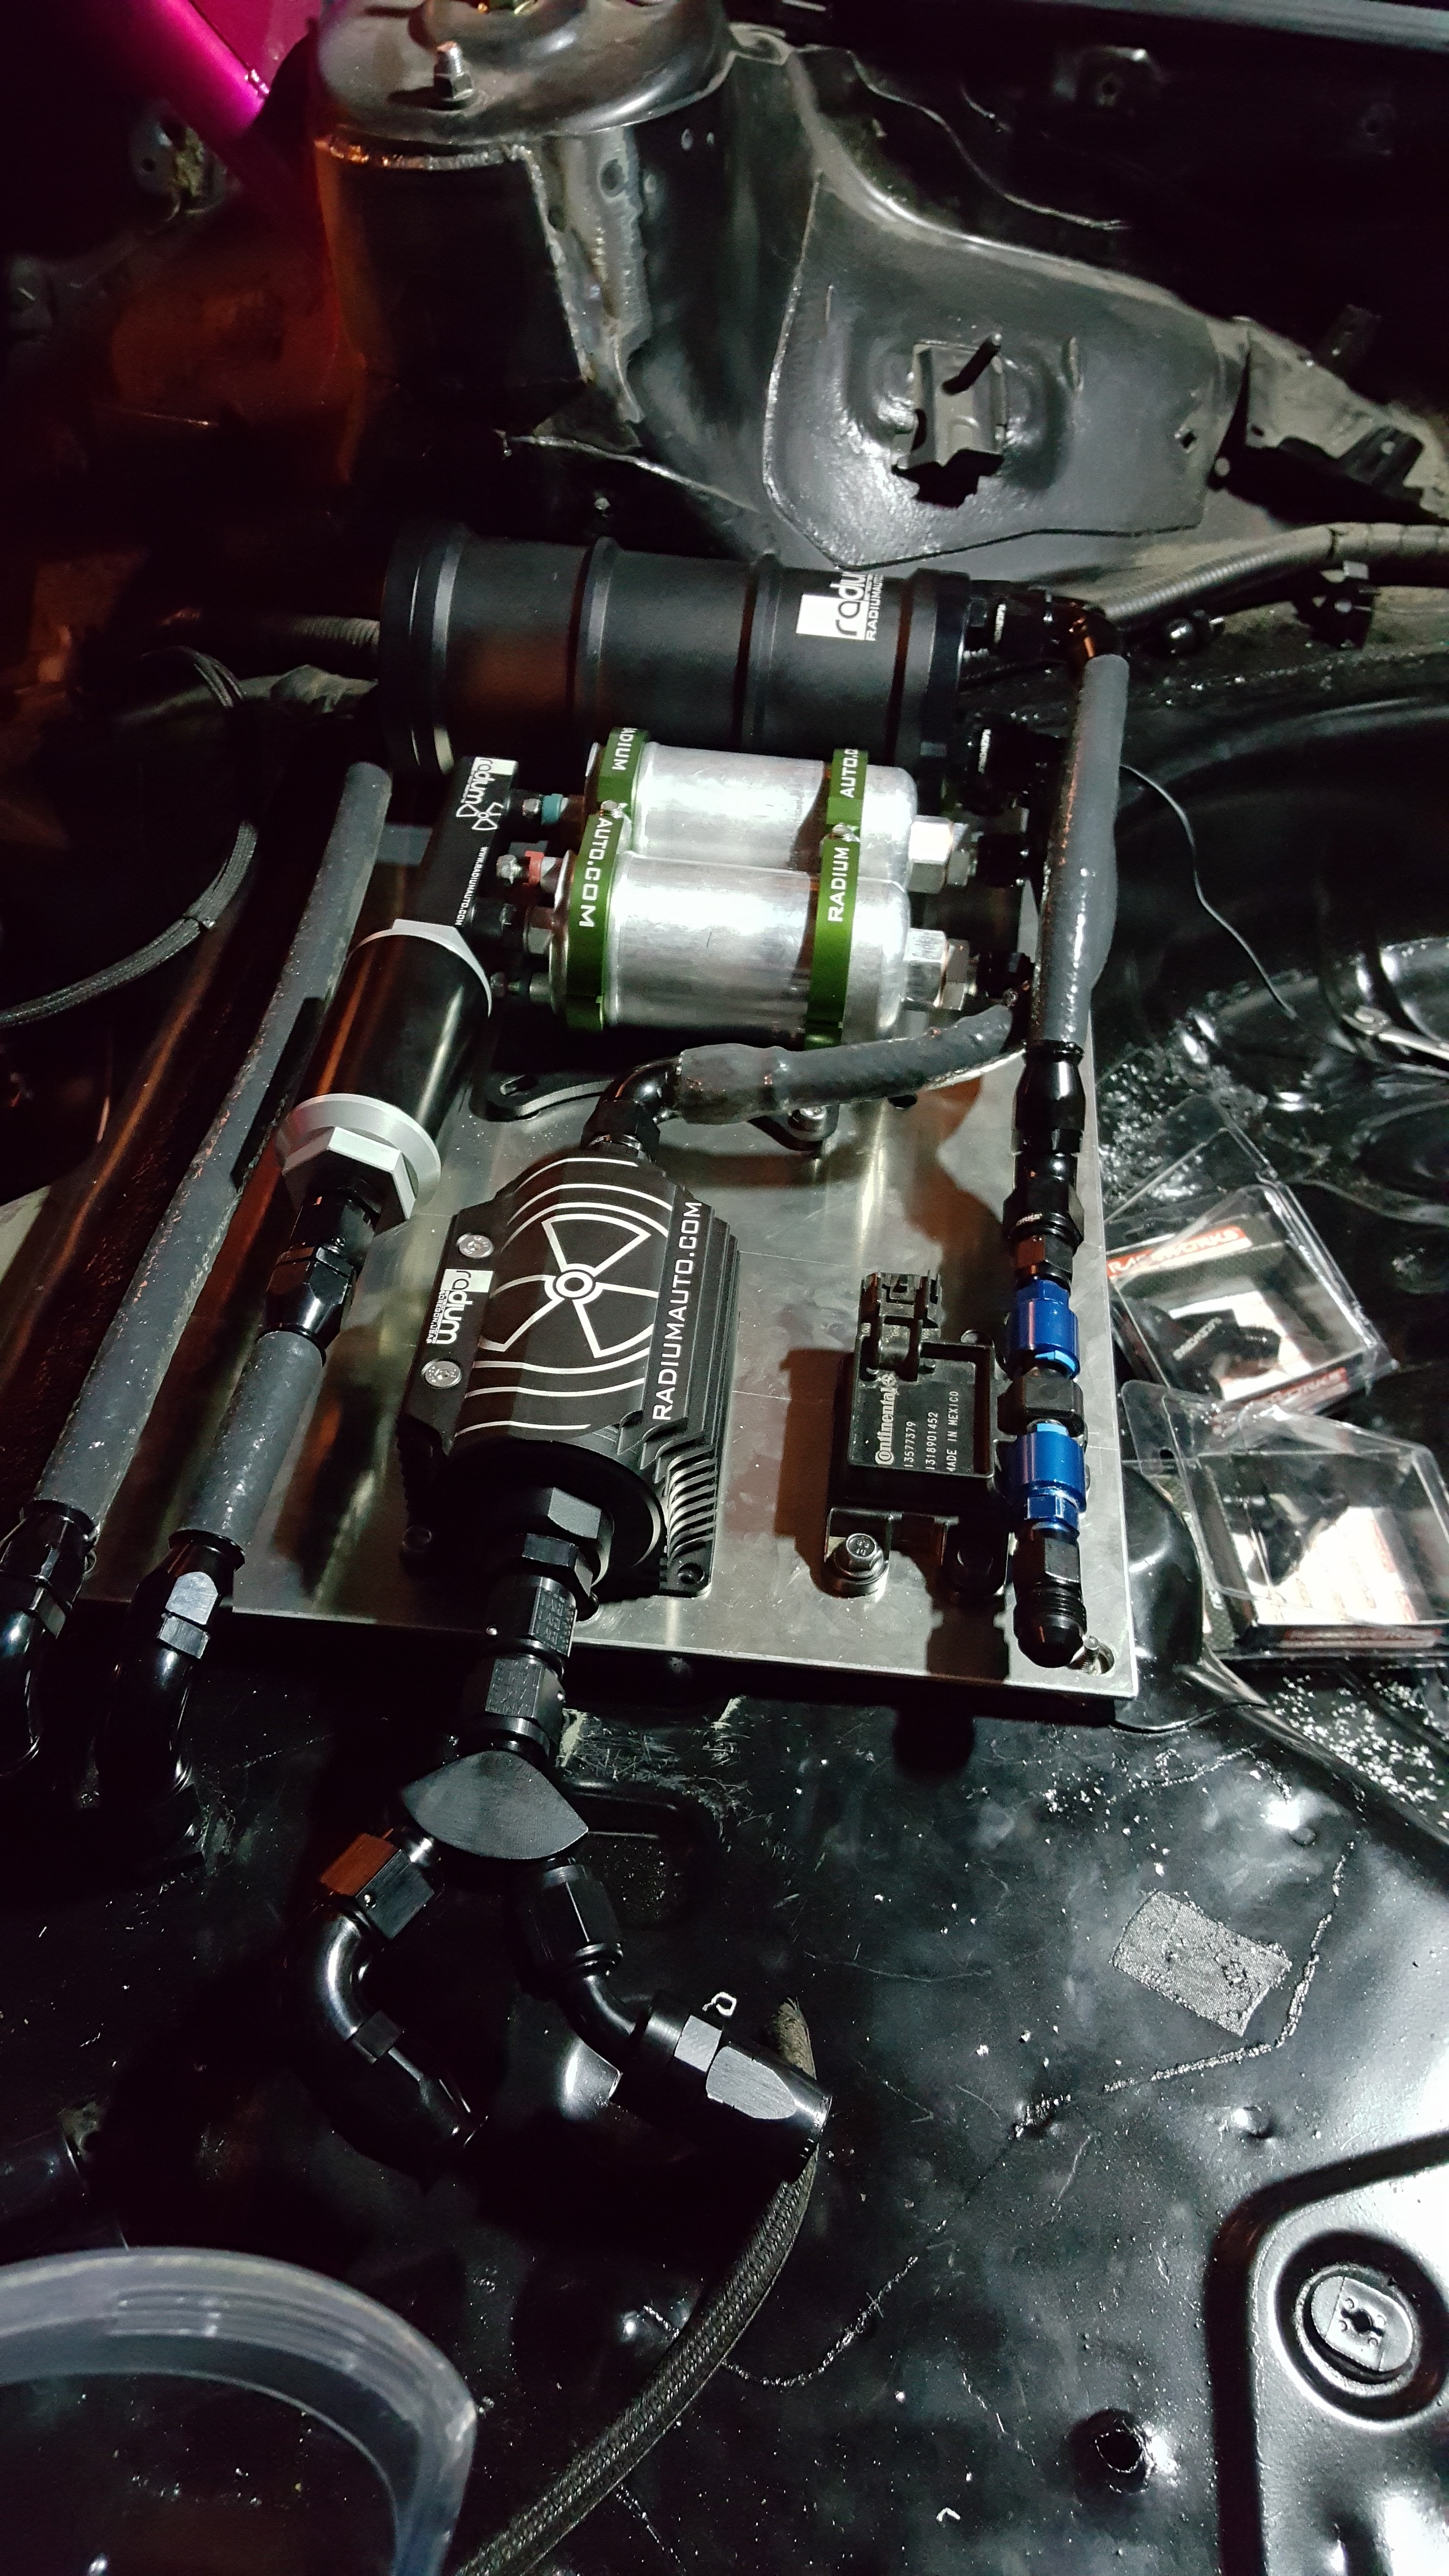
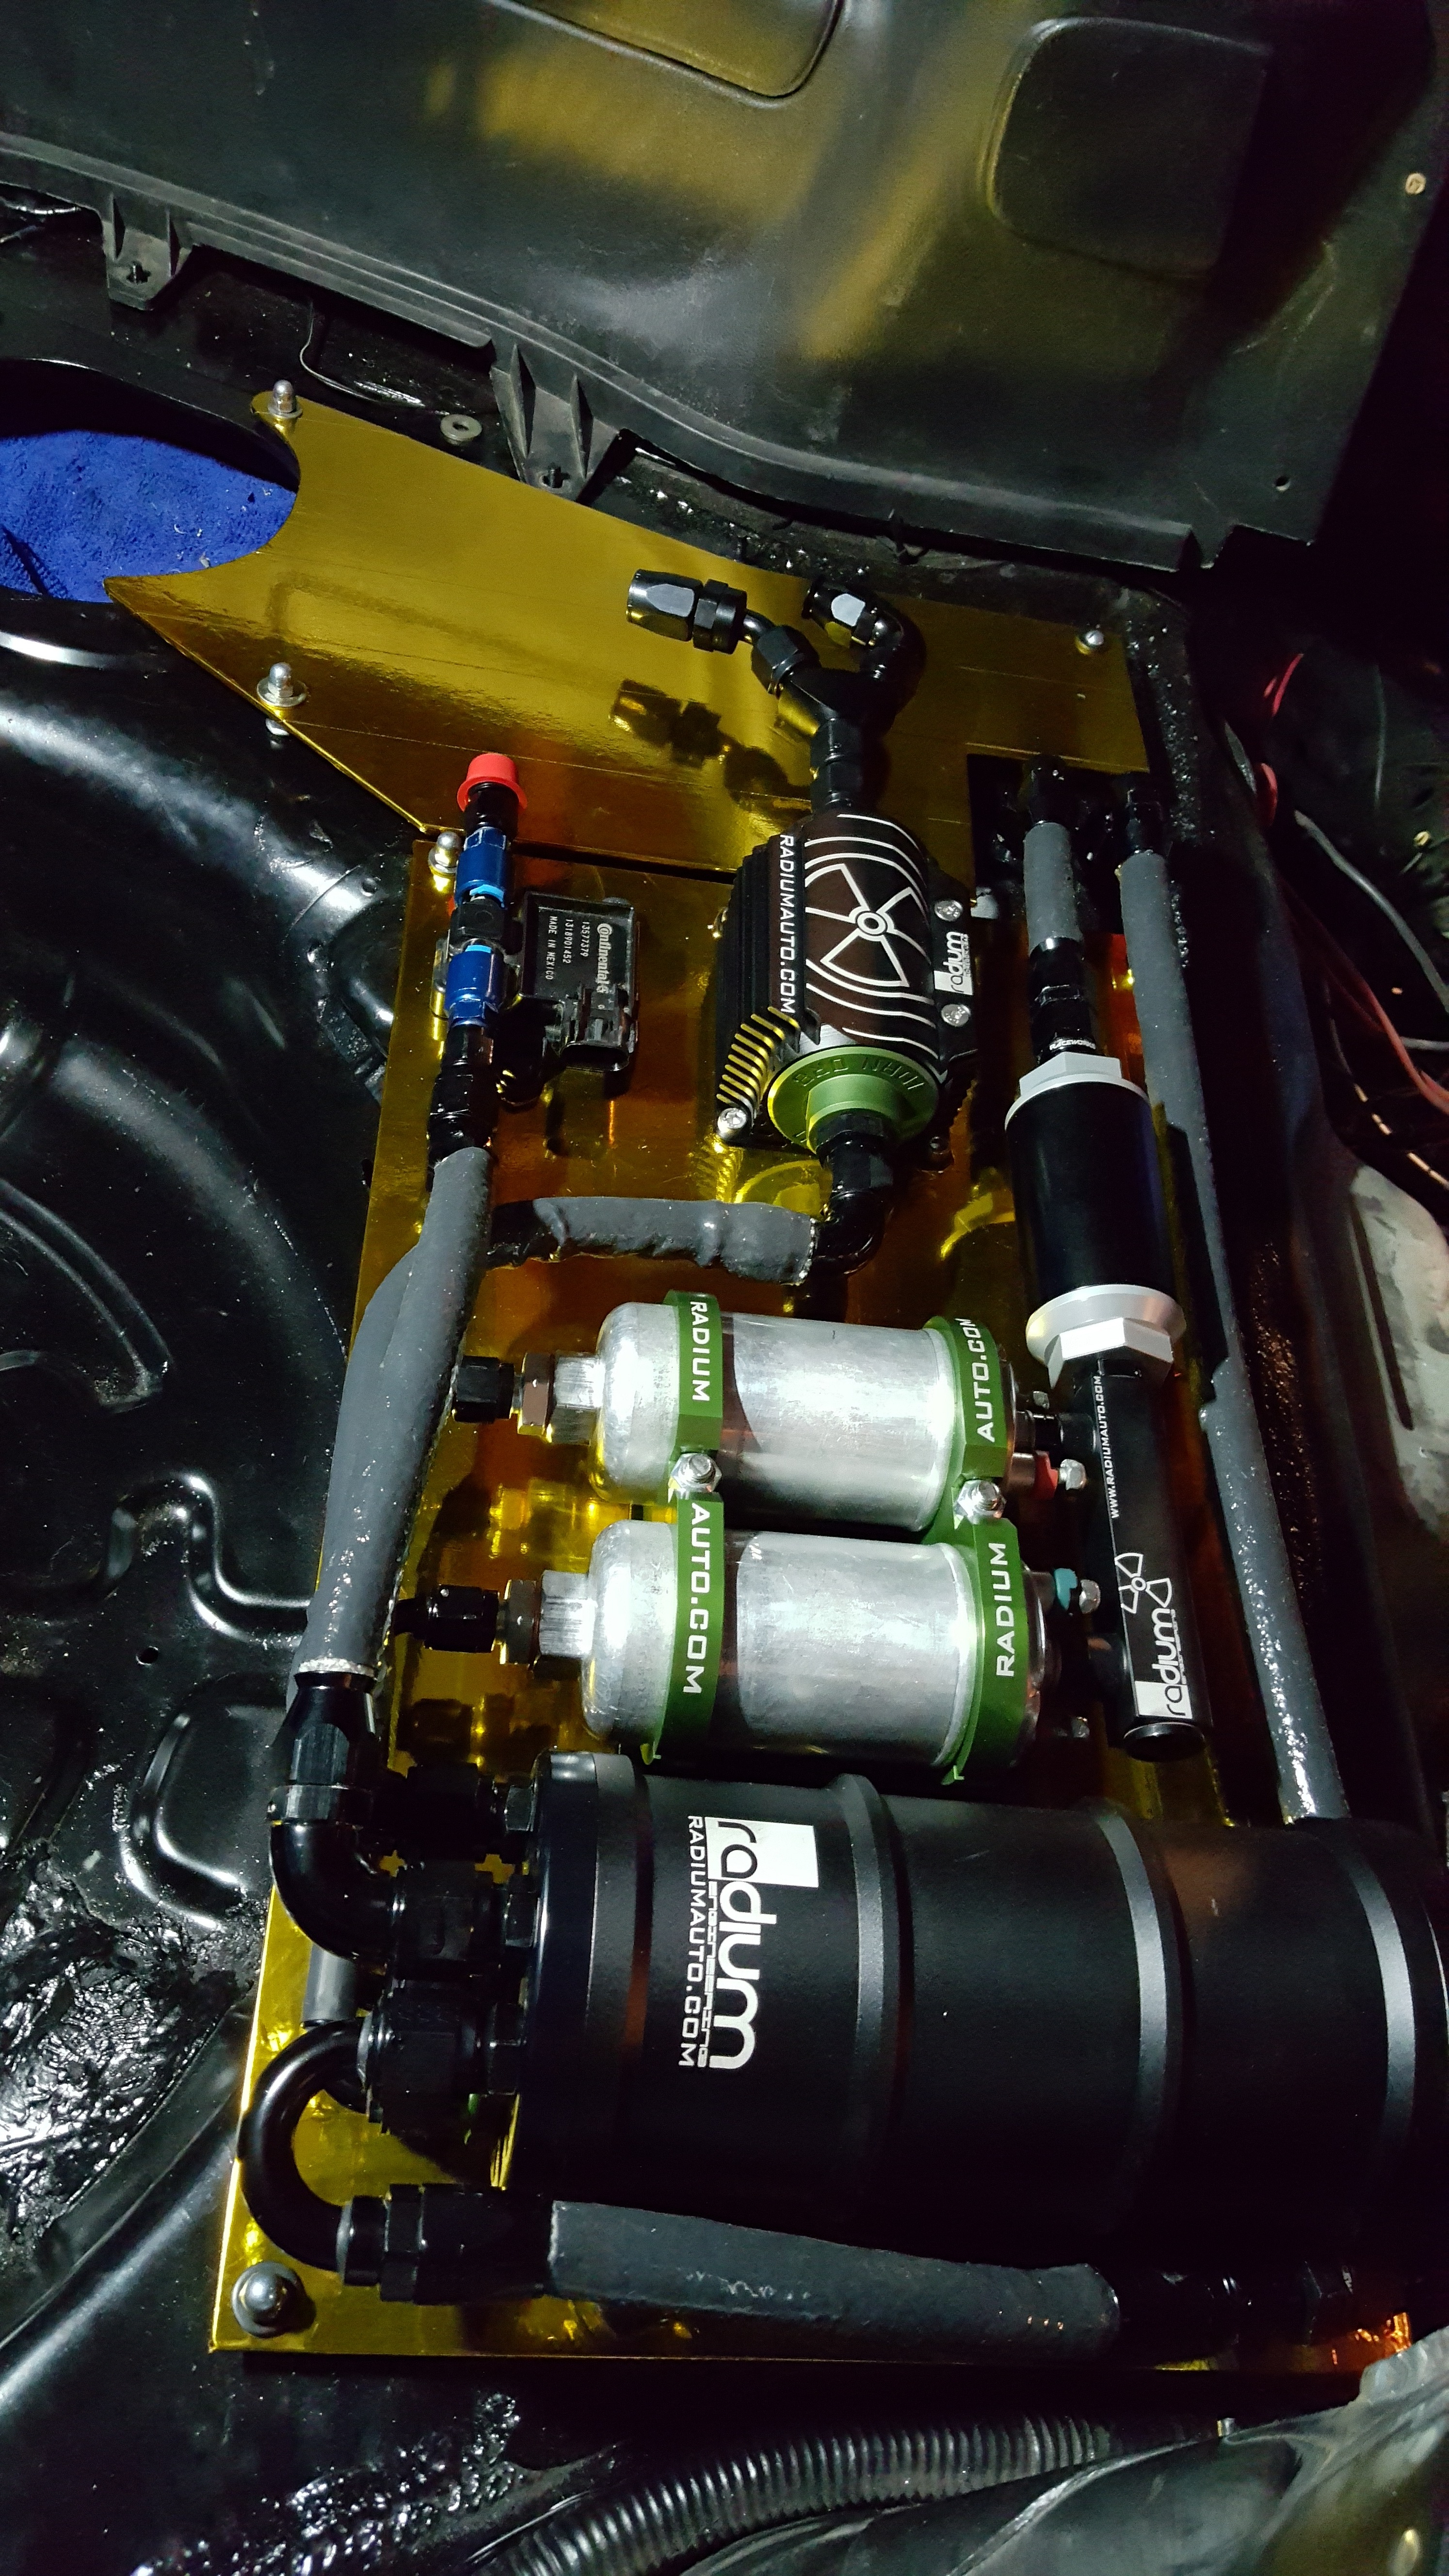
Here is my final Set up!!
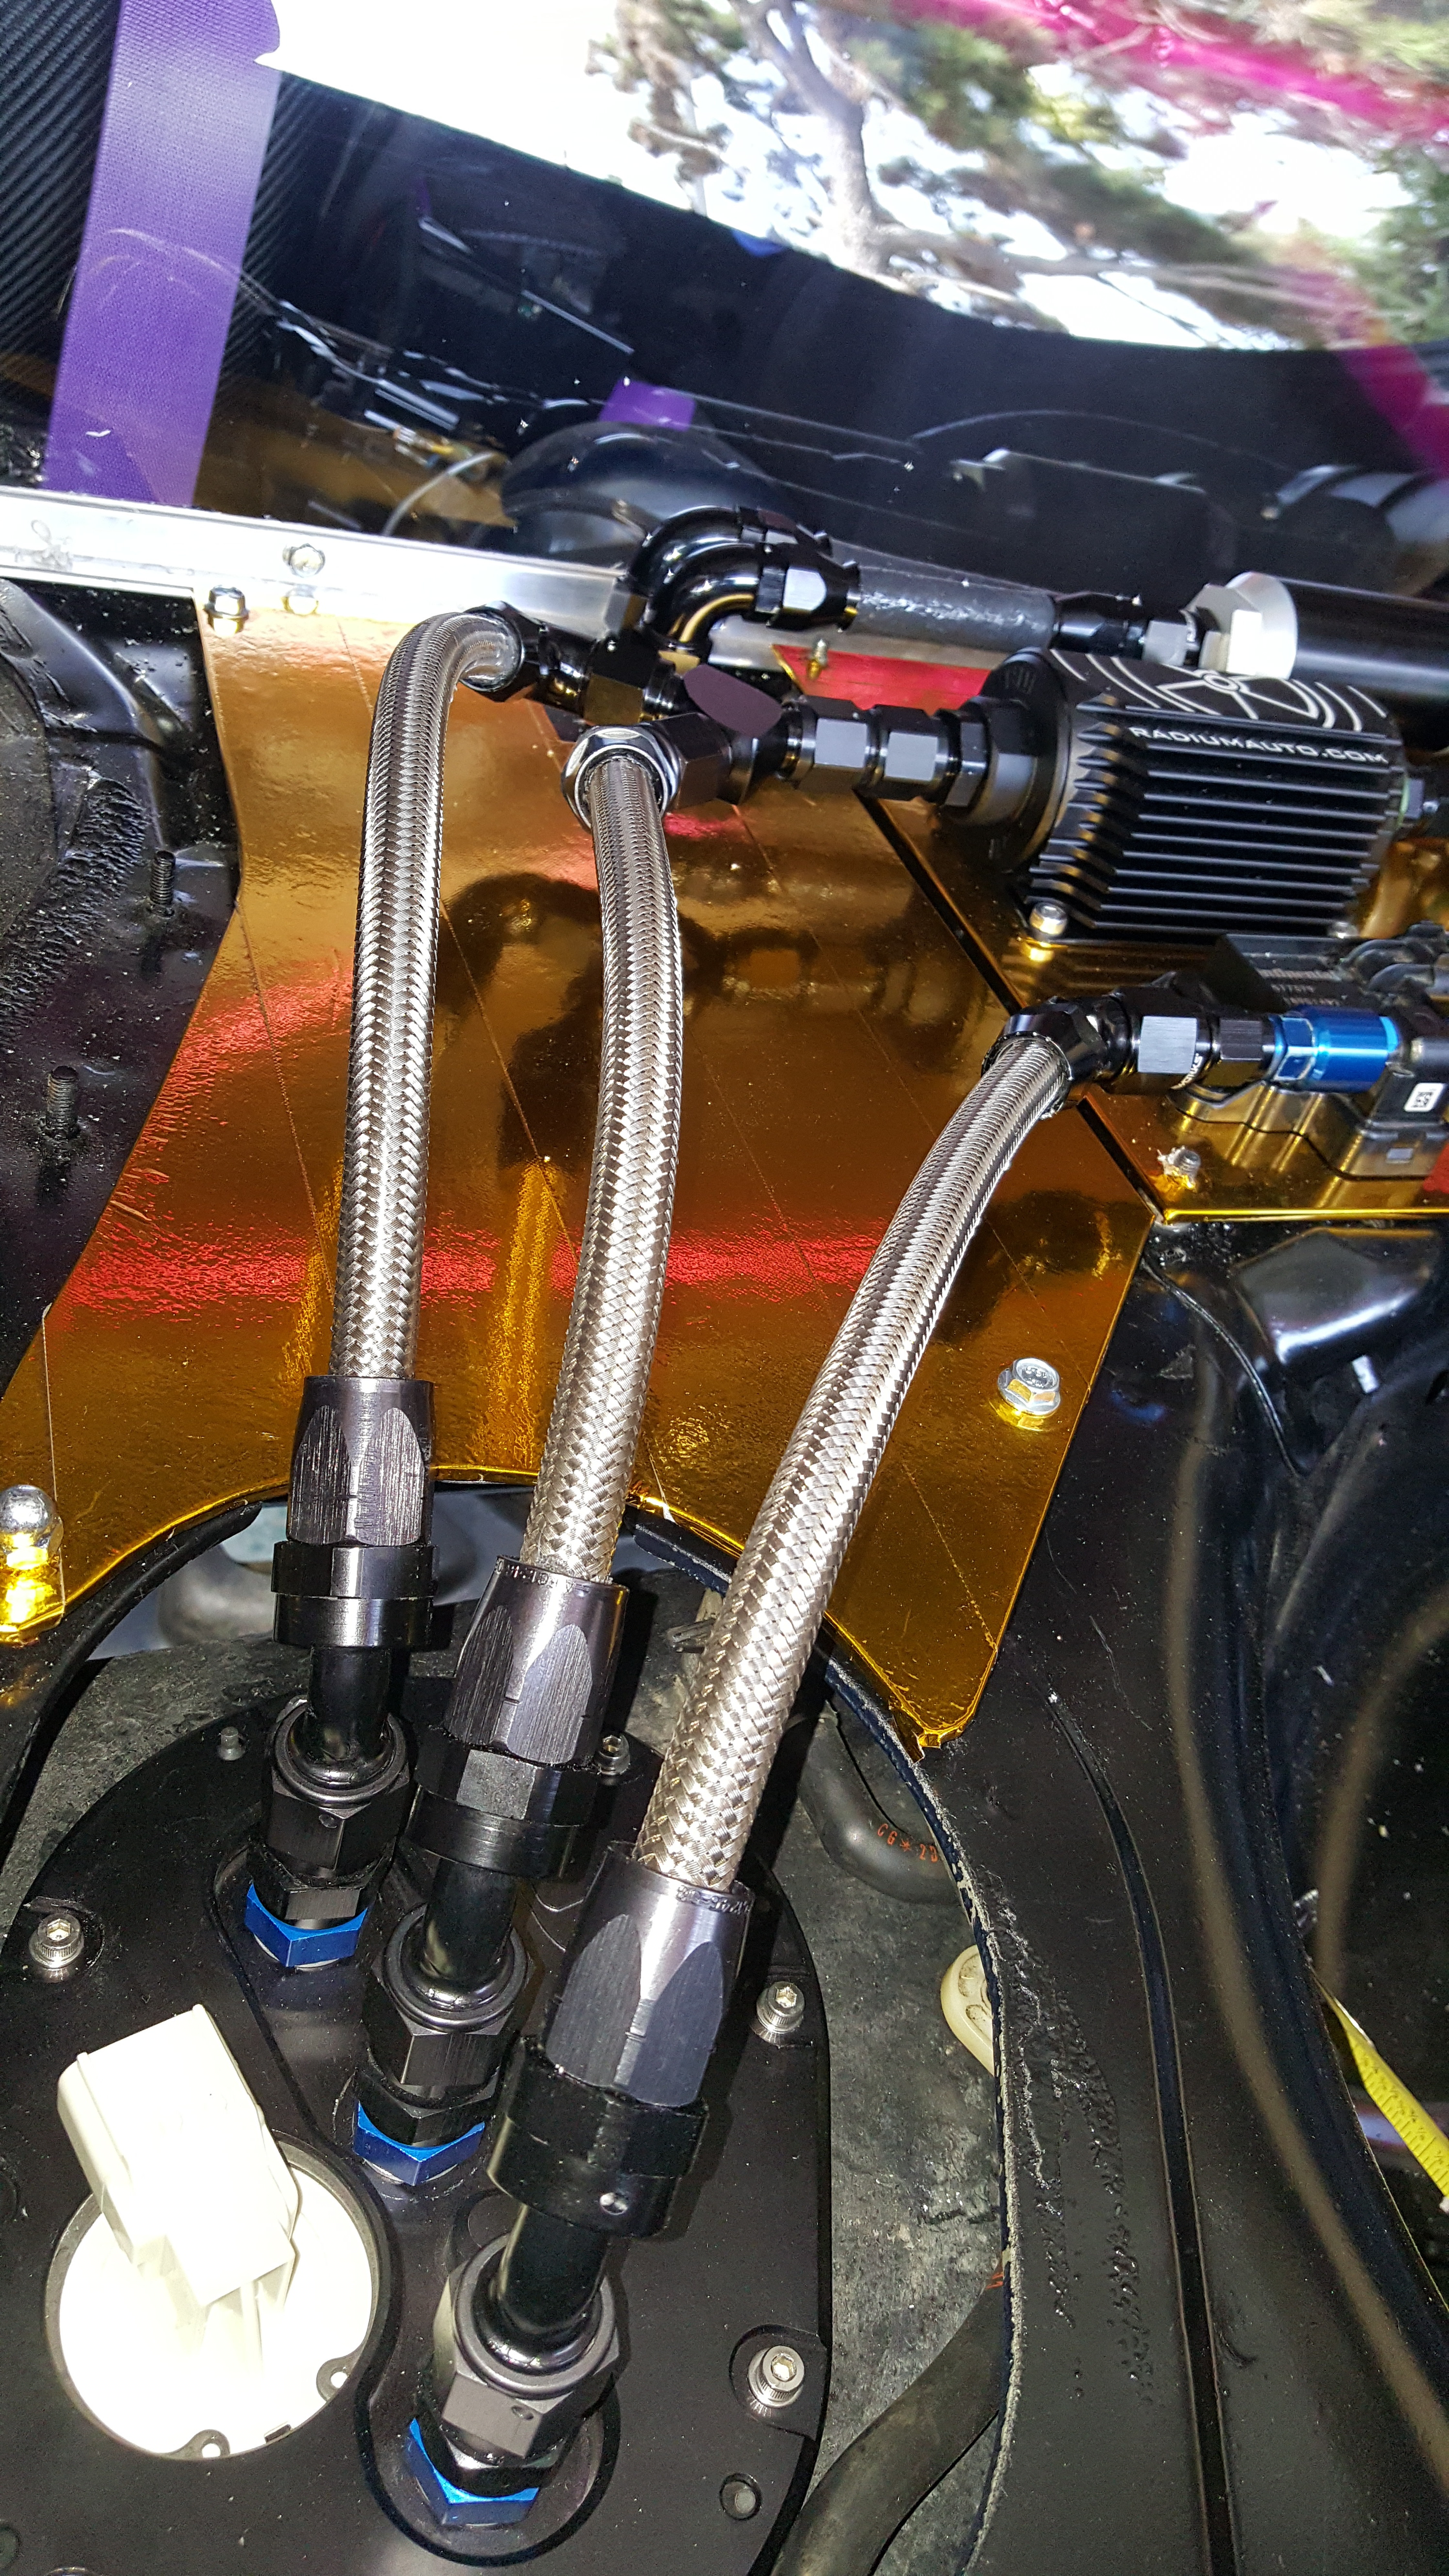
Feed:
(2) Walbro E85 400's In tank on the CJ-Motorsports Dual Pump Hanger
Only one of these will run at a time (lift Pump, the other is a back up)
Feeding a 13 Micron Stainless Mesh E85 Safe Radium Fuel Filter with Heat Sink Bracket
Feeding the Radium Surge tank
(2) Bosch 044's handling all the hard Grunt work... Pulling from the Radium Surge Tank
Pushing through the Radium Pump Manifold..
Directly to the Earls 10 Micron E85 Stainless Mesh Fuel Filter
Through the 90 Degree Bulkhead fitting to the engine Bay
Return:
Turbosmart FPR2000
returning from Engine bay through Bulkhead to
Radium Surge Tank Return Port
To overflow on Radium Surge Tank
out of surge to
Continental/GM Flex Fuel Sensor
out of Flex fuel sensor to
CJ-Motorsports Return Port on Bulkhead
To OE tank
Mocked it up and Made my Lines!
And Finally Finished!
Here is my final Set up!!
Feed:
(2) Walbro E85 400's In tank on the CJ-Motorsports Dual Pump Hanger
Only one of these will run at a time (lift Pump, the other is a back up)
Feeding a 13 Micron Stainless Mesh E85 Safe Radium Fuel Filter with Heat Sink Bracket
Feeding the Radium Surge tank
(2) Bosch 044's handling all the hard Grunt work... Pulling from the Radium Surge Tank
Pushing through the Radium Pump Manifold..
Directly to the Earls 10 Micron E85 Stainless Mesh Fuel Filter
Through the 90 Degree Bulkhead fitting to the engine Bay
Return:
Turbosmart FPR2000
returning from Engine bay through Bulkhead to
Radium Surge Tank Return Port
To overflow on Radium Surge Tank
out of surge to
Continental/GM Flex Fuel Sensor
out of Flex fuel sensor to
CJ-Motorsports Return Port on Bulkhead
To OE tank
Last edited by mannykiller; 03-04-16 at 10:54 AM.
