94 Build... GT35R, RE Vmount and a whole lot more............ NOW WITH PISTONS!!

 06-03-13, 08:28 AM
#379
Pump setup looks good - hell of a lot cleaner than mine! If you haven't done so, make sure you use proper submersible fuel hose for the intank pieces. The external layer of rubber on regular fuel line is NOT fuel tolerant and will swell and degrade VERY quickly = LEAKS! Ask me how I know. You can get it from NAPA.

Your setup looks great. It's come so far from when we met a couple years ago! Keep up the great work!
Regards,
Crispy
Your setup looks great. It's come so far from when we met a couple years ago! Keep up the great work!
Regards,
Crispy
06-03-13, 09:19 AM
#380
Wastegate John
iTrader: (13)
Join Date: Feb 2008
Location: Long Island NY 11746
Posts: 2,979
Likes: 0
Received 9 Likes
on
9 Posts
How confident are you that the racetronix unit will not leak? How was the install?
I wanted to buy it a few months ago and they were out of stock. I really want to pick it up and fix what I currently have. It seems like a much more elegant and "proper" solution.
It was the only solution that I could find that was not a few hundred dollars. I am surprised there are not more manufactures making aftermarket bulkhead connectors for fuel systems.
06-03-13, 11:52 AM
#382
Pistion to rotary
iTrader: (2)
Join Date: Jun 2012
Location: sioux falls
Posts: 305
Likes: 0
Received 0 Likes
on
0 Posts
Did you ever think about using a single walbro 485? Guess there rated to 600hp on e85. Jw if I might have to change my idea on pumps before I start on it.
Last edited by Grinch; 06-03-13 at 11:54 AM.
06-03-13, 02:40 PM
#383
The electrical bulkhead connector used by Josh is rated for fuel system use. "This bulkhead connector wiring system brings four wires into a fuel tank while being fully tested vapor-proof (sealed)"
I used the below (I was not aware of what Josh found when I assembled my setup)
- Engine Works fuel tank cover thru-panel electrical bulkhead connector (x2)[pn 16779 $27.00]
FWIW,
Crispy


I used the below (I was not aware of what Josh found when I assembled my setup)
- Engine Works fuel tank cover thru-panel electrical bulkhead connector (x2)[pn 16779 $27.00]
FWIW,
Crispy
06-03-13, 07:01 PM
#384
Pump setup looks good - hell of a lot cleaner than mine! If you haven't done so, make sure you use proper submersible fuel hose for the intank pieces. The external layer of rubber on regular fuel line is NOT fuel tolerant and will swell and degrade VERY quickly = LEAKS! Ask me how I know. You can get it from NAPA.
Your setup looks great. It's come so far from when we met a couple years ago! Keep up the great work!
Regards,
Crispy
Your setup looks great. It's come so far from when we met a couple years ago! Keep up the great work!
Regards,
Crispy

How confident are you that the racetronix unit will not leak? How was the install?
I wanted to buy it a few months ago and they were out of stock. I really want to pick it up and fix what I currently have. It seems like a much more elegant and "proper" solution.
It was the only solution that I could find that was not a few hundred dollars. I am surprised there are not more manufactures making aftermarket bulkhead connectors for fuel systems.
I wanted to buy it a few months ago and they were out of stock. I really want to pick it up and fix what I currently have. It seems like a much more elegant and "proper" solution.
It was the only solution that I could find that was not a few hundred dollars. I am surprised there are not more manufactures making aftermarket bulkhead connectors for fuel systems.
I am quite confident it is completely sealed. Its very solid and doesn't move. The O-ring is fuel grade and should seal to the base just like an injector.
There is no question I will have fuel for days. If I want more power, it will be a matter of upgrading the lines.
06-03-13, 07:06 PM
#385
Dual relay and fuel pump wiring will be coming this weekend. My new A/C compressor will be arriving soon so I can get it looking pretty and mounted up. I just picked up a chromed idler so that will look nice. (Thanks Crispy )
)
06-03-13, 10:33 PM
#386
These. See how there are no slits to slowly bite into the hose.
Google Image Result for http://www.ratwell.com/dotmac/Pictures/MoreParts7/43-ABAClamps.jpg
Also, those bulkheads Crispy used are a no go as well.
Google Image Result for http://www.ratwell.com/dotmac/Pictures/MoreParts7/43-ABAClamps.jpg
Also, those bulkheads Crispy used are a no go as well.
06-04-13, 03:17 AM
#387

These. See how there are no slits to slowly bite into the hose.
Google Image Result for http://www.ratwell.com/dotmac/Pictures/MoreParts7/43-ABAClamps.jpg
Also, those bulkheads Crispy used are a no go as well.
Google Image Result for http://www.ratwell.com/dotmac/Pictures/MoreParts7/43-ABAClamps.jpg
Also, those bulkheads Crispy used are a no go as well.

Marc, I saw the pics of the clamp in the link, Do you think its possible the extension inside the clamp would cause more of a stabbing motion as its tightened and could actually stretch/tear the hose... I know it would have to be over tightened to do that though. Would it be good to use some red line lubricant as its tightened to ensure safety of the hose. Do they sell that design with a less obtrusive section on the inside?
I personally like these. OEM stlye...lol
06-04-13, 06:38 AM
#389
Wastegate John
iTrader: (13)
Join Date: Feb 2008
Location: Long Island NY 11746
Posts: 2,979
Likes: 0
Received 9 Likes
on
9 Posts
These. See how there are no slits to slowly bite into the hose.
Google Image Result for http://www.ratwell.com/dotmac/Pictures/MoreParts7/43-ABAClamps.jpg
Also, those bulkheads Crispy used are a no go as well.
Google Image Result for http://www.ratwell.com/dotmac/Pictures/MoreParts7/43-ABAClamps.jpg
Also, those bulkheads Crispy used are a no go as well.
A buddy of mine used those bulkhead fittings and he has fuel seepage under cornering.
 06-13-13, 10:19 PM
#395
A few small parts arrived, and more on the way. Still waiting for the two big ones, exhaust manifold and Vmount...
I started getting all of my A/C components in order. I picked up a complete O-ring kit, rebuilt compressor, expansion valve and a new dryer. Spent some time cleaning up the A/C lines. They polish quite easily. Should be ready for a fresh charge of ES-12a
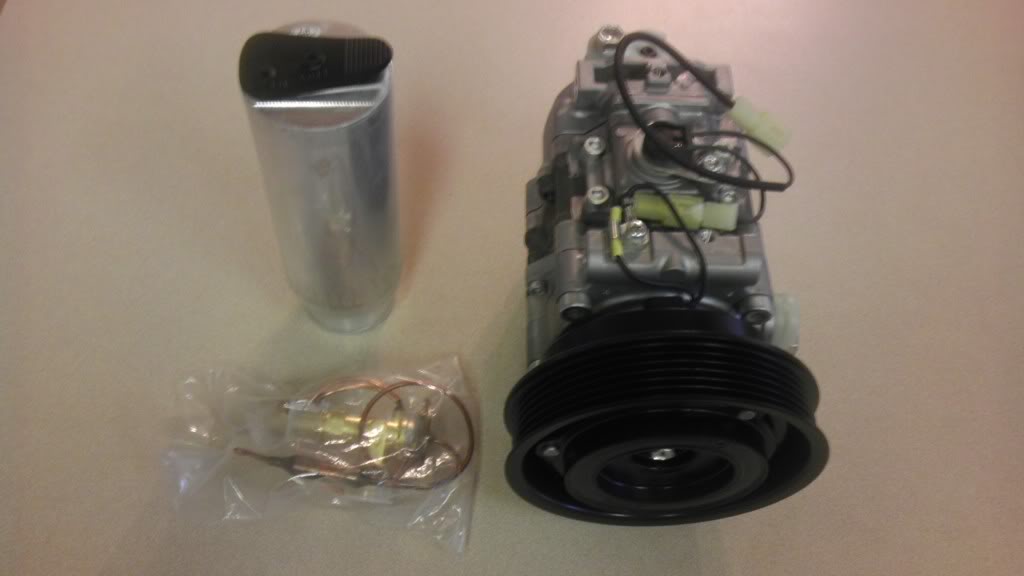
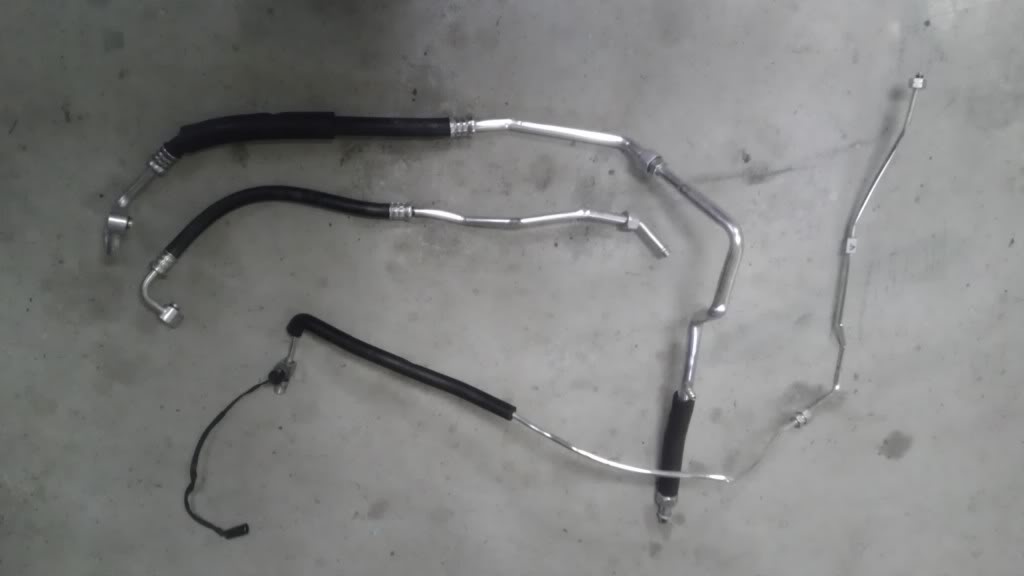
I started getting all of my A/C components in order. I picked up a complete O-ring kit, rebuilt compressor, expansion valve and a new dryer. Spent some time cleaning up the A/C lines. They polish quite easily. Should be ready for a fresh charge of ES-12a


 06-16-13, 12:17 AM
#398
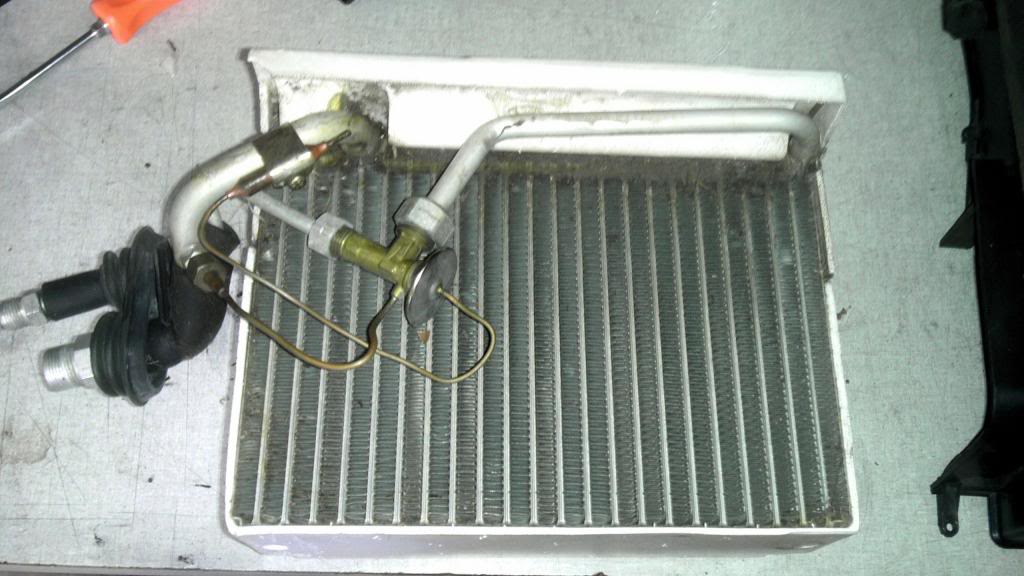
A/C components installed. The expansion valve wasn't as bad as I thought it would be. Much of this was from my stripped bay so the outer connections were all ready separated. I used a write-up that was done by a member and it made it a breeze. Gotta love the club!
Compressor and lines are pretty much in place. Of course, I'm waiting for the condensor side to get connected when I install the Vmount. Really looking forward to icey vent temps.
To address my idler pulley, I have had questions about running the idler this way. As you can see, I have essentially bypassed the PS pump and run the belt "rib" down to a flat idler. I have had ZERO issues with this for 6k miles and 3 years. I actually got the tip from another member when searching for a solution. He had ran it that way for a few years as well. The belt has shown no adverse wear.
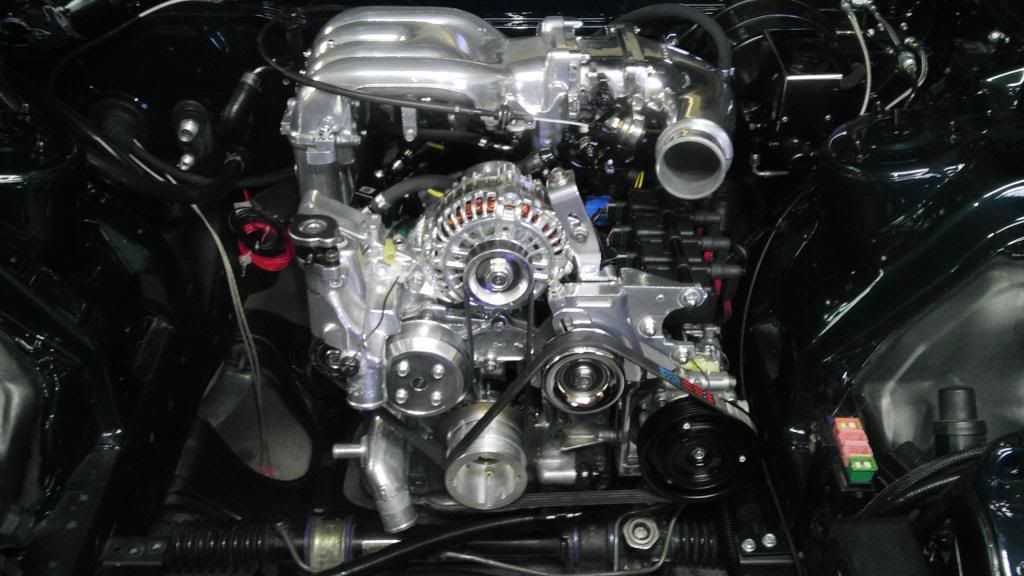

 06-18-13, 03:30 PM
#399
A/C components installed. The expansion valve wasn't as bad as I thought it would be. Much of this was from my stripped bay so the outer connections were all ready separated. I used a write-up that was done by a member and it made it a breeze. Gotta love the club!
Compressor and lines are pretty much in place. Of course, I'm waiting for the condensor side to get connected when I install the Vmount. Really looking forward to icey vent temps.
To address my idler pulley, I have had questions about running the idler this way. As you can see, I have essentially bypassed the PS pump and run the belt "rib" down to a flat idler. I have had ZERO issues with this for 6k miles and 3 years. I actually got the tip from another member when searching for a solution. He had ran it that way for a few years as well. The belt has shown no adverse wear.
06-18-13, 04:50 PM
#400
Senior Member
iTrader: (9)
Join Date: Dec 2012
Location: ft.lauderdale
Posts: 317
Likes: 0
Received 0 Likes
on
0 Posts
Awesome. I've been wondering about this for days. Did you swap out the idler for one with a lip to keep the belt from slipping off or just use the stock pulley? Also, if it is the stock pulley, how did you get that shine