
New on ClubRX - Rewire your fuel pump! Easy, cheap, reliability mod!

Originally Posted by dubulup
doesn't matter...they both do. Either you run your own (fused) wire to the battery or use the one Mazda supplies, and have an actual fuse holder...and less wires run thru the engine bay.
No...except the new wire has a longer 4AWG wire to travel thru to get to the B+ (read slight voltage drop).
No...except the new wire has a longer 4AWG wire to travel thru to get to the B+ (read slight voltage drop).
heres how i did this mod (hope it helps others)
i only had extra 8gauge wire lying around so i crimped a marine grade spade (the one that GADD has pictured) to one end. I then drilled a hole in the spot of the fuseblock that the spade connector needs to go through (i used progressively bigger drill bits up until my 8gauge wire could pass through with a bit of tug) pulled the wire through and then used a marine grade crimp connector to connect the solid blue wire with my 8 gauge.
-i didn't just cut the solid blue wire and crimp a spade to that wire because i didn't want fetch the blue wire all the way down the harness, and feeding a wire through the top (rather than pushing a wire from the bottom of the fuseblock) seemed easier to me.
-i got my marine grade connectors from my local northern hardware store, the brand is CALTERM. (this is one of the only local places around me that carried marine grade terminals) I used a heatgun and had to set it to around 600 degrees for it to start shrinking, it also left that gluey ring that someone was referring to that keeps it waterproof
-make sure you cut the solid blue wire low enough so that you have enough room to crimp the connector (i barely had enough room to crimp)
hope this helps someone
Magnet Boy
Joined: Jan 2007
Posts: 251
Likes: 1
From: NorCal
Couple questions and comments:
Dale's method runs a separate power wire to the fuel pump relay and he has this connected to the same fused supply as his stereo system. So if he is running WOT and blasting his hip-hop at the same time and this fuse blows, does his motor blow too? Seems like this would be a lot worse for your motor than an injector fuel cut. Gadd's method seems much cleaner to me and since it has its own fuse, would unlikely ever blow at WOT or ever.
However, in both cases, you cut the blue wire leading to the fuel pump relay and apply fused positive to it. The other end of the cut blue wire I gather is switched positive coming from the ignition switch. What is the best way to terminate this and prevent it from shorting somwhere? Dale's taping job looks pretty bad (no offense) so what would be better?
Edit: Thanks for starting this topic Dale and the writeup!
Originally Posted by rxcited2
What is the best way to terminate this and prevent it from shorting somwhere? Dale's taping job looks pretty bad (no offense) so what would be better?
Warming the planet.
Joined: Dec 2004
Posts: 845
Likes: 2
From: Chico, CA
Originally Posted by HDP
Heat shrink tube and electrical tape
And pull the stock fuel pump fuse.
Originally Posted by scrubolio
heres how i did this mod (hope it helps others)
i only had extra 8gauge wire lying around so i crimped a marine grade spade (the one that GADD has pictured) to one end. I then drilled a hole in the spot of the fuseblock that the spade connector needs to go through (i used progressively bigger drill bits up until my 8gauge wire could pass through with a bit of tug) pulled the wire through and then used a marine grade crimp connector to connect the solid blue wire with my 8 gauge.
-i didn't just cut the solid blue wire and crimp a spade to that wire because i didn't want fetch the blue wire all the way down the harness, and feeding a wire through the top (rather than pushing a wire from the bottom of the fuseblock) seemed easier to me.
-i got my marine grade connectors from my local northern hardware store, the brand is CALTERM. (this is one of the only local places around me that carried marine grade terminals) I used a heatgun and had to set it to around 600 degrees for it to start shrinking, it also left that gluey ring that someone was referring to that keeps it waterproof
-make sure you cut the solid blue wire low enough so that you have enough room to crimp the connector (i barely had enough room to crimp)
hope this helps someone
i only had extra 8gauge wire lying around so i crimped a marine grade spade (the one that GADD has pictured) to one end. I then drilled a hole in the spot of the fuseblock that the spade connector needs to go through (i used progressively bigger drill bits up until my 8gauge wire could pass through with a bit of tug) pulled the wire through and then used a marine grade crimp connector to connect the solid blue wire with my 8 gauge.
-i didn't just cut the solid blue wire and crimp a spade to that wire because i didn't want fetch the blue wire all the way down the harness, and feeding a wire through the top (rather than pushing a wire from the bottom of the fuseblock) seemed easier to me.
-i got my marine grade connectors from my local northern hardware store, the brand is CALTERM. (this is one of the only local places around me that carried marine grade terminals) I used a heatgun and had to set it to around 600 degrees for it to start shrinking, it also left that gluey ring that someone was referring to that keeps it waterproof
-make sure you cut the solid blue wire low enough so that you have enough room to crimp the connector (i barely had enough room to crimp)
hope this helps someone


I just did this mod, and now my fuel pump is always on. It sounds much softer than before (low setting maybe?). Instead of using the extra fuse slot though, I used the slot that the AC fuse was in. I don't have AC, and the slot already had 2 metal connectors to go into the fuse. The other side of the fuse is the same black wire, 12V. What am I missing?
Originally Posted by rxcited2
Couple questions and comments:
Dale's method runs a separate power wire to the fuel pump relay and he has this connected to the same fused supply as his stereo system. So if he is running WOT and blasting his hip-hop at the same time and this fuse blows, does his motor blow too? Seems like this would be a lot worse for your motor than an injector fuel cut. Gadd's method seems much cleaner to me and since it has its own fuse, would unlikely ever blow at WOT or ever.
However, in both cases, you cut the blue wire leading to the fuel pump relay and apply fused positive to it. The other end of the cut blue wire I gather is switched positive coming from the ignition switch. What is the best way to terminate this and prevent it from shorting somwhere? Dale's taping job looks pretty bad (no offense) so what would be better?
Edit: Thanks for starting this topic Dale and the writeup!
Dale's method runs a separate power wire to the fuel pump relay and he has this connected to the same fused supply as his stereo system. So if he is running WOT and blasting his hip-hop at the same time and this fuse blows, does his motor blow too? Seems like this would be a lot worse for your motor than an injector fuel cut. Gadd's method seems much cleaner to me and since it has its own fuse, would unlikely ever blow at WOT or ever.
However, in both cases, you cut the blue wire leading to the fuel pump relay and apply fused positive to it. The other end of the cut blue wire I gather is switched positive coming from the ignition switch. What is the best way to terminate this and prevent it from shorting somwhere? Dale's taping job looks pretty bad (no offense) so what would be better?
Edit: Thanks for starting this topic Dale and the writeup!

Originally Posted by DMoneyRX-7
Hey guys what of this? I did it Dale's way and now I'm paranoid
:-) neil

Thread Starter


Joined: Jan 2002
Posts: 15,622
Likes: 2,728
From: Pensacola, FL
Dang, you guys all hatin' on my electrical tape  . It's a good wrap, around 3 times, but it's limited access in there. It's physically sound, and that's what counts!
That is true - if the amp fuse blew, the car would stop running. I BARELY run my amp, though - it's just for my mids, and I didn't see that much of a difference than running just off the head unit, but that's for another topic. I really just ran it that way because it was already there and I wanted to finish up my experiment so you guys would have a keen writeup .
The way described in the writeup of adding your own dedicated fuse is a good way to go. I do like the idea of adding another fuse in the fuse block - I will probably move to that design later. Long-term, I need to rebuild my starting/charging harness, as parts of it are melty from some previous owner's mishap (I believe a car stereo problem, actually!) Everything works fine, but cosmetically it's not that hot.
I think the safe and simple way for Joe FD Owner to do is add an in-line fuse from the parts store and run it straight from the battery to the input of the circuit opening relay. It's simple as pie for the most novice in electronics and wiring, and it's pretty idiot-proof, which is the way a system THIS critical to the car running should be.
Anyhow, I'm glad there's discussion on the topic, and I'm glad you guys have enjoyed the writeup. This is one mod that not many people have messed with, and really needed to be documented and explored.
Dale
. It's a good wrap, around 3 times, but it's limited access in there. It's physically sound, and that's what counts!That is true - if the amp fuse blew, the car would stop running. I BARELY run my amp, though - it's just for my mids, and I didn't see that much of a difference than running just off the head unit, but that's for another topic
. I really just ran it that way because it was already there and I wanted to finish up my experiment so you guys would have a keen writeup .The way described in the writeup of adding your own dedicated fuse is a good way to go. I do like the idea of adding another fuse in the fuse block - I will probably move to that design later. Long-term, I need to rebuild my starting/charging harness, as parts of it are melty from some previous owner's mishap (I believe a car stereo problem, actually!) Everything works fine, but cosmetically it's not that hot.
I think the safe and simple way for Joe FD Owner to do is add an in-line fuse from the parts store and run it straight from the battery to the input of the circuit opening relay. It's simple as pie for the most novice in electronics and wiring, and it's pretty idiot-proof, which is the way a system THIS critical to the car running should be.
Anyhow, I'm glad there's discussion on the topic, and I'm glad you guys have enjoyed the writeup. This is one mod that not many people have messed with, and really needed to be documented and explored.
Dale
I also couldn't see how you could fit a female connector in the spare fuse holder. That's why I just went with the AC fuse which already had a connecter and I just crimped the blue wire onto that wire.
No one else experience the fuel pump staying on? Even with the key out, I can hear the fuel pump running and I can hear the fuel flow through in the engine bay. I just can't figure out why the fuel pump would stay on. It's driving me nuts!
No one else experience the fuel pump staying on? Even with the key out, I can hear the fuel pump running and I can hear the fuel flow through in the engine bay. I just can't figure out why the fuel pump would stay on. It's driving me nuts!
Originally Posted by AHarada
I also couldn't see how you could fit a female connector in the spare fuse holder. That's why I just went with the AC fuse which already had a connecter and I just crimped the blue wire onto that wire.
No one else experience the fuel pump staying on? Even with the key out, I can hear the fuel pump running and I can hear the fuel flow through in the engine bay. I just can't figure out why the fuel pump would stay on. It's driving me nuts!
No one else experience the fuel pump staying on? Even with the key out, I can hear the fuel pump running and I can hear the fuel flow through in the engine bay. I just can't figure out why the fuel pump would stay on. It's driving me nuts!
Magnet Boy
Joined: Jan 2007
Posts: 251
Likes: 1
From: NorCal
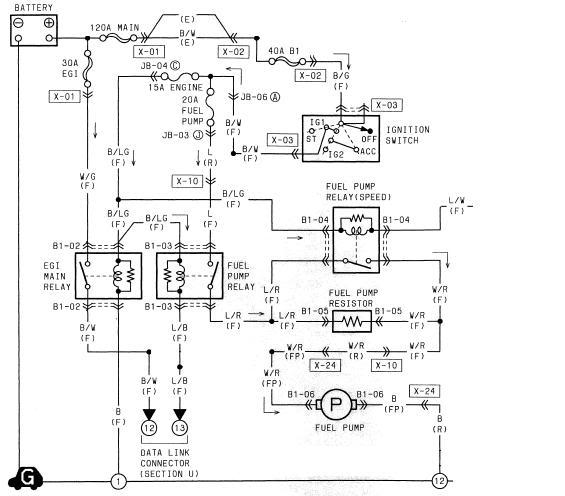
Probably helpful to refer to dubulup's schematic, see marked up version below. Looking at this figure, it looks like the fuel pump should NOT remain on if this is done correctly since the modification affects the wires before the relay switch contacts which turn the pump on. Maybe you applied power to the wrong side of the relay? In other words, maybe you wired it to permanently power it on instead of changing the source of the power just before the switch contacts?
Or maybe you powered up the coil so the contacts closed permanently? Note this would be bad not only because your pump would stay on, but also b/c you will be draining your battery day and night, night and day.
Or maybe you powered up the coil so the contacts closed permanently? Note this would be bad not only because your pump would stay on, but also b/c you will be draining your battery day and night, night and day.


Senior Member
Joined: Jul 2001
Posts: 734
Likes: 1
From: Oakland, CA
I just took a Dremel and cleared the way through the top and the bottom. I clipped the quick-disconnect directly onto the fuse...and had the other side of the fuse sit in the existing fusebox connector. Easy (finally) peasy once I found out I had to modify it. Of course, I haven't started my car yet...since my fuel injectors haven't been reinstalled yet.
Magnet Boy
Joined: Jan 2007
Posts: 251
Likes: 1
From: NorCal
Originally Posted by rx7bomex
but what u have done is replaced the feed to the relay from a switched live to a permanent live so wont the relay be activating the pump all the time..i dont understand elec that much
I am thinking maybe AHarada supplied power to the wrong wire. AHarada take some pics of what you did and post 'em. Maybe we can help straighten this out.
Thanks for the help. From looking at the schematic now, it seems like I did power the wrong wire. Under the relay, there were 2 larger wires, one blue, and one blue with red stripes. I cut and wired the large blue wire directly to 12V with a fuse. That would keep the relay closed at all times. So which wire exactly is the L(F) wire?
Oh, I thought B/LG meant the large blue wire lol. But if L is the solid blue wire, then I did wire it correctly. Now I'm back to being lost again. I'm going to test the voltages at the connectors with the circuit opening relay out.
