
David Hayes DIY LED Taillight Modification


More pictures...
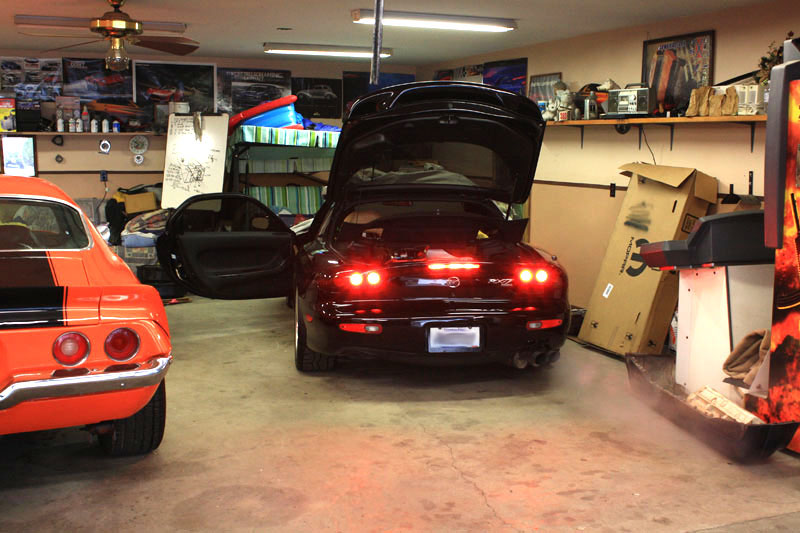
Just the brake lights (No parking light rings lit up)
Lights entirely off (try not to mind the dust that seems to IMMEDIATELY pile up on the black car the moment the car cover comes off lol)

More of the lights entirely off, just a different angle

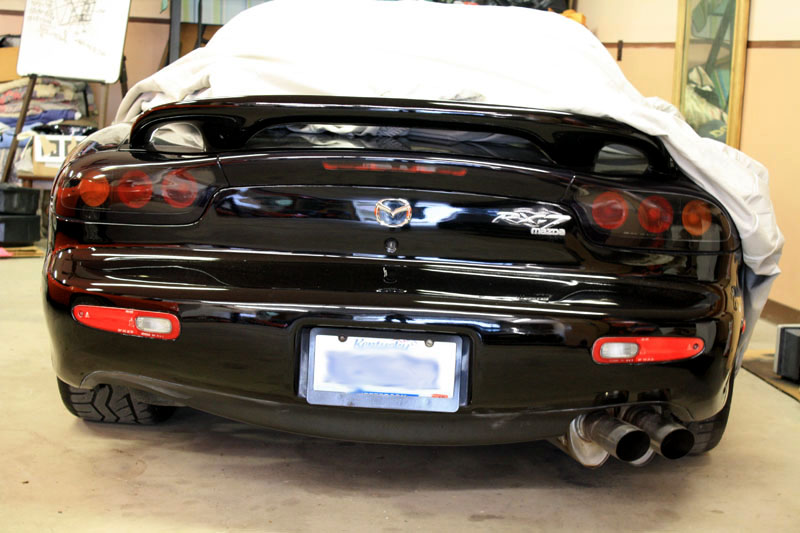
Straight from the back, lights entirely off
Just the brake lights (No parking light rings lit up)
Lights entirely off (try not to mind the dust that seems to IMMEDIATELY pile up on the black car the moment the car cover comes off lol)
More of the lights entirely off, just a different angle
Straight from the back, lights entirely off
Here are my thoughts on the entire conversion process...
1. Make SURE to buy a heat gun. Don't try to be cheap and use a hair dryer to take apart the tail lights. I used a hair dryer on the first tail light and a heat gun on the second one. WOW the difference. You also have to pull entirely too hard with the weakness of the hair dryer. I was terrified I was going to break it. With the heat gun it came right apart. You just have to ensure you don't apply too much heat for risk of melting the plastic.
2. The templates David posted were off slightly in length for the outsides. They were essentially perfect if you had a way to magically glue the edges together after you made a circle with it. David mentioned riveting them together. This would be impossible with the posted templates. I had decided to tig them together so this didn't affect me either way. I only mention it in case anyone wants to follow the rivet idea.
The inner cone templates were slightly off too. Some fiddling and cutting after the fact can take care of it. Theory offered his templates to me so I gave them a try on the cones, they were actually spot on and made doing the remaining cones much easier. (Please note that this is NOT taking sides in whatever beef these gentlemen have between one another. I have no side and truthfully thank them BOTH because without theories original design and David's DIY posting and hand holding I wouldn't have done this) Please guys don't take any of that as an insult, you are BOTH great assets to the community
3. Cutting acrylic circle rings via the dremel is REALLY messy, and fun. You can get them pretty much perfect with some practice, though if you have a source for a machine shop I'm sure it'll be easier for you. Its not worth paying a machine shop to do this though; they don't even have to be perfect for the end product to be good, they just have to be "pretty close" and the dremel will certainly get you "pretty close".
4. Most of the time involved here is, as David mentioned, waiting for stuff to dry. Most of this project is doing 10-20 minutes worth of work then waiting until tomorrow to do 10-20 more minutes. This is actually why I got distracted and took so long; its hard to get motivation to make a mess just for 10-20 minutes worth of work.
5. If you don't want the amber turn LED rings on all the time you can save a decent bit of money by not purchasing the amber luxostars and heat sinks. I decided partially through the project that I only wanted the rings to light when the turn signal came on. I went ahead and put the amber luxostars in there and even wired them up to make it easy to get them on later without taking the light apart.
6. When I did the second tail light I learned the spacing a good bit better than on the first. If you are off even slightly one way or another you'll be heating / warping the tail light housing to fit the assemblies more than needed like I did on the first light. I don't believe my first light is affected overall by this in any way, its just more work on you that you could otherwise avoid.
7. When adhesiving the LED assemblies to the stock diffusers make sure you don't get much, if any, of the adhesive between the clear acrylic and the diffuser. The adhesive gets into the grooves in the stock diffuser and "defeats" the diffusion affect. One of the brake rings is like this, though I only got some adhesive in there. Its not really noticeable unless I point it out since I didn't get much in between, but if you ended up putting adhesive in there on purpose you would see the individual LED's for sure.
8. I forgot to put the turn signal LED resisters into the housing before sealing them up. Oops! I ended up just putting them on the car, but try not to forget this step like me.
9. The LED's have different on/off characteristics than normal bulbs. Its now slightly weird looking with the non-LED bulbs on the car. Its probably my OCD nature but I am going to have to finish doing the rear in LED's so that it doesn't bother me. This is one of those things "no one would notice unless you told them".
10. I LOVE the look! It's really really cool, yet subtle. I doubt most people who don't own FD's will even notice but it certainly adds a cool factor to the car.
This is now the end of my LED journey. Again, I want to give a BIG thanks to both Theorie and David. Both of them were nothing but helpful during the conversion and I wouldn't have these cool lights without both of them doing the early R&D that I got to benefit from. Anything I said in this post was NOT meant to be an attack on either of them, just a 100% honest, objective, review of the whole process. Overall the whole thing is documented way better in this thread than most other DIY stuff and templates being off is more nitpickyness than anything else.
If there are any questions, feel free to ask and I'll answer
I also promised David some pics of mine done. Unfortunately i've been busy with Army stuff and havent even touched the car in 2 weeks. I finally started it up this morning and decided to grab a picture. I think they came out nice. I still have to turn them down though because these things can be VERY bright with just the rings lit up. Good thing theyre fully adjustable.


Sitting in an airport on the way back from NYC. Had a blast. The pics look great guys and the comments and critques are always welcomed. That is the way to move product development forward.
I'll post more tomorrow but please know this isn't personal for me. It's always been and remains a safety issue. This is not my design but Theorie's and I think it is great. Hopefully I've helped to move the safety conversation forward with the solutions in the thread and I would like nothing more than to see these offered by SakeBomb or someone else, just not me as tinman09 can attest. I need better product control with metric measurements
I've stated before there are very few persons that I truly dislike and none are on this forum.
Thanks for the comments Bryan and the constructive criticism. Should definitely help the next guy with this project. Great garage BTW! Lot's of room and very nice Camaro. What are the details on that bad boy? When I first met my wife she drove a V8 quad carb '77 Camaro that her dad had rehabbed. He didn't like the wimpy stock engine and ripped it out for the V8. That sucker put out some heat in the inside of the car but sounded great. Unfortunately when we got engaged he decided to help her out with a new car and took back the Camaro. Guess what they bought? Drumroll - a Yugo!
Here are my thoughts on what you've posted.
This is great advice as the heat gun works so much better than a hair dryer and they're only like $20 so buy one. Mine was packed away so I went the hair dryer route first but now that I have the heat gun, it is remarkably better.
You mean for the turn signal rings? That's interesting. Thought I had drawn them so they had excess length that you could trim off after forming the circle but I guess not. So you recommend that the length be extended when using the template and then trim as needed?
I don't think most people will have a TIG welder so they'll need to follow your advice. I guess I could try to auto cad the templates as they are definitely "rough" and are fine with trimming but not like what Theorie posted up. His are auto cad worthy.
Yep, that's good criticism as the templates do require some massaging and trimming. For me, the most trimming is with the depth part as the templates I posted are too deep and need to be trimmed once the inner ring is formed. What I did for TinMan is to form the metal cones and then glue and rivet them together and then glued them to the acrylic rings which were already glued to the outer metal ring. Once this was dried, I then trimmed off the section of the cone that "stuck out" of the back of the metal ring so it was flush with the back of the ring. Worked for me.
Did you also TIG weld these also? I would guess so if Tom's templates worked for you as his were cut to be taped together/glued. I overlapped mine and then glued and riveted them together so I needed something that was longer than Tom's.
Word! It's great fun and makes quite the mess. Plastic shreds get everywhere for sure. And you are correct on the "pretty close" part here as everything gets placed behind the red/amber diffusers.
Yep, cutting and assembling the pieces requires that you wait for multiple steps of glue drying. I don't see anyway around it.
This will definitely save a bunch of money as the LuxeonStar LEDs and heat sinks cost the most and will set you back around $100 once you also throw in the LED drivers needed.
I just didn't feel comfortable with the light output of the amber LED rings to use them as turn signals. With the improved method of using clear acrylic rings and having the two sets of rings come on at once, the light output is much improved but it won't equal the output of the OEM turn signal units. If the old review thread ever gets combined back with this part, I could easily go and look at the output but that will have to wait for another day as I am lazy this morning. Suffice to say, they're close but not as bright as the OEM turn signals so this is something to consider if you only want to use the rings.
Yep, true. What I did was to turn the lights on (hooked up to a 12 volt source plugged into the wall in the basement, not on the car) when I was positioning them over the 99 spec rings. This gave me a visual of how the units would look once on. I then taped them into position and siliconed them on.
There must be some difference/variability in the position of the 99 spec circles on the amber lenses and the back of the housings. I'd say this has to do with how you did your 99 spec conversion versus what Theorie did for me versus TinMan's OEM 99 spec units. I say this because we each had to trim/heat up and push out different sections of the back housings.
TinMan came up with a good way to do this - he first "spot siliconed" the units in place. He let this dry and then check to ensure his positioning was correct. Once correct, he then put the rest of the silicone on making the process easier.
I sort of did this by building up each layer of silicone. Worked for me but you are right, any silicone under the units will affect the look.
They are fine outside of the unit and might even be better there as they will stay cooler. But if you want to keep it all neat and tidy, you are right, don't forget this step.
Check out the LED bulb guide in the Interior/Exterior/Audio section. I've tested a bunch of different LEDs and have posted up which ones worked best for me. There are some very good ones for the license plate and back up lights as well as the side markers. The general rule of thumb here is go with the bulbs that have the larger circuit mounted LEDs versus those that have a bunch of the smaller ones. The larger ones put out more light and work much better.
I too love the new design. It really modernizes the look of the taillights without being too over the top. Just a nice clean design. Tom did a great job with the look and feel and how it flows on the car.
Glad to help and happy it worked out for you. If your brake units are still set at 100% I'd very much recommend you go out at night and then tweak them down as those suckers will be too bright IMO.
Congrats on finishing up the work!
Here are my thoughts on what you've posted.
Here are my thoughts on the entire conversion process...
1. Make SURE to buy a heat gun. Don't try to be cheap and use a hair dryer to take apart the tail lights. I used a hair dryer on the first tail light and a heat gun on the second one. WOW the difference. You also have to pull entirely too hard with the weakness of the hair dryer. I was terrified I was going to break it. With the heat gun it came right apart. You just have to ensure you don't apply too much heat for risk of melting the plastic.
1. Make SURE to buy a heat gun. Don't try to be cheap and use a hair dryer to take apart the tail lights. I used a hair dryer on the first tail light and a heat gun on the second one. WOW the difference. You also have to pull entirely too hard with the weakness of the hair dryer. I was terrified I was going to break it. With the heat gun it came right apart. You just have to ensure you don't apply too much heat for risk of melting the plastic.
2. The templates David posted were off slightly in length for the outsides. They were essentially perfect if you had a way to magically glue the edges together after you made a circle with it. David mentioned riveting them together. This would be impossible with the posted templates. I had decided to tig them together so this didn't affect me either way. I only mention it in case anyone wants to follow the rivet idea.
I don't think most people will have a TIG welder so they'll need to follow your advice. I guess I could try to auto cad the templates as they are definitely "rough" and are fine with trimming but not like what Theorie posted up. His are auto cad worthy.
The inner cone templates were slightly off too. Some fiddling and cutting after the fact can take care of it. Theory offered his templates to me so I gave them a try on the cones, they were actually spot on and made doing the remaining cones much easier. (Please note that this is NOT taking sides in whatever beef these gentlemen have between one another. I have no side and truthfully thank them BOTH because without theories original design and David's DIY posting and hand holding I wouldn't have done this) Please guys don't take any of that as an insult, you are BOTH great assets to the community
Did you also TIG weld these also? I would guess so if Tom's templates worked for you as his were cut to be taped together/glued. I overlapped mine and then glued and riveted them together so I needed something that was longer than Tom's.
3. Cutting acrylic circle rings via the dremel is REALLY messy, and fun. You can get them pretty much perfect with some practice, though if you have a source for a machine shop I'm sure it'll be easier for you. Its not worth paying a machine shop to do this though; they don't even have to be perfect for the end product to be good, they just have to be "pretty close" and the dremel will certainly get you "pretty close".
4. Most of the time involved here is, as David mentioned, waiting for stuff to dry. Most of this project is doing 10-20 minutes worth of work then waiting until tomorrow to do 10-20 more minutes. This is actually why I got distracted and took so long; its hard to get motivation to make a mess just for 10-20 minutes worth of work.
5. If you don't want the amber turn LED rings on all the time you can save a decent bit of money by not purchasing the amber luxostars and heat sinks. I decided partially through the project that I only wanted the rings to light when the turn signal came on. I went ahead and put the amber luxostars in there and even wired them up to make it easy to get them on later without taking the light apart.
I just didn't feel comfortable with the light output of the amber LED rings to use them as turn signals. With the improved method of using clear acrylic rings and having the two sets of rings come on at once, the light output is much improved but it won't equal the output of the OEM turn signal units. If the old review thread ever gets combined back with this part, I could easily go and look at the output but that will have to wait for another day as I am lazy this morning. Suffice to say, they're close but not as bright as the OEM turn signals so this is something to consider if you only want to use the rings.
6. When I did the second tail light I learned the spacing a good bit better than on the first. If you are off even slightly one way or another you'll be heating / warping the tail light housing to fit the assemblies more than needed like I did on the first light. I don't believe my first light is affected overall by this in any way, its just more work on you that you could otherwise avoid.
There must be some difference/variability in the position of the 99 spec circles on the amber lenses and the back of the housings. I'd say this has to do with how you did your 99 spec conversion versus what Theorie did for me versus TinMan's OEM 99 spec units. I say this because we each had to trim/heat up and push out different sections of the back housings.
7. When adhesiving the LED assemblies to the stock diffusers make sure you don't get much, if any, of the adhesive between the clear acrylic and the diffuser. The adhesive gets into the grooves in the stock diffuser and "defeats" the diffusion affect. One of the brake rings is like this, though I only got some adhesive in there. Its not really noticeable unless I point it out since I didn't get much in between, but if you ended up putting adhesive in there on purpose you would see the individual LED's for sure.
I sort of did this by building up each layer of silicone. Worked for me but you are right, any silicone under the units will affect the look.
8. I forgot to put the turn signal LED resisters into the housing before sealing them up. Oops! I ended up just putting them on the car, but try not to forget this step like me.
9. The LED's have different on/off characteristics than normal bulbs. Its now slightly weird looking with the non-LED bulbs on the car. Its probably my OCD nature but I am going to have to finish doing the rear in LED's so that it doesn't bother me. This is one of those things "no one would notice unless you told them".
10. I LOVE the look! It's really really cool, yet subtle. I doubt most people who don't own FD's will even notice but it certainly adds a cool factor to the car.
This is now the end of my LED journey. Again, I want to give a BIG thanks to both Theorie and David. Both of them were nothing but helpful during the conversion and I wouldn't have these cool lights without both of them doing the early R&D that I got to benefit from. Anything I said in this post was NOT meant to be an attack on either of them, just a 100% honest, objective, review of the whole process. Overall the whole thing is documented way better in this thread than most other DIY stuff and templates being off is more nitpickyness than anything else.
If there are any questions, feel free to ask and I'll answer
If there are any questions, feel free to ask and I'll answer
Congrats on finishing up the work!
http://www.youtube.com/watch?v=_1cUm...1&feature=plcp
You tube video
The Android apparently doesnt adjust well to the brightness changes, but... there is the vid none the less. Still havent turned the brake light intensity down yet. I've got a couple more months before it moves to do so.
You tube video
The Android apparently doesnt adjust well to the brightness changes, but... there is the vid none the less. Still havent turned the brake light intensity down yet. I've got a couple more months before it moves to do so.
^Those look awesome! It's always interesting seeing them on someone else's car. Very nice work for sure.
I would most definitely adjust them down in brightness. I think when it's dark out they'll be too bright.
I would also be interested to see what the turn signals look like during the day and get your opinion on if they are bright enough.
But most importantly, what's up with the "NOROTR" license plate? Hiding one of them piston engines in there? Sure sounds like it
^The center (brakes) are adjustable, not the parking rings. So the parts list I have posted has dimmers for the bright center brake LEDs. Bryan has used the outer parking rings as turn signals, much like the original Theorie design. Although the DIY retrofits up the power output of the rings, they are not as bright as the OEM turn signals so I added in the center led turn signal which is fully adjustable.
You could add in a dimmer (potentiometer: http://www.radioshack.com/product/in...ductId=2062354) into the parking rings as well. With this, the rings would be fully adjustable.
For me this is not required as they are not too bright at night. Drove the car yesterday and took in how the rings looked at night and I think they are fine. But you may feel otherwise and if so, add in the dimmer.
I think Heath from SBG might be working on something that will dim the brakes when you turn your headlights on and this would be ideal as you could have them fully bright during the day and then dimmed down at night.
I plead the fifth! Yeah there is a piston engine in there. I dont tend to advertise that on this forum for the hate that seems to ensue.
^Yep, that's the purpose of the Luxeons in the turn signals. See what you think with the turn rings in the daylight and report back.
As for that piston thingy in your engine bay, I think most have moved on from those debates. To each his own. And the V8 certainly sounds great.
As for that piston thingy in your engine bay, I think most have moved on from those debates. To each his own. And the V8 certainly sounds great.
As promised. Sorry it took so long. These tails are beautiful.
http://www.flickr.com/photos/arcticws6/6900356513/
http://www.flickr.com/photos/arcticws6/6900355711/
http://www.flickr.com/photos/arcticws6/6900352883/
http://www.flickr.com/photos/arcticws6/6900351093/
http://www.flickr.com/photos/arcticws6/6900350541/
his lights are on as well and you cant even tell.
http://www.flickr.com/photos/arcticws6/6900350067/
http://www.flickr.com/photos/arcticws6/6900347941/
http://www.flickr.com/photos/arcticws6/6900346699/
http://www.flickr.com/photos/arcticws6/6900344809/
Regardless of the lights, beautiful pics. Love the background although I'd guess it's pretty darn hot in the summer.
Are those true 99 spec units on your friend's car? If so, how does the parking light level compare? From the pics, I would guess it is brighter which is what the numbers confirm too. Just haven't been able to truly compare them as I don't have real 99 units.
How about the brake light level compared to the 99 units? And finally, how are the brakes at night? Did you turn them down?
I am glad you like them. You are the only other person with these.
His 99's dont compare to mine at all. I turned mine down a little bit and mine are still all around brighter than his. I could turn mine down more, but theyre not to the point of blinding traffic behind me anymore so i think theyre good where theyre at lol.

^Can you give me a little more detail? You mean have a bunch of LEDs in the taillights where some would be used for parking lights and others for the brakes? Or do you mean you'd have one set of less for both and you want the brake lights to shine brighter than the parking lights?
And it continues...
May I ask which Mod altered yet again the title of this thread?
May I ask which Mod altered yet again the title of this thread?
Last edited by mar3; Feb 26, 2012 at 11:43 AM. Reason: deleted comments after correction
This time it was me after I stripped this thread of the "conversation" that belonged in the other thread which I see is actually in the wrong place. I realize now that "kit" was the wrong word to use but after talking to all three parties in the PM's, you need to understand that any form of "production run" is also incorrect. Pre-production is the best that can be allowed after the PM's I read from all three parties.
Quite frankly, the only way to keep this all straight is probably to put the two monster threads back together and then try to remember the title I gave it way back then when all the arguments from the PM's were fresh in my mind and I knew what I had to do.
And in case anyone noticed, you really don't want to start a rant against the moderation team here. Please feel free to find something else to do - we've stopped tolerating it where we find it, no matter how you want to characterize that.
Maybe put them back together and make it a sticky.....seems like I remember the "opposition" flippantly suggesting that...
Hi Mario,
Thanks for the clarification on the latest changes. The title that was previously used is the one in the other thread, "Theorie First Production Run LED Taillight Conversion Review: IMPORTANT INFORMATION" (https://www.rx7club.com/shops-part-suppliers-vendors-206/theorie-first-production-run-led-taillight-conversion-review-important-information-976420/).
Thanks for the clarification on the latest changes. The title that was previously used is the one in the other thread, "Theorie First Production Run LED Taillight Conversion Review: IMPORTANT INFORMATION" (https://www.rx7club.com/shops-part-suppliers-vendors-206/theorie-first-production-run-led-taillight-conversion-review-important-information-976420/).

tasty tail lights indeed.
it'd be nice if the turn signals were 75mm with only one set of leds in them.
perhaps a single cone for the LuxeonStar LEDs and do away with the angel eye in the turn signal all together.
or wire the DIY set up so the inner circle of the turn signals only comes on when the brake circles are on (with the turn signals on). if that even makes sense.
-only turn signal ring blinks for normal operation.
-both turn signal ring and circle blink when brakes are on.