
DaleClark's clutch job tricks and tips

Thread Starter


Joined: Jan 2002
Posts: 15,622
Likes: 2,725
From: Pensacola, FL
DaleClark's clutch job tricks and tips
Hey guys -
Swapped out the clutch and changed out the 5th gear in my trans this weekend. Figured I'd share a few tricks that I've learned over the zillions of clutch jobs I've done.
- Air tools. It's AMAZING how big of a difference this makes. Go get a $150 air compressor and a $40 impact gun. Or, if you're really on a budget, I've seen the Craftsman 18v 1/2" drive impact gun for $100 on sale. This makes the job SOOO much easier, especially the powerplant frame nuts. I remember struggling to do those with conventional tools, with air tools it's not even a challenge.
- Fill and drain plugs. Of course, before you get too far into the job, you need to drain the gear oil out of the trans. Yes, you DO need to drain it, it will all come out of the back when you pull the driveshaft out, and then you'll be laying in a smelly mess. But, before draining, pull the FILL plugs first. There are 2. One is a Torx T-55, the other is square and a 14mm wrench works perfectly on it. Get those off FIRST, then drain. You don't want to have a drained transmission you can't fill, and also removing those plugs will help the gear oil to drain more smoothly.
Finally, the 3 plugs that don't have a crush washer, clean them up and wrap them with Teflon tape when you reinstall. Mazda used a sealant of some kind, if you don't put it on there they will weep a little bit of gear oil. Not enough to worry, but it's good form to not have leaks .
.
- Transmission jack. I finally bought one a while back, makes a HUGE difference. $80 from Habba Freight -
Transmission Jack - 450 Lb. Capacity
It has ears on the side for their dumb ratchet strap hold-down to attach, and that gets all sorts of in the way. After using it for a while with those, I ground the welds off and removed those 2 ears. HUGE difference. If you're concerned with safety, use some bungie cords. Also, having 2 people makes a big safety difference.
Anyhow, I VERY easily and VERY safely removed the trans by myself yesterday with this. Had a buddy (thanks Dan!) come over today to help with the re-install, having that jack made it SO easy - had the trans back in the car in 10 minutes, and half that time was just getting the trans back under the car.
- Wiring harness. The harness that runs to the transmission can get in the way, and I had one job where it got crushed between the trans and engine, making for a big pain in the rear to fix. Spend a minute and pull it up from behind the engine and lay it over the top of the engine. Out of the way, safe, and easy.
- Clutch hydraulics. If you're putting in a heavier than stock clutch, go ahead and get new clutch hydraulics and a braided clutch line NOW. 100,000+ mile hydraulics can't handle the increased line pressure from a heavy pressure plate, and neither can that stock rubber line. Also, even with healthy hydraulics, that rubber line WILL swell with a heavier pressure plate giving you a low engagement point. Go ahead and do it now!
- Driveshaft/PPF. I've found that it's easier to remove the driveshaft first, then the PPF, and reinstall PPF first, driveshaft second. You do have to pull the cat-back to the side some to get enough room to get the driveshaft in, but no big whoop. Also, there's no relationship between the position of the driveshaft and the diff flange - of the 50+ clutch jobs I've done on FC's and FD's, I've yet to run into any problems with how the driveshaft installs. It's balanced by itself, just plug and play.
Oh, and be careful when removing the PPF, it's heavy and can easily drop off right on you!
- Pilot bearing. In general, if it's in good shape, don't mess with it. They RARELY fail. It can be a good idea to replace the pilot bearing seal, though, and clutch kits NEVER include the seal. You can get a new one from Mazda, they're cheap, and you can install that without the special pilot bearing removal tool.
Speaking of, the Mazda pilot bearing tool makes the job SO easy. If you're going to do more than a handful in your life time, buy the tool.
- Grease. Any time you have metal on metal, you need some grease. I use good ol' wheel bearing grease. Things to hit up are:
- The metal contact points of the clutch fork to the throwout bearing
- The pilot bearing
- The shaft on the transmission that the throwout bearing moves on
- The divot on the clutch fork the slave cylinder fits into
Make sure all those surfaces are clean, smooth, and degreased with brake cleaner first!
- Clutch alignment. I've noticed that clutch alignment tools kind of suck. Today, I found me the remedy. The "nose" of the tool is too long and it doesn't fully engage the clutch splines like it should. I cut about 1/2" off with a Dremel and now it fits WAY better. Getting the clutch plate dead center is CRUCIAL to getting the transmission in easily. With the clutch in and pressure plate bolted down, you should be able to VERY easily and smoothly slip the alignment tool in and out. If it binds even in the slightest, re-center the clutch. This is the difference between the trans popping right in and fighting in for 2 hours.
- Loctite. Any mission-critical fastener could use some Loctite. I use some blue Loctite on the bolts holding in the clutch fork, the bolts holding the pressure plate to the flywheel, and the bolts for the driveshaft. Just a dab is all you need. The blue stuff works fine, I haven't found a reason to use any other color or grade.
- Flywheel. In general, it's not necessary to turn a flywheel. As long as it isn't gouged up, it's generally OK. Hit it up with some 60 grit sandpaper to take the glaze off, clean with brake cleaner, and you're good. If it is gouged up, you may just want to find a good used stock flywheel or upgrade instead of dealing with having a shop mess it up when they turn it.
Speaking of, I LOVE me a light flywheel. The ACT flywheels are very reasonably priced and work great. Go as light as you can, I have a 9-10 pound cromoly flywheel and it's awesome. Really makes the car respond better and drive better. It's a bit pricey for what it is, but it's worth it.
- Gear oil. There's a zillion threads on what to run so I won't get into that here. In general, synthetic gear oil is WAY better than non-synthetic. Get a good gear oil pump, I have one that screws right into the bottle and works well. Be careful when working with it, gear oil STINKS and is really lousy when it gets in your hair or all over your driveway. You'll need 3 quarts to fill 'er up.
- Pull-type clutch. There are a number of videos on how to disengage the clutch throwout bearing from the transmission, watch them and spend the time to learn how to do it. It's not hard, and only suckas unbolt the pressure plate and leave it in the transmission. Once you get the trick of it, it's VERY easy. Wear safety glasses though, bits of clutch dust WILL fall right in your eye - been there, done that.
- Slave cylinder. You have to make sure the end of the slave cylinder is engaging the clutch lever, it's VERY easy to get it to one side. When it's like that, you pump the clutch, shoot the slave cylinder piston out, and make a big mess of brake fluid. One thing I'm going to try tomorrow that I haven't tried before is there's an inspection plate high on the driver's side of the transmisison that seems like it would give you access to make sure it's lined up right. I'll report back if that does the trick.
I'm sure there's more, if you guys have any questions ask away!
To give you an idea of the difference these tips made, I removed my transmission yesterday by myself in an hour and a half. This was on my driveway on jackstands. That's the way it should go!
Dale
Swapped out the clutch and changed out the 5th gear in my trans this weekend. Figured I'd share a few tricks that I've learned over the zillions of clutch jobs I've done.
- Air tools. It's AMAZING how big of a difference this makes. Go get a $150 air compressor and a $40 impact gun. Or, if you're really on a budget, I've seen the Craftsman 18v 1/2" drive impact gun for $100 on sale. This makes the job SOOO much easier, especially the powerplant frame nuts. I remember struggling to do those with conventional tools, with air tools it's not even a challenge.
- Fill and drain plugs. Of course, before you get too far into the job, you need to drain the gear oil out of the trans. Yes, you DO need to drain it, it will all come out of the back when you pull the driveshaft out, and then you'll be laying in a smelly mess. But, before draining, pull the FILL plugs first. There are 2. One is a Torx T-55, the other is square and a 14mm wrench works perfectly on it. Get those off FIRST, then drain. You don't want to have a drained transmission you can't fill, and also removing those plugs will help the gear oil to drain more smoothly.
Finally, the 3 plugs that don't have a crush washer, clean them up and wrap them with Teflon tape when you reinstall. Mazda used a sealant of some kind, if you don't put it on there they will weep a little bit of gear oil. Not enough to worry, but it's good form to not have leaks
.- Transmission jack. I finally bought one a while back, makes a HUGE difference. $80 from Habba Freight -
Transmission Jack - 450 Lb. Capacity
It has ears on the side for their dumb ratchet strap hold-down to attach, and that gets all sorts of in the way. After using it for a while with those, I ground the welds off and removed those 2 ears. HUGE difference. If you're concerned with safety, use some bungie cords. Also, having 2 people makes a big safety difference.
Anyhow, I VERY easily and VERY safely removed the trans by myself yesterday with this. Had a buddy (thanks Dan!) come over today to help with the re-install, having that jack made it SO easy - had the trans back in the car in 10 minutes, and half that time was just getting the trans back under the car.
- Wiring harness. The harness that runs to the transmission can get in the way, and I had one job where it got crushed between the trans and engine, making for a big pain in the rear to fix. Spend a minute and pull it up from behind the engine and lay it over the top of the engine. Out of the way, safe, and easy.
- Clutch hydraulics. If you're putting in a heavier than stock clutch, go ahead and get new clutch hydraulics and a braided clutch line NOW. 100,000+ mile hydraulics can't handle the increased line pressure from a heavy pressure plate, and neither can that stock rubber line. Also, even with healthy hydraulics, that rubber line WILL swell with a heavier pressure plate giving you a low engagement point. Go ahead and do it now!
- Driveshaft/PPF. I've found that it's easier to remove the driveshaft first, then the PPF, and reinstall PPF first, driveshaft second. You do have to pull the cat-back to the side some to get enough room to get the driveshaft in, but no big whoop. Also, there's no relationship between the position of the driveshaft and the diff flange - of the 50+ clutch jobs I've done on FC's and FD's, I've yet to run into any problems with how the driveshaft installs. It's balanced by itself, just plug and play.
Oh, and be careful when removing the PPF, it's heavy and can easily drop off right on you!
- Pilot bearing. In general, if it's in good shape, don't mess with it. They RARELY fail. It can be a good idea to replace the pilot bearing seal, though, and clutch kits NEVER include the seal. You can get a new one from Mazda, they're cheap, and you can install that without the special pilot bearing removal tool.
Speaking of, the Mazda pilot bearing tool makes the job SO easy. If you're going to do more than a handful in your life time, buy the tool.
- Grease. Any time you have metal on metal, you need some grease. I use good ol' wheel bearing grease. Things to hit up are:
- The metal contact points of the clutch fork to the throwout bearing
- The pilot bearing
- The shaft on the transmission that the throwout bearing moves on
- The divot on the clutch fork the slave cylinder fits into
Make sure all those surfaces are clean, smooth, and degreased with brake cleaner first!
- Clutch alignment. I've noticed that clutch alignment tools kind of suck. Today, I found me the remedy
. The "nose" of the tool is too long and it doesn't fully engage the clutch splines like it should. I cut about 1/2" off with a Dremel and now it fits WAY better. Getting the clutch plate dead center is CRUCIAL to getting the transmission in easily. With the clutch in and pressure plate bolted down, you should be able to VERY easily and smoothly slip the alignment tool in and out. If it binds even in the slightest, re-center the clutch. This is the difference between the trans popping right in and fighting in for 2 hours.- Loctite. Any mission-critical fastener could use some Loctite. I use some blue Loctite on the bolts holding in the clutch fork, the bolts holding the pressure plate to the flywheel, and the bolts for the driveshaft. Just a dab is all you need. The blue stuff works fine, I haven't found a reason to use any other color or grade.
- Flywheel. In general, it's not necessary to turn a flywheel. As long as it isn't gouged up, it's generally OK. Hit it up with some 60 grit sandpaper to take the glaze off, clean with brake cleaner, and you're good. If it is gouged up, you may just want to find a good used stock flywheel or upgrade instead of dealing with having a shop mess it up when they turn it.
Speaking of, I LOVE me a light flywheel. The ACT flywheels are very reasonably priced and work great. Go as light as you can, I have a 9-10 pound cromoly flywheel and it's awesome. Really makes the car respond better and drive better. It's a bit pricey for what it is, but it's worth it.
- Gear oil. There's a zillion threads on what to run so I won't get into that here. In general, synthetic gear oil is WAY better than non-synthetic. Get a good gear oil pump, I have one that screws right into the bottle and works well. Be careful when working with it, gear oil STINKS and is really lousy when it gets in your hair or all over your driveway. You'll need 3 quarts to fill 'er up.
- Pull-type clutch. There are a number of videos on how to disengage the clutch throwout bearing from the transmission, watch them and spend the time to learn how to do it. It's not hard, and only suckas unbolt the pressure plate and leave it in the transmission
. Once you get the trick of it, it's VERY easy. Wear safety glasses though, bits of clutch dust WILL fall right in your eye - been there, done that.- Slave cylinder. You have to make sure the end of the slave cylinder is engaging the clutch lever, it's VERY easy to get it to one side. When it's like that, you pump the clutch, shoot the slave cylinder piston out, and make a big mess of brake fluid. One thing I'm going to try tomorrow that I haven't tried before is there's an inspection plate high on the driver's side of the transmisison that seems like it would give you access to make sure it's lined up right. I'll report back if that does the trick.
I'm sure there's more, if you guys have any questions ask away!
To give you an idea of the difference these tips made, I removed my transmission yesterday by myself in an hour and a half. This was on my driveway on jackstands. That's the way it should go!
Dale


....... But, before draining, pull the FILL plugs first. There are 2. One is a Torx T-55, the other is square and a 14mm wrench works perfectly on it. Get those off FIRST, then drain. You don't want to have a drained transmission you can't fill, and also removing those plugs will help the gear oil to drain more smoothly. Dale

Thread Starter
Joined: Jan 2002
Posts: 15,622
Likes: 2,725
From: Pensacola, FL
Well, I grew up on TurboII's which have basically the same transmission. They also have 2 fill and 2 drain plugs. I just fill both up until I get oil coming out and there ya go.
I do agree, the shop manual just shows the rear fill plug.
With the TurboII, the procedure was to use both. Of course, that might not be in the shop manual, that was the wisdom of the day.
Dale
I do agree, the shop manual just shows the rear fill plug.
With the TurboII, the procedure was to use both. Of course, that might not be in the shop manual, that was the wisdom of the day.
Dale

Trending Topics
Thread Starter
Joined: Jan 2002
Posts: 15,622
Likes: 2,725
From: Pensacola, FL
Some notes on lining up the clutch slave cylinder (as I just did it tonight) -
I mentioned that there's an inspection plate on the side of the transmission by the slave cylinder. With that removed, you can get to the end of the slave cylinder and make sure it's lined up with the clutch fork. However, getting the 2 10mm bolts on and off is tricky in the car, it's REALLY stuffed up in there. I was operating almost entirely by feel, and putting the 2 bolts back in is a chore as well.
It might be possible to have the slave on the transmission with part of the clutch hydraulic line attached - that way you could line up the slave cylinder off the car before installation. But, that only applies if you have the transmission out. If you're just replacing the slave, you can either a) try and stab the slave in straight so it fits into the clutch fork and cross your fingers, or b) try and remove the inspection plate to line it up and curse how tricky it is.
Dale

Joined: Mar 2001
Posts: 30,804
Likes: 646
From: FL-->NJ/NYC again!
Super-super helpful Dale 
I have never found it necessary to mess with the inspection plate on the side of the trans..... if you depress the slave cylinder all the way, then are prompt about inserting it into the bellhousing and bolt it down with the pair of m8 bolts everything usually lines up ok. You can check for the alignment by peeking in the much-easier-to-access bottom inspection plate
I have never found it necessary to mess with the inspection plate on the side of the trans..... if you depress the slave cylinder all the way, then are prompt about inserting it into the bellhousing and bolt it down with the pair of m8 bolts everything usually lines up ok. You can check for the alignment by peeking in the much-easier-to-access bottom inspection plate
Just to add to Dale's TIPS...
Clutch slave can be removed/installed easily by using a 12" extension and a swivel. By using these, you can have the socket wrench parrallel to the tranny and it is almost a staright shot forward...
I also use the access hole that's on the bottom of the tranny. A flashlight is required to look at the fork to make sure the slave is aligned...
Also.... DO NOT over tighten any bolts that go into the aluminum... They WILL strip out.....
I had to retap the holes for the bolts that hold the clutch fork because the previous repair shop stripped them out....Worst part was that it drove for 500 miles before I lost clutch engagement because the bolts came flying off and the car left me stranded.....
Good write up.
If you need to replace your pilot bearing, Autozone rents a blind hole puller that does a really good job of yanking it out of there.
I've never had much luck with the clutch alignment tools either. I use the depth measuring "feature" on a dial caliper at three places around the flywheel to make sure it's centered. It's worked every time for me.

Thanks Dale!
Here's another:
Before tightening the bell-housing bolts to the engine, make sure the hard clutch-line doesn't get pinched (BTDT).
If it does, Cunifer lines are your friend:
Federal Hill Trading Co.
:-) neil
Here's another:
Before tightening the bell-housing bolts to the engine, make sure the hard clutch-line doesn't get pinched (BTDT).
If it does, Cunifer lines are your friend:
Federal Hill Trading Co.
:-) neil
Joined: Jul 2001
Posts: 10,672
Likes: 413
From: Charlottesville VA 22901
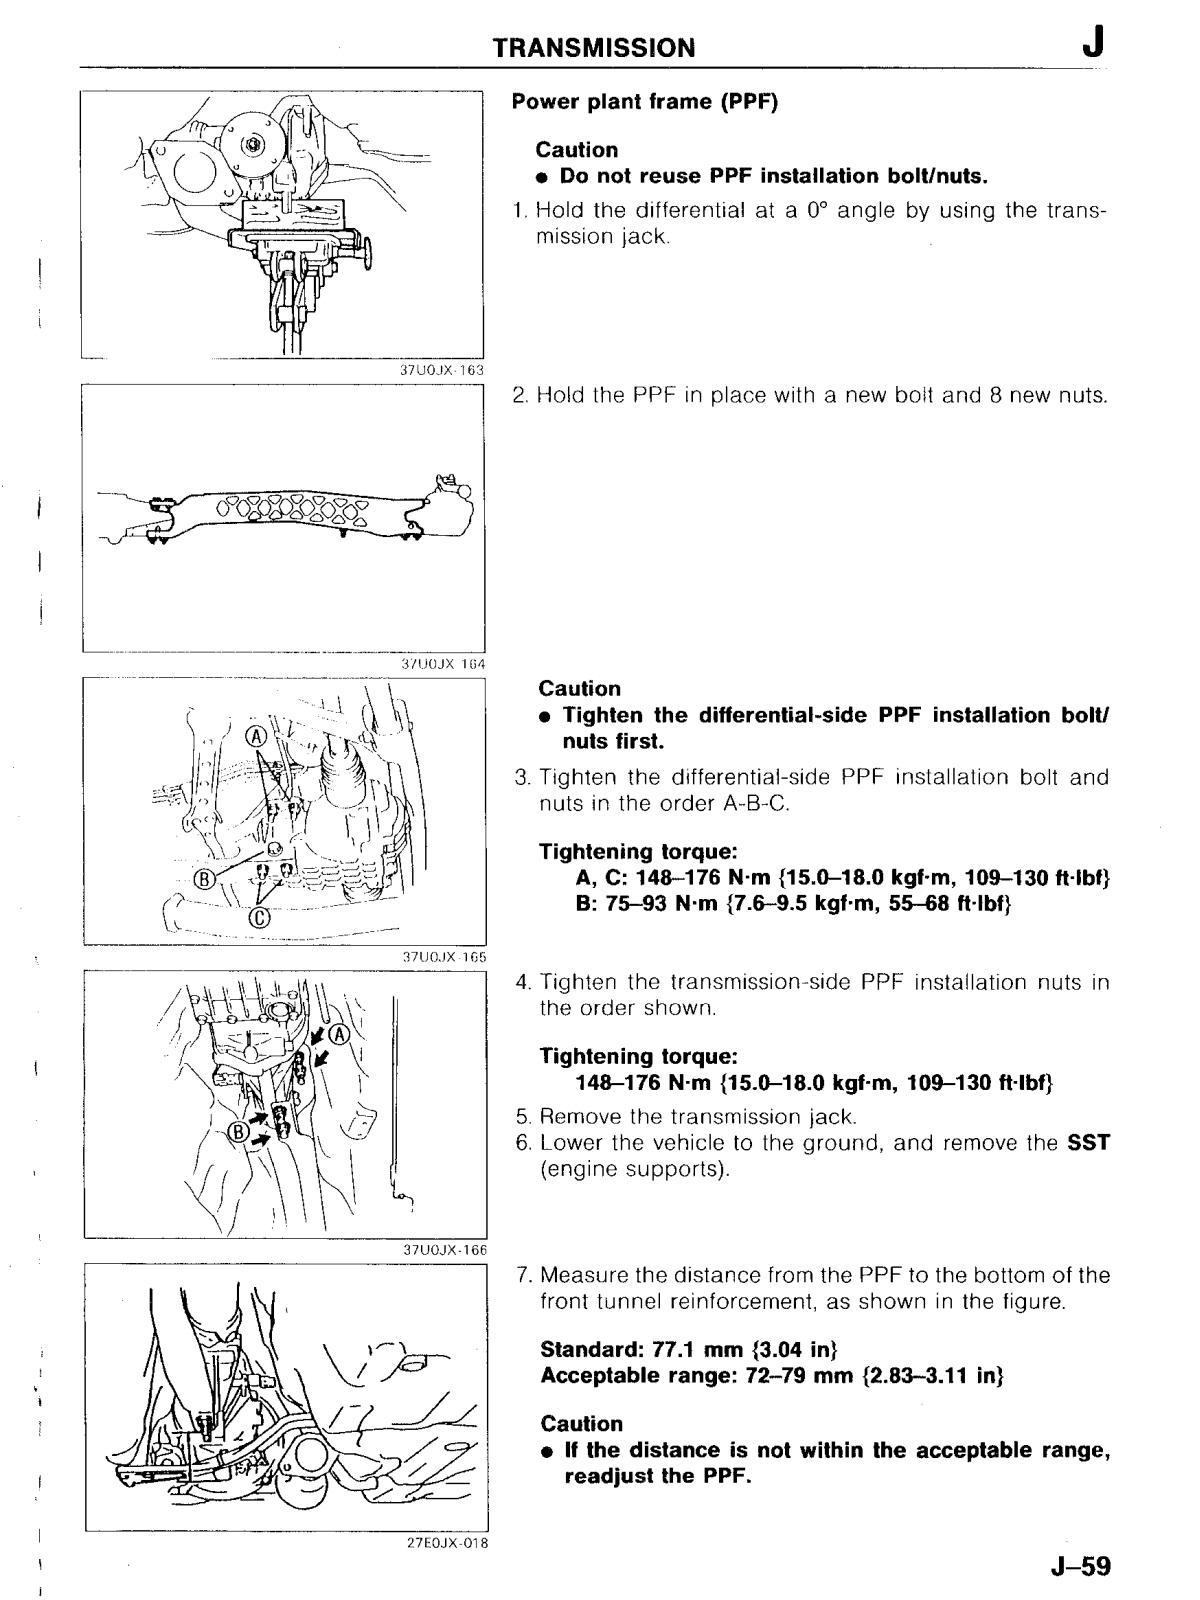
Does anyone put much thought into aligning the PPF. The manual has all sorts of measurements etc.... listed to align it.
I just match it back up to the bolt marks but just curious about what the pros think
I just match it back up to the bolt marks but just curious about what the pros think
<SNIP>
Finally, the 3 plugs that don't have a crush washer, clean them up and wrap them with Teflon tape when you reinstall. Mazda used a sealant of some kind, if you don't put it on there they will weep a little bit of gear oil. Not enough to worry, but it's good form to not have leaks.
<SNIP>
Dale
Finally, the 3 plugs that don't have a crush washer, clean them up and wrap them with Teflon tape when you reinstall. Mazda used a sealant of some kind, if you don't put it on there they will weep a little bit of gear oil. Not enough to worry, but it's good form to not have leaks
.<SNIP>
Dale
BOTH don't set hard like RTV and will not harm anything in the tranny (or diff).
:-) neil
I have also put the FD on ramps to pre-tension the suspension and it really didn't do anything different. It was suggested in a thread I read so I tried it.
L8R
Thread Starter
Joined: Jan 2002
Posts: 15,622
Likes: 2,725
From: Pensacola, FL
I've never found anything weird with putting the PPF back on. It pretty much goes where it goes, I don't think there's any way it can really get tweaked one way or the other.
Dale
Dale
Evening Dale / All- Had the ReX apart for some time installing a new clutch (ACT), Banzai oil pan brace and motor mounts as well as a braided clutch line. The mounts and the oil pan brace installed and worked well, but after the install the clutch will not disengage from the motor. Opened the inspection cover and had the wife exercise the slave cylinder and it is hitting / moving the fork. Can you install the clutch to the pressure plate wrong / backward? I think I tried because I did not see any marking and it did not fit backwards.
Ideas??
Ideas??
Thread Starter
Joined: Jan 2002
Posts: 15,622
Likes: 2,725
From: Pensacola, FL
The clutch disc itself has a flywheel side/pressure plate side. The part in the middle that protrudes out has to go towards the pressure plate.
Is the throwout bearing locked into the pressure plate or not?
Dale
Is the throwout bearing locked into the pressure plate or not?
Dale
Dale- the throw out bearing is engaged. I did not have it originally locked in and blew the slave cylinder out. What a mess. Will check out how it is installed Wednesday after work (Golf tomorrow)
I luv my carbon footprint
Joined: Mar 2002
Posts: 452
Likes: 0
From: Indianapolis
When you wiggle the transmission back in be careful not to bash the sensors screwed into the side of the transmission against the firewall. I managed to break the wire on the reverse sensor the first time I pulled the transmission because of that.
Also if you're pulling the transmission to replace a weak 5th gear syncho it isn't good enough to replace just the synchro, the replace the hub set as well. Once I replaced the 5th gear hub set and synchro at the same time my 5th gear grinding problems went away.
Also if you're pulling the transmission to replace a weak 5th gear syncho it isn't good enough to replace just the synchro, the replace the hub set as well. Once I replaced the 5th gear hub set and synchro at the same time my 5th gear grinding problems went away.
Last edited by Banzai-Racing; Jul 2, 2013 at 10:21 AM.


Finally had some time to get the RX7 back on jack stands and pulled the transmission. The clutch plate was in backwards as well as the pilot bearing was crushed. Pulled the pilot bearing and seal and put everything back in and viola ReX is rocking again. Will be calling the insurance company to get her legally back on the road. Appreciate the assistance from Banzai as well as Dale and company. Great bunch of guys : )

Thread
Thread Starter
Forum
Replies
Last Post
Jeff20B
1st Generation Specific (1979-1985)
73
Sep 16, 2018 07:16 PM