
For those that had problems installing Corksport Oil cooler lines.

Thread Starter
Joined: Sep 2004
Posts: 3,706
Likes: 4
From: Dinwiddie, Va
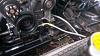
Yesterday I went and installed my ss Corksport lines, I've seen discussion as far as the fitment, leading to people not getting them installed and going with another brand.
Well I can tell you this, it wasnt as simple as putting the lines in place and merely throwing a few bolts on and tightening them down.
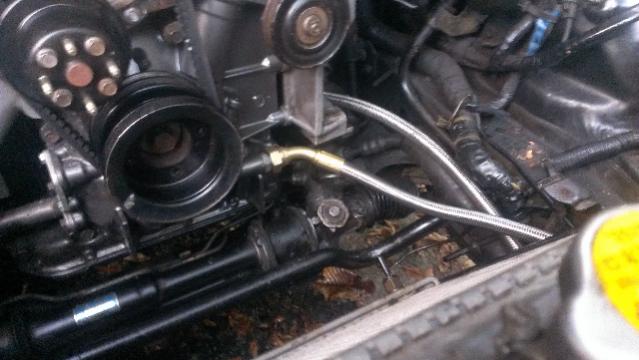
First I removed the snorkel, the fan , then fan shroud, and the driver side rad ducting, battery tray/battery, old lines from the block and oil cooler,(rear line is easier to take off from underneath with car in the air, front one youll need two adjustable wrenches, closest to block sits in place , other youll turn downwards, be careful not to hit the radiator, I did so by holding it in my hand and hitting my hand down in a hammer like motion to make sure the wrench didn't go flying into the radiator) these were easily removed with a 23mm on a 1/2" drive with the cooler still mounted up, the only one I couldnt take off was the one on the bottom of the cooler because power steering lines were in the way. I took the cooler off where it mounts and completely removed it from the car and put it where I could torque the banjo bolt off, I did so by holding it in place with a vice grip on the metal part of the old cooler line to hold it in place (or you could use a sturdy part of the cooler itself)., and then took off that banjo bolt.
Now the tricky part putting on the new lines. First off I put the lines on the block first , the rear line for mine was curved in a way so it was really meant to be installed the way it will go through where it needs to be snaked through (I had to move a metal piece that was in the way next to the battery/radiator also, did this with vice grips) make sure yours can go through the hole area it needs to snake through by the radiator/battery flip the line/reverse etc until its in its best ideal position, then with the car jacked up in the air thread the banjo bolt into the rear iron with your new banjo bolts on both sides of the cooler line fitting, keep it there loosely but enough to hold it in place and make sure its snakes through where it needs to go.
Now put on the front line with two adjustable wrenches, and keep it loose enough to move around.
Now the more miserable part , installing the lines on the cooler, first I installed the rear line that goes on the bottom corner of the cooler, I did this by laying on my back with the cooler on my chest(completely unmounted) , I maneuvered it until I could get the line to line up to be bolted down , this took a bit of finesse and slightly bending the line to help it line up, thread this one in loosely as well.
Now the top line, this one was pretty easy I did this one the same way as the last one.
Now you can bolt up your cooler andd mount it, then tighten all your lines, I had to hold the fitting down on the front line while tightening it to prevent it from hitting the accessories bracket, the rear line I used an adjustable wrench tighten it since PS lines were in the way.
My rear line is rubbing on the engine mount, but I will try moving it , all in all it was quite a pain but definitely not an impossible job as I've seen others state.
Hope this helps anyone who has been swayed away from using these lines due to the bad feedback some have given.
Well I can tell you this, it wasnt as simple as putting the lines in place and merely throwing a few bolts on and tightening them down.
First I removed the snorkel, the fan , then fan shroud, and the driver side rad ducting, battery tray/battery, old lines from the block and oil cooler,(rear line is easier to take off from underneath with car in the air, front one youll need two adjustable wrenches, closest to block sits in place , other youll turn downwards, be careful not to hit the radiator, I did so by holding it in my hand and hitting my hand down in a hammer like motion to make sure the wrench didn't go flying into the radiator) these were easily removed with a 23mm on a 1/2" drive with the cooler still mounted up, the only one I couldnt take off was the one on the bottom of the cooler because power steering lines were in the way. I took the cooler off where it mounts and completely removed it from the car and put it where I could torque the banjo bolt off, I did so by holding it in place with a vice grip on the metal part of the old cooler line to hold it in place (or you could use a sturdy part of the cooler itself)., and then took off that banjo bolt.
Now the tricky part putting on the new lines. First off I put the lines on the block first , the rear line for mine was curved in a way so it was really meant to be installed the way it will go through where it needs to be snaked through (I had to move a metal piece that was in the way next to the battery/radiator also, did this with vice grips) make sure yours can go through the hole area it needs to snake through by the radiator/battery flip the line/reverse etc until its in its best ideal position, then with the car jacked up in the air thread the banjo bolt into the rear iron with your new banjo bolts on both sides of the cooler line fitting, keep it there loosely but enough to hold it in place and make sure its snakes through where it needs to go.
Now put on the front line with two adjustable wrenches, and keep it loose enough to move around.
Now the more miserable part , installing the lines on the cooler, first I installed the rear line that goes on the bottom corner of the cooler, I did this by laying on my back with the cooler on my chest(completely unmounted) , I maneuvered it until I could get the line to line up to be bolted down , this took a bit of finesse and slightly bending the line to help it line up, thread this one in loosely as well.
Now the top line, this one was pretty easy I did this one the same way as the last one.
Now you can bolt up your cooler andd mount it, then tighten all your lines, I had to hold the fitting down on the front line while tightening it to prevent it from hitting the accessories bracket, the rear line I used an adjustable wrench tighten it since PS lines were in the way.
My rear line is rubbing on the engine mount, but I will try moving it , all in all it was quite a pain but definitely not an impossible job as I've seen others state.
Hope this helps anyone who has been swayed away from using these lines due to the bad feedback some have given.
Thread Starter
Joined: Sep 2004
Posts: 3,706
Likes: 4
From: Dinwiddie, Va
I didn't mention this but before you go and test for leaks , I would prime the oil system by taking out your egi fuse and turning over the engine (so it doesn't start and have a sudden loss in oil pressure from losing oil in the oil cooler), I would also check and add oil as needed.
Put the fuse back in and start up and check for leaks.
Don't run for long if you havent reinstalled your fan and shroud or you will overheat.
Put the fuse back in and start up and check for leaks.
Don't run for long if you havent reinstalled your fan and shroud or you will overheat.

^^ Our install of the Corksport oil lines was as simple as putting the lines in place and putting the banjo bolts in place and tightening them down. They fit perfectly. Granted, there was no power steering or AC stuff to get in the way. It took no time at all to attach them. 500 plus miles since the installation and they are working beautifully. Good advice about priming the the oil system first.
Thread Starter
Joined: Sep 2004
Posts: 3,706
Likes: 4
From: Dinwiddie, Va
Mine would have been very difficult to get on from what it seemed, I did it this way to ensure I had a minimal amount of problems.
I have my AC removed but my PS is still there.
I have my AC removed but my PS is still there.

Joined: Oct 2003
Posts: 11,576
Likes: 27
From: Morristown, TN (east of Knoxville)
I have been installing these for years and have had minor fitment issues for years.
(PREFACE: I do not lower the oil cooler from the engine bay, which I think they recommend).
The bottom line always goes on with no issues. It's the top line that gives me problems. IT seems like they could do well to make them a couple inches longer at least, it might make things easier.
I find it difficult to get the stiff hose to pass between the frame rail and metal radiator bracket under the battery tray, then make the ~45 degree turn toward the passenger side so that it can reach the top of the oil cooler. I still find that the SS hose tends to want to kink as it passes the metal radiator support and makes that sharp turn. A longer hose with more slack might prevent that, at least partially. Or maybe a different fitting with the angle built into it could also work well.
I also have problems getting it to clear the little round "bar" that sticks up from the top of the oil cooler at the top connection.I've found it much easier to install the top line when I bend that bar out of the way (or cut it off completely with a cutoff wheel).
it's too bad they can't give an inch for each line to make life easier, since all the other lines i have used may have better fitment but they always leak within a few years. those o-ring swivel fittings from RB/mazdatrix/aeroquip/earls are a total joke.

Funny that this thread is here. When I parked my RX-7 years ago, it was due to leaky oil cooler lines. I bought a pair of replacements from Cork Sport and half installed them, ran into issues and the car eventually sat for almost five months before I got them completely on. It's been so long, I don't remember what my exact issue was, but it did deal with fitment.
Trending Topics

Joined: Oct 2003
Posts: 11,576
Likes: 27
From: Morristown, TN (east of Knoxville)
I think the point is you shouldn't have to "start prying on ****" after spending (whatever they cost) on a new part intended to instill confidence in the reliability of your car.
we both know corksport sells chinese crap, the lines are probably outsourced to a local hose shop who could care less about fitment and just makes them a dozen sets at a time. they are cheap and work the best of the lines i have used so sometimes you just gotta make a compromise.
with that in mind i doubt they're going to come here, read this and make a note to the hydraulics shop to lengthen the lines and spend $.50 more on them, so break out your prybars.
the only guy who seemed to care about their product who worked for them disappeared about 7 years ago.
with that in mind i doubt they're going to come here, read this and make a note to the hydraulics shop to lengthen the lines and spend $.50 more on them, so break out your prybars.
the only guy who seemed to care about their product who worked for them disappeared about 7 years ago.
Last edited by RotaryEvolution; Oct 9, 2013 at 01:39 PM.
Thread Starter
Joined: Sep 2004
Posts: 3,706
Likes: 4
From: Dinwiddie, Va
Alot of aftermarket stuff I have purchased has had slight fitment issues , OEM always fits best, a part of upgrading is finding a way to get things to fit.
Its not ideal to buy lines that don't just bolt up , though I would rather have stronger braided lines that may not fit as well, but will last longer and are an upgrade compared the stock lines.
Its not ideal to buy lines that don't just bolt up , though I would rather have stronger braided lines that may not fit as well, but will last longer and are an upgrade compared the stock lines.
my OMP lines for example are twice as thick as the OEM lines, which translates to a little more effort in making them route and fit properly for a more durable part. stainless braided hoses aren't going to be as flexible and the length plays an important role in how the lines interact with everything around them, such as the frame rail and the A/C belt.
Thread Starter
Joined: Sep 2004
Posts: 3,706
Likes: 4
From: Dinwiddie, Va
Right, stock is made to be easier to fit.
I had issues installing the Corksport Turbo inlet duct incorporated with the stock airbox , with some effort it all fits together.
I had issues installing the Corksport Turbo inlet duct incorporated with the stock airbox , with some effort it all fits together.
Joined: Oct 2003
Posts: 11,576
Likes: 27
From: Morristown, TN (east of Knoxville)
Most anything can be DESIGNED to fit a given application/area/space properly even if it is an aftermarket part, if the correct materials are available and affordable, and proper thought and research is given. The obvious exceptions are times when you are fitting a larger part into the space of a smaller part (for example, a 4" exhaust on a lowered FD, or a 9" wide wheel on the front of an FC).
I have specifically told them years ago that they needed an extra inch or two on the top line, but I doubt they ever made a change. I don't buy them often enough to know whether or not they do.
I have specifically told them years ago that they needed an extra inch or two on the top line, but I doubt they ever made a change. I don't buy them often enough to know whether or not they do.
doesn't seem they have.
when i have lines made they are stainless braided but the shop uses the original hard tubes and simply replaces the rubber lines that have fallen apart, they also usually add a swivel lock so the lines can be positioned properly. of course they wind up being about $175 a set all said and done..
when i have lines made they are stainless braided but the shop uses the original hard tubes and simply replaces the rubber lines that have fallen apart, they also usually add a swivel lock so the lines can be positioned properly. of course they wind up being about $175 a set all said and done..
Joined: Oct 2003
Posts: 11,576
Likes: 27
From: Morristown, TN (east of Knoxville)
doesn't seem they have.
when i have lines made they are stainless braided but the shop uses the original hard tubes and simply replaces the rubber lines that have fallen apart, they also usually add a swivel lock so the lines can be positioned properly. of course they wind up being about $175 a set all said and done..
when i have lines made they are stainless braided but the shop uses the original hard tubes and simply replaces the rubber lines that have fallen apart, they also usually add a swivel lock so the lines can be positioned properly. of course they wind up being about $175 a set all said and done..
The problem I have with most aftermarket parts is that they charge the "done right, perfect fit" price, but the fitment, quality, and performance is still on the "close enough" level. That describes the majority of authentic japanese parts (body kits, etc.) as well as the obvious chinese knockoffs.
there is always the avenue for someone to make and sell those products, but i'm not seeing too many FC owners/shops taking up the torch. possibly because it's a hard sell for cars that are at the rock bottom of their value curve.

Thread
Thread Starter
Forum
Replies
Last Post