
She Followed Me Home, Honest

My uneducated guesses;
- the fuel leak would be the FPR or fuel pulsation dampener diaphragm(s)
- the other smoking issue could be a coolant/water seal O-ring failure
- the fuel leak would be the FPR or fuel pulsation dampener diaphragm(s)
- the other smoking issue could be a coolant/water seal O-ring failure


Joined: Mar 2001
Posts: 31,837
Likes: 3,234
From: https://www2.mazda.com/en/100th/
actually check the fuel pressure regulator, the car runs REALLY weird when these go bad. not sure about the smoke/coolant, but it can cause the puddles/dry spark plugs
Appreciate the info folks.
I replaced all the injectors with freshly serviced units and used the cleaned/painted rails from the "new" engine, the system was pressure tested and we could find no evidence of a leak anywhere.
The block isn't filthy but does have the normal grunge and dirt that you'd expect under the manifolds- any leak big enough to puddle would leave a track...so we thought.
When she started yesterday, there was a neighborhood blanketing amount of white, coolant smelling smoke. I expected some because a little coolant had dropped when the thermowax was disconnected and I figured it needed to burn off but this seemed excessive.
Nothing from the tailpipes and after five minutes or so, the bay cleared up.
Again, we could not determine where it might be leaking.
Still won't idle and runs like it's terminal but the oil pressure (and level) is normal and so is the water temp.
As long as I could maintain a steady 30-40 mph she could be driven and miraculously, for the last 2/3rds of the trip we caught every light but one. That bit of good fortune made completing the trip possible, I don't know how many more starts she had left.
It's so weird that she went from "fine" to "pure gawdawful" in the blink of an eye.
The weather is nice and I'll bowl up, mosey out and see what I can see.
Too busy on the Z.
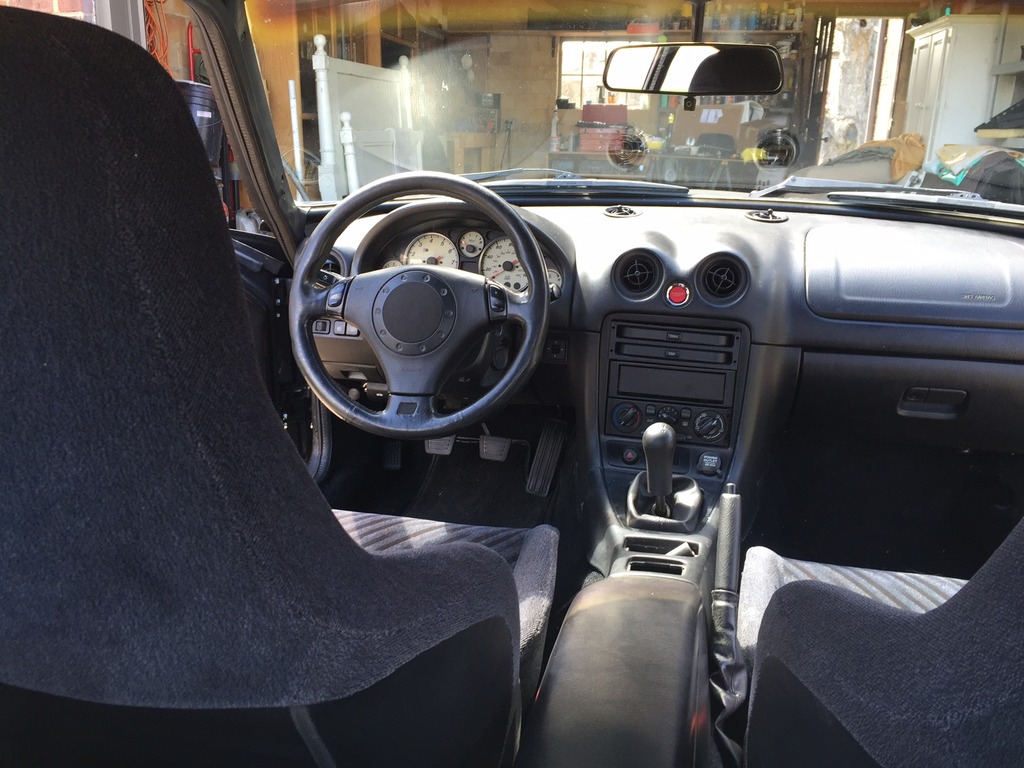
My primary job has been the gauge cluster and it's not as simple as it could be.
The Miata cluster (like the FD's) uses a flexible plastic "motherboard", not an old school, phenolic board like the FC.
Our plastic was badly scratched and a few traces were cut...I've never dealt with this material and have no idea how to repair it. Plus, we've never seen this cluster work, it could be dead for all we know.
We are replacing the stock Mazda oil pressure and water temp with VDO gauges/sending units and both the speedo and tach get Digital Dakota boxes grafted in.
For two reasons, I'm starting with my heavily modified Miata/FC hybrid cluster.
First of all, it is a known working unit, which means I can do all the wiring (except the speedo/tach) and confirm it functions.
Secondly, when I converted my cluster I wanted a pure OEM look, so I gutted a new set of VDOs and grafted them into the Miata using Mazda needles/dials. They look factory and work well...with one caveat. Removing the needles/dials loses the VDO factory calibration...I can see my temp gauge move, hear the fan kick on and assume it's 195� but I can't know for sure.
This is the look Sigfrid wants, so I'll swap my already modified gauges into his cluster and then fit the new, untouched VDOs into my cluster.
Yikes!
So far I have fuel, oil, and water temp gauges wired, the TS and high beam indicator lights, the odometer is functional (at least, alive) and the CHARGE light is connected but as yet, not confirmed.
Left is low fuel, illumination...and I think that's it.
The second cluster "issue" is locating the Digital Dakota boxes.
The wiring is simple and the boxes are small and easily packaged, but where to put them?
After install, you need access to the box as all adjustments are made with little dipswitches. The tach is "set-n-forget" but the speedo gets a few rounds of tweaking as you dial it in, so we want the boxes accessible but hidden.
Not sure.
Meanwhile, Sigfrid soldiered on with the sound package.
The hatch area is about 50% done and we await more material.
He's also been creeping up on carb adjustments and the improvement is quite impressive. Especially since I thought she was very good before.
It's nothing major but all around response is great, the biggest thing I noticed was how much smoother off-idle tip in was...turns out that was a mechanical fix, relocating the throttle linkage to give faster opening on the carb.
Our biggest hang up is now the heater core.
It weeps- just a teeny tiny bit- at one hose fitting and until that is fixed, the HVAC and dash cannot go back in.
I hope we can get that repaired and installed today, so it can be tested for a day or so and then the dash reinstalled.
It's a bit frustrating to see the interior stripped out while knowing that it's really almost done...just doesn't look like it.
The gauges are a more complex job.
Using the stock Miata cluster, the FUEL gauge will work without modification.
We're replacing the Miata OIL and WATER gauges with VDOs, using the Miata dial faces and needles so they look stock. The gauges and sending units are ordered.
The speedo and tach will each require a Dakota Digital translator box, they too are on order.
Additionally, the speedo will need a VSS signal generator to replace the Datsun mechanical speedo drive, Sigfrid is on that but I don't know the status right now.
We'll have a mostly functional cluster soon.
I detailed the Miata cluster swap here.
Aaaarrrgh.
That's how I feel about this final stage of assembly...just aaarrgh.
Minor problems are killing me here, we're so damn close and yet so far.
The heater core was the main hangup yesterday and we spent two hours "fixing it" only to discover that we made it leak even more.
Somehow.
The problem is the bungs- one is perfectly fine stock, the other is a long convoluted snake that must be cut to fit our application. Being thin brass, it's very difficult to clamp without crushing the tube.
A new core isn't expensive but leaves us with the same problem and I cannot find a way to search heater cores by size and bung orientation so I could find a better option.
Fortunately it's almost summer, so we can bypass the core and ponder a solution in relative leisure.
Accepting temporary defeat means we can reinstall the HVAC and move forward.
Failing with the heater core, the last impediment to dash install is the gauge wiring and it's been kicking my *** for two days.
I had mentally trivialized this project because I'd already done it on my FC and am familiar with the Miata cluster. We knew the cluster "motherboard" was slightly damaged but it turns out to be mostly dead.
I was 90% wired before I plugged the cluster in to test and absolutely NOTHING worked.
This was baffling as most of the circuits are super simple and obvious...you can follow the traces on the back of the unit, like having a 3d schematic.
Finally plugged my cluster in and it all worked.
This means I can finish the wiring, tidy and tuck it up and the dash can go back in.
All that's left is to install the Digital Dakota boxes for the speedo and tach and I should complete that tomorrow.
We still need to adapt a VSS unit to the transmission to feed the speedo and I'm half finished with that project. Dakota Digital sent us a GM VSS and basically said "Good luck fitting this", so I was left on my own to figure it out.
I think I have but we'll see.
This is exactly why I wanted to use simple VDO gauges and delete the Miata stuff altogether but here we are.
We only got half the sound package we ordered to finish the rear deck, should get the rest Saturday or Monday.
Irritating.
On a happy note, both the dash airbag cover and the Miata center console arrived.
The giant gaping hole in the dash will finally be covered and the console looks like it'll fit with little modification.
We are still waiting on the eyeball vents we hope to use for defrost, but they should arrive soon.
We have 10 days till Sigfrid starts working again and the Z goes into daily service and we're doing our best to finish off (at least) the big stuff by then.
We could have the interior assembled in an hour or so, it's so tempting to do it and delay these minor issues but we've worked so hard to make it right, it seems a shame to falter now.
MECP Certified Installer
Joined: Feb 2009
Posts: 3,176
Likes: 3
From: Mesquite, TX-DFW
Too bad you aren't using an RX7 transmission. The FD VSS unit bolts right on where the cable goes (Or am I mistaking the miata VSS, I know one of the two use the speedo gears in the trans to get VSS).
The VSS adaptor we got from Dakota Digital (which, IIRC, is a GM part) is meant to screw on the speedo end (square cable) of the speedo cable...which it does, just fine.
But what do we do with a 6' cable?
What I did was cut the cable housing apart- after removing the cable itself- and salvaging the fitting that screws onto the sender on the transmission. It's about 1 1/2" long- one end is threaded to screw to the trans, the other (where the cable housing exits) is a 17mm hex, so you can wrench it tight. This "open" end was exactly the right size to tap to 16mm, which is what the GM part uses.
To be honest, I suspect the GM thread is really 5/8-18 or something but 16mm x 1.5 was close enough to work.
We'll cut the cable end that goes into the trans (because of course, it's weird) and then attempt to blacksmith the cable into a square that will fit the GM adaptor. The "cable" will be about 1" long altogether.
Should work.
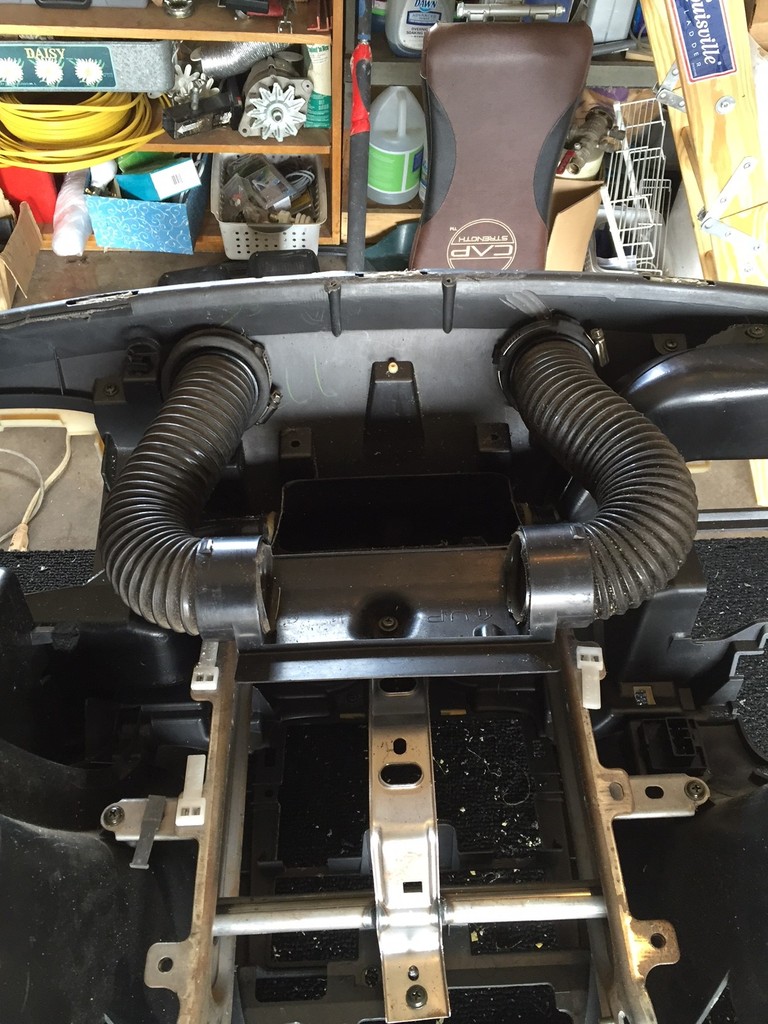
I spent some quality time under Sprocket today.
After removing the exhaust manifold heat shields, I had a pretty good view.
There is not a single sign of anything wrong externally- no leaks/drips, no cracked manifolds, no collapsed cats...nothing to even point where to look.
She won't run without constant throttle, so I couldn't look beneath as she ran, but the bay fills with smoke immediately and it's not localized on the manifold side, it comes from everywhere.
Whatever is wrong is internal and for all intents and purposes, sounds the death knell for this brave engine.
Nearly 300k miles of practically trouble free service...hell, she just made a 700 mile round trip to Santa Fe in early September and ran pretty well right up till she didn't.
She has one last journey to struggle through before being laid to rest- from the parking lot into the garage, maybe 50'.
I know she'll make it when the time comes.
But what do we do with a 6' cable?
What I did was cut the cable housing apart- after removing the cable itself- and salvaging the fitting that screws onto the sender on the transmission. It's about 1 1/2" long- one end is threaded to screw to the trans, the other (where the cable housing exits) is a 17mm hex, so you can wrench it tight. This "open" end was exactly the right size to tap to 16mm, which is what the GM part uses.
To be honest, I suspect the GM thread is really 5/8-18 or something but 16mm x 1.5 was close enough to work.
We'll cut the cable end that goes into the trans (because of course, it's weird) and then attempt to blacksmith the cable into a square that will fit the GM adaptor. The "cable" will be about 1" long altogether.
Should work.
I spent some quality time under Sprocket today.
After removing the exhaust manifold heat shields, I had a pretty good view.
There is not a single sign of anything wrong externally- no leaks/drips, no cracked manifolds, no collapsed cats...nothing to even point where to look.
She won't run without constant throttle, so I couldn't look beneath as she ran, but the bay fills with smoke immediately and it's not localized on the manifold side, it comes from everywhere.
Whatever is wrong is internal and for all intents and purposes, sounds the death knell for this brave engine.
Nearly 300k miles of practically trouble free service...hell, she just made a 700 mile round trip to Santa Fe in early September and ran pretty well right up till she didn't.
She has one last journey to struggle through before being laid to rest- from the parking lot into the garage, maybe 50'.
I know she'll make it when the time comes.
Gauges finally done...well, except for calibrating the speedo.
The tach was simple- you simply tell the Dakota Digital box there's a six cylinder engine and a four cylinder tach and it does the rest.
The speedo is a more involved process and requires driving the car, which we couldn't do because the heater core is out and the hoses dangling, but we'll get to it soon.
It shouldn't have been as difficult as it was, I think I had a mental block and was psyching myself out.
Of course, without driving the car we can't confirm our homemade VSS adaptor works yet, so that'll be interesting.
Can't wait to move on from the tedium of electrical work and return to more fun stuff...like fitting the new Miata center console.
We made up a new punchlist- eleven items so far- that needs to be cleared before final interior assembly can begin. About a third of the tasks can actually be delayed but would be nice to finish now, if possible. Nothing left causes the car to be undriveable (I mean, we can still drive without finalizing the rear hatch release) and whatever remains undone will no doubt be joined by new, more exciting problems as Sigfrid begins daily driving this beast.
The struggle continues tomorrow.
Ha!
Pictures!

Boring ones admittedly, but visual proof that at least something is happening.
It should surprise no one- least of all, me- that these two pics represent almost an entire day of work. Taken out of context as these are, it's impossible to see the domino trail of adjustments required to fit these defrost vents, but I can assure you, they were extensive.
I must commend Sigfrid, who did most of the work.
We're now at the point where what we do not only must function but must also look good because it's all visible. The outer black plastic skin of the dash is very thin and very brittle, even a new exacto blade would chip, rather than slice it and even though there are a few flaws, he did a remarkable job making it look as good as possible. I think it's fine but there are other aesthetic issues we must deal with and some of them will impact these vents later...possibly.
Besides the technical aspects of how you actually put a 2 1/2" hole into a multilayer surface, the real problems begin when you try to weasel those hoses around a underdash area that has now become kinda crowded in key areas. Compounding the difficulty was the fact that our new Miata center console arrived and we were so surprised at how closely it fit/mated with the dash bottom that we started moving the dash around to mate the two better. We'd always figured we'd need a bunch of custom work to make this happen, but in fact, the Miata console can remain mostly intact.
We trimmed/fit the dash maybe 10 times as we crept up on getting the panel gap better and finally got to a point we didn't think it could be improved given our constraints. Any further adjustment would have to come from the console.
Moving the dash ruined the interface between the dash duct manifold and the heater box...so that had to be tweaked. Moving the center HVAC box meant that the AC box had to move and then, so did the blower assembly. Basically, the whole HVAC system had to be slightly rejiggered, just to fit some defrost vents and fit the trans console.
It took a while but the dash now installs/comes out as easily as before and we've finally arrived at it's "real" location.
No idea yet how effective the vents will be but they look exactly as I'd envisioned two years ago when we started (very '70's Ferrari-esque, IMO) and they are there, so it's all good for now. We made the attempt at providing the function, so a Participation Trophy is warranted, at least.
As we approach the "final" assembly, we've been trying to catch and rectify any dangling loose ends and "we'll get to that later" projects and this can take time. An example are the firewall grommets for the heater core hoses. I had sourced a really nice set (Subaru, I think) but to fit really well the firewall hole needed to be slightly enlarged and at the time we couldn't do that easily. With our new Harbor Freight "Christmas tree" bits, enlarging the holes took about 5 minutes and the grommets now fit perfectly.
That kind of little **** is what I'm talking about.
Nevertheless, the dash is almost ready for final install.
The last remaining big task is to calibrate the speedo.
The Digital Dakota box must be "tuned in" and requires access during the process. Because they are buried behind the gauges, the DD boxes cannot be reached, much less adjusted in situ, we'll just pull the dash, plug in the cluster and do our road tuning that way. After calibration, the dash can go back in "for good".
That's planned for tomorrow.
It's gonna be so exciting to see the whole thing in place at long last.
Pictures!
Boring ones admittedly, but visual proof that at least something is happening.
It should surprise no one- least of all, me- that these two pics represent almost an entire day of work. Taken out of context as these are, it's impossible to see the domino trail of adjustments required to fit these defrost vents, but I can assure you, they were extensive.
I must commend Sigfrid, who did most of the work.
We're now at the point where what we do not only must function but must also look good because it's all visible. The outer black plastic skin of the dash is very thin and very brittle, even a new exacto blade would chip, rather than slice it and even though there are a few flaws, he did a remarkable job making it look as good as possible. I think it's fine but there are other aesthetic issues we must deal with and some of them will impact these vents later...possibly.
Besides the technical aspects of how you actually put a 2 1/2" hole into a multilayer surface, the real problems begin when you try to weasel those hoses around a underdash area that has now become kinda crowded in key areas. Compounding the difficulty was the fact that our new Miata center console arrived and we were so surprised at how closely it fit/mated with the dash bottom that we started moving the dash around to mate the two better. We'd always figured we'd need a bunch of custom work to make this happen, but in fact, the Miata console can remain mostly intact.
We trimmed/fit the dash maybe 10 times as we crept up on getting the panel gap better and finally got to a point we didn't think it could be improved given our constraints. Any further adjustment would have to come from the console.
Moving the dash ruined the interface between the dash duct manifold and the heater box...so that had to be tweaked. Moving the center HVAC box meant that the AC box had to move and then, so did the blower assembly. Basically, the whole HVAC system had to be slightly rejiggered, just to fit some defrost vents and fit the trans console.
It took a while but the dash now installs/comes out as easily as before and we've finally arrived at it's "real" location.
No idea yet how effective the vents will be but they look exactly as I'd envisioned two years ago when we started (very '70's Ferrari-esque, IMO) and they are there, so it's all good for now. We made the attempt at providing the function, so a Participation Trophy is warranted, at least.
As we approach the "final" assembly, we've been trying to catch and rectify any dangling loose ends and "we'll get to that later" projects and this can take time. An example are the firewall grommets for the heater core hoses. I had sourced a really nice set (Subaru, I think) but to fit really well the firewall hole needed to be slightly enlarged and at the time we couldn't do that easily. With our new Harbor Freight "Christmas tree" bits, enlarging the holes took about 5 minutes and the grommets now fit perfectly.
That kind of little **** is what I'm talking about.
Nevertheless, the dash is almost ready for final install.
The last remaining big task is to calibrate the speedo.
The Digital Dakota box must be "tuned in" and requires access during the process. Because they are buried behind the gauges, the DD boxes cannot be reached, much less adjusted in situ, we'll just pull the dash, plug in the cluster and do our road tuning that way. After calibration, the dash can go back in "for good".
That's planned for tomorrow.
It's gonna be so exciting to see the whole thing in place at long last.
It's been a very trying past few days.
Pretty much everything that could go sideways, has.
The primary culprit has been the gauge cluster- we knew it had a few bad traces but finally discovered it was more comprehensibly borked than expected (which is probably why the seller so readily agreed to a refund)...the speedo is totally dead.
Normally, this would be irritating but not a major disruption, however, we need to calibrate the speedo before the dash can go in because we need access to the DD box.
It's killing us both that we can't seem to get the interior back together, always hung on little details.
Sigfrid begins work next Monday and has set Friday as our deadline so he can take the weekend off. I don't see the problem- we've been driving the car without a dash/gauges for weeks now and it hasn't been an issue, but now it's suddenly a big deal. Certainly, we'll have the dash back in by then and if the HIGH BEAM indicator light doesn't work (it actually does), so what?
Fact is, we're 99% done...probably more functional and together than the majority of Z's still running, the flaws that drive S. crazy are only apparent to us.
And all are fixable, it just takes time.
I guess we just had different expectations.
She's 40 years old and just emerging from a total rebuild...of course there will be glitches but so far, nothing major or fatal has cropped up and I don't expect they will.
We've never gotten this far in the assembly process, it's all uncharted territory and I expected weirdness to crop up.
After three years of constant struggle, why should the final three weeks be any different?
Enough venting, off to work.
Work went well.
This is as complete and functional as she's ever been.
It was a struggle and much remains to be done but damn, the whole bloody dash is in!
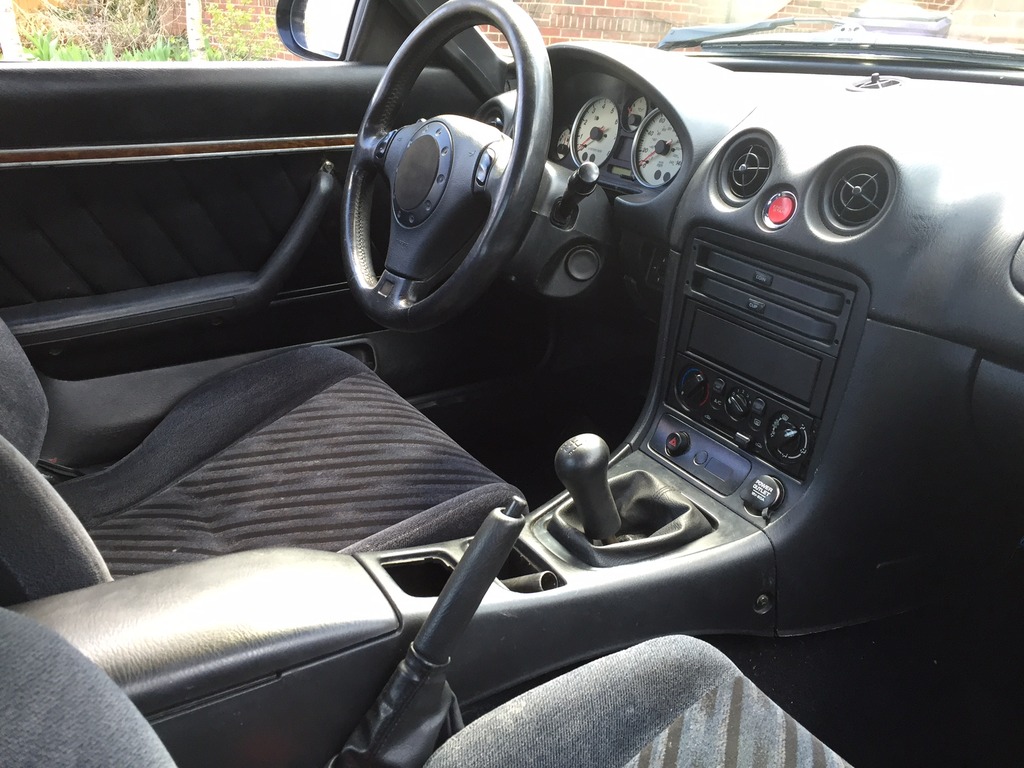
The fit of the stock Miata console was a seredipitous revelation. We had to drill one hole in the back to line up with a stock mount and the rest just fell into place. The car is in reverse here, so this is worst case position in the shifter console.
Our Mark I version of the VSS adaptor failed, which lead to many anxious minutes checking everything else first.
It didn't break or appear obviously flawed but after about 30mph, it would slip and then stop working altogether. Took a few tries to narrow that down and I'm making MarkII tonight.
The rest of the sound material arrived and we'll be finishing the hatch tomorrow...our last working day before Sigfrid becomes a happy employed person again.
S. has been talking about a set of upper dash braces for weeks and I could never visualize what he intended. He finally made them today and they are superb- the dash has never been so stable and well aligned...and zero creaking, so far. We created a custom fit foam interface between the dash vent manifold and the heater box to deal with our slight misalignment. Airflow from the vents (including the new defrost eyeballs) is very good.
By tomorrow night I hope to be amazed.
This is as complete and functional as she's ever been.
It was a struggle and much remains to be done but damn, the whole bloody dash is in!
The fit of the stock Miata console was a seredipitous revelation. We had to drill one hole in the back to line up with a stock mount and the rest just fell into place. The car is in reverse here, so this is worst case position in the shifter console.
Our Mark I version of the VSS adaptor failed, which lead to many anxious minutes checking everything else first.
It didn't break or appear obviously flawed but after about 30mph, it would slip and then stop working altogether. Took a few tries to narrow that down and I'm making MarkII tonight.
The rest of the sound material arrived and we'll be finishing the hatch tomorrow...our last working day before Sigfrid becomes a happy employed person again.
S. has been talking about a set of upper dash braces for weeks and I could never visualize what he intended. He finally made them today and they are superb- the dash has never been so stable and well aligned...and zero creaking, so far. We created a custom fit foam interface between the dash vent manifold and the heater box to deal with our slight misalignment. Airflow from the vents (including the new defrost eyeballs) is very good.
By tomorrow night I hope to be amazed.


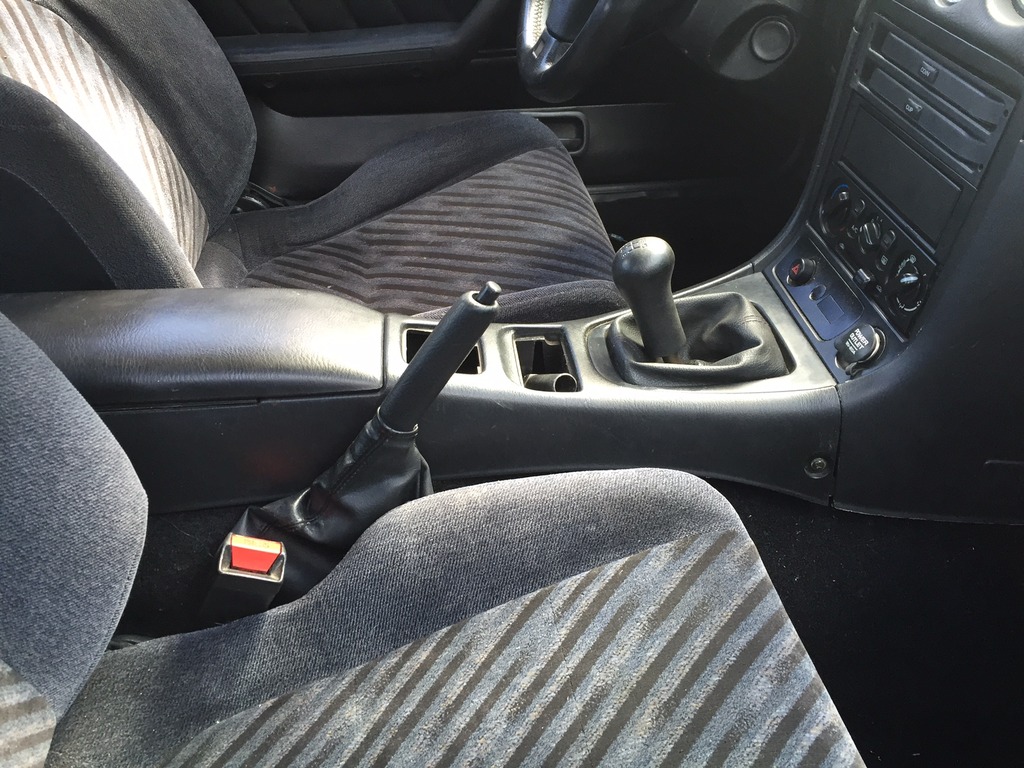
Indeed, a flip front radio.
Pull out the "coin" holder above the radio and it's slotted for an iPhone and has a connection...plug in and stream Pandora or whatnot. Stereos ain't my thing, I have no opinions or inputs.
Nope, no column lock.
Yesterday was a 12 hour flog, trying to get the interior (mostly) buttoned up.
And we did it.
The major job was finishing the rear sound mitigation package install and it took longer than anticipated. Two old ***** contorted into the hatch, trying to cram very sticky sheets into impossibly narrow cavities...it was not pretty. And of course, along the way were myriad little "let's take care of this now" details, individually trivial but collectively, a real time suck.
But it's done, every interior panel we have is installed and properly fastened.
I've never driven a forty year old car as quiet and rattle free as the Z...I'd almost say it's at "new car" levels of interior comfort.
It's pretty boring to look at and does not reflect the effort necessary to get there.
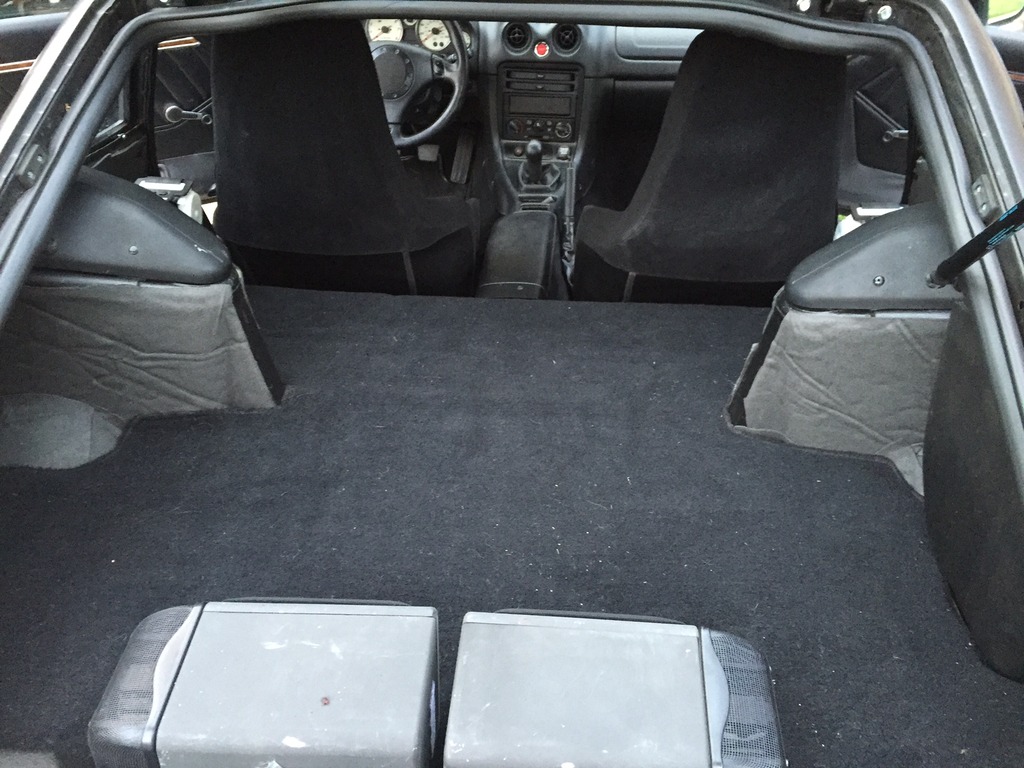
First is the floorpan (hatchpan?), which I carved a giant hole in to remove the spare tire well and fit the FC gas tank. The entire pan and hole cover were layered with two membranes of material. Then (and keep in mind, this is stock Datsun practice), suspended about three inches above the chassis floor by several brackets, is a wooden subfloor...which is what you see (covered in carpet).
The absurd thing is that Z's have bins just like the FC but once the subfloor is installed, you can't get to 'em. The subfloor is bolted in, it does not move.
The original 240Z does not have this subfloor and the bins are functional- this is just another great example of how Nissan kept grafting crap on the car as the model aged.
We glued/stapled a scrap piece of black carpet on the underside of the floor to dampen the cavity down and it really worked...the fuel pump is completely inaudible.
As tedious and difficult as the hatch work was, the visual payoff was minimal and the most obvious result of yesterday's work is the seats...which we painted black.
Especially obvious in pics, the Prelude seats were a purplish/gray/black and as more and more of the real black interior was installed, they started to stand out.
In a bad way.
Sigfrid considers these seats temporary anyway, so we figured we had nothing to lose and I watched some youtube vids, we got some Duplicolor Vinyl/Fabric paint (we got "flat", it also comes in gloss(?)) and went to town.
Overall, pretty happy.
Coverage was good, obvious flaws (like cigarette burns) are not highlighted, but not hidden either.
The material does feel stiffer/coarser but this supposedly abates over time.
Don't really care...they're black at least and fit the interior much better.

S. carved out a half day so we can finish off some mechanical tweaks, so that's today's plan.
Just in time for another 8-12" of heavy wet spring snow that moves in tonight.
Oh boy.
Pull out the "coin" holder above the radio and it's slotted for an iPhone and has a connection...plug in and stream Pandora or whatnot. Stereos ain't my thing, I have no opinions or inputs.
Nope, no column lock.
Yesterday was a 12 hour flog, trying to get the interior (mostly) buttoned up.
And we did it.
The major job was finishing the rear sound mitigation package install and it took longer than anticipated. Two old ***** contorted into the hatch, trying to cram very sticky sheets into impossibly narrow cavities...it was not pretty. And of course, along the way were myriad little "let's take care of this now" details, individually trivial but collectively, a real time suck.
But it's done, every interior panel we have is installed and properly fastened.
I've never driven a forty year old car as quiet and rattle free as the Z...I'd almost say it's at "new car" levels of interior comfort.
It's pretty boring to look at and does not reflect the effort necessary to get there.
First is the floorpan (hatchpan?), which I carved a giant hole in to remove the spare tire well and fit the FC gas tank. The entire pan and hole cover were layered with two membranes of material. Then (and keep in mind, this is stock Datsun practice), suspended about three inches above the chassis floor by several brackets, is a wooden subfloor...which is what you see (covered in carpet).
The absurd thing is that Z's have bins just like the FC but once the subfloor is installed, you can't get to 'em. The subfloor is bolted in, it does not move.
The original 240Z does not have this subfloor and the bins are functional- this is just another great example of how Nissan kept grafting crap on the car as the model aged.
We glued/stapled a scrap piece of black carpet on the underside of the floor to dampen the cavity down and it really worked...the fuel pump is completely inaudible.
As tedious and difficult as the hatch work was, the visual payoff was minimal and the most obvious result of yesterday's work is the seats...which we painted black.
Especially obvious in pics, the Prelude seats were a purplish/gray/black and as more and more of the real black interior was installed, they started to stand out.
In a bad way.
Sigfrid considers these seats temporary anyway, so we figured we had nothing to lose and I watched some youtube vids, we got some Duplicolor Vinyl/Fabric paint (we got "flat", it also comes in gloss(?)) and went to town.
Overall, pretty happy.
Coverage was good, obvious flaws (like cigarette burns) are not highlighted, but not hidden either.
The material does feel stiffer/coarser but this supposedly abates over time.
Don't really care...they're black at least and fit the interior much better.
S. carved out a half day so we can finish off some mechanical tweaks, so that's today's plan.
Just in time for another 8-12" of heavy wet spring snow that moves in tonight.
Oh boy.
And the parade of piddly **** begins.
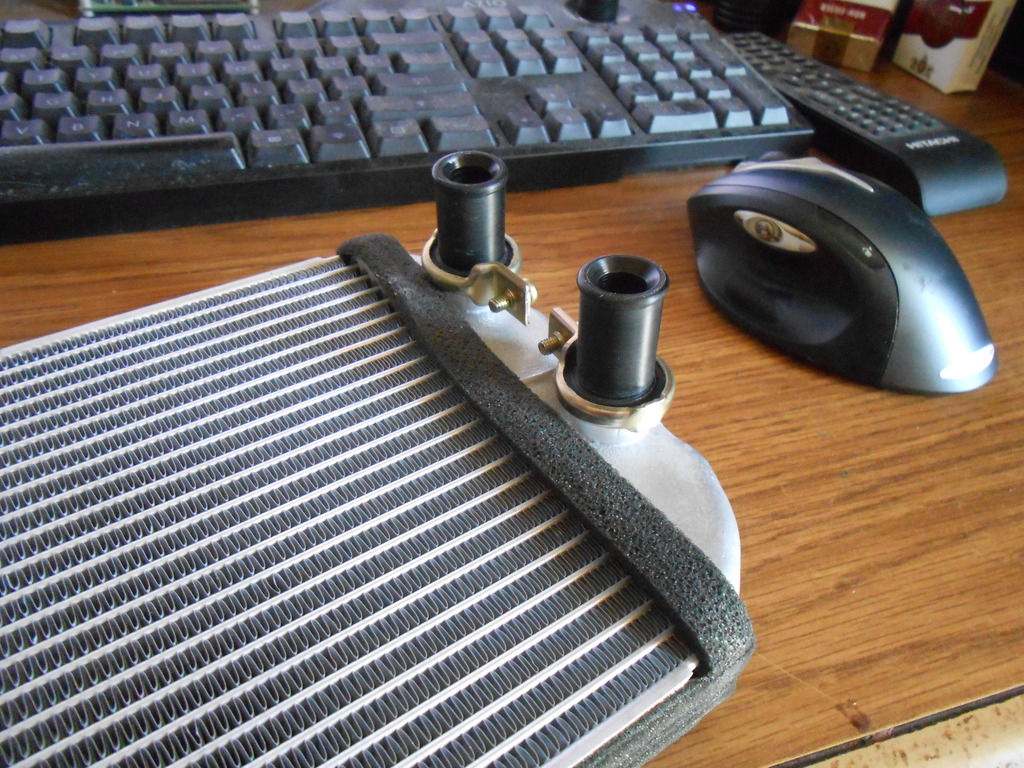
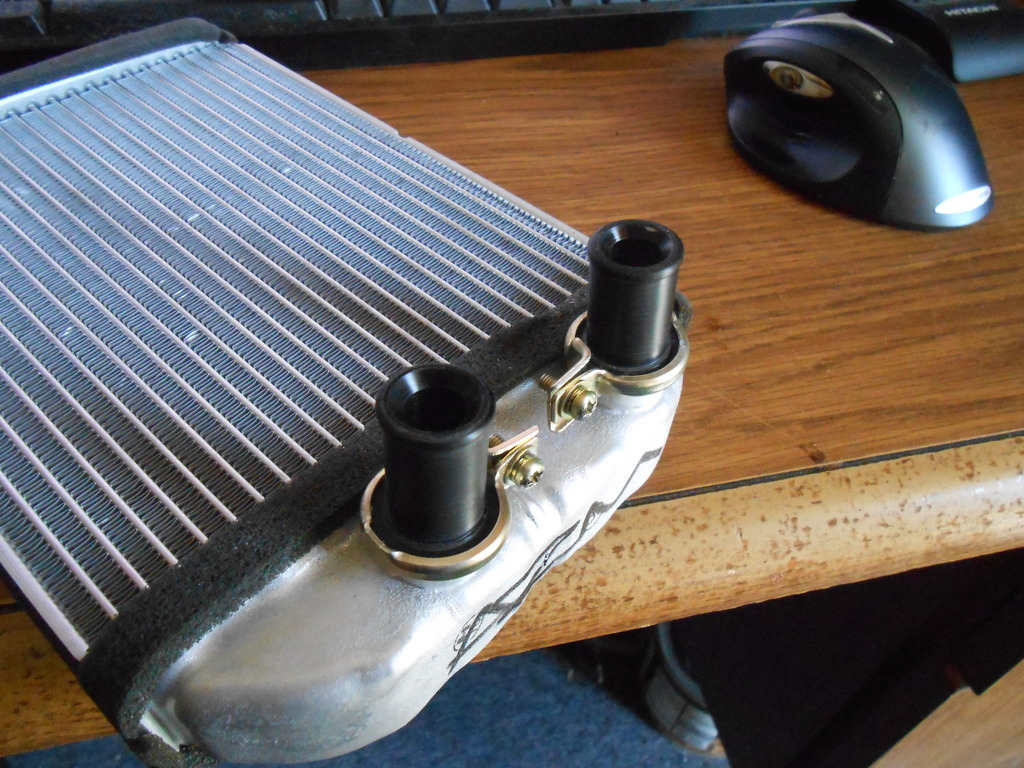
Our first float features the heater core:
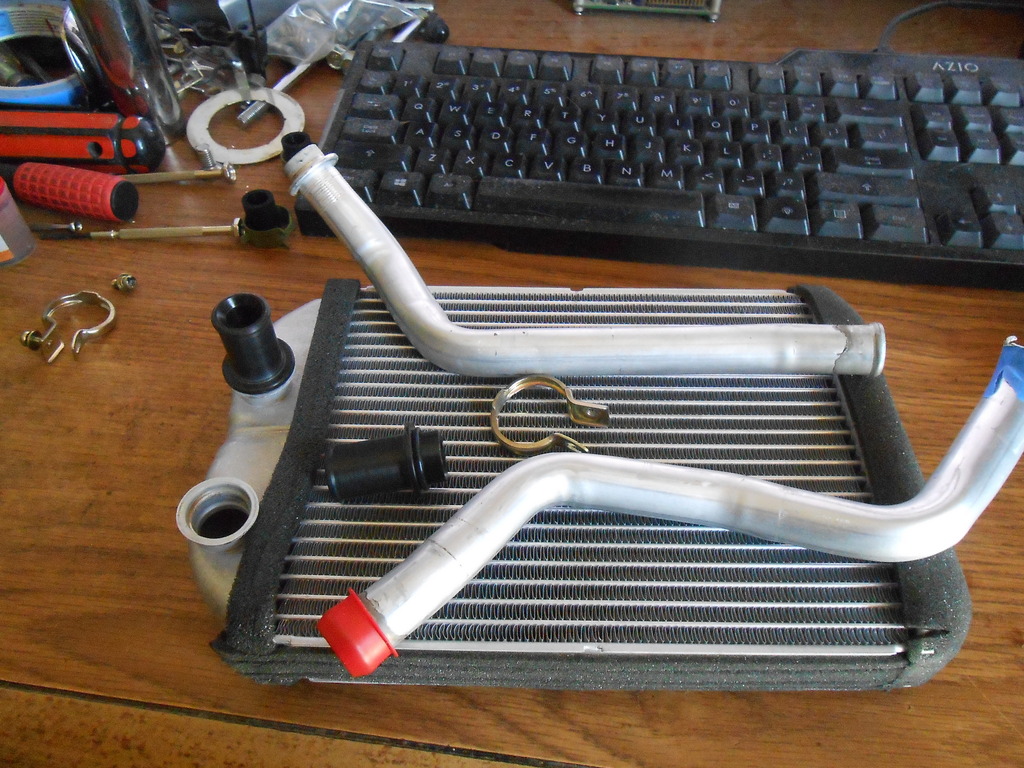
This is our replacement heater core, I have no idea where Sigfrid got it, so I don't know if it's OEM or not.
At any rate, the original was brass with permanently mounted bungs, this one's aluminum and the bungs are removable. Just like the brass, these alloy tubes are too flimsy and misshapen to do much with, so I made new ones out of some scrap Delrin I had. Didn't have a very large piece, which dictated the length, but they'll be fine.
This situation pops up when you start mixing/matching parts...I'm sure those aluminum foil spaghetti arms make perfect sense in the Miata but for us they were a nightmare.
Situation handled, hopefully.
Tomorrow ends the first full week of Sigfrid commuting, about 25 miles each way, I think.
I'm sure he'll have a whole litany of complaints but I'm happy she hasn't burned to the ground and everything seems to be working fine.
I'll hear all about it Saturday when next we meet.
Our first float features the heater core:
This is our replacement heater core, I have no idea where Sigfrid got it, so I don't know if it's OEM or not.
At any rate, the original was brass with permanently mounted bungs, this one's aluminum and the bungs are removable. Just like the brass, these alloy tubes are too flimsy and misshapen to do much with, so I made new ones out of some scrap Delrin I had. Didn't have a very large piece, which dictated the length, but they'll be fine.
This situation pops up when you start mixing/matching parts...I'm sure those aluminum foil spaghetti arms make perfect sense in the Miata but for us they were a nightmare.
Situation handled, hopefully.
Tomorrow ends the first full week of Sigfrid commuting, about 25 miles each way, I think.
I'm sure he'll have a whole litany of complaints but I'm happy she hasn't burned to the ground and everything seems to be working fine.
I'll hear all about it Saturday when next we meet.
In a Miata, those alloy tubes are held in with a mess of clips to the heater case. Based on your "unique" application, I'm not surprised you went a different route. At least the tubes are removable. I did a heater core in a Land Rover LR3. The old core had removable pipes. New core had them swedged in. Turned a 3.5hr job into a 16+ hour job.
We still have the structure/clips on our box but I suspect they will get zizzed off when we install the core this next (last?) time as they don't do us much good and are probably in the way.
Throughout this build we've tried to keep currently unused bracketry intact right until we must delete for whatever reason or we're certain it won't be needed later. I've eyed those tube retainers before and now is the time to delete them.
While the dash is off for core install, we'll also be lining what we can of the inner shell with our sound dampening scraps and attempting again to calibrate the speedo.
It's a process.
Do NOT ground the core. That creates a path to ground. As long as the cooling system has good coolant and you do not have more than 0.4V in the coolant while the engine is running, you will be fine. Here is a link to a TSB from Ford about grounding heater cores, or rather, NOT grounding them.
Tech Tip: Heater Core Electrolysis/Leakage
Tech Tip: Heater Core Electrolysis/Leakage
The Miata HVAC system is all plastic and there's no obvious ground point for the core, it would need to be specifically added for the purpose and I think I'd have noticed.
Over fifty years of car ownership and this is only the second heater core I've ever dealt with, they seem pretty reliable overall.
I find that Ford TSB very interesting. Earlier model year Fords with older so-called convential coolant had grounded heater cores from the factory. The noted vehicles listed in the TSB are factory filled with the first generation of the newer OAT or HOAT coolants, it may even only be the pale yellow G-05 coolant.
Last edited by DeaconBlue; Apr 23, 2016 at 11:38 AM.
MECP Certified Installer
Joined: Feb 2009
Posts: 3,176
Likes: 3
From: Mesquite, TX-DFW
I find that Ford TSB very interesting. Earlier model year Fords with older so-called convential coolant had grounded heater cores from the factory. The noted vehicles listed in the TSB are factory filled with the first generation of the newer OAT or HOAT coolants, it may even only be the pale yellow G-05 coolant.
De-mineralized water is not conductive at all and combined with ethylene glycol is still non-conductive. It's the crap that gets dissolved in it that makes it conductive.
Use the regular green stuff.

