
She Followed Me Home, Honest

Good, I live to entertain.
And yes, I did/do already know about the series differences, but they both employ what I consider to be excessive complexity and that's what I want to eliminate.
As I await the cable assembly from Mumbai (coming via "standard international shipping", whatever the hell that is...) I'm making an ACV block off plate, which I imagine will anchor the bottom of the port actuating cables. I've also figured out how to mod the sleeve rods and procured the necessary materials to do so, but I'm holding off till the cables actually arrive and I can confirm there's at least a chance this will all be possible.
I still need a clutch and header (the header could wait but I don't wanna...) before the engine swap can be done, and maybe $100 or so in oil, coolant, random gaskets/seals, whatever.
Now that I think about it, I also need a Miata gauge cluster. Faced with our damaged unit in the Z, I donated my cluster (with VDO mods) to the Z and now have none for the FC. I have the VDO gauges (water & oil) but no cluster to install them in.
*sigh*
Just another detail.
A slight diversion:
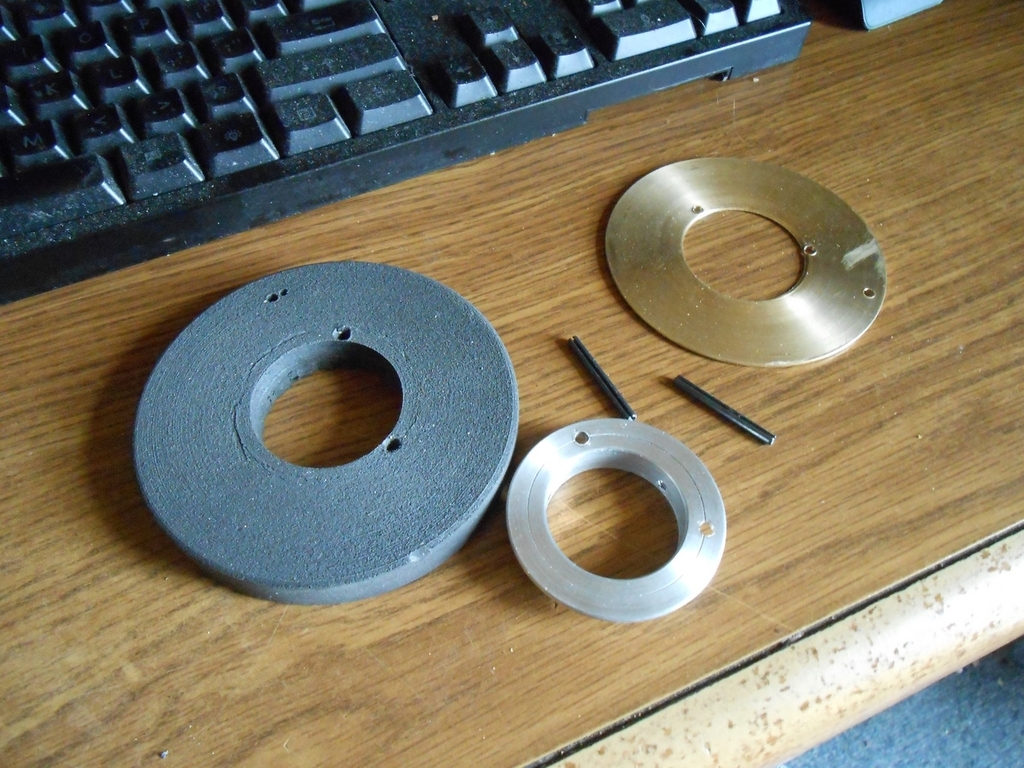
This is my fifth attempt adapting the horn & turn signal cancel from the Audi wheel to the Lexus switch...on the Z column. The requirements are simple but the confines are very tight and all the bits must be precisely aligned.
The black plastic disc serves as a spacer and electrical isolator for the horn slipring (brass). I don;t know what this stuff is...I had a sheet of it, so I used it. It's very soft and doesn't machine very cleanly, but it's what I have and will do. The aluminum ring centers/locates the parts together and along with the brass disk, helps reinforce the roll pins (which knock back the turn signal lever).
The pins are located such that cancel happens with 45� of wheel spin instead of the more traditional 90�- that's how Lexus did it, so I did too.
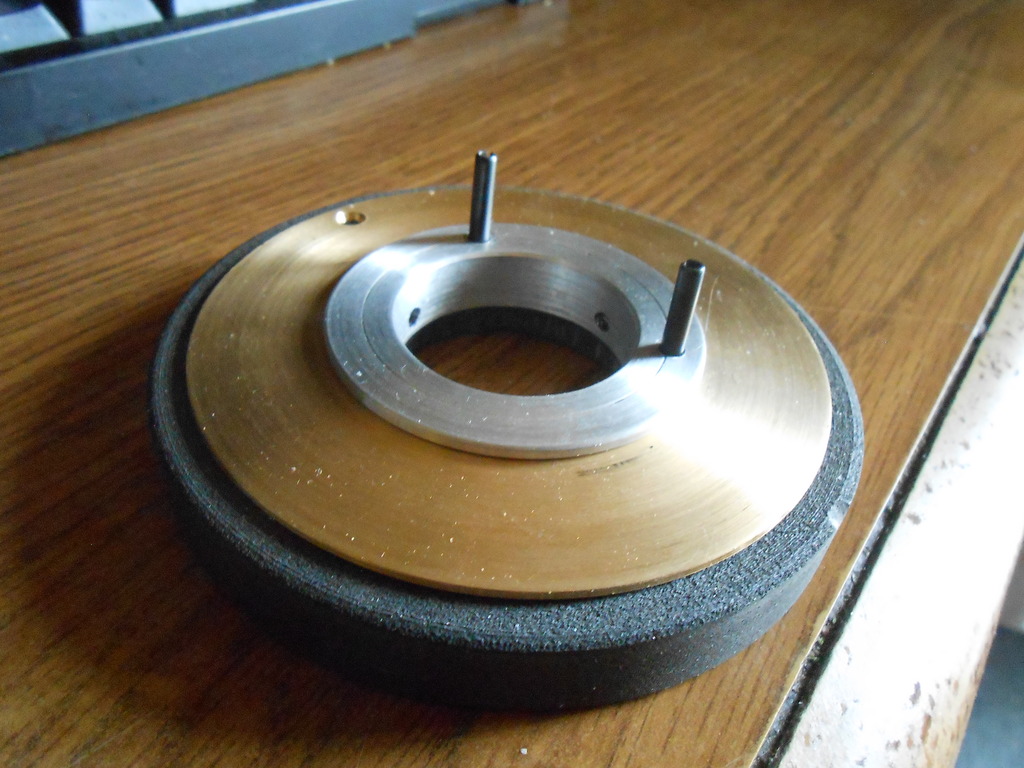
It's all a light press fit together but will be glued after test fitting. My electrical stuff is over at Sigfrid's and I need to solder the horn wire to the brass slipring before final assembly, so I don't accidentally melt the plastic below. It might explode or something.
Meanwhile, I'm now trying to get the big *** socket needed to replace the flywheel on the FC.
I've got all the parts for the flywheel/clutch but can't put them on till I find this tool. I don't want to spend $30 on a tool I'll use once.
This is my fifth attempt adapting the horn & turn signal cancel from the Audi wheel to the Lexus switch...on the Z column. The requirements are simple but the confines are very tight and all the bits must be precisely aligned.
The black plastic disc serves as a spacer and electrical isolator for the horn slipring (brass). I don;t know what this stuff is...I had a sheet of it, so I used it. It's very soft and doesn't machine very cleanly, but it's what I have and will do. The aluminum ring centers/locates the parts together and along with the brass disk, helps reinforce the roll pins (which knock back the turn signal lever).
The pins are located such that cancel happens with 45� of wheel spin instead of the more traditional 90�- that's how Lexus did it, so I did too.
It's all a light press fit together but will be glued after test fitting. My electrical stuff is over at Sigfrid's and I need to solder the horn wire to the brass slipring before final assembly, so I don't accidentally melt the plastic below. It might explode or something.
Meanwhile, I'm now trying to get the big *** socket needed to replace the flywheel on the FC.
I've got all the parts for the flywheel/clutch but can't put them on till I find this tool. I don't want to spend $30 on a tool I'll use once.
I am not sure about this since I have not tried it myself, but 54mm is very close to 2-1/8". If someone can confirm that the English size fits/works, you maybe able to find a better deal on a used impact socket in that size. There are a few of them on eBay.


Thanks for the offer, Tony, that's very kind.
I decided to try my Plan C, hail mary fallback option- a "surplus" store I've been going to for almost 60 years (seriously...for my 7th or 8th birthday I got an army surplus folding backpack shovel from there and they still sell 'em today).
The place is a total mess- IF they have what you need, it's up to you to find it and you'd better have a current tetanus shot.
Dunno why I bitch...they did have a 2 1/8" socket AND the 3/4>1/2" adaptor for a mere $8.95.
So, that was half the battle won, now, how to restrain the engine?
I've been researching various methods, most of which seem to involve infinity length breaker bars, the efforts of many burly men or bridge building size impact drivers...and I'm a bit short of any of that.
I bowled up and sat at the engine to ponder my options; thought I'd check to see how the socket fit.
Fine.
Brought out the 1/2" drive impact, see how the adaptor fit.
Fine.
Put the two together, thought "Why not?" and hit the nut with power.
RAT-A-TAT-TAT-TAT-TAT....ZINGGG!!!
I wasn't even holding the flywheel by hand, my first thought was that the adaptor had broken, it never occurred that the nut had actually come off so easily.
But it had.
I am one extraordinarily lucky geezer.
You know, the same thing happened when I did the rear spindles on the Z. It's a legendary rite of passage in the community and I'd marinated in multipage horror stories that ended in tears. When it came time to do it, I pulled them out by hand...didn't even need a hammer.
Yeah, that's lucky.
Doused the flywheel/shaft with Deep Creep and will see how removing the wheel itself goes.
Way things are going, next time I go into the garage the flywheel will be laying on the floor.
I had the same experience when I removed my flywheel nut. The front pulley bolt was a different story. That little bastard was on there with all of the force that Thor, Odin, Yoda, and God himself put onto it.
After breaking a 1/2 in breaker bar on the front bolt, i got my old worn 1/2in Blue Point rattle. Gun. Took a couple of compressor tanks worth of air. I just keep hammering on it, it finaly came out. I had watched Aaron Cake video on rebuilding, and used his technic to romove the flywheel. One wack and it let loose. I was pleasently suprized how easy it came off
I was surprised how difficult it was to find a shop who could resurface the flywheel, but it's finally done: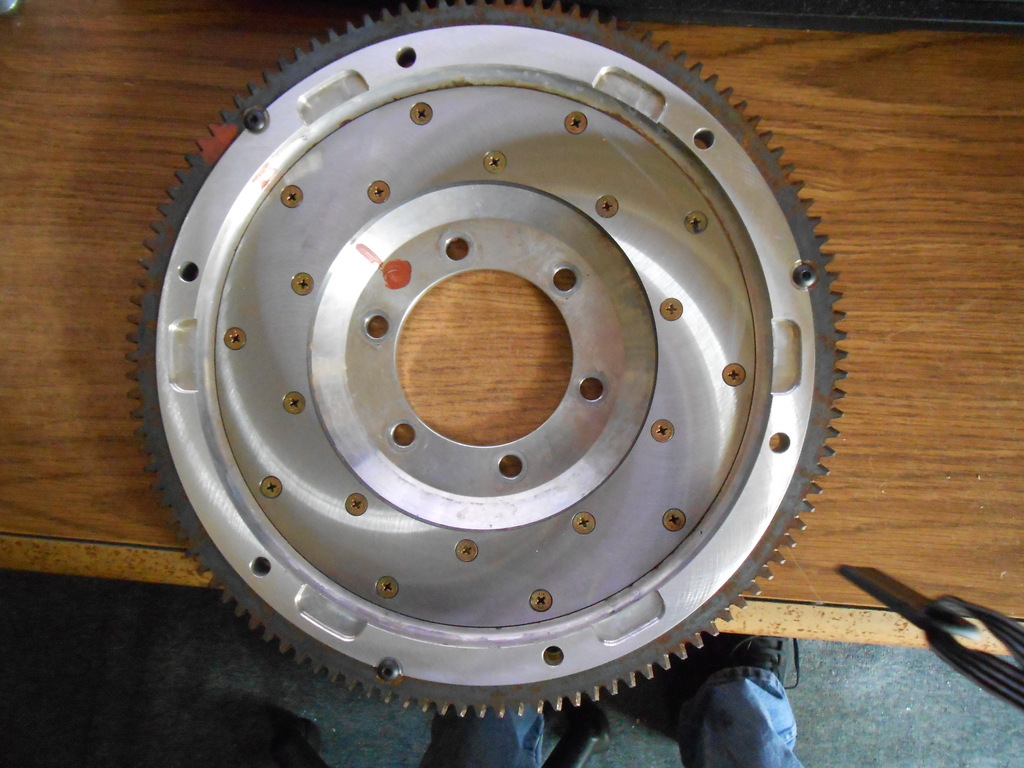
Minor progress has been made on the engine, most notably, finishing the thermowax water feed delete. The bung on the waterpump housing had already been removed and drilled/tapped to recieve the BMW fan trigger. I finally pulled the return bung on the rear iron, made a brass plug and drove it in with some JBWeld. Shouldn't leak...I hope.
Sprocket started right up (after sitting for over a month, I was quite surprised) and made her final journey from the lot into the driveway.
What a trooper.
Not too far from swapping out the engines now.
Yeah, I'd assumed that any reasonable transmission shop could do it but that did not turn out to be the case. I think they all must sub out the work to the place I eventually found.
The counter guy (who later turned out to be the man who actually ground my part) was not even remotely fazed by my aftermarket flywheel and even told me that it didn't look that bad and maybe didn't need any work but I figured I was already taking a risk (what if I hate the flywheel?) and why not maximize my chances of success?
It cost $45.
Today I realized I have no pilot bearing seal...damnit.
While I marinated in regret, I decided to really punish myself and make some gaskets.
Specifically, the water pump housing>front iron and wp>housing.
This is something old people become adept at because we're always forgetting to order **** in a timely manner and sometimes Rock Auto doesn't carry what you need.
This is what senility feels like kids...you spend all sorts of time cleaning/painting parts and then totally blow off the gaskets necessary to assemble them.
Just you wait.
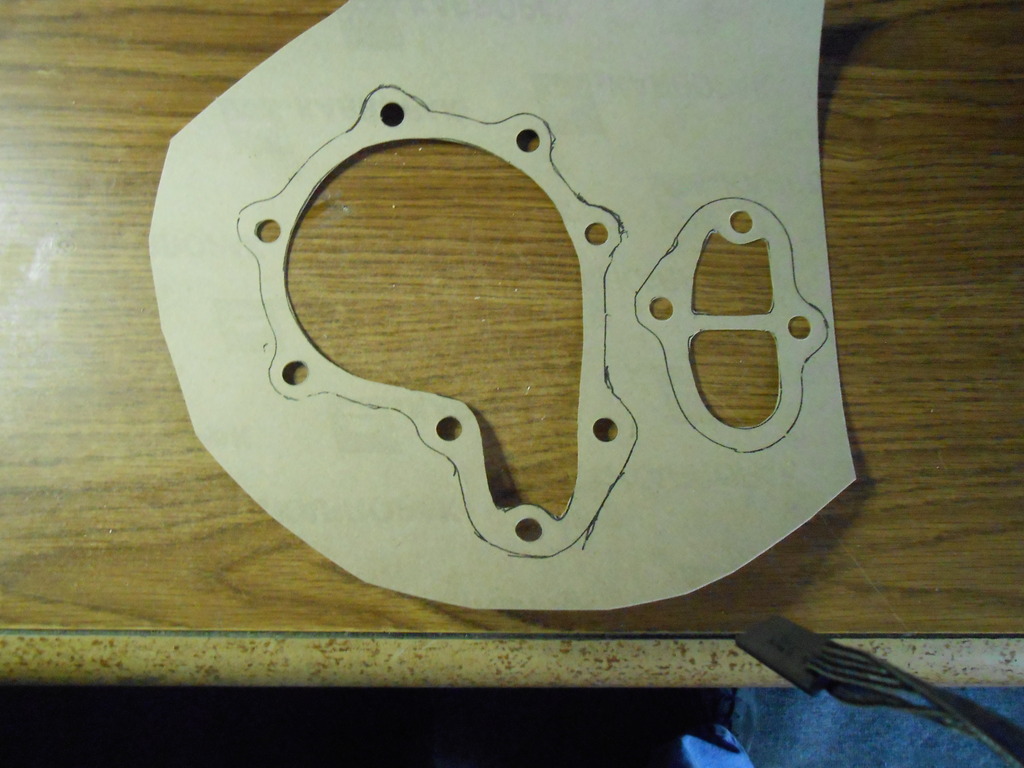
Anyway, I've had this roll of gasket paper forever and the first thing I had to do was unroll it, tack it to a wall in the sunlight and hope it would uncurl and lay semi-flat.
Which it did, in about a day.
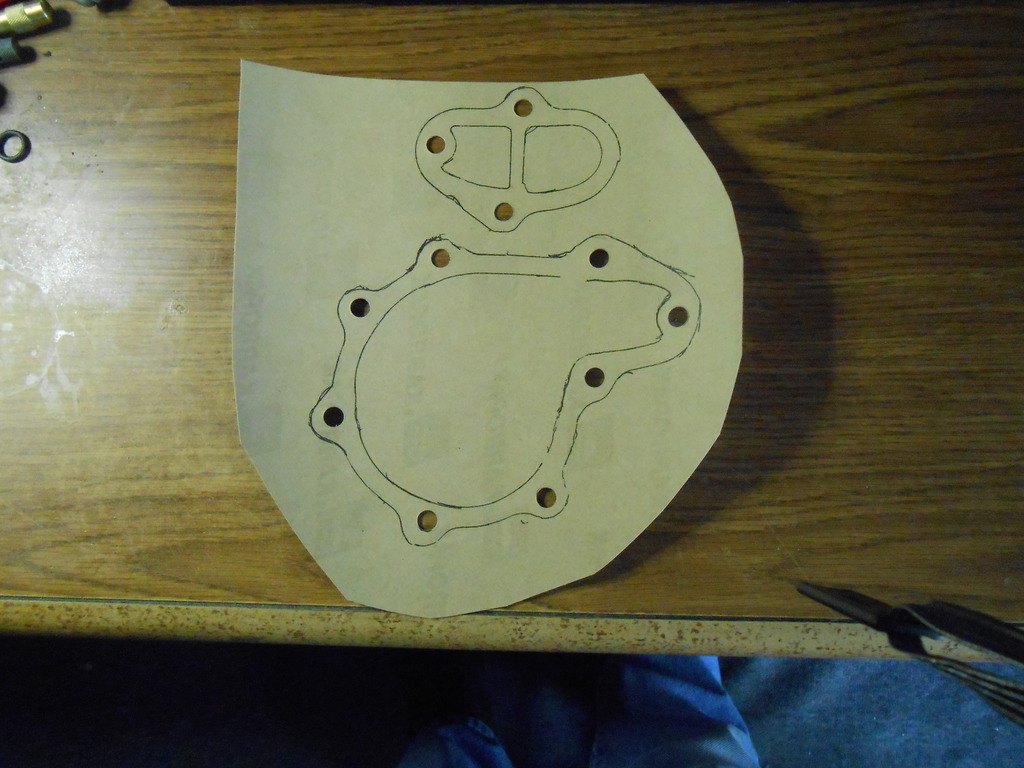
Then you trace out the shapes:

Next up are the holes and here's the easiest way to do them- use a brad bit meant for woodworking.
They not only have a little spike in the center (really easy to locate nicely on the pattern) but also on the outside edges, so they cut a very clean outer circumference.
Like so:
Next you want to cut/remove the centers of the gasket.
It's a lot simpler to cut the longer you keep the shape attached to the main sheet.
Eventually, you have this:
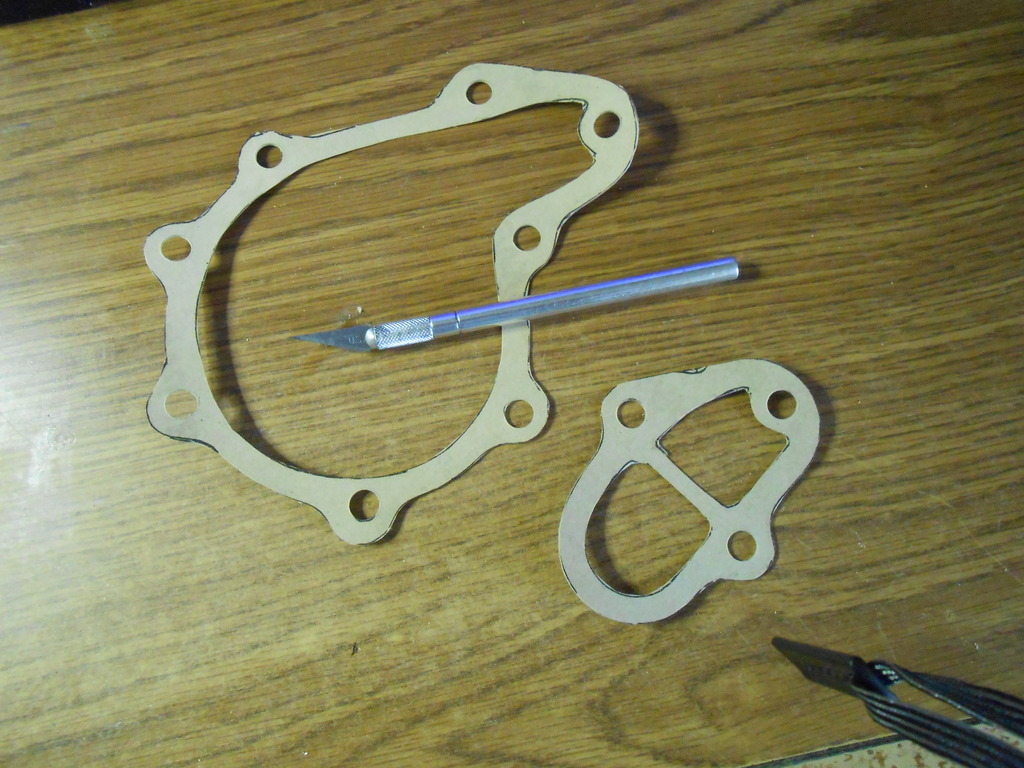
Finally, test fit and trim any excess.
So, yay!, I can finally put the front of the engine together.
Next up, the dreaded vacuum spider.
Wait, you say (probably not),Whatever happened to that cockamamie cable system you went on about?
Well, it's still on- in fact the part from Mumbai showed up two days ago and it's perfectly fine, much nicer than I expected for the absurdly low price.
However, as I awaited it's delivery, I changed my plan of attack.
I realized that I was already introducing gigantic variables into this project- stuff like headers and a lightweight flywheel and not least, a totally unknown engine. I decided it would make sense to get the car together and running with the already familiar stock intake and then modify from there.
Set a baseline, as it were.
I have a complete spare intake, which can be mocked up off the car and then moved over later.
First though comes swapping out the motors, slightly difficult without an engine hoist.
The counter guy (who later turned out to be the man who actually ground my part) was not even remotely fazed by my aftermarket flywheel and even told me that it didn't look that bad and maybe didn't need any work but I figured I was already taking a risk (what if I hate the flywheel?) and why not maximize my chances of success?
It cost $45.
Today I realized I have no pilot bearing seal...damnit.
While I marinated in regret, I decided to really punish myself and make some gaskets.
Specifically, the water pump housing>front iron and wp>housing.
This is something old people become adept at because we're always forgetting to order **** in a timely manner and sometimes Rock Auto doesn't carry what you need.
This is what senility feels like kids...you spend all sorts of time cleaning/painting parts and then totally blow off the gaskets necessary to assemble them.
Just you wait.
Anyway, I've had this roll of gasket paper forever and the first thing I had to do was unroll it, tack it to a wall in the sunlight and hope it would uncurl and lay semi-flat.
Which it did, in about a day.
Then you trace out the shapes:
Next up are the holes and here's the easiest way to do them- use a brad bit meant for woodworking.
They not only have a little spike in the center (really easy to locate nicely on the pattern) but also on the outside edges, so they cut a very clean outer circumference.
Like so:
Next you want to cut/remove the centers of the gasket.
It's a lot simpler to cut the longer you keep the shape attached to the main sheet.
Eventually, you have this:
Finally, test fit and trim any excess.
So, yay!, I can finally put the front of the engine together.
Next up, the dreaded vacuum spider.
Wait, you say (probably not),Whatever happened to that cockamamie cable system you went on about?
Well, it's still on- in fact the part from Mumbai showed up two days ago and it's perfectly fine, much nicer than I expected for the absurdly low price.
However, as I awaited it's delivery, I changed my plan of attack.
I realized that I was already introducing gigantic variables into this project- stuff like headers and a lightweight flywheel and not least, a totally unknown engine. I decided it would make sense to get the car together and running with the already familiar stock intake and then modify from there.
Set a baseline, as it were.
I have a complete spare intake, which can be mocked up off the car and then moved over later.
First though comes swapping out the motors, slightly difficult without an engine hoist.

open air trusses in garage, above car
I've used many times a 5 foot piece of 1 1/4 steal water pipe spanning a couple of trusses. A bit of chain to suspend a chain hoist or come-a-long to the pipe. once engine is airborne, rotate the pipe, and roll the engine to side of the car. The chain slips on the pipe quite easily. I have never owned the correct hoist. has worked many times
You can find these at flea markets, craigslist tool sellers, and ebay for a decent price sometimes.
https://www.mscdirect.com/product/details/48424501
I have a friend with a flywheel grinder. You know what else it works real good on? Disc brakes.
https://www.mscdirect.com/product/details/48424501
I have a friend with a flywheel grinder. You know what else it works real good on? Disc brakes.
A question for those more experienced than I (which would be almost everyone)...
When assembling the waterpump housing to the engine and the pump to the housing, do you:
-Use just the paper gasket
-Use just sealant
-Use both
Asking for a friend.
When assembling the waterpump housing to the engine and the pump to the housing, do you:
-Use just the paper gasket
-Use just sealant
-Use both
Asking for a friend.
MECP Certified Installer
Joined: Feb 2009
Posts: 3,176
Likes: 3
From: Mesquite, TX-DFW
I used both. I just barely coated the mating surfaces with RTV and threw the water pump on.
The reason I coated the mating surfaces with RTV is because I had to remove the original asbestos gasket with a razor blade, so I wanted to fill in any knicks or cuts I caused. This was 6 years ago and I am leak free.
The reason I coated the mating surfaces with RTV is because I had to remove the original asbestos gasket with a razor blade, so I wanted to fill in any knicks or cuts I caused. This was 6 years ago and I am leak free.
I use both.
With paper gaskets, I personally have some copper spray gasket that I use to cover the little imperfections. just don't spray too much or it will bleed into the fluid you are trying to seal against. A small skim of RTV also doesn't hurt. i use Toyota FIPG black RTV. It is the best stuff that I have found. The only downside is that it stains your hands because it's so sticky.
With paper gaskets, I personally have some copper spray gasket that I use to cover the little imperfections. just don't spray too much or it will bleed into the fluid you are trying to seal against. A small skim of RTV also doesn't hurt. i use Toyota FIPG black RTV. It is the best stuff that I have found. The only downside is that it stains your hands because it's so sticky.

Sigfrid carved time from his busy schedule for a work day yesterday and we made full use of it.
Changed the oil and filter, flushed the cooling system, retorqued the front wheel bearings we'd installed last time, removed the dash to redo some wiring and install a new headunit and door speakers...a bunch of fairly small stuff that was clogging up our punch list.
It went great, even my new TS cancel/horn ring was working.
Then, on the end-of-day test ride, it all went to hell.
We're on the interstate doing about 70 and Sigfrid says "That's weird, the oil pressure just dropped to zero...". there were no weird noises or smoke or anything and I initially thought the sending unit wire had been jostled/come loose because it's right next to the filter that had just been changed.
About a mile later, we pulled over.
The whole passenger side of the bay was covered in oil.
Everywhere.
There was no immediately obvious source and our primary concern was getting off the freeway and getting the Z home...which took about 3 hours. TripleA is not very punctual, it took an hour and a half for the truck to show up.
By the time we got back to his place it was getting dark and neither of us felt like checking it out further, so as of this morning I have no idea how dire the situation is.
Sigfrid will check it out today (I hope) and we'll see.
Up to the very moment we pulled over, the car was running beautifully, I hope this isn't a terminal problem.
We do have a second engine (of unknown provenance), so there are options at least but I'll just have to wait and see what S. finds out.
Meanwhile, it's full speed ahead on my FC, hope to get the engines swapped this week.
So, poop.
Last edited by clokker; May 29, 2016 at 09:07 PM.