
Modernizing the S5 Tails.


Thread Starter
Full Member
Joined: Aug 2007
Posts: 144
Likes: 0
From: Australia
Modernizing the S5 Tails.
Well today i went and removed the diffuser from the tails. Didn't find a write up as such so i'll do a little one myself, using as many pictures as needed.
First thing is to remove the tail lights, remove the 6 10mm nuts from inside the hatch for each tail light, remove light globes(label them if you have trouble knowing which goes where.). After this is done remove the 3 little screws on the back of the tail light using a phillipshead screwdriver.
I preheated my oven(conventional) to 120 degrees celcius or about 250 for you american guys. Now this is where it varies a little, i had to bake one for about 10 mins and it was done in one go, the other was 10 mins and then two more times for 5 mins each.

After you have heated the lights enough, you a flat screwdriver to push back the plastic coloured part of the tail(sorry don't know the proper name for it), i say push because prying them like others said looked like it was going to mess the shape of them up. Probably while your doing this the rubber seal around the side may come out, thats ok.
Once you get the tail lights apart, remove the diffuser, and put them back together(i heated mine up a little bit more so i could seal them tight).

After this put the rubber seal back on, i used a glue gun to do this.

Now just put it all back together in the reverse order and your done.
Before:
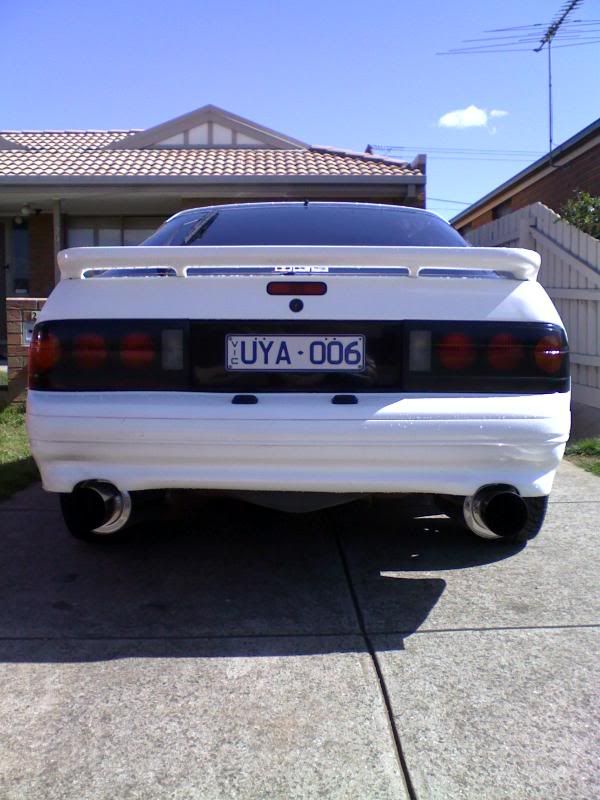
After:

First thing is to remove the tail lights, remove the 6 10mm nuts from inside the hatch for each tail light, remove light globes(label them if you have trouble knowing which goes where.). After this is done remove the 3 little screws on the back of the tail light using a phillipshead screwdriver.
I preheated my oven(conventional) to 120 degrees celcius or about 250 for you american guys. Now this is where it varies a little, i had to bake one for about 10 mins and it was done in one go, the other was 10 mins and then two more times for 5 mins each.
After you have heated the lights enough, you a flat screwdriver to push back the plastic coloured part of the tail(sorry don't know the proper name for it), i say push because prying them like others said looked like it was going to mess the shape of them up. Probably while your doing this the rubber seal around the side may come out, thats ok.
Once you get the tail lights apart, remove the diffuser, and put them back together(i heated mine up a little bit more so i could seal them tight).
After this put the rubber seal back on, i used a glue gun to do this.
Now just put it all back together in the reverse order and your done.
Before:
After:
Originally Posted by Snailz
After this is done remove the 3 little screws on the back of the tail light using a phillipshead screwdriver.
Originally Posted by Snailz
I preheated my oven(conventional) to 120 degrees celcius or about 250 for you american guys. Now this is where it varies a little, i had to bake one for about 10 mins and it was done in one go, the other was 10 mins and then two more times for 5 mins each.
Once you get the tail lights apart, remove the diffuser, and put them back together(i heated mine up a little bit more so i could seal them tight).
Once you get the tail lights apart, remove the diffuser, and put them back together(i heated mine up a little bit more so i could seal them tight).
Thread Starter
Full Member
Joined: Aug 2007
Posts: 144
Likes: 0
From: Australia
Clear them up and buff? What you mean and how can i do it?  Previous owner did that tinted **** to them. But like a dumbass i used carby cleaner to clean it up.
Spent about two hours trying to clean the white dusty kind of stuff off the indicator lenses on the front, but the tails didnt get hit too badly otherwise...
I'll take a few night pics tonight, had a look yesterday and they look pretty sexy.
Previous owner did that tinted **** to them. But like a dumbass i used carby cleaner to clean it up. Spent about two hours trying to clean the white dusty kind of stuff off the indicator lenses on the front, but the tails didnt get hit too badly otherwise...
I'll take a few night pics tonight, had a look yesterday and they look pretty sexy.

yeah what you do is get fine grit sand paper , (1000 grit) or above and gently in a bucket of water start sanding until the whole light is done
next you get polishing compound- I USED 3M - Then you buff it out and it will come out like new
next you get polishing compound- I USED 3M - Then you buff it out and it will come out like new
Trending Topics
Umm Brap Brap
Joined: Mar 2008
Posts: 137
Likes: 0
From: Jaffrey, NH
^ exactly or you can scuff them up with some 1000 and get some clear coat and reclear them getting it done professional is recomended if you are not confident in your ability to paint. then when they are dry hit them with some 1500 and some polishing compound like El Nene 7 said.
i work in a body shop and thats how we fix head lights that have little scratches
i work in a body shop and thats how we fix head lights that have little scratches
Thread Starter
Full Member
Joined: Aug 2007
Posts: 144
Likes: 0
From: Australia
The tails aren't too bad or anything. Was just the front indicator lenses i had trouble with(the one below the FTP, also containing the parkers) because of the cross grid kinda thing on the back, i couldnt clean up in the lil grooves.


1308cc pure madness
Joined: Jan 2004
Posts: 213
Likes: 0
From: sacramento, CA
ive seen it done somewhere around this forum......some guys used 4" led trailer lights he got from ebay and wired them up...looked pretty clean...
heres the link....
https://www.rx7club.com/showthread.p...led+taillights
heres the link....
https://www.rx7club.com/showthread.p...led+taillights
Last edited by rspeed9i6; Oct 12, 2008 at 07:59 PM.


Thread
Thread Starter
Forum
Replies
Last Post
RCCAZ 1
1st Generation Specific (1979-1985)
5
Aug 11, 2015 07:05 PM
BATMAN
3rd Generation Specific (1993-2002)
82
Aug 15, 2003 08:20 AM