
Column Mounted Switchgear- A Journey Into Madness

Four hours in the yard today.
Hoping for a miracle, willing to settle for some good luck and in the end I got...bupkis.
No eureka! moments, just the realization that there is no easy fix.
I need a nap, pics later.
Hoping for a miracle, willing to settle for some good luck and in the end I got...bupkis.
No eureka! moments, just the realization that there is no easy fix.
I need a nap, pics later.
I took the rest of yesterday off and decided this morning that all my proposed "fixes" created more problems than they solved.
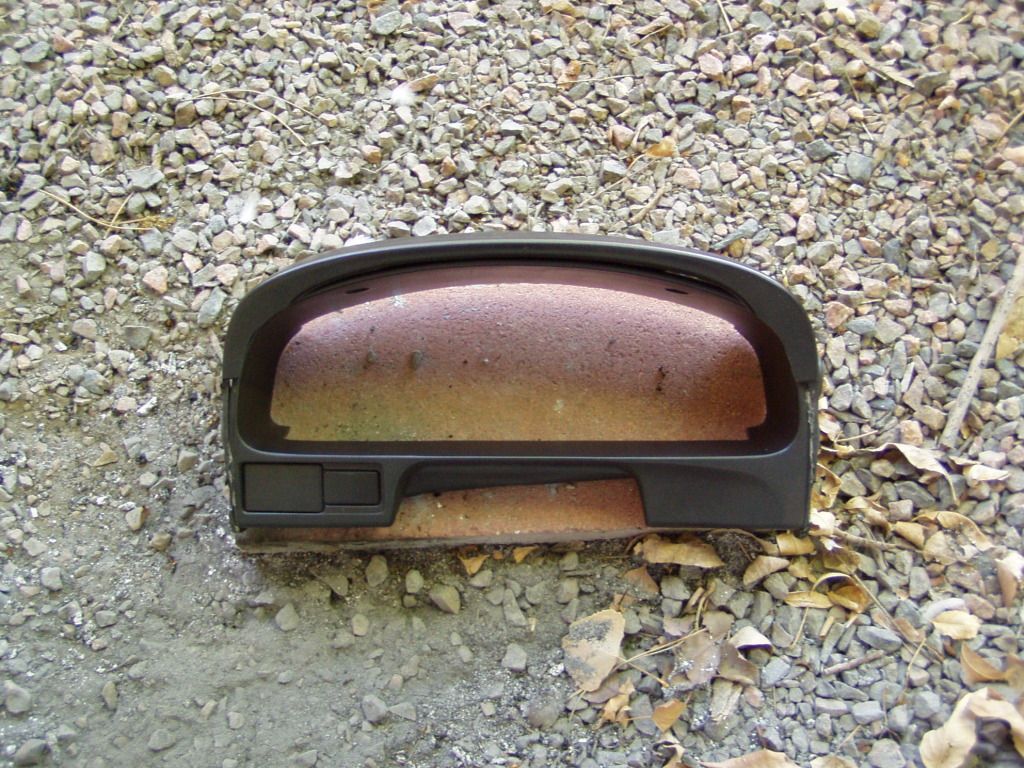
The bezel is getting cut.
But a slight backtrack first.
I've been working on integrating the Miata and FC faceplates (so the cluster would fit with the new bezel) and that project is done.
Learning from my past mistakes, this version is infinitely better structurally and aesthetically.
The first version's biggest failure was light leakage.
Unnoticeable in daylight, nighttime lighting exposed every bad gap/seam...it was horrible.
I used ABS "bondo" to caulk every joint and made styrene end caps for the housing body.
(Many pictures of this process fell below even my abysmal standards, so documentation is randomly spotty...)
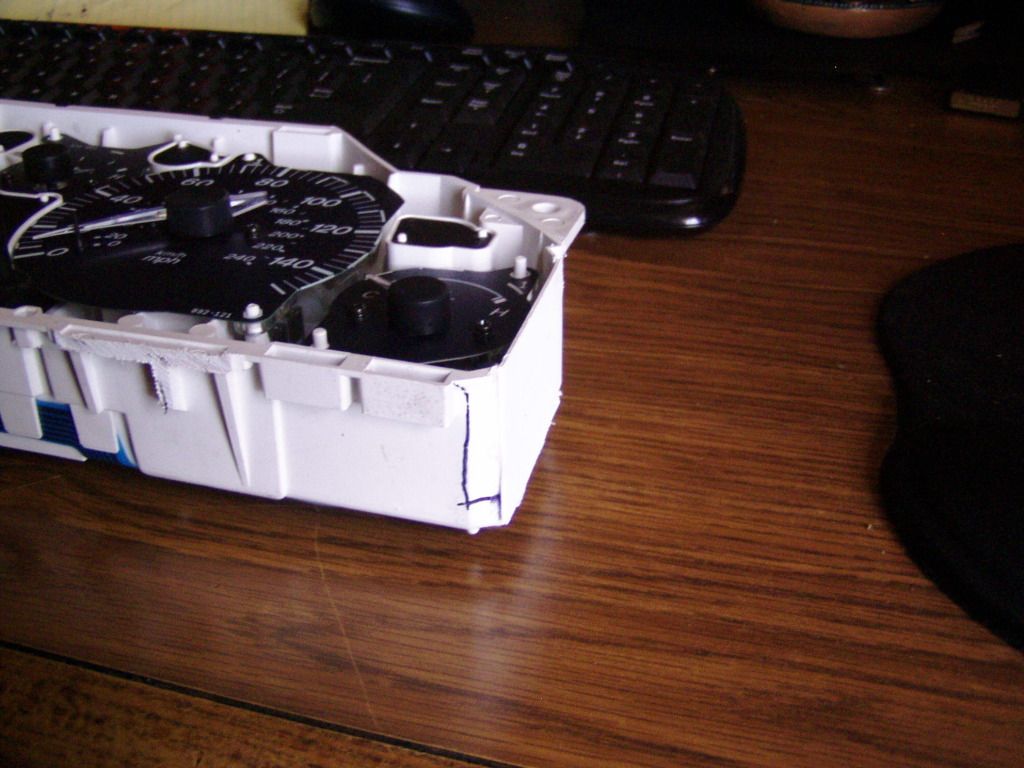
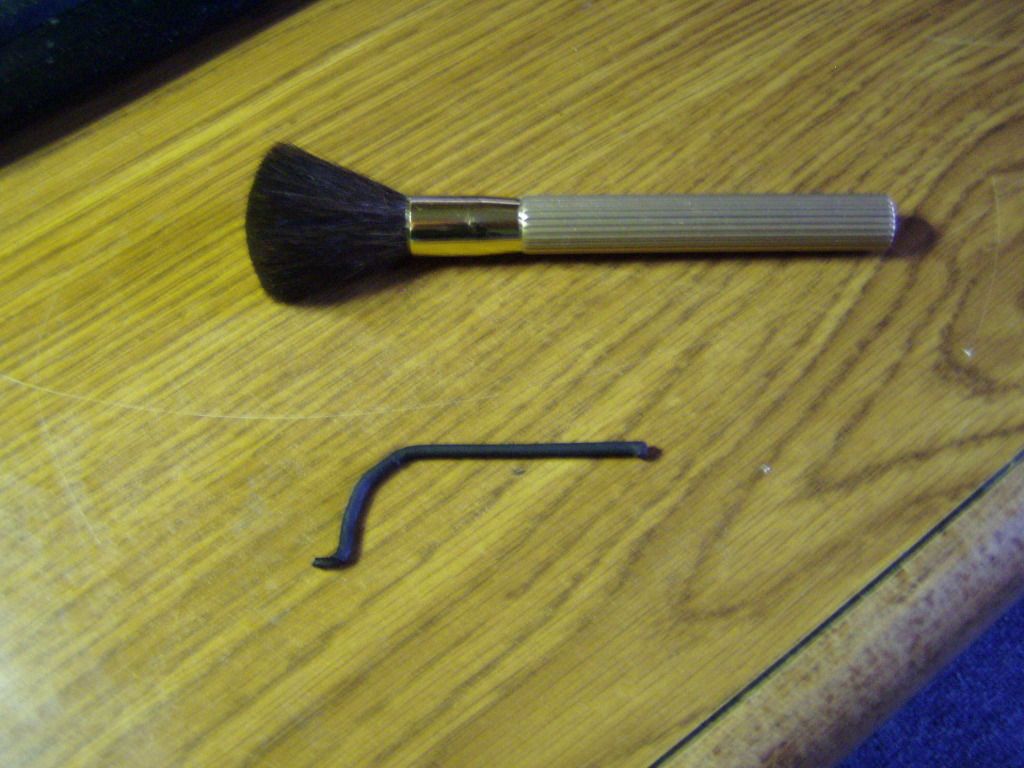
The middle shot shows the most important tool when working with gauges...some sort of makeup brush.
You DO NOT want to touch the dials or even the inside of the faceplate because you WILL leave a mark. A brush like this is the best way to clean the inevitable junk that will leap onto your spotless gauges.
This time I elected to use the original odometer reset hole in the FC faceplate, so a cranked extension was bent up and it just sits in a hole drilled in the end of the Miata reset pin.
Although I didn't realize it at the time, this was a fortunate decision.
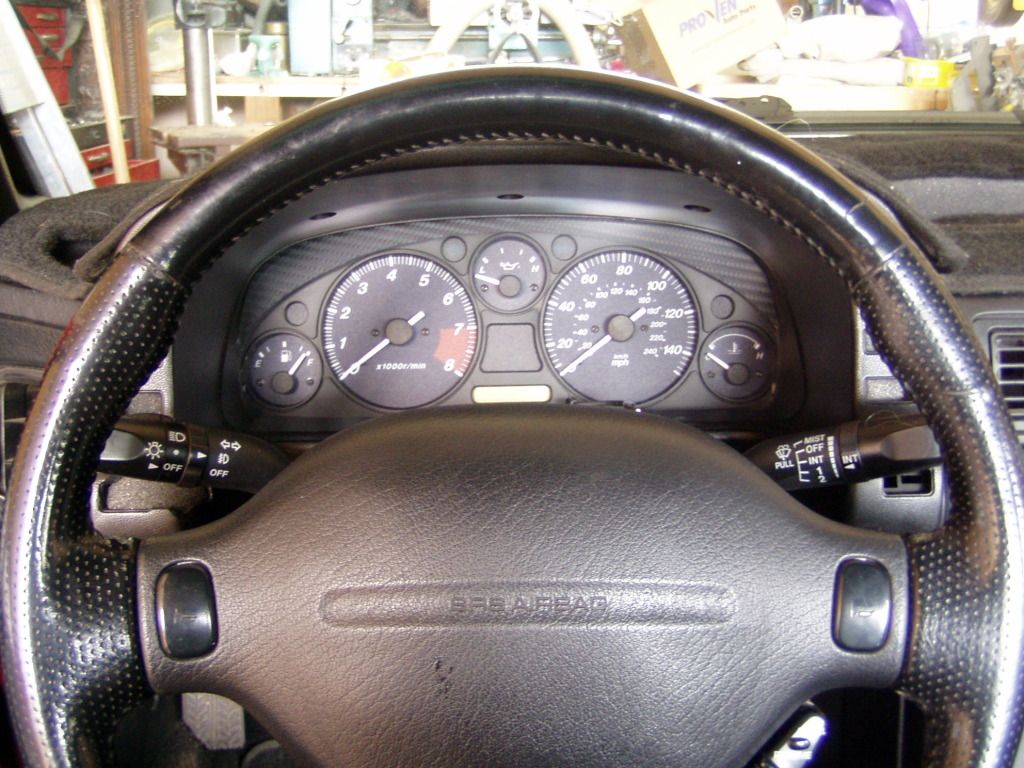
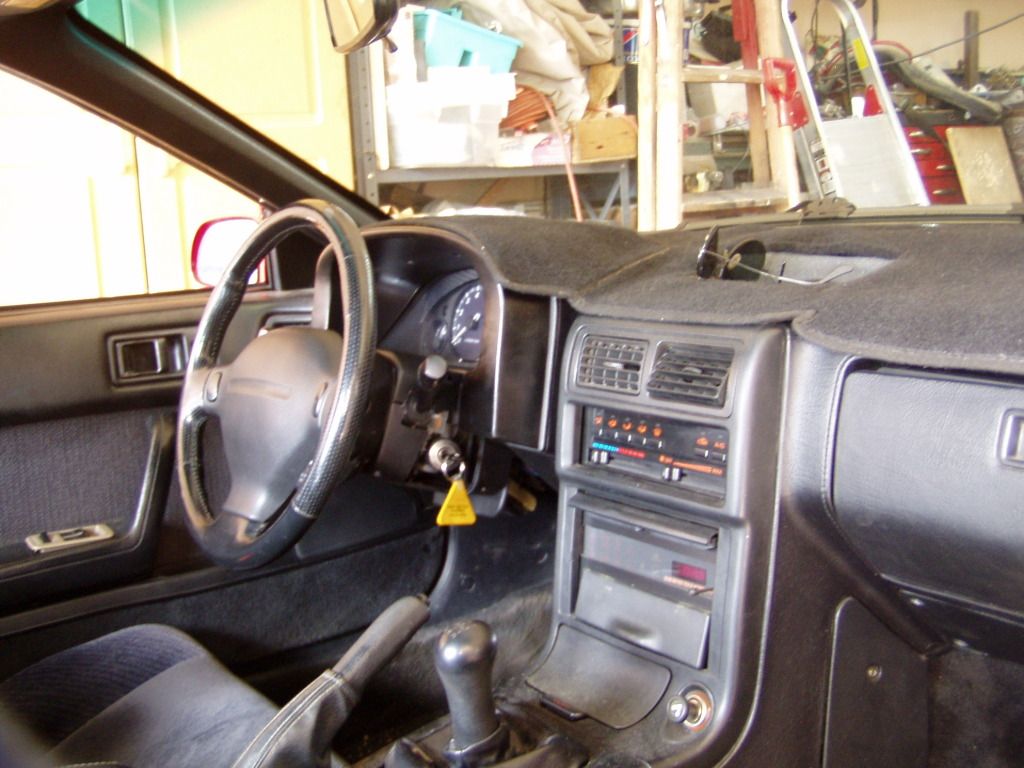
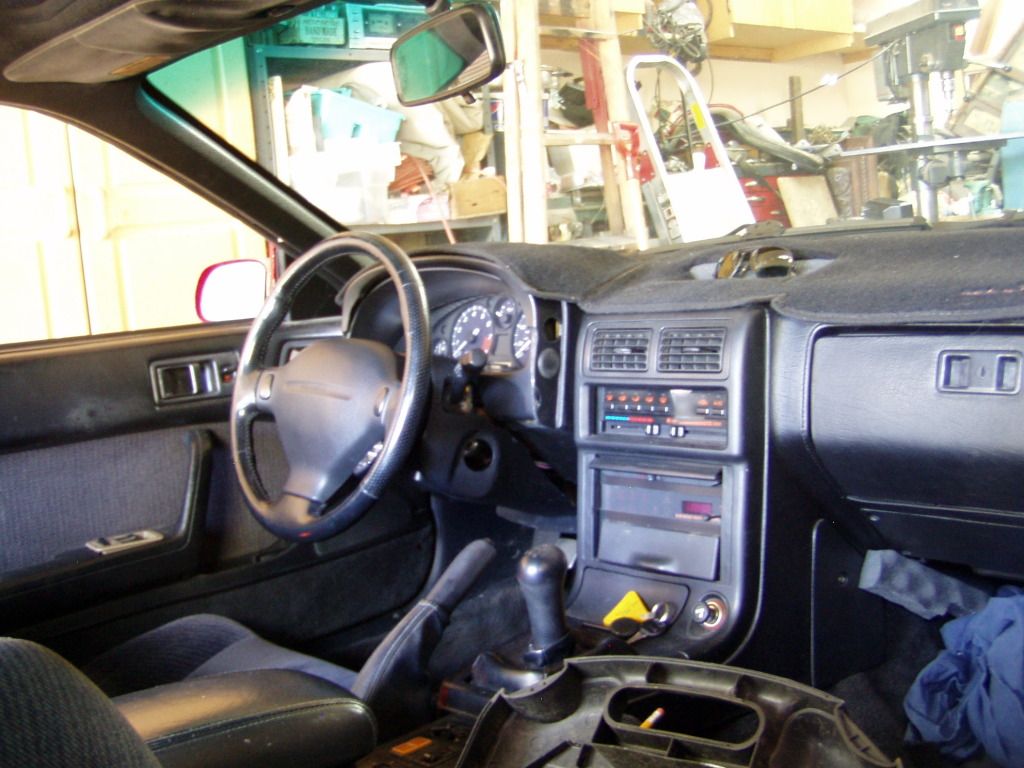
Gauges can now be final installed and introducing the new bezel!
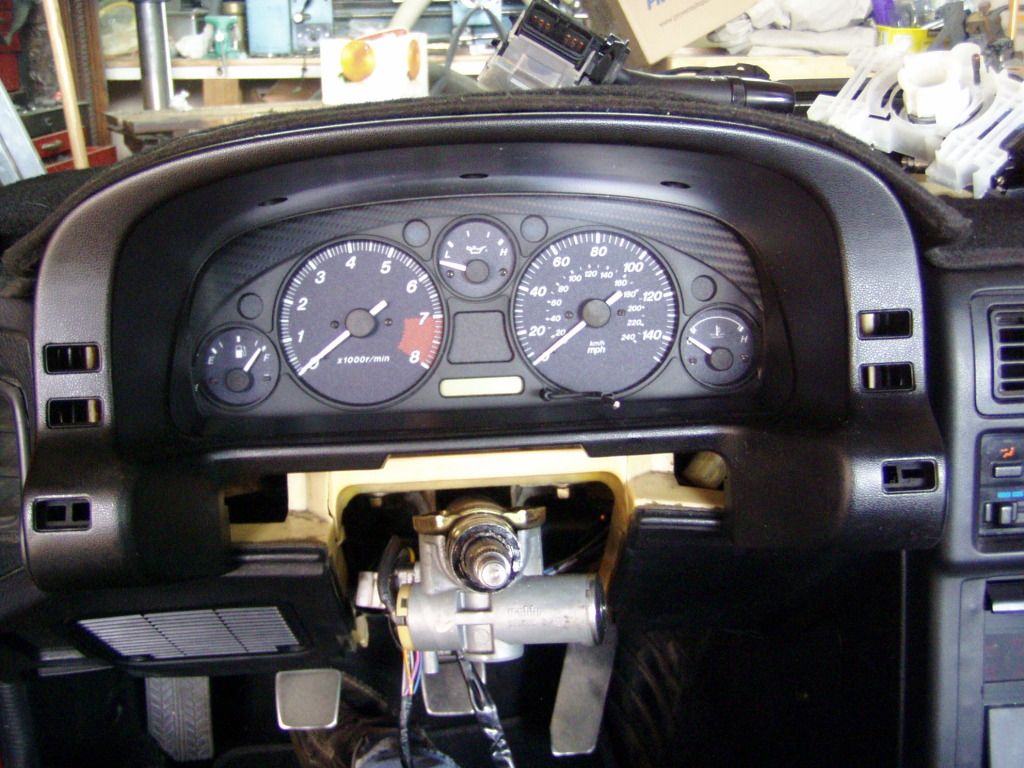
Pretty nice, eh?
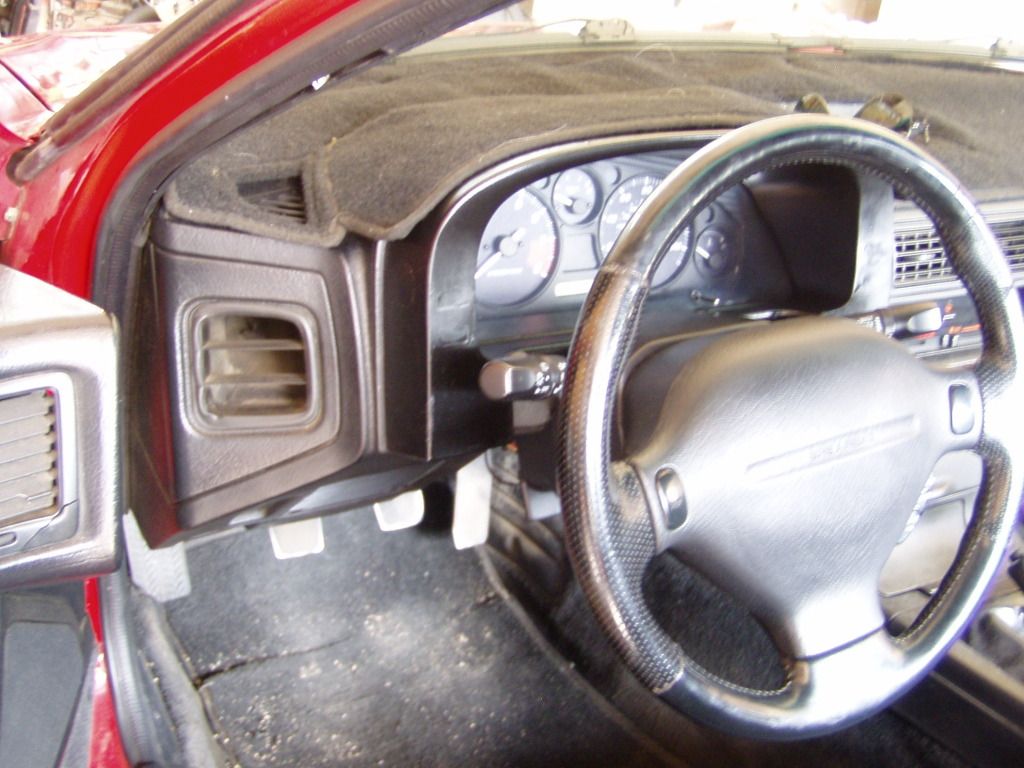
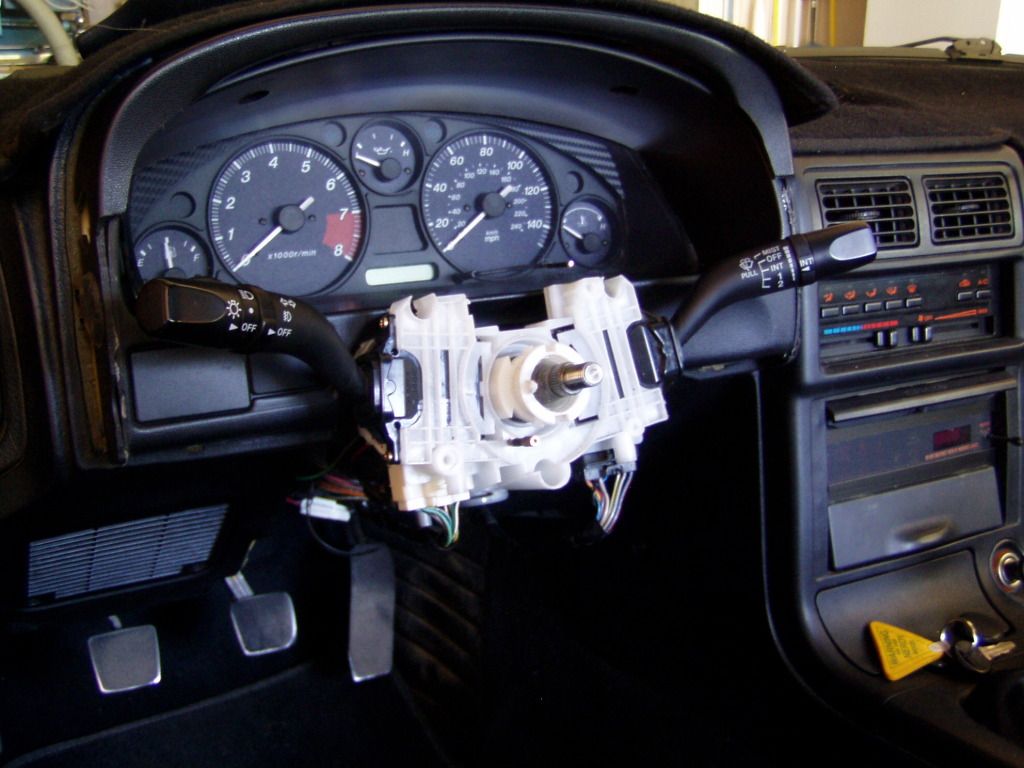
It leaves a lot more exposed plastic around the column than the coupe version but this is trivial compared to the biggest issue...this:
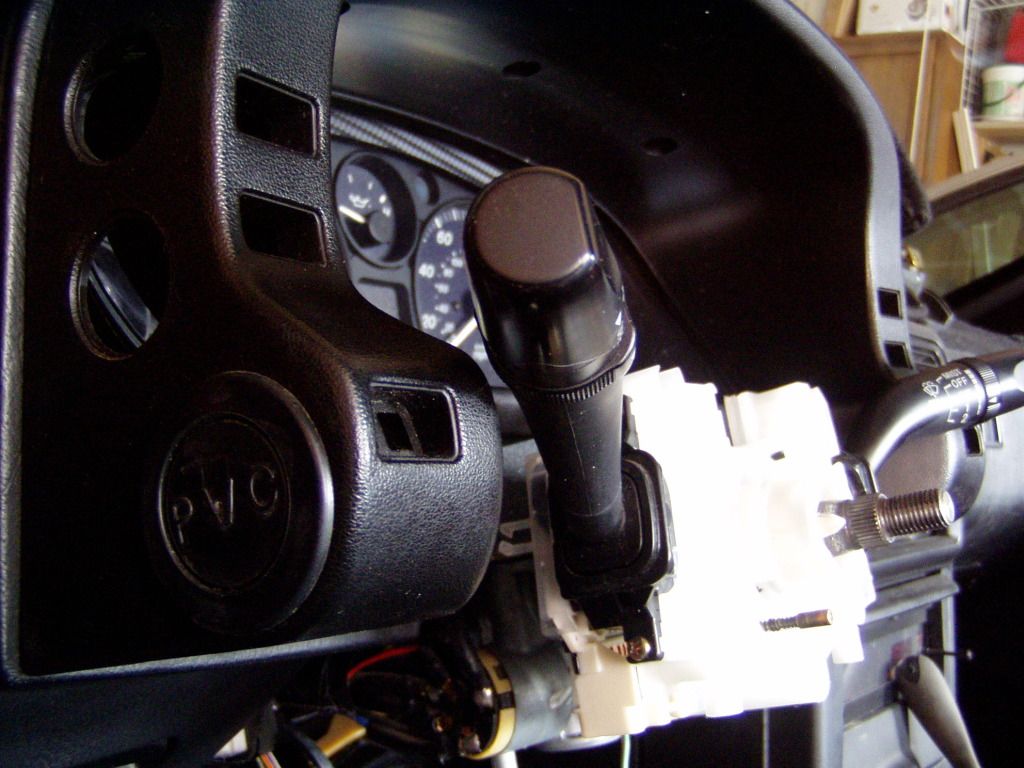
Doesn't look all that dire, does it?
It does look kinda goofy to have unexplained protrusions on the bezel but the switch clears fine EXCEPT you can't push the lever forward (towards the bezel) to engage HIGH beam.
(The wiper side is the same clearance but that stalk only gets pulled away from the bezel, never towards, so it's fine)
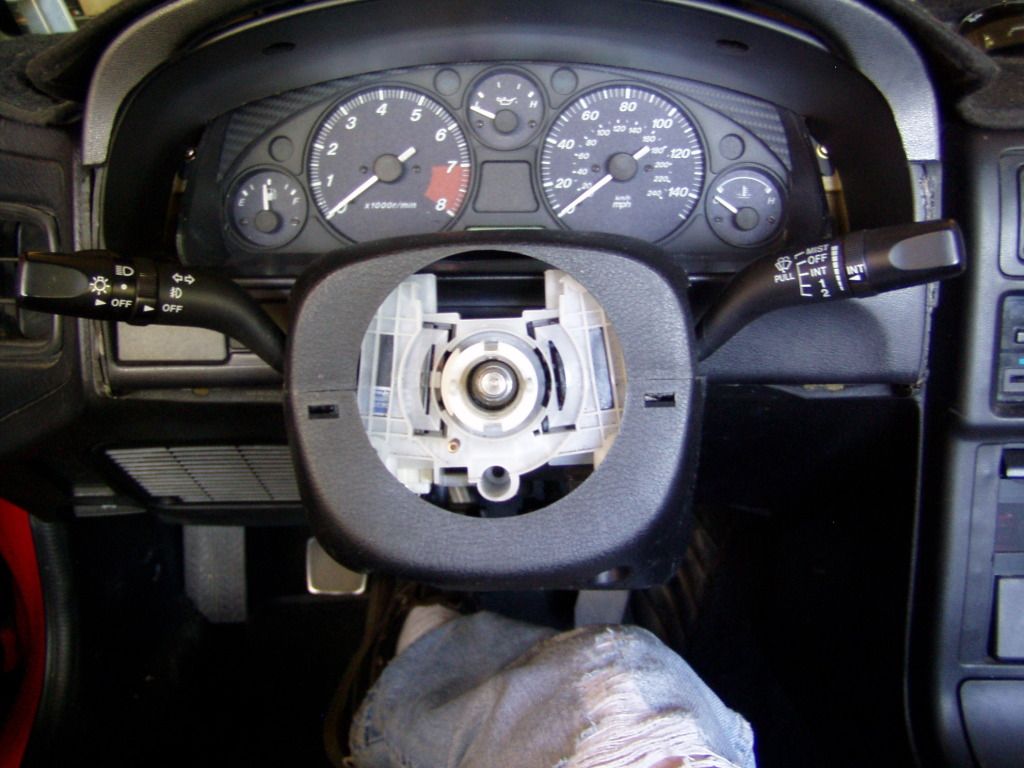
I compounded the issue by deciding that it had to clear when both HB and LEFT turn were engaged.
Naturally, this fell on an area of the bezel that was all compound curves and transitions...couldn't have fallen somewhere easy.
I made a guess, started a cut and expanded the hole till it worked.
Then, as much as possible I rationalized and cleaned up the edges.
Stuffed it full of foam to fill that and all the other holes in the bezel and we're here:
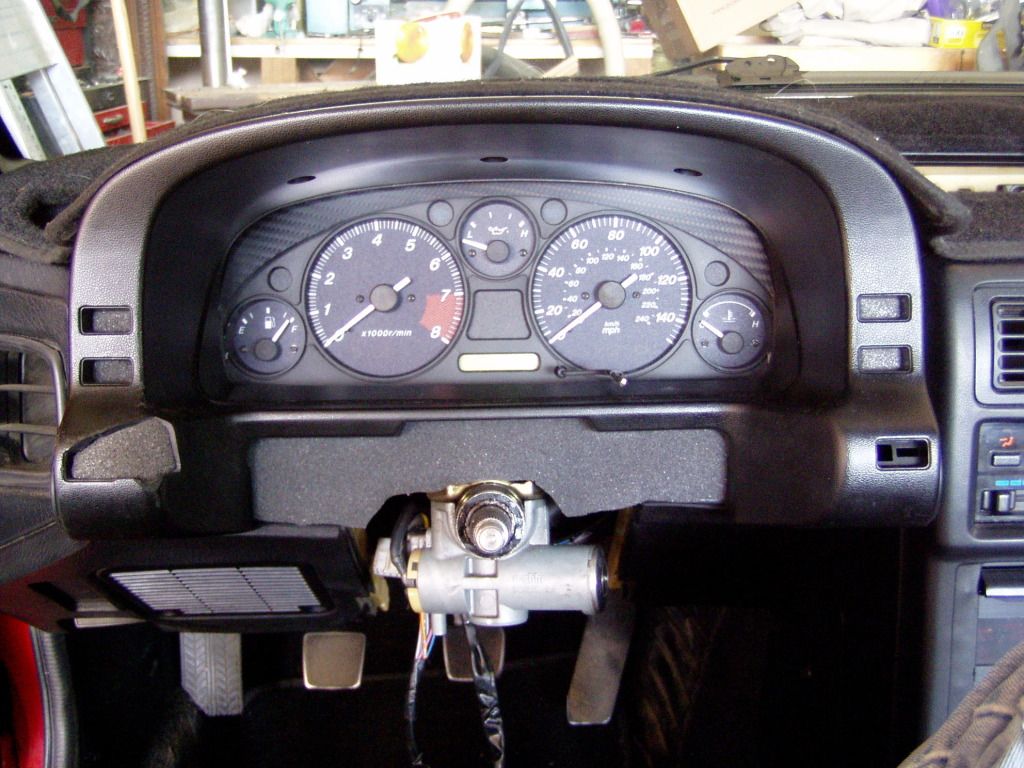
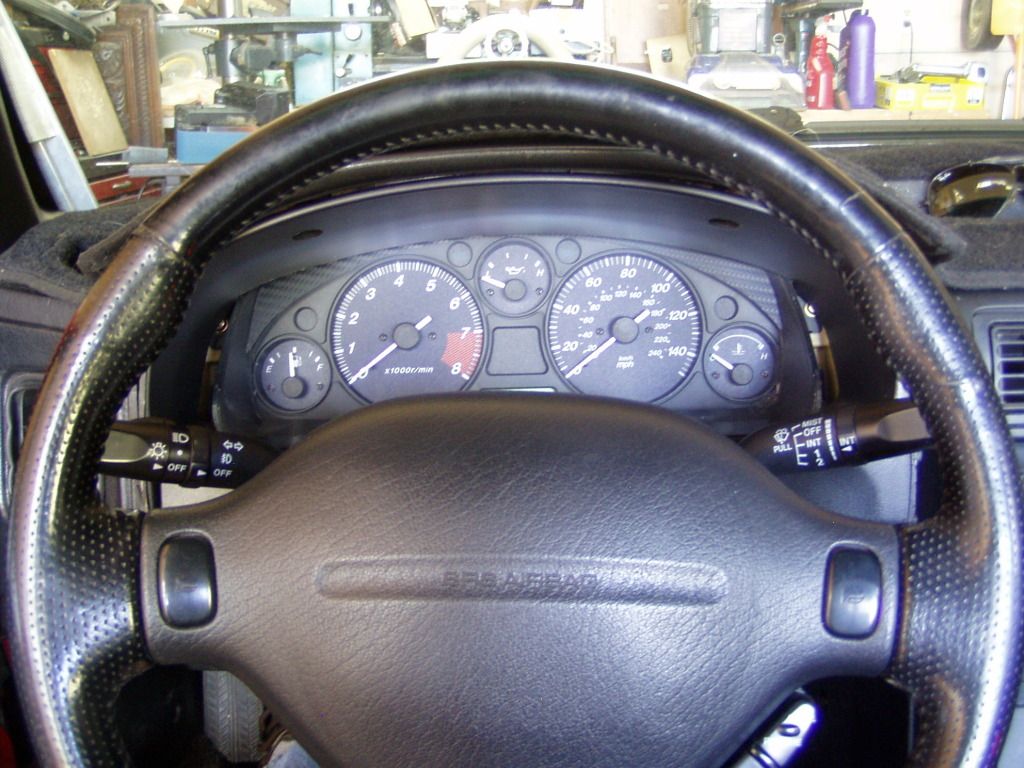
Here's the worst case scenario...high beam and left turn:
The upper half of the column trim was fitted to the new bezel:
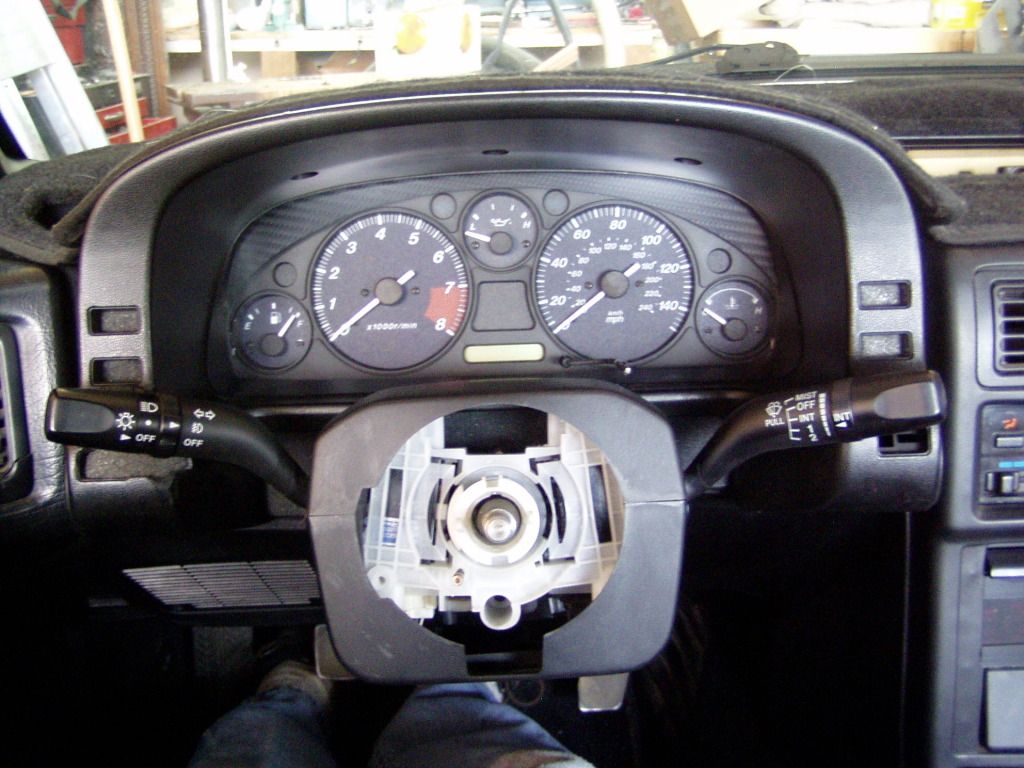
And done!
Well, not quite done.
There's a bit more to come.
Later.
The bezel is getting cut.
But a slight backtrack first.
I've been working on integrating the Miata and FC faceplates (so the cluster would fit with the new bezel) and that project is done.
Learning from my past mistakes, this version is infinitely better structurally and aesthetically.
The first version's biggest failure was light leakage.
Unnoticeable in daylight, nighttime lighting exposed every bad gap/seam...it was horrible.
I used ABS "bondo" to caulk every joint and made styrene end caps for the housing body.
(Many pictures of this process fell below even my abysmal standards, so documentation is randomly spotty...)
The middle shot shows the most important tool when working with gauges...some sort of makeup brush.
You DO NOT want to touch the dials or even the inside of the faceplate because you WILL leave a mark. A brush like this is the best way to clean the inevitable junk that will leap onto your spotless gauges.
This time I elected to use the original odometer reset hole in the FC faceplate, so a cranked extension was bent up and it just sits in a hole drilled in the end of the Miata reset pin.
Although I didn't realize it at the time, this was a fortunate decision.
Gauges can now be final installed and introducing the new bezel!
Pretty nice, eh?
It leaves a lot more exposed plastic around the column than the coupe version but this is trivial compared to the biggest issue...this:
Doesn't look all that dire, does it?
It does look kinda goofy to have unexplained protrusions on the bezel but the switch clears fine EXCEPT you can't push the lever forward (towards the bezel) to engage HIGH beam.
(The wiper side is the same clearance but that stalk only gets pulled away from the bezel, never towards, so it's fine)
I compounded the issue by deciding that it had to clear when both HB and LEFT turn were engaged.
Naturally, this fell on an area of the bezel that was all compound curves and transitions...couldn't have fallen somewhere easy.
I made a guess, started a cut and expanded the hole till it worked.
Then, as much as possible I rationalized and cleaned up the edges.
Stuffed it full of foam to fill that and all the other holes in the bezel and we're here:
Here's the worst case scenario...high beam and left turn:
The upper half of the column trim was fitted to the new bezel:
And done!
Well, not quite done.
There's a bit more to come.
Later.
Smells like 2 stroke.
Joined: Nov 2006
Posts: 527
Likes: 20
From: Misery
That looks great! I have laundry list of questions though:
1. Are you going to leave bare foam as a "filler" for the empty holes? Or are you going to eventually cover them with plastic? Just curious because sometimes foam deteriorates over time, especially in sunlight/heat.
2. Regardless of whether the intermittent or washer fluid works, do the wipers still park even with the new switch you installed? If so, how does that function work with the new switch? I'm still confused about how the wipers actually park.
3. What are your plans for a cluster light dimmer? Are you just going to wire your cluster lights on 'full blaze'? (If I did your switch mod, having the lights on full all the time probably wouldn't bother me)
4. Do all the gauges in that miata cluster work with the FC electrical system? What I mean is, did you have to do anything special with the wiring to get them to work properly? Or was it easily spliced/plugged in?
5. How is the miata cluster lit? Are the gauge needles backlit? Could you take a picture of what it looks like with the lights on?
Incase you can't tell, I'm very intrigued about the Miata cluster mod. I like it, and any info on it would be appreciated. You've got some great stuff here; sorry about the long post with so many questions, but I like your work and I wish I could pick your brain!


Joined: Mar 2001
Posts: 31,857
Likes: 3,243
From: https://www2.mazda.com/en/100th/
i actually really like the miata cluster in there, it looks right....
its too bad about the meter hood maybe you could take a pie cut out of it, and keep the bottom curve but get rid of the bulge?
i drew up 2 bad pics for reference, and wow that they are
its too bad about the meter hood maybe you could take a pie cut out of it, and keep the bottom curve but get rid of the bulge?
i drew up 2 bad pics for reference, and wow that they are
That looks great! I have laundry list of questions though:
1. Are you going to leave bare foam as a "filler" for the empty holes? Or are you going to eventually cover them with plastic? Just curious because sometimes foam deteriorates over time, especially in sunlight/heat.
Dunno yet.
2. Regardless of whether the intermittent or washer fluid works, do the wipers still park even with the new switch you installed? If so, how does that function work with the new switch? I'm still confused about how the wipers actually park.
Yes, the wipers PARK perfectly. Here's how the feature works...in the wiper motor is a contact disk with two circular tracks, one track is missing a section. Normally, the motor draws current through the full circle contact and just keeps spinning but when you turn off the switch power is only available on the interrupted ring, so the motor continues till it hits the gap in the contact ring and then stops. Basically, that's it.
3. What are your plans for a cluster light dimmer? Are you just going to wire your cluster lights on 'full blaze'? (If I did your switch mod, having the lights on full all the time probably wouldn't bother me)
Cluster lights are currently at full brightness. This has not been an issue to date but I'd like to have a dimmer switch on general principle. They might be too bright for long term night driving, it'd be nice to regulate them if needed.
4. Do all the gauges in that miata cluster work with the FC electrical system? What I mean is, did you have to do anything special with the wiring to get them to work properly? Or was it easily spliced/plugged in?
Details here.
Essentially, it's plug-n-play.
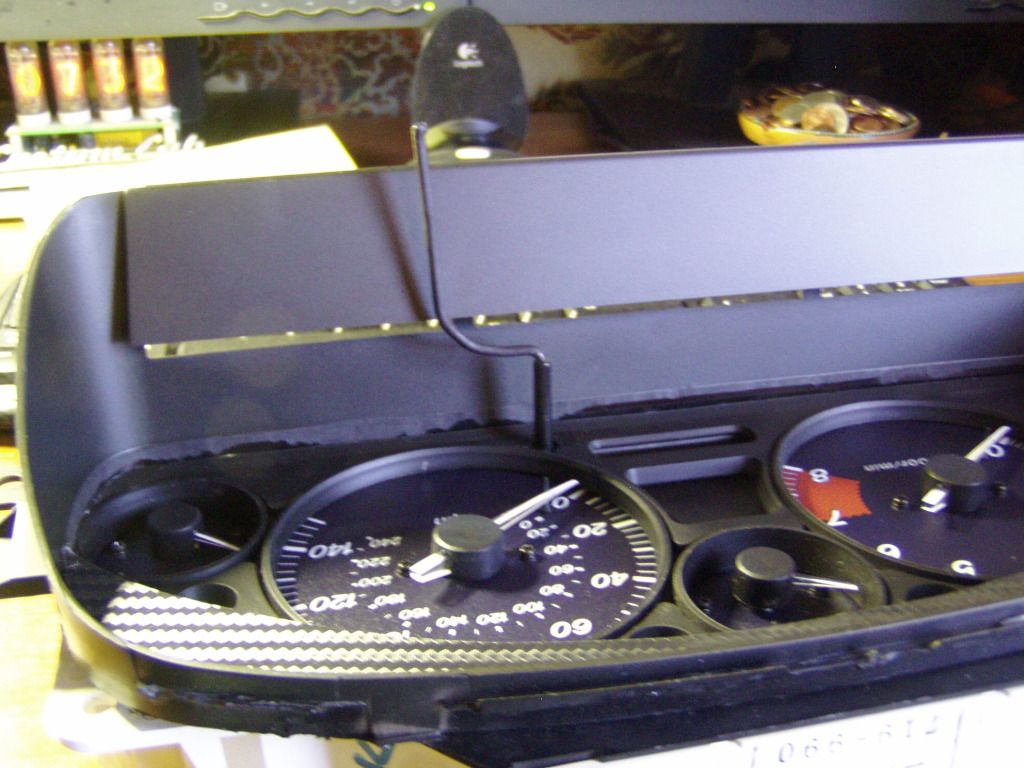
5. How is the miata cluster lit? Are the gauge needles backlit? Could you take a picture of what it looks like with the lights on?
Thankfully, the Miata gauges are properly backlit (needles too!) and are much better than the Rube Goldberg FC arrangement. Yes, night shots are possible.
Incase you can't tell, I'm very intrigued about the Miata cluster mod. I like it, and any info on it would be appreciated. You've got some great stuff here; sorry about the long post with so many questions, but I like your work and I wish I could pick your brain!
1. Are you going to leave bare foam as a "filler" for the empty holes? Or are you going to eventually cover them with plastic? Just curious because sometimes foam deteriorates over time, especially in sunlight/heat.
Dunno yet.
2. Regardless of whether the intermittent or washer fluid works, do the wipers still park even with the new switch you installed? If so, how does that function work with the new switch? I'm still confused about how the wipers actually park.
Yes, the wipers PARK perfectly. Here's how the feature works...in the wiper motor is a contact disk with two circular tracks, one track is missing a section. Normally, the motor draws current through the full circle contact and just keeps spinning but when you turn off the switch power is only available on the interrupted ring, so the motor continues till it hits the gap in the contact ring and then stops. Basically, that's it.
3. What are your plans for a cluster light dimmer? Are you just going to wire your cluster lights on 'full blaze'? (If I did your switch mod, having the lights on full all the time probably wouldn't bother me)
Cluster lights are currently at full brightness. This has not been an issue to date but I'd like to have a dimmer switch on general principle. They might be too bright for long term night driving, it'd be nice to regulate them if needed.
4. Do all the gauges in that miata cluster work with the FC electrical system? What I mean is, did you have to do anything special with the wiring to get them to work properly? Or was it easily spliced/plugged in?
Details here.
Essentially, it's plug-n-play.
5. How is the miata cluster lit? Are the gauge needles backlit? Could you take a picture of what it looks like with the lights on?
Thankfully, the Miata gauges are properly backlit (needles too!) and are much better than the Rube Goldberg FC arrangement. Yes, night shots are possible.
Incase you can't tell, I'm very intrigued about the Miata cluster mod. I like it, and any info on it would be appreciated. You've got some great stuff here; sorry about the long post with so many questions, but I like your work and I wish I could pick your brain!
Originally Posted by Scrap
So for the most part all functions still work? Im not familiar with your build, why did you switch to a miata gauge cluster?
I like the Miata layout better than the FC and I wanted to switch to an electronic speedo as well. Two birds, one stone...you do the math.
Originally Posted by j9fd3s
its too bad about the meter hood maybe you could take a pie cut out of it, and keep the bottom curve but get rid of the bulge
This is not solely due to sloth and penury (although I admit to the former and suffer the latter) but patina.
The bezel blends right in to the interior now and the question is, how noticeable are all the holes when I'm not concentrating on them? Would a normal person even notice them?
Were I to fix/finish the bezel, it would shame all the surrounding plastic, calling attention to itself with the higher level of finish.
I did grab a selection of body plugs to try in the holes but haven't gotten around to cleaning them up yet.
Plan on just living with it as is for a while, see how it goes.
Night shot (IGN off, lights only...that's why the odo display is blank)
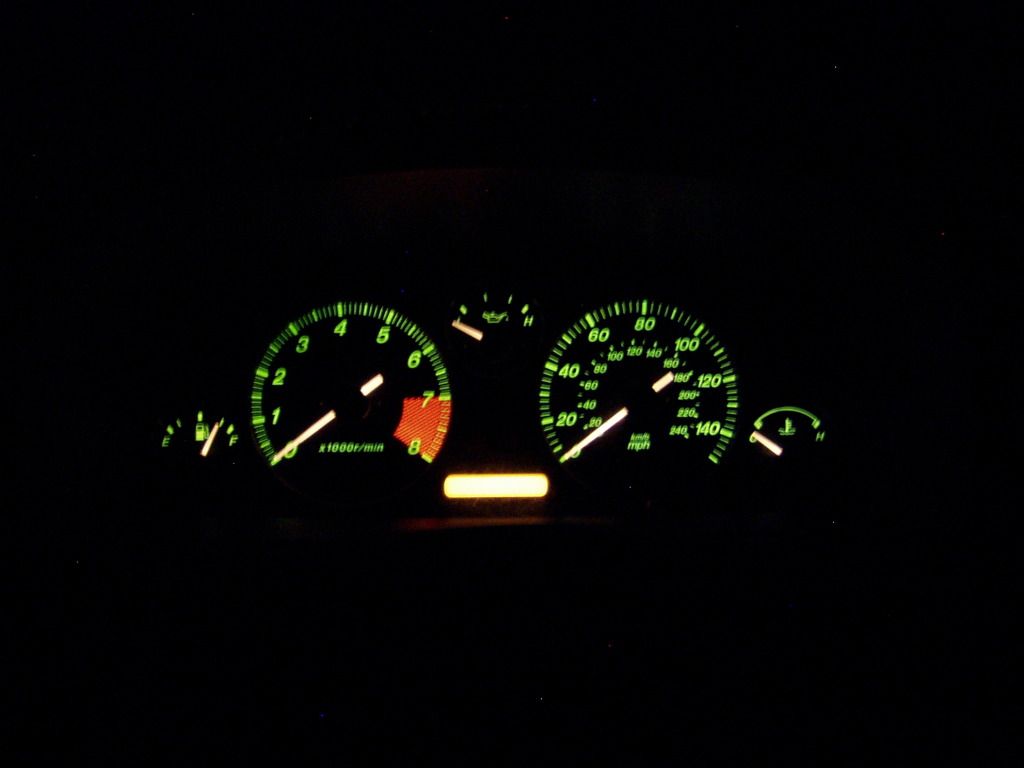
The only orange lighting left is the Logicon.
Perhaps not surprisingly, it's next on the list.
The only orange lighting left is the Logicon.
Perhaps not surprisingly, it's next on the list.
Here's the new plan.
My fallback concept (Plan B) is a total cosmetic revamp...cutting/gluing/Bondo/shaping/sanding/filling/texture/paint.
I can do this, I have the technology.
First though, I want to try something less extensive.
The ***** are now gone.
I hacksawed them off flat and used a belt sander to justify all the edges.
Then, as is my wont, I went to the junkyard.
Found some ****.
Pics will follow.
Even as I tried to avoid the total makeover:
...I knew the only real solution was to bite the bullet and git-er-dun.
By "git-er-dun" I mean quit pretending that I can somehow disguise the mods and go ahead and remake the bezel the way it should be.
Boy howdy, these bezels are a lot curvier than they appear.
In fact, did you know that the S4 & S5 coupe bezels are different from each other and both are different than the vert bezel?
I didn't.
The plan is to leave the top and gauge frame untouched and concentrate on the "****" area, so I'll have to be able to carry the edge rounding through my new structure, so it looks as a whole and not grafted on.
I'm trying to minimize the amount of body filler needed, so I spent about two hours cutting/sanding to get both sides as symmetrical as possible.
Here:
Now I need to cut some plugs to fill these holes.
Using 5/16" black ABS, which is way overkill but gives enough thickness so I can sand the edge radii without breaking through into space.
Those will be cut and glued this afternoon and left to dry overnight.
The way things are going, I'd better start working on Plan C...
Joined: Mar 2001
Posts: 31,857
Likes: 3,243
From: https://www2.mazda.com/en/100th/
My, how quickly the "fallback" plan becomes the option of choice.
Even as I tried to avoid the total makeover:
...I knew the only real solution was to bite the bullet and git-er-dun.
By "git-er-dun" I mean quit pretending that I can somehow disguise the mods and go ahead and remake the bezel the way it should be.
Boy howdy, these bezels are a lot curvier than they appear.
In fact, did you know that the S4 & S5 coupe bezels are different from each other and both are different than the vert bezel?
I didn't.
The plan is to leave the top and gauge frame untouched and concentrate on the "****" area, so I'll have to be able to carry the edge rounding through my new structure, so it looks as a whole and not grafted on.
I'm trying to minimize the amount of body filler needed, so I spent about two hours cutting/sanding to get both sides as symmetrical as possible.
Here:
Now I need to cut some plugs to fill these holes.
Using 5/16" black ABS, which is way overkill but gives enough thickness so I can sand the edge radii without breaking through into space.
Those will be cut and glued this afternoon and left to dry overnight.
The way things are going, I'd better start working on Plan C...
Not really.
Don't forget that when I deleted the two main FC switches I also lost some other functions- hazard, illumination control, rear defrost, etc.
If anything gets added it'll be them, not a switch/function I already have.
First though, I have to see how it looks bare of any adornment.
Beginning to see what it'll look like:
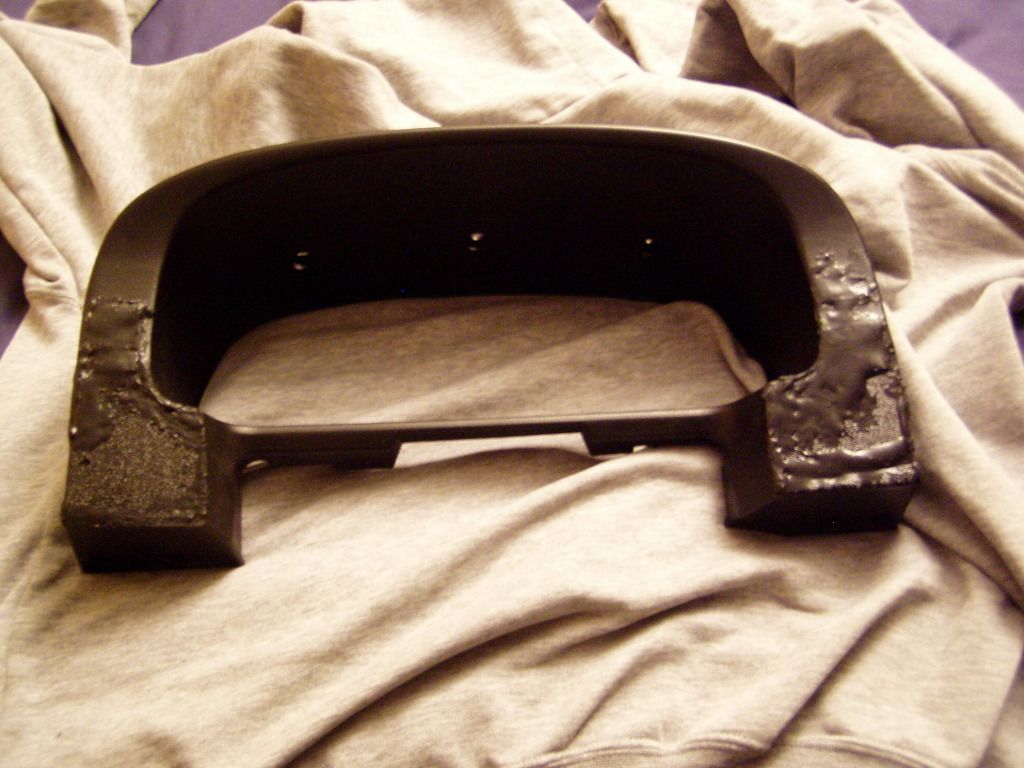
All voids filled with ABS plugs/slathered with liquid ABS bondo.
Probably take 24 hours or so to fully harden and then sanding can commence.
All voids filled with ABS plugs/slathered with liquid ABS bondo.
Probably take 24 hours or so to fully harden and then sanding can commence.
Yeah, but it buffed right out:

Well, not really.
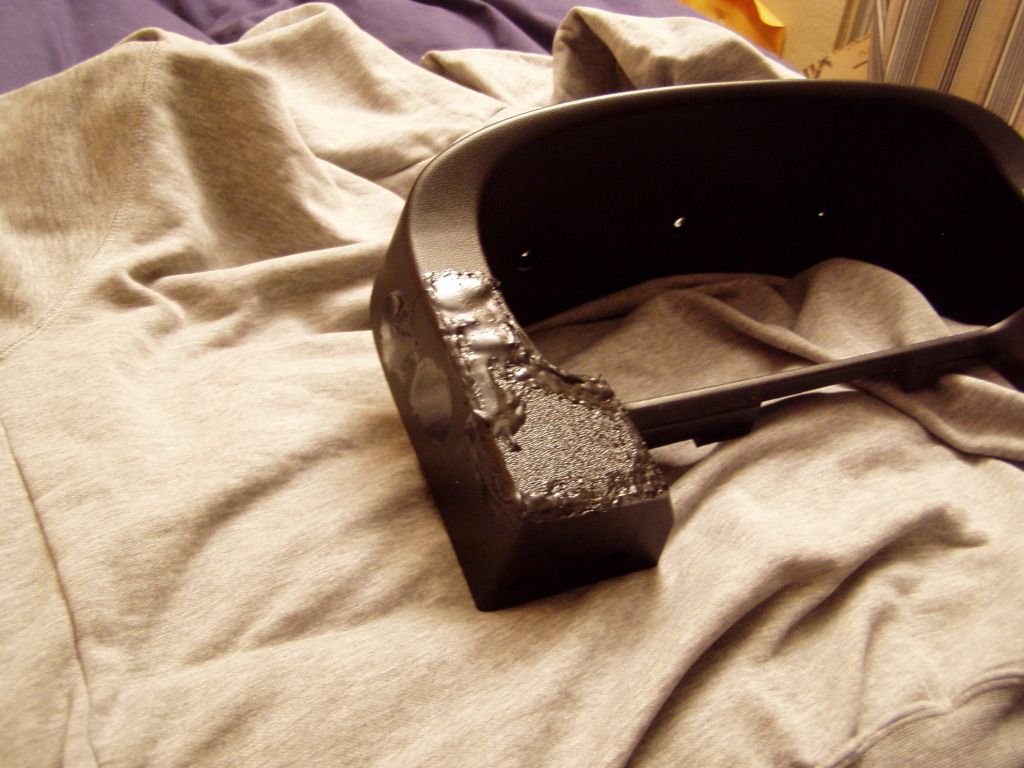
I reached the point where initial bodywork was finished...the structure/shape was finalized.
Before moving on to final stages I thought it might be useful to throw a flash coat of paint on it (satin black Fusion to just even out the color and make it look like one piece) and see how it looked.
My initial response is dislike, bordering on appalled.
*My second thought was , "Jeebus, I'm glad this is back together again!"*
I'm ignoring the surface/finish because that was only temporary anyway, lots of sanding left to do (although feel free to rag on it all you'd like, just be aware I know it "looks" like poop).
I think the shape looks clunky.
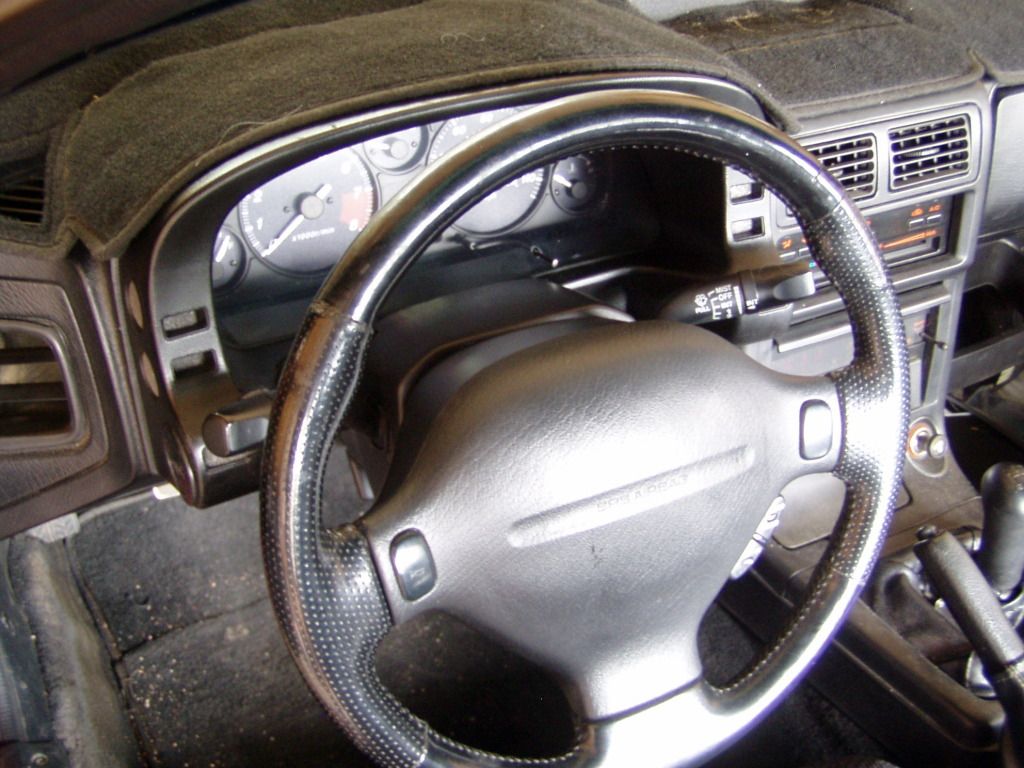
Looking at this next to a stock bezel and it becomes obvious that the mass of the stocker is visually diminished by all the switch *****/ports while my version- free from detail- is big and blocky.
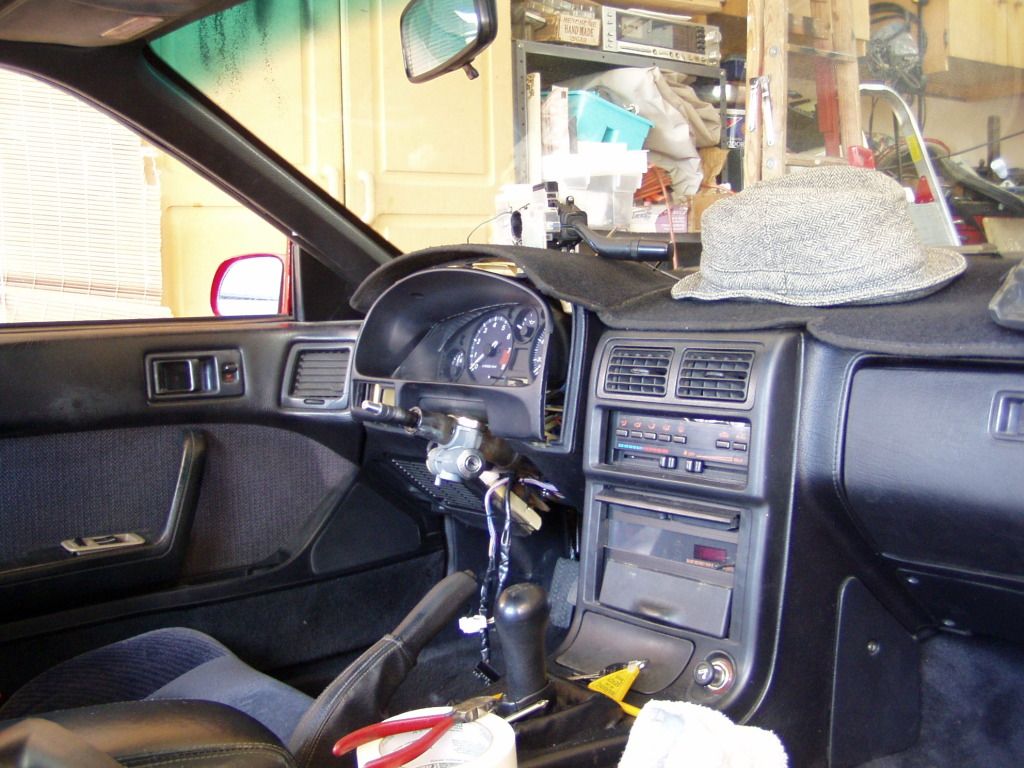
Look at the second to last cross-interior shot and compare the cluster bezel to the bezel on the center stack.
The cluster bezel is twice as thick (for no apparent reason) and much straighter and simple...there's no flair, it looks unfinished.
This requires some thought/ideas.
Well, not really.
I reached the point where initial bodywork was finished...the structure/shape was finalized.
Before moving on to final stages I thought it might be useful to throw a flash coat of paint on it (satin black Fusion to just even out the color and make it look like one piece) and see how it looked.
My initial response is dislike, bordering on appalled.
*My second thought was , "Jeebus, I'm glad this is back together again!"*
I'm ignoring the surface/finish because that was only temporary anyway, lots of sanding left to do (although feel free to rag on it all you'd like, just be aware I know it "looks" like poop).
I think the shape looks clunky.
Looking at this next to a stock bezel and it becomes obvious that the mass of the stocker is visually diminished by all the switch *****/ports while my version- free from detail- is big and blocky.
Look at the second to last cross-interior shot and compare the cluster bezel to the bezel on the center stack.
The cluster bezel is twice as thick (for no apparent reason) and much straighter and simple...there's no flair, it looks unfinished.
This requires some thought/ideas.

Smells like 2 stroke.
Joined: Nov 2006
Posts: 527
Likes: 20
From: Misery
While the gauge hood may not have enough "flair," I think fixating on it is the wrong thing to do. To me, it's not distracting in anyway. I think the only reason we notice it is because you noticed it. When I see the interior of your car, it makes me think: "Damn, he put a lot of work into this." 
But I think we're deviating from the point here: you've basically achieved your initial goal, which was to get rid of the factory FC headlight and wiper switches, and make it look like the replacements belong there. I think it looks decent, unlike many factory gauge cluster pods. Anyone ever seen an early 90's lumina or cavalier gauge cluster pod/dash board?
But I think we're deviating from the point here: you've basically achieved your initial goal, which was to get rid of the factory FC headlight and wiper switches, and make it look like the replacements belong there. I think it looks decent, unlike many factory gauge cluster pods. Anyone ever seen an early 90's lumina or cavalier gauge cluster pod/dash board?
T'would be devilishly difficult to do...which is why I didn't.
While the gauge hood may not have enough "flair," I think fixating on it is the wrong thing to do. To me, it's not distracting in anyway. I think the only reason we notice it is because you noticed it. When I see the interior of your car, it makes me think: "Damn, he put a lot of work into this."
But I think we're deviating from the point here: you've basically achieved your initial goal, which was to get rid of the factory FC headlight and wiper switches, and make it look like the replacements belong there. I think it looks decent, unlike many factory gauge cluster pods. Anyone ever seen an early 90's lumina or cavalier gauge cluster pod/dash board?
But I think we're deviating from the point here: you've basically achieved your initial goal, which was to get rid of the factory FC headlight and wiper switches, and make it look like the replacements belong there. I think it looks decent, unlike many factory gauge cluster pods. Anyone ever seen an early 90's lumina or cavalier gauge cluster pod/dash board?
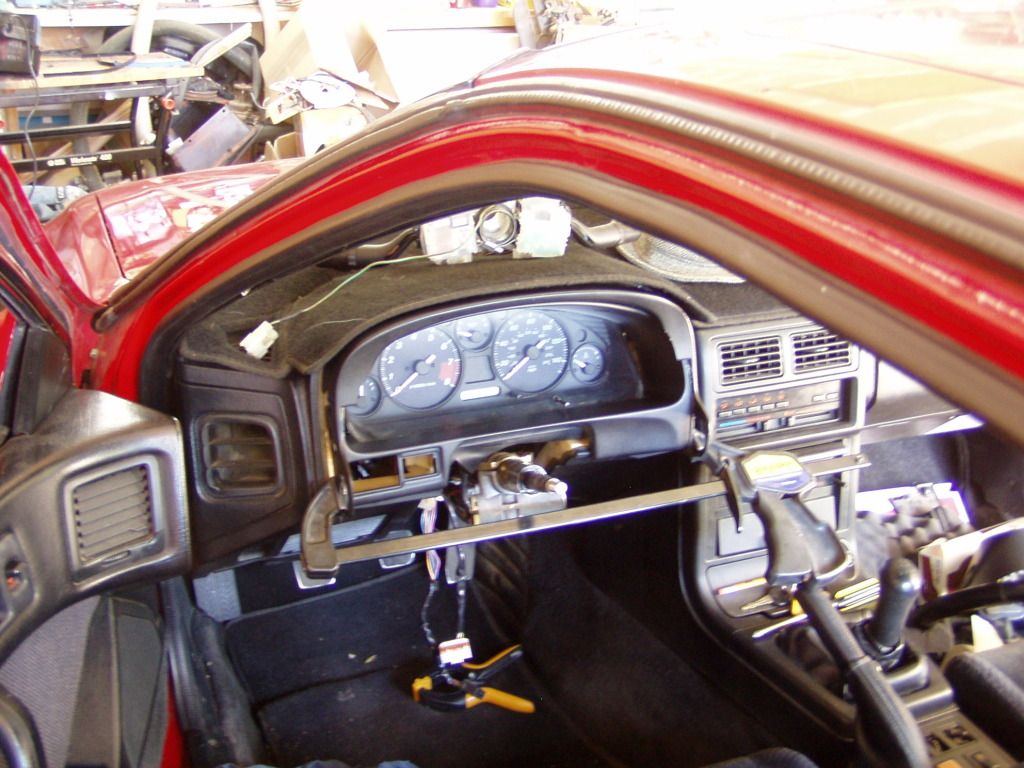
Drove around a bit yesterday, realized that from the driver's perspective the bezel is all but invisible.
The worst view is from the passenger seat.
The part's current condition-texture and color- make it stand out more than just the actual shape would, were it camouflaged better.
The problem here is cost.
I planned on using SEM texture/topcoat paints which apparently provide "near OEM" results, but boy howdy, that **** is expensive.
The texture coat is almost $30, the topcoat (required for UV protection) is $20.
If I'm going to throw $50 of finish on a part, I want to make sure it's right first.
So, it's kind of a chicken/egg situation.
It's hard to evaluate the shape while the color is so distracting but the color is too expensive to use casually.
Like many projects, this one has evolved as my skill and vision improved and it's time to revisit my options.
For instance, the main reason I didn't want to screw with the bottom of the bezel was to preserve the stock mounting holes.
Which is hilarious because both the mounting tabs on the dash are missing...I'd have to make some.
For some reason, it just occurred to me that if I was making provision for the bottom mounts, they could actually be anything I wanted, not just duplicating the "designed to fail" tabs.
So, I guess I really don't "need" the flat bottom of the bezel after all.
Back to the junkyard.
If you consider "not that far off" the equivalent of "preparing to start over from scratch", then we agree.
English can be such a flexible language, si?
Two things happened this morning.
First, I decided that my results had been unduly influenced by the techniques used.
Straight cuts with flat panel inserts were inevitably going to end up squarish, if I want curvature then different approaches will be needed.
This means that I now consider this bezel to be disposable and subject to more radical work.
If I had to start over (always a distinct possibility in my projects) it'd be easier to start with a coupe bezel anyway...I gained little from starting with the rarer vert part.
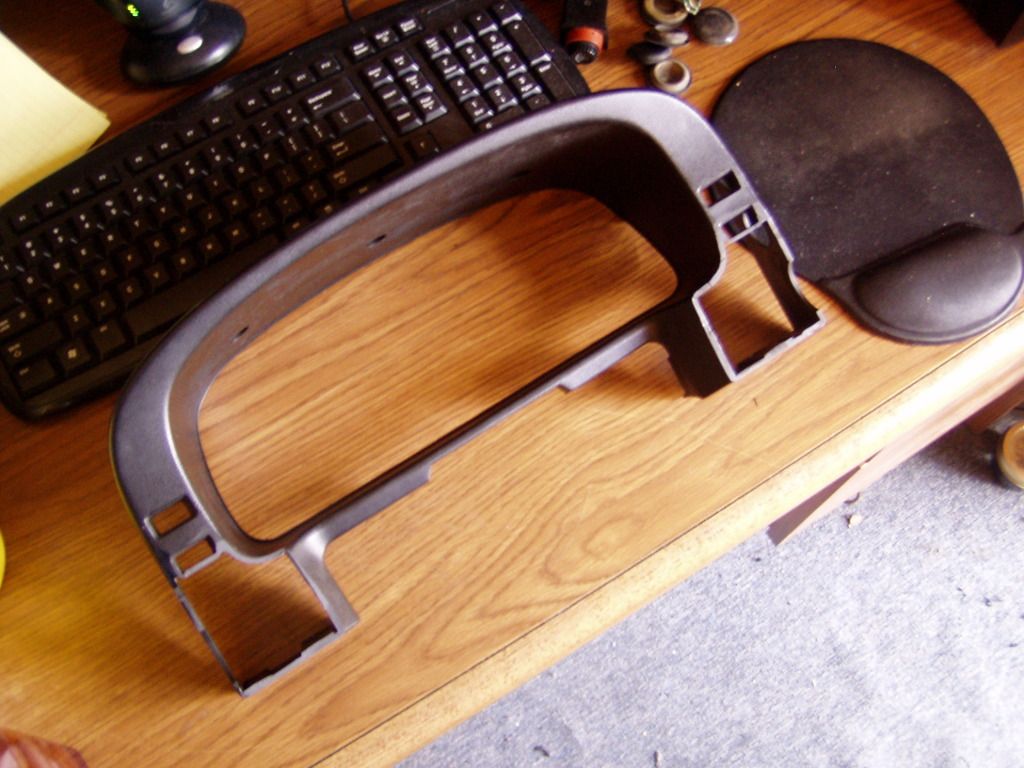
Second, I found this in the yard today:
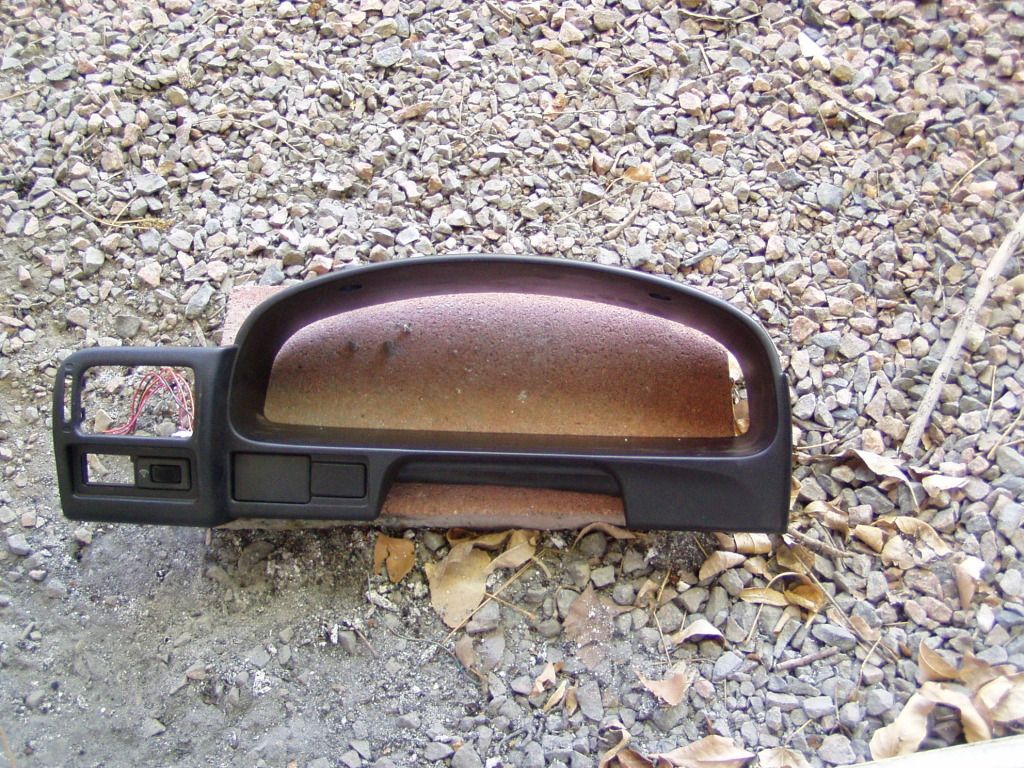
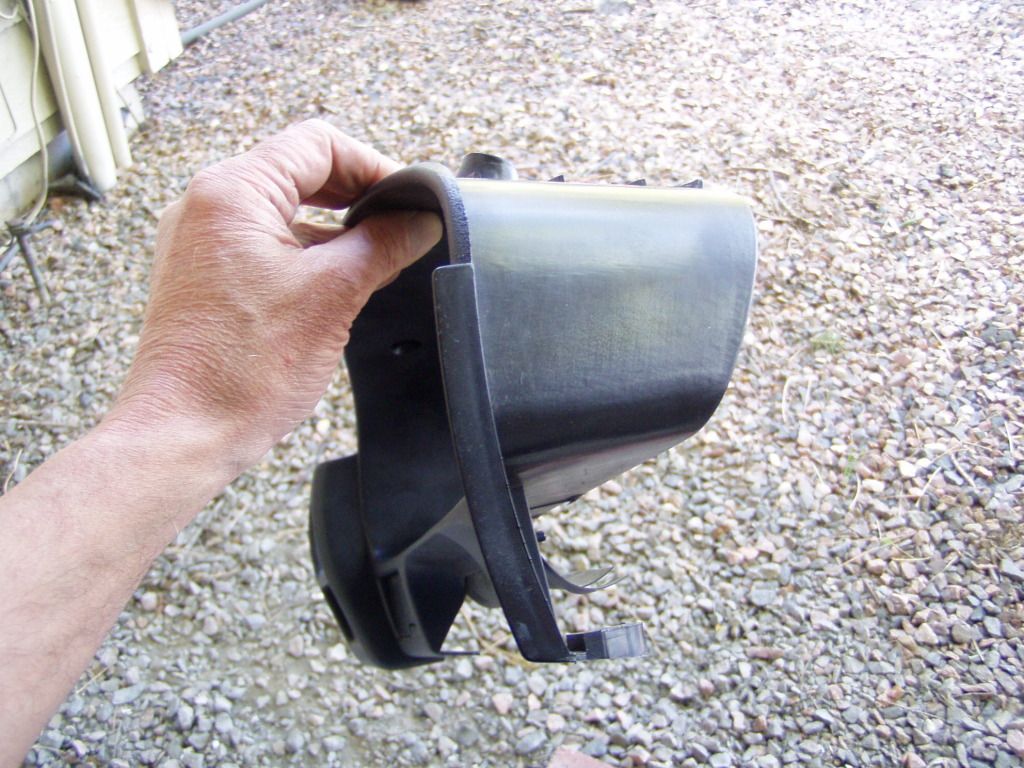
It's intriquing for a couple of reasons, not the least of which is that it may actually fit in one piece (after trimming off that vestigal hump on the left side) and if not, the lower half looks promising.
I have some festivities to attend but will get back to this tonight.
Maybe.
English can be such a flexible language, si?
Two things happened this morning.
First, I decided that my results had been unduly influenced by the techniques used.
Straight cuts with flat panel inserts were inevitably going to end up squarish, if I want curvature then different approaches will be needed.
This means that I now consider this bezel to be disposable and subject to more radical work.
If I had to start over (always a distinct possibility in my projects) it'd be easier to start with a coupe bezel anyway...I gained little from starting with the rarer vert part.
Second, I found this in the yard today:
It's intriquing for a couple of reasons, not the least of which is that it may actually fit in one piece (after trimming off that vestigal hump on the left side) and if not, the lower half looks promising.
I have some festivities to attend but will get back to this tonight.
Maybe.
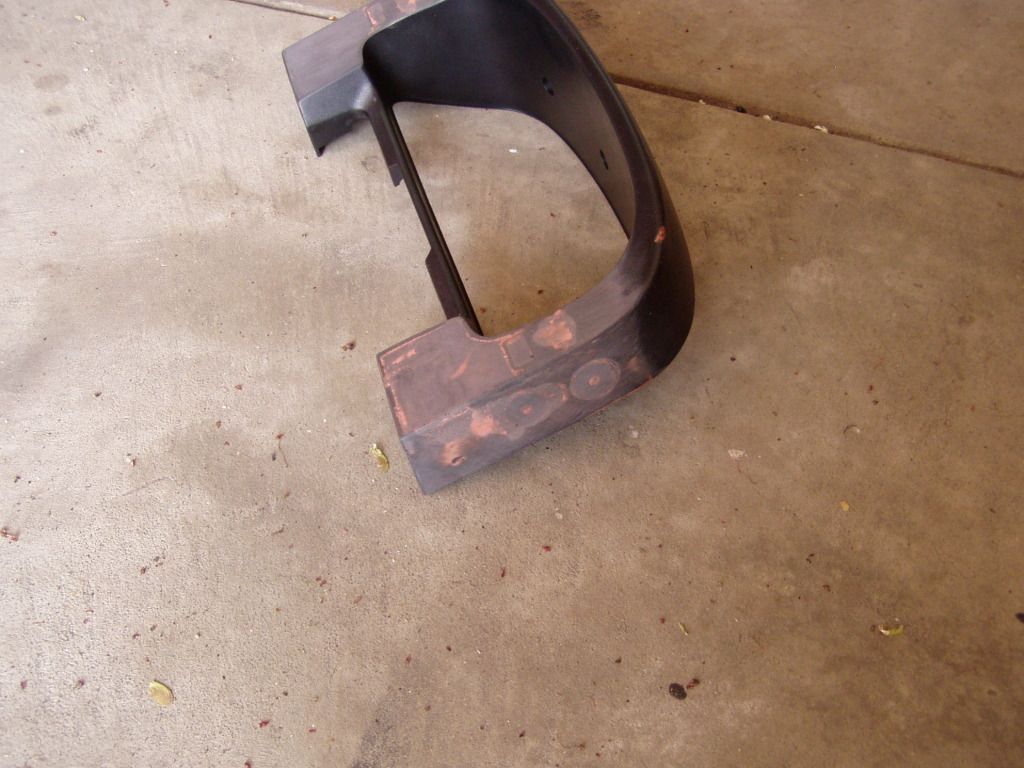
Well hi there...just found the exit to the rabbit hole I fell into Friday.
Working with this new bezel has been an ordeal but looks like it might payoff.
I amputated the vent appendage on the LH side, held it in place and decided it was worth continuing.
I then started relieving the floor and roof of the inside where it meets the gauge glass, which brought the bezel face closer to the dash. I continued this recessing till the upper lip of the bezel roof looked about where the stock bezel sat.
Bazillions of tiny cuts, filings/belt sandings later, I have this:
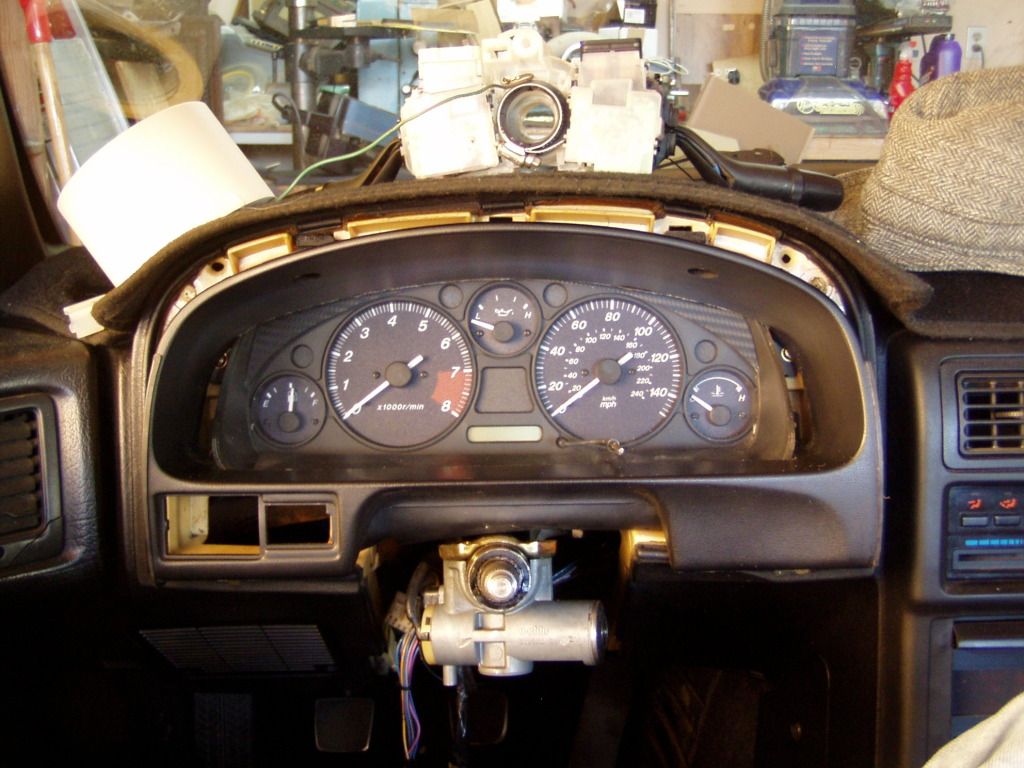
In the top pic you can see the two mounting holes in the roof.
These were very close to the outer mount points in the FC bezel but not close enough, so I glued ABS blocks to the dash and drilled holes...the upper mounts are now fixed and work like OEM (there's even a nice angle to them, you don't need a stubby phillips like the FC requires).
It's also obvious that the bezel is too wide for the cluster...this is a bummer but also the reason I decided to continue.
The extra width meant that the sides were going to be very thin (also, curvier in profile), unlike the thick FC part.
Looking at the first pic again, all it really needs is the outer skin of the FC bezel (because the new one has no sides at all) with a crescent of the top lip.
At this point I have two stock(ish) coupe bezels, both cut a bit but mostly intact (where I was going to need anyway), so the crummiest one became the test mule.
I gave it my best guess and went to town.
More tiresome fiddlefucking and I could see what seemed to be the best course to take on the real piece.
It's a good thing I had a sacrificial lamb because some of the machining steps had to be done in sequence, which I didn't know till I'd done the first version.
It's in initial glue up now.
There is very little surface area to work with till I can get it stabilized on the bench and work from the back but it should be sturdy enough to remove in a few hours.
There are areas that were left too generous by intention.
Although somewhat riskier, I thought it'd be easier to make the final trim cuts with the part mated rather than hope I could come close and then glue it up accurately.
We'll see how that theory pans out.
Working with this new bezel has been an ordeal but looks like it might payoff.
I amputated the vent appendage on the LH side, held it in place and decided it was worth continuing.
I then started relieving the floor and roof of the inside where it meets the gauge glass, which brought the bezel face closer to the dash. I continued this recessing till the upper lip of the bezel roof looked about where the stock bezel sat.
Bazillions of tiny cuts, filings/belt sandings later, I have this:
In the top pic you can see the two mounting holes in the roof.
These were very close to the outer mount points in the FC bezel but not close enough, so I glued ABS blocks to the dash and drilled holes...the upper mounts are now fixed and work like OEM (there's even a nice angle to them, you don't need a stubby phillips like the FC requires).
It's also obvious that the bezel is too wide for the cluster...this is a bummer but also the reason I decided to continue.
The extra width meant that the sides were going to be very thin (also, curvier in profile), unlike the thick FC part.
Looking at the first pic again, all it really needs is the outer skin of the FC bezel (because the new one has no sides at all) with a crescent of the top lip.
At this point I have two stock(ish) coupe bezels, both cut a bit but mostly intact (where I was going to need anyway), so the crummiest one became the test mule.
I gave it my best guess and went to town.
More tiresome fiddlefucking and I could see what seemed to be the best course to take on the real piece.
It's a good thing I had a sacrificial lamb because some of the machining steps had to be done in sequence, which I didn't know till I'd done the first version.
It's in initial glue up now.
There is very little surface area to work with till I can get it stabilized on the bench and work from the back but it should be sturdy enough to remove in a few hours.
There are areas that were left too generous by intention.
Although somewhat riskier, I thought it'd be easier to make the final trim cuts with the part mated rather than hope I could come close and then glue it up accurately.
We'll see how that theory pans out.
With initial glueup done and the pieces mated, it was removed for structural additions from the inside.
There was very little direct contact between the two parts- essentially, only the two lower corners- so little scrap chunks of ABS were glued in where needed.
Nothing to see here, moving on...
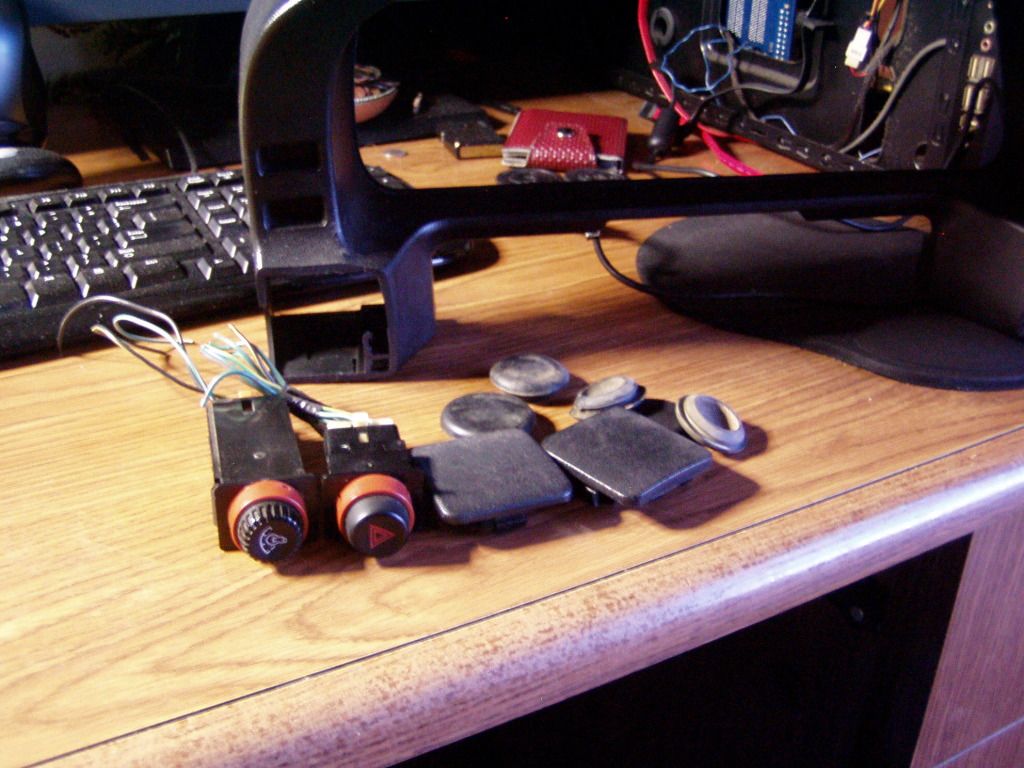
While the bezel solidifies, I'm turning to two sub-projects it created.
The new part has provision for two switches (bottom left).
I have blanking plates for both holes, the illumination dimmer that fits the smaller opening and a Mitsubishi HAZARD switch that can adapt to the other space.
Those switches will need to be spliced into the harness I already made, total of five wires.
The Altima column surround trim I had finally wrestled into shape no longer fits.
The bottom may be salvageable but the top is all wrong.
I'm going to evaluate the combo switch mounting bracket (the big white nylon piece) to see what can be safely carved off and then I guess another trip to the yard , see what I can find.
As I first held the bezel in hand at the yard, naturally my first hope was that it could be grafted in with no major bodywork to the finished piece.
You know, get lucky and use some sort of finish trim to hide the blemishes.
This may or may not happen but if bodywork IS needed, I'm going right to the big gun- body filler- from the start.
First, it's way faster than the ABS slurry I made and secondly...
The past few days the vert bezel I first modified has been sitting in the back of the car.
During the day, with the garage door open it's been exposed to direct sunlight and something weird has happened.
On one side two of the window plugs have started expanding outward, ejecting themselves from the bezel. It looks like the slurry/glue swelled up.
All the other places I used the exact same materials/technique are fine, it's just this one spot.
Before continuing with that method, I'd like to know what I did wrong.
Besides that, I realized that my first approach was designed for repairing stock panels, not creating new ones. If I were repairing cracks or even grafting in missing sections, that way was fine but filling big gaps and adding/bridging contours is beyond it's scope.
As usual, we shall see.
There was very little direct contact between the two parts- essentially, only the two lower corners- so little scrap chunks of ABS were glued in where needed.
Nothing to see here, moving on...
While the bezel solidifies, I'm turning to two sub-projects it created.
The new part has provision for two switches (bottom left).
I have blanking plates for both holes, the illumination dimmer that fits the smaller opening and a Mitsubishi HAZARD switch that can adapt to the other space.
Those switches will need to be spliced into the harness I already made, total of five wires.
The Altima column surround trim I had finally wrestled into shape no longer fits.
The bottom may be salvageable but the top is all wrong.
I'm going to evaluate the combo switch mounting bracket (the big white nylon piece) to see what can be safely carved off and then I guess another trip to the yard , see what I can find.
As I first held the bezel in hand at the yard, naturally my first hope was that it could be grafted in with no major bodywork to the finished piece.
You know, get lucky and use some sort of finish trim to hide the blemishes.
This may or may not happen but if bodywork IS needed, I'm going right to the big gun- body filler- from the start.
First, it's way faster than the ABS slurry I made and secondly...
The past few days the vert bezel I first modified has been sitting in the back of the car.
During the day, with the garage door open it's been exposed to direct sunlight and something weird has happened.
On one side two of the window plugs have started expanding outward, ejecting themselves from the bezel. It looks like the slurry/glue swelled up.
All the other places I used the exact same materials/technique are fine, it's just this one spot.
Before continuing with that method, I'd like to know what I did wrong.
Besides that, I realized that my first approach was designed for repairing stock panels, not creating new ones. If I were repairing cracks or even grafting in missing sections, that way was fine but filling big gaps and adding/bridging contours is beyond it's scope.
As usual, we shall see.
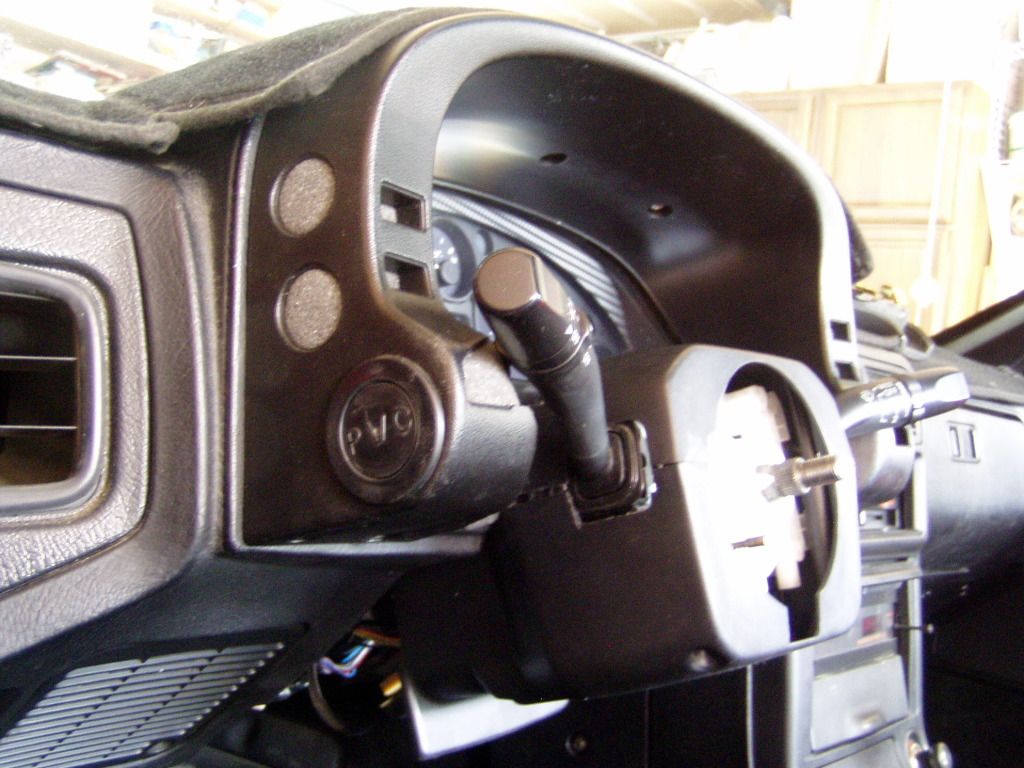
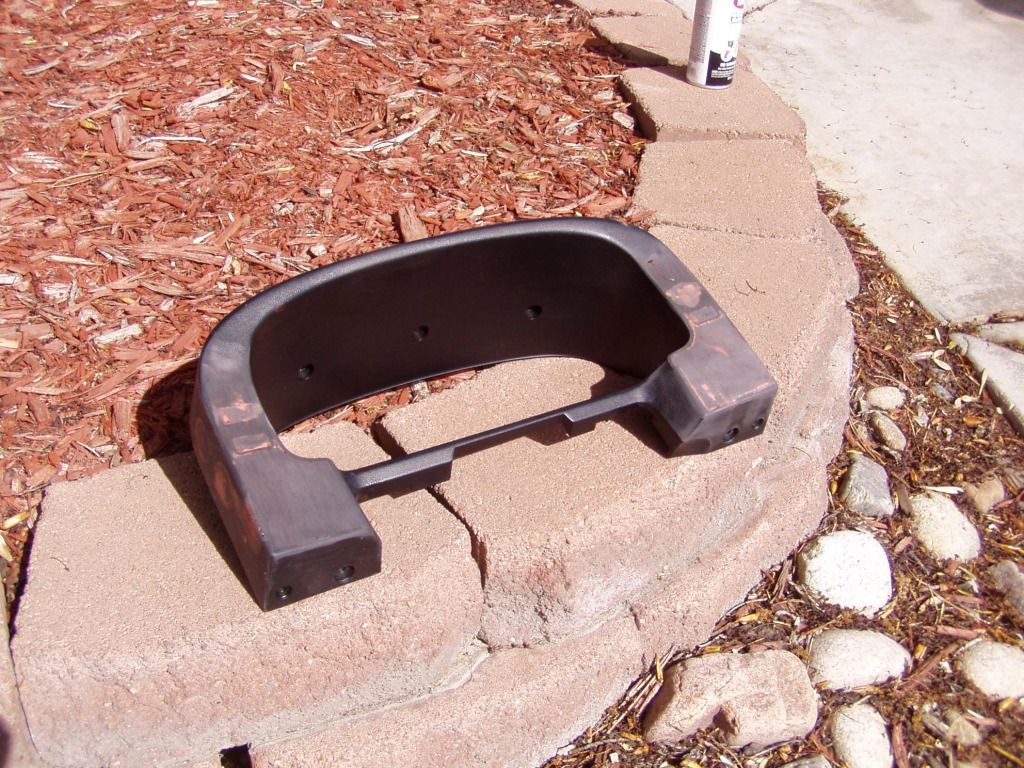
Now sturdy enough to handle, the bezel was crudely trimmed to final shape.
I wanted to see how it looked and also needed to get moving on the column surround...if that was going to prove impossible, t'was almost a deal breaker, so better to find out now rather than later.
Wham, bam, thank you maam!
There are issues to be addressed- for instance, the ignition is buried too deeply into the surround trim- but for the most part I think this is much nicer looking than the first attempt.