
How To: Power steering relocation

Thread Starter
Goes *round*round*round*
Joined: Apr 2003
Posts: 718
Likes: 0
From: San Antonio
How To: Power steering relocation
Note: This is my first write up and I hope this is as informative and instructional as I hope it is.
I had wanted to relocate my power steering and all I could find was this thread: https://www.rx7club.com/2nd-generation-specific-1986-1992-17/power-steering-relocation-write-up-664495/
And it's a bit of a pain to locate a 84-85 P/S bracket and it's even more of a pain to work with the cast iron.
I had my bracket off from removing my A/C and started looking at it. I figured out I could modify the stock bracket a bit to work on the lower position on the motor and aluminum is alot easier to work with than cast iron.
Tools:
Grinder/cutoff wheel
Hacksaw
Drill
Visegrips (to remove stud)
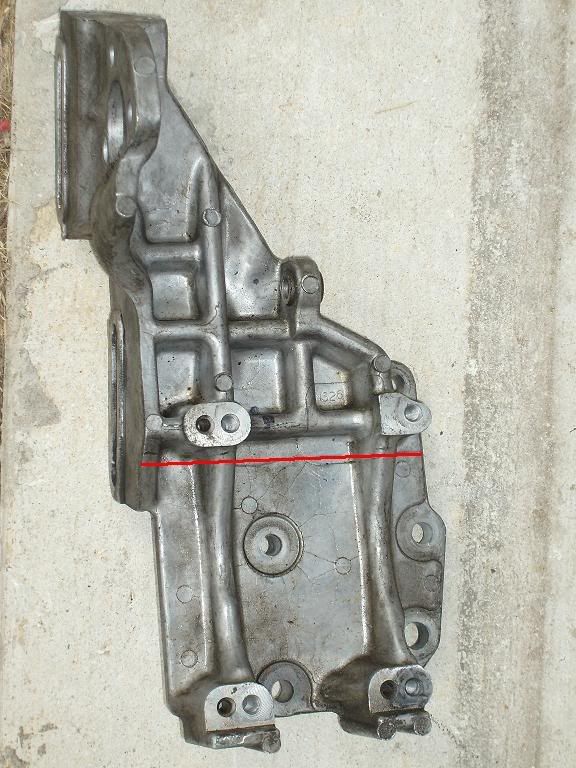
1. This is the line where I decided to cut the bracket in half.
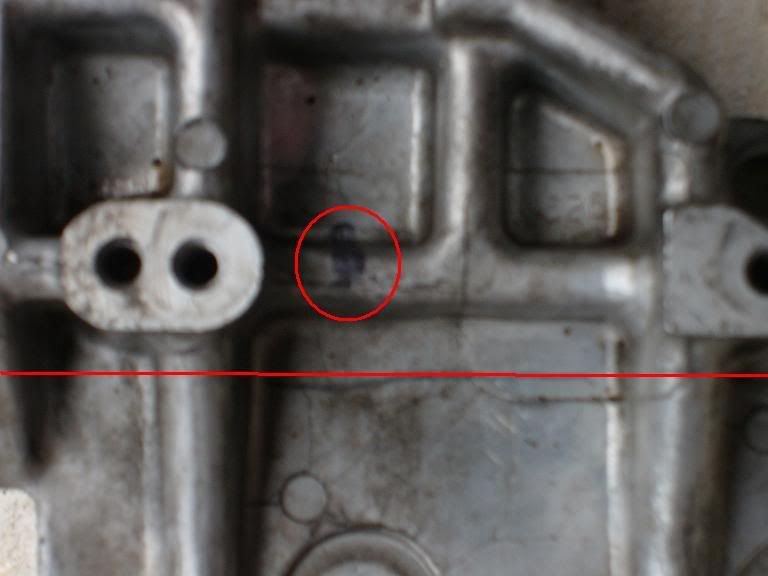
2. And here you can see the line again and the point where I marked to drill out. I chose this spot to make the two bottom holes on the stock bracket esentially moved to the upper part.
3. Cut in half.

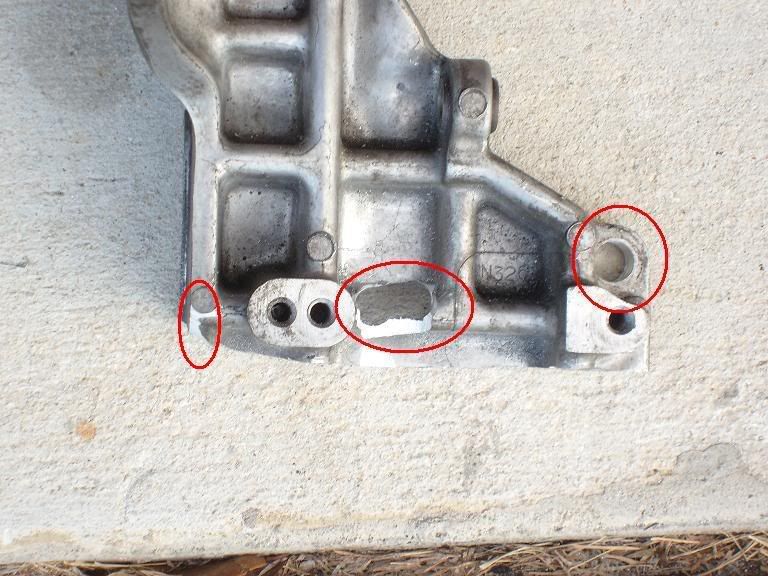
4. (From left to right)
a.I had to grind here to clear the stock oil cooler lines,
b.My first hole was a little to the right and corrected to the left.
c.The hole I enlarged to accept the larger stud on the engine.
5. I had mounted the bracket and realized I forgot to check the angle of the bracket (so the pulleys are all straight and aligned with the main) before I drilled the first two holes. I drilled the new one and filled in the rest with JB weld putty to return some more structural integrity (Note: It did hold fine even with the larger hole, I was just being careful.
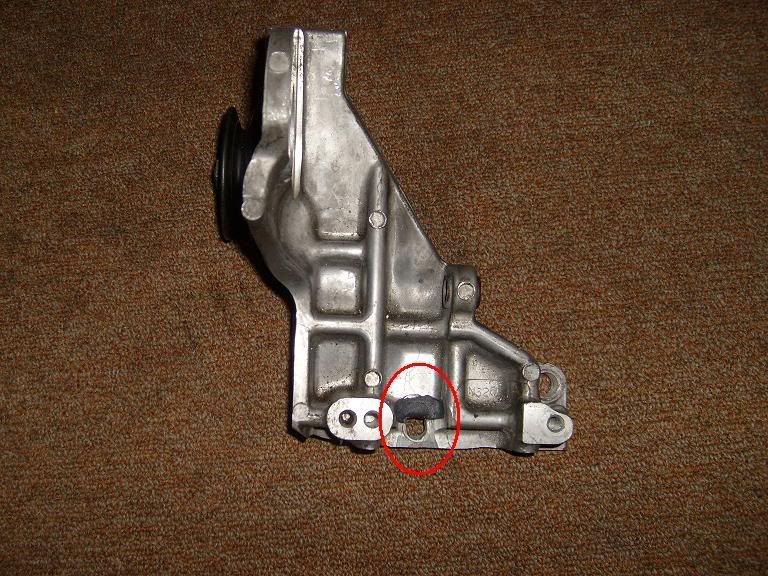
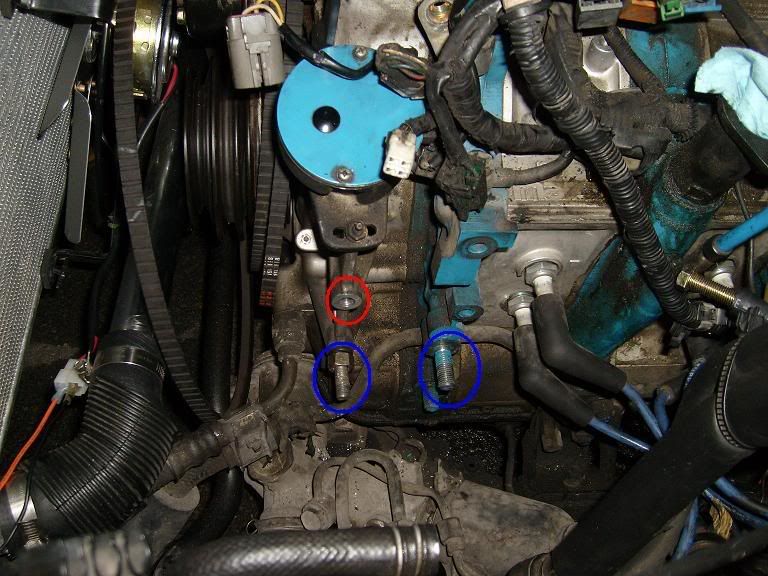
6. Red: There is a threaded stud that has to be removed to allow the bracket to fully sit.
Blue (L): I added a washer and larger nut to allow this side to sit flush across the two bolts.
Blue (R): This is just the right side stud.
I'll be glad to field any questions or criticism.
I had wanted to relocate my power steering and all I could find was this thread: https://www.rx7club.com/2nd-generation-specific-1986-1992-17/power-steering-relocation-write-up-664495/
And it's a bit of a pain to locate a 84-85 P/S bracket and it's even more of a pain to work with the cast iron.
I had my bracket off from removing my A/C and started looking at it. I figured out I could modify the stock bracket a bit to work on the lower position on the motor and aluminum is alot easier to work with than cast iron.
Tools:
Grinder/cutoff wheel
Hacksaw
Drill
Visegrips (to remove stud)
1. This is the line where I decided to cut the bracket in half.
2. And here you can see the line again and the point where I marked to drill out. I chose this spot to make the two bottom holes on the stock bracket esentially moved to the upper part.
3. Cut in half.
4. (From left to right)
a.I had to grind here to clear the stock oil cooler lines,
b.My first hole was a little to the right and corrected to the left.
c.The hole I enlarged to accept the larger stud on the engine.
5. I had mounted the bracket and realized I forgot to check the angle of the bracket (so the pulleys are all straight and aligned with the main) before I drilled the first two holes. I drilled the new one and filled in the rest with JB weld putty to return some more structural integrity (Note: It did hold fine even with the larger hole, I was just being careful.
6. Red: There is a threaded stud that has to be removed to allow the bracket to fully sit.
Blue (L): I added a washer and larger nut to allow this side to sit flush across the two bolts.
Blue (R): This is just the right side stud.
I'll be glad to field any questions or criticism.


Trending Topics
I guess if it only takes you a couple hours to make this mod it may be worth it... but I've done more useless things when I was bored. Regardless, I'm curious to see the final result.
btw how long did it take to cut that bracket? lol
btw how long did it take to cut that bracket? lol
Thread Starter
Goes *round*round*round*
Joined: Apr 2003
Posts: 718
Likes: 0
From: San Antonio
Oh right, I neglected to mention that I needed the room for intercooler piping. My bad.
I think it took me about 20mins alternating between the cutoff wheel and the hacksaw. Of course, if someone has a band saw or a larger cutoff wheel the time can be considerably shorter.
I think it took me about 20mins alternating between the cutoff wheel and the hacksaw. Of course, if someone has a band saw or a larger cutoff wheel the time can be considerably shorter.

Lives on the Forum
Joined: Feb 2001
Posts: 26,664
Likes: 23
From: n
Wow, that must've took a while!
Please do not do this!
Most epoxies have great tensile strength, but they have terrible compression strength.
You really did not "return some more structural integrity".
The JB Weld is eventually going to crumble and fall apart with the heat and vibration of the engine.
-Ted
5. I had mounted the bracket and realized I forgot to check the angle of the bracket (so the pulleys are all straight and aligned with the main) before I drilled the first two holes. I drilled the new one and filled in the rest with JB weld putty to return some more structural integrity (Note: It did hold fine even with the larger hole, I was just being careful.
Most epoxies have great tensile strength, but they have terrible compression strength.
You really did not "return some more structural integrity".
The JB Weld is eventually going to crumble and fall apart with the heat and vibration of the engine.
-Ted
Thread Starter
Goes *round*round*round*
Joined: Apr 2003
Posts: 718
Likes: 0
From: San Antonio
Thanks for the tip about the JB weld. Since I have all that spare aluminum, I might just make a replacement plug, if anything just to fill up the hole.
As far as the lines go, the hard lines seem to connect alright but the one small hose that connects to the reservoir is going to need to be replaced. The stock one is too long and would kink if I try to bend it.
As far as the lines go, the hard lines seem to connect alright but the one small hose that connects to the reservoir is going to need to be replaced. The stock one is too long and would kink if I try to bend it.
Excellent idea. I was trying to figure out a way to put my air/ water intercooler in the space where the battery and leading coils used to be (relocated them). My intercooler piping would probably work with this mod.
Reted nailed it with the jb weld issue. I would suggest that you pick up another bracket from a forum member for cheap and use the one you have now as a template for the new one, so you don't have to worry about breakage down the road.
Reted nailed it with the jb weld issue. I would suggest that you pick up another bracket from a forum member for cheap and use the one you have now as a template for the new one, so you don't have to worry about breakage down the road.
Thread Starter
Goes *round*round*round*
Joined: Apr 2003
Posts: 718
Likes: 0
From: San Antonio
Before I put it in I went ahead and cut a plug from the left over aluminum and wedged it into the space where the JB weld used to be.
Lives on the Forum
Joined: Sep 2003
Posts: 5,707
Likes: 6
From: BC, Canada
If you have no power steering or AC you can mount the alternator over there, Pineapple racing sold a kit a while ago, but I don't think it's available any more.
That's a STRUT BAR that it's hitting, a sway bar is a completely different thing.
That's a STRUT BAR that it's hitting, a sway bar is a completely different thing.
thank you good sir, i spent a good part of the day doing this fabrication and it works GREAT!!!.
i had to move my intercooler piping up a little bit but other than that it fits like a glove. I feels so good to be able to take a turn with one hand!!!.. i followed your directions step by step and it works perfect. thanks alot man, really do appreciate it
i had to move my intercooler piping up a little bit but other than that it fits like a glove. I feels so good to be able to take a turn with one hand!!!.. i followed your directions step by step and it works perfect. thanks alot man, really do appreciate it
Thread Starter
Goes *round*round*round*
Joined: Apr 2003
Posts: 718
Likes: 0
From: San Antonio
No prob. Glad someone posted back about this.
You had to move the piping up though? I suppose I might have a bit more curve right there. I did this to get more clearance for my piping in the first place. lol.
You had to move the piping up though? I suppose I might have a bit more curve right there. I did this to get more clearance for my piping in the first place. lol.