
Taking the plunge...

I thought I should stop by and show some pictures of the shiny hunk of potential that showed up for me the other day.
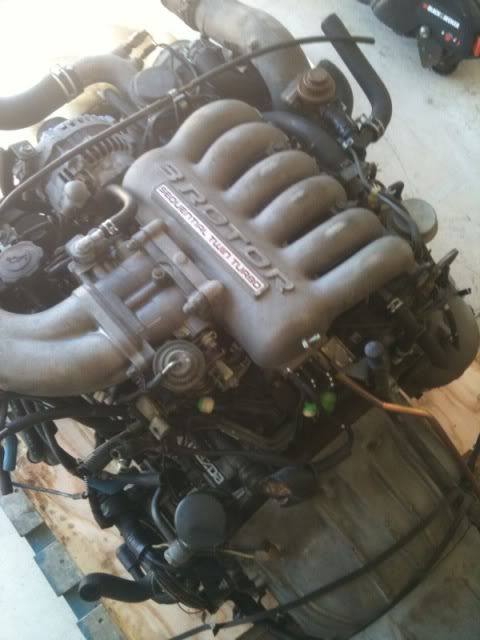
Now that I'm out of college and have some free cash, I can finally upgrade the pretty mild 2rotor setup my FC was running previously. Goals for the project are also pretty mild as far as a 20b is concerned, as I'm more concerned with a car that pushes my buttons than dyno numbers. Originally it was mid to high 400's on stock intake ports with a quiet exhaust and running by the end of the summer. (Actually, exactly this setup https://www.rx7club.com/showthread.p...light=20B+TiAL well done Zero R btw)
Unfortunately, the guy I know with the welding knowledge and equip is fairly busy, so I think it will be stock twins till the manifold gets built. No biggie, I think I can do the mounts and DP myself.
Also, I have a question for those of you who dropped in your engines without rebuilding first. What if any tests did you do before wiring it up and trying to start it? I took a peek inside the spark plug holes on each of the rotors to make sure the apex seals looked ok, but haven't gotten around to compression testing since the engine has no fluids and my tester is in another city. I also checked turbo shaft play and for any obvious signs of overheating. Anything else?
Thanks in advance
Welcome my "D" series brother.  My 20b was virtually carbon looked when I got bought mine 7 yrs ago. I thought like you did at the time and just wanted to get the engine running 1st without opening it. So what I did was turned the engine on it's side (exhaust side up) and poured some injector cleaner in the housings. I then took some cut up pieces of scotch pads and bent a long flat head screw driver. I then performed surgery on the rotor faces and tried to scrape away all the carbon build up. I then started messaging the apex seals to loosten them up. After a couple days of letting things soak and cleaning, I was able to free up the stuck apex seals and regain compression. This is something that should be done to any junk yard rotary that is carbon infested if your not willing to open the engine. The last thing you want is a big chunk of carbon breaking away and damaging your engine. For me since I changed my mind and wanted to go NA, I ended up opening the engine anyways to swap out the rotors. LOL!!!!!
My 20b was virtually carbon looked when I got bought mine 7 yrs ago. I thought like you did at the time and just wanted to get the engine running 1st without opening it. So what I did was turned the engine on it's side (exhaust side up) and poured some injector cleaner in the housings. I then took some cut up pieces of scotch pads and bent a long flat head screw driver. I then performed surgery on the rotor faces and tried to scrape away all the carbon build up. I then started messaging the apex seals to loosten them up. After a couple days of letting things soak and cleaning, I was able to free up the stuck apex seals and regain compression. This is something that should be done to any junk yard rotary that is carbon infested if your not willing to open the engine. The last thing you want is a big chunk of carbon breaking away and damaging your engine. For me since I changed my mind and wanted to go NA, I ended up opening the engine anyways to swap out the rotors. LOL!!!!!
Thanks for the tip, I'll attempt that since you can probably get a much better look through the exhaust side. The guy I bought it from poured ATF in the spark plug holes before I could stop him... not happy... but that has probably been loosening up all the crap in there since I've had it.
Also, since you're in TX and if you don't mind my asking, what peripherals did you keep? Full emissions blockoff? AC?
Also, since you're in TX and if you don't mind my asking, what peripherals did you keep? Full emissions blockoff? AC?
Heh, maybe you can shuffle some of that Megasquirt karma my direction. MS3 20b trailing split code is tentatively planned for sometime mid this summer. I've been thinking long and hard about trying it out, since I have a buddy willing to pick it up off me for his SR20 swap if I end up hating life.
I have MS classic (MS 1 CPU), the 'extra' code built in '04 or early '05 and no trailing ignition at all. Plus it's been five years since I messed with it. You'll need to help me get mine running again, lol.
So... long time, no see everybody. Been busy traveling for work and getting married, but I finally got some time to hunker down and work on the project. I needed a break so I decided to update my thread. Enjoy!

This is the start to my Megasquirt 3 board. I've only done light soldering and small kits, nothing anywhere near this big, but it was actually not terribly hard. I finished in about 12 hours spread over about a week.
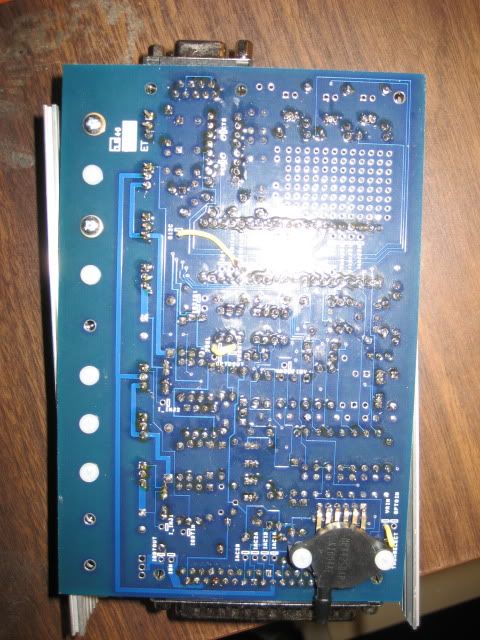
Ended up with this, a finished MS 3.0 PCB board.
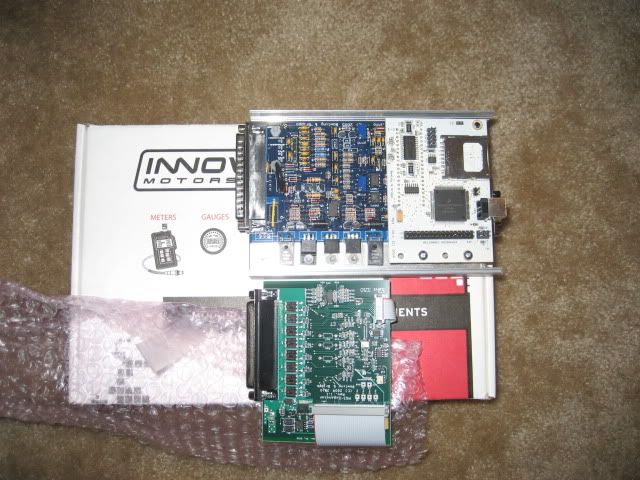
And assembled with associated goodies. I still have some testing to do so the MS3X hasn't been installed yet, but I've flashed firmware to the MS3 and it communicates with my laptop just fine. Also, the Megasquirt team released some beta code for 3 rotor trailing split. Need to finish this up so I can test that too.
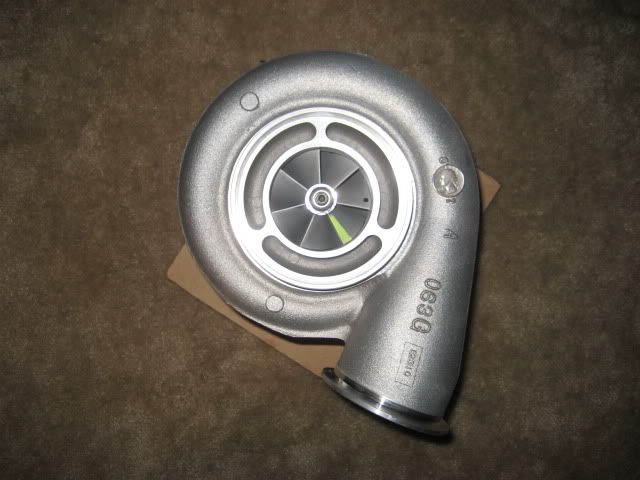
Lastly before I get to engine pics, I got my turbo in. It's a BW S400SX3 with a 1.00 T4 hot side. I'm almost afraid it will be too small, but we will see.
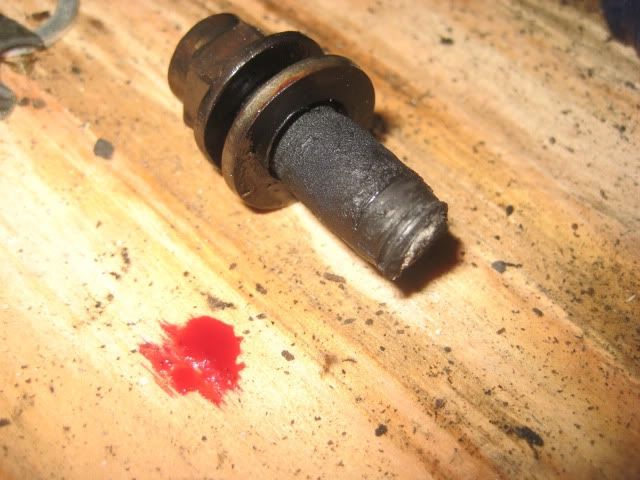
This is the only highlight from when we were stripping the engine to the short block. Damn you rusty exhaust nuts!!!!
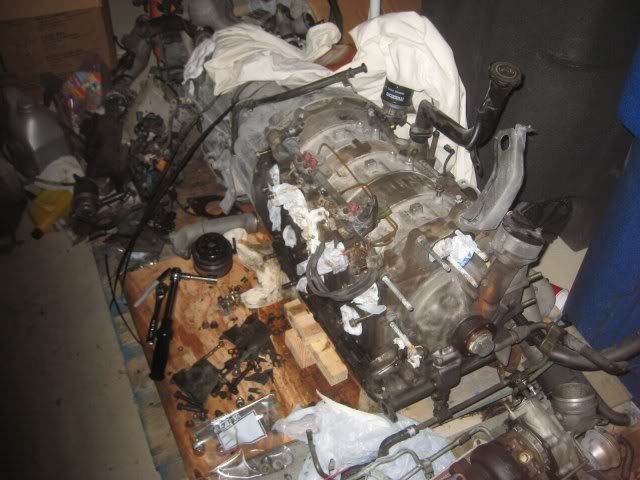
And finally the short block. I have a bunch of pictures from the unstacking but they're on a different camera.
Now for what I came to vent about. I was picking the seals out of the last rotor tonight, happy that I would be able to check tolerances and order parts this week when I notice this apex seal looks funny. F. I didn't even notice it when I was unstacking the engine or putting the housings away. The whole upper part of the 3pc seal is gone. AGH!!!!
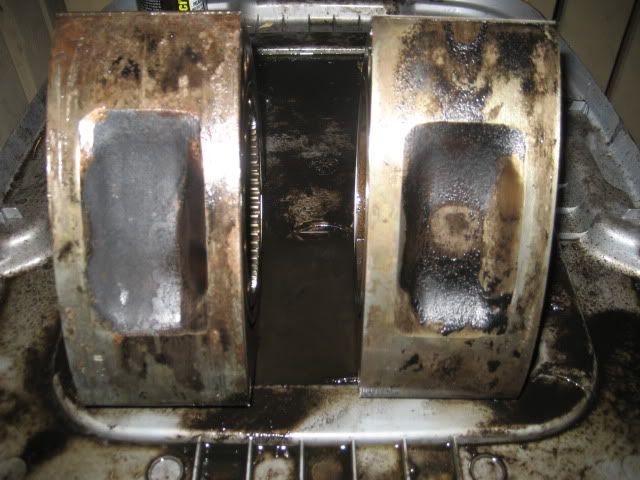
About half the seals in this engine will not move and are coated in carbon so I thought that's what "killed" it. As you can see, the rear rotor (left) is deeply gouged and pocked from an apex seal dinner. No doubt the housing looks the same. Not really surprising, just sucks that I actually have a dead engine. Oh well, if this is the biggest issue then I'll be happy.
I got in touch with the guy that is going to teach me to/do all of the TIG, so I should be playing with manifold designs as soon as parts get ordered for the rebuild. I like CMonakar's design shown here (https://www.rx7club.com/20b-forum-95/cmonakar-mandeville-20b-gt42r-project-601192/) but it's a bit daunting.
This is the start to my Megasquirt 3 board. I've only done light soldering and small kits, nothing anywhere near this big, but it was actually not terribly hard. I finished in about 12 hours spread over about a week.
Ended up with this, a finished MS 3.0 PCB board.
And assembled with associated goodies. I still have some testing to do so the MS3X hasn't been installed yet, but I've flashed firmware to the MS3 and it communicates with my laptop just fine. Also, the Megasquirt team released some beta code for 3 rotor trailing split. Need to finish this up so I can test that too.
Lastly before I get to engine pics, I got my turbo in. It's a BW S400SX3 with a 1.00 T4 hot side. I'm almost afraid it will be too small, but we will see.
This is the only highlight from when we were stripping the engine to the short block. Damn you rusty exhaust nuts!!!!
And finally the short block. I have a bunch of pictures from the unstacking but they're on a different camera.
Now for what I came to vent about. I was picking the seals out of the last rotor tonight, happy that I would be able to check tolerances and order parts this week when I notice this apex seal looks funny. F. I didn't even notice it when I was unstacking the engine or putting the housings away. The whole upper part of the 3pc seal is gone. AGH!!!!
About half the seals in this engine will not move and are coated in carbon so I thought that's what "killed" it. As you can see, the rear rotor (left) is deeply gouged and pocked from an apex seal dinner. No doubt the housing looks the same. Not really surprising, just sucks that I actually have a dead engine. Oh well, if this is the biggest issue then I'll be happy.
I got in touch with the guy that is going to teach me to/do all of the TIG, so I should be playing with manifold designs as soon as parts get ordered for the rebuild. I like CMonakar's design shown here (https://www.rx7club.com/20b-forum-95/cmonakar-mandeville-20b-gt42r-project-601192/) but it's a bit daunting.
Trending Topics


Anyone want to chime in on what the latest verdict is on if the cadmium plating on the rotor is super necessary to have? The brass hand brush and carb cleaner / kerosene / elbow grease combo isn't pulling the carbon off the bathtub, or faces for that matter. Even after a soak. I picked up a brass wire wheel to try out on the destroyed rotor and damn it works well, but eats everything off. Pineapple's video shows them doing it, but I just wanted a second opinion.
Also, what do you guys use to keep parts from rusting while the engine is apart? I'm afraid my WD40 + saran wrap or trash bag scheme isn't working. My side plates still look good but I think the rotors are showing rust discoloration where the plating has been eaten or worn off even though they're coated, wrapped, and kept indoors.
Also, what do you guys use to keep parts from rusting while the engine is apart? I'm afraid my WD40 + saran wrap or trash bag scheme isn't working. My side plates still look good but I think the rotors are showing rust discoloration where the plating has been eaten or worn off even though they're coated, wrapped, and kept indoors.
I try to leave the cadmium plating on the rotors as much as possible. When I wire wheel a rotor that's all nasty, I use a fine wheel and I don't go super aggressive/push too hard. If there is a little carbon left over, I leave it alone because it's just gonna get dirty as soon as you fire it up.
As for the rust issues stored indoors, don't take so many showers. lol Get a ceiling fan for the bathroom.
As for the rust issues stored indoors, don't take so many showers. lol Get a ceiling fan for the bathroom.
always modding
Joined: Mar 2005
Posts: 1,667
Likes: 3
From: on a tiny island in the middle of a sea
Also, what do you guys use to keep parts from rusting while the engine is apart? I'm afraid my WD40 + saran wrap or trash bag scheme isn't working. My side plates still look good but I think the rotors are showing rust discoloration where the plating has been eaten or worn off even though they're coated, wrapped, and kept indoors.
you can try those large tupperware rubbermaid storage tubs with the sealable tops..
if u wanna go really hardcore you throw some bags of silica salt in there too...
I try to leave the cadmium plating on the rotors as much as possible. When I wire wheel a rotor that's all nasty, I use a fine wheel and I don't go super aggressive/push too hard. If there is a little carbon left over, I leave it alone because it's just gonna get dirty as soon as you fire it up.
As for the rust issues stored indoors, don't take so many showers. lol Get a ceiling fan for the bathroom.
As for the rust issues stored indoors, don't take so many showers. lol Get a ceiling fan for the bathroom.
I had thought of trying some kind of desiccant, or a thicker coating perhaps cosmoline, but figured that may be overkill. Guess I'll track down something.
Do you guys also leave that gummy film near the side seals?
I had bad luck with parts rusting in plastic bags even after I doused them in WD40 for storage.
I switched to paper bags and no more rust problems!
It seems condensation is a real problem with plastic bag touching the metal parts, whereas the paper bag will actually absorb WD40 where it is touching the metal parts.
I switched to paper bags and no more rust problems!
It seems condensation is a real problem with plastic bag touching the metal parts, whereas the paper bag will actually absorb WD40 where it is touching the metal parts.
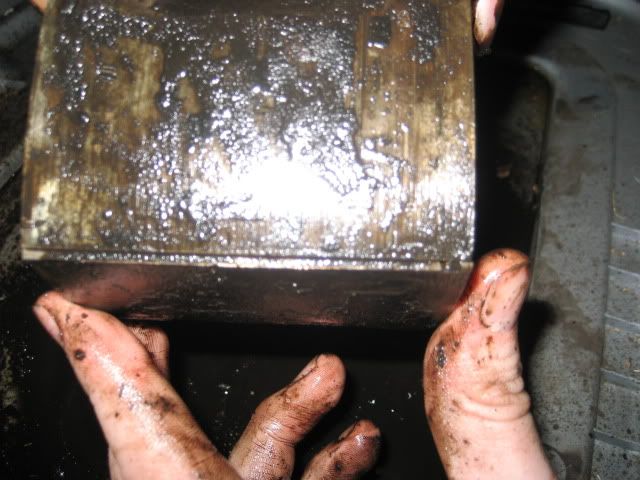
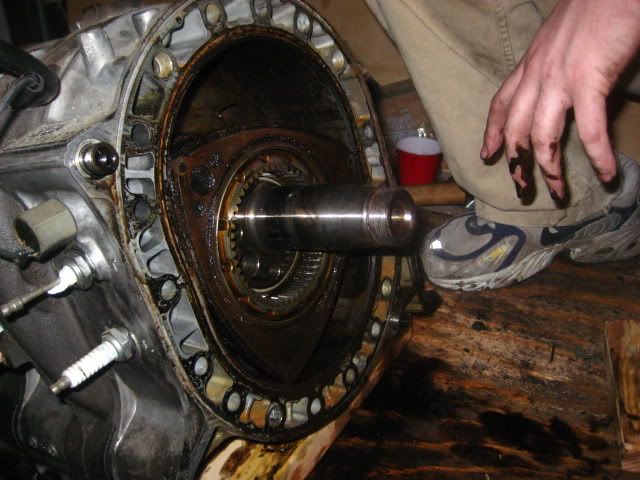
Here are just a few disassembly pics for you guys as promised.
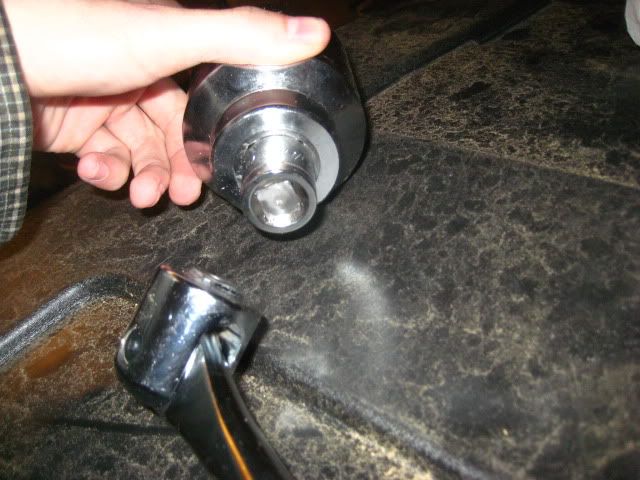
Yay HF 3ft bar failures!! -_-
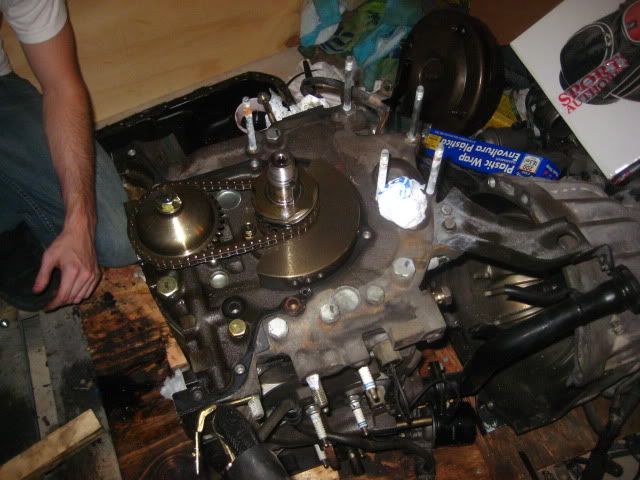
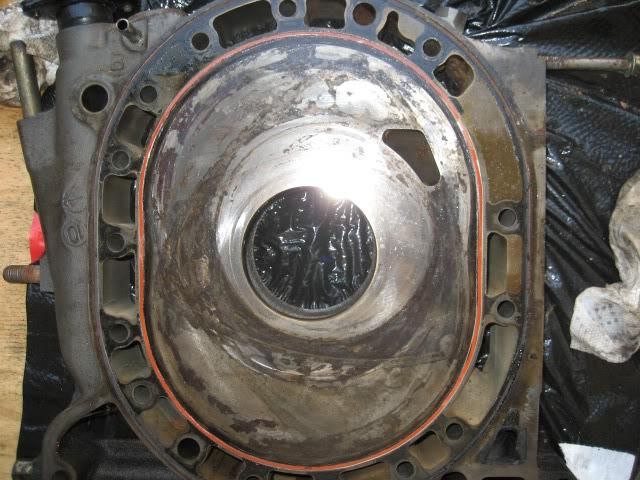
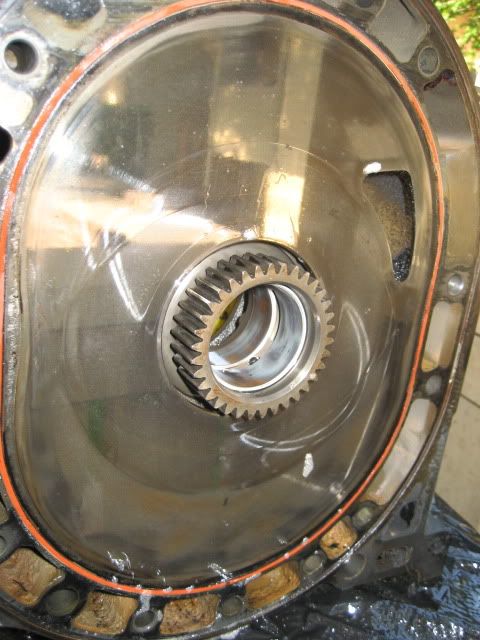
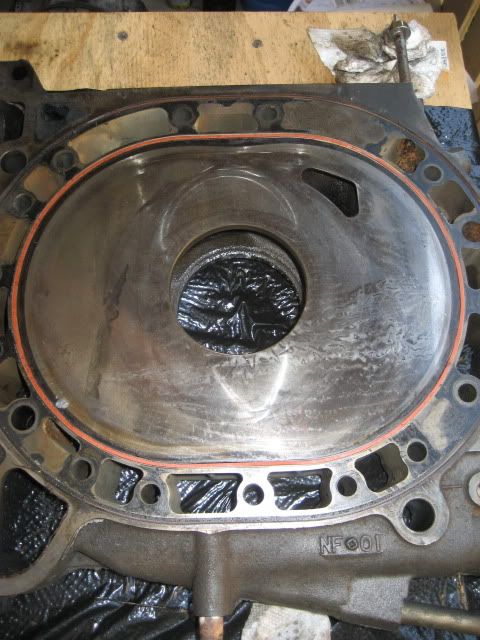
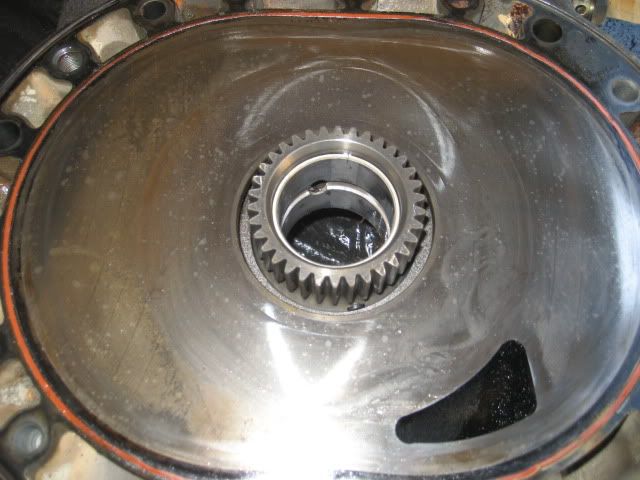
Front cover removed, no toasted oil so that's a good sign.
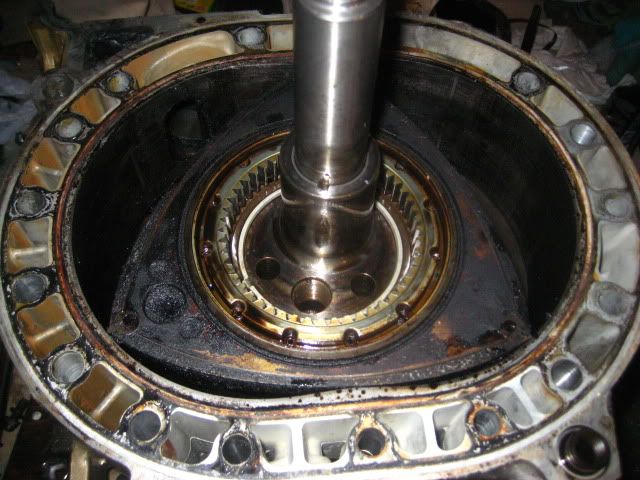
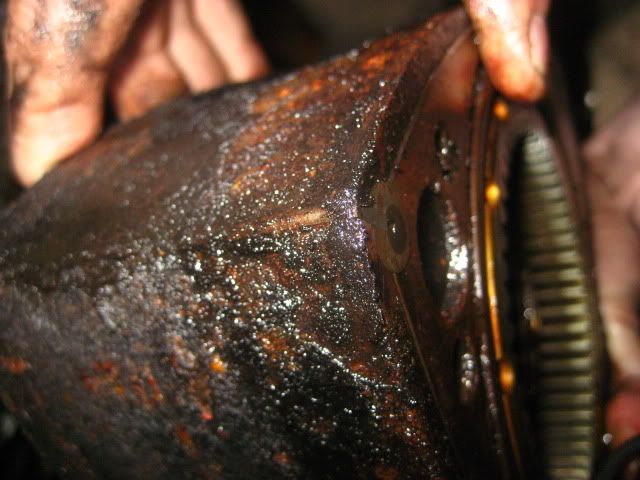
Removed the front plate to find.... ick! diiirty rotors.
Rear rotor is the same way.
JDM gunk... they threw that in for free.
I'll post up pictures of the irons and housings all marked up once I finish checking them out with the dial indicaor.
So as for the next steps tell me what you guys think for the rebuild:
1. Used REW rotor for the rear
2. Used housing for the rear - Someone know where to source used 20b housings? I suppose failing that I could use a 13b, though I seem to recall someone saying you shouldn't mix the two.
3. Atkins rebuild kit - 2pc 2mm Apex seals, new springs, new soft everything, couple of replacement corner seals and side seals for the ones I broke or that didn't spec out. NOT using solid corners. I'm nervous about trying the RA Supers for the same reason, namely eating housings and irons. If I want the option to go higher than my current goal of 500+, should I opt for the supers anyways and call it a day?
4. Source some exhaust inserts for the remaining housings
5. Port the exhaust to the sleeves, leave the intake ports stock?
6. I haven't decided on a list for oil or coolant mods for the block, suggestions?
Yay HF 3ft bar failures!! -_-
Front cover removed, no toasted oil so that's a good sign.
Removed the front plate to find.... ick! diiirty rotors.
Rear rotor is the same way.
JDM gunk... they threw that in for free.
I'll post up pictures of the irons and housings all marked up once I finish checking them out with the dial indicaor.
So as for the next steps tell me what you guys think for the rebuild:
1. Used REW rotor for the rear
2. Used housing for the rear - Someone know where to source used 20b housings? I suppose failing that I could use a 13b, though I seem to recall someone saying you shouldn't mix the two.
3. Atkins rebuild kit - 2pc 2mm Apex seals, new springs, new soft everything, couple of replacement corner seals and side seals for the ones I broke or that didn't spec out. NOT using solid corners. I'm nervous about trying the RA Supers for the same reason, namely eating housings and irons. If I want the option to go higher than my current goal of 500+, should I opt for the supers anyways and call it a day?
4. Source some exhaust inserts for the remaining housings
5. Port the exhaust to the sleeves, leave the intake ports stock?
6. I haven't decided on a list for oil or coolant mods for the block, suggestions?
always modding
Joined: Mar 2005
Posts: 1,667
Likes: 3
From: on a tiny island in the middle of a sea
the exhaust sleeve is diff on the REW (bigger and better) so you either have to de-sleeve the other 2, or use 3 REW housings... if you put them side by side and look in the exhaust port, the difference is quite apparent
Also, since I can't edit my previous post, I've been kind of back and forth about how large to port both intake and exhaust. For a while I was tempted to do a fairly aggressive street port and just keep the boost down on the street. I had previously decided against that since the need for a "race tune" since tracking the car is a way way distant thought at this point.
Now I'm not so sure that I should leave it.
Updates!!
This morning I started checking the apex seal grooves. First I cleaned out all of the carbon from the grooves. Then I stuck the feeler gauge in perpendicular to the slot and all the way down. Then I set the top part of the original 3pc seal into the slot (with the feeler still in there) and checked to see if the gauge was trapped or not. All of the slots bound the .003"(.08mm) gauge with some binding the .0025"(.06mm) one. So from this, it looks like my rotors should be good to go unless I wasn't doing this particular procedure correctly.
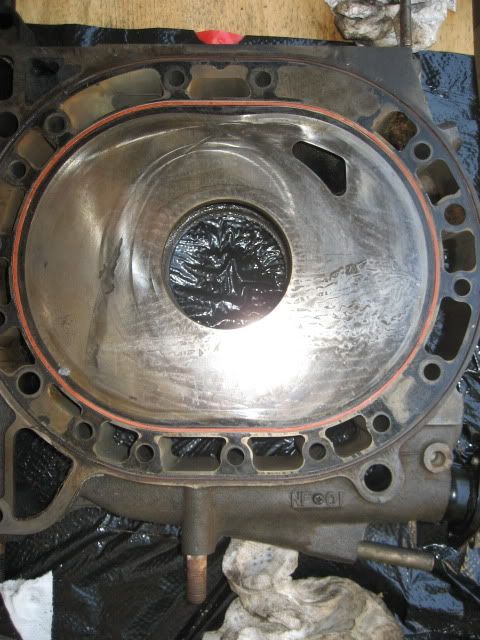
Just thought I'd post some carnage.
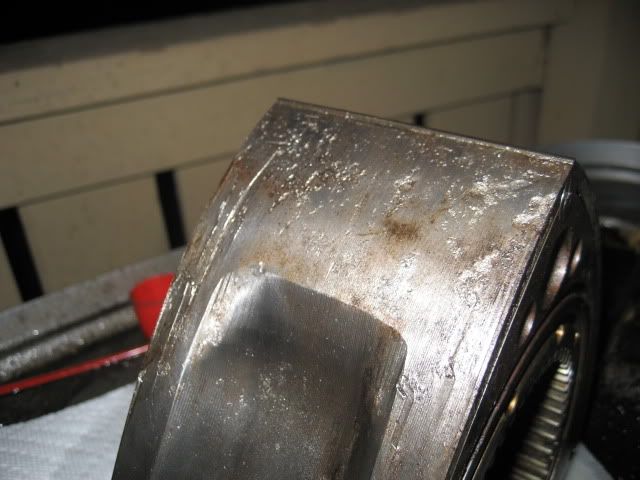
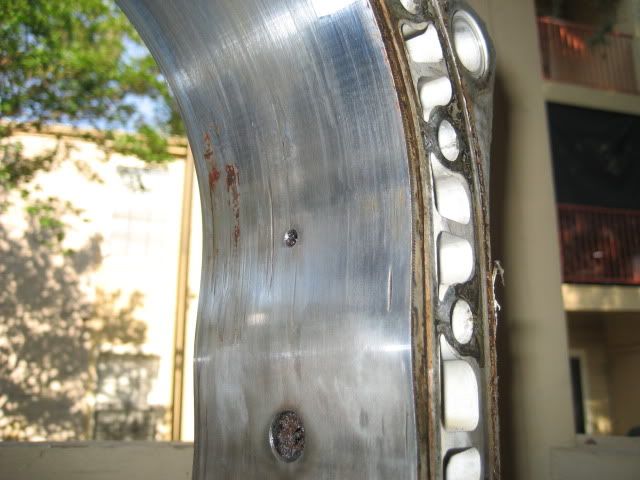
Destroyed rear rotor and housing. I cleaned up the rotor using my new wheel just to get a feel for doing it before I did the good ones. It's now way easier to see how much pitting there is. All of the faces of this particular rotor are about this bad. Now on to rebuild questions.
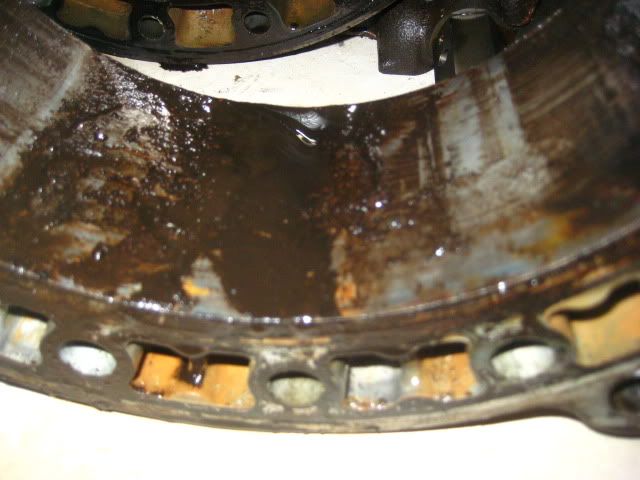
First I wanted to get some opinions on bearing reuse.
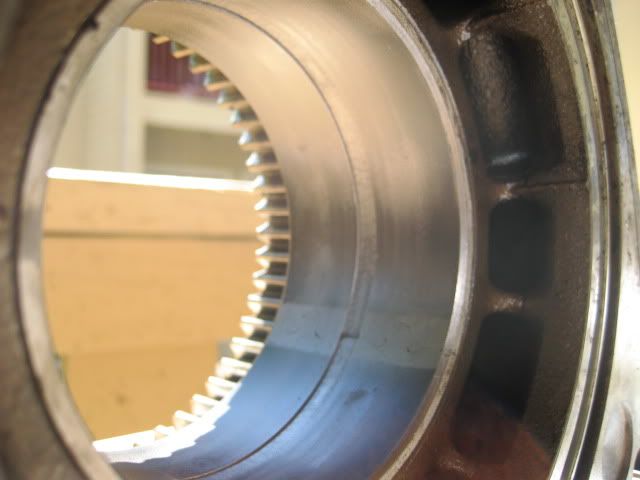
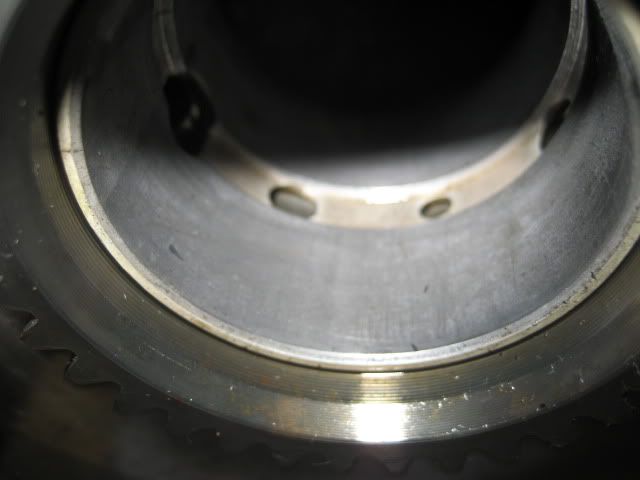
These are good examples of what all of the bearings (rotor and main) look like with the exception of one.
Should all of the bearings that don't look like this be reusable? This is the only one where you can see any of the copper showing through.
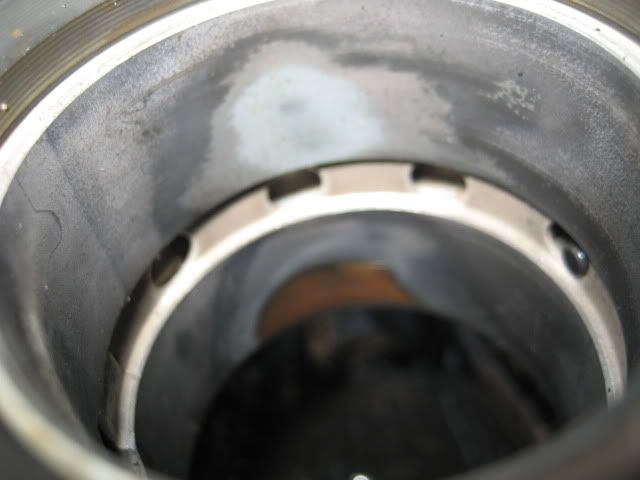
Then I started looking at the irons
The rear
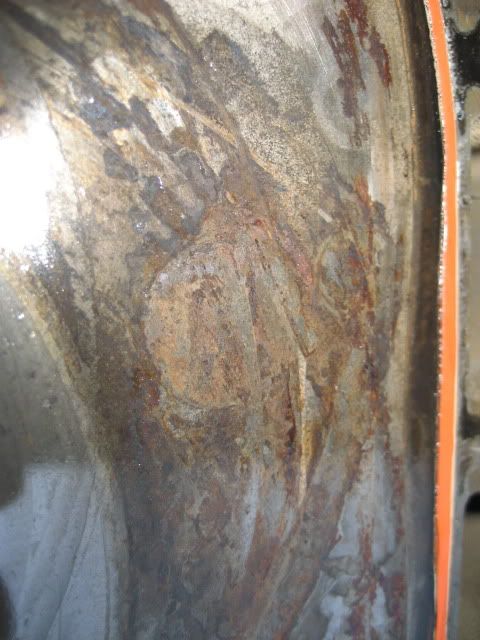
At first I thought this was just black marking, but it actually looks like rust!!! It's definitely raised and I can feel it with my fingers. As far as I have read, mild scotch brite pads are the preferred tool for black markings, but I think this one may have to get ground.=( Any input here is welcome.
The rest of the plates look ok. Not nearly as bad.
This morning I started checking the apex seal grooves. First I cleaned out all of the carbon from the grooves. Then I stuck the feeler gauge in perpendicular to the slot and all the way down. Then I set the top part of the original 3pc seal into the slot (with the feeler still in there) and checked to see if the gauge was trapped or not. All of the slots bound the .003"(.08mm) gauge with some binding the .0025"(.06mm) one. So from this, it looks like my rotors should be good to go unless I wasn't doing this particular procedure correctly.
Just thought I'd post some carnage.
Destroyed rear rotor and housing. I cleaned up the rotor using my new wheel just to get a feel for doing it before I did the good ones. It's now way easier to see how much pitting there is. All of the faces of this particular rotor are about this bad. Now on to rebuild questions.
First I wanted to get some opinions on bearing reuse.
These are good examples of what all of the bearings (rotor and main) look like with the exception of one.
Should all of the bearings that don't look like this be reusable? This is the only one where you can see any of the copper showing through.
Then I started looking at the irons
The rear
At first I thought this was just black marking, but it actually looks like rust!!! It's definitely raised and I can feel it with my fingers. As far as I have read, mild scotch brite pads are the preferred tool for black markings, but I think this one may have to get ground.=( Any input here is welcome.
The rest of the plates look ok. Not nearly as bad.
While cruising for information about the black spots left on the irons, I ran across a procedure for prepping the irons that I had never encountered, courtesy of Lynn Hanover at the "other" forum. This supposedly eats out the black spots and leaves a surface conducive to oil retention. Note that this process isn't meant to level wear grooves or really remove material at all, just to prep the surface.
Here is the consolidated info courtesy of the cozy13b (airplane) project
Given that this process has been vetted by some big forum names (Lynn over there, DaleClark over here) and I have some mild experience lapping airgun parts, I'm sorely tempted to try this out.
References:
https://www.rx7club.com/3rd-generation-specific-1993-2002-16/hand-lapping-irons-917523/
http://www.nopistons.com/forums/topi...1&#entry927810
https://www.rx7club.com/rotary-car-performance-77/my-irons-almost-done-ground-lapped-ported-epoxied-578794/
http://www.lucubration.com/cozy13bt/cleaning
===========THESE ARE NOT MY IRONS================
Reference photos for those who aren't going to read the threads:
Here are the irons before:


Here are they after:


From that last ref thread, I think I could rig this, and I have access to a mill:
http://youtube.com/watch?v=fXfk0DrxAYY
Here is the consolidated info courtesy of the cozy13b (airplane) project
There should be no attempt to reduce the surface enough to remove the wear marks
(Groove along the plugs side of the iron). This groove is caused by hot metal
wearing more quickly than cooler iron. So, the groove forms from the side seal
moving in a somewhat vertical path. The same exact wear would occur on the opposite
side but for the cooler iron. Right? The wear limit of this groove depth is .004".
It can be removed by grinding and lapping. That is reducing the entire surface
exactly the same amount. Or just lapping for a very long time. Either operation is
acceptable. The irons should be renitrided after either process.
One light lapping probably would leave a nitrided layer since it starts out at about
.003" deep. This is for street engines that do not get disassembled often. It makes
no difference in a race engine.
You hone a piston engine cylinder to remove the glaze. That is the chrome like
finish of the bore walls caused by the rings wearing away some of the surface. New
rings installed in a slick chrome like bore will take years to break in. The oil
scraper ring will remove all oil from the bore on each stroke and the new rings will
spoil from over heating.
Same thing in the rotary. To remove the glaze. The shiny surface, and replace it with
a rough surface that will hold a supply of oil to help lubricate the side seals. The
side seals are the piston rings of the rotary.
The object here is to remove the glaze with the rather course 180 grit paper on the
random obital sander. A air powered 5" round aluminum oxide disc is what I use, but an
electric unit would be fine. I run the disc dead flat on the iron long enough to
remove all of the staining done by water in the seal grooves. Go real light on the
legs. Material comes off real fast with high unit pressures, Then a fancy lapping
session or glue some wet or dry silicone carbide 400 grit paper to an old disc pad,
and wet the iron with kerosine and run over it again nice and flat just long enough to
get a flat grey look to it. About 5 minutes, and keep it wet. A new dry 180 grit disc
and a new silicone carbide disc for each iron face. You can do the wet part in the
cleaning tank for less mass making.
Then off to the car wash for a long wash and wrinse. Then dry with old clean towels
and spray with WD-40. Now you have a finish that will last through several rebuilds.
Provide quick break-in, and long life and high compression form the side seals and
corner seals. The swirl marks from the 180 grit will outlast the irons.
Just don't use a synthetic oil in a fresh rebuild. Run a few hours with dino oil, then
dump it and change filters, and run what you want. If the OMP is in use, a good brand
of dino oil and if you premix, a synthetic racing oil in the sump.
References:
https://www.rx7club.com/3rd-generation-specific-1993-2002-16/hand-lapping-irons-917523/
http://www.nopistons.com/forums/topi...1&#entry927810
https://www.rx7club.com/rotary-car-performance-77/my-irons-almost-done-ground-lapped-ported-epoxied-578794/
http://www.lucubration.com/cozy13bt/cleaning
===========THESE ARE NOT MY IRONS================
Reference photos for those who aren't going to read the threads:
Here are the irons before:
Here are they after:
From that last ref thread, I think I could rig this, and I have access to a mill:
http://youtube.com/watch?v=fXfk0DrxAYY
I've been temped to do my irons the same way. I also have a few black spots. Don't worry about replacing your bearings. Mazdaspeed will even tell you that a well broken in bearing is better than replacing with a new one. I wouldn't worry about replacing them till around 150k. I doubt your 20b has any where close to that.

Thread
Thread Starter
Forum
Replies
Last Post
Jeff20B
1st Generation Specific (1979-1985)
73
Sep 16, 2018 07:16 PM
ZaqAtaq
New Member RX-7 Technical
2
Sep 5, 2015 08:57 PM