
The ultimate porting booth

Thread Starter
Rotary Freak
Joined: Aug 2001
Posts: 2,267
Likes: 3
The ultimate porting booth
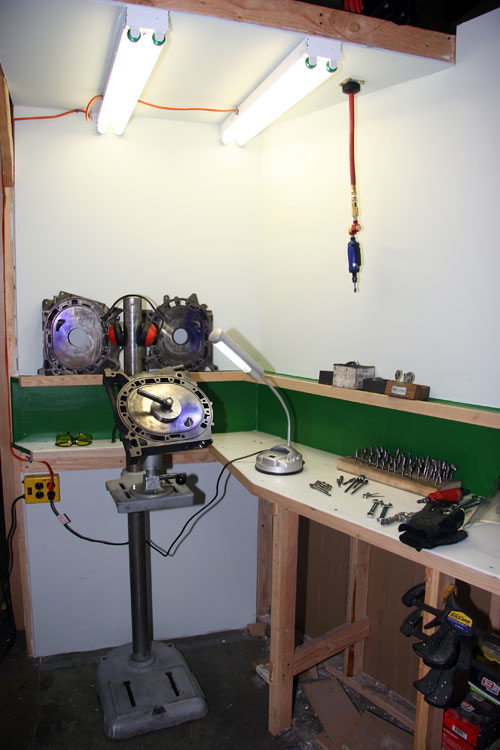
I got sick and tired of our old porting booth, so I made a new porting area. The old booth was like a closet. Very cramped, limited shelf space, dirty and poorly lit. Rob thought it was fine, but he has been using the same booth for over 15 years and is pretty set in his ways. As an added incentive, I am writing an article on engine porting for MazdaSport Magazine and I wanted a nice environment for the photos.
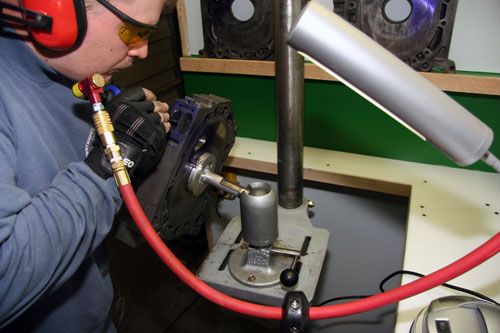
One of the biggest PITA about porting, IMHO, is frequently having to stop and reposition the work to get a better angle. And still, you are constantly bending your body this way and that to get the perfect angle, which plays Hell on your back. To combat this, I recently purchased an industrial strength Work Positioner, which has a single control that releases a ball-joint. I fabricated a mount for the plates and now I can always get the perfect position in a fraction of the time it used to take. The difference is phenominal! I mounted the work positioner on a drill press base, so I can adjust the height easily. No stooping!
Lighting is always a problem too. The old booth had a couple overhead fluorescents, plus a couple vertical on either site. Even light, but never enough. So, I installed four 3-foot 32 watt fluorescent (128 watts; equivalent to 512 incandescent watts!), which is several times brighter than the old booth. I also got a goose-neck fluorescent lamp, plus I have a couple magentic base lamps when the need arrises. The walls are painted an off-white color, so I get plenty of reflected soft light.
I built a work bench around the porting area, so I'd have a lot of space to set the tools and parts. Above the main bench is a small shelf that runs all the way around. For the counter top, I used High Density Polyethylene (HDPE), so it's easy to take care of and looks clean.
The final thing I did was mount a retractable air hose reel in the ceiling. This is a seriously nice feature. When I need the air line, I just reach up and grab it. When I'm done, it just retracts away. No tripping over air lines or wondering where the die grinder is hiding. I will probably add about four more, so I can have multiple die ginders with different bits, ready to grab and use...less time wasted changing bits.
So far, I've used the new porting area to work on one engine. I cannot put into words how much better it is. What was drudgery is now actually enjoyable, and it now takes less time to get the same quality of work.
Here are a couple pics. The second one gives you a good look at the work positioner.
Thread Starter
Rotary Freak
Joined: Aug 2001
Posts: 2,267
Likes: 3
Originally Posted by Jozay721
wow thats cool,do u put the engines beack together too?
Last edited by Blake; Jul 31, 2006 at 03:31 AM.
Eats, Sleeps, Dreams Rotary
Joined: Jul 2004
Posts: 3,247
Likes: 2
From: Allentown, PA - Paterson, NJ
Originally Posted by Kentetsu
Nicely done Blake! It really does make a difference, if you pay attention to your work area. I see plenty of good ideas put to use here...
Trending Topics
Thread Starter
Rotary Freak
Joined: Aug 2001
Posts: 2,267
Likes: 3
Originally Posted by Rx7carl
Nice work.  That positioner looks like the perfect fixture for that.
That positioner looks like the perfect fixture for that.
Thread Starter
Rotary Freak
Joined: Aug 2001
Posts: 2,267
Likes: 3
Originally Posted by Jeff20B
That's a nice idea. Did you have to bolt the drill press base to the floor?
Thread Starter
Rotary Freak
Joined: Aug 2001
Posts: 2,267
Likes: 3
Originally Posted by Hades12
Where did you get?
EDIT: Keep in mind that I had to make the jigs to hold the plates.
Last edited by Blake; Aug 1, 2006 at 12:38 PM.
Thread Starter
Rotary Freak
Joined: Aug 2001
Posts: 2,267
Likes: 3
Originally Posted by DriveFast7
Nice work Blake. I bet Rob's back thanks you too.

Thread
Thread Starter
Forum
Replies
Last Post
fd3CB
SevenStock Archive
0
Sep 11, 2015 11:12 AM