
Refinishing the emblems...

Scotto
Joined: Apr 2006
Posts: 22
Likes: 0
From: Geelong, Australia
darthrotary, what did you use to apply the paint to get such a smooth finish? Did you clearcoat it or something? Everyone else's efforts seem to be a little rougher than yours, just interested as to exactly how you did it.
dark side i sense in him
Joined: Dec 2004
Posts: 1,305
Likes: 0
From: Savannah to Atlanta to Williamsburg
i used spray paint, sprayed it into the cap an applied with a paint brush, i was worried id have brush strrokes but it evened out itself. I did the silver( aluminum engine paint) first, with a little reg model paint brush, then did the black with trim black paint (same deal with the paint in cap) with a fine model paint brush. did two coats them slap them on the car. That trim paint is super black! and it fills in ridges and smoothes it self out. I did nt do the clearcoat, didnt think about it, but gonna when i return home, bet it looks good.
The silver is shiney (glossy?) but not metallic, which was what i was going for anyway, theres nothing Metallic on my car so i figured it wouldnt look right. And as a plus, it REALLY matches the paint! I just had her painted with the original Sunbeam silver, its damn close.
The silver is shiney (glossy?) but not metallic, which was what i was going for anyway, theres nothing Metallic on my car so i figured it wouldnt look right. And as a plus, it REALLY matches the paint! I just had her painted with the original Sunbeam silver, its damn close.

OK, I couldn't resist trying this out. First I dug out a pair of emblems I've been planning on refinishing for the last 4 years:

Then I smoothed them out with some 600 emery paper:

Then I painted them gloss black with some rustoleum plastic paint:

Then I used Stu's suggestion about putting the silver paint on a flat surface (fabric from a cotton T shirt stretched over a board) and stamped on the paint:

Then I sprayed them with some clear coat:

Here's the reagents:

Here's a couple more photos:


Ray
Then I smoothed them out with some 600 emery paper:
Then I painted them gloss black with some rustoleum plastic paint:
Then I used Stu's suggestion about putting the silver paint on a flat surface (fabric from a cotton T shirt stretched over a board) and stamped on the paint:
Then I sprayed them with some clear coat:
Here's the reagents:
Here's a couple more photos:
Ray
Last edited by ray green; Oct 21, 2007 at 04:31 PM.
Two things, Ray.
One: Holy poop. I will be doing this ASAP! Those look amazing
Secondly: Where on earth did you get that model?! I've been looking for a first gen build model forever! Every hobby store I go two as the Rx7 from fast and the furious, but I dont want it x.x
One: Holy poop. I will be doing this ASAP! Those look amazing
Secondly: Where on earth did you get that model?! I've been looking for a first gen build model forever! Every hobby store I go two as the Rx7 from fast and the furious, but I dont want it x.x
 that chibi RX7 is cute... where'd ya find it?

I think we need an archive on this thread now. My emblems still look good on the sides but the rear MAZDA emblem is pretty tired looking. This beats paying $$ to get new ones.
Credit goes to Stu (Jeezus) for suggesting the stamping idea.
A note on the painting, I rushed mine a bit to get it done in an afternoon but this caused some minor blistering when I went from the black to silver paint, making the surface a bit rough. Hard to see in the photos but I know it's there.
You could probably avoid the blistering by allowing a day or two to dry between coats or by using the same brand of paint for the different colors so there is no reaction between them (notice I used rustoleum followed by duplicolor followed by krylon, all stuff I had around the house).
I got that model on ebay a few years ago for about $5.00. I'm not sure of the manufacturer but it has a spring wound motor and it's really fast, probably beat my 84 GSL for the first 10 yards.

doing it with a sponge usually works out pretty good... you have to make sure its a painters sponge though (don't really have much big holes in there) thats the major difference that I find. Another method is actually the back of a mouse pad (considering its clead )
)
Most folks would probably not want to have to remove the emblems for this job, which makes it a lot more work, including me - I'd rather not take them off my white 84 GSL and silver 85 GSL, probably breaking the pins in the process:


So it should be possible to clean up the emblems while they are in place, then stamp on the silver paint to highlight the raised letters using DJ's mouse pad idea. I'm going to give this a try on my installed emblems as soon as it stops raining (it FINALLY rained down here, YES!!). I'll post the results.
So it should be possible to clean up the emblems while they are in place, then stamp on the silver paint to highlight the raised letters using DJ's mouse pad idea. I'm going to give this a try on my installed emblems as soon as it stops raining (it FINALLY rained down here, YES!!). I'll post the results.
Credit goes to Stu (Jeezus) for suggesting the stamping idea.
A note on the painting, I rushed mine a bit to get it done in an afternoon but this caused some minor blistering when I went from the black to silver paint, making the surface a bit rough. Hard to see in the photos but I know it's there.
You could probably avoid the blistering by allowing a day or two to dry between coats or by using the same brand of paint for the different colors so there is no reaction between them (notice I used rustoleum followed by duplicolor followed by krylon, all stuff I had around the house).
I got that model on ebay a few years ago for about $5.00. I'm not sure of the manufacturer but it has a spring wound motor and it's really fast, probably beat my 84 GSL for the first 10 yards.
A note on the painting, I rushed mine a bit to get it done in an afternoon but this caused some minor blistering when I went from the black to silver paint, making the surface a bit rough. Hard to see in the photos but I know it's there.
You could probably avoid the blistering by allowing a day or two to dry between coats or by using the same brand of paint for the different colors so there is no reaction between them (notice I used rustoleum followed by duplicolor followed by krylon, all stuff I had around the house).
I got that model on ebay a few years ago for about $5.00. I'm not sure of the manufacturer but it has a spring wound motor and it's really fast, probably beat my 84 GSL for the first 10 yards.

Finally got the emblems I did on the car scraped clean. They look tons better than in the original photos. I'll take pics later.
A few years ago I painted mine with some touch up paint after my car was painted the first time. The car is tender blue so the difference between the stock silver and the blue was not that noticable.
Now with the new paint job all of my emblems have been shaved.
Now with the new paint job all of my emblems have been shaved.
dark side i sense in him
Joined: Dec 2004
Posts: 1,305
Likes: 0
From: Savannah to Atlanta to Williamsburg
whats the deal in the corner by the "7"? is that just overspray and build up from the black plastic paint? or just old badge?
Either way that looks damn good! stamping seem to be the way, and i love the model!
as for on the car, i dont know, There little pins with a clamp on the back. I took off the wheel well cover and removed the clamps and it fall right off, even if they break, SUPER glue works great.
Either way that looks damn good! stamping seem to be the way, and i love the model!
as for on the car, i dont know, There little pins with a clamp on the back. I took off the wheel well cover and removed the clamps and it fall right off, even if they break, SUPER glue works great.
Last edited by darthrotary; Oct 22, 2007 at 06:46 PM.
It might be wear but I think it's probably just the angle of the photograph.
But taken straight on it looks pretty much like yours:
I could do a little better job with the stamping action now that I've seen how it's done, I think DJ's idea of using a mouse pad would work better than my tee shirt on a board technique and allow you to "rock" the paint into the worn edges.
For mounting emblems with broken pins I've used the double sided sticky tape. Sand the backside smooth, peel one side of the tape and stick it on the back. Then use a razor blade or exacto knife to trim around the emblem. Peel off the other side of the tape and get it right the first time, it's not coming off.
dark side i sense in him
Joined: Dec 2004
Posts: 1,305
Likes: 0
From: Savannah to Atlanta to Williamsburg
I concur, and wasnt putting down the job you did, just asking  . As for the mouse pad, BRILLIANT!! seems easier than painting like i did, was shaking so damn bad was worried it look like ****.
. As for the mouse pad, BRILLIANT!! seems easier than painting like i did, was shaking so damn bad was worried it look like ****.
I used the stamp method to do a rotary badge once and it came out nice. I sprayed the whole thing with gloss black first. Then I brushed some silver model paint onto a piece of cardboard and stamped the badge into it. The result:
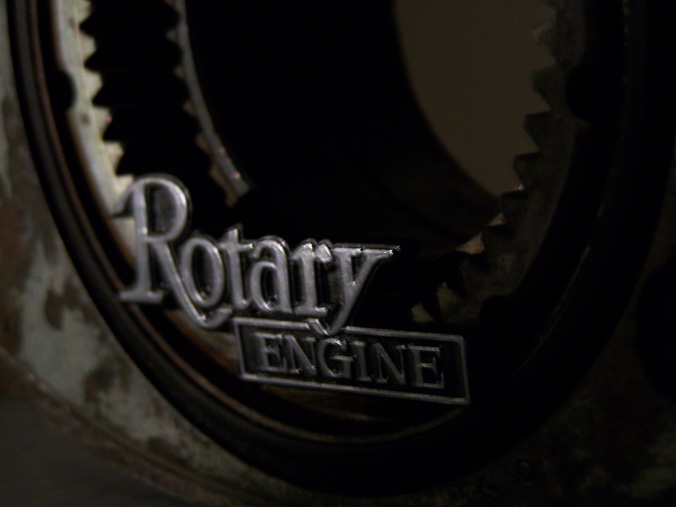
Excuse the blurry picture, it's as old as this thread.
Excuse the blurry picture, it's as old as this thread.

Thread
Thread Starter
Forum
Replies
Last Post
metal
2nd Generation Specific (1986-1992)
11
Aug 2, 2007 08:26 PM
TainoIndian
3rd Generation Specific (1993-2002)
9
May 11, 2005 01:55 AM