
My FC front Subframe swap into my SA22C


I just wanted to share how I did my swap. I know there is a write up on here but I feel they leave out a lot of good details and also cover different ways to do it. I feel that I have done the best way, both strong and functional without unnecessary work. I am open to any comments to make this write-up better or more helpful for anyone.
First off you will need to get some parts, so here is the list of needed stuff. All parts are from of course 86-91 FC RX7
Front subframe
Steering rack can be power or manual your choice, also need the mounting brackets and rubber insulators
Steering intermediate shaft
Steering column
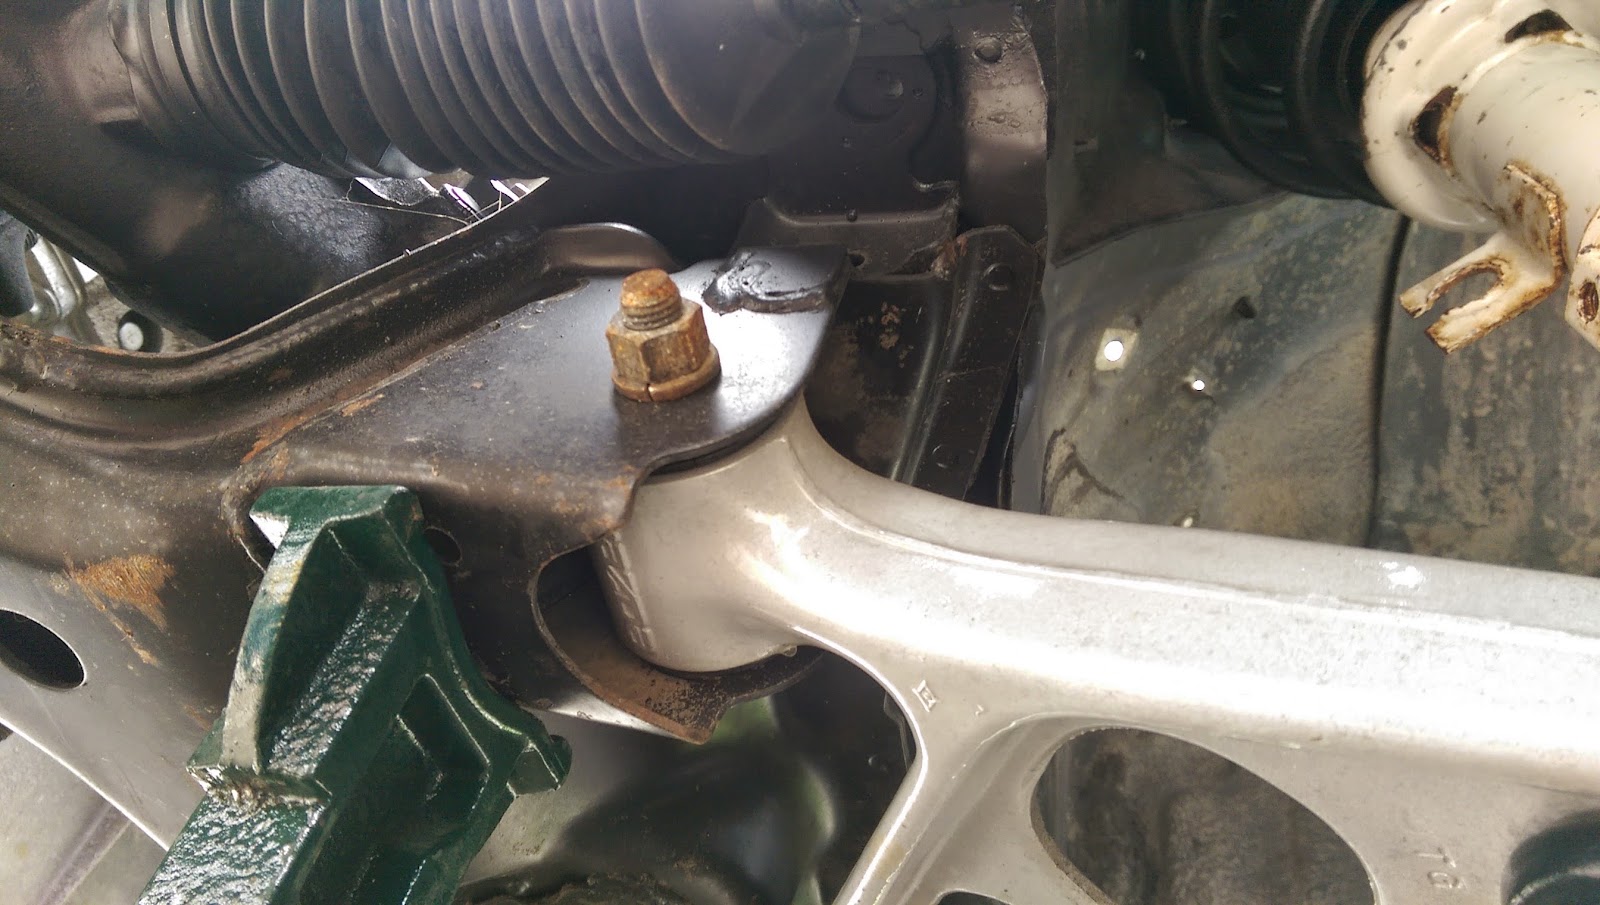
Lower control arms, S4 have bolt on ball joints S5 are not, both will work
Steering knuckles/spindles
Hubs, 4 lug or 5 lug your choice, will need brakes to match
Calipers, rotors, pads
Struts, shorter than stock springs needed, coil overs would be best, with upper mounts to match
Metal stock
Metal tube/pipe
Bolts/nuts 7/16" x 4.5" and 7" long grade 8 bolts
Metal working tools, welder, carbide cutting bits, drill bits, drill, grinder, cutoff wheel, chop saw... etc.
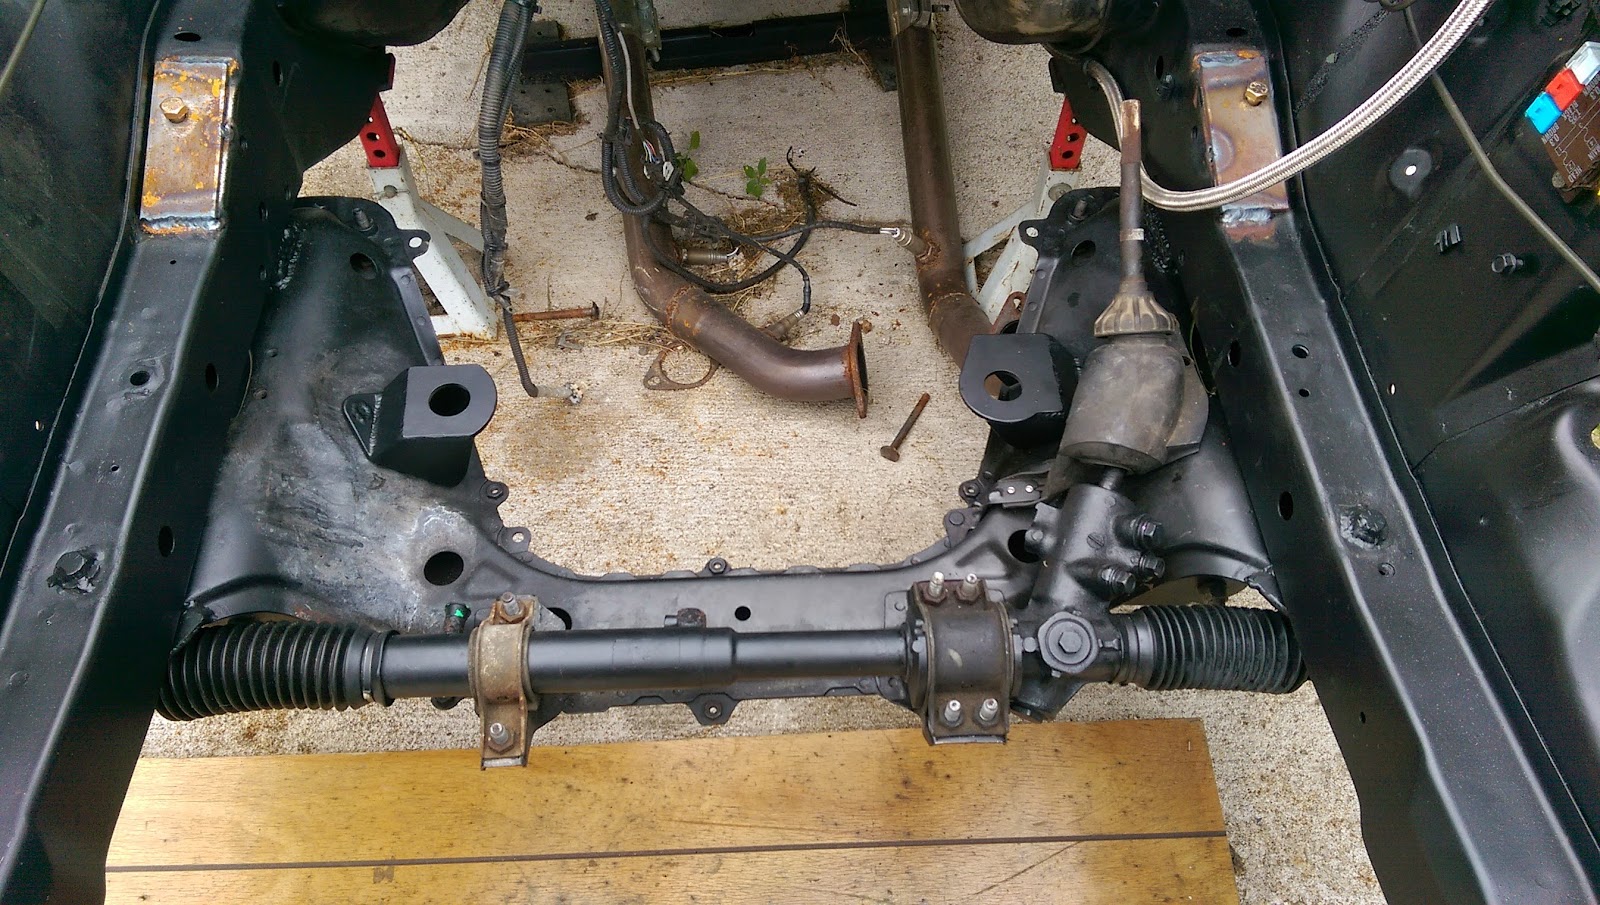
Subframe modifications:
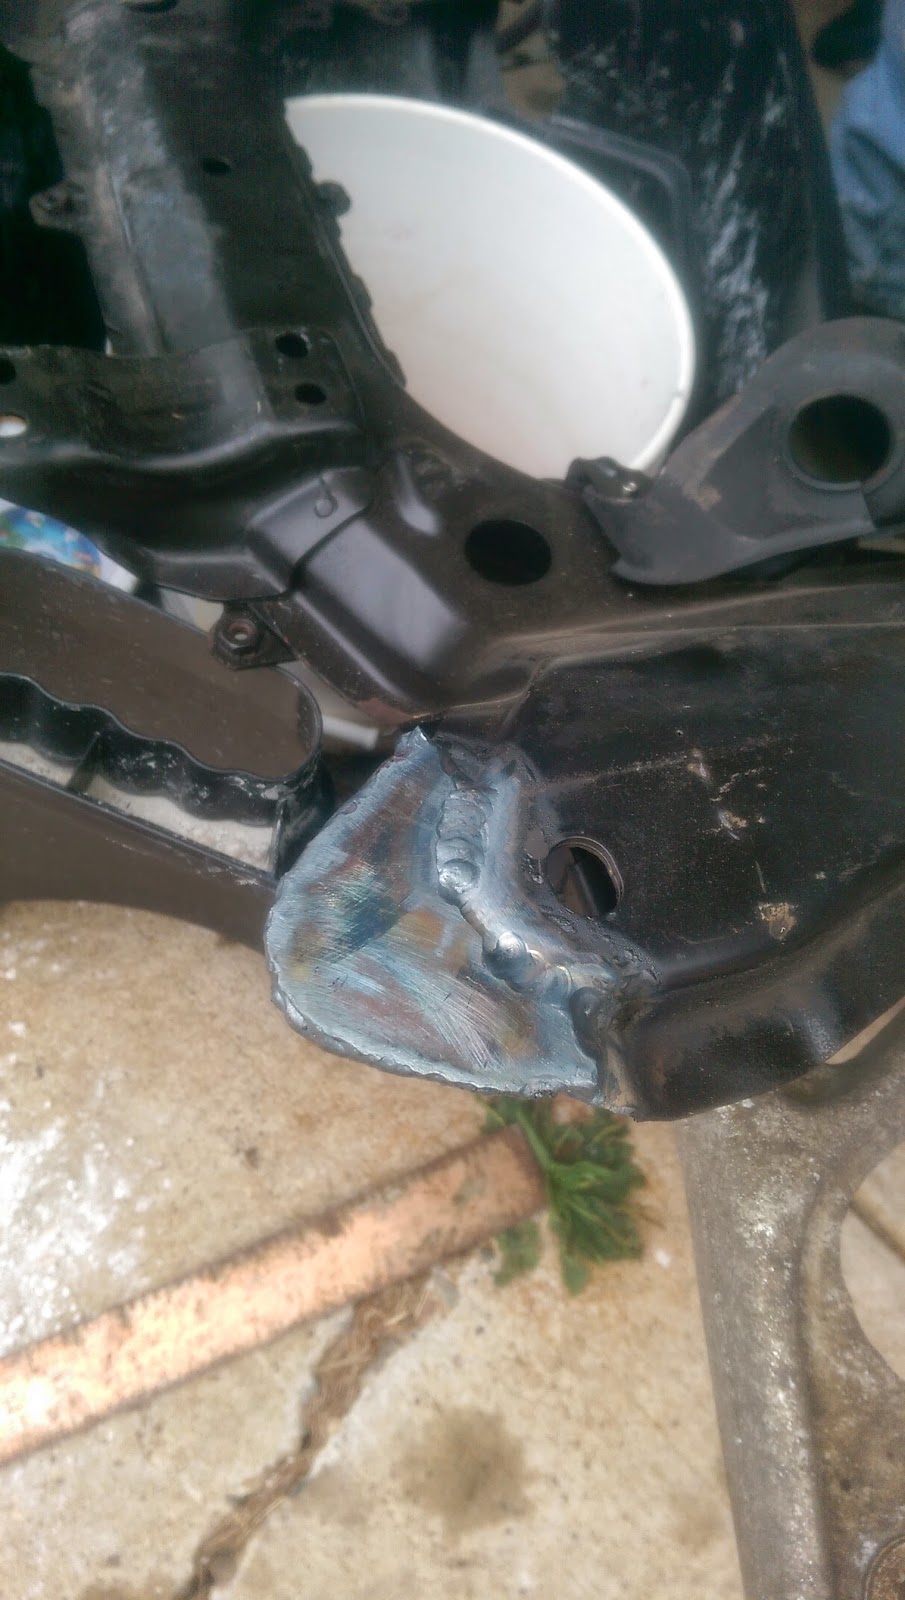
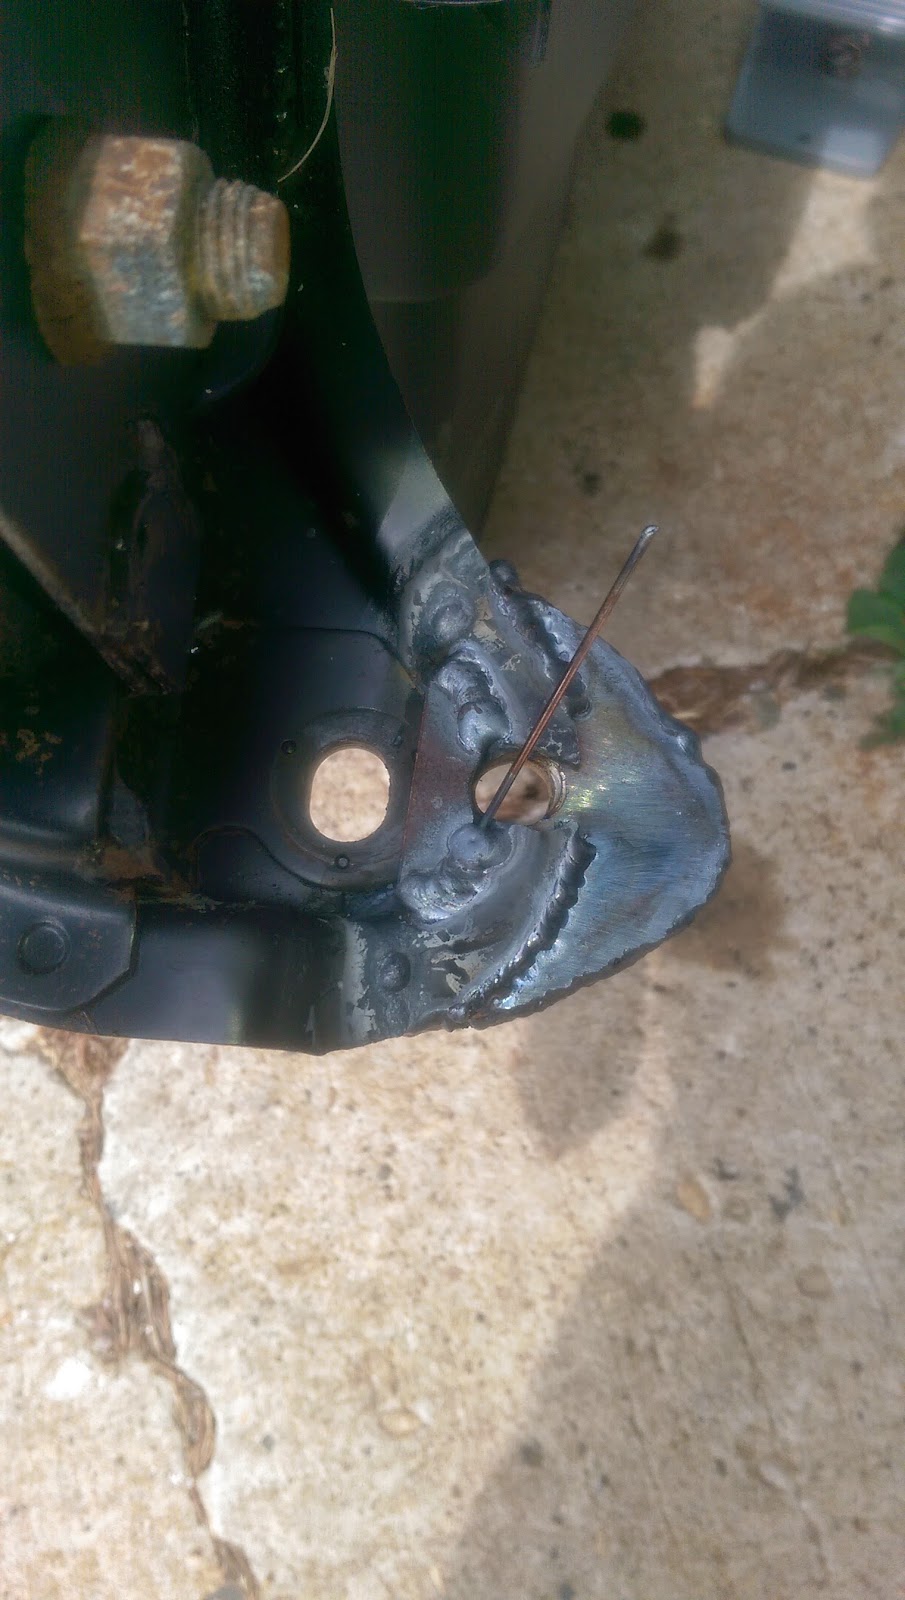
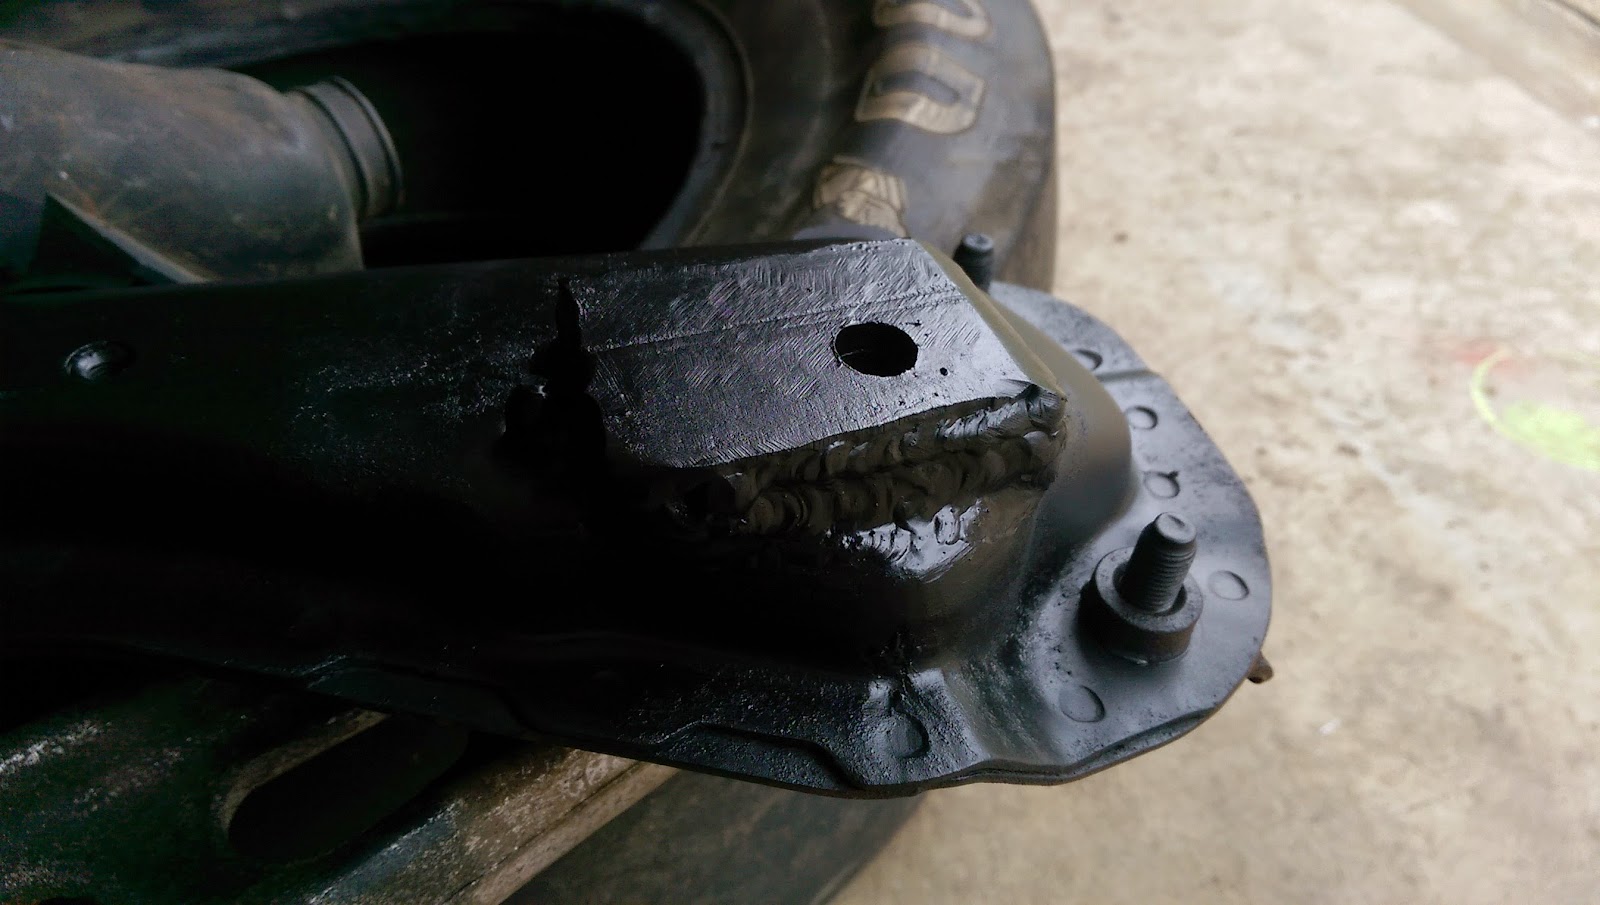
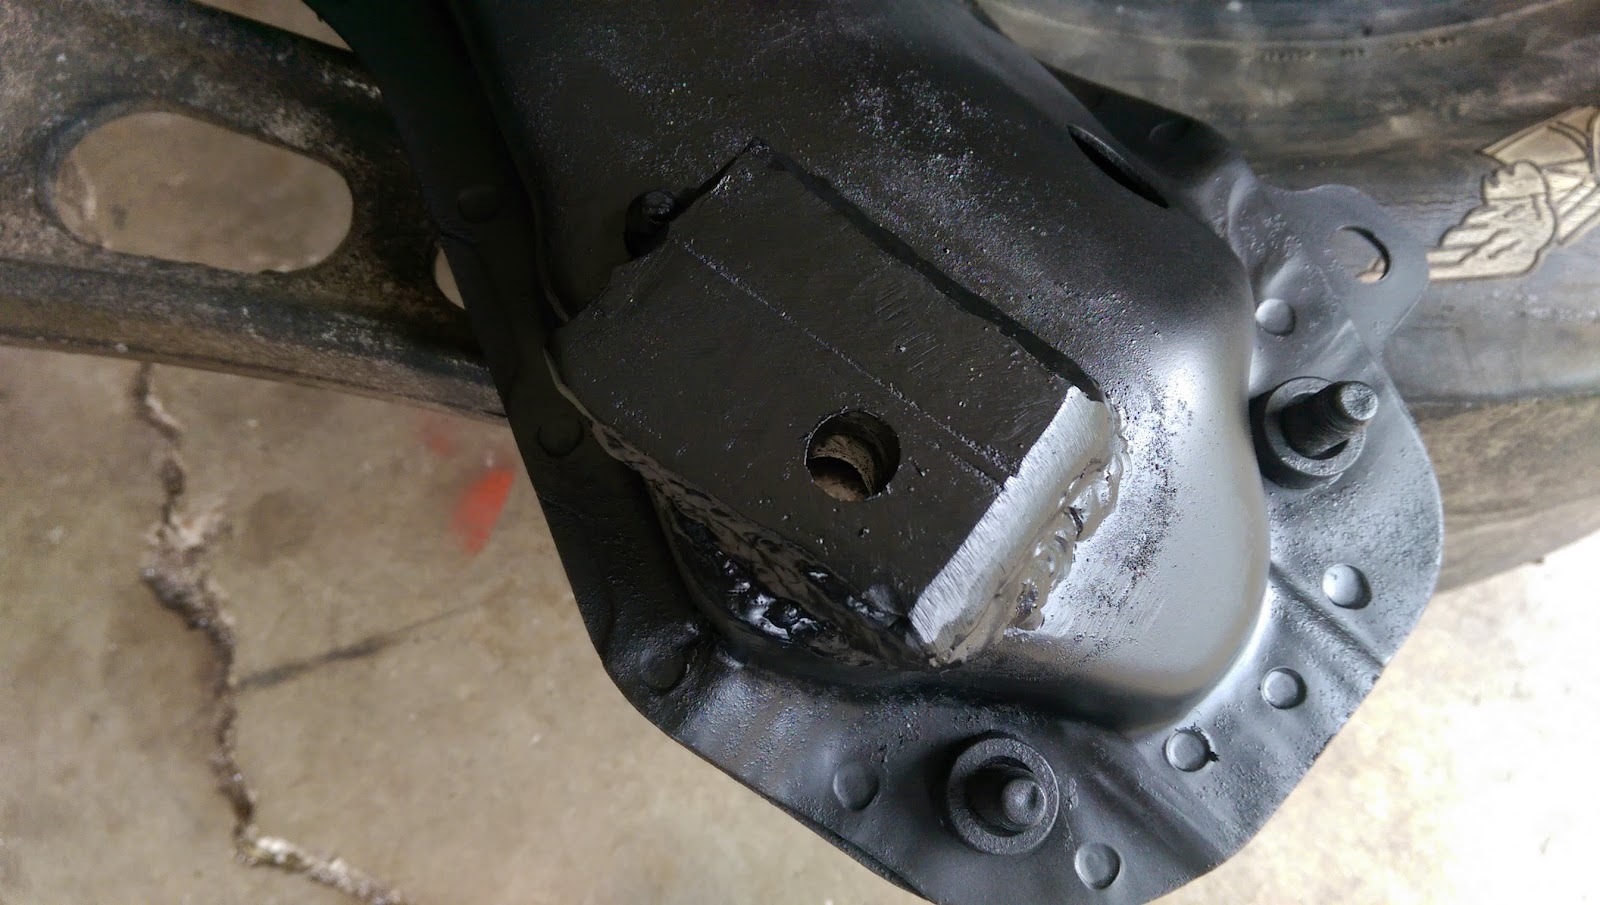
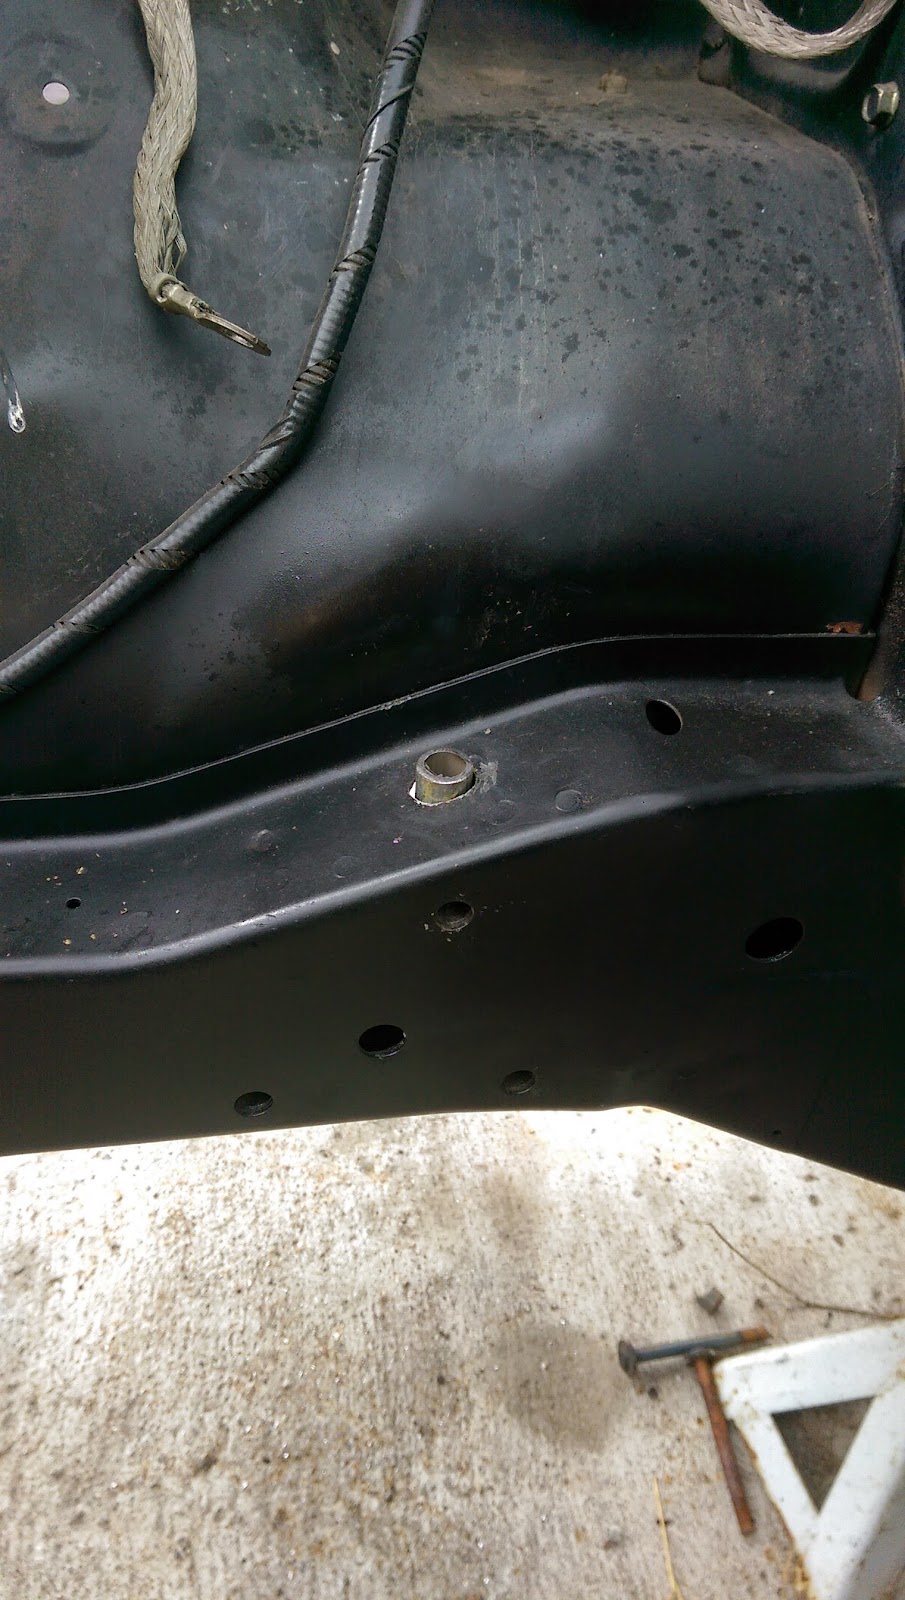
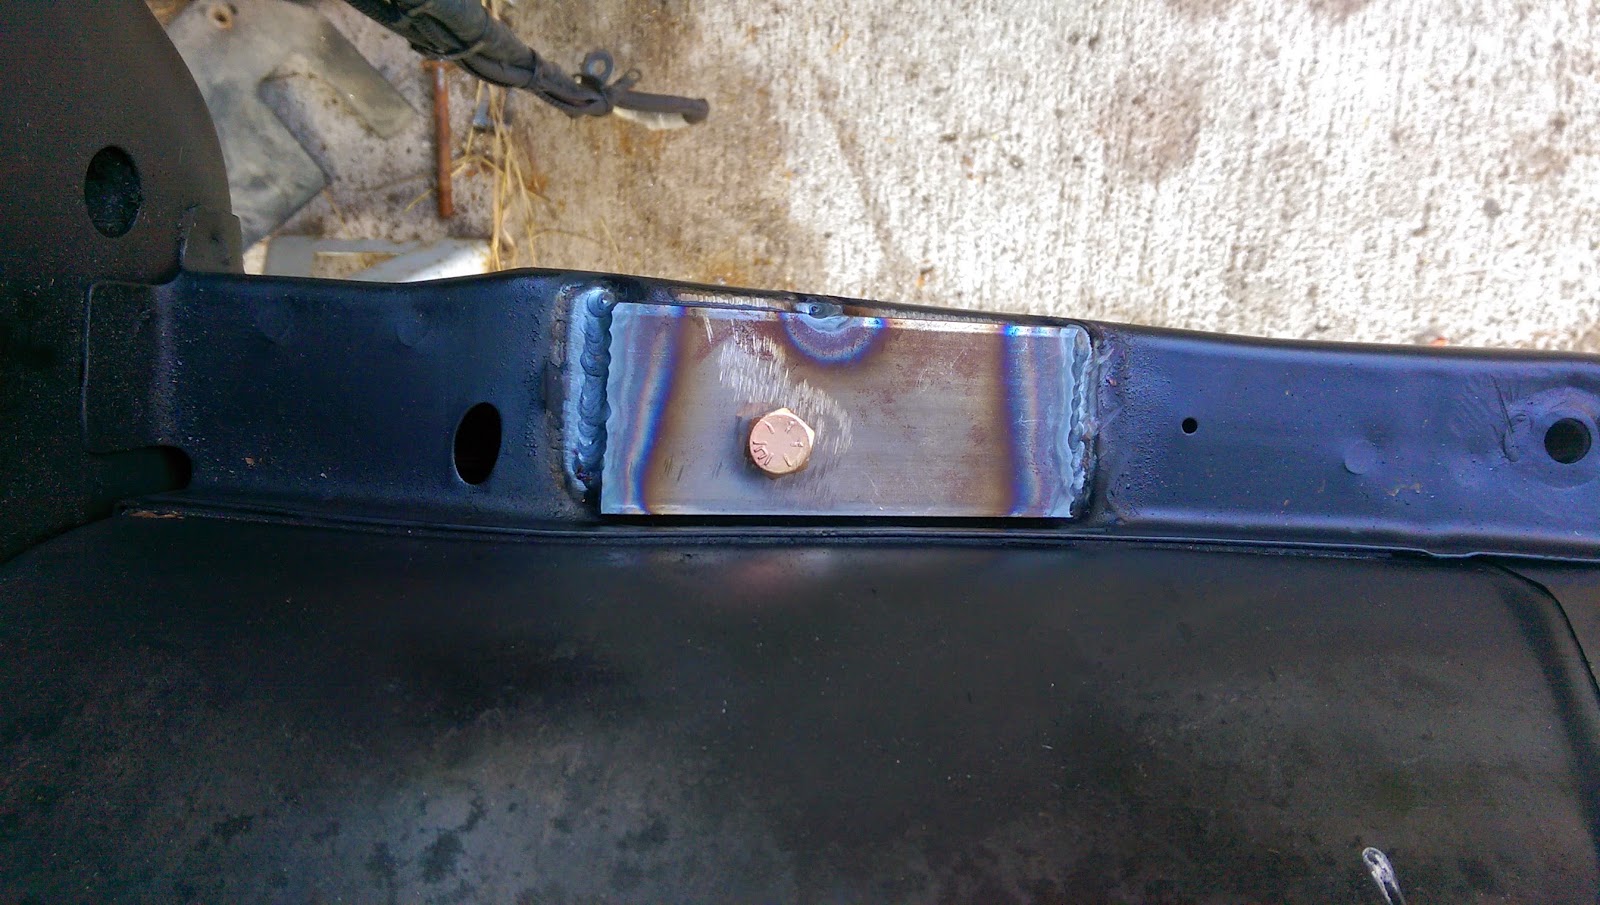
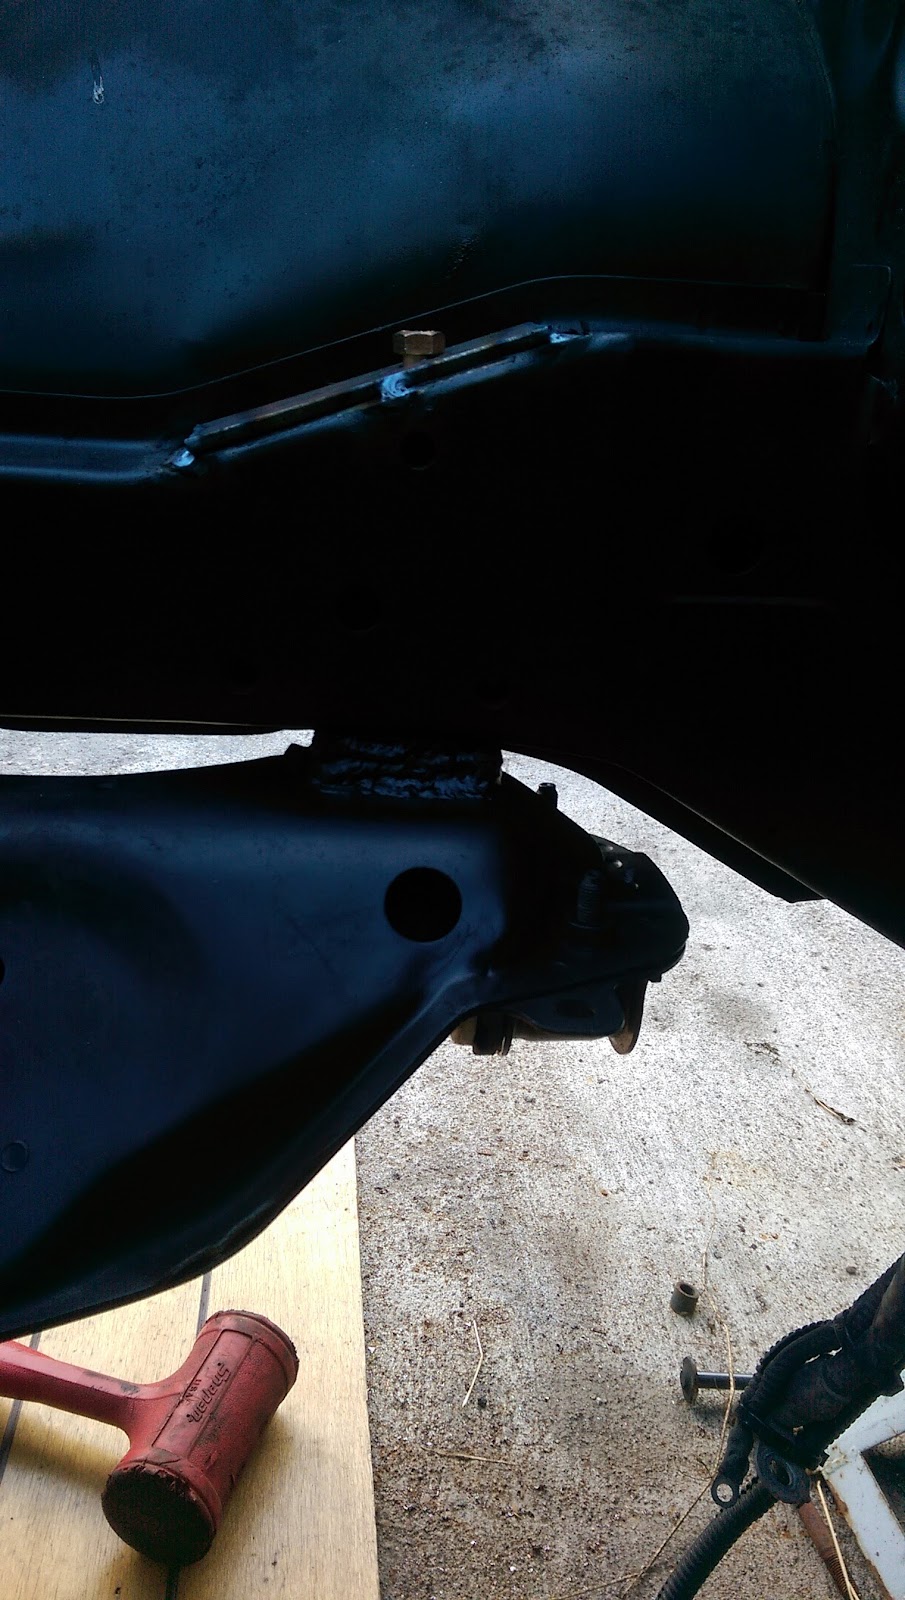
Front hole needs to move 1 inch forward, this will center the wheel in the wheel well. I did this by adding two pieces of metal to the front of the subframe like so.
Added metal to relocate front holes
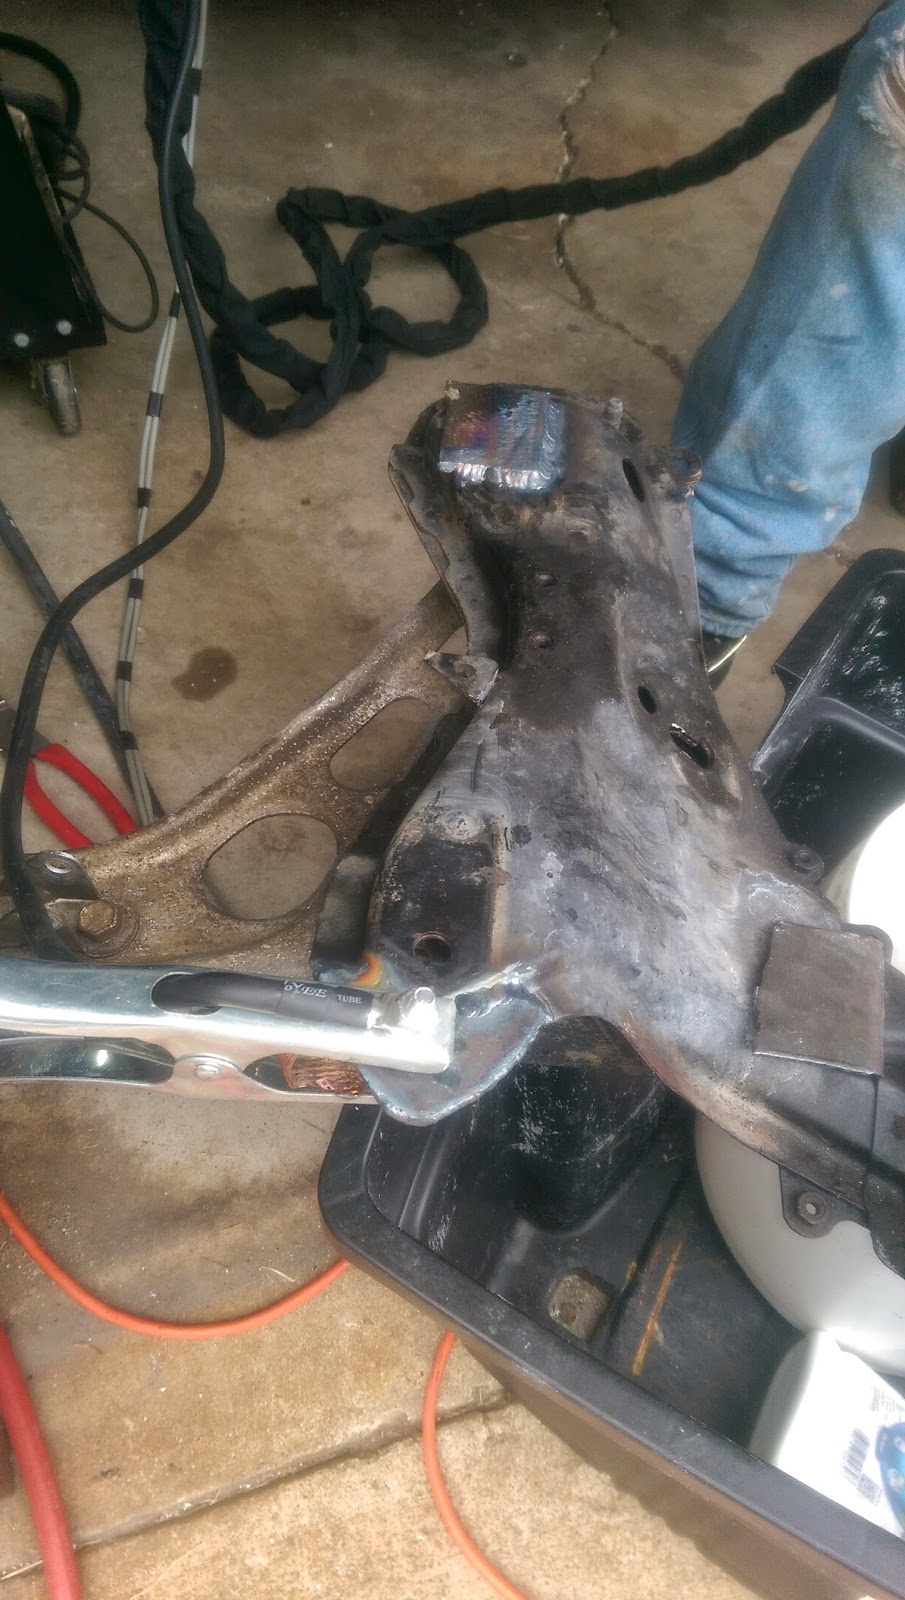
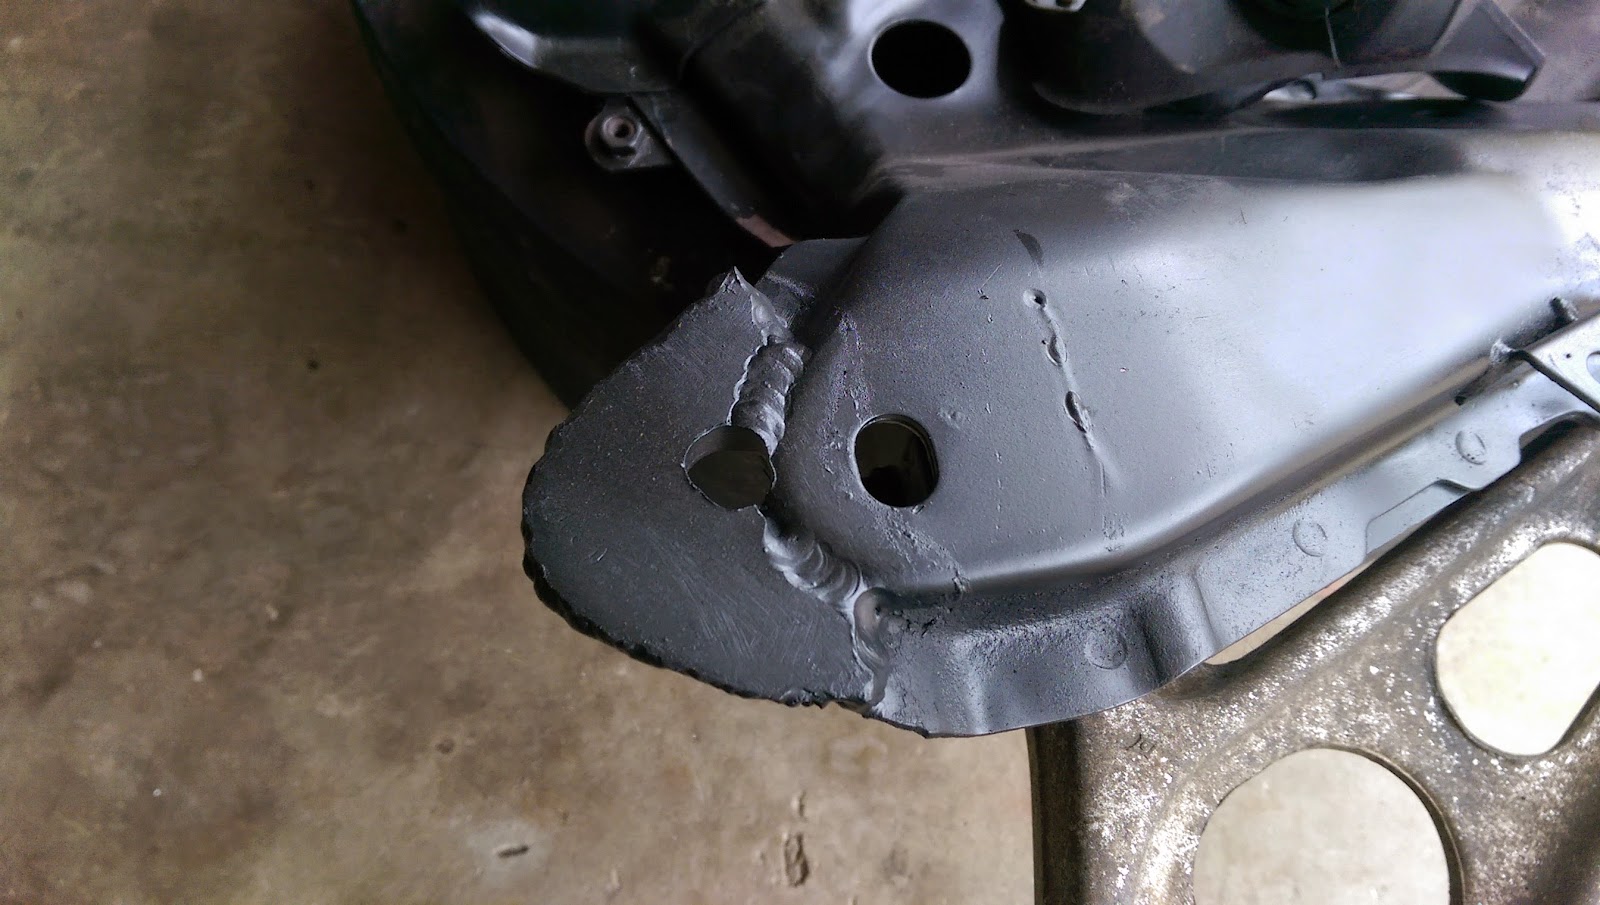
Then weld in extra reinforcing plate on the bottom of the subframe. Weld the two place together for extra strength.

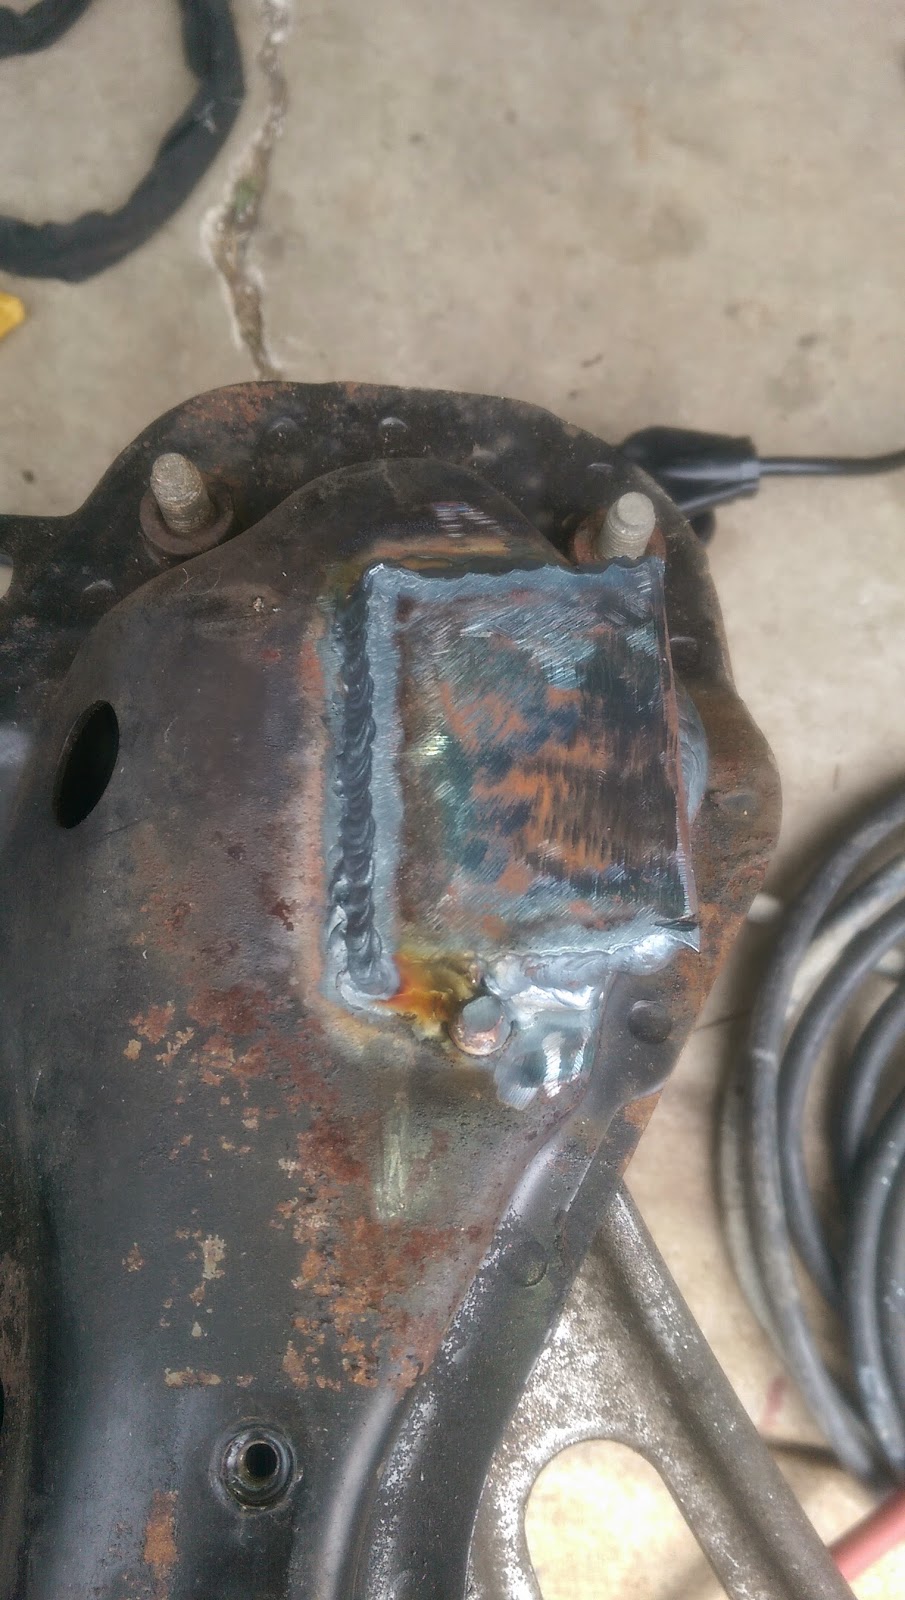
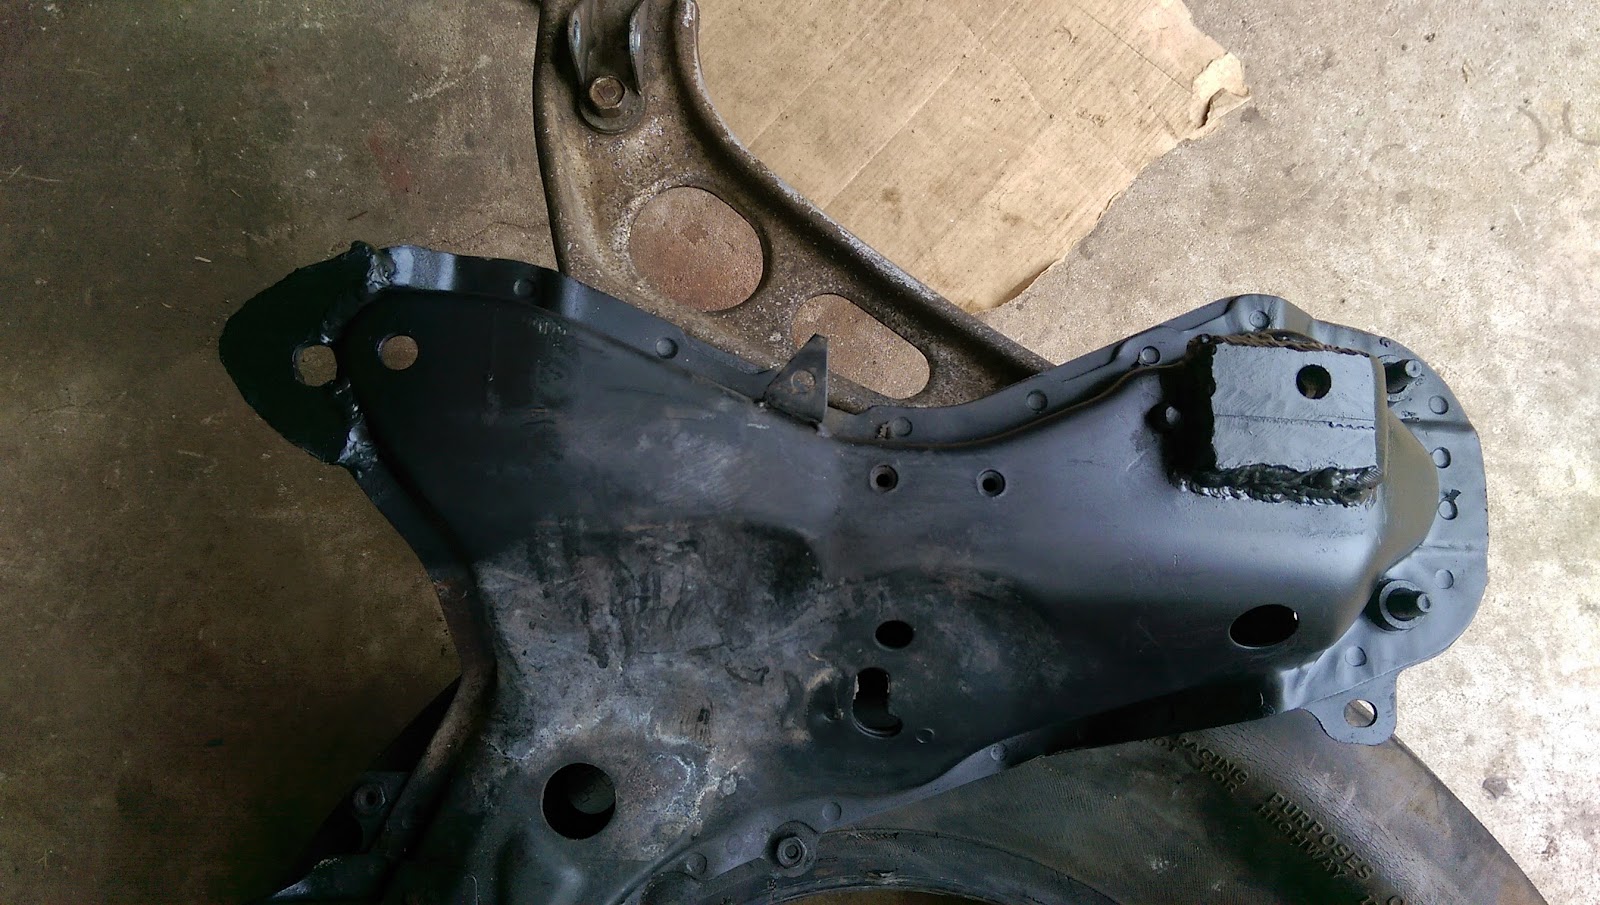
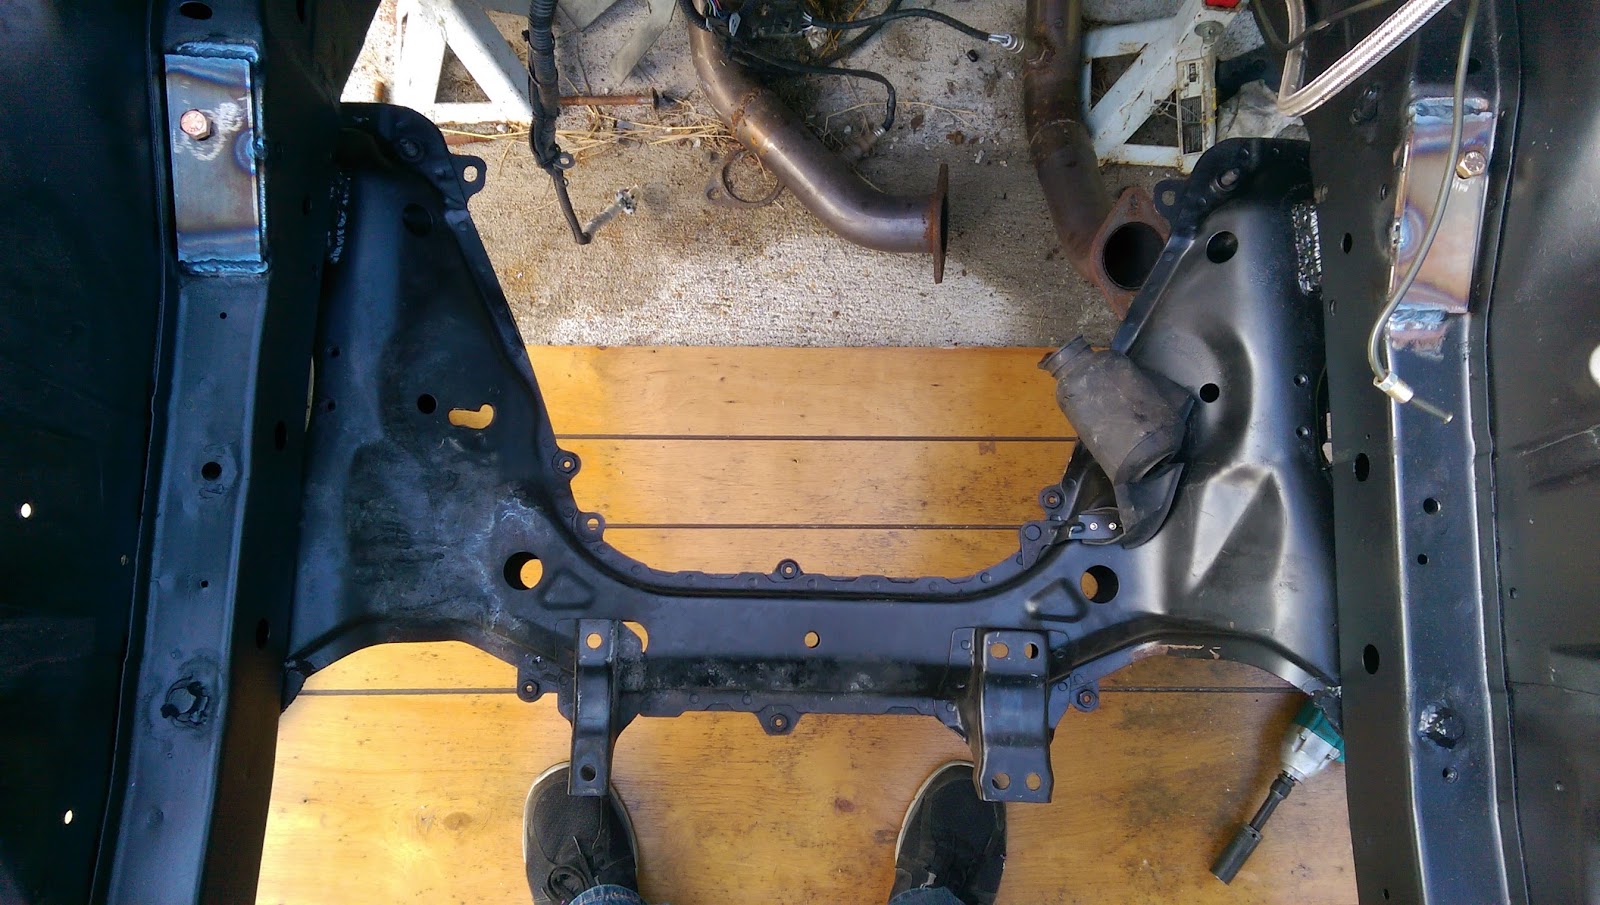
Adding spacer plates for the rear
Drill holes 1 inch on center forward of the factory holes, and the width of your frame rail studs on center, about 31 inches... Measure your frame holes first to get it right. You can also slot the holes like the factory ones for more wiggle room.
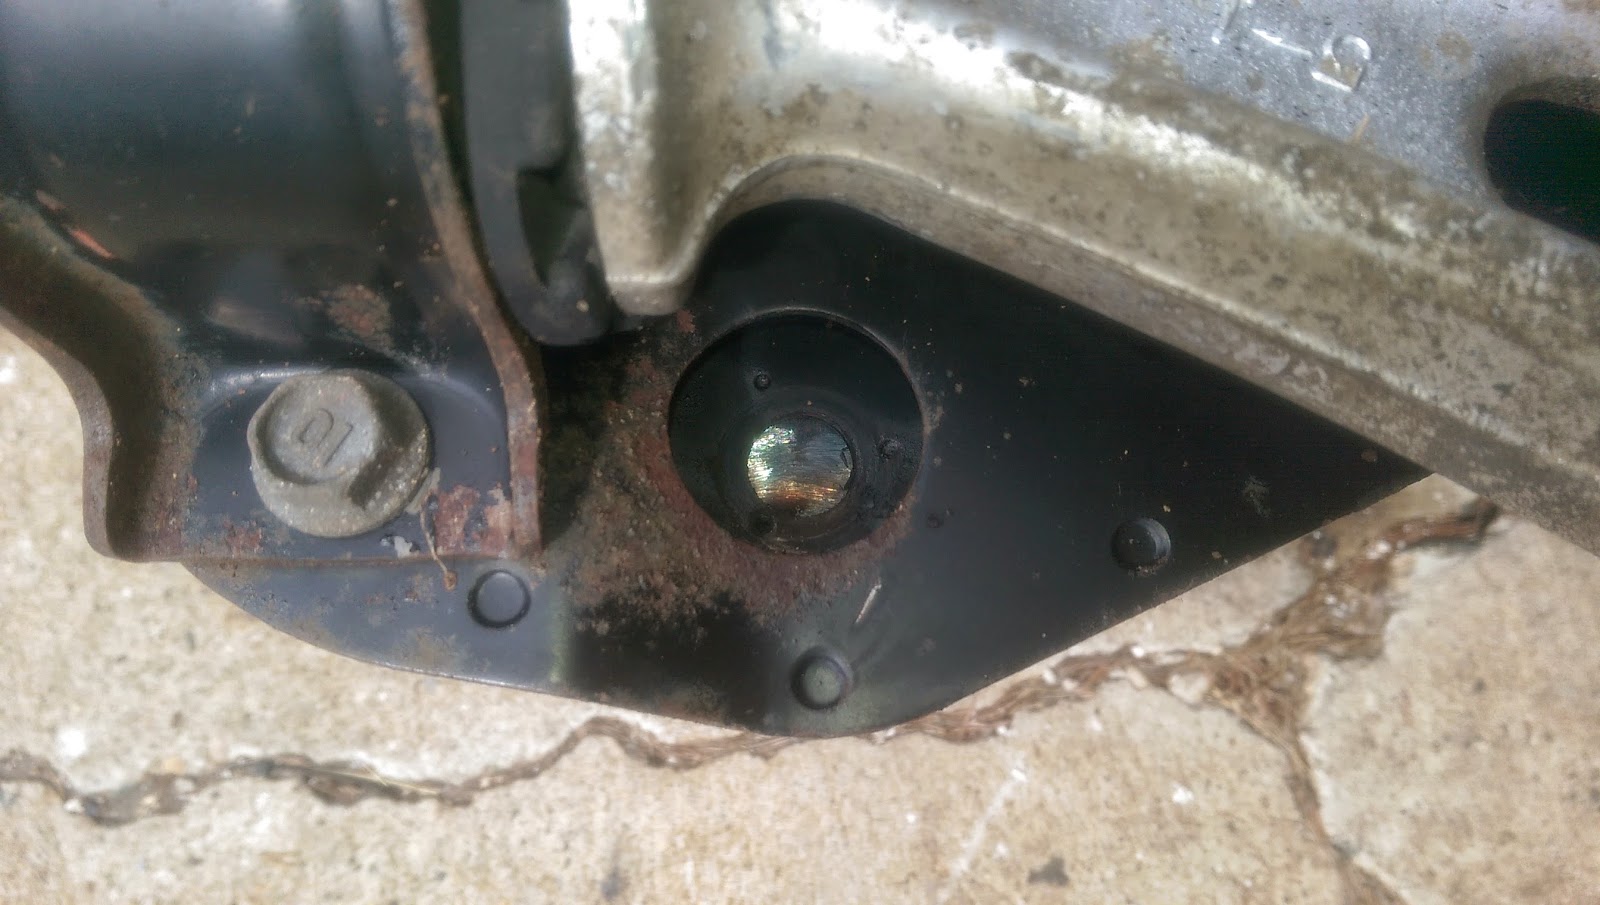
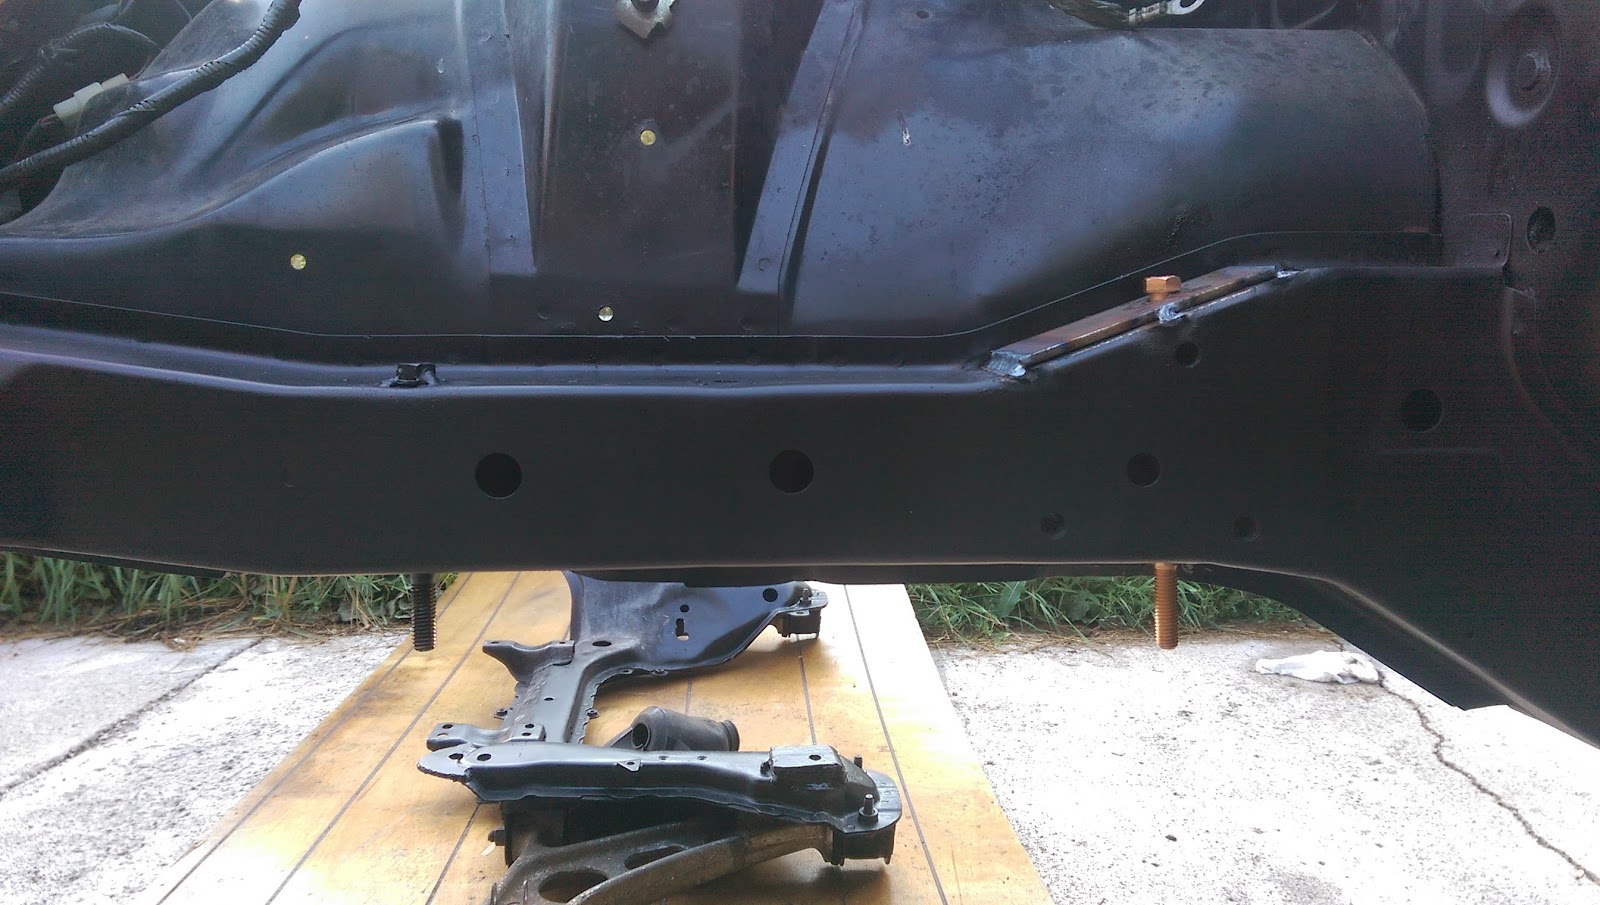
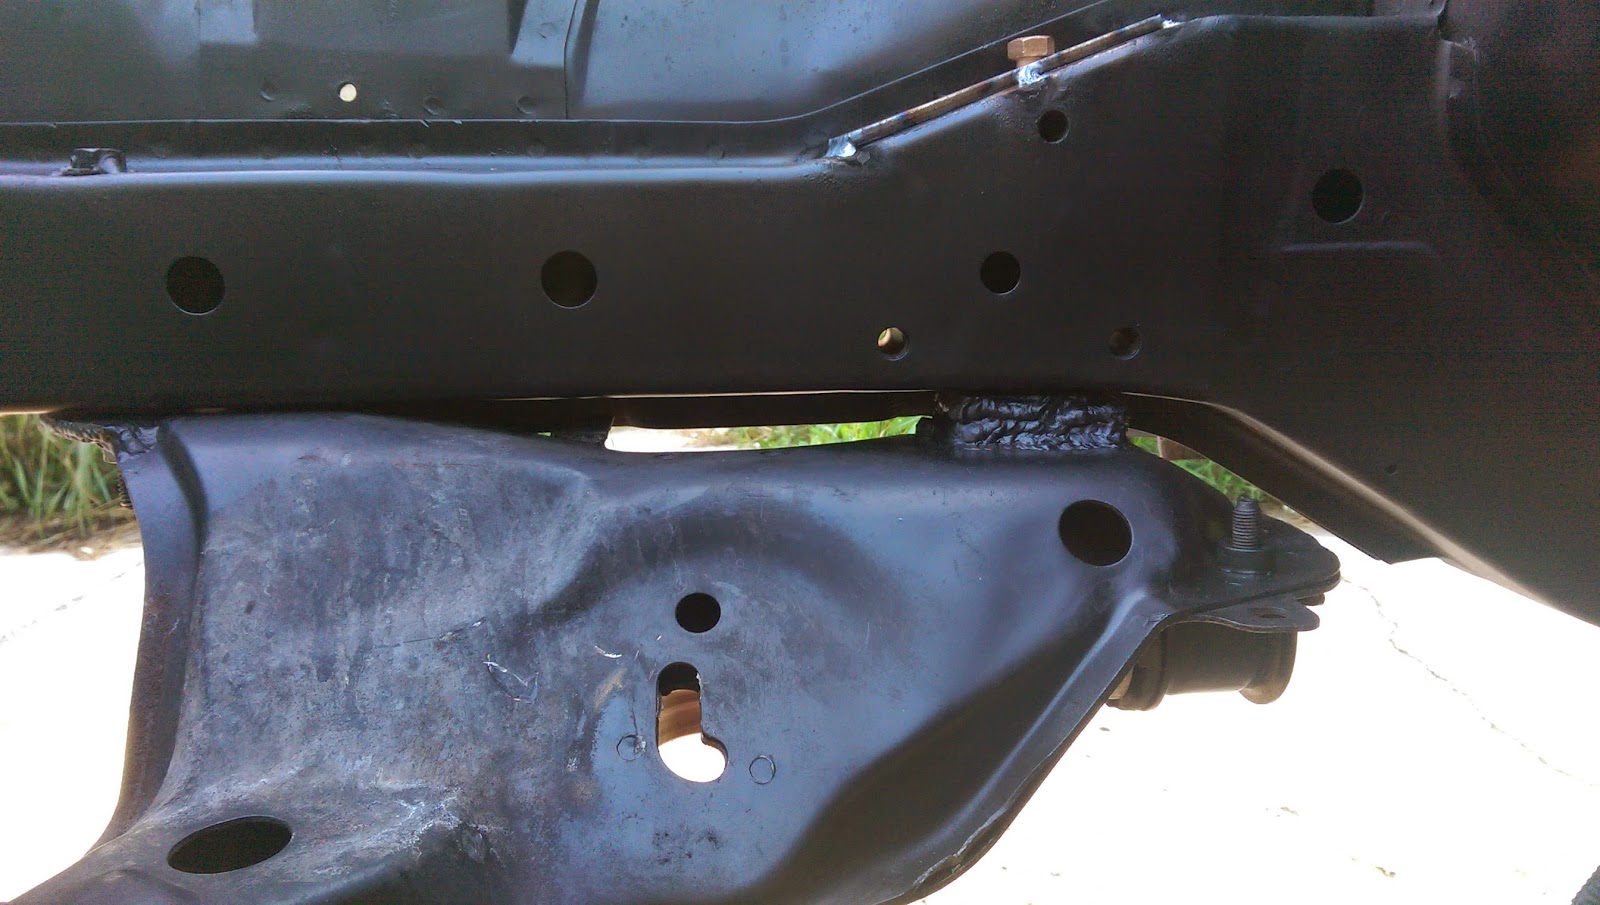
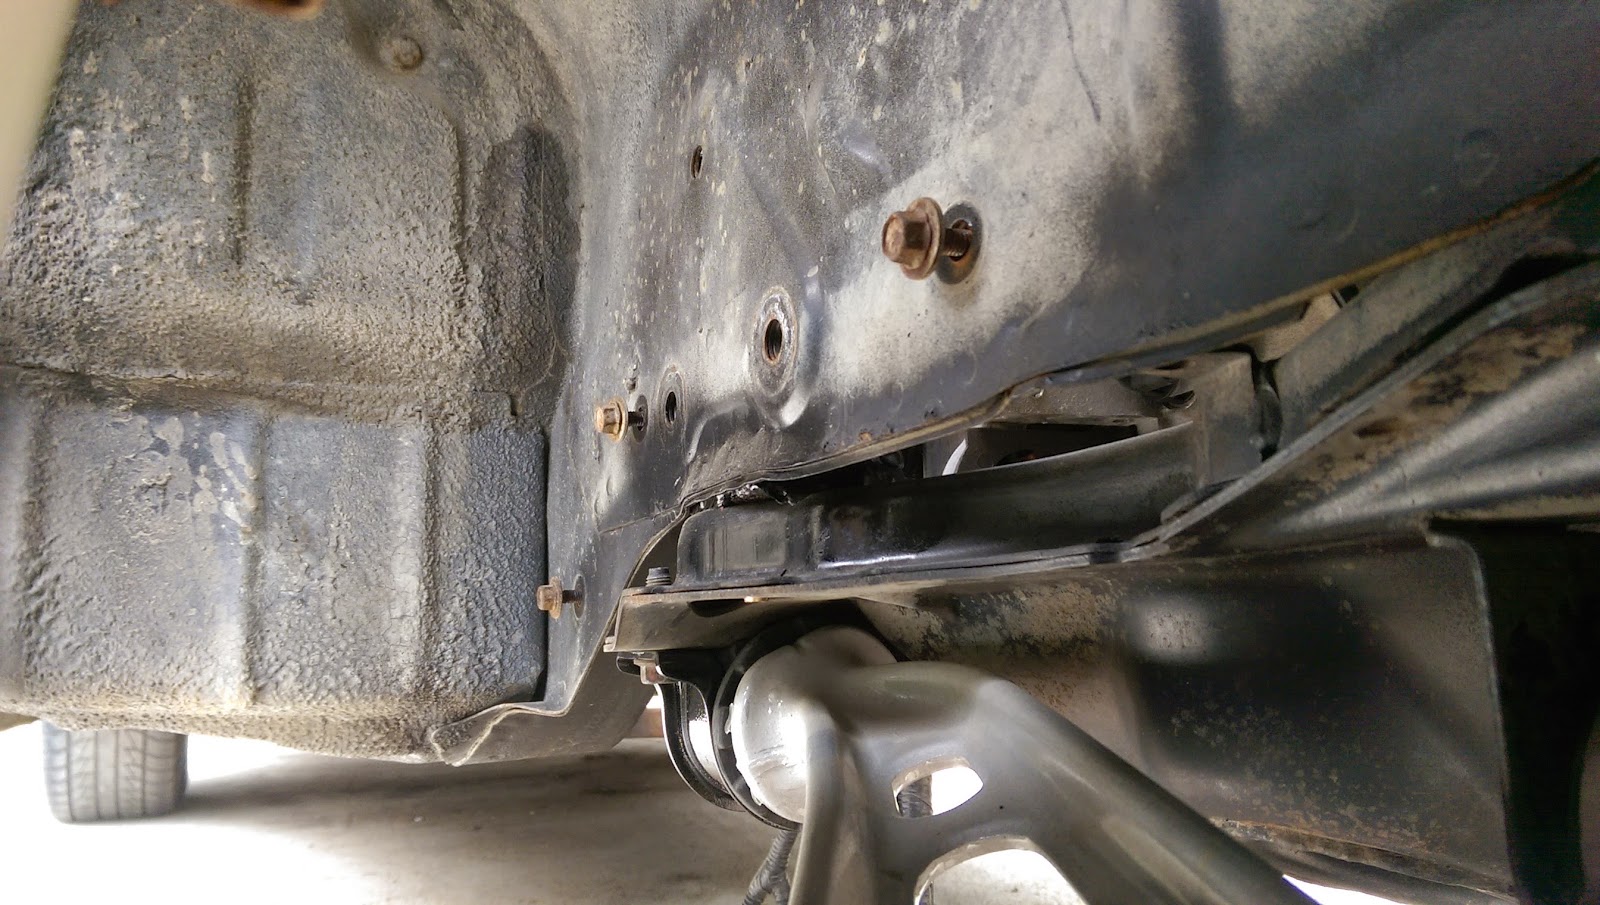
For the rear subframe mounting use the stock hole, but this requires drilling a new hole in the frame rail of the car, more on this in a bit. This will require a ton of spacing to level the subframe with the frame rails. I started with the 1/2 inch that a bunch of other write-ups say, but found that a full 1 inch is required to sit properly, and not have to cut away the pinch weld on the bottom of the cars frame rails. I do not know what caused this large discrepancy. We welded on a 1/4" plate at a time, total of 4 to be a full 1 inch pad. The location on the Subframe plates is dictated by the bottom of the frame rails pinch welds, you want to stay inside of them to not have to cut up the bottom of the frames and compromise strength.
Flipped it over to drill the hole though all of the new plates.
Paint it up with good quality chassis paint.
First off you will need to get some parts, so here is the list of needed stuff. All parts are from of course 86-91 FC RX7
Front subframe
Steering rack can be power or manual your choice, also need the mounting brackets and rubber insulators
Steering intermediate shaft
Steering column
Lower control arms, S4 have bolt on ball joints S5 are not, both will work
Steering knuckles/spindles
Hubs, 4 lug or 5 lug your choice, will need brakes to match
Calipers, rotors, pads
Struts, shorter than stock springs needed, coil overs would be best, with upper mounts to match
Metal stock
Metal tube/pipe
Bolts/nuts 7/16" x 4.5" and 7" long grade 8 bolts
Metal working tools, welder, carbide cutting bits, drill bits, drill, grinder, cutoff wheel, chop saw... etc.
Subframe modifications:
Front hole needs to move 1 inch forward, this will center the wheel in the wheel well. I did this by adding two pieces of metal to the front of the subframe like so.
Added metal to relocate front holes
Then weld in extra reinforcing plate on the bottom of the subframe. Weld the two place together for extra strength.
Adding spacer plates for the rear
Drill holes 1 inch on center forward of the factory holes, and the width of your frame rail studs on center, about 31 inches... Measure your frame holes first to get it right. You can also slot the holes like the factory ones for more wiggle room.
For the rear subframe mounting use the stock hole, but this requires drilling a new hole in the frame rail of the car, more on this in a bit. This will require a ton of spacing to level the subframe with the frame rails. I started with the 1/2 inch that a bunch of other write-ups say, but found that a full 1 inch is required to sit properly, and not have to cut away the pinch weld on the bottom of the cars frame rails. I do not know what caused this large discrepancy. We welded on a 1/4" plate at a time, total of 4 to be a full 1 inch pad. The location on the Subframe plates is dictated by the bottom of the frame rails pinch welds, you want to stay inside of them to not have to cut up the bottom of the frames and compromise strength.
Flipped it over to drill the hole though all of the new plates.
Paint it up with good quality chassis paint.
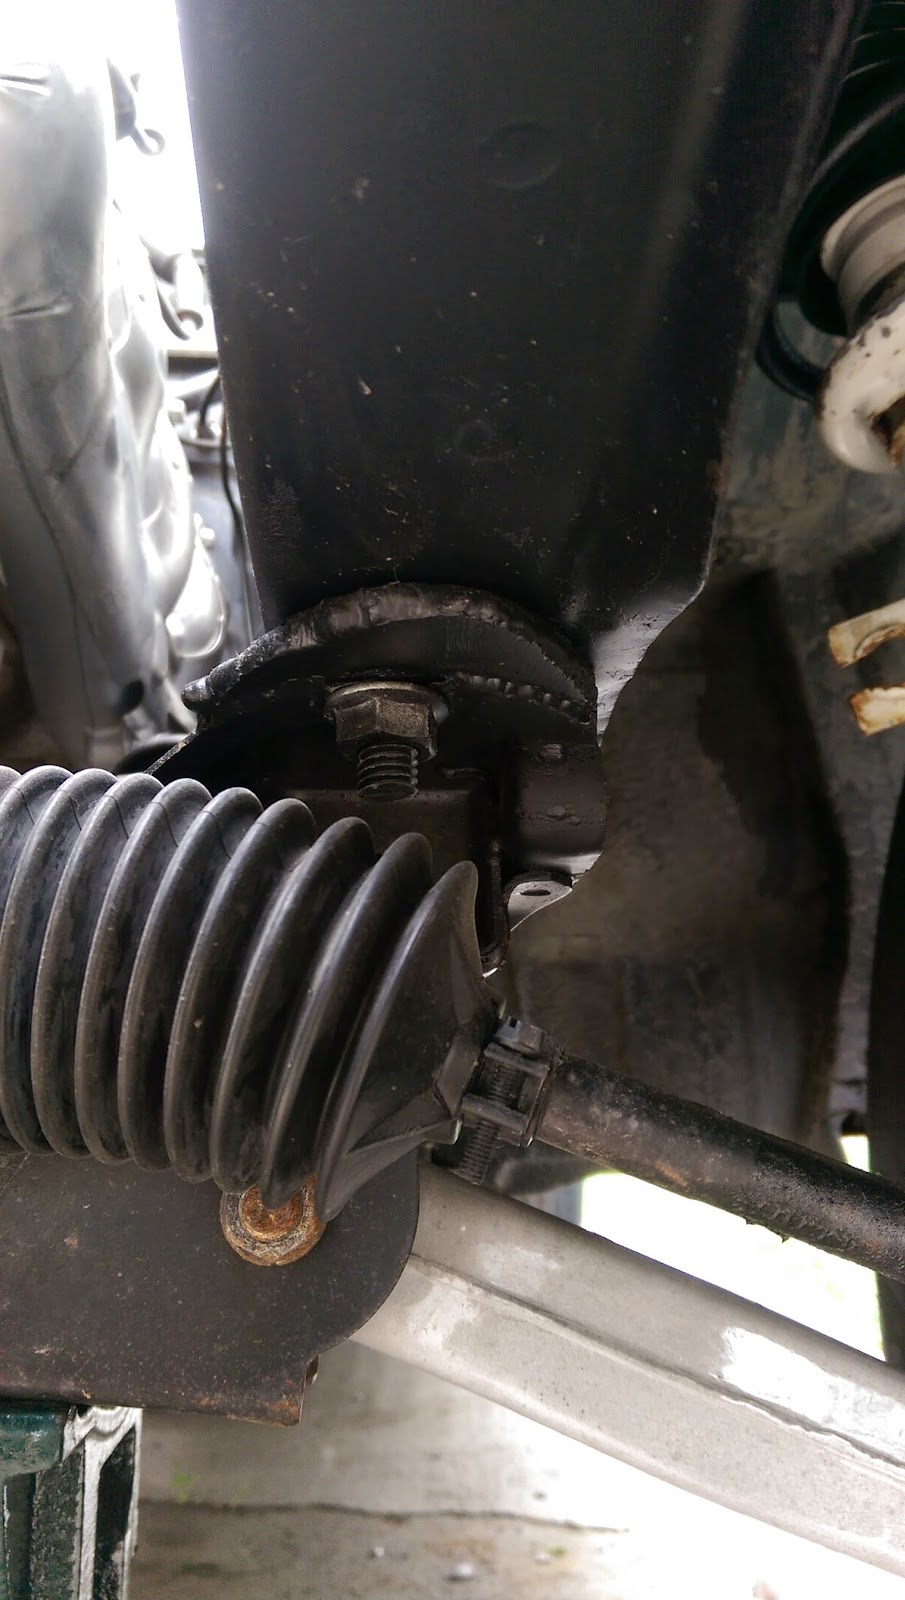
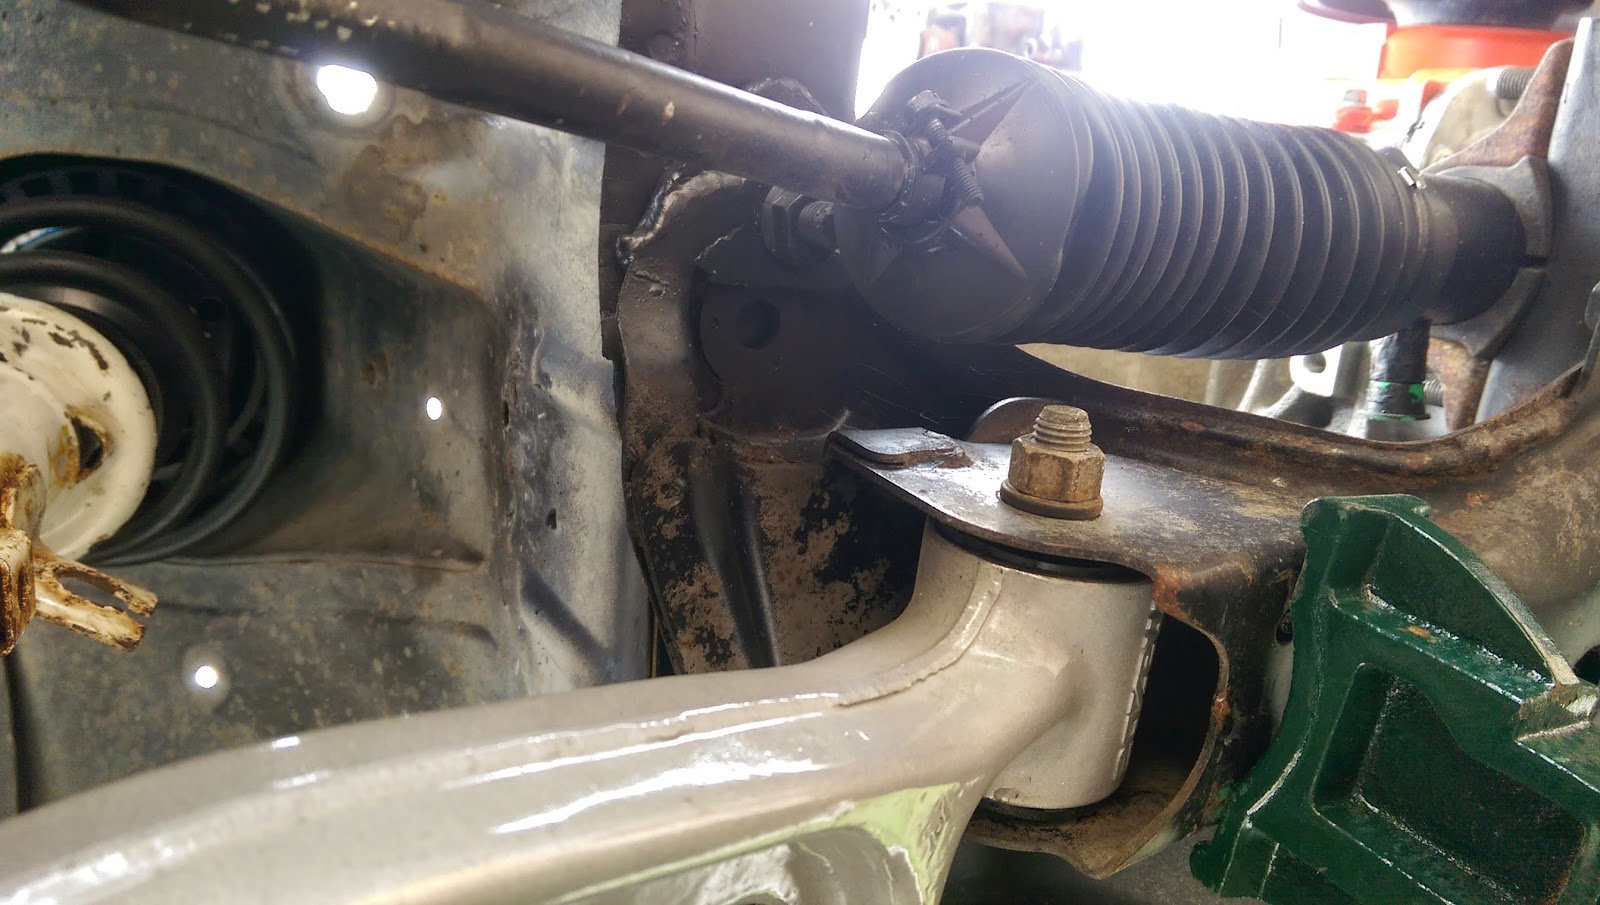
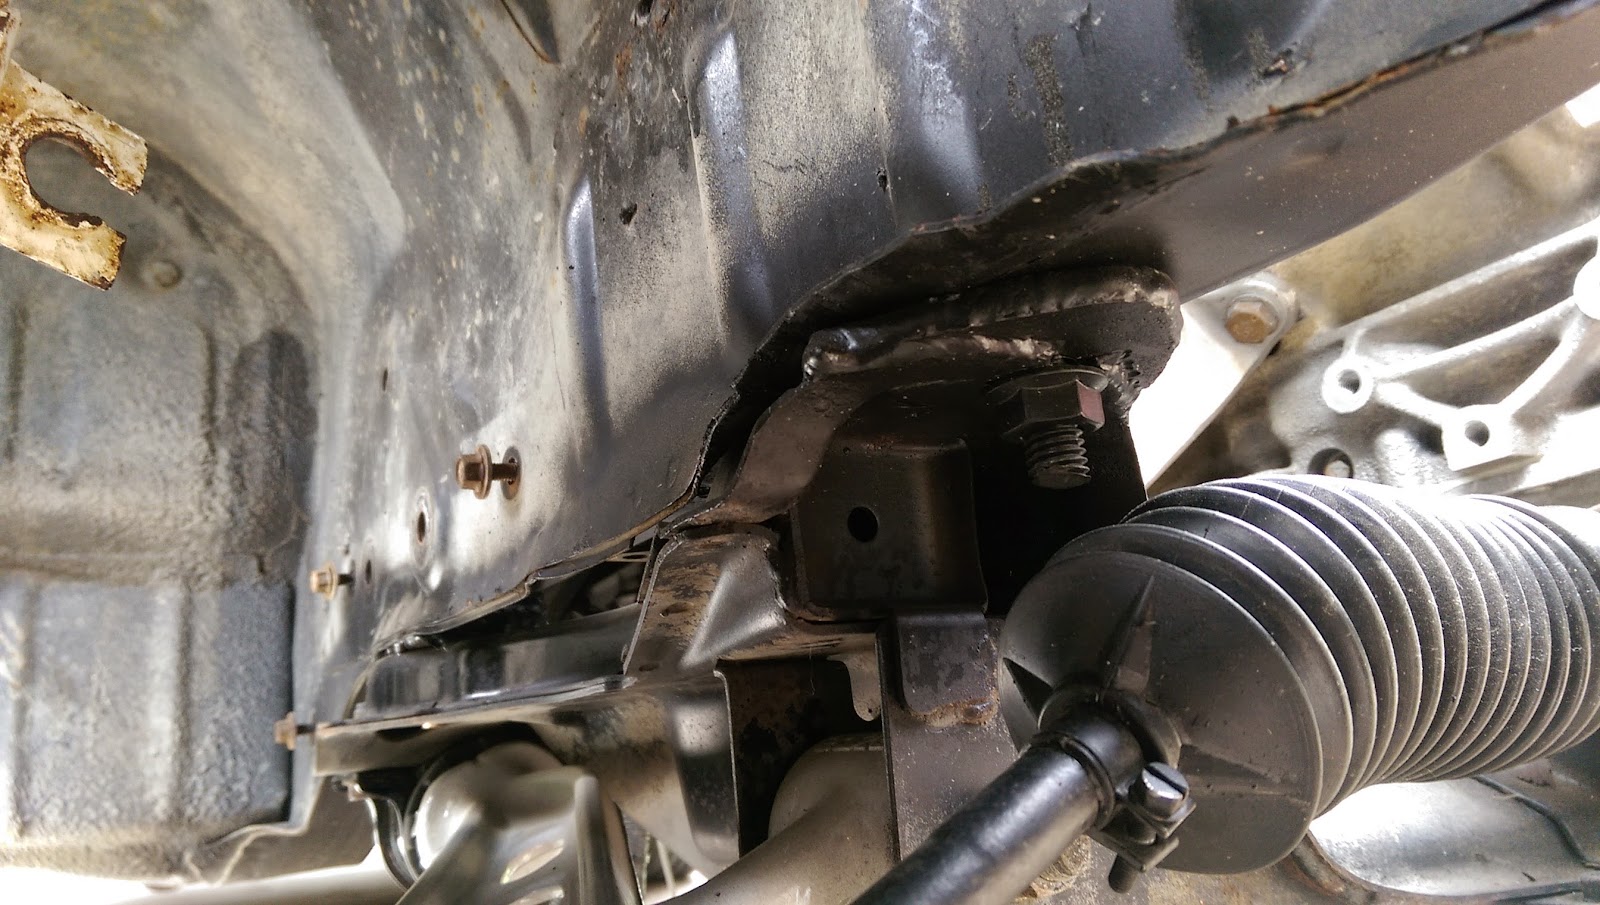
Preparing the car for new parts:
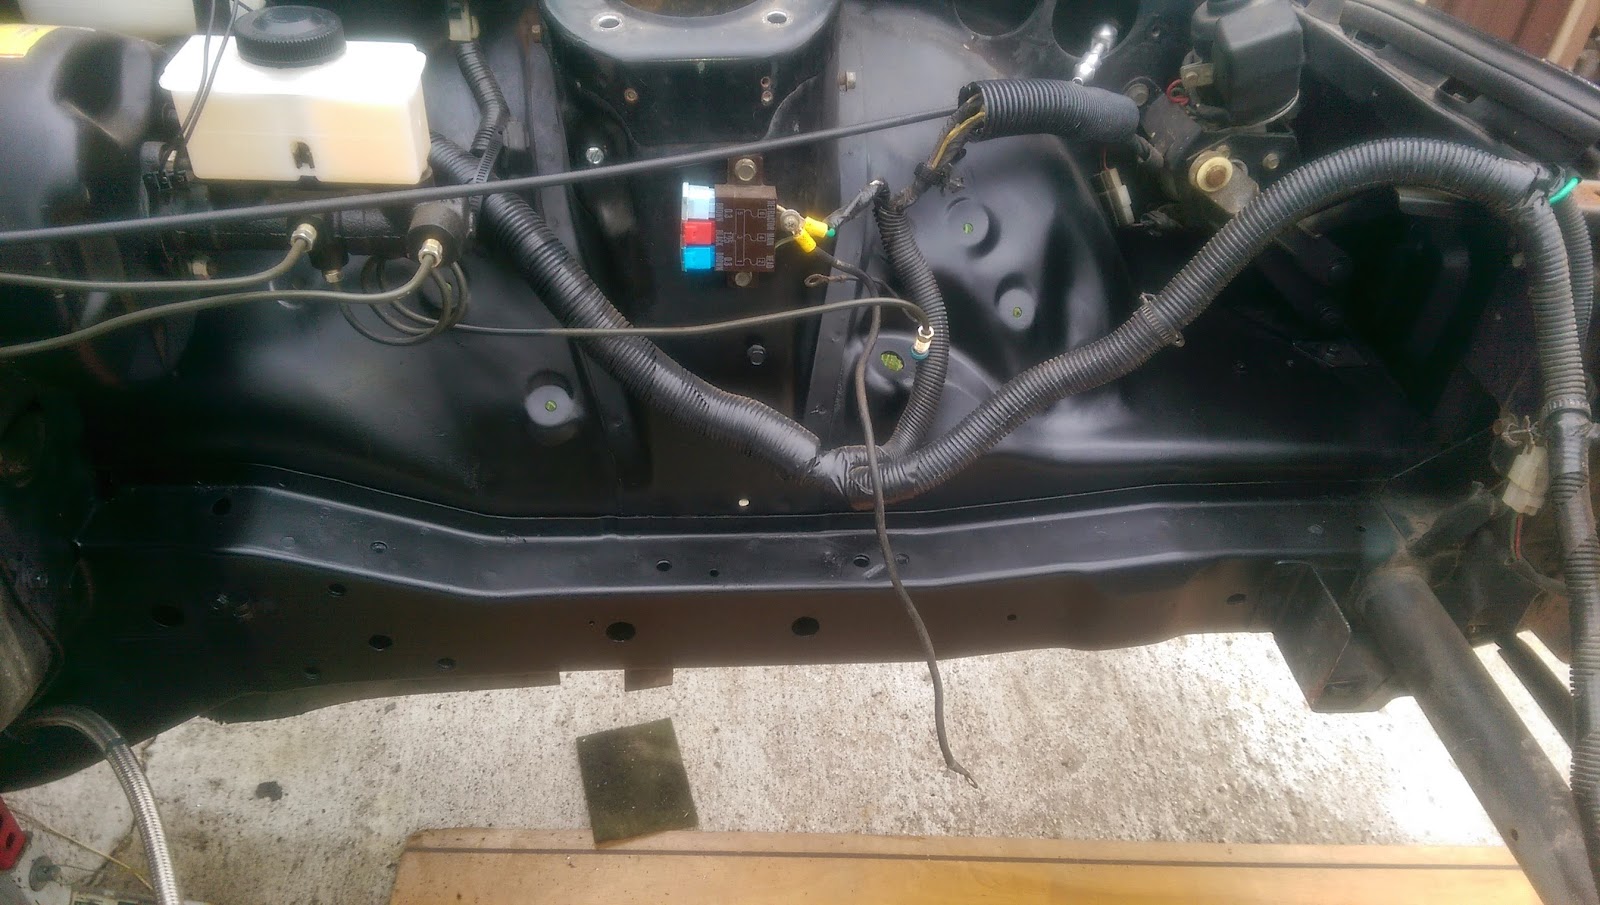
First step is to remove the factory mounting studs, grind away or cut away the factory welds then knock them out with a hammer. Paint with a good chassis paint to prevent rust.
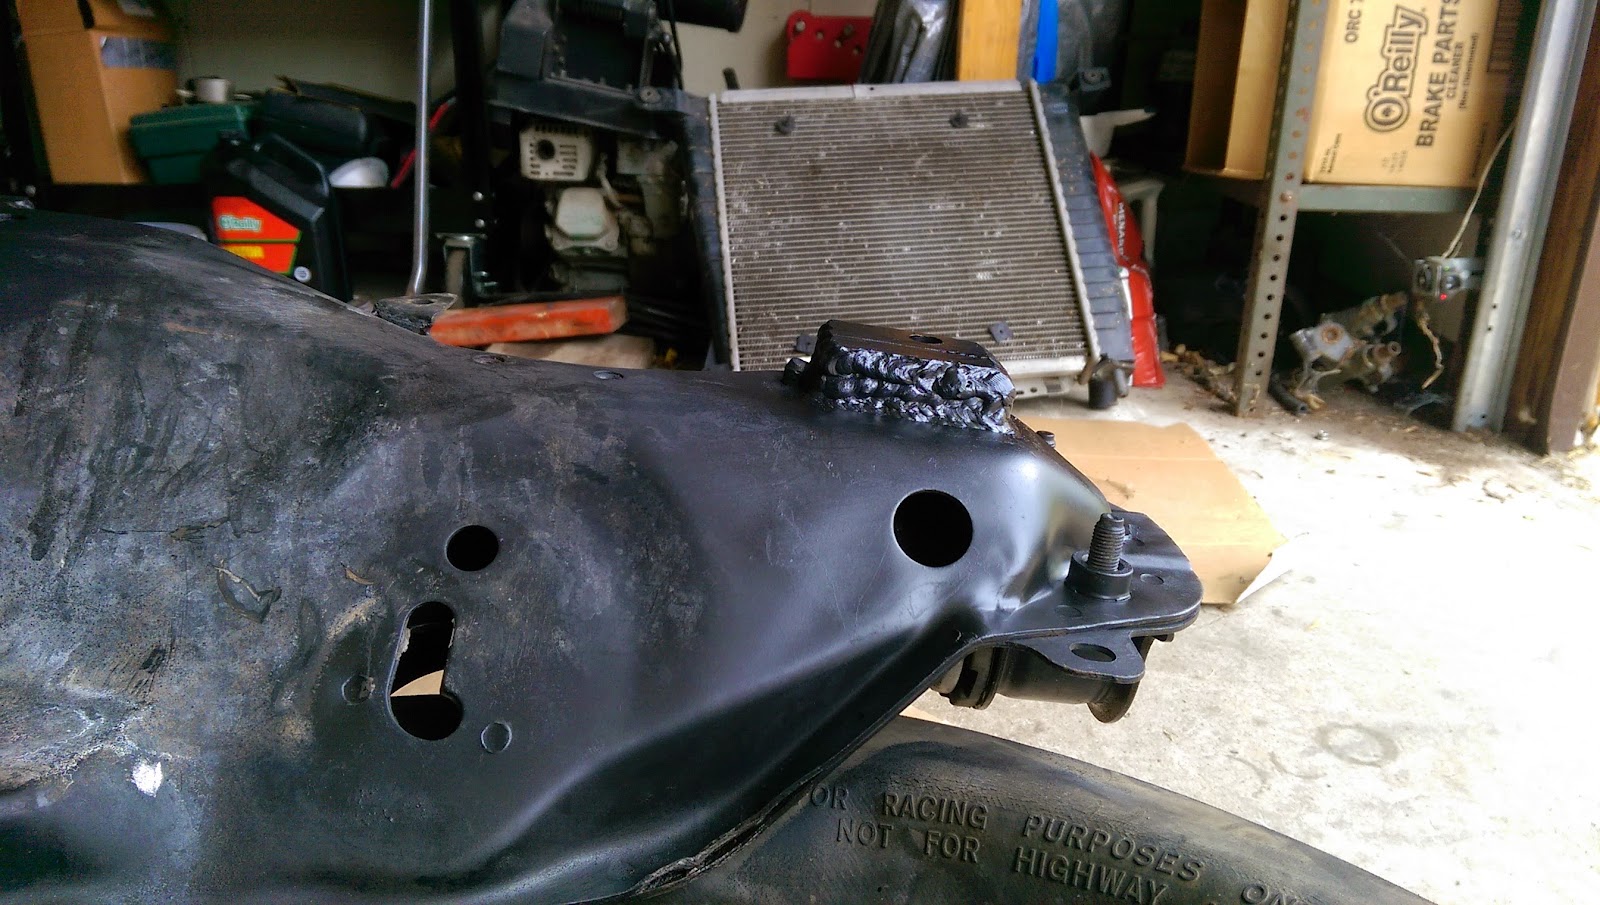
This gives a clean template to line up the new FC Subframe.
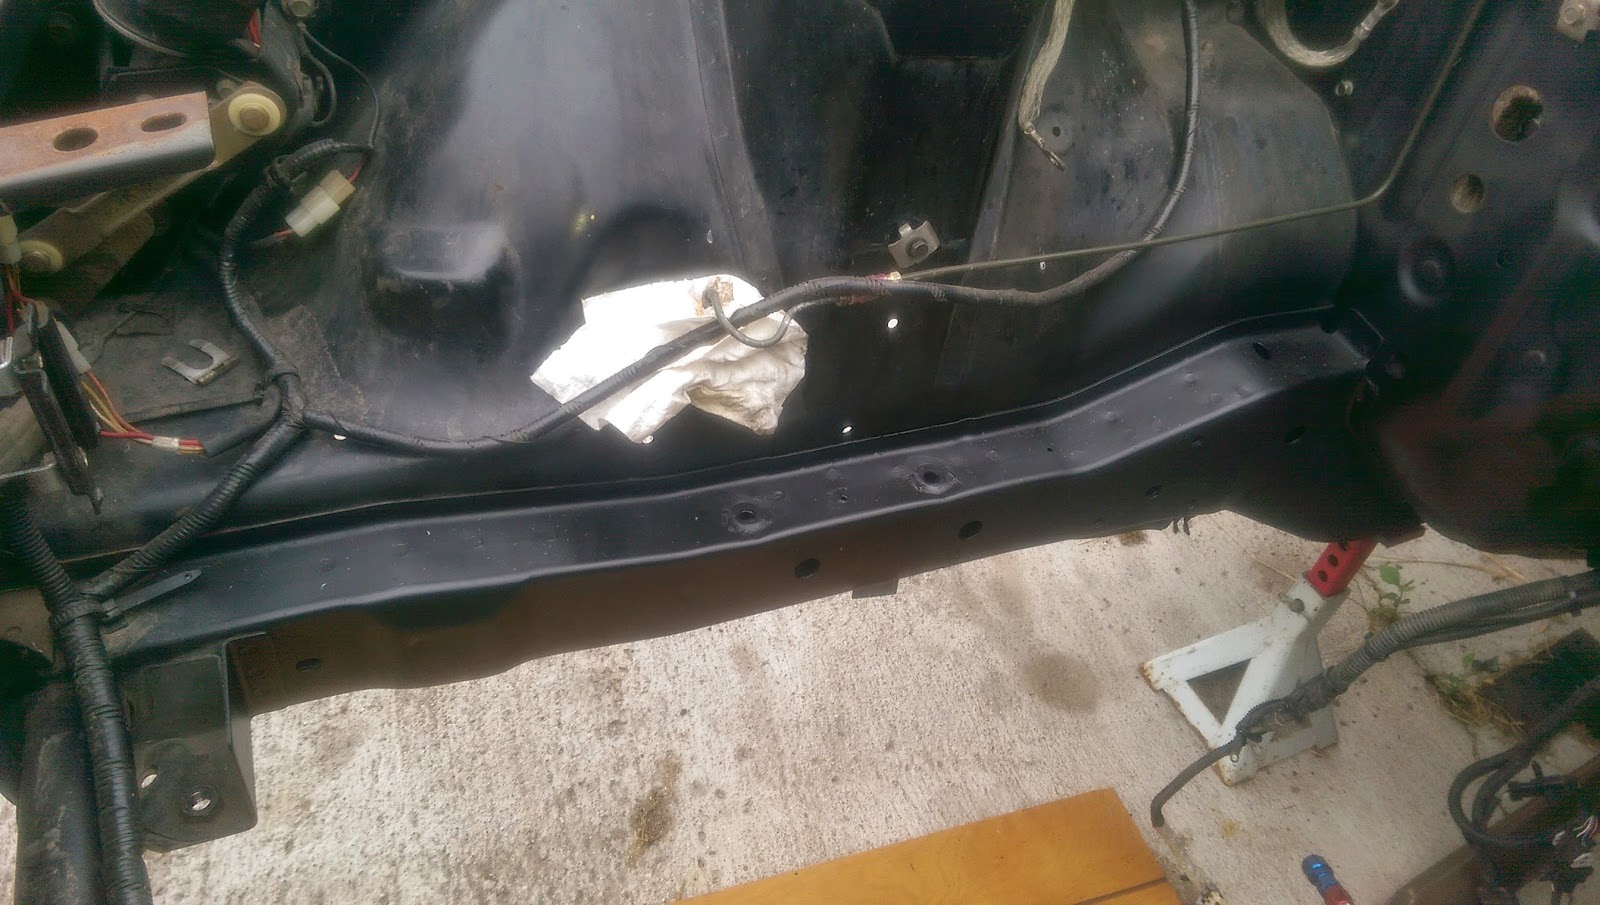
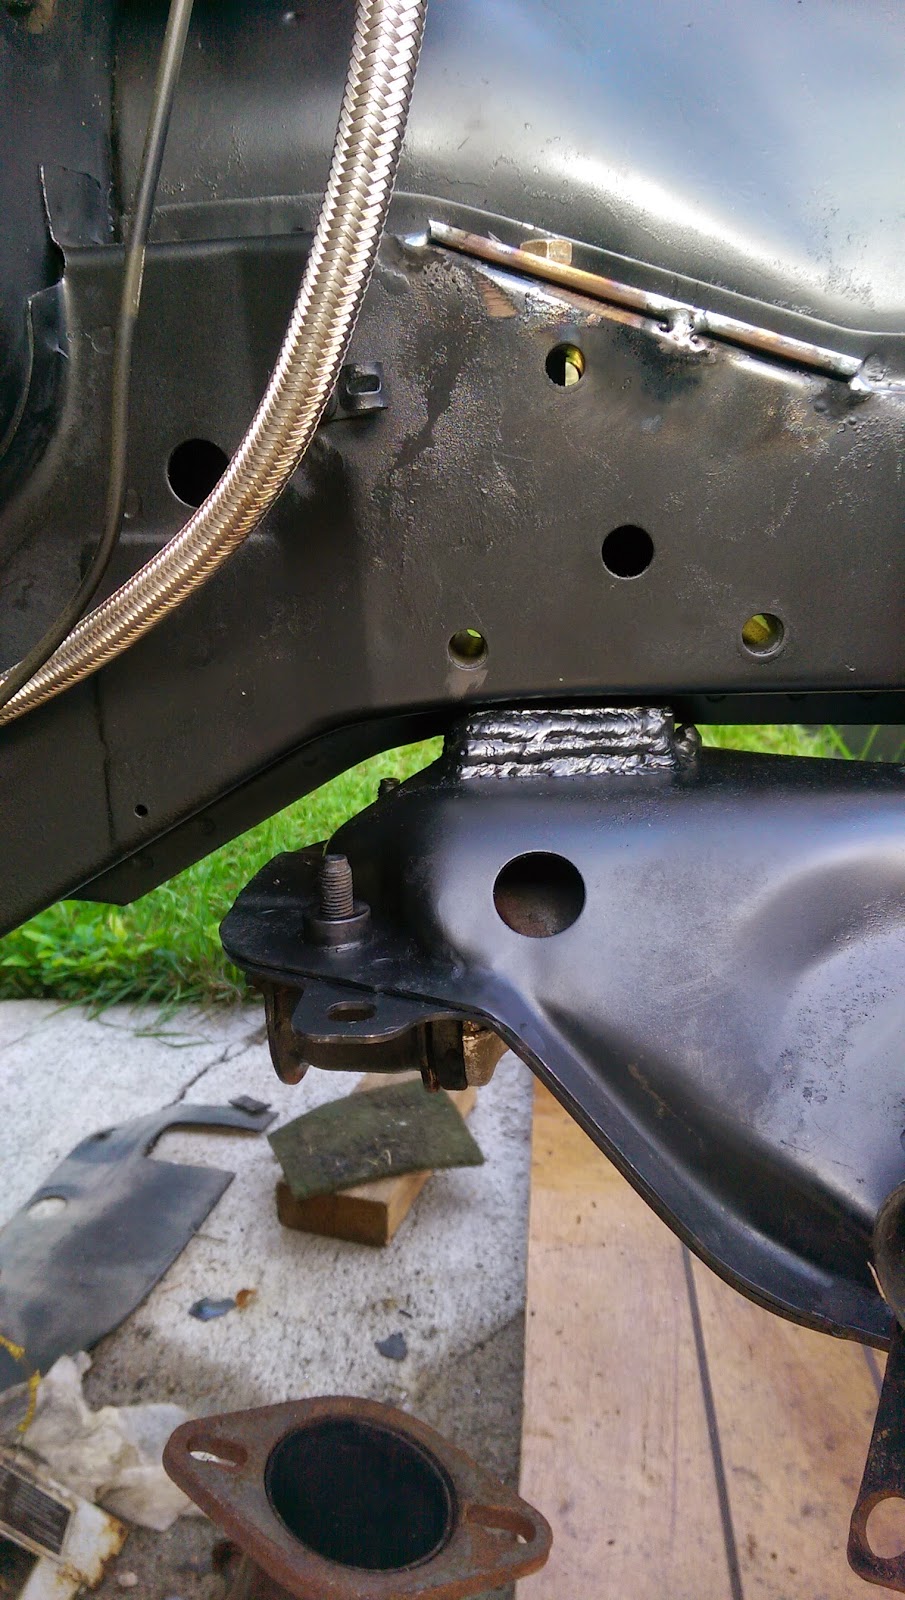
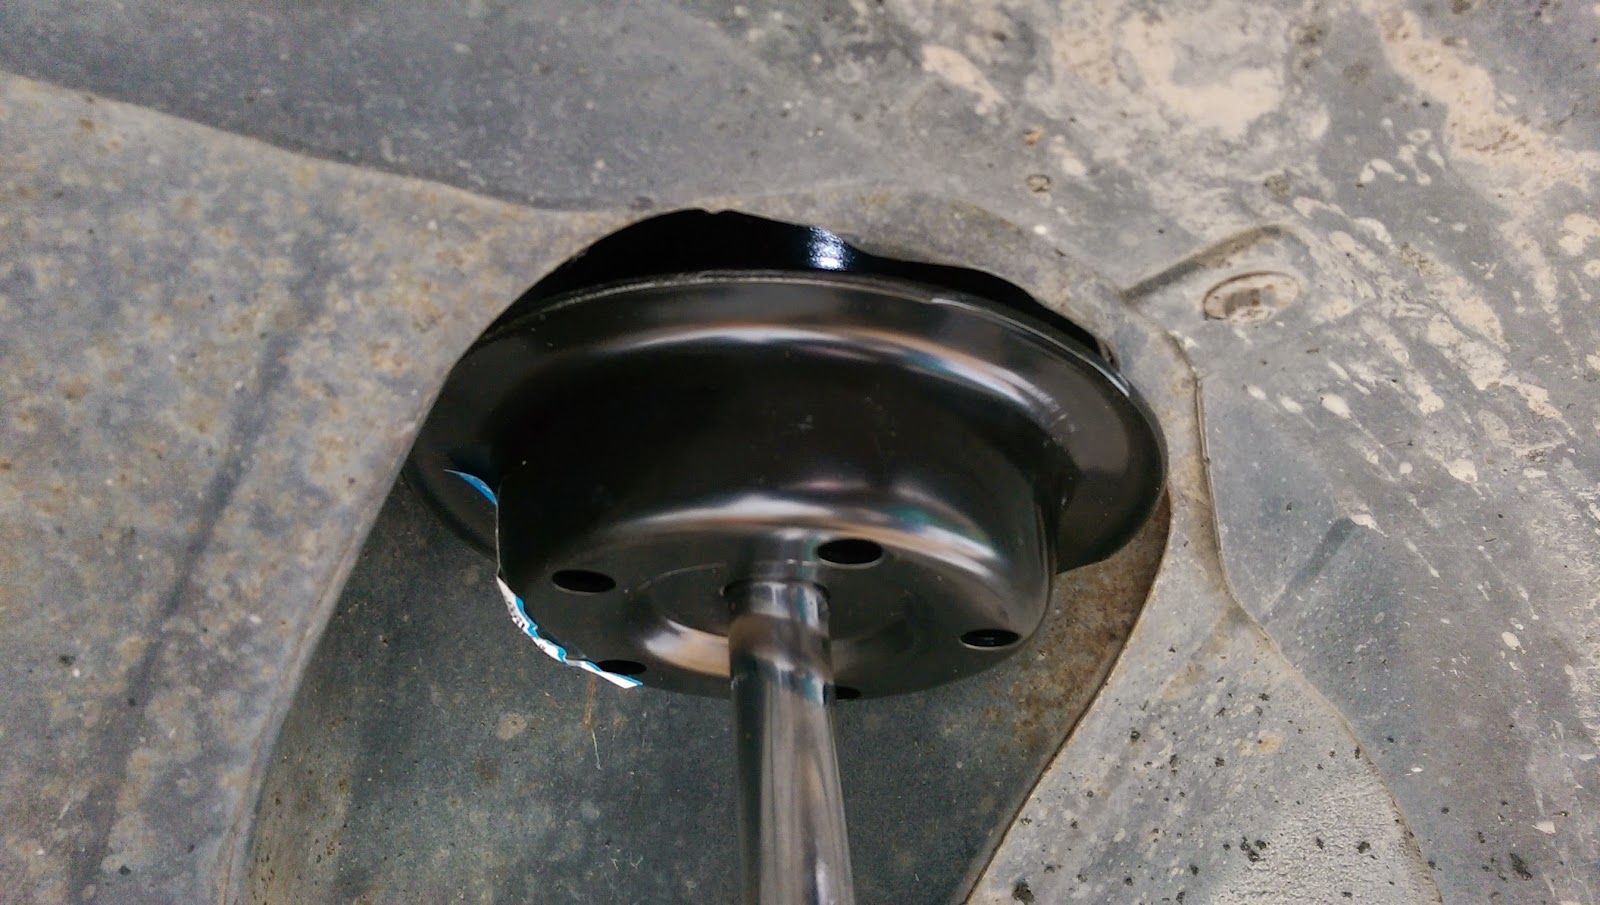
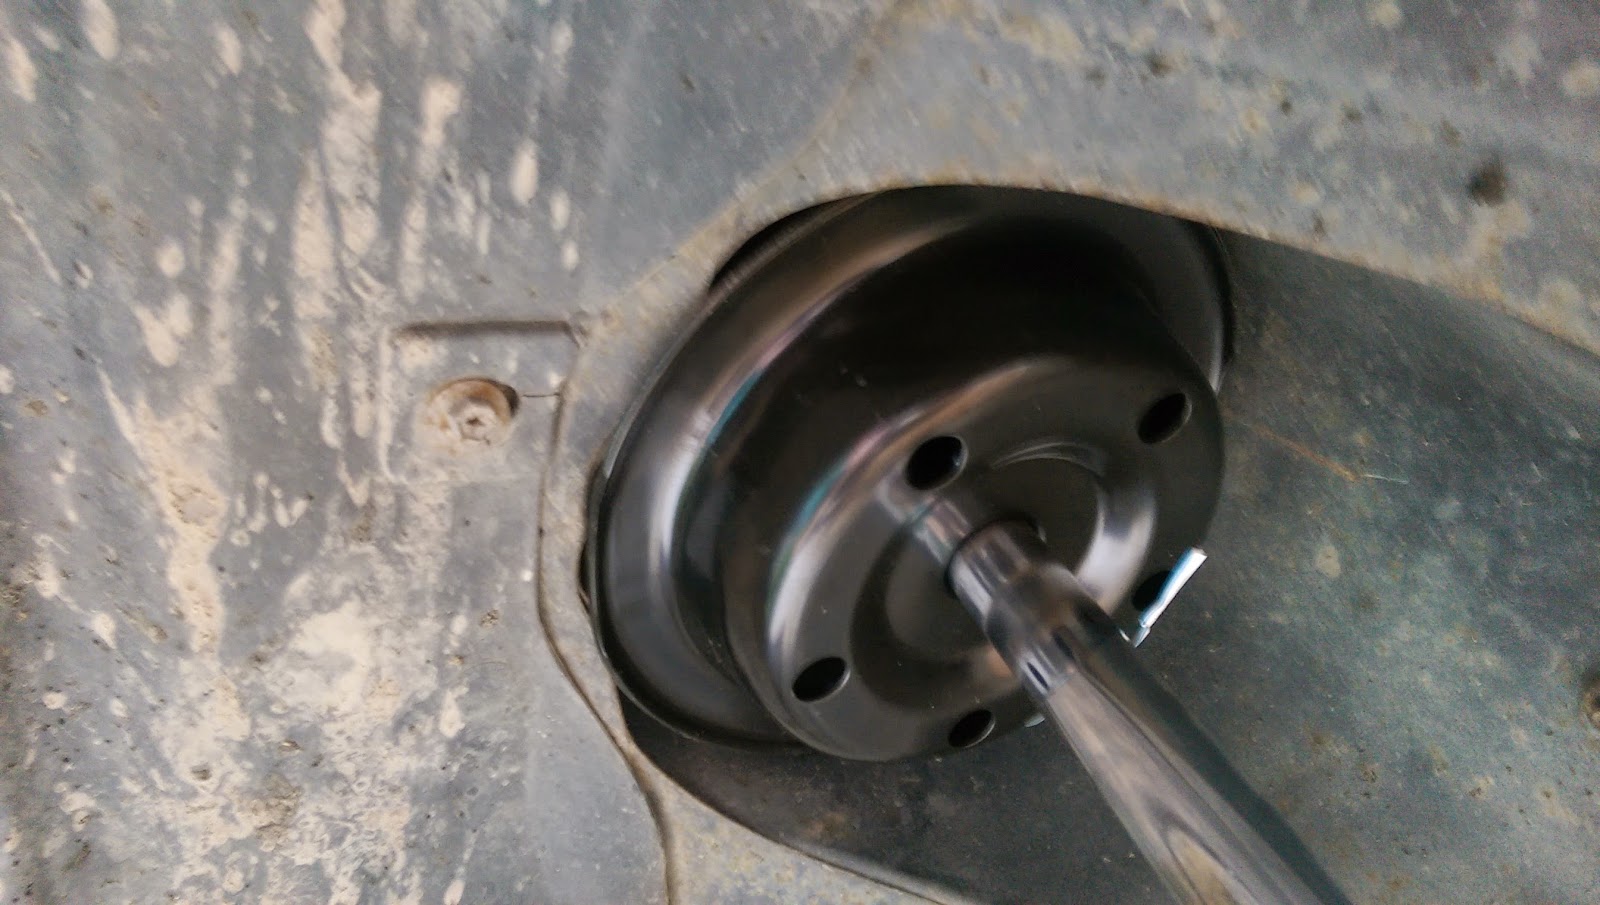
Now it is time to get the rear holes in the frame rails marked out and drilled, the simplest way to first install the 7/16" x 4 1/2" grade 8 bolts in the front frame rail holes and jack the subframe up enough the get the nuts started on the bolts. Bend the lower pinch welds on the frame rails out as you go until you get the subframe jacked up all the way to the bottom of the frame rails. I used a crescent wrench and bent it slight amounts at a time in places needed while test fitting the subframe. Measure all points to make sure the subframe is squared up under the car. Drill a 3/8" hole up from the bottom on bolts sides to get started. Remove the subframe and measure locations of bottom holes and drill same holes down from the top. Now enlarge holes on both top and bottom to 11/16". This is just large enough to insert the 3/8" pipe into later. Drill the 11/16" holes *** straight up and down and as deep as possible. You will have to drill down from the top and up from the bottom till you hit the re-enforcing bushings running horizontally for the old gear box and idler arm mounts. Once I hit these I then took my long carbide die grinder bit to them and removed enough material to make the hole line up all the way though. Install the new pipes, tight fit is preferred, and cut or grind down to fit the angle of the frame rail. The pipe is important for structural integrity, along with the plate to spread out the load.
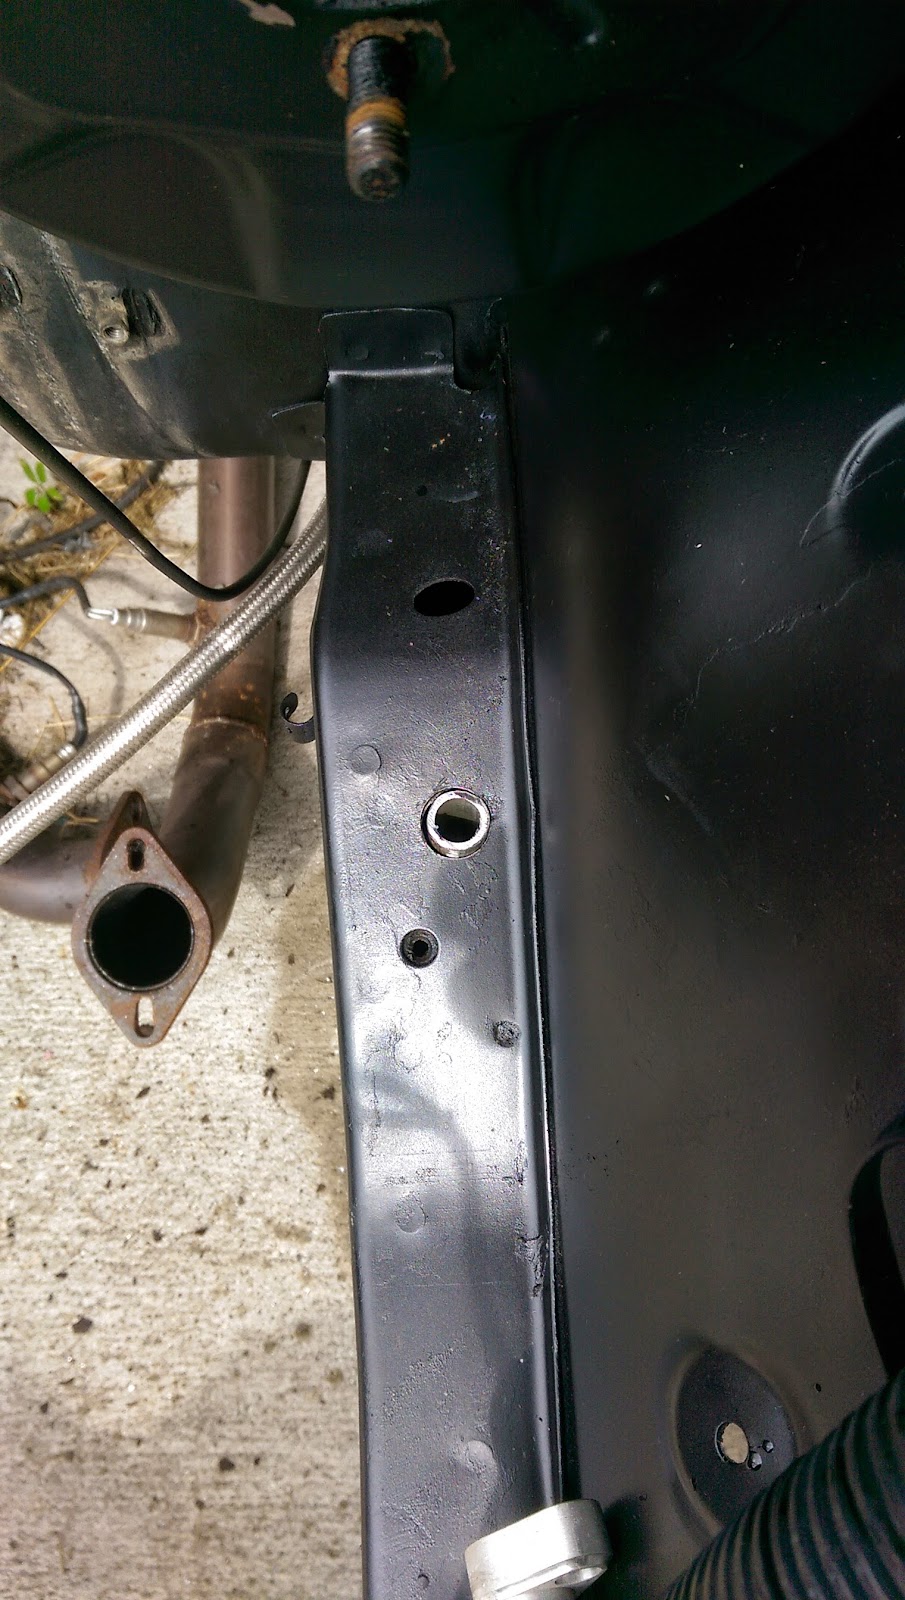
Weld metal plate over top of pipe to weld bolts to.

Now it should be ready for final fitment. Install subframe with self locking grade 8 nuts, making final adjustments to the crease below the frame rails.
First step is to remove the factory mounting studs, grind away or cut away the factory welds then knock them out with a hammer. Paint with a good chassis paint to prevent rust.
This gives a clean template to line up the new FC Subframe.
Now it is time to get the rear holes in the frame rails marked out and drilled, the simplest way to first install the 7/16" x 4 1/2" grade 8 bolts in the front frame rail holes and jack the subframe up enough the get the nuts started on the bolts. Bend the lower pinch welds on the frame rails out as you go until you get the subframe jacked up all the way to the bottom of the frame rails. I used a crescent wrench and bent it slight amounts at a time in places needed while test fitting the subframe. Measure all points to make sure the subframe is squared up under the car. Drill a 3/8" hole up from the bottom on bolts sides to get started. Remove the subframe and measure locations of bottom holes and drill same holes down from the top. Now enlarge holes on both top and bottom to 11/16". This is just large enough to insert the 3/8" pipe into later. Drill the 11/16" holes *** straight up and down and as deep as possible. You will have to drill down from the top and up from the bottom till you hit the re-enforcing bushings running horizontally for the old gear box and idler arm mounts. Once I hit these I then took my long carbide die grinder bit to them and removed enough material to make the hole line up all the way though. Install the new pipes, tight fit is preferred, and cut or grind down to fit the angle of the frame rail. The pipe is important for structural integrity, along with the plate to spread out the load.
Weld metal plate over top of pipe to weld bolts to.
Now it should be ready for final fitment. Install subframe with self locking grade 8 nuts, making final adjustments to the crease below the frame rails.
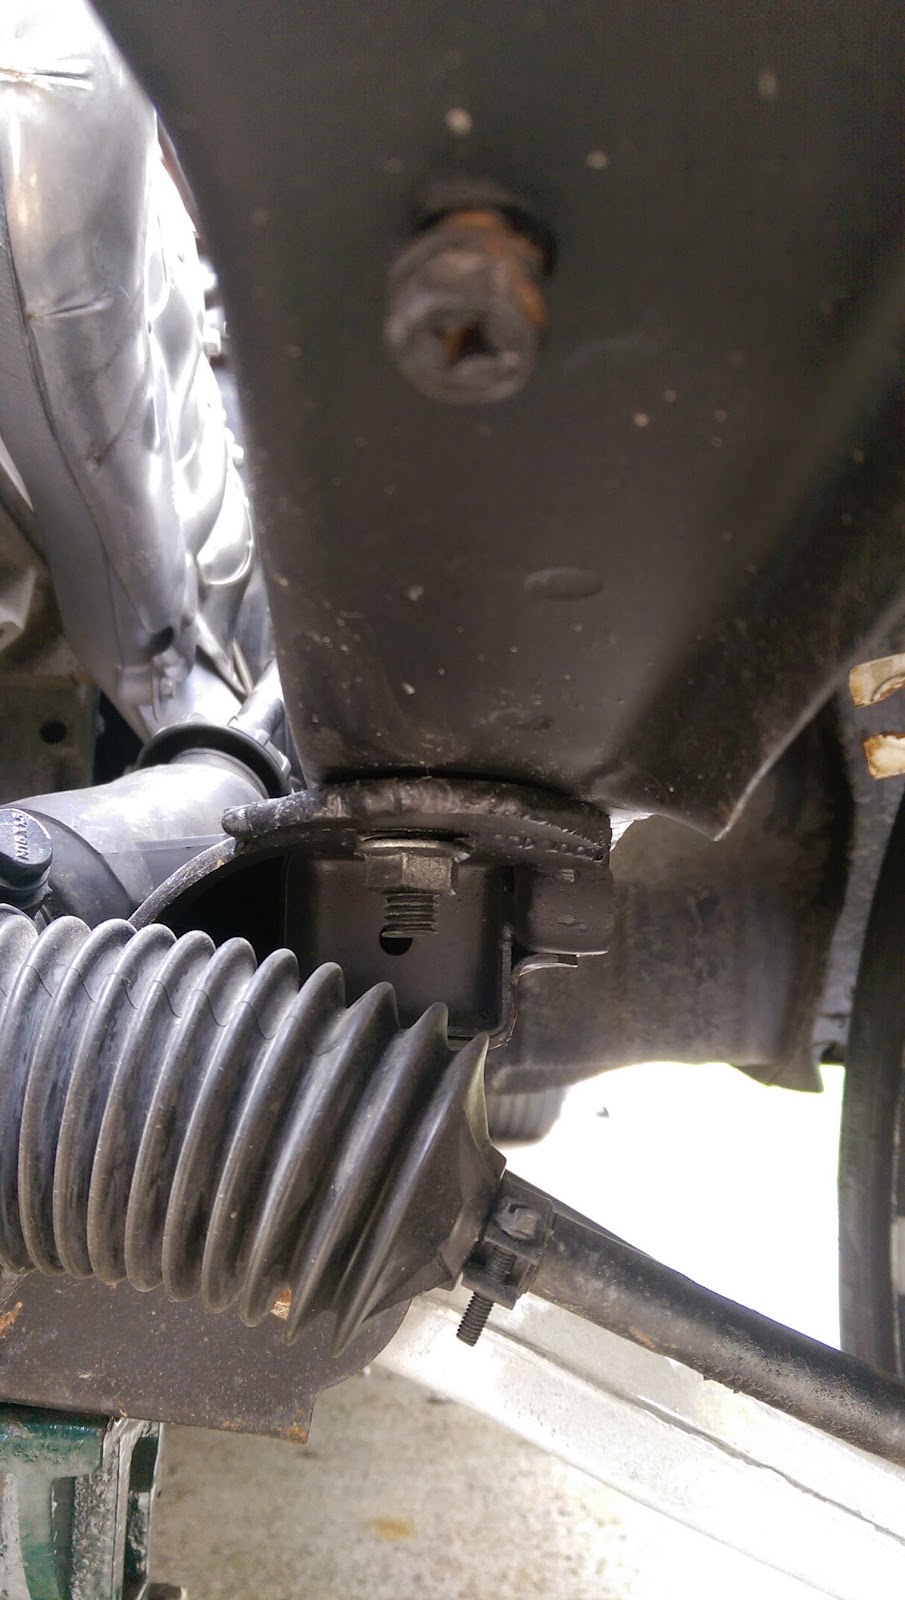

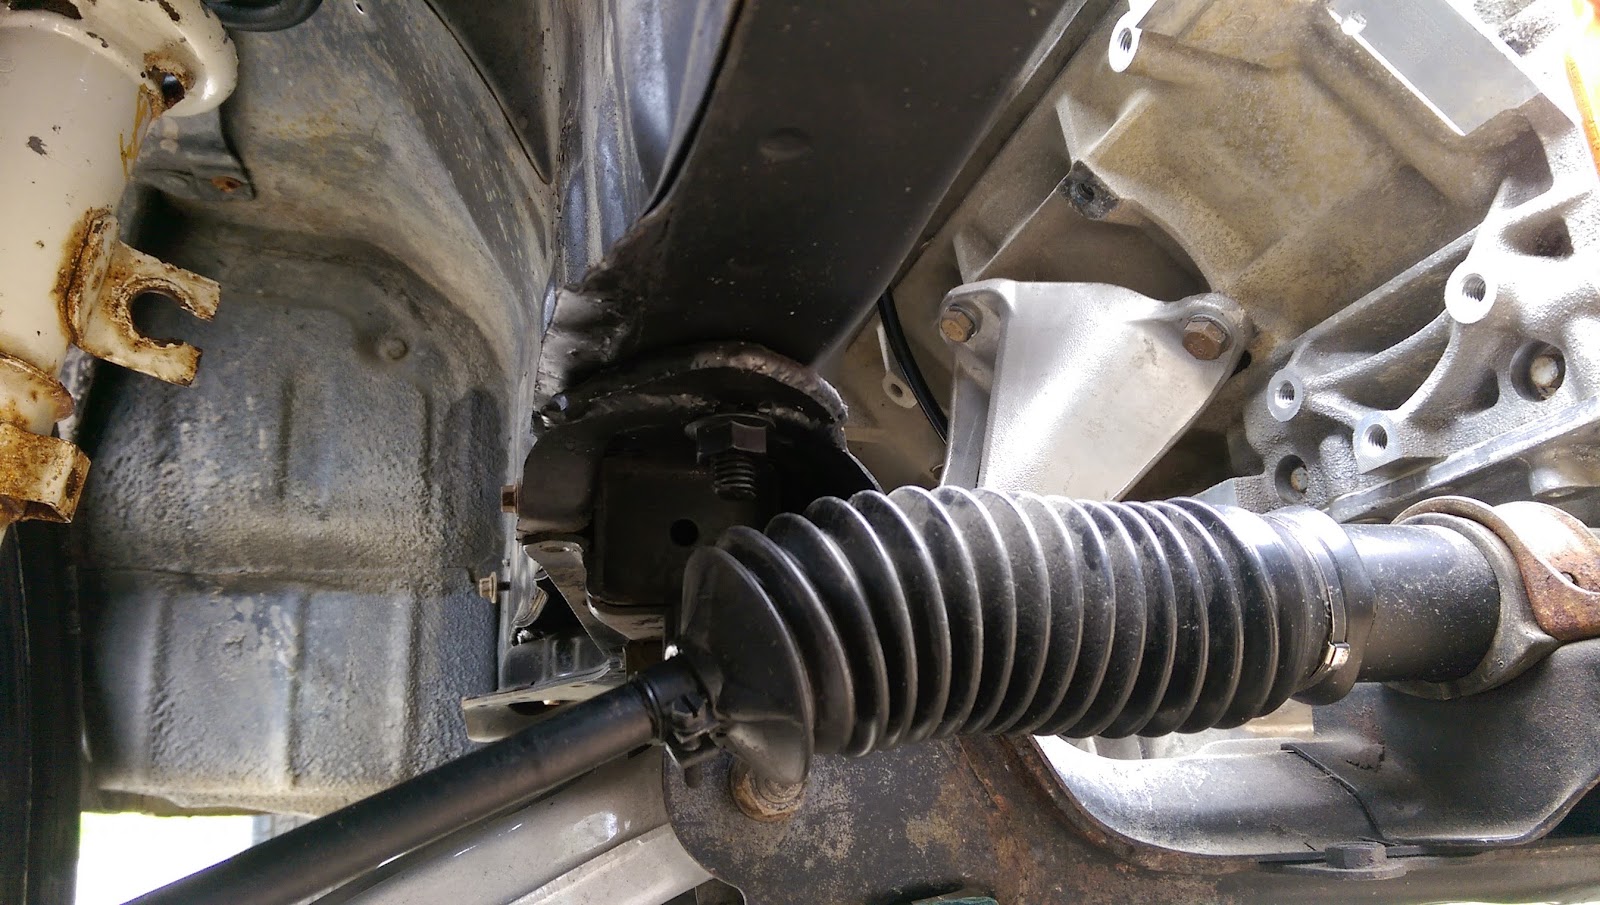
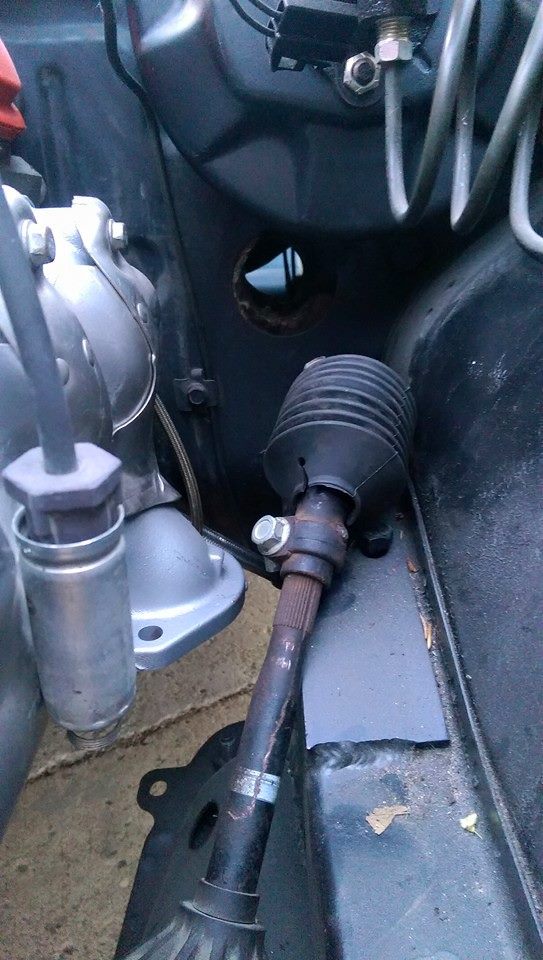
Steering:
I choose to create a hybrid steering column verses putting a whole FC one in.
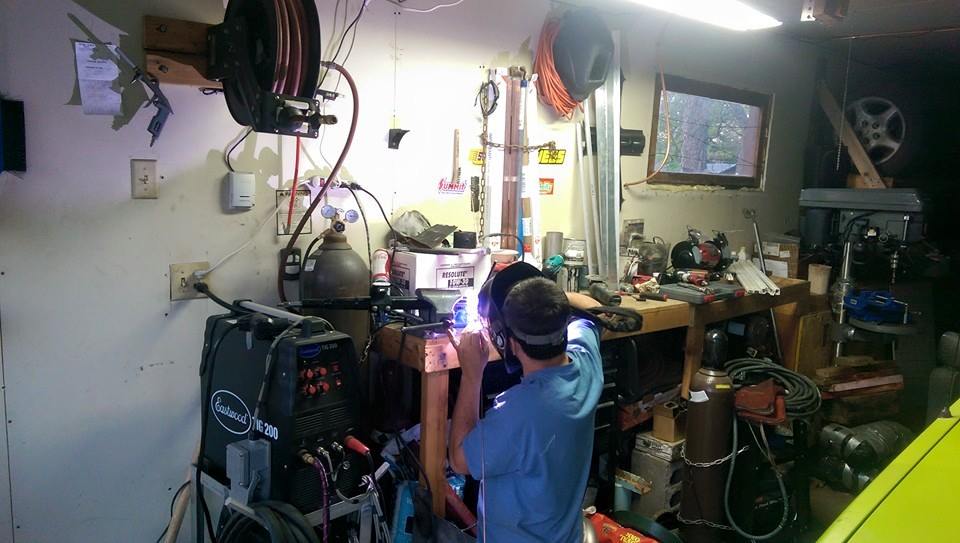
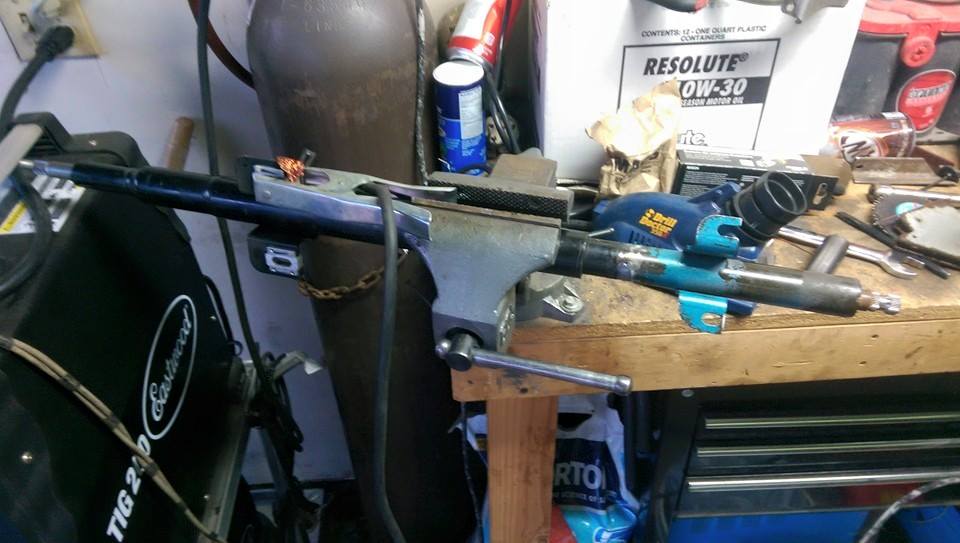
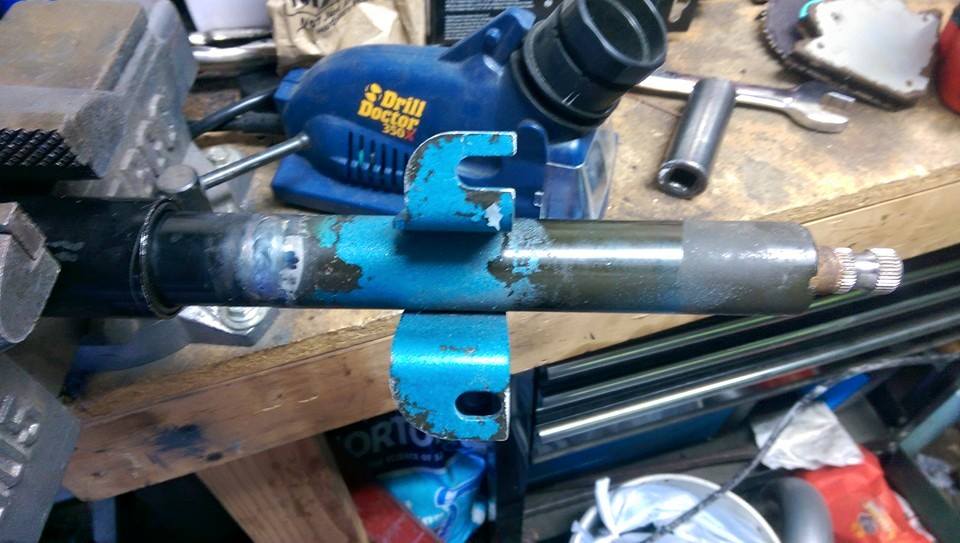
The goal is to use to bottom portion of the FC column joined to the upper portion of the SA/FB column, making the total length 32.75 inches tip of shaft to tip. Keeping the bottom mounting bracket on the FC column to support the new column, a custom bracket will be required. This can be located off of the tips of the bolts for the power brake booster. First cut the bottom off the SA/FB column, cut both the outer sleave and inner shaft all the way though, leaving plenty of room to cut again, this will then allow you to remove the shaft out of the outer sleeve of the column and drill out the plastic spots holding the crush zones together. A little hammering will be required to get them to slide apart. There will be a good foot of crush zone so don't worry if you cut some of the female part of the inner shaft off. The inner part of the shaft will end up being close to 6 inches when fully trimmed. Do the same with the FC column, leaving plenty to cut again, pull the inner shaft out and drill the plastic stops again. Hammer the inner shaft parts apart and measure to cut the male part of the inner shaft down. again you want 32.75 inches total length of the inner shaft, this may vary though so check your work. The male part of the FC shaft will need to be ground down to fit inside of the female part of the SA/FB shaft. Don't grind too much so that it fits loosely, hammer them together, a slight interference fit is best. Once the inner shaft is done cut the column outer shells to fit, this will require cutting the outer shell without cutting the shaft inside of it. Them line them up straight, clock the bottom bracket where it best fits for where you will make the brace for it, and weld them together.
Steering Column modification
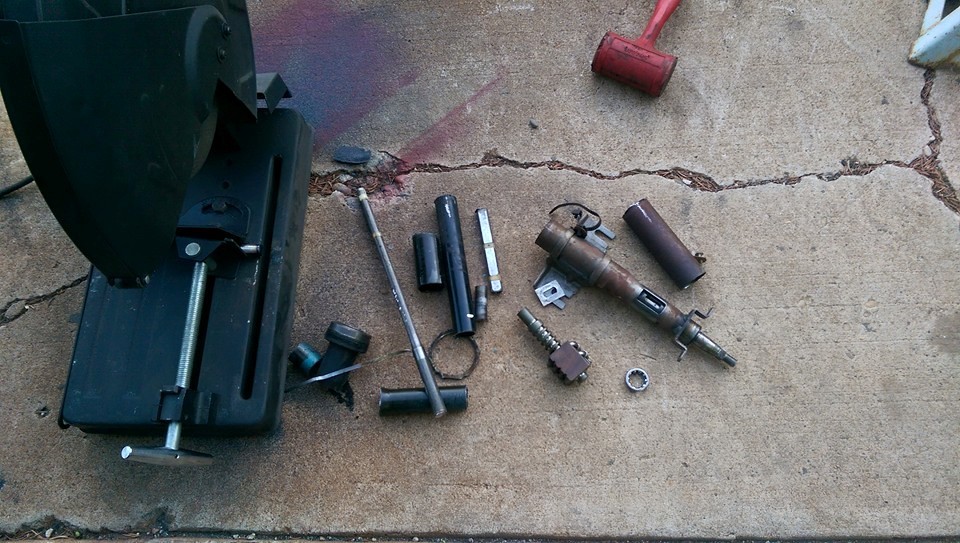
basically just cut both of the SA and FC columns apart and stick them back together with a metal hot glue gun.
SA shaft in black and FC part in blue
I didn't take many internal pics of the shafts. It was not to bad to just match up the housings the proper length with the shaft in place.
Mounted the steering shaft so we could test fit the column length
Leftover and cut off pieces
I choose to create a hybrid steering column verses putting a whole FC one in.
The goal is to use to bottom portion of the FC column joined to the upper portion of the SA/FB column, making the total length 32.75 inches tip of shaft to tip. Keeping the bottom mounting bracket on the FC column to support the new column, a custom bracket will be required. This can be located off of the tips of the bolts for the power brake booster. First cut the bottom off the SA/FB column, cut both the outer sleave and inner shaft all the way though, leaving plenty of room to cut again, this will then allow you to remove the shaft out of the outer sleeve of the column and drill out the plastic spots holding the crush zones together. A little hammering will be required to get them to slide apart. There will be a good foot of crush zone so don't worry if you cut some of the female part of the inner shaft off. The inner part of the shaft will end up being close to 6 inches when fully trimmed. Do the same with the FC column, leaving plenty to cut again, pull the inner shaft out and drill the plastic stops again. Hammer the inner shaft parts apart and measure to cut the male part of the inner shaft down. again you want 32.75 inches total length of the inner shaft, this may vary though so check your work. The male part of the FC shaft will need to be ground down to fit inside of the female part of the SA/FB shaft. Don't grind too much so that it fits loosely, hammer them together, a slight interference fit is best. Once the inner shaft is done cut the column outer shells to fit, this will require cutting the outer shell without cutting the shaft inside of it. Them line them up straight, clock the bottom bracket where it best fits for where you will make the brace for it, and weld them together.
Steering Column modification
basically just cut both of the SA and FC columns apart and stick them back together with a metal hot glue gun.
SA shaft in black and FC part in blue
I didn't take many internal pics of the shafts. It was not to bad to just match up the housings the proper length with the shaft in place.
Mounted the steering shaft so we could test fit the column length
Leftover and cut off pieces
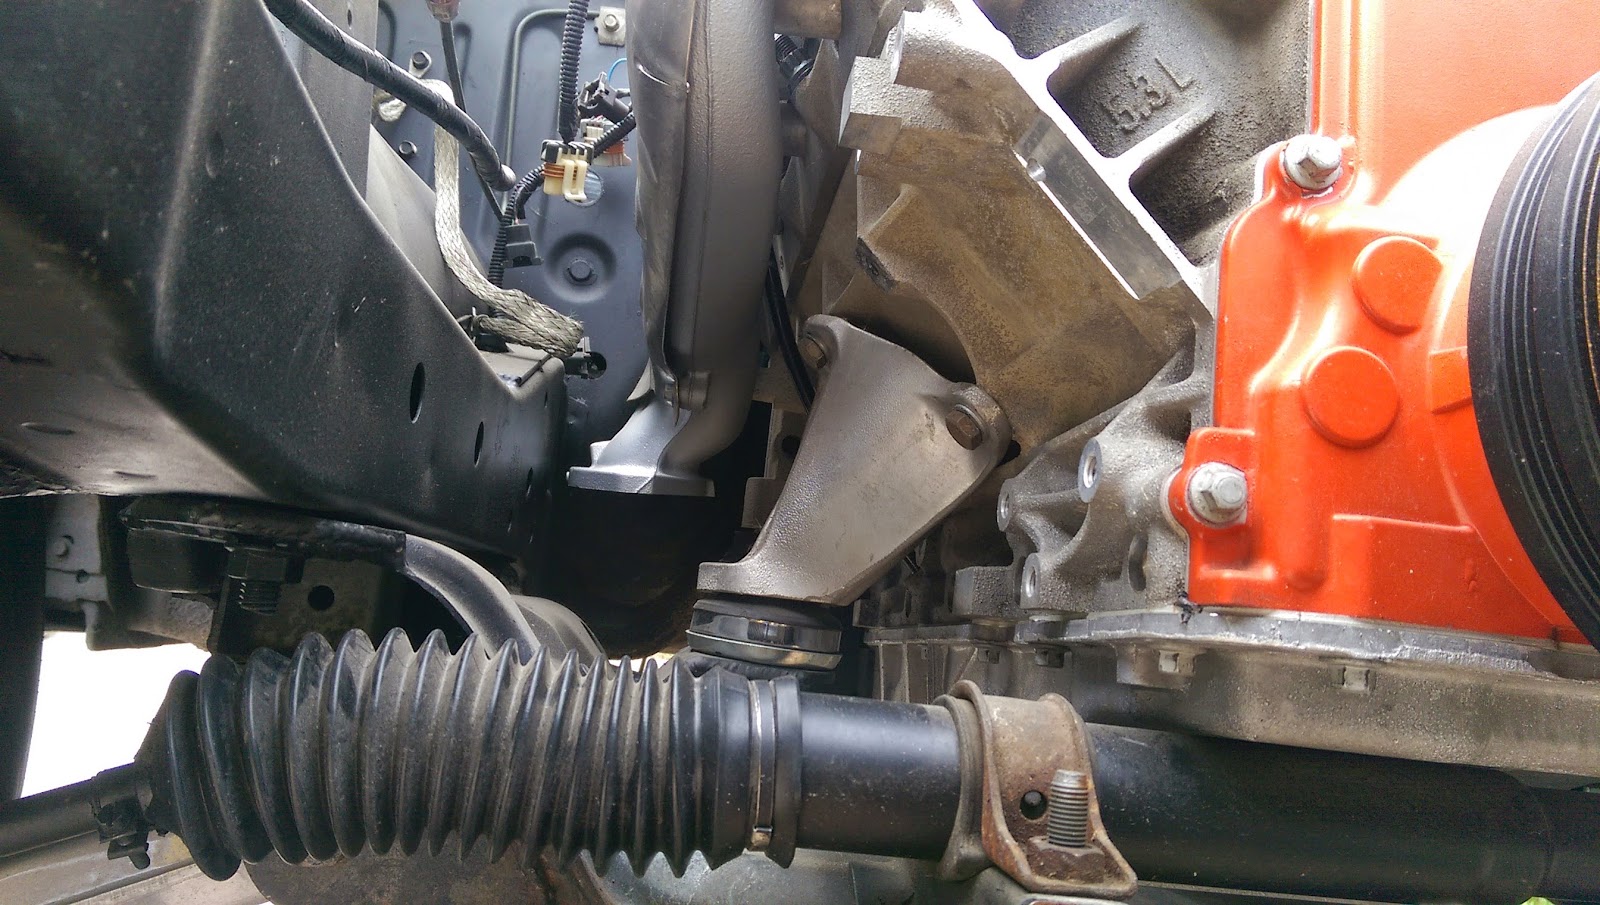
Struts
Pretty simple bit here. The top of the FC strut mounts have a wider bolt pattern then the SA/FB mounts. Simply slot all 4 holes a little bit while test fitting a mount your going to use, stock or otherwise. Stock FC spring supports require bending a lip down to fit the large diameter spring all the way up into the pocket.
After this I installed stock FC springs in my struts and bolted them up. Also installed the lower control arms, ball joints, spindles, hubs with new bearings and grease. Bolted on some wheels tested ride height.
The stock FC springs ride height is too high. I cut 1 and 1/4 coils off the top of the spring and heated it to reform the flat portion of the top of the spring. It now sits still a bit high but better. Aftermarket lowering springs would be better, and coil overs would be best to dial in ride height.
Last edited by revvingGS; Oct 18, 2025 at 11:16 AM.
Thanks for documenting this - glad people are still doing this swap in 2025. I assume you found my old thread from nearly 15 years ago since it still comes up pretty readily in a Google search. I have meant to update that thread numerous times over the years since I have gone back and redone my setup numerous times since then to get it just right. You are correct - the 1/2 spacer on the rear is too small and puts undue strain on everything trying to pull it all tight to the frame. I found 3/4" is probably the sweet spot - but if a full inch works on your car then go for it! I ended up cutting the entire frame rails off my car and remaking them out of 1/8" rectangle tube which follows the curve of the FC subframe and also greatly improves roll center, so no spacer required - but that is a ton of work and not strictly needed if you are running a reasonable ride height.
Also worth noting - there were some haters in my original thread who said the tab welded to the front to put the subframe in the right location was not strong enough etc - but I can tell you that is just fine. I put 20k miles on that setup with no issues.
Anyway, good work and thanks again for documenting this.
Old [Sch|F]ool


Joined: May 2001
Posts: 12,856
Likes: 568
From: Cleveland, Ohio, USA
I used a Series 3 power column and extended the FC steering shaft to mate up to it. I later learned than an NA Miata steering shaft is the exact length, at least if you mount the subframe like I did using the original front studs from the FB crossmember. The rear spacers were 1" angle iron with tension rod bracket bolts welded in, so I could use the same 12x1.25 nuts at all four corners.
Ford Escort top mounts are FB bolt pattern (10mm studs, though, vs 8mm) and use a D hole like FC, you just have to file them out a bit. I forget if I used ZX2 or base Escort, they are dimensionally the same but one was twice as much as the other, so I used the cheap stuff. I made my own top hats with stacks of washers and some 3/16" plate.
Pics lost to linkrot: https://www.rx7club.com/1st-generati...t-here-888050/
Last edited by peejay; Oct 20, 2025 at 07:16 PM.
Trending Topics
Thanks for documenting this - glad people are still doing this swap in 2025. I assume you found my old thread from nearly 15 years ago since it still comes up pretty readily in a Google search. I have meant to update that thread numerous times over the years since I have gone back and redone my setup numerous times since then to get it just right. You are correct - the 1/2 spacer on the rear is too small and puts undue strain on everything trying to pull it all tight to the frame. I found 3/4" is probably the sweet spot - but if a full inch works on your car then go for it! I ended up cutting the entire frame rails off my car and remaking them out of 1/8" rectangle tube which follows the curve of the FC subframe and also greatly improves roll center, so no spacer required - but that is a ton of work and not strictly needed if you are running a reasonable ride height.
Also worth noting - there were some haters in my original thread who said the tab welded to the front to put the subframe in the right location was not strong enough etc - but I can tell you that is just fine. I put 20k miles on that setup with no issues.
Anyway, good work and thanks again for documenting this.
Also worth noting - there were some haters in my original thread who said the tab welded to the front to put the subframe in the right location was not strong enough etc - but I can tell you that is just fine. I put 20k miles on that setup with no issues.
Anyway, good work and thanks again for documenting this.
As for the 1 inch spacer I was mainly playing it by test and fit. 3/4" was var better than 1/2" but what is one more time of dragging it out from under the car and weld another layer on? Plus manual steering will be slightly easier with a bit less Caster. I am no expert on all of the other suspension angles that come into play thou.
I really like this swap and would do it again.
I will have to see if I can find pics, but I actually had a later version of this that used the steering box/idler arm mounting holes to hold the back instead of drilling a new vertical hole through the frame. As you found out, that kinda sucked to do.
I have wanted to go back and redo that thread a bunch of times since the info on the first page is now somewhat outdated, but I just haven't taken the time to do so.
Glad you are enjoying it, I'm still loving mine!
Edit: You probably saw this thread, but it has a bunch of good info including some pics I posted of my more updated version which involves *slightly* more cutting and welding
https://www.rx7club.com/1st-generati...ments-1153962/
Last edited by 82transam; Oct 21, 2025 at 06:36 AM.
Old [Sch|F]ool
Joined: May 2001
Posts: 12,856
Likes: 568
From: Cleveland, Ohio, USA
Mine was stronger than the fragile FB stuff but it needed a lot more spring rate to handle close to FB, and the handling never felt very secure anyway. Which is why I bought another car and will keep it FB suspension.
Would I do it again? No, no, and no some more.
Would I do it again? No, no, and no some more.

Joined: Mar 2001
Posts: 31,833
Likes: 3,232
From: https://www2.mazda.com/en/100th/
What spring rates did you end up running Peejay? Also, with respect (not being sarcastic) I think it's safe to say that you are an outlier on this since you need/want more travel for rallycross and such that those of us just having fun on the street. Also, if you aren't correcting for roll center like my admittedly overly complex way of installing this then you aren't getting the full benefit. Moving the strut top mounting position rearward a bit would also probably help with caster...
Also, I agree with you both that the parts have become increasingly hard to get, and most of the good maintenance items like ball joints, tie rods and what not have dried up - all that's left are the Chinese knockoff/parts store style parts. I have amassed a decent collection of spare FC parts, but if I were to do this as a new owner I would probably keep it FB and get the MTheory rack kit and call it a day.
Also, I agree with you both that the parts have become increasingly hard to get, and most of the good maintenance items like ball joints, tie rods and what not have dried up - all that's left are the Chinese knockoff/parts store style parts. I have amassed a decent collection of spare FC parts, but if I were to do this as a new owner I would probably keep it FB and get the MTheory rack kit and call it a day.
Old [Sch|F]ool
Joined: May 2001
Posts: 12,856
Likes: 568
From: Cleveland, Ohio, USA
Spring rates are weird. I was using 250lb in the front and couldn't go stiffer without raising the ride height significantly.
my other FB is on 225lb springs with the sway bar and it feels great. I am somewhat fortunate now in that I have Bilsteins thst fit the FB, I could not find these in 2009.
One other issue the FC suspension has relative to FB is that the strut sits at a shallower angle because of the mounting ears, which also lowers the roll center.
One point is that all cars need suspension travel for good handling. The FB rear suspension does reward stiffer front suspension because the rear does not like to articulate, but the problem is at the rear and making the front overstiff to compensate is merely hampering the front to bring it down to the rear's level. I modified the rear bushings to help in this regard but the real fix is a 3 link or a torque arm, neither of which are legal in my class.
I still vividly remember the time I took my car post-swap around an interchange and it made like a Corvair and actually raised the inside rear tire off the ground. Very sketch. I raised the front and rear ride heights to combat this but this hampered handling on course, so I set it back and just used 10-15 year old takeoff tires from customer cars so the car couldn't build enough G forces to do that.
Last edited by peejay; Oct 22, 2025 at 08:36 AM.

Thread
Thread Starter
Forum
Replies
Last Post
KKMpunkrock2011
3rd Generation Specific (1993-2002)
34
Dec 27, 2014 06:29 PM
WingsofWar
2nd Generation Specific (1986-1992)
48
Sep 17, 2012 08:01 AM
mazmonz
1st Generation Specific (1979-1985)
21
May 23, 2011 04:17 PM

