
Intercooler Placement/Mounting


Thread Starter
Joined: Jul 2006
Posts: 849
Likes: 2
From: Orlando/Winter Park
Intercooler Placement/Mounting
So I'm finishing the final stages of my turbo planning and need some ideas for fabbing up the intercooler.... I've searched a few times but no real solid ideas. I'm planning to relocate the battery to the passenger side storage bin, so no worries there. I'm looking for good solid info... largest size I can fit (dimensions), ideas for mounting brackets... etc. I'm wanting to place it right in the opening of my Mariah widebody front airdam.
Thanks in Advance,
PS.. Pics would be AWESOME!!
Thanks in Advance,
PS.. Pics would be AWESOME!!
they're usually mounted forward of the rad. try searching google images and see what u come up with.
what i came up with:
http://www.google.com/images?q=inter...N&hl=en&tab=wi
or:
http://www.google.com/images?um=1&hl...=&oq=&gs_rfai=
what i came up with:
http://www.google.com/images?q=inter...N&hl=en&tab=wi
or:
http://www.google.com/images?um=1&hl...=&oq=&gs_rfai=
I'm not sure how much this helps, but I am running an NPR Isuzu diesel intercooler as a front mount. (I do not have a widebody though)
Here's a thread I started about the same subject that might help:
https://www.rx7club.com/1st-generation-specific-1979-1985-18/tii-fmic-piping-help-fb-884644/
Here's a thread I started about the same subject that might help:
https://www.rx7club.com/1st-generation-specific-1979-1985-18/tii-fmic-piping-help-fb-884644/
nother rican witha rotary
Joined: Mar 2002
Posts: 1,034
Likes: 0
From: S.Otown
i'll post pic's tomorrow of mine, i've got a procharger that i've got to finish mounting it's not as big as a npr one but it's got the inlet/outlet on the same side which works a little better for what i want to do for my setup
Mind you, I did the without any welding, or any real fabrication skills, but it works
just fine. I do have rubber washers on everything to give it a little play.
Sorry for the quality, these are old pics.

I plan to flip the interooler right side up in the near future, and place it where the AC/Condenser is in these pics.
I might as well, since I am no longer going to keep the AC system in the car.
It will still get plenty of air, and away from debris.
Kinda like Mike-P-28's setup here.
just fine. I do have rubber washers on everything to give it a little play.
Sorry for the quality, these are old pics.
I plan to flip the interooler right side up in the near future, and place it where the AC/Condenser is in these pics.
I might as well, since I am no longer going to keep the AC system in the car.
It will still get plenty of air, and away from debris.
Kinda like Mike-P-28's setup here.
Last edited by Directfreak; Oct 15, 2010 at 07:06 PM.
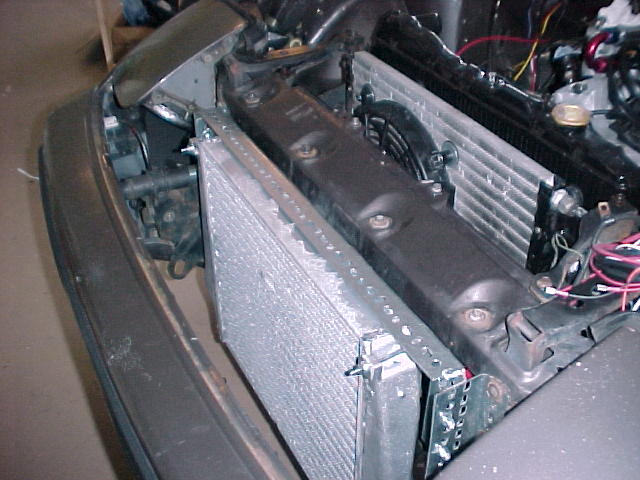
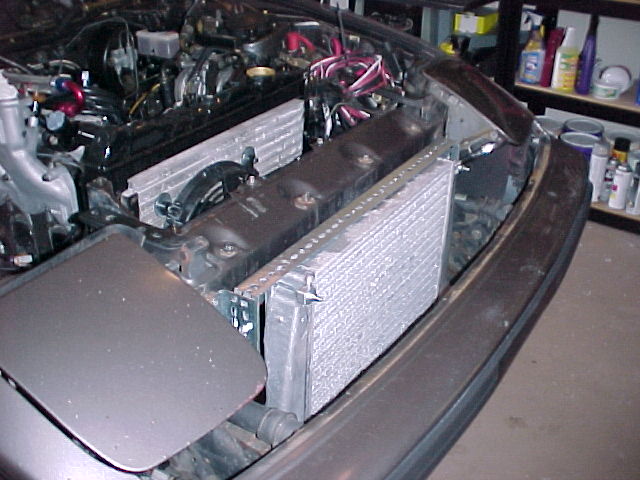
Here is a few pictures of mine. My intercooler is 3" in/out, 4" thick. I used a VERY simple mounting solution, I used 4 L shaped brackets, drilled 2 holes in the body, and mounted it infront of the circular bar that goes across the front of the car. (4 brackets, because I doubled them up for strength).


I need a new user title
Joined: Oct 2005
Posts: 2,646
Likes: 1
From: Yaizu, Japan
I haven't actually done mine yet, but based on the measurements I took, I figure this will be a nearly perfect fit in front of the stock radiator location. Once I move my battery, I can simply put a big hole in each of the two side radiator support brackets and run the pipes through those. Minimal fabrication required.
Trending Topics

Thread Starter
Joined: Jul 2006
Posts: 849
Likes: 2
From: Orlando/Winter Park
Here is a few pictures of mine. My intercooler is 3" in/out, 4" thick. I used a VERY simple mounting solution, I used 4 L shaped brackets, drilled 2 holes in the body, and mounted it infront of the circular bar that goes across the front of the car. (4 brackets, because I doubled them up for strength).
http://i3.photobucket.com/albums/y83...young/car3.jpg
http://i3.photobucket.com/albums/y83...g/DSC00745.jpg
http://i3.photobucket.com/albums/y83...g/IMG_3098.jpg
http://i3.photobucket.com/albums/y83...young/car3.jpg
http://i3.photobucket.com/albums/y83...g/DSC00745.jpg
http://i3.photobucket.com/albums/y83...g/IMG_3098.jpg
Any chance you could take some close-ups of your bracketing?
Last edited by Directfreak; Oct 16, 2010 at 12:09 PM.
Thread Starter
Joined: Jul 2006
Posts: 849
Likes: 2
From: Orlando/Winter Park
I haven't actually done mine yet, but based on the measurements I took, I figure this will be a nearly perfect fit in front of the stock radiator location. Once I move my battery, I can simply put a big hole in each of the two side radiator support brackets and run the pipes through those. Minimal fabrication required.

The exact location you then want the intercooler to sit at can be adjusted up or down, in or out in relation to where you drill the holes to bolt up to the body/intercooler.
The biggest issue you may run into, might be the intercooler piping. Mine is quite simple, but keep in mind I am going to be using flush mount headlights. It will be harder to get the piping in the right position around the factory headlight motors/linkages. I made two holes with a saws-all in the body (had a hell of a time trying to get a perfect 4" cut with a hole saw. Then I put a rubber hose (split down the center) around the edge in order to give it a better look/not rust.
Thread Starter
Joined: Jul 2006
Posts: 849
Likes: 2
From: Orlando/Winter Park
cool... .thanks for the info Dan.... I'm going to start tearing it all apart this weekend so I'm sure once I get into it, it'll make a lot more sense.
Dammit, I just short-circuited my keyboard from drooling! The club now owes me three keyboards! These pics are like ****! :P
Sorry badly off topic, but where did you find flush mount headlights?
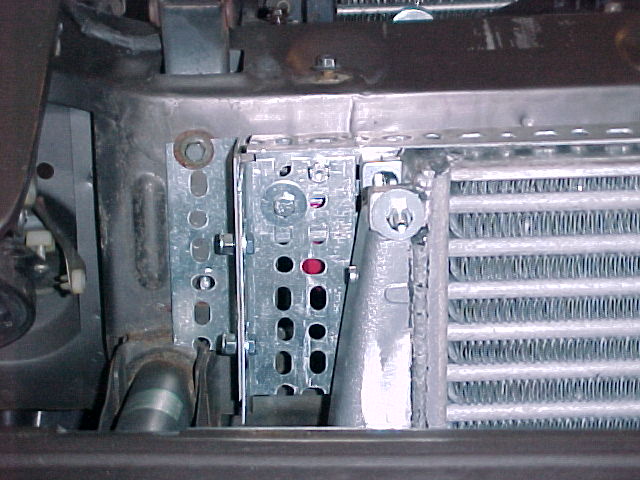
Unfortunately I have the front panel bolted on now, so I cannot take a close up of my actual mount... But I used brackets like these:
http://www.modd3d.com/articles/media...l-brackets.jpg
The exact location you then want the intercooler to sit at can be adjusted up or down, in or out in relation to where you drill the holes to bolt up to the body/intercooler.
The biggest issue you may run into, might be the intercooler piping. Mine is quite simple, but keep in mind I am going to be using flush mount headlights. It will be harder to get the piping in the right position around the factory headlight motors/linkages. I made two holes with a saws-all in the body (had a hell of a time trying to get a perfect 4" cut with a hole saw. Then I put a rubber hose (split down the center) around the edge in order to give it a better look/not rust.
Last edited by Directfreak; Oct 18, 2010 at 05:19 PM.


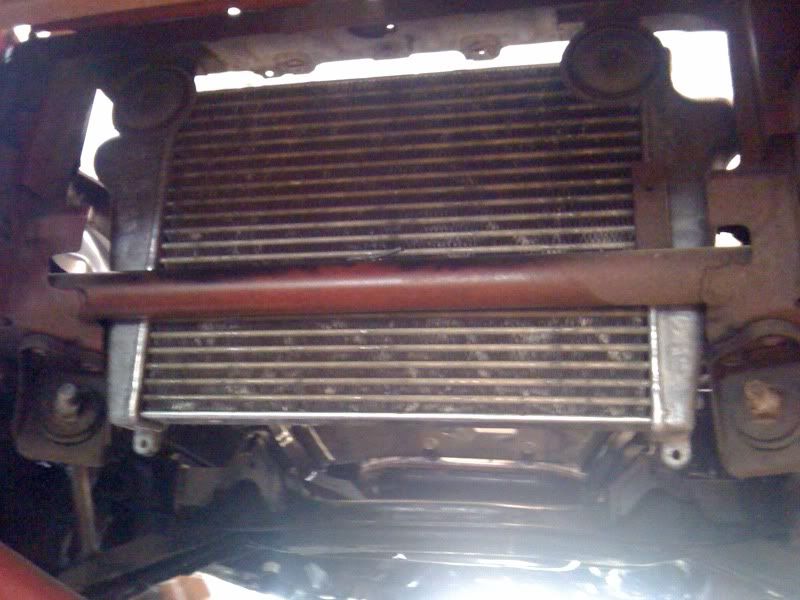
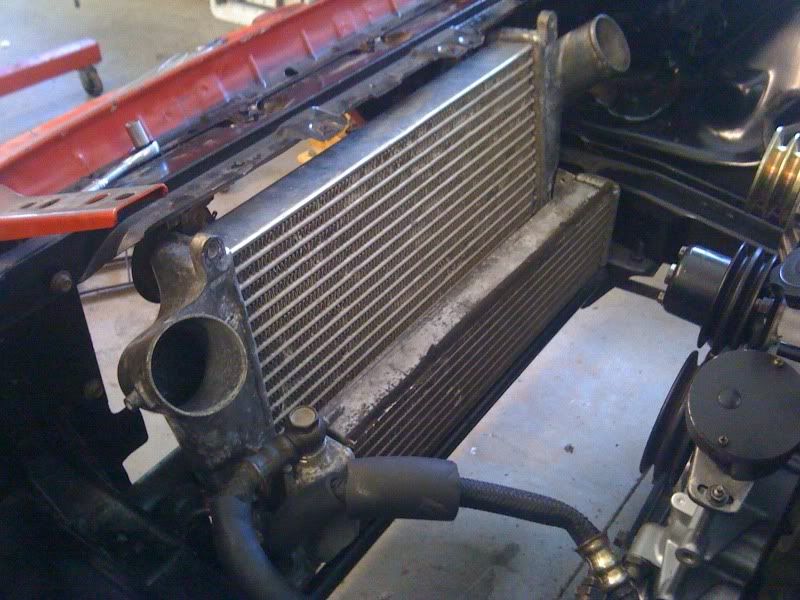
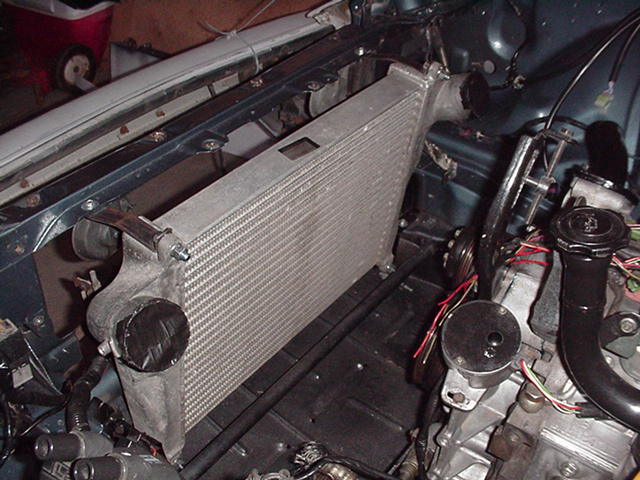
Here's how I placed my intercooler.
I removed the radiator mount to slide it in (have to make my own radiator mounts when my rad comes in) Removing the radiator mounts cleared a lot of space in my engine bay. But, if you are going to use an OEM brass radiator it is going to be very snug. I am pretty happy with my results, I ordered a smaller aluminum radiator, I'll post how the fitment is when all my parts arrive.
My intercooler is 31" x 12" x 3" I used 2 flat brackets for the top of the radiator and 2 for the bottom. I will take pics underneath tomorrow when there is more light. It can't be seen from outside the car which is a plus. Keep's it stock looking.
Last edited by Dcashdollar; Oct 18, 2010 at 07:28 PM.
HERE is the answer.
Feel free to PM me about any more questions specific to my car. But my headlights are one off made by a member of this site in Norway. He only made this set, and decided to not use them on his car.
Full Member
Joined: Feb 2008
Posts: 73
Likes: 0
From: P.Nth NZ
heres where i put mine, its 300x400x76mm, put some angle steel from each castor-arm mount for the bottom support, and 2 little tabs to hold the top secure, works mint, and heaps of airflow for the radiator still...


Thread Starter
Joined: Jul 2006
Posts: 849
Likes: 2
From: Orlando/Winter Park
Thanks for all the great pics guys.... I started making some progress last weekend. Pulling the 12a and tearing it down this weekend..... then it's time to strip the engine bay and paint it. I ordered a painless wiring kit as well, so I'm going to be re-wiring the WHOLE car along with relocating the battery to the passenger storage bin.... now if I could just find my wallet I can order my R&P kit and coil-overs from Billy.
Thread Starter
Joined: Jul 2006
Posts: 849
Likes: 2
From: Orlando/Winter Park
Thanks Dan. I saw on your other thread about that. All the sheetmetal on my front end is pretty tweaked, thought maybe you had found something I should be looking into.

Thread
Thread Starter
Forum
Replies
Last Post
ls1swap
3rd Generation Specific (1993-2002)
17
Jun 3, 2024 03:25 PM
MILOS7
3rd Generation Specific (1993-2002)
0
Sep 18, 2015 03:39 PM
Devon300zx
2nd Generation Specific (1986-1992)
3
Sep 17, 2015 03:50 PM