How to tear down a 12A without a shop
 11-26-12, 02:32 PM
#51

It's a sickness, isn't it Colin? We love our precious 12A rotor housings so much we're afraid to send them out into the world.
J9, I like your logic, might as well use the R5 rotor housings. The only alternative is to not use them, which would certainly be a waste. Besides, I want to see what Jeff is talking about with this GSL-SE port timing stuff (I'm still trying to figure out how SE port timing ended up in an SA engine 5 years before the SE was produced).
And yes Jeff, perfectly clear, so far I've got a pretty good handle on everything except the oil squirters, still working on that.
I do have 5 flywheels and 5 matching counterweights, 4 of the pairs from FBs. I'm not sure what year FB they are, but I suppose that can be sorted out by weighing them and comparing castings. Were there differences between 81-83 and 84/85? I'll take pictures.
Should I use an FB eccentric shaft too? Or are these all the same?
,
If the E shaft is not an issue, I might as well just do the FB rebuild like I originally planned, but substitute in the R5 rotor housings and save my minty FB rotor housings for another day.
I weighed the R5 and FB rotors on a bathroom scale, not terribly accurate but it gave me consistent weights for each pair of rotors - 20.4 lbs. for the R5 rotors and 19.2 lbs. for the FB rotors (a second pair of FB rotors also weighed 19.2 lbs.)
That's not much of a weight difference, only 0.6 lbs. per rotor more for the R5s than the FBs. Is that really enough to make much of a difference, and if so, by your logic Jeff, wouldn't the slightly lighter FB rotors be the better option? The FB rotors would also be from the same engine as all the other FB components - just the R5 rotor housings would be from a different source.
In simple terms, plug those R5 rotor housings into an FB rebuild? If this works, I'll clean them up (and post pics, of course).
 11-26-12, 04:16 PM
#52
Moderator
iTrader: (3)
Join Date: Mar 2001
Location: https://www2.mazda.com/en/100th/
Posts: 30,828
Received 2,596 Likes
on
1,844 Posts
oh Mazda has tried a bunch of different port timings over the years, depending on the market and car it was put in. for the Rx2/3's they even had a part number for a competition housing with different timing...
the 12A eccentric shafts are all the same, but if you're reusing bearings, its a good practice to keep the shaft and bearings together.
the 83-85 12A and 74-82 12A's have different rotor weights, although not by a lot. it is still enough to require matching counter weight/flywheel sets. it doesn't matter which ones you pick, you just need to use all 74-82 or all 83-85.
the 81-82's did use a lighter counterweight and flywheel, so this is a good upgrade for the 74-80 engines.
 11-26-12, 06:17 PM
#53
Thank you Mike! You explained it way better than I could, with fewer words.
Ray, follow this link Oil Pumps & Chains, Temperature & Pressure Adapters
and scroll down until you see this picture.

That is what they look like. Read the blurb. Now set up a place where you can unscrew them without messing up the shaft. I like an impact screwdriver and a soft yet firm surface. You have to protect the case hardened bearing surfaces of the shaft. It's not hard to remove these. Just take your time and pay attention to what you're doing. It's best to practice on a junk shaft that you intend to steal the checkball squirters from.
Ray, follow this link Oil Pumps & Chains, Temperature & Pressure Adapters
and scroll down until you see this picture.
That is what they look like. Read the blurb. Now set up a place where you can unscrew them without messing up the shaft. I like an impact screwdriver and a soft yet firm surface. You have to protect the case hardened bearing surfaces of the shaft. It's not hard to remove these. Just take your time and pay attention to what you're doing. It's best to practice on a junk shaft that you intend to steal the checkball squirters from.
11-27-12, 03:17 PM
#55
No pistons baby
Join Date: Feb 2011
Location: Edmonton, Alberta, Canada
Posts: 171
Likes: 0
Received 0 Likes
on
0 Posts
I have two 12a engines sitting in my garage waiting for me to tear them down. One is an 84 that had just started to smoke a bit before I pulled it at 192,000 km, and the other is an 83 with no compression on the rear rotor, unknown mileage. I have dreams if making lots of money selling good parts, but not sure if that's realistic. 
11-29-12, 10:15 AM
#56
Wow, this is a GREAT thread! Awesome pics Ray. I've learned a lot just with the one quick read through. I'm going to use a lot of this info to work on my '79. I'm thinking I have to do a teardown and rebuild but I'm not positive, but this thread gives me a lot of food for thought!
Keep up the good work, and keep the pics coming!
BTW, what does everyone use to clean the carbon and gunk off the rotors?
Thanks!
Mike
Keep up the good work, and keep the pics coming!
BTW, what does everyone use to clean the carbon and gunk off the rotors?
Thanks!
Mike
11-29-12, 10:24 AM
#57
Moderator
iTrader: (3)
Join Date: Mar 2001
Location: https://www2.mazda.com/en/100th/
Posts: 30,828
Received 2,596 Likes
on
1,844 Posts
my friend buys a plastic tray/tub and just puts the rotors in simple green/purple stuff for a week, it works really well.
11-29-12, 11:21 AM
#58
Agreed, the razor blade is a fantastic tool for this kind of thing. Instead of soaking and scraping stuff away a layer at a time, you can remove it all right down to the metal with one nicely placed scrape with the razor blade. Good call J9!
For polishing of the rotors and aluminum parts, a good buffing with a wire brush (motorized or hand powered) works well.
More pics coming, I've been crazy busy lately but hopefully this weekend I'll have time to assemble all the parts I plan to use for the rebuild and post up pictures for y'all's approval.
12-03-12, 08:19 PM
#61
James, that gasoline will blow you up. You know that, right?
So Collin, can you get me a job with NYCTA?
Anyway, welcome back to the "How to tear down and build a 12A without a shop or knowing what you're doing" thread.
Today's episode: What am I going to do with all these parts?
Update: Here's an overview of the situation:
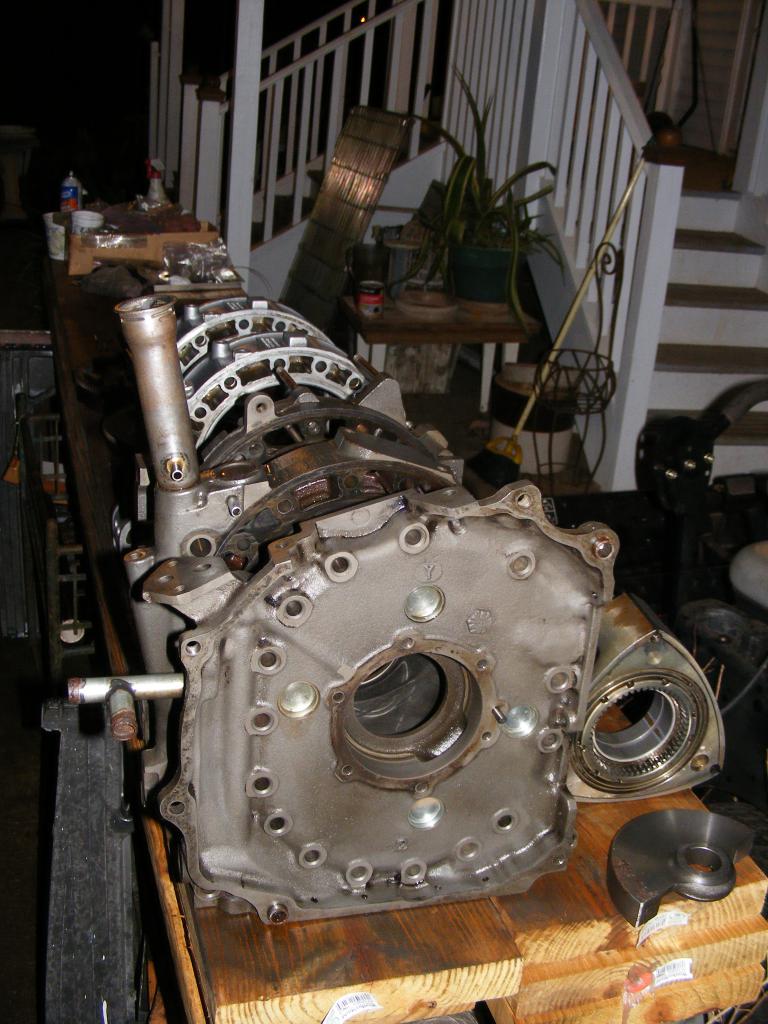
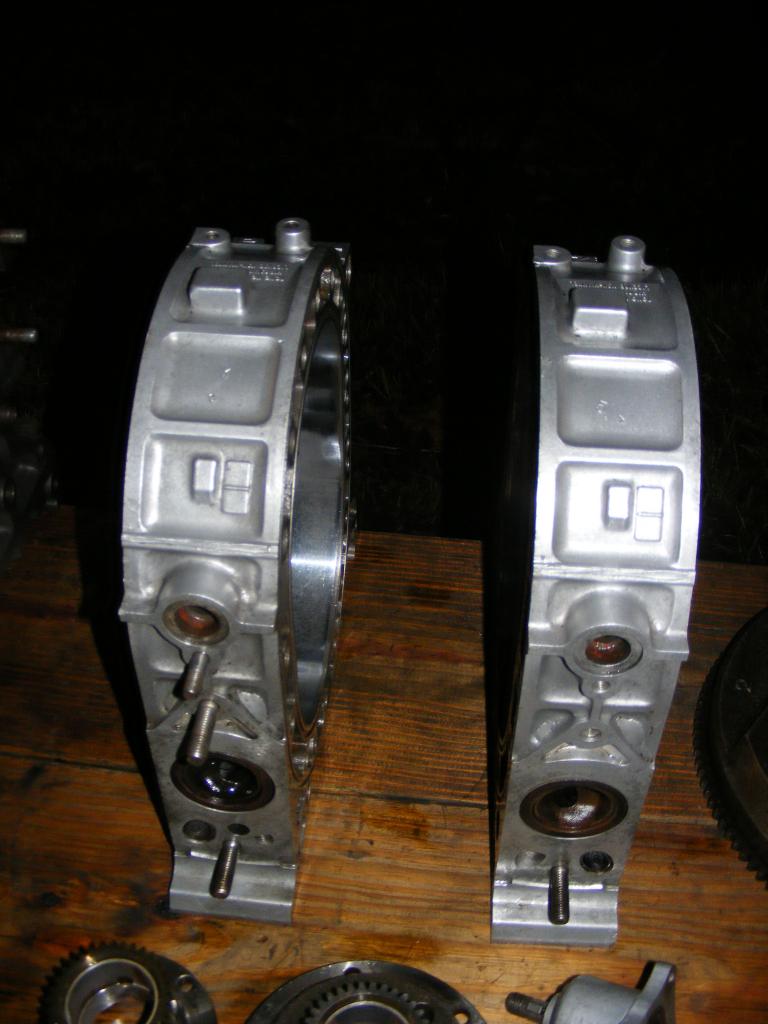
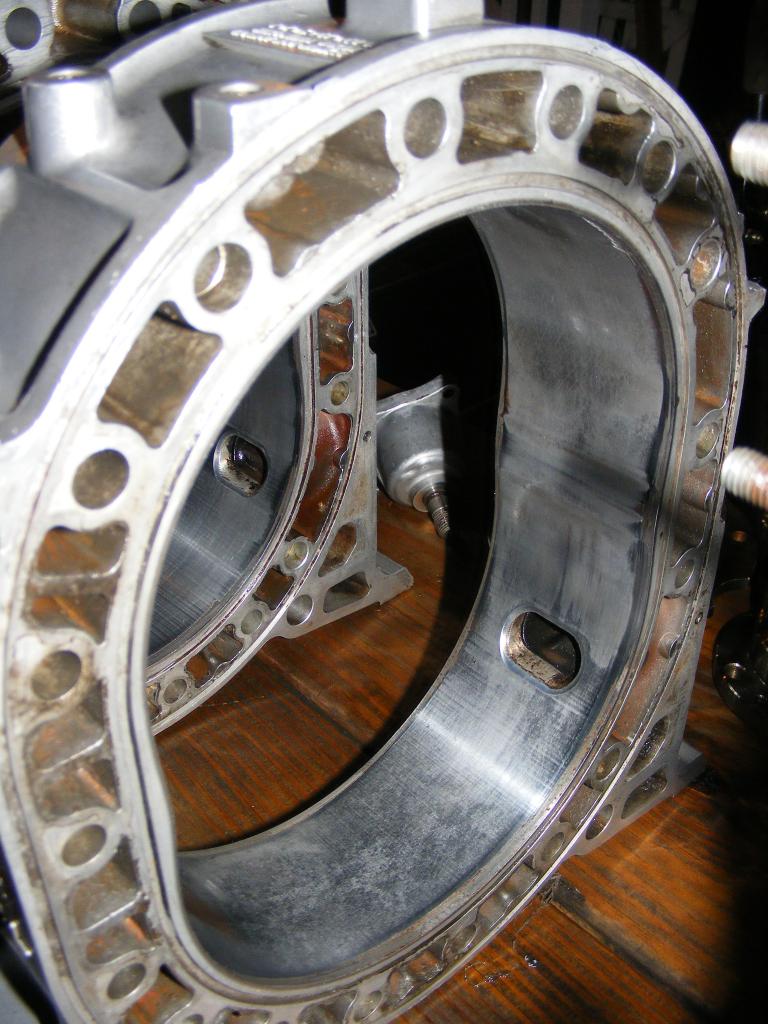
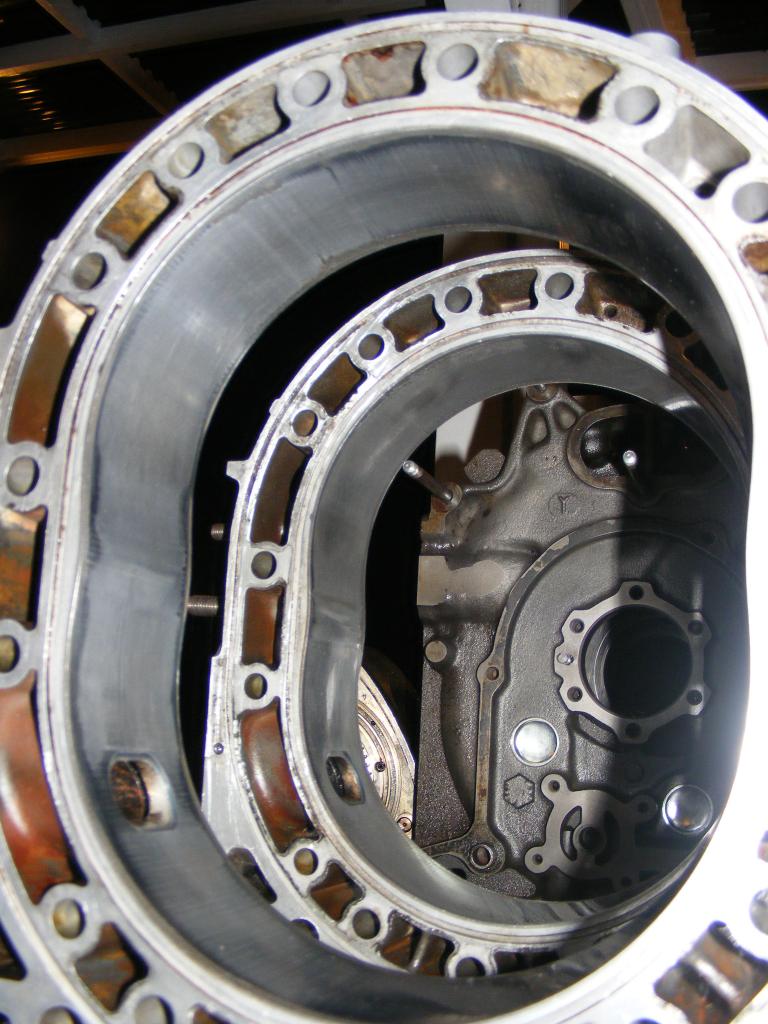
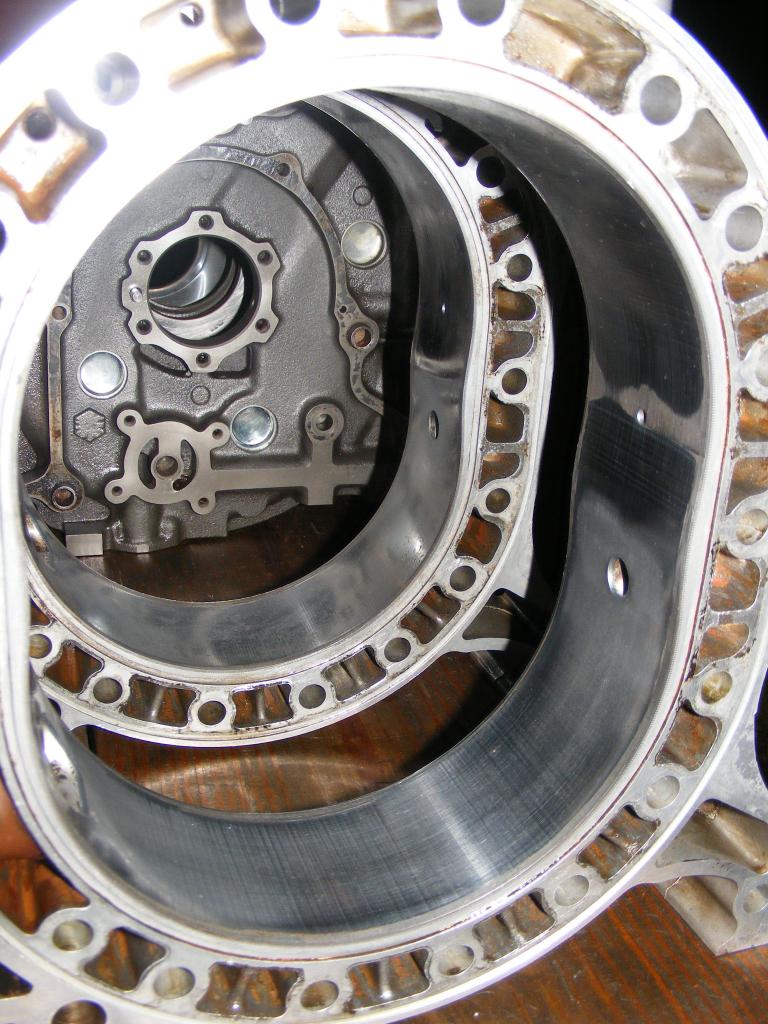
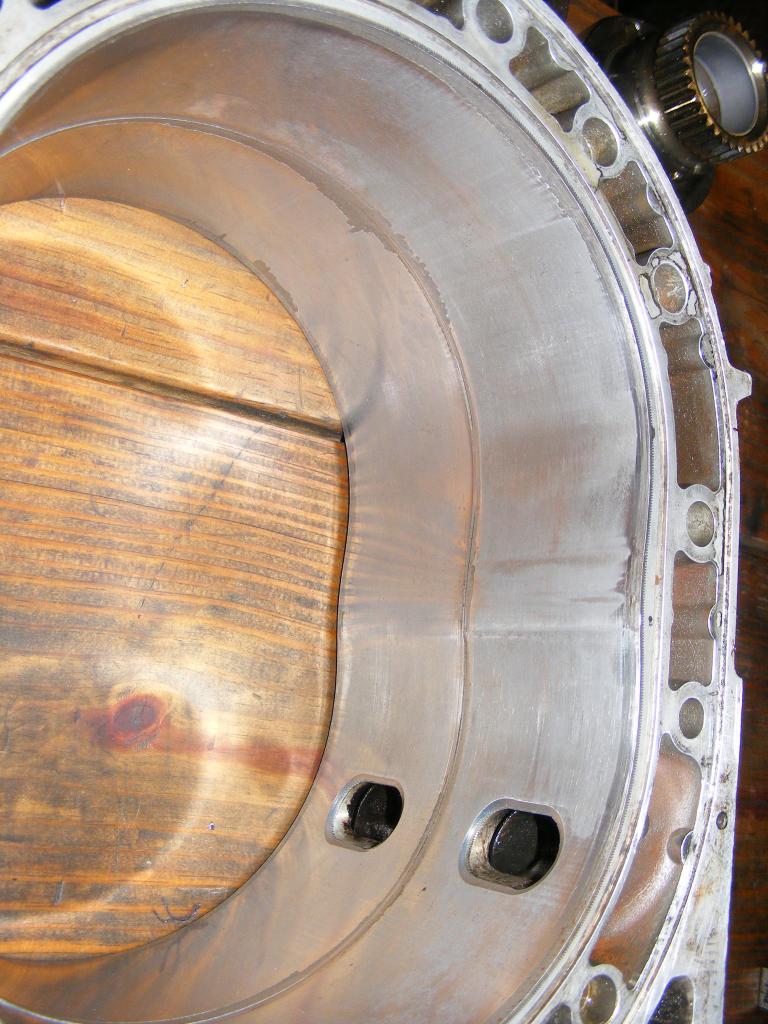
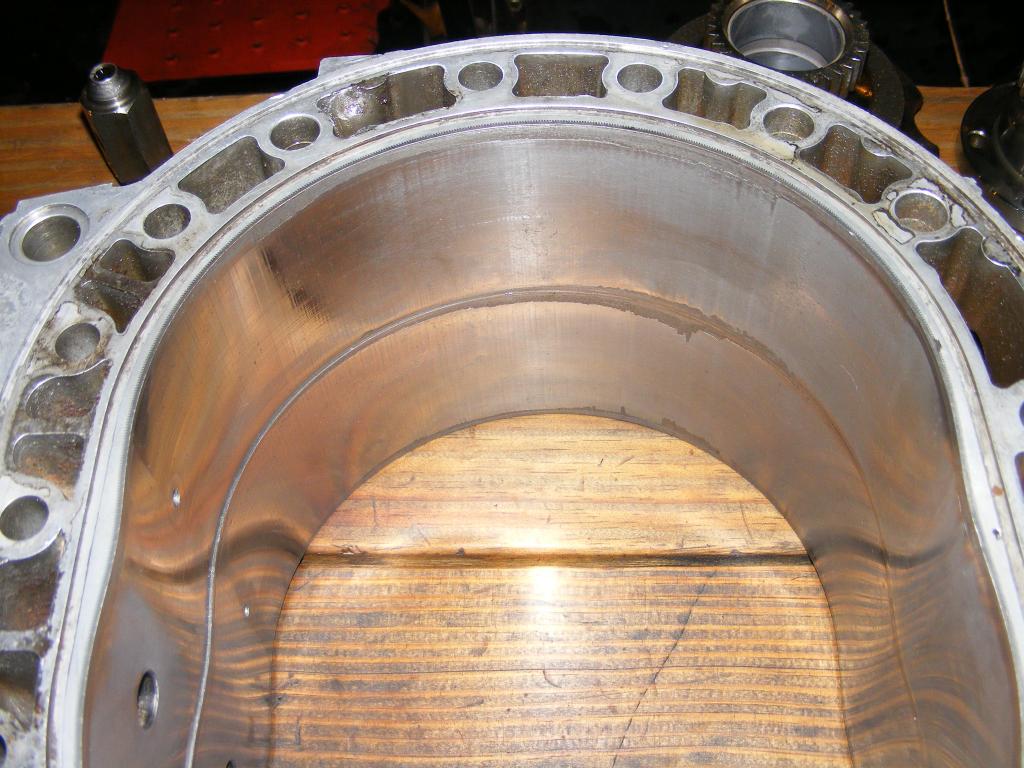
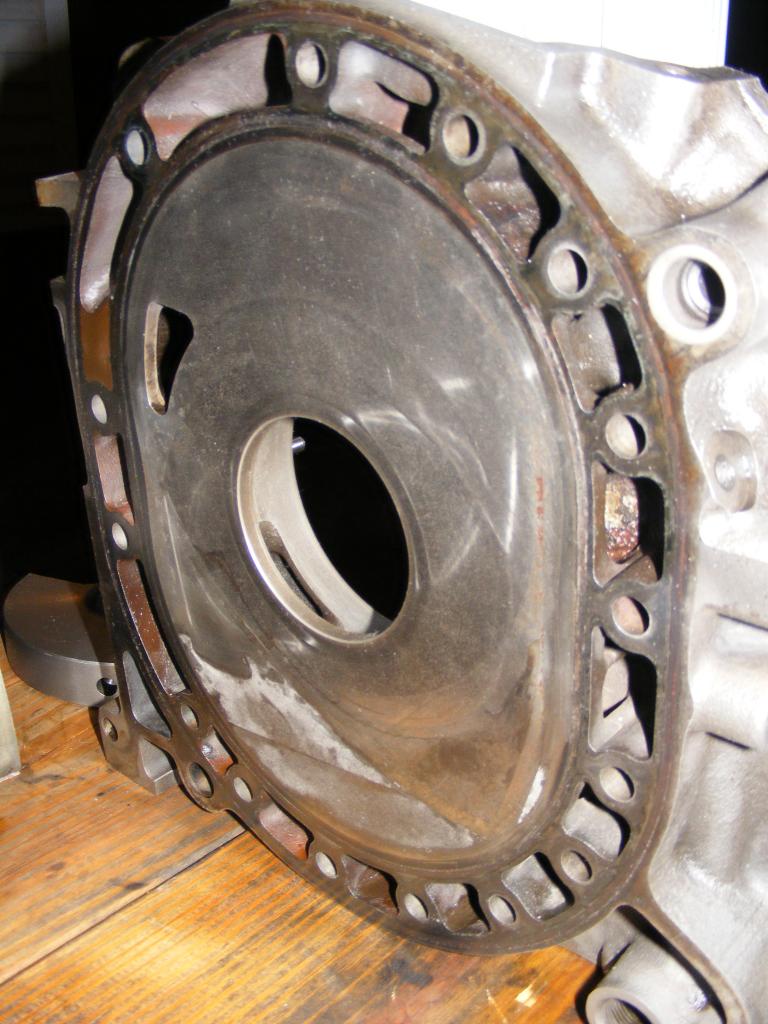
I tore down this old school 12A that I still haven't figured out where it came from. It has these weird exhaust ports, which is probably a clue:


Anybody recognize this weird friggin' early 12A?
First Question: Can I take a punch and punch those sleeves out of the exhaust ports to get better flow?
Second Question: Should I reuse these old housings with the cool oversized exhaust ports?
So Collin, can you get me a job with NYCTA?
Anyway, welcome back to the "How to tear down and build a 12A without a shop or knowing what you're doing" thread.
Today's episode: What am I going to do with all these parts?
Update: Here's an overview of the situation:
I tore down this old school 12A that I still haven't figured out where it came from. It has these weird exhaust ports, which is probably a clue:
Anybody recognize this weird friggin' early 12A?
First Question: Can I take a punch and punch those sleeves out of the exhaust ports to get better flow?
Second Question: Should I reuse these old housings with the cool oversized exhaust ports?
12-03-12, 08:21 PM
#62
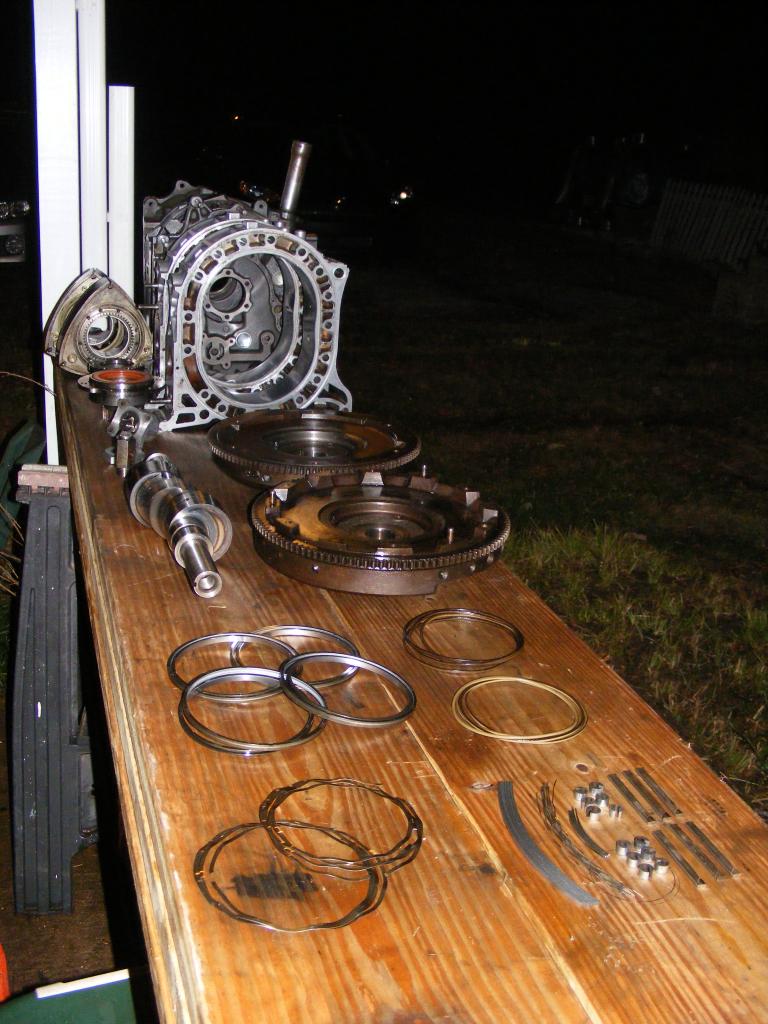
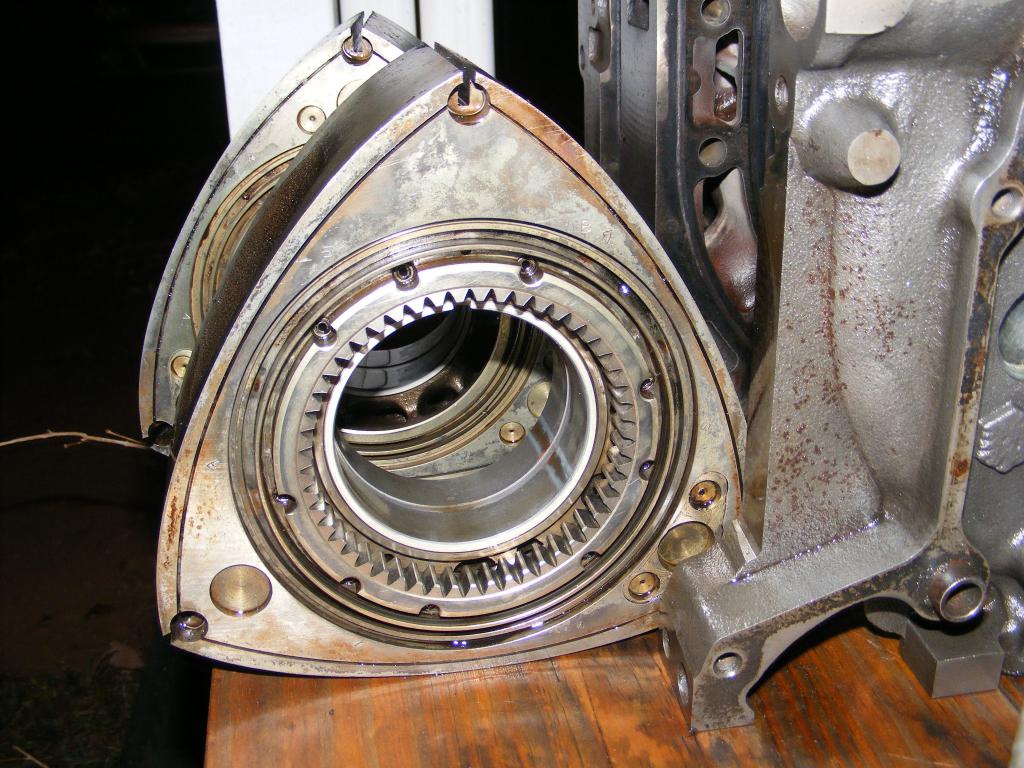
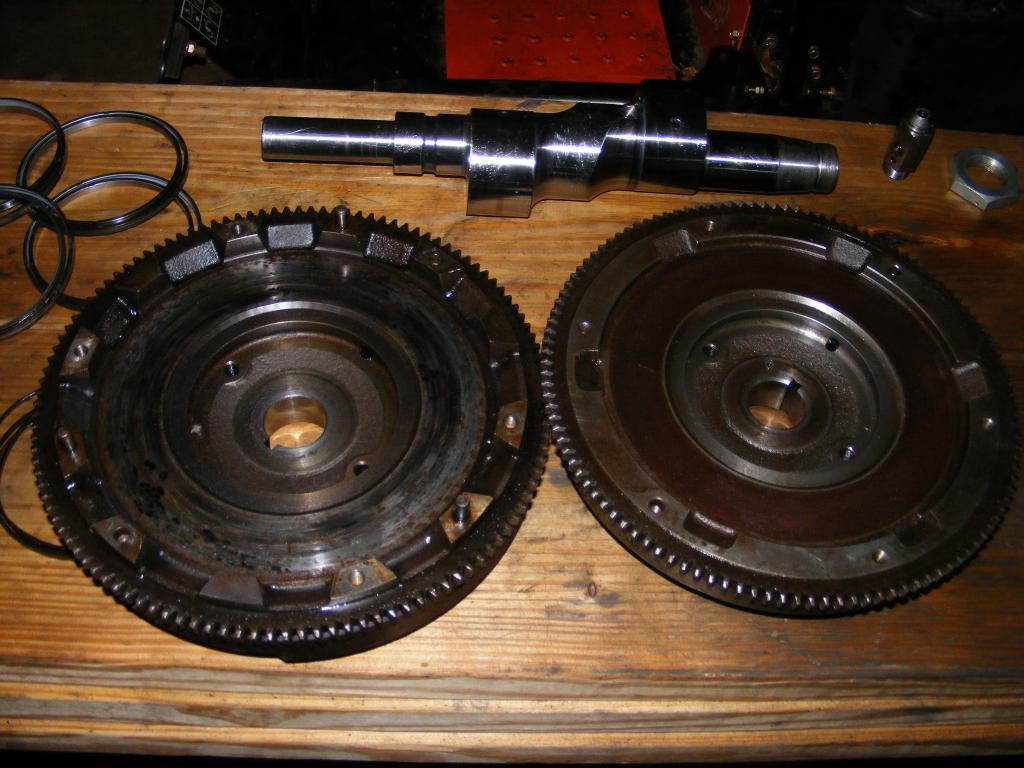
Third Question: Should I reuse these old school 12A rotors that weigh more but are in great shape and I recovered the full set of hard seals and springs (except corner) for?
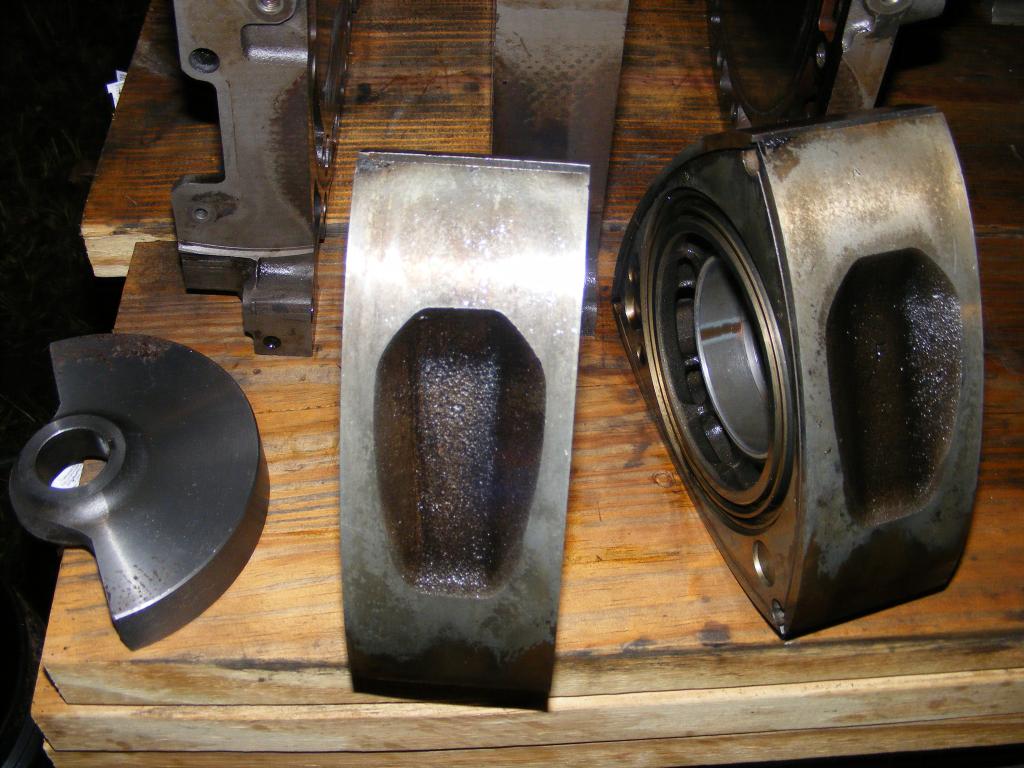

Fourth Question: Which flywheel should I use if I go with the old school heavy rotors? Lighter FB (left) or heavier SA (right)?. Will this affect the rotating assembly balance?
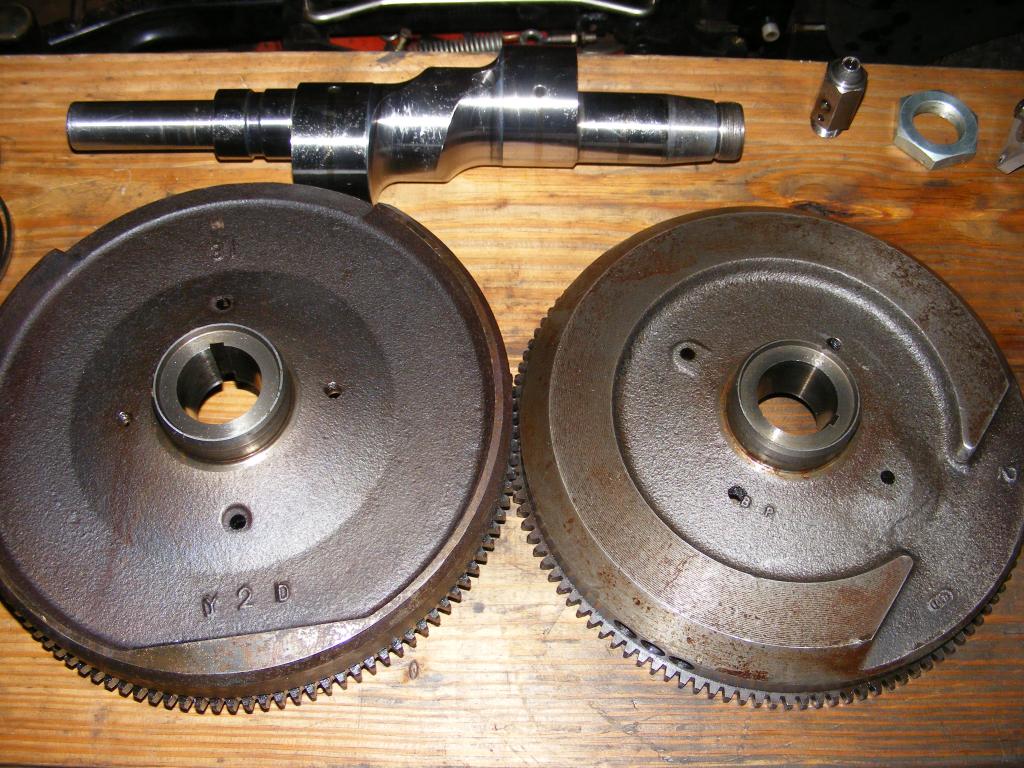

Fifth Question: Are the rotor bearings and stationary gear bearings OK?
 12-03-12, 08:23 PM
#63

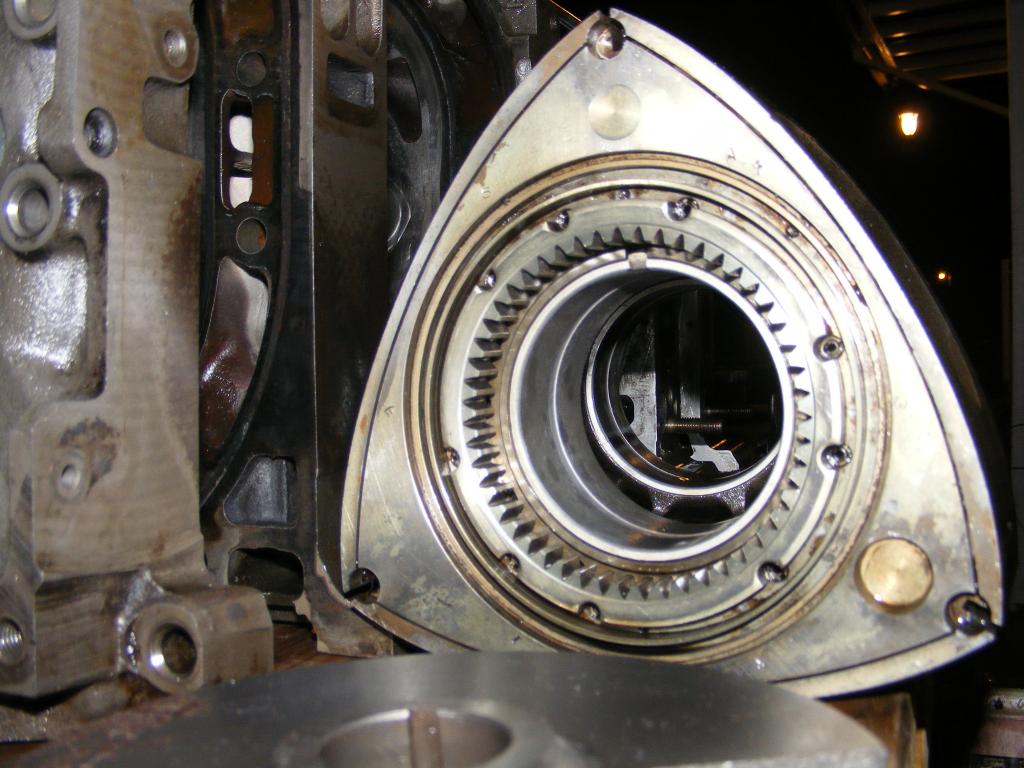
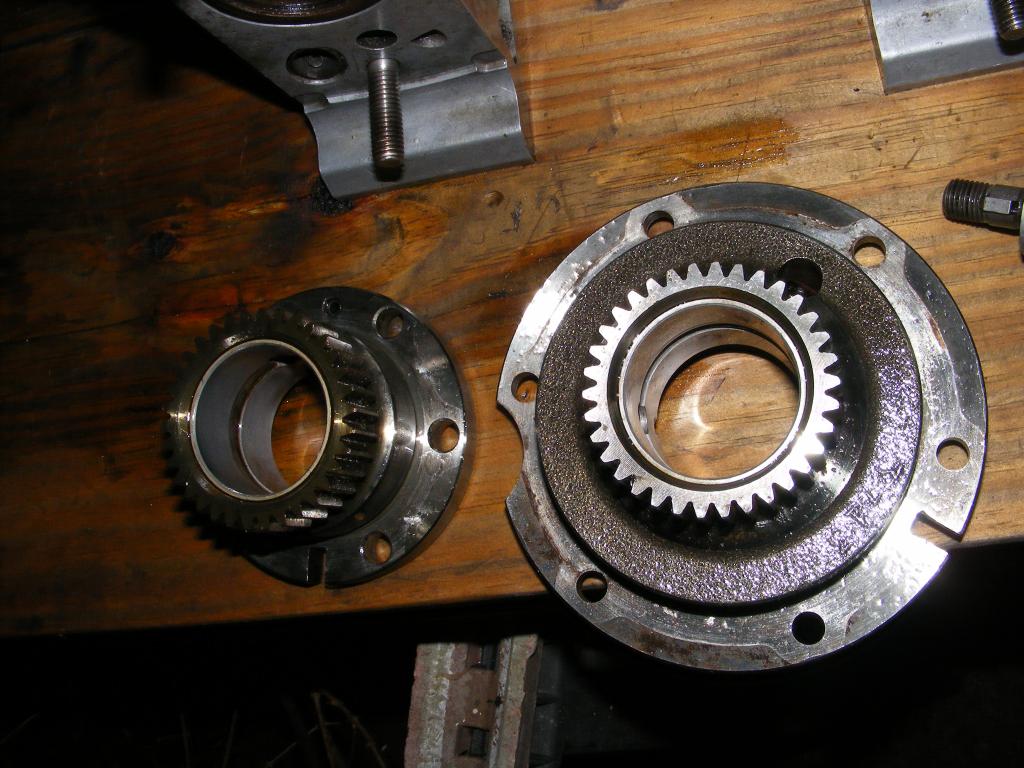
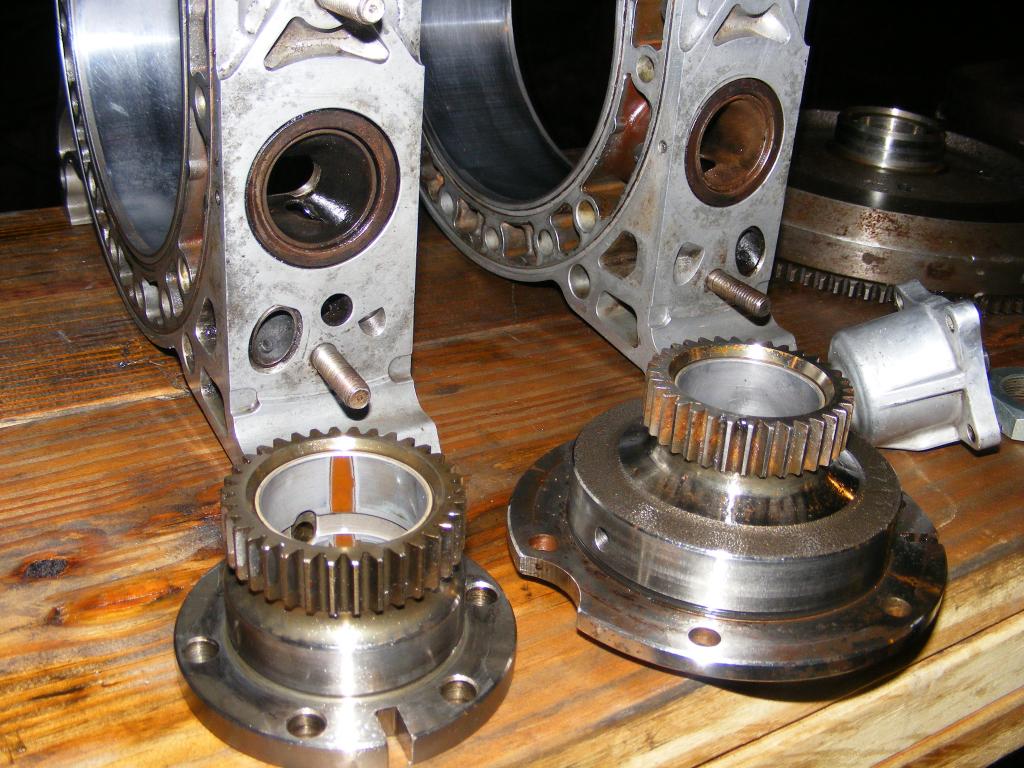
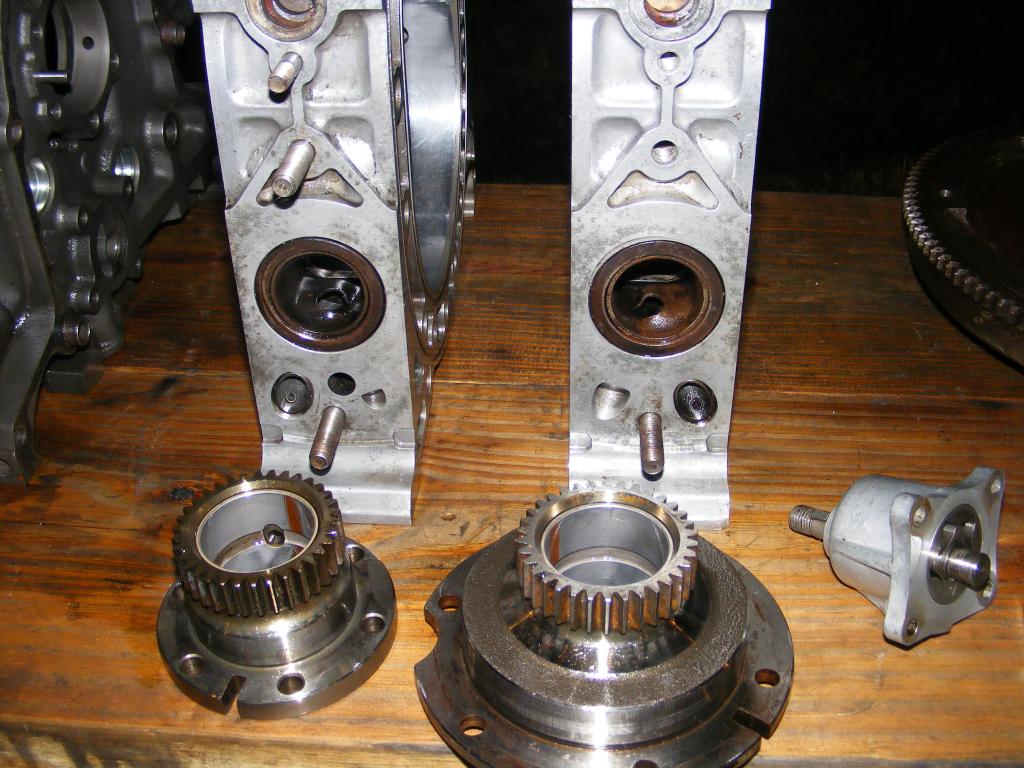
Sixth Question: Is the eshaft OK? (I know, I need to pull out and replace that butchered pilot bearing and seal).

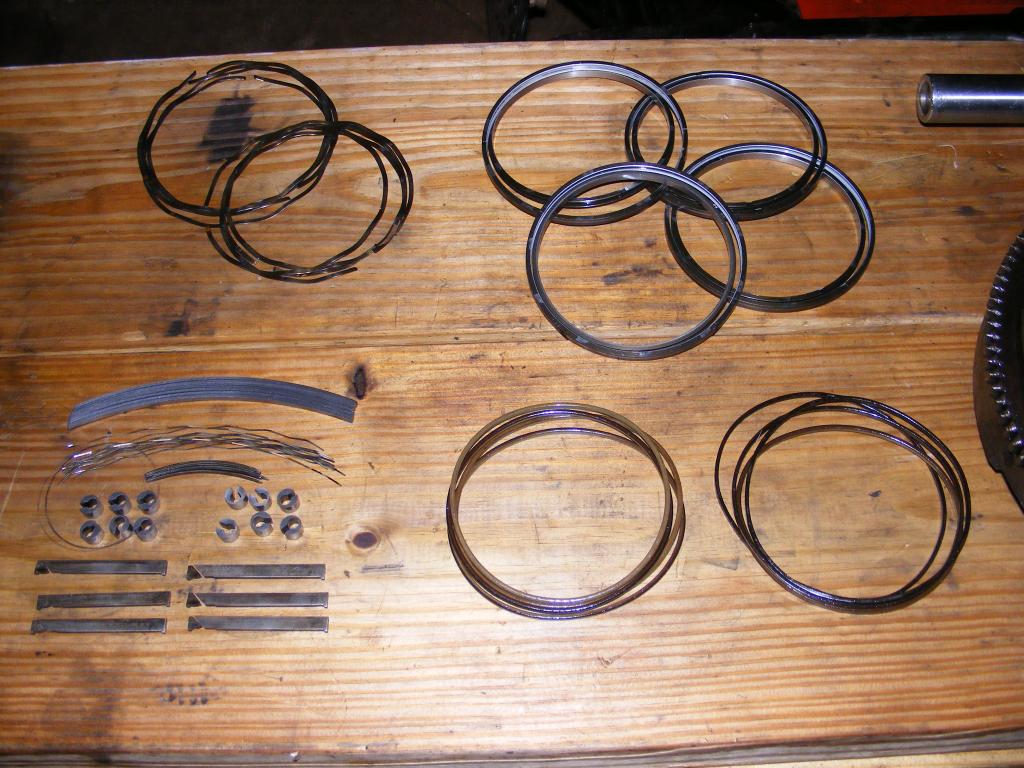
Seventh Question: Here's the FB irons I'm planning to use. They have mythical significance, since these were the irons that were in the White One when she blew an apex seal. The engine was frozen up for about a year, so the irons show some water damage from sitting in the back yard without enough attention. But they also show imprints of the White One's rotors in the nitride surfaces. I can't see how having the Ghost of the White One inside the engine can hurt.
Ninth Question: Here's my best set of used apex seals and springs, the only ones that meet the 7 mm criteria, and the side seals and springs from the old school 12A tear down that fit those old school heavy rotors. I think they'll work. What'd think?
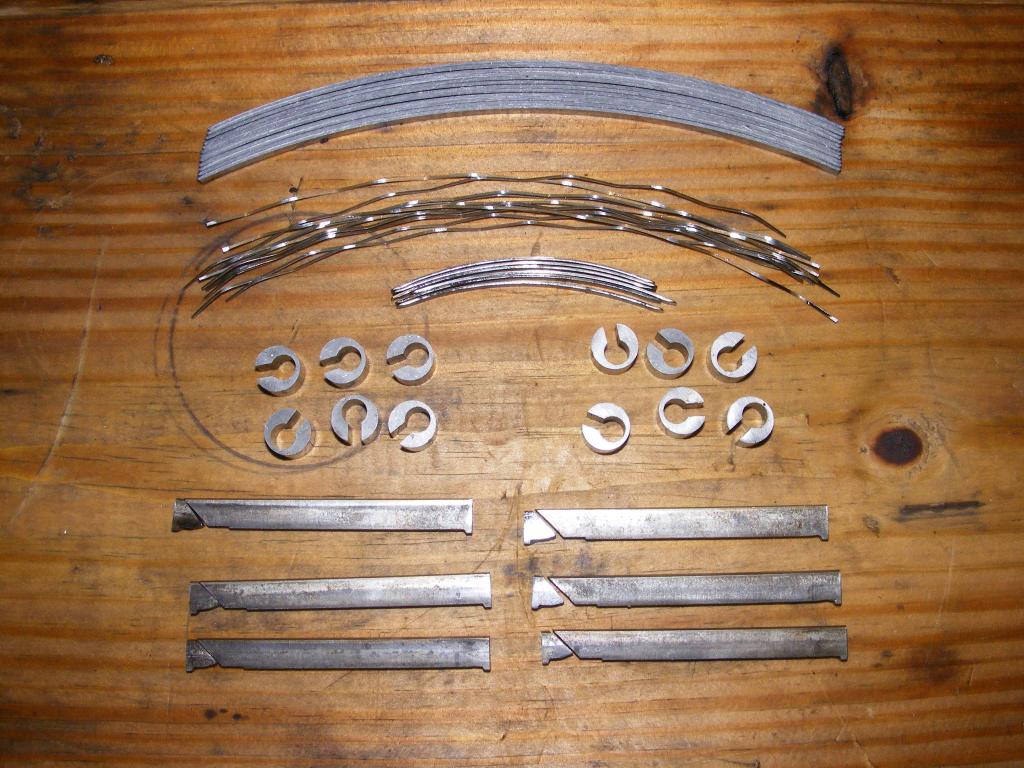
Tenth Question: Should I just buy the atkins kit with the springs and rotor seals or without the springs and rotor seals and use my old ones (I have a full set of springs, and the rotor O rings, all in decent shape, except the corner seal springs, which I'd have to buy)
Here's what I've got:
Atkins with springs ($300):

Atkins without springs ($118.75):

Thanks for the help folks!
12-03-12, 08:57 PM
#65
It all adds up James, $30 here, $30 there. I'm thinking of this as a "practice" rebuild, it doesn't need to last forever. What doesn't work on this one, I won't do on the next one.
Besides, I've got all these parts, might as well use them, right?
Besides, I've got all these parts, might as well use them, right?
12-03-12, 09:38 PM
#67
Piston engines seem (at least to me) to be more rugged. Rotaries need more perfection, at least it seems.
Gonna re-use them. Then match them to their respective E-shaft (I heard that somewhere) :P
As for practice builds... You will get hella good at rebuilding and pulling the engine. Now I can go from a running (blown coolent seals/carbon fould rotors) to a rebuilt/new seals engine installed in 16hours. Last time I clocked myself on the security camera. I can number the head bolt torque sequence in my sleep.
At least I can take solice in the fact that ANY problem I may encounter with the 7 will only put me off the road for 16 hours tops!

Although, I've never had any issues out of my 4 stroke rebuilt engines so I haven't the same practice; I think it is faster to rebuild the rotary than a 4 stroker. Two smokies are different; nothing is faster than a smoker build (yet nothing breaks faster than a smoker)!!!
12-04-12, 08:54 AM
#68
Yep, by the third 12A rebuild I figure I'll know what I'm doing.
Jeff, I'm still unclear on a couple things, mainly about the rotor housings.
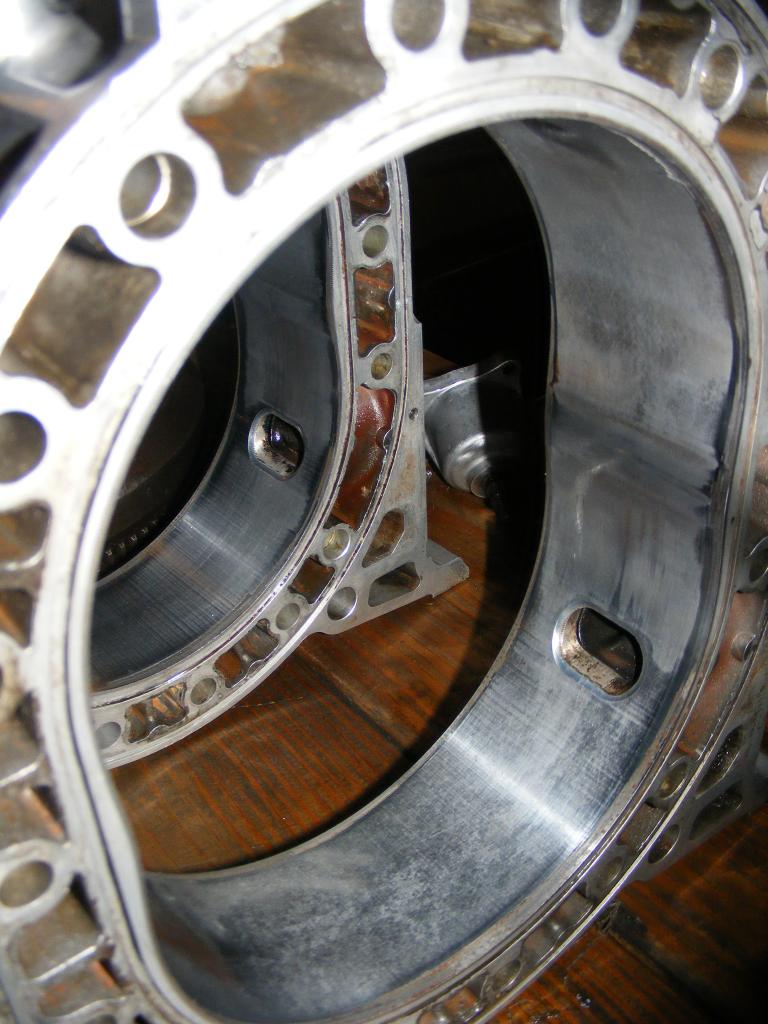
First, what specifically was the source of this version of the 12A, with those weird sleeves inserted in the exhaust ports? I'm guessing SA but those exhaust ports are not looking like the SA exhaust ports I've seen in other pictures, or like anything else, for that matter. And can the sleeves be removed and if so, is this a good idea?
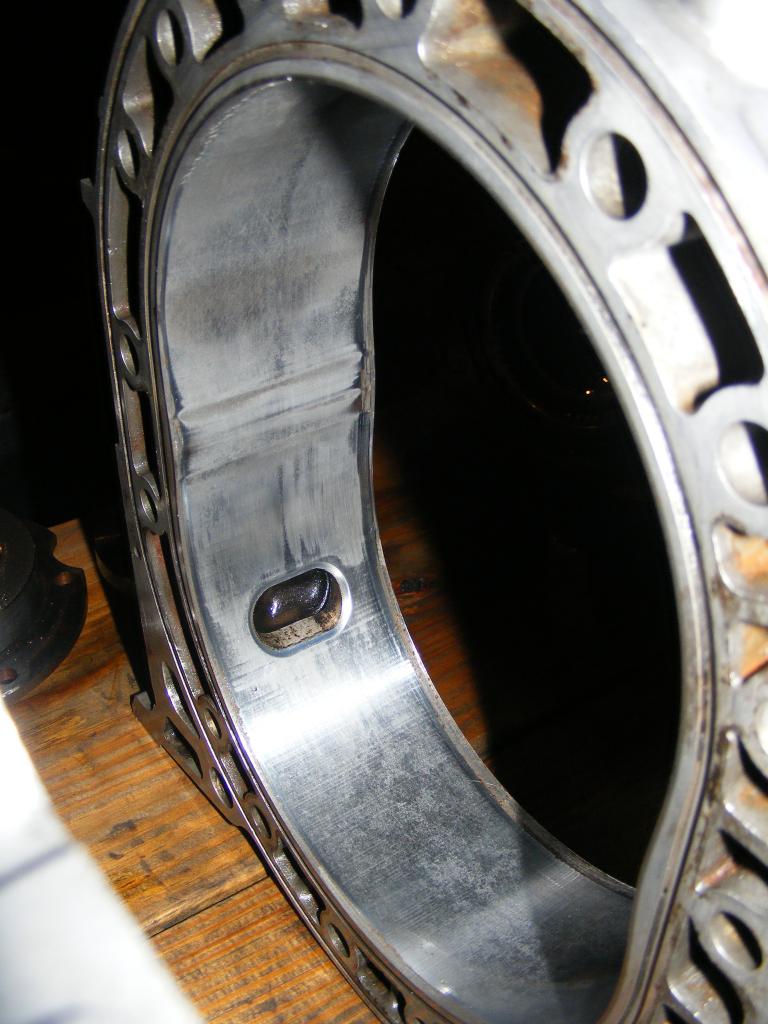
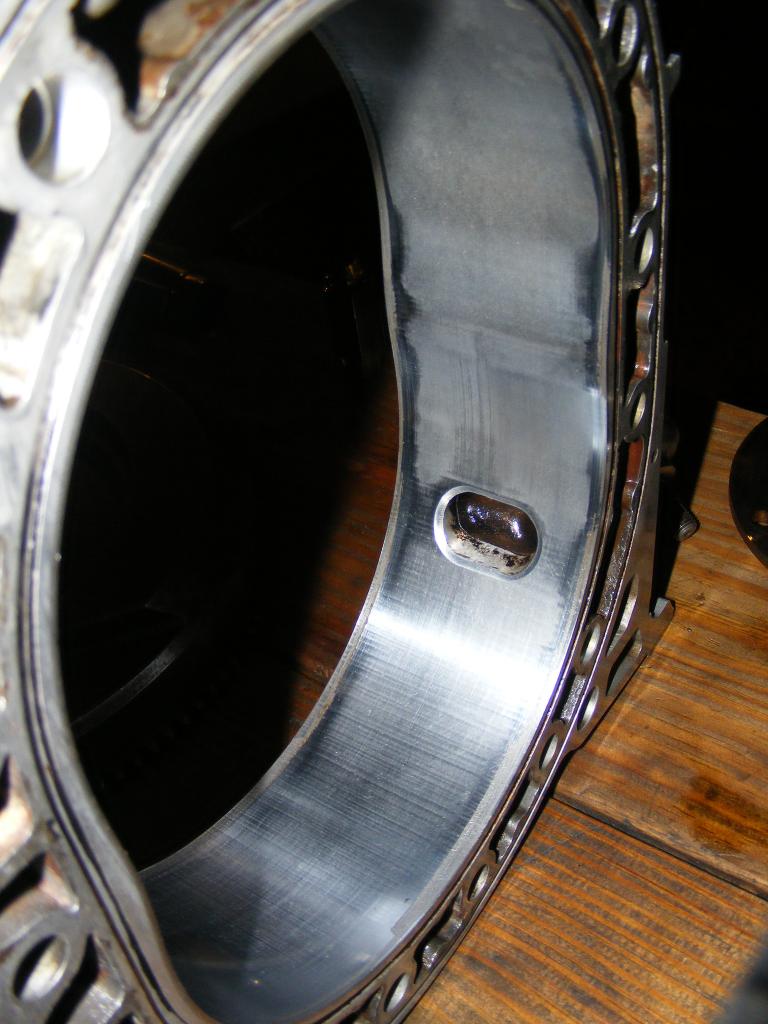
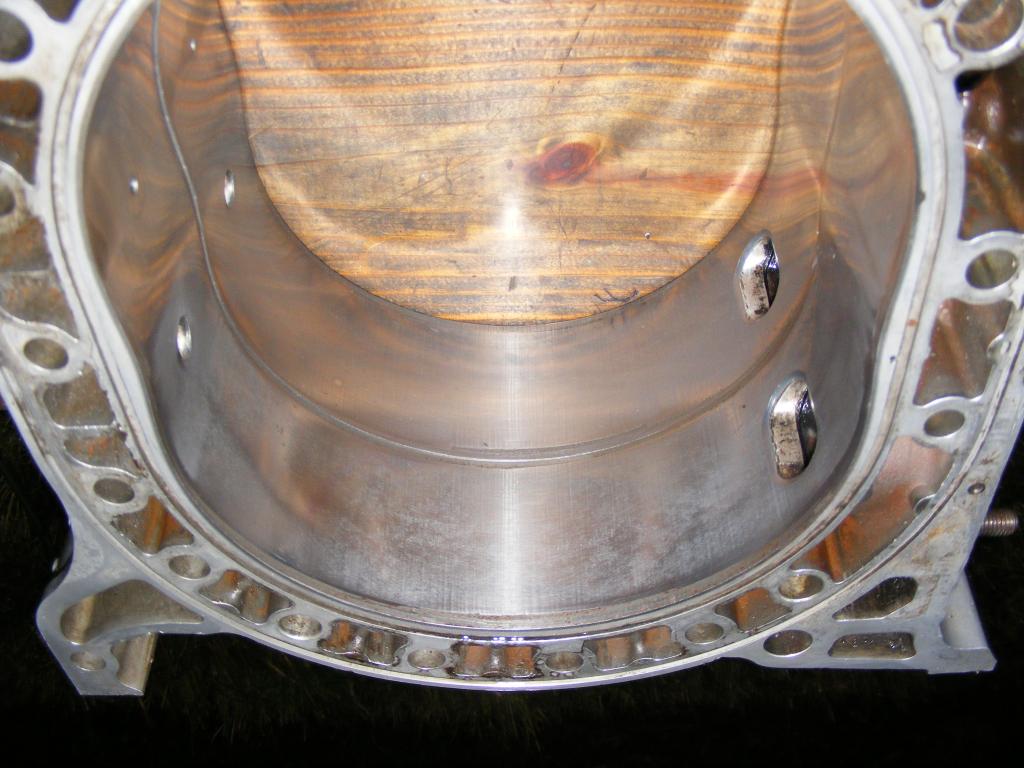
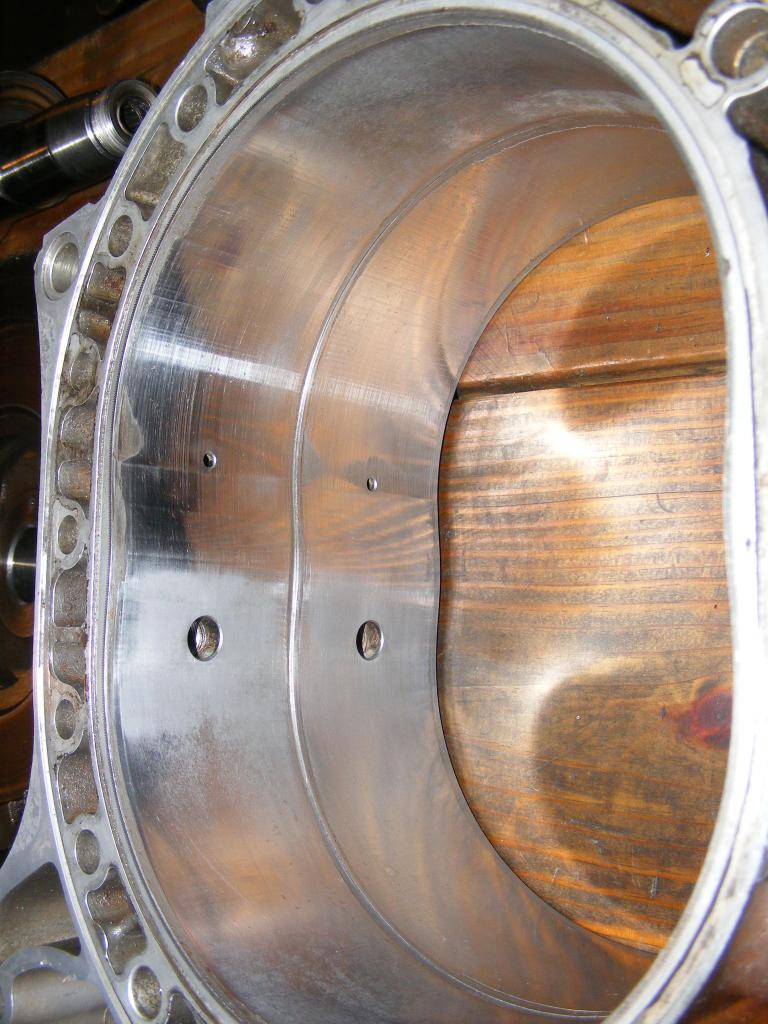
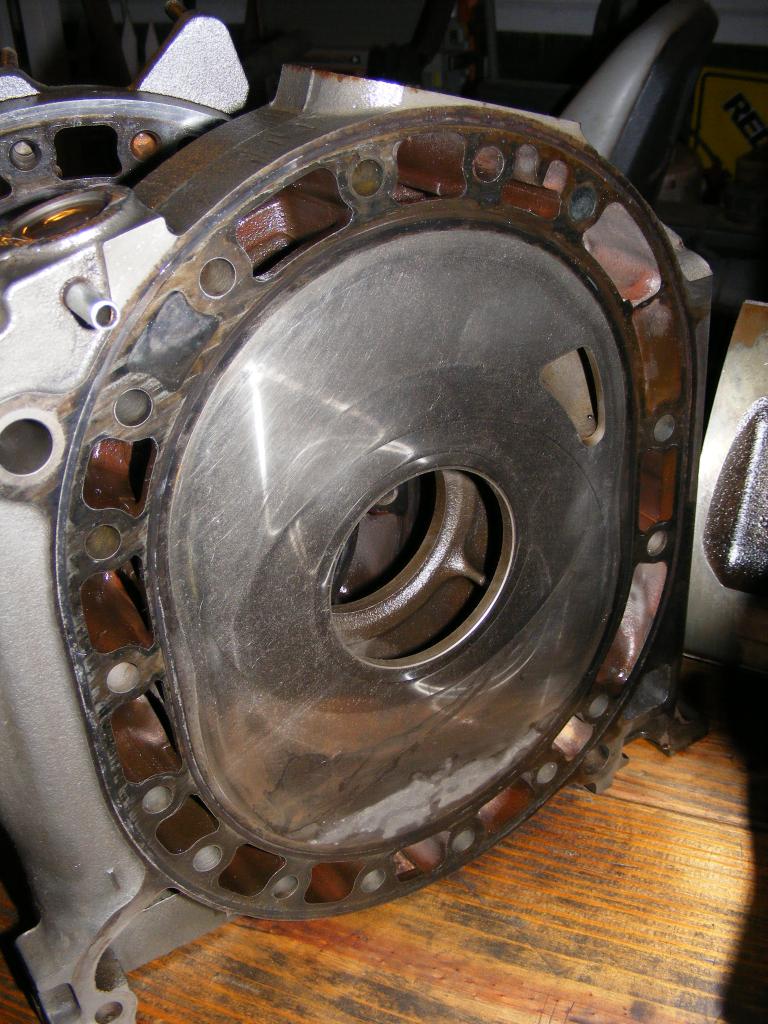
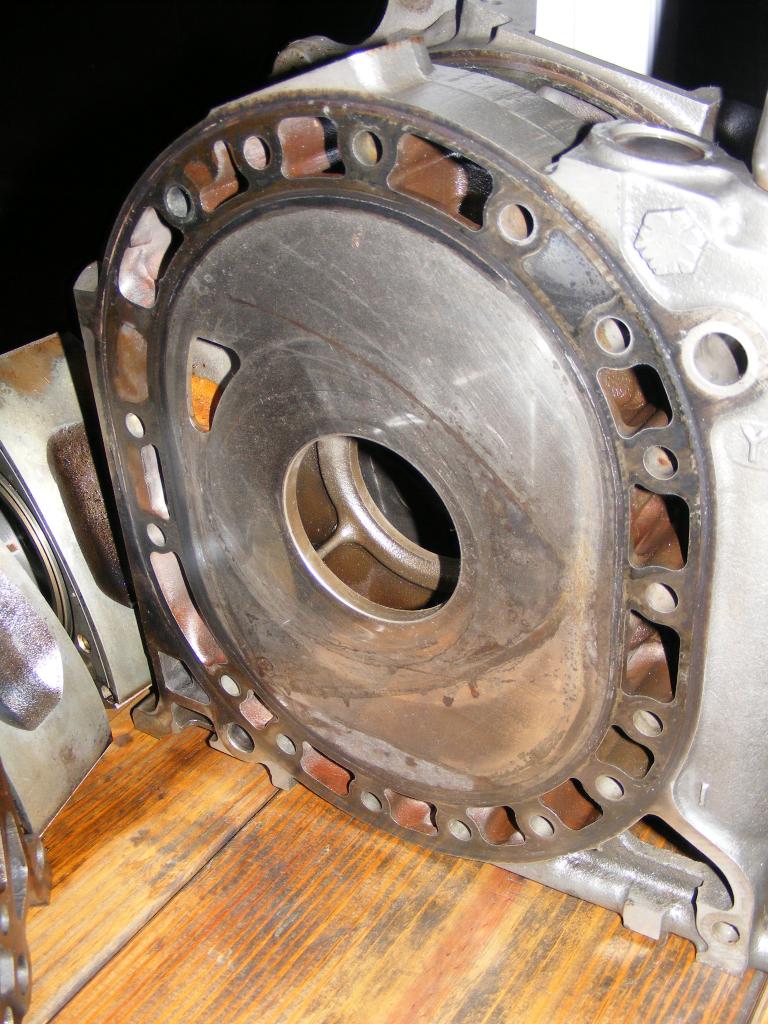
Also on the rotor housings, I know you said those over sized exhaust ports are a good idea, but what about the condition of the chrome? There's a bit of flaking up near the top of both housings that may be pushing the limits (but remember, I'm not looking for perfection this time around, just experience and hopefully an engine that will last a few, maybe 10,000 miles. Here's the more serious flaking I'm talking about:

Also, are the flywheels simply interchangeable and don't factor into the balance of the rotating assembly? If so, the lighter FB flywheel would seem to be a good substitution for the heavier SA flywheel, if there are any other significant differences (they do look quite a bit different)

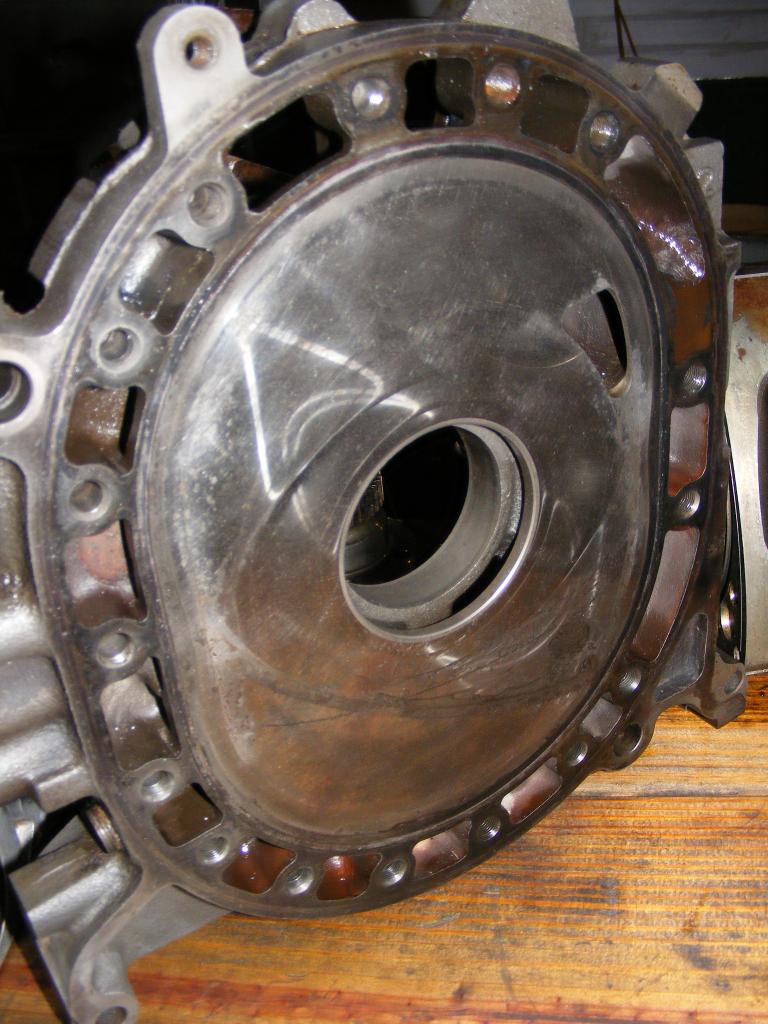
As far as the bearings go, I need to match the original eshaft to the original rotor bearings (done) but also to the original stationary gear bearings, which are not the ones in the pictures. I'll need to retrieve those stationary gears from the R5 end plates so the rotating assembly and bearings are all from the same source.
And yes, I'll be going with the atkins rebuild kit that includes the springs for an added $200, no sense skimping on those and there's a few other goodies in there too I'll need, those rubber insets for the corner seals and the corner seal springs, etc.
Again, thanks folks for the suggestions.
Jeff, I'm still unclear on a couple things, mainly about the rotor housings.
First, what specifically was the source of this version of the 12A, with those weird sleeves inserted in the exhaust ports? I'm guessing SA but those exhaust ports are not looking like the SA exhaust ports I've seen in other pictures, or like anything else, for that matter. And can the sleeves be removed and if so, is this a good idea?
Also on the rotor housings, I know you said those over sized exhaust ports are a good idea, but what about the condition of the chrome? There's a bit of flaking up near the top of both housings that may be pushing the limits (but remember, I'm not looking for perfection this time around, just experience and hopefully an engine that will last a few, maybe 10,000 miles. Here's the more serious flaking I'm talking about:
Also, are the flywheels simply interchangeable and don't factor into the balance of the rotating assembly? If so, the lighter FB flywheel would seem to be a good substitution for the heavier SA flywheel, if there are any other significant differences (they do look quite a bit different)
As far as the bearings go, I need to match the original eshaft to the original rotor bearings (done) but also to the original stationary gear bearings, which are not the ones in the pictures. I'll need to retrieve those stationary gears from the R5 end plates so the rotating assembly and bearings are all from the same source.
And yes, I'll be going with the atkins rebuild kit that includes the springs for an added $200, no sense skimping on those and there's a few other goodies in there too I'll need, those rubber insets for the corner seals and the corner seal springs, etc.
Again, thanks folks for the suggestions.
12-04-12, 10:39 AM
#69
Moderator
iTrader: (3)
Join Date: Mar 2001
Location: https://www2.mazda.com/en/100th/
Posts: 30,828
Received 2,596 Likes
on
1,844 Posts
Ray,
those rotor housings are totally fine for 10,000 miles, and really you don't have much choice. i've put more miles on worse, and so have you, probably.
the flywheels do factor in to the balance, so you need to keep the rotating assembly together. you could find an 81-82 flywheel, that one is lighter and its got the right balance for the old rotors
12-04-12, 11:38 AM
#70
Ray, whatever you do, don't follow that Qingdao guy's advice. He's pro-piston anti-rotary now. lol :p
You asked about the rotor housings. I told you they came from a J-spec car. My best guess is an HB Cosmo or HC Luce.
Can the weird inner sleeves come out? No clue.
The missing chrome is fine. Atkins apex seals are ideal for this.
I don't like the off-yellow Atkins intake gaskets. This type of paper never works very well - more susceptable to coolant soaking if you have a tiny o-ring leak at the coolant ports and they get stuck and become harder to remove over a short time. RB sells this type as well. I get my gaskets from Mazdatrix. The proper blue-green paper.
Sounds like you're starting to understand that the stat gears need to be kept with the e-shaft and rotors they came stock with. But you still haven't gotten into the oil squirters. These determine how much oil pressure you have at idle.
Now I'm confused. I don't see an 81-82 flywheel or front counterweight in your pictures. Which rotors are you going to use in this build, anyway?
By the way some years didn't come stock with the rubber plugs. You don't need them. But if you get the Atkins kit, go ahead and use them.
You asked about the rotor housings. I told you they came from a J-spec car. My best guess is an HB Cosmo or HC Luce.
Can the weird inner sleeves come out? No clue.
The missing chrome is fine. Atkins apex seals are ideal for this.
I don't like the off-yellow Atkins intake gaskets. This type of paper never works very well - more susceptable to coolant soaking if you have a tiny o-ring leak at the coolant ports and they get stuck and become harder to remove over a short time. RB sells this type as well. I get my gaskets from Mazdatrix. The proper blue-green paper.
Sounds like you're starting to understand that the stat gears need to be kept with the e-shaft and rotors they came stock with. But you still haven't gotten into the oil squirters. These determine how much oil pressure you have at idle.
Now I'm confused. I don't see an 81-82 flywheel or front counterweight in your pictures.
Which rotors are you going to use in this build, anyway?By the way some years didn't come stock with the rubber plugs. You don't need them. But if you get the Atkins kit, go ahead and use them.
12-04-12, 12:36 PM
#71
Yeah, I know. James is a great guy, he's the one who gave me the R5 12A, he took the passenger seat out of his SA and put the engine in there, brought it all the way from Charleston to Atlanta (about 6 hours) and went back with a rear axle and a bunch of other parts. Very creative Dude.
But he also likes to drive around on two wheels, an activity I've always considered a serious lack of judgement (having nearly killed myself on one when I was his age). The good news is that even though he likes pistons, he has the good sense to prefer 2 strokes over 4 strokes, and he's young. He may come over to the Dark Side yet.
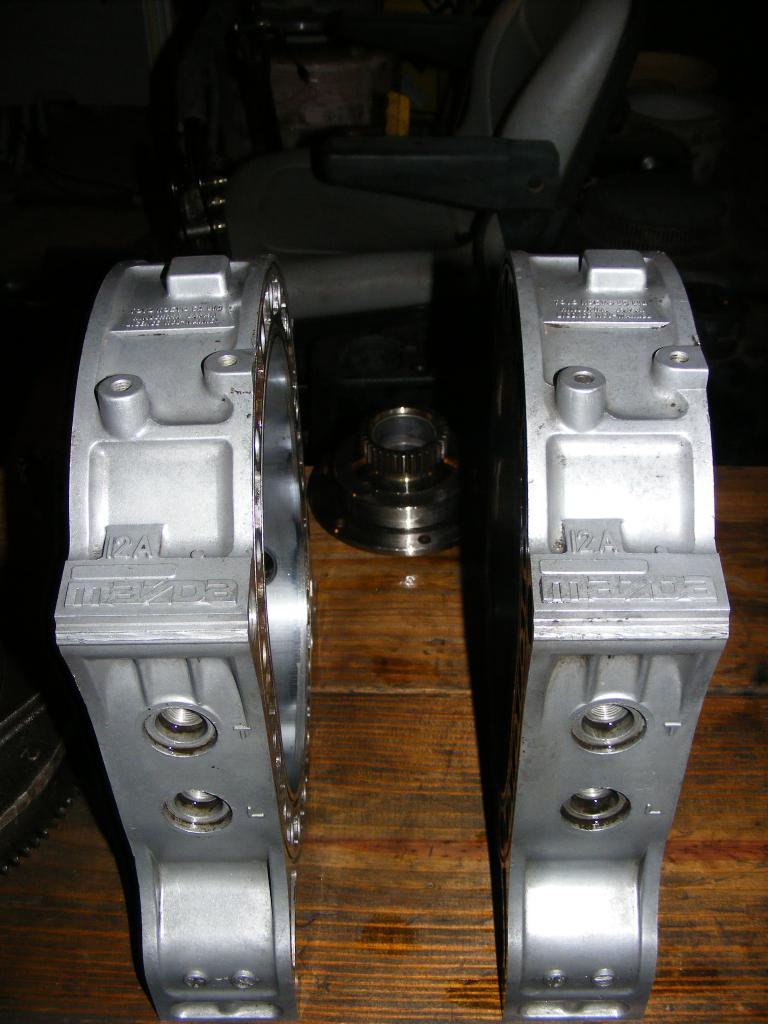
Thanks J9 for your impression on those rotor housings, I was hoping someone who knows better than me would also think they deserve another chance to wankel. Compared with the flaking I've seen on just about every rotor housing I've recovered from the other four 12A tear downs (one good housing out of 8, and including very crappy looking housings that came from 12As that were running quite nicely when parked) the surfaces on the housings from this R5 engine are much smoother, more like wear than flaking, so I think the apex seals will find a good home.
Also on the flywheels, I recall now that you, and maybe Jeff too mentioned the 81-82 flywheel is compatible with the old rotors, which I see now means that they counterbalance each other correctly (but the newer FB flywheels don't - I'm guessing from Jeff's comment that one in the picture is one of the newer ones). I'd prefer at this point to use the old rotors and matching rotating assembly for this "practice" build and save the newer, lighter rotors and matching rotating assemblies for my future builds, although I'm still open to moving up to the lighter assemblies now.
I've got three more flywheels in addition to those in the pics, but I don't know what year engines they came from. Is there any easy way to identify an 81-82 flywheel? Maybe I'll get lucky and have one of those. If not it looks like I need to stick with the heavier flywheel that came out of the R5 engine if I want to stick with the R5 rotors and rotating assembly, eshaft, bearings and all.
I also like the idea of using those R5 rotors for this build because 1) I have all the side seals for them and 2) they're in great shape and I'd like to see them used. Also the rotor bearings look better than some of the others, good enough for another go around without replacement. That R5 engine apparently was a relatively low mileage unit, everything about it was in better shape than the other 4 tear downs from FB 12As.
Jeff I'll take your advice on the gaskets and check with Mazdatrix on those. Also I hear you about using the Atkins apex seals because they will break in better with those R5 housings, but for the $220 investment would they really be that much better than those used ones I pulled from one of the other tear downs, shown in the pic above? I'm figuring since the rotor housings are probably going to have a limited lifetime there's not much advantage in putting new apex seals in, but maybe I'm not seeing this right. Another $220 isn't that much to spend if it would make a better engine.
Finally thanks for clearing up the origins of the R5 engine, now I see what you mean by "J spec" - "Japan spec", a car built for sale in Japan, right? I tend to forget that 12As were put in Mazdas that weren't RX-7s.
So does anybody know what to do about those weird sleeves in the exhaust ports? Can I pop them out, and should I?
Added note: I just found this on wikipedia, about 12As
"Early 12A engines also feature a thermal reactor, similar to the 0866 10A, and some use an exhaust port insert to reduce exhaust noise. A lean-burn version was introduced in 1979 (in Japan) and 1980 (in America) which substituted a more-conventional catalytic converter for this "afterburner". A major modification of the 12A architecture was the 6PI which featured variable induction ports."
So maybe those sleeves are there to reduce exhaust noise? Doesn't sound like a very good idea for an RX-7, but maybe makes better sense in a Luce.
But he also likes to drive around on two wheels, an activity I've always considered a serious lack of judgement (having nearly killed myself on one when I was his age). The good news is that even though he likes pistons, he has the good sense to prefer 2 strokes over 4 strokes, and he's young. He may come over to the Dark Side yet.
Thanks J9 for your impression on those rotor housings, I was hoping someone who knows better than me would also think they deserve another chance to wankel. Compared with the flaking I've seen on just about every rotor housing I've recovered from the other four 12A tear downs (one good housing out of 8, and including very crappy looking housings that came from 12As that were running quite nicely when parked) the surfaces on the housings from this R5 engine are much smoother, more like wear than flaking, so I think the apex seals will find a good home.
Also on the flywheels, I recall now that you, and maybe Jeff too mentioned the 81-82 flywheel is compatible with the old rotors, which I see now means that they counterbalance each other correctly (but the newer FB flywheels don't - I'm guessing from Jeff's comment that one in the picture is one of the newer ones). I'd prefer at this point to use the old rotors and matching rotating assembly for this "practice" build and save the newer, lighter rotors and matching rotating assemblies for my future builds, although I'm still open to moving up to the lighter assemblies now.
I've got three more flywheels in addition to those in the pics, but I don't know what year engines they came from. Is there any easy way to identify an 81-82 flywheel? Maybe I'll get lucky and have one of those. If not it looks like I need to stick with the heavier flywheel that came out of the R5 engine if I want to stick with the R5 rotors and rotating assembly, eshaft, bearings and all.
I also like the idea of using those R5 rotors for this build because 1) I have all the side seals for them and 2) they're in great shape and I'd like to see them used. Also the rotor bearings look better than some of the others, good enough for another go around without replacement. That R5 engine apparently was a relatively low mileage unit, everything about it was in better shape than the other 4 tear downs from FB 12As.
Jeff I'll take your advice on the gaskets and check with Mazdatrix on those. Also I hear you about using the Atkins apex seals because they will break in better with those R5 housings, but for the $220 investment would they really be that much better than those used ones I pulled from one of the other tear downs, shown in the pic above? I'm figuring since the rotor housings are probably going to have a limited lifetime there's not much advantage in putting new apex seals in, but maybe I'm not seeing this right. Another $220 isn't that much to spend if it would make a better engine.
Finally thanks for clearing up the origins of the R5 engine, now I see what you mean by "J spec" - "Japan spec", a car built for sale in Japan, right? I tend to forget that 12As were put in Mazdas that weren't RX-7s.
So does anybody know what to do about those weird sleeves in the exhaust ports? Can I pop them out, and should I?
Added note: I just found this on wikipedia, about 12As
"Early 12A engines also feature a thermal reactor, similar to the 0866 10A, and some use an exhaust port insert to reduce exhaust noise. A lean-burn version was introduced in 1979 (in Japan) and 1980 (in America) which substituted a more-conventional catalytic converter for this "afterburner". A major modification of the 12A architecture was the 6PI which featured variable induction ports."
So maybe those sleeves are there to reduce exhaust noise? Doesn't sound like a very good idea for an RX-7, but maybe makes better sense in a Luce.
12-04-12, 12:48 PM
#72
Waffles - hmmm good
iTrader: (1)
Go to the mazdatrix website and they have a how to on identifying your flywheels. I used the
82 on my stock SA with no changes to any other rotating assembly parts. Works great and
feels a little zippier than that old 32 lb. one that was on there.
Flywheels
82 on my stock SA with no changes to any other rotating assembly parts. Works great and
feels a little zippier than that old 32 lb. one that was on there.
Flywheels
12-04-12, 01:00 PM
#73
Moderator
iTrader: (3)
Join Date: Mar 2001
Location: https://www2.mazda.com/en/100th/
Posts: 30,828
Received 2,596 Likes
on
1,844 Posts
Jeff I'll take your advice on the gaskets and check with Mazdatrix on those. Also I hear you about using the Atkins apex seals because they will break in better with those R5 housings, but for the $220 investment would they really be that much better than those used ones I pulled from one of the other tear downs, shown in the pic above?
Added note: I just found this on wikipedia, about 12As
"Early 12A engines also feature a thermal reactor, similar to the 0866 10A, and some use an exhaust port insert to reduce exhaust noise. A lean-burn version was introduced in 1979 (in Japan) and 1980 (in America) which substituted a more-conventional catalytic converter for this "afterburner". A major modification of the 12A architecture was the 6PI which featured variable induction ports."
So maybe those sleeves are there to reduce exhaust noise? Doesn't sound like a very good idea for an RX-7, but maybe makes better sense in a Luce.
the 12A came in many flavors even in the same year, depending on the market. for instance in 1981 the US we got the N201 spec engine, which is the "lean burn" 12A with cats, europe got an N210 (i think) engine, which isn't lean burn, keeps the thermal reactor, but has bigger exhaust ports, while japan got the 6 port 12A.
and of course they were still making spare parts for everything, up until the early 90's...
12-04-12, 01:13 PM
#74
You don't have to change the front counterweight when upgrading to the 81-82 flywheel, but it's a good idea because it is lighter while still correctly offseting the rotors. I like how Mazda did that. So Ray, post up some pictures your front CWs. The 12As came with three different types. Since you're a 12A-only kind of guy, you won't run into any 13B CWs. So grab all three, post a picture and we'll identify them for you.
If you use those apex seals on your R5 rotor housings, it won't idle right for a good 1500 miles. Might not even start for you, being your first build and everything. The OEMs only work well on new rotor housings or very little wear on the chrome surface used housings. I would NEVER use those ones pictured on your R5 housings. You're not a masochist are you? I mean if you like pain you can...
Um I'd get new Atkins seals and stack the engine knowing full well it'll idle practically right after its first start up., I've had some fire within the first crank. Others take a crank or two, but they all tend to idle within a very short period of time when you throw in new Atkins seals regardless of housing wear.
To prove my point, I'm going to grab my set of J-spec R5 13B housings (they are identical to your R5 12A housings in wear and outward appearance - only the 13B version) and use them in my next build. Obviously with Atkins apex seals. My rotor-sense is telling me this engine will fire right up and want to idle within a few seconds.
As or the weird sleeves, I'll look them over to see if mine can be removed, but I don't have high hopes for it.
Too bad that wiki article is very broad and not very accurate. We know US-spec had the thermal reactor on all 78 to 80 cars. The so called lean-burn didn't come here until the 81 model year which had cats. You know that.
12-04-12, 01:19 PM
#75
Mike, his seals are not Atkins. They are worn OEMs. The triangle piece wear surface looks long like Atkins because it's worn.
Ray, do you have a micrometer? OR a digital caliper? Measure the height of all six of your seals. Tell us the numbers. My guess is 7.2 to 7.6mm in height.
On second thought, the early Atkins seals used OEM triangle pieces. This is before they went to their long triangle version with much tighter quality control. Man I recently used a set of the early type in the blue car and one of the seals was very narrow. It was like 2.8mm thick and kind of thinner toward the bottom. The other five weren't like this. And yes I had to buy six OEM triangle end pieces. That engine had a rythmic misfire at idle for the first couple hundred miles. It didn't improve until I started driving the car hard. Then it was gone by the time I tested the race prepped Nikki (taking it up to 7k at less than 200 miles on the odometer lol). Now it's fine.
Ray, did you read all that? Even new apex seals can cause idle issues if they aren't perfect. So do yourself a favor and get some new apex seals. There's no worry whether you'll end up with the early version. The ones I had were from 1999.