
Help removing Lower Control Arms/Steering Knuckle Bolts


Help removing Lower Control Arms/Steering Knuckle Bolts
The two bolts holding the lower control arms and steering knuckles refuse to come out.
My right ball joint is shot so I'm replacing both lower control arms.
I've been soaking them in PB Blaster for days, with hammer wacks to assist.
I got one out, but the others refuse to budge.
I'm using a torque wrench at 110 ft/lbs at no good.
I maxed out my old beam torque wrench at about 150-160 ft/lbs and broke one bolt.
I want to save the 2 remaining bolts still in.
I have not tried a propane torch yet, and did not know if that was advisable.
Any suggestions would be most welcomed.
Thanks.


Apply heat liberally along with the PB blaster and use an impact gun to get them loose. Rinse
and repeat until they get loose. Heat is your friend.
Next will be the inner bolt holding the LCA in. It will typically be siezed to the steel insert in the
bushing and will refuse to be pulled/pushed out. A cutoff wheel will solve that problem. Cut
the bolt between the arm and the front member on each in and drop it out.
Tim do yourself a favor and get a good impact gun. I bought my first one from homedepot, didn't work very well.
So I got an Ingersoll-Rand 600 off ebay for a little bit more, made a world of difference.
Here's the one I've got, used for $85:
Ingersoll Rand 2132G 1 2 Impact Wrench | eBay
or some new ones:
Ingersoll Rand 231C Air Impact Wrench 1 2" Drive Max Torque 600 ft Lbs | eBay
Ingersoll Rand 1 2" Drive Super Duty Air Impact Wrench 600 ft lbs IR 231C | eBay
Ingersoll Rand 1 2" Drive Super Duty Air Impact Wrench 600 ft lbs IR 231C | eBay
I will also need an air compressor.
100 or 125 psi. Is that sufficient? (new territory for me)
I hope some others with more experience will chime in here, probably 125 is enough if you want to economize.
After blowing out my homedepot Husky compressor in a couple years (about 125 psi, as I recall) I went with a better replacement, the DeWalt D55168:
rated at 200 psi but I have it set to 125-150 psi depending on the application.
You pay more up front but you buy it once and it works much better, faster and quieter from day one. I use mine for all kinds of things, inflating tires, blowing out parts, clearing dust from work areas, spray painting and of course the air tools.
Trending Topics
I have an old Craftsmen 30 Gal set at around 90psi and the red 600 ftlb 1/2" impact from harbor
freight, works like a charm and cost a lot less than the IngRand stuff. Not to knock it if you have
the funds but its not cheap.
Ray, you surprised me by having such quality tools. I'm impressed with your choices.
freight, works like a charm and cost a lot less than the IngRand stuff. Not to knock it if you have
the funds but its not cheap.
Ray, you surprised me by having such quality tools. I'm impressed with your choices.

I have a craftsman 5 gallon 125 psi compressor and used a borrowed Ingersoll Rand impact to remove the 2-1/8 inch nuts from the flywheels of the engines I've disassembled. I can't imagine not being able to use that to zip off the LCA bolts.
Waiting on my new compressor too btw: FREE SHIPPING � NorthStar Belt Drive Single-Stage Portable Air Compressor � 2 HP, 20-Gallon, Vertical, 5.0 CFM | 11 - 20 Gallon Air Compressors| Northern Tool + Equipment
But that's for painting
Waiting on my new compressor too btw: FREE SHIPPING � NorthStar Belt Drive Single-Stage Portable Air Compressor � 2 HP, 20-Gallon, Vertical, 5.0 CFM | 11 - 20 Gallon Air Compressors| Northern Tool + Equipment
But that's for painting
Thanks everyone.
Great info.
I've been debating making the investment, or taking it to my trusted auto shop.
If I can do it all myself, the price may be comparable and I get to keep the compressor and impact wrench for other things.
Doing research now.
DEWALT 15 Gal. Portable Electric Air Compressor-D55168 - The Home Depot
However much I love a good tool talk.... Have you tried a long pipe?
When I'm at work I find that human leverage can break bolts free better than my $500 impact gun. As a mechanic I bust a nut on a regular.
And I wouldn't go with HF for an impact gun. You're better off with a beat up old IR 600 gun and a rebuild kit. I doubt HF has much of any after sales support for its impact guns, but IR has been in the business for a LONG time.
I did not try a long pipe, but I did max out my beam torque wrench and broke one of the bolts.
I'm going to try the more powerful impact wrench (a 300 ft/lb did nothing). If that does not work, I do have a 6' iron pipe I used to torque the flywheel nut on.
I'm going to pick up one of these in town tomorrow:
DEWALT 15 Gal. Portable Electric Air Compressor-D55168 - The Home Depot
And I had to order this impact wrench, no one had one:
https://secure2.homedepot.com/MCCChe...&inStore=false
Then I'll try again.
I plan on still driving my FB for another 10 years. I'm sure I'll use the compressor and impact wrench along the way.
Good move Tim! You will thank yourself a million times for purchasing that compressor.
I wouldn't put that long breaker bar on one of the bolts you still need to remove, you're likely to break it off and then you'll have two bolt studs stuck in your front struts. Which brings up the question, how are you going to remove that broken bolt shaft from the strut? I wouldn't want that job!
Better to just keep up Tim's heat and penetrating oil for a few days until your impact equipment comes in, then use the impact wrench to remove them more gently. That's when you will begin to appreciate what an impact gun can do for you.
From the PM you sent me with a picture of the bolts you're dealing with, I'm wondering about those bolts, they don't look right:
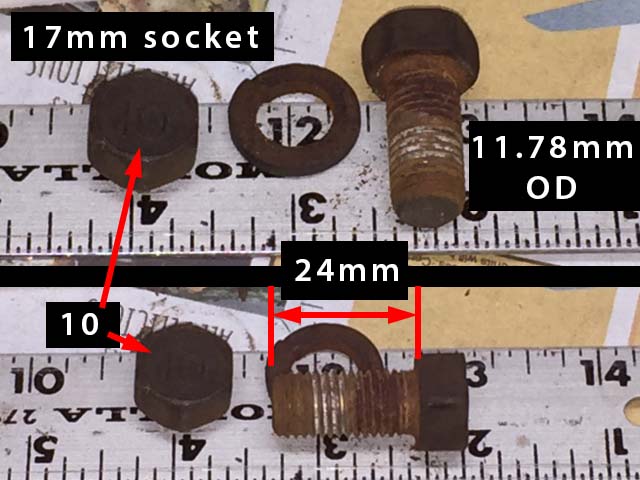
I'm thinking these are incorrect for tying the lower control arm to the strut.
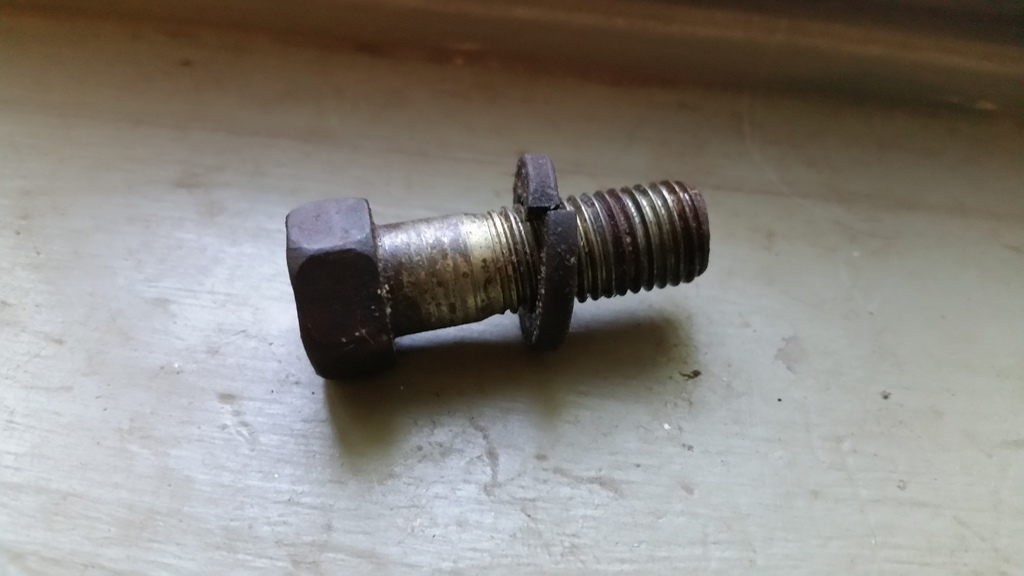
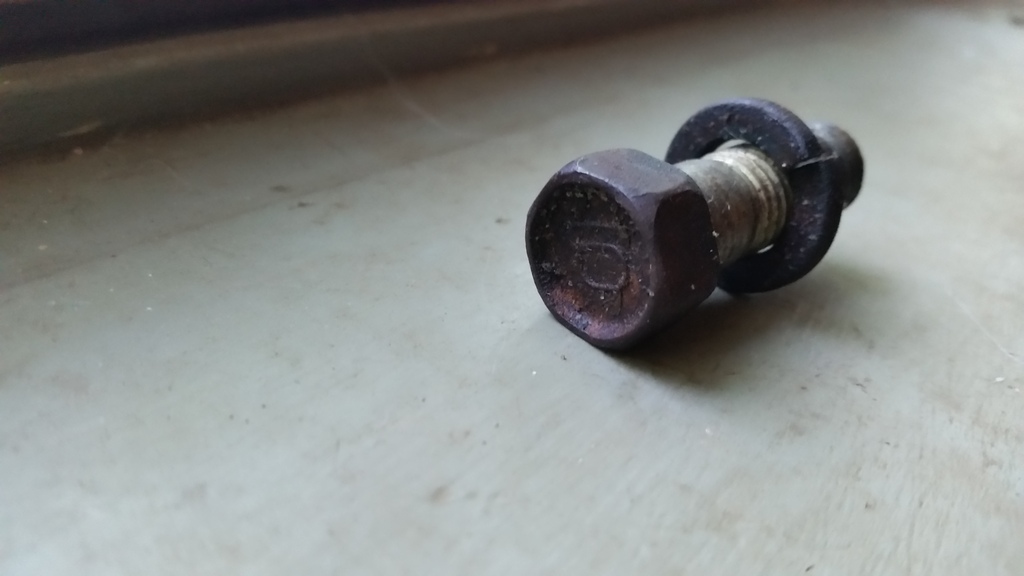
Here is a picture of the bolt I found on one of my units, it's a bit longer, with a non-threaded section near the bolt head and it has a cadmium coating.
I'm thinking the reason you're having trouble getting these out is that you're dealing with some corrosion from the incorrect bolt that shouldn't be there.
Also, being shorter than the OEM bolt, they may be unsafe.
I wouldn't put that long breaker bar on one of the bolts you still need to remove, you're likely to break it off and then you'll have two bolt studs stuck in your front struts. Which brings up the question, how are you going to remove that broken bolt shaft from the strut? I wouldn't want that job!
Better to just keep up Tim's heat and penetrating oil for a few days until your impact equipment comes in, then use the impact wrench to remove them more gently. That's when you will begin to appreciate what an impact gun can do for you.
From the PM you sent me with a picture of the bolts you're dealing with, I'm wondering about those bolts, they don't look right:

I'm thinking these are incorrect for tying the lower control arm to the strut.
Here is a picture of the bolt I found on one of my units, it's a bit longer, with a non-threaded section near the bolt head and it has a cadmium coating.
I'm thinking the reason you're having trouble getting these out is that you're dealing with some corrosion from the incorrect bolt that shouldn't be there.
Also, being shorter than the OEM bolt, they may be unsafe.
Last edited by ray green; May 6, 2016 at 04:59 AM.
Ray,
You got me worried so I did some more measurements.
On mine the front bolt is a different length than the rear bolt.
I believe your pic is the rear bolt.
I broke the front right, but got out the front left.
You got me worried so I did some more measurements.
On mine the front bolt is a different length than the rear bolt.
I believe your pic is the rear bolt.
I broke the front right, but got out the front left.
I just discovered this myself Tim, one bolt has the threadless area and is longer, the other one doesn't and isn't.
Now why the **** is that?... I said to myself. Your pics provide the answer, thanks.
So it sounds like you need the front, I'll get that in the mail for you ASAP.
Now why the **** is that?... I said to myself. Your pics provide the answer, thanks.
So it sounds like you need the front, I'll get that in the mail for you ASAP.
UDATE:
I got the DeWalt 200PSI air compressor and the IR impact wrench suggested by Ray.
Now I wonder why I didn't do this 20 years ago.
Got the remaining bolts off.
The broken one refused to move.
I drilled all the way through and still no joy.
Took the strut out and over to the workbench.
After some hours there was nothing left to grab on to.
I drilled the hole bigger till I could just see the helix of rust from the threads.
Went to Sears and bought a tap & die set. The 12mm 1.50 is not that common.
I used one of the steering knuckles as a guide to minimize the chance of cross-threading the existing threads. I just needed to get the remaining bolt threads out.
With thread cutting oil and taking my time (in and out and cleaning often) success!!
As this is a fairly critical connection, I tested with the steering knuckle in place and torqued the short bolt to the max 51 ft/lbs and it did not strip.
Ray, I'll need that short bolt now, if I may.
Questions:
I'm thinking of replacing the castle nuts on the LCR ball joints? Mine are fairly rusty. Is there any specified grade, or just higher is better?
I need to cut the pivot bolt on the LCR as it refuses to move.
Is this something still available for purchase? I can't seem to find one listed in the usual suppliers (Atkins, Mazdatix, Rockauto).
Thanks everyone for the help.
I will get my FB on the road again!!

Mr. Barber, I've got a pair of used lower control arms, if you're interested send me a pm.
I got you covered on the short bolt Tim, I was waiting to be sure you didn't need any of the others.
I'll get the short bolt in the mail tomorrow. Do you need any of the others? I stole the whole set out of the pair of front struts I sacrificed for an RX-3 project the other day (not mine).
Nice work by the way! I never could get the hang of that tap and die stuff, you got talent.

On replacing the nuts, I can only say this. A couple days ago I trashed the pull behind aerator for my zero turn lawn mower.
Hung up on a stump, bent the **** out of it and ripped the tray bolts right out of the tray.
So I was going to buy a new one but they are $279. Yikes.
So I took it all apart and beat on the yoke, tray and mounting brackets with my 20 lb sledge for about an hour to get things sort of straight and then drilled some new mounting holes in the tray bottom.
Then I put it back together with all new and upgraded nuts and bolts recovered from my RX-7 parts cars, a very significant upgrade over the Chinese hardware that came with the unit.
Best thing I ever did, replacing those nuts and bolts, the thing aerates better than ever.
So yes, new castle nuts are in order. If you've got a pic I'll see if I have any.
I admire your determination!
I got you covered on the short bolt Tim, I was waiting to be sure you didn't need any of the others.
I'll get the short bolt in the mail tomorrow. Do you need any of the others? I stole the whole set out of the pair of front struts I sacrificed for an RX-3 project the other day (not mine).
Nice work by the way! I never could get the hang of that tap and die stuff, you got talent.
On replacing the nuts, I can only say this. A couple days ago I trashed the pull behind aerator for my zero turn lawn mower.
Hung up on a stump, bent the **** out of it and ripped the tray bolts right out of the tray.
So I was going to buy a new one but they are $279. Yikes.
So I took it all apart and beat on the yoke, tray and mounting brackets with my 20 lb sledge for about an hour to get things sort of straight and then drilled some new mounting holes in the tray bottom.
Then I put it back together with all new and upgraded nuts and bolts recovered from my RX-7 parts cars, a very significant upgrade over the Chinese hardware that came with the unit.
Best thing I ever did, replacing those nuts and bolts, the thing aerates better than ever.
So yes, new castle nuts are in order. If you've got a pic I'll see if I have any.
I admire your determination!
Last edited by ray green; May 24, 2016 at 06:01 PM.
Hey Ray,
I was out in the garage trying to get the LCR pivot bolt out. I'll need a replacement.
Have to get my son to bed, walk the dog, then I can get pics of the castle nuts and the other bolts this evening.
Thanks again for the offer.
Tapping is a slow process through that high grade steel. Sometimes I could only get a 1/16th turn, then back and forth to free up the tap, spin it out, clean it off and the hole, more oil and try again.
(It was my father's baby and I consider myself the caretaker in his memory.)
Ray,
Here it is.
A are the castle nuts which hold the ball joint to the steering knuckle.
B & C go through the steering knuckle into the strut bottom.
B is the short bolt I broke.
A is the long bolt you found.
D is the long "pivot" bolt which goes through the inner end of the LCR.
If you have 2 A's, a set of 2 B's and 2 C's, and 2 D's, that would be great.
At the very least I need one B (short bolt through the steering knuckle) and one D (long pivot bolt through inner end of LCR). The B is broke and the D will be cut out tomorrow.