EASY 2nd gen direct fire install - 20 minutes


 09-28-07, 10:19 AM
#183
Waffles - hmmm good
iTrader: (1)
Ever since I popped the 2G coil in my hard start and warm start issues disappeared. No more flooding. Starts on the first crank always now. Whether it helps anything else that alone makes it worth it.
09-28-07, 05:10 PM
#187

Yeh wacky belongs in the Old Guys Club.
Back on topic, this is a timely thread. I just bought some second gen leading coil and ignitor packs and I was looking to put them in this weekend, to impress the guys at the OGTA meeting next Tuesday.
I saw this 2GDF installation thread a few years ago but couldn't find it recently with a search, why don't we make it a sticky? That is, after I follow the instructions and make sure it works.
Ray
09-28-07, 05:24 PM
#188

EDIT: It would probably help if I posted the link for you.

https://www.rx7club.com/1st-gen-archive-71/ignition-2gcdfis-diagram-correct-502148/
Jamie
09-28-07, 06:18 PM
#189
Lives on the Forum
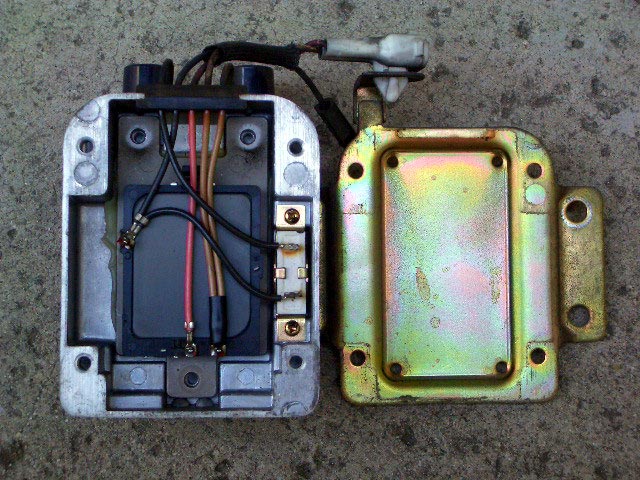
The only thing that I would add is that the resistor that comes with the 2nd gen coil pack is strictly optional. Knowing this, you can then unbolt the coils from the ignitor housing, making it a much smaller overall package to install.
Another benefit to this is that you don't have to cut any wires in the ignitor pack, so if we ever get a working TT unit going you will still be able to use your leftover parts for the install...
Yes, it works great like this. No, its not nearly as powerful as using the TT unit. Yes, it is still much better than the stock setup.
09-29-07, 06:42 PM
#190

Did the mod today.. I got the 2nd gen plugs too
Car runs and drives as well or better than before..
But I thought it'd make more of a difference than it did.. It dosent seem to start better or have more power.. or sound different.. POSSIBLE smoother idle.. but it might just me hoping for a result lol
Car runs and drives as well or better than before..
But I thought it'd make more of a difference than it did.. It dosent seem to start better or have more power.. or sound different.. POSSIBLE smoother idle.. but it might just me hoping for a result lol
09-29-07, 08:11 PM
#191
Ok, I understand everything except switching the trailing wires to the leading. It seems alot of people are stumped with this too. I would think if you did that, the trailing would be firing on the leading ignitor which would make the trailing fire the same time as the leading and cause problems. What am I missing here?
09-29-07, 08:27 PM
#192
Thanks Jamie, this was the link I was looking for:
https://www.rx7club.com/showthread.php?t=502148
These guys (Kim's FB, GSLSE Addict) know how to explain things and their diagrams and photos are great.
From Kim:
From Kent:
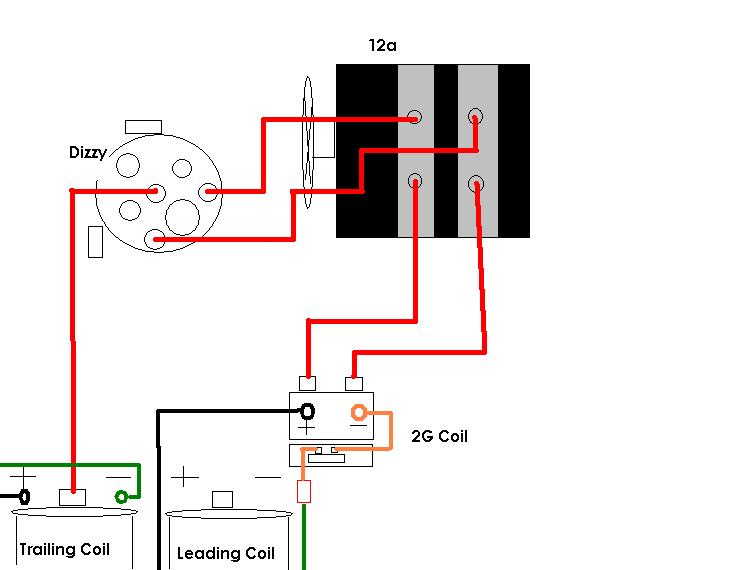
1. If the resistor is on the + side:
In this case, the resistor is wired on the + side of the circuit. You will notice a tan wire comes in from the top of the coil, goes through the balast resistor, then goes to the coil +.
In this case:
1. remove the black wire from - terminal of coil
2. connect - terminal wire from the stock leading coil to the - on the 2nd gen coil
3. connect 12v switched to the tan wire coming out of the top of the coil. You may need to cut the white connector or find a mating end.
2. If the resistor is on the - side:
In this case, the resistor is wired on the - side of the circuit. You will notice a black wire comes in from the top of the coil, connects to 2nd gen ignitor, goes through the balast resistor, then goes to the coil -.
In this case:
1. remove the tan wire from + terminal of coil
2. connect 12v switched to coil +
or
1b. leave tan wire in place
2b. connect 12v switched to the tan wire that come out of the top of the coil
3. connect - terminal wire from the stock leading coil to the little black wire coming out of the top of the 2nd gen coil
Hope this makes sense. This will let you try the 2GCDFIS while making it easy to upgrade to TT or something else in the future.
Kent
Thanks to Jamie, Kent and Kim, I'm on my way! I am a little curious, like UJ, as to why you hook up the trailing wires to the leading.
Also, Ken, if you don't need the ballast resistor and ignitor housing, is there an easy way to mount the coil pack on the strut tower? It looks to me like the housing makes this mounting job really easy.
Ray
https://www.rx7club.com/showthread.php?t=502148
These guys (Kim's FB, GSLSE Addict) know how to explain things and their diagrams and photos are great.
From Kim:
From Kent:
1. If the resistor is on the + side:
In this case, the resistor is wired on the + side of the circuit. You will notice a tan wire comes in from the top of the coil, goes through the balast resistor, then goes to the coil +.
In this case:
1. remove the black wire from - terminal of coil
2. connect - terminal wire from the stock leading coil to the - on the 2nd gen coil
3. connect 12v switched to the tan wire coming out of the top of the coil. You may need to cut the white connector or find a mating end.
2. If the resistor is on the - side:
In this case, the resistor is wired on the - side of the circuit. You will notice a black wire comes in from the top of the coil, connects to 2nd gen ignitor, goes through the balast resistor, then goes to the coil -.
In this case:
1. remove the tan wire from + terminal of coil
2. connect 12v switched to coil +
or
1b. leave tan wire in place
2b. connect 12v switched to the tan wire that come out of the top of the coil
3. connect - terminal wire from the stock leading coil to the little black wire coming out of the top of the 2nd gen coil
Hope this makes sense. This will let you try the 2GCDFIS while making it easy to upgrade to TT or something else in the future.
Kent
Thanks to Jamie, Kent and Kim, I'm on my way! I am a little curious, like UJ, as to why you hook up the trailing wires to the leading.
Also, Ken, if you don't need the ballast resistor and ignitor housing, is there an easy way to mount the coil pack on the strut tower? It looks to me like the housing makes this mounting job really easy.
Ray
09-29-07, 08:32 PM
#193
Ok, I understand everything except switching the trailing wires to the leading. It seems alot of people are stumped with this too. I would think if you did that, the trailing would be firing on the leading ignitor which would make the trailing fire the same time as the leading and cause problems. What am I missing here?
Trailing wire from coil to dizzy. Instead of plug it to where it says "L" instead of "T".
Now for trailing spark plug wires:
Spark Plug TI to distributor L1 instead of T1
Spark Plug T2 to distributor L2 insted of T2
If its confusing, we can do that the direct fire when you bring me that 12-pack of cold heines. I will drink while you do the install


 09-29-07, 10:56 PM
#195
OK, I went out and did it. I started about 10:30 and started it up at 11:15.
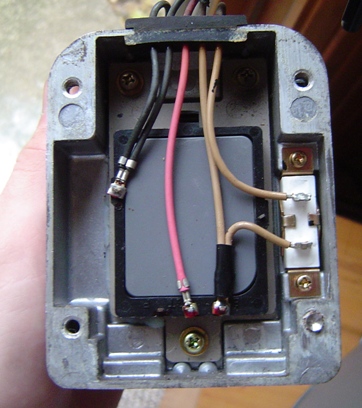
I took Kent’s lead and didn’t even open the ignitor housing and didn't cut any of the stock wiring on either the 2nd gen coil or my precious 1st gen ignition harness.
I just made two jumper wires with suitable ends to tie into the (-) and (+) on the stock leading coil then attached these to the 2nd gen coil, (-) to (-) and the (+) wire to the hole for the tan wire in the stock white plastic connector accoding to Kent's instructions. I was lucky to have a little red connector that fits tightly into the white plastic second gen connector so I didn't have to cut it off and make a splice.

I bolted the 2nd gen coil pack to a preexisting threaded hole and will add a second self tapping bolt tomorrow. All in all, a much simpler job than this post would suggest.
The car starts quickly and idles more smoothly than with the stock set up, I can feel the added horses wanting to get out. I’ll take it for a test drive tomorrow.
I'm still not clear on why the trailing plug wires should go to the leading connections on the distributor cap. I tried it both ways and it idles better with them set up this way, but it didn’t really make that much difference:

Since nobody seems to be able to offer a reasonable explanation, I guess I'll just try it both ways and see which gives me the best gas mileage.
I took Kent’s lead and didn’t even open the ignitor housing and didn't cut any of the stock wiring on either the 2nd gen coil or my precious 1st gen ignition harness.
I just made two jumper wires with suitable ends to tie into the (-) and (+) on the stock leading coil then attached these to the 2nd gen coil, (-) to (-) and the (+) wire to the hole for the tan wire in the stock white plastic connector accoding to Kent's instructions. I was lucky to have a little red connector that fits tightly into the white plastic second gen connector so I didn't have to cut it off and make a splice.
I bolted the 2nd gen coil pack to a preexisting threaded hole and will add a second self tapping bolt tomorrow. All in all, a much simpler job than this post would suggest.
The car starts quickly and idles more smoothly than with the stock set up, I can feel the added horses wanting to get out. I’ll take it for a test drive tomorrow.
I'm still not clear on why the trailing plug wires should go to the leading connections on the distributor cap. I tried it both ways and it idles better with them set up this way, but it didn’t really make that much difference:
Since nobody seems to be able to offer a reasonable explanation, I guess I'll just try it both ways and see which gives me the best gas mileage.
Last edited by ray green; 09-29-07 at 11:03 PM.
09-29-07, 11:27 PM
#196
Lives on the Forum
Ray, you're still making this harder than it has to be.
Just unbolt the coilpack from the ignitor housing, so all you have is the coil pack. Then, just take both wires from the original coil and move them over to the studs on the new coil pack. That's it.
For mounting, I just stacked some washers onto a long bolt (so they would be behind the coil), then threaded that into a mount on the strut housing. Very simple, and very clean looking...
09-30-07, 03:05 AM
#198
Lives on the Forum
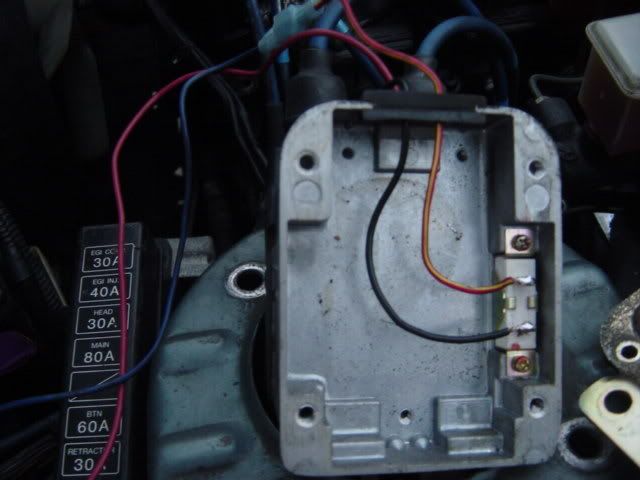
Ray, its kinda hard to tell in that photo, but I can't see any wire going to the coil post on the right? I see you've tied into one of the wires entering the coilpack, so maybe there's a black wire coming back out that goes to that post and its just invisible...
09-30-07, 08:48 AM
#199
Here are some close-up pictures of the wiring with more daylight and fewer beers – yes I was out in the driveway putting this thing in at 11:00 pm on a Saturday night, to give you some idea of how weird I really am.
Here’s the wiring to the stock leading coil connections. I had a nice yellow wire with a built in male connector left over from a Radio Shack power antenna installation, so I just slipped this into the stock female connector that used to be on the (-) pole of the stock coil. The (+) pole has a red wire added, again a piece left over from Radio Shack (they gave you enough wires with that kit to install three antennas):

Here are some pictures of the 2nd gen coil wiring. The yellow wire is the Radio Shack wire with a loop connecting it to the (-) pole. The other connection to the (+) pole is the tan wire that comes from the coil pack in it’s conventional stock position – thanks Kent for this elegant solution, I love it when I don’t have to do anything to make things better. Also you can see that nice little red (+) connector that fit right into the stock 2nd gen (+) connector, the one that leads to the tan wire:

Later on last night (don’t ask when) I decided the coil pack would look better if I added that little black cap, so I turned the (-) connector on the 2nd gen pack 90 degrees and slipped on the trim piece:

Ken, I like the idea of just putting the coil in without the ignitor housing, but does that mean you need to drill 2 (or even 4) new holes to accept the smaller screw size that connects the coil to the housing? The mounting might get a little wobbly on top of all those washers. Also it looks to me like that housing is designed as a heat sink to cool the coils – do you suppose it might actually be doing some good? Do you have any pictures of your installation? Maybe I’ll do it that way on the silver car, which is coming up in a few weeks.
And yeh, I'm still a bit confused on that trailing plug wire set up, when both wacky and Jeff say something is true you've got to think it might be true (or else there's a conspiracy to mess up all us newbies).
Jeff, I did temporarily unhook the trailing at one point (man when you pull that coil lead off the distributor it gives you about 8 high voltage shocks per second, I think that's how many I counted). But it didn't change the idle at all. Maybe we don't really need those trailing plugs after all, but I'll wait for the most critical test: Gas Mileage.
I'll do some test driving today and a little cleaning up (yes Ken, I did notice that dust on the 2nd gen plastic coil pack; it will be fixed) and maybe get some data on this leading/trailing plug wire issue.
Ray
Here’s the wiring to the stock leading coil connections. I had a nice yellow wire with a built in male connector left over from a Radio Shack power antenna installation, so I just slipped this into the stock female connector that used to be on the (-) pole of the stock coil. The (+) pole has a red wire added, again a piece left over from Radio Shack (they gave you enough wires with that kit to install three antennas):
Here are some pictures of the 2nd gen coil wiring. The yellow wire is the Radio Shack wire with a loop connecting it to the (-) pole. The other connection to the (+) pole is the tan wire that comes from the coil pack in it’s conventional stock position – thanks Kent for this elegant solution, I love it when I don’t have to do anything to make things better. Also you can see that nice little red (+) connector that fit right into the stock 2nd gen (+) connector, the one that leads to the tan wire:
Later on last night (don’t ask when) I decided the coil pack would look better if I added that little black cap, so I turned the (-) connector on the 2nd gen pack 90 degrees and slipped on the trim piece:
Ken, I like the idea of just putting the coil in without the ignitor housing, but does that mean you need to drill 2 (or even 4) new holes to accept the smaller screw size that connects the coil to the housing? The mounting might get a little wobbly on top of all those washers. Also it looks to me like that housing is designed as a heat sink to cool the coils – do you suppose it might actually be doing some good? Do you have any pictures of your installation? Maybe I’ll do it that way on the silver car, which is coming up in a few weeks.
And yeh, I'm still a bit confused on that trailing plug wire set up, when both wacky and Jeff say something is true you've got to think it might be true (or else there's a conspiracy to mess up all us newbies).
Jeff, I did temporarily unhook the trailing at one point (man when you pull that coil lead off the distributor it gives you about 8 high voltage shocks per second, I think that's how many I counted). But it didn't change the idle at all. Maybe we don't really need those trailing plugs after all, but I'll wait for the most critical test: Gas Mileage.
I'll do some test driving today and a little cleaning up (yes Ken, I did notice that dust on the 2nd gen plastic coil pack; it will be fixed) and maybe get some data on this leading/trailing plug wire issue.
Ray
Last edited by ray green; 09-30-07 at 09:03 AM.
09-30-07, 08:53 AM
#200
following the 1st and 2nd pictures, it seems you have wired incorrectly.
The wire coming from the FB coil's + terminal should go to the FC coils + terminal.
On the other hand, FB coil's - terminal should go in back of the FC coil's resistor or whatever it is called. From that point, it goes to FC coil's - termnal.
The wire coming from the FB coil's + terminal should go to the FC coils + terminal.
On the other hand, FB coil's - terminal should go in back of the FC coil's resistor or whatever it is called. From that point, it goes to FC coil's - termnal.