When you click on links to various merchants on this site and make a purchase, this can result in this site earning a commission. Affiliate programs and affiliations include, but are not limited to, the eBay Partner Network.
This is your reminder to shop around when it comes to OEM parts.
I bought seals for the next engine from Mazda Swag in Peoria. I ended up saving about $200 compared to Mazdatrix as a benchmark. For example, corner seal springs (N326-11-C20A) are $3.67 vs. $5.68 at Mazdatrix. That's $24 right there.
Not all parts though, their pilot bearing price is $4 more than Mazdatrix's, and I'm using them for balancing anyway so I'll be getting it there.
Don't forget shipping costs. There was another dealer that had lower prices but wanted over $100 to ship a box of seals.
I put in a door lock actuator from Amazon, that I plan to interface with an alarm system I'm installing. It didn't require any drilling where I placed it, and the window doesn't interfere with it when down. The rod that came with it clamps to the existing rod that runs to the lock ****. The actuator is wired to 2 relays that each trigger lock or unlock when they get the signal from the alarm. Testing with a jump pack, it seems to work fine in this spot.
I've had an alarm and power locks on my '79 since I worked at a mobile electronics shop in the early 2000s. Everything I've owned since has gotten an alarm, and power locks if it didn't already have it. The convenience factor alone is worth it. As far as I know, it still works, but pretty much everything is removed, including the dash, for a rebuild.
BTW, see those two holes in an indention to the left of where you mounted your actuator? I'm pretty sure those are for the factory door lock actuator. that's where mine are mounted. I think I maybe had to elongate them a bit for the spacing on the aftermarket unit, but I'm not sure. It's been a while...
The only other thing I've noticed is now the door doesn't unlock itself if the door is shut locked without actively holding the handle up like it normally does, not really a big deal since using a remote now but something to note to not lock the keys inside. Does yours still unlock itself if shut when locked?
I wonder if maybe your actuator is a little too stiff to allow the normal operation, or perhaps binding a bit? They come in a lot of flavors.
The tach randomly went out on my 85 last year, the alarm/remote start I've recently been installing was able to pick up a tach signal only until I plugged the cluster back in, then it would lose the signal.
I tried replacing the two 16v 47uf and single 10v 100uf electrolytic capacitors on the tach board and the tach worked again but I figured out it was only because I was testing it right off the trailing coil.
The tach signal wire was only seeing about .098V ac, while right off the negative terminal of the trailing coil it was seeing about 4V ac. I ran a new wire from the trailing coil to the cluster plug and now the tach works perfectly again, so it must have been a pinched or corroded tach wire.
Installed a Wilwood brake proportioning valve, brakes finally feel the way they should.
Since I did my TII brake swap the fronts have been too grabby. I've been using the correct prop valve from an FC, but since it's essentially a junkyard part something inside was probably seized up.
I set it close to the pressures of an FD and NB Miata compared to Wilwood's chart, around the middle turned out to be close enough. Their pressures overlap, the FD has the same size master cylinder and caliper pistons I'm running and NB is similar weight to an FB.
At least I can adjust at the track later. It feels good on the street, even had to do a not quite panic brake for a broke down vehicle in my lane.
That's a '95 Sentra booster and 15/16" MC from an MPV.
That's a little weird since the TII calipers have practically the same piston area as stock FB calipers (36mmx2 vs 51mm), but experience beats theory.
(Not a typo, when comparing fixed calipers vs sliding you only look at one half of the fixed caliper, since the pistons move half as far as with a sliding caliper)
Maybe I could have used my original prop valve? 81-82 GSL cars shared the same one as the drum brake cars, FA07-43-900.
I wouldn't be 100% sure unless I hooked it up to pressure gauges, but that FC valve was probably stuck since everything else was sized to be like a stock FD.
I took the RX-7 to the "Shortest street in America" this weekend:
It was also the big test to make sure the Commando alarm system I transplanted out of my first car worked ok with no false alarms, and it worked perfectly.
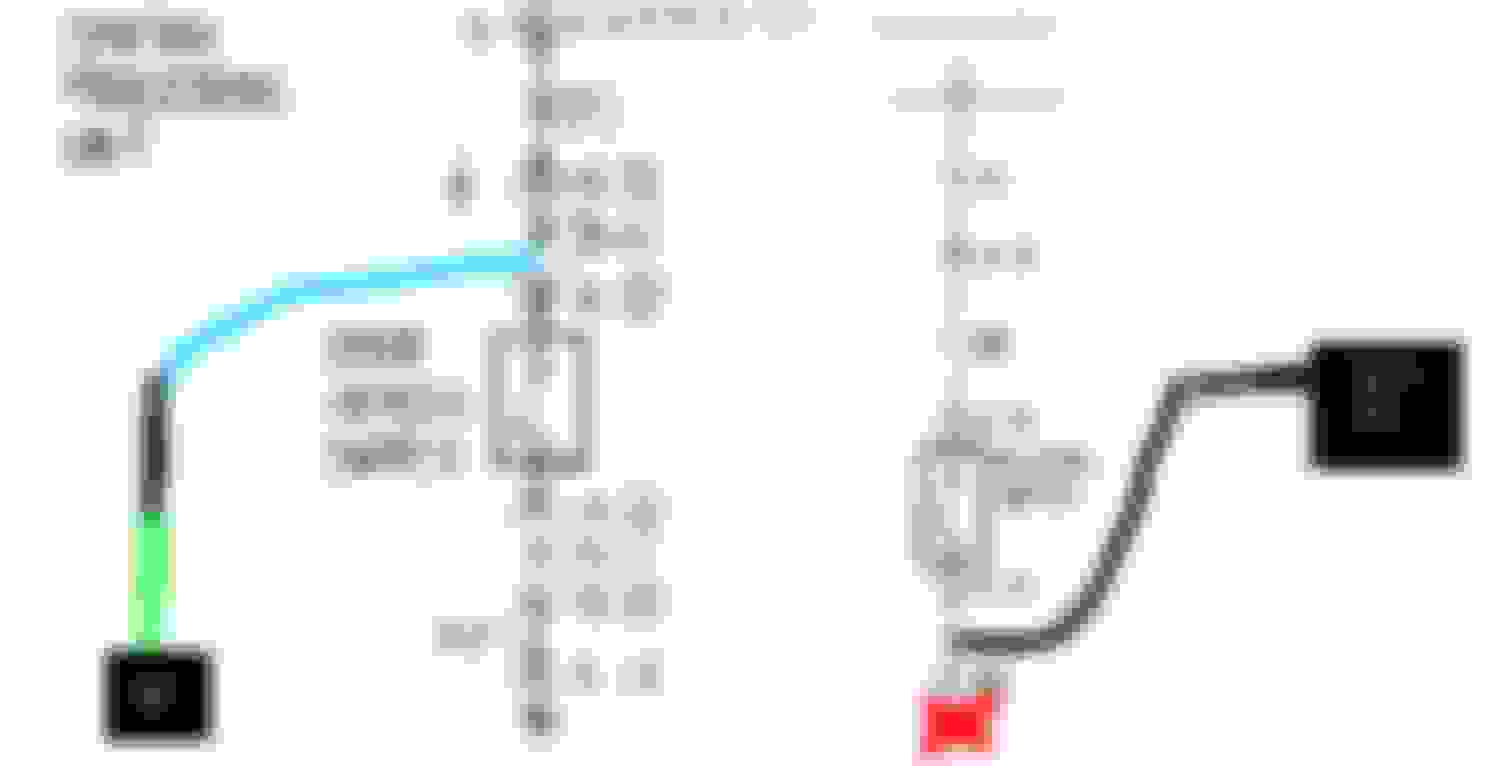
I was able to wire it up with a few features: I took advantage of the driver door handle switch to trigger the warn away siren chirps, to spook any would be thief that might check the door handle.I quickly learned to use a 1n4004 diode with stripe facing the handle switch wire, as a resistor in the alarm brain started to get very hot without one. The parking lights and domelight will light up for 30 seconds when unlocked or flash when triggered. I ran a wire from the hatch pin to the alarm brain so that if someone reaches in and presses the hatch switch it will trigger the alarm, I also wired a relay to the hatch release switch and alarm to be able to pop it with the remote. I adjusted the door lock actuators a little lower from my last picture, so that using a key is much easier, they work perfectly now and will also lock and unlock with ignition on and off.
I don't plan to use it often as I like to park with my car in gear, but I was able to get the remote start to work safely through the neutral switch that normally triggers the richer solenoid on manual S3 12a's. I could only get it to function by cutting power to the wire, meaning no richer solenoid function except when pressing the clutch, but it would cause my car to stumble for 30 seconds when stopped anyway. The remote start now will not even boot up if it detects its in any gear except neutral. If anyone tries this themselves however please be careful! I plan to program the remote to child mode just for remote start to make it harder to accidentally set off anyway.
How I wired the door handle warn away and remote start neutral safety wiring:
Good stuff! When I got an alarm in my black GS back in the 80s, people would be surprised when it yipped like a Chihuahua as I armed it. Alarms were a novelty then.
Also, folks hadn't yet learned to completely ignore car alarms!
I think all you would need to do is add a relay and use the at B30 wire to trigger it. This way the neutral safety can also be used for the richer circuit.
It would also be cool to be able to use a relay and the alarm to control the fuel pump in the bin.
Originally Posted by YellowFB
I I could only get it to function by cutting power to the wire, meaning no richer solenoid function except when pressing the clutch, but it would cause my car to stumble for 30 seconds when stopped anyway. The remote start now will not even boot up if it detects its in any gear except neutral
How I wired the door handle warn away and remote start neutral safety wiring:
Toruki: I've seen talking alarms, but a chihuahua one sounds pretty cool.
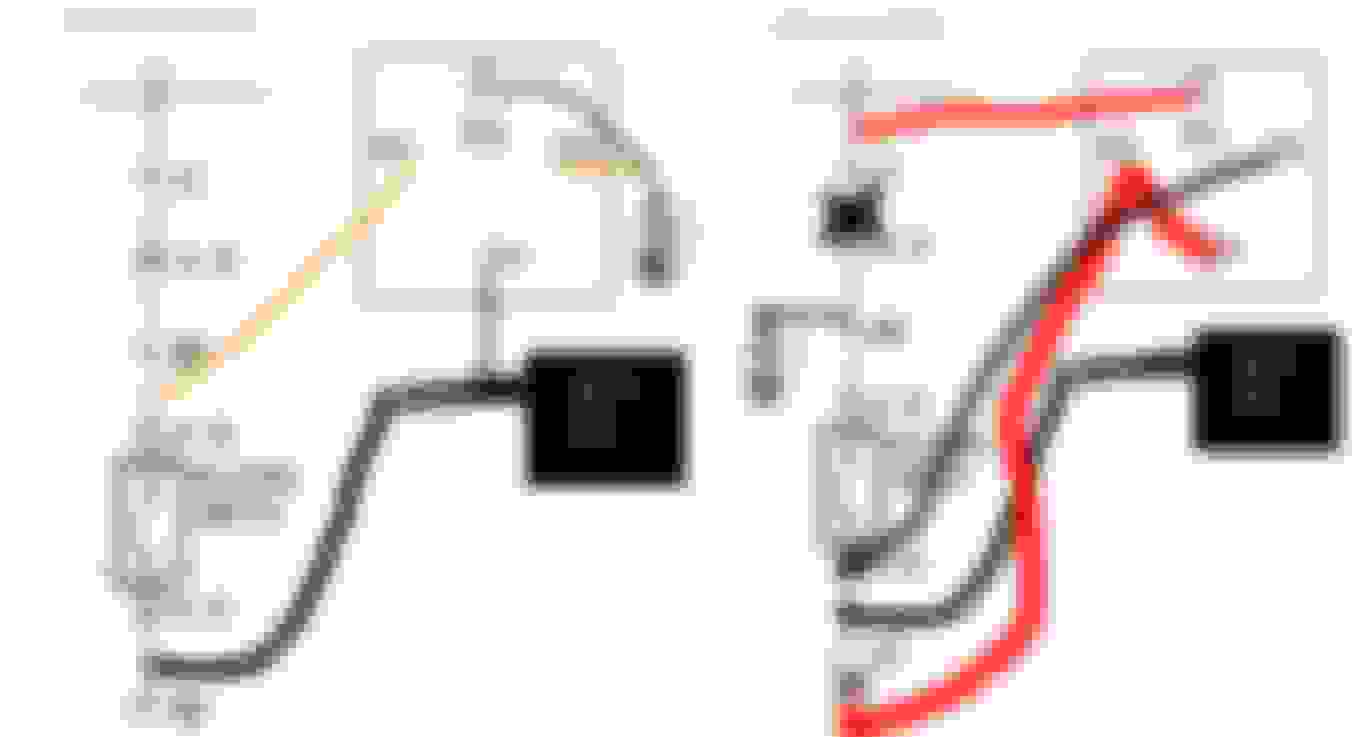
I'll need to procure another relay, but I came up with two possible relay diagrams to keep the richer solenoid functional. I'll have to see which one works best, not only for remote start, but also for the feature of activating "remote run" while the engine is already running, to be able to run back in the house with the keys.
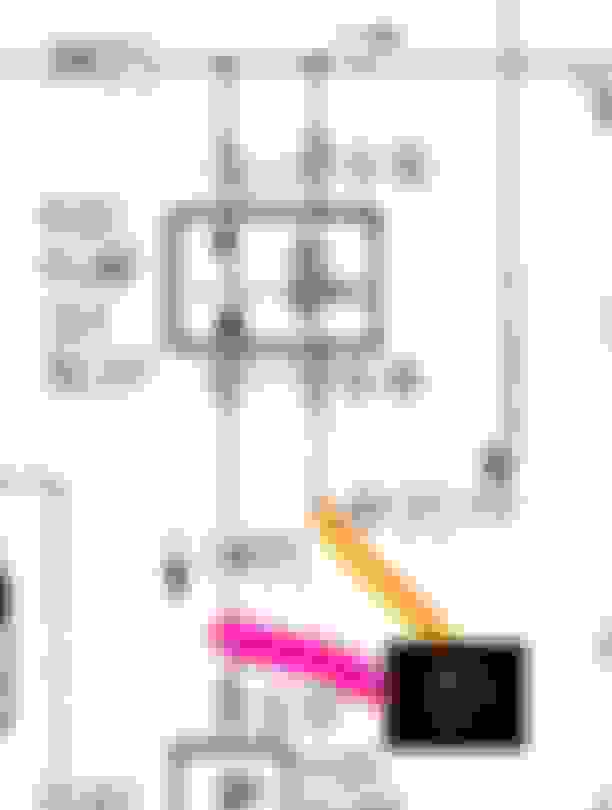
KansasCityREPU: It has a starter kill relay, which also works as anti-grind for remote start, I understand that won't prevent push starting. The orange ground when armed wire that triggers the starter kill I believe could be used to trigger the fuel pump relay,to disable the fuel pump, like when the ecu picks up zero tach signal. The only snag is the trigger wire is also active for remote start, a way around that is I could use the pink second ignition wire I left unused to power the fuel pump, only during remote start.
Last edited by YellowFB; Sep 11, 2024 at 09:10 PM.
I opened a second 12A engine in hopes to be in better shape than the previous one from last week. It sure is in better shape, but my inexperienced eye can throw me either to think its too hurt, when in fact it can be reused, or to think it can be reused when in fact it can�t. Here�s a short video of me removing the rear plate: https://imgur.com/gallery/Yq7R4Sn
Started cleaning one of the rotors. Found a broken apex seal edge. My inexperienced eye is unable to determine if I can reuse it, or if I should trash it. Any input is greatly appreciated!
Started cleaning one of the rotors. Found a broken apex seal edge. My inexperienced eye is unable to determine if I can reuse it, or if I should trash it. Any input is greatly appreciated!
The second rotor was in really good condition, so I decided to give it an ultrasonic bath today. The rotor in the left is the one with the chipped apex seal edge. The two rotors on the right are from the previous engine, which was completely trashed.
The second rotor was in really good condition, so I decided to give it an ultrasonic bath today. The rotor in the left is the one with the chipped apex seal edge. The two rotors on the right are from the previous engine, which was completely trashed.
Do you plan on replacing the oil control seals in the rotors?
Now a biggie, and more of a "why certain tuner shops suck", and the reason why I did all this at work at not at the Batcave where I would have to work on one side of the car at a time.
The first generation RX-7's rear suspension binds in roll. It has nice long parallel lower links, but the upper links are short and heavily angled to clear the springs. An angled 4 link will have its own defined roll center, and near as I have ever could figure, this roll center is up around the roof of the car. The rearend also has a Watts link, with its center pivot offset to the right and 40mm above axle centerline.
I took some photos and played with jacks.
Here's ride height.
One upper link bolt is removed, axle is supported in the middle by a trans jack.
Now let's see what happens with a half inch of bump.
See how the holes don't line up? This is because there are two described roll centers and they are fighting each other.
Let's go up another half inch.
Oof, that's getting a lot worse. For the axle to articulate, all of the bushings must distort to allow for this.
Let's take the suspension up to where the bump stop would be, now.
Oooooof!!
This is why these cars have a reputation for snap spinning. Trying to articulate creates an additional roll stiffness that ramps up significantly as roll increases. Due to the geometry it also gets worse when the cars are lowered.
And certain tuner shops who have no idea how RX-7s work will sell you solid metal joints as an "upgrade"
This is why RX-7s, especially the '84-85 models with worse geometry, like to rip the upper mounts off of the chassis. Or as the axle housing twists back and forth, the pinion angle climbs upwards as the housing takes a permanent twist on both sides.
Back in the day, the road racers would replace the upper link bushings with roll bar padding ("any bushing material") and then install a 3rd link ("traction bar") to control axle rotation.
We can't do that in Prepared. Bushings are free but we can't add other suspension devices. We can't even modify the mounting points for things, which is why I narrowed the shocks instead of just bending the little tabs on the axle a little wider. (They bend extremely easily)
But, bushings are free, and so I spent some quality time with a die grinder cutting out two half moons in the rubber about 14mm deep on each end of the upper links, on the "outsides" (outer face in back, inner face in front). This will, hopefully, achieve two things. First, it will make the bushings more compliant fore-aft, to allow for this geometrical discrepancy. Second, because of WHERE I did it, the effective center points of the bushings has changed with the effect of making the upper links more parallel, to reduce the geometric bind in the first place.
Toruki: I've seen talking alarms, but a chihuahua one sounds pretty cool.
I'll need to procure another relay, but I came up with two possible relay diagrams to keep the richer solenoid functional. I'll have to see which one works best, not only for remote start, but also for the feature of activating "remote run" while the engine is already running, to be able to run back in the house with the keys.
KansasCityREPU: It has a starter kill relay, which also works as anti-grind for remote start, I understand that won't prevent push starting. The orange ground when armed wire that triggers the starter kill I believe could be used to trigger the fuel pump relay,to disable the fuel pump, like when the ecu picks up zero tach signal. The only snag is the trigger wire is also active for remote start, a way around that is I could use the pink second ignition wire I left unused to power the fuel pump, only during remote start.
Just to clarify, your fuel pump kill would have to SUPPLY a ground to the BY wire to kill the pump. The fuel pump relay is normally closed and has to be activated to shut the fuel pump off.
Yes it's weird. The fuel pump is constantly powered by the ignition switch and the ECU actively turns it off if the ignition is on and the engine isn't turning.
That's a little weird since the TII calipers have practically the same piston area as stock FB calipers (36mmx2 vs 51mm), but experience beats theory.
(Not a typo, when comparing fixed calipers vs sliding you only look at one half of the fixed caliper, since the pistons move half as far as with a sliding caliper)
TII calipers have roughly the same piston area as stock FB calipers and that is certainly relevant from the perspective of determining the effect of master cylinder sizing.
However, when talking about locking up the brakes and determining front vs rear bias, we are more concerned with overall braking torque. Piston and pad area are relevant to that figure too, but so is rotor diameter. By increasing rotor diameter, you increase braking torque. Same as if you play with higher coefficient pads, pad height, pedal pressure etc. By increasing front rotor diameter without changing the rear - all other factors being equal - you are shifting braking bias to the front.
For example, taking GSL-SE brakes, the factory front bias of braking torque is 62.7% or a front:rear ratio of 1.90:1. If you use TII calipers alone on the GSL-SE brake rotors, nothing really changes. But increase the front rotor size to TII (276mm) and the front braking torque increases by 14% (all other factors being equal) and the front bias of braking torque increases to 68.3%.
The equation gets worse with the smaller disc brake 1st gens. The factory front bias of braking torque is similar to GSL-SE at 62.4% (which tells you something about the way the brakes were engineered!). Increase the front to TII calipers and rotors and the front braking torque increases 28% over stock and the front bias changes to 72.8%.
That is a substantial differential over stock. A proportioning valve would help, but also keep in mind that these only kick in to reduce pressure to the rears when the overall system pressure increases over a set point (to prevent rears locking in hard braking where the weight of the car shifts to the front). So, by increasing the front without matching the rears it is unsurprising that the fronts feel noticeably more grabby in normal braking (irrespective of the fact the surface area of the caliper pistons are roughly equivalent).
FWIW, the factory front bias of the FC is 66% (2.02:1 front:rear ratio) and the FD is 0.65% (1.99:1 front:rear ratio)