
How To: Rear Axle Bearing / Seal Replacement

Thread Starter
Joined: Jun 2008
Posts: 8,376
Likes: 28
From: Chino Hills, CA
How To: Rear Axle Bearing / Seal Replacement
By request, here's the skinny on replacing the rear axle bearings and seals on a First Gen.
Pictures and instructions here depict the process for an SA, GS build, which is a small-axle rear with manual-adjust drum brakes; Those with disc rears or starwheel-adjust drums will see some variations in brake/backing plate details, but the core procedure remains the same.
1) Break loose the rear lug bolts, chock the front wheels and get the rear up securely on jackstands on the frame; Make sure you get the car high enough that the tires will stay off the ground when you unload the rear axle, should you be center-lifting from below the third member. You'll want to let the axle down almost to the limit, and then raise it an inch or two to prevent it from hanging from the rear shocks - - some shocks do NOT like to spend time holding dangling weight. Make sure all is securely supported before proceeding.
2) Remove the rear wheels. Loosen the handbrake cable adjustment (inboard side of the brake handle, under the cover) to help facilitate drum removal.
3) On the rear of the brake backing plates, loosen the shoe adjustment locknuts, and then turn the adjusters to remove all drag from the drum. Keep in mind that the forward nut (and it's lockwasher!) are reverse-threaded. Turn the nuts and adjusters AWAY from each other to loosen, TOWARD each other to tighten.
(Note: on later drum brakes with auto-adjusters, you need to loosen the starwheel through a port in the backing plate. I don't have this config, so refer to your FSM for details.)
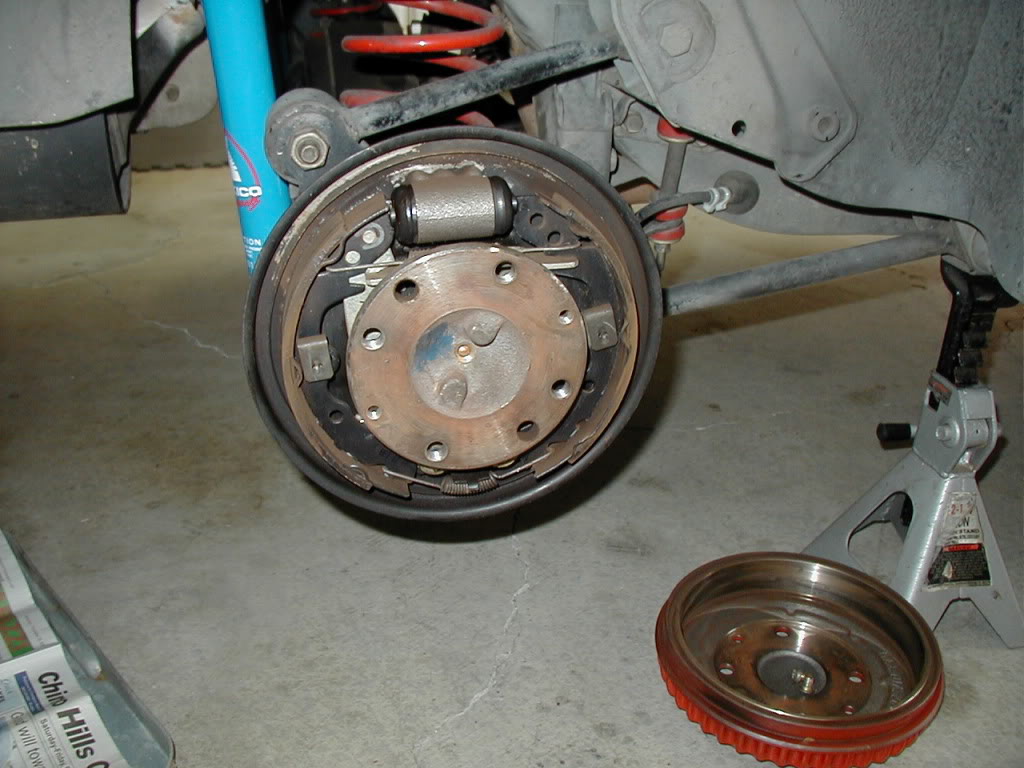
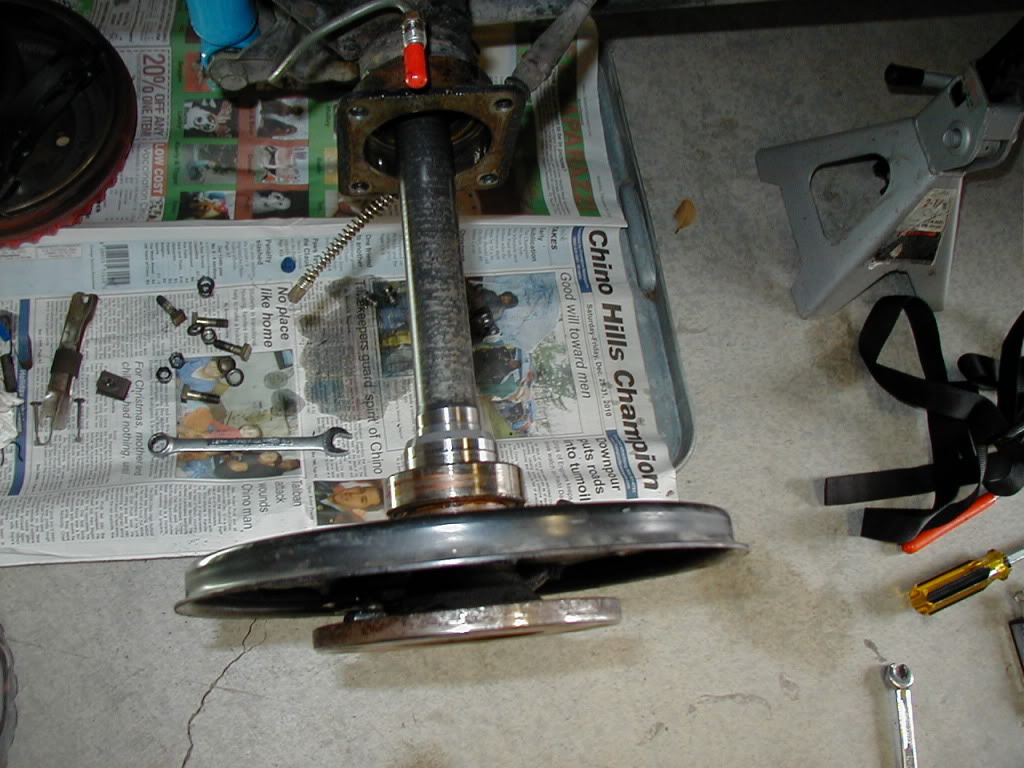
4) Remove the two large Philips screws from the face of the brake drum, and remove the drum.
If the drum is hard to remove, make sure you've loosened the handbrake and adjusters. If it still won't come off, it may be rusted to the axle flange, or you may have a shoe that is swollen from a fluid leak, or a drum that is heavily worn, having formed a ridge at the outer edge. Get a rubber mallet, and start hitting the face of the drum, toward the outside edge, first on one side and then the other. This will generally rock the drum loose in short order.
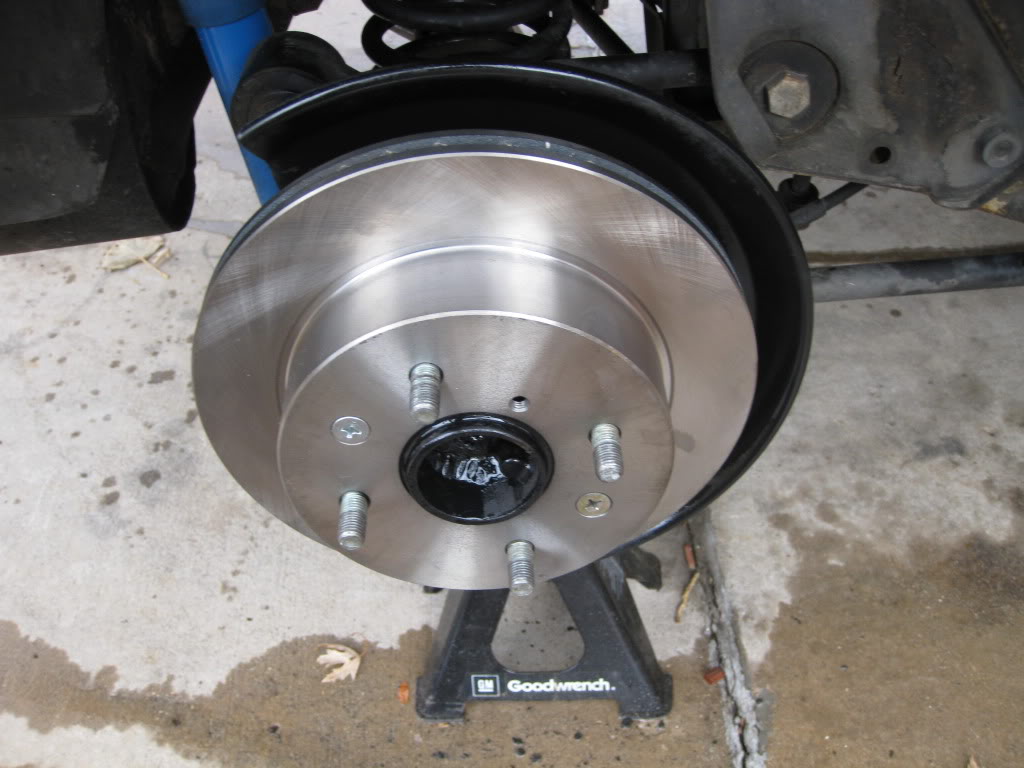
5) Once the drum is off, you'll be faced with something similar to this:
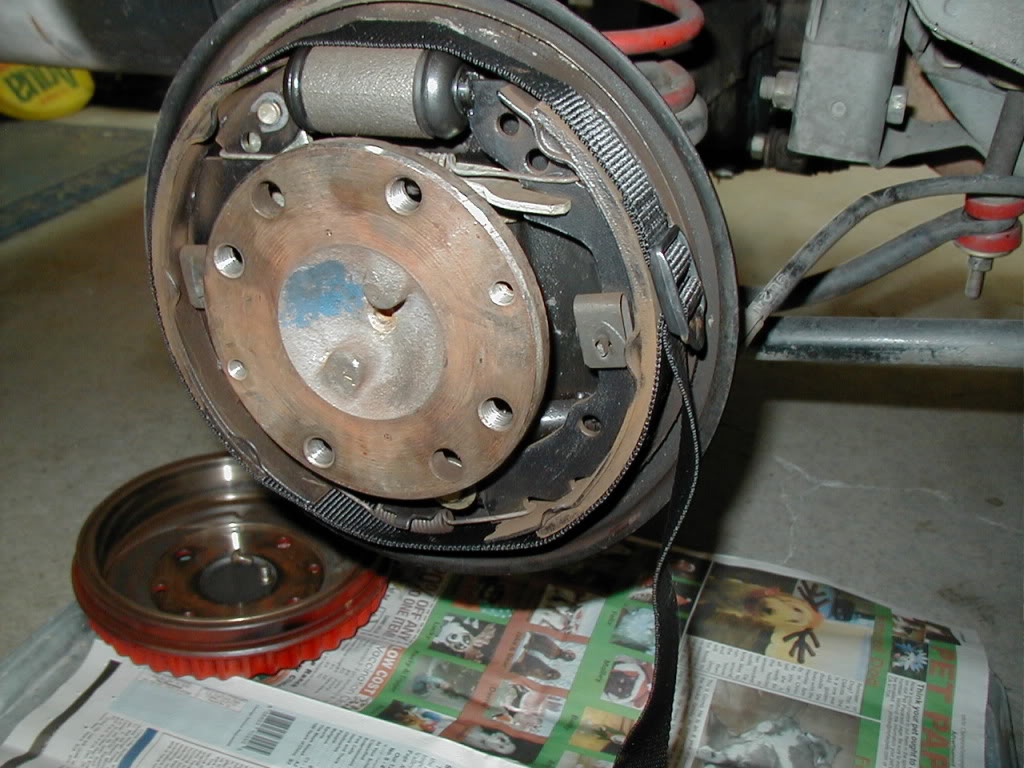
6) Next step is to disassemble the brakes from the backing plate. I find it makes things easier to use a 1" nylon web strap (buck or two from Ace hardware) to tightly strap the shoes in place first; this way nothing tends to go flying off or sliding around as you try to undo the strong springs that hold the shoes in place. It also makes reassembly stupid-easy, later:
7) With the shoes strapped, remove the Top coil spring, then the Bottom coil spring, then unclip the two retaining pin clips to the left and right by rotating the pin heads 90* with a pair of pliers. Pay close attention to parts position to aid reassembly. Pull the two retaining pins out through the rear of the backing plate, and unstrap the brake shoes; the assembly will pretty much just fall apart. Group all parts from one side of the car together; don't mix left and right.
8) You will find that the rear shoe is attached to the handbrake cable via a lever that is held to the shoe by a "C" clip - what my dad used to call a 'Jeezus clip," since they tend to fly off when you're removing them, making you say, "Jeezus, where'd it go!?!" You can leave the lever clipped to the shoe (unless you are replacing the shoes) but the lever must be removed from the cable. I find locking the square end of the cable in a pair of vise-grips, and then pulling the spring back by hand, makes it easy to lift the lever off the cable. Put the shoe with the other parts from this side.
Up til now, this has pretty much followed the procedure for replacing brake shoes; from here on in, we're dealing with axle-related steps.
9) Unclip the wire retaining pin that holds the handbrake cable to the backing plate (& don't lose the clip!):
You can then either A) work the cable all the way out of the backing plate, using care to avoid cracking the outer sheath, or you can B) work it partway out, and leave extracting it the rest of the way until the axle itself is being removed from the carrier. I like B, as the cable sheaths can be fragile with age, and the right-side cable costs upwards of $100 to replace these days.
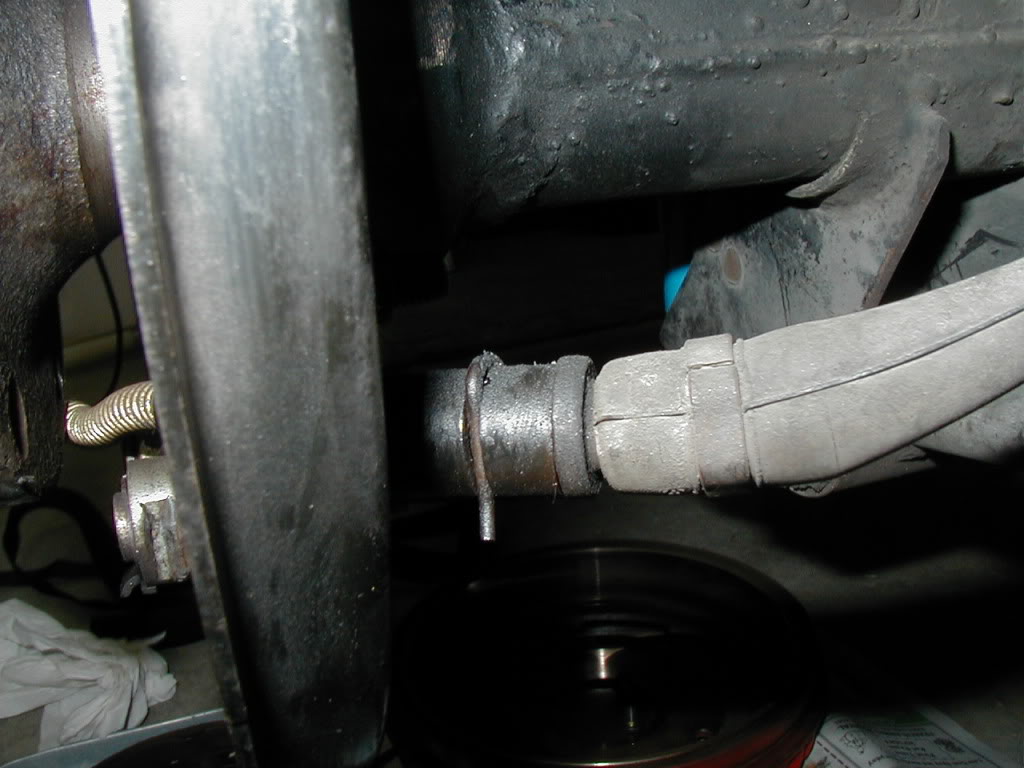
10) Remove the brake cylinder from the backing plate.
Right side (shown) has one hydraulic hardline and the bleeder; left side has two hardlines.
You'll want to use a flair wrench on the line fittings, as if you try to remove them with a regular open-end wrench, you're likely to strip them, and that means having to replace the hardlines. A flair wrench supports the nut on all sides, greatly reducing the chance of rounding it. The right side is a lot easier to undo if you pull the bleeder first; but USE CARE because some styles of bleeders (including the factory ones) have a check-ball inside that will vanish instantly in a dribble of brake fluid.
Undo the flair nut, but don't attempt to pull the line out; instead, lift the cylinder off the front of the line(s) after removing the two attaching bolts from the rear.
11)Cap the hydraulic line with a red vacuum cap to help minimize leakage of brake fluid. Use a rag to sop up what will leak anyway.

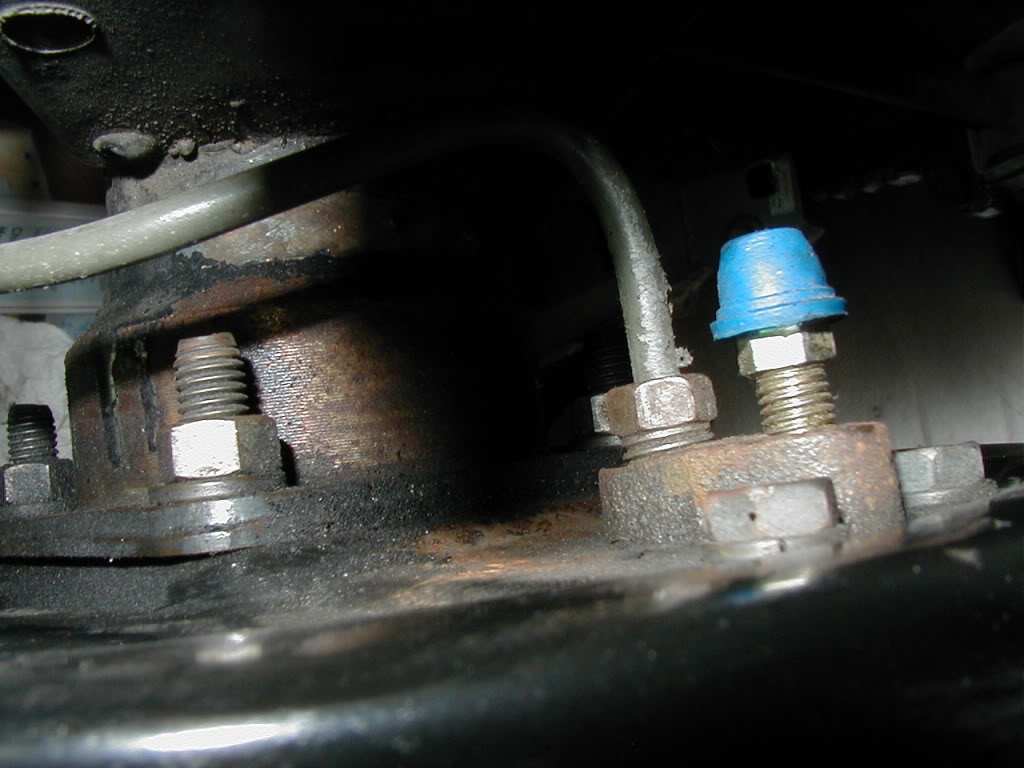
12) There are four square-headed bolts, with hex nuts and lockwashers, which hold the backing plate onto the axle carrier. Remove them by undoing the nuts from the rear; the square heads lock to the backing plate.
13) At this point, the axle is theoretically free to be removed. In practice, it may take a fair amount of force to remove it, depending on how much rust and crud has built up between the bearing race and the carrier.
The MAIN POINT in any removal scheme is to avoid bending the brake backing plate. The second MAIN POINT is to avoid yanking the car off the stands in the process. This is the other reason why having the axle partially 'loaded up' instead of dangling, with the frame securely on stands, is a good idea.
My favorite removal method is to sit facing the axle, put one foot against the lower control arm, and give a sharp yank on the axle flange (not the backing plate!)with both hands. This has worked for me every time (5 occasions now, two axles each) I've needed to pull axles; I've heard tell of people who have had to resort to slide-hammers and more extreme measures, but thus far I've been lucky.
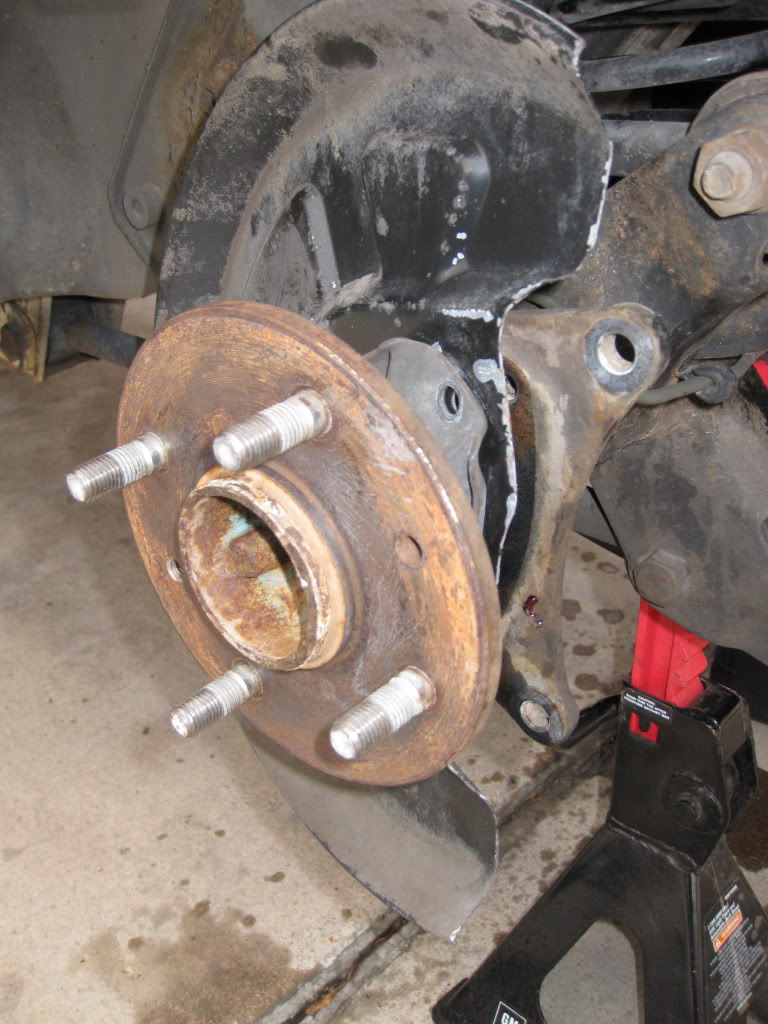
Once the axle is free, slide it carefully out of the carrier, and put it aside.
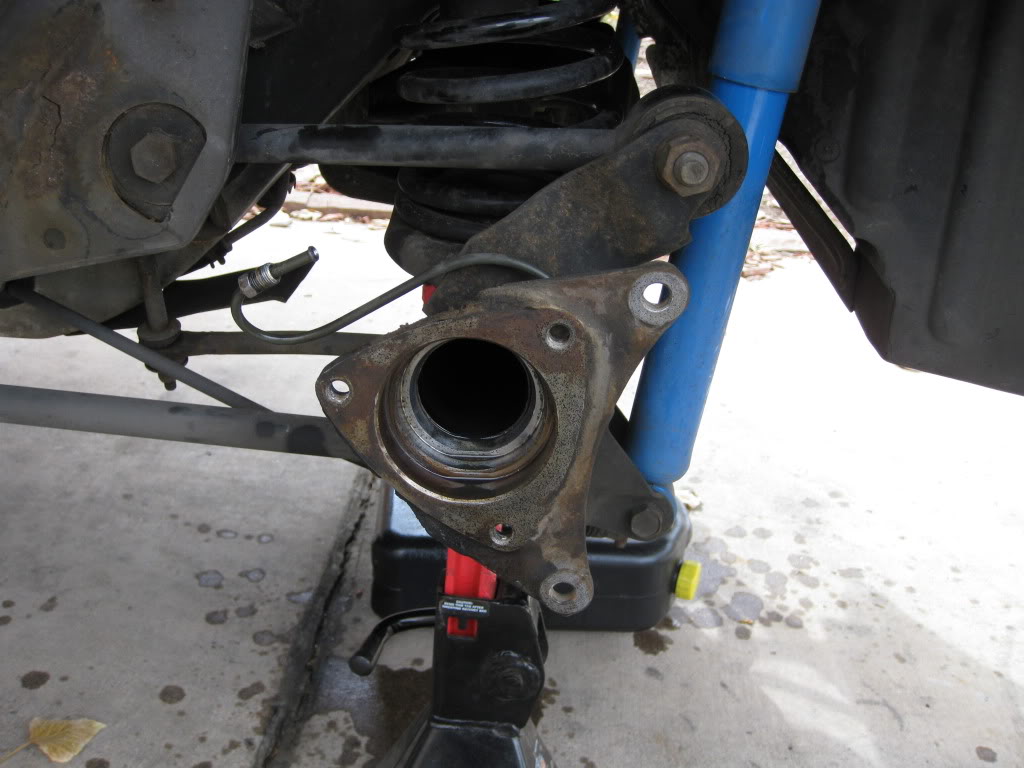
If you look at the bearing assembly on the axle, you'll see that starting from the outside, there is the backing plate, then a spacer, then the bearing itself, then the retaining collar. The bearing and collar are pressed onto the axle with several tons of force; the spacer is slip-fit, and the backing plate's hole is much larger than the axle. The backing plate clamps the outer bearing race into the carrier, but never touches the axle itself.
Removing the retaining collar and bearing, IMHO, is a job for professionals that you can yell and scream at if something goes wrong; I always take my axles, and my new bearings and retainers, to a reputable machine shop.
The FSM describes using a floor press with several special adaptors to remove the collar and bearing without damaging the backing plate; most shops will cut them off with a grinder and chisel. Pressing the new bearings on is easy - if you have a floor press.
I paid $60 total to have my bearings and collars swapped, and they were perfectly done in half an hour. If you're willing to leave them, you can probably get them done for less. Cheap insurance considering the difficulty of replacing the parts involved.
14) Removing the seal is easy; just use care to avoid gouging the surface the seal has to fit against, or else it won't seal correctly.
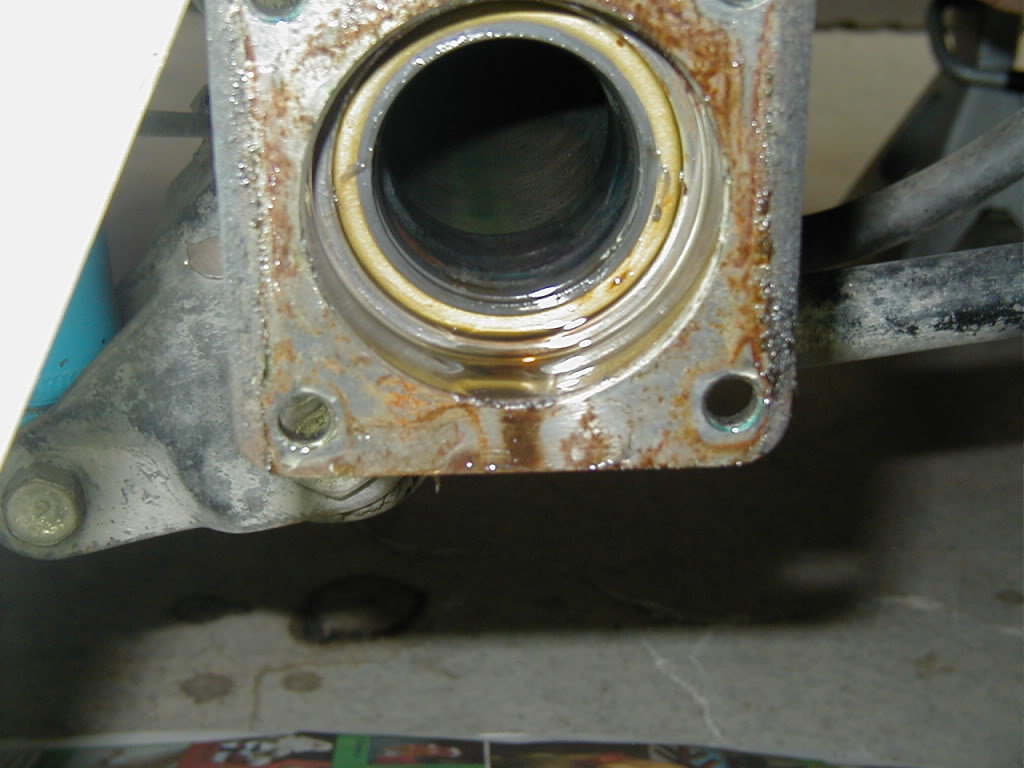
There are special tools you can buy to remove a seal, but I tend to use a wide-bladed straight screwdriver. I insert the screwdriver behind the metal seal body, and then twist (not pry!) to move the seal outward in its bore. You can also use the old "grab it with vice grips and yank it out" method. You will tear the seal up in the process, but the idea is to replace it anyway. Jus don't scratch the bore that the seal fit in.
15) carefully clean up the seal bore and the backing plate mounting flange; you want it clean and dry (no lube on it) before installing the new seal.
This completes the "removal" phase; In the next post, I'll cover seal installation and reassembly. Meantime, supper is calling!
Pictures and instructions here depict the process for an SA, GS build, which is a small-axle rear with manual-adjust drum brakes; Those with disc rears or starwheel-adjust drums will see some variations in brake/backing plate details, but the core procedure remains the same.
1) Break loose the rear lug bolts, chock the front wheels and get the rear up securely on jackstands on the frame; Make sure you get the car high enough that the tires will stay off the ground when you unload the rear axle, should you be center-lifting from below the third member. You'll want to let the axle down almost to the limit, and then raise it an inch or two to prevent it from hanging from the rear shocks - - some shocks do NOT like to spend time holding dangling weight. Make sure all is securely supported before proceeding.
2) Remove the rear wheels. Loosen the handbrake cable adjustment (inboard side of the brake handle, under the cover) to help facilitate drum removal.
3) On the rear of the brake backing plates, loosen the shoe adjustment locknuts, and then turn the adjusters to remove all drag from the drum. Keep in mind that the forward nut (and it's lockwasher!) are reverse-threaded. Turn the nuts and adjusters AWAY from each other to loosen, TOWARD each other to tighten.
(Note: on later drum brakes with auto-adjusters, you need to loosen the starwheel through a port in the backing plate. I don't have this config, so refer to your FSM for details.)
4) Remove the two large Philips screws from the face of the brake drum, and remove the drum.
If the drum is hard to remove, make sure you've loosened the handbrake and adjusters. If it still won't come off, it may be rusted to the axle flange, or you may have a shoe that is swollen from a fluid leak, or a drum that is heavily worn, having formed a ridge at the outer edge. Get a rubber mallet, and start hitting the face of the drum, toward the outside edge, first on one side and then the other. This will generally rock the drum loose in short order.
5) Once the drum is off, you'll be faced with something similar to this:
6) Next step is to disassemble the brakes from the backing plate. I find it makes things easier to use a 1" nylon web strap (buck or two from Ace hardware) to tightly strap the shoes in place first; this way nothing tends to go flying off or sliding around as you try to undo the strong springs that hold the shoes in place. It also makes reassembly stupid-easy, later:
7) With the shoes strapped, remove the Top coil spring, then the Bottom coil spring, then unclip the two retaining pin clips to the left and right by rotating the pin heads 90* with a pair of pliers. Pay close attention to parts position to aid reassembly. Pull the two retaining pins out through the rear of the backing plate, and unstrap the brake shoes; the assembly will pretty much just fall apart. Group all parts from one side of the car together; don't mix left and right.
8) You will find that the rear shoe is attached to the handbrake cable via a lever that is held to the shoe by a "C" clip - what my dad used to call a 'Jeezus clip," since they tend to fly off when you're removing them, making you say, "Jeezus, where'd it go!?!" You can leave the lever clipped to the shoe (unless you are replacing the shoes) but the lever must be removed from the cable. I find locking the square end of the cable in a pair of vise-grips, and then pulling the spring back by hand, makes it easy to lift the lever off the cable. Put the shoe with the other parts from this side.
Up til now, this has pretty much followed the procedure for replacing brake shoes; from here on in, we're dealing with axle-related steps.
9) Unclip the wire retaining pin that holds the handbrake cable to the backing plate (& don't lose the clip!):
You can then either A) work the cable all the way out of the backing plate, using care to avoid cracking the outer sheath, or you can B) work it partway out, and leave extracting it the rest of the way until the axle itself is being removed from the carrier. I like B, as the cable sheaths can be fragile with age, and the right-side cable costs upwards of $100 to replace these days.
10) Remove the brake cylinder from the backing plate.
Right side (shown) has one hydraulic hardline and the bleeder; left side has two hardlines.
You'll want to use a flair wrench on the line fittings, as if you try to remove them with a regular open-end wrench, you're likely to strip them, and that means having to replace the hardlines. A flair wrench supports the nut on all sides, greatly reducing the chance of rounding it. The right side is a lot easier to undo if you pull the bleeder first; but USE CARE because some styles of bleeders (including the factory ones) have a check-ball inside that will vanish instantly in a dribble of brake fluid.
Undo the flair nut, but don't attempt to pull the line out; instead, lift the cylinder off the front of the line(s) after removing the two attaching bolts from the rear.
11)Cap the hydraulic line with a red vacuum cap to help minimize leakage of brake fluid. Use a rag to sop up what will leak anyway.
12) There are four square-headed bolts, with hex nuts and lockwashers, which hold the backing plate onto the axle carrier. Remove them by undoing the nuts from the rear; the square heads lock to the backing plate.
13) At this point, the axle is theoretically free to be removed. In practice, it may take a fair amount of force to remove it, depending on how much rust and crud has built up between the bearing race and the carrier.
The MAIN POINT in any removal scheme is to avoid bending the brake backing plate. The second MAIN POINT is to avoid yanking the car off the stands in the process. This is the other reason why having the axle partially 'loaded up' instead of dangling, with the frame securely on stands, is a good idea.
My favorite removal method is to sit facing the axle, put one foot against the lower control arm, and give a sharp yank on the axle flange (not the backing plate!)with both hands. This has worked for me every time (5 occasions now, two axles each) I've needed to pull axles; I've heard tell of people who have had to resort to slide-hammers and more extreme measures, but thus far I've been lucky.
Once the axle is free, slide it carefully out of the carrier, and put it aside.
If you look at the bearing assembly on the axle, you'll see that starting from the outside, there is the backing plate, then a spacer, then the bearing itself, then the retaining collar. The bearing and collar are pressed onto the axle with several tons of force; the spacer is slip-fit, and the backing plate's hole is much larger than the axle. The backing plate clamps the outer bearing race into the carrier, but never touches the axle itself.
Removing the retaining collar and bearing, IMHO, is a job for professionals that you can yell and scream at if something goes wrong; I always take my axles, and my new bearings and retainers, to a reputable machine shop.
The FSM describes using a floor press with several special adaptors to remove the collar and bearing without damaging the backing plate; most shops will cut them off with a grinder and chisel. Pressing the new bearings on is easy - if you have a floor press.
I paid $60 total to have my bearings and collars swapped, and they were perfectly done in half an hour. If you're willing to leave them, you can probably get them done for less. Cheap insurance considering the difficulty of replacing the parts involved.
14) Removing the seal is easy; just use care to avoid gouging the surface the seal has to fit against, or else it won't seal correctly.
There are special tools you can buy to remove a seal, but I tend to use a wide-bladed straight screwdriver. I insert the screwdriver behind the metal seal body, and then twist (not pry!) to move the seal outward in its bore. You can also use the old "grab it with vice grips and yank it out" method. You will tear the seal up in the process, but the idea is to replace it anyway. Jus don't scratch the bore that the seal fit in.
15) carefully clean up the seal bore and the backing plate mounting flange; you want it clean and dry (no lube on it) before installing the new seal.
This completes the "removal" phase; In the next post, I'll cover seal installation and reassembly. Meantime, supper is calling!
Thread Starter
Joined: Jun 2008
Posts: 8,376
Likes: 28
From: Chino Hills, CA
Part II:
Ok, whatever we were planning to do to the axles and backing plates have been done (I usually disassemble, clean, and reassemble the brake adjusters & paint the backing plate at this point) and our new seals are in-hand, so it's time to assemble.
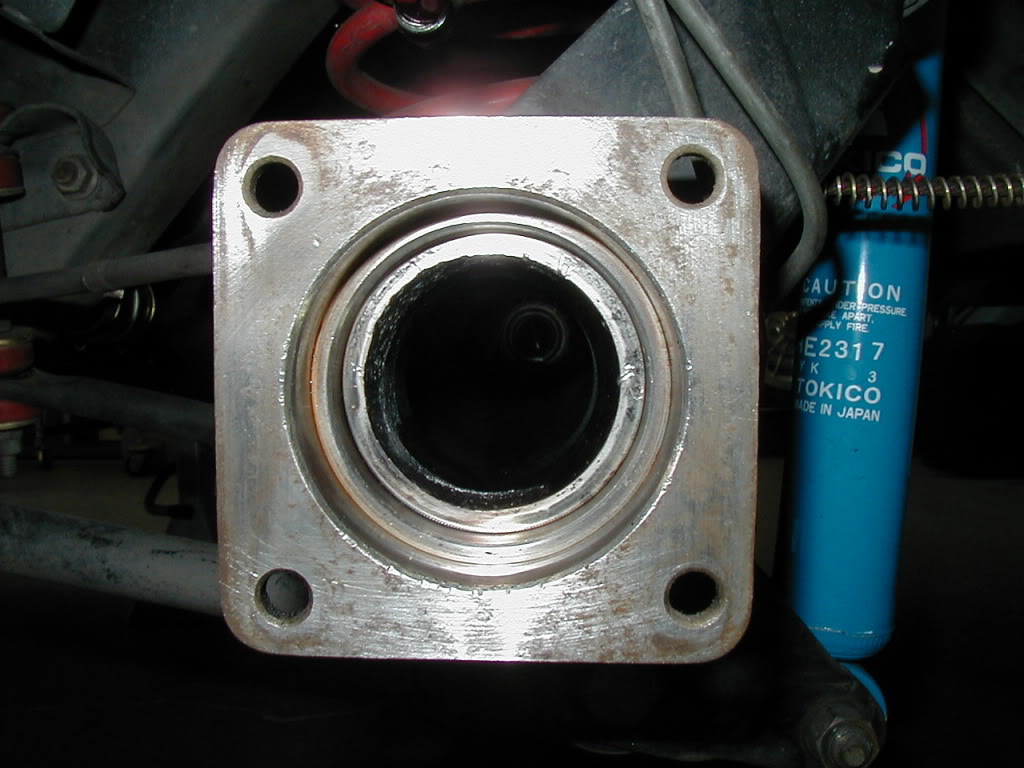
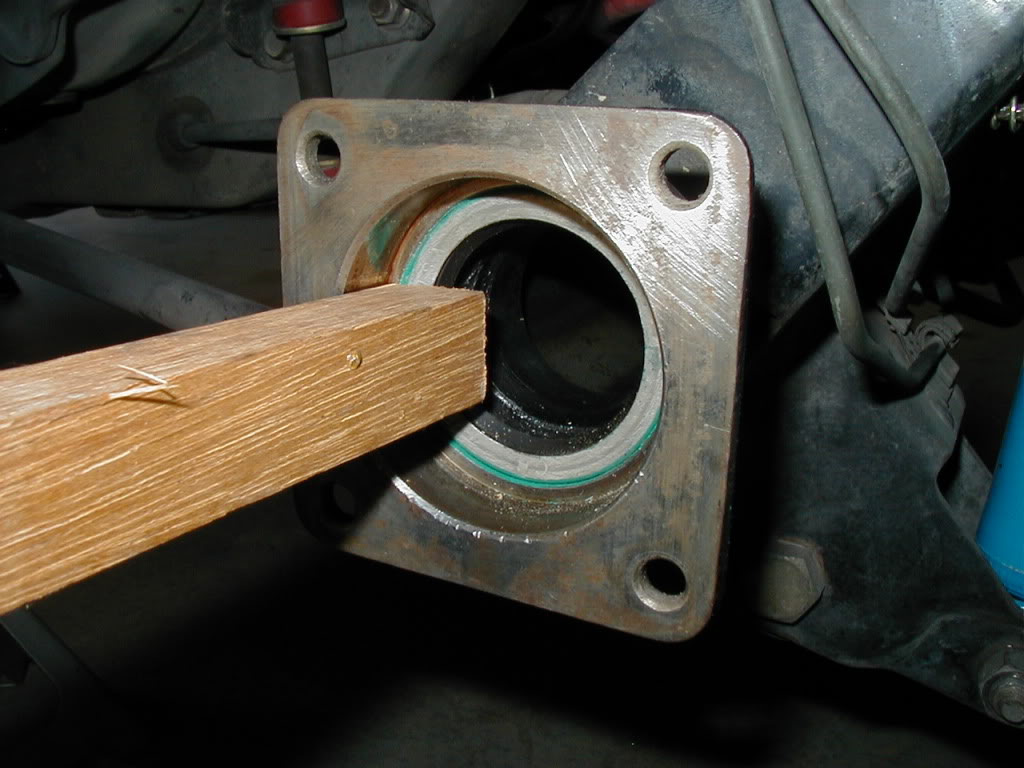
The seals are designed to be installed dry, and to press-fit into the seal bores. Because of this, they are slightly larger than the bores, and are 'reverse tapered,' meaning they are slightly larger on the edge that goes in first. They have a small chamfer or rounded leading edge, to help with lining them up in the bore.
The main trick to installing the seals is to get them started straight, and keep them straight as they install. If they get off-level too far during installation, they will either end up crooked & bind in the bore, or they will end up bent, & not seal properly.
Photo of the seal properly aligned in the entry of the bore, ready to be installed:
There are a few different methods that can be used to install seals:
a) You can use a seal-installing tool, which is basically a combination guide and drift meant to keep the seal straight in the bore while you tap it in with a hammer. I've never owned one, but they look slick enough. I've never needed one frequently enough to feel the need to spring for a set of them, though.
b) If you have a socket as large as the seal's outer face (or nearly so), you can use the socket face as a drift to work the seal in around the edges. I used to use this method, but I found it prone to denting the seal face unless you are very careful. Photo for illustration purposes:

c) You can use a hardwood block or dowel as a drift, in the same fashion, slowly working the edges in by tapping opposing edges with the wood and a hammer, working gradually in a star pattern. This is my preferred method, as it is less likely to dent the face of the seal, and if you are simply careful to 1) keep things even, and 2) NOT let the wood slip inward and tear the rubber part of the seal, it works quite reliably.
If hte seal starts to misalign early on, and you catch it, you can often pull the seal back out by hand and start again. if you aer too aggressive with your tapping and manage to crease the seal or get it bound up in the bore, you may need to juck it and get another. So, be patient, work slowly, keep watching to ensure things stay evenly aligned. The first part is the slowest.
d) I'm told you can use the axle to align and press the seal in, but I found this very cumbersome due to the axle's weight, & have never tried it.
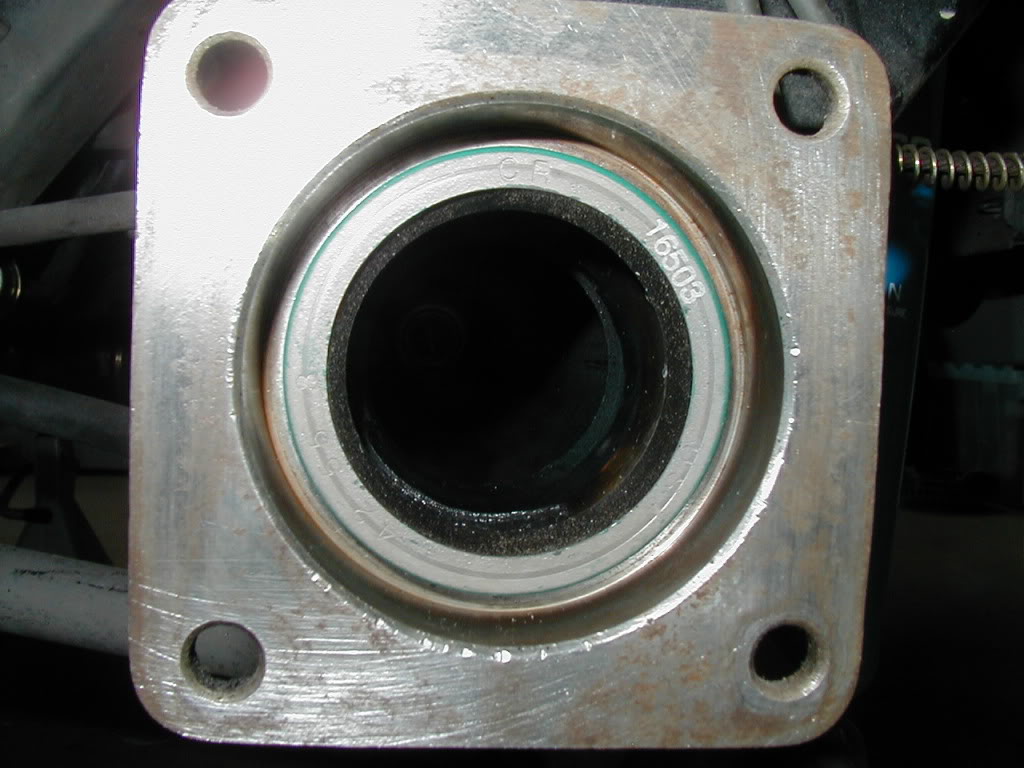
1) With whatever method you choose, gently tap the seal all the way into the bore until the outer face is flush with the bottom edge of the chamfer between the seal bore and the bearing recess:

2) Wipe off any debris from the wood block or little shards of the seal's outside sealant that may have fallen into the bearing chamber. You want this area clean!
3) Make sure you get the proper axle for the side of the care you are working on: the axles are the same, left and right, but the backing plates are NOT; the tube for the handbrake cable must face the front of the car when it's in position at the bottom of the plate.
I tend to start with the right side of the car, as there's less chance of brake fluid leaking on your fresh work if the left brake cylinder isn't installed yet - - it interrupts the supply from the master.
NOTE: some SA's (and for all I know, FB's too) come with a gasket between the backing plate and the carrier flange; you may or may not beable to use this gasket, depending on the amount of end play you end up with when the shaft is fully seated and bolted down. In my case, the OEM gaskets caused too much shaft end play with the new bearings, and I had to remove them & use a thin layer of silicone instead. Without them, my play was perfect.
If your axle had gaskets when you disassembled it, I'd recommend trying to use them first, but be sure to check your end play before completing assembly. Spec limit for SA's is 0-0.1mm or 0-0.004in, measured with a dial guage.
4) Apply bearing grease to the rubber lip of the seal, and to the outside of the retaining collar on the axle to be installed; this will lubricate the seals until you get some rear-end lube sloshing about while driving. The seal actually rides on the retaining collar, not the bearing or the shaft.
5) Being very careful to NOT let the axle shaft rub the sensitive lip of the new seal, slide the axle into the carrier. When it bumps the third member inside, you will need to angle it up and locate the hole for the splines by feel. It takes a bit of lifting to balance the shaft above the seal while you do this.
When you locate the hole in the third member, then start slowly rotating the shaft to align the splines. You'll feel another small upward 'lip' to get over, and then the shaft will slide in easily. Along the way, start the handbrake cable into it's hole, and feed it through as you move the axles inward.
6) Align the bearing outer race with the carrier bore, and slide'er home. It should fit snugly, but without any binding.
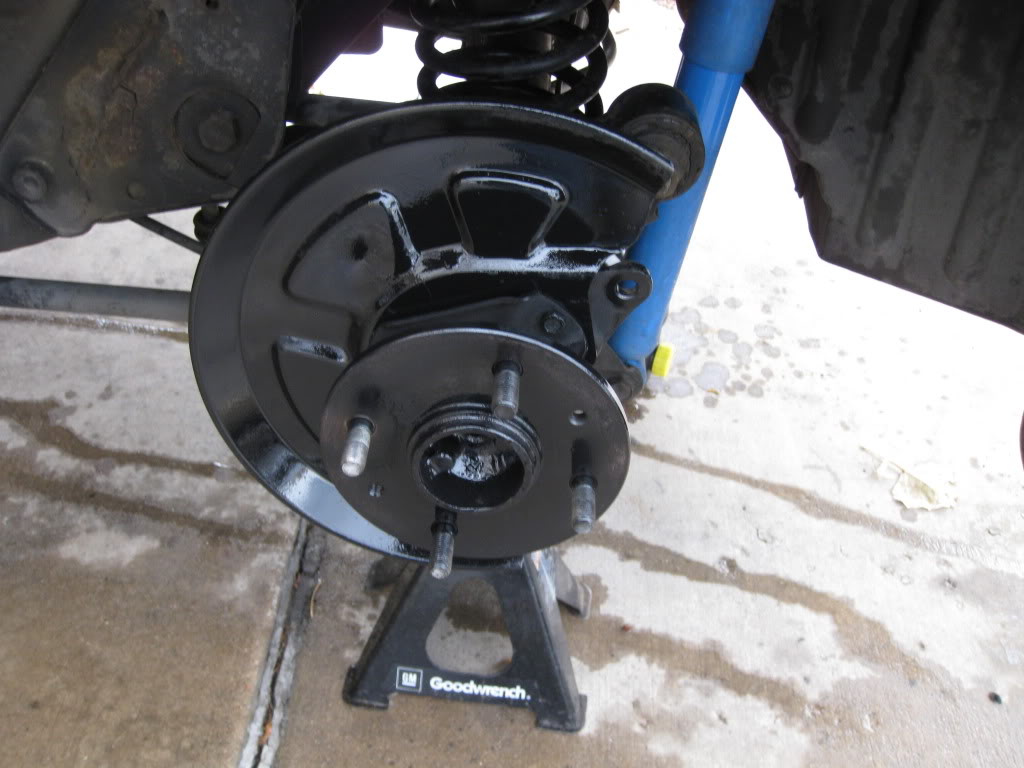
Assembly is more or less the reverse of disassembly:
7) Bolt the backing plate to the carrier, torque properly, then check axle end play before going further.
8) Reinstall the brake cylinder, taking care to align the hardlines in their bores before bolting the clyinder to the backing plate, and start the flare nuts properly. Tighten with a flare wrench.
9) Set the brake adjusters to the loosest (inmost) position.
10) Grease the ends of the wheel cylinders, the contact faces of the adjusters, and the shoe contact points on the backing plate with brake grease. Go easy; you don't want it spreading.
11) Install the wire clip that retains the handbrake cable in it's tube.
12) Install the handbrake cable lever (presumably still attached to the rear shoe) back onto the cable. This can be a bit of a bear, as the spring that holds it on is fairly strong. I like to again lock the end of the cable into a pair of visegrips, then I place the hook at the end of the lever on top the cable spring open-side down. I use a leather glove to pull the spring back, and as soon as the gap is big enough, the lever will just drop into place on the cable. Rotate the shoe into position to make sure you didn't get the cable in the lever backwards!
13) Using one retaining pin and clip, clip the rear shoe into place on the backing plate. Try to keep it from sliding around & spreading the grease on the contact points where you don't want it.
14) Slip the parking brake strut rod, with the big spring through it's rubber retainer, into position at the top of the shoe, align the notch in it with the notch in the handbrake cable lever, and clip the spring to the shoe.
15) Put the small spring in postion at the bottom of the shoe, and hook it to the shoe.
16) Using the other retaining pin and clip, clip the front shoe in place, aligning it's notch with the notch in the handbrake strut rod.
17) If you have the web strap I mentioned in disassembly, now's the time it can save you tons of frstration. The only hard part in assembling drum brakes is getting the springs stretched into place without everything sliding out of alignment. There are special 'brake spring pliers' you can buy that are meant for this, but the ones I have found are too large to work well on the first-gen's tiny drums. Using the web strap to tightly hold the shoes in place makes it child's play to stretch the springs back into place with visegrips or longnose pliers.
18) Doublecheck all is right, then do the other axle.
19) Install the drums, and adjust the shoe adjusters in accordance with the instructions in the FSM. Turn the top of the adjusters inward to spread the shoes; hold the adjusters in position and turn the locknuts top-inward to lock them down.
20 Adjust the handbrake.
21) Bleed the brake system.
You're done!
Any questions?
Ok, whatever we were planning to do to the axles and backing plates have been done (I usually disassemble, clean, and reassemble the brake adjusters & paint the backing plate at this point) and our new seals are in-hand, so it's time to assemble.
The seals are designed to be installed dry, and to press-fit into the seal bores. Because of this, they are slightly larger than the bores, and are 'reverse tapered,' meaning they are slightly larger on the edge that goes in first. They have a small chamfer or rounded leading edge, to help with lining them up in the bore.
The main trick to installing the seals is to get them started straight, and keep them straight as they install. If they get off-level too far during installation, they will either end up crooked & bind in the bore, or they will end up bent, & not seal properly.
Photo of the seal properly aligned in the entry of the bore, ready to be installed:
There are a few different methods that can be used to install seals:
a) You can use a seal-installing tool, which is basically a combination guide and drift meant to keep the seal straight in the bore while you tap it in with a hammer. I've never owned one, but they look slick enough. I've never needed one frequently enough to feel the need to spring for a set of them, though.
b) If you have a socket as large as the seal's outer face (or nearly so), you can use the socket face as a drift to work the seal in around the edges. I used to use this method, but I found it prone to denting the seal face unless you are very careful. Photo for illustration purposes:
c) You can use a hardwood block or dowel as a drift, in the same fashion, slowly working the edges in by tapping opposing edges with the wood and a hammer, working gradually in a star pattern. This is my preferred method, as it is less likely to dent the face of the seal, and if you are simply careful to 1) keep things even, and 2) NOT let the wood slip inward and tear the rubber part of the seal, it works quite reliably.
If hte seal starts to misalign early on, and you catch it, you can often pull the seal back out by hand and start again. if you aer too aggressive with your tapping and manage to crease the seal or get it bound up in the bore, you may need to juck it and get another. So, be patient, work slowly, keep watching to ensure things stay evenly aligned. The first part is the slowest.
d) I'm told you can use the axle to align and press the seal in, but I found this very cumbersome due to the axle's weight, & have never tried it.
1) With whatever method you choose, gently tap the seal all the way into the bore until the outer face is flush with the bottom edge of the chamfer between the seal bore and the bearing recess:
2) Wipe off any debris from the wood block or little shards of the seal's outside sealant that may have fallen into the bearing chamber. You want this area clean!
3) Make sure you get the proper axle for the side of the care you are working on: the axles are the same, left and right, but the backing plates are NOT; the tube for the handbrake cable must face the front of the car when it's in position at the bottom of the plate.
I tend to start with the right side of the car, as there's less chance of brake fluid leaking on your fresh work if the left brake cylinder isn't installed yet - - it interrupts the supply from the master.
NOTE: some SA's (and for all I know, FB's too) come with a gasket between the backing plate and the carrier flange; you may or may not beable to use this gasket, depending on the amount of end play you end up with when the shaft is fully seated and bolted down. In my case, the OEM gaskets caused too much shaft end play with the new bearings, and I had to remove them & use a thin layer of silicone instead. Without them, my play was perfect.
If your axle had gaskets when you disassembled it, I'd recommend trying to use them first, but be sure to check your end play before completing assembly. Spec limit for SA's is 0-0.1mm or 0-0.004in, measured with a dial guage.
4) Apply bearing grease to the rubber lip of the seal, and to the outside of the retaining collar on the axle to be installed; this will lubricate the seals until you get some rear-end lube sloshing about while driving. The seal actually rides on the retaining collar, not the bearing or the shaft.
5) Being very careful to NOT let the axle shaft rub the sensitive lip of the new seal, slide the axle into the carrier. When it bumps the third member inside, you will need to angle it up and locate the hole for the splines by feel. It takes a bit of lifting to balance the shaft above the seal while you do this.
When you locate the hole in the third member, then start slowly rotating the shaft to align the splines. You'll feel another small upward 'lip' to get over, and then the shaft will slide in easily. Along the way, start the handbrake cable into it's hole, and feed it through as you move the axles inward.
6) Align the bearing outer race with the carrier bore, and slide'er home. It should fit snugly, but without any binding.
Assembly is more or less the reverse of disassembly:
7) Bolt the backing plate to the carrier, torque properly, then check axle end play before going further.
8) Reinstall the brake cylinder, taking care to align the hardlines in their bores before bolting the clyinder to the backing plate, and start the flare nuts properly. Tighten with a flare wrench.
9) Set the brake adjusters to the loosest (inmost) position.
10) Grease the ends of the wheel cylinders, the contact faces of the adjusters, and the shoe contact points on the backing plate with brake grease. Go easy; you don't want it spreading.
11) Install the wire clip that retains the handbrake cable in it's tube.
12) Install the handbrake cable lever (presumably still attached to the rear shoe) back onto the cable. This can be a bit of a bear, as the spring that holds it on is fairly strong. I like to again lock the end of the cable into a pair of visegrips, then I place the hook at the end of the lever on top the cable spring open-side down. I use a leather glove to pull the spring back, and as soon as the gap is big enough, the lever will just drop into place on the cable. Rotate the shoe into position to make sure you didn't get the cable in the lever backwards!
13) Using one retaining pin and clip, clip the rear shoe into place on the backing plate. Try to keep it from sliding around & spreading the grease on the contact points where you don't want it.
14) Slip the parking brake strut rod, with the big spring through it's rubber retainer, into position at the top of the shoe, align the notch in it with the notch in the handbrake cable lever, and clip the spring to the shoe.
15) Put the small spring in postion at the bottom of the shoe, and hook it to the shoe.
16) Using the other retaining pin and clip, clip the front shoe in place, aligning it's notch with the notch in the handbrake strut rod.
17) If you have the web strap I mentioned in disassembly, now's the time it can save you tons of frstration. The only hard part in assembling drum brakes is getting the springs stretched into place without everything sliding out of alignment. There are special 'brake spring pliers' you can buy that are meant for this, but the ones I have found are too large to work well on the first-gen's tiny drums. Using the web strap to tightly hold the shoes in place makes it child's play to stretch the springs back into place with visegrips or longnose pliers.
18) Doublecheck all is right, then do the other axle.
19) Install the drums, and adjust the shoe adjusters in accordance with the instructions in the FSM. Turn the top of the adjusters inward to spread the shoes; hold the adjusters in position and turn the locknuts top-inward to lock them down.
20 Adjust the handbrake.
21) Bleed the brake system.
You're done!
Any questions?

Good write up DD. I think it needs to be archived after a week of comments 
Heres some more random tips.
Stubborn brake drums that have rusted them selves to the axle flange can be
freed by applying heat from a torch around the center of the drum and between
the bolt holes. You still use the hammer to tap it on the edges but when heating
the drum it will emit some rather load pings. Those noises are the drum expanding
from the heat and breaking the rust seal. It should fall off after this.
You can cut off the bearing retaining collar and old bearing with a cutoff wheel or
dremel. Just be careful not to gouge the axle in the process.


Joined: Mar 2001
Posts: 31,849
Likes: 3,238
From: https://www2.mazda.com/en/100th/
nice write up!
after bending a bunch of axle seals, i was told the dealership mechanics use the "put the seal on the axle, and use it as a GIANT installer tool" method. its worked for me! although this was um a long time ago...
after bending a bunch of axle seals, i was told the dealership mechanics use the "put the seal on the axle, and use it as a GIANT installer tool" method. its worked for me! although this was um a long time ago...
Thats how I did it as well. I installed bearing onto axle and then got it all lined up and started straight and then bolted an old crappy wheel (spare one from a previous part out). Next step involved BFH and blam-o all done.
Thread Starter
Joined: Jun 2008
Posts: 8,376
Likes: 28
From: Chino Hills, CA
There is one good argument for removing them yourself; it makes it possible to re-paint the brake backing plate much more easily. Just make sure the shop doing the press work on the new bearings don't get it back on backward...
Trending Topics
^I always cut the old ones off with a cutoff wheel. As you said, its a good excuse to sandblast (things rust a lot more out here lol) and paint the backing plate. Also, I had a bad experience with a shop bending a set of axles on me years ago because they didn't have the proper setup for removing the bearings....
As for the seal, Harbor Freight sells a cheap set of seal installers you might consider looking into. Makes the job real easy and also doubles as a race installer for the front hubs (or any two piece bearing you might be replacing)
As for the seal, Harbor Freight sells a cheap set of seal installers you might consider looking into. Makes the job real easy and also doubles as a race installer for the front hubs (or any two piece bearing you might be replacing)

Full Member
Joined: Jun 2011
Posts: 103
Likes: 0
From: Minnesota
I'm going to be replacing an axle soon on my big-bearing GSL, and there's been something that I've been wondering. I ordered new bearings and collars from RockAuto, but I didn't find new spacers on the site. Does that mean I should be able to just reuse the spacers, since they're slip-fit and can be taken off without breaking them?

i sticky'd this for now and i will move this into the archive once it has had some time on the front page. i read through it and, not that i am right and you would be wrong by any means, but i don't do a thing differently other than strapping the shoes which is an excellent idea. i see no faults in the writeup and i thank you for taking the time to take the pics and type all of the info. well done sir!
I will be doing the same thing on my GSL-SE in the next month or so. If you want, I can add to the writeup and cover the rear disk setup. Or I can do a second writeup in the same format.
I'm going to be replacing an axle soon on my big-bearing GSL, and there's been something that I've been wondering. I ordered new bearings and collars from RockAuto, but I didn't find new spacers on the site. Does that mean I should be able to just reuse the spacers, since they're slip-fit and can be taken off without breaking them?
RX-7 Chris: You might as well just add to this thread, the process of changing the seal itself is the same, its just the dissasemly of the brakes and backing plate that differs. You could probably just add a few pics and a quick note and that would be enough
Full Member
Joined: Jun 2011
Posts: 103
Likes: 0
From: Minnesota
Removing the retaining collar and bearing, IMHO, is a job for professionals that you can yell and scream at if something goes wrong; I always take my axles, and my new bearings and retainers, to a reputable machine shop.
The FSM describes using a floor press with several special adaptors to remove the collar and bearing without damaging the backing plate; most shops will cut them off with a grinder and chisel. Pressing the new bearings on is easy - if you have a floor press.
I paid $60 total to have my bearings and collars swapped, and they were perfectly done in half an hour. If you're willing to leave them, you can probably get them done for less. Cheap insurance considering the difficulty of replacing the parts involved.
Once you get the collar to crack even a little, you should be able to start chiseling it down the shaft, but the bearing is an entirely different beast. In order to safely cut the inner race without hurting the spacer, it's imperative to somehow pry off the outer race and ball bearings first, which is no easy task.
As for installing the new bearings and collars, I had access to a 30-ton shop press, but I had problems with that too. It certainly didn't help that it was out of alignment, meaning that it actually wouldn't press down in the exact center of the frame, but the bigger issue stemmed from the lack of usable plates. The holes were either too big (specifically, while pressing on the collar, I nearly had a heart attack because the two plates split apart under the pressure) or not big enough to be able to press down all the way without the shaft getting in the way (this had to do with pressing on lug studs beforehand, but it's relevant). I'm pretty sure everything was pressed into place evenly and level, but had I possessed the proper pressing plates I'd be worrying less.
tl;dr It's not a bad idea to pay the extra money to have a shop do this part of the procedure quickly, safely, and correctly.


Thread
Thread Starter
Forum
Replies
Last Post
tallbozo
1st Generation Specific (1979-1985)
3
Aug 15, 2015 02:47 PM