
Mississippi FD - 383CI Forged LS1 Stroker Build

Thread Starter
Joined: Apr 2009
Posts: 381
Likes: 27
From: Starkville, MS
Hello,
At the request of quite a few club members who have stumbled onto my build hosted on another forum I am making a copy
available here. I will be posting almost 2 years worth of material in this thread over the next few hours/days. I know
engine swaps aren't exactly smiled upon here, so I am prepared for some flaming, but please, keep it reasonable and grown
up. My engine choice may not be what many of you would choose, but I think other aspects of my build may interest some of
you especially since I document with a lot of pictures
My name is Lane Simmons, I'm a 29 year old Electrical Engineer and I have been interested in building a V8 RX7 for about 4
years now. I've owned 2 mr2's over the past 10 years but recently got my chance to switch over to RX7's and I made my move
after selling my mr2 turbo to my younger brother.
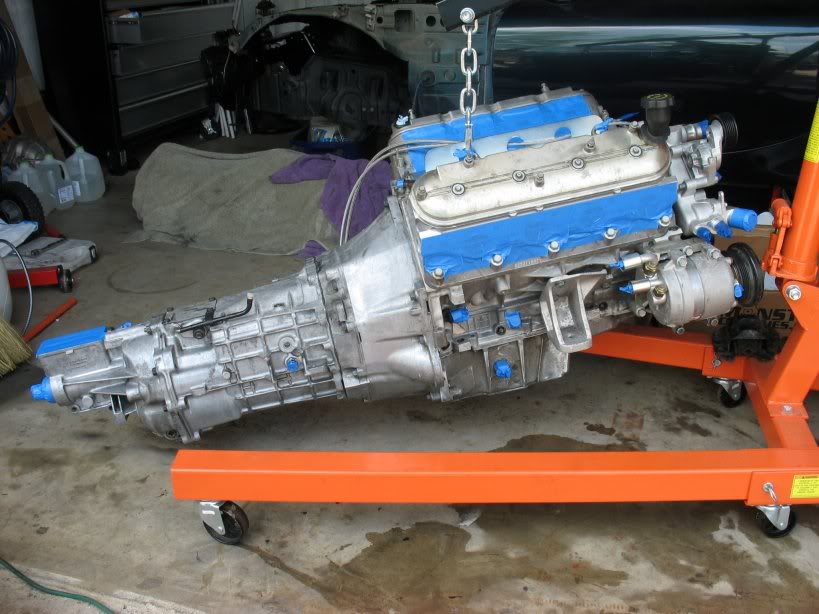
I was very fortunate to meet someone locally who was selling their 1993 FD roller + 1 7/8 JTR headers + full Hinson's V8
conversion over eBay. After talking to the owner extensively over the phone we worked out a price and I purchased it
directly. At the time, he was pulling the LS1 he'd built for the RX7 to put into his 69 (If I remember correctly) Camaro.
However, a few weeks down the road he offered to sell me the engine, transmission, and clutch as well because someone made
an offer on the Camaro he apparently couldn't refuse. It turned out that it was an offer I too could not refuse.
Plan -
Engine:
Ls1 aluminum block built for 10.4:1 compression with only 4k miles on it as built.
Complete assembly is balanced
Forged flat top 3.90" Mahle pistons
Forged Eagle rods
Forged Eagle stroker crank with 4" stroke designed to displace 383CI.
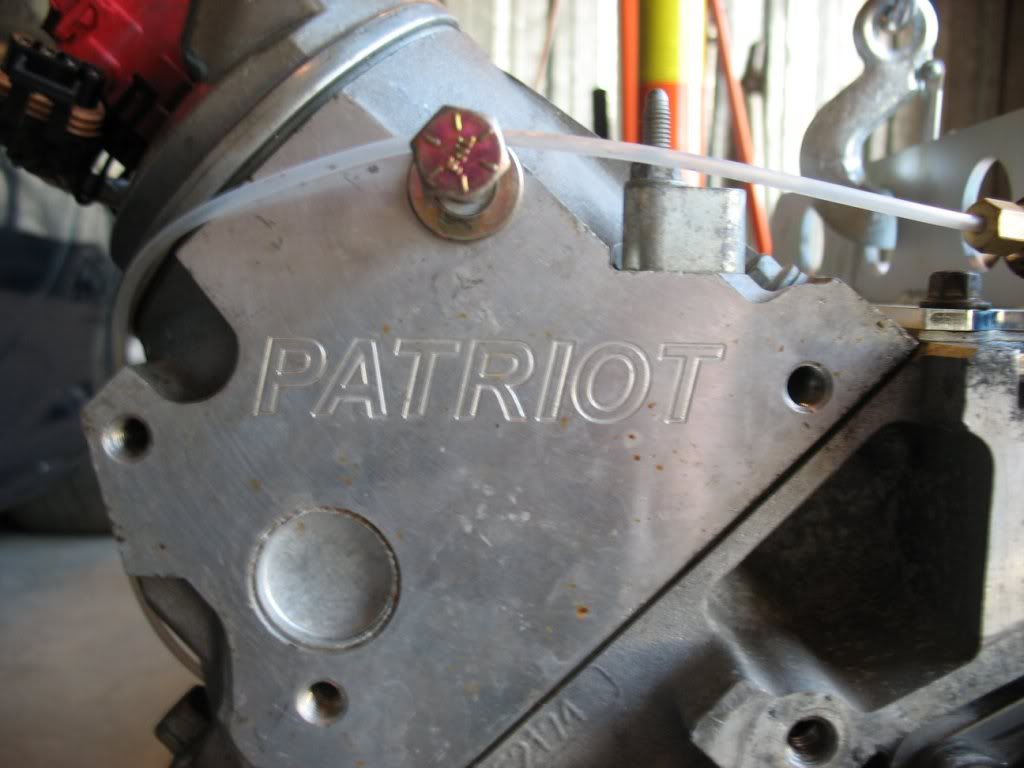
Patriot LQ9 heads with 72cc chambers 2.055"/1.60" valves with harland sharp 1.7 roller rockers.
Comp pushrods and lifters.
Gm performance oil Pump and chain
Arp rod and main bolts
Trick flow head gaskets
Patriot custom cam .585"/.585" lift, 226/226 duration and 112 lsa
0 miles on the Water pump, Ac Compressor and both tensioners
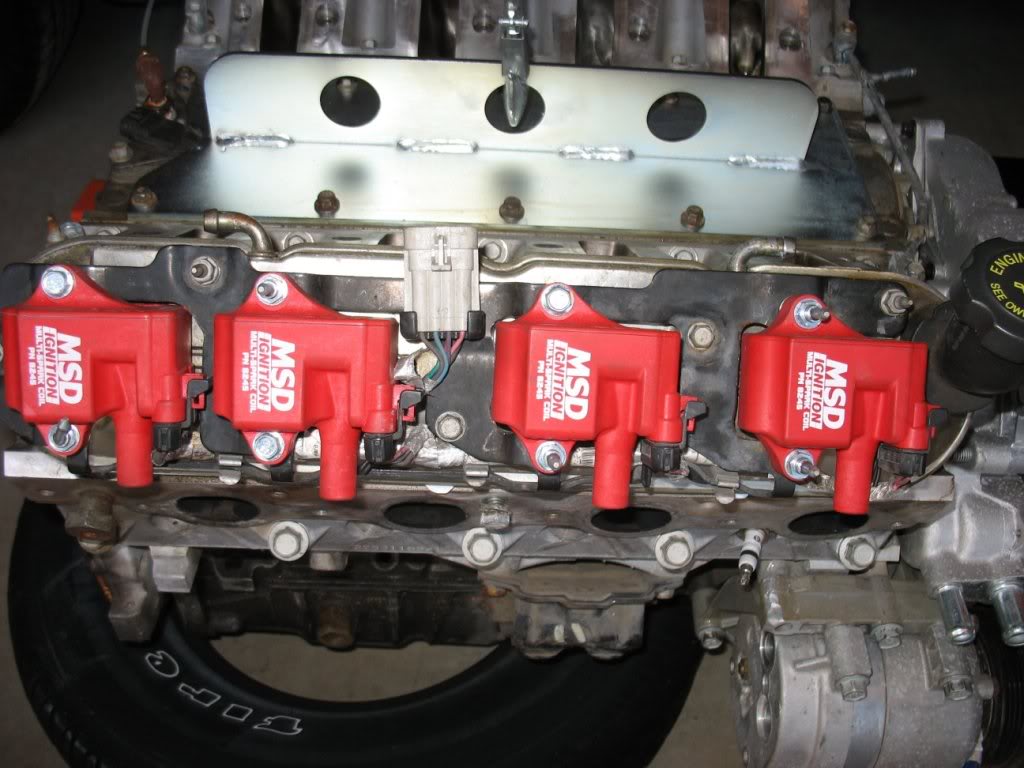
Brand new msd coils and wires.
LS6 Intake + PCV conversion
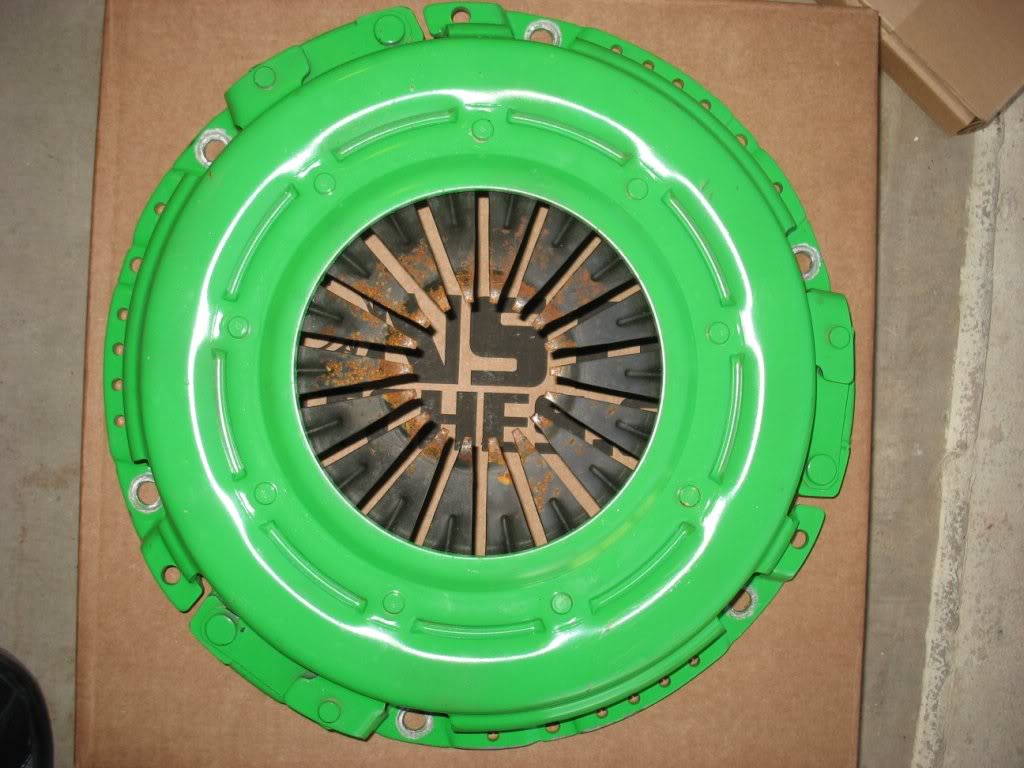
Clutch:
Monster Stage 2
Transmission:
30 spline Viper T56 with Corvette bell and tail housings.
Rear End:
Cobra 04 pumpkin with 3.55 gears and DSS axles.
Fuel:
Sumped fuel tank
Bosch 044 pump
SVO #42 Greentop injectors
Aeromotive FPR
8AN Supply line
6AN return line
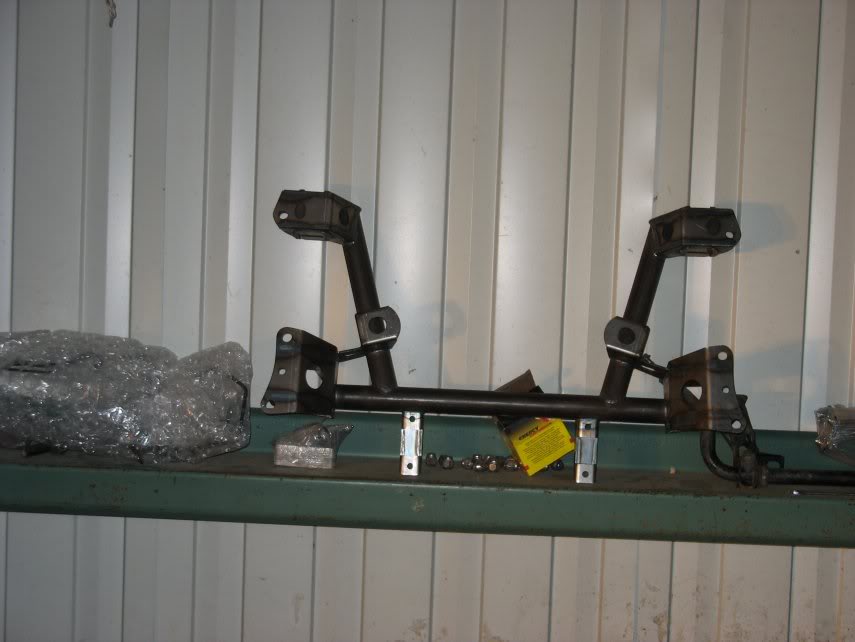
Drivetrain mounts:
All Samberg with cobra cradle + DSS driveshaft and axles. All the Hinson related stuff you see in these pictures has been
sold.
Electronics: (Done by yours truly)
A complete harness overhaul which to my knowledge is one of the biggest FD wiring projects I've ever seen documented online.
Full Speedhut gauge install
Racelogic TC
Suspension/Wheels/Brakes/Steering:
Full Superpro bushing kit
New pillowballs
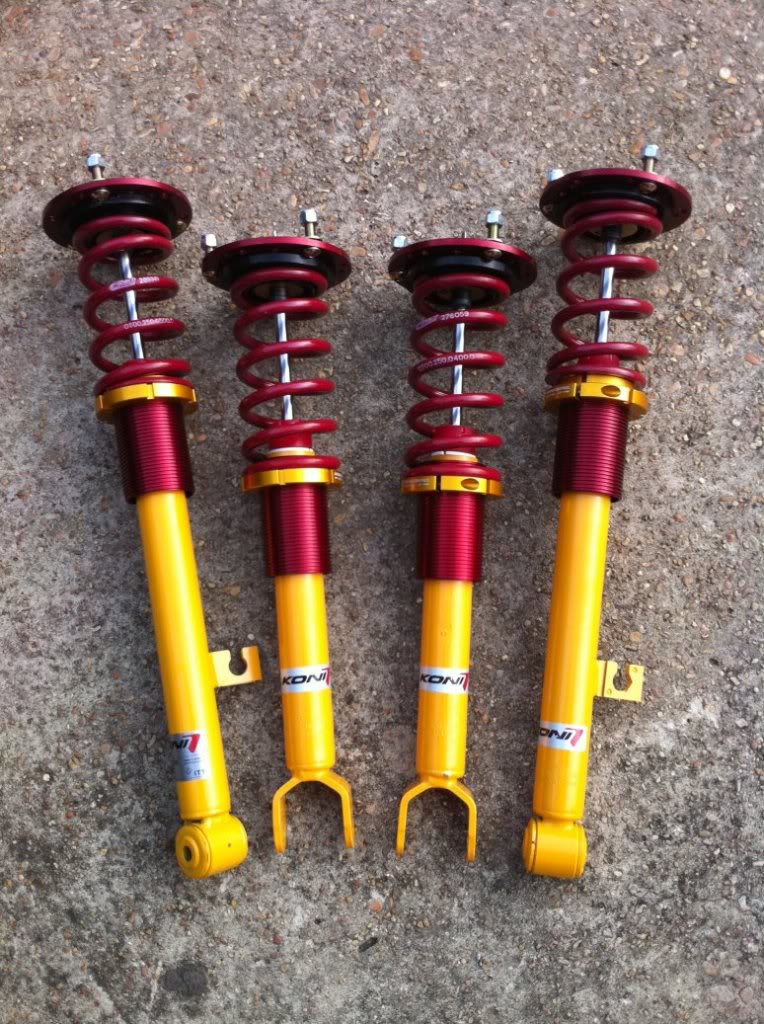
Koni Yellows + GC Coilover upgrades
Hawk HPS pads
Stoptech SS brake lines
17x10 +35 5zigen FN01R-C's with 275/40/17R and 255/40/17F tires
Work lug nuts
Power Steering line by Pez
Cooling:
Samberg Rev2 radiator + CAI
Exterior:
99+ JDM Tails
99 Front bumper, combo lights, and front spoiler
Shaved rear spoiler, wiper arm, and spray nozzle (My build started with a touring chassis)
Aluminum door handles
Hella Twin Supertone Horns
DIY HID Projector Upgrade which includes the following:
Morimoto 3Five Ballasts (35w)
Bi-xenon: Morimoto Mini projectors
Philips 85122+ (4300K) bulbs
E55 Shrouds
Crystal Clear lenses on stock RX7 light housings.
Interior:
Tan to Black conversion. All I have so far is some sub 30k black leather seats I picked up 2 weeks ago.
ACC carpet
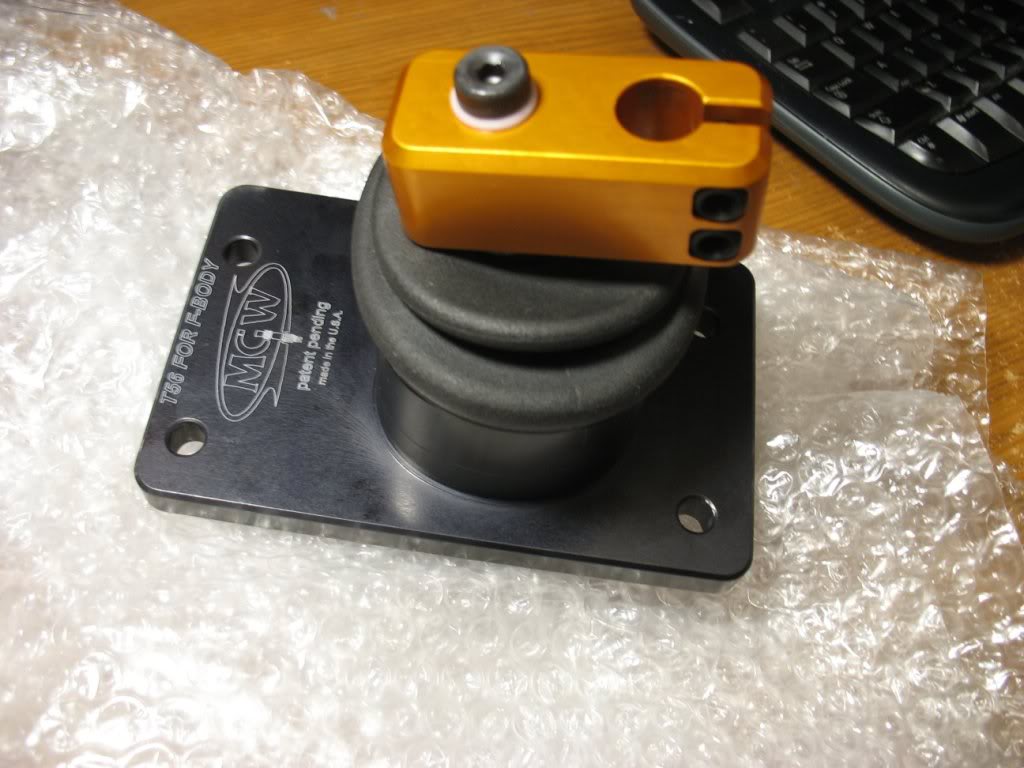
MGW T56 short shifter
MGW 6 speed shift ****
Momo Tuner Steering Wheel
Momo Hub
NRG Quick Release
Redline leather trim
SakeBomb aluminum passenger handle
JasonS floor mats
Lizard Skin sound control
Exhaust:
1 7/8" JTR Longtube Headers
Custom dual 3" exhaust by Kevin Doe
Power:
400-500WHP
Lane
At the request of quite a few club members who have stumbled onto my build hosted on another forum I am making a copy
available here. I will be posting almost 2 years worth of material in this thread over the next few hours/days. I know
engine swaps aren't exactly smiled upon here, so I am prepared for some flaming, but please, keep it reasonable and grown
up. My engine choice may not be what many of you would choose, but I think other aspects of my build may interest some of
you especially since I document with a lot of pictures
My name is Lane Simmons, I'm a 29 year old Electrical Engineer and I have been interested in building a V8 RX7 for about 4
years now. I've owned 2 mr2's over the past 10 years but recently got my chance to switch over to RX7's and I made my move
after selling my mr2 turbo to my younger brother.
I was very fortunate to meet someone locally who was selling their 1993 FD roller + 1 7/8 JTR headers + full Hinson's V8
conversion over eBay. After talking to the owner extensively over the phone we worked out a price and I purchased it
directly. At the time, he was pulling the LS1 he'd built for the RX7 to put into his 69 (If I remember correctly) Camaro.
However, a few weeks down the road he offered to sell me the engine, transmission, and clutch as well because someone made
an offer on the Camaro he apparently couldn't refuse. It turned out that it was an offer I too could not refuse.
Plan -
Engine:
Ls1 aluminum block built for 10.4:1 compression with only 4k miles on it as built.
Complete assembly is balanced
Forged flat top 3.90" Mahle pistons
Forged Eagle rods
Forged Eagle stroker crank with 4" stroke designed to displace 383CI.
Patriot LQ9 heads with 72cc chambers 2.055"/1.60" valves with harland sharp 1.7 roller rockers.
Comp pushrods and lifters.
Gm performance oil Pump and chain
Arp rod and main bolts
Trick flow head gaskets
Patriot custom cam .585"/.585" lift, 226/226 duration and 112 lsa
0 miles on the Water pump, Ac Compressor and both tensioners
Brand new msd coils and wires.
LS6 Intake + PCV conversion
Clutch:
Monster Stage 2
Transmission:
30 spline Viper T56 with Corvette bell and tail housings.
Rear End:
Cobra 04 pumpkin with 3.55 gears and DSS axles.
Fuel:
Sumped fuel tank
Bosch 044 pump
SVO #42 Greentop injectors
Aeromotive FPR
8AN Supply line
6AN return line
Drivetrain mounts:
All Samberg with cobra cradle + DSS driveshaft and axles. All the Hinson related stuff you see in these pictures has been
sold.
Electronics: (Done by yours truly)
A complete harness overhaul which to my knowledge is one of the biggest FD wiring projects I've ever seen documented online.
Full Speedhut gauge install
Racelogic TC
Suspension/Wheels/Brakes/Steering:
Full Superpro bushing kit
New pillowballs
Koni Yellows + GC Coilover upgrades
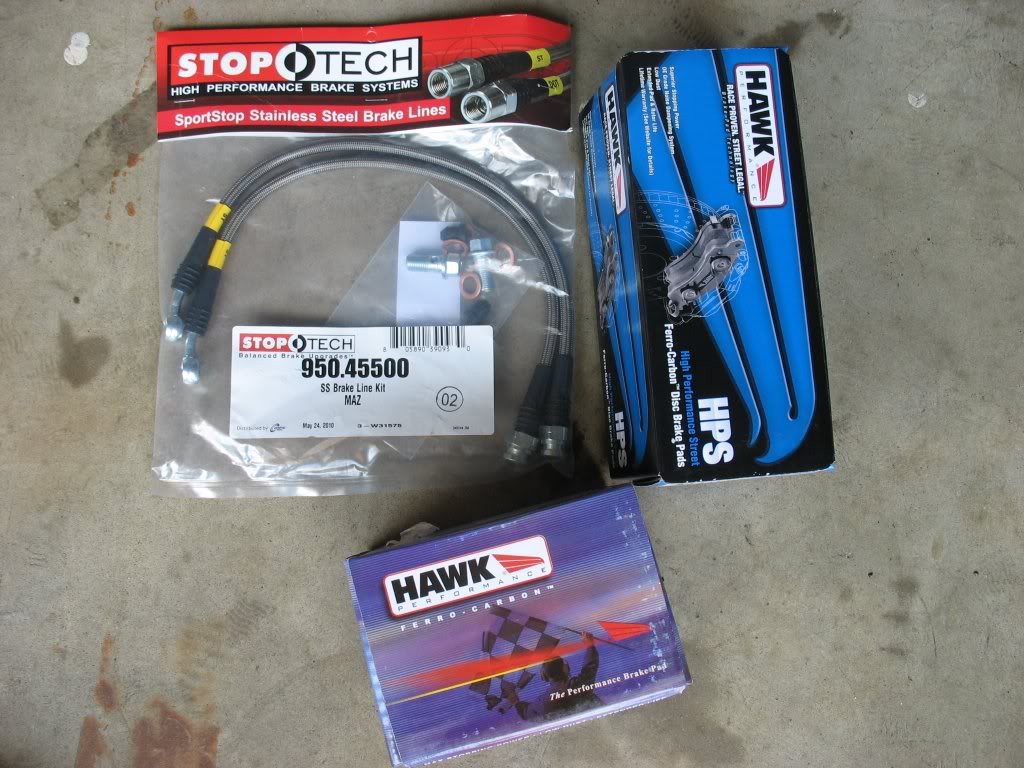
Hawk HPS pads
Stoptech SS brake lines
17x10 +35 5zigen FN01R-C's with 275/40/17R and 255/40/17F tires
Work lug nuts
Power Steering line by Pez
Cooling:
Samberg Rev2 radiator + CAI
Exterior:
99+ JDM Tails
99 Front bumper, combo lights, and front spoiler
Shaved rear spoiler, wiper arm, and spray nozzle (My build started with a touring chassis)
Aluminum door handles
Hella Twin Supertone Horns
DIY HID Projector Upgrade which includes the following:
Morimoto 3Five Ballasts (35w)
Bi-xenon: Morimoto Mini projectors
Philips 85122+ (4300K) bulbs
E55 Shrouds
Crystal Clear lenses on stock RX7 light housings.
Interior:
Tan to Black conversion. All I have so far is some sub 30k black leather seats I picked up 2 weeks ago.
ACC carpet
MGW T56 short shifter
MGW 6 speed shift ****
Momo Tuner Steering Wheel
Momo Hub
NRG Quick Release
Redline leather trim
SakeBomb aluminum passenger handle
JasonS floor mats
Lizard Skin sound control
Exhaust:
1 7/8" JTR Longtube Headers
Custom dual 3" exhaust by Kevin Doe
Power:
400-500WHP
Lane


Thread Starter
Joined: Apr 2009
Posts: 381
Likes: 27
From: Starkville, MS
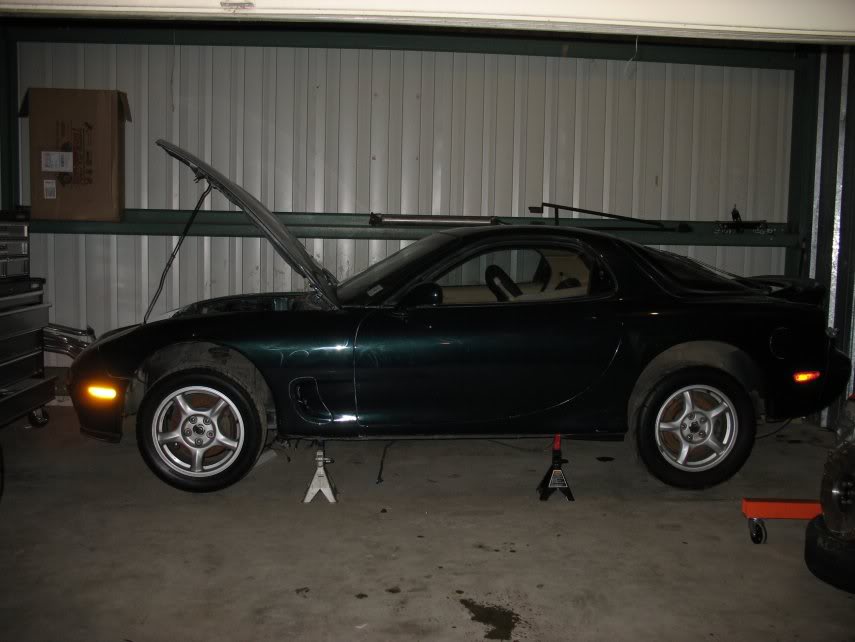
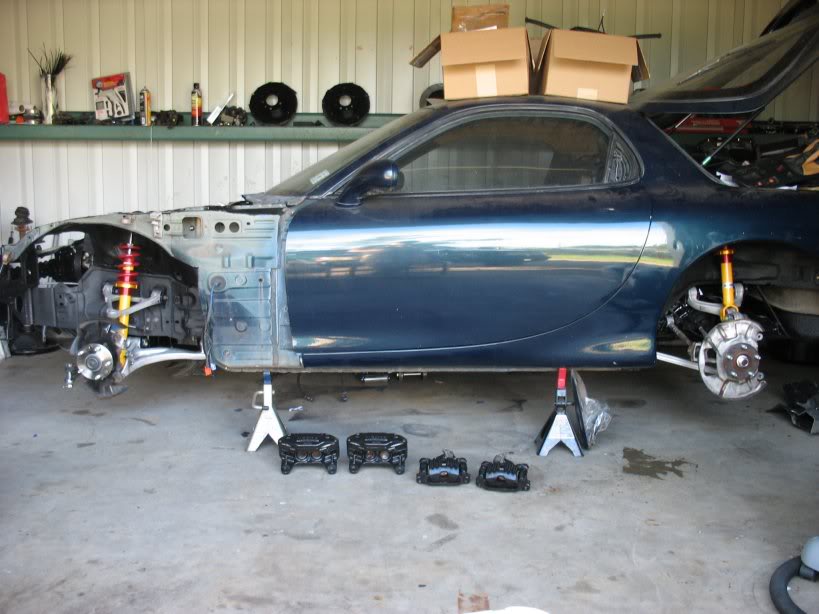
Worked in the shop for about 6 hours today. Didn't accomplish much. Managed to get the car on jack stands (holy crap this
baby's light!). I also installed a driver's side aluminum door handle from
www.rx7doorhandles.com (can get them for $160 on eBay (yeah, hindsight is 20/20)). I tried to tape up my engine
intake/exhaust ports, but even after degreasing my painter's tape wouldn't stick to the surface of the block/head. Finally,
I spent a 2 hours chasing and cleaning 5 block holes for the transmission. Apparently, a PO mounted the engine to and engine
stand using 3/8" - 16 bolts instead of using M10-1.50 bolts and marred the threads. Wasn't catastrophic, but I'm a
perfectionist when it comes to threads and I spent the time to make it right. Other than that, I just cleaned and organized.
Bought a propane bullet heater and a 1000Watt tripod mounted light system to help keep the shop workable so that had to be
installed and set up
Got a new toy the other day too:
A low mileage Cobra Diff!
Now all I need to do is see if I can find some prebuilt DSS axles from somebody who isn't using them and I'll be set
Lane
Thread Starter
Joined: Apr 2009
Posts: 381
Likes: 27
From: Starkville, MS
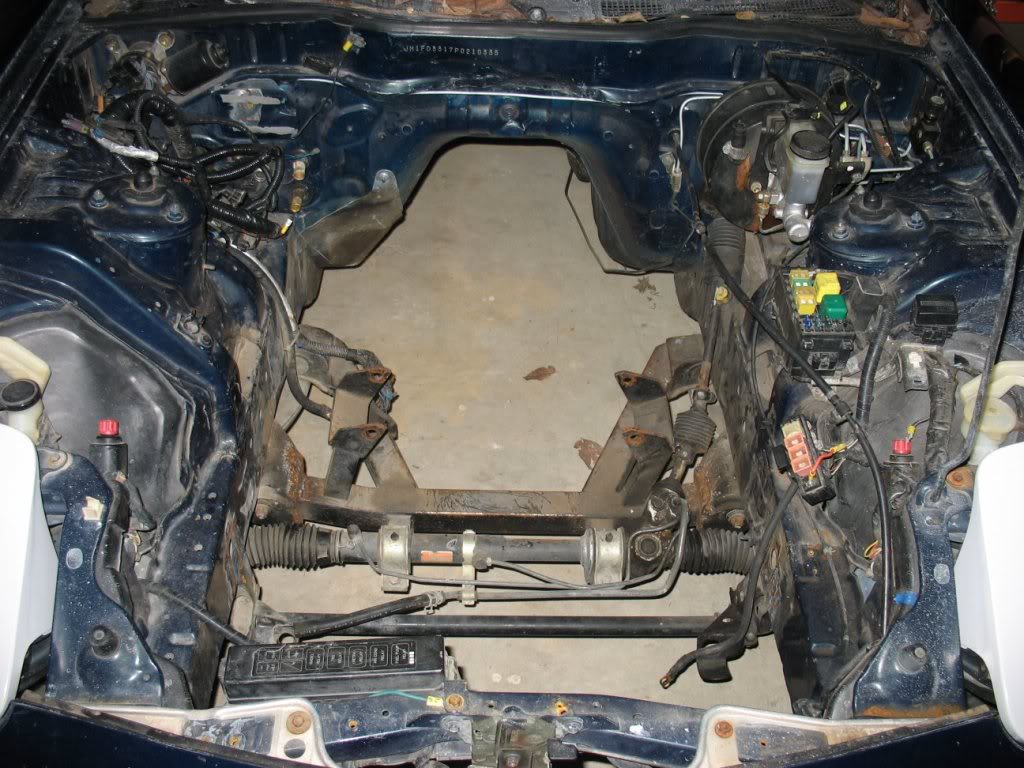
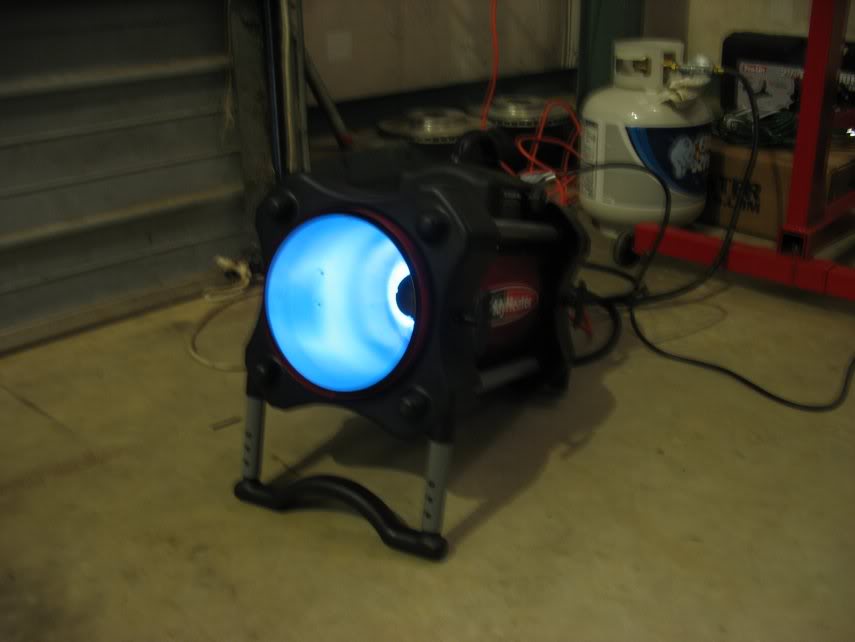
Got a little work done Saturday. I'm trying to focus on cleaning and prepping the engine bay for paint, so I tried to remove
what I could. Because of failing shop lights (Damn cheap Autozone lights), I spent half the afternoon running to Lowes to
find replacement 500wat halogen bulbs. In the end, I really only managed to remove the engine harness.
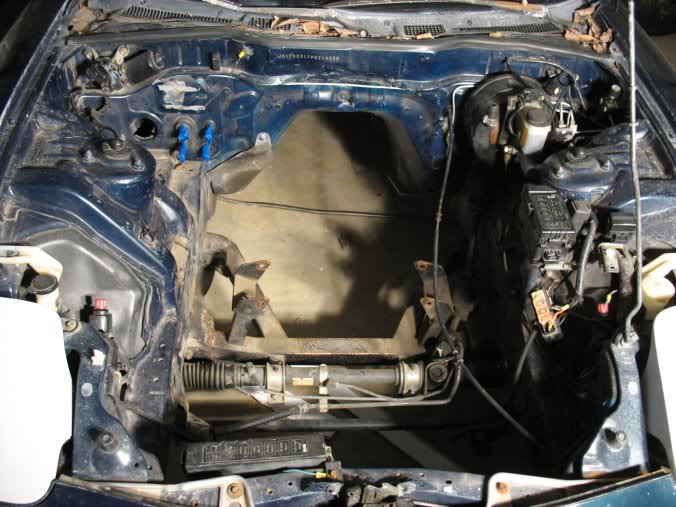
Nice to have one of these bad boys when it's snowing outside
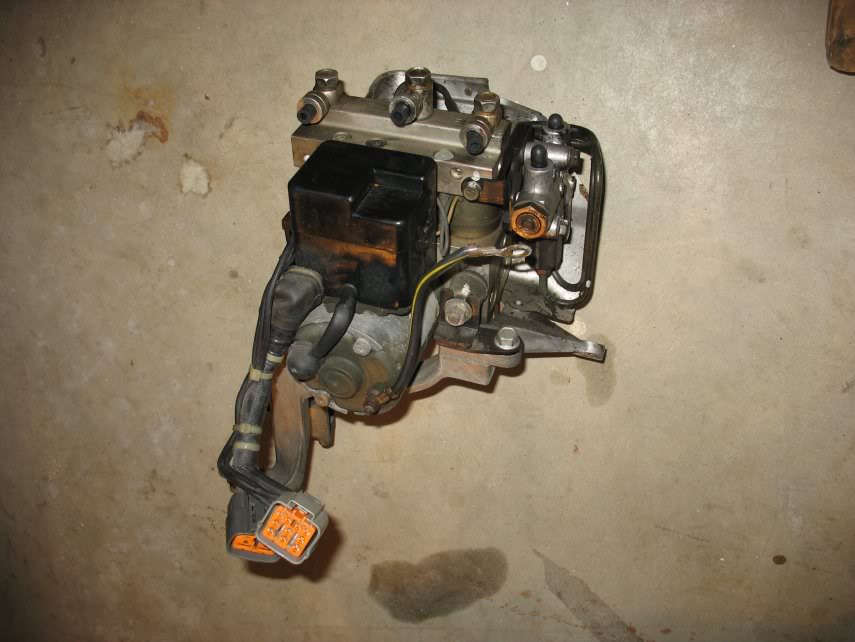
Can you spot what's missing here?
I bought the RX7 with the ABS deleted but since this is going to be my daily driver, I sold the ABS delete to reinstall the
ABS.
The ABS delete looks like a well thought out solution.
Good bends and was very stealthy.
Lane
what I could. Because of failing shop lights (Damn cheap Autozone lights), I spent half the afternoon running to Lowes to
find replacement 500wat halogen bulbs. In the end, I really only managed to remove the engine harness.
Nice to have one of these bad boys when it's snowing outside
Can you spot what's missing here?
I bought the RX7 with the ABS deleted but since this is going to be my daily driver, I sold the ABS delete to reinstall the
ABS.
The ABS delete looks like a well thought out solution.
Good bends and was very stealthy.
Lane
Thread Starter
Joined: Apr 2009
Posts: 381
Likes: 27
From: Starkville, MS
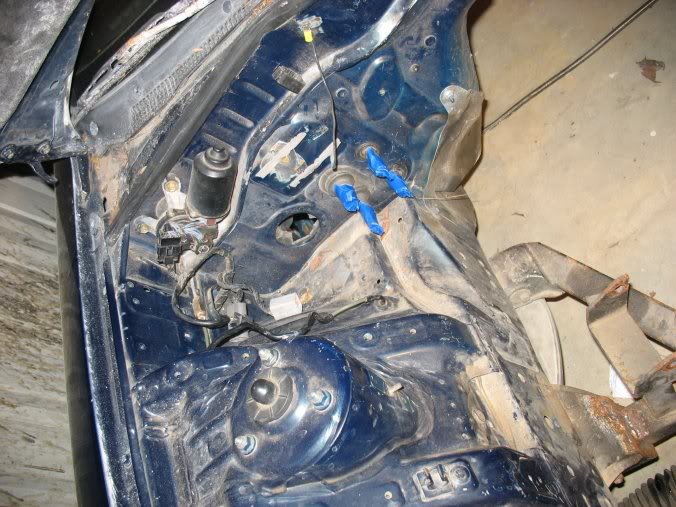
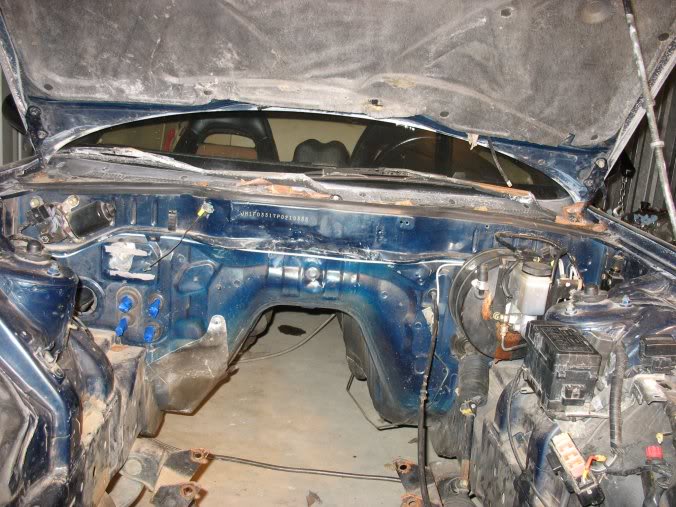
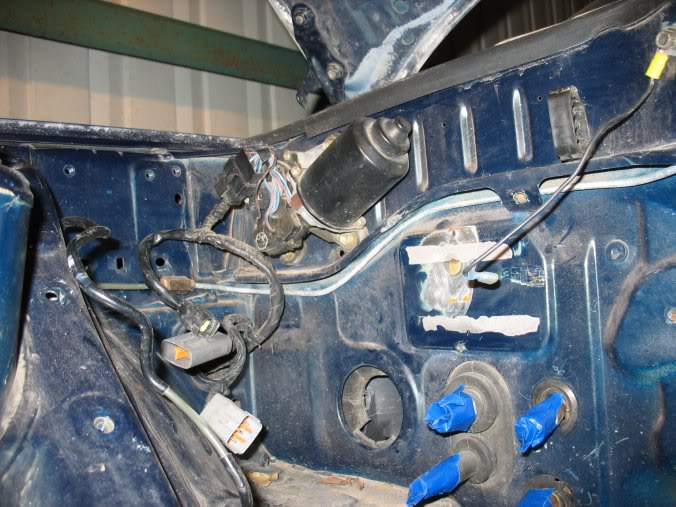
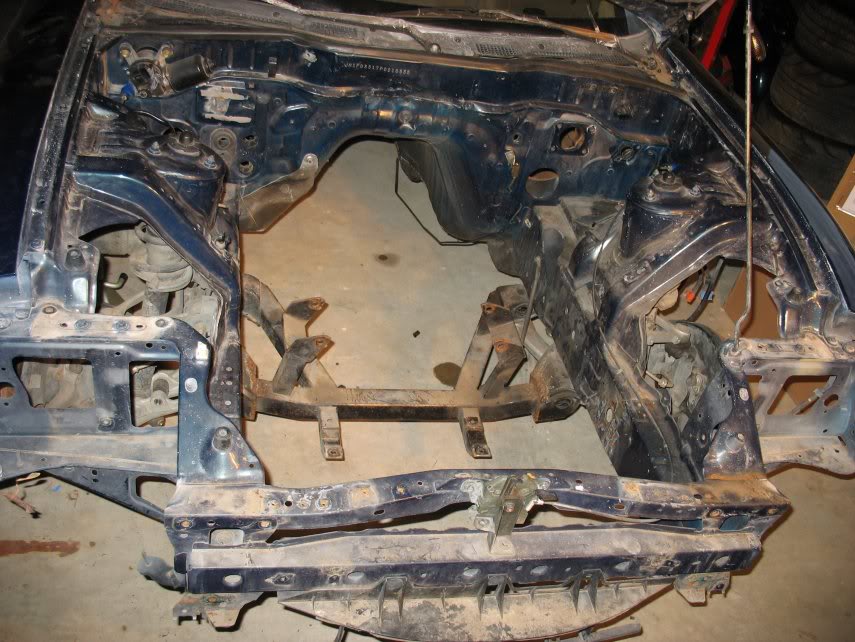
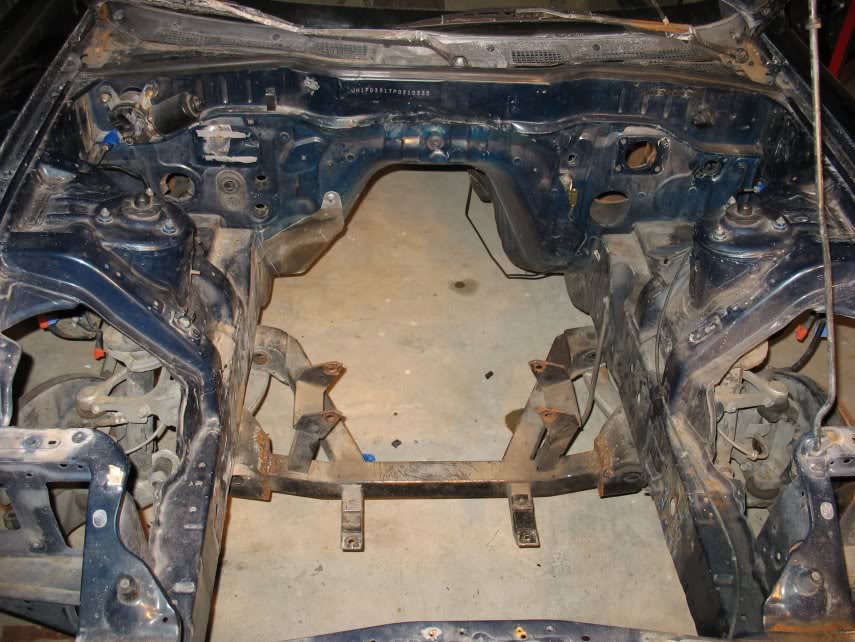
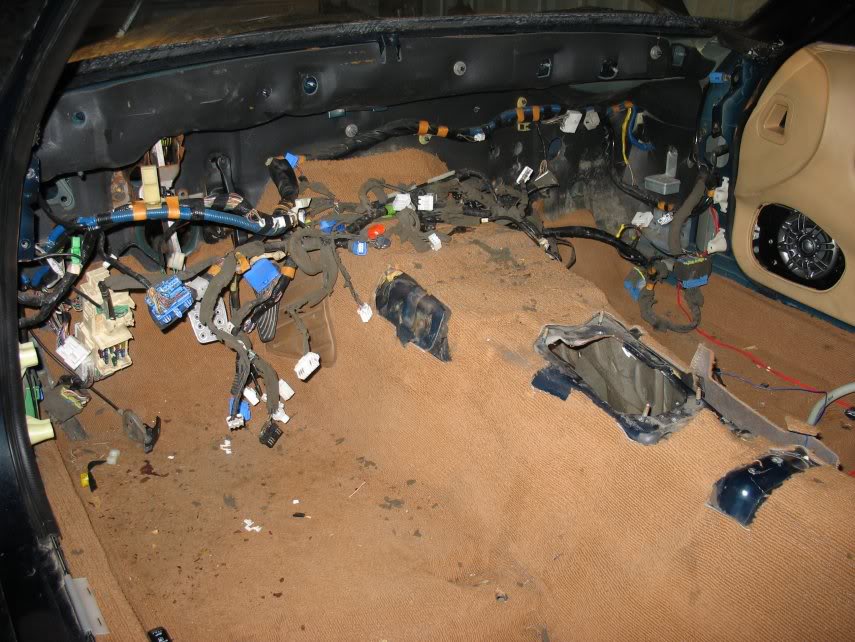
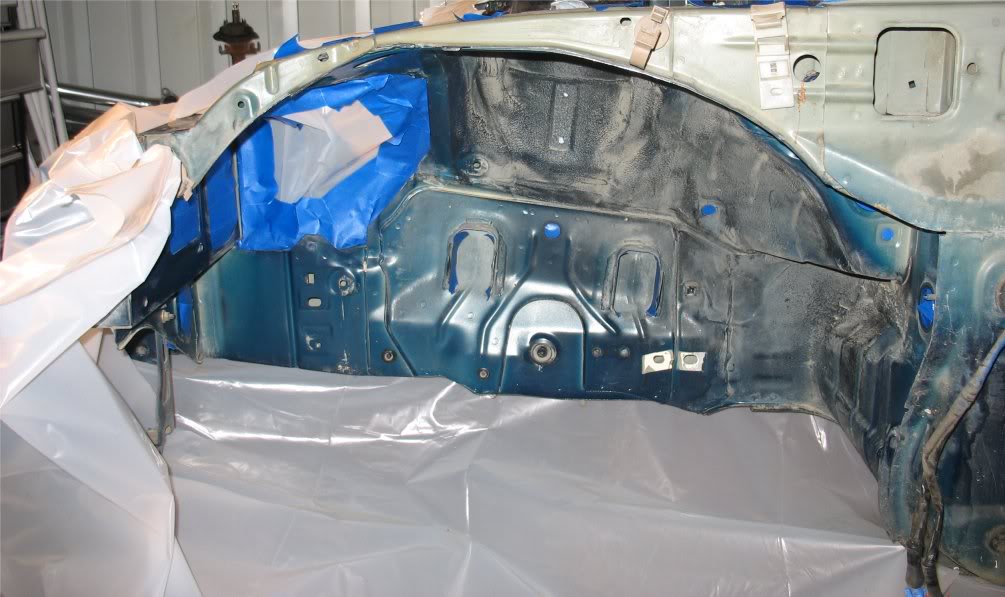
I managed to almost completely strip the engine bay and interior. The only thing left in the engine bay is short brake
hardlines that go to the fenders, windshield wiper actuator, subframe (only loosely connected), and the hood latch assembly.
I went ahead and stripped out the body harness (not for the feint of heart for those who haven't attempted it) because I
want to strip out all the unnecessary circuits and because it will make painting the engine bay easier. I'm also stripping
out the entire airbag system as I'm planning on going with an aftermarket steering wheel anyway.
Something I noticed when removing everything up front is that if you have your fd on jackstands, the front end gets so light
that the rear two jackstands form a pivot point and it becomes VERY easy to tip it backwards. Because of this, I put a jack
under the diff to stabilize things :ohnoes:
I also worked on stripping out the interior:
The only reason the carpet is still there is because I haven't removed the rear bins. I'm planning on lizard skinning
everything and putting some new black carpet in. Also, while the dash and ducting are out, I'm going to thoroughly clean
everything, especially the ducting. I didn't take pictures, but the blower fan is full of crap along with the evaporator and
heater core. It'll be nice to know that the FD will be blowing non-smelly air when it goes back together
That's pretty much it so far. Next week I'll hopefully be able to start prepping the engine bay for paint so that I'll be
able to paint it two weeks from now. I'm planning on painting the bay and all my mounting hardware with POR15. I bought a 30
gallon compressor the other week that I think will be up to the task:
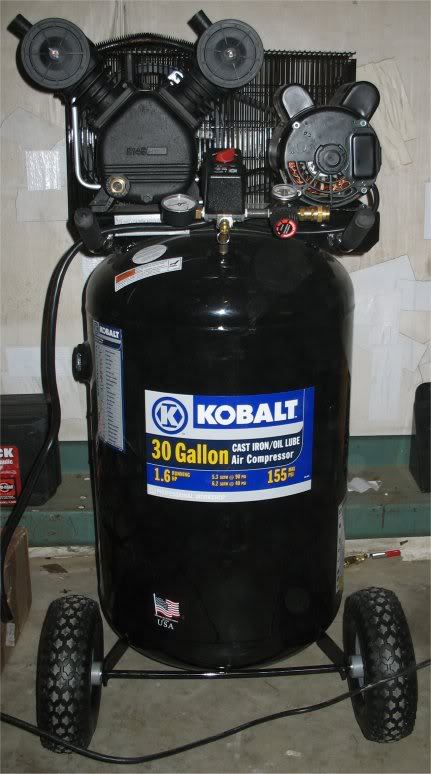
All I need to do now is buy the paint and buy a paint gun.
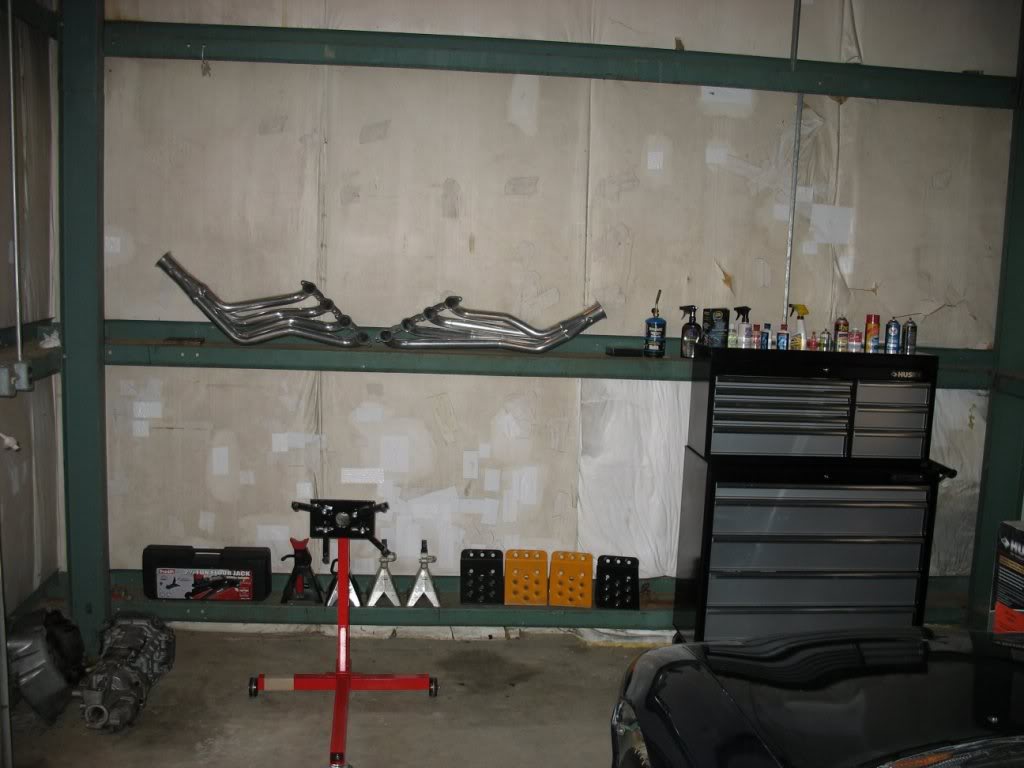
Oh, and look at all the goodies that showed up over the last 2 weeks!
The last pic is the ABS Actuator that ssrx8 sold me (great guy). I also got the hard lines from him but didn't take
pictures.
Lane
hardlines that go to the fenders, windshield wiper actuator, subframe (only loosely connected), and the hood latch assembly.
I went ahead and stripped out the body harness (not for the feint of heart for those who haven't attempted it) because I
want to strip out all the unnecessary circuits and because it will make painting the engine bay easier. I'm also stripping
out the entire airbag system as I'm planning on going with an aftermarket steering wheel anyway.
Something I noticed when removing everything up front is that if you have your fd on jackstands, the front end gets so light
that the rear two jackstands form a pivot point and it becomes VERY easy to tip it backwards. Because of this, I put a jack
under the diff to stabilize things :ohnoes:
I also worked on stripping out the interior:
The only reason the carpet is still there is because I haven't removed the rear bins. I'm planning on lizard skinning
everything and putting some new black carpet in. Also, while the dash and ducting are out, I'm going to thoroughly clean
everything, especially the ducting. I didn't take pictures, but the blower fan is full of crap along with the evaporator and
heater core. It'll be nice to know that the FD will be blowing non-smelly air when it goes back together
That's pretty much it so far. Next week I'll hopefully be able to start prepping the engine bay for paint so that I'll be
able to paint it two weeks from now. I'm planning on painting the bay and all my mounting hardware with POR15. I bought a 30
gallon compressor the other week that I think will be up to the task:
All I need to do now is buy the paint and buy a paint gun.
Oh, and look at all the goodies that showed up over the last 2 weeks!
The last pic is the ABS Actuator that ssrx8 sold me (great guy). I also got the hard lines from him but didn't take
pictures.
Lane
Thread Starter
Joined: Apr 2009
Posts: 381
Likes: 27
From: Starkville, MS
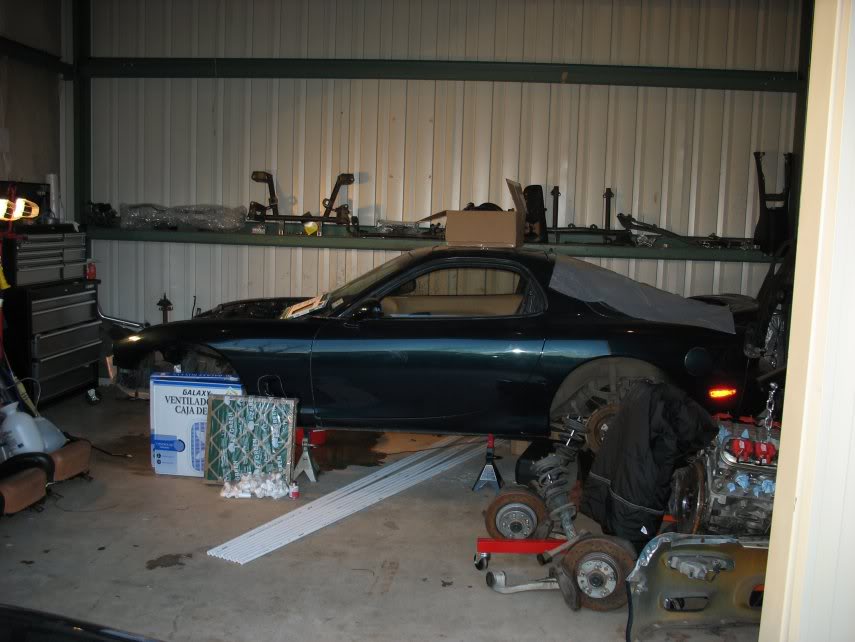
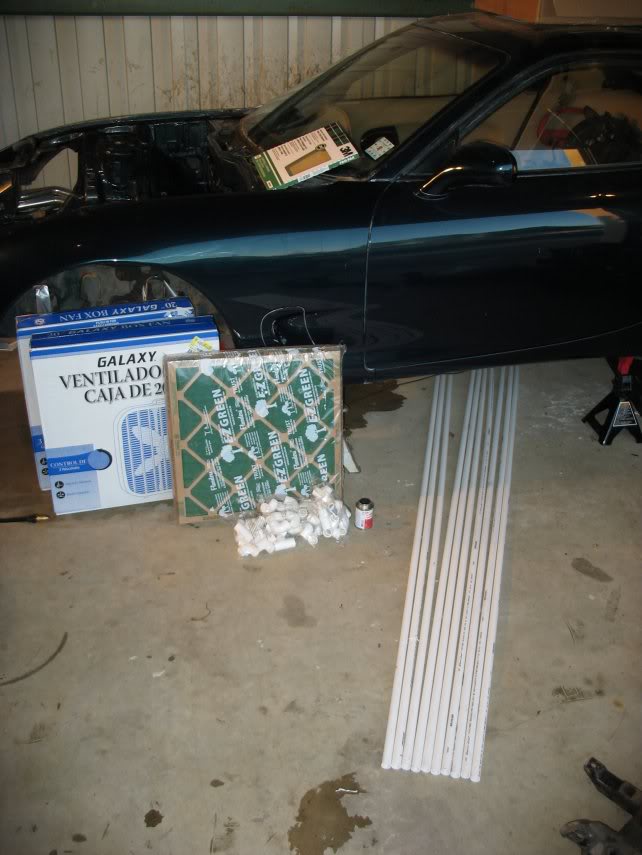
Whole lotta nothing happening lately. That's a picture of the shop 2 weeks ago. It's way too crowded. I'm really at the
point where stuff NEEDS to go back into the car because I don't have room for any more disassembling. I'm using the PVC to
build the framework and the box fans for intake/exhaust of a home-made clean room for the front of my car for painting the
engine bay. My engine bay has been degreased and sanded for 2 weeks, but I keep finding things I need to take care of before
I paint. Mainly, cut/grind down the lip that interferes with some intake manifolds. The P/O beat the lip down and I didn't
want to paint it like that, sooooo, I bought an air cutter and an angle grinder and got to work. It took fooorever. Probably
didn't buy the right tools for the job (rotary cutter). I felt like I could have ground it down faster. All-in-all I
probably spent 3-4 hours getting it right. After that I had a lovely coat of powdered sheet metal all over my engine bay
danget! Cleaning is a PITA for me because my shop/storage facility doesn't have running water, so I have to buy jugs of
water and use a pressurized sprayer to wash with. I won't even go into the details of how keep the water off the floor...
The other thing that's been keeping me from painting the engine bay is this:
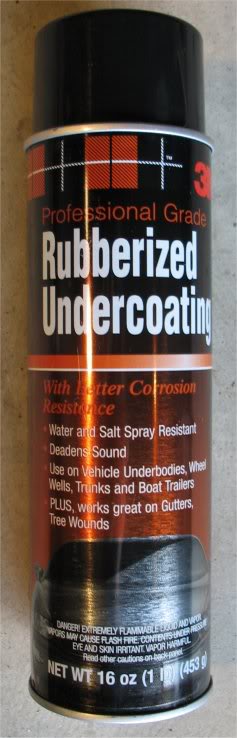
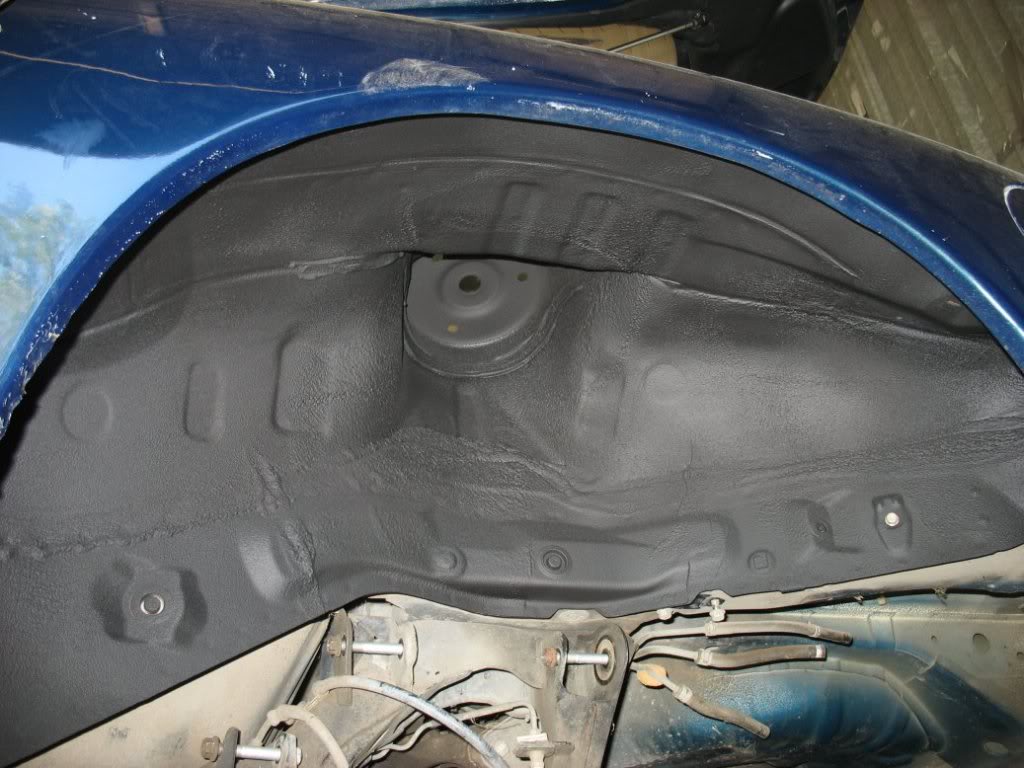
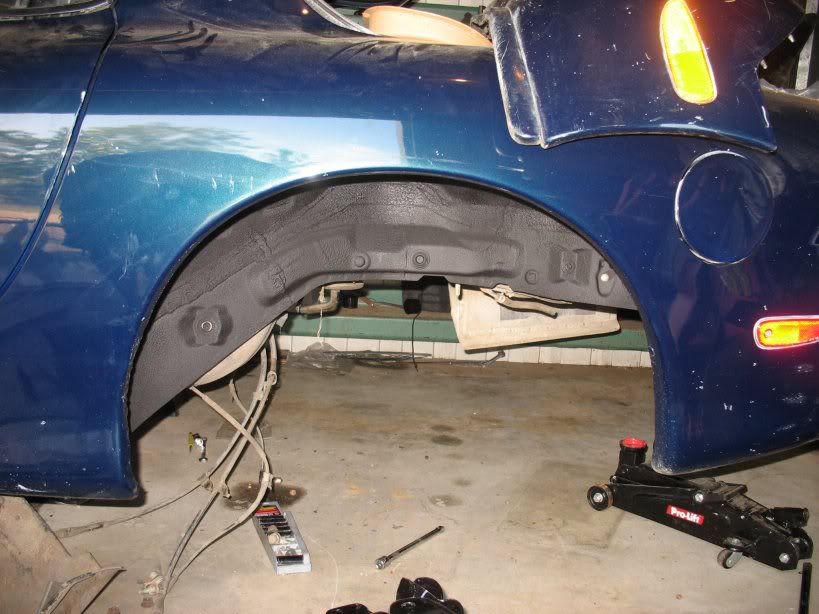
I've decided that while I've got everything stripped down I might as well take care of the wheel wells:
Prepped and masked.

Done
I LOVE this stuff! I've only done the front wheel wells, but as soon as I disassemble my rear end I'm going to do the rear
wells, my fuel tank, and I'll probably end up doing the transmission tunnel. Buy this stuff in cases gentlemen because
you'll want to paint everything with it
Lets see, what else do I have to report..... Oh, I got my Cobra inners..
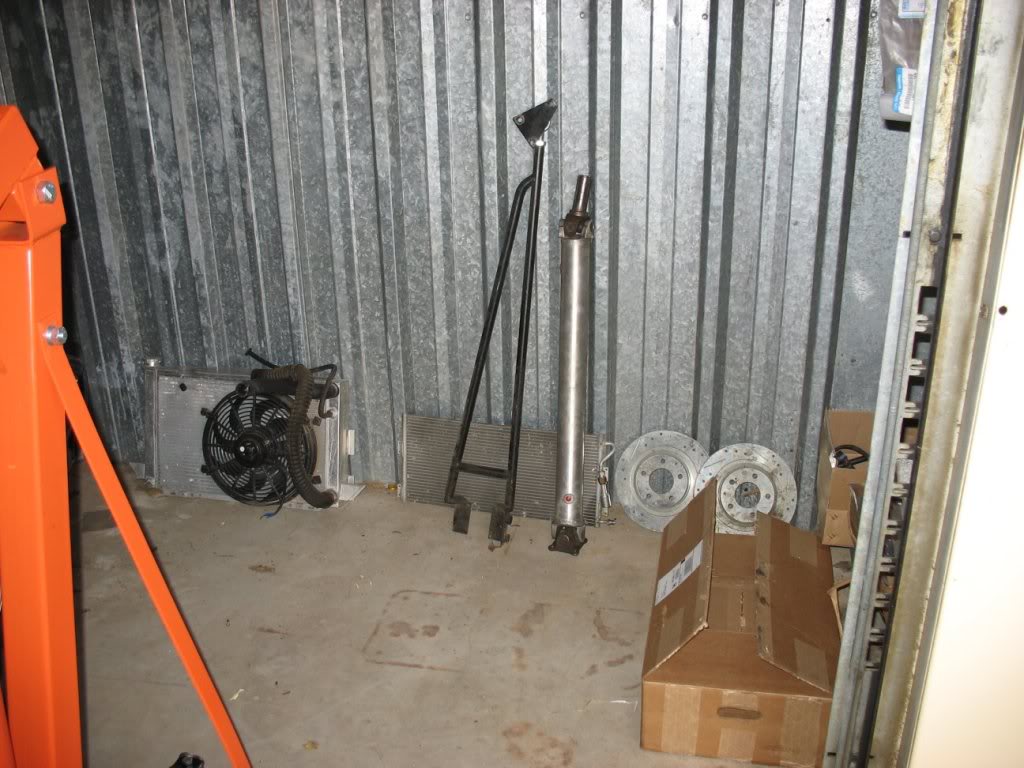
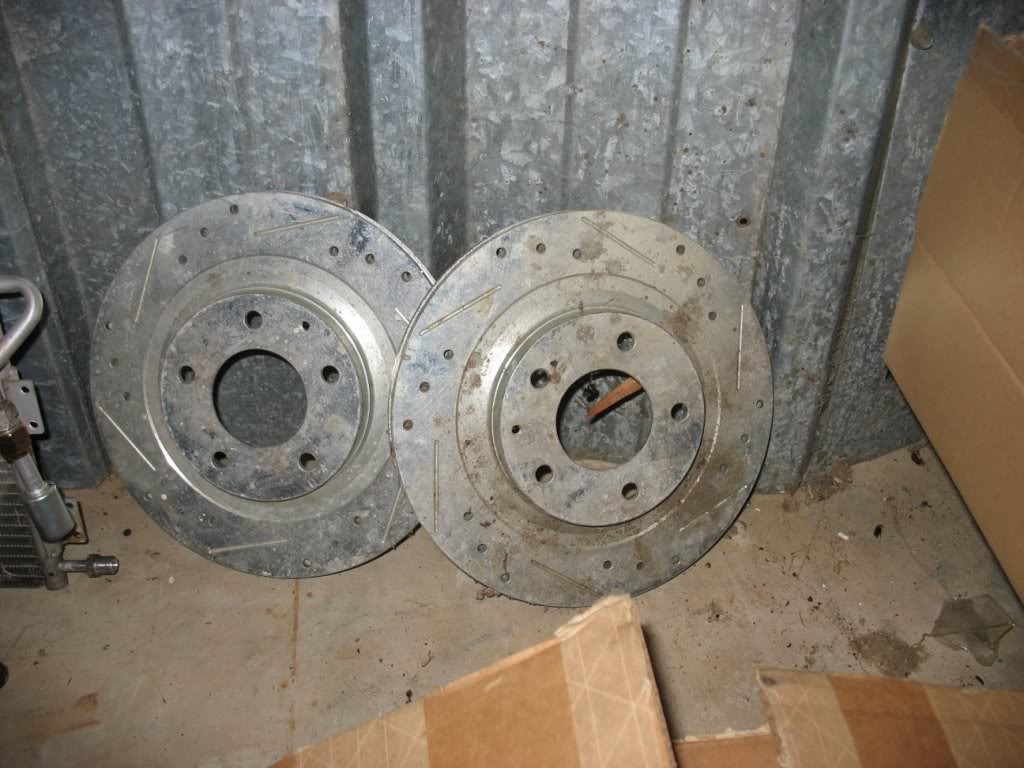
Some misc goodies:

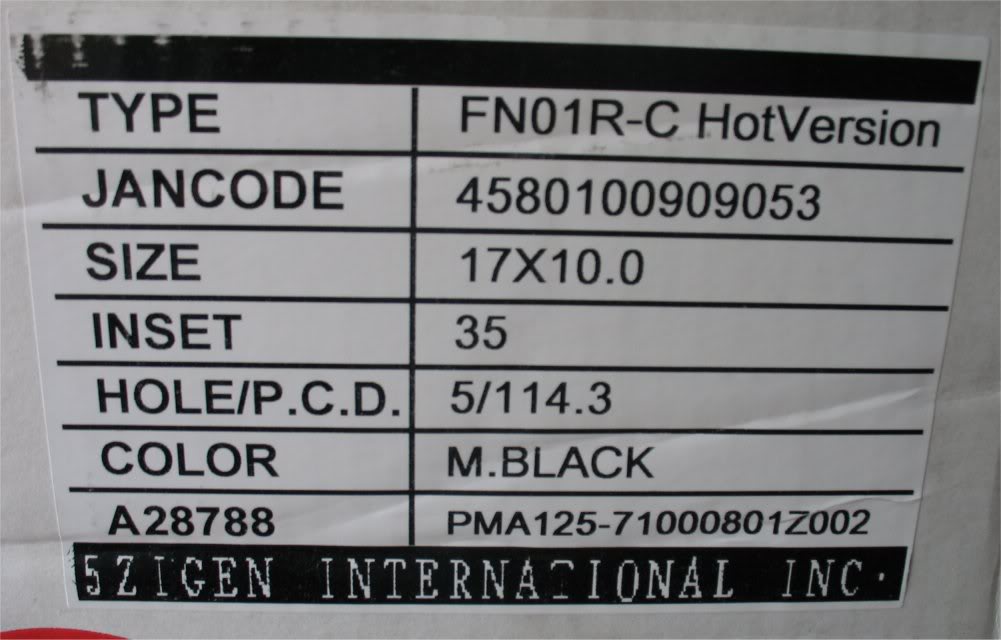
AND! I ordered a set of 5zigen FN01R-C Hot's in matte black from 1010tires.com. Four 17x10" with a +35 offsets:

I'll be running 255/40/17's in them. Not crazy about stretching the tires, but I'll need the clearance even after a fender
roll I'm afraid. Oh well, worth it in my opinion. This is the stance I'm after:
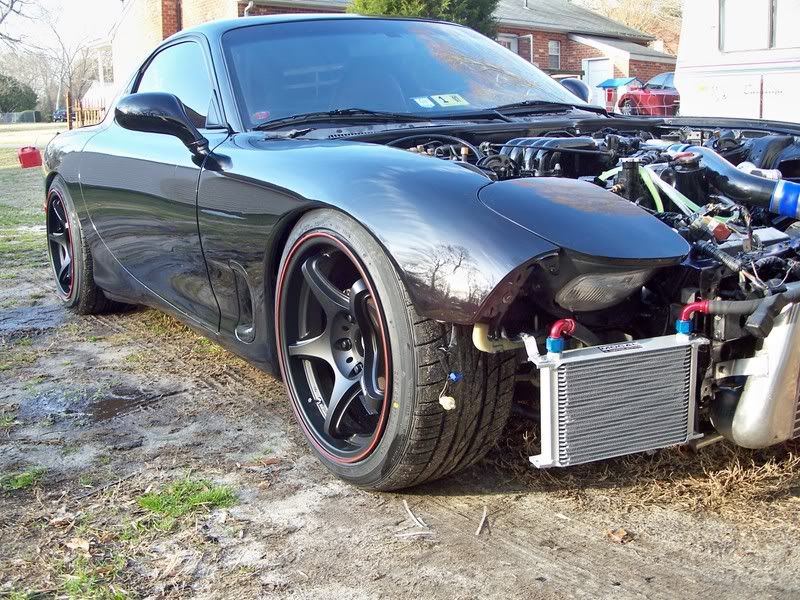
ballinnmiami240sx's RX7 minus the red pinstripes.
I hadn't planned on buying wheels this early in the project, but I decided to go ahead because 101tires had them in stock
and I didn't want to deal with availability problems 2 months down the road.
Guess that's it. I think I'm going to take a few days off the first of April to have a paint week. Other than my engine bay,
I've got subframes and a boatload of suspension parts to dress.
Cheers!
Lane
Trending Topics


Thread Starter
Joined: Apr 2009
Posts: 381
Likes: 27
From: Starkville, MS
Took Thursday off for a 4 day weekend to try and wrap up my engine bay paint job.
As mentioned earlier, I've been working on notching the firewall so I'll have the option of upgrading to a fast intake later
without messing up my pretty paint.
This is it after a lot of grinding and a very small amount of filler.
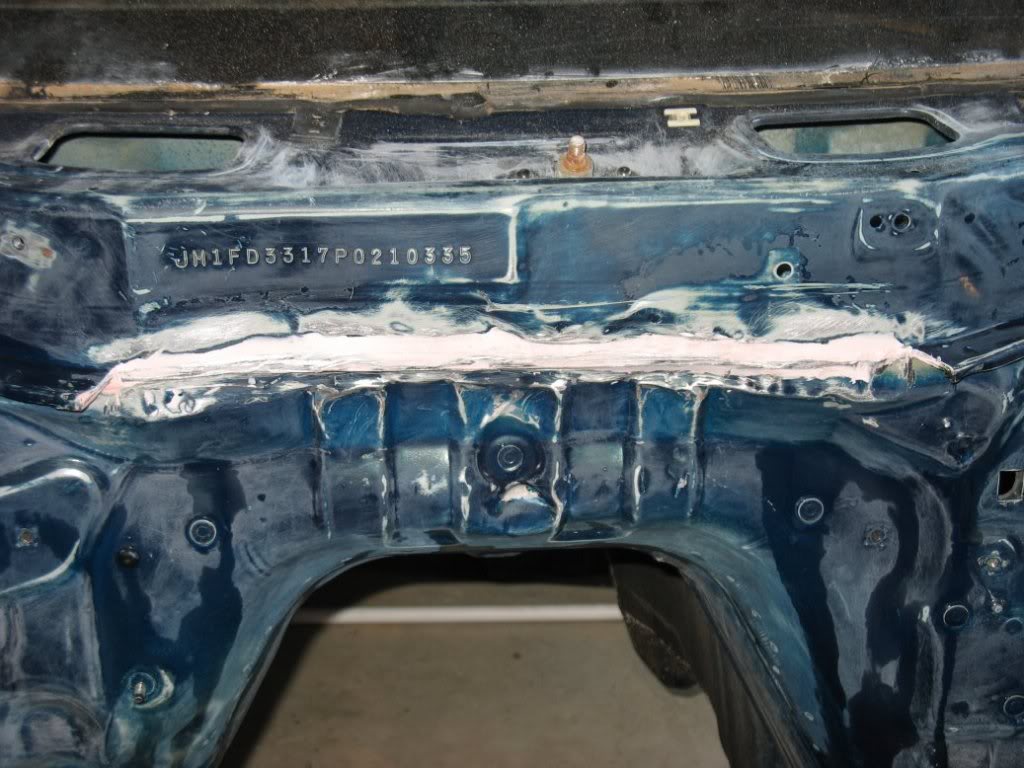
You can see it in later pics but I also hit it with some high build primer. Smoothed out very well
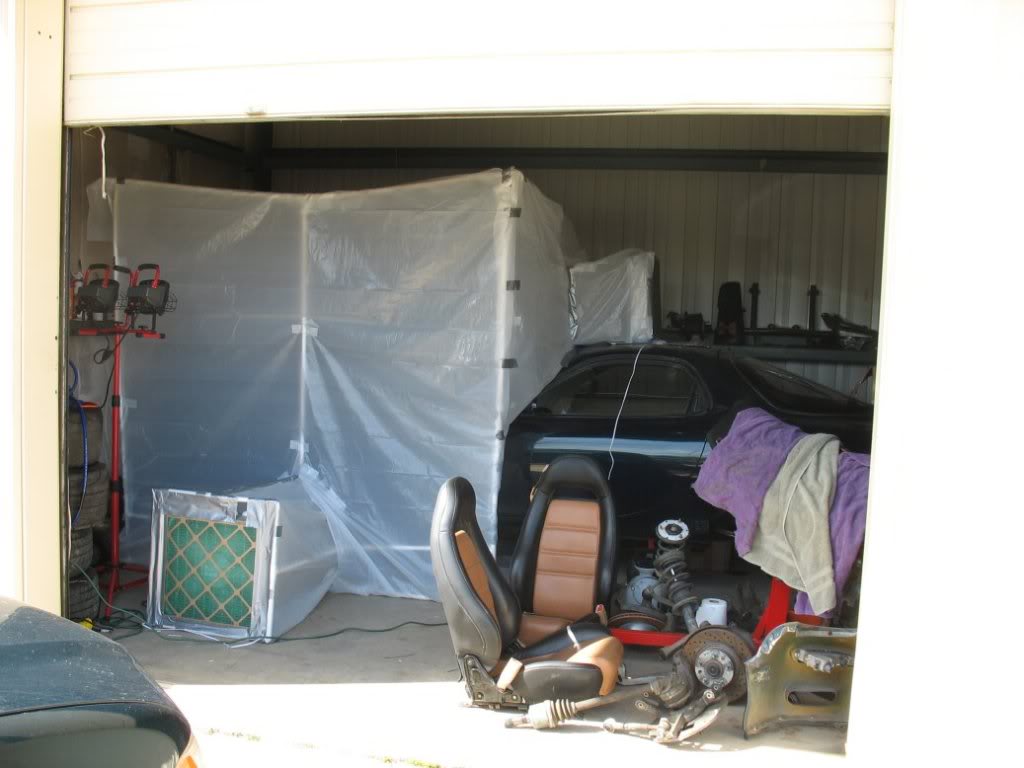
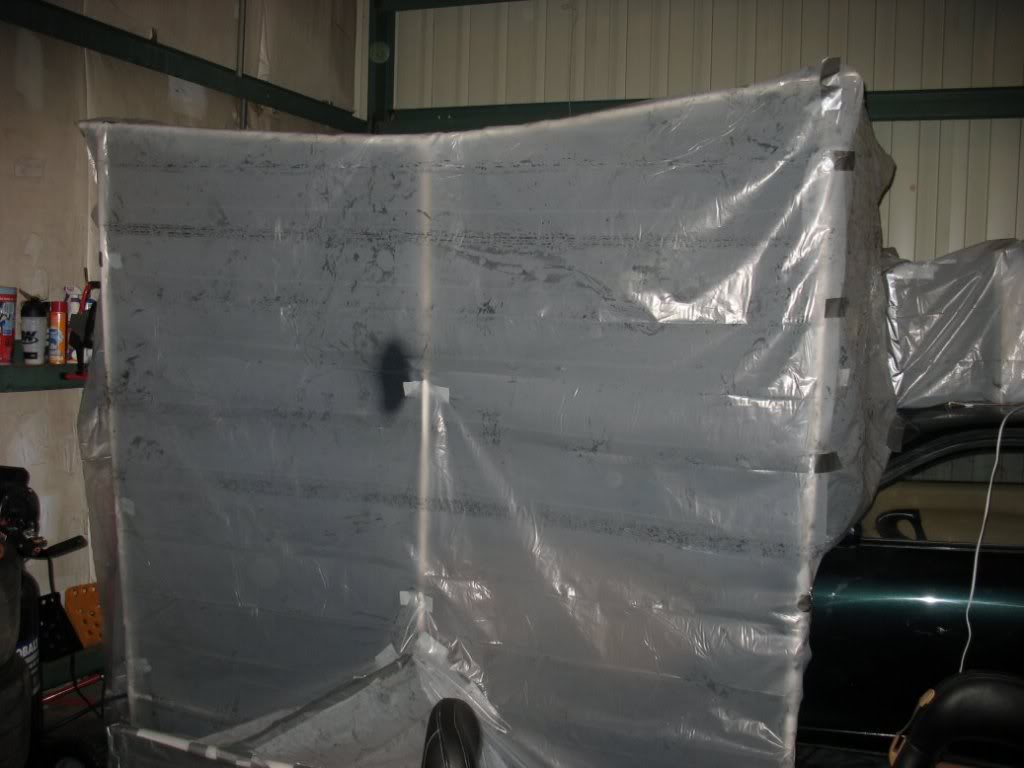
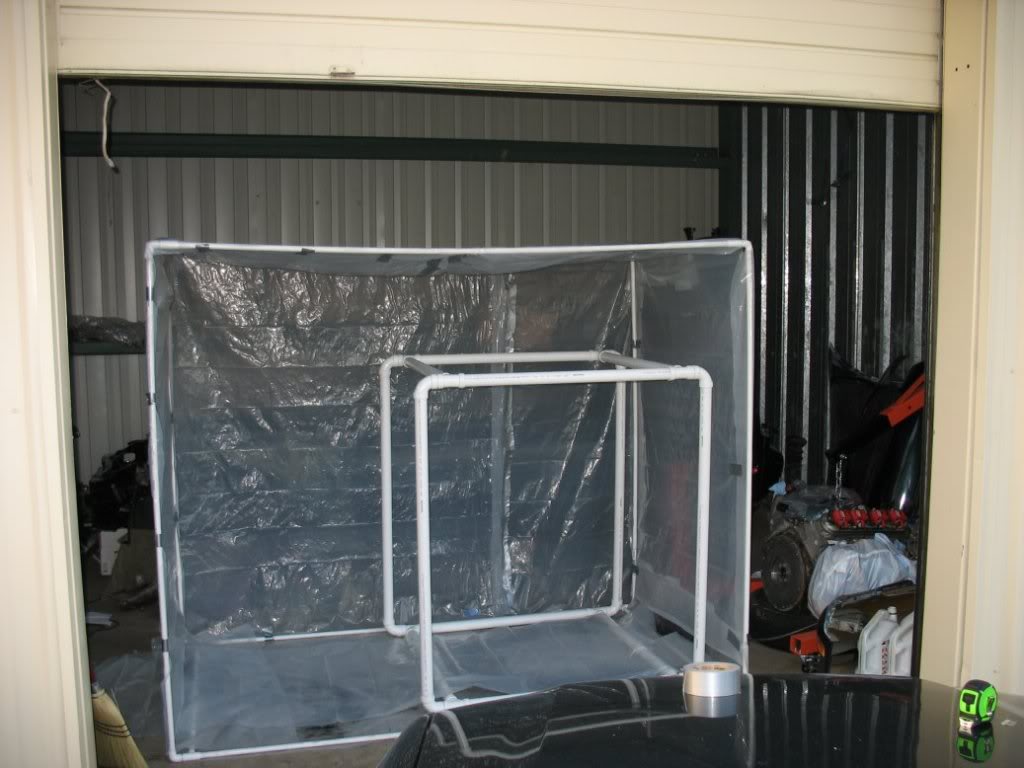
I finished the work on the notch on Thursday. On Friday I finished prepping my engine bay for paint, built a makeshift paint
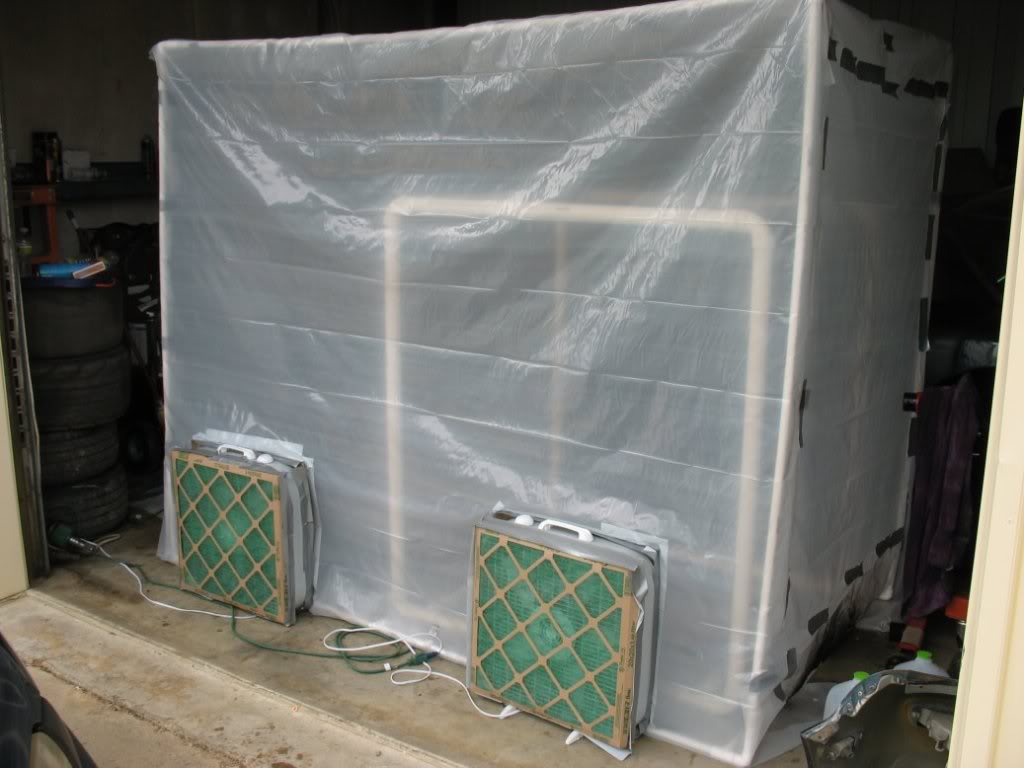
booth, and masked 90% of the bay.
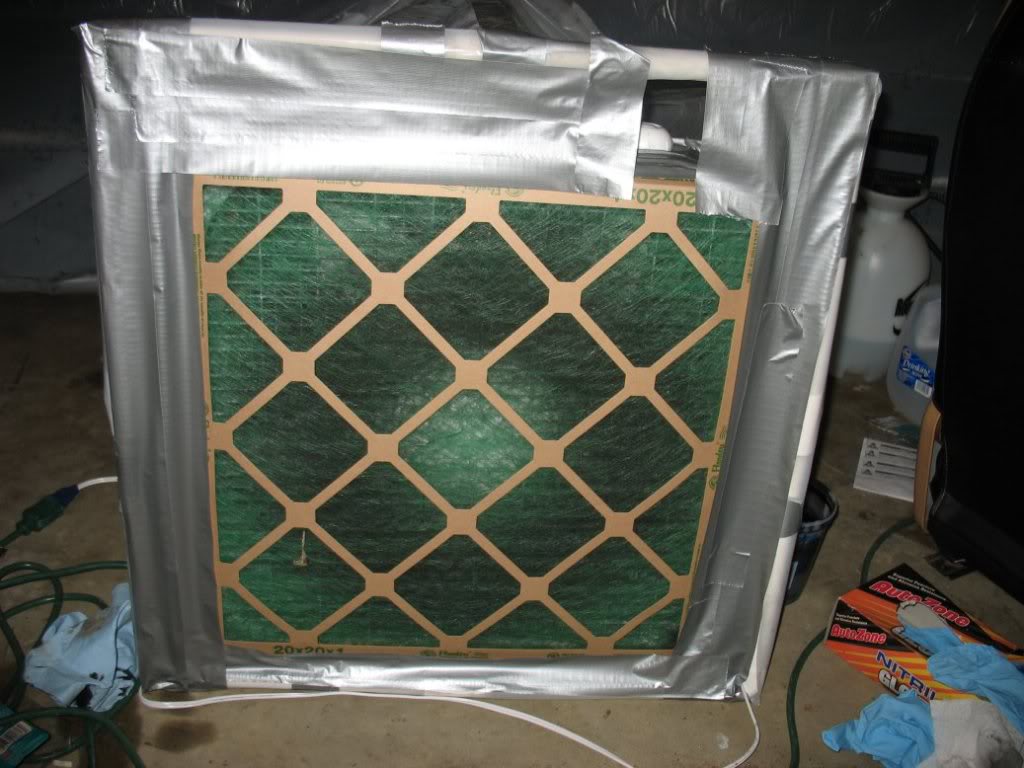
Double filtered box fans
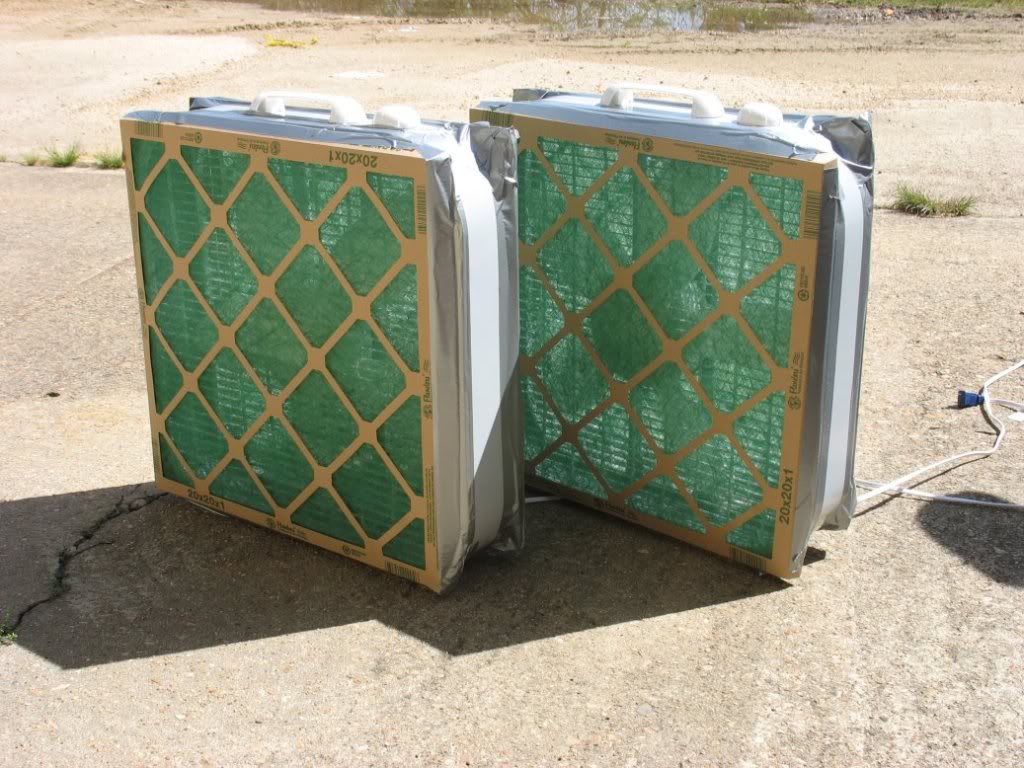
Exhaust fan in the front
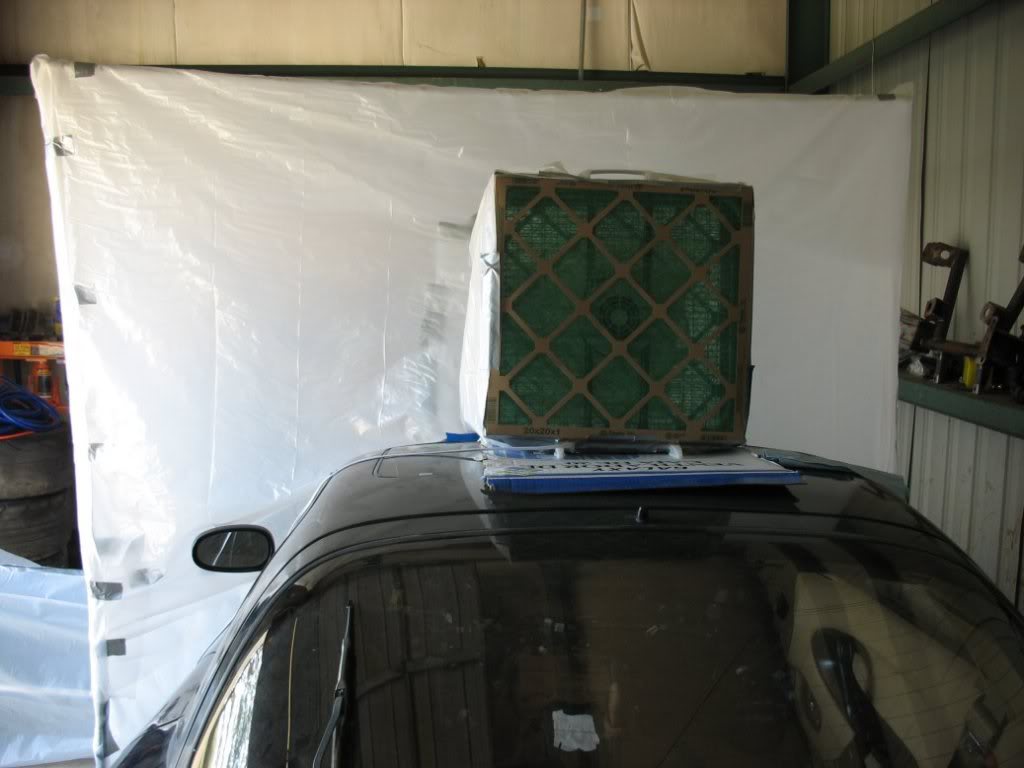
Input fan up top
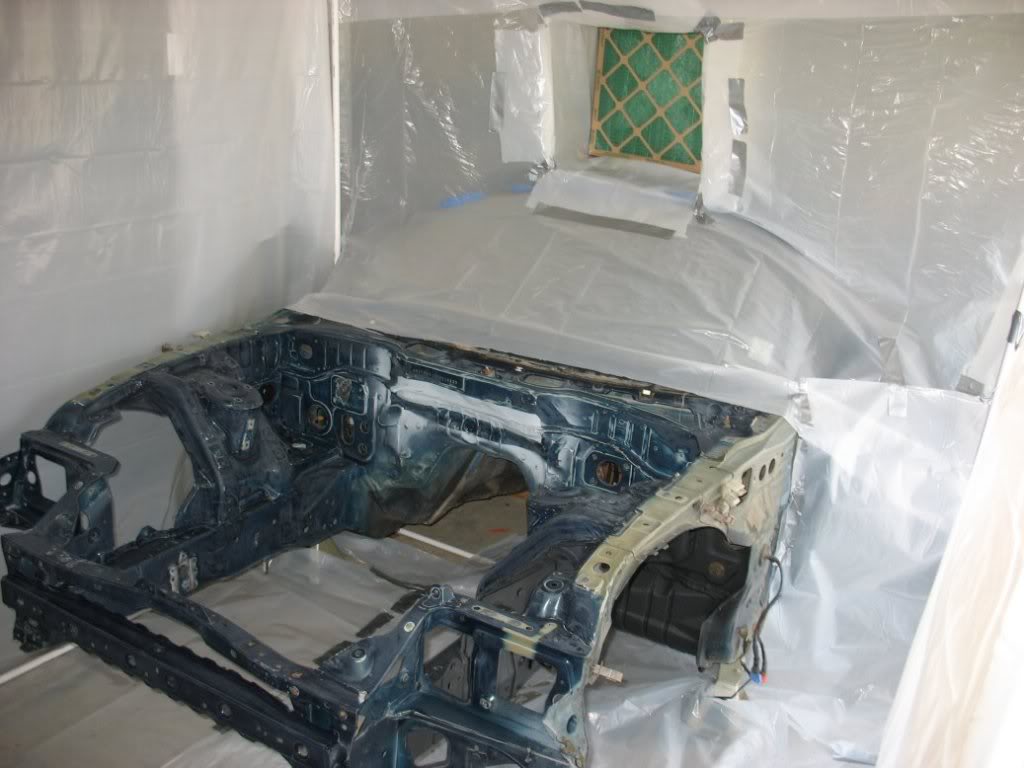
Inside

Masked
Finally, on Sunday, I painted the engine bay.
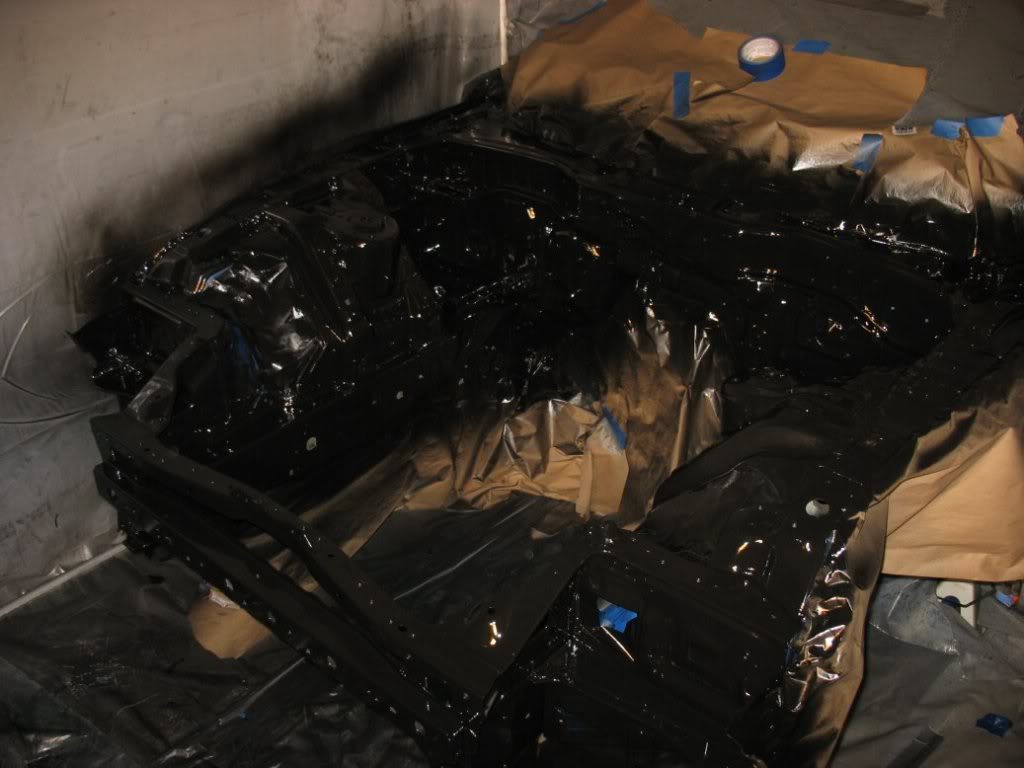
1 coat of POR15 and 1 coat of BLACKCOAT (POR15's UV protected topcoat)
Glad I built a tent. POR15 is naaasty stuff
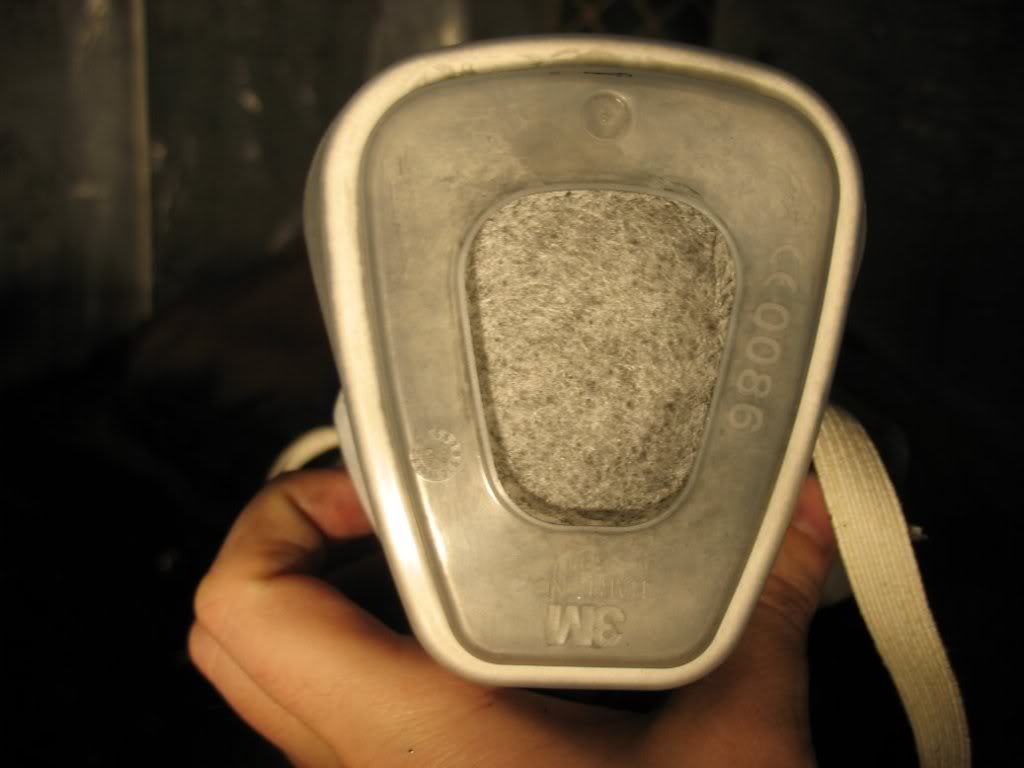
Respirator after first coat (Don't worry, I had extra filters)
What the box fans picked up
As mentioned earlier, I've been working on notching the firewall so I'll have the option of upgrading to a fast intake later
without messing up my pretty paint.
This is it after a lot of grinding and a very small amount of filler.
You can see it in later pics but I also hit it with some high build primer. Smoothed out very well
I finished the work on the notch on Thursday. On Friday I finished prepping my engine bay for paint, built a makeshift paint
booth, and masked 90% of the bay.
Double filtered box fans
Exhaust fan in the front
Input fan up top
Inside
Masked
Finally, on Sunday, I painted the engine bay.
1 coat of POR15 and 1 coat of BLACKCOAT (POR15's UV protected topcoat)
Glad I built a tent. POR15 is naaasty stuff
Respirator after first coat (Don't worry, I had extra filters)
What the box fans picked up
Thread Starter
Joined: Apr 2009
Posts: 381
Likes: 27
From: Starkville, MS
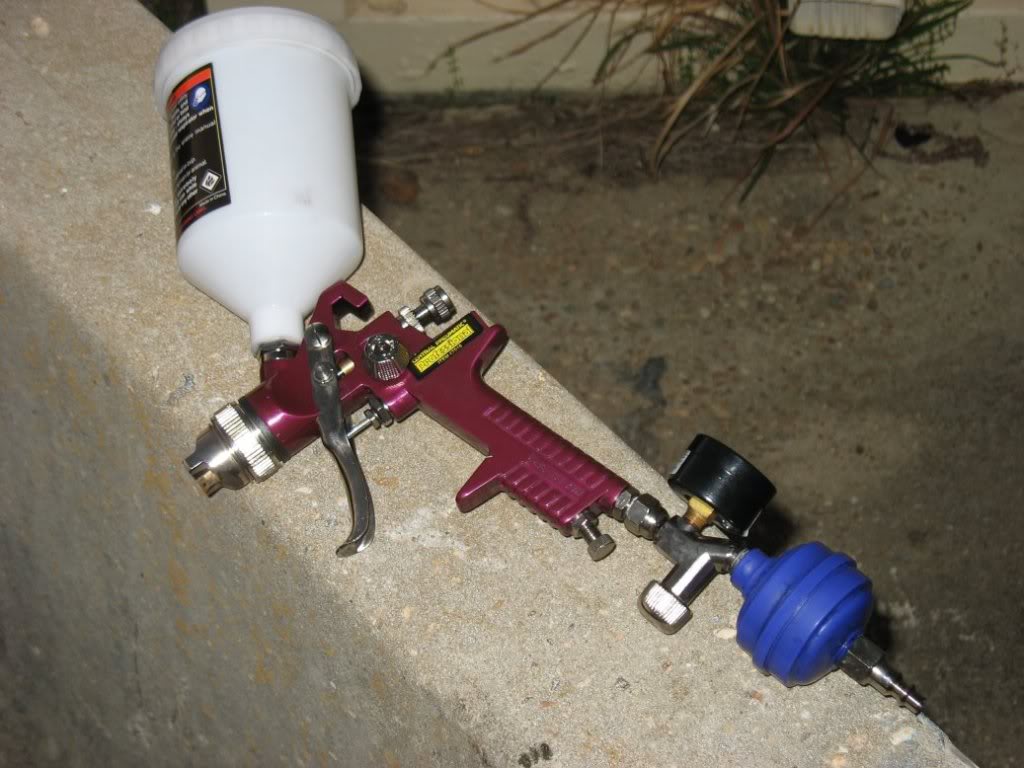
The $30 workhorse
What I learned about spraying POR15:
1. Plan to have more light at your disposal than you think you need
2. Get the best goggles you can afford - The $2 splash gaurd "goggles" at lowes didn't cut it. Even though the have an
egonomic look, they aren't airtight and POR15 fumes are serious! Serious enough that even though I couldn't 'smell' the
fumes, my eyes 'felt' them

3. GET THE BEST GOGGLES YOU CAN AFFORD! - If you are shooting in the southeast, it's humid, and your mask will fog. I had
some drips in my paint because I couldn't see the wet edge of the paint (my fault for continuing). Fixed it with a $12 pair
that sealed to my face and was thermal.
4. POR15 solvent burns! Get some overspray on your ankle, just wipe it off with some POR15 solvent right? Wrong! Funny thing
is, their solvent is greasy and I had to use Acetone get it all off and stop the burning. I know... I'm stupid
Overall, it was a good learning experience. Now I feel better about buying a better spray gun because I think my confidence
is high enough that I'll actually use it.
Next week I'm going to try and paint my subframe parts.
Lane
PS
Still working on the front harness. It's a real bear. I HATE The X connectors. Every other connector is so well documented,
but the X connectors just pop in-and-out of every page. You basically have to read the manual cover to cover for each X
connector while taking detailed notes to know what you can ax and what you need to keep. Working on X-7, X-10, and X-4 at
the moment.. Ugh...
Thread Starter
Joined: Apr 2009
Posts: 381
Likes: 27
From: Starkville, MS
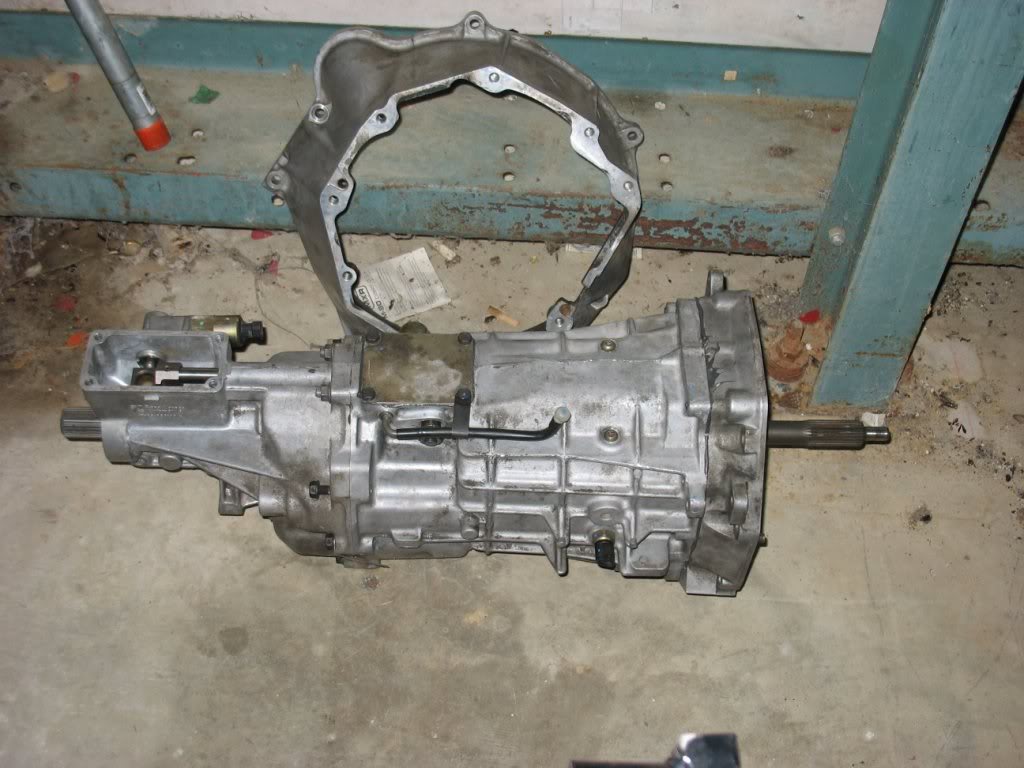
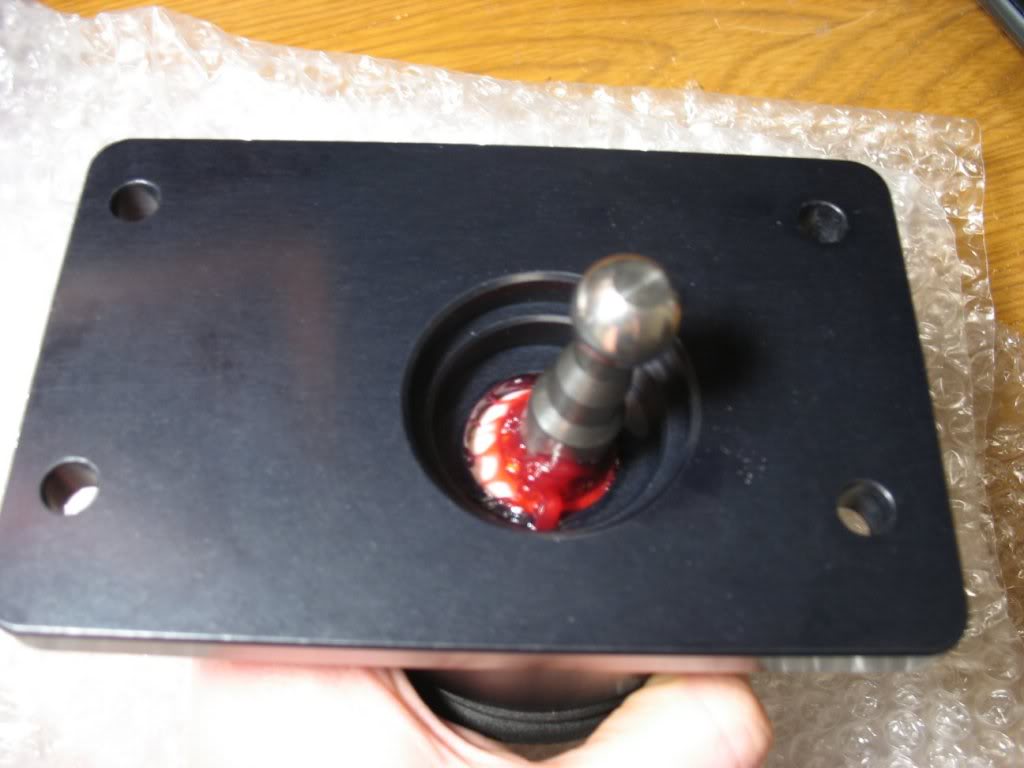
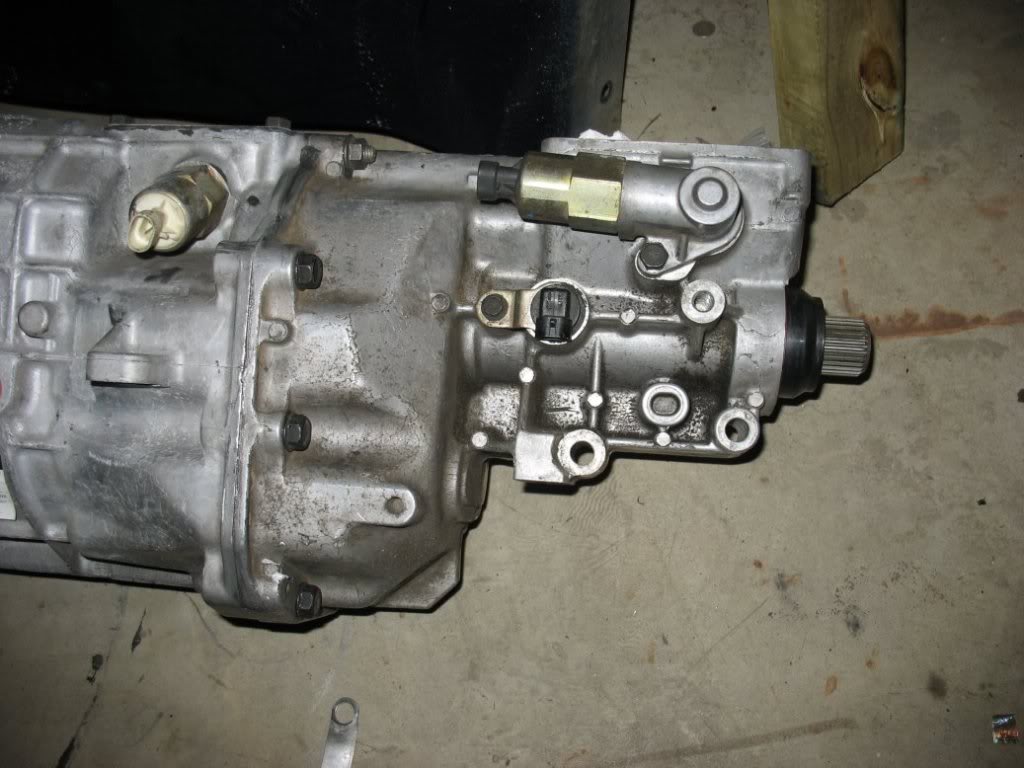
Finished buttoning up my tail housing today:

Pressing in the viper output shaft bushing (I was flush when I finished)
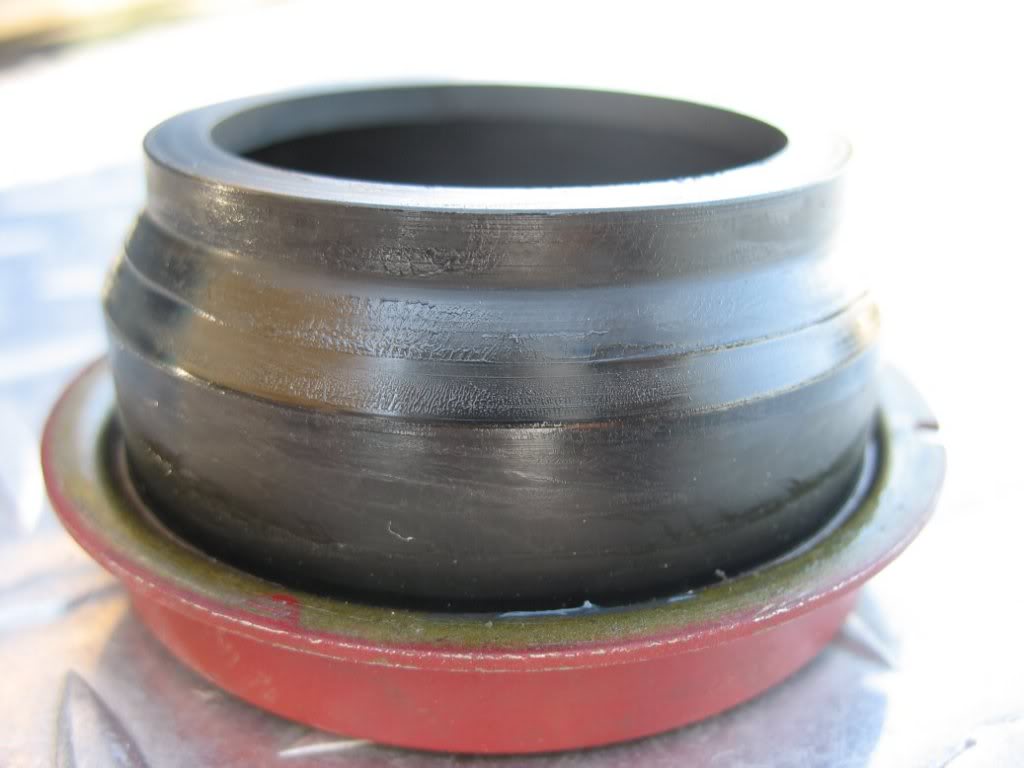
Viper output shaft seal
Pressing in the seal
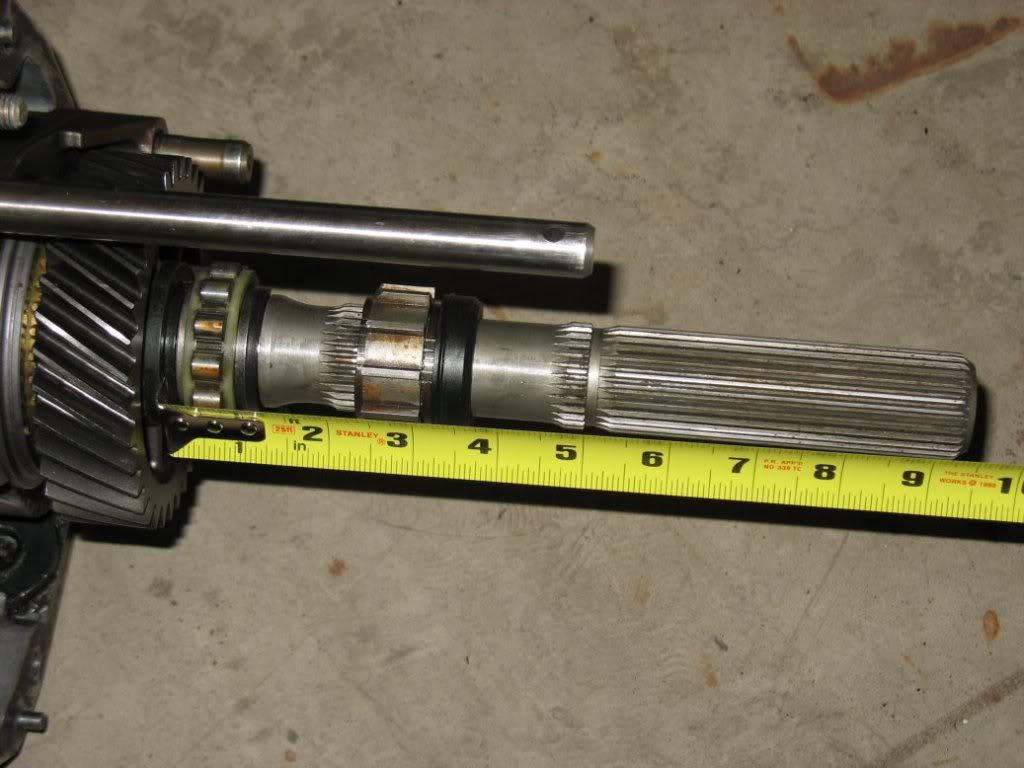
Output shaft ****!
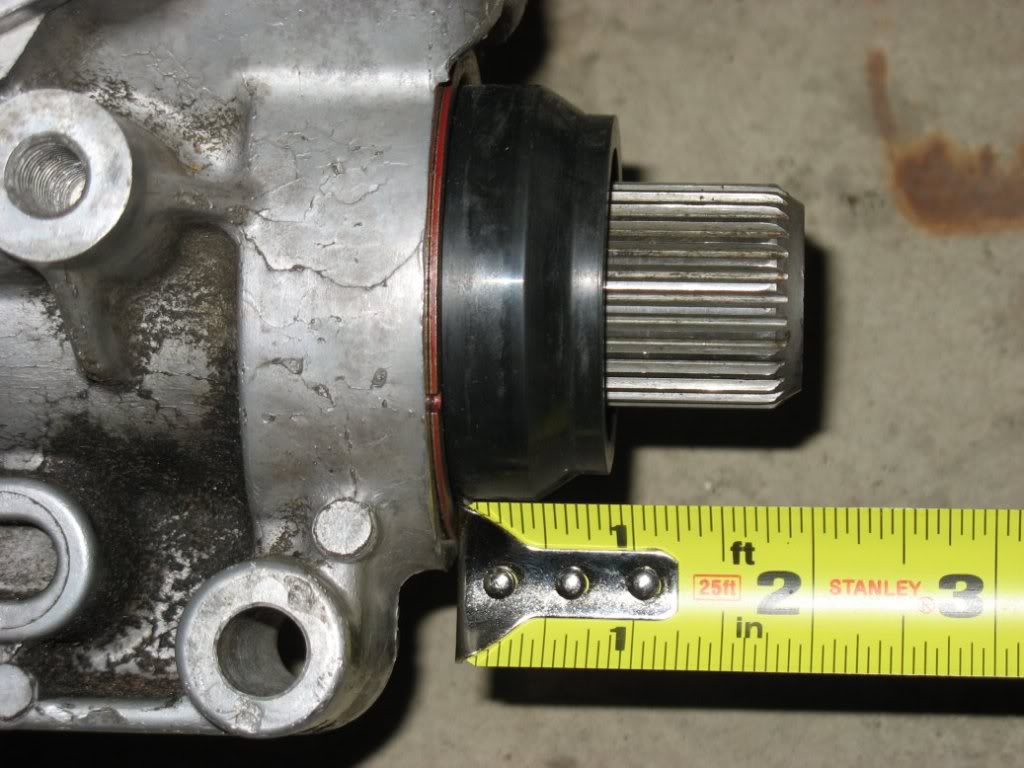
Shrinkage
All Done
If I didn't already explain it, this T56 came from a 2001 Viper. It has a Fbody input shaft, front plate, bell housing, and
tail housing. I bought it 98% done. I just had to have the tail housing machined to accept the viper seal. It was machined
for the bushing, but for some reason the seal section hadn't been touched.
Here's some shots of the work I've been doing over the last few weeks paint wise:
Rear wheel wells masked for 3M Rubberized Underbody spray
Finished
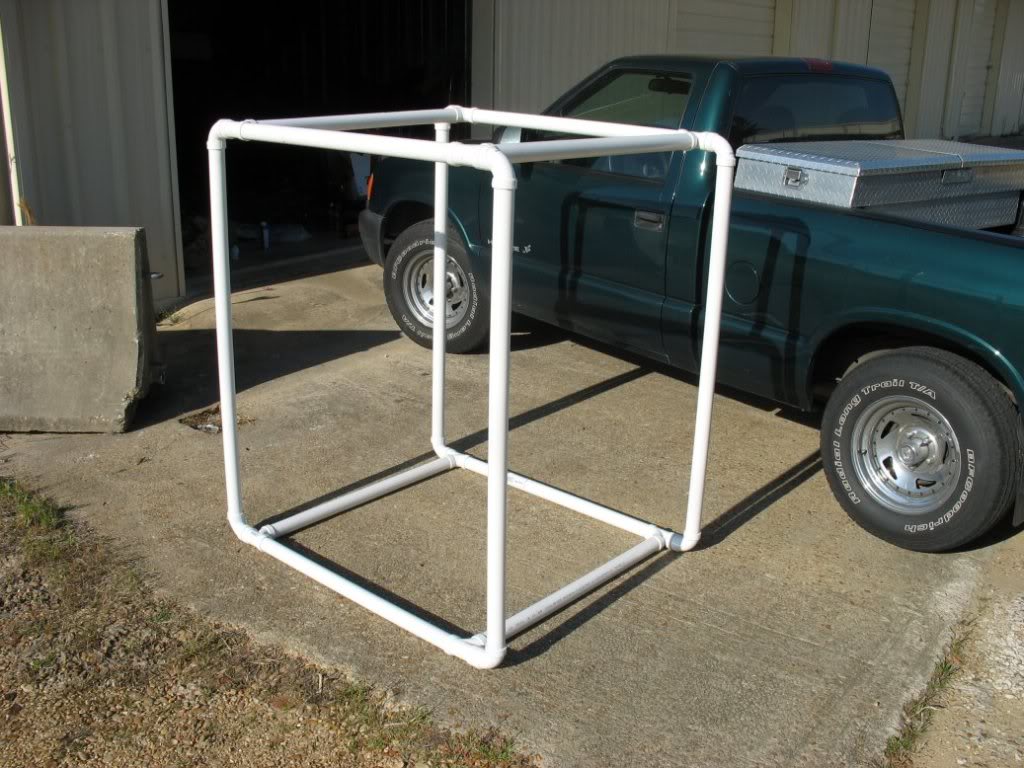
1 1/2" PVC Cube to hang stuff on inside my paint booth
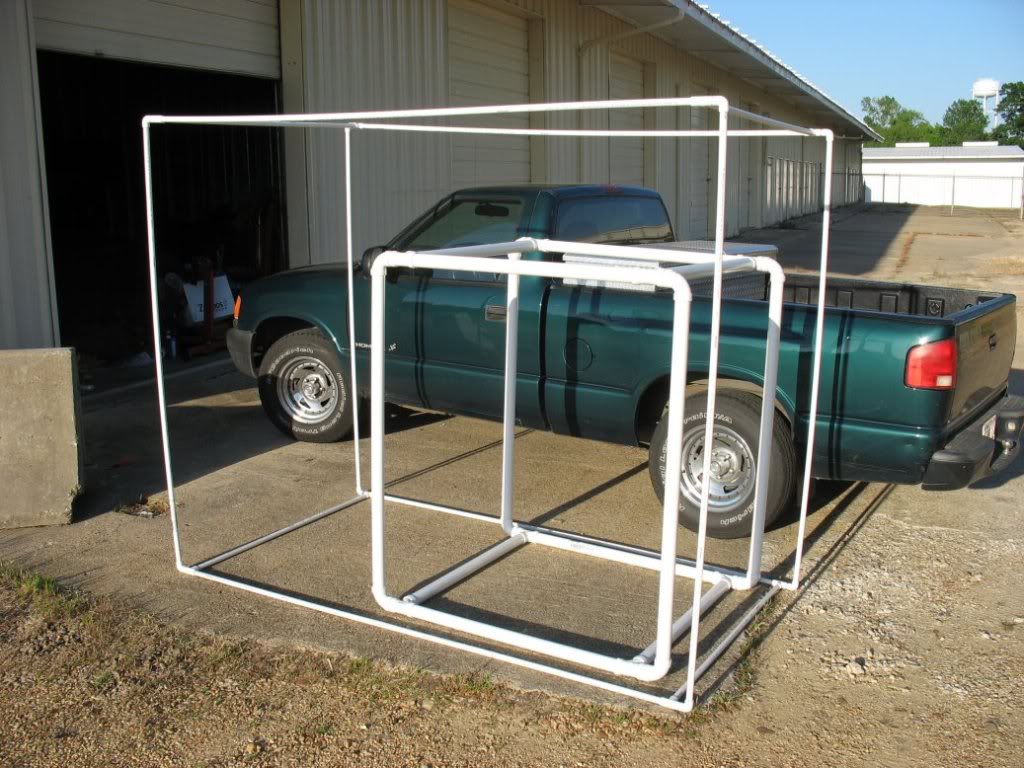
Booth skeleton and cube
Xray view
Pressing in the viper output shaft bushing (I was flush when I finished)
Viper output shaft seal
Pressing in the seal
Output shaft ****!
Shrinkage
All Done
If I didn't already explain it, this T56 came from a 2001 Viper. It has a Fbody input shaft, front plate, bell housing, and
tail housing. I bought it 98% done. I just had to have the tail housing machined to accept the viper seal. It was machined
for the bushing, but for some reason the seal section hadn't been touched.
Here's some shots of the work I've been doing over the last few weeks paint wise:
Rear wheel wells masked for 3M Rubberized Underbody spray
Finished
1 1/2" PVC Cube to hang stuff on inside my paint booth
Booth skeleton and cube
Xray view
Thread Starter
Joined: Apr 2009
Posts: 381
Likes: 27
From: Starkville, MS
Complete
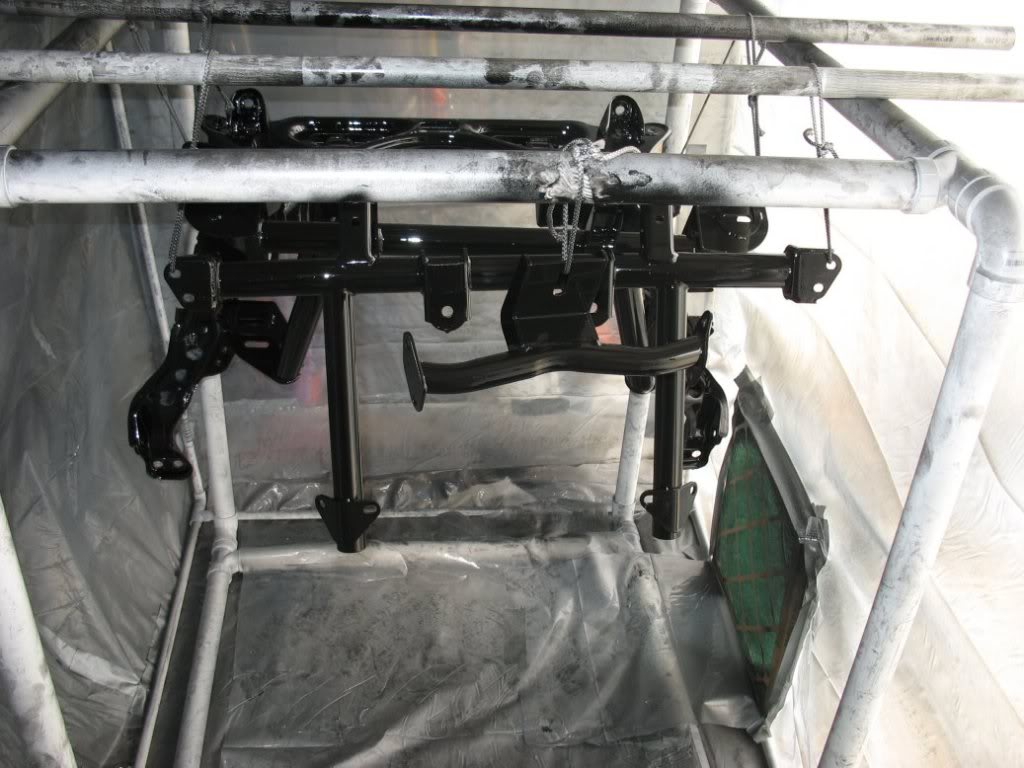
Results - Front to Back = Samberg Transmission Brace, Cobra Diff Mount, LS1 Subframe, and OEM Rear Subframe
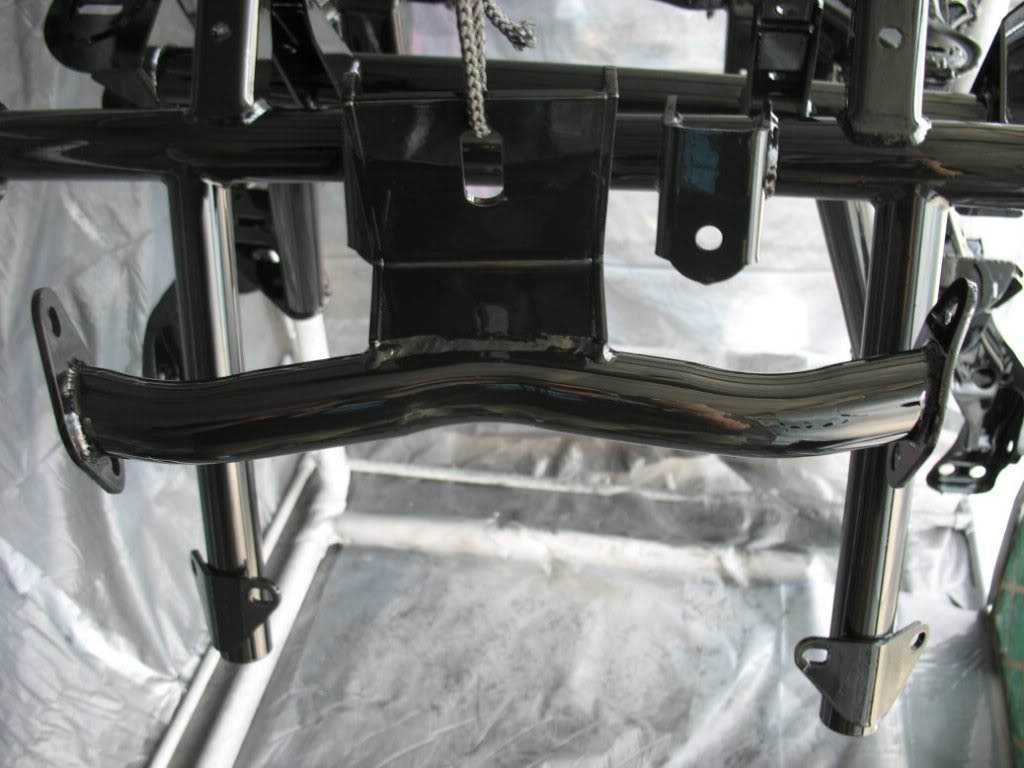
Too bad this stuff sits under the car
All done with POR15
I also coated my transmission tunnel with 3M Rubberized Underbody spray, but I didn't get pictures of it because I didn't
want to remove my masking while it was still wet.
I think that does it for paint except for little things like the Brake booster, which I'll probably do with a rattle can.
I'm excited because I'm about to start putting things back IN the car
Koni's also came in today


Cheers!
Lane
Thread Starter
Joined: Apr 2009
Posts: 381
Likes: 27
From: Starkville, MS
Made a good deal of progress over the last two weeks.
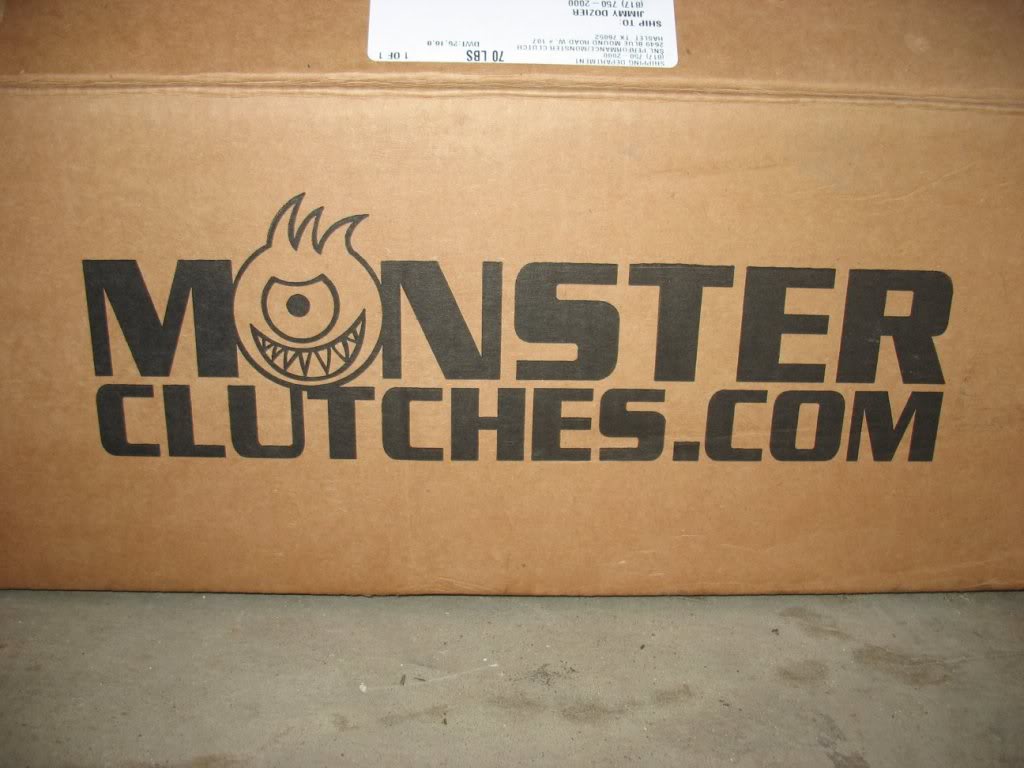
I recently made the decision that since my car is going to be more of a daily driver, maybe I should downgrade the clutch
from a 6 puck to something with a little more surface area. After talking to the guys from Monster, they graciously allowed
me to return my stage 4 clutch disk in exchange for a stage 2. This is their latest compound and I haven?t even seen
pictures of a disk like mine until it arrived
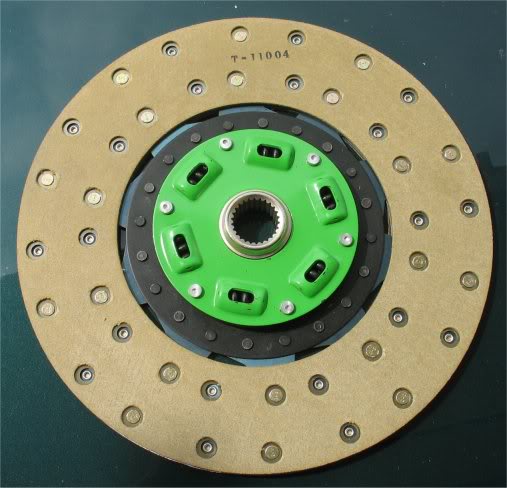
This is my stage 4 clutch disk that I sent in for an exchange:
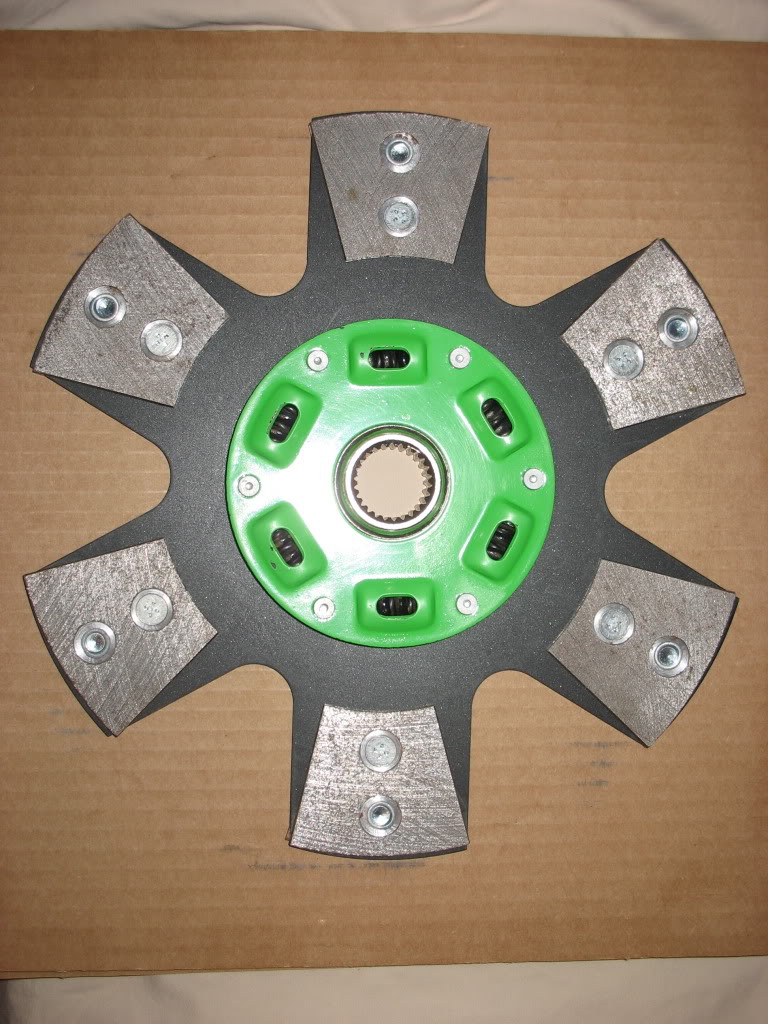
The guys are Monster Clutch were truly a pleasure to deal with. If this cluth performs as I expect it to they?ve gained a
lifetime customer.
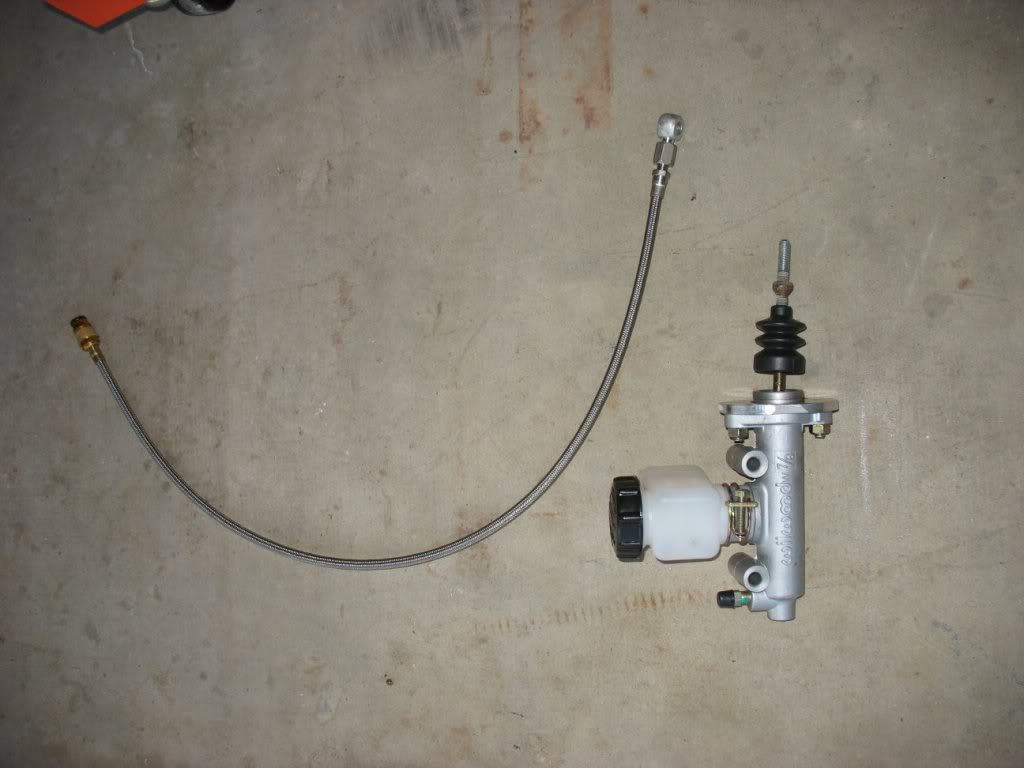
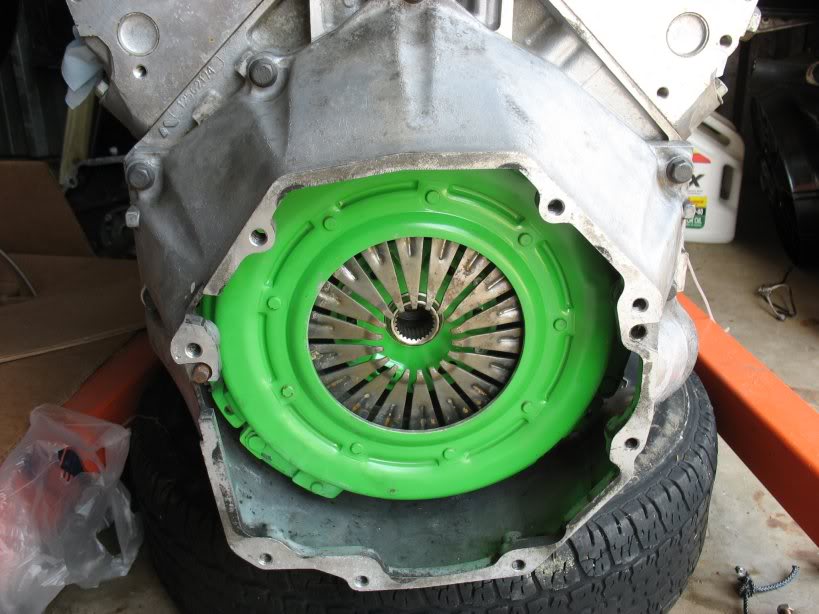
Installed:
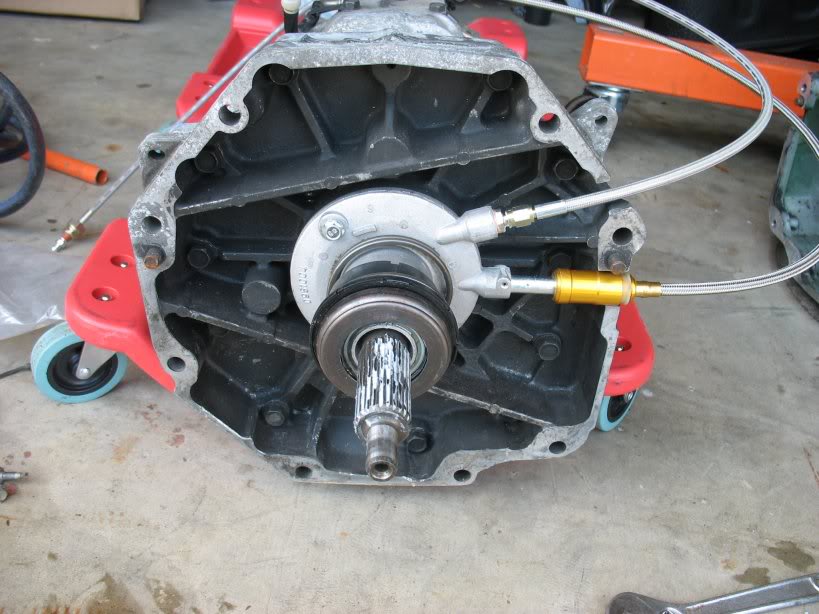
Now here?s a picture of my T56 with the slave, clutch line and remote bleeder installed. This picture really makes it look
like a over-greased the input shaft? I?m trying to tell myself that it?ll be ok. Hope it?s not going to cause a friction
problem down the road
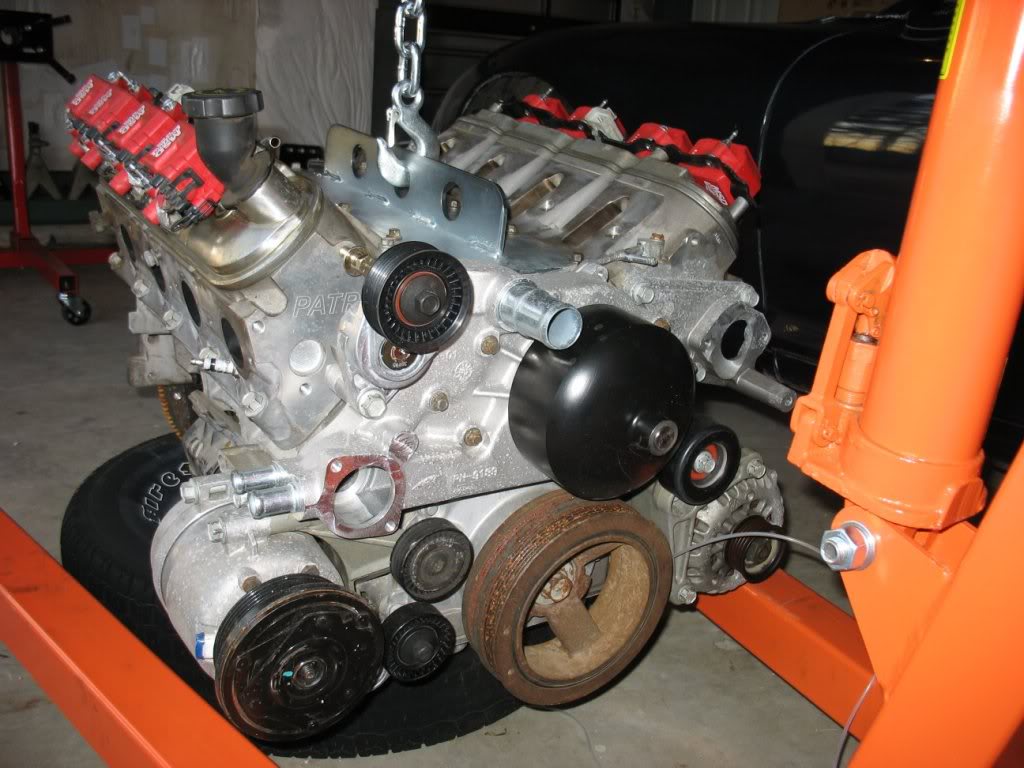
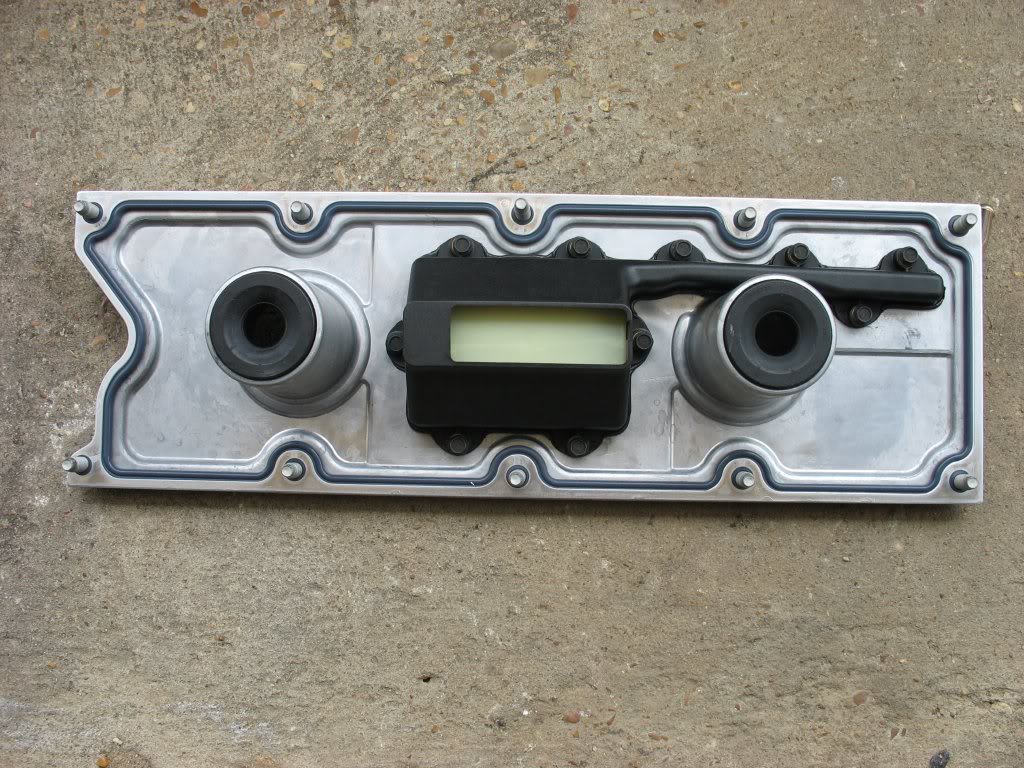
Spent some time cleaning my engine too. While I was at it I removed the coils so I could take a look at what was under the
valve covers:
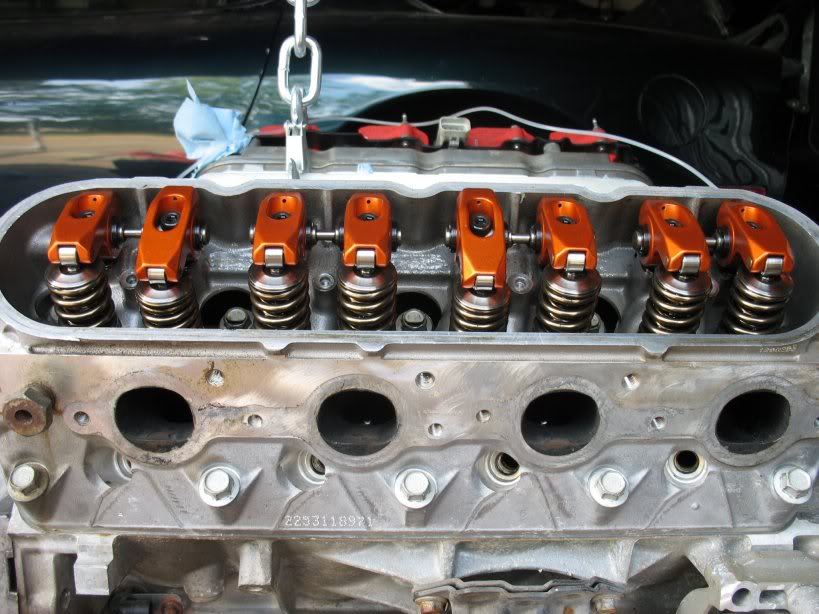
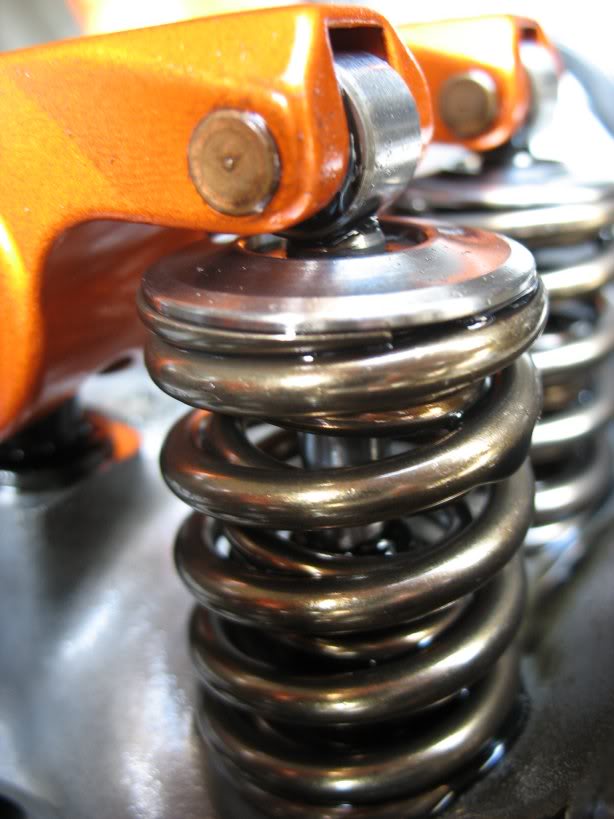
Pretty happy to see the harland sharp rockers and the upgraded springs because I bought this engine with a lot of faith in
the seller since I couldn?t tear it down on site. So far, everything he said has been the truth
Now for some BEEF!
I recently made the decision that since my car is going to be more of a daily driver, maybe I should downgrade the clutch
from a 6 puck to something with a little more surface area. After talking to the guys from Monster, they graciously allowed
me to return my stage 4 clutch disk in exchange for a stage 2. This is their latest compound and I haven?t even seen
pictures of a disk like mine until it arrived
This is my stage 4 clutch disk that I sent in for an exchange:
The guys are Monster Clutch were truly a pleasure to deal with. If this cluth performs as I expect it to they?ve gained a
lifetime customer.
Installed:
Now here?s a picture of my T56 with the slave, clutch line and remote bleeder installed. This picture really makes it look
like a over-greased the input shaft? I?m trying to tell myself that it?ll be ok. Hope it?s not going to cause a friction
problem down the road
Spent some time cleaning my engine too. While I was at it I removed the coils so I could take a look at what was under the
valve covers:
Pretty happy to see the harland sharp rockers and the upgraded springs because I bought this engine with a lot of faith in
the seller since I couldn?t tear it down on site. So far, everything he said has been the truth
Now for some BEEF!
Thread Starter
Joined: Apr 2009
Posts: 381
Likes: 27
From: Starkville, MS
On to other things?
This is what $1k gets you from Ray:
Found some time to replace my pillow ***** today?
The scoundrels:
The heros:
Action shot:
Done:
I think that?s it for the good news?
I found something lovely when I removed the bushing that was adapting the oil pressure port to a 1/8? NPT for a manual
gauge.
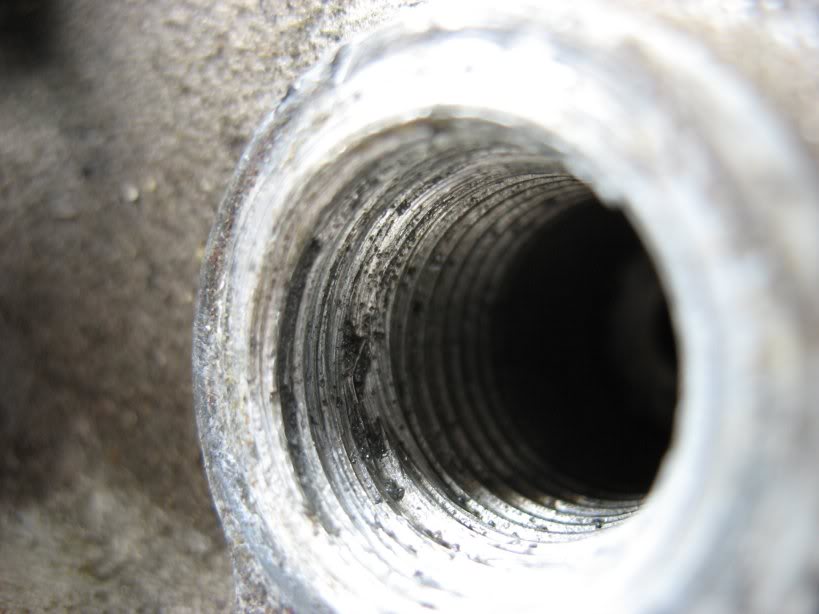
Apparently another example of metric and SAE confusion as this bushing should have been threaded for M16x1.5. The end result
is that the first few threads are really torn up. Thankfully the PO didn?t try to force the bushing in any further. I?m
going to order a M16x1.5 tap and try to carefully chase what?s left of the threads. Hopefully I can get something usable.
The bottom threads look promising
One last thing. Here?s a picture of the transmission tunnel I painted two weeks ago with 3M rubberized underbody coating
Lane
Thread Starter
Joined: Apr 2009
Posts: 381
Likes: 27
From: Starkville, MS
Got a good bit done over my three day weekend:
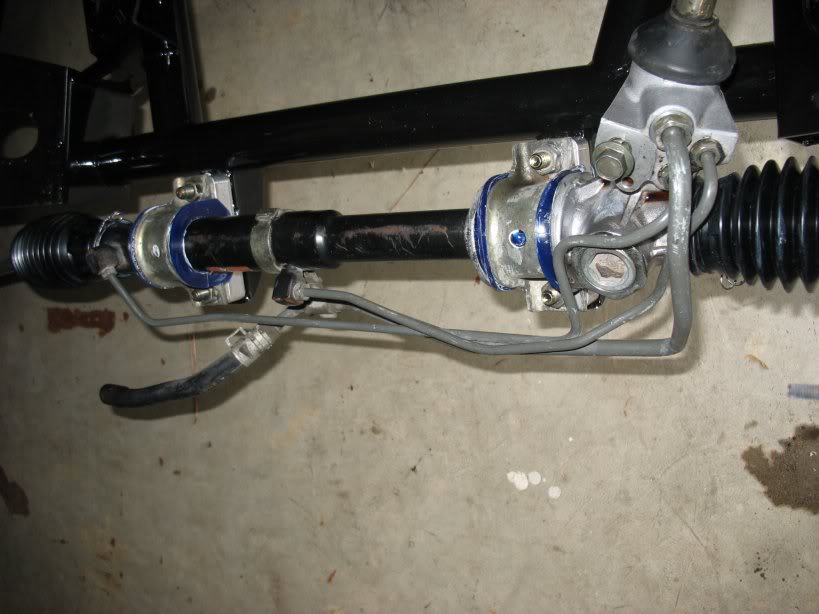
Cleaned up my rack and installed new boots. Afterwards I installed the rack spacers + Superpro bushings on my Samburg
subframe:
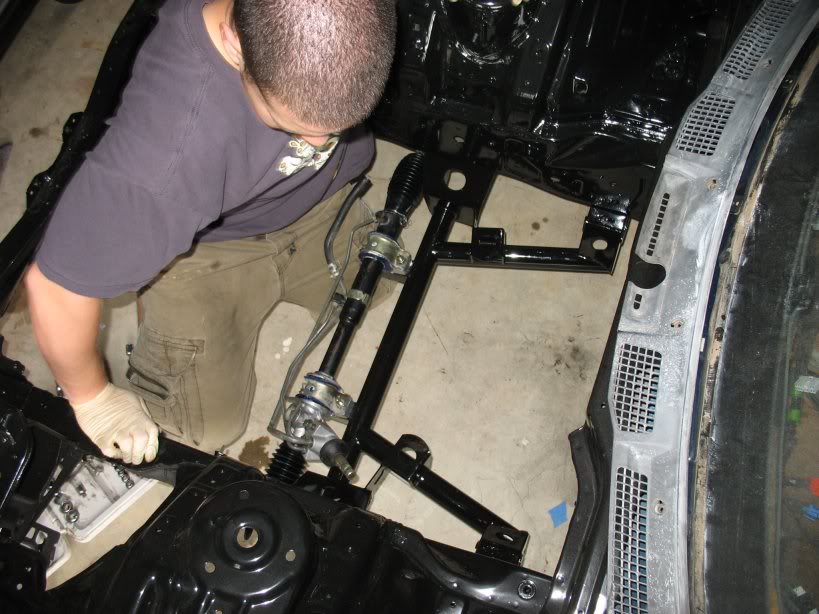
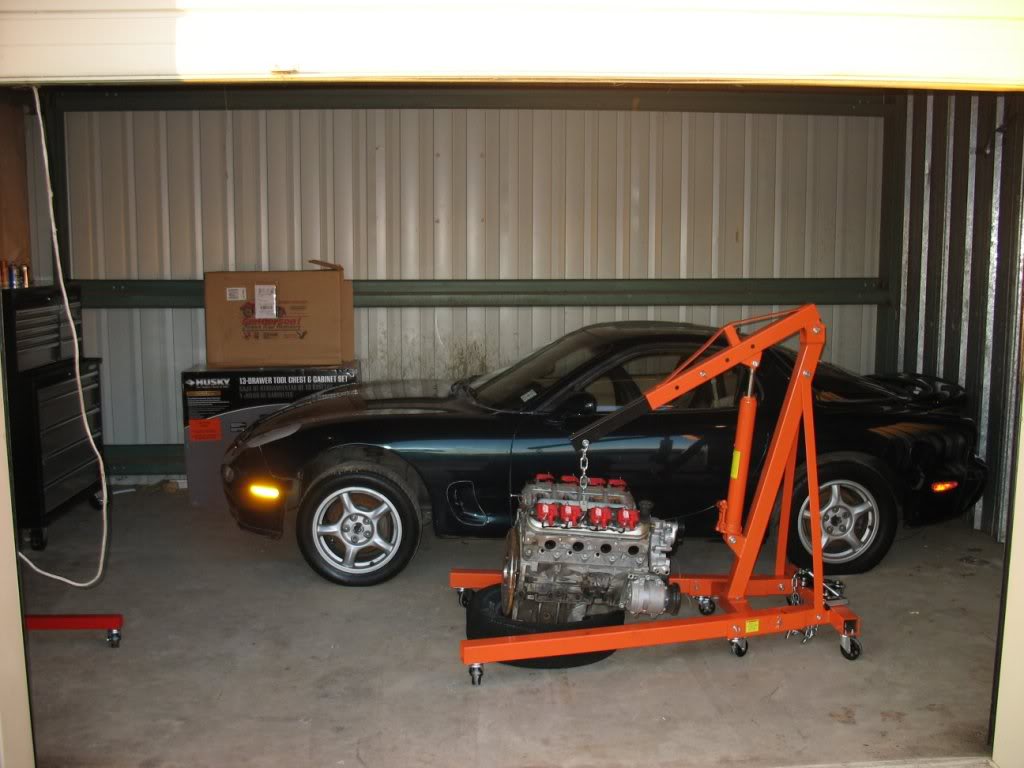
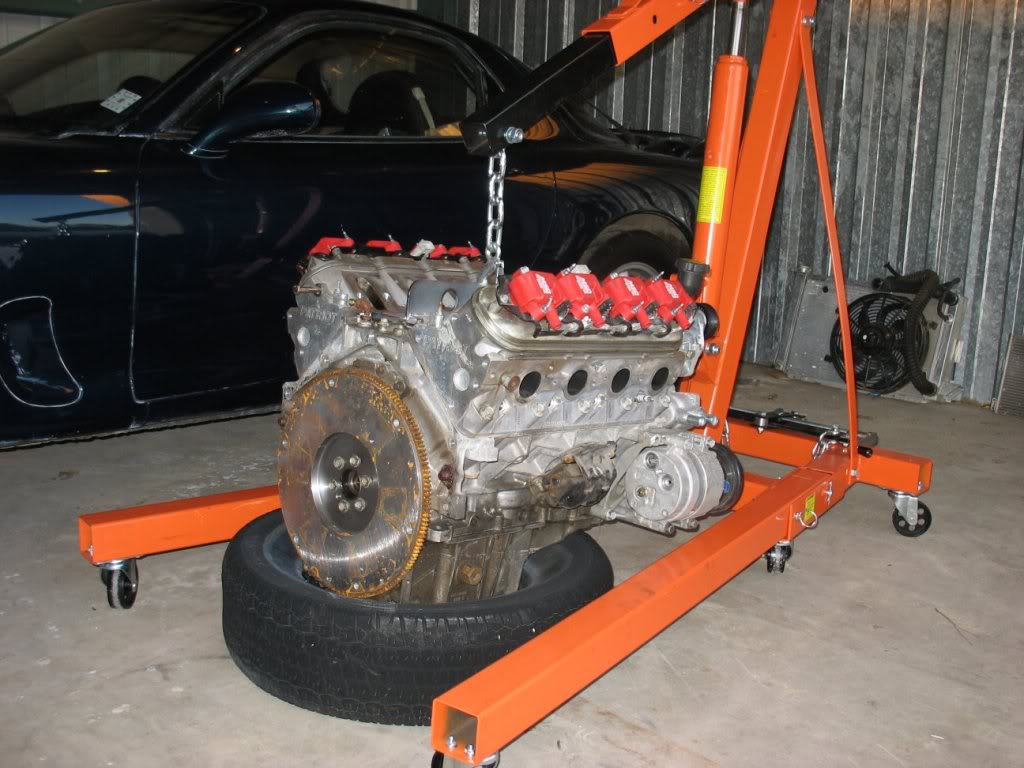
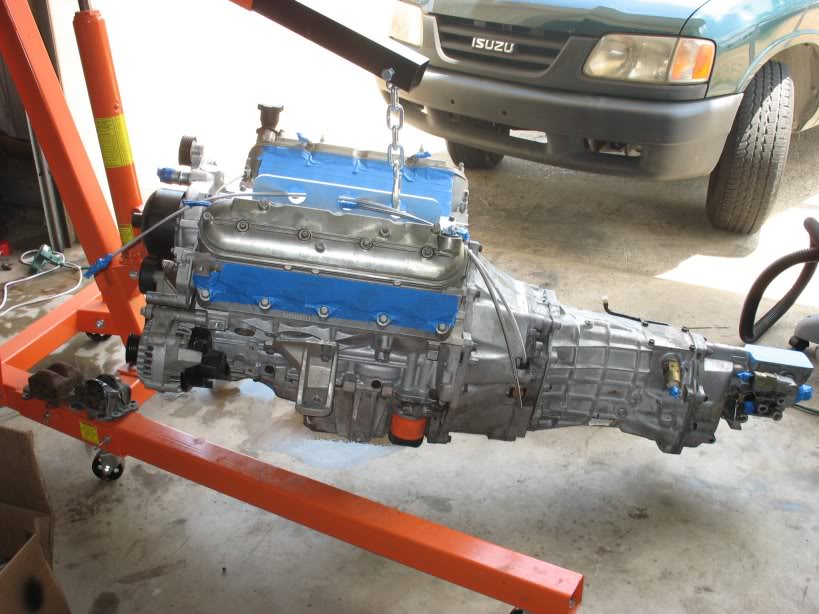
Making a hole to roll my engine around:
Getting the level right:
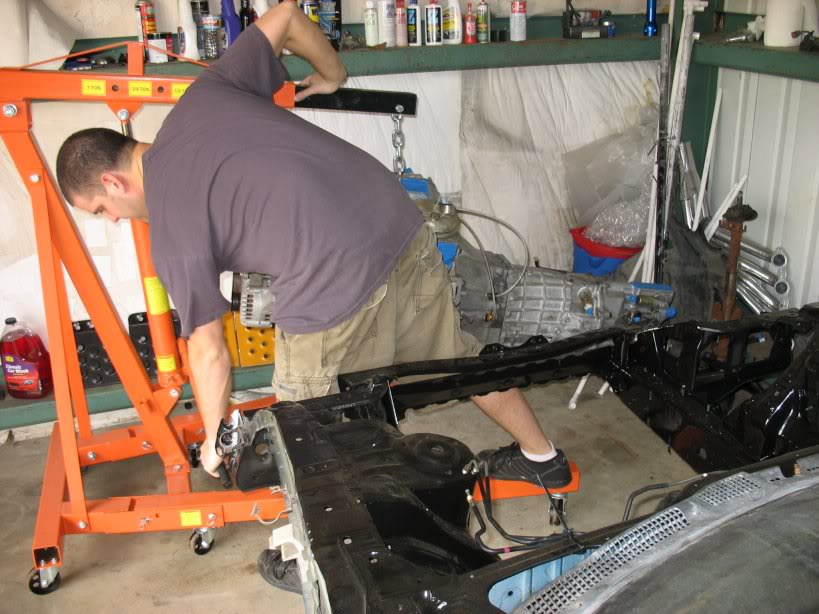
Me - Very Excited
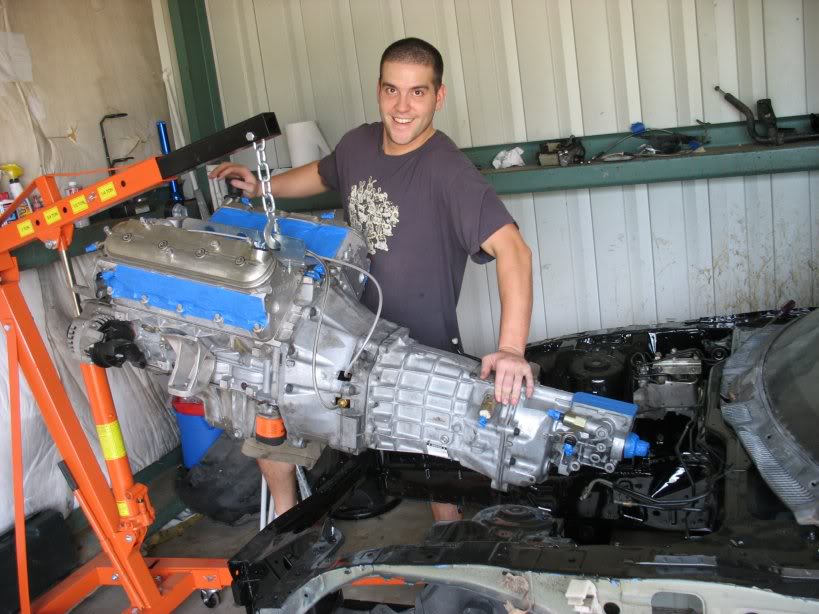
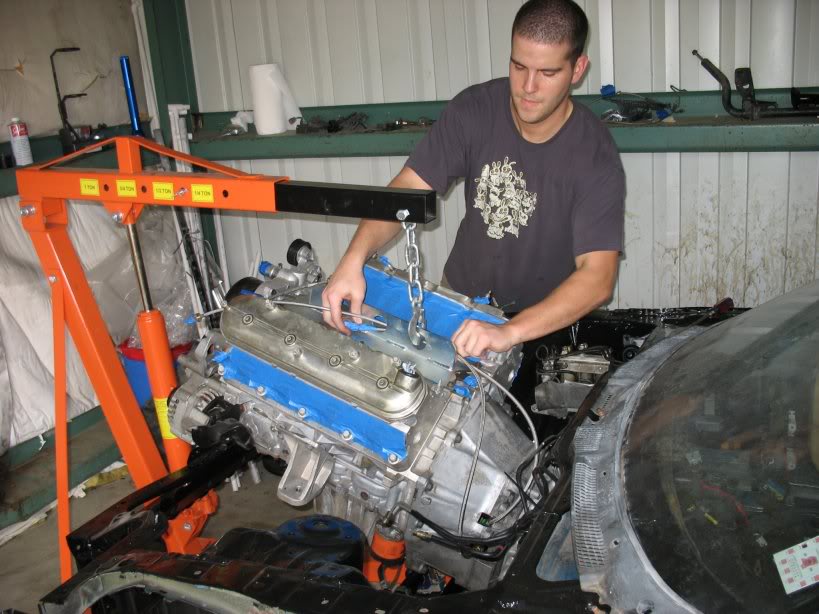

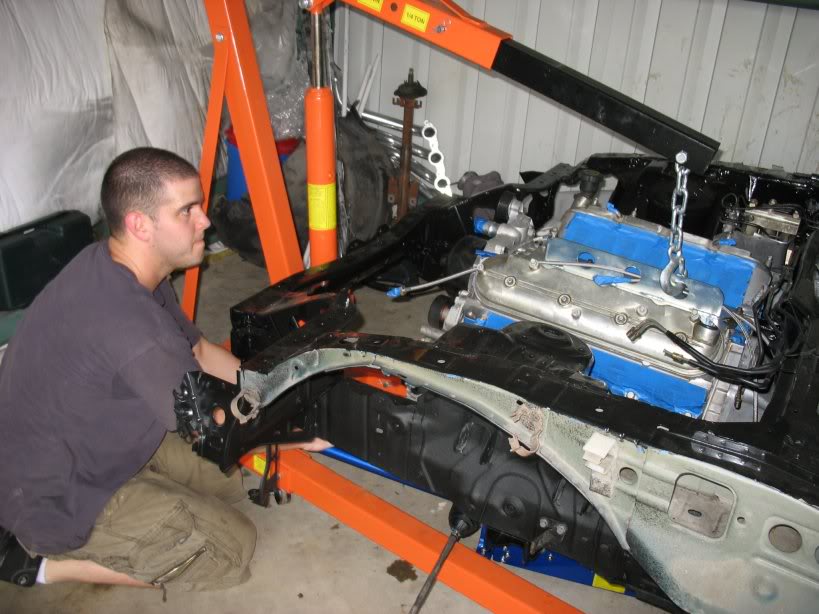
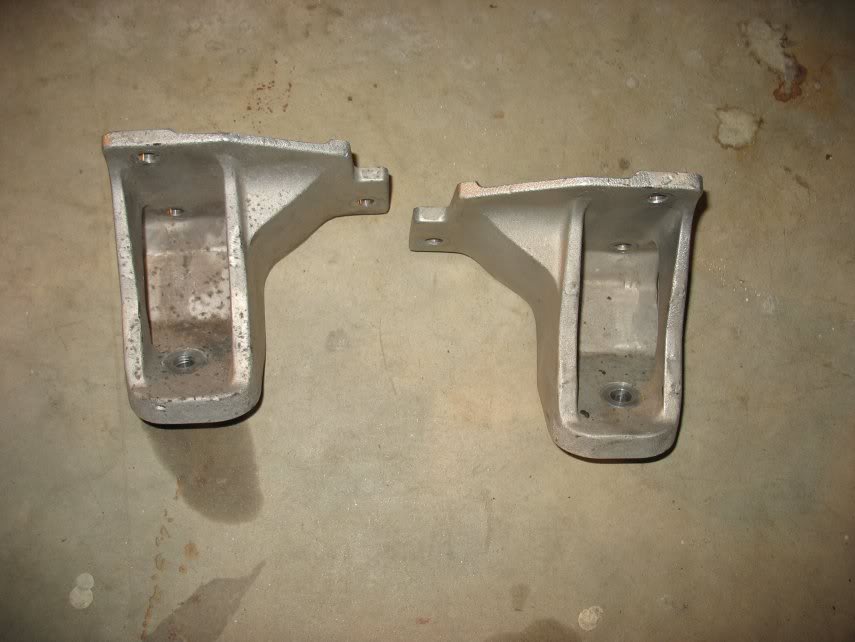
Aligning the motor mounts:
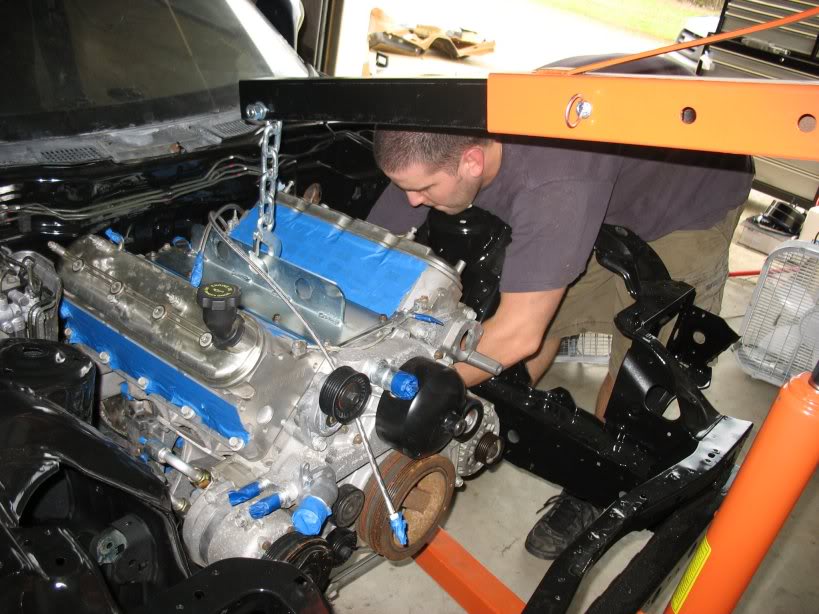
All done! (My brother and helper for the day)
Cleaned up my rack and installed new boots. Afterwards I installed the rack spacers + Superpro bushings on my Samburg
subframe:
Making a hole to roll my engine around:
Getting the level right:
Me - Very Excited
Aligning the motor mounts:
All done! (My brother and helper for the day)
Thread Starter
Joined: Apr 2009
Posts: 381
Likes: 27
From: Starkville, MS
Stripping the interior for the transmission brace install (among other things):
Installing Samburg's transmission mount:
Dropping my rear 93 subframe so my 94 subframe can go in along with my Samburg Cobra diff subframe and differential.
Out:
I actually got my 94 subframe in today, but didn't snap any pictures. I'm pretty confident that my car will be running in a
month. I have made a few changes to my plan electrically and I'm modifying my front harness so that I have 1 fuse / relay
box in the engine bay instead of 3. I'm about half way done, but I'll probably spend the rest of the week wrapping it up.
Next thing on the list to do is to install the cobra diff, take drive shaft measurements, and make the order. Likewise, I
need to design, order, and install my fuel system. That should all happen in the next 2 weeks.
Lane
Thread Starter
Joined: Apr 2009
Posts: 381
Likes: 27
From: Starkville, MS
Well I felt like I got a lot accomplished this weekend, but I don't have much to show for it.
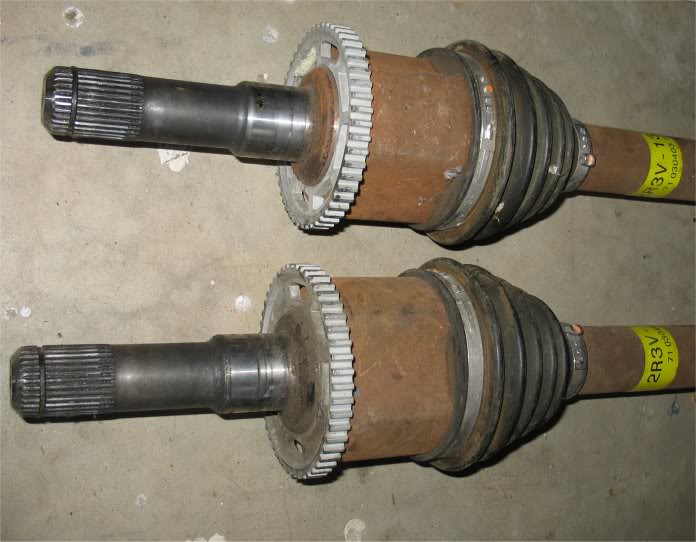
Firstly, I finally got around to building my Cobra axles:
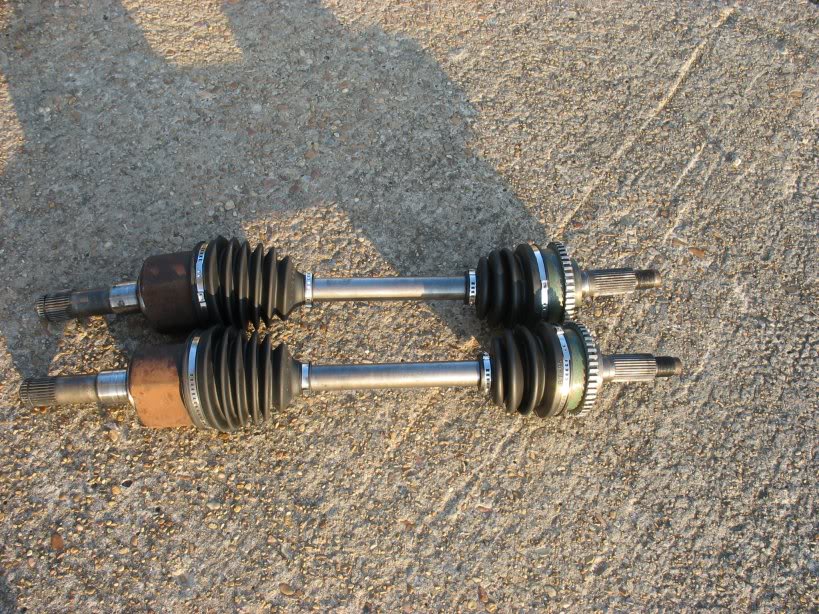
I've played around with CV joints before on my MR2, so I knew what to expect. It's a messy messy time consuming job, but I
think the end result is worth it. As a bonus I wrote a mini tutorial for how to assemble the tripod end correctly
http://www.norotors.com/index.php?topic=988.0.html
That's all the pictures I took though. Seriously.... I was covered from head to toe in grease Saturday night, so I didn't
really want to grab my camera mid assembly
Leftovers:
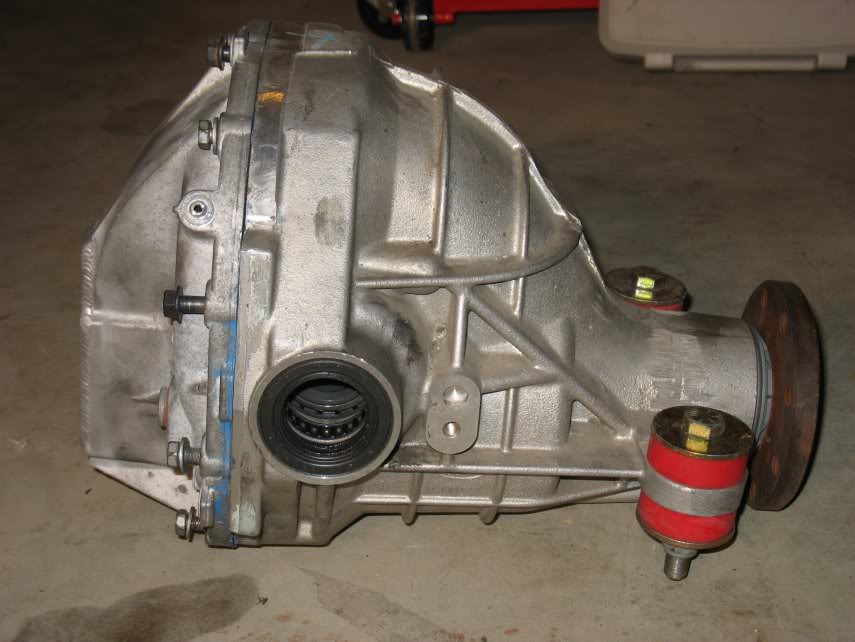
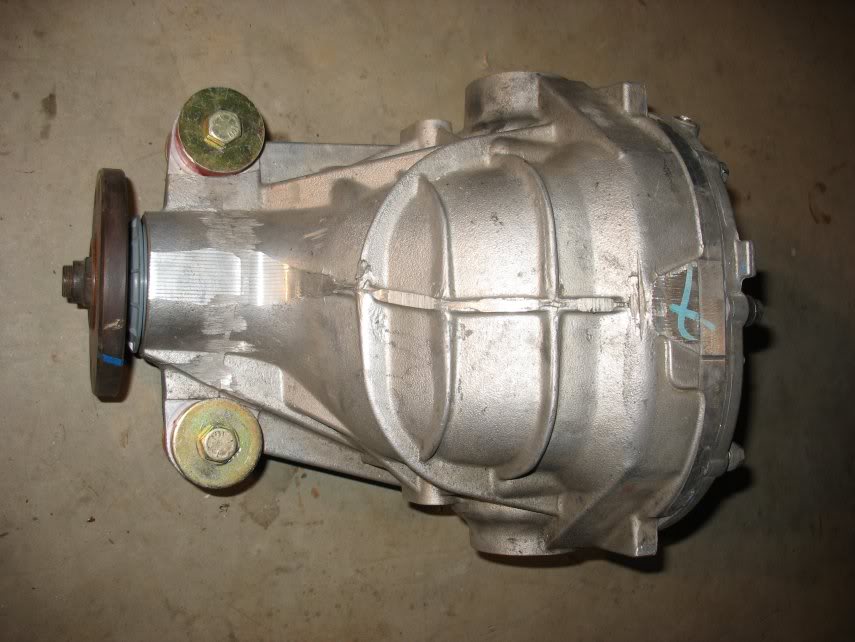
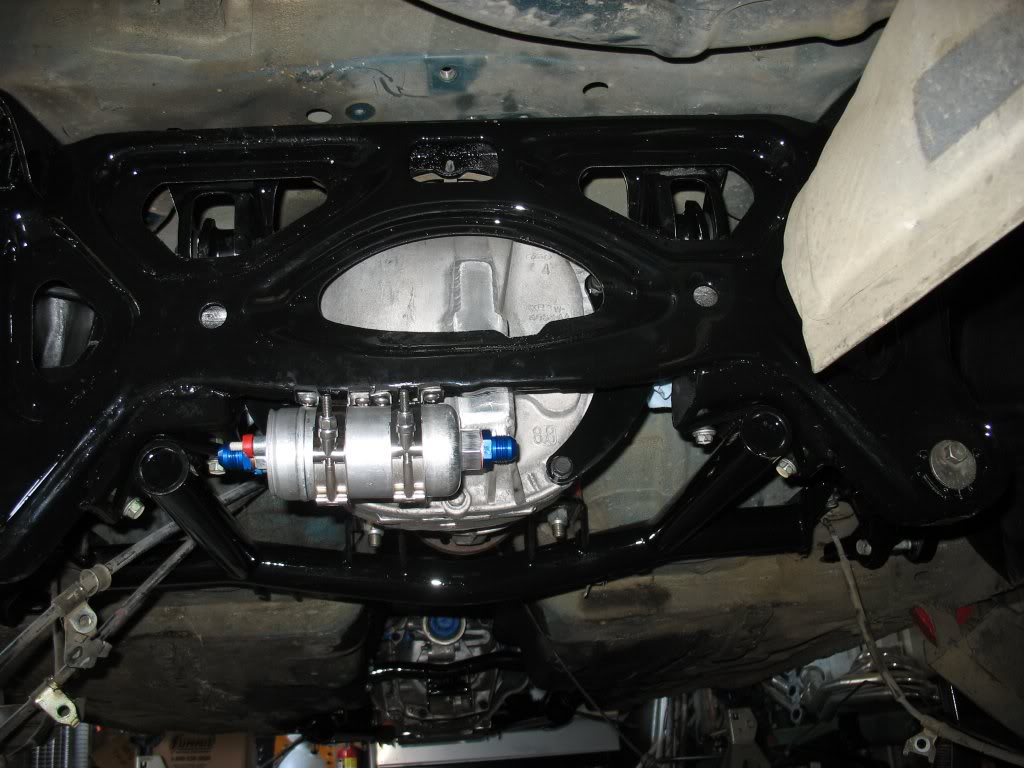
Next I started working on prepping my cobra diff and mounting it.
Diff:
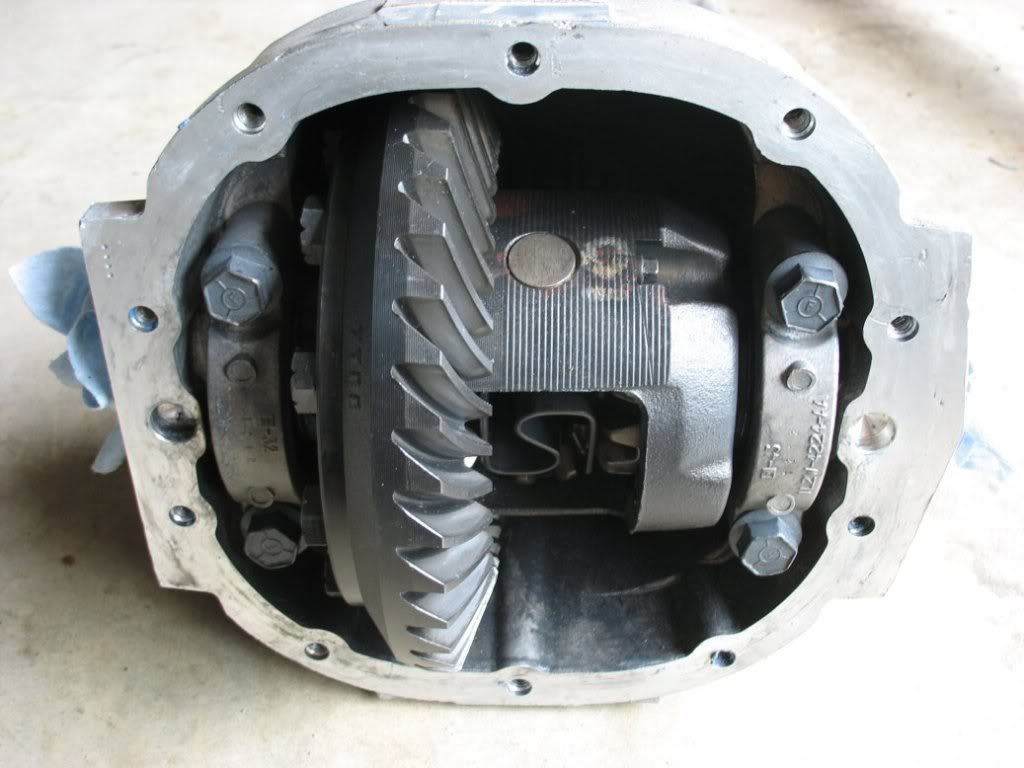
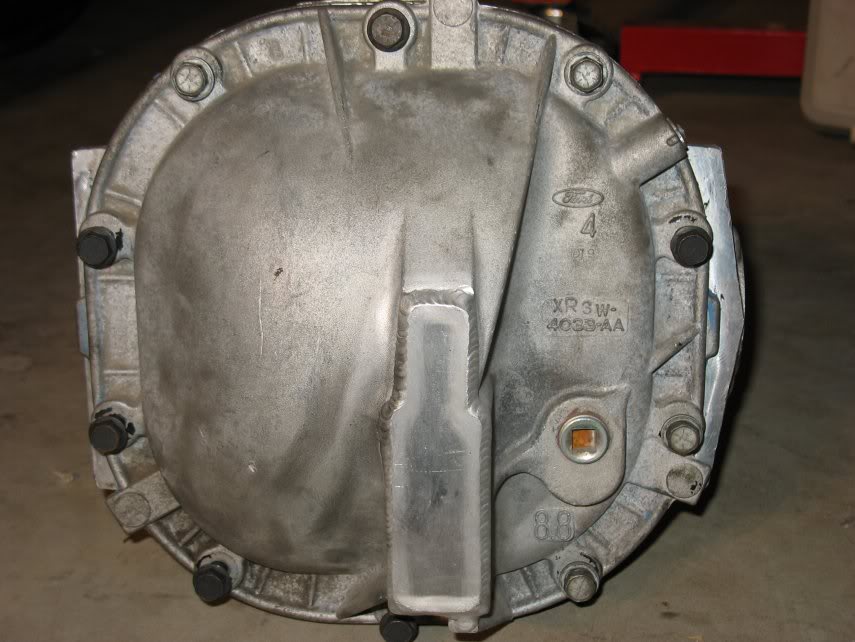
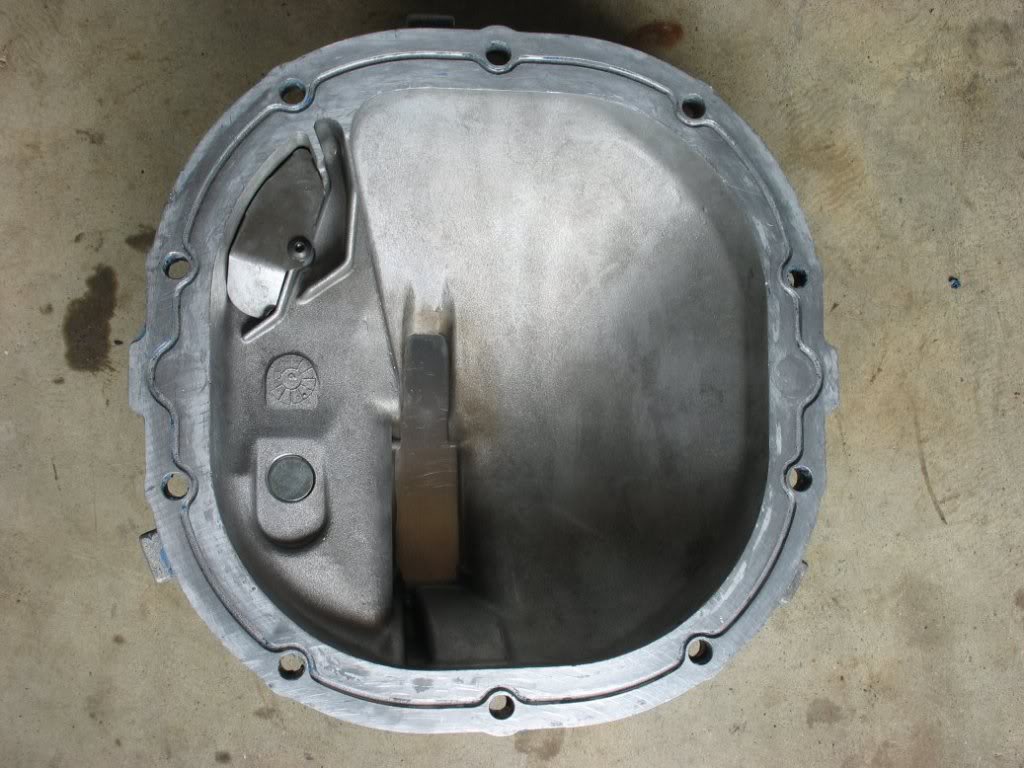
Samburg modified cover:
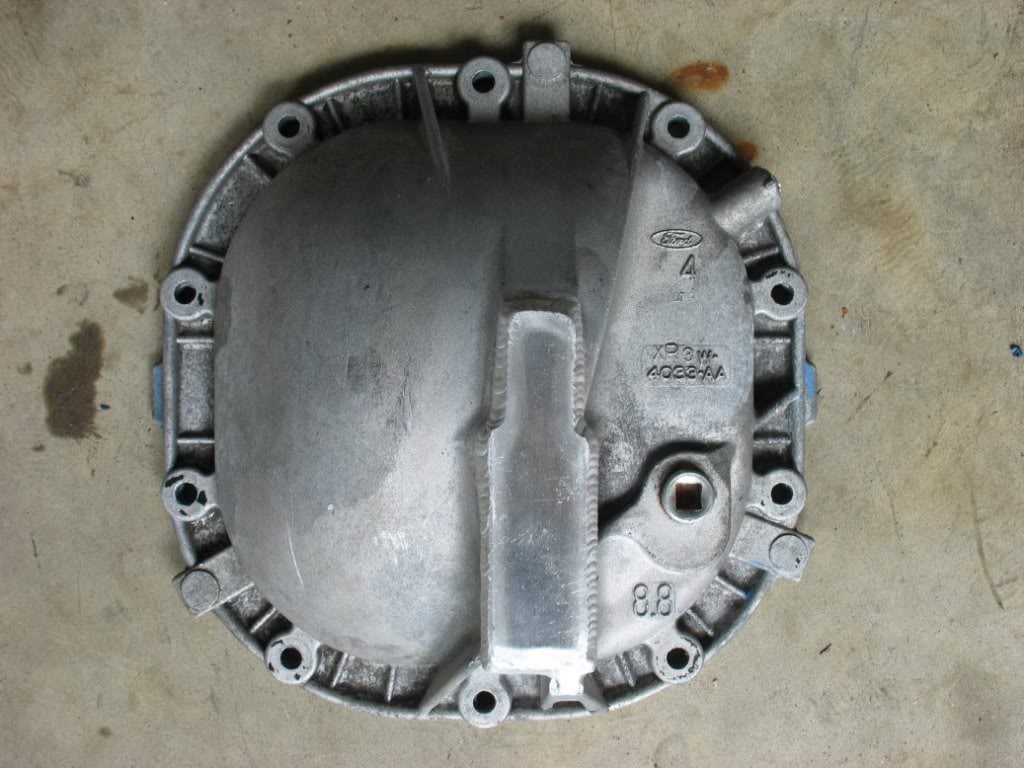
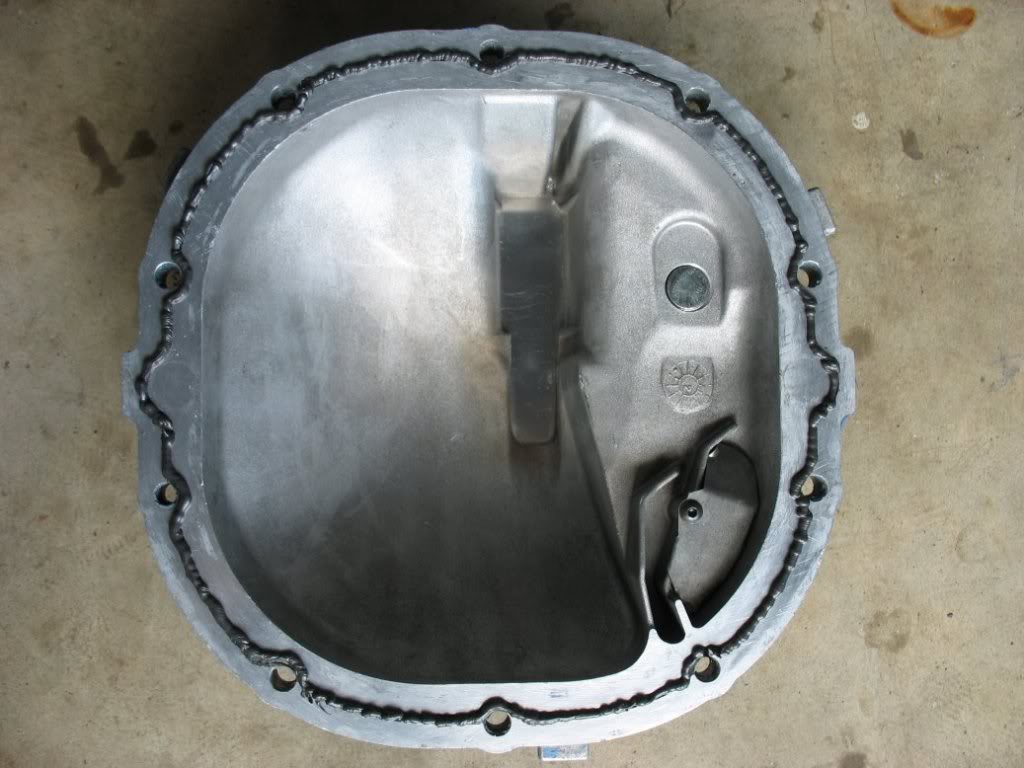
Prepped for RTV:
RTV engaged:
Installed:
Firstly, I finally got around to building my Cobra axles:
I've played around with CV joints before on my MR2, so I knew what to expect. It's a messy messy time consuming job, but I
think the end result is worth it. As a bonus I wrote a mini tutorial for how to assemble the tripod end correctly
http://www.norotors.com/index.php?topic=988.0.html
That's all the pictures I took though. Seriously.... I was covered from head to toe in grease Saturday night, so I didn't
really want to grab my camera mid assembly
Leftovers:
Next I started working on prepping my cobra diff and mounting it.
Diff:
Samburg modified cover:
Prepped for RTV:
RTV engaged:
Installed:
Thread Starter
Joined: Apr 2009
Posts: 381
Likes: 27
From: Starkville, MS
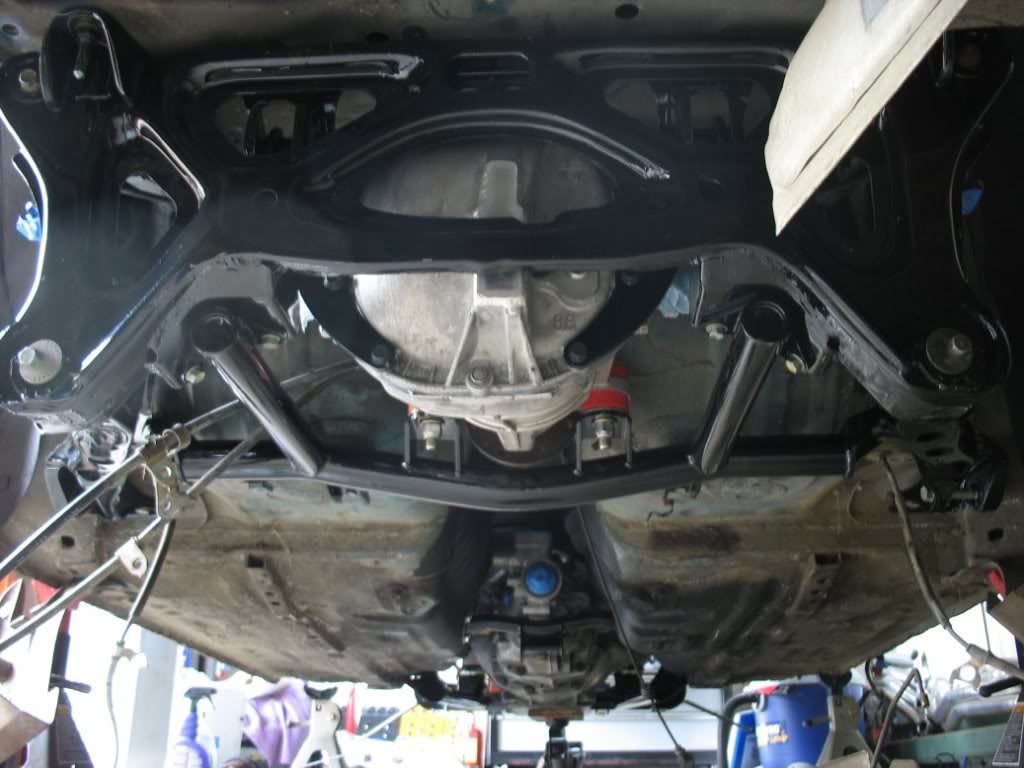
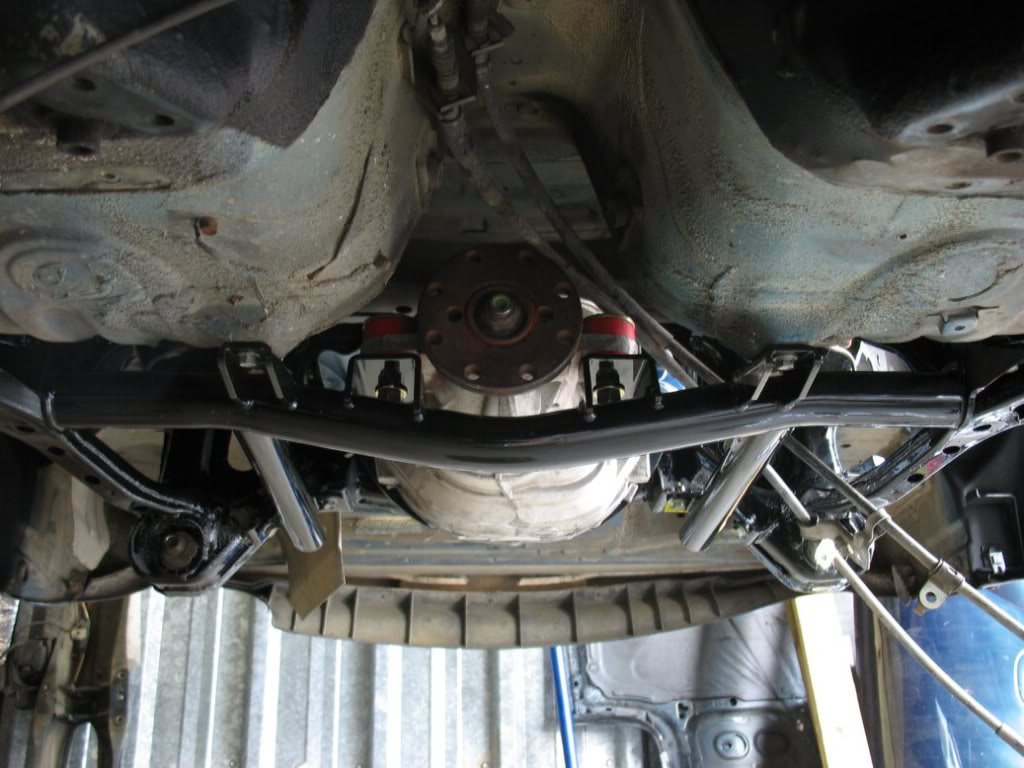
And some misc shots from under the car:
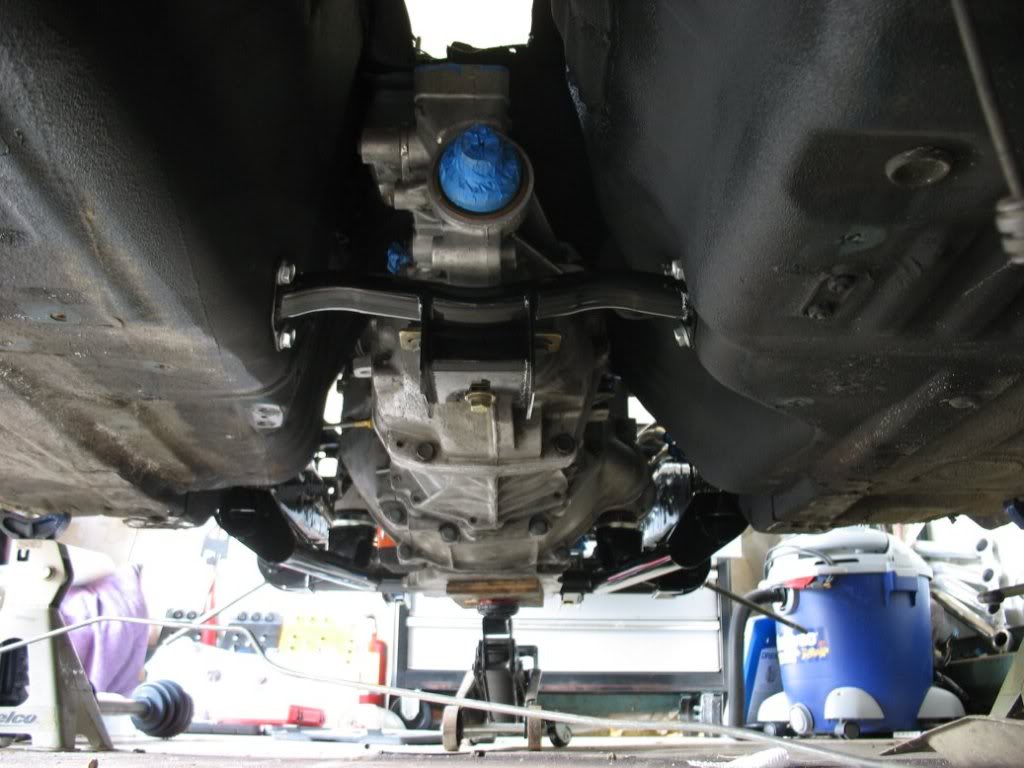
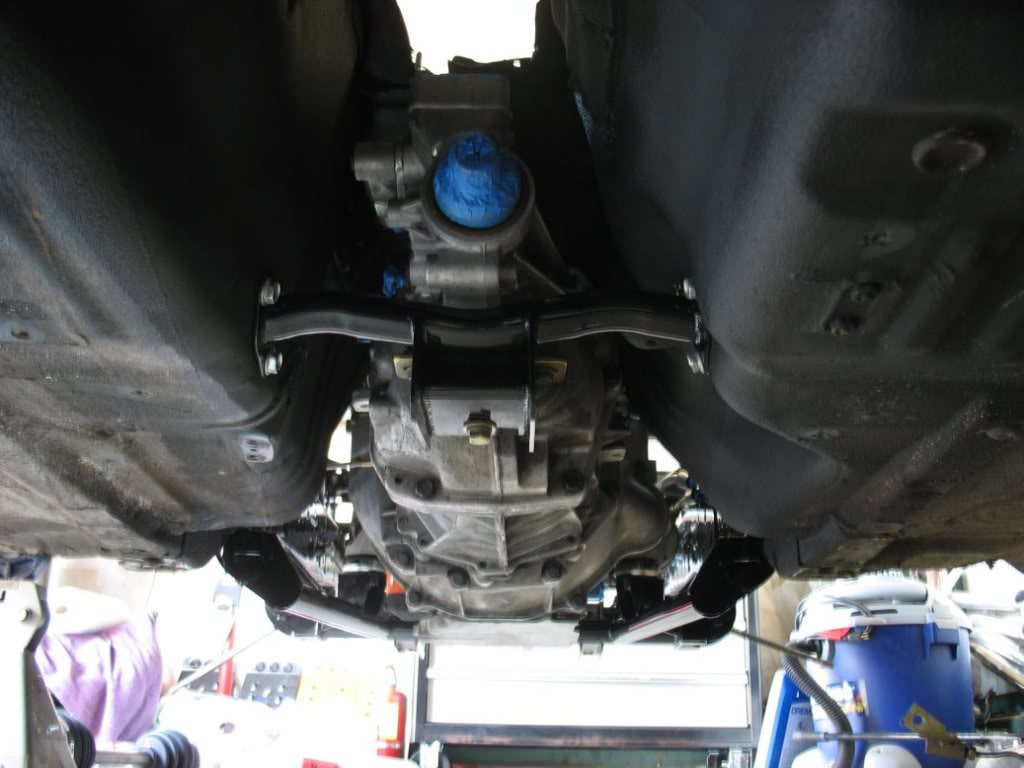
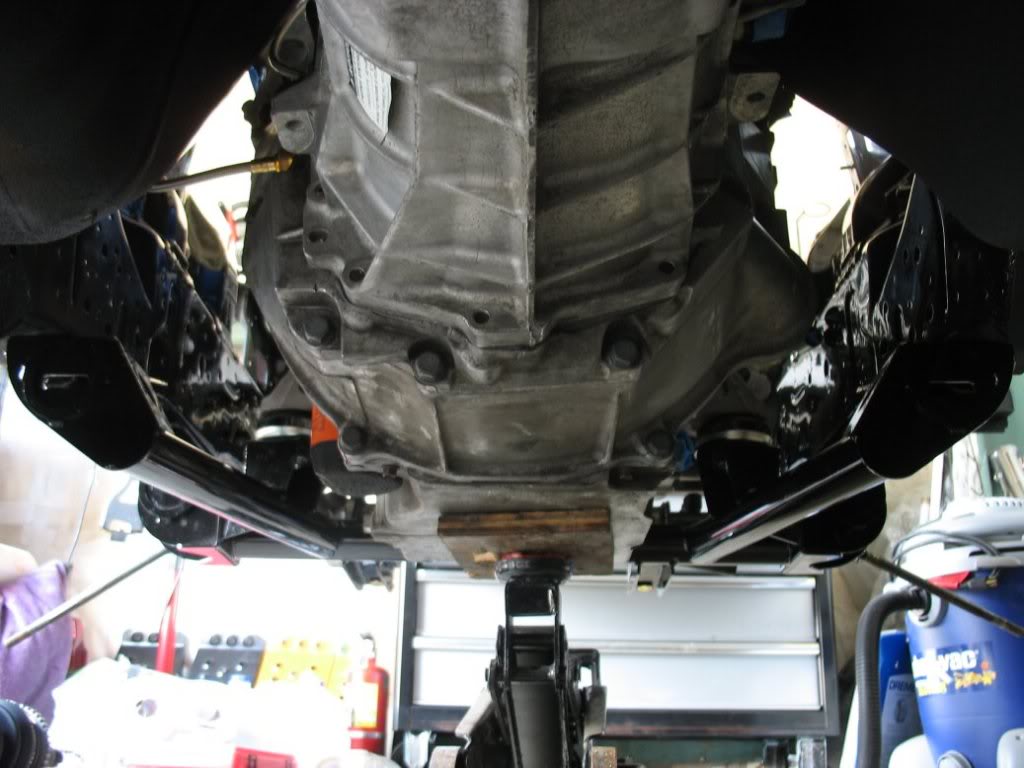
Also installed my P/S pump, did the spring mod, and installed the accessory belts:
Like I said... Not much to show for ~ 16 hours of work
Lane
Also installed my P/S pump, did the spring mod, and installed the accessory belts:
Like I said... Not much to show for ~ 16 hours of work
Lane
Thread Starter
Joined: Apr 2009
Posts: 381
Likes: 27
From: Starkville, MS
It's been really hot the last two weekends. Having a to work in triple digits in a storage bin has been slowing me down
considerably, but I'm getting by. Just trying to keep hydrated
Last weekend I got started on my fuel system:

Mounted my external Bosch 044:
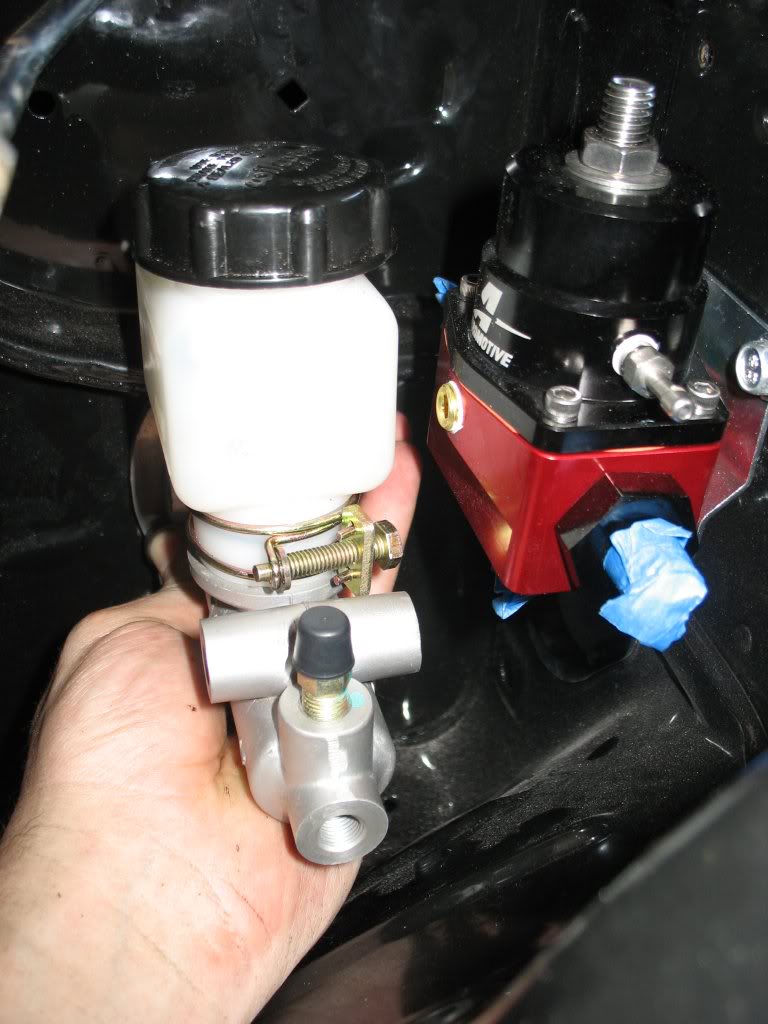
And my Automotive FPR:
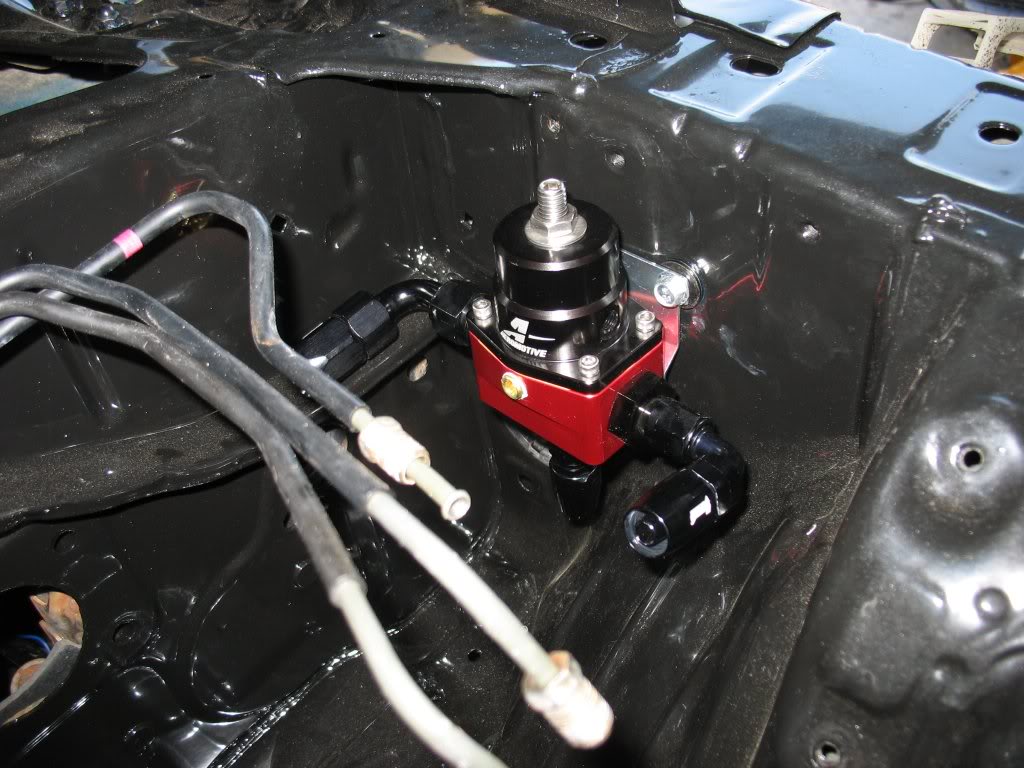
It made me mad though, because up until this point I've been thinking I could fenagle my cruise control modulator in there
somehow, but now with the master and the FPR occupying the same spot, there's no way I can see without a custom bracket
Master and FPR clearance. Looks like a need a remote line to run to my fuel pressure gauge. Need one with a right angle...
Other goodies I got last weekend:
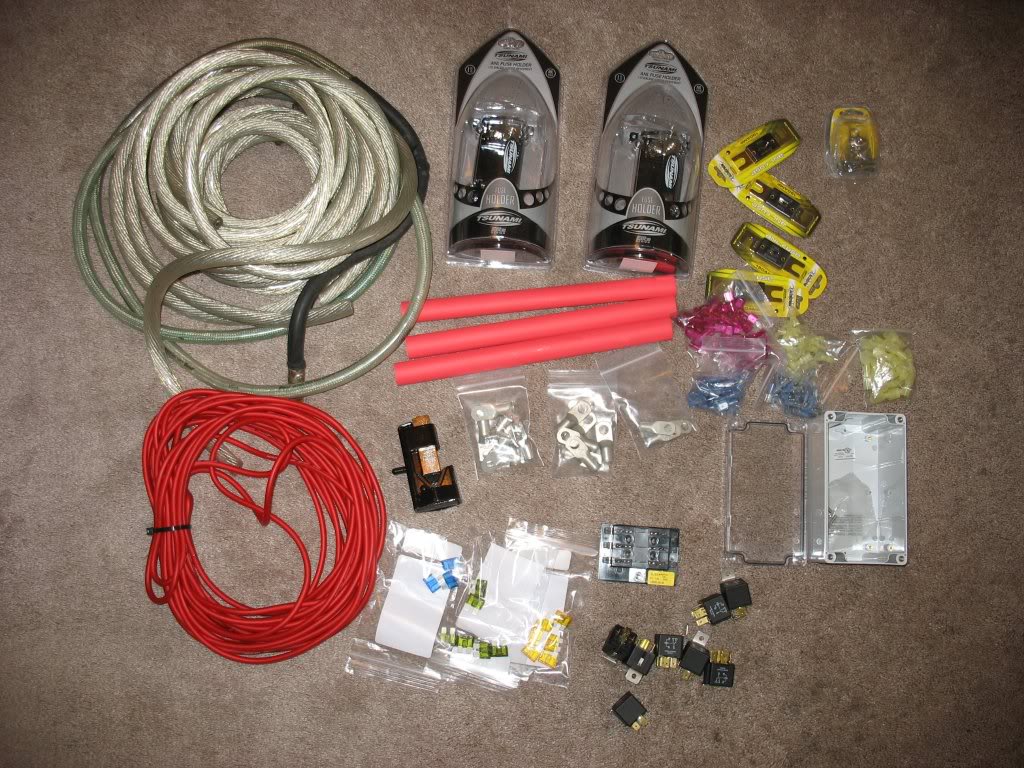
Something I'm working on with the electrical supplies above:
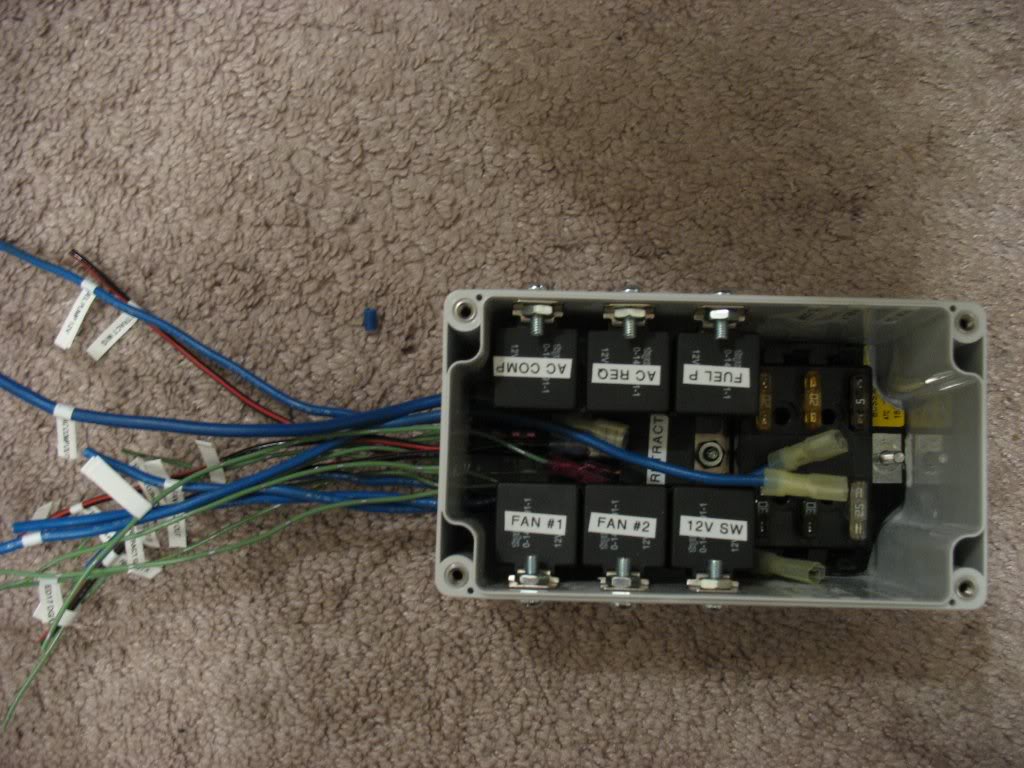
Certainly not the best fused relay solution, but I think I'm going to use it for a while.
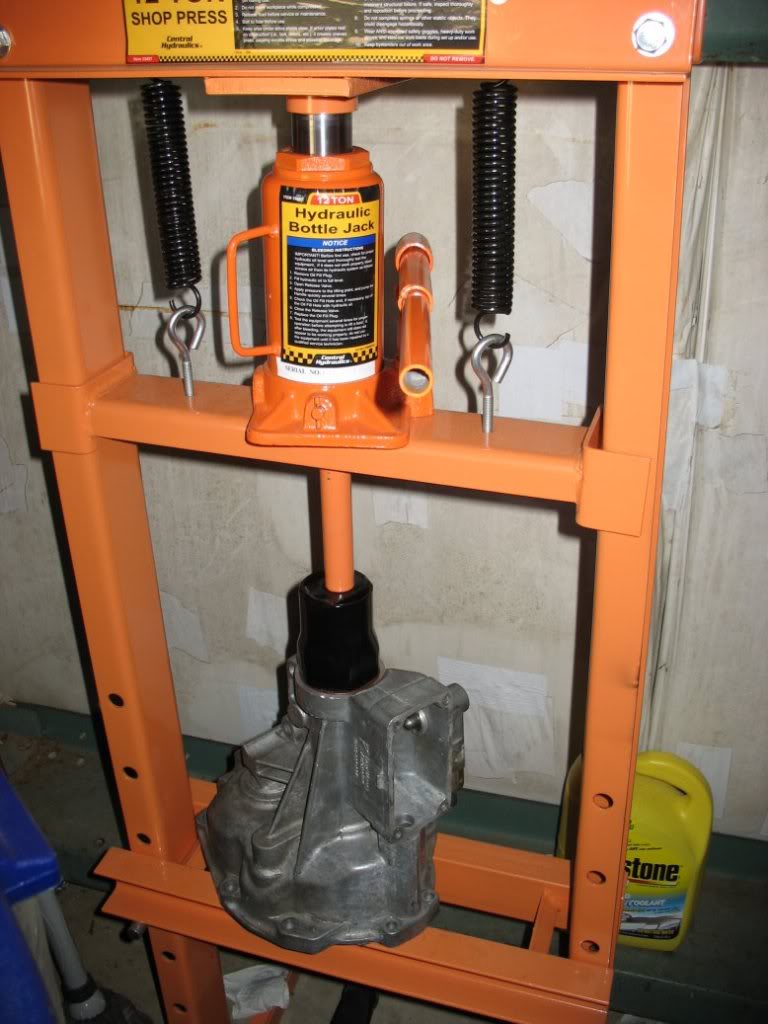
This week I put my press to work:
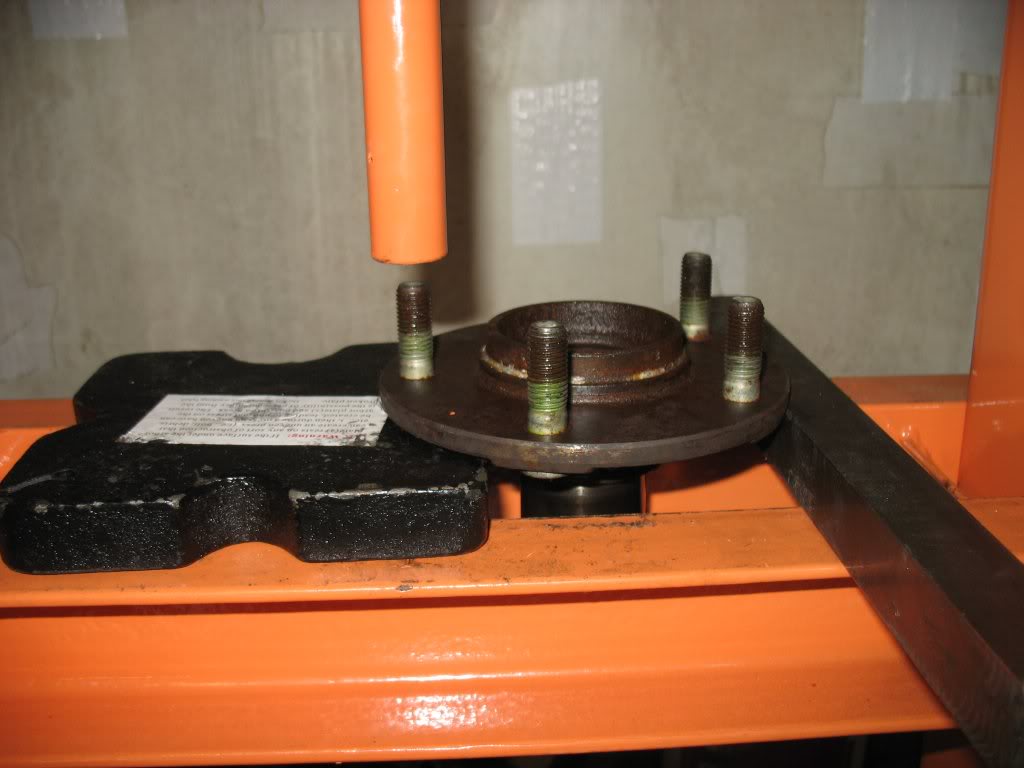
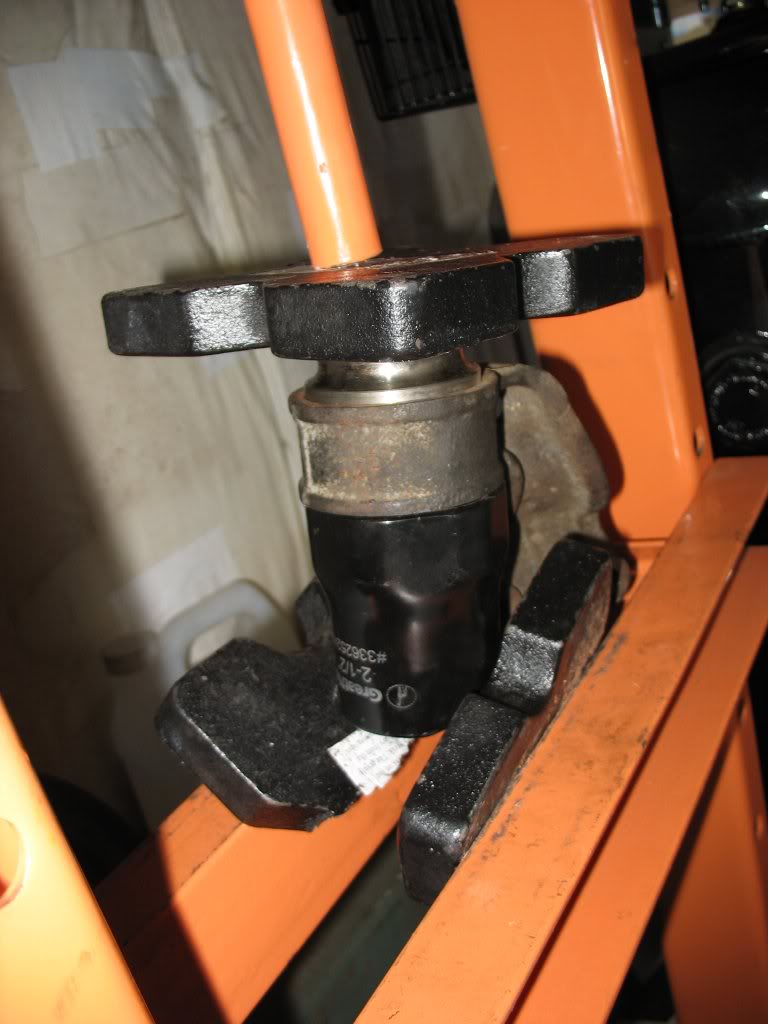
I started on my RX7 rear bearings:
Pressing out the spindle:
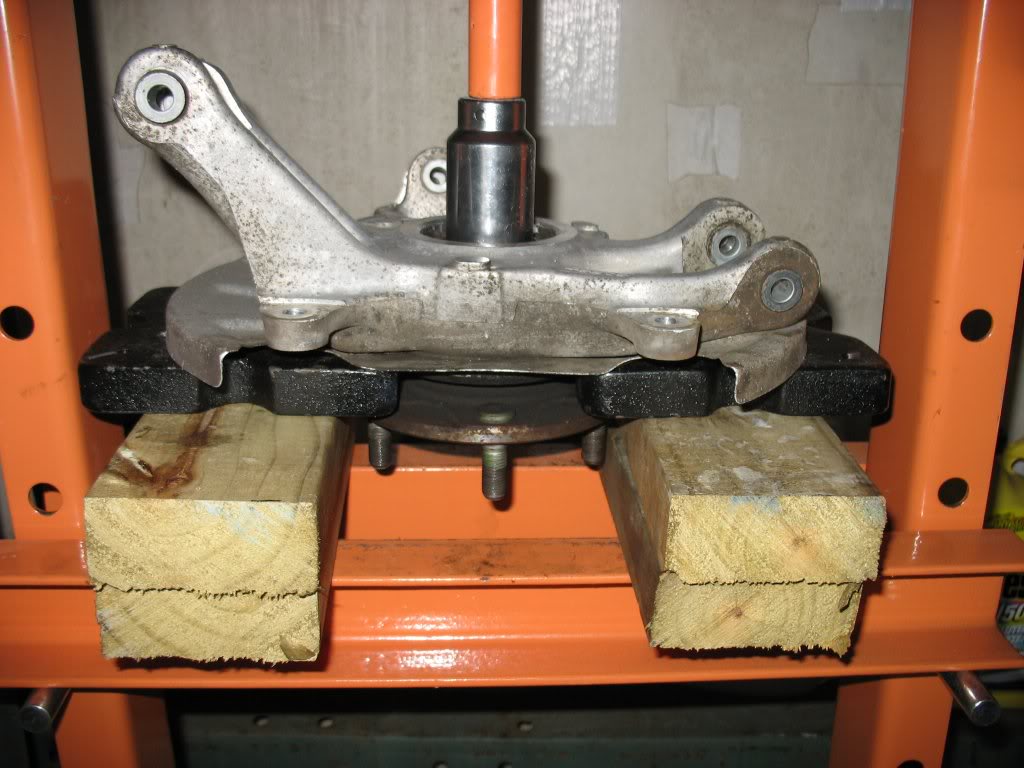
I never have been a fan of cutting off the race. I've found that a 2/3 jaw puller works just fine with a little muscle:

considerably, but I'm getting by. Just trying to keep hydrated
Last weekend I got started on my fuel system:
Mounted my external Bosch 044:
And my Automotive FPR:
It made me mad though, because up until this point I've been thinking I could fenagle my cruise control modulator in there
somehow, but now with the master and the FPR occupying the same spot, there's no way I can see without a custom bracket
Master and FPR clearance. Looks like a need a remote line to run to my fuel pressure gauge. Need one with a right angle...
Other goodies I got last weekend:
Something I'm working on with the electrical supplies above:
Certainly not the best fused relay solution, but I think I'm going to use it for a while.
This week I put my press to work:
I started on my RX7 rear bearings:
Pressing out the spindle:
I never have been a fan of cutting off the race. I've found that a 2/3 jaw puller works just fine with a little muscle:
Thread Starter
Joined: Apr 2009
Posts: 381
Likes: 27
From: Starkville, MS
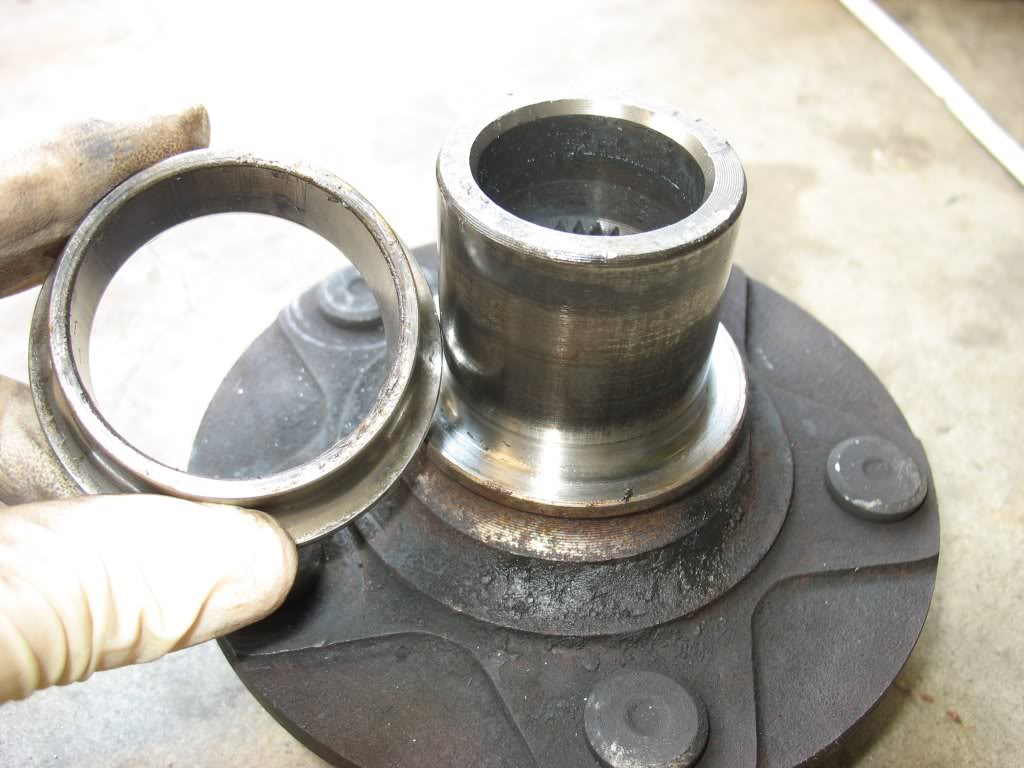
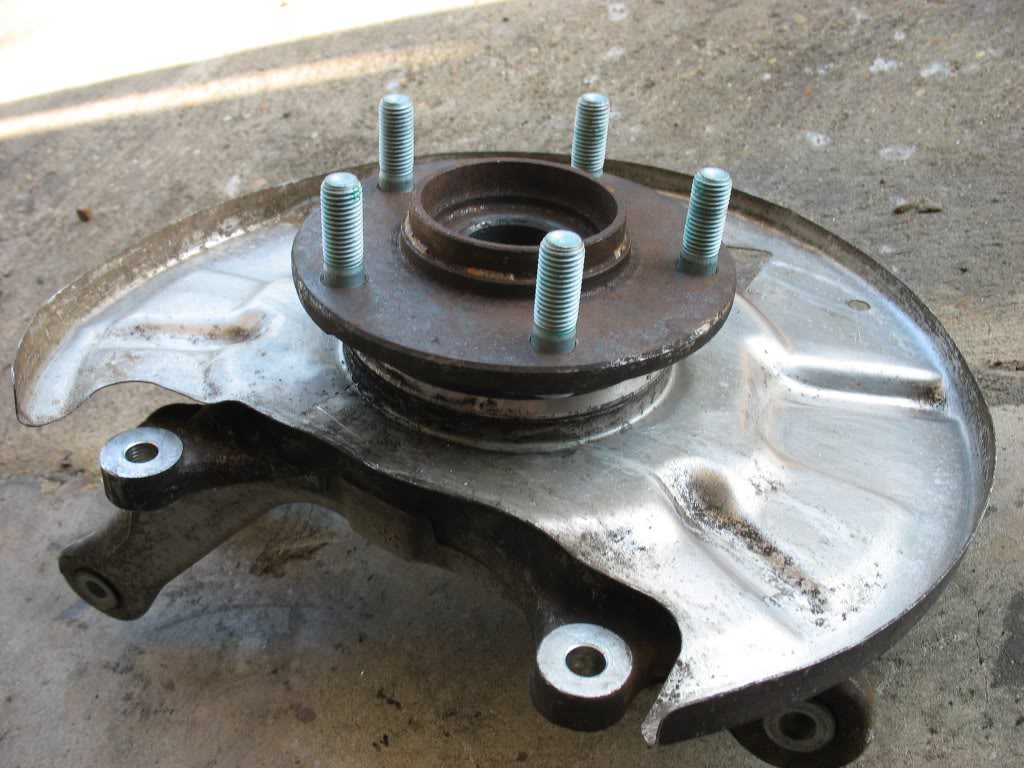
Pressing out the bearings:
Instead of buying a $19 socket (One of the biggest Autozone sold), I bought a $3 exhaust piece to press out the bearing as
shown above as it had the perfect diameter for the job.
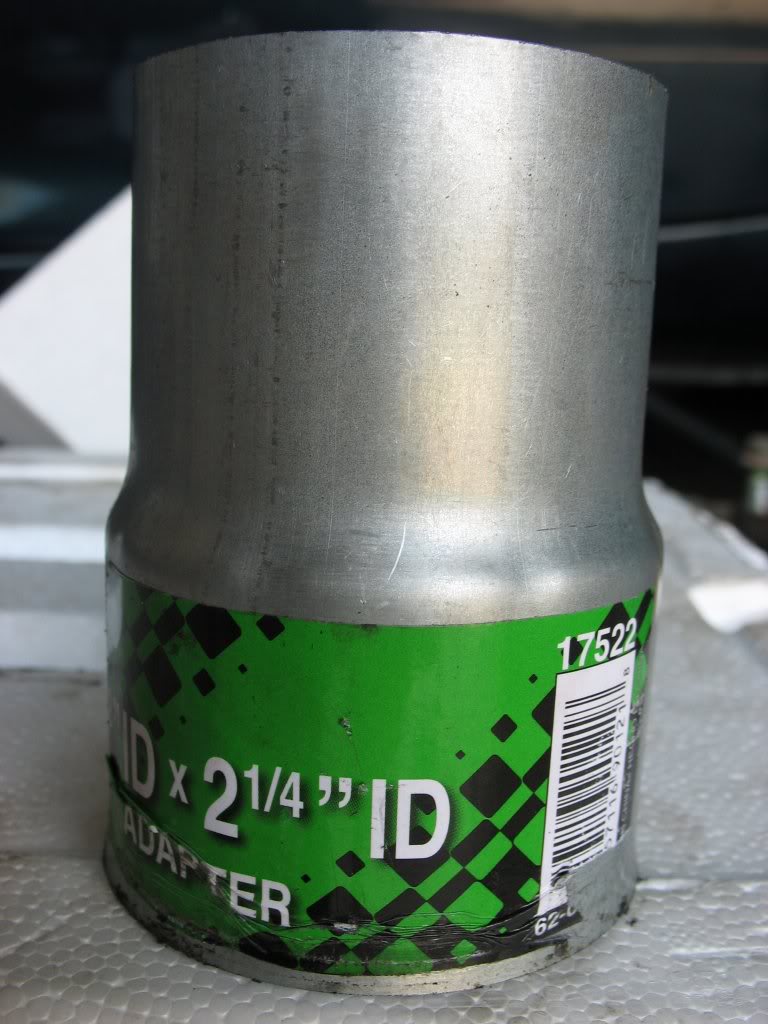
It's pretty flimsy and it flared the bottom during the press, but it did the job
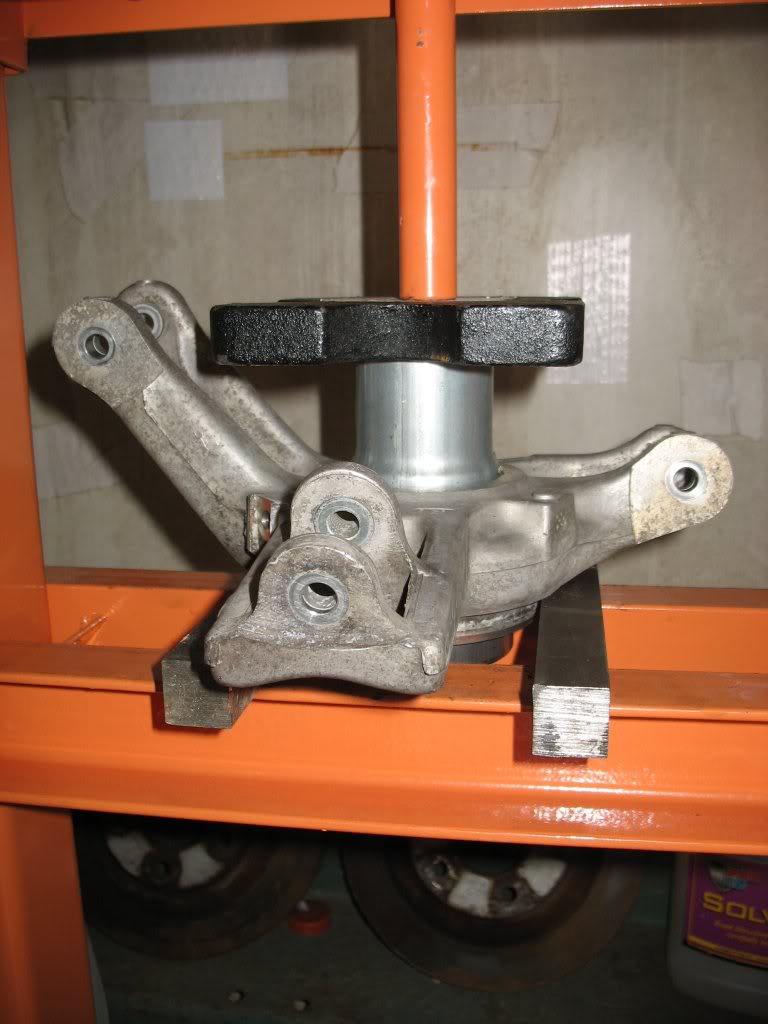
Pressing out the wheel studs:
Rear done:
I'm also doing the front, but it is much simpler as I only have to unbolt the axle stub nut to replace the hole assembly and
I have new ones waiting to go it. Maybe next week
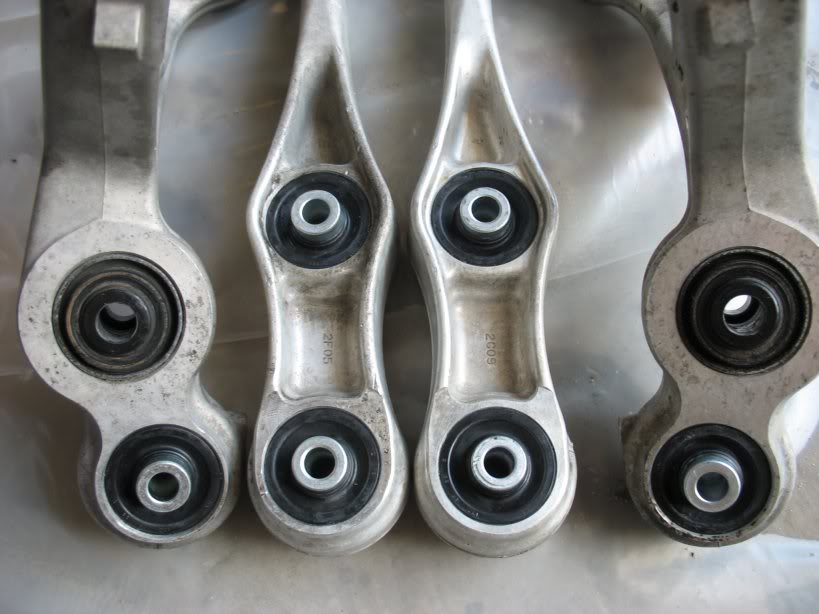
A box of suspension parts that I've been slowly installing super pro bushings into:
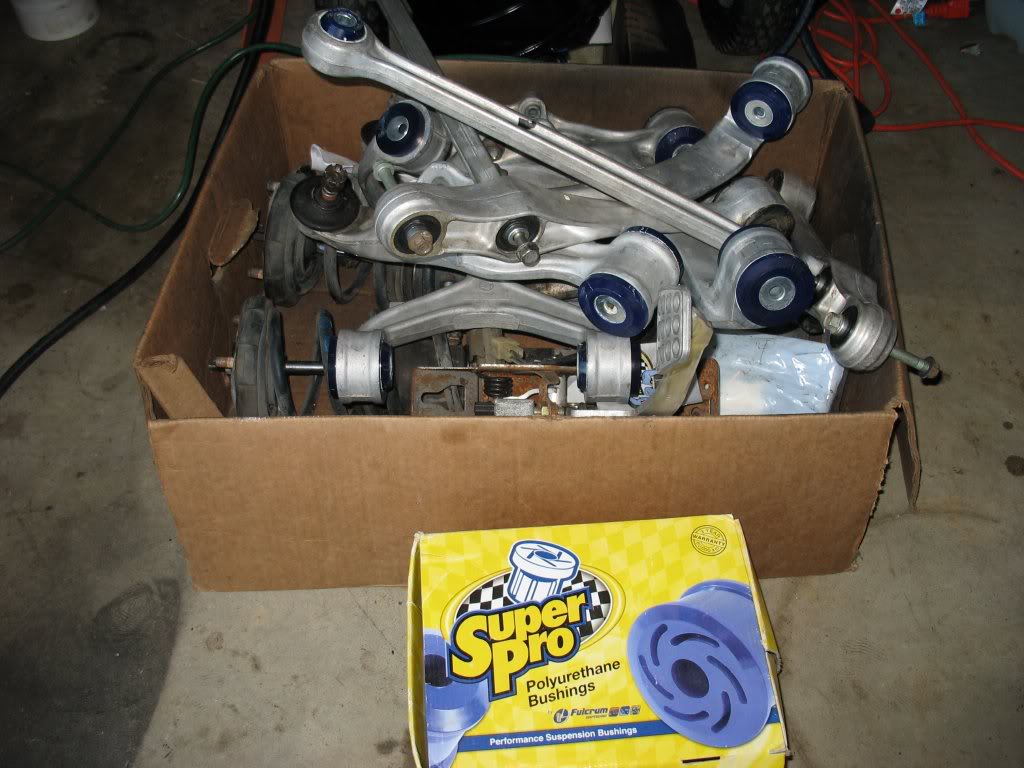
Some of these have been a royal pain in the ***. Don't get me started on the toe links... I didn't think the diff brace
would be much trouble until it did this to my arbor plate:
Nuts eh? Oh well, I don't need it anyway as I've got a cobra diff. I was just trying to be nice and install super pro
bushing in it so I could sell it to somebody that needed it. Then it goes and breaks my ****! Guess I'll have to sell the
two together with some assembly required
Rainbow at the end of the day telling me to wrap it up:

Lane
Instead of buying a $19 socket (One of the biggest Autozone sold), I bought a $3 exhaust piece to press out the bearing as
shown above as it had the perfect diameter for the job.
It's pretty flimsy and it flared the bottom during the press, but it did the job
Pressing out the wheel studs:
Rear done:
I'm also doing the front, but it is much simpler as I only have to unbolt the axle stub nut to replace the hole assembly and
I have new ones waiting to go it. Maybe next week
A box of suspension parts that I've been slowly installing super pro bushings into:
Some of these have been a royal pain in the ***. Don't get me started on the toe links... I didn't think the diff brace
would be much trouble until it did this to my arbor plate:
Nuts eh? Oh well, I don't need it anyway as I've got a cobra diff. I was just trying to be nice and install super pro
bushing in it so I could sell it to somebody that needed it. Then it goes and breaks my ****! Guess I'll have to sell the
two together with some assembly required
Rainbow at the end of the day telling me to wrap it up:
Lane
Thread Starter
Joined: Apr 2009
Posts: 381
Likes: 27
From: Starkville, MS
Started this weekend by cleaning up my heatshields before reinstalling them. Note to future swappers. Do yourself a favor
and reinstall (if you removed them in the first place) the shields before reinstalling the engine
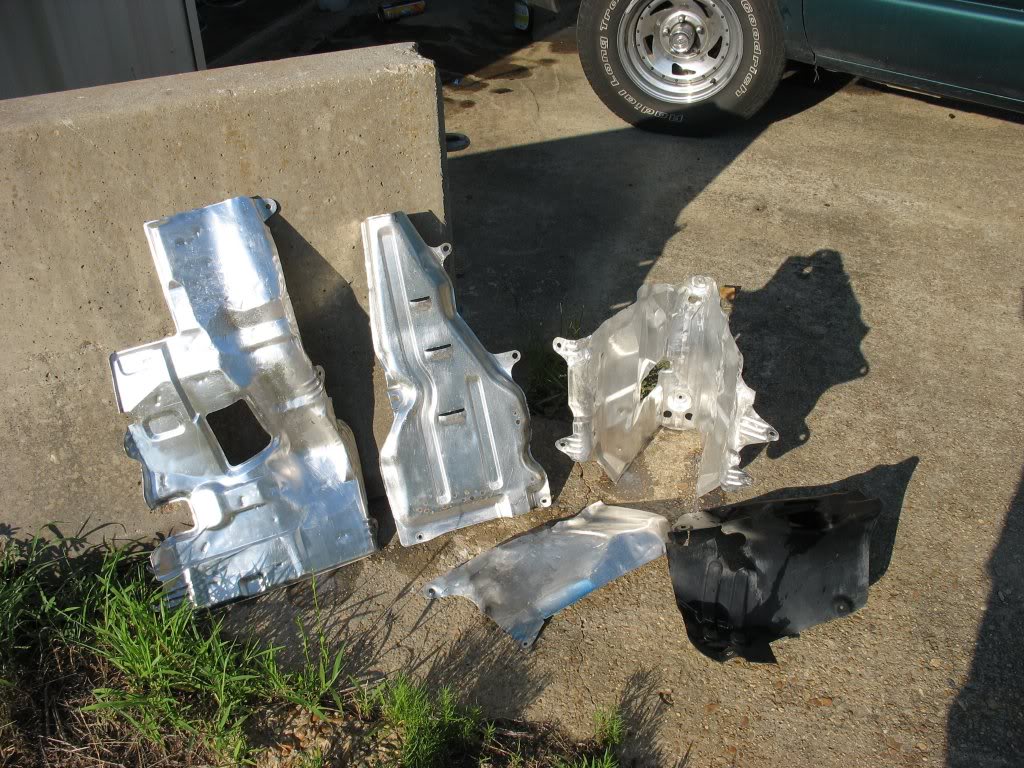
These actually cleaned up a lot easier than I thought they would. 30 minutes of work and they were clean enough to eat off
of!
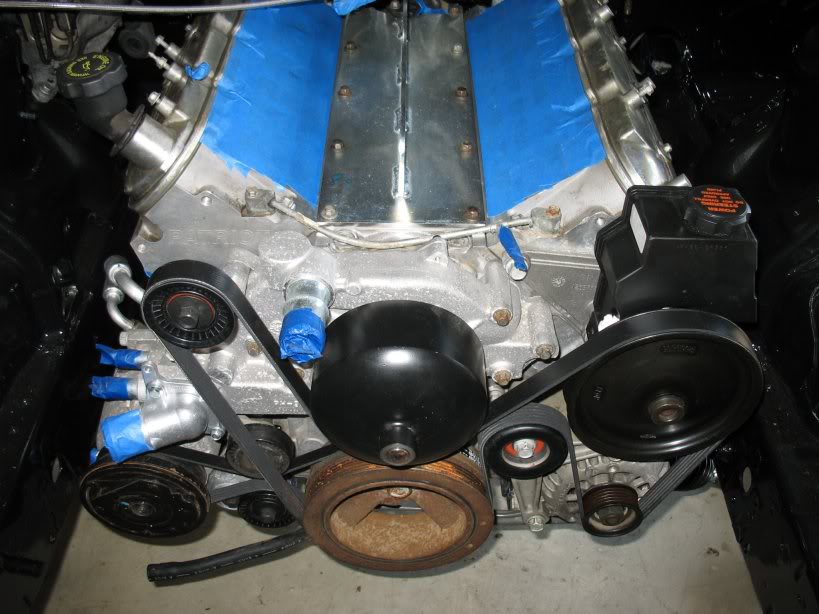
Another thing I did this week was complete my LS6 PCV upgrade using instructions from ls1howto available here:
http://www.ls1howto.com/index.php?article=18
Took a little nibble out of my valley
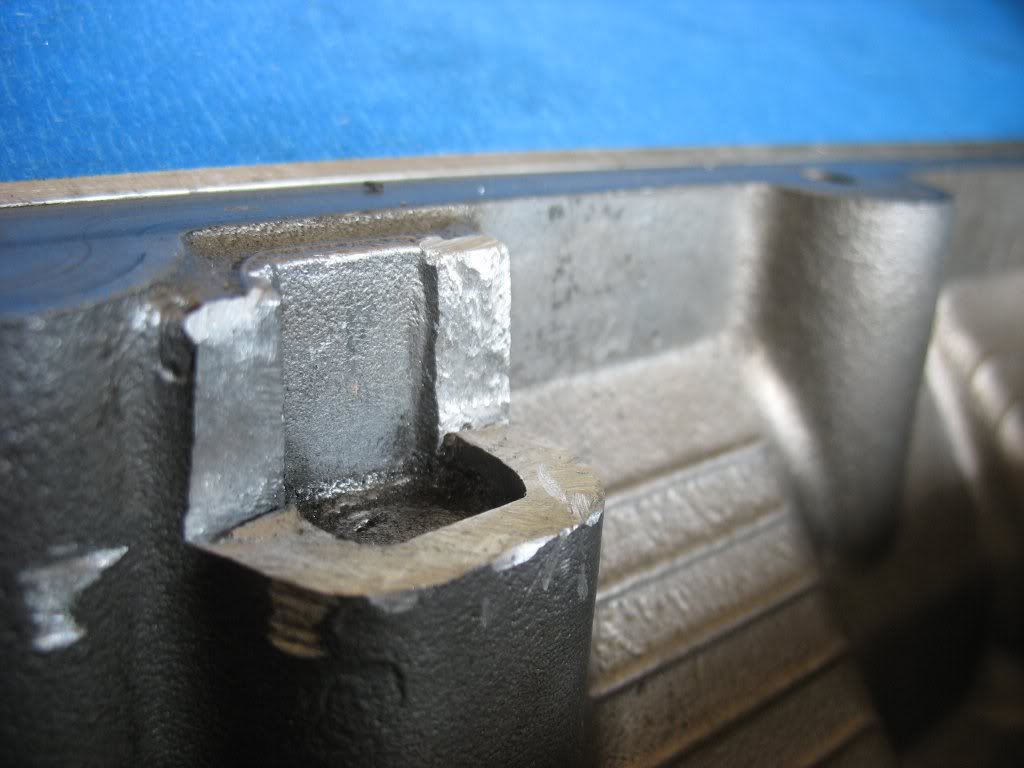
After cleaning and making the modification:
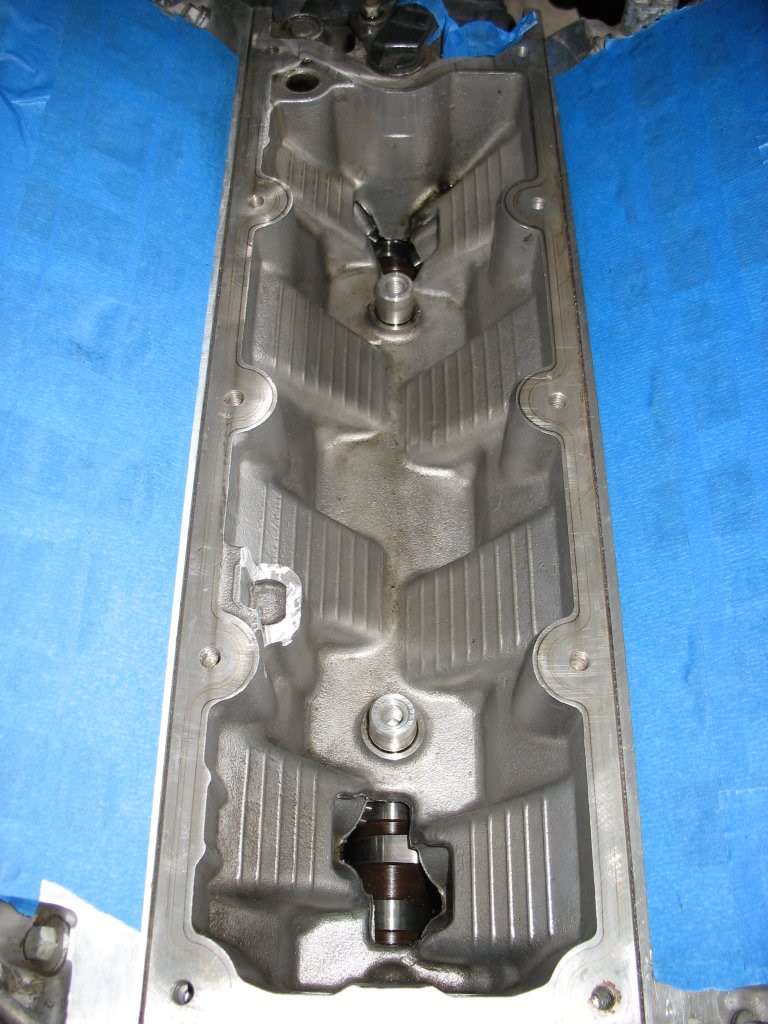
The new LS6 valley cover:
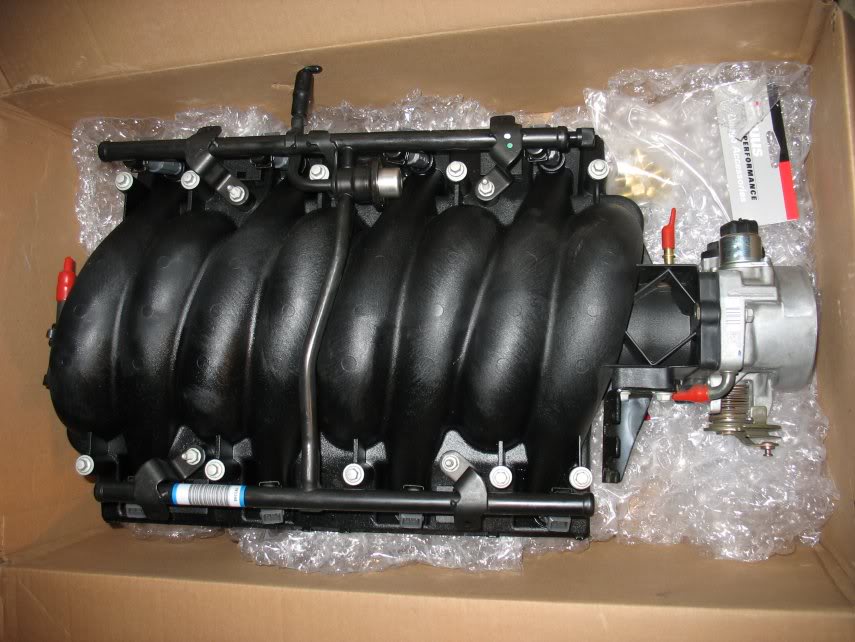
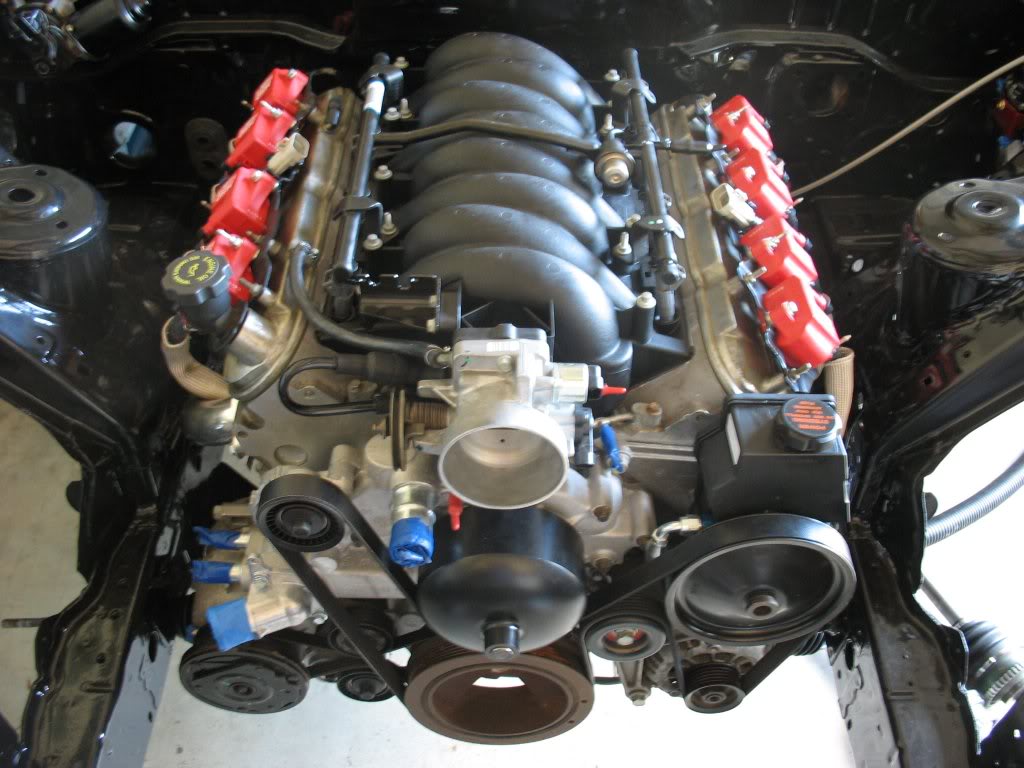
Installed + A new LS6 intake, fuel rail, injectors, and throttle body
Note the new PCV routing
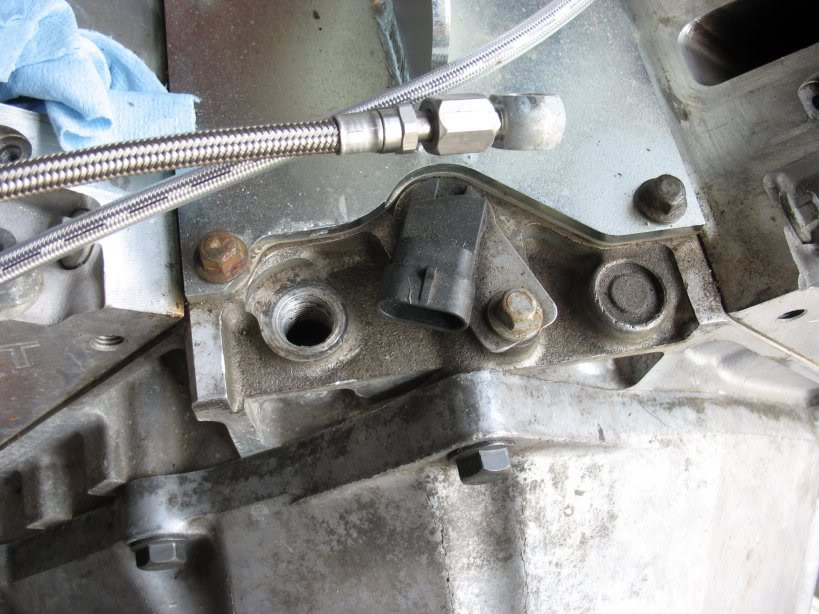
Installing Pez's P/S line at the rack:
Pez's P/S high pressure connection at the pump:
Awesome piece of work by the way. Easy to install and it's built to last a lifetime
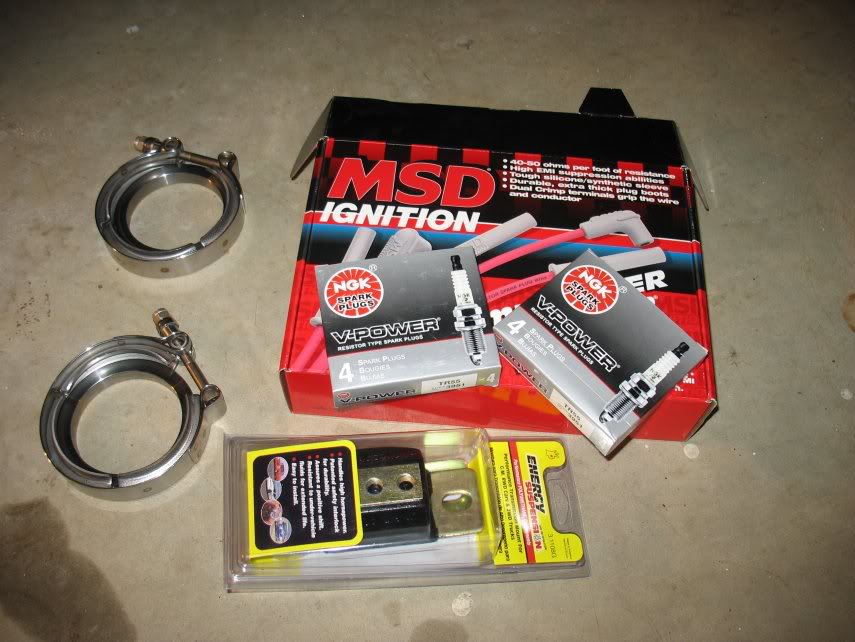
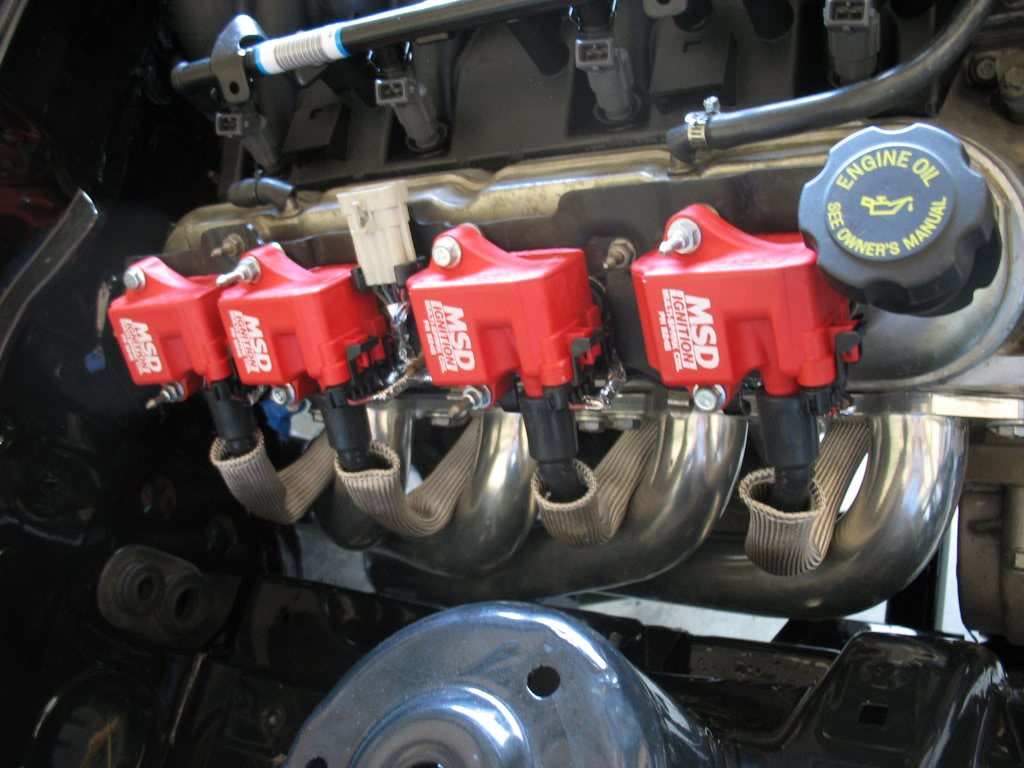
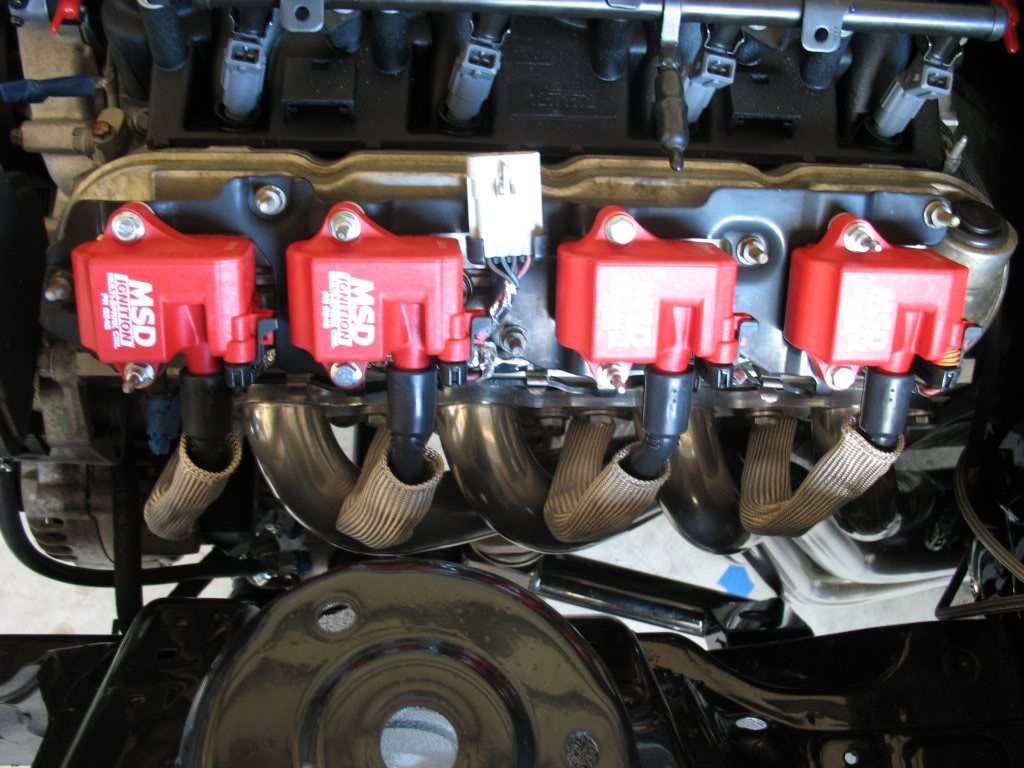
I rewrapped my coil-pack harness with heat tape since the old tape was ratty:
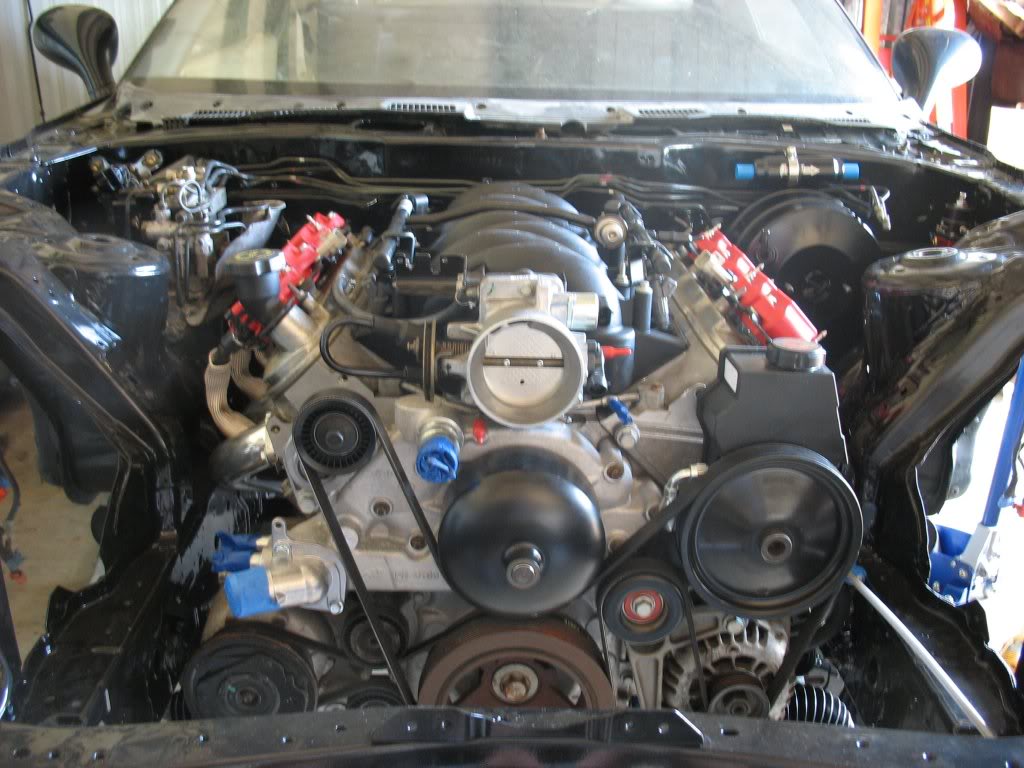
Installed my coils, spark plugs, wires, insulators, and JTR headers:
and reinstall (if you removed them in the first place) the shields before reinstalling the engine
These actually cleaned up a lot easier than I thought they would. 30 minutes of work and they were clean enough to eat off
of!
Another thing I did this week was complete my LS6 PCV upgrade using instructions from ls1howto available here:
http://www.ls1howto.com/index.php?article=18
Took a little nibble out of my valley
After cleaning and making the modification:
The new LS6 valley cover:
Installed + A new LS6 intake, fuel rail, injectors, and throttle body
Note the new PCV routing
Installing Pez's P/S line at the rack:
Pez's P/S high pressure connection at the pump:
Awesome piece of work by the way. Easy to install and it's built to last a lifetime
I rewrapped my coil-pack harness with heat tape since the old tape was ratty:
Installed my coils, spark plugs, wires, insulators, and JTR headers:
Thread Starter
Joined: Apr 2009
Posts: 381
Likes: 27
From: Starkville, MS
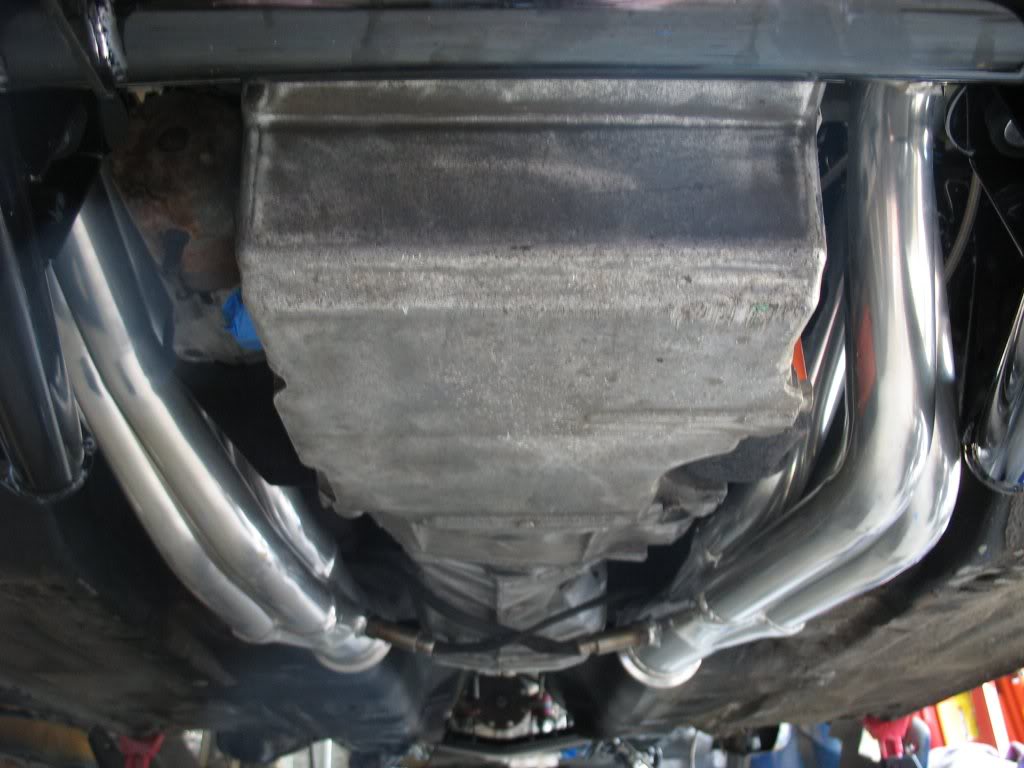
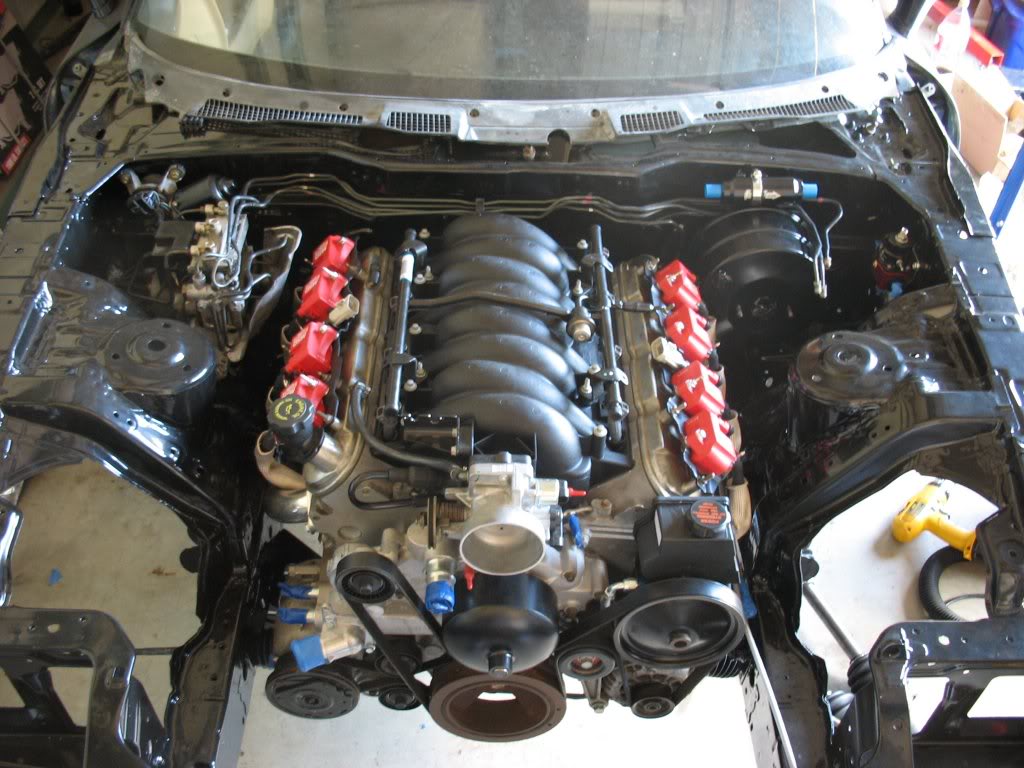
View of the headers from below:
A pic before I started adding accessories to the firewall:
Added my brake booster, fuel filter, and brake lines:
How I left her for the weekend:
That's it for a couple weeks. I'm visiting the folks for July 4th. Maybe I can save some money over the next 2 weeks and get
everything ordered I need to get this puppy off the jackstands and onto the road
Lane
Thread Starter
Joined: Apr 2009
Posts: 381
Likes: 27
From: Starkville, MS
I got a good bit done this weekend.
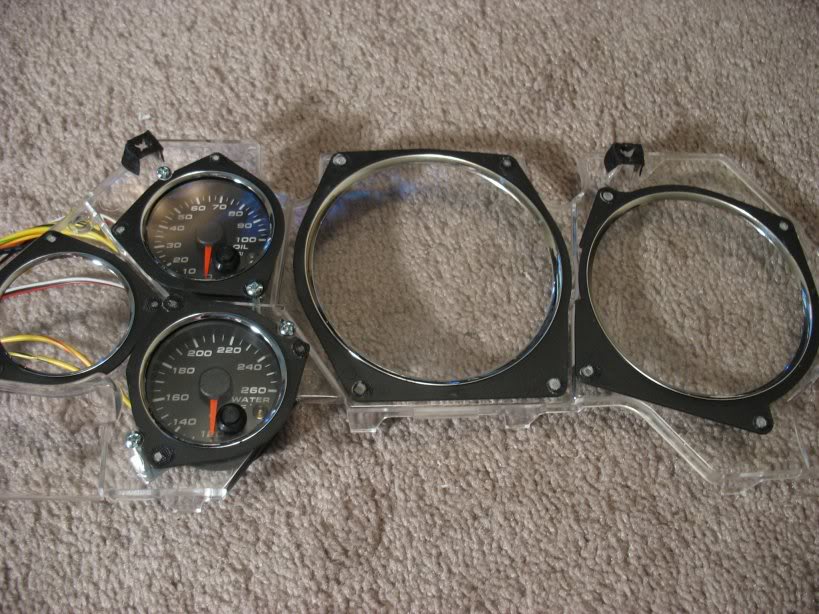
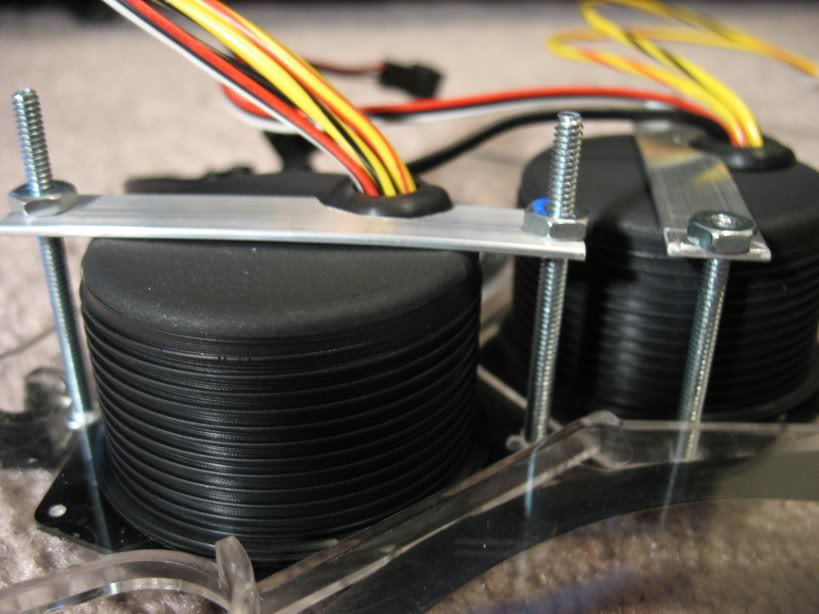
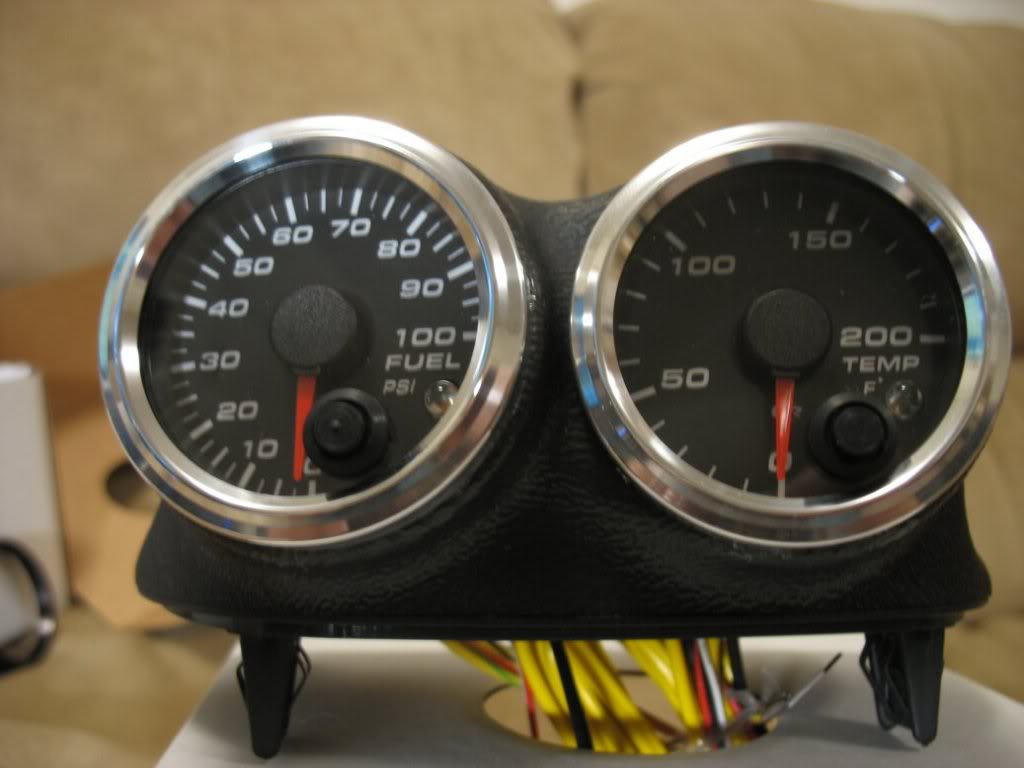
First I started playing with my gauges. I've got 4 speedhut gauges. Coolant Temp, Oil Pressure, Fuel Pressure, and Intake
Temp. The intake temperature gauge was actually an accident as I was trying to buy a coolant temp gauge and had a brain
fart. Since gauges from speedhut are custom built to order I decided not to go through the hassle of the return and just
kept the gauge:
I'm planning on doing a write-up on my install since I believe it's going to be one of the least intrusive installs to date.
The gauges in my cluster were mounted to the OEM plexiglass gauge shield.
When the speedhut gauge bezels are removed the housings have little nubs on the front the make securing them to the gauge
shield a cinch!
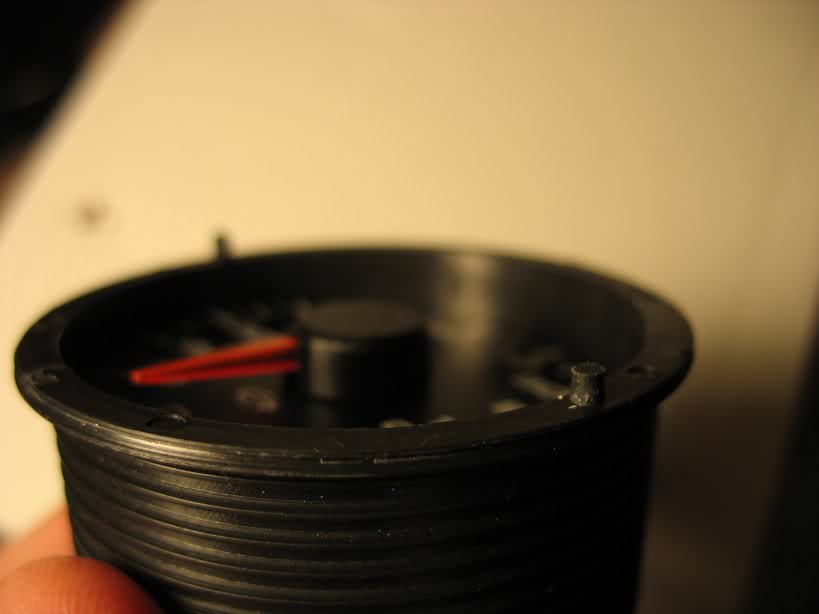
All I had to do was drill holes in the gauge shield to hold the numbs and support it with fabricated brackets.
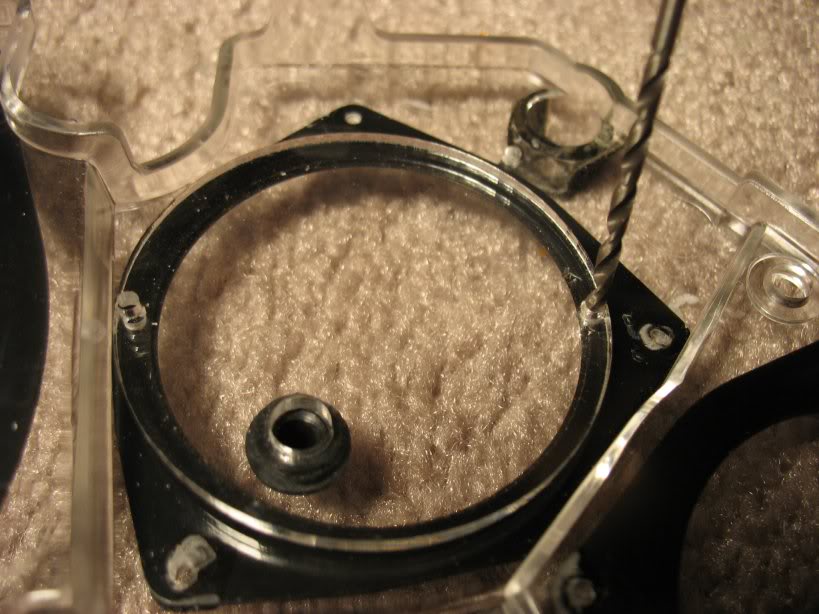
You can see above that I also went ahead and pre-drilled the hole for the gauges program button in the gauge shield.
The result being a very OEM install with a very shallow mounting depth (~ 1inch)
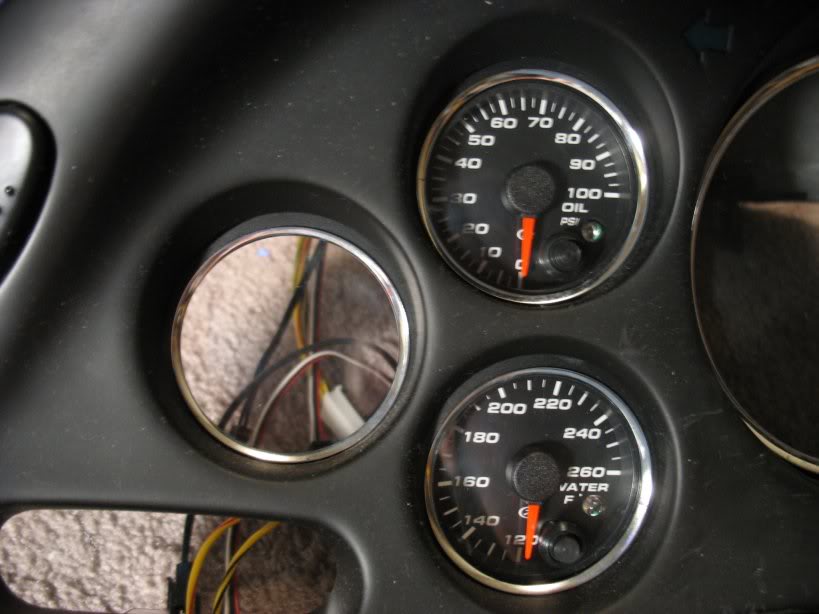
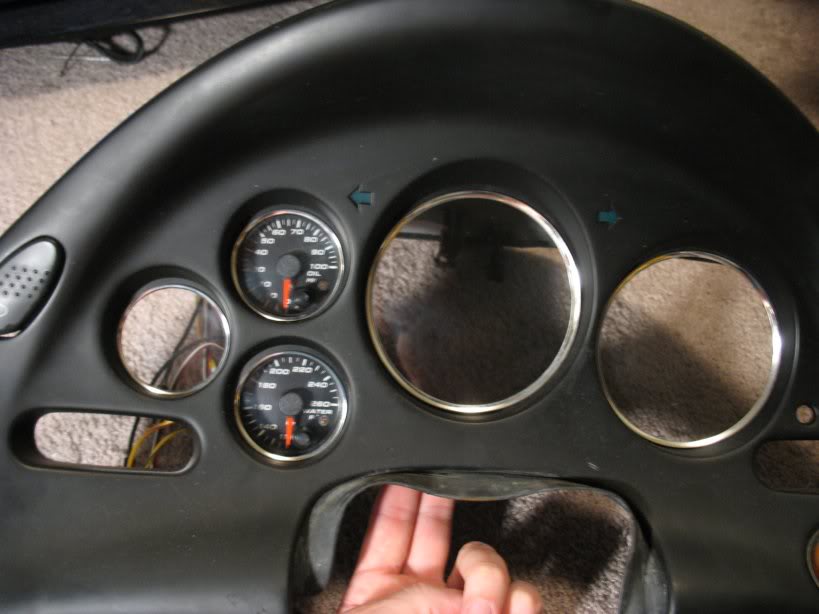
The other 2 gauges got the on dash gauge pod:

First I started playing with my gauges. I've got 4 speedhut gauges. Coolant Temp, Oil Pressure, Fuel Pressure, and Intake
Temp. The intake temperature gauge was actually an accident as I was trying to buy a coolant temp gauge and had a brain
fart. Since gauges from speedhut are custom built to order I decided not to go through the hassle of the return and just
kept the gauge:
I'm planning on doing a write-up on my install since I believe it's going to be one of the least intrusive installs to date.
The gauges in my cluster were mounted to the OEM plexiglass gauge shield.
When the speedhut gauge bezels are removed the housings have little nubs on the front the make securing them to the gauge
shield a cinch!
All I had to do was drill holes in the gauge shield to hold the numbs and support it with fabricated brackets.
You can see above that I also went ahead and pre-drilled the hole for the gauges program button in the gauge shield.
The result being a very OEM install with a very shallow mounting depth (~ 1inch)
The other 2 gauges got the on dash gauge pod:
Thread Starter
Joined: Apr 2009
Posts: 381
Likes: 27
From: Starkville, MS
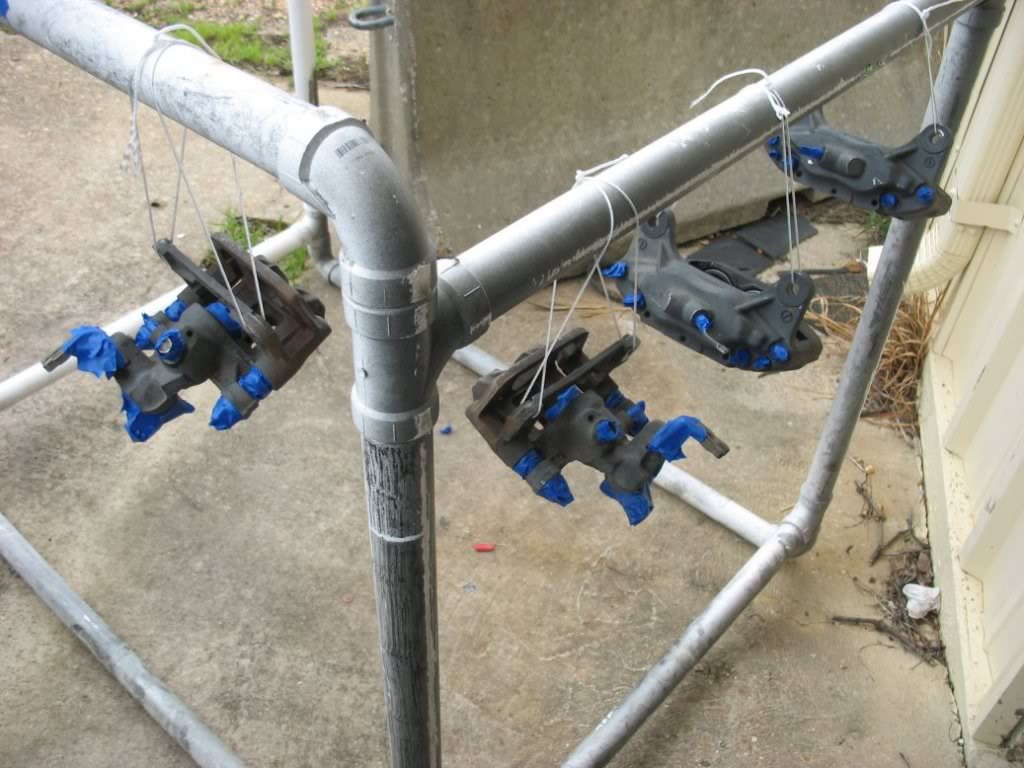
For the last bit of my weekend I worked on rebuilding and painting my calipers then installing my suspension.
Prepped for paint after rebuild:
Painted with POR15's caliper paint:
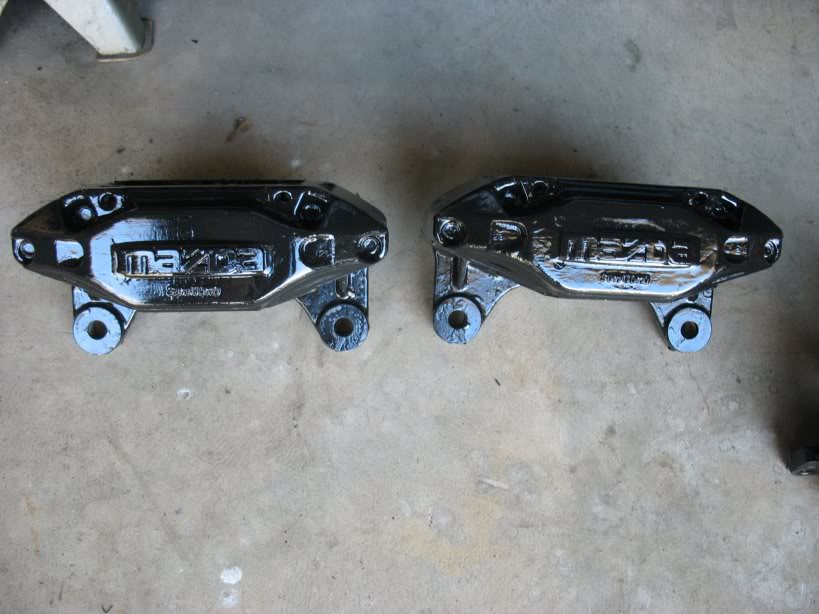
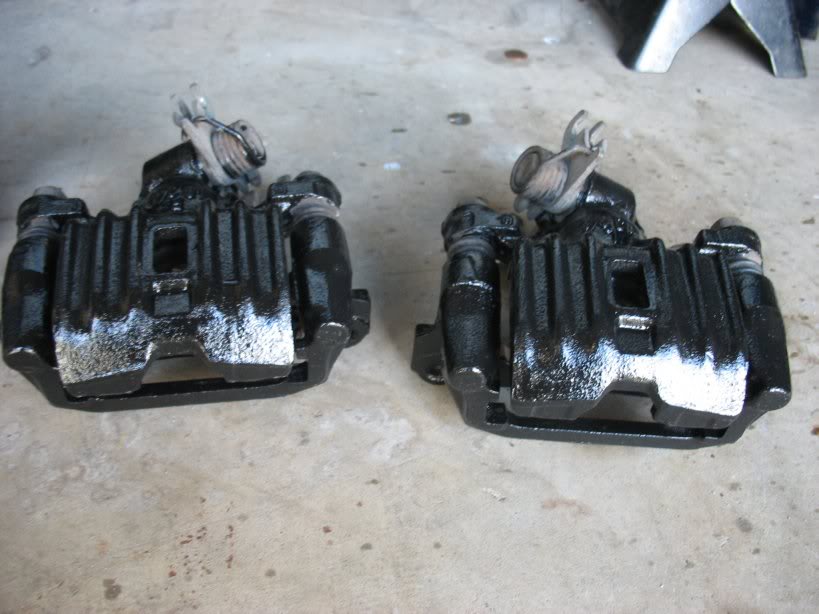
Notes about the caliper paint. The front calipers were the hardest calipers I've ever painted. The biggest reason was that I
was using the recommended sponge brush brush also because the smooth surface is not forgiving when it comes to brush
strokes. Also, it was 100 degrees in my shop so the paint wanted to dry very quickly. I ended up having to sand the first
two coats almost off to put down a third coat with a normal bristle based brush. The finish wasn't flawless, but better than
before. The dimpled finish on the rear cast calipers was much more forgiving and they didn't give me any trouble
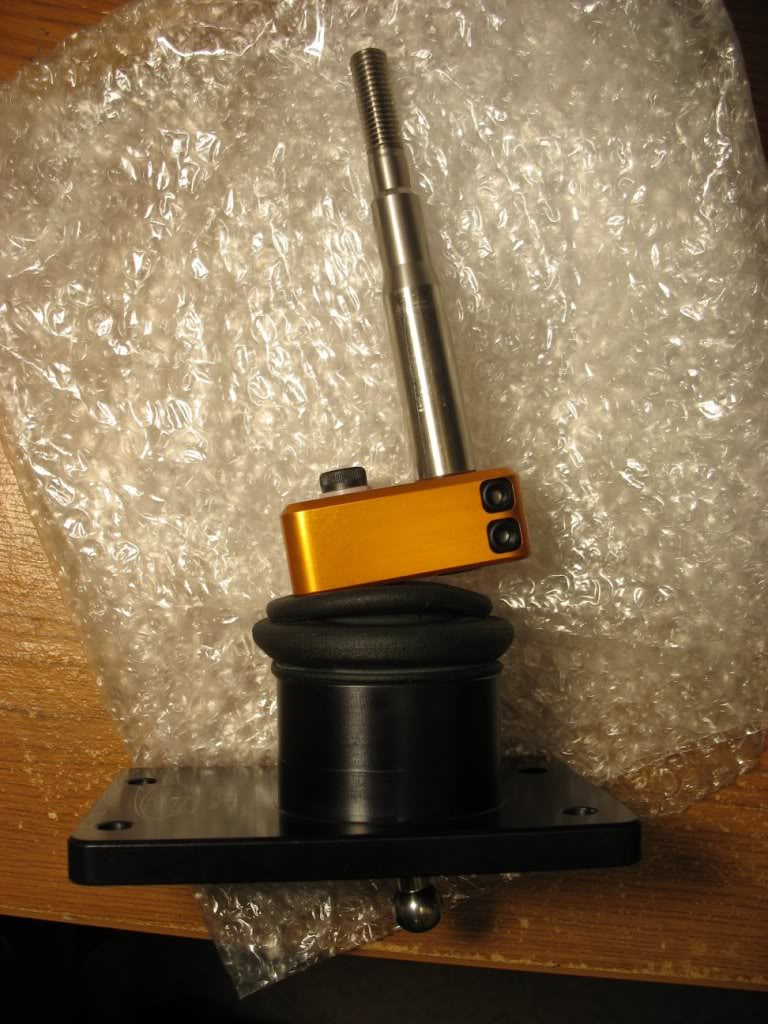
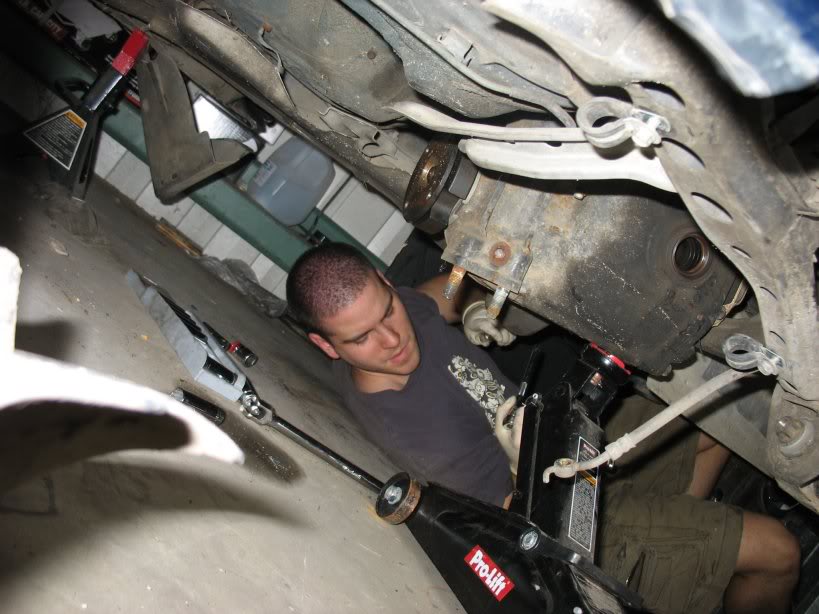
I assembled my koni + ground control coilover system and got busy installing it:
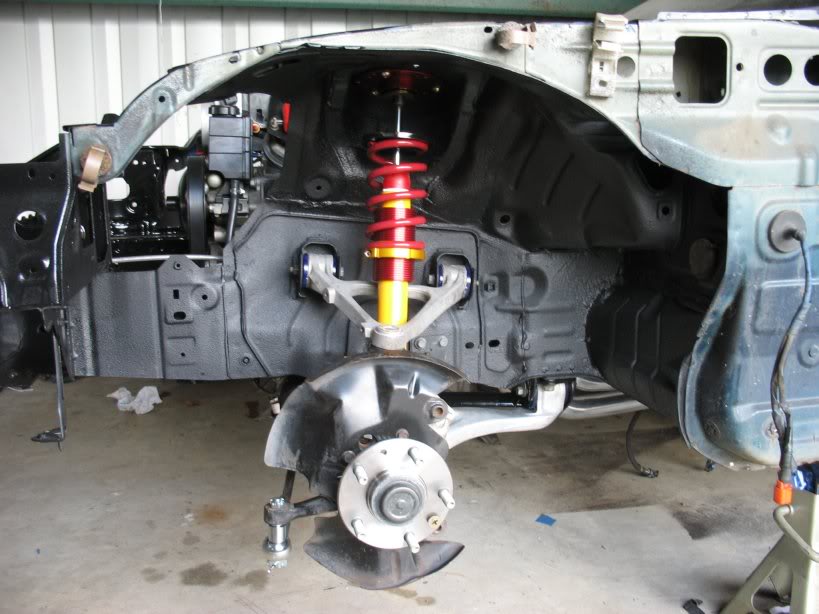
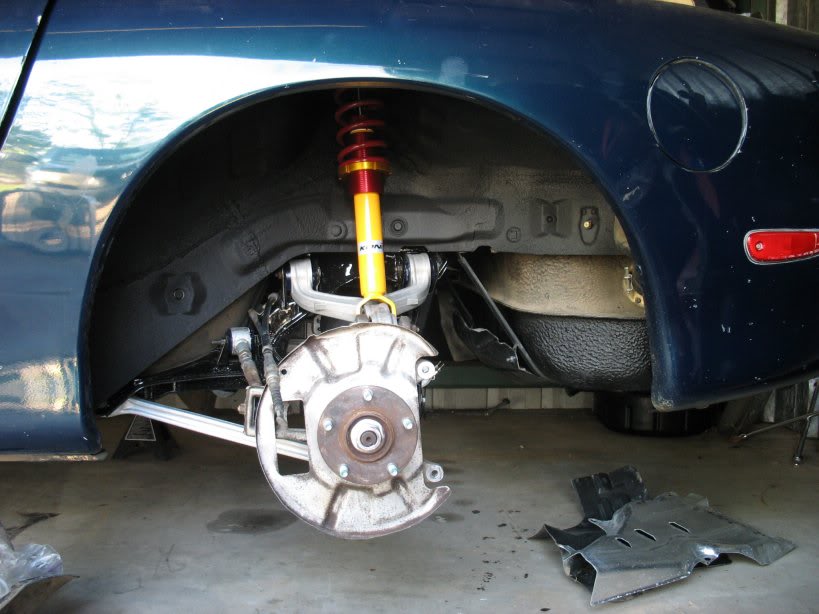
Here's a shot where you can see the cobra axles I worked so hard on
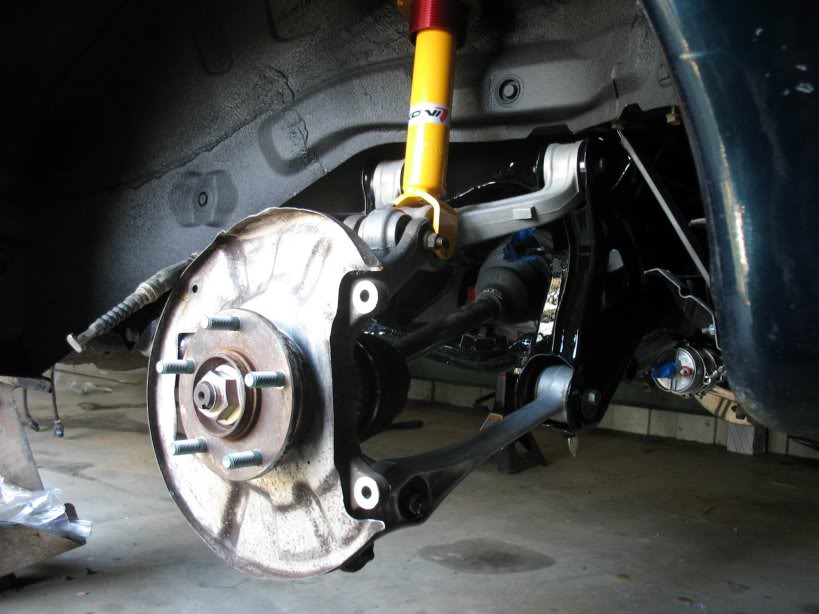
I am aware that my rear strut's aren't bolted at the bottom mount... I misplaced those bolts somewhere... Dammit!
Where I left the project for the weekend:
Lane
Prepped for paint after rebuild:
Painted with POR15's caliper paint:
Notes about the caliper paint. The front calipers were the hardest calipers I've ever painted. The biggest reason was that I
was using the recommended sponge brush brush also because the smooth surface is not forgiving when it comes to brush
strokes. Also, it was 100 degrees in my shop so the paint wanted to dry very quickly. I ended up having to sand the first
two coats almost off to put down a third coat with a normal bristle based brush. The finish wasn't flawless, but better than
before. The dimpled finish on the rear cast calipers was much more forgiving and they didn't give me any trouble
I assembled my koni + ground control coilover system and got busy installing it:
Here's a shot where you can see the cobra axles I worked so hard on
I am aware that my rear strut's aren't bolted at the bottom mount... I misplaced those bolts somewhere... Dammit!
Where I left the project for the weekend:
Lane
Thread Starter
Joined: Apr 2009
Posts: 381
Likes: 27
From: Starkville, MS
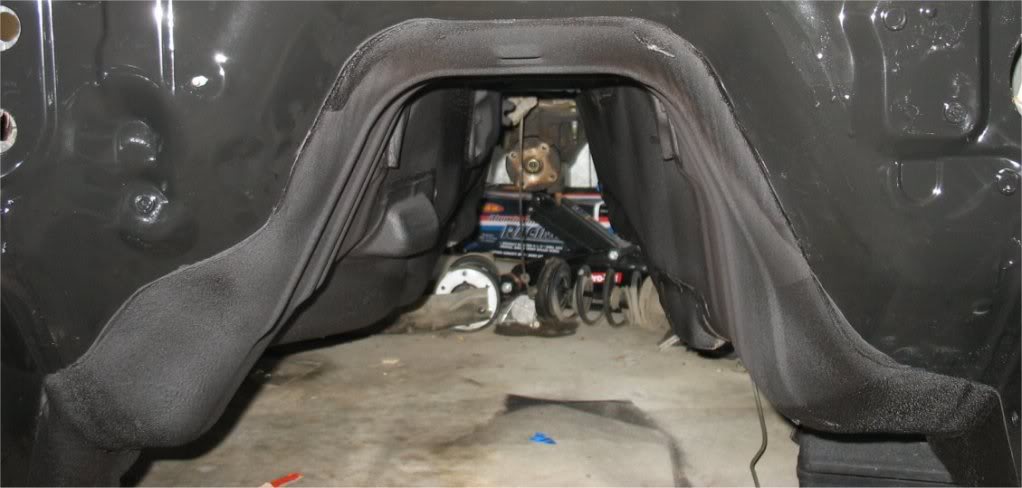
Well, this weekend was a nice slice of hell. I decided to go ahead and sound proof my interior with lizard skin spray on
sound control while I had everything stripped out. A big part of the job is stripping the stock sound dampening mats.
Thought it would take a weekend... I was wrong.
I've read all the threads on here about doing this and knew it was going to be challenging, but nothing prepared me for
this.
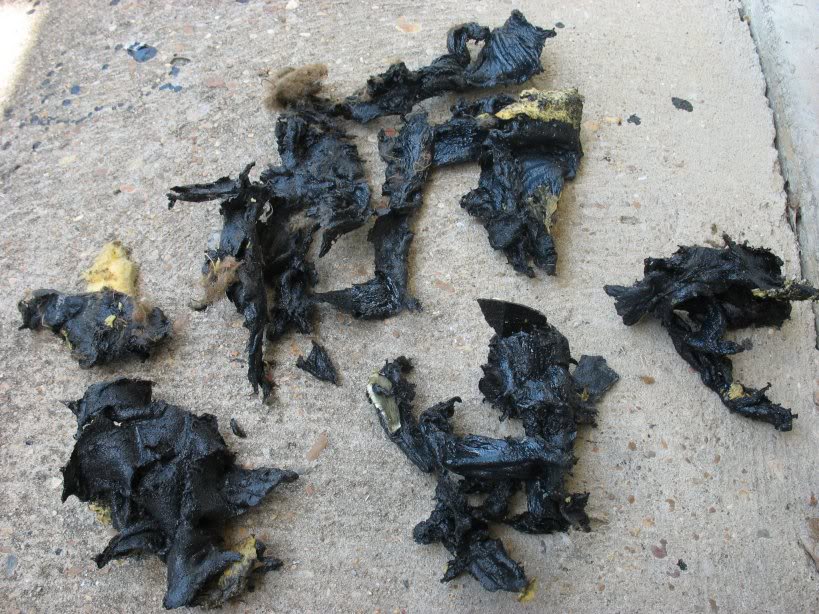
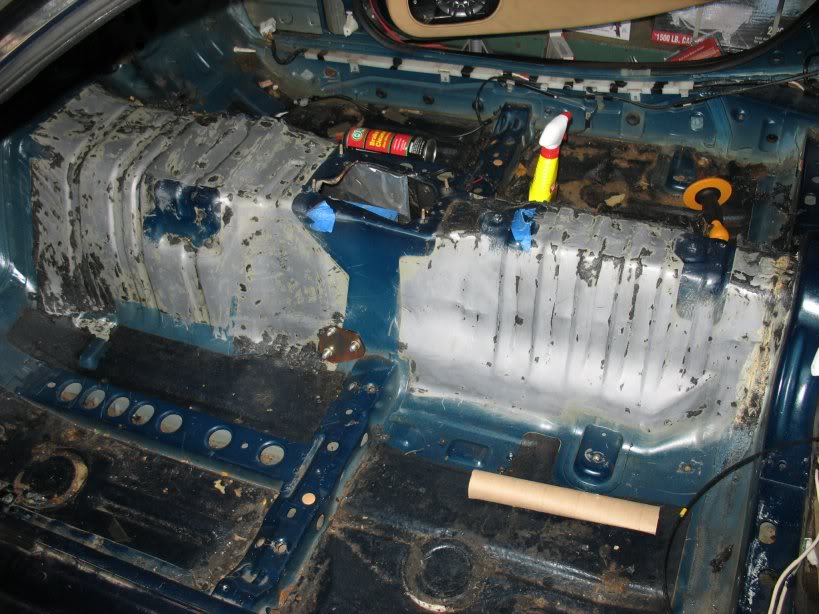
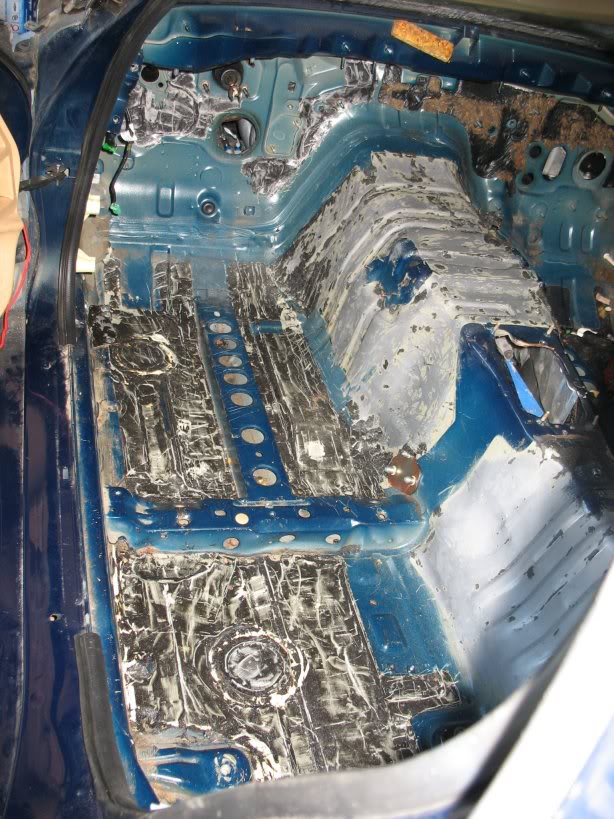
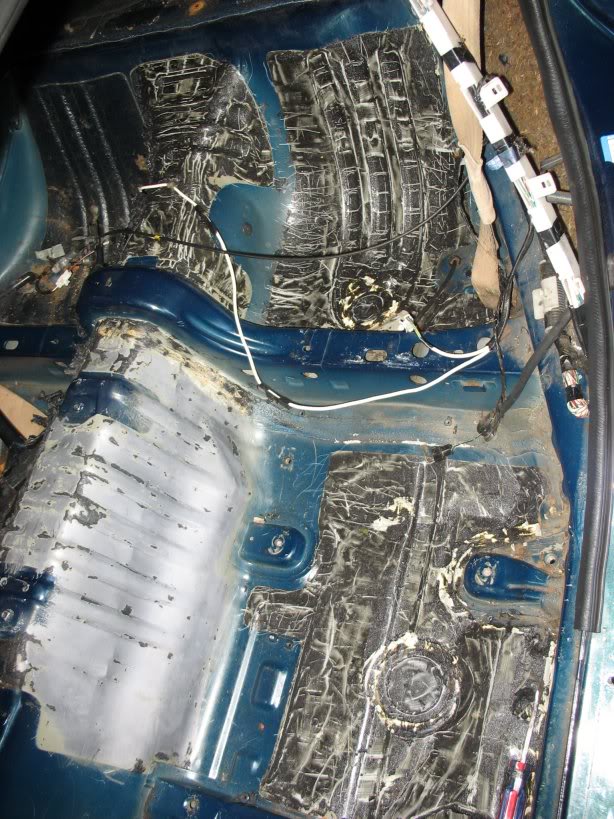
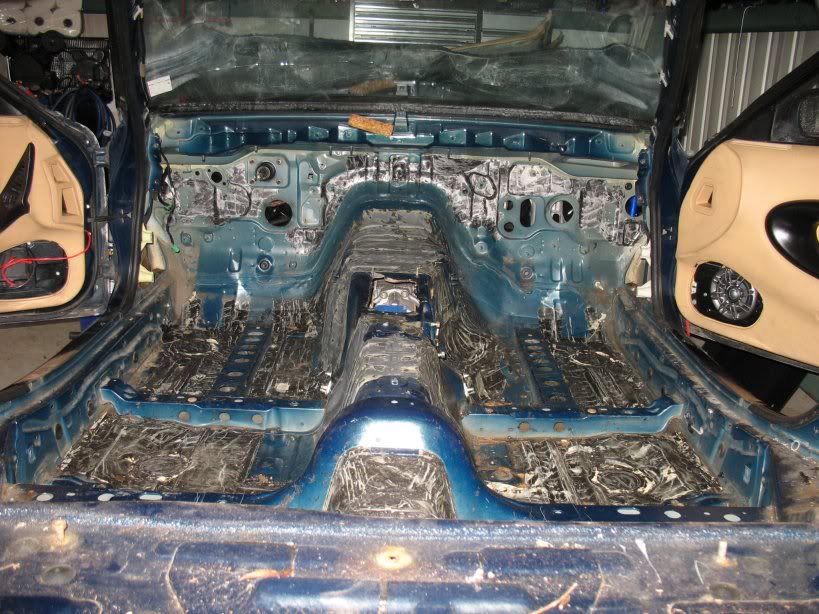
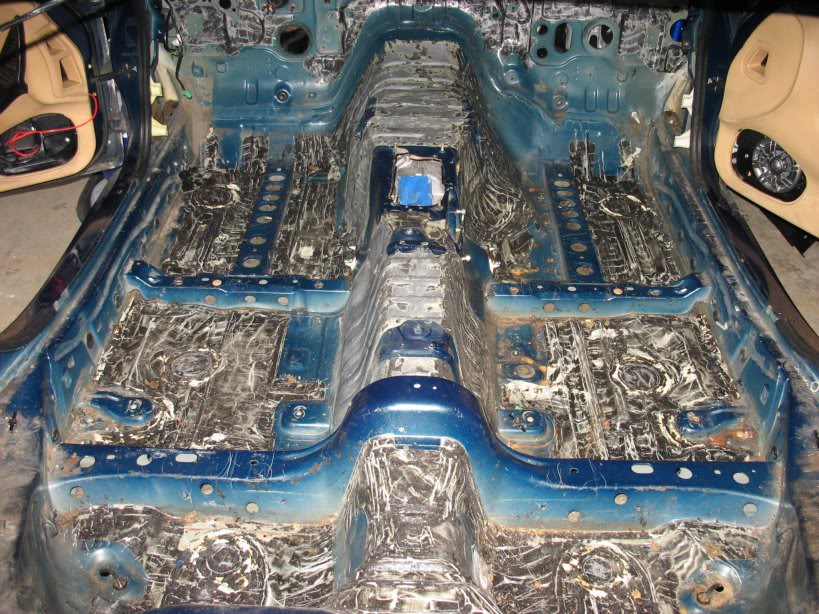
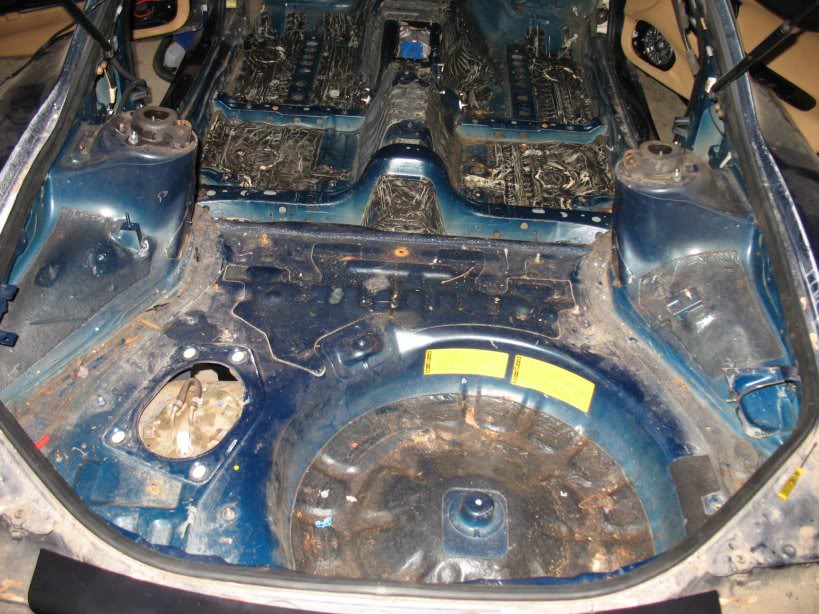
That took two days of HARD work with a heat gun and a paint scraper. I've got chemical burns on my arms and legs,
temperature burns on my fingers, shredded hands, and a bruised & cut head. It's not easy fitting a 6.1" man in all the
little nooks and crannies of the RX7 cabin to remove this stuff. Plus it doesn't help that a stripped down cabin is
essentially an obstacle course of exposed studs and sharp corners.
I know... Everyone says to use dry ice, but I couldn't find any in the one-horse-town I live in... Still have to knock out
the trunk area next week before I can vacuum, clean, and prep for the spray on sound insulation.
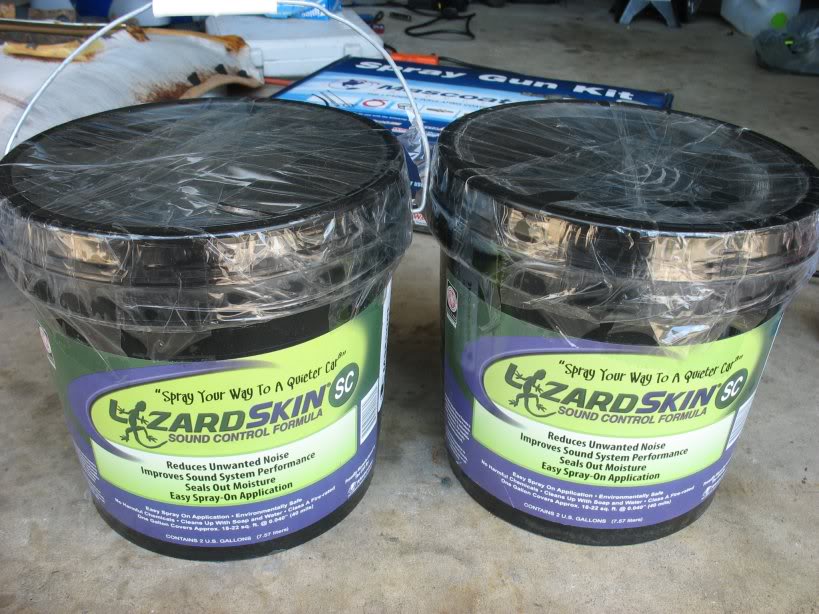
This is what I plan on using:
Disappointed I didn't accomplish more this weekend.
Lane
sound control while I had everything stripped out. A big part of the job is stripping the stock sound dampening mats.
Thought it would take a weekend... I was wrong.
I've read all the threads on here about doing this and knew it was going to be challenging, but nothing prepared me for
this.
That took two days of HARD work with a heat gun and a paint scraper. I've got chemical burns on my arms and legs,
temperature burns on my fingers, shredded hands, and a bruised & cut head. It's not easy fitting a 6.1" man in all the
little nooks and crannies of the RX7 cabin to remove this stuff. Plus it doesn't help that a stripped down cabin is
essentially an obstacle course of exposed studs and sharp corners.
I know... Everyone says to use dry ice, but I couldn't find any in the one-horse-town I live in... Still have to knock out
the trunk area next week before I can vacuum, clean, and prep for the spray on sound insulation.
This is what I plan on using:
Disappointed I didn't accomplish more this weekend.
Lane