
Got bored at work today.

Thread Starter
7s before paint!!!
iTrader: (2)
Joined: Aug 2003
Posts: 3,814
Likes: 0
From: Philly/Texas
Got bored at work today.
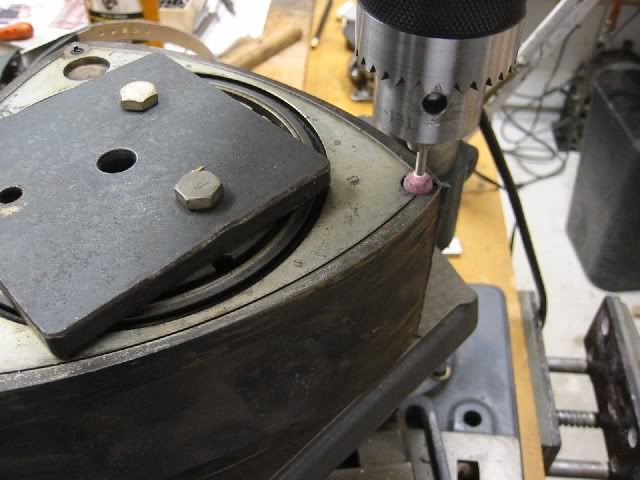
I don't have an air compressor at my disposal so i have to figure how to do things the old fashion way. I made a little fixture for holding the side seal at the right angle so i could fit them properly. I would normally just post a pic but all i have is a video camera........so here is a video of it 
http://www.youtube.com/watch?v=dQn73KOcOJI
What method do you guys use to clearance your seals?
http://www.youtube.com/watch?v=dQn73KOcOJI
What method do you guys use to clearance your seals?

Thread Starter
7s before paint!!!
iTrader: (2)
Joined: Aug 2003
Posts: 3,814
Likes: 0
From: Philly/Texas
It took me about an hour to make. Back home i have a cut up rotor with a pencil grinder mounter to it but it removes material a little faster than am comfortable with. Really, fingernail clippers 
I use one of those piston ring clearance tools. Just a cheapie.
Basically has a table with a small thin stone you rotate by hand (imagine a miniature chop saw, hand powered ) and popped a couple rivets in the little table to hold the seals at the right angle. grind a bit, fit, measure, repeat.
I like your little deal though, very neat
Basically has a table with a small thin stone you rotate by hand (imagine a miniature chop saw, hand powered
) and popped a couple rivets in the little table to hold the seals at the right angle. grind a bit, fit, measure, repeat.I like your little deal though, very neat
Trending Topics
Nice fixture barry, you've always got neat stuff.
Do you find it difficult to get the 2nd end of the seal square with that setup, or is the stone rounded to allow that?
I'm just picturing trying to feed the side seal in the slot and keep a hold of it without grinding the end on an angle...
Do you find it difficult to get the 2nd end of the seal square with that setup, or is the stone rounded to allow that?
I'm just picturing trying to feed the side seal in the slot and keep a hold of it without grinding the end on an angle...
"Elusive, not deceptive!�
Joined: May 2007
Posts: 930
Likes: 13
From: Slidell, LA
Nice fixture barry, you've always got neat stuff.
Do you find it difficult to get the 2nd end of the seal square with that setup, or is the stone rounded to allow that?
I'm just picturing trying to feed the side seal in the slot and keep a hold of it without grinding the end on an angle...
Do you find it difficult to get the 2nd end of the seal square with that setup, or is the stone rounded to allow that?
I'm just picturing trying to feed the side seal in the slot and keep a hold of it without grinding the end on an angle...
I usually remake the factory end perfect then cut the remaining end.
I use a small dental pick to hold the side seal lightly against the stone from the adjacent corner seal bore. Depending on the rotor fixture�s side seal length, flush can be very close.
A .001" cut takes about 15 sec. You get almost 100% contact so break-in wear is nil and clearances stay tight.
Barry
Nah just kidding , I live it all to my engine builder. Good idea and very nice fixture though !
Thread Starter
7s before paint!!!
iTrader: (2)
Joined: Aug 2003
Posts: 3,814
Likes: 0
From: Philly/Texas
Rotary Enthusiast
Joined: Dec 2004
Posts: 991
Likes: 1
From: Los Angeles
here is one ive seen before at the summit and jegs catalog....
http://store.summitracing.com/partde...5&autoview=sku
http://store.summitracing.com/partde...5&autoview=sku
This is the "wish I'd seen it before I bought the one I have" deal
https://www.aircraftspruce.ca/catalo...nringfiler.php
https://www.aircraftspruce.ca/catalo...nringfiler.php
Full Member
Joined: Jun 2003
Posts: 145
Likes: 0
From: Miami Fl
I don't have an air compressor at my disposal so i have to figure how to do things the old fashion way. I made a little fixture for holding the side seal at the right angle so i could fit them properly. I would normally just post a pic but all i have is a video camera........so here is a video of it
http://www.youtube.com/watch?v=dQn73KOcOJI
What method do you guys use to clearance your seals?
http://www.youtube.com/watch?v=dQn73KOcOJI
What method do you guys use to clearance your seals?
Man Allen, you really need to get your car at the track. Your losing it. LOL. Good idea's guys. I think the one with the old rotor and the dremel is the best idea because it cuts the side seal with the exact precise angle to the corner seal and thus like was mentioned ,very little break in wear is needed thus a tighter seal and more compression.

Thread
Thread Starter
Forum
Replies
Last Post
Jeff20B
1st Generation Specific (1979-1985)
4
Jun 26, 2016 10:21 AM