
Zero Clearance Side Seals?


Full Member
Joined: Nov 2003
Posts: 192
Likes: 8
From: .
I've used .000 sideseal clearance in n/a street/strip pp engines for over a year with no problems. No real break-in period either, about 100-200miles, if that, then straight to the dyno. I've also found only .002 - .0025 apex seal clearance works well (carbon seals).
I like the ideas in this thread.
I grind the sharp edge off the corner seals, it stops them cutting into the irons at high rpm but doesn't affect sealing. Especially good if the irons have been surfaced.
I like the ideas in this thread.
I grind the sharp edge off the corner seals, it stops them cutting into the irons at high rpm but doesn't affect sealing. Especially good if the irons have been surfaced.
Thread Starter
"Elusive, not deceptive!�
Joined: May 2007
Posts: 930
Likes: 13
From: Slidell, LA
You have any pics of the fixture or cutting tool? I love doing experimental stuff like this. I really do want to try this. I can't imagine finding a cutting tool thin enough to cut that corner seal like that.
Edit: Nevermind, I just realized I had a dremel and some little bitty disc to use.
Edit: Nevermind, I just realized I had a dremel and some little bitty disc to use.
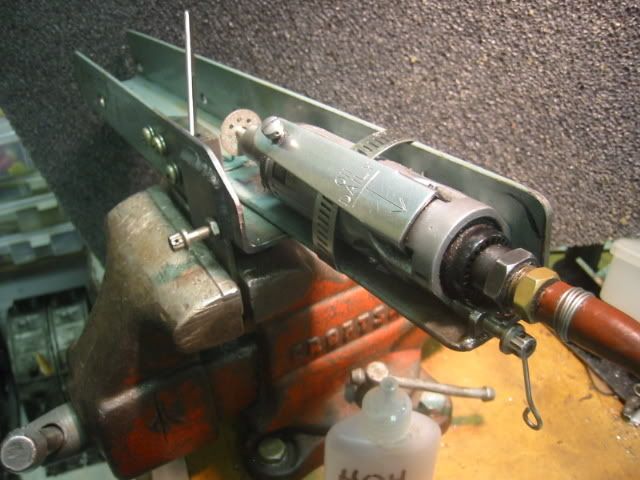
Notice the stop screw for depth and the adjustment for width. On the width adjustment 90� =.008"
The apex seal shown, is stuck in the fixture to rock the corner seal to its full travel.
Use water to extend the life of the cutter. The seal holder is made from one corner of an old rotor and tapped/screwed to the angle.
Barry
Instead of doing this, how about just doing the same thing but with the side seal groove cut into the corner seal as the OP showed. The difference is that instead of cutting the groove equal depth top to bottom, it should taper. The bottom of the groove should be greater than the top in the corner seal as installed in the rotor. This would make the side seals extend part way into the corner seal as the original picture but also do what this diagram shows. The side seals would have their ends tapered so that the bottom edge as installed would be longer than the top. It does what both of these show and strangely enough you can still get side seal clearances greater than zero.
Thread Starter
"Elusive, not deceptive!�
Joined: May 2007
Posts: 930
Likes: 13
From: Slidell, LA
Instead of doing this, how about just doing the same thing but with the side seal groove cut into the corner seal as the OP showed. The difference is that instead of cutting the groove equal depth top to bottom, it should taper. The bottom of the groove should be greater than the top in the corner seal as installed in the rotor. This would make the side seals extend part way into the corner seal as the original picture but also do what this diagram shows. The side seals would have their ends tapered so that the bottom edge as installed would be longer than the top. It does what both of these show and strangely enough you can still get side seal clearances greater than zero.
I think I understand what you are saying. But this would help only if the ports are so big that the side seals were falling into them. A little bit larger port and the corner seals would fall in also.
TearboII made such big #'s with stock ports I wonder how big we really have to go.
If I remember correctly you are not a big fan of bridgeports.
Maybe it is time for scalloped rotors if we need more flow.
Barry

Instead of doing this, how about just doing the same thing but with the side seal groove cut into the corner seal as the OP showed. The difference is that instead of cutting the groove equal depth top to bottom, it should taper. The bottom of the groove should be greater than the top in the corner seal as installed in the rotor. This would make the side seals extend part way into the corner seal as the original picture but also do what this diagram shows. The side seals would have their ends tapered so that the bottom edge as installed would be longer than the top. It does what both of these show and strangely enough you can still get side seal clearances greater than zero.
and the picture in the first post. Where there would be a step to support the side seal AND it is buried into the corner seal (like in the first pic). The way I see it is if the step and tab are machined close enough there would be no reason to hold the end clearance so tight. Allowing for heat expansion but still creating the best seal.
Instead of using a step, just angle the groove cut in the first picture so that the bottom is wider than the top. That way the seal does go under a bit and is supported by the corner seal but still does what the above picture shows. Instead of that stair step, just take the bottom corner and top corners of that seal and draw a straight line between them. That's the angle.
rotarygod,
I think I understand what you are saying. But this would help only if the ports are so big that the side seals were falling into them. A little bit larger port and the corner seals would fall in also.
TearboII made such big #'s with stock ports I wonder how big we really have to go.
If I remember correctly you are not a big fan of bridgeports.
Maybe it is time for scalloped rotors if we need more flow.
Barry
I agree that the support issue is really for the corner seals. I was just pointing out that both diagrams could be combined rather than having one or the other. Too many people are caught up on the bigger is better or the more is better phenomenon and on the street the opposite is almost always true.
I like bridgeports just fine. On the track. I do not subscribe to the bridge/peripheral port streetablity crowd as they aren't. I could really care less who owns one, drives it on the street, and likes it. A Cessna can physically roll down the street if placed on one. So can an F1 car. That doesn't make them streetable.
"Streetable" in my opinion is one that could pass emissions with nothing more than an airpump and a cat. I've done it on streetports and they are appropriately named as a result. The fact of the matter is that simple forced induction and even small ports can give as much power as anyone would ever practically need on the street anyways as 400+ hp is attainable on stock ports. I'm not impressed by big dyno numbers. I'm impressed by total packages that are balanced. That's why I think Supra's are a joke and why I generally recommend against bridgeports on the street. Some people "put up" with them but that doesn't make them any bit streetable in my opinion. It's just that though, an opinion. I'm sure someone will try to rebut me now for stating my opinion but they may as well save the effort. They are entitled to their opinions as well and if they differ from mine that's fine. A bridgeport was only created to get advanced port timing when peripheral ports were banned from race use. That was their intent and that's where they should stay as far as I'm concerned.
Now saying that, keep in mind that if you just have a play car and rarely drive it but do like to take it to the occassional track meet, I think more agressive forms of porting can be fun but lets keep the words "fun" and "practical" or "streetable" separate. If it's a play car that rarely gets driven, it can be relatively practical. It's the people that constantly ask "how should I port my engine?" and they get answers like "bridgeport it" that I find disurbing since you usually find out that this is their only car and they drive alot. If you work at home and rarely go anywhere this is probably doable with little inconvience to deal with. If you are using it as a test bed for a performance based company and it brings you business, this is also doable. For the other 99.9% of the people out there that ask this question, it's probably not the answer. If it's not a dedicated track car, I will always recommend a "street" port and even then I will never recommend it to be as big as you can possibly get it. This applies to both n/a and forced induction. Then again I'm also a person who isn't against superchargers when done right either so go figure.
Thread Starter
"Elusive, not deceptive!�
Joined: May 2007
Posts: 930
Likes: 13
From: Slidell, LA
I thought we were talking, or at least this is what I was thinking we were talking about. a combination of this:
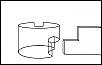
and the picture in the first post. Where there would be a step to support the side seal AND it is buried into the corner seal (like in the first pic). The way I see it is if the step and tab are machined close enough there would be no reason to hold the end clearance so tight. Allowing for heat expansion but still creating the best seal.
and the picture in the first post. Where there would be a step to support the side seal AND it is buried into the corner seal (like in the first pic). The way I see it is if the step and tab are machined close enough there would be no reason to hold the end clearance so tight. Allowing for heat expansion but still creating the best seal.
This version would still leave a gap that would lose some compression, but could not fall into a large port. Nice design.
Rotarygod's design would be difficult to fit properly because the taper, if not perfectly adjusted to the side seal it would either hold the side seal off of the side plate or allow it to hang into the port causing wear.
My thoughts anyway,
Barry
t-von, The diamond blade #545 is made to cut on a 7" arc.
Notice the stop screw for depth and the adjustment for width. On the width adjustment 90� =.008"
The apex seal shown, is stuck in the fixture to rock the corner seal to its full travel.
Use water to extend the life of the cutter. The seal holder is made from one corner of an old rotor and tapped/screwed to the angle.
Barry
Thx for the info. Much appreciated!
t-von, The diamond blade #545 is made to cut on a 7" arc.
Notice the stop screw for depth and the adjustment for width. On the width adjustment 90� =.008"
The apex seal shown, is stuck in the fixture to rock the corner seal to its full travel.
Use water to extend the life of the cutter. The seal holder is made from one corner of an old rotor and tapped/screwed to the angle.
Barry
Notice the stop screw for depth and the adjustment for width. On the width adjustment 90� =.008"
The apex seal shown, is stuck in the fixture to rock the corner seal to its full travel.
Use water to extend the life of the cutter. The seal holder is made from one corner of an old rotor and tapped/screwed to the angle.
Barry

The rotor index tab was at the top. He zeroed on the bearing (first entry). My mistake or not he set up the coordinate system off a parallel laid against the bottom corner seals with a spacer underneath to align in "x" and do a perpendicular to the bearing center.. I believe this is why the fourth entry reads the top seal bore off in the x axis at .003". I could have had him set up off the centers of the bearing and top corner seal bore but then the other two would have error. See very bottom for handwriting that says rad=7.344..."
I guess this is why the side seals need to be fit.
Last edited by user 893453465346; Apr 29, 2008 at 10:42 PM. Reason: More info.
Thread Starter
"Elusive, not deceptive!�
Joined: May 2007
Posts: 930
Likes: 13
From: Slidell, LA
Thanks for that exact measurement of 7.34429". I used a make-shift compass and came up with a little over 7”.
The .050" deep cut barely knows it is not straight at a 7" arc.
I use .0015” clearance on the side seals.
Barry
The .050" deep cut barely knows it is not straight at a 7" arc.
I use .0015” clearance on the side seals.
Barry
No it wouldn't. Fitting also wouldn't be a problem. I'm not saying it's the way to go by any means or that I'm going to do it but I guarantee it would work.

Thread Starter
"Elusive, not deceptive!�
Joined: May 2007
Posts: 930
Likes: 13
From: Slidell, LA
Does anyone know what the longer side seal part number is?
The trimmed version of the Mazda side seal is N3Y1-11-C11. There is a longer untrimmed version, but Ray Crowe could not find it. He ordered an older number but it turned out to be thicker (.8mm instead of .7mm).
Barry
The trimmed version of the Mazda side seal is N3Y1-11-C11. There is a longer untrimmed version, but Ray Crowe could not find it. He ordered an older number but it turned out to be thicker (.8mm instead of .7mm).
Barry
I've looked through my EPC as well and can't find anything. The thicker side seal Ray ordered for you was for the earlier 1st gen 12A-13b rotors with 3mm apex seals. Thoses side seals are actually thicker than the 2nd and 3rd gen 13b's. I'm surprised Ray didn't know that.
Thread Starter
"Elusive, not deceptive!�
Joined: May 2007
Posts: 930
Likes: 13
From: Slidell, LA
My guess would be that it be a derivation of the N3Y1-11-C11 number, like is N3Y1-11-C10 or C-1.
Anyway thanks for trying to find it.
Anyone else?


Junior Member
Joined: Oct 2012
Posts: 25
Likes: 0
Blast from the past bump. I love the idea! Is anyone still running zero clearance sides with cut corner seals? Any engines blow up, tear down results? I'm setting up to do rx8 rebuild and really want to do this!
Thread Starter
"Elusive, not deceptive!�
Joined: May 2007
Posts: 930
Likes: 13
From: Slidell, LA
Starts on first or second revolution most always.
Uses no perceptible oil between changes.
Should work with the later model hollowed seals. I have cut them but never used them in an engine.
Barry
Old [Sch|F]ool


Joined: May 2001
Posts: 12,879
Likes: 576
From: Cleveland, Ohio, USA
I assembled my engine tight enough that the seals just barely don't drag on the corner seals when pushed down. I could fit a .0015" feeler gauge in there but only just barely.
Engine has the best compression of any engine I've ever had. When you shut it off from a ~1500rpm idle it stops almost immediately, maybe one or two revolutions and it's stopped. No 1 second or so wind-down.
It also started on the first crank after I plugged in the injector fuse. I've heard of people having hard-starting new engines, I've never experienced it though.
The interesting thing is that, despite this awesome compression from the tight side seals, it still adds fuel to the oil at the rate of about 1qt/1000mi. I do not have an MOP.
